1
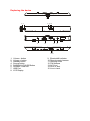
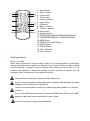
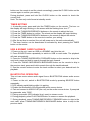
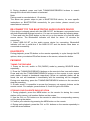
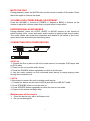
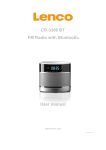
ASB-210 BT BLUETOOTH® SOUNDBAR WITH USB & SD CARDREADER User manual 20121121 v1.0 Table of content What’s in the box? ...................................................................................................... 3 Exploring the device ................................................................................................... 4 Getting started ............................................................................................................ 5 Where to install .................................................................................................................. 5 First use of the remote control ........................................................................................... 6 Replacing the battery of the remote control ........................................................................ 6 POWER SUPPLY ....................................................................................................... 6 SLEEP TIMER SETTING ........................................................................................... 6 HOW TO SET TIME ................................................................................................... 6 TIMER SETTING ........................................................................................................ 7 USB & SD/MMC CARD PLAYBACK .......................................................................... 7 BLUETOOTH® OPERATING ..................................................................................... 7 RE-CONNECT TO THE BLUETOOTH® AUDIO SOURCE DEVICE ......................... 8 EQ EFFECTS ............................................................................................................. 8 FM RADIO .................................................................................................................. 8 TUNING THE FM RADIO ........................................................................................... 8 STORING YOUR FAVORITE RADIO STATION ........................................................ 8 MUTE THE UNIT ........................................................................................................ 9 VOLUME LEVEL/TREBLE/BASS ADJUSTMENT ...................................................... 9 PROFESSIONAL AUDIO MODES ............................................................................. 9 CONNECTING WITH OTHER DEVICES ................................................................... 9 AUDIO IN.................................................................................................................... 9 LINE IN ....................................................................................................................... 9 Maintenance of the device .......................................................................................... 9 Troubleshooting ........................................................................................................ 10 Specifications ........................................................................................................... 10 Safety instructions .................................................................................................... 11 Declaration of Conformity ......................................................................................... 12 Do not distribute copyrighted material ...................................................................... 13 Disclaimer ................................................................................................................. 13 End of life.................................................................................................................. 14 Service and support .................................................................................................. 15 2 Dear customer, Thank you for choosing for Axxion. At Axxion, we are convinced that everyone should enjoy life as much as possible. Our products are meant to support, improve and create joyful moments for everyone. For this reason, we offer user-friendly, highquality and well-designed consumer electronics for an excellent price. This user manual is designed to help you with the features of this device. Note: This user manual was written during the development of the product, based on the factory settings. If the product would need improvement, priority is given to the product and therefore, in these cases, the quick start guide, user manual, illustrations in the user manual and/or packaging may differ from the actual product. Axxion is not liable for any printing errors in this user manual. What’s in the box? The content of the box is assembled with the utmost care. In the unfortunate case that anything is missing, please contact your dealer. Content of the box: 1 Soundbar 1 Remote control 1 User Manual 1 RCA Cable 1 Audio Cable 2 Wall mount brackets 3 Exploring the device 13 5 2 4 6 7 8 9 10 11 12 13 11 14 15 1. 2. 3. 4. 5. 6. 7. 8. Volume - button Volume + button Standby button Source button PAIR/PLAY/PAUSE Button SD/MMC Card slot USB Port LCD Display 9. Bluetooth® indicator 10. Remote control sensor 11. Hanging holes 12. FM antenna 13. AC Cord 14. AUX in Jack 15. Line in Jack 10 11 12 13 1 2 3 4 5 6 7 14 15 16 17 8 18 9 19 1. Sleep button 2. Source button 3. Clock button 4. Timer button 5. Numeric buttons 6. Voice button 7. EQ button 8. Bass+/- buttons 9. Treble +/- buttons 10. Mute button 11. Standby button 12. TUNING/SKIP/SEARCH BACKWARD Button 13. TUNING/SKIP/SEARCH FORWARD Button 14. MEM Button 15. PAIR/PLAY/PAUSE Button 16. MUSIC Button 17. MOVIE Button 18. VOL +/- Buttons 19. CH+/- Buttons Getting started Where to install Never place the device in direct sunlight. Place it on a sturdy platform of which the surface should be flat and steady, so the product can’t fall or hit by any objects. Make sure the product is placed in such a manner that nothing can fall on top of it, as pressure will damage or break the product. Prevent insertion of objects into the ventilation slots, or openings in the cabinet at all time. Always read the safety instructions carefully before use. Axxion is not responsible for damages and/or consequential damage caused by improper use or malfunction of the device. Axxion is not responsible for the loss of data during data transfer or or the loss of data. Do not use a USB extension cable to connect a USB device. The use of a USB extension cable can cause malfunction or loss of data. Axxion recommends using A-brand batteries. 5 First use of the remote control Before the first use of the remote control, the plastic tab should be pulled out of the remote. Axxion recommends using A-brand batteries. Bright ambient light may interfere with operation of the remote control. Remove the batteries from the remote control when it is not being used for a long time. Replacing the battery of the remote control When the remote control stops working or stops working properly, the battery should be replaced. Replace the battery as follows: 1. Press the catch at arrow 1 in the direction of arrow 2 and hold it. 2. Pull the battery tray out by pulling it in the direction of arrow 2. 3. Replace the battery with a new one and slide the battery tray back in the remote control. Note that the + side of the battery is facing up. The model number of the battery is CR2025. POWER SUPPLY Plug AC plug into the outlet socket for connecting the main power. NOTE: If not any audio signal inputs to the unit in about 10 minutes, the unit will enter to standby mode automatically (except at FM mode). SLEEP TIMER SETTING You can set the sleep timer at power on modes as following instructions: During playback, press the SLEEP button on the remote control repeatedly to cycle through the sleep time options, Release the SLEEP button when your desired sleep time shows on the screen. Once the sleep time is expired, the unit will be switched off. During playback, press SLEEP button once to check the remaining sleep time. HOW TO SET TIME At the standby mode, press and hold the CLOCK button on the remote until Hour flashes on the screen; use the TUNING/SKIP/SEARCH buttons on the remote to adjust the hour and confirm your adjustment by pressing the CLOCK button on the remote; Minute starts blinking on the screen, press the TUNING/SKIP/SEARCH 6 buttons on the remote to set the minute accordingly, press the CLOCK button on the remote again to confirm your setting. During playback, press and hold the CLOCK button on the remote to check the current time. Note: The time only could be set at standby mode. TIMER SETTING 1. At standby mode, press and hold the TIMER button on the remote. The hour on the display will begin blinking on the screen with the flashing timer icon “T”. 2. Press the TUNING/SKIP/SEARCH buttons on the remote to adjust the hour. 3. Press the TIMER button to confirm. The minute on the display will begin blinking. 4. Press the TUNING/SKIP/SEARCH buttons on the remote to adjust the minute. 5. Press the TIMER button on the remote to confirm your setting. 6. After the set time is reached, the unit will power on to the radio automatically. 7. The timer function can be deactivated or activated by short pressing the TIMER button on the remote. USB & SD/MMC CARD PLAYBACK 1. Power on the unit, insert an USB or a SD/MMC card into the unit. 2. Press SOURCE button repeatedly to switch to USB or card mode. The playback will start automatically. 3. Press the TUNING SKIP/SEARCH FORWARD button on the remote to skip to the next track; press and hold to search through the track forward. 4. Press the TUNING SKIP/SEARCH BACKWARD button on the remote to skip to the previous track; press and hold to search through the track backward. 5. Use the numeric buttons to enter the track number to select your desired track for playback. BLUETOOTH® OPERATING This unit can receive stereo audio signal from a BLUETOOTH® stereo audio source device. 1. Power on the unit, switch to BLUETOOTH® mode by pressing SOURCE button repeatedly. 2. LED indicator rapid blinking while it is pairing. 3. Enable the Bluetooth® of the Bluetooth® audio source device. 4. Pair and connect to ASB-210 BT(the unit) on the audio source device. If prompted for passcode, enter “0000”. 5. Pairing successful (LED indicator blue), ready to stream music. 6. During playback, press PLAY/PAUSE button to cease or resume the playback. 7. During playback, press TUNING/SKIP/SEARCH FORWARD button to skip to the next track; press TUNING/SKIP/SEARCH BACKWARD button twice to skip to the previous track. 7 8. During playback, press and hold TUNING/SKIP/SEARCH buttons to search through the current track forward or backward. Note: Pairing mode is canceled about 1.5 minutes. The above are generic steps to pair a BLUETOOTH® device, for more specific instructions on BLUETOOTH® connectivity for your device, please consult your manufacturer’s manual. RE-CONNECT TO THE BLUETOOTH® AUDIO SOURCE DEVICE If the device is already paired with the ASB-210 BT, but became unconnected even with both Bluetooth® devices turned on. You can re-connect them by following steps: 1. Press and hold the PAIR button on the unit or on the remote to re-link the audio source device. The Bluetooth® indicator will blink for about 1.5 minutes for connecting. 2. Select ASB-210 BT on the audio source device for connecting. Bluetooth® indicator will turn to solid blue if the ASB-210 BT and the device have been reconnected successfully. EQ EFFECTS During playback, press EQ button on the remote repeatedly to cycle through the EQ options; when your desired EQ effect shows on the screen, release the button. FM RADIO TUNING THE FM RADIO 1. Power on the unit, switch to FM (RADIO) mode by pressing SOURCE button repeatedly. 2. Press the TUNING/SKIP/SEARCH buttons on the remote to fine tune radio station. Press and hold the TUNING/SKIP/SEARCH buttons on the remote to auto search radio station forward or backward respectively (When an available station will be found, the unit will broadcast it immediately and the searching will be stopped). During auto searching, press the TUNING/SKIP/SEARCH buttons on the remote to stop the searching. 3. At radio mode, it is possible to access the frequency via numeric buttons on the remote control. For example, press buttons 8, 9 and 8 to get to 89.8 MHz. STORING YOUR FAVORITE RADIO STATION 1. During playback, press the MEM button on the remote for storing the current station until a memory cell number flashes on the screen. 2. Use the CH+ or CH- buttons on the remote to select the corresponding memory cell for storing the station. 3. Confirm your selection by pressing the MEM button on the remote. 4. During radio playback, press the CH+ or CH- buttons on the remote repeatedly to recall the stored stations. 8 MUTE THE UNIT During playback, press the MUTE button on the remote to switch off the audio. Press the button again to resume the audio. VOLUME LEVEL/TREBLE/BASS ADJUSTMENT Press the VOLUME +/- buttons or TREBLE +/- buttons or BASS +/- buttons on the remote to adjust the volume output level or treble effect or bass effect. PROFESSIONAL AUDIO MODES During playback, press the VOICE, MUSIC or MOVIE buttons on the remote to switch among voice, music and movie audio modes for getting high sound quality. The audio modes can reveal the characters and details of the sound of the voice, music and movie and make you liked being there. CONNECTING WITH OTHER DEVICES AUDIO IN 1. Connect the Aux in jacks on the unit to audio source, for example, DVD player with an RCA cable. 2. Power on the unit and the audio device. 3. Press the SOURCE button repeatedly to switch to AUX mode. 4. Use the native controls on the connected audio device to begin playing music through the connected unit. LINE IN Follow steps to connect the unit to another audio device: 1. Connect the device into the unit’s LINE IN jack with the LINE OUT cable. 2. Press STANDBY button to turn the unit on. 3. Press SOURCE button repeatedly to switch the unit to Line mode. 4. Power on the device and begin play. Maintenance of the device Clean the device only with a soft damp cloth. Do not use detergents 9 Troubleshooting Symptom Radio sound distorted. Possible Cause 1. The station is not tuned in. 2. There is a poor signal in the area. 1. The unit is not at tuner mode. 2. The volume has been muted or is on the minimum setting. Solution 1. Fine tune the station. 2. Unwind the wire antenna for best reception No radio sound. 1. Press SOURCE button repeatedly until switching to tuner. 2. Adjust the volume level or press the MUTE button to resume audio. No Sound at 1. The unit is not connected 1. Follow the manual to connect Bluetooth® with the audio source the audio source device to mode. device. the unit. 2. The unit is placed out of the 2. Relocate the unit within range Bluetooth® operating range. 3. The volume has been 3. Adjust the volume level or muted or is on the press the MUTE button to minimum setting. resume audio. Sound is Sound source is distorted. If the original sound source of distorted at the external device is poor Bluetooth®/AUX quality or with distortion and /Line in modes. noise, it will be easily noticed with high-power speakers. Try a different audio source. No sound at 1. The unit is not connected 1. Follow the manual to AUX/Line in the external appliance reconnect the audio modes. properly. appliance to the unit. 2. The volume has been 2. Adjust the volume level or muted or is on the press MUTE button to minimum setting. resume audio. Specifications Power source: AC 100~240V 50Hz/60Hz Power consumption: 50W Battery of remote control: CR2025 x 1 Receiving bands: FM 87.5 -108 MHz Bluetooth® compatible: support A2DP Dimensions: 941.8(L) x 60.5(W) x 110.5(H) mm Operating Humidity Range: 10 % to 75 % 10 Safety instructions Explanation of symbols: This symbol indicates that there are important operating maintenance instructions in the user manual accompanying the device. This symbol indicates that dangerous voltage is present within this device, constituting a risk of electronic shock or personal injury. CAREFULLY READ THE FOLLOWING SAFETY INSTRUCTIONS BEFORE USE. WARNING RISK OF ELECTRIC SHOCK DO NOT OPEN THIS DEVICE WARNING: DO NOT REMOVE ANY SCREWS OR OTHER COMPONENTS OF THE DEVICE TO PREVENT THE RISK OF ELECTRIC SHOCK. Install and use the device only as described in the user manual. This device must be used in combination with a power supply as specified in the specification table. If you are not sure of the type of power supply used in your home, consult your power company. Do not use loose or damaged cords and/or plugs. This device has a Class II construction. Devices with a Class II construction can be connected to an unearthed power outlet. The power outlet must be located close the device and must be easily accessible. Make sure that power outlets or extension cables are not over overloaded. Overloading can cause short-circuits or fire. Always pull the plug when removing it from the power outlet. Do not pull the power cord. This may cause a short-circuit. If you notice smoke, an excessive build-up of heat or any other unexpected phenomena, you should disconnect the plug from the power outlet immediately. Disconnect the plug from the power outlet during lightning storms. Disconnect the plug from the outlet when the device will not be used for a long time. Do not step on the power cord and don’t pinch the power cord. Do not place heavy objects on the power cord or any other cables as this may damage the cord or cables. Keep the device away from children! When they play with the power cord, they can seriously injure themselves. Keep the power cable away from rodents and rabbits. Make sure all ventilation openings are clear at all times, do not cover or block them. Leave 5 cm (2”) free space around the device. Always make sure the device is well ventilated. Keep the device away from heat sources such as radiators, heaters, stoves, candles and other heat-generating products Avoid using the device near strong magnetic fields. Do not use this device when condensation may occur. Do not use this device near water or other liquids. 11 Do not use this device in a damp room. Do not use this device near a swimming pool. Electrostatic interference may interfere with the normal use of this device. If this occurs, reset the device and restart it according to the instructions in the user manual. The display is made of plastic and might break when it’s damaged. Beware of sharp plastic splinters when the screen breaks to avoid injury. Should the unit become wet, immediately remove the plug from the power outlet and let the appliance fry for 72 hours before trying to use it again. Remove the batteries from the device and/or remote control if they will not be used for a long time. This device and the supplied accessories contain sensitive components. Never drop them, put them in a microwave, burn them or paint them. Do not bite or suck on the device and/or supplied accessories. Do not insert the device or the supplied accessories in your ears, mouth or other body orifices. This device and/or accessories contain small parts that may lead to a choking hazard. Therefore, keep it away from children. When connecting the device, if a connector does not seem to fit, do not force it. Be careful when using this device when participating in traffic, the sound might distract your attention. Axxion recommends using A-brand batteries. WARNING: Prolonged exposure to loud sounds from personal music players may lead to temporary or permanent hearing loss. WARNING: Do not use a USB extension cable to connect a USB device. The use of a USB extension cable can cause malfunction or loss of data. Declaration of Conformity Products with a CE marking comply with the EMC directive (2004/108/EC) and the Low Voltage Directive (2006/95/EC) issued by the European Commission of the European Community. RoHS, this device has been manufactured according to the RoHS Directive. ErP II, this device complies with the ErP Directive. WEEE, this device complies with the 2002/96/EC Directive. 12 Do not distribute copyrighted material Do not distribute copyrighted material without the permission of the owners. By doing this you risk violation of copyright laws. The manufacturer is not liable for any legal issues caused by illegal use of copyrighted material by the user. Disclaimer Some content and services accessible through this device belong to third parties and are protected by copyright, patent-, trademark- and/or other intellectual property laws. Such content and services are solely provided for your personal and non-commercial use. You may not use any content or services in a manner that has not been authorized by the content owner or service provider. Without limiting the foregoing, unless expressly authorized by the applicable content owner or service provider, you may not modify, copy, republish, upload, post, transmit, translate, sell, or create derivative works, exploit, or distribute in any manner or medium any content or services displayed through this device. “THIRD PARTY CONTENT AND SERVICES ARE PROVIDED ‘AS IS.’ AXXION DOES NOT WARRANT CONTENT OR SERVICES SO PROVIDED, NEITHER EXPRESSLY NOR IMPLIED, FOR ANY PURPOSE. AXXION EXPRESSLY DISCLAIMS ANY IMPLIED WARRANTIES, INCLUDING BUT NOT LIMITED TO, WARRANTIES OF MERCHANTABILITY OR FITNESS FOR A PARTICULAR PURPOSE. AXXION DOES NOT GUARANTEE THE ACCURACY, VALIDITY, TIMELINESS, LEGALITY, OR COMPLETENESS OF ANY CONTENT OR SERVICE MADE AVAILABLE THROUGH THIS DEVICE. UNDER NO CIRCUMSTANCES, INCLUDING NEGLIGENCE, SHALL AXXION BE LIABLE. NEITHER IN CONTRACT, NOR TORT, FOR ANY DIRECT, INDIRECT, INCIDENTAL, SPECIAL OR CONSEQUENTIAL DAMAGES, ATTORNEY FEES, EXPENSES, OR ANY OTHER DAMAGES ARISING OUT OF, OR IN CONNECTION WITH, ANY INFORMATION CONTAINED IN, OR AS A RESULT OF THE USE OF ANY CONTENT OR SERVICE BY YOU OR ANY THIRD PARTY, EVEN IF ADVISED OF THE POSSIBILITY OF SUCH DAMAGES.” Third party services may be terminated or interrupted at any time, and Axxion makes no representation or warranty that any content or service will remain available for any period. Content and services are transmitted by third parties by means of networks and transmission facilities over which Axxion has no control. Without limiting the generality of this disclaimer, Axxion expressly disclaims any responsibility or liability for any interruption or suspension of any content or service made available through this device. Axxion is neither responsible nor liable for customer service related to the content and services. Any question or request for service relating to the content or services should be made directly to the respective content and service providers. 13 End of life This symbol indicates that the relevant electrical product or battery should not be disposed of as general household waste in Europe. To ensure the correct waste treatment of the product and battery, please dispose them in accordance to any applicable local laws of requirement for disposal of electrical equipment or batteries. In so doing, you will help to conserve natural resources and improve standards of environmental protection in treatment and disposal of electrical waste (Waste Electrical and Electronic Equipment Directive). When you see a crossed-out wheeled waste container on the product. It means that the product falls under the EU directive 2002/96/EC. 14 Service and support Axxion helpdesk: Germany 0900-1520530 (Local charges) The Netherlands 0900-23553626 (Local charges + 1ct P/min) Belgium 02-6200115 (Local charges) France 0170480005 (Local charges) The helpdesk is accessible from Monday till Friday from 9 AM till 6 PM. Axxion offers service and warranty in accordance to European law, which means that in case of repair (both during and after the warranty period), you should contact your local dealer. Please note: It is not possible to send repairs to Axxion directly. Important note: If the unit is opened by a non-official service center the warranty expires. This device is not suitable for professional use. In case of professional use, all warranty obligations of the manufacturer will be voided. 15 Trademarks Bluetooth® is a trademark of Special Interest Group Axxion is a trademark of STL Group B.V. All application copyright © their respective owners ©2012 STL Group B.V. all rights reserved, Axxion is a trademark of STL Group B.V. STL Group B.V. is not responsible for any printing errors in this manual. Products of other manufacturers are only mentioned for information. This does not mean that these products are recommended by STL Group B.V.. STL Group B.V. accepts no liability for the reliability or compatibility of these products. 16