1
T Y• O F•
SI
E
E BE
•1868•
I
T
ER
•
T
H
ORN
LE
L IG H T
H
A
NIV
LIF
A
E•U
U N I V E R S I T Y O F C A L I F O R N I A AT B E R K E L E Y
C
A
R
COLLEGE OF ENGINEERING
DEPARTMENT OF ELECTRICAL ENGINEERING AND COMPUTER SCIENCES
BERKELEY, CALIFORNIA 94720
•T
The
Almagest
Vol. 2 - Ptolemy 0.7 Programmer’s Manual
Primary Authors
Shuvra Bhattacharyya, Joseph T. Buck, Wan-Teh Chang, Michael J. Chen, Brian L.
Evans, Edwin E. Goei, Soonhoi Ha, Paul Haskell, Chih-Tsung Huang, Wei-Jen Huang, Christopher Hylands, Asawaree Kalavade, Alan Kamas, Allen Lao, Edward A. Lee, Seungjun Lee,
David G. Messerschmitt, Praveen Murthy, Thomas M. Parks, José Luis Pino, John Reekie,
Gilbert Sih, S. Sriram, Mary P. Stewart, Michael C. Williamson, Kennard White.
Other contributors
Raza Ahmed, Egbert Amicht (AT&T), Sunil Bhave, Anindo Banerjea, Neal Becker
(Comsat), Jeff Bier, Philip Bitar, Rachel Bowers, Andrea Cassotto, Gyorgy Csertan (T.U.
Budapest), Stefan De Troch (IMEC), Rolando Diesta, Martha Fratt, Mike Grimwood, Luis
Gutierrez, Eric Guntvedt, Erick Hamilton, Richard Han, David Harrison, Holly Heine, WaiHung Ho, John Hoch, Sangjin Hong, Steve How, Alireza Khazeni, Ed Knightly, Christian
Kratzer (U. Stuttgart), Ichiro Kuroda (NEC), Tom Lane (Structured Software Systems, Inc.),
Phil Lapsley, Bilung Lee, Jonathan Lee, Wei-Yi Li, Yu Kee Lim, Brian Mountford, Douglas
Niehaus (Univ. of Kansas), Maureen O’Reilly, Sunil Samel (IMEC), Chris Scannel (NRL),
Sun-Inn Shih, Mario Jorge Silva, Rick Spickelmier, Eduardo N. Spring, Richard S. Stevens
(NRL), Richard Tobias (White Eagle Systems Technology, Inc.), Alberto Vignani (Fiat), Gregory Walter, Xavier Warzee (Thomson), Anders Wass, Jürgen Weiss (U. Stuttgart), Andria
Wong, Anthony Wong, Mei Xiao, Chris Yu (NRL).
Copyright © 1990-1997
The Regents of the University of California
All rights reserved.
Permission is hereby granted, without written agreement and without license or royalty fees,
to use, copy, modify, and distribute the Ptolemy software and its documentation for any purpose, provided that the above copyright notice and the following two paragraphs appear in all
copies of the software and documentation.
IN NO EVENT SHALL THE UNIVERSITY OF CALIFORNIA BE LIABLE TO ANY
PARTY FOR DIRECT, INDIRECT, SPECIAL, INCIDENTAL, OR CONSEQUENTIAL
DAMAGES ARISING OUT OF THE USE OF THIS SOFTWARE AND ITS DOCUMENTATION, EVEN IF THE UNIVERSITY OF CALIFORNIA HAS BEEN ADVISED OF THE
POSSIBILITY OF SUCH DAMAGE.
THE UNIVERSITY OF CALIFORNIA SPECIFICALLY DISCLAIMS ANY WARRANTIES, INCLUDING, BUT NOT LIMITED TO, THE IMPLIED WARRANTIES OF MERCHANTABILITY AND FITNESS FOR A PARTICULAR PURPOSE. THE SOFTWARE
PROVIDED HEREUNDER IS ON AN “AS IS” BASIS, AND THE UNIVERSITY OF CALIFORNIA HAS NO OBLIGATION TO PROVIDE MAINTENANCE, SUPPORT,
UPDATES, ENHANCEMENTS, OR MODIFICATIONS.
Ptolemy
Last updated: 8/27/97
Current Sponsors
The Ptolemy project is supported by the Defense Advanced Research Projects Agency
(DARPA), the State of California MICRO program, and the following companies: The Alta
Group of Cadence Design Systems, Hewlett Packard, Hitachi, Hughes Space and Communications, LG Electronics, NEC, Philips, and Rockwell.
The Ptolemy project is an ongoing research project focusing on design methodology
for heterogeneous systems. Additional support for further research is always welcome.
Trademarks
Sun Workstation, OpenWindows, SunOS, Sun-4, SPARC, and SPARCstation are trademarks
of Sun Microsystems, Inc.
Unix is a trademark of Unix Systems Laboratories, Inc.
PostScript is a trademark of Adobe Systems, Inc.
About the Cover
The image on the cover is from a fourteenth century Provençal illuminated manuscript at the
British Library. It depicts angels cranking a celestial gear that activates planetary spheres. The
earth is motionless, at the center.
1. Extending Ptolemy — Introduction ........................................ 1-1
1.1
1.2
1.3
1.4
1.5
Introduction . . . . . . . . . . . . . . . . . . . . . . . . . . . . . . . . . . . . . . 1-1
File Organization. . . . . . . . . . . . . . . . . . . . . . . . . . . . . . . . . . 1-1
Ptolemy environment variables 1-2
Directory Structure 1-3
Creating Custom Versions of pigiRpc . . . . . . . . . . . . . . . . 1-6
Creating a pigiRpc that includes your own stars 1-7
Creating a pigiRpc with more extensive customizations 1-8
Using mkPtolemyTree to create a custom Ptolemy trees. 1-9
mkPtolemyTree example 1-9
How mkPtolemyTree works 1-10
Combining mkPtolemyTree and pigiExample 1-11
Known Bugs in mkPtolemyTree 1-11
Using csh aliases to create a Parallel Software Development Tree
1-12
1.6
1.7
Aliases for Managing Symbolic Links 1-12
Creating a Duplicate Hierarchy 1-16
Source Code Control 1-18
Building standalone programs that use Ptolemy libraries.1-19
Standalone example using StringList 1-19
Standalone example that tests a Scheduler 1-20
Debugging Ptolemy and Extensions Within Pigi . . . . . . . 1-21
A quick scan of the stack 1-22
More extensive debugging 1-23
Debugging hints 1-25
2. Writing Stars for Simulation.................................................... 2-1
2.1
2.2
2.3
2.4
2.5
2.6
2.7
Introduction . . . . . . . . . . . . . . . . . . . . . . . . . . . . . . . . . . . . . . 2-1
Adding stars dynamically to Ptolemy . . . . . . . . . . . . . . . . . 2-1
The Ptolemy preprocessor language (ptlang) . . . . . . . . . . 2-3
Invoking the preprocessor 2-4
An example 2-4
Items that appear in a defstar 2-5
Writing C++ code for stars . . . . . . . . . . . . . . . . . . . . . . . . . 2-16
The structure of a Ptolemy star 2-17
Reading inputs and writing outputs 2-17
States 2-21
Array States 2-23
Modifying PortHoles and States in Derived Classes. . . . 2-26
Programming examples . . . . . . . . . . . . . . . . . . . . . . . . . . . 2-26
Preventing Memory Leaks in C++ Code . . . . . . . . . . . . . . 2-28
3. Infrastructure for Star Writers................................................. 3-1
Ptolemy
Last updated: 10/17/97
3.1
3.2
3.3
3.4
3.5
3.6
3.7
3.8
3.9
Introduction . . . . . . . . . . . . . . . . . . . . . . . . . . . . . . . . . . . . . 3-1
Handling Errors . . . . . . . . . . . . . . . . . . . . . . . . . . . . . . . . . . 3-1
I/O Classes . . . . . . . . . . . . . . . . . . . . . . . . . . . . . . . . . . . . . . 3-2
Extended input and output stream classes 3-2
Generating graphs using the XGraph class 3-3
Classes for displaying animated bar graphs 3-4
Collecting statistics using the histogram classes 3-5
String Functions and Classes. . . . . . . . . . . . . . . . . . . . . . . 3-8
Iterators . . . . . . . . . . . . . . . . . . . . . . . . . . . . . . . . . . . . . . . . 3-10
List Classes . . . . . . . . . . . . . . . . . . . . . . . . . . . . . . . . . . . . 3-11
Hash Tables . . . . . . . . . . . . . . . . . . . . . . . . . . . . . . . . . . . . 3-13
Sharing Data Structures Across Multiple Stars . . . . . . . 3-14
Using Random Numbers . . . . . . . . . . . . . . . . . . . . . . . . . . 3-17
4. Data Types................................................................................. 4-1
4.1
4.2
4.3
4.4
4.5
4.6
4.7
Introduction . . . . . . . . . . . . . . . . . . . . . . . . . . . . . . . . . . . . . 4-1
Scalar Numeric Types . . . . . . . . . . . . . . . . . . . . . . . . . . . . . 4-1
The Complex data type 4-1
The fixed-point data type 4-3
Defining New Data Types . . . . . . . . . . . . . . . . . . . . . . . . . 4-14
Defining a new Message class 4-15
Use of the Envelope class 4-17
Use of the MessageParticle class 4-18
Use of messages in stars 4-18
The Matrix Data Types . . . . . . . . . . . . . . . . . . . . . . . . . . . . 4-21
Design philosophy 4-21
The PtMatrix class 4-22
Public functions and operators for the PtMatrix class 4-22
Writing stars and programs using the PtMatrix class 4-29
Future extensions 4-33
The File and String Types . . . . . . . . . . . . . . . . . . . . . . . . . 4-34
The File type 4-34
The String type 4-35
Writing Stars That Manipulate Any Particle Type . . . . . . 4-35
Unsupported Types . . . . . . . . . . . . . . . . . . . . . . . . . . . . . . 4-37
Sub-matrices 4-37
Image particles 4-40
“First-class” types 4-41
5. Using Tcl/Tk............................................................................... 5-1
5.1
5.2
5.3
Introduction . . . . . . . . . . . . . . . . . . . . . . . . . . . . . . . . . . . . . 5-1
Writing Tcl/Tk scripts for the TclScript star. . . . . . . . . . . . 5-1
Tcl utilities that are available to the programmer . . . . . . . 5-6
5.4
5.5
5.6
Creating new stars derived from the TclScript star. . . . . 5-11
Selecting colors . . . . . . . . . . . . . . . . . . . . . . . . . . . . . . . . . 5-12
Writing Tcl stars for the DE domain . . . . . . . . . . . . . . . . . 5-12
6. Using the Cluster Class for Scheduling................................. 6-1
6.1
6.2
6.3
6.4
6.5
6.6
6.7
Introduction . . . . . . . . . . . . . . . . . . . . . . . . . . . . . . . . . . . . . . 6-1
Basic Classes . . . . . . . . . . . . . . . . . . . . . . . . . . . . . . . . . . . . 6-1
Galaxies and their relationship to Adjacency Lists. . . . . . 6-1
Clustering . . . . . . . . . . . . . . . . . . . . . . . . . . . . . . . . . . . . . . . 6-2
Initialization — Flattening the User Specified Graph 6-2
Absorb and Merge 6-3
Cluster Iterator Classes 6-5
Block state and name scoping hierarchy . . . . . . . . . . . . . . 6-6
Resetting an InterpUniverse back to actionList. . . . . . . . . 6-6
References. . . . . . . . . . . . . . . . . . . . . . . . . . . . . . . . . . . . . . . 6-7
7. SDF Domain .............................................................................. 7-1
7.1
7.2
Introduction . . . . . . . . . . . . . . . . . . . . . . . . . . . . . . . . . . . . . . 7-1
Setting SDF porthole parameters . . . . . . . . . . . . . . . . . . . . 7-1
8. DDF Domain.............................................................................. 8-1
8.1
Programming Stars in the DDF Domain . . . . . . . . . . . . . . . 8-1
9. BDF Domain.............................................................................. 9-1
9.1
Writing BDF Stars . . . . . . . . . . . . . . . . . . . . . . . . . . . . . . . . . 9-1
10. PN domain............................................................................. 10-1
10.1
10.2
10.3
10.4
10.5
Ptolemy
Introduction . . . . . . . . . . . . . . . . . . . . . . . . . . . . . . . . . . . . . 10-1
Processes . . . . . . . . . . . . . . . . . . . . . . . . . . . . . . . . . . . . . . 10-3
The PtThread Class 10-3
The PosixThread Class 10-4
The DataFlowProcess Class 10-6
Communication Channels . . . . . . . . . . . . . . . . . . . . . . . . . 10-7
PtGate 10-8
PosixMonitor 10-8
CriticalSection 10-8
PtCondition 10-9
PosixCondition 10-9
PNGeodesic 10-10
Scheduling. . . . . . . . . . . . . . . . . . . . . . . . . . . . . . . . . . . . . 10-12
ThreadList 10-12
PNScheduler 10-12
Programming Stars in the PN Domain . . . . . . . . . . . . . . 10-15
Last updated: 10/17/97
11. SR domain ............................................................................. 11-1
11.1
11.2
11.3
Introduction . . . . . . . . . . . . . . . . . . . . . . . . . . . . . . . . . . . . 11-1
Communication in SR . . . . . . . . . . . . . . . . . . . . . . . . . . . . 11-1
Strict and non-strict SR stars . . . . . . . . . . . . . . . . . . . . . . 11-2
12. DE Domain............................................................................. 12-1
12.1
12.2
12.3
12.4
Introduction . . . . . . . . . . . . . . . . . . . . . . . . . . . . . . . . . . . . 12-1
Programming Stars in the DE Domain . . . . . . . . . . . . . . . 12-1
Delay stars 12-2
Functional Stars 12-4
Sequencing directives 12-6
Simultaneous events 12-7
Non-deterministic loops 12-8
Source stars 12-8
Phase-Based Firing Mode . . . . . . . . . . . . . . . . . . . . . . . . 12-11
Programming Examples . . . . . . . . . . . . . . . . . . . . . . . . . 12-13
Identity Matrix Star 12-13
Matrix Transpose 12-14
13. Code Generation ................................................................... 13-1
13.1
13.2
13.3
13.4
13.5
Introduction . . . . . . . . . . . . . . . . . . . . . . . . . . . . . . . . . . . . 13-1
Writing Code Generation Stars . . . . . . . . . . . . . . . . . . . . . 13-2
Codeblocks 13-3
Codeblocks with arguments 13-5
In-line codeblocks 13-7
Macros 13-8
Assembly PortHoles 13-12
Attributes 13-12
Possibilities for effective buffering 13-14
Targets . . . . . . . . . . . . . . . . . . . . . . . . . . . . . . . . . . . . . . . 13-16
Single-processor target 13-16
Assembly code streams 13-17
Multiprocessor targets 13-18
Schedulers . . . . . . . . . . . . . . . . . . . . . . . . . . . . . . . . . . . . 13-20
Single-processor schedulers 13-20
Multiprocessor schedulers 13-21
Interface Issues . . . . . . . . . . . . . . . . . . . . . . . . . . . . . . . . 13-25
14. CGC Domain......................................................................... 14-1
14.1
14.2
14.3
14.4
Introduction . . . . . . . . . . . . . . . . . . . . . . . . . . . . . . . . . . . .
Code Generation Methods. . . . . . . . . . . . . . . . . . . . . . . . .
Buffer Embedding . . . . . . . . . . . . . . . . . . . . . . . . . . . . . . .
Command-line Settable States . . . . . . . . . . . . . . . . . . . . .
14-1
14-1
14-2
14-3
14.5
14.6
14.7
14.8
C code generated to support command line arguments 14-3
Changes in pigiRpc to support command line arguments 14-4
Limitations of command line arguments. 14-5
CGC Compile-time Speed . . . . . . . . . . . . . . . . . . . . . . . . . 14-6
BDF Stars. . . . . . . . . . . . . . . . . . . . . . . . . . . . . . . . . . . . . . . 14-6
Tcl/Tk Stars . . . . . . . . . . . . . . . . . . . . . . . . . . . . . . . . . . . . . 14-7
Tycho Target . . . . . . . . . . . . . . . . . . . . . . . . . . . . . . . . . . . . 14-8
15. CG56 Domain........................................................................ 15-1
15.1
15.2
15.3
15.4
Introduction . . . . . . . . . . . . . . . . . . . . . . . . . . . . . . . . . . . . . 15-1
Data Types. . . . . . . . . . . . . . . . . . . . . . . . . . . . . . . . . . . . . . 15-1
Attributes . . . . . . . . . . . . . . . . . . . . . . . . . . . . . . . . . . . . . . . 15-1
Code Streams . . . . . . . . . . . . . . . . . . . . . . . . . . . . . . . . . . . 15-2
Sim56Target Code Streams 15-2
S56XTarget/S56XTargetWH Code Streams 15-2
16. C50 Domain........................................................................... 16-1
16.1
16.2
16.3
16.4
16.5
16.6
Introduction . . . . . . . . . . . . . . . . . . . . . . . . . . . . . . . . . . . . . 16-1
Data Types. . . . . . . . . . . . . . . . . . . . . . . . . . . . . . . . . . . . . . 16-1
Attributes . . . . . . . . . . . . . . . . . . . . . . . . . . . . . . . . . . . . . . . 16-1
Code Streams . . . . . . . . . . . . . . . . . . . . . . . . . . . . . . . . . . . 16-1
Symbols . . . . . . . . . . . . . . . . . . . . . . . . . . . . . . . . . . . . . . . . 16-2
Reserved Memory . . . . . . . . . . . . . . . . . . . . . . . . . . . . . . . . 16-2
17. Creating New Domains ........................................................ 17-1
17.1
17.2
17.3
17.4
Introduction . . . . . . . . . . . . . . . . . . . . . . . . . . . . . . . . . . . . . 17-1
A closer look at the various classes . . . . . . . . . . . . . . . . . 17-2
Target 17-3
Domain 17-3
Star 17-3
PortHole 17-3
Geodesic 17-5
Plasma 17-5
Particle 17-5
Scheduler 17-6
What happens when a Universe is run . . . . . . . . . . . . . . . 17-6
Recipe for writing your own domain. . . . . . . . . . . . . . . . . 17-9
Introduction 17-9
Creating the files 17-9
Required classes and methods for a new domain 17-9
Building an object directory tree 17-10
INDEX .............................................................................................. I-1
Ptolemy
Last updated: 10/17/97
Chapter 1. Extending Ptolemy —
Introduction
Authors:
Christopher. Hylands
Edward. A. Lee
Thomas. M. Parks
José Luis Pino
1.1 Introduction
Ptolemy is extensible in the following ways:
•
New galaxies can be defined. We do not view this as a programming task, so it is
explained in the User’s Manual rather than in this Programmer’s Manual.
•
Customized simulation builders and controllers can be created using the ptcl interpreted command language. This language is also covered in the User’s Manual.
•
New functional blocks (stars) can be added to any of the Ptolemy domains. These
blocks can be dynamically linked with either ptcl or pigi.
•
New code generation blocks can be added to existing synthesis domains.
•
Stars with customized user interfaces and displays can be created using Tcl/Tk.
•
New simulation and design-flow managers (called targets) can be created.
•
New domains with new models of computation can be created.
This volume explains how to accomplish most of the above. The Kernel Manual, volume 3 of
The Almagest, supplements this volume with a detailed listing of all of the classes in the
Ptolemy kernel and in the code generation kernel. The sophisticated user, however, who is
extending the system in nontrivial ways, will wish to refer to the source code as the ultimate,
most complete documentation.
In this volume, we assume familiarity with the terminology and use of Ptolemy. Refer
to the User’s Manual, and particularly to the glossary contained therein for assistance. We
also assume you are familiar with the overall organization of the Ptolemy software, as
described in User’s Manual.
1.2 File Organization
Ptolemy is distributed with source code. The complete distribution even includes the
compiler we use (g++, from the Free Software Foundation), Tcl/Tk, and vem, programs that
were developed quite independently, but upon which Ptolemy relies. The distribution also
includes a large number of demonstrations. Perusing the demonstrations can be an excellent
way to get familiar with the system. Perusing the source code is by far the best way to understand the system. At a minimum, anyone wishing to write new stars should read the source
1-2
Extending Ptolemy — Introduction
code for a few of the built-in stars.
1.2.1 Ptolemy environment variables
The root of the Ptolemy tree is often installed in the home directory of a fictitious user
called ptolemy. If the installation follows this model at your site, you can find the Ptolemy
code with the following command:
cd ~ptolemy
If your installation does not have a user named ptolemy, then you must find out where your
system administrator has installed the system, and set an environment variable called
PTOLEMY to point to this directory. For instance, if your system administrator installed
Ptolemy in /users/ptolemy, then you should issue the following command:
setenv PTOLEMY /users/ptolemy
$PTARCH is an environment variable representing the architecture on which you are
running, and has one (or more) of the following values: sun4, sol2, or hppa, for Sun (under
Sun O/S), Sun (under Solaris 2.X), and HP machines respectively. There are a few other possible values for the PTARCH variable as well. There might be variations like sol2.cfront or
hppa.cfront to store an object tree created by the Cfront C++ compiler or some other nong++ compiler.The script $PTOLEMY/bin/ptarch will return the architecture of the machine
on which it is run. For example, if you were on a machine running SunOS4.1.3, you would
type:
setenv PTARCH sun4
You can use the following fragment in your .cshrc file to set $PTOLEMY and
$PTARCH. The $PTOLEMY/.cshrc file contains the fragment below and many other csh
setup commands you may find useful.
setenv PTOLEMY /users/ptolemy
if (! $?$PTARCH) setenv $PTARCH ` $PTOLEMY/bin/ptarch`
set path = ( $PTOLEMY/bin $PTOLEMY/bin.$PTARCH $path )
Note that if you are using a prebuilt Gnu compiler that you obtained from the Ptolemy
project, you must either place the Ptolemy distribution at /users/ptolemy, or you must set
certain environment variables so that the Gnu compiler can find the necessary pieces of itself.
Appendix A, Installation and Troubleshooting of the Ptolemy User’s Manual discusses these
variables in detail. The variables change with different releases of the compilers, so we do not
document them here. The User’s Manual also documents other useful environment variables,
such as LD_LIBRARY_PATH.
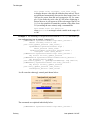
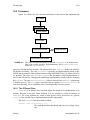
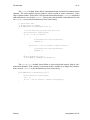
For every directory under the src tree (see figure 1-2) that contains source code that is
compiled, there is a corresponding directory under the obj.$PTARCH tree. Many developers
find it convenient to set the following aliases:
alias srcdir ‘cd `pwd | sed “s?/obj.$PTARCH/?/src/?”`’
alias objdir ‘cd `pwd | sed “s?/src/?/obj.$PTARCH/?”`’
For your convenience, these can be found in the file $PTOLEMY/.alias. They make it easy
to move between the source directory and the corresponding object directory. For example, if
you are running on a Sun machine running Solaris 2.4,
U. C. Berkeley
Department of EECS
The Almagest
1-3
% cd $PTOLEMY/src/kernel
% pwd
/users/ptolemy/src/kernel
% objdir
% pwd
/users/ptolemy/obj.sol2/kernel
% srcdir
% pwd
/users/ptolemy/src/kernel
%
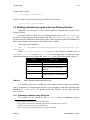
1.2.2 Directory Structure
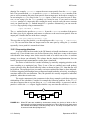
The documentation (usually) refers to the root of the Ptolemy directory tree as
$PTOLEMY, but occasional slips will refer to ~ptolemy. Below this root, you can find the
directories indicated in figure 1-1.
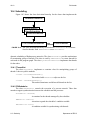
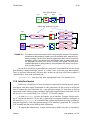
The src directory is key to much of what this volume deals with. Its structure is
shown in figure 1-2. Within the src directory, the kernel directory is most important. It contains all the classes that define what Ptolemy is. Second most important is the domains directory. Its structure is shown in figure 1-3. This directory contains one subdirectory that defines
each of the domains distributed with Ptolemy. Each domain directory contains at least the subdirectories shown in figure 1-4. If you are going to write stars for the SDF domain, for example, then you would be well advised to look at a few examples contained in the directory
$PTOLEMY/src/domains/sdf/stars.
The directory $PTOLEMY/mk contains master makefiles that are included by other
makefiles (The makefile include directive does this for us). $PTOLEMY/mk/config$PTARCH.mk refers to the makefile for the architecture $PTARCH. For instance, $PTOLEMY/
mk/config-sun4.mk is the makefile that contains the sun4 specific details.
bin
platform-independent executables
bin.$PTARCH platform-dependent executables
$PTOLEMY
demo
top-level demo directory, with pointers to demos in src
doc
documentation (including this manual) in PostScript
lib
platform-independent run-time libraries
lib.$PTARCH platform-dependent libraries used for linking
mk
shared portions of makefiles
obj.$PTARCH object files (this appears when Ptolemy is recompiled)
FIGURE 1-1:
Ptolemy
octtools
a subset of the Berkeley octtools, used by pigi
src
root of the source tree (includes all demos and icons)
tcltk
the installation of Tcl and Tk, used by pigi
tycho
the Ptolemy syntax manager
Structure of the home directory of the Ptolemy installation ($PTOLEMY).
Last updated: 10/10/97
1-4
Extending Ptolemy — Introduction
When you cd to $PTOLEMY and type make, $PTOLEMY/makefile contains a rule that
checks to see if the directory $PTOLEMY/obj.$PTARCH exists. If this directory does not
exist, then make runs the command csh -f MAKEARCH, where MAKEARCH is a C shell script
at $PTOLEMY/MAKEARCH. MAKEARCH will create the necessary subdirectories under
$PTOLEMY/obj.$PTARCH for $PTARCH if they do not exist.
We split up the sources and the object files into separate directories in part to make it easier to
support multiple architectures from one source tree. The directory $PTOLEMY/obj.$PTARCH
contains the platform-dependent object files for a particular architecture. The platform-dependent binaries are installed into $PTOLEMY/bin.$PTARCH, and the libraries go into
$PTOLEMY/lib.$PTARCH. Octtools, Tcl/Tk, and Gnu tools have their own set of architecture-dependent directories.
The makefiles are all designed to be run from the obj.$PTARCH tree so that object
files from different platforms are kept separate (when you run make in the $PTOLEMY top
level, the appropriate obj.$PTARCH tree is selected for you automatically).
We are able to have separate object and source directories by using the make program’s VPATH facility. Briefly, VPATH is a way of telling make to look in another directory for
a file if that file is not present in the current directory. For more information, see the Gnu
make documentation, in Gnu Info format files in $PTOLEMY/gnu/common/info/make-*.
compat
header files for non-standard configurations
domains
the code for each of the domains
filters
outside filter design programs
gnu
source for Gnu tools (optional)
kernel
the Ptolemy kernel
octtools
source for our subset of the Berkeley oct tools
pigiExample example showing how to make a custom pigi
$PTOLEMY/src
FIGURE 1-2:
U. C. Berkeley
pigiRpc
source for pigiRpc program
pigilib
source for most of pigi
ptcl
source for ptcl
ptklib
some Tcl/Tk code used in various places
ptlang
source for the preprocessor for star writing
pxgraph
source code for the pxgraph program
tcltk
source for Tcl and Tk (optional)
thread
code used by the PN domain
tycho
source for the tysh Tycho/Ptolemy binary
utils
external software package interface libraries
image viewer sources (optional)
xv
The structure of the $PTOLEMY/src directory
Department of EECS
The Almagest
1-5
There are three primary Ptolemy binaries:
pigiRpc
The graphical version that uses vem as a front end. pigiRpc
contains an interface to Octtools, the package that is used to
store facets. When you run pigi, you actually run a script
called $PTOLEMY/bin/pigiEnv.csh which calls vem which,
in turn, starts up pigiRpc.
ptcl
A prompt version that contains most of the functionality in
pigiRpc not including the Tk stars. ptcl does not contain an
interface to Octtools
tysh
The Tycho shell version, which is similar to pigiRpc, except
that tysh does not contain an interface to Octtools. Note that
Tycho can be run from a basic itkwish binary that contains no
Ptolemy functionality.
$PTOLEMY/
src/domains
FIGURE 1-3:
bdf
c50
Boolean-controlled dataflow domain
cg
the base class domain for all code generation
cg56
code generation for the Motorola DSP56000
cgc
code generation in C
ddf
dynamically scheduled dataflow
de
the discrete-event domain
fsm
finite state machine domain
hof
higher-order function domain
pn
the process network domain
sdf
synchronous dataflow (statically scheduled)
sr
synchronous reactive domain
vhdl
code generation for behavioral modeling in VHDL
vhdlb
code generation for behavioral modeling in VHDL
xxx
demonstration of how to define a new domain
code generation for the Texas Instruments C50
The structure of the $PTOLEMY/src/domains directory.
$PTOLEMY/
src/domains/xxx
demo
demonstrations of the domain
icons
the oct facets defining the icons used by pigi
kernel
the core code defining the domain
stars
stars distributed with the domain
targets (optional) additional targets used by the domain
FIGURE 1-4:
Ptolemy
The structure of a typical domain directory within $PTOLEMY/src/domains.
Last updated: 10/10/97
1-6
Extending Ptolemy — Introduction
Each of the three binaries above has three different versions that contain different
functionality. Below we only list the different version of pigiRpc, but ptcl and tysh have
similar versions.
pigiRpc
This binary contains all of the domains, so it is the largest
binary.
pigiRpc.ptrim
This binary contains SDF, DE, BDF, DDF and CGC domains
only.
pigiRpc.ptiny
This binary contains SDF (no image stars) and DE domains
only.
Each of the above versions can also be built as a .debug version that contains debugging information. The file $PTOLEMY/mk/ptbin.mk contains rules to build the above binaries in combination with debugging and other features. The file $PTOLEMY/mk/stars.mk
contains rules that indicate dependencies between domains and other features.
1.3 Creating Custom Versions of pigiRpc
Ptolemy is an extensible system. Extensions can take the form of universes and galaxies, which are viewed by Ptolemy as applications, but they can also take the form of additional
code linked to the Ptolemy kernel. New stars can be dynamically linked (see “Writing Stars
for Simulation” on page 2-1). Other additional code has to be linked in statically. If you add
many of your own stars to the system, you will want these stars to be statically linked as well,
so that you do not have to wait for the dynamic linking to complete every time you execute
your applications.
The Ptolemy kernel and vem (the schematic editor) run in separate Unix processes.
The Ptolemy kernel process is called “pigiRpc”, while the vem process is called “vem”. You
can create your own version of pigiRpc that contains your stars and other extensions permanently linked in.
There are at least three ways to build your own pigiRpc, depending on the kind of
extensions you are making. The first way uses src/pigiExample, and it is intended for
users who just need to add new stars. The second and third ways use the mkPtolemyTree
script and csh aliases and are for users that are creating new domains or making other more
extensive changes.
If you want to extend Ptolemy by modifying or adding a new scheduler, target, or even
an entire domain, it is recommended that you create a duplicate directory hierarchy. This
allows you to experiment with and fully test any changes separately, rather than incorporating
them into the “official” version of Ptolemy. This way, your experimentation will not interfere
with other Ptolemy users at your site, and your changes will not be overwritten by future
installations of Ptolemy releases. It also means that all of the existing makefiles will work
without modification because all of the paths specified are relative to the root of the hierarchy.
The most direct way to do this is to copy the entire Ptolemy hierarchy. This could be
done with a command such as:
cp -r $PTOLEMY ~/ptolemy
which would create a copy of the hierarchy in your home directory. Because this method
U. C. Berkeley
Department of EECS
The Almagest
1-7
requires excessive disk space and makes cooperative development difficult, many developers
prefer to use symbolic links when creating a duplicate hierarchy. mkPtolemyTree and the
csh aliases can help you setup these symbolic links.
1.3.1 Creating a pigiRpc that includes your own stars
For those who just want to statically link in their own stars with minimal hacking with
makefiles, an example showing how to do this is provided in $PTOLEMY/src/pigiExample.
In the example below, we assume that $PTOLEMY and $PTARCH are set and that you
have write permission to the Ptolemy source tree. If you don’t have write permission, you can
set up a parallel tree with the Unix ln -s command. If, for example, the Ptolemy tree was at
/users/ptolemy, but you wanted to build under ~/pt, you could do the following to create
the directory and create symbolic links for the dot files, like .cshrc, and create symbolic
links for the other files and directories in the distribution:
mkdir ~/pt
cd ~/pt
ln -s /users/ptolemy/* .
ln -s /users/ptolemy/.??* .
setenv PTOLEMY ~/pt
setenv PTARCH ‘$PTOLEMY/bin/ptarch‘
rm obj.$PTARCH src bin.$PTARCH
mkdir -p src src/pigiExample bin.$PTARCH
cd bin.$PTARCH; ln -s /users/ptolemy/bin.$PTARCH
cd ../src; ln -s /users/ptolemy/src/* .
cd pigiExample; cp /users/ptolemy/src/pigiExample/* .
You also need to be sure that you have your environment set up properly for the compiler that you are using.
Continuing with our example of how to build a pigiRpc that includes your own stars:
1. Build a basic pigiRpc. PigiRpc depends on .o files under $PTOLEMY/
obj.$PTARCH, so you must do a basic build. To build all the .o files, type:
cd $PTOLEMY; make install
The complete build process can take upwards of three hours. If you use an override.mk file, you can reduce the build time by building only the functionality you
need. See “Using mkPtolemyTree to create a custom Ptolemy trees” on page 1-9
for more information.
2. Edit $PTOLEMY/src/pigiExample/make.template. Add your stars to
LOCAL_OBJS and PL_SRCS.
3. cd to $PTOLEMY/obj.$PTARCH/pigiExample and type:
make depend
to update the makefile from the make.template. You will see messages something like:
Ptolemy
Last updated: 10/10/97
1-8
Extending Ptolemy — Introduction
makefile remade -- you must rerun make.
exit 1
make: *** [makefile] Error 1
This is normal and you may safely ignore the error message.
4. While still in $PTOLEMY/obj.$PTARCH/pigiExample, type
make
This will create a version of the pigiRpc executable with your own stars statically
linked in. If later you add a new star, you should modify the symbols OBJS and
PLSRCS in make.template to include it, and repeat the above procedure.
5. If you built your pigiRpc with SDFMyStar.o, you can test your pigiRpc by
starting up with:
pigi -rpc $PTOLEMY/obj.$PTARCH/pigiExample/pigiRpc $PTOLEMY/
src/pigiExample/init.pal
and then run the ‘wave’ universe. If you want to have the binary you just built be
the default binary for yourself, you can set your PIGIRPC environment variable to
the name of the binary you just built:
setenv PIGIRPC $PTOLEMY/obj.$PTARCH/pigiExample/pigiRpc
Next time you start pigi, your new executable will be used instead of the standard
one. To revert to using the installed pigiRpc, just type
unsetenv PIGIRPC
6. If you want your pigiRpc to be the default pigiRpc, you can install it in
$PTOLEMY/bin.$PTARCH, but this will wipe out whatever pigiRpc is in that
directory
With the same makefile, you can make a version of the pigiRpc program that has
debug symbols. Just type:
make pigiRpc.debug
To use this, assuming the Gnu debugger gdb is in your path, specify the executable as follows:
setenv PIGIRPC \
$PTOLEMY/obj.$PTARCH/pigiExample/pigiRpc.debug
assuming your executable is in $PTOLEMY/obj.$PTARCH/pigiExample/. Then start pigi
as follows:
pigi -debug
To revert to using the installed pigiRpc, just type
unsetenv PIGIRPC
1.3.2 Creating a pigiRpc with more extensive customizations
If you are extending Ptolemy in nontrivial ways, such as writing a new domain, we
U. C. Berkeley
Department of EECS
The Almagest
1-9
suggest that you create your own copy of the Ptolemy directory tree. You may use symbolic
links to the “official” directories if you do not need to modify or work on them. Your new
code should be placed in the parallel directory with the other similar Ptolemy subdirectories,
using the same directory structure. This way you can reuse the makefiles of similar Ptolemy
directories with minimal modifications. After you create your own Ptolemy tree and add your
new directories and files, certain Ptolemy makefiles, typically $PTOLEMY/mk/ptbin.mk and
$PTOLEMY/mk/stars.mk, need to be modified to include your own code. Building your
own pigiRpc, ptcl or tysh this way requires extensive knowledge of the Ptolemy directory
tree structure and makefiles, but if you are doing serious development in Ptolemy, you will
need to know this anyway.
Warning: If you have write permission in the directory where Ptolemy is installed, make sure
to modify the place where “make install” puts the completed executable, or it will attempt to
overwrite the pigiRpc in the Ptolemy installation, and other users may be upset with you if
you succeed in doing that. (If you are using the makefile from $PTOLEMY/src/pigiExample, you do not need to worry about this because “make install” has been removed from that
makefile.) The simplest thing to do is to replace the line in the makefile:
install: makefile $(DESTBIN)
with:
install: makefile pigiRpc
This will leave the pigiRpc in whatever directory you make it even if you type:
make install
1.4 Using mkPtolemyTree to create a custom Ptolemy trees
In Ptolemy 0.6 and later, there are two methods of building custom Ptolemy trees that
have a user selected set of domains: csh aliases and the mkPtolemyTree script. This section
discusses the mkPtolemyTree script, see “Using csh aliases to create a Parallel Software
Development Tree” on page 1-12 for an alternative method of creating a parallel tree.
In Ptolemy 0.6 and later, the mkPtolemyTree script and a user supplied override.mk file to create an entire custom object tree. The tree will have copies of all Ptolemy
directories on which the customized installation depends. The script will also set up the
override.mk files needed to build custom pigiRpc, tysh and ptcl binaries. Since mkPtolemyTree runs very fast, you may avoid having to recompile the entire Ptolemy tree,
which can take 3 hours on a fast workstation.
1.4.1 mkPtolemyTree example
The mkPtolemytree command usage is:
mkPtolemyTree override.mk_file root_pathname_of_new_tree
For example, say that you wanted to build a tree that only has the VHDL domain in
~/mypt.
1. One would create a file called ~/override.mk that contains:
VHDL=1
DEFAULT_DOMAIN=VHDL
Ptolemy
Last updated: 10/10/97
1-10
Extending Ptolemy — Introduction
VERSION_DESC="VHDL only"
The file $PTOLEMY/mk/ptbin.mk contains a list of the makefile variables that
can be set to bring in the various domains.
2. Set $PTOLEMY to point to the Ptolemy distribution, in this example, the Ptolemy
distribution is at /users/ptolemy:
setenv PTOLEMY /users/ptolemy
3. Set $PTARCH to the appropriate value:
setenv PTARCH ‘$PTOLEMY/bin/ptarch‘
4. Set the path properly:
set path = ($PTOLEMY/bin $PTOLEMY/bin.$PTARCH $path)
5. Execute the mkPtolemyTree command so that the override.mk file is used to
create a custom tree in the ~/mypt directory.
mkPtolemyTree ~/override.mk ~/mypt
In general, you will want to define the variables TK and HOF. Setting TK indicates that
you want to include Tcl/Tk extensions to the domains. Setting HOF means that you want to
include the higher-order functions domain. The higher-order functions domain is used in
many demonstrations to configure stars with multiple portholes and to specify scalable systems. So, adding these make variables in the same override.mk file would make it look like
the following:
HOF=1
TK=1
VHDL=1
DEFAULT_DOMAIN=VHDL
VERSION_DESC="VHDL only"
1.4.2 How mkPtolemyTree works
To accumulate a list of the directories necessary to build a custom tree, $PTOLEMY/
src/stars.mk contains a makefile variable named CUSTOM_DIRS. In stars.mk, each feature, such as VHDL adds directories to CUSTOM_DIRS. Also a feature can require sub-features,
and the sub-features can add directories to CUSTOM_DIRS. For example, VHDL requires CG,
and CG adds more directories to CUSTOM_DIRS.
When you run $PTOLEMY/bin/mkPtolemyTree, the following events occur:
1. From the override.mk file that the user specifies, the script builds a tree with the
directories as specified the value of the CUSTOM_DIRS makefile variable.
2. Next, the files in the $PTOLEMY tree are copied over if the directory exists using
tar (to save modification times).
3. For each directory specified by CUSTOM_DIRS, we create symbolic links to all the
directories that we have not expanded from the $PTOLEMY tree the make.template and makefile symbolic links in the obj directories are set correctly.
U. C. Berkeley
Department of EECS
The Almagest
1-11
4. The override.mk file is copied into the new tree as NEW_ROOT/mk/override.mk, where NEW_ROOT is the root path name of the tree we are constructing.
5. override.mk files are constructed that reference NEW_ROOT/mk/override.mk
specific to tysh, ptcl and pigiRpc.
6. make install is run in NEW_ROOT/obj.$PTARCH/ which creates the hard link
for the libraries in NEW_ROOT/lib.$PTARCH and builds the custom tysh, ptcl,
and pigiRpc.
This new tree has all the symbolic links and directories necessary to act as a fullfledged Ptolemy tree. You should be able to set your PTOLEMY environment variable to this
new tree and pigi will run your custom pigiRpc binary.
Currently the Tcl libraries and Tycho are not expanded but are accessible via symbolic
links. To have the utility expand the $PTOLEMY/lib/tcl directory, add the following line to
your override.mk file:
CUSTOM_DIRS += $(CROOT)/lib/tcl
To expand Tycho, consult the Tycho documentation and use the tylndir script.
There is no documentation of the variables to pull in each domain yet. In general, it is
the standard abbreviation for the domain in capital letter. For example, the Synchronous Dataflow (SDF) domain is SDF, the Discrete-Event (DE) domain is DE, and so forth. Some of the
domains are split up, the entire domain can be brought in by defining FOOFULL (e.g., SDFFULL or CGCFULL). When defined, they include all of the SDF and CGC functionality,
respectively, whereas SDF and CGC include only the basic functionality. The basic version of
the SDF domain does not include the image, matrix, Matlab, DSP, and Tcl/Tk stars. If you are
attempting to build a pigi that includes the Process Network (PN) domain, then you should
add the following to your override.mk file.
INCLUDE_PN_DOMAIN = yes
For a listing of the possible make variables, refer to the $PTOLEMY/mk/ptbin.mk and
$PTOLEMY/mk/stars.mk files.
1.4.3 Combining mkPtolemyTree and pigiExample
It is possible to use the override.mk file used by mkPtolemyTree in the pigiExample directory to create a custom pigiRpc with user added stars. One reason for doing this
would be to that on some platforms, stars that have been incrementally linked are not visible
from the debugger. Creating a custom pigiRpc with the star as a built in star can aid debugging.
After running mkPtolemyTree, edit $PTOLEMY/src/pigiExample/make.template and add your stars as described in “Creating a pigiRpc that includes your own stars” on
page 1-7.
1.4.4 Known Bugs in mkPtolemyTree
•
To build a customized pigiRpc, you set makefile variables like SDF or CG56 to 1 in
your override.mk. If you happen to have an environment variable called SDF or
CG56, this procedure fails because the rule in stars.mk just checks whether the variable is defined or not, not what value it has. So, ensure that you have no environment
Ptolemy
Last updated: 10/10/97
1-12
Extending Ptolemy — Introduction
variables that clash with the variables used in override.mk.
Suggested fix: In stars.mk, not only check whether a variable like SDF is defined,
but also check its value.
Hopefully, the value is different from the other definition and the code is more robust.
•
If mkPtolemyTree gives you the following message:
Making a customized Ptolemy development tree using the version of
Ptolemy installed in the directory /users/ptolemy
The new customized Ptolemy tree will go in /users/cxh/mypt
mkdir: illegal option -- n
mkdir: usage: mkdir [-m mode] [-p] dirname ...
The try setting your path so that /usr/ucb is before /usr/bin. The problem here is
that in Ptolemy 0.7, the mkPtolemyTree script uses the -n option with echo, which
is not portable.
•
mkPtolemyTree cannot add new directories to an already existing tree, it can only be
used to create a brand new parallel tree.
•
MAKEARCH may fail when used with a tree that was created with mkPtolemyTree,
since MAKEARCH may follow symbolic links into the master tree, where the user does
not have write permission.
•
mkPtolemyTree requires that the master Ptolemy tree have a fully expanded
obj.$PTARCH directory. Otherwise you will get an error about ‘no sources rule
found’.
1.5 Using csh aliases to create a Parallel Software Development
Tree
Below is a set of C shell aliases that can be used to create a parallel software development tree.
1.5.1 Aliases for Managing Symbolic Links
Below are several csh aliases that can be helpful when managing a duplicate hierarchy that is implemented with symbolic links:
alias
alias
alias
alias
alias
alias
pt ’echo $cwd | sed s:${HOME}/Ptolemy:${PTOLEMY}:’
ptl ’ln -s `pt`/* .’
sw ’mv \!^ swap$$; mv .\!^ \!^; mv swap$$ .\!^’
exp ’mkdir .\!^; sw \!^; cd \!^; ptl’
rml ’\rm -f `\ls -F \!* | sed -n s/@\$//p`’
mkl ’rml make*; ln -s `vpath`/make* .’
These are documented below in detail. For convenience, these aliases can be found in the file
$PTOLEMY/.alias.
The pt Alias
The pt alias returns the name of the “official” Ptolemy directory that corresponds to
U. C. Berkeley
Department of EECS
The Almagest
1-13
the current directory, which is presumably in your personal hierarchy. This assumes that you
have the environment variable $PTOLEMY set to the root directory of the “official” version of
Ptolemy, and that your private version is in ~/Ptolemy. If this is not the case, then you
should make suitable modifications to definition of the pt alias. This alias is useful when you
want to make a symbolic link to or otherwise access the “official” version of a file, as in
% cd ~/Ptolemy/src/domains/sdf/kernel
% ln -s `pt`/SCCS .
This will create a symbolic link in your directory ~/Ptolemy/src/domains/sdf/kernel
to the directory $PTOLEMY/src/domains/sdf/kernel/SCCS. (For information on source
code control, see below).
The ptl Alias
The ptl alias uses the pt alias to create, in the current directory, symbolic links to all
the files in the corresponding “official” directory. This is useful for quickly filling in the
branches of a new directory in your private hierarchy.
% pwd
/users/me/Ptolemy/src/domains/ddf
% mkdir stars
% cd stars
% ptl
% ls -F
DDFCase.cc@
DDFLastOfN.cc@
DDFCase.h@
DDFLastOfN.h@
DDFCase.pl@
DDFLastOfN.pl@
DDFDownCounter.cc@
DDFRepeater.cc@
DDFDownCounter.h@
DDFRepeater.h@
DDFDownCounter.pl@
DDFRepeater.pl@
DDFEndCase.cc@
DDFSelf.cc@
DDFEndCase.h@
DDFSelf.h@
DDFEndCase.pl@
DDFSelf.pl@
%
DDFThresh.cc@
DDFThresh.h@
DDFThresh.pl@
SCCS@
TAGS@
ddfstars.c@
ddfstars.mk@
make.template@
makefile@
This creates a directory named stars and fills it with symbolic links to the contents of the
corresponding directory in the “official” Ptolemy tree. Using the -F option of the ls command, makes it easy to see which files in a directory are symbolic links (they are marked with
a trailing “@” sign).
The sw Alias
When experimenting with Ptolemy, you may want to switch back and forth between
using the official version of some directory and your own version. You can keep two versions
of the same directory (or a file). The sw alias swaps a file or directory filename with another
file or directory .filename. The period at the beginning of the second file name makes it
invisible unless you use the -a option of the ls command. For example, suppose you wish to
experiment with making a change to just one file, DDFRepeater.pl, in the directory above,
to fix a bug (and then send the bug fix back to the Ptolemy group):
Ptolemy
Last updated: 10/10/97
1-14
Extending Ptolemy — Introduction
% pwd
/users/me/Ptolemy/src/domains/ddf/stars
% sw DDFRepeater.pl
mv: cannot access .DDFRepeater.pl
% ls -a
./
DDFEndCase.h@
../
DDFEndCase.pl@
.DDFRepeater.pl@
DDFLastOfN.cc@
DDFCase.cc@
DDFLastOfN.h@
DDFCase.h@
DDFLastOfN.pl@
DDFCase.pl@
DDFRepeater.cc@
DDFDownCounter.cc@
DDFRepeater.h@
DDFDownCounter.h@
DDFSelf.cc@
DDFDownCounter.pl@
DDFSelf.h@
DDFEndCase.cc@
DDFSelf.pl@
DDFThresh.cc@
DDFThresh.h@
DDFThresh.pl@
SCCS@
TAGS@
ddfstars.c@
ddfstars.mk@
make.template@
makefile@
Notice that DDFRepeater.pl was moved to .DDFRepeater.pl. You can now create your
own version of DDFRepeater.pl. To later reinstate the official version (e.g., you discovered
that what you thought was a bug was in fact a feature),
% sw DDFRepeater.pl
The exp Alias
When starting your experimentation, the job of creating the parallel tree can be rather
tedious. The exp aliases combines the functions of the ptl and sw aliases into one, making
the common task of expanding a branch in the directory hierarchy easy. Suppose you type:
% exp stars
This is equivalent to the following sequence of commands:
%
%
%
%
mkdir .stars
sw stars
cd stars
ptl
Note that the command leaves you in the new directory ready to issue another exp command.
For example, to create a duplicate of the directory $PTOLEMY/src/domains/ddf/stars,
creating all subdirectories as you go, and linking to all the appropriate files in the Ptolemy
tree,
%
%
%
%
%
cd ~/Ptolemy
exp src
exp domains
exp ddf
exp stars
U. C. Berkeley
Department of EECS
The Almagest
1-15
The rml Alias
The rml alias removes symbolic links in the current directory. Without an argument, it
removes all the visible symbolic links. Any arguments are passed on to the ls command. So,
to remove all symbolic links, including those that are invisible, use the -a option:
% rml -a
You can also give file names as arguments to remove just some of the symbolic links:
% rml *.o
The mkl alias
Suppose you wish to compile your change to the DDFRepeater.pl file, as above.
You will need to make an object tree. Assume you are on a Sun Solaris 2.x platform. You
have created a parallel tree already in ~/Ptolemy/src (i.e. ~Ptolemy/src/domains/
ddf/stars exists). Create the corresponding object tree:
% cd ~Ptolemy
% exp obj.sol2
% exp domains
% exp ddf
% exp stars
% pwd
/users/me/Ptolemy/obj.sol2/domains/ddf/stars
The directory in which you are now located contains symbolic links to the .o files and makefiles in the official Ptolemy tree. If you run make here, your replacement DDFRepeater.pl
star will be compiled in place of the official one. If you run “make install”, then a library
will be created and installed in the directory ~/Ptolemy/lib.sol2, assuming this directory
exists.
Running make as above uses the makefiles in the official Ptolemy tree, because you
have symbolic links to them. Suppose you wish to modify the make.template file in
~/Ptolemy/src/domains/ddf/stars. In this case, you should run the mkl alias to
replace the makefile symbolic links. If you have followed the above steps, try this:
% pwd
/users/me/Ptolemy/obj.sol2/domains/ddf/stars
% ls -F
DDFCase.o@
DDFRepeater.o@
DDFDownCounter.o@
DDFSelf.o@
DDFEndCase.o@
DDFThresh.o@
DDFLastOfN.o@
ddfstars.o@
libddfstars.a@
make.template@
makefile@
(This assumes that the “official” Ptolemy has been rebuilt after being installed, otherwise the
.o and .a files will be missing). Expand the makefile symbolic links:
% ls -l make*
Ptolemy
Last updated: 10/10/97
1-16
Extending Ptolemy — Introduction
lrwxrwxrwx 1 eal
56 Jul 14 11:30 make.template -> /users/
ptolemy/obj.sol2/domains/ddf/stars/make.template
lrwxrwxrwx 1 eal
51 Jul 14 11:30 makefile -> /users/
ptolemy/obj.sol2/domains/ddf/stars/makefile
Note that they point to the “official” makefiles. To make them point to the versions in your
own tree,
% mkl
% ls -l make*
lrwxrwxrwx 1 eal
47 Jul 14 11:31 make.template -> ../../
../../src/domains/ddf/stars/make.template
lrwxrwxrwx 1 eal
42 Jul 14 11:31 makefile -> ../../../../
src/domains/ddf/stars/makefile
Now you can modify the make.template file in your own tree as you need.
Warning
Note that modifying Ptolemy files is risky. You will have essentially created your own
version of Ptolemy. You will not be able to install future releases of Ptolemy without abandoning your version. However, if you have modifications that you believe are valuable, please
communicate them to the Ptolemy group at [email protected]. The Ptolemy
group welcomes suggestions for changes.
1.5.2 Creating a Duplicate Hierarchy
Let’s look at a complete example to see how these aliases can be used. Suppose you
want to modify an existing file that is part of the kernel for the SDF domain. You will need a
private copy of the file that is writable. This allows you to make your changes without affecting the “official” version of Ptolemy. In order to test your change, you will have to build a private version of the interpreter ptcl or the graphical interface pigiRpc.
First, create the root directory for your duplicate hierarchy.
% mkdir ~/Ptolemy
Then go into that directory and create symbolic links to all files in the corresponding “official” Ptolemy directory.
% cd ~/Ptolemy
% ptl
You will want to have a private version of the lib.$PTARCH directory so that you won’t
modify the “official” version of any library or object files.
% cd ~/Ptolemy
% exp lib.$PTARCH
(This assumes your $PTARCH environment variable is set). You will also want a private
U. C. Berkeley
Department of EECS
The Almagest
1-17
obj.$PTARCH directory for the same reason. In this example, the tree is expanded down to
the sdf directory:
%
%
%
%
cd ~/Ptolemy
exp obj.$PTARCH
exp domains
exp sdf
If you are modifying code in the sdf/kernel directory, then you will want to expand it as
well. Once expanded, you will want remove the make.template and makefile links
(which point to the “official” Ptolemy files) and replace them with links that use relative paths
to refer to your private versions of these files (in case you make changes to them):
% exp kernel
% mkl
If you make changes in the sdf/kernel directory, then there is a good chance that object
files in sdf/dsp and other directories will also have to be recompiled. Thus, you will want to
expand these directories (and any subdirectories below them) as well. Remember to replace
the make.template and makefile links as in the sdf/kernel directory.
%
%
%
%
exp dsp
mkl
exp stars
mkl
Because of the way symbolic links work, it is important to remove the links for the .o and .a
files in the directories you have just created. You can do this by issuing a make realclean
command in the obj.$PTARCH/domains/sdf directory. This will recursively clean out all
the subdirectories. You could also do this manually by issuing a rml *.o *.a command in
each directory.
You will also need a private version of the src directory.
%
%
%
%
%
cd ~/Ptolemy
exp src
exp domains
exp sdf
exp kernel
At any point after this, it is possible to switch back and forth between private and “official”
versions of these directories with the sw alias. In fact, you just used it (as part of the exp alias)
to switch to the private versions of the obj.$PTARCH, lib.$PTARCH, and src directories.
To compile your version of the sdf kernel directory,
% cd ~/Ptolemy/obj.$PTARCH/domains/sdf/kernel
% make install
To make a version pigiRpc (or better yet, ptinyRpc) with your changes,
Ptolemy
Last updated: 10/10/97
1-18
Extending Ptolemy — Introduction
%
%
%
%
cd ~/Ptolemy/obj.$PTARCH
exp pigiRpc
mkl
make ptinyRpc
1.5.3 Source Code Control
At the present time, at Berkeley, the Ptolemy group uses SCCS for source code control. This means that each directory with source code in it contains a subdirectory called
SCCS. That subdirectory is not distributed with Ptolemy, but if you are starting your own
development expanding on Ptolemy, you may wish to use a similar mechanism. We assume
here that you are familiar with SCCS, which is a standard Unix facility.
Recall the command above:
% pwd
/users/me/Ptolemy/src/domains/ddf/stars
% sw DDFRepeater.pl
mv: cannot access .DDFRepeater.pl
% ls -a
./
DDFEndCase.h@
../
DDFEndCase.pl@
.DDFRepeater.pl@
DDFLastOfN.cc@
DDFCase.cc@
DDFLastOfN.h@
DDFCase.h@
DDFLastOfN.pl@
DDFCase.pl@
DDFRepeater.cc@
DDFDownCounter.cc@
DDFRepeater.h@
DDFDownCounter.h@
DDFSelf.cc@
DDFDownCounter.pl@
DDFSelf.h@
DDFEndCase.cc@
DDFSelf.pl@
DDFThresh.cc@
DDFThresh.h@
DDFThresh.pl@
SCCS@
TAGS@
ddfstars.c@
ddfstars.mk@
make.template@
makefile@
Note the symbolic link to the “official” SCCS directory. This will not be present if you are
using the distributed Ptolemy and have not created it. Assume, however, that you have put this
directory under SCCS control (or someone else has). Then you can create an editable version
of the DDFRepeater.pl star with the command:
% sccs edit DDFRepeater.pl
1.24
new delta 1.25
76 lines
The sccs utility tells you the latest version number (1.24) and assigns you a new version number (1.25). You can now edit the file safely (nobody else will be allowed by sccs to edit it).
When you are done and have fully tested your changes (and obtained clearance from the
Ptolemy group if necessary), you can check the file back in:
% sccs delget DDFRepeater.pl
comments?
You should enter an explanation of your changes. If you wish to nullify your changes, restor-
U. C. Berkeley
Department of EECS
The Almagest
1-19
ing the official version,
% sccs unedit DDFRepeater.pl
and if you wish to create a new file and put it under SCCS control,
% sccs create -fi NewFileName
1.6 Building standalone programs that use Ptolemy libraries.
Sometimes it is necessary to create small standalone programs that use part of the
Ptolemy libraries.
Examples of this are the desire to use Ptolemy kernel classes such as StringList or
the need to isolate an obscure bug or memory leak. The $PTOLEMY/mk/standalone.mk file
provides the make definitions to make this possible. This file provides make rule definitions to
build various binaries some using the Pure Sofware Inc.1 utilities.
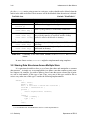
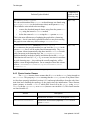
The usage for this makefile is:
make -f $PTOLEMY/mk/standalone.mk stars.mk_variable_defs filename.suffix
Where stars.mk_variable_defs is zero or more makefile variables used in
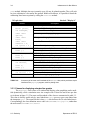
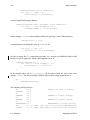
$PTOLEMY/mk/stars.mk, such as SDF=1. filename is the base name of the file to be compiled, and the basename of the output file. and suffix is one of the forms listed in table 1-1.
Suffix
.bin
.debug
.purify
.quantify
.purecov
TABLE 1-1:
Binary Type
Standard binary
Binary with debug symbols
Binary with Purify and debug
symbols
Binary with Quantify linked in
Binary with Pure Coverage linked
in
Table of filename suffixes and binary types.
It is possible to use these makefiles to create binaries that do not have any Ptolemy
code. A reason why you might want to do this is to take advantage of the Pure Software make
definitions in standalone.mk. To specify no Ptolemy libraries, use the make argument
NOPTOLEMY=1.
1.6.1 Standalone example using StringList
For example, say you want to use the StringList class in a standalone program
1. Rational (http://www.rational.com) sells tools such as:
Purify, which can be used to find memory leaks and out of bounds memory accesses.
Quantify, which can be used to profile performance.
Purecov, which can be used to provide code coverage information.
Ptolemy
Last updated: 10/10/97
1-20
Extending Ptolemy — Introduction
named bar.cc:
#include
#include "StringList.h"
main() {
StringList testing = "This is a test\n";
cout << testing;
}
To build it you would type:
make -f $PTOLEMY/mk/standalone.mk bar.bin
If you wanted to make a new standalone program that also uses part of the CG domain,
just define the domain make variables (as used in stars.mk) on the make command line:
make -f $PTOLEMY/mk/standalone.mk CG=1 bar.bin
If you are going to do this often, it may be useful to create a new directory in which to
test this program. In this directory, execute the commands:
ln -s $PTOLEMY/mk/standalone.mk makefile
ln -s $PTOLEMY/mk/standalone.mk make.template
By having these symbolic links, you will not have to supply the make argument
-f $PTOLEMY/mk/standalone.mk as before.
1.6.2 Standalone example that tests a Scheduler
Here is an example of a minimal file that can be used to call the setup in a Scheduler
for instance. If the file testAcyLoopSched.cc contains:
#include
#include
#include
#include
#include
#include
<iostream.h>
"Galaxy.h"
"SDFStar.h"
"AcyCluster.h"
"AcyLoopScheduler.h"
"SDFPortHole.h"
main() {
// First create a simple galaxy and some stars.
SDFStar star[3];
Galaxy topGalaxy;
topGalaxy.setDomain("SDF");
topGalaxy.setName("topGalaxy");
topGalaxy.addBlock(star[0],"star0");
topGalaxy.addBlock(star[1],"star1");
topGalaxy.addBlock(star[2],"star2");
// Add ports to stars.
OutSDFPort p0,p1;
InSDFPort p2,p3;
// initialize the ports
p0.setPort("output1",&star[0],FLOAT,2);
star[0].addPort(p0);
p1.setPort("output2",&star[0],FLOAT,3);
star[0].addPort(p1);
p2.setPort("input",&star[1],FLOAT,3);
U. C. Berkeley
Department of EECS
The Almagest
1-21
p3.setPort("input",&star[2],FLOAT,2);
star[1].addPort(p2);
star[2].addPort(p3);
// Connect ‘em up. The graph is
// star[1] (3) <--- (2) star[0] (3) ---> (2) star[2]
p0.connect(p2,0);
p1.connect(p3,0);
// Scheduling
AcyLoopScheduler sched;
sched.setGalaxy(topGalaxy);
cout << "No problem till now. Calling sched.setup()...\n";
sched.setup();
int i;
for (i = 0 ; i < 3 ; i++) {
cout << star[i].fullName() << "\n";
cout << "Repetitions = " << star[i].reps() << "\n";
}
StringList sch = sched.displaySchedule();
cout << sch;
}
The command to compile this and produce a standalone binary would be:
make -f $PTOLEMY/mk/standalone.mk OPTIMIZER= SDF=1 \
USE_SHARED_LIBS=yes testAcyLoopSched.debug
1.7 Debugging Ptolemy and Extensions Within Pigi
The extensibility of Ptolemy can introduce problems. Code that you add may be defective (few people write perfect code every time), or may interact with Ptolemy in unexpected
ways. These problems most frequently manifest themselves as a Ptolemy crash, where the
Ptolemy kernel aborts, creating a core file.
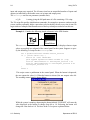
The fact that pigiRpc and vem are separate Unix processes has the advantage that
when pigiRpc aborts with a fatal error, vem keeps running. Your vem schematic is unharmed
and can be safely saved. Vem gives a cryptic error message something like:
RPC Error: server: application exited without calling
RPCExit
Closing Application /home/ohm1/users/messer/ptolemy/lib/
pigiRpcShell on host foucault.berkeley.edu
Elapsed time is 1538 seconds
The message
segmentation fault (core dumped)
may appear in the window from which you started pigi. The first line in the above message
might alternatively read
RPC Error: fread of long failed
Vem is trying to tell you that it is unable to get data from the link to the Ptolemy kernel. In
either case, it will create a large file in your home directory called core. The core1 file is
Ptolemy
Last updated: 10/10/97
1-22
Extending Ptolemy — Introduction
useful for finding the problem.
1.7.1 A quick scan of the stack
Assuming you are using Gnu tools, and assuming the pigiRpc executable that you
are using is in your path, go to your home directory and type:
gdb pigiRpc
The Gnu symbolic debugger (gdb) will show the state of the stack at the point where the program failed. Note that gdb is not distributed with Ptolemy, but is available free over the Internet in many places, including ftp://prep.ai.mit.edu/pub/gnu. The most recently
called function might give you a clue about the cause of the problem. Here is a typical session:
cxh@watson 197% gdb pigiRpc ~/core
GDB is free software and you are welcome to distribute copies of it
under certain conditions; type “show copying” to see the conditions.
There is absolutely no warranty for GDB; type “show warranty” for
details.
GDB 4.15.1 (sparc-sun-solaris2.4),
Copyright 1995 Free Software Foundation, Inc...
(no debugging symbols found)...
Tell gdb to read in the core file.
(gdb) core core
Core was generated by `/users/ptolemy/bin.sol2/pigiRpc :0.0 watson.eecs.berkeley.edu 32870 inet 1 2 3’.
Program terminated with signal 11, Segmentation fault.
Reading symbols from
/users/ptolemy/lib.sol2/libcg56dspstars.so...done.
Reading symbols from
/users/ptolemy/lib.sol2/libcg56stars.so...done.
Since this version of Ptolemy uses shared libraries, we see lots of messages about shared
libraries, which we’ve deleted here for brevity.
(gdb) where
#0 0xee7a1c20 in _kill ()
#1 0x52b04 in pthread_clear_sighandler ()
#2 0x52cb4 in pthread_clear_sighandler ()
#3 0x53130 in pthread_clear_sighandler ()
#4 0x53320 in pthread_handle_one_process_signal ()
#5 0x55658 in pthread_signal_sched ()
#6 0x554d8 in called_from_sighandler ()
#7 0x535e4 in pthread_handle_pending_signals ()
#8 0x10100c in SimControl::getPollFlag ()
#9 0x101604 in Star::run ()
#10 0xd394c in DataFlowStar::run ()
#11 0xeeca5fb8 in SDFAtomCluster::run (this=0x2bd0b0)
at ../../../../src/domains/sdf/kernel/SDFCluster.cc:1032
#12 0xeeca0f20 in SDFScheduler::runOnce (this=0x2bd050)
at ../../../../src/domains/sdf/kernel/SDFScheduler.cc:121
#13 0xeeca0eac in SDFScheduler::run (this=0x2bd050)
at ../../../../src/domains/sdf/kernel/SDFScheduler.cc:98
1. Note that core files can be large in size, so your system administrator may have setup the csh “limit”
command to disable the creation of core files. For further information, see the csh man page.
U. C. Berkeley
Department of EECS
The Almagest
1-23
#14 0x108358 in Target::run ()
#15 0x109e04 in Runnable::run ()
#16 0xe62ec in InterpUniverse::run ()
#17 0xee9e7f04 in PTcl::run (this=0x20af80, argc=2949528,
argv=0x109fa4)
at ../../src/ptcl/PTcl.cc:521
#18 0xee9e99a4 in PTcl::dispatcher (which=0x27, interp=0x1d4830,
argc=2,
The “where” command shows that state of the stack at the time of the crash. The actual stack
trace was 72 frames long, the last two frames being:
#71 0xeec06d5c in ptkMainLoop ()
at ../../src/pigilib/ptkTkSetup.c:192
#72 0x4982c in main ()
Scanning this list we can recognize that the crash occurred during the execution of a
star. Unfortunately, unless you are running a version of pigiRpc with the debug symbols
loaded, it will be difficult to tell much more from this.
1.7.2 More extensive debugging
To do more extensive debugging, you need to create or find a version of pigiRpc
with debug symbols, called pigiRpc.debug.
The first step is to build a pigiRpc that contains the domains you are interested in
debugging. There are several ways to build a pigiRpc:
a. There may be prebuilt debug binaries on the Ptolemy Web site, check the directory
that contains the latest release.
b. Rebuild the entire tree from scratch. This takes about 3 hours. Appendix A in the
Ptolemy User’s Manual has instructions about this.
c. Use mkPtolemyTree to rebuild a subset of the Ptolemy tree. See “Using mkPtolemyTree to create a custom Ptolemy trees” on page 1-9 for more information.
d. Use the csh aliases to rebuild a subset of the Ptolemy tree. See “Using csh aliases
to create a Parallel Software Development Tree” on page 1-12 for more information.
The next step is to build the pigiRpc.debug binary:
cd $PTOLEMY/obj.$PTARCH/pigiRpc; make pigiRpc.debug
Then set the PIGIRPC environment variable to point to the binary:
setenv PIGIRPC $PTOLEMY/obj.$PTARCH/pigiRpc/pigiRpc.debug1
Then run pigi as follows:
pigi -debug
An extra window running gdb appears. (If this fails, then gdb is probably not installed at your
1. Note that the pigi script will attempt to find pigiRpc.debug binary if the PIGIRPC environment variable is not set. An alternative is that one can avoid setting PIGIRPC and use the pigi -rpc option to
specify a binary.The command would be:
pigi -debug -rpc $PTOLEMY/obj.$PTARCH/pigiRpc/pigiRpc.debug
Ptolemy
Last updated: 10/10/97
1-24
Extending Ptolemy — Introduction
site or is not in your path.) Type cont to continue past the initial breakpoint.
Now, if you can replicate the situation that created the crash, you will be able to get
more information about what happened. Here is a sample of interaction with the debugger
through the gdb window:
GDB is free software and you are welcome to distribute copies of it
under certain conditions; type “show copying” to see the conditions.
There is absolutely no warranty for GDB; type “show warranty” for
details.
GDB 4.15.1 (sparc-sun-solaris2.4),
Copyright 1995 Free Software Foundation, Inc...
Breakpoint 1 at 0x39ab4: file ../../src/pigiExample/pigiMain.cc, line
58.
Breakpoint 1, main (argc=-282850408, argv=0x399c0)
at ../../src/pigiExample/pigiMain.cc:58
58
pigiFilename = argv[0];
(gdb) cont
Continuing.
At this point, you are running Ptolemy. Use it in the usual way to replicate your problem.
When you succeed, you will get a message something like:
Program received signal SIGSEGV, Segmentation fault.
0xeee81394 in mxRealMax ()
(gdb)
At this point you can again examine the stack. This time, however, there will be more information. Here, we examine the top 5 frames of the stack
(gdb) where 5
#0 0xeee81394 in mxRealMax ()
#1 0xe3864 in SimControl::getPollFlag () at ../../src/kernel/SimControl.cc:271
#2 0xe3e5c in Star::run (this=0x28c908) at ../../src/kernel/
Star.cc:73
#3 0xbacb8 in DataFlowStar::run (this=0x28c908)
at ../../src/kernel/DataFlowStar.cc:94
#4 0xef485fb8 in SDFAtomCluster::run (this=0x278570)
at ../../../../src/domains/sdf/kernel/SDFCluster.cc:1032
(More stack frames follow...)
(gdb)
This particular stack trace is a little strange at the “bottom” (gdb calls the lower numbers the bottom even though they are at the top of the list) because it was generated by invoking a dynamically linked star, and the symbol information is not complete. However, you can
still find out quite a bit. Notice that you are now told where the files are that define the methods being called. The file names are all relative to the directory in which the corresponding
object file normally resides. The Ptolemy files can all be found in some subdirectory of
$PTOLEMY/src.
You can get help from gdb by typing “help”. Suppose you wish to find out first which
star is being run when the crash occurs. The following sequence moves up in the stack until
the “run” call of a star:
(gdb) up
#1 0xe3864 in SimControl::getPollFlag () at ../../src/kernel/SimControl.cc:271
U. C. Berkeley
Department of EECS
The Almagest
1-25
271
ptBlockSig(SIGALRM);
(gdb) up
#2 0xe3e5c in Star::run (this=0x28c908) at ../../src/kernel/
Star.cc:73
73
go();
(gdb)
At this point, you can see that line 73 of the file $PTOLEMY/src/kernel/Star.cc reads
go();
Odds are pretty good that the problem is in the go() method of the star. You can find out to
which star this method belongs as follows:
(gdb) p *this
$1 = {<Block> = {<NamedObj> = {nm = 0x28ad58 "BadStar1",
prnt = 0x28c878,
myDescriptor = 0x28b658 "Causes a core dump deliberately",
_vptr. = 0xeee91738}, flags = {nElements = 0, val = 0x0},
pTarget = 0x28aa60, scp = 0x0,
ports = {<NamedObjList> = {<SequentialList> =
{lastNode = 0x0, dimen = 0}, }, }, states = {<NamedObjList> =
{<SequentialList> = { lastNode = 0x0, dimen = 0}, }, },
multiports = {<NamedObjList> = {<SequentialList> =
{lastNode = 0x0, dimen = 0}, }, }},
indexValue = -1, inStateFlag = 1}
(gdb)
This tells you that a star with name (nm) BadStar1 and descriptor “Causes a core
dump deliberately.” is being invoked. This particular star has the following erroneous go
method:
go {
char* p = 0;
*p = ’c’;
}
More elaborate debugging requires that the symbols for the star be included. The easiest way
to do this is to build a version of pigiRpc.debug that includes your star already linked into
the system. Then repeat the above procedure. The bottom of the stack frame will have much
more complete information about what is occurring.
1.7.3 Debugging hints
Below are some hints for debugging.
•
“Using emacs, gdb and pigi” on page 1-26
•
“Gdb and the environment” on page 1-26
•
“Optimization” on page 1-26
•
“Debugging StringLists in gdb” on page 1-26
•
“How to use ptcl to speed up the compile/test cycle.” on page 1-27
Ptolemy
Last updated: 10/10/97
1-26
•
Extending Ptolemy — Introduction
“Miscellaneous debugging hints for gdb” on page 1-28
See also Appendix A of the Ptolemy User’s manual.
Using emacs, gdb and pigi
By default, gdb is started in an X terminal window with its default command line
interface. Many people prefer to interface with gdb through emacs, which provides much
more sophisticated interaction between the source code and the debugger. To get an emacs
interface to gdb (assuming emacs is installed on your system), set the following environment
variable:
setenv PT_DEBUG ptgdb
To find out more about using gdb from within emacs, start up emacs and type:
M-x info
Then type:
m emacs
Then go down to:
Running Debuggers Under Emacs
* Starting GUD::
How to start a debugger subprocess.
* Debugger Operation:: Connection between the \
debugger and source buffers.
* Commands of GUD::
Key bindings for common commands.
* GUD Customization::
Defining your own commands for GUD.
Gdb and the environment
Note that the documentation for gdb says the following:
*Warning:* GDB runs your program using the shell indicated by your
`SHELL’ environment variable if it exists (or `/bin/sh’ if not). If
your `SHELL’ variable names a shell that runs an initialization file-such as `.cshrc’ for C-shell, or `.bashrc’ for BASH--any variables
you set in that file affect your program. You may wish to move setting
of environment variables to files that are only run when you sign on,
such as `.login’ or `.profile’.
Optimization
By default, Ptolemy is compiled with the optimizer turn up to a very high level. This
can result in strange behavior inside the debugger, as the compiler may evaluate instructions
in a different order than they appear in the source file. You may find it easier to debug a file by
recompiling it with the optimization turned off by removing the corresponding .o file and
doing:
make OPTIMIZER= install
Debugging StringLists in gdb
Ptolemy uses StringList object to manipulate strings. However, using gdb to view
U. C. Berkeley
Department of EECS
The Almagest
1-27
a StringList object can be non-intuitive. To print the contents of a Stringlist
myStringList as one item per line from within gdb, use:
p displayStringListItems(myStringList)
To print out the StringList as a contiguous string, use:
p displayStringList(myStringList)
How to use ptcl to speed up the compile/test cycle.
If you are spending a lot of time debugging a problem, you may want to use ptcl
instead of pigiRpc, as ptcl is smaller and starts up faster. Also, you can keep your breakpoints between invocations of ptcl, as debugging ptcl does not start up a separate emacs
each time. However, ptcl cannot handle demos that use Tk.
Here’s how to use ptcl to debug.
1. Run pigiRpc on the universe, and use compile-facet to generate a
~/pigiLog.pt file. Note the number of iterations for the universe, and then exit
pigiRpc.
2. Copy ~/pigiLog.pt to somewhere. A short file name, like /tmp/tst.tcl will
save time in typing since you may be typing it often. Don’t use something inside
your home directory as you can’t easily use ~ inside ptcl.
3. Edit the file and add a run XXX line and a wrapup line at the end. If the demo
should run for 100 iterations, then add:
run 100
wrapup
to the end of the file.
4. Build a ptcl.debug that has just exactly the functionality you need by using an
override.mk file. Alternatively, you could use either ptcl.ptrim.debug or
ptcl.ptiny.debug. If your demo is SDF, then try building and using
ptcl.ptiny.debug.
5. If you use emacs, then you can start up gdb on your binary with:
M-x gdb
6. Then type in the name of the binary. You may have to use the full pathname.
7. Inside emacs, you can then set breakpoints in the gdb window, either by typing a
break command, or by viewing the file and typing Control-X space at the location you would like a break point.
8. Type r to start the process, and then source your demo with:
source /tmp/tst.tcl
If you want to recompile your demo outside of gdb and then reload it into your
gdb session, use the file command inside gdb:
Ptolemy
Last updated: 10/10/97
1-28
Extending Ptolemy — Introduction
file /users/cxh/pt/obj.sol2/ptcl/ptcl.ptiny.debug
Your breakpoints will be saved, which is a big time saver.
Miscellaneous debugging hints for gdb
If you are having problems debugging with gdb, here’s what to check.
1. Verify that your $PTOLEMY is set to what you intended. If you are building binaries in your private tree, be sure that $PTOLEMY is set to your private tree and not
~ptdesign or /users/ptolemy.
2. Verify that your $LD_LIBRARY_PATH does not include libraries in another
Ptolemy tree. You could type:
unsetenv $LD_LIBRARY_PATH
3. gdb sources your .cshrc, so your $PTOLEMY and $LD_LIBRARY_PATH could be
different. Inside gdb, use
show env PTOLEMY
to see what it is set to. This problem is especially common if you are running gdb
inside emacs via ptgdb.
4. Verify that you are running the right binary by looking at the creation times. You
may find it useful to use the -rpc option:
pigi -debug -rpc $PTOLEMY/obj.$PTARCH/pigiRpc/pigiRpc.mine ~ptdesign/
init.pal
5. Recompile the problem files with optimization turned off and relink your
pigiRpc. You can do this with
rm myfile.o; make OPTIMIZER= install
Then rebuild your pigiRpc
6. Look for weird coding styles that could confuse the line count in emacs and gdb,
such as declaring variables in the middle of a block and brackets that open a function body on the same line as the function declaration:
int foo(int bar){
vs.
int foo(int bar)
{
7. Use stepi to step by instructions, rather than step.
U. C. Berkeley
Department of EECS
Chapter 2. Writing Stars for
Simulation
Authors:
Joseph T. Buck
Soonhoi Ha
Edward A. Lee
Other Contributors:
Most of the Ptolemy team
2.1 Introduction
Ptolemy provides rich libraries of stars for the more mature domains. Since the stars
were designed to be as generic as possible, many complicated functions can be realized by a
galaxy. Nonetheless, no star library can possibly be complete; you may need to design your
own stars. The Ptolemy preprocessor language makes this easier than it could be. This chapter
is devoted to the use of the preprocessor language.
Newly designed stars can be dynamically linked into Ptolemy, avoiding frequent
recompilation of the system. If the new stars are generic and useful, however, it might be better to add them to the list of compiled-in stars and rebuild the system. See “Creating Custom
Versions of pigiRpc” on page 1-6.
2.2 Adding stars dynamically to Ptolemy
To get a quick sense of what it means to create a new star, you can use one of the existing stars as a template. Create a new directory in which you have write permission. Copy the
source code for an existing Ptolemy star. For example,
cd my_directory
cp $PTOLEMY/src/domains/sdf/stars/SDFSin.pl SDFMyStar.pl
chmod +w SDFMyStar.pl
The “.pl” extensions on the file names stand for “Ptolemy language” or “preprocessor language.” The file name must be of the form DomainStarname.pl for dynamic linking
and the look-inside command to work. The last command just ensures that you can modify
the file. Edit the file to change the name of the star from Sin to MyStar. This is necessary so
that the name does not conflict with the existing Sin star in the SDF domain.
You can now dynamically link your new star. Start pigi, the graphical editor. If you
start pigi in your new directory, you will get a blank init.pal facet. Place your mouse cursor in this facet, and issue the “make-star” command (the shortcut is “*”). A dialog box like
2-2
Writing Stars for Simulation
the following will appear:
Enter the name of the star, MyStar, its domain, SDF, the location of the directory that
defines it, such as ~user_name/my_directory, and the name of palette in which you
would like its icon to appear, user.pal. The star will be compiled and dynamically
linked with the Ptolemy executable. An icon for it will appear in the facet user.pal. Try
using this in a simple system.
Three details about dynamic linking may prove useful:
•
If the name of the star source directory has a /src/ component, pigi will replace
this with /obj.$PTARCH/ depending on the type of machine you are running, to
get the name of the directory in which to store the object file. This is especially
useful if you are jointly doing development with others who use a different type of
machine. If there is no /src/ component in the name, then the object file is placed
in the same directory with the source file.
•
If there is a file named Makefile or makefile in the object file directory, pigi
will run the make program, using the makefile to create the object file (or make
sure it is up to date). If there is no makefile, pigi will run a make-like procedure on its own, running the preprocessor as needed to produce the C++ source
files, then running the C++ compiler to create the object file. By default, the C++
compiler will be told to look for include files in the kernel directory and the
domain-specific kernel and star directories; if this is not adequate, then you need to
write a makefile. Once compilation (if any) is complete, the dynamic linker is used
to load the star into the system. Compilation errors, if any, will appear in a popup
window.
•
Whenever the definition of a star is changed so that the new definition has different I/O ports, the icon must be updated as well. You can do this by calling makestar again to replace the old icon with a new one.
If the linking fails, one of the following situations may apply:
•
Whoever installed Ptolemy did not install the compiler.
•
The compiler is not configured correctly. If you are using a prebuilt compiler
obtained from the Ptolemy ftp site, you may need to set some environment variables if your Ptolemy installation is not at /users/ptolemy. See Appendix A of
the Ptolemy User’s Manual for more information.
•
A spurious makefile exists in your directory. If a makefile exists in your directory, Ptolemy will attempt to use it to compile your star. Remove it, and try again.
U. C. Berkeley
Department of EECS
The Almagest
2-3
•
The version of the compiler used to build Ptolemy is not the same as the version used
to compile your star. This should not occur if you are using the compiler distributed
with Ptolemy, but can occur if the compiler has been updated since Ptolemy was last
built, or if you are not using the compiler distributed with Ptolemy.
•
You have a /src/ component in the directory name, but the corresponding
/obj.$PTARCH/ directory does not exist or cannot be written. A common error is to
put the Ptolemy sources in /usr/local/src/ptolemy, which confuses Ptolemy
since a star might be in /usr/local/src/ptolemy/src/domains/sdf/stars,
which has two /src/ directories in the path.
You may find it helpful to refer to the Appendix A, Installation and Troubleshooting in the
User’s Manual.
The star you just created performs exactly the same function as an existing star in the
Ptolemy library, and hence is not very interesting. Try modifying the star. For example, you
could add 1.0 to the sine before producing the output. Find the definition of the go method,
which should look like this:
go {
output%0 << sin (double(input%0));
}
The one line of code is ordinary C++ code, although the “<<” and “%” operators have been
overloaded. This line means that the current value (%0) of the output named “output” should
be assigned the value returned by the sin function applied to the current value of the input
named “input”. The cast to double indicates that we are not really interested in the Particle object supplied by the input, but rather its value, interpreted as a double-precision floating point number. Try changing this code to
go {
output%0 << sin (double(input%0)) + 1.0;
}
To recompile and reload the star, place your mouse cursor on any instance of the icon for the
star, and type “L” (or invoke the “Extend:load-star” command through the menus).
Sometimes, you will wish to dynamically link stars that are derived from other stars
that you have dynamically linked. To do this, the base class stars must be permanently linked.
This can be done with the “Extend:load-star-perm” command (“K”). To do this, place the
mouse over an icon representing the parent star, and type “K”. Once the parent star is permanently linked, it cannot be replaced or redefined: you must restart pigi.
The go and all other entries in the .pl file defining the star are explained in the following sections.
2.3 The Ptolemy preprocessor language (ptlang)
The Ptolemy preprocessor, ptlang, was created to make it easier to write and document star class definitions to run under Ptolemy. Instead of writing all the class definitions and
initialization code required for a Ptolemy star, the user can concentrate on writing the action
code for a star and let the preprocessor generate the standard initialization code for portholes,
states, etc. The preprocessor generates standard C++ code, divided into two files (a header file
Ptolemy
Last updated: 8/26/97
2-4
Writing Stars for Simulation
with a .h extension and an implementation file with a .cc extension). It also generates standardized documentation, in a file with a .html extension, to be included in the manual. In
releases before Ptolemy 0.7, Ptolemy used .t files, which conained troff source
2.3.1 Invoking the preprocessor
The definition of a star named YYY in domain XXX should appear in file with the name
XXXYYY.pl. The class that implements this star will be named XXXYYY. Then, running the
command
ptlang XXXYYY.pl
will produce the files XXXYYY.cc, XXXYYY.h, and XXXYYY.html. Implementation of the
preprocessor
The preprocessor is written in yacc and C. It does not attempt to parse the parts of the
language that consist of C++ code (for example, go methods); for these, it simply counts curly
braces to find the ends of the items in question. It outputs #line directives so the C++ compiler will print error messages, if any, with respect to the original source file.
2.3.2 An example
To make things clearer, let us start with an example, a rectangular pulse star in the file
SDFRect.pl:
defstar {
name { Rect }
domain { SDF }
desc {
Generates a rectangular pulse of height "height" (default 1.0).
with width "width" (default 8).
}
version {%W% %G%}
author { J. T. Buck }
copyright {1993 The Regents of the University of California}
location { SDF main library }
state {
name { height }
type { float }
default { 1.0 }
desc { Height of the rectangular pulse. }
}
state {
name { width }
type { int }
default { 8 }
desc { Width of the rectangular pulse. }
}
state {
name { count }
type { int }
default { 0 }
desc { Internal counting state. }
attributes { A_NONSETTABLE|A_NONCONSTANT }
U. C. Berkeley
Department of EECS
The Almagest
2-5
}
output {
// the output port
name { output }
type { float }
desc { The output pulse. }
}
go {
// the run-time function
double t = 0.0;
if (count < width) t = height;
count = int(count) + 1;
output%0 << t;
}
}
Running the preprocessor on the above file produces the three files SDFRect.h,
SDFRect.cc and SDFRect.html; the names are determined not by the input filename but
by concatenating the domain and name fields. These files define a class named SDFRect.
At the time of this writing, only one type of declaration may appear at the top level of
a Ptolemy language file, a defstar, used to define a star. Sometime in the future, a defgalaxy section may also be supported. The defstar section is itself composed of subitems that
define various attributes of the star. All subitems are of the form
keyword { body }
where the body may itself be composed of sub-subitems, or may be C++ code (in which case
the Ptolemy language preprocessor checks it only for balanced curly braces). Note that the
keywords are not reserved words; they may also be used as identifiers in the body.
2.3.3 Items that appear in a defstar
The following items can appear in a defstar directive. The items are given in the
order in which they typically appear in a star definition (although they can appear in any
order). An alphabetical listing and summary of directives is given in table 2-1.
name
This is a required item, and has the syntax
name { identifier }
It (together with the domain) provides the name of the class to be defined and the
names of the output files. Case is important in the identifier.
domain
This is a required item; it specifies the domain, such as SDF. The syntax is:
domain { identifier }
where identifier specifies the domain (again, case is important).
Ptolemy
Last updated: 8/26/97
2-6
Writing Stars for Simulation
keyword
acknowledge
author
begin
ccinclude
code
codeblock
conscalls
constructor
copyright
derived
derivedfrom
desc
descriptor
destructor
domain
explanation
exectime
go
header
hinclude
summary
required
page
the names of other contributors to the star
no
2-8
the name(s) of the author(s)
C++ code to execute at start time, after the scheduler setup
method is called
specify other files to include in the .cc file
C++ code to include in the .cc file outside the class definition
define a code segment for a code-generation star
define constructor calls for members of the star class
C++ code to include in the constructor for the star
no
no
2-8
2-13
no
no
no
no
no
2-15
2-15
13-2
2-13
2-12
copyright information to include in the generated code
alternative form of derivedFrom
the base class, which must also be a star
no
no
no
2-8
2-7
2-7
alternative form of descriptor
a short summary of the functionality of the star
C++ code to include in the destructor for the star
the domain, and the prefix of the name of the class
full documentation (See also htmldoc).
no
no
no
yes
no
2-7
2-7
2-13
2-5
2-9
specify the execution time for a code generation star
no
13-2
C++ code to execute when the star fires
no
2-14
C++ code to include in the .h file, before the class definition
no
2-15
specify other files to include in the .h file
no
2-15
htmldoc
full documentation, optionally using HTML directives
inmulti
define a set of inputs
no
2-11
inout
define a (bidirectional) input and output
no
2-11
inoutmulti define a set of (bidirectional) inputs and outputs
no
2-11
input
define an input to the star
no
2-11
location
an indication of where a user might find the star
no
2-8
method
define a member function for the star class
no
2-15
name
the name of the star, and the root of the name of the class
yes
2-5
outmulti
define a set of outputs
no
2-11
output
define an output from the star
no
2-11
private
define private data members of the star class
no
2-14
protected defined protected data members of the star class
no
2-14
public
define public data members of the star class
no
2-14
setup
C++ code to execute at start time, before compile-time scheduling
no
2-13
state
define a state or parameter
no
2-9
version
version number and date
no
2-7
TABLE
2-1:
A C++
summary
the items
define
star. occurred)
Additional items are
in code
wrapup
code toofinvoke
at the used
end ofto
a run
(if noa error
no allowed2-14
generation stars, as explained in later chapters. A minimal set of the most useful items
are shaded.
U. C. Berkeley
Department of EECS
The Almagest
2-7
derivedfrom
This optional item indicates that the star is derived from another class. Syntax:
derivedfrom { identifier }
where identifier specifies the base class. The .h file for the base class is automatically included in the output .h file, assuming it can be located (you may need to create a makefile).
For example, the LMS star in the SDF domain is derived from the FIR star. The full
name of the base class is SDFFIR, but the derivedfrom statement allows you to say
either
derivedfrom { FIR }
or
derivedfrom { SDFFIR }
The derivedfrom statement may also be written derivedFrom or derived.
descriptor
This item defines a short description of the class. This description is displayed by the
profile pigi command. It has the syntax
descriptor { text }
where text is simply a section of text that will become the short descriptor of the star.
You may also write desc instead of descriptor. A principal use of the short
descriptor is to get on-screen help, so the descriptor should not include any troff formatting commands. Unlike the htmldoc (described below), it does not pass through
troff. The following are legal descriptors:
desc { A one line descriptor. }
or
desc {
A multi-line descriptor. The same line breaks and spacing
will be used when the descriptor is displayed on the screen.
}
By convention, in these descriptors, references to the names of states, inputs, and outputs should be enclosed in quotation marks. Also, each descriptor should begin with a
capital letter, and end with a period. If the descriptor seems to get long, augment it
with the htmldoc directive, explained below. However, it should be long enough so
that it is sufficient to explain the function of the star.
version
This item contains two entries as shown below
Ptolemy
Last updated: 8/26/97
2-8
Writing Stars for Simulation
version { number MO/DA/YR }
where the number is a version number, and the MO/DA/YR is the version date. If you
are using SCCS for version control then the following syntax will work well:
version { %W% %G% }
When the file is checked in by SCCS, the string %W% will be replaced with a string of
the form: @(#)filename num, where num is the version number, and %G% will be
replaced with a properly formatted date.
author
This optional entry identifies the author or authors of the star. The syntax is
author { author1, author2 and author3 }
Any set of characters between the braces will be interpreted as a list of author names.
acknowledge
This optional entry attaches an acknowledgment section to the documentation. The
syntax is
acknowledge { arbitrary single line of text }
copyright
This optional entry attaches a copyright notice to the .h, .cc, and .t files. The syntax
is
copyright { copyright information }
For example, we used to use the following (our lawyers have recently caused us to
increase the verbosity):
copyright {1994 The Regents of the University of California}
The copyright may span multiple lines, just like a descriptor. In house, we use the
SCCS %Q% keyword to update the date when a file is changed. A typical copyright line
might look like:
copyright {1990-%Q% The Regents of the University of
California}
location
This item describes the location of a star definition. The following descriptions are
used, for example:
U. C. Berkeley
Department of EECS
The Almagest
2-9
location { SDF dsp library }
or
location { directory }
where directory is the location of the star. This item is for documentation only.
explanation
This item is used to give longer explanations of the function of the stars. In releases
previous to Ptolemy 0.7, this item included troff formatting directives. In Ptolemy 0.7
and later, this item has been superceded by the htmldoc item.
htmldoc
This item is used to give longer explanations that include HTML format directives.
The Tycho system includes an HTML viewer that can be used to display star documentation. The HTML output of ptlang can be viewed by any HTML viewer, but
certain features, such as the <tcl></tcl> directive are only operational when
viewed with Tycho. For complete documentation for the Tycho HTML viewer, see the
HTML viewer Help menu.
state
This item is used to define a state or parameter. Recall that by definition, a parameter
is the initial value of a state. Here is an example of a state definition:
state {
name { gain }
type { int }
default { 10 }
desc { Output gain. }
attributes { A_CONSTANT|A_SETTABLE }
}
There are five types of subitems that may appear in a state statement, in any order. The
name field is the name of the state; the type field is its type, which may be one of
int, float, string, complex, fix, intarray, floatarray, complexarray,
precision, or stringarray. Case is ignored for the type argument.
The default item specifies the default initial value of the state; its argument is either
a string (enclosed in quotation marks) or a numeric value. The above entry could
equivalently have been written:
default { "1.0" }
Furthermore, if a particularly long default is required, as for example when initializing
an array, the string can be broken into a sequence of strings. The following example
shows the default for a ComplexArray:
Ptolemy
Last updated: 8/26/97
2-10
Writing Stars for Simulation
default {
"(-.040609,0.0) (-.001628,0.0) (.17853,0.0) (.37665,0.0)"
"(.37665,0.0) (.17853,0.0) (-.001628,0.0) (-.040609,0.0)"
}
For complex states, the syntax for the default value is
(real, imag)
where real and imag evaluate to integers or floats.
The precision state is used to give the precision of fixed-point values. These values
may be other states or may be internal to the star. The default can be specified in either
of two ways:
•
Method 1: As a string like “3.2”, or more generally “m.n”, where m is the number of
integer bits (to the left of the binary point) and n is the number of fractional bits (to the
right of the binary point). Thus length is m+n.
•
Method 2: A string like “24/32” which means 24 fraction bits from a total length of
32. This format is often more convenient because the word length often remains constant while the number of fraction bits changes with the normalization being used.
In both cases, the sign bit counts as one of the integer bits, so this number must be at
least one.
The desc (or descriptor) item, which is optional but highly recommended,
attaches a descriptor to the state. The same formatting options are available as with the
star descriptor.
Finally, the attributes keyword specifies state attributes. At present, two attributes
are defined for all states: A_CONSTANT and A_SETTABLE (along with their complements A_NONCONSTANT and A_NONSETTABLE). If a state has the A_CONSTANT
attribute, then its value is not modified by the run-time code in the star (it is up to you
as the star writer to ensure that this condition is satisfied). States with the
A_NONCONSTANT attribute may change when the star is run. If a state has the
A_SETTABLE attribute, then user interfaces (such as pigi) will prompt the user for
values when directives such as edit-parameters are given. States without this attribute
are not presented to the user; such states always start with their default values as the
initial value. If no attributes are specified, the default is A_CONSTANT|A_SETTABLE.
Thus, in the above example, the attributes directive is unnecessary. The notation
“A_CONSTANT|A_SETTABLE” indicates a logical “or” of two flags. Confusingly, this
means that they both apply (A_CONSTANT and A_SETTABLE).
Code generation stars use a great number of attributes, many specific to the language
model for which code is being generated. Read chapter 13, “Code Generation”, and
the documentation for the appropriate code generation domain to learn more about
these.
Mechanisms for accessing and updating states in C++ methods associated with a star
are explained below, in sections 2.4.3 on page 2-21 and 2.4.4 on page 2-23.
U. C. Berkeley
Department of EECS
The Almagest
2-11
An alternative form for the state directive is defstate. The subitems of the state
directive are summarized in table 2-2, together with subitems of other directives.
input, output, inout, inmulti, outmulti, inoutmulti
These keywords are used to define a porthole, which may be an input, output, inout
(bidirectional) porthole or an input, output, or inout multiporthole. Bidirectional ports
are not supported in most domains (The Thor domain is an exception). Like state, it
contains subitems. Here is an example:
input {
name { signalIn }
type { complex }
numtokens { 2 }
desc {A complex input that consumes 2 input particles.}
}
Here, name specifies the porthole name. This is a required item. type specifies the
particle type. The scalar types are int, float, fix, complex, message, or anytype. Again, case does not matter for the type value. The matrix types are
int_matrix_env,
float_matrix_env,
complex_matrix_env,
and
item
sub-item
inmulti,
inout,
inoutmulti,
input
name
type
descriptor
numtokens
method,
virtual method,
inline method,
pure method,
pure virtual method,
inline virtual method
outmulti,
output
name
access
arglist
type
code
state
name
type
default
descriptor
attributes
TABLE 2-2:
Ptolemy
name
type
descriptor
numtokens
summary
required
page
name of the port or group of ports
data type of input (& output) particles
summary of the function of the input
number of tokens consumed by the port (useful only for dataflow domains)
the name of the method
private, protected, or public
the arguments to the method
the return type of the method
C++ code defining the method
yes
no
no
no
11
yes
no
no
no
if not pure
15
name of the port or group of ports
data type of output particles
summary of the function of the output
number of tokens produced by the port (useful only for dataflow domains)
the name of the state variable
data type of the state variable
the default initial value, always a string
summary of the function of the state
hints to the simulator or code generator
yes
no
no
no
11
yes
yes
yes
no
no
9
Some items used in defining a star have subitems. These are described here.
Last updated: 8/26/97
2-12
Writing Stars for Simulation
fix_matrix_env. The type item may be omitted; the default type is anytype. For
more information on all of these, please see chapter 4, “Data Types”.
The numtokens keyword (it may also be written num or numTokens) specifies the
number of tokens consumed or produced on each firing of the star. This only makes
sense for certain domains (SDF, DDF, and BDF); in such domains, if the item is omitted, a value of one is used. For stars where this number depends on the value of a state,
it is preferable to leave out the numtokens specification and to have the setup
method set the number of tokens (in the SDF domain and most code generation
domains, this is accomplished with the setSDFParams method). This item is used
primarily in the SDF and code generation domains, and is discussed further in the documentation of those domains.
There is an alternative syntax for the type field of a porthole; this syntax is used in
connection with ANYTYPE to specify a link between the types of two portholes. The
syntax is
type { = name
}
where name is the name of another porthole. This indicates that this porthole inherits
its type from the specified porthole. For example, here is a portion of the definition of
the SDF Fork star:
input {
name{input}
type{ANYTYPE}
}
outmulti {
name{output}
type{= input}
desc{ Type is inherited from the input. }
}
constructor
This item allows the user to specify extra C++ code to be executed in the constructor
for the class. This code will be executed after any automatically generated code in the
constructor that initializes portholes, states, etc. The syntax is:
constructor { body }
where body is a piece of C++ code. It can be of any length. Note that the constructor is
invoked only when the class is first instantiated; actions that must be performed before
every simulation run should appear in the setup or begin methods, not the constructor.
U. C. Berkeley
Department of EECS
The Almagest
2-13
conscalls
You may want to have data members in your star that have constructors that require
arguments. These members would be added by using the public, private, or protected keywords. If you have such members, the conscalls keyword provides a
mechanism for passing arguments to the constructors of those members. Simply list
the names of the members followed by the list of constructor arguments for each, separated by commas if there is more than one. The syntax is:
conscalls { member1(arglist), member2(arglist) }
Note that member1, and member2 should have been previously defined in a public,
private, or protected section (see page 2-14).
destructor
This item inserts code into the destructor for the class. The syntax is:
destructor { body }
You generally need a destructor only if you allocate memory in the constructor,
begin method, or setup method; termination functions that happen with every run
should appear in the wrapup function1. The optional keyword inline may appear
before destructor; if so, the destructor function definition appears inline, in the
header file. Since the destructor for all stars is virtual, this is only a win when the star
is used as a base for derivation.
setup
This item defines the setup method, which is called every time the simulation is
started, before any compile-time scheduling is performed. The syntax is:
setup { body }
The optional keyword inline may appear before the setup keyword. It is common
for this method to set parameters of input and output portholes, and to initialize states.
The code syntax for doing this is explained starting on page 2-16. In some domains,
with some targets, the setup method may be called more than once during initiation.
You must keep this in mind if you use it to allocate or initialize memory.
begin
This item defines the begin method, which is called every time the simulation is
started, but after the scheduler setup method is called (i.e., after any compile-time
scheduling is performed). The syntax is:
1. Note, however, that wrapup is not called if an error occurs. See page 2-14.
Ptolemy
Last updated: 8/26/97
2-14
Writing Stars for Simulation
begin { body }
This method can be used to allocate and initialize memory. It is especially useful when
data structures are shared across multiple instances of a star. It is always called exactly
once when a simulation is started.
go
This item defines the action taken by the star when it is fired. The syntax is:
go { body }
The optional keyword inline may appear before the go keyword. The go method
will typically read input particles and write outputs, and will be invoked many times
during the course of a simulation. The code syntax for the body is explained starting
on page 2-16.
wrapup
This item defines the wrapup method, which is called at the completion of a simulation. The syntax is:
wrapup { body }
The optional keyword inline may appear before the wrapup keyword. The wrapup
method might typically display or store final state values. The code syntax for doing
this is explained starting on page 2-16. Note that the wrapup method is not invoked if
an error occurs during execution. Thus, the wrapup method cannot be used reliably to
free allocated memory. Instead, you should free memory from the previous run in the
setup or begin method, prior to allocating new memory, and in the destructor.
public, protected, private
These three keywords allow the user to declare extra members for the class with the
desired protection. The syntax is:
protkey { body }
where protkey is public, protected, or private. Example, from the XMgraph
star:
protected {
XGraph graph;
double index;
}
This defines an instance of the class XGraph, defined in the Ptolemy kernel, and a
U. C. Berkeley
Department of EECS
The Almagest
2-15
double-precision number. If any of the added members require arguments for their
constructors, use the conscalls item to specify them.
ccinclude, hinclude
These directives cause the .cc file, or the .h file, to #include extra files. A certain
number of files are automatically included, when the preprocessor can determine that
they are needed, so they do not need to be explicitly specified. The syntax is:
ccinclude { inclist }
hinclude { inclist }
where inclist is a comma-separated list of include files. Each filename must be surrounded either by quotation marks or by “<” and “>” (for system include files like
<math.h>).
code
This keyword allows the user to specify a section of arbitrary C++ code. This code is
inserted into the .cc file after the include files but before everything else; it can be
used to define static non-class functions, declare external variables, or anything else.
The outermost pair of curly braces is stripped. The syntax is:
code { body }
header
This keyword allows the user to specify an arbitrary set of definitions that will appear
in the header file. Everything between the curly braces is inserted into the .h file after
the include files but before everything else. This can be used, for example, to define
classes used by your star. The outermost pair of curly braces is stripped.
method
The method item provides a fully general way to specify an additional method for the
class of star that is being defined. Here is an example:
virtual method {
name { exec }
access { protected }
arglist { "(const char* extraOpts)" }
type { void }
code {
// code for the exec method goes here
}
}
An optional function type specification may appear before the method keyword,
which must be one of the following:
Ptolemy
Last updated: 8/26/97
2-16
Writing Stars for Simulation
virtual
inline
pure
pure virtual
inline virtual
The virtual keyword makes a virtual member function. If the pure virtual keyword is given, a pure virtual member function is declared (there must be no code item
in this case). The function type pure is a synonym for pure virtual. The inline
function type declares the function to be inline.
Here are the method subitems:
name:
The name of the method. This is a required item.
access:
The level of access for the method, one of public, protected, or
private. If the item is omitted, protected is assumed.
arglist:
The argument list, including the outermost parentheses, for the method
as a quoted string. If this is omitted, the method has no arguments.
type:
The return type of the method. If the return type is not a single identifier, you must put quotes around it. If this is omitted, the return type is
void (no value is returned).
code:
The code that implements the method. This is a required item, unless
the pure keyword appears, in which case this item cannot appear.
exectime
This item defines the optional myExecTime() function, which is used in code generation to
specify how many time units are required to execute the star’s code. The syntax is:
exectime { body }
The optional keyword inline may appear before the exectime keyword. The body
defines the body of a function that returns an integer value.
codeblock
Codeblocks are parametrized blocks of code for use in code generation stars. Their use and
format is discussed in detail in the code generation chapters. The syntax is:
codeblock {
code
...
}
2.4 Writing C++ code for stars
This section assumes a knowledge of the C++ language; no attempt will be made to
U. C. Berkeley
Department of EECS
The Almagest
2-17
teach the language. We recommend “C++ Primer, Second Edition”, by Stanley Lippman
(from Addison-Wesley) for those new to the language. Chapter 3, “Infrastructure for Star
Writers”, is also highly recommended reading for those who will be writing stars, since it
explains some of the more generic and useful classes defined in the Ptolemy kernel. Many of
these are useful in stars.
C++ code segments are an important part of any star definition. They can appear in the
setup, begin, go, wrapup, constructor, destructor, exectime, header, code, and
method directives in the Ptolemy preprocessor. These directives all include a body of arbitrary C++ code, enclosed by curly braces, “{” and “}”. In all but the code and header directives, the C++ code between braces defines the body of a method of the star class. Methods
can access any member of the class, including portholes (for input and output), states, and
members defined with the public, protected, and private directives.
2.4.1 The structure of a Ptolemy star
In general, the task of a Ptolemy star is to receive input particles and/or produce output
particles; in addition, there may be side effects (reading or writing files, displaying graphs, or
even updating shared data structures). As for all C++ objects, the constructor is called when
the star is created, and the destructor is called when it is destroyed. In addition, the setup and
begin methods, if any, are called every time a new simulation run is started, the go method
(which always exists except for stars like BlackHole and Null that do nothing) is called
each time a star is executed, and the wrapup method is called after the simulation run completes without errors.
2.4.2 Reading inputs and writing outputs
The precise mechanism for references to input and output portholes depends somewhat on the domain. This is because stars in the domain XXX use objects of class InXXXPort
and OutXXXPort (derived from PortHole) for input and output, respectively. The examples
we use here are for the SDF domain. See the appropriate domain chapter for variations that
apply to other domains.
PortHoles and Particles
In the SDF domain, normal inputs and outputs become members of type InSDFPort
and OutSDFPort after the preprocessor is finished. These are derived from base class PortHole. For example, given the following directive in the defstar of an SDF star,
input {
name {in}
type {float}
}
a member named in, of type InSDFPort, will become part of the star.
We are not usually interested in directly accessing these porthole classes, but rather
wish to read or write data through the portholes. All data passing through a porthole is derived
from base class Particle. Each particle contains data of the type specified in the type subdirective of the input or output directive.
Ptolemy
Last updated: 8/26/97
2-18
Writing Stars for Simulation
The operator “%” operating on a porthole returns a reference to a particle. Consider the
following example:
go {
Particle& currentSample = in%0;
Particle& pastSample = in%1;
...
}
The right-hand argument to the “%” operator specifies the delay of the access. A zero always
means the most recent particle. A one means the particle arriving just before the most recent
particle. The same rules apply to outputs. Given an output named out, the same particles that
are read from in can be written to out in the same order as follows:
go {
...
out%1 = pastSample;
out%0 = currentSample;
}
This works because out%n returns a reference to a particle, and hence can accept an assignment. The assignment operator for the class Particle is overloaded to make a copy of the
data field of the particle.
Operating directly on class Particle, as in the above examples, is useful for writing
stars that accept anytype of input. The operations need not concern themselves with the type
of data contained by the particle. But it is far more common to operate numerically on the data
carried by a particle. This can be done using a cast to a compatible type. For example, since
in above is of type float, its data can be accessed as follows:
go {
Particle& currentSample = in%0;
double value = double(currentSample);
...
}
or more concisely,
go {
double value = double(in%0);
...
}
The expression double(in%0) can be used anywhere that a double can be used. In many
contexts, where there is no ambiguity, the conversion operator can be omitted:
double value = in%0;
U. C. Berkeley
Department of EECS
The Almagest
2-19
However, since conversion operators are defined to convert particles to several types, it is
often necessary to indicate precisely which type conversion is desired.
To write data to an output porthole, note that the right-hand side of the assignment
operator should be of type Particle, as shown in the above example. An operator << is
defined for particle classes to make this more convenient. Consider the following example:
go {
float t;
t = some value to be sent to the output
out%0 << t;
}
Note the distinction between the << operator and the assignment operator; the latter operator
copies Particles, the former operator loads data into particles. The type of the right-side operand of << may be int, float, double, Fix, Complex or Envelope; the appropriate type
conversion will be performed. For more information on the Envelope and Message types,
please see the chapter “Data Types” on page 4-1.
SDF PortHole parameters
In the above example, where in%1 was referenced, some special action is required to
tell Ptolemy that past input particles are to be saved. Special action is also required to tell the
SDF scheduler how many particles will be consumed at each input and produced at each output when a star fires. This information can be provided through a call to setSDFParams in
the setup method. This has the syntax
setup {
name.setSDFParams(multiplicity, past)
}
where name is the name of the input or output porthole, multiplicity is the number of particles consumed or produced, and past is the maximum value that offset can take in any
expression of the form name%offset. For example, if the go method references name%0 and
name%1, then past would have to be at least one. It is zero by default.
Multiple PortHoles
Sometimes a star should be defined with n input portholes or n output portholes, where
n is variable. This is supported by the class MultiPortHole and its derived classes. An
object of this class has a sequential list of PortHoles. For SDF, we have the specialized
derived class MultiInSDFPort (which contains InSDFPorts) and MultiOutSDFPort
(which contains OutSDFPorts).
Defining a multiple porthole is easy, as illustrated next:
defstar {
...
inmulti {
name {input_name}
Ptolemy
Last updated: 8/26/97
2-20
Writing Stars for Simulation
type {input_type}
}
outmulti {
name {output_name}
type {output_type}
}
...
}
To successively access individual portholes in a MultiPortHole, the MPHIter iterator class should be used. Iterators are explained in more detail in “Iterators” on page 3-10.
Consider the following code segment from the definition of the SDF Fork star:
input {
name{input}
type{ANYTYPE}
}
outmulti {
name{output}
type{= input}
}
go {
MPHIter nextp(output);
PortHole* p;
while ((p = nextp++) != 0)
(*p)%0 = input%0;
}
A single input porthole supplies a particle that gets copied to any number of output portholes.
The type of the output MultiPortHole is inherited from the type of the input. The first line
of the go method creates an MPHIter iterator called nextp, initialized to point to portholes in
output. The “++” operator on the iterator returns a pointer to the next porthole in the list,
until there are no more portholes, at which time it returns NULL. So the while construct steps
through all output portholes, copying the input particle data to each one.
Consider another example, taken from the SDF Add star:
inmulti {
name {input}
type {float}
}
output {
name {output}
type {float}
}
go {
MPHIter nexti(input);
PortHole *p;
double sum = 0.0;
U. C. Berkeley
Department of EECS
The Almagest
2-21
while ((p = nexti++) != 0)
sum += double((*p)%0);
output%0 << sum;
}
Again, an MPHIter iterator named nexti is created and used to access the inputs.
Upon occasion, the numberPorts method of class MultiPortHole, which returns
the number of ports, is useful. This is called simply as portname.numberPorts(), and it
returns an int.
Type conversion
The type conversion operators and “<<” operators are defined as virtual methods in the
base class Particle. There are never really objects of class Particle in the system;
instead, there are objects of class IntParticle, FloatParticle, ComplexParticle,
and FixParticle, which hold data of type int, double (not float!), Complex, and Fix,
respectively (there are also MessageParticle and a variety of matrix particles, described
later). The conversion and loading operators are designed to “do the right thing” when an
attempt is made to convert between mismatched types.
Clearly we can convert an int to a double or Complex, or a double to a Complex,
with no loss of information. Attempts to convert in the opposite direction work as follows:
conversion of a Complex to a double produces the magnitude of the complex number. Conversion of a double to an int produces the greatest integer that is less than or equal to the
double value. There are also operators to convert to or from float and Fix.
Each particle also has a virtual print method, so a star that writes particles to a file
can accept anytype.
2.4.3 States
A state is defined by the state directive. The star can use a state to store data values,
remembering them from one invocation to another. They differ from ordinary members of the
star, which are defined using the public, protected, and private directives, in that they
have a name, and can be accessed from outside the star in systematic ways. For instance, the
graphical interface pigi permits the user to set any state with the A_SETTABLE attribute to
some value prior to a run, using the edit-params command. The interpreter provides similar
functionality through the setstate command. The state attributes are set in the state directive. A state may be modified by the star code during a run. The attribute A_NONCONSTANT is
used as a pragma to mark a state as one that gets modified during a run. There is currently no
mechanism for checking the correctness of these attributes.
All states are derived from the base class State, defined in the Ptolemy kernel. The
derived state classes currently defined in the kernel are FloatState, IntState, ComplexState, StringState, FloatArrayState, IntArrayState, ComplexArrayState, and
StringArrayState.
A state can be used in a star method just like the corresponding predefined data types.
As an example, suppose the star definition contains the following directive:
state {
Ptolemy
Last updated: 8/26/97
2-22
Writing Stars for Simulation
name { myState }
type { float }
default { 1.0 }
descriptor { Gain parameter. }
}
This will define a member of class FloatState with default value 1.0. No attributes are
defined, so A_CONSTANT and A_SETTABLE, the default attributes, are assumed. To use the
value of a state, it should be cast to type double, either explicitly by the programmer or
implicitly by the context. For example, the value of this state can be accessed in the go
method as follows:
go {
output%0 << double(myState) * double(input%0);
}
The references to input and output are explained above. The reference to myState has an
explicit cast to double; this cast is defined in FloatState class. Similarly, a cast to int is
available for IntState, to Complex from ComplexState, and to const char* for
Stringstate). In principle, it is possible to rely on the compiler to automatically invoke this
cast. However:
Warning: some compilers (notably some versions of g++) may not choose the expected cast.
In particular, g++ has been known to cast everything to Fix if the explicit cast is omitted in
expressions similar to that above. The arithmetic is then performed using fixed-point point
computations. This will be dramatically slower than double or integer arithmetic, and may
yield unexpected results. It is best to explicitly cast states to the desired form. An exception is
with simple assignment statements, like
double stateValue = myName;
Even g++ gets this right. Explicit casting should be used whenever a state is used in an expression. For example, from the setup method of the SDFChop star, in which use_past_inputs
is an integer state,
if ( int(use_past_inputs) )
input.setSDFParams(int(nread),int(nread)+int(offset)-1);
else
input.setSDFParams(int(nread),int(nread)-1);
Note that the type Complex is not a fundamental part of C++. We have implemented a
subset of the Complex class as defined by several library vendors; we use our own version for
maximum portability. Using the ComplexState class will automatically ensure the inclusion
of the appropriate header files. A member of the Complex class can be initialized and operated upon any number of ways. For details, see “The Complex data type” on page 4-1.
A state may be updated by ordinary assignment in C++, as in the following lines
U. C. Berkeley
Department of EECS
The Almagest
2-23
double t = expression;
myState = t;
This works because the FloatState class definition has overloaded the assignment operator
(“=”) to set its value from a double. Similarly, an IntState can be set from an int and a
StringState can be set from a char* or const char* .
2.4.4 Array States
The ArrayState classes ( FloatArrayState, IntArrayState and ComplexArrayState) are used to store arrays of data. For example,
state {
name { taps }
type { FloatArray }
default { "0.0 0.0 0.0 0.0" }
descriptor { An array of length four. }
}
defines an array of type double with dimension four, with each element initialized to zero.
Quotes must surround the initial values. Alternatively, you can specify a file name with a prefix <. If you have a file named foo that contains the default values for an array state, you can
write,
default { "< foo" }
If you expect others to be able to use your star, however, you should specify the default filename using a full path. For instance,
default { "< ~/user_name/directory/foo" }
For default files installed in the Ptolemy directory tree, this should read:
default { "< $PTOLEMY/directory/foo" }
The format of the file is also a sequence of data separated by spaces (or newlines, tabs, or
commas). File input can be combined with direct data input as in
default { "< foo 2.0" }
default { "0.5 < foo < bar" }
A “repeat” notation is also supported for ArrayState objects: the two value strings
default { "1.0 [5]" }
default { "1.0 1.0 1.0 1.0 1.0" }
are equivalent. Any integer expression may appear inside the brackets []. The number of elements in an ArrayState can be determined by calling its size method. The size is not specified explicitly, but is calculated by scanning the default value.
As an example of how to access the elements of an ArrayState, suppose fState is
a FloatState and aState is a FloatArrayState. The accesses, like those in the follow-
Ptolemy
Last updated: 8/26/97
2-24
Writing Stars for Simulation
ing lines, are routine:
fState = aState[1] + 0.5;
aState[1] = (double)fState * 10.0;
aState[0] = (double)fState * aState[2];
For a more complete example of the use of FloatArrayState, consider the FIR star defined
below. Note that this is a simplified version of the SDF FIR star that does not permit interpolation or decimation.
defstar {
name {FIR}
domain {SDF}
desc {
A Finite Impulse Response (FIR) filter.
}
input {
name {signalIn}
type {float}
}
output {
name {signalOut}
type {float}
}
state {
name {taps}
type {floatarray}
default { "-.04 -.001 .17 .37 .37 .17 -.0018 -.04" }
desc { Filter tap values. }
}
setup {
// tell the PortHole the maximum delay we will use
signalIn.setSDFParams(1, taps.size() - 1);
}
go {
double out = 0.0;
for (int i = 0; i < taps.size(); i++)
out += taps[i] * double(signalIn%i);
signalOut%0 << out;
}
}
Notice the setup method; this is necessary to allocate a buffer in the input PortHole large
enough to hold the particles that are accessed in the go method. Notice the use of the size
method of the FloatArrayState.
We now illustrate an ptcl interpreter session using the above FIR star. Assume there
is a galaxy called singen that generates a sine wave. you can use it with the FIR star, as in:
star foop singen
star fir FIR
star printer Printer
U. C. Berkeley
Department of EECS
The Almagest
2-25
connect foop output fir signalIn
connect fir signalOut printer input
print fir
Star: mainGalaxy.fir
...
States in the star fir:
mainGalaxy.fir.taps type: FloatArray
initial value: -.040609 -.001628 .17853 .37665 .37665 .17853
-.001628 -.040609
current value:
0 -0.040609
1 -0.001628
2 .17853
3 .37665
4 .37665
5 .17853
6 -0.001628
7 -0.040609
Then you can redefine taps by reading them from a file “foo”, which contains the data:
1.1
-2.2
3.3
-4.4
The resulting interpreter commands are:
setstate fir taps "<foo 5.5"
print fir
Star: mainGalaxy.fir
...
States in the star fir:
mainGalaxy.fir.taps type: FloatArray
initial value: <foo 5.5
current value:
0 1.1
1 -2.2
2 3.3
3 -4.4
4 5.5
PTOLEMY:
This illustrates that both the contents and the size of a FloatArrayState are changed by a
setstate command. Also, notice that file values may be combined with string values; when
< filename
occurs in an initial value, it is processed exactly as if the whole file were substituted at that
Ptolemy
Last updated: 8/26/97
2-26
Writing Stars for Simulation
point.
2.5 Modifying PortHoles and States in Derived Classes
When one star is derived from another, it inherits all the states of the base class star.
Sometimes we want to modify some aspect of the behavior of a base class state in the derived
class. This is done by placing calls to member functions of the state in the constructor of the
derived star. Useful functions include setInitValue to change the default value, and
setAttibututes and clearAttributes to modify attributes.
When creating new stars derived from stars already in the system, you will often also
wish to customize them by adding new ports or states. In addition, you may wish to remove
ports or states. Although, strictly speaking, you cannot do this, you can achieve the desired
effect by simply hiding them from the user.
The following code will hide a particular state named statename from the user:
constructor {
statename.clearAttributes(A_SETTABLE);
}
This means that when the user invokes “edit-params” in pigi, statename will not appear as
one of the parameters of the star. Of course, the state can still be set and used within the code
defining the star.
The same effect can be achieved with outputs or inputs. For instance, given an output
named output, you can use the following code:
constructor {
output.setAttributes(P_HIDDEN);
}
This means that when you create an icon for this star, no terminal will appear for this port.
This is most useful when output is a multiporthole, because this means simply that there will
be zero instances of the individual portholes.
This technique can also be used to hide individual portholes, however, the porthole
will still be present, so it must be used with caution. Most domains do not allow disconnected
portholes, and will flag an error. You can explicitly connect the port within the body of the
star (see the kernel manual).
2.6 Programming examples
The following star has no inputs, just an output. The source star generates a linearly increasing
or decreasing sequence of float particles on its output. The state value is initialized to define
the value of the first output. Each time the star go method fires, the value state is updated
to store the next output value. Hence, the attributes of the value state are set so that the
state can be overwritten by the star’s methods. By default, the star will generate the output
sequence 0.0, 1.0, 2.0, etc.
defstar {
name { Ramp }
domain { SDF }
desc {
U. C. Berkeley
Department of EECS
The Almagest
2-27
Generates a ramp signal, starting at "value" (default 0)
with step size "step" (default 1).
}
output {
name { output }
type { float }
}
state {
name { step }
type { float }
default { 1.0 }
desc { Increment from one sample to the next. }
}
state {
name { value }
type { float }
default { 0.0 }
desc { Initial (or latest) value output by Ramp. }
attributes { A_SETTABLE|A_NONCONSTANT }
}
go {
double t = double(value);
output%0 << t;
t += step;
value = t;
}
}
The next example is the Gain star, which multiplies its input by a constant and outputs
the result:
defstar {
name { Gain }
domain { SDF }
desc { Amplifier: output is input times "gain" (default 1.0). }
input {
name { input }
type { float }
}
output {
name { output }
type { float }
}
state {
name { gain }
type { float }
default { "1.0" }
desc { Gain of the star. }
}
go {
output%0 << double(gain) * double(input%0);
}
}
Ptolemy
Last updated: 8/26/97
2-28
Writing Stars for Simulation
The following example of the Printer star illustrates multiple inputs, ANYTYPE inputs, and
the use of the print method of the Particle class.
defstar {
name { Printer }
domain { SDF }
inmulti {
name { input }
type { ANYTYPE }
}
state {
name { fileName }
type { string }
default { "<cout>" }
desc { Filename for output. }
}
hinclude { "pt_fstream.h" }
protected {
pt_ofstream *p_out;
}
constructor { p_out = 0;}
destructor { LOG_DEL; delete p_out;}
setup {
delete p_out;
p_out = new pt_ofstream(fileName);
}
go {
pt_ofstream& output = *p_out;
MPHIter nexti(input);
PortHole* p;
while ((p = nexti++) != 0)
output << ((*p)%0).print() << "\t";
output << "\n";
}
}
This star is polymorphic since it can operate on any type of input. Note that the default value
of the output filename is <cout>, which causes the output to go to the standard output. This
and other aspects of the pt_ofstream output stream class are explained below in “Extended
input and output stream classes” on page 3-2. The iterator nexti used to scan the input is
explained in “Iterators” on page 3-10.
2.7 Preventing Memory Leaks in C++ Code
Memory leaks occur when new memory is allocated dynamically and never deallocated. In C programs, new memory is allocated by the malloc or calloc functions, and
deallocated by the free function. In C++, new memory is usually allocated by the new operator and deallocated by the delete or the delete [] operator. The problem with memory
leaks is that they accumulate over time and, if left unchecked, may cripple or even crash a program. We have taken extensive steps to eliminate memory leaks in the Ptolemy software environment by following the guidelines below and by tracking memory leaks with Purify (a
U. C. Berkeley
Department of EECS
The Almagest
2-29
commercial tool from Pure Software Inc.).
One of the most common mistakes leading to memory leaks is applying the wrong
delete operator. The delete operator should be used to free a single allocated class or data
value, whereas the delete [] operator should be used to free an array of data values. In C
programming, the free function does not make this distinction.
Another common mistake is overwriting a variable containing dynamic memory without freeing any existing memory first. For example, assume that thestring is a data member of a class, and in one of the methods (other than the constructor), there is the following
statement:
thestring = new char[buflen];
This code should be
delete [] thestring;
thestring = new char[buflen];
Using delete is not necessary in a class’s constructor because the data member
would not have been allocated previously.
In writing Ptolemy stars, the delete operator should be applied to variables containing dynamic memory in both the star’s setup and destructor methods. In the star’s constructor
method, the variables containing dynamic memory should be initialized to zero. By freeing
memory in both the setup and destructor methods, one covers all possible cases of memory
leaks during simulation. Deallocating memory in the setup method handles the case in which
the user restarts a simulation, whereas deallocating memory in the destructor covers the case
in which the user exits a simulation. This includes the cases that arise when error messages are
generated. For an example implementation, see the implementation of the SDFPrinter star
given in Section 2.6.
Another common mistake is not paying attention to the kinds of strings returned by
functions. The function savestring returns a new string dynamically allocated and should
be deleted when no longer used. The expandPathName, tempFileName, and makeLower
functions return new strings, as does the Target::writeFileName method. Therefore, the
strings returned by these routines should be deleted when they are no longer needed, and code
such as
savestring( expandPathName(s) )
is redundant and should be simplified to
expandPathName(s)
to avoid a memory leak due to not keeping track of the dynamic memory returned by
the function savestring.
Occasionally, dynamic memory is being used when instead local memory could have
been used. For example, if a variable is only used as a local variable inside a method or function and the value of the local variable is not returned or passed to outside the method or function, then it would be better to simply use local memory. For example,
char* localstring = new char[len + 1];
if ( person == absent ) return;
strcpy(localstring, otherstring);
delete [] localstring;
Ptolemy
Last updated: 8/26/97
2-30
Writing Stars for Simulation
return;
could easily return without deallocating localstring. The code should be rewritten
to use either the StringList or InfString class, e.g.,
InfString localstring;
if ( person == absent ) return;
localstring = otherstring;
return;
Both StringList and InfString can manage the construction of strings of arbitrary size. When a function or method exits, the destructors of the StringList and InfString variables will automatically be called which will deallocate their memory. Casts have
been defined that will convert StringList to a const char* string and InfString to a
const char* or a char* string, so that instances of the StringList and InfString
classes can be passed as is into routines that take character array (string) arguments. A good
example of using the StringList class is in the function compile in the file $PTOLEMY/
src/pigilib/pigiLoader.cc. A simpler example from the same file is the noPermission function which builds up an error message into a single string:
StringList sl = msg;
sl << file << ": " << sys_errlist[errno];
ErrAdd(sl);
The errAdd function takes a const char* argument, so sl will converted automatically to
a const char* string by the C++ compiler.
Instead of using the new and delete operators, it is tempting to use constructs like
char localstring[buflen + 1];
in which buflen is a variable, because the compiler will automatically handle the
deallocation of the memory. Unfortunately, this syntax is a Gnu extension and not portable to
other C++ compilers. Instead, the StringList and InfString classes should be used, as
the previous example involving localstring illustrates.
Sometimes the return value from a routine that returns dynamic memory is not stored,
and therefore, the pointer to the dynamic memory gets lost. This occurs, for example, in
nested function calls. Code such as
puts( savestring(s) );
should be written as
const char* newstring = savestring(s);
puts( newstring );
delete [] newstring;
Several places in Ptolemy, especially in the schedulers and targets, rely on the hashstring function, which returns dynamic memory. This dynamic memory, however, should
not be deallocated because it may be reused by other calls to hashstring. It is the responsibility of the hashstring function to deallocate any memory it has allocated.
U. C. Berkeley
Department of EECS
Chapter 3. Infrastructure for Star
Writers
Authors:
Joseph T. Buck
Soonhoi Ha
Edward A. Lee
3.1 Introduction
The Ptolemy kernel provides a number of C++ classes that are fairly generic and often
prove useful to star writers. Some of these are essential, such as those that handle errors. Complete documentation of the kernel classes is given in The Kernel Manual volume of The
Almagest. Here, we summarize only the most generic of these classes, i.e., the ones that are
generally useful to star programmers. All of the classes described here may be used in stars,
provided that the star writer includes the appropriate header files. For instance, the entry
ccinclude { "pt_fstream.h" }
will permit the star to create instances of the basic stream classes (described below) in the
body of functions that are defined in the star. If the user wishes to create such an instance as a
private, protected, or public member of the star, then the header file needs to be
included in the .h file, specified as done in the line
hinclude { "pt_fstream.h" }
in the Printer star defined on page 2-28.
The source code for most of classes and functions described in this section can be
found in $PTOLEMY/src/kernel. The source code is the ultimate reference. Moreover,
since this directory is automatically searched for include files when a star is dynamically
linked, no special effort is required to specify where to find the include files.
3.2 Handling Errors
Uniform handling of errors is provided by the Error class. The Error class provides
four static methods, summarized in table 3-1. From within a star definition, it is not necessary
to explicitly include the Error.h header file. A typical use of the class is shown below:
Error::abortRun(*this,"this message is displayed");
The notation “Error::abortRun” is the way static methods are invoked in C++ without
having a pointer to an instance of the Error class. The first argument tells the error class
which object is flagging the error; this is strongly recommended. The name of the object will
be printed along with the error message. Note that the abortRun call does not cause an
immediate halt. It simply marks a flag that the scheduler must test for.
The table uses standard C++ notation to indicate how to use the methods. The type of
the return value and the type of the arguments is given, together with an explanation of each.
When an argument has the annotation “= something,” then this argument is optional. If it is
3-2
Infrastructure for Star Writers
omitted from the call, then the value used will be something.
Error class
#include "Error.h"
method
description
static void abortRun ( signal a fatal error, and request a halt to the run
const NamedObj&
the object triggering the error
obj,
const char*,
const char* = 0,
const char* = 0)
static void abortRun
const char*,
const char* = 0,
const char* = 0)
static void error
(...)
static void message
(...)
static void warn
(...)
TABLE 3-1:
the error message
optional additional message to concatenate to the error message
optional additional message to concatenate to the error message
signal a fatal error, and request a halt to the run
the error message
optional additional message to concatenate to the error message
optional additional message to concatenate to the error message
signal an error, without requesting a halt to the run
output a message to the user
generate a warning message
A summary of the static methods in the Error class. Each method has two templates, as shown only for the abortRun method. The others are the same.
3.3 I/O Classes
Star programmers often need to communicate with the user. The most flexible way to
do this is to build a customized, window-based interface, as described in “Using Tcl/Tk” on
page 5-1. Often, however, it is sufficient to plot some data or to just construct strings and output them to files or to the standard output1. To do the latter, use the classes pt_ifstream and
pt_ofstream, which are derived from the standard C++ stream classes ifstream and
ofstream, respectively. More sophisticated output can be obtained with the XGraph class,
the histogram classes, and classes that interface to Tk for generating animated, interactive displays. All of these classes are summarized in this section.
3.3.1 Extended input and output stream classes
The pt_ofstream class is used in the Printer star on page 2-28. Include the header
file pt_fstream.h. The pt_ofstream constructor is invoked in the setup method with
1. Note that when users run pigi, the standard output may appear on a window that is buried. The
-console option to pigi helps, in that it creates a specific window for the standard output and other
interactions with the user. The standard output is much more useful with ptcl, the textual interpreter.
U. C. Berkeley
Department of EECS
The Almagest
3-3
the call to new. It would not do to invoke it in the constructor for the star, since the fileName
state would not have been initialized. Notice that the setup method reclaims the memory
allocated in previous runs (or previous invocations of the setup method) before creating a
new pt_ofstream object. Notice that we are not using a wrapup method to reclaim the
memory, since this method is not invoked if an error occurs during a run.
The classes pt_ifstream and pt_ofstream are only a slight extension of the
classes ifstream and ofstream. They add the following features:
•
First, certain special file names are recognized as arguments to the constructor or to the
open method. These file names are <cin>, <cout>, <cerr>, or <clog> (the angle
brackets must be part of the string), then the corresponding standard stream of the
same name is used for input (pt_ifstream) or output (pt_ofstream). In addition,
C standard I/O fans can specify <stdin>, <stdout>, or <stderr>.
•
Second, the Ptolemy expandPathName (see table 3-7 on page 3-8) is applied to
the filename before it is opened, permitting it to start with ~user or $VAR.
•
Finally, if a failure occurs when the file is opened, Error::abortRun is called with
an appropriate error message, including the Unix error condition.
These classes can be used for binary character data as well as ASCII.
3.3.2 Generating graphs using the XGraph class
The XGraph class provides an interface to the pxgraph program, used for plotting
data on an X window system display. The pxgraph program and all its options are documented in the User’s Manual. An example of the output from pxgraph is shown in figure 31.The most useful methods of the class are summarized in table 3-2.
Using the XGraph class involves an invocation of the initialize method, some
number of invocations of the addPoint method, followed by an invocation of the termi-
FIGURE 3-1:
Ptolemy
An example of the output from the pxgraph program, which can be accessed using
the XGraph class.
Last updated: 8/26/97
3-4
Infrastructure for Star Writers
nate method. Multiple data sets (currently up to 64) may be plotted together. They will each
be given a distinctive color and/or line pattern. Within each data set, it is possible to break the
connecting lines between points by calling the newTrace method.
XGraph class
#include "Display.h"
method
void initialize (
Block* parent,
int noGraphs,
const char*
options,
const char*
title,
const char*
saveFile = 0,
int ignore = 0 )
void addPoint (
float y )
void addPoint (
float x,
float y )
void addPoint (
int dataSet,
float x,
float y )
void newTrace (
int dataSet = 1)
void terminate ( )
TABLE 3-2:
description
start a fresh plot
pointer to the block using the class
the number of data sets to plot
options to pass to the pxgraph program
title to put on the graph
name of a file to save data to
number of initial points to ignore
add the next point to the first data set with implicit x position
the vertical position
add a single point to the first data set
the horizontal position of the point to plot
the vertical position of the point to plot
add a single point to a particular data set
the number of the data set (starting with 1)
the horizontal position of the point to plot
the vertical position of the point to plot
start a new trace disconnected from the previous trace
the data set for the new trace
plot the data using the pxgraph program
A summary of the most useful methods of the XGraph class, which provides a simple
interface to the pxgraph program, used for plotting data.
3.3.3 Classes for displaying animated bar graphs
The BarGraph class creates a Tk window that displays a bar graph that can be modified dynamically, while a simulation runs. An example with 12 data sets and 8 bars per data
set is shown in figure 3-2. The most useful methods of the class are summarized in table 3-3.
This class is directly usable only by stars linked into a pigi process, not to stars linked into
the interpreter, ptcl. The reason for this is that ptcl does not have the Tk code linked into it.
Correspondingly, the class definition source code is in $PTOLEMY/src/pigilib, rather than
the more usual $PTOLEMY/src/kernel.
U. C. Berkeley
Department of EECS
The Almagest
3-5
BarGraph class
method
int setup (
Block* parent,
char* desc,
int numInputs,
int numBars
double top,
double bottom,
char* geometry,
double width,
double height )
int update (
int dataSet,
int bar,
double y )
TABLE 3-3:
#include "BarGraph.h"
description
start a fresh plot; return FALSE if setup fails
pointer to the block using the class
label for the bar graph
the number of data sets to plot
the number of bars per data set to show at once
the numerical value that will produce the highest bar
the numerical value that will produce the lowest bar
the starting position for the window (e.g. “+0+0” or “-0-0”)
the starting width of the window (in cm)
the starting height of the window (in cm)
modify or add a bar; return FALSE if it fails
the number of the data set (starting with 0)
the horizontal position of the point to plot
the requested height of the bar
A summary of the most useful methods of the BarGraph class, which creates animated bar graph charts in a window, and is available to stars running under pigi.
3.3.4 Collecting statistics using the histogram classes
The Histogram class constructs a histogram of data supplied. The XHistogram
FIGURE 3-2:
Ptolemy
An example of an animated bar graph created using the BarGraph class. This class
uses Tk, so it is available under pigi, but not under ptcl.
Last updated: 8/26/97
3-6
Infrastructure for Star Writers
class also constructs a histogram, but then plots it using the pxgraph program. An example of
such a plot is shown in figure 3-3. The most useful methods of both classes are summarized in
tables 3-4 and 3-5.
The Histogram class counts the number of occurrences of data values that fall within
each of a number of bins. Each bin represents a range of numbers. All bins have the same
width, and the center of each bin will be an integer multiple of this width. Bin number 0 is
always that with the smallest center. Bins are added if new data arrives that does not fit within
any of the existing bins. The getData method is used to read out the contents of a bin. If you
start with bin number 0, and proceed until getData returns FALSE, you will have read all the
bins.
Histogram class
#include "Histogram.h"
description
Histogram (
double width =
1.0,
int maxBins =
1000 )
void add (
double x )
int numCounts ( )
double mean ( )
double variance ( )
int getData (
int binno,
int& count,
double& binCenter )
constructor
the width of each bin; bins are centered at integer multiples of
this
since bins are added as needed, it is wise to limit their number
add to the count of the bin within which the given data falls
a data point for the histogram
return the number of data values used so far in the histogram
return the average value of all observed data so far
return the variance of the observed data so far
get the count for a given bin; return FALSE if the bin is out of
range
starting at 0, the bin number
place to store the count for the given bin
place to store the center of the given bin
TABLE 3-4:
A summary of the most useful methods of the Histogram class, which creates histogram charts in a window, and is available to stars running under pigi.
FIGURE 3-3:
An example of a histogram generated using the XHistogram class.
U. C. Berkeley
Department of EECS
The Almagest
3-7
XHistogram class
#include "Histogram.h"
method
description
void initialize (
start a fresh histogram
Block* parent,
pointer to the block using the class
double binWidth, the width of each bin; bins are centered at integer multiples of
const char*
options,
const char*
title,
const char*
saveFile,
int maxBins =
1000 )
void addPoint (
double y)
int numCounts ( )
double mean ( )
double variance ( )
void terminate ( )
TABLE 3-5:
Ptolemy
this
options to pass to the pxgraph program, in addition to -bar -nl
-brw
title to put on the histogram
name of a file to save data to (or 0 if none)
since bins are added as needed, it is wise to limit their number
add to the count of the bin within which the given data falls
a data point for the histogram
return the number of data values used so far in the histogram
return the average value of all observed data so far
return the variance of the observed data so far
plot the histogram using the pxgraph program
A class for displaying histograms.
Last updated: 8/26/97
3-8
Infrastructure for Star Writers
3.4 String Functions and Classes
The Ptolemy kernel defines some ordinary functions (not classes) plus two classes that
are useful for building and manipulating strings. The non-class string functions are summarized in table 3-6.. These include functions for copying strings, adding strings to a systemordinary functions for strings
#include "miscFuncs.h"
method
description
char* savestring (
create a new copy of the given text and return a
pointer to it; the caller must eventually delete the
const char* text)
string.
const char* hashstring (
save a copy of the text in a system-wide hash table,
if it isn’t already there, and return a pointer to the
const char* text)
entry.
char* tempFileName ( )
return a new, unique temporary file name; the
caller must eventually delete the string.
const char* expandPathName ( return an expanded version of the filename argument, which may start with “~”, “~user”, or
const char* filename)
“$var”; the expanded result is in static storage, and
will be overwritten by the next call.
TABLE 3-6:
Non-class (ordinary) functions available in the Ptolemy kernel for string manipulation
wide hash table, creating temporary file names. The non-class pathname functions are summarized in table 3-7. These functions are for expanding file names that might begin with a reference to a user’s home directory ("~username") or an shell environment variable
("$VARIABLE"). Also provided is a function for verifying that an external program to be
invoked is available, and a function for searching the user’s path.
ordinary functions for path search
method
int progNotFound (
const char* program,
const char* extramsg =
0)
const char* pathSearch (
const char* file,
const char* path = 0)
TABLE 3-7:
U. C. Berkeley
#include "paths.h"
description
flag an error and return TRUE if a program is not
found
the name of the program to find in the user’s path
message to add to error message if the program
isn’t found
find a file in a Unix-style path, returning the directory name
file name to find in the path
if non-zero, the path to use instead of the user’s
path
Non-class (ordinary) functions available in the Ptolemy kernel for certain pathname
manipulations.
Department of EECS
The Almagest
3-9
Two classes are provided for manipulating strings, InfString, and StringList, these
classes are summarized in figure 3-8.
StringList class
method
StringList
#include "StringList.h"
description
constructors can take any of the following possible arguments
return an empty StringList
copy s and return a new, identical StringList
none
const StringList&
s
char c
return a StringList with one string of one character
const char* string copy the string and makes a one element StringList contain-
ing it
create an ASCII representation of the number and return a
one element StringList with that number as the element
int i
double x
unsigned u
StringList& operator = assignment takes the same types of arguments as the conarg
structors, except “none”
StringList& operator
add one or more elements to a StringList; this takes the
<< arg
same types of arguments as the constructors, except “none”
operator const char*
void initialize ( )
int length ( )
int numPieces ( )
const char* head ( )
char* newCopy ( )
join all elements together and return as a single string;
delete all elements, making the StringList empty
return the length in characters (sum of the lengths of the
elements)
return the number of elements
return the first element
return the concatenated elements in a single newly allocated string; the caller must free the memory allocated.
InfString class
method
all StringList methods
operator char*
TABLE 3-8:
Ptolemy
#include "InfString.h"
description
see above
join all elements together and return as a single string;
A summary of the most useful methods of the StringList and InfString
classes. The InfString class inherits all of the methods from StringList, adding only the cast to char*.
Last updated: 8/26/97
3-10
Infrastructure for Star Writers
Although these two classes are almost identical in design, their recommended uses are
quite different. The first is designed for building up strings without having to be concerned about
the ultimate size of the string. New characters can be appended to the string at any time, and
memory will be allocated to accommodate them. When you are ready to use the string, perhaps
by passing it to a function that expects the standard character array representation of the string,
then simply cast the object to char*.
In fact, InfString is publicly derived from StringList, adding only the cast to
char*. StringList is implemented as a list of strings, where the size of the list is not
bounded ahead of time. StringList is recommended for applications where the list structure
is to be preserved. The cast to char* in InfString destroys the list structure, consolidating all
its strings into one contiguous string.
The most useful methods for both classes are summarized in table . Since InfString
differs by only one operator, we show only that one operator.
A word of warning is in order. If a function or expression returns a StringList or
InfString, and that value is not assigned to a StringList or InfString variable or reference, and the (const char*) or (char*) cast is used, it is possible (likely under g++) that
the StringList or InfString temporary will be destroyed too soon, leaving the const
char* or char* pointer pointing to garbage. The solution is to assign the returned value to a
local StringList or InfString before performing the cast. Suppose, for example, that the
function foo returns an InfString. Further, suppose the function bar takes a char* argument. Then the following code will fail:
bar(foo());
(Note that the cast to char* is implicit). The following code will succeed:
InfString x = foo();
bar(x);
3.5 Iterators
The StringList class is one of several list classes in the Ptolemy kernel. A basic operation on list classes is to sequentially access their members one at a time. This is accomplished
using an iterator class, companion to the list class. For the StringList class, the iterator is
called StringListIter. Its methods are summarized in table 3-9. An example program fragStringListIter class
#include "StringList.h"
method
description
StringList (
constructor
StringList& list ) the list over which the iterator will iterate
const char* next ( )
return the next string on the list, or 0 if there are no more
const char* operator
a synonym for “next”
++ ( )
void reset ( )
reset the iterator to start at the head again
TABLE 3-9:
An example of an iterator class, used to access the elements of a list class.
ment using this is given below:
StringListIter item(myList);
const char* string;
U. C. Berkeley
Department of EECS
The Almagest
3-11
while ((string = item++) != 0) cout << string << "\n";
In this fragment, myList is assumed to be a StringList previously set up.
3.6 List Classes
The StringList class is privately derived from the SequentialList class, an
extremely useful class used throughout Ptolemy. This class implements a linked list with a
running count of the number of elements. It uses the generic pointer technique, with
typedef void* Pointer
Thus, items in a sequential list can be pointers to any object, with a generic pointer used to
access the object. In derived classes, like StringList, this generic pointer is converted to a
specific type of pointer, like const char*. The methods are summarized in table 3-10.
An important point to keep in mind when using a SequentialList is that its
destructor does not delete the elements in the list. It would not be possible to do so, since it has
only a generic pointer. Also, note that random access (by element number, or any other
method) can be very inefficient, since it would require sequentially chaining down the list.
SequentialList has an iterator class called ListIter. The ++ operator (or next
member function) returns a Pointer.
In table 3-11 are two classes privately derived from SequentialList, Queue and
Stack. The first of these can implement either a first-in, first-out (FIFO) queue, or a last-in,
SequentialList class
#include "DataStruct.h"
method
description
void append (Pointer p)
add the element p to the end of the list
Pointer elem ( int n )
return the n-th element on the list (zero if there are
fewer than n)
int empty ( )
return 1 if empty, 0 if not
Pointer getAndRemove ( )
return and remove the first element on the list
(return zero if empty)
Pointer getTailAndRemove ( ) return and remove the last element on the list (return
zero if empty)
Pointer head ( )
return the first element on the list (zero if empty)
void initialize ( )
remove all elements from the list
int member (Pointer p)
return 1 if the list has a pointer equal to p, 0 if not
void prepend (Pointer p)
add the element p to the beginning of the list
int remove (Pointer p)
if the list has a pointer equal to p, remove it, and
return 1; 0 if not
int size ( )
return the number of elements on the list
Pointer tail ( )
return the last element on the list (zero if empty)
TABLE 3-10:
Ptolemy
The most useful basic list structure defined in the Ptolemy kernel.
Last updated: 8/26/97
3-12
Infrastructure for Star Writers
first-out (LIFO) queue. The second implements a stack, which is also a LIFO queue.
Queue class
#include "DataStruct.h"
method
description
Pointer getHead ( )
return and remove the first element on the list (return zero if
empty)
Pointer getTail ( )
return and remove the last element on the list (return zero if
empty)
void initialize ( )
remove all elements from the list
void putHead (Pointer add the element p to the beginning of the list
p)
void putTail (Pointer add the element p to the end of the list
p)
int size ( )
return the number of elements on the list
Stack class
#include "DataStruct.h"
method
description
Pointer accessTop ( ) return the top of the stack without removing it (return zero if
empty)
void initialize ( )
remove all elements from the list
Pointer popTop ( )
return and remove the top element from the stack (zero if
empty)
void pushBottom
add the element p to the bottom of the stack
(Pointer p)
void pushTop (Pointer add the element p to the top of the stack
p)
int size ( )
return the number of elements on the list
TABLE 3-11:
U. C. Berkeley
Two classes derived from SequentialList.
Department of EECS
The Almagest
3-13
3.7 Hash Tables
Hash tables are lists that are indexed by an ASCII string. A “hashing function” is computed from the string to make random accesses reasonably efficient; they are much more efficient, for example, than a linear search over a SequentialList. Two such classes are
provided in the Ptolemy kernel. The first, HashTable, is generic, in that the table entries are
of type Pointer, and thus can point to any user-defined data structure. The second, TextTable, is more specialized; the entries are strings. It is derived from HashTable.
The HashTable class is summarized in table 3-12 and TextTable class is summaHashTable class
method
void clear ( )
virtual void cleanup (
Pointer p)
#include "HashTable.h"
description
empty the table
does nothing; in derived classes, this might deallocate
memory
return 1 if the given key is in the table, 0 otherwise
int hasKey (
const char* key )
void insert (
insert an entry; any previous entry with the same key is
replaced, and the cleanup method is called so that in
const char* key,
derived classes, its memory can be deallocated.
Pointer data )
Pointer lookup (
lookup an entry; in a derived class, this could be overloaded to return a pointer of a more specific type.
const char* key)
int remove (
remove the entry with the given key from the table; note
that the object pointed to by the entry is not deallocated.
const char* key)
int size ( )
return the number of entries in the hash table
TABLE 3-12:
A summary of the most useful methods of the HashTable class
rized in table 3-13. Only the most useful (and easily used) methods are described. You may
want to refer to the source code for more information. The HashTable class has a standard
iterator called HashTableIter, where the next method and ++ operator return a pointer to
class HashEntry. This class has a const char* key() method that returns the key for the
entry, and a Pointer value() method that returns a pointer to the entry. TextTable has an
iterator called TextTableIter, where the next method and ++ operator return type const
char*.
Sophisticated users will often want to derive new classes from HashTable. The reason is that the methods that look up data in the table can be defined to return pointers of the
appropriate type. Moreover, the deallocation of memory when an entry is deleted or the table
itself is deleted can be automated. TextTable is a good example of such a derived class. This
is not possible with the generic HashTable class, because the Pointer type does not give
enough information to know what destructor to invoke. Thus, when using the generic HashTable class, the user should explicitly delete the objects pointed to by the Pointer if they
were dynamically created and are no longer needed. A detailed example that directly uses the
HashTable class, without defining a derived class, is given in the next section. In that exam-
Ptolemy
Last updated: 8/26/97
3-14
Infrastructure for Star Writers
ple, the Pointer entries point to stars in a universe, so they should not be deleted when the
entries in the table are deleted. Their memory will be deallocated when the universe is deleted.
TextTable class
method
void clear ( )
void cleanup (
Pointer p)
int hasKey (
const char* key )
void insert (
const char* key,
const char* string
)
const char* lookup (
const char* key)
int remove (
const char* key)
int size ( )
TABLE 3-13:
#include "HashTable.h"
description
empty the table
deallocate the string pointed to by p
return 1 if the given key is in the table, 0 otherwise
create an entry containing a copy of string; any previous
entry with the same key is replaced, and the cleanup
method is called to deallocate its memory.
lookup an entry with the given key; return 0 if there is no
such entry.
remove the entry with the given key from the table and
deallocated its memory.
return the number of entries in the hash table
A summary of the most useful methods of the HashTable and TextTabl
classes.
In some future version, HashTable might be reimplemented using templates.
3.8 Sharing Data Structures Across Multiple Stars
It is sometimes desirable to have a set of stars that share and manipulate a common
data structure1. A simple way to accomplish this is to define a star that contains a static member. Suppose, for example, you wish to define a class of stars that create a shared list of pointers, one to each instance of this type of star. Thus, every star of this type would be able to
access every other star of this type. Consider the following implementation:
defstar {
name { Share }
domain { SDF }
desc { A star with a shared data structure }
hinclude { “DataStruct.h” }
private {
static SequentialList starList;
}
output {
name { howmany }
type { int }
}
code {
1. See the SDFWriteVar and SDFReadVar stars for a similar implementation.
U. C. Berkeley
Department of EECS
The Almagest
3-15
SequentialList SDFShare::starList;
}
begin {
starList.append(this);
}
go {
howmany%0 << starList.size();
}
wrapup {
starList.initialize();
}
}
This star has a static private member of type SequentialList with name starList. The
“static” in C++ ensures that there will be no more than one instance of the SequentialList object. That instance will be accessible to every instance of the star, but not to any other
object (because the member is private). That one instance is actually declared by the lines:
code {
SequentialList SDFShare::starList;
}
The declaration will get put into the file SDFShare.cc by the preprocessor. Notice that the
class name of the star is SDFShare not just Share. The begin method simply adds to the
sequential list a pointer to the star that invoked the begin method (this). Note that you
should use the begin method here rather than the setup method because the begin method
is always invoked exactly once, while the setup method might be invoked more than once
when the simulation starts up. The go method sends to the output (named howmany) the size
of the list. This will be equal to the number of stars of this type in the universe.
The wrapup method has the only tricky part of this code. It reinitializes the SequentialList so that subsequent runs do not just simply add to a list created by previous runs.
However, note that the wrapup method will not be invoked if an error occurs during the run.
Pigi ensures correct operation nonetheless by deleting all instances of the stars and recreating them if an error occurred on the previous run. Thus, between invocations of the begin
method, either the wrapup method or the constructor for the star (and all its members) will
be invoked. The constructor for SequentialList also initializes the list, so the list is always
initialized before the first begin method is called.
The above approach is somewhat limited. You may want more than one type of star to
share a data structure. In this case, you should create a common base class for all the stars that
will share the data structure. The shared data structure should be a protected member, rather
than a private member, so that it is accessible to derived stars.
Alternatively, you might want arbitrary subsets of stars to share distinct data structures, one for each subset. This can be accomplished by defining a static list that is indexed by
a string, and using a parameter in the star to identify to which subset it belongs. An efficient
data structure to use for this is the HashTable. So for example, suppose we wanted to modify
the above star to create lists of stars with common values of a parameter “mySubset”, and to
output the number of stars in their subset. The above code becomes:
defstar {
Ptolemy
Last updated: 8/26/97
3-16
Infrastructure for Star Writers
name { BetterShare }
domain { SDF }
desc { A star with a shared data structure }
hinclude { "DataStruct.h" }
hinclude { "HashTable.h" }
output {
name { howmany }
type { int }
}
state {
name { mySubset }
default { "subset A" }
type { string }
}
private {
static HashTable listOfLists;
SequentialList* myList;
}
code {
HashTable SDFBetterShare::listOfLists;
}
begin {
if (listOfLists.hasKey((char*)mySubset)) {
myList = listOfLists.lookup((char*)mySubset);
} else {
myList = new SequentialList;
listOfLists.insert((char*)mySubset,myList);
}
myList->append(this);
}
go {
howmany%0 << myList->size();
}
wrapup {
if (listOfLists.hasKey((char*)mySubset)) {
listOfLists.remove((char*)mySubset);
delete myList;
}
}
}
In addition to the static private member listOfLists, we also have a pointer myList to a
SequentialList. The begin method is a bit more complicated now. It first checks to see
whether an entry in the hash table has already been created with a key equal to the value of the
state “mySubset”. If it has, then the SequentialList pointer myList is set equal to the
value of that entry. If it has not, then a new SequentialList is allocated and inserted into
the hash table with the appropriate key. The last action is simply to insert a pointer to the star
instance into myList.
The go method is similar to before.
The wrapup method is slightly more complicated, because it needs to free the memory allocated when the new SequentialList was allocated. However, it should free that
U. C. Berkeley
Department of EECS
The Almagest
3-17
memory only once, and there may be several star instances pointing to it. Thus, it first checks
the hash table to see whether there exists an entry with key equal to mySubset. If there does,
then it removes that entry and deletes the SequentialList myList.
3.9 Using Random Numbers
Ptolemy uses the Gnu library routines for the random number generation. Refer to Volume II of the Art of Computer Programming by Knuth for details about the method. There are
built-in classes for some popular distributions: uniform, exponential, geometric, discrete uniform, normal, log-normal, and so on. These classes use a common basic random number generation routine which is realized in the ACG class. Here are some examples of using random
numbers.
The first example is the part of the DE Poisson star. See the DE chapter for details on
how to write DE stars.
hinclude { <NegExp.h> }
ccinclude { <ACG.h> }
protected {
NegativeExpntl *random;
}
// declare the static random-number generator in the .cc file
code {
extern ACG* gen;
}
constructor {
random = NULL;
}
destructor {
if(random) delete random;
}
setup {
if(random) delete random;
random = new NegativeExpntl(double(meanTime),gen);
DERepeatStar :: setup();
}
go {
......
// Generate an exponential random variable.
double p = (*random)();
......
}
The built-in class for an exponentially distributed random numbers is NegativeExpntl.
The Ptolemy kernel provides a single object to generate a stream of random numbers;
the global variable gen (a poor choice of name, perhaps) is a pointer to it. We create an
instance of the NegativeExpntl class in the setup method, not in the constructor since
Ptolemy allows you to change the seed of the random number generator. When the user
changes the seed of the random number generator, the object pointed to by gen is deleted and
re-created, so all objects such as the one pointed to by random in this star become invalid.
Ptolemy
Last updated: 8/26/97
3-18
Infrastructure for Star Writers
Finally, we can read a random number of the specific type by calling operator () of the
NegativeExpnl class.
This example uses a uniformly distributed random number.
hinclude { <Uniform.h> }
ccinclude { <ACG.h> }
protected {
Uniform *random;
}
// declare the extern random-number generator in the .cc file
code {
extern ACG* gen;
}
constructor {
random = NULL;
}
destructor {
if(random) delete random;
}
setup {
if(random) delete random;
random = new Uniform(0,double(output.numberPorts()),gen);
}
go {
......
double p = (*random)();
......
}
You may notice that the two examples above are very similar in nature. You can get another
kind of distribution for the random numbers, by including the appropriate library file in the .h
file and by creating the instance with the right parameters in the setup method.
U. C. Berkeley
Department of EECS
Chapter 4. Data Types
Authors:
Joseph T. Buck
Michael J. Chen
Alireza Khazeni
Other Contributors:
Brian Evans
Paul Haskell
Asawaree Kalavade
Tom Lane
Edward A. Lee
John Reekie
4.1 Introduction
Stars communicate by sending objects of type Particle. A basic set of types, including scalar and array types, built on the Particle class, is built into the Ptolemy kernel. Since
all of these particle types are derived from the same base class, it is possible to write stars that
operate on any of them (by referring only to the base class). It is also possible to define new
types that contain arbitrary C++ objects.
There are currently eleven key data types defined in the Ptolemy kernel. There are four
numeric scalar types—complex, fixed-point, double precision floating-point, and integer—
described in Section 4.2. Ptolemy supports a limited form of user-defined type—the Message
type, described in Section 4.3. Each of the scalar numeric types has an equivalent matrix type,
which uses a more complex version of the user-defined type mechanism; they are described in
Section 4.4.
There are two experimental types included in the basic set, containing strings and file
references, described in Section 4.5. Ptolemy allows stars to be written that will read and write
particles of any type; this mechanism is described in Section 4.6. Finally, some experimental
types that are not officially supported by Ptolemy are described in Section 4.7.
4.2 Scalar Numeric Types
There are four scalar numeric data types defined in the Ptolemy kernel: complex,
fixed-point, double precision floating-point, and integer. All of these four types can be read
from and written to portholes as described in “Reading inputs and writing outputs” on page 217. The floating-point and integer data types are based on the standard C++ double and int
types, and need no further explanation. To support the other two types, the Ptolemy kernel
contains a Complex class and a Fix class, which are described in the rest of this section.
4.2.1 The Complex data type
The Complex data type in Ptolemy contains real and imaginary components, each of
which is specified as a double precision floating-point number. The notation used to represent
4-2
Data Types
a complex number is a two number pair: (real, imaginary)—for example, (1.3,-4.5) corresponds to the complex number 1.3 − 4.5j. Complex implements a subset of the functionality
of the complex number classes in the cfront and libg++ libraries, including most of the standard arithmetic operators and a few transcendental functions.
Constructors:
Complex()
Create a complex number initialized to zero—that is, (0.0, 0.0). For
example,
Complex C;
Complex(double real, double imag)
Create a complex number whose value is (real, imag). For example,
Complex C(1.3,-4.5);
Complex(const Complex& arg)
Create a complex number with the same value as the argument (the
copy constructor). For example,
Complex A(complexSourceNumber);
Basic operators:
The following list of arithmetic operators modify the value of the complex number. All functions return a reference to the modified complex number (*this).
Complex& operator = (const Complex& arg)
Complex& operator += (const Complex& arg)
Complex& operator -= (const Complex& arg)
Complex& operator *= (const Complex& arg)
Complex& operator /= (const Complex& arg)
Complex& operator *= (double arg)
Complex& operator /= (double arg)
There are two operators to return the real and imaginary parts of the complex number:
double real() const
double imag() const
Non-member functions and operators:
The following one- and two-argument operators return a new complex number:
Complex operator + (const Complex& x, const Complex& y)
Complex operator - (const Complex& x, const Complex& y)
Complex operator * (const Complex& x, const Complex& y)
U. C. Berkeley
Department of EECS
The Almagest
4-3
Complex operator * (double x, const Complex& y)
Complex operator * (const Complex& x, double y)
Complex operator / (const Complex& x, const Complex& y)
Complex operator / (const Complex& x, double y)
Complex operator - (const Complex& x)
Return the negative of the complex number.
Complex conj (const Complex& x)
Return the complex conjugate of the number.
Complex sin(const Complex& x)
Complex cos(const Complex& x)
Complex exp(const Complex& x)
Complex log(const Complex& x)
Complex sqrt(const Complex& x)
Complex pow(double base, const Complex& expon)
Complex pow(const Complex& base, const Complex& expon)
Other general operators:
double abs(const Complex& x)
Return the absolute value, defined to be the square root of the norm.
double arg(const Complex& x)
Return the value arctan(x.imag()/x.real()).
double norm(const Complex& x)
Return the value x.real() * x.real() + x.imag() * x.imag().
double real(const Complex& x)
Return the real part of the complex number.
double imag(const Complex& x)
Return the imaginary part of the complex number.
Comparison Operators:
int operator != (const Complex& x, const Complex& y)
int operator == (const Complex& x, const Complex& y)
4.2.2 The fixed-point data type
The fixed-point data type is implemented in Ptolemy by the Fix class. This class supports a two’s complement representation of a finite precision number. In fixed-point notation,
the partition between the integer part and the fractional part—the binary point—lies at a fixed
Ptolemy
Last updated: 10/10/97
4-4
Data Types
position in the bit pattern. Its position represents a trade-off between precision and range. If
the binary point lies to the right of all bits, then there is no fractional part.
Constructing Fixed-point variables
Variables of type Fix are defined by specifying the word length and the position of the
binary point. At the user-interface level, precision is specified either by setting a fixed-point
parameter to a “(value, precision)” pair, or by setting a precision parameter. The former
gives the value and precision of some fixed-point value, while the latter is typically used to
specify the internal precision of computations in a star.
In either case, the syntax of the precision is either “x.y” or “m/n”, where x is the number of integer bits (including the sign bit), y and m are the number of fractional bits, and n is
the total number of bits. Thus, the total number of bits in the fixed-point number (also called
its length) is x+y or n. For example, a fixed-point number with precision “3.5” has a total
length of 8 bits, with 3 bits to the left and 5 bits to the right of the binary point.
At the source code level, methods working on Fix objects either have the precision
passed as an “x.y” or “m/n” string, or as two C++ integers that specify the total number of bits
and the number of integer bits including the sign bit (that is, n and x). For example, suppose
you have a star with a precision parameter named precision. Consider the following code:
Fix x = Fix(((const char *) precision));
if (x.invalid())
Error::abortRun(*this, "Invalid precision");
The “precision” parameter is cast to a string and passed as a constructor argument to the Fix
class. The error check verifies that the precision was valid.
There is a maximum value for the total length of a Fix object which is specified by the
constant FIX_MAX_LENGTH in the file $PTOLEMY/src/kernel/Fix.h. The current value
is 64 bits. Numbers in the Fix class are represented using two’s complement notation, with
the sign bit stored in the bits to the left of the binary point. There must always be at least one
bit to the left of the binary point to store the sign.
In addition to its value, each Fix object contains information about its precision and
error codes indicating overflow, divide-by-zero, or bad format parameters. The error codes are
set when errors occur in constructors or arithmetic operators. There are also fields to specify
a. whether rounding or truncation should take place when other Fix values are
assigned to it—truncation is the default
b. the response to an overflow or underflow on assignment—the default is saturation
(see page 4-6).
Warning
The Fix type is still experimental.
Fixed-point states
State variables can be declared as Fix or FixArray. The precision is specified by an
associated precision state using either of two syntaxes:
U. C. Berkeley
Department of EECS
The Almagest
4-5
•
Specifying just a value itself in the dialog box creates a fixed-point number with the
default length of 24 bits and with the position of the binary point set as required to
store the integer value. For example, the value 1.0 creates a fixed-point object with
precision 2.22, and the value 0.5 would create one with precision 1.23.
•
Specifying a (value, precision) pair create a fixed-point number with the specified precision. For example, the value (2.546, 3.5) creates a fixed-point object by casting the
double 2.546 to a Fix with precision 3.5.
Fixed-point inputs and outputs
Fix types are available in Ptolemy as a type of Particle. The conversion from an
int or a double to a Fix takes place using the Fix::Fix(double) constructor which
makes a Fix object with the default word length of 24 bits and the number of integer bits as
needed required by the value. For instance, the double 10.3 will be converted to a Fix with
precision 5.19, since 5 is the minimum number of bits needed to represent the integer part, 10,
including its sign bit.
To use the Fix type in a star, the type of the portholes must be declared as “fix”.
Stars that receive or transmit fixed-point data have parameters that specify the precision of the
input and output in bits, as well as the overflow behavior. Here is a simplified version of
SDFAddFix star, configured for two inputs:
defstar {
name { AddFix }
domain {SDF}
derivedFrom{ SDFFix }
input {
name { input1 }
type { fix }
}
input {
name { input2 }
type { fix }
}
output {
name { output }
type { fix }
}
defstate {
name { OutputPrecision }
type { precision }
default { 2.14 }
desc {
Precision of the output in bits and precision of the accumulation.
When the value of the accumulation extends outside of the precision,
the OverflowHandler will be called.
}
}
(Note that the real AddFix star supports any number of inputs.) By default, the precision used
by this star during the addition will have 2 bits to the left of the binary point and 14 bits to the
Ptolemy
Last updated: 10/10/97
4-6
Data Types
right. Not shown here is the state OverflowHandler, which is inherited from the SDFFix
star and which defaults to saturate—that is, if the addition overflows, then the result saturates, pegging it to either the largest positive or negative number representable. The result
value, sum, is initialized by the following code:
protected {
Fix sum;
}
begin {
SDFFix::begin();
sum = Fix( ((const char *) OutputPrecision) );
if ( sum.invalid() )
Error::abortRun(*this, "Invalid OutputPrecision");
sum.set_ovflow( ((const char*) OverflowHandler) );
if ( sum.invalid() )
Error::abortRun(*this, "Invalid OverflowHandler");
}
The begin method checks the specified precision and overflow handler for correctness. Then,
in the go method, we use sum to calculate the result value, thus guaranteeing that the desired
precision and overflow handling are enforced. For example,
go {
sum.setToZero();
sum += Fix(input1%0);
checkOverflow(sum);
sum += Fix(input2%0);
checkOverflow(sum);
output%0 << sum;
}
(The checkOverflow method is inherited from SDFFix.) The protected member sum is an
uninitialized Fix object until the begin method runs. In the begin method, it is given the
precision specified by OutputPrecision. The go method initializes it to zero. If the go
method had instead assigned it a value specified by another Fix object, then it would acquire
the precision of that other object—at that point, it would be initialized.
Assignment and overflow handling
Once a Fix object has been initialized, its precision does not change as long as the
object exists. The assignment operator is overloaded so that it checks whether the value of the
object to the right of the assignment fits into the precision of the left object. If not, then it takes
the appropriate overflow response is taken and set the overflow error bit.
If a Fix object is created using the constructor that takes no arguments, as in the protected declaration above, then that object is an uninitialized Fix; it can accept any assignment, acquiring not only its value, but also its precision and overflow handler.
The behavior of a Fix object on an overflow depends on the specifications and the
behavior of the object itself. Each object has a private data field that is initialized by the constructor; when there is an overflow, the overflow_handler looks at this field and uses the
U. C. Berkeley
Department of EECS
The Almagest
4-7
specified method to handle the overflow. This data field is set to saturate by default, and
can be set explicitly to any other desired overflow handling method using a function called
set_ovflow(<keyword>). The keywords for overflow handling methods are: saturate
(default), zero_saturate, wrapped, warning. saturate replaces the original value is
replaced by the maximum (for overflow) or minimum (for underflow) value representable
given the precision of the Fix object. zero_saturate sets the value to zero.
Explicitly casting inputs
In the above example, the first line of the go method assigned the input to the protected member sum, which has the side-effect of quantizing the input to the precision of sum.
We could have alternatively written the go method as follows:
go {
sum = Fix(input1%0) + Fix(input2%0);
output%0 << sum;
}
The behavior here is significantly different: the inputs are added using their own native precision, and only the result is quantized to the precision of sum.
Some stars allow the user to select between these two different behaviors with a
parameter called ArrivingPrecision. If set to YES, the input particles are not explicitly cast;
they are used as they are; if set to NO, the input particles are cast to an internal precision,
which is usually specified by another parameter.
Here is the (abbreviated) source of the SDFGainFix star, which demonstrates this
point:
defstar {
name { GainFix }
domain { SDF }
derivedFrom { SDFFix }
desc {
This is an amplifier; the fixed-point output is the fixed-point input
multiplied by the "gain" (default 1.0). The precision of "gain", the
input, and the output can be specified in bits.
}
input {
name { input }
type { fix }
}
output {
name { output }
type { fix }
}
defstate {
name { gain }
type { fix }
default { 1.0 }
desc { Gain of the star. }
}
Ptolemy
Last updated: 10/10/97
4-8
Data Types
defstate {
name { ArrivingPrecision }
type {int}
default {"YES"}
desc {
Flag indicating whether or no to use the arriving particles as they
are: YES keeps the same precision, and NO casts them to the precision
specified by the parameter "InputPrecision". }
}
defstate {
name { InputPrecision }
type { precision }
default { 2.14 }
desc {
Precision of the input in bits. The input particles are only cast
to this precision if the parameter "ArrivingPrecision" is set to NO.
}
}
defstate {
name { OutputPrecision }
type { precision }
default { 2.14 }
desc {
Precision of the output in bits.
This is the precision that will hold the result of the arithmetic
operation on the inputs.
When the value of the product extends outside of the precision,
the OverflowHandler will be called.
}
protected {
Fix fixIn, out;
}
begin {
SDFFix::begin();
if ( ! int(ArrivingPrecision) ) {
fixIn = Fix( ((const char *) InputPrecision) );
if(fixIn.invalid())
Error::abortRun( *this, "Invalid InputPrecision" );
}
out = Fix( ((const char *) OutputPrecision) );
if ( out.invalid() )
Error::abortRun( *this, "Invalid OutputPrecision" );
out.set_ovflow( ((const char *) OverflowHandler) );
if(out.invalid())
Error::abortRun( *this,"Invalid OverflowHandler" );
}
go {
// all computations should be performed with out since
// that is the Fix variable with the desired overflow
// handler
out = Fix(gain);
if ( int(ArrivingPrecision) ) {
U. C. Berkeley
Department of EECS
The Almagest
4-9
out *= Fix(input%0);
}
else {
fixIn = Fix(input%0);
out *= fixIn;
}
checkOverflow(out);
output%0 << out;
}
// a wrap-up method is inherited from SDFFix
// if you defined your own, you should call SDFFix::wrapup()
}
Note that the SDFGainFix star and many of the Fix stars are derived from the star SDFFix.
SDFFix implements commonly used methods and defines two states: OverflowHandler
selects one of four overflow handlers to be called each time an overflow occurs; and ReportOverflow, which, if true, causes the number and percentage of overflows that occurred for
that star during a simulation run to be reported in the wrapup method.
Constructors:
Fix()
Create a Fix number with unspecified precision and value zero.
Fix(int length, int intbits)
Create a Fix number with total word length of length bits and intbits bits to the left of the binary point. The value is set to zero. If the
precision parameters are not valid, then an error bit is internally set so
that the invalid method will return TRUE.
Fix(const char* precisionString)
Create a Fix number whose precision is determined by precisionString, which has the syntax “leftbits.rightbits”, where leftbits is the
number of bits to the left of the binary point and rightbits is the number
of bits to the right of the binary point, or “rightbits/totalbits”, where
totalbits is the total number of bits. The value is set to zero. If the precisionString is not in the proper format, an error bit is internally set
so that the invalid method will return TRUE.
Fix(double value)
Create a Fix with the default precision of 24 total bits for the word
length and set the number of integer bits to the minimum needed to represent the integer part of the number value. If the value given needs
more than 24 bits to represent, the value will be clipped and the number
stored will be the largest possible under the default precision (i.e. saturation occurs). In this case an internal error bit is set so that the
ovf_occurred method will return TRUE.
Fix(int length, int intbits, double value)
Create a Fix with the specified precision and set its value to the given
value. The number is rounded to the closest representable number
Ptolemy
Last updated: 10/10/97
4-10
Data Types
given the precision. If the precision parameters are not valid, then an
error bit is internally set so that the invalid method will return TRUE.
Fix(const char* precisionString, double value)
Same as the previous constructor except that the precision is specified
by the given precisionString instead of as two integer arguments.
If the precision parameters are not valid, then an error bit is internally
set so that the invalid() method will return true when called on the
object.
Fix(const char* precisionString, uint16* bits)
Create a Fix with the specified precision and set the bits precisely to
the ones in the given bits. The first word pointed to by bits contains
the most significant 16 bits of the representation. Only as many words
as are necessary to fetch the bits will be referenced from the bits argument. For example: Fix("2.14",bits) will only reference
bits[0].
This constructor gets very close to the representation and is meant
mainly for debugging. It may be removed in the future.
Fix(const Fix& arg)
Copy constructor. Produces an exact duplicate of arg.
Fix(int length, int intbits, const Fix& arg)
Read the value from the Fix argument and set to a new precision. If the
precision parameters are not valid, then an error bit is internally set so
that the invalid method will return true when called on the object. If
the value from the source will not fit, an error bit is set so that the
ovf_occurred method will return TRUE.
Functions to set or display information about the Fix number:
int len() const
Return the total word length of the Fix number.
int intb() const
Return the number of bits to the left of the binary point.
int precision() const
Return the number of bits to the right of the binary point.
int overflow() const
Return the code of the type of overflow response for the Fix number.
The possible codes are:
0 - ovf_saturate,
1 - ovf_zero_saturate,
2 - ovf_wrapped,
3 - ovf_warning,
4 - ovf_n_types.
U. C. Berkeley
Department of EECS
The Almagest
4-11
int roundMode() const
Return the rounding mode: 1 for rounding, 0 for truncation.
int signBit() const
Return TRUE if the value of the Fix number is negative, FALSE if it is
positive or zero.
int is_zero()
Return TRUE if the value of the Fix number is zero.
double max()
Return the maximum value representable using the current precision.
double min()
Return the minimum value representable using the current precision.
double value()
The value of the Fix number as a double.
void setToZero()
Set the value of the Fix number to zero.
void set_overflow(int value)
Set the overflow type.
void set_rounding(int value)
Set the rounding type: TRUE for rounding, FALSE for truncation.
void initialize()
Discard the current precision format and set the Fix number to zero.
There are a few functions for backward compatibility:
void set_ovflow(const char*)
Set the overflow using a name.
void Set_MASK(int value)
Set the rounding type. Same functionality as set_rounding().
Comparison function:
int compare (const Fix& a, const Fix& b)
Compare two Fix numbers. Return –1 if a < b, 0 if a = b, 1 if a > b.
The following functions are for use with the error condition fields:
int ovf_occurred()
Return TRUE if an overflow has occurred as the result of some opera-
tion like addition or assignment.
int invalid()
Return TRUE if the current value of the Fix number is invalid due to it
having an improper precision format, or if some operation caused a
Ptolemy
Last updated: 10/10/97
4-12
Data Types
divide by zero.
int dbz()
Return TRUE if a divide by zero error occurred.
void clear_errors()
Reset all error bit fields to zero.
Operators:
Fix& operator = (const Fix& arg)
Assignment operator. If *this does not have its precision format set
(i.e. it is uninitialized), the source Fix is copied. Otherwise, the source
Fix value is converted to the existing precision. Either truncation or
rounding takes place, based on the value of the rounding bit of the current object. Overflow results either in saturation, “zero saturation”
(replacing the result with zero), or a warning error message, depending
on the overflow field of the object. In these cases, ovf_occurred will
return TRUE on the result.
Fix& operator = (double arg)
Assignment operator. The double value is first converted to a default
precision Fix number and then assigned to *this.
The function of these arithmetic operators should be self-explanatory:
Fix& operator += (const Fix&)
Fix& operator -= (const Fix&)
Fix& operator *= (const Fix&)
Fix& operator *= (int)
Fix& operator /= (const Fix&)
Fix operator + (const Fix&, const Fix&)
Fix operator - (const Fix&, const Fix&)
Fix operator * (const Fix&, const Fix&)
Fix operator * (const Fix&, int)
Fix operator * (int, const Fix&)
Fix operator / (const Fix&, const Fix&)
Fix operator - (const Fix&) // unary minus
int operator == (const Fix& a, const Fix& b)
int operator != (const Fix& a, const Fix& b)
int operator >= (const Fix& a, const Fix& b)
int operator <= (const Fix& a, const Fix& b)
int operator > (const Fix& a, const Fix& b)
U. C. Berkeley
Department of EECS
The Almagest
4-13
int operator < (const Fix& a, const Fix& b)
Note:
•
These operators are designed so that overflow does not, as a rule, occur (the return
value has a wider format than that of its arguments). The exception is when the result
cannot be represented in a Fix with all 64 bits before the binary point.
•
The output of any operation will have error codes that are the logical OR of those of
the arguments to the operation, plus any additional errors that occurred during the
operation (like divide by zero).
•
The division operation is currently a cheat: it converts to double and computes the
result, converting back to Fix.
•
The relational operators ==, !=, >=, <=, >, < are all written in terms of a function
int compare(const Fix& a, const Fix& b)
This functions returns -1 if a < b, 0 if a = b, and 1 if a > b. The comparison is exact
(every bit is checked) if the two values have the same precision format. If the precisions are different, the arguments are converted to doubles and compared. Since double values only have an accuracy of about 53 bits on most machines, this may cause
false equality reports for Fix values with many bits.
Conversions:
operator int() const
Return the value of the Fix number as an integer, truncating towards
zero.
operator float() const
operator double() const
Convert to a float or a double, creating an exact result when possible.
void complement()
Replace the current value by its complement.
Fix overflow, rounding, and errors.
The Fix class defines the following enumerated values for overflow handling:
Fix::ovf_saturate
Fix::ovf_zero_saturate
Fix::ovf_wrapped
Fix::ovf_warning
They may be used as arguments to the set_overflow method, as in the following example:
out.set_overflow(Fix::ovf_saturate);
The member function
Ptolemy
Last updated: 10/10/97
4-14
Data Types
int overflow() const;
returns the overflow type. This returned result can be compared against the above enumerated
values. Overflow types may also be specified as strings, using the method
void set_ovflow(const char* overflow_type);
the overflow_type argument may be one of saturate, zero_saturate, wrapped, or
warning.
The rounding behavior of a Fix value may be set by calling
void set_rounding(int value);
If the argument is false, or has the value Fix::mask_truncate, truncation will occur. If the
argument is nonzero (for example, if it has the value Fix::mask_truncate_round, rounding will occur. The older name Set_MASK is a synonym for set_rounding.
The following functions access the error bits of a Fix result:
int ovf_occurred() const;
int invalid() const;
int dbz() const;
The first function returns TRUE if there have been any overflows in computing the value. The
second returns TRUE if the value is invalid, because of invalid precision parameters or a divide
by zero. The third returns TRUE only for divide by zero.
4.3 Defining New Data Types
The Ptolemy heterogeneous message interface provides a mechanism for stars to transmit arbitrary objects to other stars. Our design satisfies the following requirements:
•
Existing stars (stars that were written before the message interface was added) that
handle ANYTYPE work with message particles without change.
•
Message portholes can send different types of messages during the same simulation.
This is especially useful for modeling communication networks.
•
It avoids copying large messages by using a reference count mechanism, as in many
C++ classes (for example, string classes).
•
It is possible to safely modify large messages without excessive memory allocation
and deallocation.
•
It is (relatively) easy for users to define their own message types; no change to the kernel is required to support new message types.
The “message” type is understood by Ptolemy to mean a particle containing a message. There
are three classes that implement the support for message types:
•
The Message class is the base class from which all other message data types are
derived. A user who wishes to define an application-specific message type derives a
new class from Message.
•
The Envelope class contains a pointer to an derived from Message. When an Envelope objects is copied or duplicated, the new envelope simply sets its own pointer to
U. C. Berkeley
Department of EECS
The Almagest
4-15
the pointer contained in the original. Several envelopes can thus reference the same
Message object. Each Message object contains a reference count, which tracks how
many Envelope objects reference it; when the last reference is removed, the Message is deleted.
•
The MessageParticle class is a type of Particle (like IntParticle, FloatParticle, etc.); it contains a Envelope. Ports of type “message” transmit and
receive objects of this type.
Class Particle contains two member functions for message support: getMessage, to
receive a message, and the << operator with an Envelope as the right argument, to load a
message into a particle. These functions return errors in the base class; they are overridden in
the MessageParticle class with functions that perform the expected operation.
4.3.1 Defining a new Message class
Every user-defined message is derived from class Message. Certain virtual functions
defined in that class must be overridden; others may optionally be overridden. Here is an
example of a user-defined message type:
// This is a simple vector message object. It stores
// an array of integer values of arbitrary length.
// The length is specified by the constructor.
#include "Message.h"
class IntVecData: public Message {
private:
int len;
init(int length,int *srcData) {
len = length;
data = new int[len];
for (int i = 0; i < len; i++)
data[i] = *srcData++;
}
public:
// the pointer is public for simplicity
int *data;
int length() const { return len;}
// functions for type-checking
const char* dataType() const { return "IntVecData";}
// isA responds TRUE if given the name of the class or
// of any baseclass.
int isA(const char* typ) const {
if (strcmp(typ,"IntVecData") == 0) return TRUE;
else return Message::isA(typ);
}
// constructor: makes an uninitialized array
IntVecData(int length): len(length) {
data = new int[length];
}
// constructor: makes an initialized array from a int array
IntVecData(int length,int *srcData) { init(length,srcData);}
Ptolemy
Last updated: 10/10/97
4-16
Data Types
// copy constructor
IntVecData(const IntVecData& src) { init(src.len,src.data);}
// clone: make a duplicate object
Message* clone() const { return new IntVecData(*this);}
// destructor
~IntVecData() {
delete data;
}
};
This message object can contain a vector of integers of arbitrary length. Some functions in the
class are arbitrary and the user may define them in whatever way is most convenient; however,
there are some requirements.
The class must redefine the dataType method from class Message. This function
returns a string identifying the message type. This string should be identical to the name of the
class. In addition, the isA method must be defined. The isA method responds with TRUE (1)
if given the name of the class or of any base class; it returns FALSE (0) otherwise. This mechanism permits stars to handle any of a whole group of message types, even for classes that are
defined after the star is written.
Because of the regular structure of isA function bodies, macros are provided to generate them. The ISA_INLINE macro expands to an inline definition of the function; for example,
ISA_INLINE(IntVecData,Message)
could have been written above instead of the definition of isA to generate exactly the same
code. Alternatively, to put the function body in a .cc file, one can write
int isA(const char*) const;
in the class definition and put
ISA_FUNC(IntVecData,Message)
in the .cc file (or wherever the methods are defined).
The class must define a copy constructor, unless the default copy constructor generated
by the compiler, which does memberwise copying, will do the job.
The class must redefine the clone method of class Message. Given that the copy
constructor is defined, the form shown in the example, where a new object is created with the
new operator and the copy constructor, will suffice.
In addition, the user may optionally define type conversion and printing functions if
they make sense. If a star that produces messages is connected to a star that expects integers
(or floating values, or complex values), the appropriate type conversion function is called. The
base class, Message, defines the virtual conversion functions asInt(), asFloat(), and
asComplex() and the printing method print() — see the file $PTOLEMY/src/kernel/
Message.h for their exact types. The base class conversion functions assert a run-time error,
and the default print function returns a StringList saying
<type>: no print method
U. C. Berkeley
Department of EECS
The Almagest
4-17
where type is whatever is returned by dataType().
By redefining these methods, you can make it legal to connect a star that generates
messages to a star that expects integer, floating, or complex particles, or you can connect to a
Printer or XMgraph star (for XMgraph to work, you must define the asFloat function; for
Printer to work, you must define the print method).
4.3.2 Use of the Envelope class
The Envelope class references objects of class Message or derived classes. Once a
message object is placed into an envelope object, the envelope takes over responsibility for
managing its memory: maintaining reference counts, and deleting the message when it is no
longer needed.
The constructor (which takes as its argument a reference to a Message), copy constructor, assignment operator, and destructor of Envelope manipulate the reference counts of
the references Message object. Assignment simply copies a pointer and increments the reference count. When the destructor of a Envelope is called, the reference count of the Message
object is decremented; if it becomes zero, the Message object is deleted. Because of this deletion, a Message must never be put inside a Envelope unless it was created with the new
operator. Once a Message object is put into an Envelope it must never be explicitly deleted;
it will “live” as long as there is at least one Envelope that contains it, and it will then be
deleted automatically.
It is possible for an Envelope to be “empty”. If it is, the empty method will return
TRUE, and the data field will point to a special “dummy message” with type DUMMY that has no
data in it.
The dataType method of Envelope returns the datatype of the contained Message
object; the methods asInt(), asFloat(), asComplex(), and print() are also “passed
through” in a similar way to the contained object.
Two Envelope methods are provided for convenience to make type checking simpler:
typeCheck and typeError. A simple example illustrates their use:
if (!envelope.typeCheck("IntVecData")) {
Error::abortRun(*this, envelope.typeError("IntVecData"));
return;
}
The method typeCheck calls isA on the message contents and returns the result, so an error
will be reported if the message contents are not IntVecData and are not derived from IntVecData. Since the above code segment is so common in stars; a macro is included in Message.h to generate it; the macro
TYPE_CHECK(envelope,"IntVecData");
expands to essentially the same code as above. The typeError method generates an appropriate error message:
Expected message type ’arg’, got ’type’
To access the data, two methods are provided: myData() and writableCopy(). The
myData function returns a pointer to the contained Message-derived object. The data pointed
Ptolemy
Last updated: 10/10/97
4-18
Data Types
to by this pointer must not be modified, since other Envelope objects in the program may
also contain it. If you convert its type, always make sure that the converted type is a pointer to
const (see the programming example for UnPackInt below). This ensures that the compiler
will complain if you do anything illegal.
The writableCopy function also returns a pointer to the contained object, but with a
difference. If the reference count is one, the envelope is emptied (set to the dummy message)
and the contents are returned. If the reference count is greater than one, a clone of the contents
is made (by calling its clone() function) and returned; again the envelope is zeroed (to prevent the making of additional clones later on).
In some cases, a star writer will need to keep a received Message object around
between executions. The best way to do this is to have the star contain a member of type
Envelope, and to use this member object to hold the message data between executions. Messages should always be kept in envelopes so that the user does not have to worry about managing their memory.
4.3.3 Use of the MessageParticle class
If a porthole is of type “message”, then its particles are objects of the class MessageParticle. A MessageParticle is simply a particle whose data field is an Envelope, which means that it can hold a Message in the same way that Envelope objects do.
Many methods of the Particle class are redefined in the MessageParticle class
to cause a run-time error; for example, it is illegal to send an integer, floating, or complex
number to the particle with the << operator. The conversion operators (conversion to type
int, double, or Complex) return errors by default, but can be made legal by redefining the
asInt, asFloat, or asComplex methods for a specific message type.
The principal operations on MessageParticle objects are << with an argument of
type Envelope, to load a message into the particle, and getMessage(Envelope&), to
transfer message contents from the particle into a user-supplied message. The getMessage
method removes the message contents from the particle1. In cases where the destructive
behavior of getMessage cannot be tolerated, an alternative interface, accessMessage(Envelope&), is provided. It does not remove the message contents from the particle.
Promiscuous use of accessMessage in systems where large-sized messages may be present
can cause the amount of virtual memory occupied to grow (though all message will be deleted
eventually).
4.3.4 Use of messages in stars
Here are a couple of simple examples of stars that produce and consume messages. For
more advanced samples, look in the Ptolemy distribution for stars that produce or consume
messages. The image processing classes and stars, which are briefly described below in
“Image particles” on page 4-40, provide a particularly rich set of examples. The matrix classes
described on page 4-21 are also good examples. The matrix classes are recognized in the
Ptolemy kernel, and supported by pigi and ptlang.
1. The reason for this “aggressive reclamation” policy (both here and in other places) is to minimize the
number of no-longer-needed messages in the system and to prevent unnecessary clones from being
generated by writableCopy() by eliminating references to Message objects as soon as possible.
U. C. Berkeley
Department of EECS
The Almagest
4-19
defstar {
name { PackInt }
domain { SDF }
desc { Accept integer inputs and produce IntVecData messages.}
defstate {
name { length }
type { int }
default { 10 }
desc { number of values per message }
}
input {
name { input }
type { int }
}
output {
name { output }
type { message }
}
ccinclude { "Message.h", "IntVecData.h" }
start {
input.setSDFParams(int(length),int(length-1));
}
go {
int l = length;
IntVecData * pd = new IntVecData(l);
// Fill in message. input%0 is newest, must reverse
for (int i = 0; i < l; i++)
pd->data[l-i-1] = int(input%i);
Envelope pkt(*pd);
output%0 << pkt;
}
}
Since this is an SDF star, it must produce and consume a constant number of tokens on each
step, so the message length must be fixed (though it is controllable with a state). See “Setting
SDF porthole parameters” on page 7-1 for an explanation of the setSDFParams method.
Notice that the output porthole is declared to be of type message. Notice also the ccinclude statement; we must include the file Message.h in all message-manipulating stars, and
we must also include the definition of the specific message type we wish to use.
The code itself is fairly straightforward—an IntVecData object is created with new,
is filled in with data, and is put into an Envelope and sent. Resist the temptation to declare
the IntVecData object as a local variable: it will not work. It must reside on the heap. Here
is a star to do the inverse operation:
defstar {
name { UnPackInt }
domain { SDF }
desc {
Accept IntVecData messages and produce integers. The first ’length’
values from each message are produced.
Ptolemy
Last updated: 10/10/97
4-20
Data Types
}
defstate {
name { length }
type { int }
default { 10 }
desc { number of values output per message }
}
input {
name { input }
type { message }
}
output {
name { output }
type { int }
}
ccinclude { "Message.h", "IntVecData.h" }
start {
output.setSDFParams(int(length),int(length-1));
}
go {
Envelope pkt;
(input%0).getMessage(pkt);
if (!pkt.typeCheck("IntVecData")) {
Error::abortRun(*this,pkt.typeError("IntVecData"));
return;
}
const IntVecData * pd = (const IntVecData *)pkt.myData();
if (pd.length() < int(length)) {
Error::abortRun(*this,
"Received message is too short");
return;
}
for (i = 0; i < int(length); i++) {
output%(int(length)-i-1) << pd->data[i];
}
}
}
Because the domain is SDF, we must always produce the same number of outputs regardless
of the size of the messages. The simple approach taken here is to require at least a certain
amount of data or else to trigger an error and abort the run.
The operations here are to declare an envelope, get the data from the particle into the
envelope with getMessage, check the type, and then access the contents. Notice the cast
operation; this is needed because myData returns a const pointer to class Message. It is
important that we converted the pointer to const IntVecData * and not IntVecData*
because we have no right to modify the message through this pointer. Many C++ compilers
will not warn by default about “casting away const”; we recommend turning on compiler
warnings when compiling code that uses messages to avoid getting into trouble (for g++, say
-Wcast-qual; for cfront-derived compilers, say +w).
If we wished to modify the message and then send the result as an output, we would
call writableCopy instead of myData, modify the object, then send it on its way as in the
U. C. Berkeley
Department of EECS
The Almagest
4-21
previous star.
4.4 The Matrix Data Types
The primary support for matrix types in Ptolemy is the PtMatrix class. PtMatrix is
derived from the Message class, and uses the various kernel support functions for working
with the Message data type as described in Section 4.3 on page 4-14. This section discusses
the PtMatrix class and how to write stars and programs using this class.
4.4.1 Design philosophy
The PtMatrix class implements two dimensional arrays. There are four key classes
derived from PtMatrix: ComplexMatrix, FixMatrix, FloatMatrix, and IntMatrix.
(Note that FloatMatrix is a matrix of C++ doubles.) A review of matrix classes implemented by other programmers revealed two main styles of implementation: a vector of vectors, or a simple array. In addition, there are two main formats of storing the entries: columnmajor ordering, where all the entries in the first column are stored before the entries of the second column, and row-major ordering, where the entries are stored starting with the first row.
Column-major ordering is how Fortran stores arrays whereas row-major ordering is how C
stores arrays.
The Ptolemy PtMatrix class stores data as a simple C array, and therefore uses rowmajor ordering. Row-major ordering also seems more natural for operations such as image
and video processing, but it might make it more difficult to interface Ptolemy’s PtMatrix
class with Fortran library calls. The limits of interfacing Ptolemy’s PtMatrix class with other
software is discussed in Section 4.4.5 on page 4-33.
The design decision to store data entries in a C array rather than as an array of vector
objects has a greater effect on performance than the decision whether to use row major or column major ordering. There are a couple of advantages to implementing a matrix class as an
array of vector class objects: referencing an entry may be faster, and it is easier to do operations on a whole row or column of the matrix, depending on whether the format is an array of
column vectors or an array of row vectors. An entry lookup in an array of row vectors requires
two index lookups: one to find the desired row vector in the array and one to find the desired
entry of that row. A linear array, in contrast, requires a multiplication to find the location of
first element of the desired row and then an index lookup to find the column in that row. For
example, A[row][col] is equivalent to looking up &data + (row*numRows + col) if
the entries are stored in a C array data[], whereas it is *(&rowArray + row) + col if
looking up the entry in an array of vectors format.
Although the array of vectors format has faster lookups, it is also more expensive to
create and delete the matrix. Each vector of the array must be created in the matrix constructor, and each vector must also be deleted by the matrix destructor. The array of vectors format
also requires more memory to store the data and the extra array of vectors.
With the advantages and disadvantages of the two systems in mind, we chose to implement the PtMatrix class with the data stored in a standard C array. Ptolemy’s environment is
such that matrices are created and deleted constantly as needed by stars: this negates much of
the speedup gained from faster lookups. Also, we felt it was important to keep the design of
the class simple and the memory usage efficient because of Ptolemy’s increasing size and
Ptolemy
Last updated: 10/10/97
4-22
Data Types
complexity.
4.4.2 The PtMatrix class
The PtMatrix base class is derived from the Message class so that we can use
Ptolemy’s Envelope class and message-handling system. However, the MessageParticle
class is not used by the PtMatrix class; instead, there are special MatrixEnvParticle
classes defined to handle type checking between the various types of matrices. This allows the
system to automatically detect when two stars with different matrix type inputs and outputs
are incorrectly connected together.1 Also, the MatrixEnvParticle class has some special
functions not found in the standard MessageParticle class to allow easier handling of
PtMatrix class messages. A discussion of how to pass PtMatrix class objects using the
MatrixEnvParticles can be found in a following section.
As explained previously, there are currently four data-specific matrix classes: ComplexMatrix, FixMatrix, FloatMatrix, and IntMatrix. Each of these classes stores its
entries in a standard C array named data, which is an array of data objects corresponding to
the PtMatrix type: Complex, Fix, double, or int. These four matrix classes implement a
common set of operators and functions; in addition, the ComplexMatrix class has a few special methods such as conjugate() and hermitian() and the FixMatrix class has a number of special constructors that allow the user to specify the precision of the entries in the
matrix. Generally, all entries of a FixMatrix will have the same precision.
The matrix classes were designed to take full advantage of operator overloading in
C++ so that operations on matrix objects can be written much like operations on scalar ones.
For example, the two-operand multiply operator * has been defined so that if A and B are
matrices, A * B will return a third matrix that is the matrix product of A and B.
4.4.3 Public functions and operators for the PtMatrix class
The functions and operators listed below are implemented by all matrix classes (ComplexMatrix, FixMatrix, FloatMatrix, and IntMatrix) unless otherwise noted. The
symbols used are:
•
XXX refers to one of the following: Complex, Fix, Float, or Int
•
xxx refers to one of the following: Complex, Fix, double, or int
Functions and Operators to access entries of the Matrix:
xxx& entry(int i)
Example: A.entry(i)
Return the ith entry of the matrix when its data storage is considered to
be a linear array. This is useful for quick operations on every entry of
the matrix without regard for the specific (row,column) position of
that entry. The total number of entries in the matrix is defined to be
numRows() * numCols(), with indices ranging from 0 to num1. We recommend, however, that you do not adapt this method to your own types, but use the standard
method of adding new message types described in Section 4.3. The method currently used for the
matrix classes may not be supported in future releases.
U. C. Berkeley
Department of EECS
The Almagest
4-23
Rows() * numCols() - 1. This function returns a reference to the
actual entry in the matrix so that assignments can be made to that entry.
In general, functions that wish to linearly reference each entry of a
matrix A should use this function instead of the expression A.data[i]
because classes which are derived from PtMatrix can then overload
the entry() method and reuse the same functions.
xxx* operator [] (int row)
Example: A[row][column]
Return a pointer to the start of the row in the matrix’s data storage.
(This operation is different to matrix classes defined as arrays of vectors, in which the [] operator returns the vector representing the
desired row.) This operator is generally not used alone but with the []
operator defined on C arrays, so that A[i][j] will give you the entry
of the matrix in the ith row and jth column of the data storage. The
range of rows is from 0 to numRows()-1 and the range of columns is
from 0 to numCols()-1.
Constructors:
XXXMatrix()
Example: IntMatrix A;
Create an uninitialized matrix. The number of rows and columns are set
to zero and no memory is allocated for the storage of data.
XXXMatrix(int numRow, int numCol)
Example: FloatMatrix A(3,2);
Create a matrix with dimensions numRow by numCol. Memory is allo-
cated for the data storage but the entries are uninitialized.
XXXMatrix(int numRow, int numCol, PortHole& p)
Example: ComplexMatrix(3,3,myPortHole)
Create a matrix of the given dimensions and initialize the entries by
assigning to them values taken from the porthole myPortHole. The
entries are assigned in a rasterized sequence so that the value of the first
particle removed from the porthole is assigned to entry (0,0), the second particle’s value to entry (0,1), etc. It is assumed that the porthole
has enough particles in its buffer to fill all the entries of the new matrix.
XXXMatrix(int numRow, int numCol, XXXArrayState& dataArray)
Example: IntMatrix A(2,2,myIntArrayState);
Create a matrix with the given dimensions and initialize the entries to
the values in the given ArrayState. The values of the ArrayState
fill the matrix in rasterized sequence so that entry (0,0) of the matrix is
the first entry of the ArrayState, entry (0,1) of the matrix is the second, etc. An error is generated if the ArrayState does not have
enough values to initialize the whole matrix.
XXXMatrix(const XXXMatrix& src)
Ptolemy
Last updated: 10/10/97
4-24
Data Types
Example: FixMatrix A(B);
This is the copy constructor. A new matrix is formed with the same
dimensions as the source matrix and the data values are copied from the
source.
XXXMatrix(const XXXMatrix& src, int startRow, int startCol, int
numRow, int numCol)
Example: IntMatrix A(B,2,2,3,3);
This special “submatrix” constructor creates a new matrix whose values come from a submatrix of the source. The arguments startRow
and startCols specify the starting row and column of the source
matrix. The values numRow and numCol specify the dimensions of the
new matrix. The sum startRow + numRow must not be greater than
the maximum number of rows in the source matrix; similarly, startCol + numCol must not be greater than the maximum number of columns in the source. For example, if B is a matrix with dimension (4,4),
then A(B,1,1,2,2) would create a new matrix A that is a (2,2) matrix
with data values from the center quadrant of matrix B, so that A[0][0]
== B[1][1], A[0][1] == B[1][2], A[1][0] == B[2][1], and
A[1][1] == B[2][2].
The following are special constructors for the FixMatrix class that allow the programmer to
specify the precision of the entries of the FixMatrix.
FixMatrix(int numRow, int numCol, int length, int intBits)
Example: FixMatrix A(2,2,14,4);
Create a FixMatrix with the given dimensions such that each entry is
a fixed-point number with precision as given by the length and intBits inputs.
FixMatrix(int numRow, int numCol, int length, int intBits,
PortHole& myPortHole)
Example: FixMatrix A(2,2,14,4);
Create a FixMatrix with the given dimensions such that each entry is
a fixed-point number with precision as given by the length and intBits inputs and initialized with the values that are read from the particles contained in the porthole myPortHole.
FixMatrix(int numRow, int numCol, int length, int intBits, FixArrayState& dataArray)
Example: FixMatrix A(2,2,14,4);
Create a FixMatrix with the given dimensions such that each entry is
a fixed-point number with precision as given by the length and intBits inputs and initialized with the values in the given FixArrayState.
There are also special copy constructors for the FixMatrix class that allow the programmer
to specify the precision of the entries of the FixMatrix as they are copied from the sources.
These copy constructors are usually used for easy conversion between the other matrix types.
U. C. Berkeley
Department of EECS
The Almagest
4-25
The last argument specifies the type of masking function (truncate, rounding, etc.) to be used
when doing the conversion.
FixMatrix(const XXXMatrix& src, int length, int intBits,
int round)
Example: FixMatrix A(CxMatrix,4,14,TRUE);
Create a FixMatrix with the given dimensions such that each entry is
a fixed-point number with precision as given by the length and intBits arguments. Each entry of the new matrix is copied from the cor-
responding entry of the src matrix and converted as specified by the
round argument.
Comparison operators:
int operator == (const XXXMatrix& src)
Example: if(A == B) then ...
Return TRUE if the two matrices have the same dimensions and every
entry in A is equal to the corresponding entry in B. Return FALSE other-
wise.
int operator != (const XXXMatrix& src)
Example: if(A != B) then ...
Return TRUE if the two matrices have different dimensions or if any
entry of A differs from the corresponding entry in B. Return FALSE oth-
erwise.
Conversion operators:
Each matrix class has a conversion operator so that the programmer can explicitly cast
one type of matrix to another (this casting is done by copying). It would have been possible to
make conversions occur automatically when needed, but because these conversions can be
quite expensive for large matrices, and because unexpected results might occur if the user did
not intend for a conversion to occur, we chose to require that these conversions be used explicitly.
operator XXXMatrix () const
Example: FloatMatrix C = A * (FloatMatrix)B;
Convert a matrix of one type into another. These conversions allow the
various arithmetic operators, such as * and +, to be used on matrices of
different type. For example, if A in the example above is a (3,3)
FloatMatrix and B is a (3,2) IntMatrix, then C is a FloatMatrix
with dimensions (3,2).
Destructive replacement operators:
These operators are member functions that modify the current value of the object. In
the following examples, A is usually the lvalue (*this). All operators return *this:
XXXMatrix& operator = (const XXXMatrix& src)
Example: A = B;
Ptolemy
Last updated: 10/10/97
4-26
Data Types
This is the assignment operator: make A into a matrix that is a copy of
B. If A already has allocated data storage, then the size of this data storage is compared to the size of B. If they are equal, then the dimensions
of A are simply set to those of B and the entries copied. If they are not
equal, the data storage is freed and reallocated before copying.
XXXMatrix& operator = (xxx value)
Example: A = value;
Assign each entry of A to have the given value. Memory management
is handled as in the previous operator.
Note: this operator is targeted for deletion. Do not use it.
XXXMatrix& operator += (const XXXMatrix& src)
Example: A += B;
Perform the operation A.entry(i) += B.entry(i) for each entry in
A. A and B must have the same dimensions.
XXXMatrix& operator += (xxx value)
Example: A += value;
Add the scalar value to each entry in the matrix.
XXXMatrix& operator -= (const XXXMatrix& src)
Example: A -= B;
Perform the operation A.entry(i) -= B.entry(i) for each entry in
A. A and B must have the same dimensions.
XXXMatrix& operator -= (xxx value)
Example: A -= value;
Subtract the scalar value from each entry in the matrix.
XXXMatrix& operator *= (const XXXMatrix& src)
Example: A *= B;
Perform the operation A.entry(i) *= B.entry(i) for each entry in
A. A and B must have the same dimensions. Note: this is an elementwise
operation and is not equivalent to A = A * B.
XXXMatrix& operator *= (xxx value)
Example: A *= value;
Multiply each entry of the matrix by the scalar value.
XXXMatrix& operator /= (const XXXMatrix& src)
Example: A /= B;
Perform the operation A.entry(i) /= B.entry(i) for each entry in
A. A and B must have the same dimensions.
XXXMatrix& operator /= (xxx value)
Example: A /= value
Divide each entry of the matrix by the scalar value. The scalar value
must be non-zero.
U. C. Berkeley
Department of EECS
The Almagest
4-27
XXXMatrix& operator identity()
Example: A.identity();
Change A to be an identity matrix so that each entry on the diagonal is 1
and all off-diagonal entries are 0.
Non-destructive operators (these return a new matrix):
XXXMatrix operator - ()
Example: B = -A;
Return a new matrix such that each element is the negative of the element of the source.
XXXMatrix operator ~ ()
Example: B = ~A;
Return a new matrix that is the transpose of the source.
XXXMatrix operator ! ()
Example: B = !A;
Return a new matrix which is the inverse of the source.
XXXMatrix operator ^ (int exponent)
Example: B = A^2;
Return a new matrix which is the source matrix to the given exponent
power. The exponent can be negative, in which case the exponent is
first treated as a positive number and the final result is then inverted. So
A^2 == A*A and A^(-3) == !(A*A*A).
XXXMatrix transpose()
Example: B = A.transpose();
This is the same as the ~ operator but called by a function name
instead of as an operator.
XXXMatrix inverse()
Example: B = A.inverse();
This is the same as the ! operator but called by a function name
instead of as an operator.
ComplexMatrix conjugate()
Example: ComplexMatrix B = A.conjugate();
Return a new matrix such that each element is the complex conjugate of
the source. This function is defined for the ComplexMatrix class only.
ComplexMatrix hermitian()
Example: ComplexMatrix B = A.hermitian();
Return a new matrix which is the Hermitian Transpose (conjugate
transpose) of the source. This function is defined for the ComplexMatrix class only.
Ptolemy
Last updated: 10/10/97
4-28
Data Types
Non-member binary operators:
XXXMatrix operator + (const XXXMatrix& left, const XXXMatrix&
right)
Example: A = B + C;
Return a new matrix which is the sum of the first two. The left and
right source matrices must have the same dimensions.
XXXMatrix
operator
matrix)
+
(const
xxx&
scalar,
const
XXXMatrix&
Example: A = 5 + B;
Return a new matrix that has entries of the source matrix added to a
scalar value.
XXXMatrix operator + (const XXXMatrix& matrix, const xxx& scalar)
Example: A = B + 5;
Return a new matrix that has entries of the source matrix added to a
scalar value. (This is the same as the previous operator but with the
scalar on the right.)
XXXMatrix operator - (const XXXMatrix& left, const XXXMatrix&
right)
Example: A = B - C;
Return a new matrix which is the difference of the first two. The left
and right source matrices must have the same dimensions.
XXXMatrix
operator
matrix)
-
(const
xxx&
scalar,
const
XXXMatrix&
Example: A = 5 - B;
Return a new matrix that has the negative of the entries of the source
matrix added to a scalar value.
XXXMatrix operator - (const XXXMatrix& matrix, const xxx& scalar)
Example: A = B - 5;
Return a new matrix such that each entry is the corresponding entry of
the source matrix minus the scalar value.
XXXMatrix operator * (const XXXMatrix& left, const XXXMatrix&
right)
Example: A = B * C;
Return a new matrix which is the matrix product of the first two. The
left and right source matrices must have compatible dimensions
(i.e. A.numCols() == B.numRows().
XXXMatrix
operator
matrix)
*
(const
xxx&
scalar,
const
XXXMatrix&
Example: A = 5 * B;
U. C. Berkeley
Department of EECS
The Almagest
4-29
Return a new matrix that has entries of the source matrix multiplied
by a scalar value.
XXXMatrix operator * (const XXXMatrix& matrix, const xxx& scalar)
Example: A = B * 5;
Return a new matrix that has entries of the source matrix multiplied
by a scalar value. (This is the same as the previous operator but with the
scalar on the right.)
Miscellaneous functions:
int numRows()
Return the number of rows in the matrix.
int numCols()
Return the number of columns in the matrix.
Message* clone()
Example: IntMatrix *B = A.clone();
Return a copy of *this.
StringList print()
Example: A.print()
Return a formatted StringList that can be printed to display the contents of the matrix in a reasonable format.
XXXMatrix& multiply (const XXXMatrix& left, const XXXMatrix&
right, XXXMatrix& result)
Example: multiply(A,B,C);
This is a faster 3 operand form of matrix multiply such that the result
matrix is passed as an argument so that we avoid the extra copy step
that is involved when we write C = A * B.
const char* dataType()
Example: A.dataType()
Return a string that specifies the name of the type of matrix. The strings
are “ComplexMatrix”, “FixMatrix”, “FloatMatrix”, and “IntMatrix”.
int isA(const char* type)
Example: if(A.isA("FixMatrix")) then ...
Return TRUE if the argument string matches the type string of the
matrix.
4.4.4 Writing stars and programs using the PtMatrix class
This section describes how to use the matrix data classes when writing stars. Some
examples will be given here but the programmer should refer to the stars in $PTOLEMY/src/
and
$PTOLEMY/src/domains/sdf/image/
domains/sdf/matrix/stars/*.pl
Ptolemy
Last updated: 10/10/97
4-30
Data Types
stars/*.pl for more examples
Memory management
The most important thing to understand about the use of matrix data classes in the
Ptolemy environment is that stars that intend to output the matrix in a particle should allocate
memory for the matrix but never delete that matrix. Memory reclamation is done automatically by the reference-counting mechanism of the Message class. Strange errors will occur if
the star deletes the matrix before it is used by another star later in the execution sequence.
Naming conventions
Stars that implement general-purpose matrix operations usually have names with the
_M suffix to distinguish them from stars that operate on scalar particles. For example, the
SDFGain_M star multiplies an input matrix by a scalar value and outputs the resulting matrix.
This is in contrast to SDFGain, which multiplies an input value held in a FloatParticle by
a double and puts that result in an output FloatParticle.
Include files
For a star to use the PtMatrix classes, it must include the file Matrix.h in either its
.h or .cc file. If the star has a matrix data member, then the declaration
hinclude { "Matrix.h" }
needs to be in the Star definition. Otherwise, the declaration
ccinclude { "Matrix.h" }
is sufficient.
To declare an input porthole that accepts matrices, the following syntax is used:
input {
name { inputPortHole }
type { FLOAT_MATRIX_ENV }
}
The syntax is the same for output portholes. The type field can be COMPLEX_MATRIX_ENV,
FLOAT_MATRIX_ENV, FIX_MATRIX_ENV, or INT_MATRIX_ENV. The icons created by
Ptolemy will have terminals that are thicker and that have larger arrow points than the terminals for scalar particle types. The colors of the terminals follow the pattern of colors for scalar
data types (e.g., blue represents Float and FloatMatrix).
Input portholes
The syntax to extract a matrix from the input porthole is:
Envelope inPkt;
(inputPortHole%0).getMessage(inPkt);
const FloatMatrix& inputMatrix =
*(const FloatMatrix *)inPkt.myData();
The first line declares an Envelope, which is used to access the matrix. Details of the Envelope class are given in “Use of the Envelope class” on page 4-17. The second line fills the
envelope with the input matrix. Note that, because of the reference-counting mechanism, this
line does not make a copy of the matrix. The last two lines extract a reference to the matrix
U. C. Berkeley
Department of EECS
The Almagest
4-31
from the envelope. It is up to the programmer to make sure that the cast agrees with the definition of the input port.
Because multiple envelopes might reference the same matrix, a star is generally not
permitted to modify the matrix held by the Envelope. Thus, the function myData() returns
a const Message *. We cast that to be a const FloatMatrix * and then de-reference it
and assign the value to inputMatrix. It is generally better to handle matrices by reference
instead of by pointer because it is clearer to write “A + B” rather than “*A + *B” when
working with matrix operations. Stars that wish to modify an input matrix should access it
using the writableCopy method, as explained in “Use of the Envelope class” on page 4-17.
Allowing delays on inputs
The cast to (const FloatMatrix *) above is not always safe. Even if the source
star is known to provide matrices of the appropriate type, a delay on the arc connecting the
two stars can cause problems. In particular, delays in dataflow domains are implemented as
initial particles on the arcs. These initial particles are given the value “zero” as defined by the
type of particle. For Message particles, a “zero” is an uninitialized Message particle containing a “dummy” data value. This dummy Message will be returned by the myData method in
the third line of the above code fragment. The dummy message is not a FloatMatrix, rendering the above cast invalid. A star that expects matrix inputs must have code to handle
empty particles. An example is:
if(inPkt.empty()) {
FloatMatrix& result = *(new FloatMatrix(int(numRows),
int(numCols)));
result = 0.0;
output%0 << result;
}
There are many ways that an empty input can be interpreted by a star that operates on matrices. For example, a star multiplying two matrices can simply output a zero matrix if either
input is empty. A star adding two matrices can output whichever input is not empty. Note
above that we create an output matrix that has the dimensions as set by the state parameters of
the star so that any star that uses this output will have valid data.
A possible alternative to outputting a zero matrix is to simply pass that empty MessageParticle along. This approach, however, can lead to counterintuitive results. Suppose
that empty message reaches a display star like TkText, which will attempt to call the
print() method of the object. An empty message has a print() method that results in a
message like
<type>: no print method
This is likely to prove extremely confusing to users, so we strongly recommend that each
matrix star handle the empty input in a reasonable way, and produce a non-empty output.
Matrix outputs
To put a matrix into an output porthole, the syntax is:
FloatMatrix& outMatrix =*(new FloatMatrix(someRow,someCol));
Ptolemy
Last updated: 10/10/97
4-32
Data Types
// ... do some operations on the outMatrix
outputPortHole%0 << outMatrix;
The last line is similar to outputting a scalar value. This is because we have overloaded the <<
operator for MatrixEnvParticles to support PtMatrix class inputs. The standard use
of the MessageParticle class requires you to put your message into an envelope first and
then use << on the envelope (see “Use of the Envelope class” on page 4-17), but we have specialized this so that the extra operation of creating an envelope first is not explicit.
Here is an example of a complete star definition that inputs and outputs matrices:
defstar {
name { Mpy_M }
domain { SDF }
desc {
Does a matrix multiplication of two input Float matrices A and B to
produce matrix C.
Matrix A has dimensions (numRows,X).
Matrix B has dimensions (X,numCols).
Matrix C has dimensions (numRows,numCols).
The user need only specify numRows and numCols. An error will be
generated automatically if the number of columns in A does not match
the number of columns in B.
}
input {
name { Ainput }
type { FLOAT_MATRIX_ENV }
}
input {
name { Binput }
type { FLOAT_MATRIX_ENV }
}
output {
name { output }
type { FLOAT_MATRIX_ENV }
}
defstate {
name { numRows }
type { int }
default { 2 }
desc { The number of rows in Matrix A and Matrix C.}
}
defstate {
name { numCols }
type { int }
default { 2 }
desc { The number of columns in Matrix B and Matrix C}
}
ccinclude { "Matrix.h" }
go {
// get inputs
Envelope Apkt;
(Ainput%0).getMessage(Apkt);
const FloatMatrix& Amatrix =
U. C. Berkeley
Department of EECS
The Almagest
4-33
*(const FloatMatrix *)Apkt.myData();
Envelope Bpkt;
(Binput%0).getMessage(Bpkt);
const FloatMatrix& Bmatrix =
*(const FloatMatrix *)Bpkt.myData();
// check for “null” matrix inputs, which could be
// caused by delays on the input line
if(Apkt.empty() || Bpkt.empty()) {
// if either input is empty, return a zero
// matrix with the state dimensions
FloatMatrix& result =
*(new FloatMatrix(int(numRows),
int(numCols)));
result = 0.0;
output%0 << result;
}
else {
// Amatrix and Bmatrix are both valid
if((Amatrix.numRows() != int(numRows)) ||
(Bmatrix.numCols() != int(numCols))) {
Error::abortRun(*this,
"Dimension size of FloatMatrix inputs do ",
"not match the given state parameters.");
return;
}
// do matrix multiplication
FloatMatrix& result =
*(new FloatMatrix(int(numRows),
int(numCols)));
// we could write
//
result = Amatrix * Bmatrix;
// but the following is faster
multiply(Amatrix,Bmatrix,result);
output%0 << result;
}
}
}
4.4.5 Future extensions
After reviewing the libraries of numerical analysis software that is freely available on
the Internet, it is clear that it would be beneficial to extend the PtMatrix class by adding
those well-tested libraries as callable functions. Unfortunately, many of those libraries are currently only available in Fortran, and there are some incompatibilities with Fortran’s column
major ordering and C’s row major ordering. Those problems would still exist even if the Fortran code was converted to C. There are a few groups which are currently working on C++
ports of the numerical analysis libraries. One notable group is the Lapack++1 project which is
1. LAPACK++: A Design Overview of Object-Oriented Extensions for High Performance Linear
Algebra, by Jack J. Dongarra, Roldan Pozo, and David W. Walker, available on netlib.
Ptolemy
Last updated: 10/10/97
4-34
Data Types
developing a flexible matrix class of their own, besides porting the Fortran algorithms of
Lapack into C++. This might possibly be incorporated in a future release.
4.5 The File and String Types
There are two experimental types in Ptolemy that support non-numeric computation.
These types represent the beginnings of an effort to extend Ptolemy’s dataflow model to “nondataflow” problems such as scheduling and design flow. Their interfaces are still being developed, so should be expected to change in future releases. We would welcome suggestions on
how to improve the interface and functionality of these two types.
4.5.1 The File type
The file type is implemented by the classes FileMessage and FileParticle,
which are derived from Message and Particle. It uses the reference-counting mechanism
of the Message and Envelope classes to ensure that files are not deleted until no longer
needed. Although we created a new particle type to allow these types to appear in the pigi
graphical interface, we recommend that you use the Message interface described in
Section 4.3 for your own types.
The File type adds the following functions to Message:
Constructors
FileMessage()
Create a new file message with a unique filename. By default, the file
will be deleted when no file messages reference it.
FileMessage(const char* name)
Create a new file message with the given filename. By default, the file
will not be deleted when no file messages reference it.
FileMessage(const FileMessage& src)
Create a new file message containing the same filename as the given
file message. By default, the file will not be deleted when no file messages reference it.
Operations
const char* fileName()
Return the file name contained in this message.
StringList print()
Return the file name contained in this message in a StringList
object.
const char* fileName()
Return the file name contained in this message.
void setTransient(int transient)
Set the status of the file. If transient is TRUE, the file will be deleted
U. C. Berkeley
Department of EECS
The Almagest
4-35
when no file messages reference it; if FALSE, then it will not be
deleted.
4.5.2 The String type
The string type is implemented by the classes StringMessage and StringParticle, which are derived from Message and Particle. It contains an InfString object—
InfString is a version of StringList that allows limited modification, and is used to
interface C++ to Tcl. Again, It uses the reference-counting mechanism of the Message and
Envelope classes to ensure that strings are not deleted until no longer needed. StringMessage is currently very simple—it adds the following functions to Message:
Constructors
StringMessage()
Create a new string message an empty string.
StringMessage(const char* name)
Create a new string message with a copy of the given string. The given
string can be deleted, since the new message does not reference it.
StringMessage(const StringMessage& src)
Create a new string message containing the same string as the given
string message. Again, the string is copied.
Operations
StringList print()
Return the string contained in this message in a StringList object.
4.6 Writing Stars That Manipulate Any Particle Type
Ptolemy allows stars to declare that inputs and outputs are of type ANYTYPE. A star
may need to do this, for example, if it simply copies its inputs without regard to type, as in the
case of a Fork star, or if it calls a generic function that is overloaded by every data type, such
as sink stars which call the print method of the type.
The following is an example of a star that operates on ANYTYPE particles:
defstar {
name {Fork}
domain {SDF}
desc { Copy input particles to each output. }
input {
name{input}
type{ANYTYPE}
}
outmulti {
name{output}
type{= input}
}
go {
Ptolemy
Last updated: 10/10/97
4-36
Data Types
MPHIter nextp(output);
PortHole* p;
while ((p = nextp++) != 0)
(*p)%0 = input%0;
}
}
Notice how in the definition of the output type, the star simply says that its output type
will be the same as the input type. ptlang translates this definition into an ANYTYPE output
porthole and a statement in the star constructor that reads
output.inheritTypeFrom(input);
as you can see by examining the .cc file generated for SDFFork.
During galaxy setup, the Ptolemy kernel assigns actual types to ANYTYPE portholes,
making use of the types of connected portholes and inheritTypeFrom connections. For example, if a Fork’s input is connected to an output porthole of type INT, the Fork’s input becomes
type INT, and then so do its output(s) thanks to the inheritTypeFrom connection. At runtime
there is no such thing as an ANYTYPE porthole; every porthole has been resolved to some specific data type, which can be obtained from the porthole using the resolvedType() method.
(However, this mechanism does not distinguish among the various subclasses of Message, so
if you are using Message particles you still need to check the actual type of each Message
received.)
Porthole type assignment is really a fairly complex and subtle algorithm, which is discussed further in the Ptolemy Kernel Manual. The important properties for a star writer to
know are these:
•
If an input port has a specific declared type, it is guaranteed to receive particles of that
type. For reasons mentioned in “Reading inputs and writing outputs” on page 2-17, it
is safest to explicitly cast input particles to the desired type, as in
go {
double value = double(in%0);
...
}
but this is not strictly necessary in the current system.
•
In simulation domains, an output port is NOT guaranteed to transmit particles of its
declared type; the actual resolved type of the porthole will be determined by the connected input porthole. Therefore, you should always allow for type conversion of the
value computed by the star into the actual type of the output particle. This happens
implicitly when you write something like
out%0 << t;
because this expands into a call of the particle’s virtual method for loading a value of
the given type. But assuming that you know the exact type of particle in the porthole -- say by writing something like (FloatParticle&) (out%0) --- is very unsafe.
•
In code generation domains, it is usually critical that the output porthole’s actual type
be what the star writer expected. Most codegen domains therefore splice type conver-
U. C. Berkeley
Department of EECS
The Almagest
4-37
sion stars into the schematic when input and output ports of different declared types
are connected. In this way, both connected stars will see the data type they expect, and
the necessary type conversion is handled transparently.
•
The component portholes of a multiporthole are type-resolved separately. Thus, if an
input multiporthole is declared ANYTYPE, its component portholes might have different types at runtime. (This was not true in Ptolemy versions preceding 0.7.) The component portholes of an output multiporthole can have different resolved types in any
case, because they might be connected to inputs of different types.
•
It is rarely a good idea to declare a pure ANYTYPE output porthole; rather, its type
should be equated to some input porthole using the ptlang = port notation or an
explicit inheritTypeFrom call. This ensures that the type resolution algorithm can succeed. A “pure ANYTYPE” output will work only if connected to an input of determinable type; if it’s connected to an ANYTYPE input, the kernel will be unable to resolve a
type for the connection. By providing an = type declaration, you allow the kernel to
choose an appropriate particle type for an ANYTYPE-to-ANYTYPE connection.
4.7 Unsupported Types
There are a number of data types in Ptolemy that we recommend not be used by external developers because they are either insufficiently mature or likely to change. This section
briefly describes those classes.
4.7.1 Sub-matrices
The Ptolemy kernel contains a set of matrices to support efficient computation with
sub-matrices. These classes were developed specifically for the experimental multidimensional SDF (MDSDF) domain and will probably be implemented differently in a future
release.
There are four sub-matrix classes, one for each concrete matrix class: ComplexSubMatrix, FixSubMatrix, FloatSubMatrix, and IntSubMatrix, each of which inherits
from the corresponding PtMatrix class. A sub-matrix contains a reference to a “parent”
matrix of the same type, and modifies its internal data pointers and matrix size parameters to
reference a rectangular region of the parent’s data. The constructors for the submatrix classes
have arguments that specify the region of the parent matrix referenced by the sub-matrix.
As for matrices, the description of sub-matrices uses the convention that XXX means
Complex, Fix, Float, or Int, and xxx means Complex, Fix, double, or int.
The submatrix constructors are:
XXXSubMatrix()
Create an uninitialized matrix.
XXXSubMatrix(int numRow, int numCol)
Create a regular matrix with dimensions numRow by numCol; return a
new submatrix with this matrix as its parent. Memory is allocated for
the data storage but the entries are uninitialized.
XXXSubMatrix(XXXSubMatrix& src, int sRow, int sCol, int nRow,
Ptolemy
Last updated: 10/10/97
4-38
Data Types
int nCol)
Create a sub-matrix of the given dimensions and initialize it to reference the region of the parent matrix starting at (sRow, sCol) and of size
(nRow, nCol). The parent matrix is the same as the parent matrix of
src. The given dimensions must fit into the parent matrix, or an error
will be flagged. Unlike the “sub-matrix” constructors in the regular
matrix classes, this constructor does not copy matrix data.
XXXSubMatrix(const XXXSubMatrix& src)
Make a duplicate of the src sub-matrix. The parent of the new matrix
is the same as the parent of src.
Submatrices support all operations supported by the regular matrix classes. Because
the matrix classes uniformly use only the entry() and operator [] member functions to
access the data, the sub-matrix classes need only to override these functions, and all matrix
operations become available on sub-matrices.
xxx& entry(int i)
Return the ith entry of the sub-matrix when its data storage is considered to be a linear array.
xxx* operator [] (int row)
Return a pointer to the start of the row of the sub-matrix’s data storage.
Using sub-matrices in stars
Sub-matrices are not currently useful in general-purpose dataflow stars. Rather, they
were developed to provide an efficient means of referencing portions of a single larger matrix
in the multi-dimensional synchronous dataflow (MDSDF) domain. We give here a summary.
For more details, see [Che94] and the MDSDF sources in $PTOLEMY/src/domains/
mdsdf/kernel and $PTOLEMY/src/domains/mdsdf/stars.
Unlike other domains, the MDSDF kernel does not transfer particles through FIFO
buffers. Instead, each geodesic keeps a single copy of a “parent” matrix, that represents the
“current” two-dimensional datablock. Each time a star fires, it obtains a sub-matrix that references this parent matrix with the getOutput() function of the MDSDF input port class. For
example, a star might contain:
FloatSubMatrix* data = (FloatSubMatrix*)(input.getInput());
Note that this is not really getting a matrix, but a sub-matrix that references a region of
the current data matrix. The size of the sub-matrix has been set by the star in its initialization
code by calling the setMDSDFParams() function of the port.
To write data to the output matrix, the star gets a sub-matrix which references a region
of the current output matrix and writes to it with a matrix operator. For example,
FloatSubMatrix* result = (FloatSubMatrix*)(output.getOutput());
result = -data;
U. C. Berkeley
Department of EECS
The Almagest
4-39
Because the sub-matrices are only references to the current matrix on each arc they
must be deleted after use:
delete &input;
delete &result;
Here is a simplified example of a complete MDSDF star:
defstar {
name { Add }
domain { MDSDF }
desc {
Matrix addition of two input matrices A and B to
produce matrix C. All matrices must have the same
dimensions.
}
version { %W% %G% }
author { Mike J. Chen }
location { MDSDF library }
input {
name { Ainput }
type { FLOAT_MATRIX }
}
input {
name { Binput }
type { FLOAT_MATRIX }
}
output {
name { output }
type { FLOAT_MATRIX }
}
defstate {
name { numRows }
type { int }
default { 2 }
desc { The number of rows in the input/output matrices. }
}
defstate {
name { numCols }
type { int }
default { 2 }
desc { The number of columns in the input/output
matrices. }
}
ccinclude { “SubMatrix.h” }
setup {
Ainput.setMDSDFParams(int(numRows), int(numCols));
Binput.setMDSDFParams(int(numRows), int(numCols));
output.setMDSDFParams(int(numRows), int(numCols));
}
go {
// get a SubMatrix from the buffer
FloatSubMatrix& input1
Ptolemy
Last updated: 10/10/97
4-40
Data Types
= *(FloatSubMatrix*)(Ainput.getInput());
FloatSubMatrix& input2
= *(FloatSubMatrix*)(Binput.getInput());
FloatSubMatrix& result
= *(FloatSubMatrix*)(output.getOutput());
// compute product, putting result into output
result = input1 + input2;
delete &input1;
delete &input2;
delete &result;
}
}
The sub-matrix “particles”
The ptlang type of submatrices is FLOAT_MATRIX, INT_MATRIX, and so on. (This
is not documented in the User’s Manual and is likely to change in a future release.) Each of
these ptlang types is implemented by a sub-class of Particle: IntMatrixParticle, FloatMatrixParticle, FixMatrixParticle and ComplexMatrixParticle. These particle
classes exist only for setting up the portholes and performing type-checking—they are never
created or passed around during a simulation. Instead, sub-matrices are created and destroyed
by the MDSDF kernel and stars as described above.
4.7.2 Image particles
A set of experimental image data types, designed to make it convenient to manipulate
images and video sequences in Ptolemy, were defined by Paul Haskell. They are based on
Ptolemy’s built-in Message type, described above. A library of stars that uses these image
data types can be found in the image library of the DE domain.
This set of classes is being replaced by the PtMatrix classes, and the SDF image
classes now all use PtMatrix. We give here a brief introduction to the image data types used
in the DE domain, although new work should consider using PtMatrix classes instead. Class
definitions can be found in $PTOLEMY/src/domains/de/kernel.
The base class of all the image classes is called BaseImage. It has some generic
methods and members for manipulating images. Most of the methods are redefined in the
derived classes. The fragment method partitions an image into many smaller images, which
together represent the same picture as the original. The assemble method combines many
small images which make up a single picture into a single image that contains the picture. The
fragment method works recursively, so an image that has been produced by a previous
fragment call can be further fragmented. Assembly always produces a full-sized image from
fragments, however small.
Use of the size, fullSize, and startPos members varies within each subclass.
Typically the size variable holds the number of pixels that an object is storing. If an object is
not produced by fragment(), then (size == fullSize). If the object is produced by a
fragment() call, size may be less than or equal to fullSize. An objects’s fullSize
may be bigger or smaller than width*height. It would be bigger, for example, in DCTIm-
U. C. Berkeley
Department of EECS
The Almagest
4-41
age, where the amount of allocated storage must be rounded up to be a multiple of the block-
size. It would be smaller, for example, for an object that contains run-length coded video.
The frameId variable is used during assembly. Fragments with the same frameId’s
are assembled into the same image. So, it is important that different frames from the same
source have different frameIds.
The comparison functions {==, !=, <, >, etc.} compare two objects’ frameId’s. They
can be used to resequence images or to sort image fragments.
The copy constructor and clone methods have an optional integer argument. If a nonzero argument is provided, then all state values of the copied object are copied to the created
object, but none of the image data is copied. If no argument or a zero argument is provided,
then the image data is copied as well. Classes derived from BaseImage should maintain this
policy.
The GrayImage class, derived from BaseImage, is used to represent gray-scale
images. The DCTImage class is used to represent images or image fragments that have been
encoded using the discrete-cosine transform. The MVImage class is a bit more specialized; it
stores a frame’s worth of motion vectors.
4.7.3 “First-class” types
All of the types built-in to the Ptolemy kernel are “first-class” in the sense that they are
understood by pigi and ptlang. We recommend that users create their own types using the
mechanism described in “Defining New Data Types” on page 4-14. This approach has the disadvantage that all user-defined types are seen by pigi and ptlang as being of type “message.” If this is not acceptable, then it is possible to create your own first-class types by subclassing Particle and adding the new types to VEM. The following instructions briefly
describes this process. We stress, however, that this method is not officially supported and that
types created this way will probably have to be reworked in a future release of Ptolemy. You
will need to use some other color—say fileColor—as a sample to follow when modifying
the various source files.
•
Sub-class Particle and Message. Use the classes in $PTOLEMY/src/kernel/
FileMessage.h/cc and $PTOLEMY/src/kernel/FileParticle.{h,cc} as
examples. You will need to create a static instance of your Particle and static
Plasma and PlasmaGate instances to hold your particles, as demonstrated by
FileParticle.
•
Modify $PTOLEMY/src/pigilib/mkTerm.c. There are three switch statements
where you will need to insert a new case.
•
In the directory $PTOLEMY/lib/colors/ptolemy, edit bw.pat and colors.pat
to add the new color. The color is in RBG format, with 1000 being full-scale.
•
Run the Octtools installColors program. It will ask you a series of mysterious and
strangely beautiful questions. To start with, use the defaults, except for “Output display type”, where you answer GENERIC-COLOR. Run the same program again with
the following output display types: GENERIC-BW, Postscript-Color, and Postscript-BW.
•
To support monochrome screens (when pigi is started with the -bw option), repeat
Ptolemy
Last updated: 10/10/97
4-42
Data Types
the above, but specify $PTOLEMY/lib/colors/ptolemy/bw.pat as the pattern
file, $PTOLEMY/lib/bw_patterns as the directory in which to install, GENERICCOLOR as the display device, and answer YES to the question about color output
device.
•
After rebuilding pigilib and restarting, create an icon for a star that has your new
type as an input or output. The terminal should be of the new color.
U. C. Berkeley
Department of EECS
The Almagest
5-1
Chapter 5. Using Tcl/Tk
Authors:
Edward A. Lee
Other Contributors:
Brian L. Evans
Wei-Jen Huang
Alan Kamas
Kennard White
5.1 Introduction
Tcl is an interpreted “tool command language” designed by John Ousterhout while at
UC Berkeley. Tk is an associated X window toolkit. Both have been integrated into Ptolemy.
Parts of the graphical user interface and all of the textual interpreter ptcl are designed using
them. Several of the stars in the standard star library also use Tcl/Tk. This chapter explains
how to use the most basic of these stars, TclScript, as well how to design such stars from
scratch. It is possible to define very sophisticated, totally customized user interfaces using this
mechanism.
In this chapter, we assume the reader is familiar with the Tcl language. Documentation
is provided along with the Ptolemy distribution in the $PTOLEMY/tcltk/itcl/man directory in Unix man page format. HTML format documentation is available from the other.src tar
file in $PTOLEMY/src/tcltk. Up-to-date documentation and software releases are available
by on the SunScript web page at http://www.sunscript.com. There is also a newsgroup
called comp.lang.tcl. This news group accumulates a list of frequently asked questions
about Tcl which is available http://www.teraform.com/%7Elvirden/tcl-faq/.
The principal use of Tcl/Tk in Ptolemy is to customize the user interface. Stars can be
created that interact with the user in specialized ways, by creating customized displays or by
soliciting graphical inputs.
5.2 Writing Tcl/Tk scripts for the TclScript star
Several of the domains in Ptolemy have a star called TclScript. This star provides
the quickest and easiest path to a customized user interface. The icon can take any number of
forms, including the following:
Tcl
TclScript
Tcl
TclScript
Tcl
TclScript
Tcl
TclScript
Tcl
TclScript
Tcl
TclScript
Tcl
TclScript
Tcl
TclScript
Tcl
TclScript
Tcl
TclScript
Tcl
TclScript
Tcl
TclScript
Tcl
TclScript
All of these icons refer to the same star, but each has been customized for a particular number
of input and output ports. You should select the one you need on the basis of the number of
Ptolemy
Last updated: 10/10/97
5-2
Using Tcl/Tk
input and output ports required. The left-most icon has an unspecified number of inputs and
outputs (as indicated by the double arrows at its input and output ports).
The TclScript star has one parameter (settable state):
tcl_file
A string giving the full path name of a file containing a Tcl script
The Tcl script file specifies initialization commands, for example to open new windows on the
screen, and may optionally define a procedure to be invoked by the star every time it runs. We
begin with two examples that illustrate most of the key techniques needed to use this star:
Example 1: Consider the following simple schematic in the SDF domain:
Tcl
YY
YYYYYYYYYY
WW
YY
WW
YY
WW
YY
WW
123
YY
kkkkkkkkkk
WW
Tk
TclScript
ShowValues
The TkShowValues star is in the standard SDF star library. It displays whatever input
values are supplied in a subpanel of the control panel for the system. Suppose we specify the following Tcl script for the TclScript star:
set s $ptkControlPanel.middle.button_$starID
if {! [winfo exists $s]} {
button $s -text "PUSH ME"
pack append $ptkControlPanel.middle $s {top}
bind $s <ButtonPress-1> "setOutputs_$starID 1.0"
bind $s <ButtonRelease-1> "setOutputs_$starID 0.0"
setOutputs_$starID 0.0
}
unset s
This script creates a pushbutton in the control panel. When the button is depressed,
the star outputs the value 1.0. When the button is released, the star outputs value 0.0.
The resulting control panel is shown below:
While the system is running, depressing the button labeled “PUSH ME” will cause the
value displayed at the bottom to change from 0.0 to 1.0. Releasing the button will
change the value back to 0.0. The lines in the Tcl script are explained below:
U. C. Berkeley
Department of EECS
The Almagest
5-3
set s $ptkControlPanel.middle.button_$starID
This defines a Tcl variable “s” whose value is the name of the window to be used for
the button. The first part of the name, $ptkControlPanel, is a global variable giving the name of the control panel window itself. This global variable has been set by
pigi and can be used by any Tcl script. The second part, .middle, specifies that the
button should appear in the subwindow named .middle of the control panel. The
control panel, by default, has empty subwindows named .high, .middle, and .low.
The last part, .button_$starID, gives a unique name to the button itself. The Tcl
variable starID has been set by the TclScript star to a name that is guaranteed to
be unique for each instance of the star. Using a unique name for the button permits
multiple instances of the star in a schematic to create separate buttons in the control
window without conflict.
if {! [winfo exists $s]} {
...
}
This conditionally checks to see whether or not the button already exists. If, for example, the system is being run a second time, then there is no need to create the button a
second time. In fact, an attempt to do so will generate an error message. If the button
does not already exist, then it is created by the following lines:
button $s -text "PUSH ME"
pack append $ptkControlPanel.middle $s {top}
The first of these defines the button, and the second packs it into the control panel (see
the Tk documentation). The following Tcl statement binds a particular command to a
mouse action, thus defining the response when the button is pushed:
bind $s <ButtonPress-1> "setOutputs_$starID 1.0"
When button number 1 of the mouse is pressed, the Tcl interpreter invokes a procedure named setOutputs_$starID with a single argument, 1.0 (passed as a string).
This procedure has been defined by the TclScript star. It sets the value(s) of the outputs of the star. In this case, there is only one output, so there is only one argument.
The next statement defines the action when the button is released:
bind $s <ButtonRelease-1> "setOutputs_$starID 0.0"
The next statement initializes the output of the star to value 0.0:
setOutputs_$starID 0.0
The last command unsets the variable s, since it is no longer needed:
Ptolemy
Last updated: 10/10/97
5-4
Using Tcl/Tk
unset s
As illustrated in the previous example, a number of procedures and global variables will have
been defined for use by the Tcl script by the time it is sourced. These enable the script to modify the control panel, define unique window names, and set initial output values for the star.
Much of the complexity in the above example is due to the need to use unique names for each
star instance that sources this script. In the above example, the Tcl procedure for setting the
output values has a name unique to this star. Moreover, the name of the button in the control
panel has to be unique to handle the case when more than one TclScript star sources the
same Tcl script. These unique names are constructed using a unique string defined by the star
prior to sourcing the script. That string is made available to the Tcl script in the form of a global Tcl variable starID. The procedure used by the Tcl script to set output values is called
setOutputs_$starID. This procedure takes as many arguments as there are output ports.
The argument list should contain a floating-point value for each output of the star.
In the above example, Tcl code is executed when the Tcl script is sourced. This occurs
during the setup phase of the execution of the star. After the setup phase, no Tcl code will be
executed unless the user pushes the “PUSH ME” button. The command
bind $s <ButtonPress-1> "setOutputs_$starID 1.0"
defines a Tcl command to be executed asynchronously. Notice that the command is enclosed
in quotation marks, not braces. Tcl aficionados will recognize that this is necessary to ensure
that the starID variable is evaluated when the command binding occurs (when the script is
sourced), rather than when the command is executed. There is no guarantee that the variable
will be set when the command is executed.
In the above example, no Tcl code is executed when the star fires. The following
example shows how to define Tcl code to be executed each time the star fires, and also how to
read the inputs of the star from Tcl.
Example 2: Consider the following schematic in the SDF domain:
Ramp
Tcl
TclScript
Xgraph
Rect
Suppose we specify the following Tcl script for the TclScript star:
proc goTcl_$starID {starID} {
set inputVals [grabInputs_$starID]
set xin [lindex $inputVals 0]
set yin [lindex $inputVals 1]
setOutputs_$starID [expr $xin+$yin]
}
U. C. Berkeley
Department of EECS
The Almagest
5-5
Unlike the previous example, this script does not define any code that runs when the
script is sourced, during the setup phase of execution of the star. Instead, it simply
defines a procedure with a name unique to the instance of the star. This procedure
reads two input values, adds them, and writes the result to the output. Although this
would be a very costly way to accomplish addition in Ptolemy, this example nonetheless illustrates an important point. If a Tcl script sourced by a TclScript star defines
a procedure called goTcl_$starID, then that procedure will be invoked every time
the star fires. The single argument passed to the procedure when it is called is the
starID. In this example, the procedure uses grabInputs_$starID, defined by
the TclScript star, to read the inputs. The current input values are returned by this
procedure as a list, so the Tcl command lindex is used to index into the list. The final
line adds the two inputs and sends the result to the output.
As shown in the previous example, if the Tcl script defines the optional Tcl procedure
goTcl_$starID, then that procedure will be invoked every time the star fires. It takes one
argument (the starID) and returns nothing. This procedure, therefore, allows for synchro-
nous communication between the Ptolemy simulation and the Tcl code (it is synchronized to
the firing of the star). If no goTcl_$starID procedure is defined, then communication is
asynchronous (Tcl commands are invoked at arbitrary times, as specified when the script is
read). For asynchronous operation, typically X events are bound to Tcl/Tk commands that
read or write data to the star.
The inputs to the star can be of any type. The print() method of the particle is used
to construct a string passed to Tcl. Although it is not illustrated in the above examples, asynchronous reads of the star inputs are also allowed.
Below is a summary of the Tcl procedures used when executing a TclScript star:
grabInputs_$starID
A procedure that returns the current values of the inputs of the
star corresponding to the given starID. This procedure is
defined by the TclScript star if and only if the instance of the
star has at least one input port.
setOutputs_$starID
A procedure that takes one argument for each output of the
TclScript star. The value becomes the new output value for
the star. This procedure is defined by the TclScript star if and
only if the instance of the star has at least one output port.
goTcl_$starID
If this procedure is defined in the Tcl script associated with an
instance of the TclScript star, then it will be invoked every
time the star fires.
wrapupTcl_$starID
If this procedure is defined in the Tcl script associated with an
instance of the TclScript star, then it will be invoked every
Ptolemy
Last updated: 10/10/97
5-6
Using Tcl/Tk
time the wrapup method of the star is invoked. In other words,
it will be invoked when a simulation stops.
destructorTcl_$starID
If this procedure is defined in the Tcl script associated with an
instance of the TclScript star, then it will be invoked when
the destructor for the star is invoked. This can be used to
destroy windows or to unset variables that will no longer be
needed.
In addition to the starID global variable, the TclScript star makes other information
available to the Tcl script. The mechanism used is to define an array with a name equal to the
value of the starID variable. Tcl arrays are indexed by strings. Thus, not only is starID a
global variable, but so is $starID. The value of the former is a unique string, while the value
of the latter is an array. One of the entries in this array gives the number of inputs that are connected to the star. The value of the expression [set ${starID}(numInputs)] is an integer giving the number of inputs. The Tcl command “set”, when given only one argument,
returns the value of the variable whose name is given by that argument. The array entries are
summarized below:
$starID
This evaluates to a string that is different for every instance of
the TclScript star. The starID global variable is set by the
TclScript star.
[set ${starID}(numInputs)]
This evaluates to the number of inputs that are connected to the
star.
[set ${starID}(numOutputs)]
This evaluates to the number of outputs that are connected to
the star.
[set ${starID}(tcl_file)]
This evaluates to the name of the file containing the Tcl script
associated with the star.
[set ${starID}(fullName)]
This evaluates to the full name of the star (which is of the form
universe.galaxy.galaxy.star).
5.3 Tcl utilities that are available to the programmer
A number of Tcl global variables and procedures that will be useful to the Tcl programmer
have been incorporated into Ptolemy. Any of these can be used in any Tcl script associated
with an instance of the TclScript star. For example, in example 1 on page 5-2, the global
variable ptkControlPanel specifies the control panel that is used to run the system. Below
is a list of the useful global variables that have been set by the graphical interface (pigi)
when the Tcl script is sourced or when the goTcl_$starID procedure is invoked:
$ptkControlPanel A string giving the name of the control panel window associ-
ated with a given run. This variable is set by pigi.
U. C. Berkeley
Department of EECS
The Almagest
5-7
$ptkControlPanel.high
The uppermost panel in the control panel that is intended for
user-defined entries.
$ptkControlPanel.middle
The middle panel in the control panel that is intended for userdefined entries.
$ptkControlPanel.low
The lowest panel in the control panel that is intended for userdefined entries.
In addition to these global variables, a number of procedures have been supplied.
Using these procedures can ensure a consistent look-and-feel across a variety of Ptolemy
applications. The complete set of procedures can be found in $PTOLEMY/lib/tcl. We list a
few of the more useful ones here. Note also that the entire set of commands defined in the Tclbased textual interpreter for Ptolemy, ptcl, are also available. So for example, the command
curuniverse will return the name of the current universe. See the ptcl chapter in the
User’s Manual.
ptkExpandEnvVar
Procedure to expand a string that begins with an environment
variable reference. For example,
ptkExpandEnvVar $PTOLEMY/src
will return something like
/usr/users/ptolemy/src
Arguments:
path
the string to expand
ptkImportantMessage
Procedure to pop up a message window and grab the focus. The
process is suspended until the message is dismissed.
Arguments:
win
window name to use for the message
text
text to display in the pop-up window
ptkMakeButton
Procedure to make a pushbutton in a window. A callback procedure must be defined by the programmer. It will be called
whenever the user pushes the button, and takes no arguments.
Arguments:
win
name of window to contain the button
name
name to use for the button itself
desc
description to be put into the display
callback
name of callback procedure to
register changes
ptkMakeEntry
Procedure to make a text entry box in a window. A callback
procedure must be defined by the programmer. It will be called
whenever the user changes the value in the entry box and types
Ptolemy
Last updated: 10/10/97
5-8
Using Tcl/Tk
<Return>. Its single argument will be the new value of the
entry.
Arguments:
win
name of window to contain
the entry box
name
name to use for the entry box itself
desc
description to be put into the display
default
the initial value of the entry
callback
name of callback procedure to register changes
ptkMakeMeter
Procedure to make a bar-type meter in a window.
Arguments:
win
name of window to contain the
entry box
name
name to use for the entry box itself
desc
description to be put into the display
low
the value of the low end of the scale
high
the value of the high end of
the scale
ptkSetMeter
Procedure to set the value of a bar-type meter created with
ptkMakeMeter.
Arguments:
win
name of window to contain the
entry box
name
name to use for the entry box itself
value
the new value to display in
the meter
ptkMakeScale
Procedure to make a sliding scale. All scales in the control
panel range from 0 to 100. A callback procedure must be
defined by the programmer. It will be called whenever the user
moves the control on the scale. Its single argument will be the
new position of the control, between 0 and 100.
Arguments:
win
name of window to contain the scale
name
name to use for the scale itself
desc
description to be put into the display
position
initial integer position between
0 and 100
callback
name of callback procedure to
register changes
Note:
A widget is created with name $win.$name.value that
should be used by the programmer to display the current value
of the slider. Thus, the callback procedure should contain a
command like:
U. C. Berkeley
Department of EECS
The Almagest
5-9
$win.$name.value configure -text $new_value
to display the new value after the slider has been moved. This is
not performed automatically because the fixed range from 0 to
100 may be correct from the user’s perspective. So, for example, if you divide the scale value by 100 before displaying it,
then to the user, it will appear as if the scale ranges from 0.0 to
1.0. It is also possible to control the position of the slider from
Tcl (overriding the user actions) using a command like
$win.$name.scale set $position
where position is an integer-valued variable in the range of 0
to 100.
Example 3: The following Tcl script can be used with the TclScript star in the system configuration given in example 1 on page 5-2:
ptkMakeMeter $ptkControlPanel.high meter_$starID \
"meter tracking scale" 0 100
proc scale_update_$starID {new_value} \
"ptkSetMeter $ptkControlPanel.high \
meter_$starID \$new_value
$ptkControlPanel.high.scale_$starID.value \
configure -text \$new_value"
ptkMakeScale $ptkControlPanel.high scale_$starID \
"my scale" 50 scale_update_$starID
ptkMakeButton $ptkControlPanel.middle button_$starID \
"my button" button_update
proc button_update {} {ptkImportantMessage .msg "Hello"}
ptkMakeEntry $ptkControlPanel.low entry_$starID \
"my entry" 10 entry_update_$starID
proc entry_update_$starID {new_value} \
"setOutputs_$starID \$new_value"
It will create the rather ugly control panel shown below:
The commands are explained individually below.
ptkMakeMeter $ptkControlPanel.high meter_$starID \
Ptolemy
Last updated: 10/10/97
5-10
Using Tcl/Tk
"meter tracking scale" 0 100
This creates a meter display with the label “meter tracking scale” in the upper part of
the control panel with range from 0 to 100.
proc scale_update_$starID {new_value} \
"ptkSetMeter $ptkControlPanel.high \
meter_$starID \$new_value
$ptkControlPanel.high.scale_$starID.value \
configure -text \$new_value"
This defines the callback function to be used for the slider (scale) shown below the
meter. The callback function sets the meter and updates the numeric display to the left
of the slider. Notice that the body of the procedure is enclosed in quotation marks
rather than the usual braces. This ensures that the variables ptkControlPanel and
starID will be evaluated at the time the procedure is defined, rather than at the time it
is invoked. To make sure that new_value is not evaluated until the procedure is
invoked, we use a preceding backslash, as in \$new_value. We could have alternatively passed the ptkControlPanel and starID values as arguments.
ptkMakeScale $ptkControlPanel.high scale_$starID \
my_scale 50 scale_update_$starID
This makes the slider itself, and sets its initial value to 50, half of full scale.
ptkMakeButton $ptkControlPanel.middle button_$starID \
"my button" button_update
This makes a button labeled “my button”.
proc button_update {} {ptkImportantMessage .msg "Hello"}
This defines the callback function connected with the button. This callback function
opens a new window with the message “Hello”, and grabs the focus. The user must
dismiss the new window before continuing.
ptkMakeEntry $ptkControlPanel.low entry_$starID \
"my entry" 10 entry_update_$starID
This makes the entry box with initial value “10”.
proc entry_update_$starID {new_value} \
"setOutputs_$starID \$new_value"
This defines the callback function associated with the entry box. Again notice that the
procedure body is enclosed quotation marks.
U. C. Berkeley
Department of EECS
The Almagest
5-11
5.4 Creating new stars derived from the TclScript star
A large number of useful stars can be derived from the TclScript star. The
TkShowValues star used in example 1 on page 5-2 is such a star. That star takes inputs of any
type and displays their value in a window that is optionally located in the control panel. It has
three parameters (settable states):
label
A string-valued parameter giving a label to identify the display.
put_in_control_panel A Boolean-valued parameter that specifies whether the display
should be put in the control panel or in its own window.
wait_between_outputsA Boolean-valued parameter that specifies whether the execution of the system should pause each time a new value is displayed. If it does, then a mouse click in the display restarts the
system.
Conspicuously absent is the tcl_file parameter of the TclScript star from which this is
derived. The file is hard-wired into the definition of the star by the following C++ statement
included in the setup method:
tcl_file =
"$PTOLEMY/src/domains/sdf/tcltk/stars/tkShowValues.tcl";
The parameter is then hidden from the user of the star by the following statement included in
the constructor:
tcl_file.clearAttributes(A_SETTABLE);
Thus, the user sees only the parameters that are defined in the derived star. This is a key part
of customizing the star.
A second issue is that of communicating the new parameter values to the Tcl script.
For example, the Tcl script will need to know the value of the label parameter in order to create the label for the display. The TclScript star automatically makes all the parameters of
any derived star available as array entries in the global array whose name is given by the global variable starID. To read the value of the label parameter in the Tcl script, use the
expression [set ${starID}(label)]. The confusing syntax is required to ensure that Tcl
uses the value of starID as the name of the array. The string “label” is just the index into the
array. The set command in Tcl, when given only one argument, returns the value of the variable whose name is given by the argument.
Some programmers may prefer an alternative way to refer to parameters that is slightly
more readable. The Tcl statement
upvar #0 $starID params
allows subsequent statement to refer to parameters simply as $param(param_name). The
upvar command with argument #0 declares the local variable params equivalent to the global variable whose name is given by the value of starID.
Many more examples can be found in $PTOLEMY/src/domains/sdf/tcltk/
stars.
Ptolemy
Last updated: 10/10/97
5-12
Using Tcl/Tk
5.5 Selecting colors
Since X window installations do not necessarily use consistent color names, a particular color database has been installed in Ptolemy. The available colors can be found in the file
$PTOLEMY/lib/tcl/ptkColor.tcl. To access this color database, use the Tcl function
ptkColor name
which returns a color defined in terms of RGB components. This color can be used anyplace
that Tk expects a color. If the given name is not in the color database, the color returned is
black.
5.6 Writing Tcl stars for the DE domain
In the discrete-event (DE) domain, stars are fired in chronological order according to
the time stamps of the new data that has arrived at their input ports. The Tcl interface class
TclStarIfc, which was originally written with the SDF domain in mind, works well for
some types of DE stars. Specifically, any star with an input in the DE domain can use this
class effectively. Consequently, a basic Tcl/Tk star, TclScript, has been written for the DE
domain.
The TclScript star can have any number of input or output portholes. As of this
writing, it will not work if it is instantiated with no inputs. The problem is that with no inputs,
there will be no events to trigger a firing of the star. This will be corrected in the future.
U. C. Berkeley
Department of EECS
Chapter 6. Using the Cluster Class
for Scheduling
Authors:
José Luis Pino
6.1 Introduction
The Ptolemy kernel has three main facilities to aid in the implementation of scheduling algorithms: generic clustering mechanisms, graph iterators, and classical graph algorithms. In this chapter, we will cover the use of these facilities and some of the important
methods currently available in Ptolemy to implement new scheduling algorithms.
6.2 Basic Classes
User-specifications done in Ptolemy are represented internally as a collection of annotated directed graphs that may contain cycles. Nodes in these directed graphs may themselves
contain other directed graphs. An atomic node is either a Star, which defines code to implement the node operation, or a WormHole, which has an internal graph that is hidden from the
outside. A WormHole is used when there is a change in the semantics between the internal and
external graphs, such as a change in the Domain or Scheduler. For purposes of the outside
graph, a WormHole is equivalent to a Star. A non-atomic node, or Galaxy, is a node which
contains an internal graph which is visible from the outside. This internal graph is stored in a
Galaxy’s BlockList. Finally, a Scheduler is a class that determines the firing order of
atomic nodes in a graph.
WormHoles, Galaxies and Stars are all derived from the class Block. A Block
contains PortLists, which store a list of PortHoles that provide locations to connect input
or output arcs to the Block. Blocks also contain StateLists, which may either be userspecified parameters or run-time states that are used when a graph is executed.
A user specification is compiled into an internal representation known as an interpreted universe (InterpUniverse). Currently, the user specifications are in the form of ptcl
or oct facets. In the future there will probably be also a Tycho specification format. An
InterpUniverse captures the user hierarchy in the form of a directed graph of WormHoles,
Galaxies and Stars. The InterpUniverse is derived from Galaxy and contains the toplevel user-specification in its BlockList. Every other level of the user specified hierarchy is
represented by either a Wormhole or Galaxy embedded inside of its parent Galaxy.
All Blocks have a parent Block pointer. The parent of a Block is the Galaxy or
WormHole in which the Block is embedded. The InterpUniverse, which is the top-level
Galaxy user specification, has its parent pointer set to NULL.
6.3 Galaxies and their relationship to Adjacency Lists
To define graph algorithms, adjacency-lists and adjacency-matrices are commonly
used to represent a directed graph [Cor90]. An adjacency-matrix is a square matrix where
6-2
Using the Cluster Class for Scheduling
there is one column, i, and one row, j, for each node, i, the graph. An element (i, j) in this
matrix is either 1 if there is an arc from i to j, or 0 if no arc exists. The second representation is
an adjacency-list in which each node has a list containing the nodes to which it is connected.
Thus an adjacency-list is better suited for sparse graphs, whereas adjacency-matrices are well
suited for dense graphs.
Blocks with their PortLists can be viewed as equivalent to the adjacency-list data
structure. A PortHole, in most domains, is either an input or an output. It contains a farSidePort pointer to the PortHole it is connected to (NULL if it is not connected). To
traverse the adjacency-list, a scheduler writer must make use of two iterators in Ptolemy (See
“Iterators” on page 3-10): GalStarIter and SuccessorIter. By using a GalStarIter a
scheduler writer can iterate over the nodes in the user-specified graph. Then on each of these
nodes we can find the adjacent nodes using the SuccessorIter. Although it is not necessary
for adjacency-list equivalence, the PredecessorIter is provided to iterate over the nodes
that are predecessors to a given node.
There is slight overhead in accessing the graph using both GalStarIter and SuccessorIter over a straight forward implementation of an adjacency-list class. This overhead has a constant cost which is not dependent on the size of the graph. Thus we feel that the
robustness achieved by not having two parallel representations of the same graph far outweigh
this small overhead.
6.4 Clustering
Clustering is often used in implementing scheduling heuristics. We have provided a
generic Cluster class in the Ptolemy kernel which scheduler writers can use directly or, if
need be, derive specialized clustering classes. The older schedulers such as the BDF scheduler
and the SDF loop schedulers have not been upgraded to use the new Cluster classes. Thus,
the BDF and SDF schedulers should not be used as examples of how to do clustering in
Ptolemy, but rather the hierarchical SDF parallel scheduler ($PTOLEMY/src/domains/cg/
hierScheduler) can be used as a model. The HierScheduler in the current version of
Ptolemy is a prototype of the hierarchical parallel scheduler detailed in [Pin95]. In addition,
we have a specialized loop scheduler [Mur94] which also uses the new cluster facilities.
The class Cluster is derived from the DynamicGalaxy and as such manages its
own memory. The Cluster classes use ClusterPorts which are derived from GalPort.
The main difference between the ClusterPorts and GalPorts is that ClusterPorts
maintain a farSidePort pointer. We need this change in ClusterPort in order to easily
iterate over the Clusters at any level of the clustering hierarchy. A ClusterPort::farSidePort pointer will only be NULL if the ClusterPort is aliased to a Star PortHole
connected at higher level of the clustering hierarchy.
6.4.1 Initialization — Flattening the User Specified Graph
Clustering is done directly on the internal representation of the user-specified graph.
Before we can begin to cluster the internal representation, the irrelevant user hierarchy must
be flattened. The flattening is accomplished by creating a temporary Cluster instance and
then invoking the Cluster::initializeForClustering method on the Galaxy whose
internals we want to cluster. This top-level Galaxy will remain intact, but all internal Galax-
U. C. Berkeley
Department of EECS
The Almagest
6-3
ies which pass the Cluster::flattenGalaxy test will be flattened and deleted. Thus any
Scheduler and Target pointers to the top-level Galaxy will not need to be updated
because they do not change. The necessary information from the user-specified hierarchy is
preserved automatically with the aid of the Scope class detailed in section 6.5.
After the internals of the top-level Galaxy have been flattened, Clusters are constructed around each individual atomic Block. In that way, the scheduler writer can treat all
the Blocks at each level (except the innermost level) as a Cluster. This property is maintained through any sequence of merge/absorb calls. An example initializeForClustering invocation is shown in figure 6-1, frames 1 and 2.
A facility for restoring the internal Ptolemy representation back to the original userspecified hierarchy is detailed in section 6.6.
6.4.2 Absorb and Merge
The basic clustering mechanisms are implemented with the virtual methods: Cluster::merge and Cluster::absorb. Both of these methods can take up to two arguments.
The first argument is the Cluster to absorb/merge and the second argument(optional) specifies whether or not to remove the absorbed or merged Cluster from the original parent Galaxy.
The Cluster::merge method takes the contents of the Cluster being merged and
moves them into the Cluster pointed to by the this pointer. A merge operation is communicative. A series of merge steps is shown in figure 6-1 frames 3 and 4.
The Cluster::absorb method takes the Cluster being absorbed and moves it into
the Cluster pointed to by the this pointer. Unlike merge, absorb is not communicative as
shown in figure 6-1 frames 5 and 5’.
The absorbed or merged Cluster is removed from the original parent Galaxy by
default when Cluster::merge or Cluster::absorb is called. We provide three ways to
update the graph after a clustering operation with differing levels of efficiency. These methods are detailed in the table 6-1. We first list some variable definitions:
•
Let N be defined as the number of Clusters in the parent Galaxy
•
Let E t be defined as the number of PortHoles in this Cluster
•
Let E c be defined as the number of PortHoles in the Cluster to absorb or merge
Complexity to
update at each
clustering step
Deletion/Update Method
Using merge/absorb in their default mode of operation. This is the most
inefficient way to do clustering.
TABLE 6-1:
Ptolemy
O(N + E t × E c)
Complexity cost of absorb/merge step.
Last updated: 10/10/97
6-4
Using the Cluster Class for Scheduling
1. Initial Graph
2. initializeForClustering
B
B
A
D
C
3. B.merge(C)
4. BC.merge(A)
B
B
D
A
D
C
C
5. D.absorb(ABC)
5’. ABC.absorb(D)
B
B
A
D
C
U. C. Berkeley
D
C
A
FIGURE 6-1:
A
A
D
C
A five step clustering example. By convention, a Cluster in this figure will be
named by the listing of its innermost atomic Blocks. In frame 1, the user-specified
graph is shown. Cluster::initializeForClustering is called and the
resultant graph is shown in frame 2 — this step adds a Cluster around all atomic
Blocks. Frames 3-5 show a series of merge/absorb operations. The ordering is
important only with absorb operation — as shown by frames 5 and 5’.
Department of EECS
The Almagest
6-5
Complexity to
update at each
clustering step
Deletion/Update Method
GalTopBlockIter::remove
We can use this method if the Cluster to absorb/merge was found using
a GalTopBlockIter (or derived iterator class) on the parent Galaxy.
O ( E t × E c)
The scheduler writer needs to do two things:
•
remove the absorbed/merged cluster using from the parent Galaxy using the iterator’s remove method.
•
delete the removed Cluster using the C++ operator delete.
This is the most efficient way of updating the graph after a clustering
operation — but it is not always possible because we may be traversing
the graph in some other way such as using a SuccessorIter.
cleanupAfterCluster (defined in Cluster.{h,cc})
If we cannot use the previous method, we can leave the Cluster in the
parent Galaxy list (it will be marked invalid automatically). The Cluster iterator classes automatically skip these invalid Clusters. Periodically (but not at each clustering step), the cleanupAfterCluster
function should be invoked to remove and delete the invalid Clusters.
O ( E t × E c)
This function will cost O(N + E t × E c) to execute, but since it is not done
at each clustering step — the result on the overall complexity will be
additive versus being multiplicative. For an example of how this is done,
refer to: $PTOLEMY/src/domains/cg/hierScheduler/HierScheduler.cc.
TABLE 6-1:
Complexity cost of absorb/merge step.
6.4.3 Cluster Iterator Classes
The Cluster iterator classes assume that all Blocks in the Galaxy being iterated on
are Clusters. This property is TRUE assuming that the Galaxy (or one of its parent Galaxies) has been properly initialized (section 6.4.1) and merge/absorb have been the only functions that have modified the topology of the graph since the initialization. These iterators
ignore pointers to invalid Clusters which have been left in the Galaxy using merge/
absorb with the removeFlag set to FALSE (last two cases in table 6-1). The cluster iterators
are listed in table 6-2.
Iterator
Description
ClusterIter
Iterate over all valid Clusters in the given Galaxy.
SuccessorClusterIter
Iterate over all successor (adjacent) Clusters for a
given Cluster.
TABLE 6-2:
Ptolemy
Cluster Iterators
Last updated: 10/10/97
6-6
Using the Cluster Class for Scheduling
Iterator
PredecessorClusterIter
Description
Iterate over all predecessor Clusters for a given Cluster.
TABLE 6-2:
Cluster Iterators
6.5 Block state and name scoping hierarchy
Recall, that when we initialize a Galaxy for clustering, we flatten the original userspecified hierarchy. Before this action, we extract the important information in the hierarchy
using the Scope class. In this section we detail this class. The details in this section, however,
are not necessary to understand clustering in Ptolemy.
Blocks inherit states from their parent. The Scope class makes it possible for a Target or Scheduler to change the Block hierarchy by saving the inherited states in the userspecified hierarchy. The scoping hierarchy was first released in Ptolemy 0.6, and is only created when the static method Scope::createScope(Galaxy&) is invoked. Currently, the
only code that uses the scoping hierarchy is the Cluster class.
The Scope class manages its memory. Once a Scope is created, it will not be deleted
until all Blocks within the given Scope are deleted. The Scope class is privately derived
from Galaxy. To turn on scoping a programmer simply calls the static method:
static Scope* Scope::createScope(Galaxy&)
This method constructs a parallel tree corresponding to each Galaxy and copies the
StateList and name() for each level.
6.6 Resetting an InterpUniverse back to actionList
Ptolemy 0.6 and later includes the ability to reset an InterpUniverse back to the
original user-specification. Resetting is occasionally necessary to undo certain operations
done on a universe by a Scheduler or Target. An example is in parallel scheduling, where
the original stars in the InterpUniverse are moved to the subGalaxies for the child
Targets (see $PTOLEMY/src/domains/cg/parScheduler/ParProcessors.cc). To
signal that a the InterpUniverse needs to be rebuilt upon the next run, the scheduler writer
should invoke Target::requestReset().
U. C. Berkeley
Department of EECS
The Almagest
6-7
6.7 References
[Cor90]
Cormen, Leiserson and Rivest, Introduction to Algorithms, New York: MIT
Press, 1990.
[Mur94]
Murthy, Bhattacharyya, and Lee, Combined code and data minimization for
synchronous dataflow programs, Memorandum UCB/ERL M94/93, University
of California at Berkeley, December,1994. (http://ptolemy.eecs.berkeley.edu/
papers/jointCodeDataMinimize)
[Pin95]
Pino, Bhattacharyya, and Lee, A Hierarchical Multiprocessor Scheduling
Framework for Synchronous Dataflow Graphs Memorandum UCB/ERL M95/
36, University of California at Berkeley, May, 1995. (http://ptolemy.eecs.berkeley.edu/papers/hierStaticSched)
Ptolemy
Last updated: 10/10/97
6-8
U. C. Berkeley
Using the Cluster Class for Scheduling
Department of EECS
Chapter 7. SDF Domain
Authors:
Joseph T. Buck
Soonhoi Ha
Edward A. Lee
7.1 Introduction
Synchronous dataflow (SDF) is a statically scheduled dataflow domain in Ptolemy.
“Statically scheduled” means that the firing order of the stars is determined once, during the
start-up phase. The firing order will be periodic. The SDF domain in Ptolemy is one of the
most mature, with a large library of stars and demo programs. It is a simulation domain, but
the model of computation is the same as that used in most of the code generation domains. A
number of different schedulers, including parallelizing schedulers, have been developed for
this model of computation.
We assume in this very short chapter that the reader is familiar with the SDF model of
computation. Refer to the User’s Manual. Moreover, we assume the reader is familiar with
chapter 2, “Writing Stars for Simulation”. Since most of the examples given in that chapter are
from the SDF domain, there is only a little more information to add here.
7.2 Setting SDF porthole parameters
All stars in the SDF domain must follow the basic SDF principle: the number of particles consumed or produced on any porthole does not change while the simulation runs. These
numbers are given for each porthole as part of the star definition. Most stars consume just one
particle on each input and produce just one particle on each output. In these cases, no special
action is required, since the porthole SDF parameters will be set to unity by default. However,
if the numbers differ from unity, the star definition must reflect this. For example, the FFTCx
star has a size parameter that specifies how many input samples to read. The value of that
parameter specifies the number of samples required at the input in order for the star to fire.
The following line in the setup method of the star is used to make this information available
to the scheduler:
input.setSDFParams (int(size), int(size)-1);
The name of the input porthole is input. The first argument to setSDFParams specifies how
many samples are consumed by the star when it fires; it is the same as the number of samples
required in order to enable the star. The second argument to setSDFParams specifies how
many past samples (before the most recent one) will be accessed by the star when it fires.
If the number of particles produced or consumed is a constant independent of any
states, then it may be declared right along with the declaration of the input, in the .pl file. For
example,
input {
name { signalIn }
type { complex }
7-2
SDF Domain
numTokens { 2 }
desc { Complex input that consumes 2 input particles. }
}
This declares an input that consumes two successive complex particles.
U. C. Berkeley
Department of EECS
Chapter 8. DDF Domain
Authors:
Soonhoi Ha
8.1 Programming Stars in the DDF Domain
A DDF star, as distinct from an SDF star, has at least one porthole, either an input or
an output, that receives or sends a variable number of particles. Such portholes are called
dynamic. Consequently, for a DDF star, how many particles to read or write is determined at
run time, in the go method. Consider an example, the LastOfN star:
defstar {
name {LastOfN}
domain {DDF}
desc {
Outputs the last token of N input tokens,
where N is the value of the control input.
}
input {
name {input}
type {anytype}
num {0}
}
input {
name {control}
type {int}
}
output {
name {output}
type {anytype}
}
private {
int readyToGo;
}
constructor {
input.inheritTypeFrom(output);
}
setup {
waitFor(control);
readyToGo = FALSE;
}
go {
if (!readyToGo) {
control.receiveData();
waitFor(input, int (control%0));
readyToGo = TRUE;
} else {
int num = int (control%0);
for (int i = num; i > 0; i--) input.receiveData();
8-2
DDF Domain
output%0 = input%0;
output.sendData();
waitFor(control);
readyToGo = FALSE;
}
}
}
The LastOfN star discards the first N-1 particles from the input porthole and routes the last
one to the output porthole . The value N is read from the control input. Since the control
data varies, the number of particles to read from the input porthole is variable, as expected
for a DDF star. We can specify that the input porthole is dynamic by setting the num field of
the input declaration to be 0 using the preprocessor format:
num {0}
The firing rule of the star is controlled by the waitFor method of the DDFStar class (actually, it is defined in the base class, DynDFStar). The waitFor method takes a porthole as an
argument, and an optional integer as a second argument. It indicates that the star should fire
when amount of data specified by the integer (default is 1) is available on the specified port. In
the above example, the setup method specifies that the star should first wait for a control
input. When a control input arrives, the go method reads the control value, and uses waitFor to specify that the star should fire next when the specified number of inputs have arrived
at input. The private member readyToGo is used to keep track of which input we are waiting for. The line
for (int i = num; i > 0; i--) input.receiveData();
causes the appropriate number of inputs (given by num) to be consumed.
The next example is a DDF star with a dynamic output porthole: a DownCounter star.
defstar {
name {DownCounter}
domain {DDF}
desc { Count down from the input value to zero. }
input {
name {input}
type {int}
}
output {
name {output}
type {int}
num {0}
}
go {
input.receiveData();
for (int i = int (input%0) - 1 ; i >= 0; i--) {
output%0 << i ;
output.sendData();
}
}
U. C. Berkeley
Department of EECS
The Almagest
8-3
}
The DownCounter star has a dynamic output porthole that will generate the down-counter
sequence of integer data starting from the value read through the input porthole. The code in
the go method is self-explanatory.
It is possible, if a bit strange, for a star to alternate between SDF-like behavior and
DDF-like behavior. To assert that its next firing should be under SDF rules, the star calls. The
following example shows a star that uses the same input for control and data. An integer input
specifies the number of particles that will be consumed on the next firing. After these particles
have been consumed, the star reverts to SDF behavior to collect the next control input. In the
following, readyToGo and num are private integers.
setup {
clearWaitPort();
readyToGo = FALSE;
}
go {
int i;
if (!readyToGo) {
// get input token from Geodesic
input.receiveData();
num = int(input%0);
waitFor(input, num);
readyToGo = TRUE;
} else {
for (i = 0; i < num; i++) {
input.receiveData();
output%0 << int(input%0);
output.sendData();
}
readyToGo = FALSE;
clearWaitPort();
}
}
Because of the clearWaitPort() in the setup method, the star begins as an SDF star. It
consumes one data, stores its value in num, and issues a waitFor command. This changes its
behavior to DDF and specifies the number of input tokens that are required. On the next firing,
it will read num input tokens and copy them to the output, and then it will revert to SDF behavior.
Ptolemy
Last updated: 7/23/96
8-4
U. C. Berkeley
DDF Domain
Department of EECS
Chapter 9. BDF Domain
Authors:
Joseph T. Buck
9.1 Writing BDF Stars
BDF stars are written in almost exactly the same way as SDF stars are written. When
the go method of the star is executed, it is guaranteed that all required input data are present,
and after execution, any particles generated by the star are correctly sent off to their destinations. The only additional thing the star writer must know is how to specify that a porthole is
conditional on other portholes. This is accomplished with a method of the class BDFPortHole called setBDFParams.
The setBDFParams method takes four arguments. The first argument is the number
of particles transferred by the port when the port is enabled. Note that unconditional ports are
always enabled. The second argument is either a pointer or a reference to another BDFPortHole, which is called the associated port (the function has two overloaded forms, which is
why the argument may be specified either as a pointer or as a reference). The third argument is
a code specifying the relation between the porthole this method is called on and the associated
port:
BDF_NONE
This code indicates no relation at all.
BDF_TRUE
This code indicates that data are transferred by the port only when the
conditional port has a TRUE particle.
BDF_FALSE
This code indicates that data are transferred by the port only when the
conditional port has a FALSE particle.
BDF_SAME
This code indicates that the stream transferred by the associated port is
the same as the stream transferred by this port. This relationship is
specified for the BDF Fork actor and aids the operation of the clustering algorithm.
BDF_COMPLEMENT
This code indicates that the stream transferred by the associated port is
the logical complement of the stream transferred by this port. This relationship is specified for the BDF Not actor and aids the operation of the
clustering algorithm.
The fourth argument for setBDFParams is the maximum delay, that is, the largest
value that the star may specify as an argument to the % operator on that porthole. The default
value is zero. This argument serves the same purpose as the second argument to setSDFParams.
The setSDFParams function may be used on BDF portholes; it does not alter the
associated port or the relation type, but does alter the other two parameters of setBDFParams. By default, BDF portholes transfer one token, unconditionally.
9-2
BDF Domain
Calls to setBDFParams may be placed in the setup method of a star, or alternatively
in the constructor if the call does not depend on any parameters of the star. Consider as an
example a Switch star. This star’s functionality is as follows: on each execution, it reads a
particle from its control input port. If the value is TRUE, it reads a particle from its trueInput port; otherwise it reads a particle from its falseInput port. In any case, the particle is
copied to the output port. Using the ptlang preprocessor, the setup method could be written
setup {
trueInput.setBDFParams(1, control, BDF_TRUE, 0);
falseInput.setBDFParams(1, control, BDF_FALSE, 0);
}
and the go method could be written
go {
if (int(control%0))
output%0 = trueInput%0;
else
output%0 = falseInput%0;
}
U. C. Berkeley
Department of EECS
Chapter 10. PN domain
Authors:
Thomas M. Parks
Other Contributors:
Brian Evans
10.1 Introduction
The Process Network (PN) domain is an implementation of the theory presented in
Thomas M. Parks’ thesis [Par95]. The PN domain includes the Synchronous Dataflow (SDF),
Boolean Dataflow (BDF), and Dynamic Dataflow (DDF) domains as subdomains. This hierarchical relationship among the domains is shown in the User’s Manual in Figure 1-2. The
model of computation for each domain is a strict subset of the model for the domain that contains it.
The nodes of a program graph, which correspond to processes or dataflow actors, are
implemented in Ptolemy by objects derived from the class Star. The firing function of a dataflow actor is implemented by the run method of Star. The edges of the program graph,
which correspond to communication channels, are implemented by the class Geodesic. A
Geodesic is a first-in first-out (FIFO) queue that is accessed by the put and get methods.
The connections between stars and geodesics are implemented by the class PortHole. Each
PortHole has an internal buffer. The methods sendData and receiveData transfer data
between this buffer and a Geodesic using the put and get methods.
Several existing domains in Ptolemy, such as SDF and BDF, implement dataflow process networks by scheduling the firings of dataflow actors. The firing of a dataflow actor is
implemented as a function call to the run method of a Star object. A scheduler executes the
system as a sequence of function calls. Thus, the repeated actor firings that make up a dataflow process are interleaved with the actor firings of other dataflow processes. Before invoking
the run method of a Star, the scheduler must ensure that enough data is available to satisfy
the actor’s firing rules. This makes it necessary for a Star object to inform the scheduler of
the number of tokens it requires from its inputs. With this information, a scheduler can guarantee that an actor will not attempt to read from an empty channel.
By contrast, the PN domain creates a separate thread of execution for each node in the
program graph. Threads are sometimes called lightweight processes. Modern operating systems, such as Unix, support the simultaneous execution of multiple processes. There need not
be any actual parallelism. The operating system can interleave the execution of the processes.
Within a single process, there can be multiple lightweight processes or threads, so there are
two levels of multi-threading. Threads share a single address space, that of the parent process,
allowing them to communicate through simple variables. There is no need for more complex,
heavyweight inter-process communication mechanisms such as pipes.
Synchronization mechanisms are available to ensure that threads have exclusive access
to shared data and cannot interfere with one another to corrupt shared data structures. Monitors and condition variables are available to synchronize the execution of threads. A monitor is
10-2
PN domain
an object that can be locked and unlocked. Only one thread may hold the lock on a monitor. If
a thread attempts to lock a monitor that is already locked by another thread, it is suspended
until the monitor is unlocked. At that point it wakes up and tries again to lock the monitor.
Condition variables allow threads to send signals to each other. Condition variables must be
used in conjunction with a monitor; a thread must lock the associated monitor before using a
condition variable.
The scheduler in the PN domain creates a thread for each node in the program graph.
Each thread implements a dataflow process by repeatedly invoking the run method of a Star
object. The scheduler itself does very little work, leaving the operating system to interleave
the execution of threads. The put and get methods of the class Geodesic have been reimplemented using monitors and condition variables so that a thread attempting to read from
an empty channel is automatically suspended, and threads automatically wake up when data
becomes available.
The classes PtThread, PtGate, and PtCondition define the interfaces for threads,
monitors, and condition variables in Ptolemy. Different implementations can be used as long
as they conform to the interfaces defined in these base classes. At different points in the development of the PN domain, we experimented with implementations based on Sun’s Lightweight Process library, AWESIME (A Widely Extensible Simulation Environment) by Dirk
Grunwald [Gru91}, and Solaris threads [Pow91,Eyk92,Kha92,Kle92a,Kle92b,Ste92,Sun94].
The current implementation is based on a POSIX thread library by Frank Mueller
[Mue92,Mue93,Gie93,Mue95]. This library, which runs on several platforms, is based on
Draft 6 of the POSIX standard. Parts of our implementation will need to be updated to be
compliant with the final POSIX thread standard.
By choosing the POSIX standard, we improve the portability of our code. Sun and
Hewlett Packard already include an implementation of POSIX threads in their operating systems, Solaris 2.5 and HPUX 10. Having threads built into the kernel of the operating system,
as opposed to a user library implementation, offers the opportunity for automatic parallelization on multiprocessor workstations. Thus, the same program runs properly on uniprocessor
workstations and multiprocessor workstations without needing to be recompiled. This is
important because it would be impractical to maintain different binary executables of Ptolemy
for each workstation configuration.
U. C. Berkeley
Department of EECS
The Almagest
10-3
10.2 Processes
Figure 10-1 shows the class derivation hierarchy for the classes that implement the
PtThread
SolThread
AweThread
PosixThread
PNThread
DataFlowProcess
DataFlowStar
SyncDataFlowProcess
FIGURE 10-1:
The class derivation hierarchy for threads. PtThread is an abstract base
class with several possible implementations. Each DataFlowProcess
refers to a DataFlowStar.
processes of Kahn process networks. The abstract base class PtThread defines the interface
for threads in Ptolemy. The class PosixThread provides an implementation based on the
POSIX thread standard. Other implementations using AWESIME [Gru91] or Solaris [Pow91]
are possible. The class PNThread is a typedef that determines which implementation is
used in the PN domain. Changing the underlying implementation simply requires changing
this typedef. The class DataFlowProcess, which is derived from PNThread, implements
a dataflow process. The Star object associated with an instance of DataFlowProcess is
activated repeatedly, just as a dataflow actor is fired repeatedly to form a process.
10.2.1 The PtThread Class
PtThread is an abstract base class that defines the interface for all thread objects in
Ptolemy. Because it has pure virtual methods, it is not possible to create an instance of
PtThread. All of the methods are virtual so that objects can be referred to as a generic
PtThread, but with the correct implementation-specific functionality.
The class PtThread has three public methods.
virtual void initialize() = 0;
This method initializes the thread and causes it to begin execution.
Ptolemy
Last updated: 4/17/97
10-4
PN domain
virtual void runAll();
This method causes all threads to begin (or continue) execution.
virtual void terminate() = 0;
This method causes execution of the thread to terminate.
The class PtThread has one protected method.
virtual void run() = 0;
This method defines the functionality of the thread. It is invoked
when the thread begins execution.
10.2.2 The PosixThread Class
The class PosixThread provides an implementation for the interface defined by
PtThread. It does not implement the pure virtual method run, so it is not possible to create
an instance of PosixThread. This class adds one protected method, and one protected data
member to those already defined in PtThread.
static void* runThis(PosixThread*);
This static method invokes the run method of the referenced
thread. This provides a C interface that can be used by the
POSIX thread library.
pthread_t thread;
A handle for the POSIX thread associated with the
PosixThread object.
pthread_attr_t attributes;
A handle for the attributes associated with the POSIX thread.
int detach;
A flag to set the detached state of the POSIX thread.
The initialize method shown below initializes attributes, then creates a thread.
The thread is created in a non-detached state, which makes it possible to later synchronize
with the thread as it terminates. The controlling thread (usually the main thread) invokes the
terminate method of a thread and waits for it to terminate. The priority and scheduling policy for the thread are inherited from the thread that creates it, usually the main thread. A function pointer to the runThis method and the this pointer, which points to the current
PosixThread object, are passed as arguments to the pthread_create function. This creates a thread that executes runThis, and passes this as an argument to runThis. Thus, the
run method of the PosixThread object is the main function of the thread that is created. The
runThis method is required because it would not be good practice to pass a function pointer
to the run method as an argument to pthread_create. Although the run method has an
implicit this pointer argument by virtue of the fact that it is a class method, this is really an
implementation detail of the C++ compiler. By using the runThis method, we make the
pointer argument explicit and avoid any dependencies on a particular compiler implementation.
void PosixThread::initialize()
{
U. C. Berkeley
Department of EECS
The Almagest
10-5
// Initialize attributes.
pthread_attr_init(&attributes);
// Detached threads free up their resources as soon
// as they exit; non-detached threads can be joined.
detach = 0;
pthread_attr_setdetachstate(&attributes, &detach);
// New threads inherit their priority and scheduling policy
// from the current thread.
pthread_attr_setinheritsched(&attributes,
PTHREAD_INHERIT_SCHED);
// Set the stack size to something reasonably large. (32K)
pthread_attr_setstacksize(&attributes, 0x8000);
// Create a thread.
pthread_create(&thread, &attributes,
(pthread_func_t)runThis, this);
// Discard temporary attribute object.
pthread_attr_destroy(&attributes);
}
The runAll method, which is shown below, allows all threads to run by lowering the
priority of the main thread. If execution of the threads ever stops, control returns to the main
thread and its priority is raised again to prevent other threads from continuing.
// Start or continue the running of all threads.
void PosixThread::runAll()
{
// Lower the priority to let other threads run. When control
// returns, restore the priority of this thread to prevent
// others from running.
pthread_attr_t attributes;
pthread_attr_init(&attributes);
pthread_getschedattr(mainThread, &attributes);
pthread_attr_setprio(&attributes, minPriority);
pthread_setschedattr(mainThread, attributes);
pthread_attr_setprio(&attributes, maxPriority);
pthread_setschedattr(mainThread, attributes);
pthread_attr_destroy(&attributes);
}
The terminate method shown below causes the thread to terminate before deleting
the PosixThread object. First it requests that the thread associated with the PosixThread
object terminate, using the pthread_cancel function. Then the current thread is suspended
by pthread_join to give the cancelled thread an opportunity to terminate. Once termination
Ptolemy
Last updated: 4/17/97
10-6
PN domain
of that thread is complete, the current thread resumes and deallocates resources used by the
terminated thread by calling pthread_detach. Thus one thread can cause another to terminate by invoking the terminate method of that thread.
void PosixThread::terminate()
{
// Force the thread to terminate if it has not already done so.
// Is it safe to do this to a thread that has already
// terminated?
pthread_cancel(thread);
// Now wait.
pthread_join(thread, NULL);
pthread_detach(&thread);
}
10.2.3 The DataFlowProcess Class
The class DataFlowProcess is derived from PosixThread. It implements the map
higher-order function (see the PN Domain chapter in the User’s Manual). A DataFlowStar
is associated with each DataFlowProcess object.
DataFlowStar& star;
This protected data member refers to the dataflow star associated with the DataFlowProcess object.
The constructor, shown below, initializes the star member to establish the association
between the thread and the star.
DataFlowProcess(DataFlowStar& s)
: star(s) {}
The run method, shown below, is defined to repeatedly invoke the run method of the
star associated with the thread, just as the map function forms a process from repeated firings
of a dataflow actor. Some dataflow stars in the BDF domain can operate with static scheduling
or dynamic, run-time scheduling. Under static scheduling, a BDF star assumes that tokens are
available on control inputs and appropriate data inputs. This requires that the scheduler be
aware of the values of control tokens and the data ports that depend on these values. Because
our scheduler has no such special knowledge, these stars must be properly configured for
dynamic, multi-threaded execution in the PN domain. Stars in the BDF domain that have been
configured for dynamic execution, and stars in the DDF domain dynamically inform the
scheduler of data-dependent firing rules by designating a particular input PortHole with the
waitPort method. Data must be retrieved from the designated input before invoking the
star’s run method. The star’s run method is invoked repeatedly, until it indicates an error by
returning FALSE.
void DataFlowProcess::run()
{
// Configure the star for dynamic execution.
star.setDynamicExecution(TRUE);
U. C. Berkeley
Department of EECS
The Almagest
10-7
// Fire the Star ad infinitum.
do
{
if (star.waitPort()) star.waitPort()->receiveData();
} while(star.run());
}
10.3 Communication Channels
Figure 10-2 shows the class derivation hierarchy for the classes that implement the
CriticalSection
PtGate
SolMonitor
AweMonitor
PosixMonitor
PNMonitor
FIGURE 10-2:
PtCondition
SolCondition
AweCondition
PosixCondition
PNCondition
The class derivation hierarchy for monitors and condition variables.
PtGate and PtCondition are abstract base classes, each with several
possible implementations. Each CriticalSection and PtCondition
refers to a PtGate.
communication channels of Kahn process networks. The classes that implement the communication channels provide the synchronization necessary to enforce the blocking read semantics of Kahn process networks. The classes PtGate, PosixMonitor and
CriticalSection provide a mutual exclusion mechanism. The classes PtCondition and
PosixCondition provide a synchronization mechanism. The class PNGeodesic uses these
classes to implement a communication channel that enforces the blocking read operations of
Kahn process networks and the blocking write operations required for bounded scheduling.
The abstract base class PtGate defines the interface for mutual exclusion objects in
Ptolemy. The class PosixMonitor provides an implementation of PtGate based on the
POSIX thread standard. Other implementations are possible. The class PNMonitor is a
typedef that determines which implementation is used in the PN domain. Changing the
underlying implementation simply requires changing this typedef.
The abstract base class PtCondition defines the interface for condition variables in
Ptolemy. The class PosixCondition provides an implementation based on the POSIX
thread standard. Other implementations are possible. The class PNCondition is a typedef
that determines which implementation is used in the PN domain. Changing the underlying
implementation simply requires changing this typedef.
The class CriticalSection provides a convenient method for manipulating
Ptolemy
Last updated: 4/17/97
10-8
PN domain
PtGate objects, preventing some common programming errors. The class PNGeodesic uses
all of these classes to implement a communication channel.
10.3.1 PtGate
A PtGate can be locked and unlocked, but only one thread can hold the lock. Thus if
a thread attempts to lock a PtGate that is already locked by another thread, it is suspended
until the lock is released.
virtual void lock() = 0;
This protected method locks the PtGate object for exclusive
use by one thread.
virtual void unlock() = 0;
This protected method releases the lock on the PtGate object.
10.3.2 PosixMonitor
The class PosixMonitor provides an implementation for the interface defined by
PtGate. It has a single protected data member.
pthread_mutex_t thread;
A handle for the POSIX monitor associated with the PosixMonitor object.
The implementations of the lock and unlock methods are shown below.
void PosixMonitor::lock()
{
pthread_mutex_lock(&mutex);
}
void PosixMonitor::unlock()
{
pthread_mutex_unlock(&mutex);
}
10.3.3 CriticalSection
The class CriticalSection provides a convenient mechanism for locking and
unlocking PtGate objects. Its constructor, shown below, locks the gate. Its destructor, also
shown below, unlocks the gate. To protect a section of code, simply create a new scope and
declare an instance of CriticalSection. The PtGate is locked as soon as the CriticalSection is constructed. When execution of the code exits scope, the CriticalSection
destructor is automatically invoked, unlocking the PtGate and preventing errors caused by
forgetting to unlock it. Examples of this usage are shown in Section 10.3.6. Because only one
thread can hold the lock on a PtGate, only one section of code guarded in this way can be
active at a given time.
CriticalSection(PtGate* g) : mutex(g)
{
if (mutex) mutex->lock();
U. C. Berkeley
Department of EECS
The Almagest
10-9
}
~CriticalSection()
{
if (mutex) mutex->unlock();
}
10.3.4 PtCondition
The class PtCondition defines the interface for condition variables in Ptolemy. A
PtCondition provides synchronization through the wait and notify methods. A condition variable can be used only when executing code within a critical section (i.e., when a
PtGate is locked).
PtGate& mon;
This data member refers to the gate associated with the PtCondition object.
virtual void wait() = 0;
This method suspends execution of the current thread until notification is received. The associated gate is unlocked before execution is suspended. Once notification is received, the lock on
the gate is automatically reacquired before execution resumes.
virtual void notify() = 0;
This method sends notification to one waiting thread. If multiple threads are waiting for notification, only one is activated.
virtual void notifyAll() = 0;
This method sends notification to all waiting threads. If multiple
threads are waiting for notification, all of them are activated.
Once activated, all of the threads attempt to reacquire the lock
on the gate, but only one of them succeeds. The others are suspended again until they can acquire the lock on the gate.
10.3.5 PosixCondition
The class PosixCondition provides an implementation for the interface defined by
PtCondition. The implementations of the wait, notify and notifyAll methods are
shown below.
void PosixCondition::wait()
{
// Guarantee that the mutex will not remain locked
// by a cancelled thread.
pthread_cleanup_push((void(*)(void*))pthread_mutex_unlock,
&mutex);
pthread_cond_wait(&condition, &mutex);
// Remove cleanup handler, but do not execute.
pthread_cleanup_pop(FALSE);
Ptolemy
Last updated: 4/17/97
10-10
PN domain
}
void PosixCondition::notify()
{
pthread_cond_signal(&condition);
}
void PosixCondition::notifyAll()
{
pthread_cond_broadcast(&condition);
}
10.3.6 PNGeodesic
The class PNGeodesic, which is derived from the class Geodesic defined in the
Ptolemy kernel, implements the communication channels for the PN domain. In conjunction
with the PtGate member provided in the base class Geodesic, two condition variables provide the necessary synchronization for blocking read and blocking write operations.
PtCondition* notEmpty;
This data member points to a condition variable used for blocking read operations when the channel is empty.
PtCondition* notFull;
This data member points to a condition variable used for blocking write operations when the channel is full.
int cap;
This data member represents the capacity of the communication
channel and determines when it is full.
static int numFull;
This static data member records the number of full geodesics in
the system.
The slowGet method, shown in below, implements the get operation for communication channels. The entire method executes within a critical section to ensure consistency of the
object’s data members. If the buffer is empty, then the thread that invoked slowGet is suspended until notification is received on notEmpty. Data is retrieved from the buffer, and if it
is not full notification is sent on notFull to any other thread that may have been waiting.
Particle* PNGeodesic::slowGet()
{
// Avoid entering the gate more than once.
CriticalSection region(gate);
while (sz < 1 && notEmpty) notEmpty->wait();
sz--;
Particle* p = pstack.get();
if (sz < cap && notFull) notFull->notifyAll();
return p;
}
U. C. Berkeley
Department of EECS
The Almagest
10-11
The slowPut method, shown below, implements the put operation for communication
channels. The entire method executes within a critical section to ensure consistency of the
object’s data members. If the buffer is full, then the thread that invoked slowPut is suspended
until notification is received on notFull. Data is placed in the buffer, and notification is sent
on notEmpty to any other thread that may have been waiting.
// Block when full.
// Notify when not empty.
void PNGeodesic::slowPut(Particle* p)
{
// Avoid entering the gate more than once.
CriticalSection region(gate);
if (sz >= cap && notFull)
{
{
CriticalSection region(fullGate);
numFull++;
}
while (sz >= cap && notFull) notFull->wait();
{
CriticalSection region(fullGate);
numFull--;
}
}
pstack.putTail(p); sz++;
if (notEmpty) notEmpty->notifyAll();
}
The setCapacity method, shown below, is used to adjust the capacity limit of communication channels. If the capacity is increased so that a channel is no longer full, notification is sent on notFull to any thread that may have been waiting.
void PNGeodesic::setCapacity(int c)
{
CriticalSection region(gate);
cap = c;
if (sz < cap && notFull) notFull->notifyAll();
}
Ptolemy
Last updated: 4/17/97
10-12
PN domain
10.4 Scheduling
Figure 10-3 shows the class derivation hierarchy for the classes that implement the
ThreadScheduler
SolScheduler
AweScheduler
PosixScheduler
PNThreadScheduler
FIGURE 10-3:
PNScheduler
The class derivation hierarchy for schedulers. ThreadList is a container
class for threads. Each PNScheduler uses a ThreadList.
dynamic scheduling of Kahn process networks. The class ThreadList provides mechanisms
for terminating groups of threads. This class is used by PNScheduler to create threads for
each node in the program graph. The class SyncDataFlowProcess implements the threads
for the nodes.
10.4.1 ThreadList
The class ThreadList implements a container class for manipulating groups of
threads. It has two public methods.
virtual void add(PtThread*);
This method adds a PtThread object to the list.
virtual ~ThreadScheduler();
This method terminates and deletes all threads in the list.
10.4.2 PNScheduler
The class PNScheduler controls the execution of a process network. Three data
members support synchronization between the scheduler and the processes.
ThreadList* threads;
A container for the threads managed by the scheduler.
PNMonitor* monitor;
A monitor to guard the scheduler’s condition variable.
PNCondition* start;
A condition variable for synchronizing with threads.
U. C. Berkeley
Department of EECS
The Almagest
10-13
int iteration;
A counter for regulating the execution of the processes.
The createThreads method, shown below, creates one process for each node in the
program graph. A SyncDataFlowProcess is created for each DataFlowStar and added to
the ThreadList container.
// Create threads (dataflow processes).
void PNScheduler::createThreads()
{
if (! galaxy()) return;
GalStarIter nextStar(*galaxy());
DataFlowStar* star;
LOG_NEW; threads = new ThreadList;
// Create Threads for all the Stars.
while((star = (DataFlowStar*)nextStar++) != NULL)
{
LOG_NEW; SyncDataFlowProcess* p
= new SyncDataFlowProcess(*star,*start,iteration);
threads->add(p);
p->initialize();
}
}
It is often desirable to have a partial execution of a process network. The class SyncDataFlowProcess, which is derived from DataFlowProcess, supports this by synchronizing the execution of a thread with the iteration counter that belongs to the
PNScheduler. The run methods of PNScheduler and SyncDataFlowProcess implement this synchronization. The PNScheduler run method, shown below, increments the
iteration count to give every process an opportunity to run. The SyncDataFlowProcess
run method, shown below, ensures that the number of invocations of the star’s run method
does not exceed the iteration count.
// Run (or continue) the simulation.
int PNScheduler::run()
{
if (SimControl::haltRequested() || ! galaxy())
{
Error::abortRun("cannot continue");
return FALSE;
}
while((currentTime < stopTime) && !SimControl::haltRequested())
{
// Notify all threads to continue.
{
CriticalSection region(start->monitor());
iteration++;
start->notifyAll();
}
PNThread::runAll();
Ptolemy
Last updated: 4/17/97
10-14
PN domain
while (PNGeodesic::blockedOnFull() > 0
&& !SimControl::haltRequested())
{
increaseBuffers();
PNThread::runAll();
}
currentTime += schedulePeriod;
}
return !SimControl::haltRequested();
}
void SyncDataFlowProcess::run()
{
int i = 0;
// Configure the star for dynamic execution.
star.setDynamicExecution(TRUE);
// Fire the star ad infinitum.
do
{
// Wait for notification to start.
{
CriticalSection region(start.monitor());
while (iteration <= i) start.wait();
i = iteration;
}
if (star.waitPort()) star.waitPort()->receiveData();
} while (star.run());
}
The increaseBuffers method is used during the course of execution to adjust the
channel capacities according to the theory presented in [Par95, ch. 4]. Each time execution
stops, the program graph is examined for full channels. If there are any full channels, then the
capacity of the smallest one is increased.
// Increase buffer capacities.
// Return number of full buffers encountered.
int PNScheduler::increaseBuffers()
{
int fullBuffers = 0;
PNGeodesic* smallest = NULL;
// Increase the capacity of the smallest full geodesic.
GalStarIter nextStar(*galaxy());
Star* star;
while ((star = nextStar++) != NULL)
{
BlockPortIter nextPort(*star);
PortHole* port;
while ((port = nextPort++) != NULL)
{
PNGeodesic* geo = NULL;
U. C. Berkeley
Department of EECS
The Almagest
10-15
if (port->isItOutput() &&
(geo = (PNGeodesic*)port->geo()) != NULL)
{
if (geo->size() >= geo->capacity())
{
fullBuffers++;
if (smallest == NULL ||
geo->capacity() <
smallest->capacity())
smallest = geo;
}
}
}
}
if (smallest != NULL)
smallest->setCapacity(smallest->capacity() + 1);
return fullBuffers;
}
10.5 Programming Stars in the PN Domain
Unlike portholes in the SDF domain, the number of tokens consumed by an input or
produced by an output can be dynamic in the PN domain. This is indicated with the
P_DYNAMIC porthhole attribute.
input {
name { a }
type { int }
attributes { P_DYNAMIC }
}
For dynamic ports, it is necessary to invoke the receiveData and sendData methods explicitly. Note that the receiveData method must be used to initialize outputs. For
static ports, the receiveData and sendData methods are invoked implicitly and should not
be used in the go method.
Because a separate thread of execution is created for each star, the go method of a PN
star is not required to terminate. As a programmer, you are free to use infinite loops, such as
while(TRUE) { ... } within the go method of your PN stars. This may be necessary if
you access a porthole (requiring a blocking read) before entering the main loop of the process.
In the future, such code could be placed in the star’s begin method, but currently (as of
release 0.6) the begin method is executed before the star’s thread is created.
go {
// Read both inputs the first time.
a.receiveData();
b.receiveData();
while (TRUE) {
output.receiveData();// Initialize the output.
if (int(a%0) < int(b%0)) {
Ptolemy
Last updated: 4/17/97
10-16
PN domain
output%0 = a%0;
output.sendData();
a.receiveData();
}
else if (int(a%0) > int(b%0)) {
output%0 = b%0;
output.sendData();
b.receiveData();
}
else {
// Remove duplicates.
output%0 = a%0;
output.sendData();
a.receiveData();
b.receiveData();
}
}
}
Instead of using an infinite loop, most PN stars rely on the run method of DataFlowProcess to repeatedly invoke the star’s go method.
U. C. Berkeley
Department of EECS
Chapter 11. SR domain
Authors:
Stephen Edwards
Other Contributors:
Christopher Hylands
11.1 Introduction
Synchronous Reactive (SR) is a statically scheduled simulation domain in Ptolemy
designed for concurrent, control-dominated systems. Simple stars for the SR domain are easy
to write, but more complex ones that take full advantage of the domain are more subtle. Stars
can be written in either C++ or Itcl.
11.2 Communication in SR
Time in SR is divided into discrete instants. In each instant, the communication channels in SR contain a valued event, have no event, or are “undefined,” corresponding to when
the system could not decide whether there was an event or not. These channels are not buffered, unlike Ptolemy’s dataflow domains, and do not hold their values between instants.
Stars in the SR domain have input and output ports, much like they do in other
domains. However, primarly because absent events are different from undefined ones, the
interface to these ports are unique.
Because SR domain ports are unbuffered, output ports can be read just like input ports.
It is often convenient to do this when checking to see whether the value on an output port is
already correct and does not need to be changed.
Input/Output Porthole Interface
int SRPortHole::known()
Return TRUE when the value in the port is is known.
int SRPortHole::present()
Return TRUE when the value in the port is present.
int SRPortHole::absent()
Return TRUE when the value in the port is absent.
Particle & InSRPort::get()
Return the particle in the port. This should only be called when present()
returns TRUE.
Output Porthole Interface
Particle & OutSRPort::emit()
Force the value on the output port to be present and return a reference to the
output particle.
11-2
SR domain
void OutSRPort::makeAbsent()
Force the value on the output port to be absent.
11.3 Strict and non-strict SR stars
Broadly, there are two types of stars in the SR domain: strict and non-strict. If any
input to a strict star is unknown, then all of its outputs are unknown. A two-input adder, for
example, behaves like this--it cannot say anything about its output until the values of both
inputs are known. A non-strict star, by contrast, can produce some outputs before all of its
inputs are known. A two-input multiplexer is an example: when the selection input is known,
it can ignore the unselected input.
Non-strict stars are the key to avoiding deadlocked situations when there are cyclic
connections in the system. If all the stars in a cycle are strict, they each need all of their inputs
before producing an output--all will be left waiting. The deadlock can be broken by introducing a non-strict star into the cycle that can produce an output without having all inputs from
other stars in the cycle
A number of methods set attributes of SR stars. These should be called in the
setup() method of a star as appropriate. By default, none of these attributes is assumed to
hold.
SRStar::reactive()
Indicate the star is reactive--it needs at least one present input to produce a
present output.
Star::noInternalState()
Indicate the star has no internal state--its behavior in an instant is a function
only of the inputs in that instant, and not on history.
By default, a star in the SR domain is strict. Here is (abbreviated) ptlang source for a twoinput adder:
defstar {
name { Add }
domain { SR }
input {
name { input1 }
type { int }
}
input {
name { input2 }
type { int }
}
output {
name { output }
type { int }
}
setup {
reactive();
U. C. Berkeley
Department of EECS
The Almagest
11-3
noInternalState();
}
go {
if ( input1.present() && input2.present() ) {
output.emit() <<
int(input1.get()) + int(input2.get());
} else {
Error::abortRun(*this,
"One input present, the other absent");
}
}
}
Non-strict stars inherit from the SRNonStrictStar class. Here is abbreviated source
for a non-strict two-input multiplexer:
defstar {
name { Mux }
domain { SR }
derivedFrom { SRNonStrictStar }
input {
name { trueInput }
type { int }
}
input {
name { falseInput }
type { int }
}
input {
name { select }
type { int }
}
output {
name { output }
type { int }
}
setup {
noInternalState();
reactive();
}
go {
if ( !output.known() && select.known() ) {
if ( select.present() ) {
if ( int(select.get()) ) {
// Select is true-// copy the true input if it’s known
if ( trueInput.known() ) {
if ( trueInput.present() ) {
output.emit() <<
int(trueInput.get());
} else {
Ptolemy
Last updated: 10/10/97
11-4
SR domain
// true input is absent:
// make the output absent
output.makeAbsent();
}
}
} else {
// Select is false-//copy the false input if it’s known
if ( falseInput.known() ) {
if ( falseInput.present() ) {
output.emit() <<
int(trueInput.get());
} else {
// false input is absent:
// make the output absent
output.makeAbsent();
}
}
}
} else {
// Select is absent:
// make the output absent
output.makeAbsent();
}
}
}
}
U. C. Berkeley
Department of EECS
Chapter 12. DE Domain
Authors:
Soonhoi Ha
Edward A. Lee
Thomas M. Parks
Other Contributors:
Brian L. Evans
12.1 Introduction
The discrete event (DE) domain in Ptolemy provides a general environment for timeoriented simulations of systems such as queueing networks, communication networks, and
high-level computer architectures. In the domain, each Particle represents an event that
corresponds to a change of the system state. The DE schedulers process events in chronological order. Since the time interval between events is generally not fixed, each particle has an
associated time-stamp. Time stamps are generated by the block producing the particle, using
the time stamps of the input particles and the latency of the block.
We assume in this chapter that the reader is thoroughly familiar with the DE model of
computation. Refer to the User’s Manual. Moreover, we assume the reader is familiar with
chapter 2, “Writing Stars for Simulation”. In this chapter, we give the additional information
required to write stars for the DE domain.
12.2 Programming Stars in the DE Domain
A DE star can be viewed as an event-processor; it receives events from the outside,
processes them, and generates output events after some latency. In a DE star, the management
of the time stamps of the particles (events) is as important as the input/output mapping of particle values.
Generating output values and time stamps are separable tasks. For greatest modularity,
therefore, we dedicate some DE stars, so-called delay stars, to time management. Examples of
such stars are Delay and Server. These stars, when fired, produce output events that typically have larger time stamps than the input events. They usually do not manipulate the value
of the particles in any interesting way. The other stars, so-called functional stars, avoid timemanagement, usually by generating output events with the same time stamp as the input
events. They, however, do manipulate the value of the particles.
Delay stars should not be confused with the delay marker on an arc connecting two
stars (represented in pigi by a small green diamond). The latter delay is not implemented as
a star. It is a property of the arc. In the DE domain, the delay marker does not introduce a time
delay, in the sense of an incremented time stamp. It simply tells the scheduler to ignore the arc
while assigning dataflow-based firing priorities to stars. A star whose outputs are all marked
with delays will have the lowest firing priority, and so will be fired last among those stars eligible to be fired at the current time.
The scheduler’s assignment of firing priority also uses properties of the individual
12-2
DE Domain
stars: each star type can indicate whether or not it can produce zero-delay outputs. If a star
indicates that it does not produce any output events with zero delay, then the scheduler can
break the dataflow priority chain at that star. This saves the user from having to add explicit
delay markers. A star class can make this indication either globally (it never produces any
immediate output event) or on a port-by-port basis (only some of its input ports can produce
immediate outputs, perhaps on only a subset of its output ports).
For managing time stamps, the DEStar class has two DE-specific members: arrivalTime and completionTime, summarized in table 12-1.. Before firing a star, a DE scheduler sets the value of the arrivalTime member to equal the time stamp of the event
triggering the current firing. When the star fires, before returning, it typically sets the value of
the completionTime member to the value of the time stamp of the latest event produced by
the star. The schedulers do not use the completionTime member, however, so it can actually
be used in any way the star writer wishes. DEStar also contains a field delayType and a
method setMode that are used to signal the properties of the star, as described below.
12.2.1 Delay stars
Delay-stars manipulate time stamps. Two types of examples of delay stars are pure
delays, and servers. A pure-delay star generates an output with the same value as the input
sample, but with a time stamp that is greater than that of the input sample. The difference
between the input sample time stamp and the output time stamp is a fixed, user-defined value.
Consider for example the Delay star:
defstar {
name {Delay}
domain {DE}
desc { Delays its input by a fixed
input {
name {input}
type {anytype}
}
output {
name {output}
type {=input}
}
defstate {
name {delay}
type {float}
default {"1.0"}
desc { Amount of time delay.
}
constructor {
delayType = TRUE;
}
go {
completionTime = arrivalTime
Particle& pp = input.get();
output.put(completionTime) =
}
}
amount }
}
+ double(delay);
pp;
Inside the go method description, the completionTime is calculated by adding the delay to
U. C. Berkeley
Department of EECS
The Almagest
12-3
the arrival time of the current event. The last two lines will be explained in more detail below.
Another type of delay star is a server. In a server star, the input event waits until a simulated resource becomes free to attend to it. An example is the Server star:
defstar {
name {Server}
domain {DE}
desc {
This star emulates a server. If an input event arrives when it
is not busy, it delays it by the service time (a constant parameter).
If it arrives when it is busy, it delays it by more than the service
time. It must become free, and then serve the input.
}
input {
name {input}
type {anytype}
}
output {
name {output}
type {=input}
}
defstate {
name {serviceTime}
type {float}
default {"1.0"}
desc { Service time. }
}
constructor {
delayType = TRUE;
}
go {
// No overlapped execution. set the time.
if (arrivalTime > completionTime)
completionTime = arrivalTime + double(serviceTime);
else
completionTime += double(serviceTime);
Particle& pp = input.get();
output.put(completionTime) = pp;
}
}
This star uses the completionTime member to store the time at which it becomes free after
processing an input. On a given firing, if the arrivalTime is later than the completionTime, meaning that the input event has arrived when the server is free, then the server delays
the input by the serviceTime only. Otherwise, the time stamp of the output event is calculated as the serviceTime plus the time at which the server becomes free (the completionTime).
Both pure delays and servers are delay stars. Hence their constructor sets the delayType member, summarized in table 12-1. This information is used by the scheduler.
The technical meaning of the delayType flag is this: such a star guarantees that it will
never produce any output event with zero delay; all its output events will have timestamps
Ptolemy
Last updated: 10/17/97
12-4
DE Domain
larger than the time of the firing in which they are emitted. Stars that can produce zero-delay
events should leave delayType set to its default value of FALSE.
Actually, stars often cheat a little bit on this rule; as we just saw, the standard Delay
star sets delayType even if the user sets the star’s delay parameter to zero. This causes the
star to be treated as though it had a positive delay for the purpose of assigning firing priorities,
which is normally what is wanted. Both pure delays and servers are delay stars. Hence their
constructor sets the delayType member, summarized in table 12-1. This information is used
by the scheduler, and is particularly important when determining which of several simultaneous events to process first.
12.2.2 Functional Stars
In the DE model of computation, a star is runnable (ready for execution), if any input
porthole has a new event, and that event has the smallest time stamp of any pending event in
the system. When the star fires, it may need to know which input or inputs contain the events
that triggered the firing. An input porthole containing a new particle has the dataNew flag set
by the scheduler. The star can check the dataNew flag for each input. A functional star will
typically read the value of the new input particles, compute the value of new output particles,
and produce new output particles with time stamps identical to those of the new inputs. To see
how this is done, consider the Switch star:
defstar {
name {Switch}
domain {DE}
desc {
Switches input events to one of two outputs, depending on
the last received control input.
}
input {
name {input}
type {anytype}
}
input {
name {control}
type {int}
}
output {
name {true}
type {=input}
}
output {
name {false}
type {=input}
}
constructor {
control.triggers();
control.before(input);
}
go {
if (input.dataNew) {
completionTime = arrivalTime;
U. C. Berkeley
Department of EECS
The Almagest
12-5
Particle& pp = input.get();
int c = int(control%0);
if(c)
true.put(completionTime) = pp;
else
false.put(completionTime) = pp;
}
}
}
The Switch star has two input portholes: input, and control. When an event arrives at the
input porthole, it routes the event to either the true or the false output porthole depending
on the value of the last received control input. In the go method, we have to check whether
a new input event has arrived. If not, then the firing was triggered by a control input event,
and there is nothing to do. We simply return. If the input is new, then its particle is read using
get method, as summarized in table 12-1. In addition, the most recent value from the control
input is read. This value is used to determine which output should receive the data input. The
statements in the constructor will be explained below in “Sequencing directives” on page 126.
There are three ways to access a particle from an input or output port. First, we may
use the % operator followed by an integer, which is equivalent to the same operator in the SDF
InDEPort class
method
Particle& operator %
void before
(GenericPort& p)
int dataNew
Particle& get ()
void getSimulEvent ()
int numSimulEvents ()
void triggers ()
void triggers
(GenericPort& p)
description
get a particle from the porthole without resetting dataNew
simultaneous inputs here should be processed before those at p
flag indicating whether the porthole has new data
get a particle from the porthole and reset dataNew
fetch a simultaneous event from the global event queue
return the number of pending simultaneous events at this input
indicate that the input does not trigger any immediate output
events
indicate that the input triggers an immediate output on port p
OutDEPort class
method
Particle& operator %
Particle& put
(double time)
void sendData ()
TABLE 12-1:
Ptolemy
description
get the most recent particle from the porthole
get a new writable particle with the given time stamp
flush output porthole data to the global event queue (called by
put)
A summary of the members and methods of the InDEPort and OutDEPort
classes that are used by star writers.
Last updated: 10/17/97
12-6
DE Domain
domain. For example, control%0 returns the most recent particle from the control porthole. The second method, get, is specific to InDEPort. It resets the dataNew member of the
port as well as returning the most recent particle from an input port. In the above example, we
are not using the dataNew flag for the control input, so there is no need to reset it. However, we are using it for the input porthole, so it must be reset. If you need to reset the
dataNew member of a input port after reading the newly arrived event (the more common
case) you should use the get method instead of %0 operator. Alternatively, you can reset the
dataNew flag explicitly using a statement like:
input.dataNew = FALSE;
The put method is also specific to OutDEPort. It sets the timeStamp member of the port to
the value given by its argument, and returns a reference to the most recent particle from an
output port. Consider the line in the above example:
true.put(completionTime) = pp;
This says that we copy the particle pp to the output port with timeStamp = completionTime. We can send more than one output event to the same port by calling the put method
repeatedly. A new particle is returned each time.
12.2.3 Sequencing directives
A special effort has been made in the DE domain to handle simultaneous events in a
rational way. If two distinct stars can be fired because they both have events at their inputs
with identical time stamps, some choice must be made as to which one to fire. A common
strategy is to choose one arbitrarily. This scheme has the simplest implementation, but can
lead to unexpected and counterintuitive results from a simulation.
The choice of which to fire is made in Ptolemy by statically assigning priorities to the
stars according to a topological sort. Thus, if one of the two enabled stars could produce
events with zero delay that would affect the other, as shown in figure 12-1, then that star will
be fired first. The topological sort is actually even more sophisticated than we have indicated.
It follows triggering relationships between input and output portholes selectively, according to
assertions made in the star definition. Thus, the priorities are actually assigned to individual
portholes, rather than to entire stars.
The cryptic statements in the constructor in the above example reveal these triggering
relationships to the scheduler. Consider for example the following problem. In the Switch
star above suppose that on a given firing, an input with time stamp τ is processed, and the
particle is sent to the true output. Suppose that the very next time the star fires, a control
C
A
B
FIGURE 12-1: When DE stars are enabled by simultaneous events, the choice of which to fire is
determined by priorities based on a topological sort. Thus if B and C both have events
with identical time stamps, B will take priority over C. The delay on the path from C to
A serves to break the topological sort.
U. C. Berkeley
Department of EECS
The Almagest
12-7
input with time stamp τ arrives with value FALSE. Probably, the previous output should have
gone to the false porthole. Consider the constructor statement:
control.before(input);
This tells the scheduler that if a situation arises where two simultaneous events might
appear at the control and input portholes, then the one at the control porthole should
appear first. This is implemented by giving the stars “upstream” from the control porthole
higher firing priorities than those “upstream” from the input porthole. Thus, if for some reason the simultaneous events are processed in two separate firings (always a possibility), then
the control event is sure to be processed first. A chain of before directives can assign relative priorities to a whole set of inputs.
The other statement in the constructor:
control.triggers();
has somewhat different objectives. It tells the scheduler that a control input does not
trigger outputs on any porthole. If an input event causes an output event with the same time
stamp, then the input event is said to have “triggered” the output event. In the above example,
the control event does not trigger any immediate output event, but an input event does. By
default, an input triggers all outputs, so it is not necessary to add the directive
input.triggers(output);
Providing triggers directives informs the scheduler that certain paths through the
graph do not have zero delay, allowing it to ignore those paths in making its topological sort.
The triggers directive is essentially a selective version of the delayType flag: setting
delayType means the star contains no zero-delay paths, whereas providing triggers information tells the scheduler that only certain porthole-to-porthole paths through the star have
zero delay. By default, the scheduler assumes that all paths through the star have zero delay.
In some stars, an input event conditionally triggers an output. In principle, if there is
any chance of triggering an output, we set the triggering relation between the input and the
output. The triggering relation informs the scheduler that there may be a delay-free path from
the input to the output. It is important, therefore, that the star writer not miss any triggering
relation when triggers directives are provided.
If an input triggers some, but not all outputs, then the constructor for the star should
contain several triggers directives, one for each output that is triggered by that input. If an
input triggers all outputs, then no directive is necessary for it.
If delayType is set to TRUE, it is not necessary to write any triggers directives; a
delay star by definition never triggers zero-delay output events.
12.2.4 Simultaneous events
An input port may have a sequence of simultaneous events (events with identical time
stamps) pending. Normally, the star will be fired repeatedly until all such events have been
consumed. Optionally, a DE star may process simultaneous events during a single firing. The
getSimulEvent method can be used as in the following example, taken from an up-down
counter star:
go {
...
Ptolemy
while (countUp.dataNew) {
count++;
countUp.getSimulEvent();
Last updated: 10/17/97
12-8
DE Domain
}
... }
Here, countUp is an input porthole. The getSimulEvent method examines the global event queue to see if any more events are available for the porthole with the current timestamp. If so, it fetches the next one and sets the dataNew flag to TRUE; if none remain, it sets
the dataNew flag to FALSE. (In this example, the actual values of the input events are uninteresting, but the star could use get() within the loop if it did need the event values.)
Sometimes, a star simply needs to know how many simultaneous events are pending
on a given porthole. Without fetching any event, we can get the number of simultaneous
events by calling the numSimulEvents method. This returns the number of simultaneous
events still waiting in the global event queue; the one already in the porthole isn’t counted.
If the star has multiple input ports, the programmer should carefully consider the
desired behavior of simultaneous inputs on different ports, and choose the order of processing
of events accordingly. For example, it might be appropriate to absorb all the events available
for a control porthole before examining any events for a data porthole.
If a star will always absorb all simultaneous events for all its input portholes, it can use
phase-based firing mode to improve performance. See section 12.3.
12.2.5 Non-deterministic loops
The handling of simultaneous events is based on assigning priorities to portholes, tracing the connectivity of a schematic, and using the relationships established by the before and
triggers relationships. When we assign these priorities, we start from the input ports of sink
stars, and rely primarily on a topological sort. Delay-free loops, which would prevent the
topological sort for terminating, are detected and ruled out. But, another kind of loop, called a
non-deterministic loop, can cause unexpected results. A non-deterministic loop is one in
which the priorities cannot be assigned uniquely; there is more than one solution. Such a loop
has at least one before relation. If a programmer can guarantee that there is no possibility of
simultaneous events on such a loop, then system may be simulated in a predictable manner.
Otherwise, the arbitrary decisions in the scheduler will affect the firing order.
If a non-deterministic loop contains exactly one before relation, the scheduler
assigns priorities in a well-defined way, but unfortunately, in a way that is hidden from the
user. For a non-deterministic loop with more than one before relation, the assignment of the
priorities is a non-deterministic procedure. Therefore, the scheduler emits a warning message.
The warning message suggests that the programmer put a delay element on an arc (usually a
feedback arc) to break the non-deterministic loop. As mentioned before, the delay element has
a totally different meaning from that in the SDF domain. In the SDF domain, a delay implies
an initial token on the arc, implying a one-sample delay. In the DE domain, however, a delay
element simply breaks a triggering chain. Therefore, the source port of the arc is assigned the
lowest priority.
12.2.6 Source stars
The DE stars discussed so far fire in response to input events. In order to build signal
generators, or source stars, or stars with outputs but no inputs, we need another class of DE
star, called a self-scheduling star. A self-scheduling star fools the scheduler by generating its
own input events. These feedback events trigger the star firings. An event generator is a speU. C. Berkeley
Department of EECS
The Almagest
12-9
cial case of a delay star, in that its role is mainly to control the time spacing of source events.
The values of the source events can be determined by a functional block attached to the output
of the event generator (e.g. Const, Ramp, etc).
A self-scheduling star is derived from class DERepeatStar, which in turn is derived
from class DEStar. The DERepeatStar class has two special methods to facilitate the selfscheduling function: refireAtTime and canGetFired. These are summarized in table 122. The Poisson star illustrates these:
defstar {
name {Poisson}
domain {DE}
derivedfrom { RepeatStar }
desc {
Generates events according to a Poisson process.
The first event comes out at time zero.
}
output {
name {output}
type {float}
}
defstate {
name {meanTime}
type {float}
default {"1.0"}
desc { The mean inter-arrival time. }
}
defstate {
name {magnitude}
type {float}
default {"1.0"}
desc { The value of outputs generated. }
}
hinclude { <NegExp.h> }
ccinclude { <ACG.h> }
protected {
NegativeExpntl *random;
}
// declare the static random-number generator in the .cc file
DERepeatStar class
method
int canGetFired ( )
void refireAtTime
(double t)
void begin ()
TABLE 12-2:
Ptolemy
description
return 1 if the star is enabled for firing
schedule the star to fire again at time t
schedule the star to fire at time zero
A summary of the methods of the DERepeatStar class used when writing a source
star. Source stars are derived from this.
Last updated: 10/17/97
12-10
DE Domain
code {
extern ACG* gen;
}
constructor {
random = NULL;
}
destructor {
if(random) delete random;
}
begin {
if(random) delete random;
random = new NegativeExpntl(double(meanTime),gen);
DERepeatStar::begin ();
}
go {
// Generate an output event
// (Recall that the first event comes out at time 0).
output.put(completionTime) << double(magnitude);
// and schedule the next firing
refireAtTime(completionTime);
// Generate an exponential random variable.
double p = (*random)();
// Turn it into an exponential, and add to completionTime
completionTime += p;
}
}
The Poisson star generates a Poisson process. The inter-arrival time of events is exponentially distributed with parameter meanTime. Refer to “Using Random Numbers” on page 3-17
for information about the random number generation. The method refireAtTime launches
an event onto a feedback arc that is invisible to the users. The feedback event triggers the selfscheduling star some time later.
Note that the feedback event for the next execution is generated in the current execution. To initiate this process, an event is placed on the feedback arc by the DERepeatStar::
begin method, before the scheduler runs.
The DERepeatStar class can also be used for other purposes besides event generation. For example, a sampler star might be written to fire itself at regular intervals using the
refireAtTime method.
Another strangely named method, canGetFired is seldom used in the star definitions. The method checks for the existence of a new feedback event, and returns TRUE if it is
there, or FALSE otherwise.
The internal feedback arc consists of an input and an output porthole that are automatically created and connected together, with a delay marker added to prevent the scheduler
from complaining about a delay-free loop. (This effectively assumes that refire requests will
always be for times greater than the current time.)
Sometimes the programmer of a star derived from DERepeatStar needs to be explic-
U. C. Berkeley
Department of EECS
The Almagest
12-11
itly aware of these portholes. In particular, they should be taken into account when considering whether a star is delay-type. Setting delayType in a DERepeatStar derivative asserts
that not only do none of the star’s visible input portholes trigger output events with zero delay,
but refire events do not either. Frequently this is a false statement. It’s usually safer to write
triggers directives that indicate that specific input portholes cannot trigger zero-delay outputs. (Since the feedback portholes have a delay marker, it is never necessary to mention the
feedback output porthole in triggers directives, even for an input porthole that gives rise to
refireAtTime requests --- the scheduler is uninterested in zero-delay paths to the feedback
output.)
The event passed across the feedback arc is an ordinary FLOAT particle, normally
having value zero. Sometimes it can be useful to store extra information in the feedback event.
Beginning in Ptolemy 0.7, the refireAtTime method accepts an optional second parameter
that gives the numeric value to place in the feedback event. Fetching the value currently
requires direct access to the feedback input port, for example
if (feedbackIn->dataNew) {
double feedbackValue = double(feedbackIn->get());
...
A future version of DERepeatStar might provide some syntactic sugar to hide the
details of this operation.
In Ptolemy versions prior to 0.7, DERepeatStar did not place a delay marker on the
feedback arc, but instead used a hack involving special porthole priorities. This hack did not
behave very well if the star also had ordinary input portholes. To work around it, writers of
derived star types would sometimes set delayType or provide triggers directives. When
updating such stars to 0.7, these statements should be examined critically --- they will often be
found to be unnecessary, and perhaps even wrong.
12.3 Phase-Based Firing Mode
The ordering of simultaneous events is the most challenging task of the DE scheduler.
In general, simultaneous events are caused by insufficient time resolution, particularly when
the time unit is integral. In our case, simultaneous events are primarily caused by functional
stars that produce output events with the same time stamp as the input events. Since the time
stamp is a double-precision floating-point number, we have very high time resolution.
As explained earlier, the DE scheduler fetches at most one event for each input porthole for each firing of a DE star. In the body of the star code, the programmer can consume the
simultaneous events onto a certain input porthole by calling the getSimulEvent method for
the porthole. This mode of operation is called simple mode, which is the default mode of operation.
Suppose we program a new DE star, called Counter. The Counter star has one
clock input and one demand input. A clock event will increase the counter value by one,
and the demand input will send the counter value to the output. If there are multiple simultaneous clock inputs and a simultaneous demand input, we should count all the clock inputs
before consuming the demand input and producing an output. Thus, the programmer should
call the getSimulEvent method for the clock input. However, the getSimulEvent
method is expensive when there are many simultaneous events, since it gets only one simulta-
Ptolemy
Last updated: 10/17/97
12-12
DE Domain
neous event at a time. This runtime overhead is reduced in the phase-based firing mode.
In the phase-based firing mode, or simply the phase mode, before executing a star, the
scheduler fetches all simultaneous events for the star. The fetched events are stored in the
internal queue of each input porthole. The internal queue of inputs is created only if the star
operates in phase mode. In phase mode, when a DE star fires, it consumes all simultaneous
events currently available. It constructs a phase. Afterwards, other simultaneous events for the
same star may be generated by a network of functional stars. Then, the star may be fired again
with another set of simultaneous events, which forms another phase. We can set the operation
mode of a star phase by calling method setMode(PHASE) in the constructor, as summarized
in table 12-1 on page 12-5. The following example is written in the simple mode.
go {
...
while (input.dataNew) {
temp += int(input.get());
input.getSimulEvent();
}
...
}
If the star is re-written using the phase mode, it will look like:
constructor {
setMode(PHASE);
}
go {
...
while (input.dataNew) {
temp += int(input.get());
}
...
}
or,
go {
...
for (int i = input.numSimulEvents(); i > 0; i--) {
temp += int(input.get());
}
...
}
The get method in phase mode fetches events from the internal queue one at a time. After
consuming all events from the queue (now the queue is empty), it resets the dataNew flag. If
a star in phase mode does not access all simultaneous input events in a particular firing, the
unaccessed events are discarded.
The method, numSimulEvent, returns the current queue size in phase mode. Recall
that in simple mode, the method returns the number of simultaneous events in the global event
queue, which is one less than the actual number of simultaneous events. This difference of one
between two modes is necessary for coding efficiency.
There is still inherent non-determinism in the handling of simultaneous events in the
U. C. Berkeley
Department of EECS
The Almagest
12-13
DE domain. For example, suppose that the Switch star has more than one simultaneous control event. Which one is really the last one? Since the input is routed to either the true or
false output depending on the last value of the control event, the decision is quite critical.
We leave the responsibility of resolving such inherent non-determinism to the user.
12.4 Programming Examples
This section presents different examples of programming in the discrete-event domain.
There are no pre-defined stars that work with matrices in the discrete-event domain. We will
give several examples of DE stars that work with matrices.
12.4.1 Identity Matrix Star
This section develops a star in the DE domain that will create an identity matrix.
Instead of creating a source star which must schedule itself, we will create a star that fires
whenever it receives an new input value. For example, a clock or some other source can be
attached to the star to set its firing pattern.
defstar {
name { Identity_M }
domain { DE }
desc { Output a floating-point identity matrix.}
author { Brian L. Evans }
input {
name { input }
type { anytype }
}
output {
name { output }
type { FLOAT_MATRIX_ENV }
}
defstate {
name { rowsCols }
type { int }
default { 2 }
desc {
Number of rows and columns of the output square matrix. }
}
ccinclude { "Matrix.h" }
go {
// Functional Star: pass timestamp without change
completionTime = arrivalTime;
// For messages, you must pass dynamically allocated data
FloatMatrix& result =
*(new FloatMatrix(int(rowsCols),int(rowsCols)));
// Set the contents of the matrix to an identity matrix
result.identity();
// Send the matrix result to the output port
output.put(completionTime) << result;
}
}
Ptolemy
Last updated: 10/17/97
12-14
DE Domain
This is a functional star because the time stamp on the input particle is not altered. The
output is a matrix message. The matrix is a square matrix. In order for the matrix to remain
defined after the go method finishes, the matrix result cannot be allocated from local memory. Instead, it must be allocated from global dynamic memory via the new operator. In the
syntax for the new operator, the int cast in int(rowsCols) extracts the value from
rowsCols which is an instance of the State data structure. The dynamic memory allocated
for the matrix will be automatically deleted by the Message class. Then, the matrix is reset to
be an identity matrix. Finally, the matrix is sent to the output port with the same time stamp as
that of the input data. Note that the syntax to output data in the discrete-event domain differs
from the syntax of the synchronous dataflow domain due to the time stamp. In the SDF
domain, the output code would be
output%0 << result
12.4.2 Matrix Transpose
In the next example, we will compute the matrix transpose.
defstar {
name { Transpose_M }
domain { DE }
desc { Transpose a floating-point matrix.}
author { Brian L. Evans }
input {
name { input }
type { FLOAT_MATRIX_ENV }
}
output {
name { output }
type { FLOAT_MATRIX_ENV }
}
ccinclude { "Matrix.h" }
go {
// Functional Star: pass timestamp without change
completionTime = arrivalTime;
// Extract the matrix on the input port
Envelope Xpkt;
input.get().getMessage(Xpkt);
const FloatMatrix& Xmatrix =
*(const FloatMatrix *)Xpkt.myData();
// Create a copy of the input matrix
FloatMatrix& xtrans = *(new FloatMatrix(Xmatrix));
// Transpose the matrix
xtrans.transpose();
// Send the matrix result to the output port
output.put(completionTime) << xtrans;
}
}
The key difference between creating an identity matrix and taking a matrix transpose
in the DE domain is the conversion of the input data to a matrix. The input data comes in the
U. C. Berkeley
Department of EECS
The Almagest
12-15
form of an envelope which is essentially an instance of a class embedded in a message particle. To extract the contents of the message, we first extract the message from the input envelope. Then, we extract the data field from the message and cast it to be a FloatMatrix. Just
as in the previous example, we need to allocate dynamic memory to hold the value of the
matrix to be output. In this case, we do not have to code the transpose operation since it is
already built into the matrix classes.
Ptolemy
Last updated: 10/17/97
12-16
U. C. Berkeley
DE Domain
Department of EECS
The Almagest
13-1
Chapter 13. Code Generation
Authors:
Joseph Buck
Soonhoi Ha
Edward A. Lee
Praveen K. Murthy
Thomas M. Parks
José Luis Pino
Kennard White
13.1 Introduction
The CG domain and derivative domains are used to generate code rather than to run
simulations [Pin92]. Only the derivative domains are of practical use for generating code. The
stars in the CG domain can be thought of as “comment generators”; they are useful for testing
and debugging schedulers and for little else. The CG domain is intended as a model and a collection of base classes for derivative domains. This section documents the common features
and general structure of all code generation domains.
The CG domain is currently based on dataflow semantics. Dataflow models of computation in Ptolemy include synchronous dataflow (SDF), dynamic dataflow (DDF), and boolean dataflow (BDF). Both DDF and BDF are very general models of dataflow in that they are
Turing equivalent. SDF is a subset of both these models. Hence, a code generation target that
uses the BDF scheduler can support BDF and SDF stars but a target that uses SDF schedulers
only supports SDF stars. Most targets in code generation domains use SDF schedulers and
parallel schedulers which makes these targets support only SDF stars. An advantage of SDF is
that compilation can be done statically; this permits very efficient code generation. While we
have implemented targets that allow DDF code generation stars in the system, these targets
are not in the current release. However, there are a couple of targets that use the BDF scheduler; refer to the BDF domain documentation, the section on the bdf-cg target in the CG
domain documentation in the user’s manual, and the section on the bdf-cgc target in the CGC
domain documentation for more information on BDF semantics and the types of stars that can
be supported. In this chapter, we assume that stars obey only SDF semantics since code generation for non-SDF models is still in its early stages.
The design goal of the code generation class hierarchy is to save work and to make the
system more maintainable. Most of the work required to allocate memory for buffers, constants, tables, and to generate symbols that are required in code is completely processor-independent; hence these facilities are provided in the generic classes found in the $PTOLEMY/
src/domains/cg/kernel directory.
A key feature of code generation domains is the notion of a target architecture. Every
application must have a user-specified target architecture, selected from a set of targets supported by the user-selected domain. Every target architecture is derived from the base class
Target, and controls such operations as scheduling, compiling, assembling, and downloading code. Since it controls scheduling, multiprocessor architectures can be supported with
Ptolemy
Last updated: 10/17/97
13-2
Code Generation
automated task partitioning and synchronization.
In the following sections, we will introduce the methods and data structures needed to
write new code generation stars and targets. However, we will not document what is needed to
write a new code generation domain; that discussion can be found in chapter 17. We will first
introduce what is needed to write a new code generation star, introducing the concepts of code
blocks, code streams and code block macros. Next we will describe the various methods
which will generally use the addCode method to piece together the code blocks into the code
streams. We will then go into what is required to write single-processor and multiple-processor targets. Finally we will document the various schedulers available in the code generation
domains.
13.2 Writing Code Generation Stars
Code generation stars are very similar to the C++ simulation stars. The main difference is that the initialization (setup()), run time (go()), and termination (wrapup()) methods generate code to be compiled and executed later. Additionally, code generation stars have
two more methods called initCode()and execTime().
The setup() method is called before the schedule is generated and before any memory is allocated. In this method, we usually initialize local variables or states. Note that the
setup method of a star may be called multiple times. This means that the user should be careful so that the behavior of the star does not change even though setup method is called multiple times. The initCode() method of a star is called after the static schedule has been
generated and before the schedule is fired. This method is used to generate the code outside of
the main loop such as initialization code and procedure declaration code. To generate start-up
code, use the initCode method, NOT the setup method, since setup is called before scheduling and memory allocation. The main use of the setup method, as in SDF, is to tell the scheduler if more than one sample is to be accessed from a porthole with the setSDFParams call.
The go() function is used to generate the main loop code for the star. Finally, the
wrapup() function is used to generate the code after the main loop.
The execTime() method returns an integer specifying the time needed to execute the
main loop code of a code generation star in processor cycles or instruction steps. These numbers are used by the parallel schedulers. In the assembly code generation domains, the integer
returned is the main loop code execution time in DSP instruction cycles. The better the execTime() estimates are for each star, the more efficient the parallel schedule becomes.
If a star is invoked more than once during an iteration period, the precedence relation
between stars should be known to the parallel scheduler. If there is no precedence relation
between invocations, the parallel scheduler will try to parallelize them. By default, there is a
precedence relation between invocations for any star (this is equivalent to having a self-loop).
To assert that there is no such self-loop for a star, we have to call the noInternalState()
method in the constructor:
constructor {
noInternalState();
}
It is strongly recommended that the star designer determine whether the star is parallelizable
or not, and call noInternalState() if it is.
U. C. Berkeley
Department of EECS
The Almagest
13-3
The CGStar class is the base class for all code generation stars, such as high level language code generation stars and assembly language code generation stars. In this section, we
will explain the common features that the CGStar class provides for all derivative code generation stars.
As a simple example to see how code generation stars are written, let’s write an adder
star for the C code generation domain. The defstar is almost the same as for a simulation
star:
defstar {
name {Add}
domain {CGC}
desc { Output the sum of the inputs, as a floating
value.}
author { J. Pino }
input {
name {input1}
type {float}
}
input {
name {input2}
type {float}
}
output {
name {output}
type {float}
}
...
13.2.1 Codeblocks
Next we have to define the C code which will be used to generate the run-time code.
For this we use a codeblock. A codeblock is a pseudo-language specification of a code segment. By pseudo-language we mean that the block of code is written in the target language
with interspersed macros. Macros will be explained in the following section.
Codeblocks are implemented as protected static class members (e.g. there is one
instance of a codeblock for the entire class). Since they are protected, codeblocks from one
star class can be used from a derived star. The codeblock directive defines a block of code
with an associated identifying name (“addCB” in this case).
codeblock (addCB) {
/* output = input1 + input2 */
$ref(output) = $ref(input1) + $ref(input2);
}
Special care should be given to codeblock specification. Within each line, spaces, tabs, and
new line characters are important because they are preserved. For this reason, the brackets
“{ }” should not be on the same lines with the code. Had addCB been defined as follows:
codeblock (addCB) { /* output = input1 + input2 */
$ref(output) = $ref(input1) + $ref(input2); }
the line
Ptolemy
Last updated: 10/17/97
13-4
Code Generation
ref(output) = $ref(input1) + $ref(input2);
would be lost! This is because anything preceding the closing “}” on the same line is discarded by the preprocessor (ptlang). Secondly, the spaces and tabs between the opening “{”
and the first non-space character will be ignored.
The first definition of the addCB codeblock is translated by ptlang into a definition
of a static public member in the .h file:
class CGCAdd : public CGCStar
{
...
static CodeBlock addCB;
...
}
An associated constructor call will be generated in the .cc file:
CodeBlock CGCAdd :: addCB (
" /* output = input1 + input2 */\n"
" $ref(output) = $ref(input1) + $ref(input2);\n"
);
The argument is a single string, divided into lines for convenience. The following will complete our definition of the add star:
go {
addCode(addCB);
}
Notice that the code is added in the go method, thus implying that the code is generated in the
main loop.
The
addCode(code,stream name,<unique name>)
method of a CG star provides an interface to all the code streams (stream name and uniquename arguments are optional). This method defaults to adding code into the myCode stream
(codestreams are explained later on). If a stream name is specified, addCode looks up the
stream using the getStream(stream-name) method and then adds the code into that
stream. Furthermore, if a unique name is provided for the code, the code will only be added if
no other code has previously been added with the given unique name. The method addCode
will return TRUE if the code-string has been added to the stream and otherwise will return
FALSE.
The star just defined is a very simple star. Typical code generation stars will define
many codeblocks. Conditional code generation is easily accomplished, as is done in the following example:
go {
if (parameter == YES)
addCode(yesblock);
else
addCode(noblock);
U. C. Berkeley
Department of EECS
The Almagest
13-5
}
So far, we have used the addCode() method to generate the code inside the main loop
body. In the assembly language domains, addCode can be called in the initCode and
wrapup methods, to place code before or after the main loop respectively. In all of the code
generation domains, we can use the addProcedure() method to generate declarations outside of the main body. Refer to “Code streams” on page 13-16 for documentation on the
addCode and addProcedure methods.
The next section describes the extended codeblock support. The previous discussion of
simple codeblocks is still correct and supported by ptlang; the extensions below are upward
compatible. These extensions are experimental. They may change in future version of
Ptolemy, and may still contain bugs.
13.2.2 Codeblocks with arguments
Simple codeblocks (as described above) have a name and are implemented as static
member strings. Extended codeblocks have a name, optional arguments, and are implemented
as non-static functions. They have an escape mechanism so that C++ expressions may be
evaluated at run time and inserted into the generated code. However, in order to take advantage of this escape mechanism, a codeblock must be defined and called with arguments, even
if those arguments are empty. An example:
codeblock(cbLoop,"int N, double x") {
for (i=0; i < @N; i++) {
$ref(output,i) = sin(i*@x);
}
}
This defines a codeblock named cbLoop with two arguments: N and x. The variable i will
appear in the generated code, while the C++ expressions N and x are escaped by @ and will be
evaluated at code-generation time. When this is called as
cbLoop(5, 0.1);
the following string will be returned:
for (i=0; i < 5; i++) {
$ref(output,i) = sin(i*0.1);
}
This might be used within a go() method as:
go {
addCode(cbLoop(5, 0.1));
}
The addCode() method will process the $ref() macro as described elsewhere. More complicated expressions are allowable. In general, the @ clause may be delimited by parentheses
“(”and “)”, and must be operator << printable. The above codeblock could have been equivalently declared as:
Ptolemy
Last updated: 10/17/97
13-6
Code Generation
codeblock(cbLoop,"int N, double x") {
for (i=0; i < @(N); i++) {
$ref(output,i) = sin(i*@(x));
}
}
A more complicated example follows:
codeblock(cbLoop2,"char *portname, int N, double x") {
for (i=0; i < @(int(length)); i++) {
$ref(@portname,i) = sin(i*@(x/N));
}
}
In this example, length is a data member of the star (typically a state). When called as:
cbLoop2("ina", 3, 0.2);
it would generate (assuming the value of length is 20):
for (i=0; i < 20; i++) {
$ref(ina,i) = sin(i*0.6666666);
}
In order to trigger the C++ expression processing via @-escapes in codeblocks which would
otherwise have no arguments, add in a null argument list as in:
codeblock(cbLoop3,"") {
for (i=0; i < @(int(length)); i++) {
$ref(output,i) = sin(i*0.1);
}
}
In the example above, the @(int(length)) will be replaced with the value of the class
member length. The above example would be called with an empty argument list as:
go {
addCode(cbLoop3());
}
The complete parsing rules are:
@@
@ATSIGN
@{
@LBRACE
@}
@RBRACE
@\
@BACKSLASH
@id
@(expr)
U. C. Berkeley
==>
==>
==>
==>
==>
==>
==>
==>
==>
==>
@
(double "@" goes to single)
@
{
{
(LBRACE is literal string)
}
}
(RBRACE is literal string)
\
\
(BACKSLASH is literal string)
C++ token {id} (id is one or more alphanumerics)
C++ expr {expr}(expr is arbitrary with balanced
Department of EECS
The Almagest
13-7
parens)
@(white_space) ==>
nothing
@anything_else is passed through unchanged (including the @)
In an extended codeblock, trailing backslashes "\" will omit the following newline in the generated code. This special meaning of trailing "\" may be prevented by using "@\" or
“@BACKSLASH”.
13.2.3 In-line codeblocks
Code blocks may be specified in the body of a method. Inside the definition of a
method (such as go()), all contiguous blocks of lines with a leading @ will be translated into
an in-line codeblock (i.e., an addCode() statement). The @ escape mechanism for C++
expressions works as described above for codeblocks with arguments. Within @-escaped
expressions, in-line codeblocks may reference local method variables as well as member variables.
Leading white-space before a leading @ will be ignored. Note that no override mechanism is provided to prevent the in-line codeblock interpretation. Note also that @ has dual
meanings: the first @ on the line introduces in-line codeblock mode, while subsequent @ characters on the same line escape into C++ expressions. For example:
go() {
@CMAM_wait( &$ref(ackFlag), 1);
}
is equivalent to:
go() {
addCode("CMAM_wait( &$ref(ackFlag), 1);\n");
}
A more complicated example:
go {
@
$ref(output) = \
int ni = input.numberPorts();
for (int i = 1; i <= ni; i++) {
@$ref(input#@i) @(i < ni ? " + " : ";\n") \
}
}
If “input.numberPorts()” returns 3 when the above program is run, the generated code
will be:
"
$ref(output) = $ref(input#1) + $ref(input#2) + $ref(input#3);\n"
Currently, only the pre-defined methods (start, go, exectime etc.) are processed this way;
not user-defined methods.
Ptolemy
Last updated: 10/17/97
13-8
Code Generation
13.2.4 Macros
In code generation stars, the inputs and outputs no longer hold values, but instead correspond to target resources where values will be stored (for example, memory locations/registers in assembler generation, or global variables in C-code generation). A star writer can also
define states which can specify the need for global resources.
A code generation star, however, does not have knowledge of the available global
resources or the global variables/tables which have already been defined in the generated
code. For star writers, a set of macros to access the global resources is provided. The macros
are expanded in a language or target specific manner after the target has allocated the
resources properly. In this section, we discuss the macros defined in the CGStar class.
$ref(name)
Returns a reference to a state or a port. If the argument, name, refers to a port,
it is functionally equivalent to the name%0 operator in the SDF simulation
stars. If a star has a multi-porthole, say input, the first real porthole is input#1.
To access the first porthole, we use $ref(input#1) or
$ref(input#internal_state) where internal_state is the name of a
state that has the current value, 1.
$ref(name,offset)
Returns a reference to an array state or a port with an offset that is not negative.
For a port, it is functionally equivalent to name%offset in SDF simulation
stars.
$val(state-name)
Returns the current value of the state. If the state is an array state, the macro
will return a string of all the elements of the array spaced by the new line character. The advantage of not using $ref macro in place of $val is that no additional target resources need to be allocated.
$size(name)
Returns the size of the state/port argument. The size of a non-array state is one;
the size of a array state is the total number of elements in the array. The size of
a port is the buffer size allocated to the port. The buffer size is usually larger
than the number of tokens consumed or produced through that port.
$starName()
Returns the instantiated name of the star (without galaxy or universe names)
$fullName()
Returns the complete name of the star including the galaxies to which it
belongs.
$starSymbol(name)
Returns a unique label in the star instance scope. The instance scope is owned
by a particular instance of that star in a graph. Furthermore, the scope is alive
across all firings of that particular star. For example, two CG stars will have
two distinct star instance scopes. As an example, we show some parts of ptlang
U. C. Berkeley
Department of EECS
The Almagest
13-9
file of the CGCPrinter star.
initCode {
...
StringList s;
s << " FILE* $starSymbol(fp);";
addDeclaration(s);
addInclude("<stdio.h>");
addCode(openfile);
...
}
codeblock (openfile) {
if(!($starSymbol(fp)=fopen("$val(fileName)","w"))) {
fprintf(stderr,"ERROR: cannot open output file
for Printer star.\n");
exit(1);
}
}
The file pointer fp for a star instance should be unique globally, and the
$starSymbol macro guarantees the uniqueness. Within the same star
instance, the macro returns the same label.
$sharedSymbol(list,name)
Returns the symbol for name in the list scope. This macro is provided so that
various stars in the graph can share the same data structures such as sin/cos
lookup tables and conversion table from linear to mu-law PCM encoder. These
global data structures should be created and initialized once in the generated
code. The macro sharedSymbol does not provide the method to generate the
code, but does provide the method to create a label for the code. To generate
the code only once, refer to “Code streams” on page 13-16. A example where a
shared symbol is used is in CGCPCM star.
Ptolemy
Last updated: 10/17/97
13-10
Code Generation
codeblock (sharedDeclarations)
{
int $sharedSymbol(PCM,offset)[8];
/* Convert from linear to mu-law */
int $sharedSymbol(PCM,mulaw)(x)
double x;
{
double m;
m = (pow(256.0,fabs(x)) - 1.0) / 255.0;
return 4080.0 * m;
}
}
codeblock (sharedInit)
{
/* Initialize PCM offset table. */
{
int i;
double x = 0.0;
double dx = 0.125;
for(i = 0; i < 8; i++, x += dx)
{
$sharedSymbol(PCM,offset)[i] =
$sharedSymbol(PCM,mulaw)(x);
}
}
initCode {
...
if (addGlobal(sharedDeclarations, "$sharedSymbol(PCM,PCM)"))
addCode(sharedInit);
}
The above code creates a conversion table and a conversion function from linear to
mu-law PCM encoder. The conversion table is named offset and belongs to the PCM
class. The conversion function is named mulaw, and belongs to the same PCM class.
Other stars can access that table or function by saying $sharedSymbol(PCM,offset) or $sharedSymbol(PCM,mulaw). The initCode method tries to put the
sharedDeclarations codeblock into the global scope (by addGlobal() method
in the CGC domain). That code block is given a unique label by $sharedSymbol(PCM,PCM). If the codeblock has not been previously defined, addGlobal
returns true, thus allowing addCode(sharedInit). If there is more than one
instance of the PCM star, only one instance will succeed in adding the code.
$label(name), $codeblockSymbol(name)
Returns a unique symbol in the codeblock scope. Both label and codeblockSymbol refer to the same macro expansion. The codeblock scope only
lives as long as a codeblock is having code generated from it. Thus if a star
uses addCode() more than once on a particular codeblock, all codeblock
U. C. Berkeley
Department of EECS
The Almagest
13-11
instances will have unique symbols. A example of where this is used in the
CG56HostOut star.
codeblock(cbSingleBlocking) {
$label(wait)
jclr #m_htde,x:m_hsr,$label(wait)
jclr #0,x:m_pbddr,$label(wait)
movep $ref(input),x:m_htx
}
codeblock(cbMultiBlocking) {
move #$addr(input),r0
.LOOP #$val(samplesOutput)
$label(wait)
jclr #m_htde,x:m_hsr,$label(wait)
jclr #0,x:m_pbddr,$label(wait)
movep x:(r0)+,x:m_htx
.ENDL
nop
}
The above two codeblocks use a label named wait. The $label macro will assign
unique strings for each codeblock.
The base CGStar class provides the above 8 macros. In the derived classes, we can add more
macros, or redefine the meaning of these macros. Refer to each domain document to see how
these macros are actually expanded. There are three commonly used macros in the assembly
code generation domains; these are:
$addr(name)
This returns the address of the allocated memory location for the given state or
porthole name. The address does not include references to the memory bank
the location is coming from; for instance, “x:2034” for location 2034 in the “x”
memory bank for Motorola 56000 is output as 2034.
$addr(name,<offset>)
This macro returns the numeric address in memory of the named object, without (for the 56000) an “x:” or “y:” prefix. If the given quantity is allocated in a
register (not yet supported) this function returns an error. It is also an error if
the argument is undefined or is a state that is not assigned to memory (e.g. a
parameter).
Note that this does NOT necessarily return the address of the beginning of a
porthole buffer; it returns the “access point” to be used by this star invocation,
and in cases where the star is fired multiple times, this will typically be different from execution to execution.
If the optional argument offset is specified, the macro returns an expression
that references the location at the specified offset -- wrapping around to the
beginning of the buffer if that is necessary. Note that this wrapping works independent of whether the buffer is circularly aligned or not.
$ref(name,<offset>)
Ptolemy
Last updated: 10/17/97
13-12
Code Generation
This macro is much like $addr(name), only the full expression used to refer to
this object is returned, e.g. “x:23” for a 56000 if “name” is in x memory. If
“name” is assigned to a register, this expression will return the corresponding
register. The error conditions are the same as for $addr
$mem(name)
Returns the name of the memory bank in which the given state or porthole has
its memory allocated.
To have “$” appear in the output code, put “$$” in the codeblock. For a domain where “$” is
a frequently used character in the target language, it is possible to use a different character
instead by redefining the virtual function substChar (defined in CGStar) to return a different character.
It is also possible to introduce processor-specific macros, by overriding the virtual
function processMacro (rooted in CGStar) to process any macros it recognizes and defer
substitution on the rest by calling its parent’s processMacro method.
13.2.5 Assembly PortHoles
Here are some methods of class AsmPortHole that might be useful in assembly code
generation stars:
bufSize()
Returns an integer, the size of the buffer associated with the porthole.
baseAddr() Returns the base address of the porthole buffer
bufPos()
Returns the offset position in the buffer, which ranges from 0 to bufSize()-1.
circAccessThisTime()
This method returns true (nonzero) if the data to be read or written on
this execution “wrap around”, so that accessing them in a linear order
will not work.
13.2.6 Attributes
Attributes are assertions about the object they are applied to. Both states and portholes
can have attributes. Attributes that apply to states have the prefix “A_”. Attributes that apply
to portholes have the prefix “P_”. The following attributes are common to all code generation
domains:
A_GLOBAL
If set, this state is declared global so that it is accessible everywhere. Currently,
it is only supported in the CGC domain.
A_LOCAL
This is the opposite of A_GLOBAL.
A_SHARED
A state that is shared among all stars that know its name, type, size.
A_PRIVATE
U. C. Berkeley
Department of EECS
The Almagest
13-13
Opposite of A_SHARED.
The default for stars is A_LOCAL|A_PRIVATE. Right now, only A_SHARED|A_LOCAL is supported in the assembly language domains. This combination means that all stars will share the
particular state across a processor. For all stars to share it in a universe the bits
A_SHARED|A_GLOBAL need to be set; this combination is not implemented yet - the default
method will probably restrict all the stars that share this state to the same processor.
A_CONSTANT
The state value is not changed by the star’s execution.
A_NONCONSTANT
The state value is changed by the star’s execution.
A_SETTABLE
The user may set the value of this state from a user interface.
A_NONSETTABLE
The user may not set the value of this state from a user interface (e.g. editparameters doesn’t show it).
Applying an attribute to an object implies that some bits are to be “turned on”, and others are to be “turned off”. The underlying attribute bits have names beginning with AB_ for
states, and PB_ for portholes. The only two bits that exist in all states are AB_CONST and
AB_SETTABLE. By default, they are on for states, which means that the default state works
like a parameter (you can set it from the user interface, and the star’s execution does not
change it).
For assembly language domains, the following attributes are defined:
A_CIRC
If set, the memory for this state is allocated as a circular buffer, whose address
is aligned to the next power of two greater than or equal to its length.
A_CONSEC
If set, allocate the memory for the next state in this star consecutively, starting
immediately after the memory for this star.
A_MEMORY
If set, memory is allocated for this state.
A_NOINIT
If set, the state is not be automatically initialized. The default is that all states
that occupy memory are initialized to their default values.
A_REVERSE
If set, write out the values for this state in reverse order.
A_SYMMETRIC
If set, and if the target has dual data memory banks (e.g. M56000, Analog
Devices 2100, etc.), allocate a buffer for this object in both memories.
Ptolemy
Last updated: 10/17/97
13-14
Code Generation
Given these attributes (technically, the above also have “bit” representations of the form
AB_xxx; A_xxx just turns the bit AB_xxx on), the following attributes correspond to requests
to turn some attributes off and to turn other attributes on. For example:
A_ROM
Allocate memory for this state in memory, and the value will not change -A_MEMORY and A_CONSTANT set.
A_RAM
A_MEMORY set, A_CONST not set
For portholes in code generation stars, we have:
P_CIRC
If set, then allocate the buffer for this porthole as a circular buffer, even if this
is not required because of any other consideration.
P_SHARED
Equivalent to A_SHARED, only for portholes.
P_SYMMETRIC
Similar to A_SYMMETRIC, but for portholes.
P_NOINIT
Do not initialize this porthole.
Attributes can be combined with the “|” operator. For example, to allocate memory for a state
but make it non-settable by the user, I can say
AB_MEMORY|A_NONSETTABLE
13.2.7 Possibilities for effective buffering
In principle, blocks communicate with each other through porthole connections. In
code generation domains, we allocate a buffer for each input-output connection by default.
There are some stars, however, that do not modify data at all. A good, and also ubiquitous,
example is a Fork star. When a Fork star has N outputs, the default behavior is to create N
buffers for output connections and copy data from input buffer to N output buffers, which is a
very expensive and silly approach. Therefore, we pay special attention to stars displaying this
type of behavior. In the setup method of these stars, the forkInit() method is invoked to
indicate that the star is a Fork-type star. For example, the CGCFork star is defined as
defstar {
name { Fork }
domain { CGC }
desc { Copy input to all outputs }
version { @(#)CGCFork.pl 1.6 11/11/92 }
author { E. A. Lee }
copyright { 1991-1994 The Regents of the University of California }
location { CGC demo library }
explanation {
U. C. Berkeley
Department of EECS
The Almagest
13-15
Each input is copied to every output. This is done by the way
the buffers are laid out; no code is required.
}
input {
name {input}
type {ANYTYPE}
}
outmulti {
name {output}
type {=input}
}
constructor {
noInternalState();
}
start {
forkInit(input,output);
}
exectime { return 0;}
}
Where possible, code generation domains take advantage of Fork-type stars by not allocating
output buffers, but instead the stars reuse the input buffers. Unfortunately, in the current
implementation, assembly language fork stars can not do their magic if the buffer size gets too
large (specifically, if the size of the buffer that must be allocated is greater than the total number of tokens generated or read by some port during the entire execution of the schedule).
Here, forks or delay stars that copy inputs to outputs must be used.
Another example of a Fork-Type star is the Spread star. The star receives N tokens
and spreads them to more than one destination. Thus, each output buffer may share a subset of
its input buffer. We call this relationship embedding: the outputs are embedded in the input.
For example, in the CGCSpread star:
setup {
MPHIter iter(output);
CGCPortHole* p;
int loc = 0;
while ((p = (CGCPortHole*) iter++) != 0) {
input.embed(*p, loc);
loc += p->numXfer();
}
}
Notice that the output is a multi-porthole. During setup, we express how each output is
embedded in the input starting at location loc. At the buffer allocation stage, we do not allocate buffers for the outputs, but instead reuse the input buffer for all outputs. This feature,
however, has not yet been implemented in the assembly language generation domains.
A Collect star embeds its inputs in its output buffer:
setup {
MPHIter iter(input);
Ptolemy
Last updated: 10/17/97
13-16
Code Generation
CGCPortHole* p;
int loc = 0;
while ((p = (CGCPortHole*) iter++) != 0) {
output.embed(*p, loc);
loc += p->numXfer();
}
}
Other examples of embedded relationships are UpSample and DownSample stars.
One restriction of embedding, however, is that the embedded buffer must be static. Automatic
insertion of Spread and Collect stars in multi-processor targets (refer to the target section)
guarantees static buffering. If there is no delay (i.e., no initial token) in the embedded buffer,
static buffering is enforced by default. A buffer is called static when a star instance consumes
or produces data in the same buffer location in any schedule period. Static buffering requires a
size that divides the least common multiple of the number of tokens consumed and produced;
if such a size exists that equals or exceeds the maximum number of data values that will ever
be in the buffer, static allocation is performed.
13.3 Targets
A code generation Domain is specific to the language generated, such as C (CGC),
Sproc assembly code (Sproc) [Mur93], Silage [Kal93], DSP56000 assembly code (CG56),
and DSP96000 assembly code (CG96). Each code generation domain has a default target
which defines routines generic to the target language. A derived Target that defines architecture specific routines can then be written. A given language, particularly a generic language
such as C, may run on many target architectures. Code generation functions are cleanly
divided between the default domain target and the architecture specific target.
All target architectures are derived from the base class Target. The special class
KnownTarget is used to add targets to the known list of targets, much as KnownBlock is
used to add stars (and other blocks) to the known block list and to assign names to them.
A Target object has methods for generating a schedule, compiling the code, and running the code (which may involve downloading code to target hardware and beginning its
execution). There also may be child targets (for representing multiprocessor targets) together
with methods for scheduling the communication between them. Targets also have parameters
that are user specified.
13.3.1 Single-processor target
The base target for all code generation domains is the CGTarget, which represents a
single processor by default. This target is called default-CG in the target list for the CG
domain. As the generic code generation target, the CGTarget class defines many common
functions for code generation targets. Methods defined here include virtual methods to generate, display, compile, and run the code. Derived targets are free to redefine these virtual methods if necessary.
Code streams
A code generation target manages code streams which are used to store star and target
generated code. The CGTarget class has the two predefined code streams: myCode and pro-
U. C. Berkeley
Department of EECS
The Almagest
13-17
cedures. The myCode stream is referred to as CODE and the procedures stream is called
PROCEDURE; these names should be used when referring to these streams as in “CodeStream* code = getStream(CODE)”. Derived targets are free to add more code streams
using the CGTarget method addStream(stream-name). For example, the default CGC
target defines fourteen additional code streams.
Other methods, such as addProcedure(code,uniquename) can be defined, to
provide a more efficient or convenient interface to a specific code stream (in this case, procedures). With addProcedure it becomes clear why unique names are necessary. Recall that
addProcedure is used to declarations outside of the main body of the code. For example,
say we wanted to write a function in C to multiply two numbers. The codeblock to do this
could read:
codeblock(sillyMultiply) {
/* A silly function */
double $sharedSymbol(silly,mult)(double a, double b)
{
double m;
m = a*b;
return m;
}
}
Note that in this codeblock we used the sharedSymbol macro described in the code generation macros section. To add this code to the procedures stream, in the initCode method of
the star, we can call either:
addProcedure(sillyMultiply,"mult");
or
addCode(sillyMultiply,"procedures","mult");
or
getStream("procedures")->put(sillyMultiply,"mult");
As with addCode, addProcedure returns a TRUE or FALSE indicating whether the
code was inserted into the code stream. Taking this into account, we could have added the
code line by line:
if (addProcedure("/* A silly function */\n","mult")) {
addProcedure(
"double $sharedSymbol(silly,mult)(double a, double
b)\n"
);
addProcedure("{\n");
addProcedure("\tdouble m;\n");
addProcedure("\tm = a*b;\n");
addProcedure("\treturn m;\n");
addProcedure("}\n");
}
13.3.2 Assembly code streams
Code is generated in the assembly language domains into four streams. The streams
inherited from CGTarget are the CODE and PROCEDURES stream. The two new streams are:
Ptolemy
Last updated: 10/17/97
13-18
Code Generation
mainLoop
Code added to this stream comprises the main loop of the generated
algorithm. All addCode calls from a star’s go function automatically
are concatenated to this stream unless another stream is supplied as an
argument.
trailer
Code added to this stream comprises the wrapup section of the generated algorithm. All addCode calls from a star’s wrapup method automatically are concatenated to this stream unless another stream is
supplied as an argument.
Code generation
Once the program graph is scheduled, the target generates the code in the virtual
method generateCode(). (Note: code streams should be initialized before this method is
called.) All the methods called by generateCode are virtual, thus allowing for target customization. The generateCode method then calls allocateMemory() which allocates the
target resources. After resources are allocated, the initCode method of the stars are called
by codeGenInit(). The next step is to form the main loop by calling the method mainLoopCode(). The number of iteration cycles are determined by the argument of the “run”
directive which a user specifies in pigi or in ptcl. To complete the body of the main loop,
go() methods of stars are called in the scheduled order. After forming the main loop, the
wrapup() methods of stars are called.
Now, all of the code has been generated; however, the code can be in multiple target
streams. The frameCode() method is then called to piece the code streams together and
place the unified stream into the myCode stream. Finally, the code is written to a file by the
method writeCode(). The default file name is “code.output”, and that file will be
located in the directory specified by a target parameter, destDirectory.
Finally, since all of the code has been generated for a target, we are ready to compile,
load, and execute the code. Derived targets should redefine the virtual methods compileCode(), loadCode(), and runCode() to do these operations. At times it does not make
sense to have separate loadCode() and runCode() methods, and in these cases, these operations should be collapsed into the runCode() method.
13.3.3 Multiprocessor targets
Targets representing multiple processors are derived from the CGTarget class. The
base class for all multiple-processor targets is called MultiTarget, and resides in the
$(PTOLEMY)/src/domains/cg/kernel directory. CGMultiTarget is derived from
MultiTarget. CGMultiTarget class is the base class for all multiple-processor targets. It
is called FullyConnected in the CG domain target list.
The design of Ptolemy is also intended to support heterogeneous multi-processor targets. In the future, the base class of all “abstract” heterogeneous multiprocessor targets will be
implemented from the MultiTarget class. For such targets, certain actors must be assigned
to certain targets, and the cost of a given actor is in general a function of which child target it
is assigned to. We have developed parallel schedulers that address this problem [Sih91].
We have implemented, or are in the process of implementing, both “abstract” and
“concrete” multi-processor targets. For example, we have classes named CGMultiTarget
U. C. Berkeley
Department of EECS
The Almagest
13-19
and CGSharedBus that represent sets of homogenous single-processor targets of arbitrary
type, connected in either a fully connected or shared-bus topology, with parametrized communication costs. These targets, however, use only the CG domain stars and hence do not actually generate code (recall that CG domain stars are “comment generators”). Some other actual
implementations of multiprocessor systems include the CM-5 (CGCCm5Target in the CGC
domain), the Sproc multiprocessor DSP [Mur93], and the ordered transaction architecture
[Sri93]. Refer to the CG56 domain documentation for CG56MultiSim target, or the CGC
domain documentation for CGCMultiTarget class as examples of “concrete” multi-processor targets. In this section, we concentrate on the “abstract” multiprocessor target classes that
are in the $(PTOLEMY)/src/domains/cg/targets directory.
CGMultiTarget is the base target class for all homogeneous targets. By default, it
models a fully-connected multiprocessor architecture; when a processor wants to communicate with another processor, it can do immediately. The scheduleComm() method returns
the time when the required communication is scheduled. In the CGMultiTarget class, it
returns the same time as when the communication is required. On the other hand, CGSharedBus, which is derived from the CGMultiTarget class, is the base target class for all multiprocessor targets having a shared-bus topology. In the CGSharedBus class, the
scheduleComm() method schedules the required communication on the shared-bus member
object of that class, and returns the scheduled time. The communication cost (in time) is modeled by the commTime() method. Given the information on which processors are involved in
this communication and how many tokens are transmitted, it returns the expected communication time once started. By default (or in fully-connected topology), it only depends on the
number of tokens.
A CGMultiTarget has a sequence of child target objects to represent each of the
individual processors. The number of processors are determined by an IntState, nprocs,
and the type of the child target is specified by a StringState, childType. Refer to the
User’s Manual for details on how to specify the various target parameters. In the setup stage,
the child targets are created and added to the child target list as members of the multiprocessor
target. Classes derived from MultiTarget represent the topology of the multi-processor network (communication costs between processors, schedules for use of communication facilities, etc.), and single-processor child targets can represent arbitrary types of processors. The
resource allocation problem is divided between the parent target, representing the shared
resources, and the child targets, representing the resources that are local to each processor.
The main role of a multiprocessor target is to set up one of the chosen parallel schedulers, and to coordinate the child targets. The CGMultiTarget class has a set of parameters to
select parallel scheduling options. See the schedulers section for a detailed discussion on parallel schedulers. The selected parallel scheduler schedules the program graph onto the child
targets and the scheduling results are displayed on a Gantt chart. The parent multiprocessor
target collects the code from each of the child targets after the child targets have generated
code based on the scheduling results. By default, it merges all of the child-processor code into
a single file. If separate files are required, then one approach is to create separate files with
names derived from the child target names and write the code to these files in the frameCode() method of the multi-target.
Interprocessor communication (IPC) stars are created by the multiprocessor target by
the methods createSend() and createReceive(). These stars are spliced in to the sub-
Ptolemy
Last updated: 10/17/97
13-20
Code Generation
galaxies that are created and handed down to the child targets. Typically, these methods just
create the appropriate IPC star and return a pointer to the object created. Each send/receive
pair is matched in the pairSendReceive() method. Typically, this might involve setting
pointers in the send/receive pair to point to each other.
There is no preprocessor for targets like ptlang for stars. Designing a customized
multiprocessor target, therefore, is a bit complicated compared to designing a customized star.
If the interconnection topology is neither fully-connected nor shared-bus, in particular, the
communication scheduling should be designed in the target, which makes a target design
more complicated. So the best way to design a target is to look at an already-implemented target such as CGCMultiTarget class in the CGC domain.
13.4 Schedulers
Given a Universe of functional blocks to be scheduled and a Target describing the
topology and characteristics of the single- or multiple-processor system for which code is to
be generated, it is the responsibility of the Scheduler object to perform some or all of the
following functions:
•
Determine which processor a given invocation of a given Block is executed on (for
multiprocessor systems).
•
Determine the order in which actors are to be executed on a processor.
•
Arrange the execution of actors into standard control structures, like nested loops.
In this section, we explain different scheduling options and their effect on the generated code.
13.4.1 Single-processor schedulers
For targets consisting of a single processor, we provide three different scheduling
techniques. The user can select the most appropriate scheduler for a given application by setting the loopingLevel target parameter.
In the first approach (loopingLevel = DEF), which is the default SDF scheduler, we
conceptually construct the acyclic precedence graph (APG) corresponding to the system, and
generate a schedule that is consistent with that precedence graph. Note that the precedence
graph is not physically constructed. There are many possible schedules for all but the most
trivial graphs; the schedule chosen takes resource costs, such as the necessity of flushing registers and the amount of buffering required, into account. The target then generates code by
executing the actors in the sequence defined by this schedule. This is a quick and efficient
approach when the SDF graph does not have large sample-rate changes. If there are large sample-rate changes, the size of the generated code can be huge because the codeblock for an
actor might occur many times (if the number of repetitions for the actor is greater than one); in
this case, it is better to use some form of loop scheduling.
We call the second approach Joe’s scheduler. In this approach (loopingLevel =
CLUST), actors that have the same sample rate are merged (wherever this will not cause deadlock) and loops are introduced to match the sample rates. The result is a hierarchical clustering; within each cluster, the techniques described above can be used to generate a schedule.
The code then contains nested loop constructs together with sequences of code from the
actors.
U. C. Berkeley
Department of EECS
The Almagest
13-21
Since the second approach is a heuristic solution, there are cases where some looping
possibilities go undetected. By setting the loopingLevel to SJS, we can choose the third
approach, called SJS (Shuvra-Joe-Soonhoi) scheduling after the inventor’s first names
[Bha94]. After performing Joe’s scheduling at the front end, it attacks the remaining graph
with an algorithm that is guaranteed to find the maximum amount of looping available in the
graph.
A fourth approach, obtained by setting loopingLevel to ACYLOOP, we choose a
scheduler that generates single appearance schedules optimized for buffer memory usage.
This scheduler was developed by Praveen Murthy and Shuvra ‘Bhattacharyya [Mur96]
[Bha96]. This scheduler only tackles acyclic SDF graphs, and if it finds that the universe is not
acyclic, it automatically resets the loopingLevel target parameter to SJS. Basically, for a given
SDF graph, there could be many different single appearance schedules. These are all optimally compact in terms of schedule length (or program memory in inline code generation).
However, they will, in general, require differing amounts of buffering memory; the difference
in the buffer memory requirement of an arbitrary single appearance schedule versus a single
appearance schedule optimized for buffer memory usage can be dramatic. In code generation,
it is essential that the memory consumption be minimal, especially when generating code for
embedded DSP processors since these chips have very limited amounts of on-chip memory.
Note that acyclic SDF graphs always have single appearance schedules; hence, this scheduler
will always give single appearance schedules. If the file target parameter is set, then a summary of internal scheduling steps will be written to that file. Essentially, two different heuristics are used by the ACYLOOP scheduler, called APGAN and RPMC, and the better one of
the two is selected. The generated file will contain the schedule generated by each algorithm,
the resulting buffer memory requirement, and a lower bound on the buffer memory requirement (called BMLB) over all possible single appearance schedules.
If the second, third, or fourth approach is taken, the code size is drastically reduced
when there are large sample rate changes in the application. On the other hand, we sacrifice
some efficient buffer management schemes. For example, suppose that star A produces 5 samples to star B which consumes 1 sample at a time. If we take the first approach, we schedule
this graph as ABBBBB and assign a buffer of size 5 between star A and B. Since each invocation of star B knows the exact location in the allocated buffer from which to read its sample,
each B invocation can read the sample directly from the buffer. If we choose the second, third,
or fourth approach, the scheduling result will be A5(B). Since the body of star B is included
inside a loop of factor 5, we have to use indirect addressing for star B to read a sample from
the buffer. Therefore, we need an additional buffer pointer for star B (memory overhead), and
one more level of memory access (runtime overhead) for indirect addressing.
13.4.2 Multiprocessor schedulers
A key idea in Ptolemy is that there is no single scheduler that is expected to handle all
situations. Users can write schedulers and can use them in conjunction with schedulers we
have written. As with the rest of Ptolemy, schedulers are written following object-oriented
design principles. Thus a user would never have to write a scheduler from ground up, and in
fact the user is free to derive the new scheduler from even our most advanced schedulers. We
have designed a suite of specialized schedulers that can be mixed and matched for specific
applications.
Ptolemy
Last updated: 10/17/97
13-22
Code Generation
The first step in multiprocessor scheduling, or parallel scheduling, is to translate a
given SDF graph to an acyclic precedence expanded graph (APEG). The APEG describes the
dependency between invocations of blocks in the SDF graph during execution of one iteration. Refer to the SDF domain documentation for the meaning of one iteration. Hence, a block
in a multirate SDF graph may correspond to several APEG nodes. Parallel schedulers schedule the APEG nodes onto processors.
We have implemented three scheduling techniques that map SDF graphs onto multiple-processors with various interconnection topologies: Hu’s level-based list scheduling,
Sih’s dynamic level scheduling [Sih91], and Sih’s declustering scheduling [Sih91]. The target
architecture is described by its Target object, derived from CGMultiTarget. The Target
class provides the scheduler with the necessary information on interprocessor communication
to enable both scheduling and code synthesis.
The CGMultiTarget has a parameter, schedName, that allows the user to select the
type of schedule. Currently, there are five different scheduling options:
DL
If schedName is set to DL, we select the Sih’s dynamic level
scheduler that accounts for IPC overhead during scheduling.
HU
Hu’s level scheduler is selected, which ignores the IPC overhead.
DC
The Sih’s declustering scheduler can be selected by setting DC.
The declustering algorithm is advantageous only when the list
scheduling algorithm shows poor performance, judged from the
scheduling result because it is more expensive than the DL or HU
scheduler.
HIER(DL) or HIER(HU) or HIER(DC)
If we want to use Pino’s hierarchical scheduler, we have to set
schedName to HIER(DL or HU or DC). The default top-level
scheduling option is the DL scheduler. To use other scheduler,
DC or HU should be specified within the parenthesis.
CGDDF
If the schedName is set to CGDDF, the Ha’s dynamic construct
scheduler is selected. To use this scheduler, Ptolemy should be
recompiled with special flags, or use mkcgddf executable.
Whichever scheduler is used, we schedule communication nodes in the generated
code. For example, if we use the Hu’s level-based list scheduler, we ignore communication
overhead when assigning stars to processors. Hence, the code is likely to contain more communication stars than with the other schedulers that do not ignore IPC overhead.
There are other target parameters that direct the scheduling procedure. If the parameter
manualAssignment is set to YES, then the default parallel scheduler does not perform star
assignment. Instead, it checks the processor assignment of all stars (set using the procId state
of CG and derived stars). By default, the procId state is set to -1, which is an illegal assignment since the child target is numbered from 0. If there is any star, except the Fork star, that
has an illegal procId state, an error is generated saying that manual scheduling has failed.
Otherwise, we invoke a list scheduler that determines the order of execution of blocks on each
processor based on the manual assignment. We do not support the case where a block might
U. C. Berkeley
Department of EECS
The Almagest
13-23
require more than one processor. The manualAssignment option automatically sets the
oneStarOneProc state to be discussed next.
If there are sample rate changes, a star in the program graph may be invoked multiple
times in each iteration. These invocations may be assigned to multiple processors by default.
We can prevent this by setting the oneStarOneProc state to YES. Then, all invocations of a
star are assigned to the same processor regardless of whether they are parallelizable or not.
The advantage of doing this is the simplicity in code generation since we do not need to splice
in Spread/Collect stars, which will be discussed later. Also, it provides us another possible scheduling option: adjustSchedule; this is described below. The main disadvantage of
setting oneStarOneProc to YES is the performance loss of not exploiting parallelism. It is
most severe if Sih’s declustering algorithm is used. Therefore, Sih’s declustering algorithm is
not recommended with this option.
In this paragraph, we describe a future scheduling option which this release does not
support yet. Once automatic scheduling (with oneStarOneProc option set) is performed, the
processor assignment of each star is determined. After examining the assignment, the user
may want to override the scheduling decision manually. It can be done by setting the
adjustSchedule parameter. If that parameter is set, after the automatic scheduling is performed, the procId state of each star is automatically updated with the assigned processor.
The programmer can override the scheduling decision by setting that state. The
adjustSchedule cannot be YES before any scheduling decision is made previously. Again,
this option is not supported in this release.
Different scheduling options result in different assignments of APEG nodes. Regardless of which scheduling options are chosen, the final stage of the scheduling is to decide the
execution order of stars including send/receive stars. This is done by a simple list scheduling
algorithm in each child target. The final scheduling results are displayed on a Gantt chart. The
multiple-processor scheduler produces a list of single processor schedules, giving them to the
child targets. The schedules include send/receive stars for interprocessor communication. The
child targets take their schedules and generate code.
To produce code for child targets, we create a sub-galaxy for each child target, which
consists of the stars scheduled on that target and some extra stars to be discussed below if necessary. A child target follows the same step to generate code as a single processor target
except that the schedule is not computed again since the scheduling result is inherited from the
parent target.
Send/Receive stars
After the assignment of APEG nodes is finished, the interprocessor communication
requirements between blocks are determined in sub-galaxies. Suppose star A is connected to
star B, and there is no sample rate change. By assigning star A and star B to different processors (1 and 2 respectively), the parallel scheduler introduces interprocessor communication.
Then, processor 1 should generate code for star A and a “send” star, while processor 2 should
generate code for a “receive” star and star B. These “send” and “receive” stars are inserted
automatically by the Ptolemy kernel when determining the execution order of blocks in each
child target and creating the sub-galaxies. The actual creation of send/receive stars is done by
the parallel scheduler by invoking methods (createSend() and createReceive(), as
mentioned earlier) in the parent multi-target.
Ptolemy
Last updated: 10/17/97
13-24
Code Generation
Once the generated code is loaded, processors run autonomously. The synchronization
protocol between processors is hardwired into the “send” and “receive” stars. One common
approach in shared-memory architectures is the use of semaphores. Thus a typical synchronization protocol is to have the send star set a flag when it completes the data transfer, and have
the receive star read the data and reset the semaphore. The receive star will not read the data if
the semaphore has not been set and similarly, the send star will not write data if the semaphore
has not been reset. In a message passing architecture, the send star may form a message
header to specify the source and destination processors. In this case, the receive star would
decode the message by examining the message header.
For properly supporting arbitrary data types, the send star should have an ANYTYPE
input; the receive star should have an ANYTYPE output. The resolved type for each of these
ports can be obtained using the Porthole::resolvedType method. For a preliminary version of the communication stars, you can use a fixed datatype such as FLOAT or INT.
The send/receive stars that are declared to support ANYTYPE but fail to support a particular datatype, should display an appropriate error message using the Error::abortRun
method. Finally, each of these stars must call PortHole::numXfer to determine the size of
the block of data that needs to be transferred upon each invocation.
Spread/Collect stars
Consider a multi-rate example in which star A produces two tokens and star B consumes one token each time. Suppose that the first invocation of star B is assigned to the same
processor as the star A (processor 1), but the second invocation is assigned to processor 2.
After star A fires in processor 1, the first token produced should be routed to star B assigned to
the same processor while the second token produced should be shipped to processor 2; interprocessor communication is required! Since star A has one output port and that port should be
connected to two different destinations (one is to star B, the other is to a “send” star), we insert
a “spread” star after star A. As a result, the sub-galaxy created for processor 1 contains 4
blocks: star A is connected to a “spread” star, which in turn has two outputs connected to star
B and a “send” star. The role of a “spread” star is to spread tokens from a single output porthole to multiple destinations.
On the other hand, we may need to “collect” tokens from multiple sources to a single
input porthole. Suppose we reverse the connections in the above example: star B produces one
token and star A consumes two tokens. We have to insert a “collect” star at the input porthole
of star A to collect tokens from star B and a “receive” star that receives a token from processor
2.
The “spread” and “collect” stars are automatically inserted by the scheduler, and are
invisible to the user. Moreover, these stars can not be scheduled. They are added to sub-galaxies only for the allocation of memory and other resources before generating code. The
“spread” and “collect” stars themselves do not require extra memory since in most cases we
can overlay memory buffers. For example, in the first example, a buffer of size 2 is assigned
to the output of star A. Star B obtains the information it needs to fetch a token from the first
location of the buffer via the “spread” star, while the “send” star knows that it will fetch a
token from the second location. Thus, the buffers for the outputs of the “spread” star are overlaid with the output buffer of star A.
U. C. Berkeley
Department of EECS
The Almagest
13-25
User Specification
Sparc
DSP
VHDL
Sparc
Spliced-in send/receive pairs
Sparc
DSP
C
C
Sparc
S-56X
C
S-56X
C
S-56X
VHDL
C
VHDL
C
VHDL
VHDL
FIGURE 13-1: An interface constructed between three code generation domains. The interface
constructed by the framework is made up of communication pairs, each pair encircled by an ellipse. The first (sine) and last (xgraph) stars are to be run on the host
workstation (CGC). The second block (analysis filter bank, a galaxy made up of
two polyphase FIR actors) is to be run on a DSP card (CG56). The third block
(synthesis filter bank, a galaxy made up of two polyphase FIR actors) is to be run
using a VHDL simulator.
In case there are delays or past tokens are used on the connection between two blocks
that should be connected through “spread” or “collect” stars, we need to copy data explicitly.
Thus, we will need extra memory for these stars. In this case, the user will see the existence of
“spread/collect” stars in the generated code.
Spread/Collect stars have only been implemented in the CGC domain so far.
13.5 Interface Issues
In Ptolemy 0.6 and later, we have developed a framework for interfacing code generation targets with other targets (simulation or code generation). In this section we will detail
how to support this new framework for a code generation target. To learn how to develop
applications within Ptolemy that use multiple targets that support this new framework, refer to
the Interface Issues section in the User’s Manual - CG Domain chapter.
As with Wormholes, we have developed a way to interface N targets without requiring N2 specialized interfaces. We do this by generating a customized interface (analogous to
the universal EventHorizon in wormholes) that is automatically built by using communication stars supplied by each code generation target. This interface is generated in C (using the
CGC domain) and runs on the Ptolemy host workstation.
To support this infrastructure, a target writer needs to define two pairs of communica-
Ptolemy
Last updated: 10/17/97
13-26
Code Generation
tion stars and add target methods which return each of these pairs. The framework will then
build the interface by splicing in these stars as is shown in figure 13-1. These same actors are
used when constructing an interface to a Ptolemy simulation target as shown in figure 13-2.
User Specification
Sim-SDF
External
Sim-SDF
Spliced-in simulation-SDF send/receive actors
DSP
SimIn
SimOut
C
C
S-56X
C
S-56X
C
S-56X
VHDL
C
VHDL
C
VHDL
VHDL
FIGURE 13-2: General Ptolemy simulation interface. The analysis and synthesis filter bank
blocks are identical to those described in figure 13-1. The SimIn and SimOut
stars are built into Ptolemy and defined in:
$PTOLEMY/src/domains/cgc/targets/main/CGCSDF{Send,Receive}.pl
These communication stars, described in section 13.4.2, are a specialized form of
send/receive stars. In addition to the previous assumptions in section 13.4.2, send/receive for
this infrastructure must also define C code to control the target for operations such as downloading, initializing and (if applicable) terminating the generated executable.
One pair of communication stars must communicate from the target to the CGC code
that will run on the Ptolemy host workstation. The other pair must communicate in the opposite direction. The CGC send/receive stars are typically defined from a common base communication star specific for each target. This common base defines the C code to control a target
that was discussed in the previous paragraphs. Examples of send/receive stars that support this
infrastructure can be found in:
For the S56XTarget (Ariel S-56X DSP card):
$PTOLEMY/src/domains/cg56/targets/CGCXBase.pl
$PTOLEMY/src/domains/cg56/targets/CGCXSend.pl
$PTOLEMY/src/domains/cg56/targets/CGCXReceive.pl
$PTOLEMY/src/domains/cg56/targets/CG56XCSend.pl
$PTOLEMY/src/domains/cg56/targets/CG56XCReceive.pl
For the SimVSSTarget (Synopsis VSS Simulator):
$PTOLEMY/src/domains/vhdl/targets/CGCVSynchComm.pl
U. C. Berkeley
Department of EECS
The Almagest
13-27
$PTOLEMY/src/domains/vhdl/targets/CGCVSend.pl
$PTOLEMY/src/domains/vhdl/targets/CGCVReceive.pl
$PTOLEMY/src/domains/vhdl/targets/VHDLCSend.pl
$PTOLEMY/src/domains/vhdl/targets/VHDLCReceive.pl
After defining both pairs of communication stars, methods to instantiate these stars
must be defined in the target:
CommPair fromCGC(PortHole&);
CommPair toCGC(PortHole&);
A CommPair is a communication pair, where one of the communication stars in a
CGC star. The S56XTarget::fromCGC method, illustrates the typical code needed for these
methods:
CommPair S56XTarget::fromCGC(PortHole&) {
CommPair pair(new CGCXSend,new CG56XCReceive);
configureCommPair(pair);
return pair;
}
The configureCommPair function is defined in the S56XTarget.cc file and configures the S56XTarget communication stars.
Ptolemy
Last updated: 10/17/97
13-28
U. C. Berkeley
Code Generation
Department of EECS
The Almagest
14-1
Chapter 14. CGC Domain
Authors:
Joseph T. Buck
Soonhoi Ha
Edward A. Lee
Yu Kee Lim
Thomas M. Parks
José Luis Pino
Other Contributors:
Sunil Bhave
Kennard White
14.1 Introduction
The CGC domain generates code for the C programming language. “Code Generation”
on page 13-1 describes the features common to all code generation domains. The basic principles of writing code generation stars are explained in “Writing Code Generation Stars” on
page 13-2.You will find explanations for codeblocks, macros, and attributes there. This chapter explains features specific to the CGC domain. Refer to the CGC domain chapter in the
user’s manual for an introduction to this domain.
14.2 Code Generation Methods
The addCode method is context sensitive so that it will ‘do the right thing’ when
invoked from within the initCode, go, and wrapup methods of CGCStar. Refer to “Writing
Code Generation Stars” on page 13-2 for documentation on addCode, including context sensitive actions and conditional code generation. There are several additional code-generation
methods defined in the CGC domain. The addInclude method is used to generate
#include file directives. The addDeclaration method is used to declare local variables
within the main function. The addGlobal method is used to declare global variables outside
the main function. As with addCode, these methods return TRUE if code was generated for
the appropriate stream and FALSE otherwise. These methods are member functions of the
CGCStar class.
int addInclude (const char* file)
Generate the directive #include file in the include stream.
The string file must include quotation marks ("file") or angle
brackets (<file>) around the name of the file to be included.
Only one #include file directive will be generated for the
file, even if addInclude is invoked multiple times with the
same argument. Return TRUE if a new directive was generated.
int addDeclaration (const char* text, const char* name = NULL)
Add text to the mainDecls stream. Use name as the identify-
ing key for the code fragment if it is provided, otherwise use
Ptolemy
Last updated: 8/26/97
14-2
CGC Domain
text itself as the key. Code will be added to the stream only
the first time that a particular key is used.
int addGlobal (const char* text, const char* name = NULL)
Add text to the globalDecls stream. Use name as the identi-
fying key for the code fragment if it is provided, otherwise use
text itself as the key. Code will be added to the stream only
the first time that a particular key is used.
int addCompileOption (const char* text)
Add options to be used when compiling a C program. The
options are collected in the compileOptionsStream stream.
int addLinkOption (const char* text)
Add options to be used when linking a C program. The options
are collected in the linkOptionsStream stream.
The following streams, which are used by the code generation methods just described,
are defined as members of the CGCTarget class in addition to the streams defined by the
CGTarget class.
CodeStream include
Include directives are added to this stream by the addInclude
method of CGCStar.
CodeStream mainDecls
Local declarations for variables are added to this stream by the
addDeclaration method of CGCStar.
CodeStream globalDecls
Global declarations for variables and functions are added to this
stream by the addGlobal method of CGCStar.
CodeStream mainInit
Initialization code is added to this stream when the addCode
method is invoked from within the initCode method.
CodeStream mainClose
Code generated when the addCode method is invoked from
within the wrapup method of stars is placed in this stream.
CodeStream compileOptionsStream
Options to be passed to the C compiler which have been added
using the CGCStar::addCompileOption method.
CodeStream linkOptionsStream
Options to be passed to the linker which have been added using
the CGCStar::addLinkOption method.
14.3 Buffer Embedding
Although many of the methods related to buffer embedding are actually implemented
in the CG domain, only the CGC domain makes use of them at this time. The following func-
U. C. Berkeley
Department of EECS
The Almagest
14-3
tion is defined as a method of the CGPortHole class.
void embed (CGPortHole port, int location = -1)
Embed the buffer of port in the buffer of this porthole with
offset location. The default location of -1 indicates that
the offset is not yet determined.
For example, the following statements appear in the setup method of the Switch
block. This causes the buffers of trueOutput and falseOutput to be embedded within the
buffer of input.
input.embed(trueOutput,0);
input.embed(falseOutput,0);
14.4 Command-line Settable States
In the Ptolemy releases before Ptolemy0.6 the C programs generated by Ptolemy in the
CGC domain did not take any command-line arguments. The state values of the various stars
were set during compilation and thus hard-coded into the program. In order to change a state
variable, the code had to be recompiled again (i.e. the universe had to be re-run within
Ptolemy). This was time consuming, and it also placed unnecessary load on the machine. In
Ptolemy0.6 and later, the CGC domain can generate C code that allow users to set the state
values from the command-line, which allows runs with different parameters to be executed
and compared quickly and easily.
Implementation
14.4.1 C code generated to support command line arguments
A sample of the additional code generated to support command-line arguments is
shown below:
.
.
struct {
double FOO;
double BAR;
} arg_store = {1.0, 0.01,};
void set_arg_val(char *arg[]) {
int i;
for (i = 1; arg[i]; i++) {
if ((!strcmp(arg[i], "-help")) \
||(!strcmp(arg[i], "-HELP")) \
||(!strcmp(arg[i], "-h"))) {
printf("Settable states are :\n
FOO\tdefault : 1.0\n
BAR\tdefault : 0.01\n");
exit(0);
}
if (!strcmp(arg[i], "-FOO")) {
if (arg[i + 1])
arg_store.FOO = atof(arg[i + 1]);
Ptolemy
Last updated: 8/26/97
14-4
CGC Domain
continue;
}
if (!strcmp(arg[i], "-BAR")) {
if (arg[i + 1])
arg_store.BAR = atof(arg[i + 1]);
continue;
}
}
}
/* main function */
main(int argc, char *argv[]) {
.
.
double value_11;
double value_12;
.
.
// End of Declaration
set_arg_val(argv);
.
// Begin of Initialization
.
value_12 = arg_store.BAR;
value_11 = arg_store.FOO;
.
// Code
.
}
The default values (set by the "edit-parameters" command) are stored in the struct
arg_store. The function set_arg_val(argv) scans the list of command-line arguments
for FOO and BAR and sets the corresponding member in arg_store. It also builds up the help
message (consist of the settable state names and their default values) to be printed when the
program receives a '-h', '-help' or '-HELP' option. The state values are initialized to the corresponding arg_store members during the variable initialization stage. By doing this, a
state will get its default value if it is not set on the command-line.
14.4.2 Changes in pigiRpc to support command line arguments
The pragma mechanism in the Target base class is used to specify the state that is to
be made settable via command-line arguments as well as to store the name to be used on the
command-line. In CGCtarget, these are stored as a character string in a TextTable* mappings (a pointer to a HashTable in which the data value and index are character strings) via
the overloaded pragma() member functions.
A function, isCmdArg(const State* state), is used to check whether 'state'
is to be set by a command-line argument. It calls CGCTarget::pragma() and scans through
the StringList returned for the state's name. If found, the mapped name is return. Otherwise a null string is return.
Four new protected CodeStream are added to CGCTarget to store the additional
codes:
cmdargStruct
U. C. Berkeley
stores the struct members.
Department of EECS
The Almagest
14-5
cmdargStruct
stores the default values.
setargFunc
stores the code segment in set_arg_val().
setargFuncHelp
stores the built-up help message.
Four new public member functions and four private ones are also added to CGCStar
to generate the codes:
cmdargStates()
calls cmdargState() to generate the members of
struct arg_store using the mapped name returned by
isCmdArg().
cmdargStatesInits()
calls cmdargStatesInit() to generate the default values of
the settable states.
setargStates()
calls setargState() to generate the code segment to match
the mapped name to the command-line options.
setargStatesHelps()
calls setargStatesHelp() to build up the help message.
These are called in the CGCTarget::declareStar(CGCStar* star) function
after the global and main declarations have been generated. CGCStar::initCodeState(const State* state) is modified to generate the required initialization code if
state is to be settable from the command-line.
In order for a $val state to be settable from the command-line, it has to be changed to
a reference state. The expandVal() member function is overloaded in CGCStar to
check if the "name" state is to be made settable from the command-line. If so, it is added to
the list of referenced state so that it will be declared and initialized.
14.4.3 Limitations of command line arguments.
Currently, this implementation works only for scalar states with float or integer values.
Extension to other types of state should be straight forward by simply adding the appropriate
struct member declaration code in CGCStar::cmdargState(const State* state).
The cmdargStatesInit(), setargState(), setargStatesHelp() and initCodeString() member functions need to be modified accordingly to generate codes for the initialization, setting function, help message and assignment respectively of the new state
variable.
Also, there is no provision to check for duplicate command-line names. If there are
duplicates, Ptolemy will simply generate multiple struct members with the same name, and
error will result in the generated code. To get around this, a new Tk interface could be written
to specify and set the settable states and checking can be done at that level. Alternatively, it
might be a better idea to use the put() method in CodeStream to add the struct member
with its unique handle to the appropriate CodeStream. That way, there will not be duplicate
struct members and state-variables could still reference the same member, so that two or
more states could be set to the same value from a single argument on the command-line.
Another limitation is that the command-line capability only works for states of blocks
at the top level. It will not work for states of Galaxies and Universes, and states that referPtolemy
Last updated: 8/26/97
14-6
CGC Domain
enced other settable states. This could probably be solved by modifying the pragma mechanism to ensure that pragmas at the top level propagate all the way down to the contained
blocks. By doing this, states will inherit pragmas from their parent galaxies so that these
can be picked up by the isCmdArg() function, and the appropriate codes can be generated.
Certain states will affect the overall scheduling of the whole system, e.g. the factor of
upsampling and downsampling stars, and changing these would mean that new code
needs to be generated since the scheduling is hard-coded into the generated code. Thus these
should not be allowed to take values from the command-line. A new attribute can be introduced to identify those states that should not be settable from the command-line. Warnings
can then be generated if users attempt to specify these for command-line setting.
14.5 CGC Compile-time Speed
There are several areas that can affect the amount of time that it takes a CGC universe
to compile, we discuss them below.
•
Large sample rate changes and large delays can result in Ptolemy taking a very long
time to generate C code. A symptom of this sort of problem is that the pigiRpc process will consume all the available swap and eventually crash. If you feel you need
really large delays, James Lundblad suggests writing your own code in your stars that
provides the same functionality as delays, but uses malloc() in the initCode section instead of the array that is created by the CGC Delay icon.
•
C compiler optimizers do not work well with functions that have thousands of lines.
The main() function of a CGC simulation may be too large for the peephole optimizer, causing the optimizer to take a long time to compile the file. Under gcc, you
can pass the -O0 option to turn off the optimizer.
14.6 BDF Stars
Because the class CGCPortHole is not derived from BDFPortHole, the setBDFParams method described in “BDF Domain” on page 8-1 is not available for code generation
stars. Use the setRelation method of DynDFPortHole instead.
void setRelation (DFRelation relation, DynDFPortHole* assoc)
Specify the relation of this port with the associated porthole assoc.
There are five possible values for relation:
DF_NONE
no relationship.
DF_TRUE
produces/consumes data only when assoc has a TRUE
particle.
DF_FALSE produces/consumes data only when assoc has a FALSE
particle.
DF_SAME
signal is logically the same as assoc.
DF_COMPLEMENT signal is the logical complement of
assoc.
For example, the following statements describe the relationships among the portholes
of the Switch block.
trueOutput.setRelation(DF TRUE, control);
U. C. Berkeley
Department of EECS
The Almagest
14-7
falseOutput.setRelation(DF FALSE, control);
14.7 Tcl/Tk Stars
The CGCTclTkTarget class defines the tkSetup stream for Tcl/Tk stars.There is no
special code generation function for this stream, so its name must be used with addCode. This
is usually done from within the initCode method.
addCode(codeblock, "tkSetup");
The following functions, which are defined in the file tkMain.c, can be used within
codeblocks of Tcl/Tk stars in the CGC domain.
void errorReport (char* message)
This functions creates a pop-up window containing message.
void makeEntry (char* window, char* name, char* desc, char*
initValue, Tcl CmdProc* callback)
This function creates an entry box in a window. The name of the entry
box must be unique (e.g. derived from the star name). The description
of the entry box is desc. The initial value in the entry box is
initValue.
A callback function is called whenever the user enters a RET in the
box. The argument to the callback function will be the value that the
user has put in the entry box. The return value of the callback function should be TCL_OK.
void makeButton (char* window, char* name, char* desc, Tcl CmdProc* callback)
This function creates a push button in a window. The name of the
push button must be unique (e.g. derived from the star name). The
description of the push button is desc.
A callback function is called whenever the user pushes the button.
The return value of the callback function should be TCL_OK.
void makeScale (char* window, char* name, char* desc, int position, Tcl CmdProc* callback)
This function creates a scale (with slider) in a window. The name of the
scale must be unique (e.g., derived from the star name). The description
of the push button is desc. The initial position of the slider must be
between 0 and 100.
A callback function is called whenever the user moves the slider in
the scale. The argument to the callback function will be the current
position of the slider, which can range from 0 to 100. The return value
of the callback function should be TCL_OK.
void
Ptolemy
displaySliderValue
value)
(char*
window,
char*
name,
char*
Last updated: 8/26/97
14-8
CGC Domain
This function displays a value associated with a scale’s slider. The
scale is identified by its name and the window it is in. This function
must be called by the user of the slider. Only the first 6 characters of the
value will be used.
14.8 Tycho Target
The CGC TychoTarget is an experimental target that provides a way to create CGC
control panels that use the functionality in Tycho. A universe that uses TychoTarget must provide a script that creates the control panel that the user sees. The TychoTarget is documented
in $PTOLEMY/demo/whats_new/whats_new0.7/tychotarget.html.
U. C. Berkeley
Department of EECS
The Almagest
15-1
Chapter 15. CG56 Domain
Authors:
Joseph T. Buck
José Luis Pino
Other Contributors:
S. Sriram
Kennard White
15.1 Introduction
The CG56 domain generates assembly code for the Motorola 56001 processor. Chapter 13 describes the features common to all code generation domains. The basic principles of
writing code generation stars are explained in section 13.2. You will find explanations for
codeblocks, macros, and attributes there. This chapter explains features specific to the CG56
domain. Refer to the CG56 chapter in the user manual for an introduction to these domains.
15.2 Data Types
The supported CG56 data types are:
int
intarray
fix
fixarray
In addition the complex data type is partially supported. None of the currently defined
stars that take anytype input except Fork, are compatible with the complex data type. It
would be possible to write a star that supports a complex token read into an anytype input.
To do this the star writer would have to check on the input type and make sure to do the
intended function on both the X and Y memory components of the complex input token.
15.3 Attributes
In addition to the code generation attributes detailed in 13.2.6, for CG56 attributes are
defined to specify the X and Y memory banks. They are:
A_XMEM
Allocate this state in X memory
A_YMEM
Allocate this state in Y memory
The underlying bits are AB_XMEM, and AB_YMEM. Each attribute above turns one off
and turns the other on (e.g. A_YMEM turns AB_YMEM on and AB_XMEM off).
Also for CG56 stars, portholes can assert attributes P_XMEM and P_YMEM, which work
in exactly the same way as A_XMEM and A_YMEM. The default attribute for a 56001 porthole is
P_XMEM, which allocates the porthole buffer in X memory. Specifying the P_YMEM attribute
places the porthole buffer in Y memory.
Ptolemy
Last updated: 10/10/97
15-2
CG56 Domain
15.4 Code Streams
The CG56 domain uses the default assembly language code streams discussed in
“Assembly code streams” on page 13-17. There are few target specific code streams detailed
by target below.
15.4.1 Sim56Target Code Streams
simulatorCmds
Collects the commands to configure the Motorola DSP simulator.
shellCmds
Collects the commands that will be used in a shell script to start
the run. The resultant script simply invokes the simulator with
the file generated from simulatorCmds.
15.4.2 S56XTarget/S56XTargetWH Code Streams
aioCmds
Collects the GUI specification which is interpreted by qdm or
gslider.
shellCmds
Collects the commands that will be used in a shell script to start
the run. The resultant script can start qdm or gslider. In the case
of the S56XTarget, it might also download and run the generated code on the S-56X dsp card.
U. C. Berkeley
Department of EECS
The Almagest
16-1
Chapter 16. C50 Domain
Authors:
Luis Gutierrez
16.1 Introduction
The C50 domain generates assembly code for the Texas Instruments C5x series of processors. Chapter 13 describes the features common to all code generation domains. The basic
principles of writing code generation stars are explained in section 13.2. You will find explanations for codeblocks, macros, and attributes there. This chapter explains features specific to
the C50 domain. Refer to the C50 chapter in the Ptolemy User’s Manual for an introduction to
these domains.
16.2 Data Types
The supported CG50 data types are:
int
intarray
fix
fixarray
In addition the complex data type is supported for portholes (but not states). A complex number is stored as a sequence of two 16 bit numbers. The real part is stored at the
lower address.
16.3 Attributes
In addition to the code generation attributes detailed in 13.2.6, for C50 attributes are
defined to specify the Single Access RAM and Double Access RAM memory banks. They
are:
A_BMEM
Allocate this state in the address range specified by the bMemMap target parameter.
A_UMEM
Allocate this state in the address range specified by the uMemMap target parameter.
The underlying bits are AB_BMEM, and AB_UMEM. Each attribute above turns one off
and turns the other on (e.g. A_BMEM turns AB_BMEM on and AB_UMEM off).
Also for C50 stars, portholes can assert attributes P_BMEM and P_UMEM, which work in
exactly the same way as A_BMEM and A_UMEM. The default attribute for a C50 porthole is
P_BMEM, which allocates the porthole buffer in DARAM memory. Specifying the P_UMEM
attribute places the porthole buffer in SARAM memory.
16.4 Code Streams
The C50 domain uses the default assembly language code streams discussed in
“Assembly code streams” on page 13-17. Additionally, TITarget declares a code stream
Ptolemy
Last updated: 10/10/97
16-2
C50 Domain
named TISuProcs to store code that should be placed outside the main loop. Note that the
code stored in this code stream will get added after the wrapup methods of the stars have been
called. The TISuProcs code stream is useful for adding procedures when using non-COFF
assemblers (like the TI DSK assembler) or defining tables of coefficients in program memory
(as an example, the C50 instruction macd needs one of the operands to be in program memory)
16.5 Symbols
The DSKC50 targets defines certain symbols that are meant to be unique. They are
AIC_INIT, SETUPX, SETUPR, XINT, RINT and TINT . The C50Sin star defines a global symbol SINTBL used to store a sine table that is shared by all C50Sin stars. The user
should avoid redefining these symbols in the output assembly file.
16.6 Reserved Memory
The DSKC50 target reserves the last 9 words in DARAM block 1 to store data needed
to configure the Analog Interface Chip in the DSK board
U. C. Berkeley
Department of EECS
Chapter 17. Creating New Domains
Authors:
Mike Chen
Christopher Hylands
Thomas M. Parks
Other Contributors:
Wan-Teh Chang
Michael C. Williamson
17.1 Introduction
One of Ptolemy’s strengths is the ability to combine heterogeneous models of computation into one system. In Ptolemy, a model of computation corresponds to a Domain. The
code for each Domain interacts with the Ptolemy kernel. This overview describes the general
structure of the various classes that are used by a Domain in its interaction with the kernel.
The Ptolemy User’s Manual has a more complete overview of this information.
A functional block, such as an adder or an FFT, is called a Star in Ptolemy terminology, (see “Writing Stars for Simulation” on page 2-1 for more information). A collection of
connected Stars form a Galaxy (see Chapter 2 of the User’s Manual for more information).
Ptolemy supports graphical hierarchy so that an entire Galaxy can be formed and used as a
single function block icon. The Galaxy can then be connected to other Stars or Galaxies
to create another Galaxy. Usually, all the Stars of a Galaxy are from the same Domain but
it is possible to connect Stars of one domain to a Galaxy of another domain using a WormHole.
A Universe is a complete executable system. A Universe can be either a single
Galaxy or a collection of disconnected Galaxies. To run a Universe, each Galaxy also
needs a Target. In simulation domains, a Target is essentially a collection of methods to
compute a schedule and run the various Stars of a Galaxy. Some Domains have more than
one possible scheduling algorithm available and the Target is used to select the desired
scheduler. In code generation domains, a Target also computes a schedule and runs the individual Stars, but each Star only generates code to be executed later. Code generation Targets also handle compiling, loading, and running the generated code on the target
architecture.
At a lower level are the connections between Blocks. A Block is a Star or Galaxy.
Each Block has a number of input and output terminals which are attached to a Block
through its PortHoles. A special PortHole, called a MultiPortHole, is used to make
multiple connections but with only one terminal. Two Blocks are not directly connected
through their PortHoles. Rather, their PortHoles are connected to an intermediary object
called a Geodesic. In simulation domains, data is passed between PortHoles (through the
Geodesic) using container objects called Particles. Ptolemy uses a system where Particles are used and recycled instead of created and deleted when needed. Particles are
obtained from a production and storage class called a Plasma, which creates new Particles
if there are no old ones to reuse. Particles that have completed their task are returned to the
17-2
Creating New Domains
Plasma, which may reissue them at a later request. Graphically, the Star to Star connection
is depicted below:
Block
• initialize()
• run()
• wrapup()
Geodesic
• initialize()
• setSourcePort()
• setDestPort()
Geodesic
PortHole
Block
PortHole
PortHole
• initialize()
• receiveData()
• sendData()
• type()
PortHole
Plasma
Block
Particle
PortHole
Particle
• type()
• print()
• initialize()
FIGURE 17-1: Block objects in Ptolemy can send and receive data encapsulated in Particles
through Portholes. Buffering and transport is handled by the Geodesic and garbage collection by the Plasma. Some methods are shown.
The classes defined above provide most of the functionality necessary for a working
domain. One additional class needed by all domains is a Scheduler to compute the order of
execution of the Stars in the Galaxy.
Therefore, creating a new Ptolemy simulation domain will typically involve writing
new classes for Stars, PortHoles, WormHoles, Targets, and Schedulers.
Creating a new domain is a fairly involved process, and not to be done lightly. The first
thing that many users want to do when they see Ptolemy is create a new domain. However, it is
often the case that the functionality they need is already in either the SDF or DE domains, or
they can merely add a Target or Scheduler rather than an entire domain.
17.2 A closer look at the various classes
A simulation Domain can use the various classes mentioned above as they exist in the
Ptolemy kernel or it can redefine them as needed. For example, in the SDF domain, the classes
SDFStar, SDFPortHole, SDFScheduler, SDFDomain, SDFTarget, and SDFWormhole
have all been defined. Most of those classes inherit much of their functionality from the corresponding kernel classes but the Domain creator is free to make major changes as well. The
kernel Geodesic, Plasma, and Particle classes are used without modification, but other
domains such as the CG domain have derived a subclass from Geodesic. The Domain creator needs to decide whether or not existing Ptolemy classes can be used without change,
therefore it is a good idea to understand what functionality the kernel classes provide.
The following is a brief description of the various classes that either need to be defined
or are used by a Domain. Note that we only provide a functional description of some of the
major methods of each class and not a complete description of all methods.
U. C. Berkeley
Department of EECS
The Almagest
17-3
17.2.1 Target
A Target is an object that manages the execution of the Stars in a Domain.
Major methods:
run()
Called to execute a schedule.
wrapup()
Called at the end of an execution to clean up.
setup()
Called by initialize() (which is inherited from the Block
class, which is a common base class for many of Ptolemy’s
classes). Sets each Star to point to this Target and sets up the
Scheduler.
Major objects contained are:
gal
A pointer to the Galaxy being executed.
sched
A pointer to the Scheduler that is being used.
For further information about Targets, see some of the existing domains.
17.2.2 Domain
Declares the type of various components of the Domain, like which type of WormHole, PortHole, Star, etc. is used by the Domain.
Major methods:
newWorm()
Create a WormHole of the appropriate type for this Domain.
newFrom()
Create an EventHorizon (an object that is used to interface to
other Domains, used with WormHoles) that translates data
from a Universal format to a Domain specific one.
newTo()
Create an EventHorizon that translates data from a Domain
specific format to a Universal one.
newNode()
Returns a Geodesic of the appropriate type for this Domain.
17.2.3 Star
A Star is an object derived from class Block that implements an atomic function.
Major methods:
run()
What to do to run the star.
For example, the DataFlowStar class (a parent class to many of the dataflow domain
stars such as SDFStar and DDFStar) defines this function to make each input PortHole
obtain Particles from the Geodesic, execute the go() method of each Star, and then
have each output PortHole put its Particles into the Geodesic.
17.2.4 PortHole
PortHoles are data members of Stars and are where streams of Particles enter or
leave the Stars. Each PortHole always handles Particles of one type, so two connected
PortHoles need to decide which data type they will use if they are not the same. There is a
Ptolemy
Last updated: 10/10/97
17-4
Creating New Domains
base class called GenericPort which provides some basic methods that derived classes
should redefine as well as some data members commonly needed by all PortHole types.
Major methods:
isItInput()
Return TRUE if the PortHole class is an input type.
isItOutput()
Return TRUE if the PortHole class is an output type.
isItMulti()
Return TRUE if the PortHole class is a MultiPorthole.
connect()
Connect this PortHole to a Geodesic (create one if needed)
and tell that Geodesic to connect itself to both this PortHole
and the destination PortHole. Also provides the number of
delays on this connection.
initialize()
Initialize the PortHole. In the case of output PortHoles, this
function will usually initialize the connected Geodesic as
well. Resolve the type of Particles with the PortHole it is
connected to.
receiveData()
What to do to receive data from the Geodesic.
sendData()
What to do to send data to the Geodesic.
putParticle()
Put a particle from the buffer into the Geodesic.
getParticle()
Get a particle from the Geodesic and put it into the buffer.
numXfer()
Returns numberTokens, the number of Particles transferred per execution.
numTokens()
Returns the number of Particles inside the Geodesic.
numInitDelays() Returns the number of initial delay on the Geodesic.
geo()
Returns a pointer to the Geodesic this PortHole is connected
to.
setDelay()
Set the delay on the Geodesic.
Major data members:
myType
Data type of particles in this porthole.
myGeodesic
The Geodesic that this PortHole is connected to
myPlasma
A pointer to the Plasma used to request new Particles.
myBuffer
Usually a CircularBuffer used to store incoming or outgoing Particles.
farSidePort
The PortHole that we are connected to.
bufferSize
The size of the Buffer.
numberTokens
The number of Particles consumed or generated each time
we access the Geodesic.
Note that PortHoles are generally separated into input PortHoles and output
U. C. Berkeley
Department of EECS
The Almagest
17-5
PortHoles. They aren’t designed to handle bidirectional traffic.
17.2.5 Geodesic
Models a FIFO buffer (usually) between two PortHoles. Major methods:
setSourcePort() Set the source PortHole and the delay on this connection. A
delay is usually implemented as an initial Particle in the
Geodesic’s buffer, but this can be changed depending on the
desired functionality.
setDestPort()
Set the destination PortHole.
disconnect()
Disconnect from the given PortHole.
setDelay()
Set the number of delays on this connection.
initialize()
Initialize the buffer in this Geodesic. This means either clear it
or insert the number of initial Particles needed to match the
number of delays on this connection (these Particles are
taken from the source PortHoles’s Plasma).
put()
Put a Particle into the buffer
get()
Get a Particle from the buffer. incCount() and
decCount() are used by a Scheduler to simulate an execution.
numInit()
Return the number of initial particles.
Major data members:
originatingPort A pointer to the source PortHole.
destinationPort A pointer to the destination PortHole.
pstack
The buffer, implemented as a ParticleStack.
sz
The number of Particles in the buffer.
numInitialParticles
The number of initial delays.
17.2.6 Plasma
There are container object for unused Particles. There is one global instance of a
Plasma for each type of Particle defined in the kernel. This class is usually only used by the
Domains and not changed by the authors of new Domains.
Major methods:
put()
Return an unused Particle to the Plasma.
get()
Get an unused Particle (or create one if needed).
17.2.7 Particle
The various Particle types supported by Ptolemy. Currently, the types are Float,
Ptolemy
Last updated: 10/10/97
17-6
Creating New Domains
Int, Complex, Fix, and Message. The Message Particle is used to carry Messages
(inside Envelopes) which can be almost anything. For example, the Matrix class is transferred using Message Particles. These classes are also only used as-is by the Domains and
not redefined for new domains.
17.2.8 Scheduler
Sets up the execution by determining the order in which each Star of the Galaxy will
fire. Execution is performed using two main methods -- setup() and run(). Schedulers
can be timed or untimed, depending on the Domain’s model of execution. This class will usually be different for each domain, although some domains reuse the Scheduler of another
domain, if the Scheduler is appropriate for the new domain’s model of computation.
Major methods:
setup()
Checks the Stars in the Galaxy, initializes them, and creates a
schedule.
run()
Run the schedule computed in setup()
Major data members
myGalaxy
The pointer to the Galaxy that the Scheduler is working on.
myTarget
The pointer to the Target which is controlling the execution.
17.3 What happens when a Universe is run
Now that you have some idea of what classes exist in the Ptolemy kernel, this section
will try to explain flow of control when a Universe is run. By knowing this, you will get an
idea of what additions or changes might be needed to get the functionality you desire and how
the code of your new domain will fit in.
First off, a little more about the basics of Ptolemy classes. Almost every object class in
Ptolemy is derived from the NamedObj class. This class simply provides support for a Name
field, a longer Description field, and a pointer to a Parent Block. Also, the method initialize() is declared here to be purely virtual, so every object should have some kind of
initialization function.
The Block class is derived from NamedObj and is the main base class for most actors
in Ptolemy. It has I/O constructs like PortHoles and MultiPortHoles, state/parameter
constructs like State, and defines execution methods such as setup(), run() and wrapup(). The Block also provides a virtual function to access an associated Scheduler.
A simulation universe is generally of type DataFlowStar. When a universe is run,
the flow of control is as follows, using the SDF domain as an example:
PTcl::dispatcher()
PTcl::run()
PTcl::computeSchedule()
Runnable::initTarget()
Block::initialize()
SDFTarget::setup()
Target::setup()
SDFScheduler::setup()
U. C. Berkeley
Department of EECS
The Almagest
17-7
Notice at this point that we have called two domain-specific methods, namely
SDFTarget::setup() and SDFScheduler::setup(). The Target can have a choice of
more than one Scheduler and in this case it called the default SDFScheduler. We continue
here with a more detailed description of a very important function:
SDFScheduler::setup()
checkConnectivity()
prepareGalaxy()
checkStars()
repetitions()
computeSchedule()
adjustSampleRates()
//
//
//
//
//
//
//
//
//
//
//
//
//
//
Checks that the galaxy is
properly connected.
Initializes the portHoles of each star and
the geodesics that connect them.
Verifies that the type of the Stars are
compatible with this Scheduler.
Solves the balance equations for the
system and calculates how many times
each star should be fired for
one iteration (specific to dataflow).
Compute the actual schedule
Set the number of tokens transferred
between EventHorizons if this schedule
is for a WormHole.
The order of various operations can be different for each scheduler. For example, a
new domain may require that the PortHoles be initialized after the repetitions were calculated but before the schedule was computed. The domain writer may wish to define a new
function prepareForScheduling() that would call the setup() function of each Star
without initializing the Star’s PortHoles.
Expanding prepareGalaxy() in more detail:
SDFScheduler:: prepareGalaxy()
galaxy()->initialize()
//
InterpGalaxy::initialize() //
//
Galaxy::initSubblocks()
//
DataFlowStar::initialize()//
//
//
//
//
//
Block::initialize()
//
//
//
//
//
PortHole::initialize() //
//
//
//
//
//
//
//
Geodesic::initialize() //
Ptolemy
Initialize the galaxy.
Causes the initialization of delays
and the setup of bus widths.
Calls initialize() of each star.
This is a general initialize.
function for data flow stars.
Your own Star class might
redefine it. Sets the number
of input Ports and clears
some parameters.
Initializes the PortHoles and States
of the Block/Star. Calls the user
defined setup() function of each
star after the portholes and
geodesics have been initialized.
General PortHole initialization;
again you can redefine it for a
domain specific PortHole.
Resolves the type of Particles
to be sent. Allocates a
buffer and a Plasma. Request
empty Particles from the Plasma
to initialize the buffer.
General Geodesic initialization,
Last updated: 10/10/97
17-8
Creating New Domains
//
//
//
called by output PortHole only.
Clears the buffer and adds any
initial Particles for delays.
After the schedule is set up and all the actors in the Universe have been initialized,
the flow of control is as follows:
PTcl::run()
PTcl::computeSchedule()
PTcl::cont()
universe->setStopeTime()
universe->run()
InterpUniverse::run()
Runnable::run()
target->run()
sched->run()
SDFScheduler::run()
// Described above.
// Used to set the number of
//
iterations to be run.
// The domain specific Scheduler’s
//
run() function.
Let’s look at what a typical scheduler does when it runs a star.
SDFScheduler::run()
runOnce()
star->run()
DataFlowStar::run()
..Ports->receiveData()
// Checks if there has been an error
//
in the last iteration. Calls
//
runOnce() for each iteration.
//
Goes through each Star on the
//
schedule (which is a list of Stars
//
computed by setup() ) and calls
//
star->run().
// The SDF domain uses the general
//
DataFlowStar
//
run() function. A new Domain
//
might want to redefine this.
// Calls receiveData() for each of
//
the PortHoles for this Star.
//
Output PortHoles would do nothing
//
in this case but input PortHoles
//
would get Particles from the
//
Geodesic.
Star::run()
SimControl::doPreActions()// Execute pre-actions for a star.
go()
// Call the Star specific go() function
//
that will process the input data
//
and generate data to be put in the
//
output PortHoles.
SimControl::doPostActions() // Execute post-actions for a star
..Ports->sendData()
// Calls sendData() for each of the
//
PortHoles for this Star.
//
Input PortHoles would do nothing
//
in this case but output PortHoles
//
would put their Particles into
//
the Geodesic and refill their
//
buffers with empty Particles
//
from the Plasma.
U. C. Berkeley
Department of EECS
The Almagest
17-9
17.4 Recipe for writing your own domain
This section describes some of the template files we have made so that you don’t have
to start coding from scratch. We also discuss which classes and methods of those classes that a
new domain must define.
17.4.1 Introduction
The first thing to do is to think through what you want this domain to do. You should
have some idea of how the your Stars will exchange data and what kind of Scheduler is
needed. You should also understand the existing Ptolemy domains so that you can decide
whether your domain can reuse some of the code that already exists. Also, read Chapter 1 so
you understand the general classes in the Ptolemy kernel and how the domain methods interact.
17.4.2 Creating the files
The mkdom script at $PTOLEMY/bin/mkdom can be used to generate template files for
a new domain. mkdom takes one argument, the name of the domain, which case insensitive,
mkdom converts the what ever you pass to it as a domain name to upper and lower case internally. Here, we assume that you have set up a parallel development tree, as documented in
chapter 1, or you are working in the directory tree where Ptolemy was untar’d.
1. To use mkdom, create a directory with the name of your domain in the src/
domains directory. In this example, we are creating a domain called yyy:
mkdir $PTOLEMY/src/domains/yyy
2. cd to that directory and then run mkdom:
cd $PTOLEMY/src/domains/yyy
$PTOLEMY/bin/mkdom yyy
17.4.3 Required classes and methods for a new domain
mkdom will create copies of key files in $PTOLEMY/src/domains/yyy/kernel and
a Nop star in $PTOLEMY/src/domains/yyy/stars. The template files have various comments about which methods you need to redefine. The template files also define many function
for you automatically. If you aren’t clear as to how to define the methods in each class, it is
best to try look at the existing Ptolemy domains as examples.
YYYDomain.cc
This file will be setup for you automatically so that you
shouldn’t need to modify much. The various methods here
return WormHoles and EventHorizons which should be
defined in YYYWormhole. A node is usually a type of Geodesic that allows multiple connections, such as AutoForkNode.
You can define your own YYYGeodesic or simply use the kernel’s AutoForkNode if that is suitable (this is what SDF does).
YYYWormhole.{h,cc}
Various methods to interface your new domain with others must
be defined if you wish to use your domain with other domains.
Ptolemy
Last updated: 10/10/97
17-10
Creating New Domains
However, if you don’t need to mix domains, then you may skip
these files. Wormholes translate different notions of time or
concurrency. Since some domains are timed (like DE) and others are not (like SDF), you must be able to convert from one to
another.
YYYGeodesic.{h,cc}
Currently we set the Geodesic to be the kernel’s AutoForkNode. If the kernel’s Geodesic class offers all the functionality
you need, then this doesn’t need to be changed. Otherwise try
looking at some of the pre-existing domains for examples.
YYYPortHole.{h,cc}
Define input PortHoles and output PortHoles, as well as
MultiPortHoles, specific to your domain. The only required
methods are generated for you, but you’ll likely want to define
many more support methods. Look at the kernel PortHole,
DFPortHole, and SDFPortHole for examples.
YYYStar.{h,cc}
Domain-specific class definition. Again, all the required meth-
ods have been defined but you’ll want to add much more. Refer
to Star, DataFlowStar, and SDFStar as examples.
YYYScheduler.{h,cc}
This is where much of the action goes. You’ll need to define the
function setup(), run(), and setStopTime().
17.4.4 Building an object directory tree
Ptolemy can support multiple machine architectures from one source tree, the object
files from each architecture go into $PTOLEMY/obj.$PTARCH directories. Currently, there
are two ways to build the $PTOLEMY/obj.$PTARCH directory tree: MAKEARCH and mkPtolemyTree. To build object files for your new domain in $PTOLEMY/obj.$PTARCH, you
will have to set up either or both of these ways. Typically, you first use MAKEARCH because it
can operate on an existing Ptolemy tree, and once everything works, then you and other users
run mkPtolemyTree to setup parallel development trees on the new domain.
MAKEARCH
$PTOLEMY/MAKEARCH is a /bin/csh script that creates or updates the object tree in
an already existing Ptolemy tree. To add a domain to MAKEARCH, edit the file and look for a
similar domain, and add appropriately. A little trial and error may be necessary, but the basic
idea is simple: MAKEARCH traverses directories and creates subdirectories as it sees fit. Note
that if MAKEARCH is under version control, you may need to do chmod a+x MAKEARCH when
you check it back out, or it won’t be executable.
Continuing with our example:
3. Edit MAKEARCH and add your domain yyy to the list of experimental domains:
set EXPDOMAINS=(cg56 cgc vhdlb vhdl mdsdf hof ipus yyy)
U. C. Berkeley
Department of EECS
The Almagest
17-11
This will cause a stars and kernel directory to be created in $PTOLEMY/
obj.$PTARCH/domains/yyy when MAKEARCH is run.
4. Run MAKEARCH:
cd $PTOLEMY; csh -f MAKEARCH
If you get a message like:
cxh@watson 181% csh -f MAKEARCH
making directory /users/ptolemy/obj.sol2/domains/yyy
mkdir: Failed to make directory "yyy"; Permission denied
yyy: No such file or directory
The you may need to remove your obj.$PTARCH tree, as MAKEARCH has probably
traversed down a parallel tree created by mkPtolemyTree and come up in a directory that you do not own.
mkPtolemyTree
$PTOLEMY/bin/mkPtolemyTree is a tclsh script that creates a new parallel
Ptolemy tree. Note that mkPtolemyTree cannot be run in an already existing Ptolemy development tree. The file $PTOLEMY/mk/stars.mk controls what directories mkPtolemyTree
creates, you need not actually edit the mkPtolemyTree script. To create pigiRpc binaries
with your new domain in it, you will need to modify stars.mk, so adding support for mkPtolemyTree is fairly trivial.
$PTOLEMY/mk/stars.mk
Follow the style for domain addition that you see in this file for the other domains. A
few things to keep in mind:
•
You should list the new domain before any other domain library that the new domain
depends on.
•
You should make sure to define the make variables to pull in other domain libraries as
necessary. You may need MDSDF=1 definition for example.
•
mkPtolemyTree uses the CUSTOM_DIRS makefile variable to determine what directories to create, so be sure to add your directories here.
Continuing with our example of adding the yyy domain:
5. Edit $PTOLEMY/mk/stars.mk and add your entry:
YYYDIR = $(CROOT)/src/domains/cg56
ifdef YYY
CUSTOM_DIRS += $(YYYDIR)/kernel $(YYYDIR)/stars
# Have to create this eventually
PALETTES += PTOLEMY/src/domains/yyy/icons/main.pal
STARS += $(LIBDIR)/yyystars.o
LIBS += -lyyystars -lyyy
LIBFILES += $(LIBDIR)/libyyystars.$(LIBSUFFIX) \
$(LIBDIR)/libyyy.$(LIBSUFFIX)
endif
Ptolemy
Last updated: 10/10/97
17-12
Creating New Domains
$PTOLEMY/mk/ptbin.mk
In $PTOLEMY/mk/ptbin.mk, add your domain to the FULL definition. This causes
your domain to be built in whenever a full pigiRpc binary is created.
Building a pigiRpc
6. To build a pigiRpc with your domain, first build and install your domain’s kernel
and star libraries:
cd $PTOLEMY/obj.$PTARCH/domains/yyy
make depend
make install
If your domain depends on other domains, you will have to build in those directories as well. You may find it easier to do cd $PTOLEMY; make install, though
this could take 3 hours. An alternative would be to create a parallel directory tree
using mkPtolemyTree.
7. If you have not recompiled from scratch, or run mkPtolemyTree, you may also
need to do:
cd $PTOLEMY/obj.$PTARCH/pigilib; make ptkRegisterCmds.o
8. Then build your pigiRpc. You can either build a full pigiRpc with all of the
domains, or you can create a override.mk in $PTOLEMY/obj.$PTARCH/
pigiRpc which will pull in only the domains you want.
$PTOLEMY/obj.$PTARCH/pigiRpc/override.mk could contain:
YYY=1
DEFAULT_DOMAIN=YYY
USERFLAGS=
VERSION_DESC="YYY Domain Only"
To build your binary, do:
cd $PTOLEMY/obj.$PTARCH/pigiRpc; make
If you don’t have all the libraries built, you may get an error message:
make: *** No rule to make target `../../lib.sol2/libcg56dspstars.so’,
needed by `pigiRpc’. Stop.
The workaround is to do:
cd $PTOLEMY/obj.$PTARCH/pigiRpc; make PIGI=pigiRpc
9. See “Creating a pigiRpc that includes your own stars” on page 1-7 for details on
how to use your new pigiRpc binary.
10. To verify that your new domain has been installed, start pigi with the -console
option:
cd $PTOLEMY; pigi -rpc $PTOLEMY/obj.$PTARCH/pigiRpc/pigiRpc -console
U. C. Berkeley
Department of EECS
The Almagest
17-13
and then type:
domains
into the console window prompt. Below is the sample output for the yyy example
domain:
pigi> domains
YYY
pigi> knownlist
Nop
pigi>
Ptolemy
Last updated: 10/10/97
17-14
U. C. Berkeley
Creating New Domains
Department of EECS
The Almagest
INDEX
Symbols
.............................................................................2-23
$PTARCH ............................................................. 1-2
$PTOLEMY .......................................................... 1-3
% operator ................................................ 2-19, 12-5
.alias file ..................................................... 1-2, 1-12
.cc files................................................................... 2-4
.cshrc file ............................................................... 1-2
.h files .................................................................... 2-4
.html files............................................................... 2-4
.pl file.............................................................2-1, 7-1
= operator.............................................................2-19
~ptolemy................................................................ 1-3
A
A ..........................................................................2-10
A_CONSTANT attribute.....................................2-10
A_NONCONSTANT attribute................. 2-10, 2-21
A_NONSETTABLE attribute .............................2-10
A_SETTABLE attribute........................... 2-10, 2-21
AB_CIRC attribute........................................... 13-13
AB_CONSEC attribute .................................... 13-13
accessMessage method
MessageParticle class ...................................4-18
ACG class............................................................3-17
acknowledge ptlang directive ........................2-6, 2-8
ACYLOOP, SDF scheduler option .................. 13-21
Add (SDF block) .................................................2-20
addCode (CGStar method) ....................... 14-2, 14-7
addCompileOption (CGCTarget method) ...........14-2
addDeclaration (CGCStar method) .....................14-2
AddFix (SDF block) .............................................. 4-5
addGlobal (CGCStar method) .............................14-2
addInclude (CGCStar method) ............................14-2
addLinkOption (CGCTarget method) .................14-2
aggressive reclamation ........................................4-18
aliases
exp ................................................................1-12
mkl................................................................1-12
objdir .............................................................. 1-2
pt...................................................................1-12
ptl..................................................................1-12
rml ................................................................1-12
srcdir............................................................... 1-2
sw .................................................................1-12
aliases for developers ..........................................1-12
allocateMemory, method.................................. 13-18
anytype portholes.................................................2-11
application exited error message .........................1-21
Ptolemy
I-1
ArrayState class................................................... 2-23
ArrivingPrecision parameter ................................. 4-7
asComplex method
Message class ............................................... 4-18
asFloat method
Message class ............................................... 4-18
asInt method
Message class ............................................... 4-18
AsmPortHole, class .......................................... 13-12
attribute.............................................2-9, 2-10, 2-21
A_CIRC .................................................... 13-13
A_CONSEC .............................................. 13-13
A_CONSTANT ........................................ 13-13
A_GLOBAL.............................................. 13-12
A_LOCAL ................................................ 13-12
A_MEMORY............................................ 13-13
A_NOINIT ................................................ 13-13
A_NONCONSTANT................................ 13-13
A_NONSETTABLE ................................. 13-13
A_PRIVATE ............................................. 13-12
A_RAM..................................................... 13-14
A_SETTABLE............................. 13-13, 13-13
A_SHARED.............................................. 13-12
A_UMEM .................................................... 16-1
A_XMEM ......................................... 15-1, 16-1
A_YMEM .................................................... 15-1
P_BMEM ..................................................... 16-1
P_CIRC ..................................................... 13-14
P_NOINIT................................................. 13-14
P_SHARED .............................................. 13-14
P_SYMMETRIC....................................... 13-14
P_UMEM ..................................................... 16-1
P_XMEM ..................................................... 15-1
P_YMEM ..................................................... 15-1
attribute, A_BMEM ............................................ 16-1
attribute, A_UMEM ............................................ 16-1
attribute, A_XMEM ............................................ 15-1
attribute, A_YMEM ............................................ 15-1
Attributes.......................................................... 13-12
author ptlang directive................................... 2-6, 2-8
B
bad format parameters
Fix class.......................................................... 4-4
BarGraph class ...................................................... 3-4
baseAddr, method............................................. 13-12
BaseImage class .................................................. 4-40
BDFPortHole class..................................... 9-1, 14-6
before method........................................... 12-5, 12-7
begin method
Last updated: 10/17/97
I-2
DERepeatStar class...................................... 12-9
begin ptlang directive..................................2-6, 2-13
Bhattacharyya, S. S. ..........................................13-21
Bhave, S. ............................................................. 14-1
binary point ........................................................... 4-4
Buck, J. T.2-1, 3-1, 4-1, 7-1, 9-1, 13-1, 14-1, 15-
1
Buck, J.T ............................................................. 14-1
bufPos, method..................................................13-12
bufSize, method ................................................13-12
C
C++ Primer.......................................................... 2-17
callTcl_$starID.............................................. 5-4, 5-5
canGetFired method .................... 12-9, 12-9, 12-10
ccinclude ptlang directive ...........................2-6, 2-15
cerr ........................................................................ 3-3
Cfront C++ compiler............................................. 1-2
CG, domain ......................................................... 13-1
CGCPCM ............................................................ 13-9
CGCPortHole class ............................................. 14-6
CGCStar class ..................................................... 14-1
CGCTarget class ................................................. 14-2
CGDDF Scheduler ............................................13-22
CGMultiTarget, class .......................... 13-18, 13-19
CGPortHole class ................................................ 14-3
CGSharedBus, class ..........................................13-19
CGStar, class ....................................................... 13-3
CGTarget............................................................. 14-2
Chang, W.-T........................................................ 17-1
Chen, M. J. ..................................................4-1, 17-1
cin.......................................................................... 3-3
circAccessThisTime, method............................13-12
clearAttributes method ........................................ 2-26
clog........................................................................ 3-3
clone method
Message class.................................... 4-16, 4-18
Closing Application error message ..................... 1-21
code ptlang directive ...................................2-6, 2-15
code stream
aioCmds ....................................................... 15-2
shellCmds..................................................... 15-2
simulatorCmds ............................................. 15-2
code streams ......................................................13-16
Codeblock ........................................................... 13-3
codeblock ptlang directive .................................... 2-6
codeGenInit, method .........................................13-18
CodeStream, class .............................................13-16
Collect CGC ......................................................13-15
collect star .........................................................13-24
Collect, star .......................................................13-15
colors ................................................................... 5-12
CommPair .........................................................13-27
U. C. Berkeley
communication networks.......................... 4-14, 12-1
compileCode, method....................................... 13-18
compile-time scheduling .....................................2-13
Complex class.......................... 2-21, 2-22, 4-2–4-3
- operator ........................................................ 4-2
!= operator ...................................................... 4-3
* operator........................................................ 4-2
*= operator ..................................................... 4-2
+ operator ....................................................... 4-2
+= operator ..................................................... 4-2
/ operator ........................................................ 4-3
/= operator ...................................................... 4-2
-= operator ...................................................... 4-2
= operator ....................................................... 4-2
== operator ..................................................... 4-3
abs() function.................................................. 4-3
arg() function.................................................. 4-3
basic operators................................................ 4-2
conj() function ................................................ 4-3
constructors .................................................... 4-2
cos() function.................................................. 4-3
exp() function ................................................. 4-3
imag() function .......................................4-2, 4-3
log() function.................................................. 4-3
norm() function .............................................. 4-3
pow() function ................................................ 4-3
real() function .........................................4-2, 4-3
sin() function .................................................. 4-3
sqrt() function ................................................. 4-3
Complex data type.........................................4-1–4-3
complex data type................................................2-11
complex state .......................................................2-10
complex type
portholes .......................................................2-11
states ............................................................... 2-9
COMPLEX_MATRIX_ENV ..............................4-30
complex_matrix_env type
portholes .......................................................2-11
complexarray type
states ............................................................... 2-9
ComplexArrayState class ....................................2-21
ComplexMatrix, see Matrix class
ComplexParticle class .........................................2-21
ComplexState class................................... 2-21, 2-22
computer architecture modeling ..........................12-1
conscalls ptlang directive ........................... 2-6, 2-13
constructor ptlang directive ........................ 2-6, 2-12
constructors..........................................................2-13
copy constructor
Department of EECS
The Almagest
Message class ...............................................4-16
copyright ptlang directive..............................2-6, 2-8
core dump ............................................................1-21
core dumped ........................................................1-21
core files ..............................................................1-21
cout ............................................................. 2-28, 3-3
creating a new star ................................................. 2-1
CUSTOM_DIRS .................................................1-10
D
data types .............................................................2-11
user-defined ..................................................4-14
dataNew flag.......................................... 12-5, 12-12
dataNew flag in DE .............................................12-4
dataType method
Envelope class ..............................................4-17
DC Scheduler.................................................... 13-22
DCTImage class ..................................................4-41
DDF star ................................................................ 8-1
DDFStar class........................................................ 8-2
DE
writing stars ..................................................12-1
DE domain...........................................................12-1
debugging ................................................. 1-21, 1-23
default parameter values......................................2-10
default value for states........................................... 2-9
delay
DE domain....................................................12-1
delay stars in DE domain .............................12-1
for matrix arcs ..............................................4-31
in dataflow....................................................4-31
in DE ............................................................12-8
Delay (DE block).................................................12-1
DEPortHole class.................................................12-5
DERepeatStar class .............................................12-9
derived ptlang directive ......................................... 2-6
derivedfrom ptlang directive .........................2-6, 2-7
desc ptlang directive .............................................. 2-6
descriptor .............................................................2-10
descriptor ptlang directive .............................2-6, 2-7
DEStar class.........................................................12-9
destructor ptlang directive .......................... 2-6, 2-13
determinism ...................................................... 12-12
discrete event (DE) domain .................................12-1
divide by zero
Fix class.......................................................... 4-4
DL Scheculer .................................................... 13-22
domain
SDF................................................................. 7-1
domain ptlang directive .................................2-5, 2-6
DownCounter (DDF star) ...................................... 8-2
dummy message ............................ 4-17, 4-18, 4-31
Ptolemy
I-3
duplicate directory tree........................................ 1-12
dynamic linking............................................. 2-1, 3-1
permanent....................................................... 2-3
dynamic porthole................................................... 8-1
DynDFStar class.................................................... 8-2
E
edit-params command .............................. 2-21, 2-26
Edwards, S........................................................... 11-1
emacs ................................................................... 1-26
empty method
Envelope class.............................................. 4-17
Envelope class .......................................... 4-14, 4-17
environment variables
PT_DEBUG ................................................. 1-26
PTARCH ........................................................ 1-2
PTOLEMY..................................................... 1-2
Error class.............................................................. 3-1
Evans, B. .................................................... 4-1, 10-1
event .................................................................... 12-1
event generator .................................................... 12-9
exectime ptlang directive ...................................... 2-6
execTime, method ............................................... 13-2
exp alias............................................................... 1-12
expandPathName................................................... 3-3
expandPathName function .................................... 3-8
explanation ptlang directive .......................... 2-6, 2-9
exponentially distributed random number........... 3-17
external programs
invoking ......................................................... 3-8
F
FFTCx (SDF block) .............................................. 7-1
file input to states ................................................ 2-23
file, target parameter ........................................ 13-21
first-in, first-out (FIFO) queue ............................ 3-11
Fix class................................................. 4-3, ??–4-14
- operator ...................................................... 4-12
* operator ..................................................... 4-12
*= operator ................................................... 4-12
+ operator ..................................................... 4-12
+= operator................................................... 4-12
/ operator ...................................................... 4-12
/= operator .................................................... 4-12
-= operator.................................................... 4-12
= operator ..................................................... 4-12
clear_errors() ................................................ 4-12
compare() ..................................................... 4-11
complement() ............................................... 4-13
constructors .................................................... 4-9
conversion operators .................................... 4-13
Last updated: 10/17/97
I-4
dbz() ............................................................. 4-12
intb()............................................................. 4-10
invalid()........................................................ 4-11
is_zero() ....................................................... 4-11
len() .............................................................. 4-10
max() ............................................................ 4-11
maximum length ............................................ 4-4
min()............................................................. 4-11
overflow() .................................................... 4-10
ovf_occurred ................................................ 4-11
precision() .................................................... 4-10
roundMode() ................................................ 4-11
set_overflow................................................. 4-11
set_rounding................................................. 4-11
setToZero() .................................................. 4-11
signBit() ....................................................... 4-11
uninitialized.................................................... 4-6
value() .......................................................... 4-11
fix type
portholes....................................................... 2-11
states............................................................... 2-9
FIX_MATRIX_ENV .......................................... 4-30
fix_matrix_env type
portholes....................................................... 2-12
FIX_MAX_LENGTH ........................................... 4-4
Fixed-point
inputs and outputs .......................................... 4-5
fixed-point ............................................................. 4-3
array parameters............................................. 4-4
parameters ...................................................... 4-4
precision....................................................... 2-10
setting precision ........................................... 2-10
states............................................................... 4-4
Fixed-point data type .................................... ??–4-14
FixMatrix, see Matrix class
FixParticle class .................................................. 2-21
float type
portholes....................................................... 2-11
states............................................................... 2-9
FLOAT_MATRIX_ENV.................................... 4-30
float_matrix_env type
portholes....................................................... 2-11
floatarray type
states............................................................... 2-9
FloatArrayState class ............................... 2-21, 2-23
FloatMatrix, see Matrix class
FloatParticle class ............................................... 2-21
FloatState class.................................................... 2-21
Fork
U. C. Berkeley
code generation ......................................... 13-14
Fork (SDF block).................................................2-20
frameCode, method .......................................... 13-18
fread of long failed ..............................................1-21
Free Software Foundation ..................................... 1-1
functional star in DE............................................12-1
G
g++.......................................................................2-22
g++ compiler ......................................................... 1-1
Gain (SDF block) ................................................2-27
gdb ............................................................ 1-22, 1-26
generateCode, method ...................................... 13-18
generic pointer technique ....................................3-11
get method ...................................12-5, 12-6, 12-12
getMessage method
MessageParticle class ...................................4-18
getSimulEvent method .......................... 12-5, 12-11
globalDecls (CGCTarget method).......................14-2
Gnu tools .............................................................1-22
go method .............................................................. 2-3
go ptlang directive ...................................... 2-6, 2-14
grabInputs_$starID ........................................5-4, 5-5
GrayImage class ..................................................4-41
H
Ha, S. ........... 2-1, 3-1, 7-1, 8-1, 12-1, 13-1, 14-1
hash table ............................................................... 3-8
hash tables ...........................................................3-13
HashEntry class ...................................................3-13
hashing function ..................................................3-13
hashstring function ................................................ 3-8
HashTable class ........................................ 3-13, 3-15
HashTableIter class .............................................3-13
Haskell, P.................................................... 4-1, 4-40
header ptlang directive ............................... 2-6, 2-15
heterogeneous message interface ........................4-14
HIER Scheduler................................................ 13-22
hinclude ptlang directive ............................ 2-6, 2-15
Histogram class ..................................................... 3-5
hppa.cfront............................................................. 1-2
htmldoc ptlang directive ........................................ 2-6
HU Scheduler ................................................... 13-22
Hylands, C. ...................................... 1-1, 11-1, 17-1
I
I/O..................................................................3-2, 3-3
ifstream class .................................................3-2, 3-3
image processing .................................................4-40
include (CGCTarget) ...........................................14-1
include files ........................................................... 3-1
InDEPort class .....................................................12-5
InfString class........................................................ 3-9
initCode (CGCStar method) ................................14-7
initCode, method .................................................13-2
Department of EECS
The Almagest
initial value for states...........................................2-25
initialized Fix objects ............................................ 4-6
initializing states from files .................................2-23
inline method ptlang directive .............................2-11
inline virtual method ptlang directive..................2-11
inmulti ptang directive.........................................2-19
inmulti ptlang directive.................... 2-6, 2-11, 2-11
inout ptlang directive....................... 2-6, 2-11, 2-11
inoutmulti ptlang directive .............. 2-6, 2-11, 2-11
input...............................................................3-2, 3-3
input ptlang directive.............2-6, 2-11, 2-11, 2-17
InSDFPort class ........................................ 2-17, 2-19
installColors.........................................................4-41
int type
portholes .......................................................2-11
states ............................................................... 2-9
INT_MATRIX_ENV ..........................................4-30
int_matrix_env type
portholes .......................................................2-11
intarray type
states ............................................................... 2-9
IntArrayState class...............................................2-21
IntMatrix, see Matrix class
IntParticle class....................................................2-21
IntState class........................................................2-21
isA method
Message class ...............................................4-16
ISA_FUNC macro ...............................................4-16
ISA_INLINE macro ............................................4-16
iterator classes .....................................................3-10
iterators ..................................................... 3-10, 3-13
K
Kalavade, A. .......................................................... 4-1
key method
HashEntry class ............................................3-13
Khazeni, A............................................................. 4-1
L
label
codeblockSymbol ...................................... 13-10
Lane, T................................................................... 4-1
last-in, first-out (LIFO) queue .............................3-11
LastOfN (DDF block)............................................ 8-1
Lee, E. A.1-1, 2-1, 3-1, 4-1, 7-1, 12-1, 13-1, 14-
1
libraries of stars ..................................................... 2-1
Lim, Y. K.............................................................14-1
Lippman, S. .........................................................2-17
ListIter class.........................................................3-11
loadCode, method............................................. 13-18
load-star command ................................................ 2-3
load-star-perm command....................................... 2-3
location ptlang directive ................................2-6, 2-8
Ptolemy
I-5
look-inside command ............................................ 2-1
loop schedulers ................................................. 13-21
loopingLevel, target parameter ........................ 13-21
M
macro
$addr(name,offset) .................................... 13-11
$ref (assembly).......................................... 13-12
label ........................................................... 13-10
ref ................................................................. 13-8
sharedSymbol............................................... 13-9
starName ...................................................... 13-8
macro, $$ .......................................................... 13-12
macro, codeblockSymbol ................................. 13-10
macros, CG stars ................................................. 13-8
mainDecls (CGCTarget member) ....................... 14-1
mainLoopCode, method ................................... 13-18
make .............................................................. 1-4, 2-1
make.template ....................................................... 1-7
makefiles ............................................................... 1-4
make-star command .............................................. 2-1
Matrix class .............................................. 4-21–4-33
- operator ...................................................... 4-28
- operator, unary negation operator.............. 4-27
! operator, inverse operator .......................... 4-27
!= operator.................................................... 4-25
* operator ..................................................... 4-28
*= operator ................................................... 4-26
+ operator ..................................................... 4-28
+= operator................................................... 4-26
/= operator .................................................... 4-26
-= operator.................................................... 4-26
= operator, assignment operator................... 4-25
== operator................................................... 4-25
^ operator ..................................................... 4-27
~ operator, transpose operator...................... 4-27
clone() function ............................................ 4-29
ComplexMatrix ............................................ 4-22
conjugate() function for ComplexMatrix ..... 4-27
constructors .................................................. 4-23
conversion operators .................................... 4-25
dataType() function...................................... 4-29
entry() function ................................. 4-22, 4-38
FixMatrix ..................................................... 4-22
FixMatrix, special constructors......... 4-24, 4-25
FloatMatrix................................................... 4-22
hermitian() function for ComplexMatrix ..... 4-27
including Matrix.h into a Star ...................... 4-30
indentity() function ...................................... 4-27
Last updated: 10/17/97
I-6
IntMatrix ...................................................... 4-22
inverse() function ......................................... 4-27
isA() function ............................................... 4-29
Lapack++ ..................................................... 4-33
MatrixEnvParticle ........................................ 4-22
multiply() function ....................................... 4-29
outputting to a PortHole............................... 4-31
print() function ............................................. 4-29
star input and output..................................... 4-30
transpose() function ..................................... 4-27
writing Stars that use the Matrix class ......... 4-29
Matrix.h include file............................................ 4-30
Message class ........................................... 4-14, 4-40
message data type................................................ 2-11
message programming example.......................... 4-18
message type
portholes....................................................... 2-11
MessageParticle class.................... 2-21, 4-15, 4-18
method ptlang directive.................... 2-6, 2-11, 2-15
mkl alias .............................................................. 1-12
mkPtolemyTree ..................................................... 1-9
MultiInSDFPort class.......................................... 2-19
MultiOutSDFPort class ....................................... 2-19
multiple portholes ............................................... 2-19
multiple-processor schedulers...........................13-21
MultiPortHole class............................................. 2-19
multiprocessor target.........................................13-18
MultiTarget, class..............................................13-18
Murthy, P. K........................................... 13-1, 13-21
MVImage class ................................................... 4-41
myData method
Envelope class.............................................. 4-17
N
name ptlang directive .................................... 2-5, 2-6
NegativeExpntl class........................................... 3-17
non-determinism ...............................................12-12
non-deterministic loop ........................................ 12-8
num ptlang directive.............................................. 8-2
numberPorts method ........................................... 2-21
numSimulEvents method .................................... 12-5
numTokens ptlang directive.................................. 7-2
numtokens ptlang directive ...................... 2-11, 2-12
O
obj.$PTARCH directories ..................................... 1-4
objdir alias............................................................. 1-2
Octtools ................................................................. 1-5
ofstream class ................................................ 3-2, 3-3
operator, referencing an entry .................. 4-23, 4-38
OutDEPort class .................................................. 12-5
outmulti ptlang directive ....... 2-6, 2-11, 2-11, 2-19
output ............................................................ 3-2, 3-3
U. C. Berkeley
output ptlang directive...........2-6, 2-11, 2-11, 2-19
OutSDFPort class ..................................... 2-17, 2-19
overflow
Fix class.......................................................... 4-4
override.mk......................................... 1-7, 1-9, 1-11
P
parallel directory tree
mkPtolemyTree .............................................. 1-9
parallel schedulers ............................................ 13-21
parallel software development tree
csh aliases .....................................................1-12
parameter ............................................................... 2-9
parameters
complex ........................................................2-10
Parks, T. M. ..... 1-1, 10-1, 12-1, 13-1, 14-1, 17-1
Particle class .................................. 2-17, 2-21, 4-15
particle types........................................................2-21
pathSearch function ............................................... 3-8
phase mode in DE............................................. 12-12
PHASE, de........................................................ 12-12
phase-based firing mode in DE ........................ 12-12
pigi......................................................................... 3-4
pigiExample directory ........................................... 1-7
pigiRpc ....................................................... 1-5, 1-21
pigiRpc, custom version ........................................ 1-6
pigiRpc.debug......................................................1-23
Pino, J. L....................... 1-1, 6-1, 13-1, 14-1, 15-1
plotting data ........................................................... 3-3
Pointer type..........................................................3-11
Poisson (DE block)................................... 3-17, 12-9
Poisson process....................................................12-9
polymorphism......................................................2-28
PortHole class......................................................2-17
porthole SDF parameters....................................... 7-1
porthole, dynamic .................................................. 8-1
ports, hiding from the user...................................2-26
pragma ...................................................... 2-21, 14-4
precision parameter ............................................... 4-4
precision state ......................................................2-10
precision type
states ............................................................... 2-9
preprocessor........................................................... 2-1
print method.........................................................2-21
Message class .................................... 4-16, 4-31
Printer (SDF block) .............................................2-28
private ptlang directive ............................... 2-6, 2-14
processMacro, method...................................... 13-12
profile command.................................................... 2-7
progNotFound function ......................................... 3-8
protected ptlang directive ........................... 2-6, 2-14
pt alias..................................................................1-12
PT_DEBUG environment variable......................1-26
Department of EECS
The Almagest
pt_ifstream class ............................................3-2, 3-3
pt_ofstream class ...........................................3-2, 3-3
PTARCH environment variable ............................ 1-2
ptbin.mk................................................................. 1-6
ptcl ............................................. 1-1, 1-5, 2-24, 3-4
ptkControlPanel.............................................5-2, 5-6
ptl alias.................................................................1-12
ptlang ..................................................................... 2-3
PTOLEMY environment variable ......................... 1-2
ptolemy user .......................................................... 1-2
public ptlang directive ................................ 2-6, 2-14
pure method ptlang directive ...............................2-11
Pure Sofware Inc. ................................................1-19
pure virtual method ptlang directive....................2-11
Purecov ................................................................1-19
pure-delay star in DE...........................................12-2
Purify ...................................................................1-19
put method ................................................ 12-5, 12-6
pxgraph program ...........................................3-3, 3-6
Q
Quantify...............................................................1-19
quantization
Fix class.......................................................... 4-4
Queue class..........................................................3-11
queueing ..............................................................12-1
queueing networks...............................................12-1
R
Ramp (SDF block)...............................................2-26
random numbers ..................................................3-17
receive star........................................................ 13-23
receiveData method ............................................... 8-2
Rect (SDF block)................................................... 2-4
reference count .............................. 4-14, 4-17, 4-30
refireAtTime method ................................ 12-9, 12-9
rml alias ...............................................................1-12
rounding
Fix class.......................................................... 4-4
RPC Error ............................................................1-21
runCode, method .............................................. 13-18
S
saturation
Fix class.......................................................... 4-4
savestring function................................................. 3-8
sccs ......................................................................1-18
schedulers
static ............................................................... 7-1
schedulers, CG domain..................................... 13-20
SDF
domain............................................................ 7-1
porthole parameters ........................................ 7-1
writing stars ......................................... 7-1, 12-1
Ptolemy
I-7
SDF (synchronous dataflow)................................. 7-1
SDFFix class ......................................................... 4-9
seed of a random number .................................... 3-17
segmentation fault ............................................... 1-21
self-scheduling star.............................................. 12-8
send star............................................................ 13-23
Send/Receive stars............................................ 13-23
send/receive stars.............................................. 13-23
sendData method ........................................ 8-2, 12-5
sequencing directives in DE ................................ 12-6
SequentialList...................................................... 3-15
SequentialList class ............................................. 3-11
Server (DE block)................................................ 12-1
server stars in DE ................................................ 12-3
setAttibututes method.......................................... 2-26
setAttributes method ........................................... 2-26
setBDFParams (BDFPortHole method) .............. 14-6
setBDFParams method
BDFPortHole class......................................... 9-1
setInitValue method ............................................ 2-26
setOutputs_$starID........................................ 5-4, 5-5
setSDFParams method .....................2-12, 2-19, 7-1
setstate command ................................................ 2-21
setup method ......................................................... 7-1
setup ptlang directive ................................. 2-6, 2-13
shared data structures .......................................... 3-14
sign bit ................................................................... 4-4
signal generators in DE ....................................... 12-8
simple mode in DE........................................... 12-11
SIMPLE, de...................................................... 12-11
simultaneous events (DE domain)....................... 12-6
sol2.cfront.............................................................. 1-2
source code ............................................................ 1-1
source code control.............................................. 1-18
source stars in DE................................................ 12-8
Spread CGC...................................................... 13-15
spread star......................................................... 13-24
Spread, star ....................................................... 13-15
spread/collect stars ........................................... 13-24
srcdir alias ............................................................. 1-2
Sriram, S.............................................................. 15-1
stack..................................................................... 1-22
Stack class ........................................................... 3-11
star, defining a new star......................................... 2-1
stars.mk ...................................................... 1-6, 1-10
state........................................................................ 2-9
state ptlang directive................ 2-6, 2-9, 2-11, 2-21
states
hiding from the user ..................................... 2-26
static buffering.................................................. 13-16
static members..................................................... 3-15
static methods........................................................ 3-1
static scheduling
Last updated: 10/17/97
I-8
SDF ................................................................ 7-1
statistics, histogram ............................................... 3-5
stderr...................................................................... 3-3
stdin ....................................................................... 3-3
stdout ..................................................................... 3-3
string states............................................................ 2-9
stringarray states ................................................... 2-9
StringArrayState class......................................... 2-21
StringList class ...................................................... 3-9
StringListIter class .............................................. 3-10
strings .................................................................... 3-9
StringState class .................................................. 2-21
sub-galaxy .........................................................13-23
substChar, method.............................................13-12
sub-universe ......................................................13-23
sw alias ................................................................ 1-12
Switch (CGC Block) ........................................... 14-3
Switch (CGC block)............................................ 14-6
symbolic links ..................................................... 1-12
synchronous dataflow ........................................... 7-1
T
target, code generation ......................................13-16
target, multiprocessor........................................13-18
targets .................................................................... 1-1
Tcl/Tk.................................................................... 1-1
TclScript (DE block) ........................................... 5-12
TclScript star ......................................................... 5-1
TclStarIfc class.................................................... 5-12
tempFileName function......................................... 3-8
TextTable class ................................................... 3-13
TextTableIter class .............................................. 3-13
time stamp ........................................................... 12-1
Tk .......................................................................... 3-4
tkMain.c .............................................................. 14-7
tkSetup CGCTclTkTarget ................................... 14-7
TkShowValues ...................................................... 5-2
triggers method ................................................... 12-5
troff........................................................................ 2-4
truncation
Fix class ......................................................... 4-4
two’s complement ................................................. 4-4
Tycho Target ....................................................... 14-8
tylndir script ........................................................ 1-11
type conversion ................................................... 2-21
Message class............................................... 4-16
type, C50 state..................................................... 16-1
type, CG56/CG96 state ....................................... 15-1
TYPE_CHECK macro ........................................ 4-17
typeCheck method
Envelope class.............................................. 4-17
typeError method
Envelope class.............................................. 4-17
U. C. Berkeley
types.....................................................................2-11
tysh ........................................................................ 1-5
U
underflow
Fix class.......................................................... 4-4
Uniform class.......................................................3-18
uniformly distributed random number.................3-18
uninitialized Fix object .......................................... 4-6
user-defined messages .........................................4-15
V
value method
HashEntry class ............................................3-13
vector message.....................................................4-15
vem ........................................................................ 1-1
version ptlang directive .................................2-6, 2-7
video processing ..................................................4-40
virtual method ptlang directive............................2-11
W
waitFor method
DDFStar class................................................. 8-2
White, K. ....................................... 13-1, 14-1, 15-1
Williamson, M.....................................................17-1
wrapup (Star method) ..........................................14-2
wrapup method ....................................................3-15
wrapup ptlang directive .............................. 2-6, 2-14
writableCopy method
Envelope class ..............................................4-17
writeCode, method ........................................... 13-18
X
X window system .................................................. 3-3
XGraph class ......................................................... 3-3
XHistogram class................................................... 3-5
Y
yacc........................................................................ 2-4
Department of EECS