1
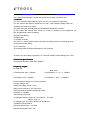
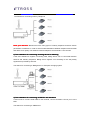
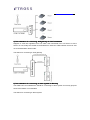
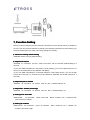
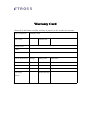
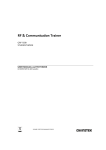
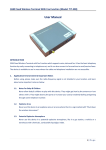
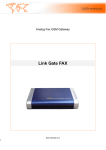
GSM FWT-360 (Gateway)
User's Manual
Model no.: 360
Product name : GSM Fixed Wireless Terminal
Frequencies : GSM 900/1800Mhz GSM FWT/GSM fixed wireless terminal/GSM
gateway
Structure
Item
GSM FWT--360
Remark
color
gray
White/black
Material
ABS (Acrylonitrile Butadiene Styrene)
Dimension 200mm×140mm×33mm
Excluding antenna
Weight
450g
Weight of Main unit
Power
Switch
Rocker switch
Power
Socket
12V DC input
Phone
interface
RJ11
Antenna
interface
SMA-female
LED
display
No.1: Power, No.2.in use, No.3, in talk, No.4,
Battery, if have, No. 5-7, Signal strength
2 RJ-11 ports
From left to
right(front side
view)
Front side LEDs display for Signal strength, Power, Working
Status,Talking and Battery indicator;
Rear side
2pcs SMA antenna connectors, 2 RJ-11
output,Power port and switch;
Bottom
side
2pcs Sim card holder slots, you can insert Sim card
into the slot .
1,General Description:
Etross-360 is a GSM to Analog Converter(single port,insert 2 sim cards ), the device can
produce a FXS line to allow a regular phone to be connected and
used just like a local landline(PSTN) except your calls will go out the GSM network. This
device can both receive and make calls.
The main application is: Connecting the RJ-11 FXS line to connect Ordinary telephone
set for voice call, to connect PBX for call extentions, to connect billing systems
for public phone use, to connect VoIP gateway to realize VoIP call termination, to connect
alarm system for security purpose, etc. It is not a VOIP gateway, nor a GSM+VOIP
It is a GSM Fixed Wireless Terminal that produces a Analog FXS phone line.
2,,Features:
1) It is a 2 channels GSM Gateway which has 2 RJ-11 outputs for extensions;
2) It can connect with ordinary telephone set, PBX , VOIP Gateway, Billing meter etc. ;
3) Dialing tone frequency:450hz;
4) Employ Industrial module [Siemens MC388(900/1800MHZ), to make;
5) Can adjust dial interval from 0.5sec to 9 secs by setting up from telephone set;
gsm fwt/gateway8) Caller ID display;
9) DTMF/FSK Dialing;
10) Bell signal;
11) Polarity reversal;
12) The RJ-11 socket which connect the phone or billing system for metering purpose;
13) Antenna socket (SMA);
14) IP Presetting;
15) Working status and Signal Strength by LED indicator;
16) back up Li-ion battery( Optional) 7.2V 1300mAh.standby 24hrs,talking time: 2.5hrs.
3,Technical Specifications
Air interface standard: GSM 900/1,800Mhz
Frequency ranges:
B) GSM 900:
I) Transmission: 890 ~ 915MHz
Ii) Reception: 935 ~ 960MHz
GSM 1800:
I) Transmission: 1, 710 ~ 1, 785MHz
Ii) Reception: 1, 805 ~ 1, 880MHz
Phone interface: supply RJ-11 Phone Interface
Hanging voltage: 45V
Picking off voltage: 30mA / 41mA
Dialing tone Frequency: 350,440,450Hz
Antenna interface: Antenn0 amplifying>2.5db
Sensitivity:<-104DBM
Transmitting power<3W
AC-Adapter interface: Input: AC 110~240VAC 50~60Hz
Output: 12DC 1A.
AC-Adapter type: EU,US,AU,British can be optional
4,Operation Circumstance:
Operation temperature: -10c~60C
Storage temperature:-20C~70C
Operation humidity:45%-95%
Atmosphere pressure:86-106Kpa
Environment noise: <60DB
Transmitting Power:2W
Sensitivity: <-104dbm
Antenna Amplifying: >2.5db
Dialing frequency: 450Hz
Hanging voltage: 45V
Picking current: 30mA/41mA
4,Check Package:
ETROSS-360 GSM FWT 1 piece;
Ac-adapter 12V 1A: 1 piece,
GSM Antenna with 3m cable 2 pieces,
User's Manual 1 piece,
G.W: 0.75kg per unit. And 20pcs per carton, 16kg per carton.
Gift carton Measurement: 55cmX34.5cmX32.5cm
5,Packing List
Name
Quantity
Remark
GSM FWT-360
1pcs
Dual band
Ac- adapter
1pcs
AC-110-240V, DC12V/1A
Antenna
2pcs
Magnetic Antenna with 3m
cable
User's Manual
1pcs
English
G.W: 0.75kg per unit. 20pcs/CTN, 16kg /CTN,CTN Size: 55cmX34.5cmX32.5cm
6,Installation And Connection
The Condition for Installation
The terminal asks for 110- 220V AV power supply. It must be installed in the area where the
GSM network can cover. The strength of the signal can affect the quality of voice.
1. Screw off the screws that are on the back of the terminal, Insert SIM card for every Sim
card holder, and then tighten the screws.
2. Install antenna. In order to ensure the quality of voice, antenna must be put beyond 1.5
from the telephone and terminal.
3. On end of the telephone line connects to the “Phone” port of the terminal, the other end
connects to telephone.
4. “Power” port connects to power adapter that is connected to 110-220V AC power supply.
1) The Installation for Connecting to Ordinary Telephone
The Sketch for connecting ordinary Telephone
Draw your attention: Because there are many types of ordinary telephone and their electric
parameters are different. In order to avoid mutual disturbance between telephone and terminal
and affect voice quality. The distance between telephone and terminal is 1.5m at least.
2) The installation for connecting to billing device for metering
If the users demand to register cost during calls, billing device can be connected between
terminal and ordinary telephone. Billing device register cost according to the anti-polarity
signal that is provided by terminal.
The sketch for connecting to Billing device or Computer charging system
3) The installation for connecting to PBX for call extentions
If users want to connect small PBX to this terminal, connect terminal’s “Phone port” to the
PBX.
The sketch for connecting to PBX device.
4) The installation for connecting VoIP gateway for Call Termination
Suppose a VoIP call originates from US, which was transferred from US Server to China
Server on VoIP, finally the call will be terminated from internet to GSM network and to be sent
out to the destination answer side.
The sketch for connecting to VoIP gateway
5) The installation for connecting to alarm system for Security
The GSM FWT can substitute the PSTN for connecting to alarm system for security purpose
when PSTN failure or not available.
The sketch for connecting to alarm system
7, Function Setting
Before you do the following function settings, Lift handset or press hands free key of telephone
set, then you can press the buttons according to the following instructions to finish setting, you
will hear 2 beeps when you finish, this testify setting successfully.
1
) Restore to factory default setting
*#99#99# restore to factory default setting.
2
) Adjust dial interval
*#01#30# , 01--command,30--time,Max 9.9 seconds,Min 0.5 seconds, default setting is 3
seconds.
*If you use GSM FWT-8848 for connecting to VoIP gateway, you can set dial interval as 0.5
second, it can make PDD<5 sec (Method: *#01#05#);
*If you use GSM FWT-8848 for connecting telephone, PBX, billing device, you can set dial
interval as 3 seconds or 5 seconds as you like (Method: *#01#30#, set the dial interval as 3
seconds).
3
) Adjust Earphone Volume
*#02#15#
02--command,15--volume,Max 16,Min 1, default setting is 15.
4
) Adjust Mic. Volume (sensitivity)
*#03#10#
03--command,10--amount,Max 16,Min 1, default setting is 10.
5
) Setting local area code
*#04#*0755#
10--command,*0755—area code,Max 5 numbers, use "*" instead if area
code is less than 5 digits.
6
) Setting IP numbers
*#05#17911#
05--command , 17911—IP numbers , Max 5 numbers, use "*" instead if IP
number is less than 5 digit.
7)H
Hide Caller ID (been sent out)Setting
Default setting is 00
*#13#01#
13--command,01--value,Max-02,Min-00
00-- presentation indicator is used according to the subscription of the CLIR service
01 – CLIR allowed
02 – CLIR prohibited
Notice: This Setting need GSM carrier support.
8) Bar incoming call Setting
*#14#00#
14--command,00--value,00--no barring, 01--set barring
default setting --00
9)FSK setting (optional) (should confirm before order)
*#17#00# setting caller ID
17-order, 00-value, 00-DTMF, 01-FSK, default setting is 00
This setting need terminal has FSK Chip set support
1
) 0 Billing Mode setting
*#15#00#
15--command, 00-value, 01-reversal polarity, 02-12 KHz, 03-16 KHz, default setting-- 01
11)IIMEI change Setting ( for Quad Band M10 Module only)
1. Write IMEI to RAM
*#18#IMEI no.#, 18--command, IMEI No. --15-digit IMEI no.
2. Check IMEI, if it is right, and then write it to module.
*#19#IMEI no.#, 19--command, IMEI No. --15-digits IMEI No.
Notice: Step 1 and Step 2, IMEI no. must be same.
12) Pin Lock &Network Lock Setting (optional)(Should confirm before order)
2)PIN Lock
1, Set to open PIN code check and automatic PIN lock function
*#07#*1234# 07-command, 1234- the current SIM card PIN code
If set sucessfully, the device will open PIN code check, and automatically change the current
SIM Card into "PIN on" from "PIN off"
2, Set to close PIN code check and auomatic PIN lock function
*#08#*1234# 08-command, 1234- the current SIM card PIN code
If set sucessfully, the device will close PIN code check and automatic PIN lock function.
3, Set to change PIN code,open automatic PIN lock function
*#09#1234*56785678# 09-command, 1234- the current sim card PIN code, 5678-new PIN
code. (5678 can be any other 4 digits number, suppose you can use 2009).
If set successfully, the device will change the current sim card PIN code as you want.5678, or
the any other 4 digit PIN codes, and open automatic PIN lock function.
2)Network Lock
1,Set to open Network lock function
*#10#01234# 10-command, 01234-password
2,Set to close Network lock function
*#11#01234# 11-command,01234-password
3,Set the Network codes
*#12#1*46003*46003# 12-command,1--No. Of IMSI, 46003--the IMSI code for China Telecom
*#12#2*46000*46000# 12-command, 2--No. Of IMSI, 46000--the IMSI code for China Mobile
8,Making Calls and Answer Incoming Calls
Making Calls
1. Lift the handset or press “hand-free” key, you will hear dialing tone, then you can dial
the telephone numbers you want to call.
2. Dialing: dialing the telephone numbers you want to call
3. On completion of dialed digits, you can press “#” to transmit the called telephone
numbers. If you don’t dial any key for continual 3 seconds during the dialing, terminal
transmits called telephone numbers automatically.
4. During calls, if the telephone numbers is not free ones, the terminal sends out
anti-polarity signal.
5. If the calling party or called party hangs up, the terminal stops sending out anti-polarity
signal.
Answering Incoming Calls
When some calls are coming in, if the connected telephone has the function of displaying
incoming calls, the telephone rings and displays the incoming telephone numbers. Now
users can lift the handset or press “hand-free” to answer it.
Warranty Card
Please fill in the blanks carefully, and keep it properly as the voucher for warranty.
Type of Equipment
GSM FWT-8848
User’s name
Contact with:
Contact Tel.no.
Address
Date of Ex-works
Date of Maintenance
Sales Agent
(Stamp)
Damage
Management
Purchasing Date
Maintainer