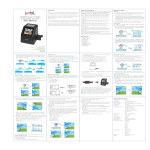
1
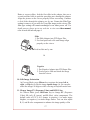
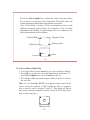
4-in-1
F2D Super Plus
Film to Digital Converter
User Manual
v2.0
Table of Contents
Introduction ... 1
Before Using the Converter ... 1
Having Difficulty Using This Product ... 4
Package Contents ... 5
Ordering Accessories ... 5
Functions of Keys ... 6
Connect F2D Super Plus to TV Screen ... 7
Getting Started... 8
1. Attach Power ... 8
2. Use Built-in Memory ... 8
3. Use Optional SD/SDHC Memory Card ... 8
4. Format/Delete All Internal Memory or the SD/SDHC Card ... 9
5. Mode Selection ... 10
6. Set Film Type ... 11
7. Select Proper Adapter or/and Insert ... 11
8. Insert Proper Adapter into Slot ... 14
9. Prepare Film and Feed the Film into Adapter ... 15
10. Edit Image Orientation ... 17
11. Change Image EV (Exposure Value) and RGB Color ... 17
12. Convert Film to Digital File ... 19
13. Playback and Edit Converted Image Files ... 20
14. Connect F2D to Computer to Upload Image Files ... 22
15. Upload Image Files to PC and Delete the Uploaded Files ... 23
Specifications ... 24
One-Year Limited Warranty (United States Only) ... 25
Thank You for Choosing Wolverine and Quick Start ... Back Cover
Introduction
Thank you for purchasing Wolverine F2D Super Plus Film to Digital
Converter. You can take stacks of film and convert them into digital
images to preserve them forever. Wolverine has created a simple-to-use
device to convert your film into high mega pixel digital images in
seconds. No computer or software is needed. Plug the F2D Super Plus
into an outlet or an USB port; all images are saved to memory or
optional SD/SDHC memory card. The F2D Super Plus can be
connected with your Windows PCs or Mac computer system to upload
converted and saved digital images through USB ports.
Before Using F2D Super Plus
This section provides important safety information that you should read
before using your F2D Super Plus.
Do not drop or handle too aggressively as it may cause damage to
the device.
Do not allow the device to come into contact with water or other
liquids. In the event that water or other liquids enter the interior,
.
.
1
.
.
.
.
.
.
.
.
.
.
.
.
immediately turn off the device. Continued use of the device may
result in fire or electric shock.
Do not handle the device with wet hands. Doing so may cause
electric shock and damages to the unit.
Do not place the device close to any equipment generating strong
electromagnetic fields. Exposure to strong magnetic fields may
cause malfunction or data corruption.
Do not expose the device to extreme temperatures, humidity or
vibrations, which may cause damages to the device.
Do not open the outer casing. This unit does not require batteries or
contain user serviceable parts.
Do not move or disconnect the device from the computer while the
device is reading/writing data. This may cause damages to the data
and/or the device.
Under no circumstances should user try to repair the device. Doing
so may cause electric shock and void the warranty.
Warranty will be voided if the device is mishandled. Please take
care in handling the device. Wolverine Data is not responsible for
2
consequential damages, including loss of data. Always back up all
data. For full warranty statement see the end of this manual.
Wolverine Data has no obligation to repair, replace or issue refunds
without a Return Merchandise Authorization (RMA) number and
the original purchase receipt of the defective product.
Repairs or replacement service will not be offered to products that
were misused, scratched, repaired without authorization, or any
other reasons beyond the range of intended use.
Replacement product may be either new or refurbished, provided
that its functions are at least equal to that of the product being
replaced.
Wolverine Data is not responsible for any data stored on the
returned product, please backup any data prior to ship back the unit.
All out of warranty repairs are subjected to repair fee. Please
contact your dealer or Wolverine Data for current charges.
3
Having Difficulty Using This Product
..
Please try the following options:
Call us at 949-458-9888 M-F 9:00-5:00 Pacific Time
We strongly recommend you to visit our web site,
www.wolverinedata.com/support to watch the videos including:
1. F2D Super Plus video manual
2. Easy way to open the super F2D negative adapter
3. How to convert Super 8 and recreate the movie
4. How to release a stuck slide adapter if inserted upside down
E-mail or write to our technical support staff at
[email protected] or
our address: 9939 Muirlands Blvd. Irvine, CA 92618
.
4
Package Contents
F2D Super Plus converter
35 mm slide adapter (#1)
35 mm negative adapter (#2)
Super 8 film insert (#3)
110 negative insert (#4)
USB power adapter
USB cable
cleaning brush
user manual.
Ordering Accessories
Please call us at 949-458-9888 or visit Wolverine
Data web site to order accessories. Go to
www.wolverinedata.com, click Accessories under
the pull down menu of tab PRODUCT, click
Wolverine F2D. Select TV-out cable (see picture,
Code: F2D14TV) or other related accessories.
5
Functions of Keys
. Power: Power on/off.
. Left/Mirror and Right/Flip: Highlight the selection to left/up or
right/down; mirror or flip image in "Convert" mode.
. Convert/Mode: Convert film to digital image in "Convert" mode.
.
Press Mode key one time to bring back the previous menu. Press
Mode key twice any time to go back to Home Menu (start menu).
OK/Enter key: Confirm and enter the selection
Power
Convert/Mode
C
OK/Enter
Right/Flip
Left/Mirror
6
Connect F2D Super Plus to TV Screen to View Images
on TV
If your TV set equipped with RCA composite ports that accept video-in
signal, you can view converted images on TV screen instead from the
F2D Super Plus viewer.
Change your TV set INPUT to appropriate source. Plug the 3.5 mm end
of the RCA cable to TV OUT port located at the back of F2D Super
Plus, and plug RCA end (white or yellow connector) to VIDEO-IN
(yellow) port of the TV set. The viewer of the F2D Super Plus will turn
dark, menu and images will appear only on TV.
7
Getting Started
1. Attach Power
Connect the cable to included power adapter. Plug the power adapter
to a wall outlet, or plug cable to computer USB port directly. F2D
Super Plus turns off itself after 30 minutes of idle time.
2. Use Built-in Memory
F2D Super Plus has built-in memory that stores about 35 ~ 40 digital
images. After power on, a "No card" icon will appear on the viewer
for 3 seconds if an external memory card is not inserted.
3. Use Optional SD/SDHC Memory Card
Insert a SD/SDHC memory card (Max. 32 GB) before powering on
the F2D Super Plus. Do not use SDXC or MicroSD memory card
with card adapter on F2D Super Plus. It could freeze the device.
Ensure the card is unlocked, gently insert it with gold fingers facing
up until it clicks. Power off the F2D Super Plus before removing
the memory card. Eject the card by gently pushing in the card,
instead of pulling out directly.
8
A new memory card or an used camera card should be formatted
before using with the F2D Super Plus. Refer to item 4.
Each 1 GB of SD/SDHC memory holds about 500-700 digital
images. The maximum accepting capacity of a SD/SDHC Memory
Card is 32 GB, otherwise it will freeze the F2D Super Plus.
Un
lo
ck
1/8"
Unlock the card
Gold contacts face up
Push in until clicks &
1/8" remains
4. Format/Delete All Internal Memory or SD/SDHC Card
This function formats/deletes all files stored in the internal memory if
SD/SDHC memory card is not inserted. With external memory card
inserted, the function of "Delete All" would erase all files on the
inserted card. Caution, any and all existing files would be deleted
after the procedure of "Delete All". Make a backup if it's needed.
1. Insert SD/SDHC memory card if needed.
2. Turn power on, press Right key to select Delete All then press OK.
3. Press Left key to highlight YES then press OK.
9
5. Mode Selection
F2D Super Plus has 7 modes and are listed below. Press Left or Right
keys to change the mode then press OK/Enter key to enter the
selection. You can always press Mode key to bring back the previous
menu or press Mode key twice to go back to Home menu.
Film Type - Selects type of film to convert, refer to Film Type
Table on page 13
Delete All - Deletes all files in the internal memory or the inserted
SD/SDHC card
Convert - Converts film to digital image. You can go to Covert
mode directly if all settings remained the same as last session
Playback - Reviews all converted images that stored in memory
USB Upload - uploads converted image files to PC or Mac
Language - Sets menu in English or Japanese
.
.
.
.
.
.
10
6. Set Film Type
Ensure the Film Type setting is correct, or you will see X-ray-like
image on the viewer. The film type setting will remain unchanged
even when F2D Super Plus is powered off.
1. At Film Type menu, press OK/Enter key.
2. Press Left or Right key to highlight Color Negatives or Slides
Positive or Black & White then press OK key.
3. Press Left or Right key to select the type of film then press OK.
7. Select Proper Adapter or/and Place Insert
Use proper Adapter or/and Insert to convert your film, refer to Film
Type Table on page 13.
Flip open the Adapter then place the insert into the middle of window
opening, align the 4 dimples underneath (see page 12). Snap close all
3 catches along the bottom edge tightly to avoid jamming when
pushing adapter into the F2D Super Plus.
11
2
Negative Adapter
Warning: Using wrong adapter or/and insert will result cropped or
black areas on images.
Negative Adapter (#2)
Flip open
4
110 INSERT
3
1
SUPER 8 INSERT
Negative Adapter (#2)
with Super 8 Insert (#3)
Negative Adapter (#2)
with 110 Insert (#4)
12
Film Type Table
Film Type Format
110
Color
126KPK
Negative
135
Super 8
110
Slide
Positive 126KPK
135
Black 110
&
126KPK
White 135
Adapter to Use
Negative Adapter (2)
Negative Adapter (2)
Negative Adapter (2)
Negative Adapter (2)
Slide Adapter (1)
Slide Adapter (1)
Slide Adapter (1)
Negative Adapter (2)
Negative Adapter (2)
Negative Adapter (2)
Insert to Use
110 Insert (4)
----Super 8 Insert (3)
*110 Slide Insert
-----------
Film Width
16 mm
26 mm
35 mm
8 mm
16 mm
26 mm
35 mm
16 mm
26 mm
35 mm
* it's an optional part, not included in the package. Please check order
information on page 5.
13
8. Clean Film Dust and Insert Proper Adapter into Slot
For best results, use included cleaning brush with felt side down to
wipe dust off the light table gently before inserting adapter. Insert
film Adapter with two stick-out stoppers face down or the
embossed wording face up, push it into the right side slot, right to
left.
Gently insert and push Adapter until stopped. If adapter was inserted
upside down or in improper direction, it would be stuck inside the
F2D Super Plus. If the adapter was stuck, please call us or go to our
14
web site for the solution on video,
refer to item 4, how to release a
stuck slide adapter if inserted
upside down, refer to page 4.
9. Prepare Film and Feed the Film into Adapter
Use fine soft cloth or canned air (not included) to wipe or blow off
any dust on the film before feeding them into the Adapter. Gently
feed the film from the right side of adapter.
In general, feed the film in right side up, and shiny side up as
follows:
Slides: printed logo or brand name facing down
Super 8: perforated holes at top
15
Note: to convert slides, feed the first slide in the adapter, then use a
second and third slide to push the preceding ones through the adapter.
Align the picture on the viewer properly before converting. Continue
to feed slides through the adapter one by one. Ensure the Film Type
setting is correct, or you will see X-ray-like image on the viewer. The
film type setting will remain unchanged even when power off. For
detail process, please go to our web site to view our video manual,
refer to web site info on page 4.
Slide
1. Put Slide Adapter into F2D Super Plus.
2. Feed and push each slide until image align
properly on the viewer.
Feed in slide one by one
16
Negative
1. Put Negative Adapter into F2D Super Plus
2. Feed negative film and check the image
from the viewer.
10. Edit Image Orientation
At Convert Mode, press Mirror key to mirror the image left to
right, or Flip key to flip the image upside down. Or you can also
rotate the images 90 degrees while viewing at Playback mode later.
11. Change Image EV (Exposure Value) and RGB Color
At Convert Mode, press OK/Enter key to change EV (Exposure
Value), R (red), G (green), and B (blue) color components. The
default value of EV is 0.0, change to positive(+) to make image
brighter, or negative(-) to make image darker. You can also adjust
R, G, and B color components to enhance the image quality of the
17
2
film. Press Left or Right key to adjust the values, then press Enter
key to move on to the next color component. The edited value will
remain unchanged until further adjustments were made.
Note: Each brand or batch of film development process used
different chemicals and had their own characters. You can make
adjustments individually, or upload image files to a computer to do
batch enhancements with a software.
Convert Mode
Film Type
EV 0.0
Memory Card
135
Save
Cancel
Exposure Value
Home
18
12. Convert Film to Digital File
1. At Convert Mode, press Convert key to convert image to digital.
2. Press OK key to save the converted digital image to memory. Or
press Left or Right key to select Cancel (not saved).
3. Feed another slide or push the negative film to left side to convert
the next film.
Note: If a red rectangle "FULL" icon appears in the center of the
viewer, means the memory is full. Upload the files to computer,
refer to item 14 and 15 on page 22 and 23. Then delete all files in
the memory through computer software wizard or F2D Super Plus,
refer to item 4 on page 9.
EV 0.0
FULL
135
Memory Full
19
13. Playback and Edit Converted Image Files
1. Press Left or Right key to highlight "Playback".
2. Press OK/Enter key to playback saved files on the viewer at 2
second intervals.
Playback Mode
Playback in Pause
3. Press OK/Enter key to pause slide show. Press Left/Right key to
advance image forward or backward manually.
4. Press OK/Enter key one more time to go to Edit menu.
In the Edit menu, highlight Exit, then press OK/Enter key to
resume Playback.
20
After the image is edited, select Save icon to save edited image. The
edited image will replace the original image in memory.
Highlight Home icon, press OK/Enter key to exit Playback mode,
or press Convert key two times to go to Home menu.
Playback/Edit Menu
Exit Edit menu, resume
Playback mode
Save edited image
Go to Home Menu
(Exit Playback)
Rotate +90
Rotate -90
Delete
21
14. Connect F2D Super Plus to Computer to Upload Image Files
For people don't have a card reader on computer, you can use F2D
Super Plus as an external card reader for your computer.
1. Plug small end of the USB cable to F2D Super Plus and the big
end to USB port on the computer.
2. Insert SD/SDHC memory card if not using the internal memory.
3. Power on F2D Super Plus.
4. Press Left/Right key to highlight "USB UPLOAD".
5. Press OK/Enter key to activate the USB mode.
USB UPLOAD
USB UPLOAD
22
15. Upload Image Files to PC and Delete the Uploaded Files
You can use F2D Super Plus as an external card reader to upload
converted image files. It's a better practice to upload files to
different folders each time to avoid files superseding.
MAC system:
iPHOTO will pop out. If not, launch iPHOTO and import the files.
Windows PC system:
A Microsoft Wizard Window will pop out. Follow the steps to copy
picture files to your PC.
All converted image files will be named in alpha-numerical order,
such as PICT0001.JPG, PICT0002.JPG, PICT0003.JPG etc, and
stored under the directory of DCIM/100COACH.
After files were copied to your computer, you can delete the files
on the card using functions on the computer, or F2D Super Plus
Delete All function. If you leave the files in the memory card,
newly converted files will be named consecutively in alphanumerical order, otherwise it starts from PICT0001.
23
Specifications
Lens: F/3.48, f=5.12
LCD:2.4 inch LTPS LCD Display
External memory: SD/SDHC card
Exposure: Auto
Color balance: Auto
Resolution: 20 MP
Data conversion: 24 bits per color channel
Convert method: Single pass
Light source: backlight
Power: Powered from USB/5V adapter
Interface: USB 2.0
Dimension: 103 x 90.5 x 104 mm
Weight: 340 g
Language: English and Japanese
24
Caution: This device complies with part 15 of the FCC Rules. Changes of modifications
not expressly approved by Wolverine Data could void the user 's authority to operate the
equipment.
One-Year Limited Warranty (United States Only)
Wolverine Data manufactures its hardware products from parts and components that are
new or equivalent to new in accordance with industry-standard practices. Wolverine Data
warrants that the hardware products it manufactures will be free from defects in materials
and workmanship. The limited warranty term is one year beginning on the date of invoice,
as further described in the following text.
Damage due to shipping the product is covered under this limited warranty. Otherwise, this
limited warranty does not cover damage due to external causes, including accident, abuse,
misuse, problems with electrical power, servicing not authorized by Wolverine Data, usage
not in accordance with product instructions, failure to perform required preventive
maintenance, and problems caused by use of parts and components not supplied by
Wolverine Data.
The warranty extends only to the first consumer purchaser, and is not transferable. This
limited warranty does not cover any items that are in one or more of the following
25
categories: software; external devices (except as specifically noted); accessories or parts
added to a Wolverine Data system after the system is shipped from Wolverine Data or its
resellers; accessories or parts that are not installed in the Wolverine Data factory. During
the one-year period, beginning on the invoice date, Wolverine Data will repair or replace
products returned to Wolverine Data's facility.
To request limited warranty service, you must contact Wolverine Data within the limited
warranty period. Appropriate telephone number for customer assistance refer to page 4. If
limited warranty service is required, Wolverine Data will issue a RMA (Return Material
Authorization) number. You must ship the product back to Wolverine Data in their original
or equivalent packaging, prepay shipping charges, and insure the shipment or accept the
risk of loss or damage during shipment. Wolverine Data will ship the repaired or
replacement products to you freight prepaid if you use an address in the continental United
States, where applicable. Shipments to other locations will be made freight collect.
To obtain service, you must include: (a) a copy of your receipt or other comparable proof
of purchase; (b) a written description of the problem; (c) your address and telephone
number; (d) Write the RMA number on the outside shipping packaging.
NOTE: Wolverine Data uses new and reconditioned parts made by various manufacturers
in performing limited warranty repairs and building replacement products. If Wolverine
Data repairs or replaces a product, its limited warranty term is not extended.
26
Warranty Exclusions
Normal Wear and Tear
Periodic maintenance, repair and replacement of parts due to normal wear and tear are
excluded from coverage.
Abuse and Misuse
Defects or damage that result from: (a) improper operation, storage, misuse or abuse,
accident or neglect, such as physical damage (cracks, scratches, etc.) to the surface of the
product resulting from misuse; (b) contact with liquid, water, rain, extreme humidity or
heavy perspiration, sand, dirt or the like, extreme heat, or food; (c) use of the products or
accessories for commercial purposes or subjecting the product or accessory to abnormal
usage or conditions; or (d) other acts which are not the fault of Wolverine Data, are
excluded from coverage.
Use of Non-Wolverine Converter's Accessories
Defects or damage that results from the use of Non-Wolverine Converter's accessories or
other peripheral equipment are excluded from coverage.
Unauthorized Service or Modification
Defects or damages resulting from service, testing, adjustment, instillation, maintenance,
alteration, or modification in any way by someone other than Wolverine Data are excluded
from coverage.
27
Altered Products
Product or accessories with (a) serial numbers or date tags that have been removed, altered
or obliterated; (b) broken seals or that show evidence of tampering; (c) mismatched board
serial numbers; or (d) nonconforming or non-Wolverine Data parts or accessories, are
excluded from coverage.
Other Limitations
Any implied warranties, including without limitation the implied warranties of
merchantability and fitness for a particular purpose, shall be limited to the duration of this
limited warranty, otherwise the repair, replacement or refund as provided under this express
limited warranty is the exclusive remedy of the consumer, and is provided in lieu of all
other warranties, express or implied. In no event shall wolverine data be liable, whether in
contract or tort (including negligence) for damages in excess of the purchase price of the
product, accessory or software, or for any indirect, incidental, special or consequential
damages of any kind, or loss of revenue or profits, loss of business, loss of information or
data, software or application with the ability or inability to use the product, accessories or
software to the full extent these damages may be disclaimed by law. Some states (or
jurisdictions) do not allow the exclusion or limitation of incidental or consequential
damages, so the above exclusion or limitation may not apply to you.
28
Thank you for choosing Wolverine
Please call us at 949-458-9888 M-F 9:00-5:00 Pacific Time or
watch video manual at www.wolverinedata.com/support
Quick Start
1. Attach power cord
2. Insert SD/SDHC memory card - Optional step
3. Turn on F2D Super Plus
4. Press Left or Right and OK keys to set film type
Feed in slide
5. Insert proper Adapter from right side slot
one by one
6. Feed the film into the right side of Adapter
7. Edit image orientation, EV and RGB if required - Optional step
8. Press Convert key to convert film to digital
9. Press OK key to save image
10. Feed in the next film, repeat converting process
Join Mailing List to receive our exclusive coupon offers