1
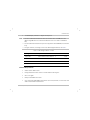
Element Management System for TDM
Applications
Version 1.7
Installation Guide
RADview-EMS/TDM (Unix)
RADview-EMS/TDM (Unix)
Element Management System for TDM Applications
Version 1.7
Installation Guide
Notice
This manual contains information that is proprietary to RAD Data Communications Ltd. (“RAD”). No part of this
publication may be reproduced in any form whatsoever without prior written approval by RAD.
Right, title and interest, all information, copyrights, patents, know-how, trade secrets and other intellectual property or
other proprietary rights relating to this manual and to the RADview-EMS/TDM (Unix) are proprietary products of RAD
protected under international copyright law and shall be and remain solely with RAD.
You shall not copy, reverse compile or reverse assemble all or any portion of the manual or the RADview-EMS/TDM (Unix).
You are prohibited from, and shall not, directly or indirectly, develop, market, distribute, license or sell any product that
supports substantially similar functionality as the RADview-EMS/TDM (Unix), based on or derived in any way from the
RADview-EMS/TDM (Unix). Your undertaking in this paragraph shall survive the termination of this Agreement.
This Agreement is effective upon your opening of the RADview-EMS/TDM (Unix) package or to downloading it and shall
continue until terminated. RAD may terminate this Agreement upon the breach by you of any term hereof. Upon such
termination by RAD, you agree to return to RAD the RADview-EMS/TDM (Unix) and all copies and portions thereof.
For further information contact RAD at the address below or contact your local distributor.
International Headquarters
RAD Data Communications Ltd.
North America Headquarters
RAD Data Communications Inc.
24 Raoul Wallenberg St.
Tel Aviv 69719, Israel
Tel: 972-3-6458181
Fax: 972-3-6498250, 6474436
E-mail: [email protected]
900 Corporate Drive
Mahwah, NJ 07430, USA
Tel: (201) 5291100, Toll free: 1-800-4447234
Fax: (201) 5295777
E-mail: [email protected]
© 1994–2008 RAD Data Communications
Publication No. 357-281-02/08
License Terms
RAD hereby grants a non-exclusive, nontransferable worldwide license to the licensee of this software product to use and
install this RAD software product on one workstation only, in object code only for the sole and internal purpose of
configuring, monitoring and managing RAD’s hardware products.
Title. All claims to the contrary contained herein notwithstanding, title in and to this RAD software product and
documentation, including but not limited to, all copyright, patent, trade secret rights, and intellectual property rights shall
remain in and with RAD. The licensee of this software product shall not copy, reverse compile or reverse assemble all or
any portion of this software product.
Copies. This RAD software product and documentation shall not be copied, in whole or in part, except as explicitly
permitted by RAD or for internal backup or archival purposes.
Warranty
RAD does not warrant that this software product is free from errors and/or will run properly on all computer hardware
and/or operating systems. RAD does not warrant that this software product will meet requirements of its licensee or
operate in the combinations which may be selected for use by a licensee or the end users or that the operation of this
software product will be uninterrupted or error free.
THE WARRANTIES ABOVE ARE EXCLUSIVE AND IN LIEU OF ALL OTHER WARRANTIES, WHETHER EXPRESS OR IMPLIED,
INCLUDING THE IMPLIED WARRANTIES OF MERCHANTABILITY AND FITNESS FOR A PARTICULAR PURPOSE.
Limitation of Liability
RAD’s cumulative liability to you or any other party for any loss or damages resulting from any claims, demands, or actions
arising out of or relating to this Agreement and the RADview-EMS/TDM (Unix) shall not exceed the sum paid to RAD for the
purchase of the RADview-EMS/TDM (Unix). In no event shall RAD be liable for any indirect, incidental, consequential, special
or exemplary damages or lost profits, even if RAD has been advised of the possibility of such damages.
This Agreement shall be construed and governed in accordance with the laws of the State of Israel.
Contents
1. 2. 3. 4. 5. 6. Package Contents .................................................................................................. 1 System Requirements ............................................................................................ 1 Hardware Requirements......................................................................................... 1 Software Requirements ......................................................................................... 2 Installation ............................................................................................................. 4 Installation Sequence ............................................................................................. 4 Installing the Informix Database ............................................................................. 4 Installing the RADview-EMS Package....................................................................... 5 Installing Additional PC Clients (Optional) ............................................................. 11 Installation Notes................................................................................................. 15 Post-Installation Steps ......................................................................................... 15 Creating a User .................................................................................................... 15 Defining the User Environment ............................................................................ 17 Frequently Asked Questions on Installation .......................................................... 20 Uninstalling the RADview Package ........................................................................ 23 Uninstalling RADview ........................................................................................... 23 Uninstalling the Database .................................................................................... 24 RADview-EMS/TDM (Unix) Ver. 1.7
Installation Guide
1.
Package Contents
The RADview-EMS/TDM (Unix) package includes the following items:
•
RADview-EMS/TDM (Unix) Installation CD
•
RADview-HPOV database (Informix) CD
•
RADview-EMS PC Client Installation CD
•
Installation guide
•
Technical Documentation CD.
2.
System Requirements
RADview-HPOV for TDM Applications version 5.9 can only be installed over the Solaris™
10 Operating System, according to the following minimum hardware and software
requirements.
Hardware Requirements
For networks consisting of up to 300 managed elements:
•
Sun Fire V215 Server with XVR-100* graphics card or Sun Ultra 25
•
2GB RAM or higher
•
Swap file should be twice RAM size
•
Hard disk with at least 2 GB free disk space under /opt partition
•
Hard disk with at least 600 MB for Informix directory
RADview-EMS/TDM (Unix) Ver. 1.7
System Requirements
1
Installation Guide
•
Note •
1152x900 display resolution or higher with depth 24.
For each 3 additional simultaneous users via X-session add 1 GB RAM and 1 CPU.
(When using EMS client on a different workstation there is no need to add RAM or
CPU)
•
For each additional simultaneous open zoom application add 75MB RAM (via X-session
only)
•
For larger networks, consisting of more than 300 managed elements, see Table 1.
Table 1. HW Scaling Guideline – Solaris
Managed Elements
System
No. of CPUs
RAM
Up to 300
Sun Fire V215 or Sun Ultra 25
1
2 GB
300 to 1000
Sun Fire V215
2
2 GB
1000 to 2000
Sun Fire V490/V890
4
4 GB
2000 to 5000
Sun Fire V890
4
8 GB
Software Requirements
2
•
Solaris 10, Nov 2006 or later
•
During installation choose “Select to include Solaris 64 Bit Support”
•
CDE 1.4 or higher
•
HP Open View NNM 7.50 or later
•
Up to 250 nodes HPOV NNM Starter Edition can be used, however, for more than 250
nodes contact HPOV local distributor.
System Requirements
RADview-EMS/TDM (Unix) Ver. 1.7
Installation Guide
Note All the requirements and Table 1 apply to a single-user scenario. If several users use
RADview simultaneously, additional resources may be required to maintain satisfactory
performance as indicated above.
Note No other Solaris versions are supported (for example, versions 2.5.1, 2.6, 2.7 are not
supported).
Note A license server is integrated into RADview. The license server protects the SW by
restricting the installation of the RADview package onto a single host/computer, and
restricting the number of network elements that can be managed by the system
(according to the installed RADview license details).
In case you install this RADview version as an upgrade to an existing system, you will be
required to install a license. Refer to Chapter 4 for additional details.
RADview-EMS/TDM (Unix) Ver. 1.7
System Requirements
3
Installation Guide
3.
Installation
Installation Sequence
Note The RADview-EMS/TDM (Unix) package should be installed only after Solaris 10 and HPOV
NNM 7.5 are properly installed on the station. For more information about the installation
of these platforms, refer to their documentation.
The RADview-EMS/TDM (Unix) package must be installed in the following sequence:
1. Install the Informix Database
2. Install RADview-HPOV/TDM (optional, see note)
Note Install RADview-HPOV/TDM before installing RADview-EMS/TDM only if you need to
manage devices that are managed by the RADview-HPOV/TDM package. For installation
instructions, see the RADview-HPOV/TDM User Manual.
3. Install RADview-EMS/TDM
4. Install Additional PC Clients (optional).
Note All installations must be performed on one computer station, and in the order specified
above.
Installing the Informix Database
RADview-EMS/TDM (Unix) uses the Informix database, which must be installed prior to
installing the RADview-EMS package.
4
Installation
RADview-EMS/TDM (Unix) Ver. 1.7
Installation Guide
Before initiating the Informix installation, close all running applications.
³
To perform the Informix database installation:
1. Log in as root.
2. Type: csh
3. Insert the RADview-HPOV database CD into the CD drive.
4. Type: cd /cdrom/cdrom0/Informix
5. Type: ./informix.install
6. When prompted, type the Informix home directory path /export/home/Informix.
Note During the Informix installation the /etc/system file is automatically updated. The
installation script prompts you to confirm a system reboot, so that the modification can
take effect.
7. When prompted, confirm the system reboot.
8. When the reboot completes, log in as root.
9. Type: csh
10. Type: cd /cdrom/cdrom0/informix
11. Type: ./informix.install
Informix installation continues until complete, at which time the prompt (#)
reappears.
Installing the RADview-EMS Package
Once Informix database is installed, install the RADview-EMS package.
RADview-EMS/TDM (Unix) Ver. 1.7
Installation
5
Installation Guide
Starting with the Initial Components
³
To install the RADview-EMS components:
1. Log in as
root.
2. Type:
csh
cd /tmp
source /<INFORMIXDIR>/.mng164_inf.csh.
Note Replace <INFORMIXDIR> with your Informix installation directory (for example,
/export/home/informix).
3. Insert the RADview-EMS/TDM (Unix) Installation CD into the CD-ROM drive.
4. Type:
cd /cdrom/cdrom0/radview.
5. Verify that Informix is running by typing:
onstat –
If Informix is online the following message appears:
INFORMIX-OnLine version 7.31.UDI - -On-Line- 6.
Type:
./install_gui.rad.
The RADview Installation warning appears.
7. Click <OK>.
The RADview Installation Product List appears.
8. Select the product(s) to be installed or select all and click <Install>.
6
Installation
RADview-EMS/TDM (Unix) Ver. 1.7
Installation Guide
A confirmation dialog box is displayed.
9. If the displayed Informix installation directory is correct, click <Yes>.
The installation continues to the EMS/TDM Setup Wizard stage.
Skip to Continuing with RADview-EMS/TDM.
10. If the displayed Informix installation directory is not correct, click <No>.
A dialog box requests you to type the correct Informix Installation path.
11. In the Installation Path dialog box, type the Informix installation path and click <OK>.
If the path is correct, the installation continues to the EMS/TDM Setup Wizard stage;
skip to Continuing with RADview-EMS/TDM.
If the path is not correct, an error message appears informing you that the directory
does not exist. In such a case, click <OK> and re-enter the path.
Note If this is an upgrade of an existing installation, a confirmation message box appears and
requires your confirmation to overwrite the contents of the existing database directory.
Click <Overwrite> to overwrite and complete the installation. To cancel the installation
without overwriting, click <Quit>.
Continuing with RADview-EMS/TDM
Once the initial EMS components are installed, the RADview-EMS/TDM Setup Wizard is
automatically displayed.
³
To continue with the RADview-EMS/TDM installation:
1. In the Welcome dialog box, click <Next>.
The Select Installation Type dialog box is displayed.
2. Select Server and Client.
RADview-EMS/TDM (Unix) Ver. 1.7
Installation
7
Installation Guide
Note •
•
Server Only is an option for the distributed system installation. For more information,
consult with Technical Support.
Client Only is an option to be used only when setting up a PC-based client (not valid
for Unix installations). For more information, see Installing Additional PC Clients
(Optional) on page 11.
3. Click <Next>.
The Select Installation Method dialog box is displayed.
4. Choose the installation type:
Typical – for installation with the default settings.
Advanced – includes the International Settings and the Database Settings dialog
boxes.
Note If you choose Typical and this is the first time you are installing RADview-EMS, the
Database Settings dialog box will display. Otherwise, if you are performing an upgrade
and you choose Typical, the Database Settings dialog box will not display.
5. Click <Next>.
The General Information dialog box is displayed.
6. Select Master Server, and enter your Zone Name and Area Name (e.g., Zone =
England, Area = London). These names determine the hierarchy levels in future
topologies of multiple servers. Write down the names you selected and save them for
later use. Check that you are using the correct station host name, and that it is listed
as Station Name.
7. Click <Next>.
The International Settings Dialog Box dialog box is displayed.
8
Installation
RADview-EMS/TDM (Unix) Ver. 1.7
Installation Guide
8. Select the Language, Country, and Time Zone for your station.
The default values are taken from the operating system.
Note •
RADview applications use only English language text. It is recommended to use English
as the default language setting for RADview. You can select a different Language,
which allows you to input text in languages other than English. RADview has been
tested only with English as its default language and RAD cannot guarantee its proper
operation in other languages.
•
Select the Country according to the Language you selected.
•
Select the appropriate Time Zone so that the time that is displayed in Current Time
Test matches the correct time in your country and area.
9. Click <Next>.
The Select Target Database Server dialog box is displayed.
10. Select one of the following target database server:
Oracle Database Server
IBM Informix Server.
Note Make sure that the database service (Oracle or Informix) is running.
11. Click <Next>.
Connecting to Database screen is displayed.
After connection to the database is established, the Database Settings dialog box
is displayed.
RADview-EMS/TDM (Unix) Ver. 1.7
Installation
9
Installation Guide
12. In the Database Settings dialog box, change DbSpace Name to rootdbs, User to root
and Password to <root password>. For all the other parameters, leave the default
values.
Note •
If this is the first installation of the EMS package on your workstation and you want to
use the Informix user instead of the Root user, perform the following steps:
1. Open a Terminal window.
2. Log in as su (superuser).
3. Type passwd informix and set the password that you want to use as an
Informix user. Retype the password to confirm.
4. Use this user and password in the Database Settings dialog box.
•
If a previous EMS server version was installed on your system with User = Informix
and Password = Informix, you must use these settings again.
13. For first-time installation on the station (skip this step if not relevant):
Select New Database = Yes.
Verify that the values displayed are correct and click <Next>.
If a new Database is created, a warning message is displayed saying that the
existing Database Information will be lost.
14. Click <OK>.
The Install Summary dialog box is displayed.
15. Click <Next>.
The Installation Progression dialog box is displayed.
When it completes, the Installation Summary dialog box is displayed.
10
Installation
RADview-EMS/TDM (Unix) Ver. 1.7
Installation Guide
16. Click <Finish>.
17. Type:
init 6 to reboot the system.
The Installation Done Window appears.
RADview-EMS is fully installed and ready for use.
Installing Additional PC Clients (Optional)
In needed, additional PC-based clients can be installed on separate non-Unix stations.
Additional client stations enable scalability of distribution, as explained in Chapter 1.
³
To install the Client Station on the PC station:
1. Insert the RADview-EMS/TDM (PC) Installation CD into the CD-ROM drive.
The RADview-EMS/TDM Setup window is displayed.
2. Install the following components:
RADview Shell – only if this is a new installation
RADview-EMS/TDM (Client Only).
Installing RADview Shell on the PC Client
Note If this is an upgrade installation, do not install the RADview shell.
³
To install the RADview Shell:
1. On the RADview-EMS/TDM Setup Dialog Box, click RADview Shell.
The Welcome dialog box is displayed.
2. Click <Next>.
RADview-EMS/TDM (Unix) Ver. 1.7
Installation
11
Installation Guide
The Choose Destination Location dialog box is displayed.
3. Use the default folder or click <Browse> to select the folder where RADview Shell will
be installed. All further components of RADview-EMS installation will be installed in
this folder. Click <Next>.
The Select Program Folder dialog box is displayed.
4. Click <Next>.
The RADview Platform Selection dialog box is displayed.
5. Select Standalone Application, and click <Next>.
The Start Copying Files dialog box is displayed.
6. Click <Next>.
The Setup Complete dialog box is displayed.
7. Click <Finish>.
Installing RADview-EMS/TDM on the PC Client
Note If a RADview-EMS package is already installed on your workstation, delete the
'vpd.properties' file from the root directory before performing the RADview-EMS/TDM
installation.
³
To install the RADview-EMS/TDM on the PC client:
1. On the RADview-EMS/TDM Setup Dialog Box, click on RADview-EMS/TDM.
The Welcome dialog box is displayed.
2. Click <Next>.
The Select Installation Type dialog box is displayed.
12
Installation
RADview-EMS/TDM (Unix) Ver. 1.7
Installation Guide
3. Choose Client, click <Next> and an SNMPc warning dialog box opens.
4. Select whether to keep or overwrite the current MIBs and event policies, and click
<Next>.
The Select Products dialog box is displayed.
5. Select the product(s) you would like to install, and click <Next>.
The Select Installation Method dialog box is displayed.
6. Select the setup type:
Typical – for installation with the default settings
Advanced – includes the International Settings dialog box.
7. Click <Next>.
The General Information dialog box is displayed.
8. Enter the Zone Name and Area Name for the Client Station. Enter the Host Name of
the Client Station for Station Name. Enter the IP address of the Master Server Unix
Station for Master Server Address. Click <Next>.
Note For a single-station installation, any string of characters without a space can be used for
Zone/Area names.
The International Settings dialog box is displayed only if this is an Advanced
installation (see step 6). If this is a Typical installation, the Install Summary dialog
box is displayed. Continue with step 10.
9. Select the Language, Country, and Time Zone for your station, and click <Next>. The
default values are taken from the operating system.
RADview-EMS/TDM (Unix) Ver. 1.7
Installation
13
Installation Guide
Note •
RADview applications use only English language text. It is recommended to use English
as the default language setting for RADview. You can select a different Language,
which allows you to input text in languages other than English. RADview has been
tested only with English as its default language and we cannot guarantee its proper
operation in other languages.
•
Select the Country according to the Language you selected.
•
Select the appropriate Time Zone so that the time that is displayed in Current Time
Test matches the correct time in your country and area.
The Install Summary dialog box is displayed.
10. Click <Next>.
The Installation Progression dialog box is displayed.
When it completes, the Installation Summary dialog box is displayed.
11. Click <Finish>.
12. After the RADview-EMS/TDM installation has completed, the following message box is
displayed.
13. Click <No> since you are using the License Server that has already been installed with
the EMS Server.
14. Return to the RADview-EMS/TDM Setup dialog box, click <Exit>, and then click
<Restart> in the Setup Complete dialog box.
RADview-EMS/TDM is fully installed and ready for use on the PC client.
14
Installation
RADview-EMS/TDM (Unix) Ver. 1.7
Installation Guide
Installation Notes
Changing the RADview-HPOV Installation Directory
By default, the RADview-HPOV installation script tries to install into the /opt partition. If
your /opt partition lacks sufficient disk space, the installation script stops and indicates
the minimum disk space needed to install the selected components.
In such a case, you can either free the required disk space or create a symbolic link to
another location on the disk, which has sufficient disk space.
For example, if you would like to create a symbolic link between /opt and /export/home
use the following procedure:
1. Create a new directory named /export/home/MNG.
2. Type:
4.
ln -s /export/home/MNG /opt/MNG
Post-Installation Steps
Before opening RADview-EMS/TDM (Unix), you must create a user, and then set the user
environment to include the variables needed for RADview-EMS/TDM (Unix), HPOV, and
Informix. It is recommended that you select C as the user's SHELL. For more information
on user management, refer to Chapter 6.
Creating a User
³
To create a user:
1. Log in as root user.
2. Type:
smc
RADview-EMS/TDM (Unix) Ver. 1.7
Post-Installation Steps
15
Installation Guide
The Open Toolbox dialog box appears with the Solaris Management Console in
the background.
3. Select the Server Toolbox tab, and choose your server name from the Server
dropdown box.
4. From the Toolboxes list, select This Computer and click Open.
The Solaris Management Console for the selected computer is displayed.
5. From the Navigation pane, select System Configuration > Users.
The Log In menu is displayed.
6. Log in using Administrator credentials (root).
The Solaris Management Console for the selected computer is displayed.
7. From the Navigation pane, select System Configuration > Users > User Accounts.
8. From the Action menu, select Add User > With Wizard.
The Add New User wizard is initiated.
9. In the Add New User wizard, do the following:
16
a.
Enter the user information and click <Next>.
b.
Define the user identification number (it is recommended to use the default),
and click <Next>.
c.
Define and confirm the new user password, and click <Next>.
d.
Select the new user primary group (it is recommended to use the default), and
click <Next>.
e.
Create the new user home directory (e.g. /export/home) and click <Next>.
Post-Installation Steps
RADview-EMS/TDM (Unix) Ver. 1.7
Installation Guide
f.
In the mail server dialog box, click <Next>.
g.
Review the new user information and click Finish.
The Solaris Management Console for the selected computer is displayed.
10. Right-click the icon of the newly created user and select Properties.
11. From the General tab set the Login Shell to C Shell.
12. From the Console menu, select Exit to close the Solaris Management Console.
13. Reboot the management station to put the changes into effect.
14. Log in as the newly created user.
15. Select Common Desktop Environment (CDE) as the default desktop.
16. Edit the .cshrc file in the user home directory to add /usr/local/bin /usr/sbin
to the following command:
set path = ($path /usr/local/bin /usr/sbin) so that the command line
appears as:
set path = ($path /usr/local/bin /usr/sbin)
17. Save the .cshrc file.
Defining the User Environment
The RADview post installation user environment tool automates all post-installation
procedures and completes the installation of RADview UNIX-based products. The script is
written in csh. It can be used by both a new user and an existing user to test the user
environment.
RADview-EMS/TDM (Unix) Ver. 1.7
Post-Installation Steps
17
Installation Guide
³
To set the user environment for a new user:
1. After you create a new user and log in as the new user, type:
/opt/MNG/MNGVIEWHP/bin/user_env.csh
The script sets the user environment. The user files are edited automatically.
**********************************************************
*
RADview User Environment
*
*
This script should run only on a Unix server, that is *
*
a dedicated RADview-HPOV installation.
*
This script sets the User Environment variables for a *
*
newly created user and performs User Environment tests*
*
for an existing user.
*
*
Run this script as RADview user and not as root.
*
*
This script must run under csh environment only.
*
*
User Environment variables are written into the
*
*
logfile user_env.log in the users home directory.
*
*
**********************************************************
18
Post-Installation Steps
RADview-EMS/TDM (Unix) Ver. 1.7
Installation Guide
Setting User Environment for a new RADview user...
Setting user files:
/export/home/radview/.login
/export/home/radview/.dtprofile
User Environment files set successfully.
Editing user file /export/home/radview/.cshrc
Adding HPOV NNM /bin directory to the users path.
---------------------------------------------------User Environment parameters set successfully.
Logout and login again to activate the new User
Environment.
Run this script again after login to test the User
Environment settings.
---------------------------------------------------Figure 1. RADview User Environment Tool – New User
RADview-EMS/TDM (Unix) Ver. 1.7
Post-Installation Steps
19
Installation Guide
2. A message appears for you to log out and re-login (to activate the changes).
3. Run the script again to test the user environment.
5.
³
Frequently Asked Questions on Installation
Q
I forgot my RADview user's password. How can I recover it? Also, is there a default
user name and password that I can use?
A
The default user name and password for accessing RADview-EMS (via the
LaunchDesk) are "root" for the user name and "root" for the password. However,
if the default password of the root user has changed since the initial installation,
then it is necessary to reset the password for your specific user name.
To reset the password:
1. Stop the EMS server.
2. In the /opt/MNG/MNGVIEWHP/ems/conf/sec/ directory, backup the file svcsec.xml
(copy svcsec.xml to svcsec.old.xml).
3. Edit the file svcsec.xml as follows: find the <database> section in the syntax and
add/change the following line:
<admin><administrator>root</administrator></admin>.
4. Restart EMS server.
5. Log in to the server and add a new administrator user via the Security Admin console.
6. Stop the EMS server again.
20
Frequently Asked Questions on Installation
RADview-EMS/TDM (Unix) Ver. 1.7
Installation Guide
7. Access the svcsec.xml file again and remove the previously added line:
<admin><administrator>root</administrator></admin>.
The password is now reset.
³
Q
How can I change the Unix station's password without conflicting with the EMS
server password?
A
When the EMS server is installed and running, changing the Unix station's password
may conflict with the EMS server application.
To change the Unix station's password without conflicting with the EMS server
installation
1. Copy the ems.sql file to the Informix database directory.
2. Log in as a RADview user (not as super user).
3. Start the EMS Server.
4. Verify that Informix is online by typing /<informixdir>/bin/onstat where <informixdir>
is the Informix home directory.
The following message (or a similar one) is displayed.
Informix Dynamic Server Version 7.31.UD1 -- On-Line -- Up 4 days 22:45:47 -5. After verifying that Informix is online, type:
$INFORMIXDIR/bin/dbaccess -e - ems.sql
Make sure that no errors are reported.
The following syntax is displayed.
RADview-EMS/TDM (Unix) Ver. 1.7
Frequently Asked Questions on Installation
21
Installation Guide
*******************************************************
# $INFORMIXDIR/bin/dbaccess -e - ems.sql
-- This file should be executed using
-- $INFORMIXDIR/bin/dbaccess -e - ems.sql
DATABASE ems;
Database selected.
GRANT CONNECT TO PUBLIC;
Permission granted.
GRANT RESOURCE TO PUBLIC;
Permission granted.
GRANT ALL ON ems.fm_event_v TO PUBLIC AS ems
Permission granted.
Database closed.
**********************************************************
6. Open the EMS LaunchDesk and click the RADview-EMS system console button (green
button).
7. Select the Datasource repository service (under process1).
8. Change the username to mng164 and the password to mng164.
9. Click set for setting the entered username and password.
10. Close all GUI dialog boxes and consoles.
11. Stop the EMS server.
22
Frequently Asked Questions on Installation
RADview-EMS/TDM (Unix) Ver. 1.7
Installation Guide
12. Restart the EMS server.
From this point onwards, the server operates with the username mng164 and
the password mng164.
6.
Uninstalling the RADview Package
Uninstalling RADview
³
To uninstall the RADview-EMS system:
1. Log in as superuser:
2. Type:
su.
/opt/MNG/MNGVIEWHP/ems/uninstall/uninstall.
3. In the dialog box that is displayed, select the products that you want to uninstall.
4. Delete the 'EMS' directory.
5. In the root (' / ') directory, search for the 'vpd.properties' file and then delete this
file.
³
To uninstall the RADview shell:
1. Access the user’s home directory.
2. Type:
csh.
3. Type:
source /opt/OV/bin/ov.envvars.csh.
4. Type:
source /opt/MNG/MNGVIEWHP/bin/mng164_uninstall.csh.
5. Type:
cd /opt/
6. Type:
rm
-r MNG
RADview-EMS/TDM (Unix) Ver. 1.7
Uninstalling the RADview Package
23
Installation Guide
7. Type:
cd/etc/opt/OV/share/registration/C
8. Type:
rm mng164* <Enter>
9. Type:
init 6.
Uninstalling the Database
³
To uninstall the Informix database:
1. Log in as su
2. Type:
csh
3. Type:
setenv INFORMIXDIR <informix home directory>
4. Type:
<informix home directory>/i_uninstall
5. Type y in the three consecutive confirmation messages.
6. Using admintool, remove the Informix user and group.
7.
Remove Informix-marked lines from the /etc/system file.
These lines start with:
* informix additions – enabling semaphores
and end with:
* end informix additions
24
Uninstalling the RADview Package
RADview-EMS/TDM (Unix) Ver. 1.7
Innovative Access Solutions
International Headquarters
RAD Data Communications Ltd.
24 Raoul Wallenberg Street
Tel Aviv 69719, Israel
Tel: 972-3-6458181
Fax: 972-3-6498250, 6474436
Email: [email protected]
North America Headquarters
RAD Data Communications Inc.
900 Corporate Drive
Mahwah, NJ 07430, USA
Tel: (201) 5291100
Toll free: 1-800-4447234
Fax: (201) 5295777
Email: [email protected]
www.rad.com
Publication No. 357-281-02/08