1
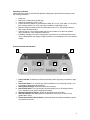
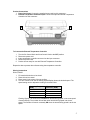
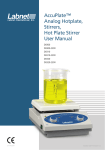
Instruction Manual Model AccuPlate™ Hotplate AccuPlate Stirrers AccuPlate Hotplate Stirrer 12/10 CLS-EQ-LHP01REV2 9296050000 About This Manual This manual is designed to assist you in optimal usage of your new hot plate, stirrer or hotplate stirrer. Product Voltages Hot plates, stirrers, and stirrer/hot plates are available in different voltages. Before initial use, check that the unit you received is the correct voltage for your location. Warranty Registration Filling out and mailing the attached Warranty Registration Card or submitting this information online at http://www.labnetlink.com will validate the hot plate, stirrer or hotplate stirrer’s warranty. Table of Contents Safety Information Operating Conditions Product Controls and Indicators Product Connections Stirring Instructions Heating Instructions (without the External Temperature Controller) Heating Instructions (with the External Temperature Controller) Heating Operation Principles Heating Operation Safety Product Repair Product Maintenance Technical Specifications Product Size and Dimensions Accessories Frequently Asked Questions CE, WEEE Warranty Statement 3 4 4 5 5 6 6 7 8 8 8 9 9 9 10 11 12 2 Safety Information This instruction manual contains important operating and maintenance instructions which must be read, understood, and followed by the product user. Failure to use this product according to this instruction manual may degrade or defeat the protection normally provided by this product. Read this instruction manual prior to product use and keep this instruction manual for future reference. Product Symbols Caution - Risk of danger: Cautions that there is material in the instruction manual which must be read, understood, and followed in order to preserve product safety features. Caution – Hot Surface: Cautions that the top plate is too hot to touch Indicates that the unit is plugged into power supply. Indicates that the accessory external temperature controller is properly plugged into the unit. Warnings Personal Injury Do not use this product in a manner other than as stated in the Operating Conditions section of this manual as the protection provided by the equipment may be impaired. This product is designed for use in laboratory environments by persons knowledgeable in safe laboratory practices. Always wear safety glasses and other appropriate protective equipment when operating this product. Electric Shock This product must be connected to a grounded power outlet for safe functioning. Use only the power cord supplied with the product. The power cord is the device available for full disconnect from mains input. Position the product for use so that the power cord can be easily disconnected without having to move the product. Disconnect the power cord before moving or cleaning the unit. Product Damage Keep the product dry and clean. Do not immerse the product for cleaning. Do not heat or stir volatile or flammable materials. The ceramic top may break if impacted. The maximum gross weight placed on the top surface must not exceed 11Kg (25 lbs.) These units are not explosion or spark proof. Do not operate this product near volatile or flammable materials. Do not use this product with a metal vessel. 3 Operating Conditions Labnet hot plates, stirrers, and stirrer/hot plates are designed to provide safe functioning under the following conditions: Indoor use Altitude up to 2000 meters (6,500 feet) Ambient temperatures of 0°C to 30°C Product should be placed on a flat surface at least 30.5 cm (12") from walls, 122 cm (48") from ceilings, and 30.5 cm (12") from other hot plates if using multiple units. Maximum relative humidity of 80% for temperatures up to 31°C, decreasing linearly to 50% relative humidity at 40°C. Pollution Degree 2: Any foreign matter that may accumulate on or within the product during normal use is not electrically conductive. Installation Category II: Product is designed for connection to an electrical branch circuit inside a building with main supply voltage fluctuations not exceeding ±10% of the nominal voltage. Product Controls and Indicators 1 7 3 2 6 5 4 1. Power Indicator: Illuminates at all times when the product is properly connected to input power. 2. Stir Control Knob: Turn it all the way counterclockwise to turn off stirring function. Turn it clockwise to set desired stirring speed. 3. Stirring Speed Display: Shows the speed set for stirring 4. Heat Control Knob: Turn it all the way counterclockwise to turn off heating function. Turn it clockwise to set desired heating temperature. 5. Heating Temperature Display: Shows the temperature set for heating. 6. Hot Top Indicator: Illuminates when the temperature of the top is too hot to touch (greater than ~60°C). 7. Temperature Probe In Use Indicator: Illuminates when the external temperature probe is connected to the unit. 4 Product Connections 1. Power Cord Input: Connect the supplied power cord into this connector. 2. External Temperature Controller Input: Connect the optional External Temperature Controller into this connector. 2 1 To Connect the External Temperature Controller 1. 2. 3. 4. 5. Turn the Stir Control Knob and Heat Control Knob to the OFF position. Disconnect power cord. Insert temperature controller connector into the input connector. Reconnect power cord. Product is now ready for use with External Temperature Controller. Repeat the above process when disconnecting the temperature controller. Stirring Instructions D0410, D0420 1. 2. 3. 4. Fill vessel with solution to be stirred. Place stir bar into vessel. Place vessel in the center of the top surface. Turn Stir Control Knob until the Stirring Speed Display shows the desired speed. The speed setting can be adjusted according to the table below. Operating Range (RPM) 60-100 100-200 200-400 400-1150 Adjustable Increment, (RPM) 5 10 20 50 Flashing Display: The number will FLASH when actual stirring speed is not at set speed. Constant Display: The number will not flash when actual stirring speed is at the set speed. The number will remain constantly ON when the actual stirring speed is at the set speed. 5 5. When desired stirring is complete, turn the Stir Control Knob to the OFF position. Allow stir bar to cease rotation before removing the vessel from the unit. 6. Heating and stirring can be performed simultaneously on the D0420 models which offer both heating and stirring functions. Please note that the viscosity of the stirred material will affect the ability of the stir bar to remain coupled to the rotating ring magnet. Materials of high viscosity must be stirred at slower speed settings. Heating Instructions (without External Temperature Controller) D0400, D0420 1. 2. 3. 4. Fill vessel with solution to be heated. If using a D0420 and the stirring function, place stir bar into vessel. Place vessel in the center of the top surface. Turn Heat Control Knob until the Heating Temperature Display shows the desired heating temperature. The temperature setting can be adjusted in 5°C increments. Flashing Display: The number shown on the Heating Temperature Display will FLASH when the actual heating temperature is not at the set temperature. Constant Display: The number shown on the Heating Temperature Display will remain constantly ON when the actual heating temperature is at the set temperature. Hot Top Indicator: The Hot Top Indicator will be ON at all times when the temperature of the top surface is too hot to touch (greater than ~60°C). The Hot Top Indicator will FLASH when the Heat Control Knob is turned OFF but the top surface is still too hot to touch. The Hot Top Indicator will be OFF when the temperature of the top is less than ~60°C. Caution: The Hot Top Indicator will turn OFF when the power cord is disconnected from the product even if the temperature of the top surface Heating Instructions (with External Temperature Controller) D0400, D0420 1. Connect the External Temperature Controller to the connector on the back of the unit. Temperature Probe in Use Indicator: This will illuminate when External Temperature Controller is properly connected. 2. Fill vessel with solution to be heated. 3. If using a D0400 and the stirring function, place stir bar into vessel. 4. Place vessel in the center of the top surface. 5. Insert the tip of the External Temperature Probe into the solution. - The tip should be located in the center of the vessel and at approximately one-half of the depth of the solution. 6. Secure the position of the External Temperature Controller by using a ring stand/support rod and clamp. - Assure that the cable of the External Temperature Controller does not come into contact with the heating surface. 7. Turn Heat Control Knob until the Heating Temperature Display shows the desired heating temperature. The temperature setting can be adjusted in 5°C increments. Flashing Display: The number shown on the Heating Temperature Display will FLASH when the actual heating temperature is not at the set temperature. 6 Constant Display: The number shown on the Heating Temperature Display will remain constantly ON when the actual heating temperature is at the set temperature. Hot Top Indicator: The Hot Top Indicator will be ON at all times when the temperature of the top surface is too hot to touch (greater than ~60°C). The Hot Top Indicator will FLASH when the Heat Control Knob is turned OFF but the top surface is still too hot to touch. The Hot Top Indicator will be OFF when the temperature of the top is less than ~60°C. Heating Operation Principles The heating element and a temperature sensor are located just beneath the ceramic top surface of the product. The microprocessor controlled heat, generated by the heating element, is based upon the sensor temperature and the value set on the Heating Temperature Display. When the sensor temperature is not within range of the value set on the display, the display will FLASH. When the sensor temperature is within range, the value displayed will remain constantly ON. The Heating Temperature Display does not indicate the actual temperature of materials placed on top of the product or the actual temperature of the ceramic top surface. The table below shows a typical difference between the temperature set on the Heating Temperature Display and the actual temperature measurement of the ceramic top surface: Temperature Set on Display (°C) 50 100 150 200 250 300 Actual Top Surface Temperature (°C) 45 85 125 165 205 245 Temperature Set on Display (°C) 350 400 450 500 550 Actual Top Surface Temperature (°C) 285 325 365 405 440 (The information above was taken using a D0420 with no top load in 20°C ambient conditions) Using the External Temperature Controller enables precision temperature control of materials placed in vessels on top of the product. An External Temperature Controller is available for this product as an accessory item. Contact your Labnet distributor for additional details. When the External Temperature Controller is connected to the product, the closed loop control process described previously is extended to include temperature input from the External Temperature Controller. The microprocessor controlled heat, generated by the heating element, is based upon the sensor temperature located in the tip of the External Temperature Controller and the value set on the Heating Temperature Display. When the sensor temperature is not within range of the value set on the display, the display will FLASH. When the sensor temperature is within range, the value displayed will remain constantly ON. When the External Temperature Controller is connected to the product and properly placed into a liquid on the top surface, then the Heating Temperature Display does indicate and directly control the actual temperature of the liquid on the top surface. Caution: The top surface and the vessel used may be at substantially higher temperatures than indicated by the setting on the Heating Temperature Display as the controller regulates the liquid temperature inside the vessel. 7 Heating Operation Safety The microprocessor controlled system has error routines built in to detect product operation in some unfavorable conditions. The type of error routines which may be active in a product varies depending upon the functionality of the model and the operating software version. If an error routine is engaged, the product will typically shut down. Some error routines will display an error code number in the left digital location of the Heating Temperature Display when the product is shut down. For more information on error codes, contact Labnet at 732-417-0700. A product shut down by an error routine must be disconnected and reconnected to mains input before it can be used again. Please contact your Labnet Distributor if a product does not reset from the error routine shut down or if it continues to shut down after resetting. Caution: Error routines built into these products do not substitute the need to use these products per the specified operating conditions and according to safe laboratory practices. There are potential failure modes in product functionality or in process of use that could result in uncontrolled or unexpected heating of the top surface. Reaction plans should be developed and safety precautions put in place based on the worse case scenario that any materials placed on the top surface could be subjected to a continuous supply of heat, raising the material temperature to levels in excess of 550°C. Product Repair There are no direct user serviceable components inside this series of products. Please contact you Labnet Distributor for repair or maintenance issues. Product Maintenance Power Caution: Disconnect power to the product by unplugging the power cord before performing any maintenance or inspection procedures. Inspect the power cord regularly and replace if damaged. Use only replacement power cords available from Labnet or authorized Labnet product distributors. Ceramic Top Plate These products are supplied with Pyroceram® top that is easy to clean and highly resistant to scratches, corrosion, and chemical attack. The ceramic top may break during use if not properly maintained. Keep the ceramic top clean. A nonabrasive cleaner may be used to clean the ceramic top. Inspect the ceramic top for damage during cleaning. Discontinue product use if the ceramic top is chipped, etched, or shows excessive scratching. A replacement top can be ordered. See page 12 for details. Contact your Labnet Distributor or Labnet Customer Service for top replacement. General It is important to keep this product dry and clean. Remove minor exterior liquid spills promptly. Clean exterior surfaces with a nonabrasive cleaner. Do not reconnect product to power input until all cleaned surfaces have dried. If liquid or wet solid material gets inside the product, immediately disconnect power to the product and discontinue use. Contact Labnet for additional instructions regarding interior spills. 8 Technical Specifications Name Model Power (Volts/Hz/Watts/Amp 120V Models 100V Models 230V Models Temp Range* 5°-550°C (41°-1022°F) Stir Range (RPM) AccuPlate D0400 120V/60Hz/ 100V/60Hz/ 230V/50Hz/ Hotplate 628W/5.3A 548W/5.5A 628W/2.7A Accuplate D0410 120V/60Hz/ 100V/60Hz/ 230V/50Hz/ 60-1150 Stirrer 73W/0.7A 78W/0.8A 73W/0.3A Accuplate D0420 120V/60Hz/ 100V/60Hz/ 230V50Hz/ 5°-550°C 60-1150 Hotplate 698W/5.9A 623W/6.3A 698W/3.0A (41°-1022°F) Stirrer * The Temperature Range using the External Temperature Controller is 5°-200°C (41°-392°F). Product Size and Dimensions Name AccuPlate Hotplate Models D0400/D0400-230V Top Plate Size Inches 5" x 7" (Centimeters) (12.7 x 17.8 cm) Product Dimensions 4.25 x 7.75 x 11" Inches (Centimeters) (10.8 x 19.7 x 28 cm) AccuPlate Stirrer D0410/D0410-230V 5" x 7" (12.7 x 17.8 cm) 4.25 x 7.75 x 11" (10.8 x 19.7 x 28 cm) Weight 2.7kg (6.0lbs.) 3.2kg (7.0lbs.) 3.2kg (7.0lbs.) AccuPlate Hotplate Stirrer D0420/D0420-230V 5" x 7" (12.7 x 17.8 cm) 4.25 x 7.75 x 11" (10.8 x 19.7 x 28 cm) Accessories D0461 D0462 D0463 D0464 D0465 D0466 Kit includes D0462, D0466 and Stir Bar retriever External Temperature Probe (for D0400 and D0420) Teflon® coated magnetic stir bar (1 x 2.5cm) Boss Head clamp – for holding D0465 at a 90° angle from D0466 Temperature probe (D0462) holding rod Vertical Support Rod (two 22.8cm rods which can be connected) 9 Frequently Asked Questions I have a beaker of water on my hot plate and set the temperature for 550°C. Why does the display setting blink and not remain constant? The display will blink at any time when the temperature sensor is not within range of the set temperature value. The temperature measured by the sensor is a composite of the temperature of the heating element located beneath the sensor, the ceramic top above the sensor, and the very small air space around the sensor. Water requires a substantial amount of heat in order to boil yet remains at a constant temperature of 100°C for the duration of the boiling process. Although the heating element is producing maximum heat at the 550°C setting, the water consumes this heat so quickly during the boiling process that the heat is unable to raise the temperature measured by the sensor to within range of the 550°C set value. How long does it take to bring a beaker of water to boil? Using a 600 mL PYREX® beaker with 400 mL of water at 25°C, it takes approximately 15 minutes to bring the water to a full, rolling boil. Can I use a metal tray on top of my Labnet hot plate? No. The metal will act as a heat sink, and have a high probability of creating an abnormal heating condition. If an abnormal condition is detected, the product will shut down. A metal vessel will also scratch the ceramic top plate. The stir bar keeps decoupling. Why and what can I do to stop this? These units are programmed to minimize decoupling. However, liquid viscosity, stir bar magnetic strength, vessel used, and speed changes can cause decoupling. High viscosity liquids must be stirred at slower speed settings. The magnetic strength of stir bars can weaken over time and may need to be replaced. Vessels used need to have thin, flat bottoms to insure optimal performance. Rapid decreases in stir speed can cause decoupling as the magnet slows down quicker than the stir bar and the liquid. What size vessel should I use? Vessels used on the top of a hot plate must not be larger than the top plate. 10 CE Declaration of Conformity Labnet International Inc. hereby declares under its sole responsibility that the following products: D0400, D0400-230V, D0410, D0410-230V, D0420 and D0420-230V Conform to the following EU Directives: 73/23/EEC: Low Voltage Directive as amended by 93/68/EEC 89/336/EEC: Electromagnetic Compatibility Directive as amended by 92/31/EEC and 93/68/EEC Presumption of compliance to these directives is supported through successful evaluation to the requirements of the following standards IEC 61010-1: 2001 (Second Edition) IEC 61010-2-010: 2003 (Second Edition) IEC 61010-2-051: 2003 (Second Edition) EN61326-1 EN61000-3-2, -3-3, -4-2, -4-3, -4-5, -4-6, -4-8, -4-11 Product Disposal The “crossed-out wheelie bin” symbol, if present on the product, indicates that the product was planned for use in a country complying with the Waste Electrical and Electronic Equipment EU Directive, 2002/96/EC. This symbol indicates that this equipment must not be disposed of with unsorted municipal waste. It is the product user’s responsibility to correctly dispose of waste equipment by handing it over to an authorized facility for separate collection and recycling. It is the product user’s responsibility to decontaminate waste equipment from biological, chemical, and/or radiological hazards prior to disposal. Additional information pertaining to the disposal of Labnet stirrer/hot plates per the WEEE Directive can be obtained at www.corning.com/weee . 11 Warranty Statement Labnet International, Inc. warrants that this product will be free from defects in material and workmanship for a period of two (2) years from date of purchase. If a defect is present, Labnet International will, at its option, repair, replace, or refund the purchase price of this product at no charge to you, provided it is returned during the warranty period. This warranty does not apply if the product has been damaged by accident, abuse, misuse, or misapplication, or from ordinary wear and tear. For your protection, items being returned must be insured against possible damage or loss. This warranty shall be limited to the replacement of defective products. IT IS EXPRESSLY AGREED THAT THIS WARRANTY WILL BE IN LIEU OF ALL WARRANTIES OF FITNESS AND IN LIEU OF THE WARRANTY OF MERCHANTABILITY. For research use only. Not intended for any animal or human therapeutic or diagnostic use. Labnet recommends that you record the details of your purchase in the spaces below for your future reference. Printed in U.S.A 12/10 CLS-EQ-LHP01REV2 9296050000 Model Number Serial Number Date Purchased/ Received for use Purchase Reference Number Purchased From © 2010 Labnet International Incorporated AccuPlate is a trademark of Labnet International Incorporated. Corning,PYREX and Pyroceram are registered trademarks of Corning Incorporated,Corning,NY. All other trademarks included in this document are the properties of their respective owners. P.O. Box 841 • Woodbridge, NJ 07095 • USA • website: http://www.labnetlink.com US • toll free: 888-LABNET1 • fax: 732 417-1750 • email: [email protected] International • phone: +1-732-417-0700 • fax: +1-732-417-1750 • email: [email protected] 12


![View User`s Manual [US] - Acoustic Amplification](http://vs1.manualzilla.com/store/data/005929580_1-14523f44a960f194cc16791ff2ace09d-150x150.png)