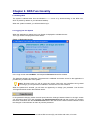
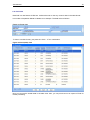
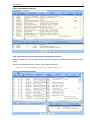
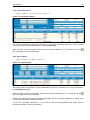
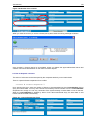
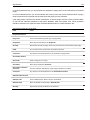
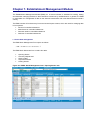
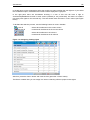
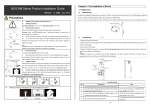
1
National Drug Control System
(NDS) 6.0
User Manual
Table of Contents
FOREWORD .....................................................................................................................................................7
CHAPTER 1. SYSTEM LOGIC AND BASIC PRINCIPLES ..........................................................................................9
1.1. Transactions on international level................................................................................................9
1.2. Transactions on national (domestic) level ..................................................................................10
1.3. Masters (Service Modules) ............................................................................................................10
1.4. Reports ............................................................................................................................................10
1.5. Parameters & Security ...................................................................................................................11
1.6. NDS Manual text markup and notations ......................................................................................11
CHAPTER 2. NDS FUNCTIONALITY .................................................................................................................13
2.1. Starting NDS ...................................................................................................................................13
2.2. Logging into the System ...............................................................................................................13
2.3. Setting Application Language.......................................................................................................15
2.4. Menus and Toolbars ......................................................................................................................15
2.4.1. Main Menu ................................................................................................................................................15
2.4.2. Accessing the Menu ..................................................................................................................................16
2.4.3. Special Keys & Shortcut Keys...................................................................................................................16
2.4.4. Common Toolbar Buttons .........................................................................................................................17
2.5. Navigation .......................................................................................................................................18
2.6. Types of Fields ...............................................................................................................................18
2.6.1. Editable Text/Number field ........................................................................................................................18
2.6.2. Comment field ...........................................................................................................................................19
2.6.3. Date Field..................................................................................................................................................19
2.6.4. Checkbox ..................................................................................................................................................19
2.6.5. Drop-down boxes ......................................................................................................................................19
2.7. Data Entry Screens ........................................................................................................................21
2.7.1. Single Record Entry Screen ......................................................................................................................21
2.7.2. Multiple Record Entry Screen....................................................................................................................21
2.7.3. Header/Detail Screen ................................................................................................................................22
2.7.4. Report screens ..........................................................................................................................................23
2.8. Operations with Records...............................................................................................................24
2.8.1. Adding New Record ..................................................................................................................................24
2.8.2. Deleting An Existing Record......................................................................................................................24
2.8.3. Modifying An Existing Record ...................................................................................................................24
2.9. Queries ............................................................................................................................................25
2.10. Data Sorting ..................................................................................................................................25
2.11. Excel Output .................................................................................................................................26
2.11.1. Pivot Table Usage in NDS.......................................................................................................................28
2.11.2. Excel Pivots.............................................................................................................................................30
2.11.3. Exporting data using NDS Excel Pivot ....................................................................................................30
2.12. Grid view .......................................................................................................................................33
2.13. Audit Trail......................................................................................................................................35
2.14. Error log ........................................................................................................................................35
2.15. Substance/Preparation Calculator .............................................................................................37
2.16. MyNDS ...........................................................................................................................................37
2.17. Exiting NDS...................................................................................................................................37
CHAPTER 3. MASTERS...................................................................................................................................39
3.1. Substances .....................................................................................................................................39
3.1.1. How to enter a new substance and define/alter its attributes ....................................................................39
3.1.2. How to indicate the name of a substance..................................................................................................40
3.1.3. How to indicate the type of a substance....................................................................................................41
3.1.4. How to indicate the special conditions of transactions with a substance...................................................41
3.1.5. How to define a pure substance (Pure Substance Master) .......................................................................42
3.1.6. How to specify a Variation (Variation Master) ...........................................................................................43
User Manual
3.1.7. How to import pure substance list (Import Pure Substance List)...............................................................43
3.1.8. How to define units of measurement (Unit of Measurement Master) ........................................................44
3.1.9. How to indicate the conditions of import or export of a substance (General Conditions Master)...............45
3.1.10. How to indicate types of transactions with controlled substances (Transaction Type Master) ................46
3.2. Preparations ...................................................................................................................................47
3.2.1. How to create a Preparation......................................................................................................................47
3.2.2. How to specify the Type of Preparation (Preparation Type Master) ..........................................................49
3.2.3. How to indicate the name of the preparation.............................................................................................50
3.2.4. How to indicate the substances the preparation contains .........................................................................50
3.2.5. How to indicate the size of a package .......................................................................................................51
3.2.6. How to indicate relevant comments ..........................................................................................................52
3.2.7. How to export the data on Preparations ....................................................................................................53
3.2.8. How to import the data on Preparations ....................................................................................................53
3.3. Competent Authorities...................................................................................................................54
3.3.1. Competent Authority Master......................................................................................................................54
3.3.2. CA Communication Master .......................................................................................................................57
3.3.3. C.A. Function Master.................................................................................................................................58
3.3.4. CA Department Master..............................................................................................................................59
3.4. Permitted/Restricted Substances.................................................................................................60
3.4.1. How to indicate the Estimated/Assessed quantities of Controlled Substances .........................................61
3.4.2. How to import the Estimated/Assessed quantities ....................................................................................62
3.5. Groups.............................................................................................................................................64
3.5.1. How to create a Group of Substances.......................................................................................................64
3.6. Establishments...............................................................................................................................67
3.6.1. How to create an Establishment................................................................................................................67
3.6.2. How to copy the Establishment Details .....................................................................................................69
3.6.3. How to indicate the sites and headquarters ..............................................................................................70
3.6.4. Establishment Type Master.......................................................................................................................71
3.6.5. How to export data on establishments (Establishment Export) .................................................................71
3.6.6. How to import data on establishments (Establishment Import) .................................................................72
3.7. Demographics ................................................................................................................................73
3.7.1. Country Master..........................................................................................................................................73
3.7.2. City Master ................................................................................................................................................76
3.7.3. Area Master...............................................................................................................................................77
3.7.4. Region Master and Region-Country Relation Master ................................................................................78
3.7.5. Indication of official signatories for the Country (Signature Master) ..........................................................80
3.7.6. Indication of Customs Points of the Country (Customs Point Master) .......................................................81
CHAPTER 4. IMPORT AND EXPORT TRANSACTIONS .........................................................................................83
4.1. Import Transaction Documents ....................................................................................................83
4.1.1. Import Authorization Request....................................................................................................................83
4.1.2. Import Authorization ..................................................................................................................................85
4.1.3. Import Certificate Request.........................................................................................................................87
4.1.4. Import Certificate .......................................................................................................................................88
4.2. Export Transaction Documents ....................................................................................................89
4.2.1. Export Authorization Request....................................................................................................................89
4.2.2. Export Authorization ..................................................................................................................................90
4.3. Endorsements ................................................................................................................................91
4.4. Additional information on import/export transaction.................................................................93
4.5. Import/Export Reports ...................................................................................................................94
4.5.1. Import/Export Report .................................................................................................................................94
4.5.2. Import report..............................................................................................................................................95
4.5.3. Endorsement Report - Imports ..................................................................................................................95
4.5.4. Certificates Report ....................................................................................................................................96
4.5.5. Export Report ............................................................................................................................................96
4.5.6. Endorsement Report – Exports .................................................................................................................97
4.6. XML Export......................................................................................................................................97
CHAPTER 5. LICENSES ..................................................................................................................................99
5.1. How to create a License Request .................................................................................................99
5.1.1. Defining substances to be licensed .........................................................................................................100
User Manual
5.1.2. Setting a type of License .........................................................................................................................101
5.1.3. Linking substances to correspondent types of activity ............................................................................101
5.1.4. Attaching clearance information ..............................................................................................................102
5.2. How to Approve a License Request ...........................................................................................102
5.3. How to revoke the License ..........................................................................................................103
5.4. How to Suspend a License..........................................................................................................104
5.5. How to Re-activate a Suspended License .................................................................................105
5.6. How to Renew a License .............................................................................................................105
5.6.1. Extension of Valid License. .....................................................................................................................106
5.6.2. Renewal of Expired License....................................................................................................................106
5.7. How to amend a License .............................................................................................................107
5.8. License Reports ...........................................................................................................................107
5.9. Licence Type Master ....................................................................................................................108
CHAPTER 6. INCB REPORTING FORMS ........................................................................................................109
6.1. Narcotics .......................................................................................................................................109
6.1.1. Quarterly statistical report – Form A........................................................................................................109
6.1.2. Form B. Annual Estimates.......................................................................................................................113
6.1.3. Form C. Annual Statistics........................................................................................................................119
6.2. Psychotropics...............................................................................................................................124
6.2.1. Quarterly report. Psychotropic Form A/P.................................................................................................124
6.2.2. Form B/P .................................................................................................................................................127
6.2.3. Psychotropic Form P ...............................................................................................................................128
6.3. Form D. Precursors. Annual Statistics ......................................................................................132
6.3.1. How to indicate seizures of quantities included in Tables I or II ..............................................................132
6.3.2. How to indicate seizures of substances not included in tables I or II identified as having been used in illicit
manufacture ......................................................................................................................................................134
6.3.3. How to indicate the information on methods of diversion and illicit manufacture.....................................135
6.3.4. How to indicate data on stopped shipments............................................................................................137
6.3.5. How to indicate the information on licit trade in and use of precursors. ..................................................138
CHAPTER 7. ESTABLISHMENT MANAGEMENT MODULE ..................................................................................141
7.1. Stock data management ..............................................................................................................141
7.1.1. Opening Stocks and Stock Adjustment ...................................................................................................142
7.1.2. How to indicate the inspections and their results ....................................................................................142
7.1.3. How to indicate the information concerning the Government’s Special Stocks .......................................143
7.1.4. How to indicate the closing stocks ..........................................................................................................144
7.1.5. How to view a Stock Ledger....................................................................................................................145
7.1.6. How to view a Stock Ledger – Actual Trade............................................................................................146
7.2. How to indicate the manufacture-related data ..........................................................................147
7.2.1. How to indicate data on losses occurred during manufacture .................................................................147
7.2.2. How to record the manufacturing of narcotic drugs and psychotropic substances..................................148
7.2.3. How to record manufacturing of Schedule III preparations, exempted preparations and non-psychotropic
substances ........................................................................................................................................................148
7.3. Domestic transactions.................................................................................................................150
7.3.1. How to account for domestic trade in controlled substances...................................................................150
7.3.2. How to Compare Domestic Sales and Domestic Purchases...................................................................151
7.3.3. How to record transactions between wholesalers/manufacturers ...........................................................152
7.3.4. How to detect discrepancies in domestic trade data ...............................................................................153
7.4. How to indicate the data on disposal of controlled substances .............................................153
CHAPTER 8. SYSTEM SECURITY AND PARAMETERS ......................................................................................155
8.1. Security .........................................................................................................................................155
8.1.1. How to define a role ................................................................................................................................155
8.1.2. How to define a user ...............................................................................................................................158
8.1.3. How to grant/revoke a role to/from user(s) ..............................................................................................159
8.1.4. Event Log ................................................................................................................................................160
8.2. Parameters ....................................................................................................................................160
8.2.1. Form Fields Master .................................................................................................................................160
8.2.2. Error Master ............................................................................................................................................162
8.2.3. Language Master ....................................................................................................................................163
User Manual
8.2.4. Custom Numbering .................................................................................................................................164
8.2.5. Changing user defined codes of substances (Substance Change).........................................................165
8.2.6. Pre-defined Substances ..........................................................................................................................165
8.2.7. Backup/Restore functionality...................................................................................................................166
Foreword
During the last two centuries narcotics and other psychoactive drugs, once a relief, turned into a
disastrous threat to wealth and health of nations. With the development and strengthening of illicit trade in
such substances, this threat was getting more and more serious. Unfortunately, it still is…
Over the 20-th century, a worldwide system for control of drugs of abuse has developed gradually through
the adoption of a series of international treaties. The important multilateral conventions currently in force
are the Single Convention on Narcotic Drugs of 1961 as amended by the 1972 Protocol; the Convention
on Psychotropic Substances of 1971 and, adopted in 1988, the United Nations Convention against Illicit
Traffic in Narcotic Drugs and Psychotropic Substances. Each successive treaty brought complementary
regulations and advances in international law. From the beginning, the basic aim of the international drug
control treaties has been to limit the use of drugs to medical and scientific purposes only.
Nowadays production, manufacture of and trade in psychoactive drugs and the chemicals needed for
their illicit manufacture are controlled nationally and internationally. The purpose of control is twofold:
• To prevent diversion of substances into illicit channels; and
• To ensure that countries obtain the quantities they need for medical, scientific and other licit
purposes.
Monitoring and managing movements of controlled substances is a complex process involving numerous
partners. Typically, information needs to be exchanged between commercial companies, national drug
control administrations, customs officials and the International Narcotics Control Board (INCB). Member
states are also obliged to report an annual review of legislative and administrative measures, trends in
indicators of drug demand and supply, and information on the implementation of the drug control treaties.
A computer-based system (NDS) is intended for facilitation of daily management of licit movements and
drug controls measures. Being an electronic repository of data on national drug control measures, drug
abuse and trafficking, it enhances timeliness of information exchange at the national and international
levels.
The system enables national administrations to keep track of all individual transactions and data from
issuance of domestic licenses, import-export authorizations, certificates and pre-notifications for
international licit trade to domestic distribution. It facilitates national monitoring and management of
companies in relation to production, manufacture, consumption, stocks, confiscation or seizures
information. It offers electronic data interchange (EDI) within and among countries as well as to and from
INCB/UNODC. Hard copies of INCB Forms can be printed in multiple languages. While the system is
available from UNODC web site in English, French, Spanish and Russian, it has been designed to allow
individual countries adapt it to their own languages.
The main goal of this manual is to give the user an idea what NDS is and how it can make the control of
narcotic drugs, psychotropic substances and precursors as well as related reporting easier and more
efficient.
Chapter 1. System logic and basic principles
When starting using NDS, a user should clearly realize the following:
• NDS is an instrument of control and reporting, developed in full accordance with international
conventions on control of narcotics, psychotropic substances and precursors.
• The control is carried out on two levels: national and international. Special modules of NDS
correspond to each level.
There are also a number of master-forms used for organizing data in a more convenient and effective
manner. The co-relation of all system elements is shown at the end of this Chapter.
1.1. Transactions on international level
On the international level the data on transactions with controlled substances are processed in the
Export-Import module of NDS. To understand the implications of working with this module, the user
should remember the scheme of licit trade in narcotic drugs, psychotropic substances and precursors.
Figure 1. Licit trade of controlled substances
Step
1.
Importing country
Importing establishment requests an import
authorization from its competent authority
Exporting country
Exporting establishment requests an
authorization from its competent authority
export
The competent authority checks whether the
requested quantity exceeds the quota of this
substance in estimates/assessments for this year.
2.
3.
Also the competent authority verifies if the importing establishment has proper license(s) for
transactions with the indicated substances and
the requested quantity does not exceed the
remainder of limit set in annual estimates/assessments.
If the request is authorized, the competent
authority of the importing country sends the
import authorization to the competent authority of
the exporting country
The competent authority of the exporting country
checks whether the exporting establishment has
proper licenses for dealing with the requested
substances and (if yes) approves the export
authorization request
4.
5.
A contract between the exporting establishment and importing establishment is concluded
6.
Exporting establishment transfers the export
authorization along with the import authorization to the
customs body of the exporting country
7.
The customs body of the exporting country makes the
appropriate endorsements on the export and import
authorizations, stating the actual quantity of exported
substances, crossing the border, and then sends them
to the customs body of the importing country
8.
When the controlled substance(s) actually cross
the border of the importing country, the customs
body makes its endorsement on the export
authorization, stating the actual quantity of the
imported substance(s). The endorsed export
authorization then shall be returned to the
competent authority of the exporting country.
User Manual
10
This is the process that the Conventions of 1961, 1971 and 1988 require the governments to implement.
The National Drug Control System provides the automation of all the processes listed above. In addition,
it gives the customs bodies and competent authorities of both exporting and importing countries almost
instant access to the data on the substances being imported/exported.
With NDS, it is very easy to trace the quantities that are already imported and the quantities that are
authorized for import/export but are not actually imported/exported yet. Getting all necessary data takes
no longer than a mouse click.
1.2. Transactions on national (domestic) level
Another module of NDS – the EMM (Establishment Management Module) – is ‘responsible’ for
management of data on controlled substances at the national level, i.e. accounting for manufacture and
distribution of controlled substances.
This module enables users to enter, view and manage the data in the context of establishments, i.e.
entities or individuals, licensed or otherwise legally empowered to deal with controlled substances.
The establishments are acting on the basis of licenses, issued by competent authorities. To make the
license management easier and more precise, special License menu section is provided in NDS 6.0.
The minute details of working with these two modules will be described later in the respective sections of
this manual.
1.3. Masters (Service Modules)
These modules are intended to facilitate a more convenient and effective organization of basic data.
So, if a user needs to enter a new substance, preparation, establishment, or any other records in a new
language, then he/she will use the ‘Masters’ module.
1.4. Reports
The NDS makes the preparation of all 7 main reports presented to INCB easier and more accurate. Also,
the users who have proper access rights, may view the data not only in aggregated form (as it appears in
the paper reports), but also as a breakdown of separate transactions by establishments.
There are three report modules in NDS, dealing with Narcotics, Psychotropics and Precursors
respectively.
Report
Name
Narcotic drugs
Form A
Form B
Form C
Quarterly Statistics
Annual Estimates
Annual Statistics
Psychotropic substances
Form A/P
Form B/P
Form P
Quarterly Statistics
Annual Assessments
Annual Statistics
Precursors
Form D
Annual Statistics
User Manual
11
1.5. Parameters & Security
This component is used for tuning the whole system and thus is not accessible for each and every user.
The access rights to this module are usually granted for system administrators; that is why in this manual
we will not describe this module in detail.
1.6. NDS Manual text markup and notations
In order to make the text of this manual more informative, but at the same time more easily
understandable, the special markup is used to represent various elements of NDS.
Example
Description
SubstanceName
field
‘Substance Details’
tab
Import/Export
Form A
System module
<Save Password>
screen button or keyboard key
Licenses
menu item
Also, the following notations are used to describe operations with menus:
Notation
What to do
: MenuItem
choose the menu item
Æ
next action
Û
single click with left mouse button
ÛÛ
double-click with left mouse button
Ü
single click with right mouse button
Chapter 2. NDS Functionality
2.1. Starting NDS
The system is started either from the Windows Start menu or by double-clicking on the ‘NDS’ icon,
which is placed by default on your Windows Desktop.
When the system is started, you will be asked to log in.
2.2. Logging into the System
When the application is started, the Login Screen is displayed to validate the user.
The Login screen is displayed as shown below:
Figure 1. NDS Login Screen
In the Login screen the UserName 1 and respective Password should be entered.
The password appears as asterisks. The password is validated and further access to the application is
provided only to valid users of the system.
Note. Be aware that you will be given the access rights that are pre-defined and granted
according to your ID-password combination. Password is not case-sensitive.
When the password is entered, you will have an opportunity to change your password. Just click the
<Change Password> button that will flash active.
In the password-changing section that will open below the Change Password button in the login screen
you will need to enter your new password into EnterNewPassword field and then confirm it by entering
the same combination into the ConfirmPassword field. After that click the Save Password button to save
the changes or Cancel button to return to previous password.
1
The User should enter the name of his/her NDS account (ID), not his/her real name, of course.
User Manual
Figure 2. Password changing window
Upon login NDS screen will open (appearance of the screen is given below).
Figure 3. NDS Screen Upon Opening
14
User Manual
15
2.3. Setting Application Language
NDS 6.0 allows a user to choose the language of the interface to make his work more convenient and
effective.
: System Æ Set Application Language Û
Figure 4. Set Application Language screen
Just select the language you need and press the <Ok> button.
When you select a language, all interface elements start being displayed in the newly chosen language.
If there is no data entered in the chosen language, or some interface element is not available in that
language, they will be displayed in English.
2.4. Menus and Toolbars
The menu and the toolbar are two of the user-friendly features of NDS application. The main menu has a
toolbar attached to it. This toolbar consists of several tool buttons as shown below:
2.4.1. Main Menu
When the application is started after logging in successfully, the Main Menu for the Application is
displayed. The Main Menu and the sheet tool bar, displayed, vary depending upon the module in which
the user has logged in.
Figure 5. Main menu and submenus
User Manual
16
2.4.2. Accessing the Menu
To access a menu item, use either the mouse or the keyboard. Following are the standards adopted for
navigation:
2.4.2.1. Using the Mouse
Selection of a Main Menu Option: To open the Main Menu option, point the mouse pointer to any of the
menu options on the menu bar and click the left mouse button.
Selection of a Submenu: To select a sub-menu item, move the selection cursor down with the mouse
until the sub-menu item is highlighted and then click the left mouse button.
2.4.2.2. Using the Keyboard
Selection of a Main Menu Option: Every menu item has one of its characters underlined. If the item is
one of the Main Menu Options, then pressing the ALT Key and the underlined character in the menu
option, opens the relevant menu displaying sub menu items, if any or directly invokes the relevant screen.
Selection of a Submenu: Once a Main Menu option is listed, the user can either enter the underlined
character of the required menu item on the list or navigate to that item using the arrow keys. After
reaching the required sub-menu item, the corresponding screen may be invoked by pressing the
<ENTER> Key.
2.4.3. Special Keys & Shortcut Keys
Special keys are also known as shortcut keys. These are defined key combinations that provide a quick
way to accomplish certain tasks e.g. to enter in the Query mode in the screen the key provided is <F11>,
to add a new record <F2>.
A list of the special keys and their corresponding functions is listed in the table below.
Special Function Keys
Key
Function
<F1>
Lists the help contents.
<F2>
Add a new record/line into current screen/table.
<F3>
Delete the current record.
<F4>
Sort rows (records)
<F8>
Export the data, as chosen by the user, into Excel
<F9>
Display Audit Trail information window.
<F10>
Enter Query.
<F12>
Execute Query.
<F11>
Enter Query. Switches the screen mode from <Edit> mode to <Query> mode. The user
enters the required conditions of the query.
<F12>
Run the query based on user’s criteria and retrieve all matching records.
Shortcut keys
<Ctrl>+<s>
Save modifications or new entries.
<Ctrl>+<p>
Print the existing form or screen. There will be printing options to print the data in
different formats (layouts). For example, forms A, P, D, etc. will have 2 printing
options:
User Manual
17
Key
Function
<Ctrl>+<w>
Close the current / active window (screen).
<Ctrl> + <F10>
Grid view
<Ctrl> + <Shift> + <F10>
Grid Edit view
Accelerator keys enable users to select a menu item with a keystroke rather than with the mouse. An
underlined character in the menu item’s name or label tells the user what key to press. The user presses
it in combination with the <ALT> key. For instance, to access the Help menu, the key provided is
<ALT>+<H>.
2.4.4. Common Toolbar Buttons
The toolbar buttons that are common across the entire system are shown in the table below.
Button
Description
Application toolbar
<Help>. Shows the list of help topics for NDS.
<UserDetails> shows the details of the current user
<CloseApplication>. Closes all NDS windows and screens open at the moment.
Module toolbar
<CancelQuery>. Discards the results of the current Query and switches the
screen to Edit mode.
<EnterQuery>. Switches the screen to Query mode so that you can enter the
Query criteria.
<ExecuteQuery>. Executes the Query according to the entered criteria.
<AddRecord>. Adds new record to the current Screen or Section of a Screen.
<DeleteRecord>. Deletes the current (active) record.
<Save>. Saves the changes made to the records of the Screen.
<PrintALL> prints all data in current screen
<Print>. Prints the viewed data of the current Screen.
<Excel>. Exports the data of the current record into Excel format.
<ExcelByRow>. Export unformatted data to Excel
<ExcelPivot> Exports the data into pivot table of Excel
<AuditTrail>. Shows the AuditTrail data for the current record.
<Close>. Closes the current Screen.
User Manual
18
In some modules there are also additional toolbar buttons, which will be reviewed separately in the
respective sections.
2.5. Navigation
Navigation between screens can be done using the menu options.
Navigation between records can be done by clicking on the respective buttons that are attached to that
particular screen as shown below:
Figure 6. Navigation bar
2.6. Types of Fields
Fields are primary elements of any database. They are used for the actual entering and storage of
information. In NDS the following types of fields are used:
•
•
•
•
•
•
Editable Text/Number field
Comment field
Date field
Check box
Drop-down box
Attached text field
All these types are described below one-by-one.
2.6.1. Editable Text/Number field
This is the most simple field type.
All you have to do is enter the necessary value, i.e. figure or text.
Figure 7 Example of Editable Text/Number fields
You may make queries over fields of this type (See Queries section for more details).
User Manual
19
2.6.2. Comment field
The Comment fields are intended for entering large quantities of text and usually are titled as
“Comments”, “Remarks” or “Notes”.
Figure 8 Example of Comment field
2.6.3. Date Field
This is the field specially intended for entering dates.
Date fields are ‘equipped’ with drop-down calendars that facilitate the date entering and decrease the
possibility of mistakes and errors.
Figure 9 Drop-down Calendar
Note. When entering the date using the drop-down calendar, point to the desired date and
make a double-click for the calendar to roll up. If you make a single click, the date will be
selected, but the calendar will stay open on the screen.
2.6.4. Checkbox
This field is the easiest-to-fill. In fact, it has only two options: checked (Yes) and unchecked (No).
Figure 10 Examples of checkboxes
Queries on checkboxes are possible.
2.6.5. Drop-down boxes
Drop-down boxes are very widely utilized in NDS because of their simplicity and usability. A drop-down
box can be easily recognized by the ‘down’ arrow on the right of the value field.
Drop-down boxes (drop-downs) make data-entering faster and more convenient, simultaneously reducing
the number of possible errors as the user should only select some value from a list.
The functioning of all drop-downs is the same:
• Click on the ‘down’ arrow to open the list
• Click on the desired value
User Manual
20
Figure 11. Example of an Open Drop-down Box
For example, if you know the code of a substance, start entering it in SubstanceCode, and the system
will automatically complete both SubstanceCode and SubstanceName fields following the code you are
entering.
Vice versa, if you start entering the SubstanceName, the system will keep proposing the name options
until you select the one you need. In this case the SubstanceCode field will be completed automatically.
You can not only select the data from drop-down lists, but also add and edit such data. Double mouse
click on any of NDS’s drop-downs evokes the special form, called Master, which enables the user to
manage the data in the lists.
For example, we have some Sample Country, from which we import controlled substances for the first
time, and in our system there is no establishment for this country.
Once you double-click the ExpEstablishment field the Establishment Master will open. Here we may
enter all necessary details for ‘new’ Establishment.
User Manual
21
When we exit the Establishment Master, the name of new establishment will already be in the list.
2.7. Data Entry Screens
There are three types of data entry screens available in NDS.
2.7.1. Single Record Entry Screen
In a Single Record Entry Screen, the user is allowed to make only one entry at a time. Such screens are
used for master maintenance programs in NDS.
The snapshot shown below is an example of a window allowing single record entry.
Figure 12. Single-entry screen
2.7.2. Multiple Record Entry Screen
In this type of screen, the user is allowed to make multiple entries and save them in a single save
operation. Such screens are used for master maintenance programs in NDS.
User Manual
22
The snapshot shown below is an example of a window allowing multiple record entries.
Figure 13. Multiple Record Entry Screen
2.7.3. Header/Detail Screen
This type of screen is used in cases where for a header information there are multiple details existing.
The snapshot shown below is an example of a Header/Detail screen.
Please note the presence of two record navigators in any header-detail screen. They are provided
because each header record may contain several detail records. For instance, in the Establishment
Master, you may enter several contacts for one establishment.
The section where the last mouse click has been done is considered by the system as ‘current’ or ‘active’
one. All the operations, which will be described later, are executed only on the active sections and
records.
A very common example of detail records is the language records. As we have mentioned before, NDS
may be adjusted to almost any language: all the users have to do is enter the proper language record
where needed (see the example in Preparations section of Chapter 3 of this manual).
User Manual
23
Figure 14. Navigation bars
2.7.4. Report screens
These screens are provided in Import/Export, Licenses and EMM modules of NDS to facilitate the search
of records against multiple criteria. Let us consider the example of Import-Export Report screen.
Figure 15. Import/Export Report
The screens of this type consist of two logical parts:
• Criteria section (upper); and
• Result section (lower)
As you can see, with the report query form it is much easier to search for necessary data on specific
transactions. Otherwise you would have had to make several step-by-step queries in several tabs.
To use the screen, you just need to enter the necessary criteria in the Criteria section, and then press the
<ExecuteQuery> toolbar button.
Note. The more criteria you enter, the less records you will obtain in the result section.
User Manual
24
The records matching all entered criteria will be shown in the Result part of the report query screen. You
may print the selected data, or export them to Excel for further analysis and/or formatting.
You may also edit the data by means of double mouse click upon the necessary record: the
‘Import/Export Document’ screen will open, where you will be able to proceed with editing.
2.8. Operations with Records
2.8.1. Adding New Record
You may add a new record in various ways, depending upon what is more convenient for you.
•
•
•
•
.
Click on the <New> toolbar button
Or Press <F2>
Or Select the Add a New Record menu item from the System menu option.
Or choose the Add a New Record option from the menu displayed when the right mouse
button is clicked.
Note. When adding new records, make sure the screen you are working with is set to ‘Add’
mode. ‘Add’ mode switches on automatically upon you make one of the above-mentioned
actions. The mode status is shown in the lower-right corner of the screen.
If the screen is not in the ‘Add’ mode, you will be just editing the existing data, which may spoil
the contained information and cause undesirable changes in final reporting.
2.8.2. Deleting An Existing Record
As with adding, to delete an existing record you may choose several ways:
•
•
•
•
.
Click on the <Delete> toolbar button
Or Press <F3>
Or Select the Delete Current Record menu item from the System menu option.
Or choose the Delete Current Record option from the menu displayed when the right
mouse button is clicked.
While deleting existing records, the user can also delete multiple records simultaneously.
2.8.3. Modifying An Existing Record
To modify an existing record, the user must first query and retrieve the records to be modified.
After the required records are retrieved, the user can make the desired modifications. All the validations
applicable in the ‘Add’ mode are also applicable while making the modifications.
Note. When modifying the data, make sure you are in ‘Edit’ mode.
User Manual
25
2.9. Queries
Sometimes it is necessary to select some records, which have common features. For example; all
transactions made by an establishment during the previous year.
In this case it is more convenient for a user not to scroll through all records, but to use queries, which are
a simple and quick search instrument.
First, you should create the query:
•
•
•
•
Click on the <EnterQuery> tool button
Or Press <F11>
Or Select the Enter Query option from the System menu.
Or choose the Enter Query option from the menu displayed when the right mouse button is
clicked.
After the query is created, the screen you are working with is set to ‘Query’ mode, which will be shown in
the lower-right corner.
Note. When in ‘Query’ mode, you will not be able to edit data or add new records
In the table below you will find some rules of query-making, so that you will be able to work more
efficiently and effectively.
Once the criteria are entered, you should execute the query.
To execute the query:
•
•
•
•
Click on the <ExecuteQuery> tool button
Or Press <F12>
Or Select the Execute Query option from the System menu
Or Choose the Execute Query option from the menu displayed when the right side mouse
button is clicked.
After the above message, the application goes into the Add mode.
However, there are certain limitations to the Query model of this system. Thus you cannot search on
multi-line comments in this system, and if you try, no results will be obtained.
2.10. Data Sorting
Sometimes, in multiple-row forms you may want to sort the data by some field in ascending or
descending order. For this purpose the quick sorting functionality is envisaged in NDS 6.0.
By default, the records in multiple-row forms are sorted by their Codes; in our example below the
substances are sorted by the SubstanceCode.
Figure 16. Data sorted by SubstanceCode
User Manual
26
To sort the data by any field just make a single mouse click on this field’s header. The red arrow will
appear, showing that now this very field sorts the data.
Figure 17. Data sorted by SubstanceName in ascending order
Note. The red arrow directed downwards shows that the data are sorted in ascending order.
On the contrary, the arrow directed upwards shows that the data are sorted in descending
order.
One more click on the field’s header changes the sorting order. Thus, if you click one more time on the
SubstanceName header, the data will look as follows:
Figure 18. Data sorted by SubstanceName in descending order
To quit the sorting mode, make a mouse click right on the red arrow. It will disappear, but the data will
stay sorted.
Figure 19. Data after sorting mode is off
2.11. Excel Output
The user can export data retrieved on any screen into Excel spreadsheets by clicking the <Excel> button.
<Excel> button exports the data contained in the fields of a header of the current screen plus the fields of
the current tab of the details section. Clicking the button will open a dialog box where the user can select
the desired fields for export.
User Manual
27
Figure 20. Excel Export options
You may select the fields for export by putting a tick mark besides their names, and unselect them in the
same way. Unselected fields are marked with a red x-sign.
However, in NDS 6.0 you are also provided with one very interesting feature: selection management.
Now you may not only select the fields for export to Excel, but also save the most frequently used
selections for future use. Just select the necessary fields, type the selection name into the
SelectionName field and press the <SaveSelection> button.
If you do not need any of previously saved selections, just choose it in the ‘Choose Tree Selection’ dropdown and press the <Delete Selection> button.
Also, you may select all fields at one time by pressing the <Select All (Tree)> button and unselect all
fields at one time by pressing the <Reset Selection (Tree)> button.
After the necessary selection is made or chosen, press the <Export> button to export the data to Excel.
There is another button, also associated with Excel export: <ExcelRow>.
This button exports the unsorted data.
Another feature of Excel export is an opportunity to export data directly to Excel Pivot Table. For this
purpose a special <Excel Pivot> button is provided in some screens (especially report query screens) on
NDS.
User Manual
28
2.11.1. Pivot Table Usage in NDS
Pivot Table is an MS Excel functionality to analyze data. For understanding, it can be thought of a Crosstabular data distribution/presentation in an Excel Sheet. Let us try to understand it through an example.
Figure 21. Example of Pivot Table usage in NDS from Import/Export Report
Let us say we want to “establish a trend analysis about the total imports and exports to and from our local
country to another trading countries for Fentanyl”, so that the final output clearly presents the data for
quick and easy analysis.
Such an analysis on real data is done in the accompanied Excel File Example for Pivot Table (NDS).xls.
It contains a Sheet named Pivot Table that has a very simple yet nice two-dimensional presentation.
The table you see here is a cross-tabular presentation of the imports and exports of our local country as
per trading country. It shows all the trading partners (countries) of our local country on the left in rows and
the Transaction Type in columns (our column has two different values, total imports and exports). The
Approved Quantities are chosen as the data to show for any Row (Trading Country) and Column
(Transaction Type IMP/EXP).
User Manual
29
Figure 22. Example of Pivot Table in Excel File (Example for Pivot Table (NDS).xls)
If you see the sheet named Pivot Chart you can easily determine trends for imports and exports.
Figure 23. Example of Pivot Chart in Excel File (Example for Pivot Table (NDS).xls)
You need considerable effort to present data in the form you see in Excel File. To make it possible for
NDS users to do these kinds of analysis without knowing a lot of technical things, we added a smart tool
in NDS called Excel Pivot.
User Manual
30
2.11.2. Excel Pivots
Excel Pivots has four basic kinds of field orientations:
1)
2)
3)
4)
Row Fields
Column Fields
Data Fields
Page Fields
Figure 24. Structure of Pivot Table
Row Fields are the fields that are distributed in rows e.g. Trading Country in our case.
Column Fields are the fields shown in columns of the Pivot Table, in this case Transaction Type
(Imports/Exports).
Data Fields are the data items themselves, on which you want to base your analysis and calculations
e.g. Approved quantity in our case.
Page Field is the field use to filter a restrict/filter the data shown at any particular time in Pivot Table. In
our case Substance/Preparation is the page field which by defaults shows no restriction but results can
be restricted for any substance or preparation in the list.
We just need to identify these dimensions/fields in our data and start building our Pivot Table.
2.11.3. Exporting data using NDS Excel Pivot
Open any report, retrieve some data, go to menu System –> Excel Pivot
User Manual
Figure 25. Screen dialog for Excel Pivot
31
User Manual
32
Figure 26. Screen dialog for Excel Pivot after selecting fields
After you specify all the dimensions/orientations of the
Pivot Fields, you can save your selection by giving it a
name in the field Selection Title and pressing Save
button. Then you can later select your saved settings
for a Pivot by selecting them from the dropdown list
Choose Saved Selection.
After selecting fields all the necessary orientations (Row, Column, Data), press Export
button.
You will see an exactly same Excel Workbook as was shown at the beginning with three
sheets:
1)
Data (the actual dataset from NDS window).
2)
Pivot Table (the table created as per user criteria and on the basis of
the data in Sheet data).
3)
Pivot Chart (the graph or chart created for the Pivot Table).
Note. Excel pivots are only available for Reports
User Manual
33
2.12. Grid view
Data Grid is a new feature of NDS 6.0. It allows the user to view any screen’s data in the table format.
Let us take a Preparation Master’s Header as an example. The data looks as follows:
Figure 27. Form view
To view it in a table format, just press the <Ctrl> + <F10> combination.
Figure 28. Grid (table) view
Now you can see the header data in the table view. Also, you can print them out or export to Excel for
further processing.
User Manual
34
The additional Grid View Window contains 3 features accessible by clicking on any cell in the Grid with
the right button of the mouse. Select the requested option from the pop-up menu:
•
Go to .. :
A new pop-up window is open, the user can start typing any set of
characters and the system will jump each time to the first row on the clicked column that
matches the typed value, there are 2 navigation buttons Up and Down that enable the
user to jump to the Next or Previous matching row respectively.
Figure 29. Grid view with Go To… feature
The window has the possibility to work as case sensitive/insensitive by
checking/unchecking the 'Match Case' checkbox. Also to it’s possible to search the
requested value within the contents of the different rows or only as 'start with' by checking
the 'AnyWhere' checkbox.
•
Quick Filter:
By Right-Click on any Cell in the Grid and choosing Quick Filter option
from the pop-up menu, the system will recognize automatically the value in that cell, and
apply a filter as following: Clicked Column = Cell Value. Repeating the Quick Filter
activity on another column will join the two conditions and so on.
•
Reset Quick Filter:
Will remove any set of conditions applied by QuickFilter and
retrieve the original record set of the Grid.
Figure 30. Grid view after applying Quick Filter feature
However, you may only view data, not edit or otherwise change them. To be able to edit the data you
should use the <Ctrl>+<Shift>+<F10> combination.
User Manual
35
Figure 31. Grid Edit view
Note. In grid view you may double-click any necessary record and it will be opened for editing (if
such is allowed) in the normal view.
2.13. Audit Trail
The system provides a facility for recording the brief information of the use of particular record. This
facility is called the Audit Trail.
It shows who created the selected record, and when he/she created it. Moreover, AuditTrail provides
the information which user last modified the data and the date of the last modification.
A sample audit trail detail screen is shown below.
Figure 32. Audit Trail
2.14. Error log
NDS 6.0 provides a user with an opportunity to record and view the errors made by particular users.
Note. By an ‘error’ here is understood the action making the system respond with an
information message, error message, warning message etc.
This functionality may be invoked from the main menu:
: System Æ Error Log Û
User Manual
36
Figure 33. Error Log Criteria
The Error Log Criteria screen will be opened. Here you should indicate a user whose errors you want to
trace and the type (or several types) of errors to be traced.
When you have selected the criteria, press the <OK> button to view the information on the errors.
Figure 34. Error Log Report
You may view the information, export it to Excel or delete from the database.
If you want to clear the list completely, use the <Delete All> button.
User Manual
37
2.15. Substance/Preparation Calculator
This useful window will help the users to calculate on the fly how will be affected the quantities for the
base substances contained.
This special window will pop up after pressing <Ctrl> + <F7> on any window.
Then after selecting any substance or preparation and entering its quantity you should press the button
<Calculate> in order to see the list of base quantities equivalences.
Figure 35. Substance/Preparation Calculator
2.16. MyNDS
In NDS 6.0 a new feature has been introduced – the <MyNDS> button. It allows users to customize NDS
by adding their own features.
2.17. Exiting NDS
Click on Exit Application option from the System menu or press <Ctrl> + <Q> on the keyboard or
click on the <Exit Application> Button on the Frame toolbar to quit the application.
Chapter 3. Masters
These modules are intended to facilitate a more convenient and effective organization of basic data.
So, if a user needs to enter a new substance, preparation, establishment, or create a record for either of
above-mentioned in a new language, then he/she will use the Masters module.
3.1. Substances
The Substance Master is one of the cornerstones of NDS.
Substance Master is used to define the attributes of Substances, controlled on international level by INCB
and on local level by respective competent authority.
The internationally controlled narcotic drugs, psychotropic substances and precursors are provided in the
appropriate Schedules and Tables to Yellow, Green and Red Lists respectively. However, local
competent authorities may assign additional substances to be controlled within their country or territory.
INCB assigns the codes of the controlled substances, their variations and salts. These codes are given in
the Yellow, Green and Red Lists together with alternative codes such as
• EAN International code, a 13-digit code, also known as ‘bar code’
• HS (Harmonized System) code, a uniform code of Customs Cooperation Council
• CAS (Chemical Abstracts Services) code
The Substance Master also enables the user to read the substance attributes in various languages and
also set special conditions that designate how NDS will apply control measures on that particular
substance.
Substance Master consists of the header section, three tabs and three underlying sub-masters:
• Pure Substance master;
• Variation master; and
• Unit of Measurement master
3.1.1. How to enter a new substance and define/alter its attributes
To enter a new substance into the system or edit the substance information you should do the following:
: Masters Æ Substances Æ Substance Master Û
Figure 36. Substance Master with 'Languages' tab
User Manual
40
In the header section of the main Substance Master form you should fill in the following fields:
Field
Value
Pure Substance Code
Code of the pure substance, which is a base for the entered substance
Variation Code
Code of the variation (radical) comprising the entered substance
UDF Code
Composite of PureSubstanceCode and VariationCode
Conversion Factor
Percentage of pure anhydrous content of the substance
Schedule Ind.
Number of Schedule or Table the entered substance is listed in
Doses
Daily doses of the substance (not mandatory)
Limit of Tolerance
The minimum dose of the substance causing death (not mandatory)
UOM
Unit of Measurement in which the substance is being accounted for and reported to
INCB.
UOM Description
Code and name tag for the Unit of Measurement used for indication of quantities of the
entered substance
EAN Code
13-digit Code of European Article Numbering International (bar code)
HS Code
Uniform code of the substance in Harmonized System of the Customs Cooperation
Council
CAS Code
Code of the substance assigned by Chemical Abstracts Services
Note. You may easily recognize if a pure substance is a narcotic, psychotropic of precursor by a
PureSubstanceCode. All codes of narcotic drugs start from ‘N’, codes of psychotropic
substances start from ‘P’ and codes of precursors and other substances start from ‘C’.
3.1.2. How to indicate the name of a substance
When you have defined the code of the substance, you should indicate its name. This name will be
displayed throughout the system as well as in printed reports and data files.
The names of substances are entered in the ‘Languages’ tab.
‘Languages’ tab contains the following fields:
Field
Value
Language Code
Code of one of the languages recognized by the system
Substance Name
The name which will be displayed on the screen or in printed forms every time the
respective language is set
Sort Description
The content of this field defines the place of the substance in the Substance Code
drop-downs throughout the system. 2
Comments
Optional comments on the substance name
2
In some INCB forms the substances should be reported in alphabetical order. If you use the language other than English, it may be
expedient to enter a string in your native language into the SortDescription field.
User Manual
41
3.1.3. How to indicate the type of a substance
The data on particular substance are managed depending on whether the substance is a narcotic drug, a
psychotropic substance or a precursor. Type of entered substance is indicated in the ‘Substance Type’
tab of Substance Master form.
The Figure below shows the appearance of ‘Substance Type’ tab.
Figure 37. 'Substance Type' tab
This tab includes seven checkboxes:
Field
Value
Narcotic Indicator
The substance is a narcotic drug included in the Yellow List
Psychotropic Indicator
The substance is a psychotropic substance included in the Green List
Precursor Indicator
The substance is a precursor included in the Red List
Others
The substance is not included in either of the above-mentioned Lists, but can be
possibly used in illicit manufacture of narcotic drugs or psychotropic substances
Synthetic Ind.
The substance is synthetic, i.e. manufactured from other substances
Variation Ind.
The substance is a variation
INCB Ind.
The substance is controlled by INCB
3.1.4. How to indicate the special conditions of transactions with a substance
Different substances require different measures of control. Using the ‘Special Conditions’ tab you may
easily specify which restrictions will be applied to particular substance.
Figure 38. 'Special Conditions' tab
User Manual
42
Field
Value
Check Estimates
If the imported quantity exceeds the quantity of Estimates/Assessments for this
substance, NDS will produce a warning message
Check Licenses
If a License is not available for transaction with this substance, NDS will produce a
warning message
Check Import (Export)
Limit
The NDS will check if the quantity of transaction exceeds the Import (Export) limit, and,
if does, will warn you with special message
Track License Quantity
Not only availability of a license for particular transaction with particular substance will
be checked, but also the licensed quantity.
Import Conditions
Certain conditions regulating the import of this substance (the text entered in this field
may later be inserted into the Notes field of Import Documents of Import Export Module)
Export Conditions
License Conditions
Certain conditions regulating the export of this substance (the text entered in this field
may later be inserted into the Notes field of Export Documents of Import Export Module)
Certain conditions of issuing and revoking a license for transactions with this substance
(the text entered in this field may be later inserted into the Conditions field of License
Documents of Licenses Module)
3.1.5. How to define a pure substance (Pure Substance Master)
If you need to enter new pure substance as well as add or change the language-related information on
particular Pure Substance you may use the Pure Substance Master, which may be opened either upon
double-clicking on the PureSubstanceCode field of Substance Master or from the Masters menu.
: Masters Æ Substances Æ Pure Substance Master Û
Figure 39. Pure Substance Master form
In the Header section you should indicate the Code of new Pure Substance.
Note. Before entering new PureSubstanceCode, make sure that the same Code does not
already exist in the system. You should use the Query feature for this purpose. However, if you
enter the Code that already exists, the system will produce a warning message.
In the Details section of this form you may enter the name of the Pure Substance in the languages you
are using.
Field
Value
Language Code
Code of one of the Languages recognized by the system.
Pure Substance Name
The name which will be displayed on the screen or in printed forms every time the
respective Language is set
Sort Description
The content of this field defines the place of the Substance in the Pure Substance Code
drop down in the Substance Master form.
Comments
Optional comments concerning the PureSubstanceName
User Manual
43
3.1.6. How to specify a Variation (Variation Master)
The Variation Master, similar to Pure Substance Master, is used when it is necessary to enter new
Variation Code or add/change the language information on particular VariationCode.
It may be opened either by double-clicking on the VariationCode field of Substance Master or from the
Masters menu.
: Masters Æ Substances Æ Variation Master Û
Figure 40. Variation Master form
In the Header section you should indicate a code of new variation.
Note. Before entering new VariationCode, make sure the code you are about to use does not
exist in the system.
In the Details section of this form you may enter the name of the Variation in any language you wish to
use.
Field
Value
Language Code
Code of one of the Languages recognized by the system.
Variation Name
The name which will be displayed on the screen or in printed forms every time the
respective Language is set
Sort Description
The content of this field defines the place of the substance in the VariationCode drop
down in the Substance Master form.
Comments
Optional comments concerning the VariationName
3.1.7. How to import pure substance list (Import Pure Substance List)
Sometime INCB together with World Health Organization make additions to the Schedules and Tables of
1961, 1971 and 1988 Conventions. The lists of pure substances are published on INCB web site and may
be downloaded by interested parties.
Import Pure Substance List feature of NDS 6.0 facilitates data-import process.
It may be invoked as follows:
: Masters Æ Substances Æ Import Pure Substance List Û
•
•
•
browse the necessary *.txt file by means of ‘Select file’ dialog box;
select the substances you intend to add to NDS database;
click <Save> button to save changes or <Cancel> to abort the procedure.
User Manual
44
Figure 41. Import Pure Substance List
3.1.8. How to define units of measurement (Unit of Measurement Master)
In practice the Unit of Measurements Master is mainly used for defining new measurement units for
substances and preparations as well as for entering/alteration of language-related information on the
UOMs existing in the system. Also it provides an opportunity to define new conversion factors in order to
make data-management more flexible and convenient.
At the Header section you should enter/choose the code of appropriate UOM.
Note. Before entering new UOM Code make sure there is no same code already existing in the
system.
Field
Value
Language Code
Code of one of the Languages recognized by the system.
Unit of Measurement
The name which will be displayed on the screen or in printed forms every time the
respective Language is set
Sort Description
The content of this field defines the place of the substance in the SubstanceCode drop
downs throughout the system.
Comments
Optional comments concerning the unit of measurement
By using the ‘Advanced’ tab of Units of Measurement Master you may define the conversion factors to
easily calculate the number of other UOMs in the current UOM.
User Manual
45
Figure 42. Unit of Measurement Master with 'Languages' tab active
Figure 43. 'Advanced' tab of Unit of Measurement Master
3.1.9. How to indicate the conditions of import or export of a substance (General Conditions
Master)
This maintenance screen is intended for entering frequently used conditions of import/export. The
Conditions Master may be invoked either from Import/Export module or from the Masters menu:
: Masters Æ Substances Æ Conditions Master Û
User Manual
46
Figure 44. General Conditions Master
All you need to do is enter the Code, Conditions and then save the record.
3.1.10. How to indicate types of transactions with controlled substances (Transaction Type
Master)
The Transaction Type Master is used to indicate the types of transactions carried out by establishments.
It may be invoked from the main menu:
: Masters Æ Establishment Æ Transaction Type Master Û
Figure 45. Transaction Type Master
User Manual
47
You will need to enter the following data:
Field
Description
TransactionTypeCode
Unique code that will represent this transaction type in the system
LanguageCode
Code of a language in which the transaction type name will be displayed
Transaction Type Name
Name for this type of transaction
SortDescription
The contents of this field defines the place of transaction type name in the appropriate
drop-downs of EMM
Comments
Necessary comments concerning the transaction type.
3.2. Preparations
The Single Convention of 1961 defines a preparation as a “mixture, solid or liquid, containing a drug”. The
Convention on Psychotropic Substances of 1972 gives another definition: ‘any solution or mixture in
whatever physical state containing one or more psychotropic substances, or one or more psychotropic
substances in dosage form’.
For the purposes of NDS the definition of the term ‘preparation’ sounds as:
Any
mixture
or
solution,
in
whatever
physical
controlled substance(s) in dosage form.
state,
containing
The addition ‘in dosage form’ is very important, as although the import and export of controlled
substances is reported in metric units, as grams, kilograms and litres, in practice Establishments are
dealing with tablets, ampoules, packages etc.
3.2.1. How to create a Preparation
First, open the Preparation Master.
: Masters Æ Substances Æ Preparation Master Û
User Manual
48
Figure 46. Preparation Master
Then, fill in the PreparationCode field. In this field you are supposed to enter the combination of letters
and figures 3 (so called ‘alphanumeric combination’) that will represent the new preparation throughout
NDS database. This code should be unique, i.e. it should not repeat in NDS.
Other header fields are:
Field
Value
EAN Code
13-digit code (also known as ‘bar code’) assigned by EAN International
Exempted Preparation
A checkbox showing if the preparation is exempted from under some measures of
international control 4.
Preparation Type Code
Code of preparation type. See the explanations below. See also Preparation Type
Master section.
Preparation Type
Shows the name of preparation type. Filled in automatically
UOM
Code of unit of measurement of preparation type. See explanations below.
UOM Description
Shows the name of the unit of measurement. Filled in automatically
What is “preparation type”? This term in NDS denotes primary dosage of preparation. That may be tablet,
capsule, ampoule etc. You may define your own preparation types using the Preparation Type Master,
which may be invoked by double-clicking on the PreparationTypeCode field. (See also Preparation Type
Master)
The UOM (unit of measurement) represents the package, in which the preparation is presented for
customs clearance. (See also How to define units of measurement (Unit of Measurement Master))
Thus, if the preparation has a form of tablets and these tablets are packed in blisters, then Preparation
Type will be ‘tablet’ and UOM ‘blister’.
3
Depending upon settings in ‘Parameters’ section, this field may be filled in automatically.
According to the 1961 Convention and the 1971 Convention, if a preparation containing controlled substances is compounded in
such a way that it cannot produce any ill effects or presents low or no risk of abuse, and if the substances contained in such
preparation cannot be readily recovered from it, such preparation can be exempted from some control measures. In NDS such
preparations do not affect the statistics in INCB forms.
4
User Manual
49
The number of preparation units in a package (UOM) is indicated in the ‘Package Size’ tab. (see details
below in Package Size Tab section).
3.2.2. How to specify the Type of Preparation (Preparation Type Master)
The Preparation Type Master is used to indicate new types of Preparations as well as to enter additional
language information for the existing ones.
You can start the Master in using one of the following ways:
1) From the Main Menu
: Masters Æ Substances Æ Preparation Type Master Û
2) By double-clicking on the PreparationTypeCode or PreparationTypeName drop-down tab in the
Preparation Master.
To assign a new Preparation Type the following fields should be filled in:
Field
Value
Header Section
Preparation Type Code
6-symbol code which will be used to represent this preparation type throughout the
system
Details Section
Language Code
Code of the Language for which the PreparationTypeName will be displayed.
Preparation Type Name
Name of the preparation type as displayed when the language code is selected
Sort Description
Defines the order in which the preparation type code and preparation type name will be
displayed in respective drop-downs.
Comments
Any relevant comments and/or remarks on the preparation type
Figure 47. Preparation Type Master
User Manual
50
3.2.3. How to indicate the name of the preparation
Here you should indicate the name of the preparation in any desired languages.
Figure 48. 'Language' tab
The indicated PreparationName should include its name on the package, international unregistered
name, and (if possible) the content of controlled drug in one unit.
Note. Whatever quantity is indicated in the PreparationName field, it will not be anyhow
regarded by the system for calculation of quantity of the controlled substance. So, make sure
you have filled in all necessary fields in ‘Contents’ tab as well.
3.2.4. How to indicate the substances the preparation contains
The ‘Contents’ tab is designed for indication of substances contained in the preparation as well as for
calculation of pure anhydrous content of the controlled substances.
First, enter the necessary SubstanceCode (see the drop down boxes section for details). Please note
that you should indicate the code for the substance that is actually contained in the preparation. Thus if
the preparation contains Codeine Hydrochloride, you should indicate the Codeine Hydrochloride, not pure
Codeine.
Upon entering the ConversionFactor, SubstanceName and UOMDescription fields will be filled in
automatically.
Note. The UOMDescription field in this tab is not the same as the UOMDescription field in the
header. Here it represents the unit of measurement, in which the controlled substance is
reported on respective forms to INCB.
Work with this tab will require some mathematical input from the user, because he/she will need to
indicate a correct volume/quantity of controlled substance in a preparation unit so that the system will be
able to make other calculations.
, where
Qg
CVU
NVU
NUOM
5
– gross quantity of controlled substance
– concentration of controlled substance in one volume/mass unit 5 of preparation
– quantity of volume/mass units in one unit of preparation
– number of mass units in the reporting Unit of Measurement.
We used the term ‘volume unit’ to avoid confusing with a ‘unit of measurement’ term. Here ‘volume unit’ represents the
measurement unit that is stated on the preparation label. It may be gram, milligram or kilogram.
User Manual
51
Although the formula looks a bit complicated, the below-mentioned example would make it clear.
Example: We have a preparation in 3 ml ampoules containing Morphine Hydrochloride solution of 5
mg/ml concentration. Preparations come in packs containing 10, 20 or 40 ampoules.
Consequently, the gross quantity of Morphine Hydrochloride will be:
Q =
3 × 5
= 0,015
1000
As you see, we first multiplied the concentration of the substance (5mg/ml) by the volume of ampoule
(3 ml) and then divided the product by the number of milligrams in one gram (1000). Thus we obtained
that there is 0.015 gram of Morphine Hydrochloride in one ampoule of our sample preparation.
Now you should enter this value into the Quantity/Volume field on the ‘Contents’ tab and NDS will
generate the quantity of pure anhydrous Morphine. It will be 0.0089 gram.
Figure 49. 'Contents' tab
The screenshot above shows the correct entering of data for our example in the ‘Contents’ tab.
3.2.5. How to indicate the size of a package
Sometimes imported/exported preparations differ only in number of ampoules, tablets, etc. in one
package. In this case you can enter several options for the package size.
If we come back to our example of import of Morphine Hydrochloride, the properly-entered data in
‘Package Size’ tab will look as follows.
User Manual
52
Figure 50. 'Package Size' tab
Upon entering, the data on the package size becomes available in Import Authorization Request form of
Import-Export module (see Import Transaction Documents section for more details).
Figure 51. Preparation Data in Import Export Module
3.2.6. How to indicate relevant comments
In the Additional Comments tab you may leave comments that you think will be useful for future
reference.
Figure 52. Additional Comments tab
User Manual
53
3.2.7. How to export the data on Preparations
To run the special form dedicated to export the data on preparations in XML format do the following:
: Masters Æ Substances Æ Preparation Export Û
Figure 53. Preparation Export
When you press the <Export> button, the data on selected preparations will be exported in XML format to
the folder indicated in your nds.ini file.
3.2.8. How to import the data on Preparations
In order to import data on preparations in XML format you should use the Export Preparation List form.
: Masters Æ Substances Æ Preparation Import Û
Figure 54. Preparation Import
User Manual
54
3.3. Competent Authorities
3.3.1. Competent Authority Master
The Competent Authorities are special bodies authorized by governments of member states to implement
certain functions in relation to controlled substances.
Competent Authority Master helps to enter, store and otherwise manage the data on various competent
authorities pertaining to different member states.
Competent Authority Master is invoked as follows:
: Masters Æ Competent Authority Æ Competent Authority Master Û
Figure 55. Competent Authority Master
The Competent Authority Master screen consists of a header section and four tabs:
• ‘Communication’
• ‘Function’
• ‘Administrative’
• ‘Signatory’
In the header section you should fill in the following fields:
Field
Description
CA Code
Unique code that will represent this competent authority throughout the system.
EAN Code
13-digit code assigned by EAN International
Department Code
Code of the name that will be used together with CA Code to represent this CA
Country Code
Code of country to which the CA relates
Phone Area
International phone code of the country
User Manual
55
Field
Description
Contact Person
Name of a contact person
Designation
Communication
Address
Full postal address of the competent authority.
List of Forms to be
Mailed
List of forms to be mailed by this CA.
3.3.1.1. How to indicate the ways of communication to Competent Authority
The ‘Communication’ tab is used to enter data on means of communication with this CA.
Figure 56. 'Communication' tab
To enter the necessary means of communication, do the following:
• add new record in the upper part of the tab
• select the code of communication from the drop-down. If there is no necessary code, double-click
the CommunicationCode drop down and use the C.A. Communication Master (see C.A.
Communication Master sub-section)
• select the LanguageCode
• enter CommunicationDetails, and Comments if necessary.
Thus, if a CA has such an E-mail address: info@ca_name.org, then the following data should be entered:
CommunicationCode
4
CommunicationName
E-MAIL
LanguageCode
Eng (or any other)
CommunicationDetails
info@ca_name.org
If you cannot find proper means of communication in the Communication Code drop-down, you may use
the C.A. Communication Master.
See also C. A. Communication Master
User Manual
56
3.3.1.2. How to indicate functions of competent authority
To indicate the functions of a given competent authority use the “Function” tab.
Figure 57. 'Function' tab
•
•
•
•
select the code or name of proper function(s) from FunctionCode or FunctionName dropdowns,
check up the Signatory checkbox if the present competent authority is an authorized signatory
for this function,
check the Correspondence box if the correspondence concerning this function should be mailed
to the present competent authority
enter comments in one or several languages (optional).
If you cannot find proper function in the respective drop-down, use the CA Function Master to enter it into
the system.
See also C. A. Function Master
3.3.1.3. How to indicate administrative details of the competent authority
For this purpose use the ‘Administrative’ tab of Competent Authority master.
Figure 58. 'Administrative' tab
User Manual
57
Here you should fill in the following fields:
Field
Description
Requested by ICPO
This flag shows if the information can be requested by International Criminal Police
Organization (Interpol)
GMT Time Difference
Difference of time between the location of the CA and the Greenwich Mean Time.
Office Hrs. Start Time
Local time that CA starts functioning
Office Hrs. End Time
Local time that CA end functioning
Office Hrs. Breakfast
Start Time
Start of lunchtime
Office Hrs. Breakfast
End Time
End of lunchtime
Language Proficiency
Language spoken at this CA
Comments
Necessary comments concerning this CA
3.3.1.4. How to indicate the countries for which this CA is a signatory
To indicate such countries, use the ‘Signatory’ tab in the Competent Authority Master.
Figure 59. 'Signatory' tab
Just enter code(s) or name(s) of appropriate country together with necessary comments and save the
record.
3.3.2. CA Communication Master
The C.A. Communication Master is used to indicate the means of communication used with competent
authorities.
It may be invoked in two ways:
1) from the main menu
: Masters Æ Competent Authority Æ C.A. Communication Master Û
2) by double-clicking the CommunicationCode or CommunicationName drop-downs in
Competent Authority Master window.
User Manual
58
Figure 60. CA Communication Master
Here you should enter the following data:
Field
Description
CommunicationCode
Unique code that will represent this way of communication in the system
LanguageCode
Code of a language in which the communication name will be displayed
CommunicationName
Name for this way of communication with competent authority
SortDescription
The contents of this field defines the place of CommunicationName in the
CommunicationCode and CommunicationName drop-downs of Competent Authority
Master
Comments
Necessary comments concerning communication name
3.3.3. C.A. Function Master
The C.A. Function Master is used to indicate the functions of competent authorities.
It may be invoked in two ways:
1) from the main menu
: Masters Æ Competent Authority Æ C.A. Function Master Û
2) by double-clicking the FunctionCode or FunctionName drop-downs in Competent Authority Master
window.
User Manual
59
Figure 61. CA Function Master
You will need to enter the following data:
Field
Description
FunctionCode
Unique code that will represent this function in the system
LanguageCode
Code of a language in which the function name will be displayed
FunctionName
Name for this function of competent authority
SortDescription
The contents of this field defines the place of FunctionName in the FunctionCode and
FunctionName drop-downs of Competent Authority Master
Comments
Necessary comments concerning function
3.3.4. CA Department Master
The C.A. Department Master is used to indicate the names of the competent authorities.
Note. Sometimes the names of various competent authorities are very similar or the same. That is why
NDS provides an opportunity to enter names such as ‘Ministry of Public Health’ once and then use them
for several countries.
CA Department Master may be invoked in two ways:
1) from the main menu
: Masters Æ Competent Authority Æ C.A. Department Master Û
2) by double-clicking the DepartmentCode or DepartmentName drop-downs in Competent
Authority Master window.
User Manual
60
Figure 62. CA Department Master
You will need to enter the following data:
Field
Description
DepartmentCode
Unique code that will represent this name in the system
LanguageCode
Code of a language in which the department name will be displayed
DepartmentName
Name for this competent authority
SortDescription
The contents of this field defines the place of the competent authority name in the
DepartmentCode and DepartmentName drop-downs of Competent Authority Master
Comments
Necessary comments concerning the competent authority name
3.4. Permitted/Restricted Substances
According to the 1961 Convention and the 1971 Convention, the Governments/Countries shall submit
their Estimates on Narcotic Drugs and Assessments on Psychotropic Substances to INCB. After the
revision, the INCB publishes the Estimates and Assessments and disseminates it to the Governments.
The competent authorities should take measures to keep the import and export of controlled substances
within the set limits. Therefore, such limits should be checked before any Import or Export Authorization is
issued (see Chapter 4. Import and Export Transactions for more details). NDS is greatly helpful in such
checks.
The Permitted-Restricted Substance Master is intended for indication of Estimates/Assessments as well
as the import and export limits for controlled substances dealt with in the particular country during for a
particular year.
User Manual
61
3.4.1. How to indicate the Estimated/Assessed quantities of Controlled Substances
To indicate the estimates on controlled substances you should open the Permitted-Restricted Substance
Master Maintenance form.
: Masters Æ Substances Æ Permitted-Restricted Substance Û
Figure 63. Permitted-Restricted Substance Master
In the Header section of this Master form you are supposed to enter the Country and the Year for which
the Estimated/Assessed quantities will be entered.
If you enter the Estimates/Assessments for this country for the first time, you will have to enter all values
in the detail section manually.
Field
Value
Substance Code /
Code of a Substance/Preparation for which the Estimated/Assessed quantity is entered
Preparation Code
Substance Name /
Name tag for SubstanceCode
Preparation Name
Schedule Table
Indicator
Number of Schedule or Table this substance is listed at. You cannot modify this value
from this Master, as it is fixed in the Substance Master.
Estimate
The Estimated/Assessed quantity of the Substance
Import Limit
Maximum permitted quantity to be imported during the year in question
Export Limit
Maximum permitted quantity to be exported during the year in question
UOM
Unit of Measurement for the substance. You cannot modify this value either, as it is
fixed in Substance Master
User Manual
62
In case data are already entered for the Country, you can make the data-entering process much easier
and less time-consuming.
There are two specialized toolbar buttons provided in the Permitted-Restricted Substance Master.
Button
Name
<CopySubstanceDetails>
<CopyAllDetails>
The first one copies all codes and names of Estimated/Assessed substances from the previous year to
the form of the current year. The estimated/assessed quantities, as well as import and export limits will be
set to zeroes.
Figure 64. Action of <CopySubstanceDetails> button
The second button copies codes, names and all indicated quantities.
Figure 65. Action of <CopyAllDetails> button
Note. The entered quantities will be referenced by NDS when you create an Import
Authorization or Export Authorization (see also ‘Import/Export Transactions’).
3.4.2. How to import the Estimated/Assessed quantities
As the Countries from time to time change the initial Estimates and Assessments by furnishing respective
Supplements and Modifications to INCB, the latter regularly publishes new figures on its web-site, from
which they may be downloaded in the form of *.txt file.
To import the text-format data in an easier manner, special ‘Load Estimates/Assessment Publication’ form
is provided in NDS 6.0.
User Manual
63
Figure 66. 'Load Estimates/Assessments Publication' form
To load the updated estimates-assessments, enter the year, to which the data relate, and browse the
necessary *.txt file from your hard disk.
Figure 67. ‘Load Estimates/Assessments publication’ screen in action
Now, if you want to save the new values in the Permitted-Restricted Substance Master just press the
<Save> button.
User Manual
64
3.5. Groups
Sometimes, especially for licensing purposes, it is necessary and expedient to work with groups of
Substances united by some characteristics, rather than with individual Substances.
For example, in many cases the Competent Authorities can issue licenses for ‘trading in narcotic drugs’,
not indicating all narcotic drugs one by one in the License itself 6. So, for NDS to properly recognize such
License, it will be necessary to unite all narcotic drugs into some Group so that NDS will treat any of the
drugs in this group in the same manner.
3.5.1. How to create a Group of Substances
NDS provides an opportunity to create and manage substance groups with special Group Master.
: Masters Æ Substances Æ Group Master Û
Figure 68. Group Master
The Group Master screen consists of two logical parts. In the left part there is a pane showing all alreadycreated Groups. Mouse click on the ‘+’ sign unrolls the list of substances, preparations and groups
comprising this Group.
Figure 69. Group pane
6
For more detailed information on rules of managing Licenses in NDS see the Chapter 5 ‘Licenses’.
User Manual
65
To make the visual perception easier, the Substances and Preparations are represented with two
different signs in Group Master:
represents Substances
represents Preparations
represents Groups
To enter new Group you should create a new Group record in the left pane of the Master screen. Here
you should enter the GroupCode.
Then, specify the name of the new Group in the language section by entering the LanguageCode,
GroupName and, if necessary, correct SortDescription.
Under the language section, there are three more sections: Substances, Preparations and Groups ones.
In each section there is an upper blank row, which may be used for express querying of data. In our
example in the Figure below all variations of CPS are queried.
Figure 70. Substance section of Group master
The
button shows the substance attributes, entered in the Substance Master.
Figure 71. Substance Attributes pop-up
User Manual
66
When you select the necessary Substance, do the following:
In case of single Substance
1) click on the selected Substance
2) hold the mouse button
3) drag (move) the mouse cursor to the necessary Group in the left pane.
In case of multiple Substances:
1) select a range of Substances: click on the first Substance, hold the <shift> key and click on the
last Substance
2) not releasing the <shift> key, click on the selection and hold the mouse button
3) drag the selection to the necessary Group in the left pane.
The same rules apply to the Preparations section as well, though the information shown upon the click on
button is slightly different.
Figure 72. Preparations Section of the Group Master
Figure 73. Preparation Attributes pop-up
Note. A group may contain Substance(s), Preparation(s) and other Group(s).
After you have finished forming the necessary Group, save the record. Starting from that moment the
newly created Group becomes available in the Licenses Module.
User Manual
67
3.6. Establishments
Establishment is a generic term used in NDS to indicate an entity or an individual licensed (or otherwise
legally empowered) for operations with controlled substances.
3.6.1. How to create an Establishment
•
Open the Establishment Master.
: Masters Æ Establishment Æ Establishment Master Û
•
•
Fill in the necessary header and detail fields
Save the new record. From now on it will be available in all Establishments-related drop-downs.
In the figure below you can see the example of the newly entered Establishment.
Figure 74 New Establishment Record
When entering the data, please take into consideration the following information on the fields.
Field
Value
Country Code
Code of the country the establishment is located in.
Country Name
Name of the country, the establishment is located in. This field is filled in automatically
when you enter the CountryCode
Street Name
Street and house number
City
Name of the city where the establishment is located
Establishment Code
Unique combination of letters and figures (alphanumeric combination). Depending upon
the system settings it may be assigned to an Establishment automatically or manually7.
Establishment Name
Official name of the establishment
State
State of the country (if any)
7
If you try to enter one the same code for two different Establishments, the system will warn you.
User Manual
68
Field
Value
Zip-Code
ZIP of other postal code
Establishment Type
Code
Code of establishment type (Manufacturer, Retailer, Doctor, etc.)
Establishment Type
Name
(See also
Establishment Type
Master section)
Country Name
Filled in automatically according to EstablishmentTypeCode
Alternative name of the country. For example:
United Kingdom of Great Britain and Northern Ireland
instead of United Kingdom in the System
EAN Code
13-digit code (also known as bar-code) given to organizations by EAN International
InActive
The indicator showing if the establishment is still functioning or not.
As the establishments sometimes need to be contacted not only in English, but also in other languages
(for example in the official language of the country of residence, or official language of the country of NDS
user), it is necessary to enter the contact information in various languages. For this purpose the
‘Language’ tab is provided in Establishment Master (see the Figure above).
Field
Language Code
Value
Code of language.
Establishment Name
Name of the Establishment corresponding to the LanguageCode. It will be used
throughout the system when the respective Language is selected by a user for NDS.
Street Name
Name of street corresponding to the LanguageCode. It will be used throughout the
system when the respective Language is selected by a user for NDS
City
City of the establishment corresponding to the LanguageCode. It will be used
throughout the system when the respective Language is selected by a user for NDS
State
Country Name
Comment
Name of state or province corresponding to the LanguageCode. It will be used
throughout the system when the respective language is selected by a user for NDS
Alternative name of the establishment country corresponding to the LanguageCode. It
will be used throughout the system when the respective language is selected by a user
for NDS
Details of communication (phone, telex numbers, e-mail, etc.)
You may use the Communication Details tab to enter the data on the communications with the
establishment.
User Manual
69
Figure 75. 'Communication Details' tab
Field
Value
Communication Code
Code of particular way of communication
Communication Name
Way of communication (phone, fax, telex, etc.)
Comment
Details of communication (phone, telex numbers, e-mail, etc.)
If the Establishment stops its activity, NEVER DELETE IT.
Note. Deletion of an establishment that was involved in one or several transactions may cause
serious data insufficiency. To prevent this problem, the InActive field was introduced in the
system.
When you check the InActive field, specify the date it stopped its activity from and the code of
establishment that will take over the activities of the latter.
See also Establishment Type Master section.
3.6.2. How to copy the Establishment Details
In practice sometimes you may have to enter several Establishments that are similar to each other. In this
case it is better to use the <CopyDetails> button of Establishment Master.
For example, a given establishment is registered for Uzbekistan, and we need to enter several other
establishments registered in the same country and city.
Figure 76. Copying Establishment Detail
User Manual
70
For this purpose we need to find the proper record in establishment master by means of navigation bar or
querying. After that press the <CopyDetails> button. The following dialog box will appear.
The new record will be created. In order not to confuse it with the old one, the system marks it as a copy.
Figure 77. Result of copying Establishment details
Now you can make necessary alterations and save the record as a new establishment.
3.6.3. How to indicate the sites and headquarters
NDS 6.0 gives an opportunity to trace the trade in narcotic drugs and other controlled substances by
networks of Establishments, i.e. by headquarters and their subordinate sites.
You can indicate whether the Establishment is a site or headquarter in the Site Management section of
the Establishment Master.
Figure 78. Site Management Section
User Manual
71
Note. You may turn the site management section on or off in nds.ini file. Just check the
parameter of SHOWSITES string in [NDS] section of nds.ini file. If SHOWSITES=Y the site
management section will be displayed, if not – concealed.
If the establishment is the headquarter for one or more other establishments, just leave the HQCode and
HQName blank. If it is a site, just indicate the code/name of its headquarters and then save the record.
3.6.4. Establishment Type Master
In some cases, when you cannot find the necessary Establishment Type, you may define it by yourself.
•
Double-click on the EstablishmentTypeCode field. The Establishment Type Master window will
open.
•
Enter the necessary Code and EstablishmentTypeName
•
Define if the establishment will be or will not be allowed to keep stocks (AllowedToKeepStocks)
•
Save the record.
Figure 79 Establishment Type Master
According to the 1961 Convention, the stock of manufacturing and wholesale trading companies must be
reported as ‘Stocks’ on FORM C; however, retailers’ stocks must be reported as ‘Consumed’ on FORM
C. NDS is flexible in naming establishment types. To distinguish between manufacturers, wholesalers and
retailers, NDS has an AllowedToKeepStocks 8 (YES or NO) drop-down in the Establishment Type
Master.
If the drop-down is set to YES, the system will calculate any substances on the stock of any
establishment of that type as ‘kept in stocks’ in the EMM and on FORMS C, and D; otherwise, the system
will calculate it as ‘consumed’.
3.6.5. How to export data on establishments (Establishment Export)
Unlike previous versions, NDS 6.0 gives its users an opportunity to export establishments-related data in
XML format.
For this purpose you are supposed to use the Export Establishment List screen. It may be invoked as
follows:
: Masters Æ Establishment Æ Establishment Export Û
To export the establishments-related data:
• select the country you are going to fetch the data upon;
• select the establishments you need
• press <Export> button to start generation of XML file.
The proper XML file will be generated and saved in a folder indicated in nds.ini file.
8
In fact, this flag does not mean that it is prohibited for hospitals or other retailers have controlled substances in stocks.
User Manual
72
Figure 80. Establishment Export
3.6.6. How to import data on establishments (Establishment Import)
NDS 6.0 enables the user not only to export, but also to import the establishment-related data in XML
format.
Special Import Establishment List screen may be started as follows:
: Masters Æ Establishment Æ Establishment Import Û
Figure 81. Establishment Import
User Manual
73
To actually import establishment-related data into the system, do the following:
• Download the necessary XML file;
• Open Import Establishment List screen as written above;
• Browse the necessary file with Select File dialog box, press the <Open> button;
• Select the establishments you need;
• Press the <Save> button to store newly imported establishments in the system.
3.7. Demographics
This sub-menu invokes the master forms used for managing the data in drop-downs related to various
countries, members to drug-control Conventions.
3.7.1. Country Master
: Masters Æ Demographics Æ Country Master Û
This form manages the name of a Country as displayed in Country Code and Country name drop-downs
throughout NDS as well as other data, associated with the particular Country.
The Country Master screen consists of Header and three tabs:
• ‘Language’
• ‘Convention’
• ‘Annual’
The following data should be entered in the Header section
Field
Value
Country Code
Three-letter code that represents the country throughout the system
Country Name
Name of the country displayed according to current Language selected for the system
(see ‘Language’ tab)
Independence Date
Date of Countries Independence
Country Size
Area of the country (in square kilometres).
Time Zone
Time difference from GMT
Phone Number
Country’s International phone code
Telex Number
International telex tag for this country
Internet Domain
Two-letter country domain (e.g. us for USA, ru for Russian Federation, ge for Germany,
etc.)
CCC Code
Code of the Customs Cooperation Council
ICPO Code
Code for the Country assigned by International Criminal Police Organization (Interpol).
ISO Number
Code for the Country assigned by International Standardization Organization (ISO).
User Manual
74
Figure 82. Country Master
3.7.1.1. Indication of Country Name (‘Language’ tab)
The Language tab is intended for indication of CountryName in various languages supported by the
system. If some language is selected in system Language Settings menu, the respective
CountryName will be displayed in all drop-downs.
The following fields should be filled in the ‘Language’ tab.
Field
Value
Language Code
Code of the language, for which the current CountryName will be displayed
Country Name
Name of the country as displayed according to LanguageCode
Sort Description
Defines the order in which the country name will be displayed in CountryCode and
CountryName drop-downs
Comments
Any relevant remarks concerning the country name
3.7.1.2. Indication of Conventions the Country is a member to (‘Convention’ tab)
This tab is used in order to indicate whether the country is a member to certain drug-control Conventions,
i.e. whether it shall or shall not observe certain control regulations, as well as for certain statistical
purposes.
User Manual
75
Figure 83. ‘Convention’ tab
The following data should be indicated:
Field
Value
Header section
Convention Code
Code of the Convention the country is a member to.
Details section
Language Code
Code of the language, for which the current ConventionName will be displayed in
country-related records/reports
Convention Name
Name of the Convention corresponding to the ConventionCode.
Sort Description
Defines the order in which the ConventionName will be displayed in drop-downs
Comments
Any relevant remarks concerning the Convention
3.7.1.3. Indication of annual statistics for the Country (‘Annual’ tab)
In this tab you are supposed to indicate the data required by INCB to be reported annually on Form B
(See also Narcotics. Form B).
Figure 84. 'Annual' tab
User Manual
76
The following data should be indicated:
Field
Value
Year
The year, to which the below mentioned statistics for the Country relates
No. of Inhabitants
Number of inhabitants as of the year in question
Income
GDP per capita as of the year in question.
No. of Doctors
Number of practicing doctors
No. of Dentists
Number of practicing dentists
No. of Vets
Number of practicing veterinarians
No. of Pharmacies
Number of registered pharmacies involved in retail trade of medicines.
No. of Hospitals
Number of registered hospitals
No. of beds
Number of hospital beds in the country.
Comments
Any relevant comments on the above-mentioned statistics (sources, relevance, possible
discrepancies, etc.)
3.7.2. City Master
The City Master is used to indicate the names of various cities in various countries.
City Master may be invoked in two ways:
1) from the main menu
: Masters Æ Demographics Æ City Master Û
2) by double-clicking the City drop-downs in Customs Point Master.
Figure 85. City Master
User Manual
77
You will need to enter the following data:
Field
Description
Header section
Country
Code or name of the country the city is located in.
City
Name of the city.
ZipCode
Postal code of the city.
Comments
Appropriate comments concerning the city.
Details section
LanguageCode
Code of a language in which the city name will be displayed
CityName
Name of the city
SortDescription
The contents of this field defines the place of the city name in the City drop-downs of
Customs Point Master
Comments
Necessary comments concerning the city name
See also:
Customs Point Master
3.7.3. Area Master
The Area Master is used to manage the data related to various areas of various countries.
In NDS the term ‘area’ means the same as terms ‘territory’ of the Single Convention and the term ‘region’
of the 1971 convention and represents
‘a part of the Country treated as a single entity for certain, including but not limited to
statistical, purposes’.
The Master may be started from the Main Menu:
: Masters Æ Demographics Æ Area Master Û
Alternatively, it may be started by double clicking on any AreaCode or AreaName drop-down box in the
system.
Figure 86. Area Master
User Manual
78
The following data shall be indicated:
Field
Value
Header section
Country Code
Code of the country the area is a part of
Country Name
Name corresponding to the CountryCode
Area Code
Unique code for the area. It should not repeat throughout the system. If you indicate the
code already present in NDS, the system will warn you with relevant message.
Area Size
Area size in square kilometres
Details Section
Language Code
Code of the language, for which the current AreaName will be displayed in respective
drop-downs/records/reports
Area Name
Name that will be displayed in drop-downs/records/reports when the language
corresponding to the LanguageCode is selected by a user.
Sort Description
Defines the order in which the area name will be displayed in related dropdowns/records/reports
Comments
Any relevant comments and/or remarks
3.7.4. Region Master and Region-Country Relation Master
As the Areas are parts of Countries, the Countries may be parts of Regions. The concept of ‘Region’ in
NDS is different from the one described in the 1971 Convention and stands for:
‘A group of countries united by geographical, political or other characteristic features for statistical or other
purposes and treated as a single whole’.
Region Master is intended only for indication of RegionName in various languages, while Region-Country
Relation Master is used in order to indicate which countries comprise certain region.
3.7.4.1. Indication of Region Name (Region Master)
As other Masters, Region Master may be invoked in two ways:
1) From the Main Menu:
: Masters Æ Demographics Æ Region Master Û
2) By double-clicking on any RegionCode or RegionName drop-down throughout the system.
Figure 87. Region Master
User Manual
79
The following fields should be filled in:
Field
Value
Header section
Region Code
Unique code for this region. It shall not be repeated in the system. However, if you try to
enter the code, which is already assigned to some other region, the system will issue a
warning message.
Details Section
Language Code
Code of the language, for which the current RegionName will be displayed in respective
drop-downs/records/reports
Region Name
Name that will be displayed in drop-downs/records/reports when the language
corresponding to the LanguageCode is selected by a user.
Sort Description
Defines the order in which the region name will be displayed in related dropdowns/records/reports
Comments
Any relevant comments and/or remarks
3.7.4.2. Indication of the Countries constituting the Region (Region-Country Relation Master).
The Master may be started as follows:
: Masters Æ Demographics Æ Region-Country Relation Master Û
Figure 88. Region-Country Relation Master
User Manual
80
The following data should be indicated:
Field
Value
Header section
Region Code
Code of the region
Region Name
Name of the Region corresponding to the RegionCode
Country Code
Code of the country, constituting the region
Country Name
Name of the Country corresponding to the CountryCode
Relation Code
Code of the relation (a treaty, act, pact, other document or characteristic feature on the
basis of which the countries are united into the region)
Relation Name
Name corresponding to the RelationCode.
Details Section
Language Code
Code of the language for which the relation name will be displayed in dropdowns/records/reports
Relation Name
The relation name for the current language code
3.7.5. Indication of official signatories for the Country (Signature Master)
When the competent authority for a certain country has a substantial workload of issuing authorizations
for import or export of narcotic drugs and psychotropic substances, it may become necessary to automate
the process of signing the import authorizations, import certificates and export authorizations. The
Signature Master makes it very easy-to-do.
Start the Master as follows:
: Masters Æ Demographics Æ Signature Master Û
Figure 89. Signature Master
User Manual
81
To enter a new Signature, do the following:
1) Scan the real signature
2) Save it in Windows Bitmap (*.bmp) format
3) Add new record with the Signature Master
4) Enter UserID (two-letter code, in most cases the person’s initials)
5) Enter the person’s Name and/or Position Title into UserName field
button and browse the *.bmp file containing the person’s signature
6) Press the
7) Save the record
Note. Steps 1, 2, and 6 are optional. In fact, the scanned images of signatures are not widely
used due to sensitivity of the issue.
3.7.6. Indication of Customs Points of the Country (Customs Point Master)
The Customs Point Master is used to manage data displayed in PointOfEntry and PointOfExit dropdowns of the Import-Export module.
The Master may be invoked in two possible ways:
1) From the Main Menu:
: Masters Æ Demographics Æ Customs Point MasterÛ
2) By double-clicking on the PointOfExit or PointOfEntry drop-downs
Figure 90. Customs Point Master
User Manual
82
The following data should be indicated:
Field
Value
Header section9
Country
Code of the country to which the customs point belongs, as well as the name
corresponding to the code
City
Code or Name of the city the customs point is actually located in.
Customs Point
Name of the customs point as entered in details section according to the language
selected.
Details Section
Language
Code of the language for which the PointName will be displayed
Point Name
Name of the customs point to be displayed when the language corresponding to
LanguageCode is selected.
Address
Full postal address of the customs point in the language corresponding to the
LanguageCode
Comments
Any relevant comments or remarks concerning the PointName
9
All fields in the Header section of this screen are mandatory.
Chapter 4. Import and Export Transactions
The international control of controlled substances is carried out on two levels: domestic and international
ones. In this Chapter we will learn in details how the import and export transactions shall be recorded and
accounted for with NDS.
Any international transaction with controlled substances consists of the following stages:
Import transaction
Export transaction
Request for Import Authorization
Request for Export Authorization
Issue of Import Authorization
Issue of Export Authorization
Request for Import Certificate(s)10
Endorsement
Issue of Import Certificate(s)1
Endorsement
4.1. Import Transaction Documents
4.1.1. Import Authorization Request
The Requests for import authorizations are filed with the competent authority by the establishments that
are intending to import the controlled substances. Usually the employees of the competent authority enter
the requests into NDS.
To create the import authorization request, you should first create an import document.
: Import/Export Æ Import Export Document Û Imp/Exp Flag Æ Import Û
Note. You will not be able to make any actions until you have chosen the proper value for
Imp/Exp Flag.
The Imp/Exp Flag switch defines whether the document will be regarded by the system as import or
export one. Respectively, the system will provide a specific set of options for the document. Thus, if you
choose the Import option, you will be able to create an import authorization request, then import
authorization itself, proper certificates (if needed) and, finally, an endorsement. However, if you choose
the Export option, then you will only be able to create an export authorization request, export
authorization and proper endorsement.
After you have filled in the Imp/Exp Flag field, please fill other Header fields as well. If you cannot find
the necessary value in a drop-down list (for example, in CountryCode or Exp
(Imp).EstablishmentCode), just double-click the Code field, and make the proper additions or changes
11
in the correspondent Master form .
Note. The fields which are mandatory, are marked with a red dot
10
11
In case of partial shipment only.
See Chapter 2, ‘Types of Fields’ section for more details.
User Manual
84
After filing-in the general information on particular transaction (header section), you will be able to create
an Import authorization request. Just click on the proper tab.
Figure 91 Example of Import Authorization Request
Note. Please pay attention to correct indication of the RequestNumber, as this number will be
later used for issuing of import authorization. Depending upon settings in User Preferences, this
field may be filled either automatically or manually the last case the numbering policies, if any
exist, must be strictly observed. Also, the request number may be automatically set depending
on the type of the requested substance(s). The last feature is also defined in User Preferences
section.
Signature field. Being a drop-down box, it allows the user to put signatures of designated persons on the
import authorization that is being printed. Using the Signature Master you may enter names and
surnames of people having signing power as well as the image of their signatures in *.bmp format. (See
also Signature Master)
This feature enables responsible persons to save time. However, because of particularities of document
management in different countries, the feature is optional.
Another group of fields we should pay a decent attention to, is the transportation-related fields.
Itinerary. Here you should indicate the full path of transportation of the substances to be imported.
Country of origin, country of destination and all transit countries should be listed. For example, if the
substances are to be imported to Russian Federation from Germany by railroad, then the Itinerary field
should look as follows:
From Munich (Germany) to St. Petersburg (Russia) by railroad via Poland
Point of Entry. Here it should be stated the code of customs point where the controlled substances are
supposed to cross the border of an importing/transit country upon entering. The value is selected from the
drop-down box (see also Customs Point Master)
Point of Exit. The exit customs point where the controlled substances are supposed to exit the country.
The value is selected from the drop-down box (see also Customs Point Master)
Mode of Transport. The means of transportation used for physical transfer of controlled substances.
User Manual
85
Note. You must indicate the customs points, not the actual points of border crossing. A vivid
example of such necessity is transportation by air. In this case it is nearly impossible to indicate
the actual point of border crossing, while the last customs point will be that located at the airport
of departure.
The last step in creating an import authorization request, and the most important one, is entering the
substances to be imported.
You can choose the substances using the special drop-down box, by either selecting from the list, or
entering the assigned substance code.
When entering the quantity of the substance to be imported, you may use the <Info> button
.
Figure 92. Substance/preparation information pop-up
When the data on the controlled substance are entered, you should save the prepared request.
Once you have entered all the necessary details, save the request. After saving it will be recognized by
the system as “open” until you have created an import authorization on its basis.
4.1.2. Import Authorization
Import authorizations are issued on the basis of entered requests.
There are two ways of opening the previously entered request.
1) Find it with a query in ImportExport Document form;
12
2) Open it with OpenRequest menu item ,
: Import/Export Æ Open Requests Û
So that the dialog window below will appear.
Figure 93 Open Requests dialog window
12
This option is more convenient when you have a number of entered Requests pending authorization.
User Manual
86
In the first case, after querying, click on the Import Authorization tab. In the second case, just doubleclick on the RequestNumber field; the request will be opened in the Import Authorization tab.
Figure 94 Example of Import Authorization
As you can see, there are two new fields in the ‘Import Authorization’ tab. In fact, that is the only
difference between the latter and the ‘Import Authorization Request’ tab.
Thus, all you are supposed to do to create an import authorization, is to fill in those two fields:
ApprovalDate and ApprovedQty (approved quantity).
Note. The inner logic of NDS does not allow the ApprovedQuantity to be greater than the
RequestedQuantity.
When you fill them in, the RequestNumber field will turn red.
Save the Import authorization. When it is saved, the import authorization request will be deleted from the
list of open requests and any operations on it, including deletion, will be banned. Now, to make changes
in the request you should delete the authorization
When the authorization is being saved, NDS may automatically compare the quantity with the one set for
the importing country in Estimates (Assessments) approved by INCB. If the requested substance is not
listed in Estimates (Assessments) or its quantity exceeds the permitted quantity, NDS will inform you
about the violation with an error message.
Upon saving, NDS also may check if the license for the operations with controlled substance is available.
If not, the system will inform you about lack of license with proper error message.
The necessity for checking of estimates/assessments, licenses, license quantities as well as of export
and import limits is defined for any particular substance in the ‘Special Conditions’ tab of the Substance
Master.
Figure 95. Substance-related record in Substance Master
User Manual
87
Once the Import authorization is issued, it may be sent to the competent authority of exporting country in
printed version or digitally so that the respective export authorization will be issued.
The last stage of importing cycle is the endorsement, which is to be made on the import authorization
when it actually arrives together with the controlled substances.
However, sometimes the importing establishment may need to import the substances part by part in
several shipments. In this case it should also request for and obtain Import Certificates. Although INCB
does not recommend such practice, a need occurs from time to time. That is why in the next two sections
we will describe how to prepare the Import Certificate Request and issue Import Certificate(s) using NDS.
4.1.3. Import Certificate Request
13
You may create an import certificate request instantly by going to the ‘Import Certificate Request’ tab right
after saving import authorization. Otherwise, you may first query the necessary import authorization
record (see Chapter 2. General functionality. Queries) and then open the ‘Import Certificate Request’ tab.
The fields in this tab are nearly the same as in previously reviewed tabs, so are the rules of working with
such fields. Only one field is added, which is Imp.Auth.#, indicating that this particular certificate is issued
as a supplement to some already issued Import Authorization.
However, unlike the import authorization related tabs, the SubstanceCode drop-down ‘contains’ only the
substances and/or preparations indicated in the import authorization. Thus in our example the import
authorization was issued only for morphine, hence only morphine is shown in the drop-down box.
Figure 96. Choosing the Authorized Substances for Import Certificate
The example of the import certificate request is shown in the figure below.
Figure 97. Import Certificate Request
13
In some countries the import certificates are not acceptable. Thus, depending upon the settings of NDS for such particular
countries, the ‘Import Certificate Request’ and ‘Import Certificate’ tabs may be unavailable.
User Manual
88
4.1.4. Import Certificate
To issue an import certificate, as in case with the import authorization, it is enough to enter the approval
date and quantity to be approved in the proper fields (ApprovalDate and ApprovedQty respectively)
Figure 98. Import Certificate
When these values are entered, the automatically generated RequestNumber turns red.
Note. The system automatically sums up the quantities of all substances in all certificate
requests being approved. If such sum exceeds the quantities approved in import authorization,
the system will display a warning/error message.
In our example, the import authorization was issued for 10 litres of methyl ethyl ketone. Let us try to file
two import certificate requests for 7 litres and 6 litres so that we will try to intentionally exceed the already
authorized limit.
When we try to approve the first certificate for 7 litres, no problem occurs because we still are within the
authorized limit. However, when we try to approve the second certificate for 6 litres, the system will
respond with the following message:
Figure 99. Warning Message
User Manual
89
Now if you click on the <OK> button, the authorized limit balance will be shown automatically in the
Approved Qty field.
Now you may save the import certificate. Upon saving you will be able to make NO changes in original
import certificate requests, unless you first delete the import certificate itself.
4.2. Export Transaction Documents
4.2.1. Export Authorization Request
To create an export authorization request we should first create an export document.
: Import/Export Æ Import/Export Document Û
Choose Export option in Imp/Exp Flag drop-down.
The window is nearly the same as in case of import document, but the fields related to the exporting
country are located on the left side, and the ones related to the importing country – on the right side.
Figure 100. Export Document Header
Fill in the header fields related to exporting and importing countries, establishments and competent
authorities as we have described in Import Authorization Request section of this Manual, and then go to
the ‘Export Authorization Request’ tab.
Note. Please pay attention to correct indication of the RequestNumber, as this number will be
later used to issue export authorizations. Depending upon settings in User Preferences, this
field may be filled either automatically or manually. In the last case the numbering policies, if
any exist, must be strictly observed.
As you can see in the picture above, the only difference between the import authorization request and
export authorization request is two fields (encircled) in which the reference number of import authorization
or import certificate and its date of issuance are to be entered.
Other fields are filled in as it has been described in the Import Authorization Request section.
User Manual
90
Figure 101 Example of Export Authorization Request
Do not forget to save the request after entering necessary values.
4.2.2. Export Authorization
In order to authorize the export authorization request, you should first select the necessary requests by
means of Open Requests menu option or by querying, as it has been described previously in the Import
Authorization section.
The only values you have to enter are the date of approval (ApprovalDate) and the quantity approved for
export (Approved Qty).
Note. Upon saving, the system may automatically check for availability of license(s) necessary
for transactions with the substances stated in the authorization as well as the
estimates/assessments, license quantities, import limit, and export limit. The necessity of such
check is stated in the ‘Special Conditions’ tab of Substance Master for any particular substance.
Figure 102 Example of Export Authorization
At the moment of crossing the customs border of exporting country, the export authorization must be
endorsed by the customs body and the endorsement must indicate the actual quantity of exported
substances.
User Manual
91
4.3. Endorsements
As mentioned above, the authorizations for export or import of controlled substances are endorsed upon
exit from an exporting country or upon entry to an importing country. The endorsements themselves serve
as indication of completion of export or import transaction.
Technically, there are nearly no differences between endorsements on export authorizations or on import
authorizations (certificates), because any endorsement must contain the date of import (export) and the
actual quantity of imported (exported) substances. That is why there is only one ‘Endorsement’ tab in
NDS, which is used for creating endorsements for both import and export transactions.
To endorse the import/export document, find the necessary one by means of querying and click on the
‘Endorsement’ tab.
Choose the proper number of export authorization, import authorization or import certificate from the
14
Authorization/Certificate# drop-down .
The system automatically detects whether one or more Import Certificates have already been issued and
displays their numbers in the Authorization/Certificate# drop-down box.
Note. If there are several import certificates, the endorsements should be made on each of
them. That means that you should create endorsements in the system for each of them as well.
Thus, when you finish and save the first endorsement, create a new record and fill in necessary
fields. The system will warn you if you try to make more than one endorsement for one
certificate.
After that most fields of this tab will be filled in automatically with data already contained in respective
authorization (certificate).
Figure 103 Example of Export Authorization Endorsement
14
In case of Certificates, only the Numbers of Certificates, not Authorizations, will be shown in the Authorization/Certificate# dropdown box.
User Manual
92
What you will need to pay attention to are the following fields:
Field
Value
Endorsement Date
Actual date of export/import
Import/Export
Reference #
Number of the corresponding document: import authorization or import certificate (when
exporting) or export authorization (when importing)
Preparation Type
Type of exported preparations (see Preparations section for details)
No of Units
Number of actually exported preparation units, i.e. packs, boxes, etc. (see Preparations
section for details)
Endorsed Qty
The actually imported/exported quantity of controlled substance
Note. The EndorsedQuantity should not exceed the quantity stated in the respective
authorization, i.e. it should be less or equal than the authorized quantity. If not, the system will
notify you about the violation with a warning message.
Note. When you have saved the endorsement, you are not able to change the
EndorsementDate. If you try to do it, the following warning message will be shown:
This feature prevents the occurrence of errors in the INCB reports, related to change of
endorsement dates. However, if you do need to change the date, delete the endorsement
record and create a new record with proper date.
When the respective authorization/certificate is endorsed, the substances indicated in it are considered
exported or imported and respective changes are being made by the system in the following modules and
reports depending upon whether the endorsed substance is a narcotic, psychotropic or precursor.
Substance
Updated modules
Narcotic
EMM, Form A, Form C
Psychotropic
EMM, Form A/P, Form P
Precursor
EMM, Form D
User Manual
93
4.4. Additional information on import/export transaction
Unlike previous versions, NDS 6.0 provides an opportunity to record more information about particular
import/export transaction. Thus, import/export module contains two more tabs, called ‘Remarks’ and
‘Additional Establishments’.
In the ‘Remarks’ tab there can be indicated the proposed date of export, remarks on the transaction,
conditions of transaction as well as several comments by the customs. These fields also may be used for
additional information in case the legal requirements of some particular country are not fully covered by
the standard fields of Import/Export module.
Figure 104. 'Remarks' tab
Also you may attach files, which may be useful for processing of particular transaction. Just click the
<Attachment> button and choose necessary MSWord document or scanned document to be attached.
Figure 105. Attachments pop-up
Another tab, which has appeared in NDS 6.0, is the ‘Additional Establishments’ tab. Here you can
indicate various establishments (see the definition in Establishment Master) that are involved in this
particular import/export transaction, such as carrier, ultimate consignee, broker, etc. This piece of
information is very useful for further analysis and detection of establishments potentially involved in illegal
trafficking of narcotic drugs, psychotropic substances and precursors.
User Manual
94
Figure 106. 'Additional Establishments' tab
4.5. Import/Export Reports
The Report Queries in Import/Export module are intended for rapid querying and processing of data.
You may select data easily by means of various criteria, which embrace all aspects of work with import
and export transactions.
The logic of work with all ‘reports’ is the same: the only thing you should do is select necessary criteria
(<ExecuteQuery>) button. The system will browse the corresponding records and
and press the
display them in table view in the lower part of the screen.
4.5.1. Import/Export Report
The most comprehensive form is Import/Export Report.
: Import/Export Æ Import/Export Report Û
Figure 107. Import/Export Report
User Manual
95
4.5.2. Import report
: Import/Export Æ Import Report Û
This report shows the quantities on other related data on import of substances from a country indicated in
the TradingCountry field.
When the query is done the results are shown first as a list of substances. So, you should click onto the
sign of the right side to view the details.
Please note, that the transactions retrieved by this report are not necessarily completed, i.e. there can be
no endorsements made on these transactions.
To view the completed transactions, i.e. the ones on which the endorsements are made, use the
Endorsement Report - Import Transactions.
Figure 108. Import Report
4.5.3. Endorsement Report - Imports
: Import/Export Æ Endorsement Report – Imports Û
Figure 109. Endorsement Report - Imports
This report is used to briskly retrieve the data on the completed Import transactions, i.e. the transactions
on which the endorsements are already made and the substances that are accounted for as ‘imported’.
When the query is done the results are shown first as a list of substances. So, you should click on the
sign of the right side to view the details.
User Manual
96
4.5.4. Certificates Report
: Import/Export Æ Certificates Report Û
Figure 110. Certificates Report
This report is intended for retrieving information on the import certificates issued in the user’s default
country for import of controlled substances from TradingCountry.
When the query is done the results are shown first as a list of substances. So, you should click on the
sign of the right side to view the details.
4.5.5. Export Report
: Import/Export Æ Export Report Û
Figure 111. Export Report
This report shows the quantities on other related data on export of substances to a country indicated in
the TradingCountry field.
When the query is done, the results are shown first as a list of substances. So, you should click on the
sign of the right side to view the details.
Please note, that the transactions retrieved by this report are not necessarily completed, i.e. there can be
no endorsements made on these transactions.
To view the completed transactions, i.e. the ones on which the endorsements are made, use the
Endorsement Report - Export Transactions.
User Manual
97
4.5.6. Endorsement Report – Exports
: Import/Export Æ Endorsement Report – Export Transactions Û
Figure 112. Endorsement Report - Export Transactions
This report is used to briskly retrieve the data on the completed export transactions, i.e. the transactions
on which the endorsements are already made and the substances that are accounted for as ‘exported’.
When the query is done the results are shown first as a list of substances. So, you should click on the
sign of the right side to view the details.
4.6. XML Export
There is a new feature in NDS 6.0, i.e. the opportunity to export the export-import data in XML format. For
this purpose a special button is provided in the upper right corner of the Import-Export Document screen.
When you press it, the XML-generation dialog box will appear.
Choose the necessary options for XML export and press the <Start> button. The XML-file will be
generated.
Chapter 5. Licenses
Licenses in NDS are documents issued by the competent authority of a given country legally authorizing
its resident establishments to handle controlled substances or deal with them.
The process of issuing a license, alike with import/export authorizations, is divided into two stages:
request of license and authorization of such a request.
5.1. How to create a License Request
: License Æ License Request Û
Figure 113. License Request Form
Most of the fields are already familiar to you, as they have been described in sections dedicated to
Import/Export module and Establishment Master.
Field
Value
Request Number
The number of request. Can be assigned automatically, depending upon system
settings
Request Date
Date the request has been filed.
Valid From
Date the validity of the license is supposed to start from
Valid To
Date when the license is supposed to expire
Country Code
Code of the country of the competent authority
Country Name
Name of the country (filled in automatically)
CA Code
Code of respective competent authority
User Manual
100
Field
Value
CA Department Name
License-issuing department of the competent authority (filled in automatically)
Establishment Code
The code of establishment applying for license
Establishment Name
Name-tag of EstablishmentCode (filled-in automatically)
Conditions
The special conditions to be included into the license’s wording.
Contact Person
An employee of the establishment responsible for license management
E-mail
E-mail address of the establishment for contacts concerning licensing
Phone Number
Phone number of the establishment
Fax
Fax number of the establishment
Remarks
Any useful and applicable remarks
5.1.1. Defining substances to be licensed
After that, you should indicate the substances for which the license is issued. This can be done in
SubstanceDetails tab.
Figure 114 Substance Details tab
We would like to draw your attention to the Type selector in the right part of the tab.
This selector is used to choose the category of substances (either pure substances and salts, or
preparations, or groups) to be displayed in the Subst/Prep/Group (substance/preparation/group) dropdown box. So, if a Preparation option is selected, then only preparations will be displayed.
This feature enables you to enter the substance- and preparation-related information even faster.
The Subst/Prep/Group Name displays the text tag for the code shown in the Subst/Prep/Group dropdown menu.
Note. The RequestedQty may be left blank. That will mean that the establishment is entitled to
deal with unlimited quantity of the specified substance.
The rules of work with other fields of this tab are the same as the rules of work with fields in tabs of
Import/Export module.
User Manual
101
5.1.2. Setting a type of License
After you have completed filling-in the header of the request, you should define the type of license being
issued. To do this click on the LicenseTypes tab and choose necessary value from the
LicenseTypeCode drop-down menu.
Note. You should select at least one license type. If you do not choose any, the system will
warn you with appropriate message.
If you need to create new License type, double-click on the LicenseTypeCode drop-down tab to get
access to the License Type Master (see License Type Master section for more information).
Figure 115 ‘License Types’ tab
One license may include several types of activity. As you can see on the figure above, an establishment
is requesting a license for manufacturing and retail trade in the controlled substances.
5.1.3. Linking substances to correspondent types of activity
Sometimes one license allows an establishment to carry out several activities with different substances,
but simultaneously some activities are allowed only with particular substances.
Note. If a license is given for a pure substance, it automatically extends to all its salts. On the
contrary, license issued for a particular salt is valid for this salt only
Figure 116 Linking Substance Details tab
To link a substance or a preparation to the necessary LicenseType,
• indicate the site (if the license is given for HQ) of single establishment being licensed in the
SiteCode / SiteName fields
• indicate the type of license granted to this particular site (LicenseType field)
User Manual
102
As you may have already noticed, the icons representing substances and preparations are different in
order to facilitate their visual recognition.
5.1.4. Attaching clearance information
Additional information necessary to be provided to the competent authority for obtaining a license may be
recorded in the Clearance Information pop-up window, which is invoked by pressing a <Clearance
Information> button.
Figure 117. Clearance Information pop-up window
The information may be attached in form of MS Word documents or in form of scanned paper documents
in *.bmp format.
Note. Double-click respective WordDocument or ScannedDocument field to browse a proper
file from your hard-disk.
5.2. How to Approve a License Request
The mechanism of approving a license request is similar to that of authorizing an import authorization
request.
: License Æ Open Requests Û
Figure 118. Open Requests window
Note. If there are a substantial number of open requests, you may use the RequestDateFrom
and RequestDateTo fields to swiftly make a query on the known dates of the necessary
Request. You may also use a sorting functionality to sort the request records in either
ascending or descending order (see. ‘Sorting’ section of Chapter 2. General Functionality).
User Manual
103
Double-click on the RequestNumber field to open the request authorization window with the request
data.
Figure 119. License Authorization Form
All you have to do in order to authorize the request is to enter necessary quantities into the ApprovedQty
field on the Substance Details tab.
Note. The RequestedQty may be left blank in case the establishment requests an unlimited
license. However, you may specify some fixed quantity in the ApprovedQty field.
Note. The ValidFrom date cannot be less than ApprovalDate.
When you save the request authorization, you issue the license, and from this point on, it will be
considered by NDS in all transactions carried out by the licensed establishment.
5.3. How to revoke the License
In practice there are cases when the issued licenses must be revoked, i.e. their action should be
terminated, due to whatever reason, before the designated term of expiration.
You may revoke a license using the same form as for license approval.
: License Æ License Approval Û
Here you should just enter a date starting from which the license will be revoked (RevokeDate) and enter
the RevokeReason in the adjacent field.
When you revoke the license, it will not be considered by NDS and the latter will warn of the absence of
proper license unless another license is issued.
User Manual
104
Figure 120 Revoke of the License
When you save the record (i.e. revoke a license) the system issues a warning message as follows:
Once revoked, a license cannot be re-activated, unless you delete the approved/revoked license and
create a new license authorization on the basis of license request.
5.4. How to Suspend a License
The action of a license can be interrupted by the competent authority on an interim basis.
There is a special license suspension form in NDS.
: License Æ License Suspension Û
Upon opening this form, enter the number of license to be suspended into the LicenseNumber field or
query the license data. You may also choose the necessary license number from the LicenseNumber
drop-down box, though it is not very convenient if the system already contains data on lots of licenses.
When the LicenseNumber is entered by either of two above-mentioned ways, the other data on this
license will be browsed automatically.
Figure 121. License Suspension Form
User Manual
105
As in case with the license revoke, all you need to do is enter the necessary SuspensionDate and
Suspension Reason.
Note. SuspensionReason field is mandatory. The NDS will not suspend a License until the
reason has been specified.
When the license is suspended, the system will warn you about it any time the establishment will be
involved in import/export transactions with controlled substances, specified in the license.
5.5. How to Re-activate a Suspended License
For re-activation of suspended licenses there is a special form in License menu.
: License Æ License Reactivation Û
Figure 122. License Reactivation form
Two fields should be filled in order to re-activate the license: ReactivateDate and ReactivateReason.
5.6. How to Renew a License
There is a difference between renewal and reactivation of licenses.
Note. Renewal means extension of action period of a valid or expired license. Thus you may
not renew the revoked or suspended license.
There are two renewal forms provided in NDS: one for renewal of the already expired licenses and
another one for renewal of licenses that are still active.
User Manual
106
5.6.1. Extension of Valid License.
: License Æ License Renewal Æ Extend Valid Licenses Û
In the displayed form you should fill in the following fields:
Field
Value
LicenseNumber
This drop-down box shows the numbers of currently valid licenses.
ValidTo
New expiry date.
RenewalDate
Date the license is being renewed
ApprovalDate
The date the license has been approved.
Figure 123. Fields to be filled for License Extension
5.6.2. Renewal of Expired License
The license may be renewed for a new term after the expiration.
: License Æ License Renewal Æ Renew Expired Licenses Û
To renew the license you should fill in the same fields following the same rules as in case of license
extension.
Figure 124. Fields to be filled for license renewal
Technically, the only difference of license renewal form from the license extension form is the
LicenseNumber drop-down box, which shows the numbers of expired licenses.
User Manual
107
5.7. How to amend a License
You may amend the already-issued and valid license. Amendment means that you may not only add
substances, but also delete them and alter the approved quantities of substances as well as change, add
or delete the types of licenses.
: License Æ License Amendment Û
The rules of working with this form are the same as the rules of working with a License Authorization
form.
Figure 125. License Amendment form
5.8. License Reports
: Licenses Æ License Reports Û
Figure 126. License Report
This report query is used to briskly retrieve the data on the licenses issued in some country.
Double-click on any of retrieved records in order to open the proper record in license module.
User Manual
108
5.9. Licence Type Master
The License Type Master is used to indicate the types of license issued to establishment by competent
authorities.
It may be invoked in two ways:
1) from the main menu
: Masters Æ Licenses Æ License Type Master Û
2) by double-clicking the LicenseTypeCode
LicenseRequest module.
or
LicenseTypeName
drop-downs
in
the
Figure 127. License Type Master
You will need to enter the following data:
Field
Description
LicenseTypeCode
Unique code that will represent this type of licenses in the system
Import
This checkbox shows of the license of this type will be checked by the system when the
establishment to which the license is issued to carries out an import transaction
Export
This checkbox shows of the license of this type will be checked by the system when the
establishment to which the license is issued to carries out an export transaction
Suffix
A special suffix automatically added to the numbers of licenses of this type. You may fill
it in or leave blank.
LanguageCode
Code of a language in which the license type name will be displayed
LicenseTypeName
Name for this license type.
SortDescription
The content of this field defines the place of license type name respective drop-downs of
NDS.
Comments
Necessary comments concerning license type.
Chapter 6. INCB Reporting Forms
6.1. Narcotics
6.1.1. Quarterly statistical report – Form A
According to the 1961 Convention, the member states are required to prepare statistical data on trade in
narcotic drugs on a quarterly basis and furnish it to INCB within one month after the end of the quarter to
which the statistical data relates.
Form A consists of a header section and 5 tabs:
• ‘Remarks’
• ‘Imports’
• ‘Exports’
• ‘Imports CPS’
• ‘Exports CPS’
The Form A may be invoked from the main menu:
: Narcotics Æ Form A Û
Figure 128. Form A.
Field
Value
Country Code
The code of the country for this the statistics is being provided
Country Name
The tag showing the name for the CountryCode
Year
The year for which the information is being provided
Quarter
Quarter for which the information is being provided.
User Manual
110
The ‘Remarks’ tab, is intended for indication of data, usually stated on the remarks page of paper-based
Form A.
6.1.1.1. Entering Imports and Exports data
The Form A uses the data from Import/Export module of NDS, automatically calculating the quantities and
capturing the countries the transactions were carried out with. However, you may as well enter the data
on transactions manually.
Note. When entering data directly into Form A, as well as to the other INCB reporting Forms,
please bear in mind that the system accepts only the data on base substances, not on
Preparation or Groups.
If the data in the Form A are calculated by the system (i.e. aggregated) then the figures will appear in
black. Otherwise, if the data are entered manually, and do not correspond to the system calculations, they
will appear in red. In the Figure below the data are entered manually.
Note. If you want to know the results of system’s calculations, just delete the value and leave
the field (press <Tab> key or click other field), and the system will display the aggregated value
instead.
Figure 129. Form A. 'Imports' tab
Both ‘Imports’ and ‘Exports’ tabs are subdivided into two logical parts:
• Substance Section (upper)
• Country Breakdown Section (lower)
User Manual
111
The following fields should be filled in both sections:
Field
Value
Substance Section
Substance Code
The code of reported substance
Substance Name
Name of the reported substance
Total Imports Entered
(Total Exports Entered)
Total quantity of the substance imported to (exported from) the country during the
quarter in question
UOM
Unit of measurement, in which the substance is reported
Country Breakdown
Section
Country Code
Code of the country, which is a counterpart on particular transaction
Country Name
Name tag for CountryCode
Quantity Entered
Quantity of controlled substance, entered manually
Comments
Necessary comments on the import/export country
Total
Grand total of quantities by countries. Calculated automatically, need not be entered.
Note. ‘Imports’ and ‘Exports’ tabs are identical in terms of fields and rules of data entering.
6.1.1.2. Entering data on imports and exports of Concentrate of Poppy Straw (CPS)
The ‘Imports CPS’ and ‘Exports CPS’ tabs were introduced into NDS specially to improve the accounting
for and reporting of transactions with concentrates of poppy straw and the alkaloids contained in them.
The poppy straw and its concentrates require special ‘attention’ due to their natural origin, which means
that the proportions of alkaloids may vary considerably from shipment to shipment. Therefore, the gross
weight of CPS and approximate net weight of imported/exported alkaloids should be indicated and
reported to INCB.
In practice, there are three types of poppy straw concentrates. Concentrate of poppy straw containing
morphine as the main alkaloid is referred to as concentrate of poppy straw (M). Concentrate of poppy
straw containing thebaine as the main alkaloid is referred to as concentrate of poppy straw (T).
Concentrate of poppy straw containing oripavine as the main alkaloid is referred to as concentrate of
poppy straw (O). Each of above-mentioned types contains various quantities of anhydrous alkaloids:
AMA – anhydrous morphine alkaloid
AOA – anhydrous oripavine alkaloid
ATA
– anhydrous thebaine alkaloid
ACA
– anhydrous codeine alkaloid
The data on the concentrates and contained alkaloids may be either calculated automatically (from the
quantities of endorsements of import-export transactions) or entered manually. If the data are calculated
by the system (i.e. aggregated) then the figures will appear in black. Otherwise, if the data are entered
manually, and do not correspond to the system calculations, they will appear in red. In the Figure below
the data are entered manually.
Note. If you want to know the results of system’s calculations, just delete the value and leave
the field (press <Tab> key or click other field), and the system will display the aggregated value
instead.
User Manual
112
Figure 130. 'Imports CPS' tab
Both CPS-related tabs are subdivided into four logical parts:
• Substance Section (upper left)
• Alkaloid Section (upper right)
• Country Breakdown Section (middle)
• Alkaloid Breakdown Section (lower)
The following fields should be filled in each section:
Field
Value
Substance Section
Substance Code
Code of the reported concentrate
Substance Name
Name tag for the SubstanceCode above
Total Imports Entered
(Total Exports Entered)
Total entered (in red) or aggregated (in black) quantity of imported (exported) CPS.
UOM
Unit of measurement used for reporting the imported (exported) quantities.
Alkaloid Section
Imports Entered
(Exports Entered)
Total imported (exported) quantity of the alkaloid
Country Breakdown
Section
Country Code
Code of the counterpart country
Country Name
Name of the counterpart country corresponding to the CountryCode
Quantity Entered
Quantity imported from (exported to) the counterpart country
Comments
Any relevant comments/remarks on the import/export transaction
User Manual
113
Field
Value
Alkaloid Breakdown
Section
Quantity Entered
Quantity of alkaloid imported from (exported to) the counterpart country
Comments
Any relevant comments/remarks on the transaction with the alkaloid.
6.1.2. Form B. Annual Estimates
The Form B should be transmitted to INCB before July 1st of the year preceding the year to which the
estimates relate.
As you are well aware, the paper-based Form B consists of 5 parts:
Part I:
Part II:
Part III:
Part IV:
Part V:
Background information and statement of the method
Annual estimates of requirements of narcotic drugs
Annual estimates of the manufacture of synthetic drugs
Annual estimates of opium production
Annual estimates of the cultivation of the opium poppy for purposes other than opium
production
Figure 131. Form B. Annual Estimates
All these parts have found their proper ‘reflection’ in electronic Form B in NDS. Following are the
respective tabs:
Part I
Part II
Part III
Part IV
Part V
Header and ‘Medical Practitioners’ tab
‘Drug Estimates’ tab
‘Synthetic Estimates’ tab
‘Opium Estimates’ tab
‘Other Estimates’ tab
User Manual
114
A country may also revise the requirement in narcotic drugs so that the quantities will be increased or
decreased. In this case the country should indicate such changes as supplement to Form B and furnish to
INCB in the shortest possible notice.
The Form B may be started as follows:
: Narcotics Æ Form B Û
6.1.2.1. How to indicate the background information and describe the method of estimates
To provide the background information, you should fill the following fields of Header and ‘Medical
Practitioners’ tab.
Field
Value
Header
Country Code
The code of the country the estimates relate to.
Country Name
Name corresponding to the CountryCode
Year
The year to which the estimates relate
Supplement Number
This field indicates whether this form is an original estimate or a supplement. If it is not
displayed at all, then the form is recognized as original estimate; otherwise, if it is
displayed and its value is greater than ‘0’ it will be considered a supplement
Medical Practitioners
tab
No. Of Doctors
Number of practicing doctors in the country
No. Of Dentists
Number of practicing dentists
No. Of Vets
Number of veterinarians
No. Of Pharmacies
Number of working pharmacies
No. Of. Hospitals
Number of hospitals in the country
No. Of Beds
Total number of hospital beds
Methods of
Determining
Method(s) used for calculation of estimates.
Note. The MethodsOfDetermining field is mandatory. If no changes occur in the estimation
methods, then you should indicate that no changes have been made.
User Manual
115
6.1.2.2. How to indicate the information on annual requirements of narcotic drugs
For this purpose you are to use the ‘Drug Estimates’ tab of Form B.
Figure 132. 'Drug Estimates' tab
Note. The lower part of this tab is dedicated to the indication of proposed quantities of alkaloids
and possible purposes of their utilization in case the respective substance in the upper part is a
CPS.
6.1.2.3. How to indicate the information on annual requirements of manufacture of synthetic drugs
In order to indicate the requirements of manufacture of synthetic drugs, go to ‘Synthetic Estimates’ tab.
Here you may enter not only the quantities to be manufactured, but also the establishments that plan to
manufacture such synthetic drugs.
Note. Only the countries and/or territories authorized for manufacturing of synthetic narcotic
drugs shall indicate their requirements for manufacture of such substances. Other countries or
territories shall not.
User Manual
116
Figure 133. 'Synthetic Estimates' tab
The following fields should be filled in:
Field
Value
Establishment Code
Code of the establishment authorized for manufacture of synthetic narcotic drugs
Establishment Name
Name corresponding to EstablishmentCode
Substance Code
Code of the synthetic narcotic drug planned to be manufactured
Substance Name
Name corresponding to SubstanceCode
Quantity
Quantity of synthetic narcotic drug to be manufactured
UOM
Unit of measurement, in which the substance is reported
Comments
Any relevant comments/remarks on the manufacture of the substance
6.1.2.4. How to indicate the information on estimates of opium production
To enter the estimates on opium production, you should use the ‘Opium Estimates’ tab.
Figure 134. 'Opium Estimates' tab
User Manual
117
If the country for which the estimates are prepared is subdivided into several territories, then you should
indicate the estimates for each of them.
Note. Only countries and territories authorized for cultivation of opium poppy for the purpose of
opium production are supposed to provide this kind of information.
This tab includes the following fields:
Field
Value
Area Code
Code of a region of a country
Area Name
Name tag for respective AreaCode
Area Under Cultivation
The size of territory allocated for opium poppy cultivation in hectares.
Quantity to be
Produced (kg)
Approximate quantity of opium expected to be produced from the harvested poppy (in
kilograms)
Moisture %
Average moisture content in the mass of obtained opium.
Comments
Any relevant comments/remarks on the opium cultivation
Note. Please do not be confused with the word ‘area’ in the field names. In the case of
AreaCode and AreaName it means ‘part of the country treated as single entity’. In case of
AreaUnderCultivation it represents a ‘Lot size of a land’.
6.1.2.5. How to indicate the estimates on cultivation of opium poppy for purposes other than opium
production
To do this you should open the ‘Other Estimates’ tab.
Figure 135. 'Other Estimates' tab
This tab consists of three parts:
• Drug Details section
• Area Details section
• Alkaloid Details section
User Manual
118
In the Drug Details section you should enter the quantities of poppy straw to be produced from harvested
poppy.
In the Area Details Section you should indicate the territory where the above-mentioned kind of poppy
straw is planned to be produced and the area where the poppy is to be cultivated.
If the poppy straw is produced for further manufacture of narcotic drugs, then the country should indicate
on Form B the estimated quantities of anhydrous alkaloids: AMA, ACA and/or ATA. These quantities
should be entered in the respective fields of Alkaloid Details section of ‘Other Estimates’ tab.
The following fields should be filled:
Field
Value
Drug Details Section
Drug Code
Code of the substance (proper type of poppy straw)
Drug Name
Name tag corresponding to the DrugCode
Quantity
Approximate quantity of poppy straw to be produced from the harvested opium poppy
UOM
Unit of measurement in which the drug shall be reported
Comments
Any relevant comments/remarks on the production of poppy straw
Area Details Section
Area Code
Code of a region of a country
Area Name
Name tag for respective AreaCode
Area Under Cultivation
(hectares)
The size of territory allocated for opium poppy cultivation in hectares.
Comments
Any relevant comments/remarks on the AreaUnderCultivation
Alkaloid Details Section
Alkaloid Code
Code of alkaloid (ATA, AMA or ACA) to be obtained.
Alkaloid Name
Name of alkaloid corresponding to AlkaloidCode
Quantity
Approximate quantity of alkaloid to be obtained
User Manual
119
6.1.2.6. How to make a supplementary estimate
Supplementary Estimates may be created using the same Form B as the original Estimates.
Create a new record, fill in the Header fields, except the SupplementNumber and open the
‘Supplements’ tab. Whenever you enter the country-year combination which already exists, the system
‘understands’ it as an attempt to create a supplement. Thus, the SupplementNumber in newly created
Form B will be different from ‘0’ and will represent the number of supplementary estimate.
Figure 136. 'Supplements' tab
Note. The quantities you indicate in the supplementary estimates increase the ones in the
original estimates. So, if the final need in some narcotic drug is 480 grams, and in original
estimate you have indicated 400 grams, then in supplementary estimate you should indicate
just 80 grams.
6.1.3. Form C. Annual Statistics
The annual statistics of production, manufacture, consumption, stocks and seizure of narcotic drugs must
be furnished to INCB not later than June 30th of the year following the year on which the data are
gathered.
Form C should be furnished even if the country has not produced, manufactured, consumed, stocked or
seized any drug during the year to which the form relates. Only a Form C mentioning no movement of
drugs constitutes a definite declaration on that subject.
The paper-based Form C, submitted to INCB, consists of four parts:
Part I:
Part II:
Part III:
Part IV:
statistical data on manufacture, consumption, utilization and stocks of narcotic drugs.
statistical data on the manufacture of narcotic drugs.
statistical data on the licit cultivation of the opium poppy and the licit production of
cannabis, coca leaf and opium.
statistical data on seizures of narcotic drugs.
User Manual
120
6.1.3.1. How to indicate information on manufacture, consumption, utilization and stocks
To indicate this piece of information, you should first create the new Form C.
: Narcotics Æ Form C Û
Figure 137. Form C. Annual Statistics
In the Header section please be careful when entering the year.
Note. The country-year combination must be unique, i.e. it must not repeat throughout NDS. If
you try to create a Form C with the same country-year combination as in some existing Form C,
NDS will display a warning message. In this case you should delete the newly created record
and open the existing one by means of querying.
The ‘Statistics’ tab consists of two logical parts:
• Drug Details Section (upper)
• Alkaloid Details Section (lower)
The following fields should be filled:
Field
Value
Drug Code
Code of reported narcotic drug. The field is a drop-down box, containing the codes and
names of narcotic drugs only.
Drug Name
Name tag for the DrugCode.
UOM
Unit of measurement in which the quantity of substance is reported.
Quantity Manufactured
Quantity Consumed
Quantity used for the
manufacture of
Schedule III
Preparations
Data on the quantities of drugs manufactured during the year in question. It should be
noted that, for each substance, the data entered in this field should reflect an aggregate
figure of the data entered in ‘Manufactured’ tab.
Should be used to enter data on the consumption, i.e. on supply of a narcotic drug to
any person or enterprise for retail distribution, medical use or scientific research, during
the year in question.
Should be used to enter data on the quantities of drugs used in the manufacture of
Schedule III preparations. Please note that you should indicate the quantities USED for
manufacture of preparations, not the quantities of obtained preparations.
User Manual
121
Field
Value
Quantity held in stock
on 31st December
Should be used to enter data on stocks held as at 31 December of the year in question.
Quantity procured (P)
for special purposes or
withdrawn (W) from
special stocks
Qty. Lost During
Manufacturing Process
Should be used to indicate the amounts procured for and/or withdrawn from special
stocks. If you enter the positive value, NDS will recognize it as procured and will mark it
with letter ‘P’ when printing the report. Vice-versa, if you enter the negative value (with ‘-‘
sign preceding it), it will be recognized as ‘withdrawn’ and marked with letter ‘W’ in
paper report.
Should be used to enter data on losses occurred during the manufacturing process.
Data referring to the destruction of obsolete materials should be entered on the
‘Remarks’ tab.
Note. The fields of the Alkaloid Details Section, although identical to those of Drug Details
Section, are filled only in case the substance they relate to is a CPS.
6.1.3.2. How to indicate the statistical data on manufacture of narcotic drugs
According to the 1961 Convention, the term ‘manufacture’ represents:
‘any process, other than production, by which drugs may be obtained, including the refining and
transformation of one drug into another drug’.
To indicate the manufacturing information you should use the ‘Manufactured’ tab:
Figure 138. 'Manufactured Raw Material’ tab
In the upper part you are supposed to indicate the quantity of substance USED for manufacture of other
narcotic drugs whilst in the lower part the OBTAINED substances are to be indicated.
Note. For each record in the upper section there may be two or more lines in the lower section
of the tab, as one drug may be used for manufacture of two or more drugs.
User Manual
122
6.1.3.3. How to enter data on utilization of opiates 15 for manufacture of other substances
On the ‘Manufactured Opiates’ tab you should enter the data contained on the second page of the Part II
(page 7) of paper-based Form C. Below you will see the general view of this tab.
Figure 139. ‘Manufactured Opiates’ tab
The usage logic is very simple and easily understandable:
1) In the upper part you should select the code of a drug used in manufacture process and indicate
its quantity.
2) In the lower part you should select code of drug, which is the outcome of the manufacture
process and once again indicate its quantity.
Note. For each record in the upper section there may be two or more lines in the lower section
of the tab, as one drug may be user for manufacture of two or more other drugs.
6.1.3.4. How to indicate the data on cultivation of opium poppy, coca bush and cannabis plant.
This statistical data should be indicated only by the countries, where cultivation of opium poppy, coca
bush or cannabis plant is authorized.
The tab is intended for entering the data indicated in parts III.a. and III.b. of the paper-based Form C.
Thus, in the upper part you are supposed to enter the data concerning the purposes and scope of opium
poppy cultivation, whereas in the lower part you are supposed to enter the figures concerning the
quantities of obtained cannabis and coca leaf.
There are four purposes of cultivation of opium poppy:
• Production of opium
• Production of poppy straw (M) for manufacture of narcotic drugs
• Production of poppy straw (T) for manufacture of narcotic drugs
• Purposes other than production or manufacture of narcotic drugs.
Thus, you should select one of these purposes in the Purpose drop-down and then indicate the area
where the poppy was sown for this purpose, area from where the poppy was harvested and the produced
quantity of opium poppy (for above-mentioned purpose, of course).
15
The tab is titled ‘Manufactured – Opiates’, although the data on utilization of coca leaf, coca paste and ecgonine, which are not
opiates by nature, should also be indicated here.
User Manual
123
Figure 140. ‘Cultivation’ tab
Note. If the country does not authorize the cultivation of opium poppy for the purposes of
production of opium or poppy straw, or the cultivation of coca bush, or cannabis plant, such a
country should not provide any information on licit cultivation, and the respective fields of
database should be left blank.
6.1.3.5. How to enter information on seized quantities of narcotic drugs
In this tab you should enter the data contained in the Part IV of the paper-based Form C. These data is to
be provided by all governments, whenever narcotic drugs have been seized, destroyed, used for licit
purposes and/or taken over by governments for special purposes during the year in question. Quantities
pending disposal should also be indicated. The view of the tab is given below.
Figure 141. 'Seizures' tab
User Manual
124
The following data should be provided:
Field
Value
Substance Code
Code of substance being reported
Drug Name
Name tag for SubstanceCode
Quantity Seized
The quantity of seized substance. Gross weight should be indicated.
Quantity Destroyed
Quantity used for licit
purposes
Quantity taken over by
Government
Quantity not disposed
of pending a decision
The quantities of seized substances that were destroyed during the year in question.
Gross weight should be indicated.
Quantity of seized substances that were released for licit use during the year in
question. Unlike all other quantities in this tab, in this field you should indicate the pure
anhydrous content of the controlled substance.
Quantity taken for special stocks or special purposes during the year in question
according to government decision. Gross weight should be indicated.
Quantities of seized controlled substances, in relation to which no government decision
has been issued as of December 31 of the year in question. Gross weight should be
indicated.
UOM
Unit of measurement, in which the substance is being reported
Comments
Any relevant comments/remarks concerning the seizure
6.2. Psychotropics
6.2.1. Quarterly report. Psychotropic Form A/P
According to the 1971 Convention, the member states are required to prepare statistical data on trade in
psychotropic substances on a quarterly basis and furnish it to INCB within one month after the end of the
quarter to which the statistical data relates.
Form A/P consists of a header section and 3 tabs:
• ‘Remarks’
• ‘Import’
• ‘Export’
The ‘Import’ and ‘Export’ tabs show the aggregated information, i.e. the information on the whole country
or territory and also provide the breakdown of imported or exported quantities on counterpart countries.
The Form A/P uses the data from Import/Export module of NDS, automatically calculating the quantities
and capturing the countries the transactions were carried out with. However, you may as well enter the
data on transactions manually.
To create a new quarterly report, do the following:
: Psychotropic Æ Form A/P Û
User Manual
125
Figure 142. Form A/P
In the Header section you should fill in the following fields:
Field
Value
Country Code
The code of the country for this the statistics is being provided
Country Name
The tag showing the name for the CountryCode
Year
The year for which the information is being provided
Quarter
Quarter for which the information is being provided.
The Form A/P opens with the ‘Remarks’ tab being active. In this tab you may indicate any information that
you think will be useful for consideration by INCB.
6.2.1.1. How to enter the import and export data on psychotropic substances
The data on quantities of psychotropic substances imported to and exported from the country are
indicated in ‘Imports’ and ‘Exports’ tabs respectively.
User Manual
126
Figure 143. ‘Imports’ tab
Both ‘Imports’ and ‘Exports’ tabs consist of two logical parts:
• Substance Data section (upper)
• Country Breakdown section (lower)
The following fields should be filled in the Substance Data section:
Field
Value
Substance Code
Code of the imported/exported substance
Substance Name
Name of the reported substance according to the SubstanceCode
Schedule
Number of Schedule in which the substance in question is included.
Total Imports (Exports)
Total aggregated quantity of imported (exported) substance.
UOM
Unit of measurement, in which the substance is reported
Note. The aggregated quantities are obtained by summing up all endorsed quantities in
Import/Export module. You may also enter some quantities manually, but without the underlying
Import/Export transactions they will appear in red. In the figure above you may see that the
quantity for Secobarbital is calculated by the system, while the one for Alprazolam is entered
manually.
User Manual
127
The following fields should be filled in the Country Breakdown section:
Field
Value
Country Code
Code on the country where the substance was imported from or exported to.
Country Name
Name of the importing/exporting country, corresponding to a CountryCode
Quantity Entered
Quantity of the substance imported from or exported to this particular country
Comments
Any relevant comments on the trading country.
As mentioned above, the ‘Exports’ tab is identical to the ‘Imports’ tab.
6.2.2. Form B/P
Form B/P is to be submitted to INCB at least once every three years. Assessments should reflect the total
medical and scientific requirements for one year.
INCB will use reported assessments for reference during a three-year period unless a modification to
previously submitted assessments is received.
6.2.2.1. How to create an Annual Assessment and/or Modification
: Psychotropic Æ Form B/P Û
The fields in the Header section are nearly identical to the ones of Narcotics Form B. The only difference
is Modifications field, which replaces the SupplementNumber fields in Form B. However, the functions
of these fields are the same: they indicate whether this form is an original assessment (estimate) or a
modification (supplement).
If no assessments have yet been created for the specific country for specific year, then the Modifications
field value becomes 0. If not, it accepts values from 1 upwards, depending on the number of already
submitted modifications.
Figure 144. Form B/P. Annual Assessments
User Manual
128
After filling in the Header section fields, go to ‘Assessments’ tab.
Field
Value
Substance Code
Code of reported psychotropic substance. The field is a drop-down box, containing the
codes and names of psychotropic substances only.
Substance Name
Name tag for the SubstanceCode
Quantity Entered
Quantity entered manually
Schedule
Number of Schedule (II, III or IV) the substance is included into.
UOM
Unit of measurement the substance is being reported.
Comments
Any relevant comment on the requirement for the entered quantity.
Use the same procedure to enter a Modification.
Note. When entering the modified quantity, please bear in mind that not the additional
quantities but the revised total assessments should be indicated. The new total assessments
will be substituted for the quantities indicated in previous submissions of form B/P and any
subsequent modifications to those submissions. So, if in initial assessment you have indicated
500 grams of some psychotropic substance, and then the necessity for it increased by 150
grams, in modification you should indicate all 650 grams.
6.2.3. Psychotropic Form P
The Annual Statistical Report on Substances indicated in Schedules I, II, III and IV of the1971 Convention
on psychotropic substances (the so-called ‘Form P’) is provided to INCB once a year not later than June
30 of the year following the year in question.
The paper-based Form P consists of the following parts:
Part I.
Statistical data on the manufacture, utilization, stocks, imports and exports of substances
in Schedules I, II, III and IV of the 1971 Convention and their salts;
Part II.
Trade details: statistical data on imports and exports of substances in Schedules I, II, III
and IV of the 1971 Convention;
Part III.
Statistical data on the use of substances in Schedules I, II, III and IV of the 1971
Convention for the manufacture of other psychotropic substances.
Note. The difference between the import/export section of Part I and the Part II is the following:
the import/export section of Part I gives the overall figures of import and export of psychotropic
substances, and Part II gives the country breakdown of the trade of psychotropic substances,
i.e. gives the information in which quantities and where such substances were imported from
or exported to.
First, open the Psychotropic Form P.
: Psychotropic Æ Form P Û
Add a new record with new country-year combination, or find the proper record by means of querying.
User Manual
129
Figure 145. Form P. ‘Statistics’ tab
6.2.3.1. How to indicate the statistical data required in Part I of Form P (manufacture, stocks, import and
export)
The general data on manufacture, utilization, stocks, imports and exports of psychotropic substances
listen in Schedules I, II, III and IV of the 1971 Convention is contained in the ‘Statistics’ tab of electronic
Form P.
The following data should be provided:
Field
Quantity Manufactured
Quantity Used for
Manufacture of non
Psychotropic
Substances or
Products
Quantity Used for
Manufacture of
preparations exempted
under art. 3 paras 2&3
Manufacturers’ Stocks
as at 31 December
Import
Export
16
Value
Total quantity manufactured domestically between 1 January and 31 December of the
year to which the statistical data relate. The quantities of psychotropic substances used
for the preparation of pharmaceutical dosage forms should not be indicated as Quantity
manufactured.
16
Quantity used for the manufacture of non-psychotropic substances or products
(permitted under article 4, paragraph (b), of the 1971 Convention). That quantity should
include the total amount placed in the manufacturing process during the year to which
the statistical data relate, even if the manufacturing process was not completed by the
end of that year.
Total quantity used for manufacture of preparations exempted from certain measures of
control (permitted under article 3, paragraphs 2 and 3, of the 1971 Convention). That
quantity should include the total amount placed in the manufacturing process during the
year to which the statistical data relate, even if the manufacturing process was not
completed by the end of that year.
The quantity held in stock by the Manufacturers at the end of the year in question. The
quantities of substances included into Schedules I and II should be indicated on a
compulsory basis, and the quantities of substances included into Schedules III and IV –
on a voluntary basis.
Quantities of substances, which physically cross the border of the Country (or Region)
during the year in question.
For Substances included in Schedules II, III and IV.
User Manual
130
6.2.3.2. How to indicate information required in Part II of Form P (coutry breakdown of import and export)
The Part II of Form P contains the countries-related breakdown of the import and export of psychotropic
substances.
To indicate such data you should use the ‘Imports’ and ‘Exports’ tabs of Form P.
Figure 146. 'Imports' tab
The system automatically creates the Form P upon the first transaction with psychotropic substances for
the respective year is entered in the Import/Export module. However, you may also enter the necessary
data manually. In general, if all import and export transactions are recorded properly in the system and
respective endorsements exist, the system displays all necessary data on ‘Export’ and ‘Import’ tabs.
Field
Value
Substance Details
Section
Substance Code
Code of imported (exported) substance
Substance Name
Name tag for SubstanceCode
Total Quantity
Total quantity of the substance imported to (exported from) the country
UOM
Unit of measurement in which the substance is reported
Schedule
Number of Schedule of 1971 Convention in which the substance is listed
Country Breakdown
Section
Country Code
Code of the country the substance was imported from (exported to)
Country Name
Name of the country corresponding to CountryCode
Quantity Imported
(Exported)
Quantity of the substance which was imported from (exported to) the country
corresponding to CountryCode
User Manual
131
6.2.3.3. How to indicate the data required for Part III of Form P (use of psychotropic substances for
manufacture of other pshychotropic substances)
As it is stipulated in the 1971 Convention on Psychotropic Substances, the countries and territories
signatories to the Convention are requested to provide information on the use of psychotropic substances
listed in Schedules I, II, III and IV for the manufacture of other psychotropic substances, indicating the
name of the source substance, the quantity used in the manufacturing process, the name of the other
psychotropic substance derived from the manufacturing process and the quantity of that substance
derived from the manufacturing process.
Such data is provided using the ‘Manufactured’ tab of Form P.
Figure 147. 'Manufactured' tab
In the upper part you are supposed to indicate the quantity of substance USED for manufacture of other
psychotropic substances, whilst in the lower part the OBTAINED substances are to be indicated.
Note. For each record in the upper section there may be two or more lines in the lower section
of the tab, as one substance may be used for manufacture of two or more drugs.
User Manual
132
6.3. Form D. Precursors. Annual Statistics
According to art. 12 of paragraph 12 of the 1988 Convention against Illicit Traffic in Narcotic Drugs and
Psychotropic Substances, the parties of the Convention shall furnish to INCB ‘in the form and manner
provided for by it and on the forms made available by it’ the information on:
•
The amounts seized of substances in Table I and Table II and, when known, their origin;
•
Any substance not included in Table I or Table II which is identified as having been used in illicit
manufacture of narcotic drugs or psychotropic substances, and which is deemed by the Party to
be sufficiently significant to be brought to attention of the Board;
•
Methods of diversion and illicit manufacture.
The electronic Form D is built upon the paper-based Form D, which is being presented by the countries to
INCB annually.
: Precursors Æ Form D Û
Note. Please pay attention to the proper indication of country-year combination, which should
be unique.
As in other INCB forms there is a special ‘Remarks’ tab, which is intended for indication of additional
information that the reporting country believes will be essential and important for INCB.
6.3.1. How to indicate seizures of quantities included in Tables I or II
To enter data on seized quantities of Substances listed in Tables I and II of the Red List you should use
the ‘Seizures’ tab of Form D.
Figure 148. Form D. ‘Seizures’ tab
This tab consists of two logical parts
• Substance Details (upper)
• Country breakdown (lower).
First, you should indicate the substance, which was seized one or more times in this country during a
reporting year.
Second, you should indicate the countries, from which this substance was brought as well as quantities
by each country.
User Manual
133
The following data should be indicated:
Field
Value
In the Substance
(upper) part
Substance Code
The code of a seized substance included into Table I or Table II of the Red List or of the
substances having been used in illicit manufacture
Substance Name
Name tag for the SubstanceCode
Seized Quantity
The quantity of the substance (pure anhydrous content) that was seized
Schedule
Number of Table the substance is included into. Although the ‘Table’ term is usually
applicable to precursors, the word ‘schedule’ is used throughout NDS, as the essence of
Tables and Schedules is naturally the same.
UOM
Unit of measurement in which the substance should be reported on Form D
Confidential
The checkbox showing if the entered information should be treated by INCB
confidentially (checked) or not (unchecked).
In the Country
breakdown (lower) part
Country of Origin
Code of the country from which the reported substance has been brought in.
Country Name
Name tag for Country of Origin
# of Seizures
Number of seizures which took place during the year in question (filled in automatically)
Quantity Seized
Quantities of seized substances illegally brought in from particular country
Comments
Any relevant comments on the origin country
Confidential
The checkbox showing if the entered information should be treated by INCB
confidentially (checked) or not (unchecked).
After you have finished entering the data save the record.
User Manual
134
6.3.2. How to indicate seizures of substances not included in tables I or II identified as having
been used in illicit manufacture
For this purpose use the ‘Illicit Manufacture’ tab of digital Form D.
Figure 149. 'Illicit Manufacture' tab
The tab consists of three logical sections:
• Substance details section (upper)
• Breakdown by countries of origin (middle)
• Information on transit countries and destination countries (if different from reporting country)
Here you may need to enter the following data:
Field
Value
In the Substance
details (upper) section
Substance Code
The code of a seized substance identified as having been used in illicit manufacture
Substance Name
Name tag for the SubstanceCode
Seized Quantity
Schedule Indicator
The quantity of the substance (pure anhydrous content) that was seized during the
reporting year
Number of Table the substance is included into. Although the ‘Table’ term is usually
applicable to precursors, the word ‘schedule’ is used throughout NDS, as the essence of
Tables and Schedules is naturally the same.
UOM
Unit of measurement in which the substance should be reported on Form D
Comments
Comments regarding the quantities of seized substances
In the country
breakdown (middle)
part
Country of Origin
Code of the country from which the reported substance has been brought in.
Country Name
Name tag for Country of Origin
# of Seizures
Number of seizures which took place during the year in question
User Manual
135
Field
Value
Quantity Seized
Quantities of seized substances illegally brought in from particular country
Comments
Comments concerning seizures by this country.
In the transit/
destination countries
(lower) section
Transit Country Code
Code of the country, through the territory of which the seized substance was brought
into the territory of reporting country (If different from reporting country)
Destination Country
Code
Code of the country where the seized substance was to be delivered to. (If different from
reporting country)
# of Seizures
Number of seizures which took place during the year in question
Circumstances
circumstances of seizure
Place of Seizure
place where the seizure was conducted (e.g. in illicit laboratories, commercial
warehouses or customs area, etc.)
Name of Substance
Intended
the name of the narcotic drug or psychotropic substance that was intended to be illicitly
manufactured using the substance seized
Intended Illicit
Manufacture
Remark confirming that the seized substance was really intended for illicit manufacture,
not for some legal purposes
Volume and Extents
volume and extent of the illicit manufacture of the above narcotic drug or psychotropic
substance
Licit Uses
licit use of the substance seized including extent, importance, etc.
6.3.3. How to indicate the information on methods of diversion and illicit manufacture
To report to INCB the data indicated on pages 7 and 8 of paper-based Form D user the ‘Methods of
Diversion’ tab.
Figure 150. 'Methods of Diversion' tab
User Manual
136
The tab consists of two sections:
•
•
Substance details section (where you should also indicate the name of substance intended to be
obtained as a result of illicit manufacture, extent of illicit manufacture etc.) - upper
Transit and destination countries details section – lower
You should fill in the following fields (if appropriate):
Field
Value
In the Substance
details (upper) section
Substance Code
The code of a seized substance identified as having been used in illicit manufacture
Substance Name
Name tag for the SubstanceCode
Seized Quantity
The quantity of the substance (pure anhydrous content) that was seized during the
reporting year
UOM
Unit of measurement in which the substance should be reported on Form D
Schedule Indicator
Number of Table the substance is included into. Although the ‘Table’ term is usually
applicable to precursors, the word ‘schedule’ is used throughout NDS, as the essence of
Tables and Schedules is naturally the same.
Comments
Comments regarding the quantities of seized substances
In the transit/
destination countries
(lower) section
Transit Country Code
Code of the country, through the territory of which the seized substance was brought
into the territory of reporting country. (if different from reporting country)
Destination Country
Code
Code of the country where the seized substance was to be delivered to. (if different from
reporting country)
# of Seizures
Number of seizures which took place during the year in question
Place of Seizure
place where the seizure was conducted (e.g. in illicit laboratories, commercial
warehouses or customs area, etc.)
Circumstances
circumstances of seizure
Name of Substance
Intended
the name of the narcotic drug or psychotropic substance that was intended to be illicitly
manufactured using the substance seized
Intended Illicit
Manufacture
Remark confirming that the seized substance was really intended for illicit manufacture,
not for some legal purposes
Volume and Extents
volume and extent of the illicit manufacture of the above narcotic drug or psychotropic
substance
Licit Uses
licit use of the substance seized including extent, importance, etc.
User Manual
137
6.3.4. How to indicate data on stopped shipments
Parties are obliged under article 12, paragraph 9 (c), to notify, as soon as possible, the competent
authorities and services of the Parties concerned if there is reason to believe that the import, export or
transit of a substance in Table I or Table II is destined for the illicit manufacture of narcotic drugs or
psychotropic substances. Information on shipments that have been stopped because of sufficient
evidence that the substance may be diverted into illicit channels is essential to overview trafficking trends,
and to prevent attempts to divert the substances from other sources. Countries are therefore requested
to provide detailed information on stopped shipments of substances scheduled in Tables I and II, and of
non-scheduled substances. For these purposes the ‘Stopped Shipments’ tab is envisaged in NDS 6.0.
Figure 151. 'Stopped Shipments' tab
The tab consists of two sections:
- Substance (shipment) details section (upper); and
- Transit and seizure details section (lower)
User Manual
138
You may indicate the following data:
Field
Value
In the Substance
details (upper) section
Substance Code
The code of a seized substance
Substance Name
Name tag for the SubstanceCode
Seized Quantity
The quantity of the substance (pure anhydrous content) that was seized during the
reporting year
UOM
Unit of measurement in which the substance should be reported on Form D
Schedule Indicator
Number of Table the substance is included into. Although the ‘Table’ term is usually
applicable to precursors, the word ‘schedule’ is used throughout NDS, as the essence of
Tables and Schedules is naturally the same.
Comments
Comments regarding the quantities of seized substances
In the transit/ seizure
details (lower) section
Transit Country Code
Code of the country, through the territory of which the seized substance was brought
into the territory of reporting country. (if different from reporting country)
Destination Country
Code
Code of the country where the seized substance was to be delivered to. (if different from
reporting country)
# of Seizures
Number of seizures which took place during the year in question
Place of Seizure
place where the seizure was conducted (e.g. in illicit laboratories, commercial
warehouses or customs area, etc.)
Circumstances
circumstances which raised suspicion about the shipment
Informed Countries
countries/territories informed of the stopped shipment
Results
results of further investigations (whether the shipments was confiscated,
destroyed, released, taken over by government for further licit use, etc.)
6.3.5. How to indicate the information on licit trade in and use of precursors.
To indicate the information furnished to INCB on pages 11-20 of paper-based Form D use the ‘Licit Uses
and Trade’ tab (see the Figure below)
This tab consists of three logical parts:
• Substance Details Section (upper)
• Export & Import Details Section (middle)
• Licit Purposes Section (lower)
I. First, indicate the substance, legally traded in the reporting country during a reporting year.
II. Second, indicate the countries, from which the substance was imported and the countries where
to the substance was exported. Do not forget to indicate the quantities imported from or exported
to each of the countries.
III. Third, indicate the purposes of licit use of the substance together with the approximate quantities
required for each purpose.
User Manual
139
Figure 152. ‘Licit Uses and Trade’ tab
You may enter the following data here:
Field
Value
In the Substance
Details (upper) part
Substance Code
The code of a seized substance included into Table I or Table II of the Red List or of the
substances having been used in illicit manufacture
Substance Name
Name tag for the SubstanceCode
Total Imports
Total quantity of the Substance brought to the territory of the reporting Country during
the year in question
Total Exports
Schedule
Total quantity of the Substance, exported from the territory of the reporting country
during the year in question.
Number of Table the substance is included into. Although the ‘Table’ term is usually
applicable to precursors, the word ‘schedule’ is used throughout NDS, as the essence of
Tables and Schedules is naturally the same.
UOM
Unit of measurement in which the substance should be reported on Form D
Confidential
The checkbox showing if the entered information should be treated by INCB
confidentially (checked) or not (unchecked).
In the Imports and
Exports Details Section
(middle)
Origin Country Code
Code of the country from which this quantity of substance was imported
Destination Country
Code
Code of the Country to which this quantity of substance was exported
Import (Export)
Quantity
Imported or exported quantities of the Substance
In the Licit Purposes
Section (lower)
Purposes
The licit purposes the substance has been imported (exported) for.
Approx Required Qty
Approximate requirements in Substance for certain purpose.
Chapter 7. Establishment Management Module
The Establishment Management Module (EMM), as its name indicates, is intended for entering, editing
and otherwise managing the data on the transactions carried out by establishments. In general, the EMM
is ‘responsible’ for management of data on the domestic transactions with controlled substances inside a
country.
The EMM consists of four data-entry forms and several report screens, which are used for managing data
in four spheres:
• Stocks of controlled substances
• Manufacture of controlled substances
• Domestic trade in controlled substances
• Seizures of controlled substances
7.1. Stock data management
The EMM Stock Management Form opens as follows:
: EMM Æ EMM Stock Movement Û
The EMM Stock Movement form contains four tabs:
•
•
•
•
•
‘Opening Stocks’
‘Inventory Adjustments’
‘Stock Ledger’
‘Inspection Results’
‘Closing Stocks’
Figure 153. EMM - Stock Management form. 'Opening Stocks' tab
User Manual
142
7.1.1. Opening Stocks and Stock Adjustment
Opening stocks are the stocks of controlled substances kept by manufacturers or retail traders as at the
1st January of the reporting year.
If no data are available for the previous year, and all transactions with controlled substances have been
carried out during the year in question, the system automatically sets the opening stocks of all reported
substances to zero.
If some transactions have been entered into the system during the previous year NDS will show the
balances of stocks of controlled substances at each of stock-keeping establishments.
However, in practice it may happen that some transactions affecting the value of opening stocks may
become known to the competent authority after the initial EMM form has been created. In this case the
opening stocks should be corrected (in accounting jargon – ‘adjusted’). For this purpose, special tab is
envisaged in NDS: the ‘Inventory Adjustment’ tab.
Figure 154. 'Inventory Adjustment' tab
Note. Please keep in mind that you should enter positive value into Quantity field to increase
the initial value, and negative value to decrease the initial one.
7.1.2. How to indicate the inspections and their results
The competent authority may inspect the stocks of the wholesalers and/or manufacturers with the
purpose of monitoring the actual quantity of controlled substances held therein. NDS provides a simple
but powerful instrument for recording the general information of such inspections as well as their results.
In order to record the above-mentioned information, the ‘Inspection Results’ tab is provided in EMM
Module.
The tab is divided into three logical parts.
• Inspection Details Section (upper)
• Substance Details Section (middle)
• CPS Details Section (lower)
Note. The lower section is used only when the substance in question is a CPS
User Manual
143
Please pay attention to the following fields:
Field
Value
Declared Quantity
The quantity declared by the stockowner as ‘held in stocks’.
Inspected Quantity
Actual Quantity
The quantity of the controlled substance or preparation, which was actually considered
by the Inspector(s). In fact, the inspection may be carried out on a sample rather than on
the whole stock, because of time limitation and magnitude of stocks
The actual quantity of controlled substance (preparation) revealed in
InspectedQuantity.
Note. Although the results of inspections are important for competent authorities, neither of
figures indicated in the ‘Inspection Results’ tab anyhow affects the totals in the other tabs of
EMM or in the report forms.
Figure 155. 'Inspection Results' tab
7.1.3. How to indicate the information concerning the Government’s Special Stocks
Due to provisions of 1961 Convention on Narcotic Drugs and 1972 Convention on Psychotropic
Substances, the Governments shall report the quantities of controlled substances that were added
(procured) or withdrawn from special stocks. At the same time the governments shall not be obliged to
report the actual quantities of controlled substances kept in special stocks.
There is a special tab in NDS ‘responsible’ for entering data on transactions with special stocks.
All you will have to do in order to enter new transactions is to define TransactionDate,
Subst./Prep.Code (code of the substance or preparation) and the Quantity of the substance or
preparation, which was procured for special stocks (positive Quantity value) or withdrawn from special
stocks (negative value).
User Manual
144
Figure 156. 'Procured/Withdrawn' tab
7.1.4. How to indicate the closing stocks
This tab allows a user to indicate the stocks of controlled substances at the warehouses of manufacturers
and wholesalers as of December 31st of the reporting year.
Figure 157. Closing Stocks
Similarly to the ‘Opening Stocks’ tab, a user is supposed to enter date of entering the data on closing
stocks (TransactionDate), code and name of controlled substance in question (Subs/Prep. and
Subs/Prep.Name), and make necessary notes (Remarks).
Please take into account two neighbouring fields ClosingBalance and ClosingQuantity. The first of
them shows the quantity of some substance or preparation calculated automatically. The second is
provided for manual entering of quantity, if it differs from automatically calculated one.
User Manual
145
7.1.5. How to view a Stock Ledger
: EMM Æ Stock Ledger Report Û
Figure 158. Stock Ledger report
A Stock Ledger report query is intended for rapid viewing of the quantities of substances in stocks as well
as the transactions with them.
The Stock Ledger screen consists of four logical parts:
• Criteria
• Base Substances
• Actual Trade – Total
• Actual Trade – Detailed
In the criteria section you may enter various criteria for querying the data. Please note that Year field is
mandatory.
In the Base Substance Section you may see the Opening Balance for particular Substance, transactions
affecting the stocks, and Closing Balance of this Substance.
In the Actual Trade – Total section you can see the information on substances and preparations
containing the Base Substance indicated above in the Base Substance Section.
Actual Trade – Detailed section hosts breakdown of transactions with the substances/preparations
containing the Base as well as data on other substances constituting traded substances/preparations/
Note. Double-click on every record on Stock Ledger opens respective record in EMM.
User Manual
146
7.1.6. How to view a Stock Ledger – Actual Trade
: EMM Æ Stock Ledger Report – Actual TradeÛ
Figure 159. Stock Ledger report – Actual Trade
A “Stock Ledger report – Actual Trade“ query is intended for rapid viewing of the quantities of products in
stocks as well as the transactions with them. The only difference from the previous “Stock Ledger Report”
is that it is not converting the actual trade to base equivalent values, but presents the actually traded
products.
The Stock Ledger screen consists of three logical parts:
• Criteria
• Actual Trade – Total
• Actual Trade – Detailed
In the criteria section you may enter various criteria for querying the data. Please note that Year field is
mandatory.
In the Actual Trade Section you may see the Opening Balance for particular Product, transactions
affecting the stocks, and Closing Balance of this Product.
Actual Trade – Detailed section hosts all the transactions that made the displayed total of this Product
and this Transaction Type, displayed in Section 1.
Note. Double-click on every record on Stock Ledger opens respective record in EMM.
User Manual
147
7.2. How to indicate the manufacture-related data
For indication of manufacture-related data there is a special ‘EMM – Manufactured’ form in NDS.
: EMM Æ EMM – Manufactured Û
7.2.1. How to indicate data on losses occurred during manufacture
Unlike the data on Substances destroyed intentionally following some decision of a court or Competent
Authority, the term ‘Losses’ applies to the quantities of controlled Substances lost during manufacturing
process due to technological or other reasons. (See also Narcotics. Form C). These quantities do not
include the quantities of expired and obsolete substances and preparations held at the stocks of
wholesalers or manufacturers later disposed of, because such quantities should be recorded as
destroyed in the ‘Destroyed’ tab of EMM–Seizures form.
The quantities indicated in this tab affect the figures in the Form C.
Figure 160. EMM – Manufactured form. ‘Losses’ tab.
User Manual
148
7.2.2. How to record the manufacturing of narcotic drugs and psychotropic substances
Figure 161. 'Manufactured' tab
The data on transactions of manufacturing of one controlled substance from another controlled substance
are recorded using the ‘Manufactured’ tab of EMM-Manufactured form. The appearance of this tab is
given in the figure below.
At the upper part of details section you will need to enter the substance(s) and alkaloids that were used
for the manufacture, and in the lower part – the substance(s) and alkaloids obtained as a result of
manufacturing process.
The transactions entered in this tab affect the figures in the Reports.
7.2.3. How to record manufacturing of Schedule III preparations, exempted preparations and nonpsychotropic substances
According to he 1961 Convention, and 1972 Convention the statistical data provided by Countries
(Governments) to INCB include the data on the quantities of controlled Substances used for manufacture
of preparations from which the narcotic drugs or psychotropic substances cannot be readily recovered. In
case of narcotics such preparations are called ‘Schedule III Preparations’, as they are listed in Schedule
III of Yellow List, and in case of psychotropic substances they are called ‘Exempted Preparations’. Also
the countries are requested to report the quantities of psychotropic substances used for manufacture of
non-psychotropic substances.
Note. You should indicate only the quantities used for manufacturing of above-mentioned
Substances and Preparations. You are not obliged to indicate the obtained quantities. However,
if the indication of obtained substances seems expedient, you may indicate such quantities in
the ‘Remarks’ tab of respective Report form.
EMM provides three more tabs for recording of the data listed at the paragraph above.
• ‘Used for Schedule III’
• ‘Exempted Preparations (Mfg)’
• ‘MFG – Non-Psychotropic‘
The images of these tabs are given below.
User Manual
Figure 162. 'Used for Schedule III' tab
Figure 163. 'Exempted Preparation (MFG)' tab
149
User Manual
150
Figure 164. 'MFG - Non Psychotropic' tab
As you can see, the differences between the above-mentioned tabs are quite small.
The main difference is that in narcotics-related tab – ‘Used for Schedule III’ – only narcotic drugs are
shown in the SubstanceCode drop-down, whereas Psychotropic Substances are shown in the
SubstanceCode drop-downs of two Psychotropic-related tabs.
All three tabs consist of Substance Details (upper) and Alkaloid Details (lower) section. As in other NDS
forms, the Alkaloid Details Section is used only when the respective record in the Substance Details
section contains data on Concentrate of Poppy Straw.
7.3. Domestic transactions
7.3.1. How to account for domestic trade in controlled substances.
The quantities of controlled substances imported by wholesalers and manufacturers are considered as
‘kept in stocks’ on the INCB forms, as well as the quantities manufactured. The quantities of substances
transferred to the retailing establishments and quantities imported by retailing establishments are
considered ‘consumed’ according to 1961 Convention.
The transactions which lead to the transfer of controlled substances between wholesalers, between
wholesalers and manufacturers as well as from wholesalers and manufacturers to retailers are being
accounted for using the ‘EMM – Domestic Trade’ form.
: EMM Æ EMM – Domestic Trade Û
User Manual
151
Figure 165. 'Domestic Sales Details' tab
Let us consider an example with an Establishment A selling 5 grams of ephedrine to Establishment B
(wholesaler) and 3 grams of ephedrine to Establishment C (retailer). The transaction takes place in 2006.
Then the records to be entered will be as follows:
Establishment A. Year 2006.
• Two records (5 and 3 grams of ephedrine) in ‘Domestic Sales’ tab
Establishment B. Year 2006
• 1 record for 5 grams of ephedrine in ‘Domestic Purchases’ tab
Establishment C. Year 2006.
• 1 record for 3 grams of ephedrine in ‘Consumed’ tab
The System also will automatically create one more record
Establishment B. Year 2007
• 1 record for 5 grams of ephedrine in ‘Opening Stocks’ tab of EMM-Stock Management form.
So that the purchased ephedrine will be properly accounted for during the following year.
Note. The ‘Domestic Sales’ and ‘Domestic Purchases’ tabs are identical.
7.3.2. How to Compare Domestic Sales and Domestic Purchases
Technically, from the accounting point of view, any record in ‘Domestic Sales’ tab of selling company
should be reflected by the same record in ‘Domestic Purchases’ of the counterpart company in order to
balance the quantities throughout the Country. However, due to various reasons, this does not always
happen. In order to reveal the missing records the special ‘” report query is provided in EMM Module (see
also ‘Report Queries’ section).
: EMM Æ Domestic Purchases/Sales. Missing Entries Û
User Manual
152
Figure 166. Domestic Purchases vs. Domestic Sales. Missing Entries. report
As you can see, the PurchaseQuantity fields are empty, which reveals the missing data.
Note. When querying do not forget to specify the criteria in the fields marked with red circle.
7.3.3. How to record transactions between wholesalers/manufacturers
For the purpose of rapid querying and displaying of information on the transactions that do not change the
quantities accounted for as ‘stocks’ special ‘’ report query form is provided in NDS 6.0. (See also Report
Queries)
: EMM Æ Domestic Purchases/Sales Û
Figure 167. Domestic Purchases/Sales report
In the upper part of this form there are indicated the names of transaction participants and in the lower
part – the information upon the substances traded.
Note. When querying do not forget to specify the criteria in the fields marked with red circle.
User Manual
153
7.3.4. How to detect discrepancies in domestic trade data
The ‘Domestic Purchases vs. Domestic Trade. Discrepancies’ is intended for detection of discrepancies,
i.e. the situations when the purchase data does not coincide with the sales data. (See also Report
Queries section)
: EMM Æ Domestic Purchases/Sales - Discrepancies Û
Figure 168. Domestic Purchases/Sales - Discrepancies Report
Note. When querying do not forget to specify the criteria in the fields marked with red circle.
7.4. How to indicate the data on disposal of controlled substances
The EMM also provides an opportunity to briskly record the data concerning the disposal of controlled
substances. Disposals happen from time to time if, for example, substances or preparations in stock
exceed their expiration date.
: EMM Æ Disposal Û
Figure 169. 'Disposal' tab
The tab consists of two parts: Substance Details Section (upper) and Alkaloid Details Section (lower). As
in other NDS forms, the Alkaloid Details Section is used only when the respective record in the Substance
Details section contains data on Concentrate of Poppy Straw.
Chapter 8. System Security and Parameters
8.1. Security
The Security module is used only by system Administrator, i.e. the person specially assigned to ensure
the functionality of the whole NDS system.
There are two main concepts you should understand before you start working with Security module.
User – virtual person, identified by means of login and password and having certain rights to work with
certain modules/screens/records of NDS.
Role – set of rights to work (view, add, modify, delete) with certain modules/screens/records of NDS.
The Users/Roles Management form is opened as follows:
: Security Management Æ Users/Role Management Û
Figure 170. Users/Roles Management Form
8.1.1. How to define a role
The right part of Users/Roles Management form is dedicated to role management. Here you can create a
new role (<Add Role…> button), change the attributes of already-existing role (<Edit Role…> button> and
delete a role that is not necessary (<Delete Role> button).
Let us review the role-management on the following example: we should create a role for a ‘Guest’ i.e.
the user who will be able to view all records, but will not be able to add new records, as well as change an
delete the already existing ones.
User Manual
Press the <Add Role…> button to create a new Role. The ‘Role Management’ dialog box will open.
Figure 171. Role Management screen
Enter the Code and the Name of the Role and press the <Save> button. The ‘Role Grants’ tab opens.
Figure 172. 'Role Grants' tab
156
User Manual
157
In the left pane you are supposed to select the module you want to assign the user rights to. If you select
the ‘All Modules’ option, all modules and screens will be displayed in right pane.
In the right pane there are checkboxes showing if a user of this role will have a right to
view/insert/update/delete records in some screen (checked) or not (unchecked). Our task is to create a
role giving user rights to view records only. Thus we should check all boxes in ‘View’ column (see Figure
below).
To facilitate the selection process, use the following buttons in column headers:
check all
- selects all checkboxes in the current column
uncheck all
- unselects all checkboxes in the current column
- selects all checkboxes in all columns
- unselects all checkboxes in all columns
Figure 173. Assigning viewing rights
After that, press the <Save> button and close the form (press the <Close> button).
The Role is created. Now you can assign it to users so that they will have proper access rights.
User Manual
158
8.1.2. How to define a user
To open a new user account (define a new user) use the <Add user…> button in the left pane of
User/Role Management screen. The User Maintenance screen will open.
Figure 174. User Maintenance screen
In the Header section you are to indicate the User ID (login) and his/her Name.
After that, you may indicate the following information in the ‘General Details’ tab.
Field
Value
Country
Country the User resides in or represents
CA Code
Competent Authority of the Country of the User
Default Language
The Language in which the information will be entered by and displayed to this particular
User.
Import/Export Validity
Period (Months)
The period for which the User will be able to issue Export/Import authorizations
License Validity Period
(Months)
The period for which the User will be able to issue Licenses.
Active User
This drop-down box shows if the User is an active or inactive one. In case of ‘inactivity’
he/she will not be able to work with the system.
Ignore warning in the
Import/Export module
The User will be able to override the warnings in Import/Export module, i.e. issue file for
and issue Import or Export Authorizations when they exceed the specified limit.
Ignore warning for
Estimates
User will be able to override the warnings concerning excess of Estimates.
Ignore warning for
Export Limit
User will be able to override the warnings concerning the Export Limits
Ignore warning for
available License
User will be able to override warnings when license for some particular Substance of
transaction is unavailable
Ignore warning for
License Quota
User will be able to override warnings when the Licensed quota is exceeded.
When you enter the user-related information, you may proceed with assigning (granting) a role to him/her.
User Manual
159
8.1.3. How to grant/revoke a role to/from user(s)
A role may be granted to or revoked from a User in two possible ways.
1) By means of ‘User Roles’ tab in User Maintenance screen
2) By means of Users/Roles Management screen.
8.1.3.1. Granting roles with ‘User Roles’ tab
The ‘User Roles’ tab of ‘User Maintenance’ screen looks as follows.
Figure 175. 'User roles' tab
All you have to do is press the <Grant Role to User> button and then select proper Role from the dropdown list. After that, press the <Save> button to save the record.
To revoke the role from user, place the mouse cursor on the necessary role and press the <Revoke User
From Role> button. Then save the record.
8.1.3.2. Granting roles with Users/Roles Management screen
To Grant a role to a User by means of Users/Roles Management Screen:
1) Click in the User Name in the left pane,
2) Hold the mouse button and drag the user name to the necessary Role.
3) When the Role is highlighted, release the button.
4) Save the record.
User Manual
160
To Revoke the Role from a User,
1) Click on the necessary User under some Role
2) Hold the mouse button and drag the User name to left pane
3) Release the mouse button
4) Save the record.
8.1.4. Event Log
Unlike the Error Log, the Event Log functionality allows the user to record all actions of all users
throughout NDS.
The Event Log may be invoked as follows:
: Security Management Æ Event Log Û
1) Enter the start and end dates of the period you want to review the actions for;
2) Indicate a user, whose actions you want to review;
3) Indicate type and subtype of event (if the EventType and EventSubtype fields are left blank, all
events will be displayed)
4) Indicate name of the NDS object (module or separate form) which you want to review.
5) Press the <Execute Query> button on the toolbar or press the <F12> key on keyboard: the summary
information on the events will be displayed in the details part of the Event Log screen.
8.2. Parameters
8.2.1. Form Fields Master
The Form Fields Master gives you an opportunity to change the names of the fields in NDS forms. It is
very useful if one needs to translate the whole system to some local language.
This Master embraces all field labels throughout the system, so it is possible to change field labels in all
modules and screens, besides the INCB printed reporting forms.
User Manual
161
The Form Fields Master is started as follows:
: Parameters Æ Form Fields Master Û
Figure 176. Form Fields Master
To change a field name, do the following:
1) Choose the necessary field name in left pane
2) Choose the record in the necessary language in the right pane, or add a record in a new
language
3) Change the field name or enter a new one in FieldName field
4) Change or enter the text of context help in FieldHelpText field. This text will be displayed in the
context help mode when a mouse cursors hovers over the field name.
5) Change or enter necessary comments in Comments field. This field is not mandatory.
6) Save the record.
From now on the new name of the field will be displayed in the respective modules of NDS when the
respective language is selected by a user.
User Manual
162
8.2.2. Error Master
The Error Master provides an opportunity to edit the error and information messages displayed by the
system to users.
The Error Master is invoked as follows:
: Parameters Æ Error Master Û
Figure 177. Error Master
All error/warning messages are ‘bound’ to the error codes generated by the system in case of some
events. When the pre-set event occurs, the system checks which language the user has selected and
displays the error/warning message in that language.
To modify the existing error/warning message or to enter a message in a new language for existing error
code you should enter or modify the following fields:
Field
Value
Error Code
Code of event when the system is supposed to display this message
Language Code
Code of language for which the system will display this message
Error Type
Type of error or warning message. Choose one of the following:
•
S – (stop) – error message with ‘stop’ sign. Equipped with only ‘Ok’ button.
Only the action indicated in this message will be executed upon pressing
of the button.
•
Q – (question) – warning message equipped with three buttons. It gives a user
an alternative whether to agree with the proposed action (OK), disagree
and continue the started operation (NO) or abort the operation as a whole
(CANCEL)
•
W – (warning) – warning message with only one (OK) button. Warns the user
of the consequences of the started operation.
Reason
Brief description of operation which lead to the occurrence of event corresponding to
ErrorCode
Action
Proposed action with which a user may agree or disagree
Comments
Necessary comments on the error/warning message
User Manual
163
After you have entered/modified the data, save the record. From now on this message will be displayed
by the system when the ErrorCode occurs in case the user has selected the proper language.
8.2.3. Language Master
Language Master is used to manage the list of languages supported by the system. By means of this
master you may enter into the system, for example, your local language, if you intend to use it for working
with NDS.
Language Master is started as follows:
: Parameters Æ Language Master Û
Figure 178. Language Master
If you do not find the necessary language in the list of available languages, and would like to add one, do
the following:
1)
2)
3)
4)
5)
6)
Add new record
Specify a three-letter code in LanguageCode field
Specify a full and correct LanguageName
Enter a string by which this language will be sorted in the language list in SortDescription field
Enter necessary comments (optional)
Save the record
From now on the entered language will be displayed in the list of languages recognized by the system.
User Manual
164
8.2.4. Custom Numbering
Custom numbering is a simple, yet powerful feature, which allows users not to enter manually various
document and/or transaction numbers, but provides an opportunity to program the system to do it
automatically.
The Custom Numbering Master is started as follows:
: Parameters Æ Define Custom Numbering Û
Figure 179. Custom Numbering Master
First, select a section that you are going to define custom numbers for.
Then, think over the format of custom number. In our example the newly added import authorization will
have the following number:
So, you will define the four logical parts of the number and then define the proper codes and delimiters for
each part.
Each ‘Code’ field may have the following types:
• Text
– plain text
• Sequence No. – Number which increases by one point each time the new form (document) is
created. You will not be able to ‘undo’ the numbering so that the numbers will
not repeat and will stay unique.
• Year
– current year
• Number
– any number. The number in this field is not changing with opening of new
documents.
• Month
– current month
• --– blank space.
You may define the numbering policy for the whole section as well as for individual substance group. If
you check the DefaultSubstanceType checkbox, the defined numbering policy will be applied to all
Substances in the current section.
User Manual
165
8.2.5. Changing user defined codes of substances (Substance Change)
This master is used in order to facilitate the process of changing the User Defined Codes (UDF Codes) of
substances already in the system.
: Parameters Æ User Defined Code Change Master Û
Figure 180. UDF Code Change Master
Just find the necessary substance, enter the new UDF code and then save the record.
8.2.6. Pre-defined Substances
These NDS functionality provides an opportunity to define the substances indicated in paper-based INCB
reporting forms (Form A, Form A/P, Form C etc.).
The substances indicated in this section will be printed when a user selects an INCB printing option.
Figure 181. Pre-defined Substances for Form A.
User Manual
166
8.2.7. Backup/Restore functionality
As it follows from the name of this feature, it allows administrators of NDS to backup the data on a regular
basis and then restore them from the previously saved versions.
: System Æ Backup/Recovery
Just select the proper tab according to whether you want to make a backup copy (‘Backup’ tab) or restore
data from backup file (‘Restore’ tab).
Indicate the file name and press the <OK> button to complete the operation.
Figure 182. Backup/Recovery Screen