1
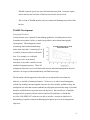
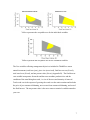
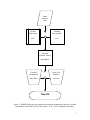
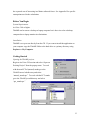
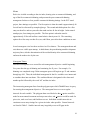
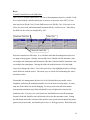
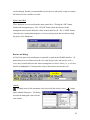
ThinME
User’s Guide
July 2001
KaDonna C. Randolph, Robert S. Seymour, and Robert G. Wagner
ThinME
User’s Guide
July 2001
KaDonna C. Randolph, Robert S. Seymour, and Robert G. Wagner
Cooperative Forestry Research Unit
University of Maine
Orono, ME 04469
Custom ArcView GIS User Interface by
KaDonna Randolph and Sean Murphy
Summary
The Maine Forest Service identified commercial thinning as crucial to enhancing Maine’s
wood supply in their 1998 Timber Supply report. Members of the University of Maine’s
Cooperative Forestry Research Unit (CFRU) also identified a better understanding about
commercial thinning and resulting growth & yield responses as their top research priority
for 2000-2005. As a result, the CFRU established a Commercial Thinning Research
Network in 2000 to develop a set of interim commercial thinning guidelines and establish
a statewide network of research sites to address specific questions about commercial
thinning in Maine's forests. ThinME is the resulting product of the Network’s first aim of
producing a set of interim commercial thinning guidelines.
By means of a customized ArcView GIS interface ThinME illustrates the effects of
different commercial thinning prescriptions on biological and financial variables.
ThinME presently is designed to distill a myriad of harvesting options into a more
reasonable assemblage of alternatives by assisting the user in answering three questions:
(1) when should thinning occur, (2) how much should be removed, and (3) when should
the final harvest occur to satisfy a given set of management objectives? The management
objective variables included in ThinME are mean annual increment, piece size, final
harvest cost, total wood cost, and net present value.
2
Contents
Introduction..........................................................................................................................5
ThinME Development
Conceptual Construct...............................................................................................6
Design Process .........................................................................................................8
Source Data..............................................................................................................8
Growth Model........................................................................................................10
Thinning Prescriptions
PCT Stands.................................................................................................10
Unthinned Natural Stands ..........................................................................11
Harvest Cost Model ...............................................................................................12
Before You Begin
System Requirements.............................................................................................13
Installation..............................................................................................................13
Getting Started
Opening the ThinME projects................................................................................13
Views, Boxes, Buttons, and Dialogs......................................................................15
ArcView with the nomogram views and user control boxes .....................15
Views .........................................................................................................16
Nomogram Theme .........................................................................16
Trajectory Lines Theme.................................................................17
Axis Theme....................................................................................18
Boxes
Variable Control Boxes with Slider Bars.......................................19
Main Control Box ..........................................................................20
Buttons and Dialogs...................................................................................20
Identify...........................................................................................20
Select..............................................................................................21
Locate.............................................................................................21
Other Dialogs .................................................................................21
3
Using ThinME Overview
Input ...........................................................................................................22
Output and Interpretation...........................................................................22
Shutdown ...........................................................................................................................24
Troubleshooting
Error Message Boxes .............................................................................................25
No regions are highlighted after “OK” is clicked..................................................25
The identify dialog box does not display the objective variable values ................26
ArcView cannot find a theme when a project is opened .......................................26
Limitations .........................................................................................................................26
Appendices.........................................................................................................................27
A. Stand development with no commercial thinning
B. Management Variable Definitions
C. Worksheet for calculating variable values
D. Summary of Ronco Cove Inventory
E. Summary of Alder Stream Inventory
F. Summary of Sarah’s Road Inventory
G. Model Evaluation and Selection
H. Volume Equations
I. Assumptions used in the harvesting cost estimations and calculations of total
wood cost and net present value
J. Forest Vegetation Simulator documentation
Literature Cited ..................................................................................................................27
4
Introduction
The Maine Forest Service identified commercial thinning as crucial to enhancing Maine’s
wood supply in their 1998 Timber Supply report. Members of the University of Maine’s
Cooperative Forestry Research Unit (CFRU) also identified a better understanding about
commercial thinning and resulting growth & yield responses as their top research priority
for 2000-2005. As a result, the CFRU established a Commercial Thinning Research
Network in 2000 to develop a set of interim commercial thinning guidelines and establish
a statewide network of research sites to address specific questions about commercial
thinning in Maine's forests. ThinME is the resulting product of the Network’s first aim of
producing a set of interim commercial thinning guidelines.
Scope of ThinME
ThinME is a tool that can assist forest managers with developing appropriate commercial
thinning prescriptions for spruce-fir stands in Maine. Questions regarding when to thin,
how much to remove during the thinning, and when to make a final harvest can be
addressed.
Using a customized ArcView GIS interface, ThinME provides a graphical approach to
identifying residual densities, timings of entry, and methods of thinning for the
achievement of a set of stand management objectives. The stand management objectives
ThinME helps optimize are mean annual increment, piece size, final harvest cost, total
wood cost, and net present value.
Cautions
-
ThinME stand projections are based on model simulations derived from a limited
sample of spruce-fir stands in the state of Maine; therefore, ThinME simulations
reflect these stand conditions. Applicability of ThinME output to stands that
users may have is based on the degree of similarity between their stands and the
stands upon which ThinME projections are based. These stand conditions are
detailed in Appendices D, E, and F of this manual.
5
-
ThinME cannot be given user-specified stand inventory data. Economic inputs,
such as interest rate and value of the harvested wood, also are fixed.
-
This version of ThinME permits only one commercial thinning entry before final
harvest.
ThinME Development
Conceptual Construct
Various formats were explored for the thinning guidelines, including those used in
Scandinavian countries, before we settled on predictive three-dimensional graphs
(nomograms). The nomograms consist
of stand age and residual stand density
on the main axes and a “contour map” of
Example nomogram for mean
annual increment
a variable of interest relative to the main
axes. For example, we could plot
average tree size, mean annual
increment, or any other variable, for any
stand development trajectory. These 3D
nomograms allow the user to work backward from an individual management objective
and arrive at a target residual stand density and final harvest age.
The limitation with this approach is that often we are interested in more than one
objective or variable of stand performance. If, however, we take a set of nomograms,
exclude (by shading out) unacceptable outcomes for each variable, and then overlay the
nomograms, the zone that remains unshaded on all graphs represents the range of residual
densities and final harvest ages that meets all objectives. Because this use of multiple
nomograms has properties similar to those found in GIS problems, we found that
ArcView GIS (ESRI 1997) software was able to provide a visual user-interface for
determining acceptable commercial thinning prescriptions given a set of management
objectives.
6
Mean annual increment
Final harvest cost
Yellow represents the acceptable area for the individual variables.
Yellow represents the acceptable area for the combined variables.
The five variables reflecting management objectives included in ThinME are mean
annual increment (cords/acre/year), piece size (trees/cord), final harvest cost ($/cord),
total wood cost ($/cord), and net present value ($/acre) (Appendix B). The final harvest
cost variable incorporates forwarder and harvester machine productivities and the
condition of the stand being harvested, i.e. size of the trees and intensity of removal.
Total wood cost is the expense of growing the wood over the entire rotation and includes
the price of pre-commercial thinning, net revenue from commercial thinning, and cost of
the final harvest. The net present value is the net revenue at rotation’s end discounted to
year zero.
7
Design Process
Several steps were required to present the nomograms in the final ArcView GIS format.
The process is outlined in Figure 1 and further explained in the sections below. Briefly,
the procedure entailed:
1. collecting stand inventory data;
2. utilizing the Forest Vegetation Simulator (FVS) to
a. simulate commercial thinning prescriptions and
b. project stand growth;
3. transferring the growth projection output to a spreadsheet to
a. calculate the management variable post-thinning values (Appendix
C) and
b. prepare data input files for ARC/INFO;
4. generating and overlaying the nomograms in ARC/INFO; and
5. customizing ArcView for the user-interface of ThinME.
Source Data
Representative samples of spruce-fir timberlands ready for commercial thinning
throughout the state of Maine were located as part of the CFRU Maine Commercial
Thinning Research Network. Seven initial sites were selected for research plot
installations and inventoried during the summer of 2000. Three sites were selected from
these seven for use in ThinME. The Plum Creek Timber Company Ronco Cove site in
Piscataquis County was selected as the basis for the 750 TPA PCT stand, the
International Paper Company Alder Stream site in Somerset County as the basis of the
500 TPA PCT stand, and the Seven Islands Land Company Sarah’s Road site in Oxford
County as the basis for the unthinned natural stand. The 1000 TPA PCT stand was based
on a subset of the Ronco Cove inventory data. The Ronco Cove and Alder Stream sites
are respectively 94% and 84% balsam fir (Appendix D and E). The Sarah’s Road site is
87% red spruce (Appendix F).
8
Stand
Inventory
Data
Growth
Projections
Thinning
Prescriptions
FVS
FVS
Calculate
Variable Values
Spreadsheet
Generate
Nomograms
Create User
Interface
ARC/INFO
ArcView
ThinME
Figure 1. ThinME design process required to present the management objective variable
nomograms in the final ArcView GIS format. FVS = Forest Vegetation Simulator.
9
Growth Model
We examined and compared three growth and yield models available for predicting
spruce-fir responses to commercial thinning: FIBER (Solomon et al. 1995), the Nova
Scotia Softwood Growth and Yield Model (GNY) (NSDNR 1993), and the US Forest
Service’s Forest Vegetation Simulator (FVS) NE-TWIGS variant (Bush 1995). Using a
variety of biological and practical criteria, we evaluated the suitability of each model for
developing the nomograms. We found that the most suitable model for the development
of ThinME was FVS (Appendix G).
FVS is a distance-independent, individual tree growth model consisting of several
variants that provide growth and yield estimates for specific geographic areas of the US.
The Northeast variant uses growth and yield equations developed by Teck and Hilt
(1991) commonly known as NE-TWIGS. NE-TWIGS was developed with US Forest
Service Forest Inventory and Analysis data collected in the northeastern US. In the data
set, two growth remeasurement intervals were available from Maine, 1959-1970 and
1970-1982 (Hilt et al.1987). Teck et al. (1996) provide a concise overview of FVS, its
structure, and implementation.
Volume equations in FVS were customized to equal Honer’s (1967) merchantable
volumes (Appendix H). Merchantability limits were set to include trees in the 4” DBH
class and larger. Reported volumes are to a 3” top diameter inside bark, excluding a 6”
stump. All trees > 2.5” DBH were included in the pre-commercially thinned (PCTed)
stand simulations and all trees > 4.5’ tall were included in the natural stand simulations
per the inventory tree lists.
Thinning Prescriptions
PCT Stands
The thinning prescription implemented in the PCT stands consisted of three steps. First,
a 10% basal area reduction was made across all diameter classes to account for forwarder
and harvester trails. Second, 70% of the basal area in balsam fir trees in the 9” DBH
class and larger was removed. Third, a thinning from below (favoring the harvest of
10
balsam fir) was made across all diameter classes beginning with the 4” class. In this third
step, no more than 70% of each diameter class was cut. The total basal area removed by
these three steps ranged between 20% and 50%. For some of the lighter basal area
removals, step three was omitted and the percent removed in step two was reduced. The
first timing of entry is at the age when the stand is approximately 40 feet tall as
ascertained by site index curves (Steinman 1992). The second and third options for a first
thinning entry are then five and ten years after the stand reaches 40 feet in height. The
document “Implementing Commercial Thinning with the Forest Vegetation Simulator”
(Appendix J) describes the implementation of the thinning prescription.
Unthinned Natural Stands
Two thinning prescriptions were implemented in the natural stands, low thinning and
crown thinning. The low thinning prescription consisted of three steps. First, a 10%
basal area reduction was made across all diameter classes to account for forwarder and
harvester trails. Second, all balsam fir trees were removed. Third, a thinning from below
was made across all diameter classes beginning with the 4” class. In this third step, all
stems were removed from a diameter class before the next largest class was cut.
The crown thinning prescription consisted of three steps. First, a 10% basal area
reduction was made across all diameter classes to account for forwarder and harvester
trails. Second, all balsam fir trees were removed. The third step was constructed to
simulate the release of crop trees on a predefined spacing on the ground and consisted of
multiple parts. To begin with, the total basal area was divided into quartiles by diameter.
Then trees were removed from the fourth quartile (the largest diameters) until a
maximum of 35% of the basal area in that quartile was removed. Next, trees were cut in
the third quartile until a maximum of 30% of the basal area in the quartile was removed.
After that, trees were removed from the second quartile until a maximum of 75% of the
basal area was removed from the range. Following that, trees were removed from the
first quartile until the overall basal area removal target was met. No maximum limit was
set for this quartile; no more than 40% of the basal area in this class ever was removed
(Table 1). The maximum removal levels for each quartile were based on examinations of
11
the crown thinning prescriptions applied in the field as part of the CFRU Maine
Commercial Thinning Research Network.
Table 1. Example basal area removal percents for each quartile in the third step of the
crown thinning.
Overall % Basal Area
% Basal Area Removal in Step 3
Q1
Q2
Q3
Q4
0.0” – 4.7”
4.8” – 6.6”
6.7” – 9.0”
9.1” +
20
0
0
10
35
25
0
2
30
35
30
0
23
30
35
35
0
45
30
35
40
0
38
30
35
45
17
75
30
35
50
38
75
30
35
Removal
Total basal area removed in each prescription ranged between 20% and 50%. For some
of the lighter thinnings only trees in the third and fourth quartiles were harvested. The
first option for a thinning entry is when the stand is approximately 50 feet tall and has a
stand relative density (Wilson et al. 1999) near 0.6. The remaining options for a first
thinning entry are then five, ten, and fifteen years after these conditions are met.
The document “Implementing Commercial Thinning with the Forest Vegetation
Simulator” (Appendix J) describes the implementation of the thinning prescriptions.
Harvesting Cost Model
The harvesting costs included in part or as whole of the three financial variables, were
generated with PPHARVST, public domain software available from the US Forest
Service (Fight et al. 1999). PPHARVST was developed for use in management planning
for ponderosa pine plantations. It allows users to estimate harvesting costs over a wide
range of tree sizes and volumes removed. Equipment prices, harvesting productivities,
and other assumptions were modified so that the model output very closely approximated
12
the expected cost of harvesting in a Maine softwood forest. See Appendix I for specific
assumptions used in the calculations.
Before You Begin
System Requirements
ArcView 3.0b or higher
ThinME can be run on a desktop or laptop computer but is best viewed on a desktop
computer due to laptop monitor size limitations.
Installation
ThinME is set up to run directly from the CD. If you want to install the application on
your computer copy the ThinME folder to the hard drive as a primary directory using
Explorer or My Computer.
Getting Started
Opening the ThinME projects
Begin an ArcView GIS session and select “Open an
Existing Project” from the pop-up menu. To work
with the non-PCTed (natural) stands go to the
ThinME/natural subdirectory and select
“natural_stands.apr.” To work with the PCT stands
go to the ThinME/pct subdirectory and select
“pct_stands.apr.”
13
ThinME was created with ArcView 3.0b. If you are using a newer version of ArcView
you may receive the prompt below. Click “Yes” and continue.
Once the project is open select “ThinME” from the main menu. In the PCT stands
project, you have a choice of three initial densities: 1000 trees per acre, 750 trees per
acre, or 500 trees per acre. In the natural stands project, your choices are the type of
commercial thinning implemented: crown thinning or low thinning. Select the desired
option.
Next you are prompted to select a site
index (SI50, breast ht). The PCT project
includes site indexes 80, 70, 60, 50, and
40. The natural project includes site
indexes 60, 50 and 40. Select the
desired site index and click “OK”.
14
Views, Boxes, Buttons, and Dialogs
After selecting the site index, the nomogram views will open along with six user control
boxes.
ArcView with the nomogram views and user control boxes:
Variable Control Boxes
with Slider Bars
Main Control Box
Tool Bar
Nomogram View
Box Title Bar
The nomogram views and user control boxes can be resized and repositioned to
fit your desktop space. To resize the boxes place the cursor at the corner of the
box until the double-ended arrow appears. Then hold down the left mouse button and
drag the arrow until the box is the preferred size. To move the box, click on the box’s
title bar, hold down the left mouse button, and drag the box to the new position. The
variable control boxes should be repositioned so they are not overlapping.
15
Views
Each view is titled according to the site index, density prior to commercial thinning, and
age of the first commercial thinning, and presents the post-commercial thinning
nomograms for three or four possible commercial thinning timings. In the PCT stand
project, three timings are possible. The first option is when the stand is approximately 40
feet tall and is referenced by stump height age. The second and third options for a first
entry are then five and ten years after the stand reaches 40 feet in height. In the natural
stand project, four timings are possible. The first option is when the stand is
approximately 50 feet tall and has a stand relative density near 0.6. The remaining
options for a first entry are then five, ten, and fifteen years after these conditions are met.
In each nomogram view box there are three ArcView themes. The nomogram theme and
axis theme are visible upon startup. A third theme, the post-thinning stand development
trajectory lines, aids the determination of the residual density after commercial thinning
and must be made active by the user.
Nomogram Theme
Individual nomograms were created for each management objective variable beginning
five years after the age of thinning and continuing for 45 years. For example, if a
thinning was completed at age 50 the nomogram space will begin at age 55 and continue
through age 100. Then, the individual nomograms for the five variables were intersected
to combine them into one theme. The combined theme is designated with a letter and
number prefix followed by the word “all” and the site index.
The intersecting nomogram lines form the polygons upon which ThinME bases its query
for meeting the management objectives. The nomogram lines were set at regular
intervals for each variable. The polygons then were labeled so that > queries would be
made for mean annual increment and net present value, and < queries would be made for
piece size, total wood cost, and final harvest cost. Individual variable intervals are
consistent across entry timings for a given site index when possible. General intervals
are listed in Table 2. Smaller intervals may irregularly occur to fill gaps in the
16
nomogram space. Given these intervals, very precise queries are limited. For example in
some nomograms, a query for mean annual increment > 0.65 may generate the same
result as a query for mean annual increment > 0.66 (Figure 2).
Table 2. General intervals between nomogram lines.
PCT Stand
1000 TPA
750 TPA
500 TPA
Natural Stand
Crown thinning
Low Thinning
MAI
(cord/ac/yr)
Piece Size
(trees/cord)
NPV
($/acre)
Final Harvest
Cost ($/cord)
Total Wood
Cost ($/cord)
0.01 or 0.02
0.01 or 0.02
0.01 or 0.02
2
2
2
4, 10, or 15
2, 4, or 5
5, 10, or 15
2
2 or 4
1 or 2
5
2, 4, or 5
5, 10, or 15
0.01
0.01
2 or 4
2
4, 5, or 10
4 or 10
4
2
2 or 4
4 or 5
0.68
0.64
0.66
0.68
0.66
0.64
Figure 2. Example polygon labeling for a mean annual increment nomogram. Blue
numbers indicate contour values. Red numbers indicate polygon values by which the
queries are made.
Trajectory Lines Theme
The post-thinning stand development trajectory lines theme consists of seven lines that
correspond to the different thinning intensity levels used to create the nomograms. These
levels are 20% basal area removal, 25% basal area removal, …, and 50% basal area
removal. This theme must be activated by the user in the following manner: move the
cursor to the left edge of the view box until the
cursor appears, then hold down the
17
left mouse button and
drag the cursor right
to reveal the view’s
Table of Contents.
Click the box next to
the top theme, in this
example named
R10lines70. (The
name of the trajectory
lines theme in each
nomogram view has a
unique letter and
number prefix
followed by the word
30% BA removal
“lines” and the site
index.) See pages 7
40% BA removal
and 14 in the Tutorial for a
discussion on using the lines to
determine residual density after
thinning.
50% BA removal
Axis Theme
The axis is a generated lines theme included to orient the user in the nomogram space. It
is designated by a letter prefix, the site index, and the word “axis.”
18
Boxes
Variable Control Boxes with Slider Bars
There are five variable control boxes, one for each management objective variable. Each
box is titled with the variable and its unit of measure: net present value (NPV), $/acre;
total wood cost (Wood Cost), $/cord; final harvest cost (Fnl Hrv Cst), $/cord; piece size
(Piece Sz), trees/cord; and mean annual increment (MAI), cords/acre/year. Note that in
the MAI box the values are multiplied by 100.
Minimum Slider Bar
Slider Tab
Maximum Slider Bar
Each box contains two slider bars. It is with these bars that the management objectives
are input to the program. Initially, the top slider bar is labeled with the minimum value
occurring in the nomograms and the bottom slider bar is labeled with the maximum value
occurring in the nomograms. Moving the slider tab with the mouse or left and right
arrow keys changes the values. To use the arrow keys, first highlight the bar by clicking
on the slider tab with the mouse. The arrow keys are useful for incrementing the values
one unit at a time.
Presumably, the management objective levels will include the best possible values
attainable, and hence the minimum tolerable level is the lone necessary input. As such,
only one of the slider bars needs changing. For net present value and mean annual
increment the minimum (top) slider tab should be moved rightward to increase the
minimum value. For piece size, total wood cost, and final harvest cost the maximum
(bottom) slider tab should be moved leftward to decrease the maximum value. Setting
the tabs thusly allows the selection of the smallest costs, greatest mean annual increment,
greatest net present value, and smallest piece size (i.e. the biggest trees). Both slider tabs
19
can be changed, but this is recommended only for the user who purely wants to examine
the behavior of the variables over time.
Main Control Box
Three functions are executed from the main control box. Clicking the “OK” button
initiates the nomogram query. The “CLEAR” button clears the selection in the
nomograms and resets the slider bar values to their initial levels. The “CLOSE” button
closes the user control and nomogram view boxes and questions the user about exiting
the project (See Shutdown).
Buttons and Dialogs
All ArcView menu tools and buttons are operable as usual in the ThinME interface. Of
particular use are two default tools, the select and identify tools, and one new tool, a
locate tool, located on the tool bar when a nomogram view box is active (i.e., a view box
title bar is highlighted). Clicking on the icons in the tool bar activates the tool.
Tool Bar
Identify
Clicking in one of the nomogram view boxes with the identify cursor
brings
up the identify dialog box. The dialog
box lists the nomogram values for the
area clicked.
20
Select
When the select cursor is in a nomogram view box the location coordinates of the
cursor are displayed on the far right side of the tool bar. (The coordinates also are
displayed with the identify cursor.) The horizontal axis is in years. The vertical axis is in
basal area (ft2/ac) in the natural
stands project and in trees per acre in
the PCT stands project.
Important Note: The vertical axis
was transformed to improve
readability of the nomograms in
ArcView. When read from the tool
bar the natural stand vertical axis
(basal area) should be multiplied by two to obtain the actual value, and the PCT stand
vertical axis (trees) should be multiplied by ten to obtain the actual value. No
transformations are necessary when the vertical location is read directly from the axis
included in the nomogram view box.
Locate
Clicking in one of the nomogram view boxes with the location cursor
brings
up the location dialog box that registers the final harvest age at the clicked location.
Other Dialogs
Net present values are not included in the PCT stand nomograms for site indexes 50 and
40 because all values are less
than zero. When these site
indexes are selected a
message box appears
reminding you of this detail.
21
Using ThinME Overview
In this section a brief overview is given about inputting your management objectives into
ThinME and interpreting the output. We recommend that you read the previous sections
under Getting Started before continuing. Also, we urge you to go through the
accompanying Tutorial document in the ThinME/SupportingDocumentation subdirectory
for a more detailed description of using ThinME.
Input
Begin an ArcView session and open the appropriate project, select the desired conditions
from the ThinME pull-down menu, and arrange the user control and view boxes for your
monitor. Next, set the slider tabs to your management objectives by moving the tabs with
the mouse or left and right arrow keys. If a variable is unimportant leave the tabs in their
original positions. After the tabs are set correctly, click “OK” in the main control box.
(Previous sections in Getting Started detail these steps.) The nomograms will be queried
for polygons that meet all of the constraints indicated by the slider tab values. When
completed, the acceptable region(s) are highlighted yellow.
Output and Interpretation
The three questions that ThinME helps to answer are (1) when should commercial
thinning be implemented, (2) how much should be thinned, and (3) when should the final
harvest be made? The first question is answered by comparing the size and shape of the
highlighted regions in the different nomogram view boxes. Large regions indicate more
flexibility in the thinning prescription than do small highlighted regions. Taller areas
imply more flexibility in residual density and wider areas imply more flexibility in final
harvest age. If a view box has no yellow region, then implementing a thinning at that
timing will not allow you to meet your objectives and it can be omitted from
consideration. (See Troubleshooting if none of the view boxes have a yellow region.)
The thinning timing you select will depend upon your need for flexibility in residual
density, final harvest age, or both.
22
Once you have selected a timing for the commercial thinning you can begin to answer the
remaining questions, “how much should be thinned and when should the final harvest be
made?” Enlarge the nomogram view box of the selected timing for better viewing and
add the post-thinning stand development trajectory lines theme (See Getting Started,
Trajectory Lines Theme).
For any given residual density there is a time frame in which the final harvest must be
made: after the stand “grows into” the highlighted region and before the stand “grows
out” of the highlighted region. For this reason, residual stand density and final harvest
age should be read in tandem from the vertical and horizontal axes, respectively.
First, select a point of
interest in the
highlighted region.
In the example at
right, the point of
interest is circled and
corresponds to the
latest possible final
harvest age. Follow a
trajectory similar to
the nearest stand
development line
from this point back
to the vertical axis
(represented by the
dashed line in the
example). Read the value directly from the axis or activate the select tool and read the
coordinate from the tool bar, remembering to transform the value appropriately (See
Getting Started, Buttons and Dialogs). Next, activate the locate tool, click the mouse at
the point of interest, and read the age from the dialog box (See Getting Started, Buttons
23
and Dialogs). The process can be repeated to find the coordinates of the earliest final
harvest, maximum residual density, minimum residual density, or anything in between.
In general, the final silvicultural prescription will not be determined solely with ThinME.
By determining the density and final harvest age ranges that meet your objectives you can
consult harvest schedules, wood supply models, and other matters that might effect your
prescription (such as wildlife or riparian habitat restrictions). Afterward you can return to
ThinME and determine the residual density that matches the final harvest age required by
a harvest schedule, the final harvest age that matches the residual density required by a
special wildlife species, etc.
Shutdown
To end the ThinME session click “CLOSE” on the main control box. All of the user
control and nomogram view boxes will close. You will receive a prompt asking if you
want to exit the project.
Click “YES” if you are ready to exit the project and then exit ArcView as usual.
Caution: You are not given the option to save the project upon exiting. Changes you
may have made such as resizing the nomogram view boxes are not retained for the next
session. Only if you have copied ThinME to your hard drive may you save the project.
To save your changes click “NO” on the leave dialog. Then go to FileÆSave Project or
Save Project As and save the project.
24
Click “NO” if you want to continue working in the project but wish to change one of the
initial conditions (site index, thinning method, or initial density). The project will remain
open and you can begin again by selecting ThinME from the main menu bar.
If the location cursor was clicked more than once only the last dialog box may close. If
you are continuing to work in the project you will want to close the remaining location
dialog boxes by clicking on the X in the box’s upper right corner.
Troubleshooting
The ArcView main Help menu is not customized with information about ThinME.
Error Message Boxes
There are two error message boxes that may
appear during the course of your ArcView
session. The “Oops! No Selection” message
box appears when “Cancel” is clicked while
selecting a site index from the pull-down
menu. The second message box informs you
that the slider tabs are set illogically. This
message would appear if “OK” was clicked
with the tabs set as they are in the variable control box at
right. The query, final harvest cost > 23 and < 19 is not
appropriate in the ThinME application.
No regions are highlighted after “OK” is clicked
If no highlighted regions are visible in any of the views after “OK” is clicked then your
individual management objectives are not simultaneously attainable. Repeat the query
with each management objective separately to determine which variable may be
restricting the joint achievement of your objectives. Additionally, incrementally relaxing
the constraint for one or more variables also may reveal the limiting objective level.
25
The identify dialog box does not list the objective variable values
If the identify dialog box does not list the objective variable values for the point at which
the mouse was clicked then the nomogram theme is not the “active” theme in the view
box Table of Contents. The nomogram theme is by default the active theme, but the
trajectory lines theme may become active if the name is clicked
when added. To make the nomogram theme active again, simply
click on the theme title in the Table of Contents. The active
theme in the Table of Contents at right is “R10all70.”
ArcView cannot find a theme when a project is opened
This problem should not occur when ThinME is run directly from the CD. It may arise
when you try to open a project you saved to your hard drive before exiting a previous
ThinME session. To avoid this problem make sure you save the new project in the same
subdirectory as all of the ArcView info and theme folders, i.e. the natural or pct
subdirectory.
Limitations
See Appendix I for fixed assumptions in the financial variable calculations.
As mentioned in the Getting Started, Nomogram Theme section the nomogram line
intervals may limit precise queries of the nomograms. The intervals should be adequate,
however, given the range of the variable values. An attempt was made to reduce the
interval width toward the more desirable levels of a variable. For example, net present
value intervals may be smaller near the maximum values and larger near the minimum
values.
ThinME inherits any limitations of the FVS growth and yield model since this was the
model used to predict stand response after thinning. A careful examination of FVS’s
behavior was conducted prior to selecting it for use in ThinME. No major faults were
found with its performance during the evaluation process.
26
Appendices
The appendices are included as separate documents in the
ThinME/SupportingDocumentation subdirectory:
A. Stand development with no commercial thinning
B. Management Variable Definitions
C. Worksheet for calculating variable values
D. Summary of Ronco Cove Inventory
E. Summary of Alder Stream Inventory
F. Summary of Sarah’s Road Inventory
G. Model Evaluation and Selection
H. Volume Equations
I. Assumptions used in the harvesting cost estimations and calculations of total
wood cost and net present value
J. Forest Vegetation Simulator documentation
Literature Cited
Bush, Renate R. 1995. Northeastern TWIGS Variant of the Forest Vegetation Simulator.
Available on the USDA Forest Service website at
www.fs.fed.us/fmsc/fvs/fvs_variant_overviews.htm. Last checked July 5, 2001.
Environmental Systems Research Institute, Inc. (ESRI). 1997. ArcView GIS 3.0b.
Redlands, California.
Fight, Roger D., Alex Gicqueau, and Bruce R. Hartsough. 1999. Harvesting costs for
management planning for ponderosa pine plantations. General Technical Report PNWGTR-467. Portland, OR: US Department of Agriculture, Forest Service, Pacific
Northwest Research Station. 8 p.
27
Hilt, Donald E., Richard M. Teck, and Richard H. Blodgett. 1987. Development and
implementation of growth and yield models in the Northeast. In: Proceedings of the New
England growth and yield workshop, January 7-9, 1987, Durham, NH. R. Seymour and
W. Leak, eds. CFRU Information Report 17. Orono, ME: University of Maine, College
of Forest Resources. pp. 31-45.
Honer, T. G. 1967. Standard volume tables and merchantable conversion factors for the
commercial tree species of central and eastern Canada. Information Report FMR-X-5.
Ottawa, Ontario: Forest Management Research and Services Institute.
Nova Scotia Department of Natural Resources (NSDNR). 1993. Nova Scotia softwood
growth and yield model - version 1.0 user manual. For. Res. Section. Nova Scotia Dept.
of Natural Resources For. Res. Rep. 43. 12 p.
Solomon, D., Herman, D., Leak, W. 1995. FIBER 3.0: an ecological growth model for
northeastern forest types. USDA For. Serv. Gen. Tech. Rep. NE-204. 24 p.
Steinman, J. R. 1992. A comprehensive evaluation of spruce-fir growth and yield in
Maine as related to physical and chemical soil properties. Ph.D. Thesis, University of
Maine, Orono, ME. See also Wilson et al. 1999.
Teck, Richard M., and Donald E. Hilt. 1991. Individual-tree diameter growth model for
the northeastern United States. USDA For. Serv. Research Paper NE-649. 11 p.
Teck, Richard M., Melinda Moeur, and Bov Eav. 1996. Forecasting ecosystems with the
forest vegetation simulator. Journal of Forestry. 94(12):7-10.
Wilson, D., Seymour, R., Maguire, D. 1999. Density management diagram for
Northeastern red spruce and balsam fir forests. North. J. Appl. For. 16(1):48-56.
28