1
Oracle® Hospitality Suite8
Reservations User Manual
Release 8.9
July 2015
Copyright © 1987, 2015, Oracle and/or its affiliates. All rights reserved.
This software and related documentation are provided under a license agreement containing
restrictions on use and disclosure and are protected by intellectual property laws. Except as
expressly permitted in your license agreement or allowed by law, you may not use, copy,
reproduce, translate, broadcast, modify, license, transmit, distribute, exhibit, perform, publish, or
display any part, in any form, or by any means. Reverse engineering, disassembly, or
decompilation of this software, unless required by law for interoperability, is prohibited.
The information contained herein is subject to change without notice and is not warranted to be
error-free. If you find any errors, please report them to us in writing.
If this software or related documentation is delivered to the U.S. Government or anyone licensing it
on behalf of the U.S. Government, then the following notice is applicable:
U.S. GOVERNMENT END USERS: Oracle programs, including any operating system, integrated
software, any programs installed on the hardware, and/or documentation, delivered to U.S.
Government end users are "commercial computer software" pursuant to the applicable Federal
Acquisition Regulation and agency-specific supplemental regulations. As such, use, duplication,
disclosure, modification, and adaptation of the programs, including any operating system,
integrated software, any programs installed on the hardware, and/or documentation, shall be
subject to license terms and license restrictions applicable to the programs. No other rights are
granted to the U.S. Government.
This software or hardware is developed for general use in a variety of information management
applications. It is not developed or intended for use in any inherently dangerous applications,
including applications that may create a risk of personal injury. If you use this software or
hardware in dangerous applications, then you shall be responsible to take all appropriate fail-safe,
backup, redundancy, and other measures to ensure its safe use. Oracle Corporation and its
affiliates disclaim any liability for any damages caused by use of this software or hardware in
dangerous applications.
Oracle and Java are registered trademarks of Oracle and/or its affiliates. Other names may be
trademarks of their respective owners.
Intel and Intel Xeon are trademarks or registered trademarks of Intel Corporation. All SPARC
trademarks are used under license and are trademarks or registered trademarks of SPARC
International, Inc. AMD, Opteron, the AMD logo, and the AMD Opteron logo are trademarks or
registered trademarks of Advanced Micro Devices. UNIX is a registered trademark of The Open
Group.
This software or hardware and documentation may provide access to or information on content,
products, and services from third parties. Oracle Corporation and its affiliates are not responsible
for and expressly disclaim all warranties of any kind with respect to third-party content, products,
and services. Oracle Corporation and its affiliates will not be responsible for any loss, costs, or
damages incurred due to your access to or use of third-party content, products, or services.
Contents
Preface ........................................................................................................................... 8
Audience ............................................................................................................................ 8
Customer Support ............................................................................................................. 8
Documentation .................................................................................................................. 8
Revision History ................................................................................................................ 8
1 Introduction ............................................................................................................. 9
Logging In .......................................................................................................................... 9
Reservations Shortcut Bar ............................................................................................... 10
Navigation Keys .............................................................................................................. 11
Using the blue drill down arrow .................................................................................... 12
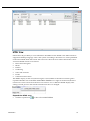
HTML View ..................................................................................................................... 13
The Quick Keys ................................................................................................................ 16
The Date Box .................................................................................................................... 17
Changing the date............................................................................................................ 18
Customising Suite8 Grids................................................................................................ 18
Customising the HTML display ..................................................................................... 22
Favourites ......................................................................................................................... 23
Logging off, Exiting Suite8 and Locking the Station ..................................................... 24
2 Reservations ........................................................................................................... 25
Reservation Navigator..................................................................................................... 25
Reservation Search........................................................................................................... 25
Custom SQL Statements .................................................................................................. 32
New/Edit Reservation .................................................................................................... 38
New Reservation ....................................................................................................... 38
Selecting a rate code.................................................................................................. 47
Inventory Tab ............................................................................................................ 50
Profiles ....................................................................................................................... 55
Package grid .............................................................................................................. 60
Grid View .................................................................................................................. 70
Attributes and Special Attributes............................................................................. 71
Credit Cards .............................................................................................................. 73
Fixed Charges ............................................................................................................ 79
Notes .......................................................................................................................... 82
Meal Plan ................................................................................................................... 89
Amenity ..................................................................................................................... 91
Walk In Reservation ........................................................................................................ 93
Checking in a reservation................................................................................................ 94
Cancelling a reservation .................................................................................................. 95
Special Functionality ....................................................................................................... 98
Days Functionality .................................................................................................... 98
Guest Profiles ............................................................................................................ 99
Linking a booker ..................................................................................................... 105
3
Promotions .............................................................................................................. 106
Superblocking ......................................................................................................... 108
Hints ........................................................................................................................ 108
Default Folio Styles ................................................................................................. 109
Day Type Rates ....................................................................................................... 109
Editing Multiple Reservations ............................................................................... 110
Guest Based Posting for Share Reservations ......................................................... 110
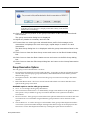
3 Reservation Options ............................................................................................. 113
Add On ........................................................................................................................... 113
Add to Queue................................................................................................................. 113
Advanced Billing Authorization................................................................................... 114
Allowances ..................................................................................................................... 119
Amenity .......................................................................................................................... 121
Billing.............................................................................................................................. 124
Billing Instructions......................................................................................................... 124
Bonus Point Cards ......................................................................................................... 130
Cancellation Information .............................................................................................. 134
City Ledger Authorization ............................................................................................ 135
Correspondence ............................................................................................................. 136
Credit Card Authorization ............................................................................................ 150
New / Additional Authorization .......................................................................... 150
Manual Authorization ............................................................................................ 152
Day use on departure day ............................................................................................. 153
Deposits Requested ....................................................................................................... 155
Edit Sharers .................................................................................................................... 160
Fixed Charges................................................................................................................. 161
Free Nights ..................................................................................................................... 164
Guest Comments ........................................................................................................... 169
Guest Profiles ................................................................................................................. 171
Guest Transportation..................................................................................................... 177
History & Future ............................................................................................................ 185
Leisure Bookings............................................................................................................ 186
Linked Documents......................................................................................................... 192
Locator ............................................................................................................................ 194
Luggage Labels .............................................................................................................. 195
Meal Plan........................................................................................................................ 199
Messages......................................................................................................................... 201
Notes............................................................................................................................... 205
Party................................................................................................................................ 211
Post No Show Fees......................................................................................................... 214
Post Departure Keys ...................................................................................................... 216
Pre Arrival Keys............................................................................................................. 218
Registration Card ........................................................................................................... 219
Registration Card Batch................................................................................................. 222
Reinstate ......................................................................................................................... 224
4
Room Assignment ......................................................................................................... 227
Room Move Reasons ..................................................................................................... 229
Share Reservations ......................................................................................................... 233
Share with new reservation .................................................................................... 234
Share with existing reservation .............................................................................. 235
Display Shares................................................................................................................ 236
Master Share................................................................................................................... 242
Independent Share......................................................................................................... 243
Save................................................................................................................................. 243
Split ................................................................................................................................. 243
Suite add on ................................................................................................................... 246
Swap room ..................................................................................................................... 248
Table Reservation .......................................................................................................... 250
Traces.............................................................................................................................. 255
Transponder cards ......................................................................................................... 258
Undo Check In ............................................................................................................... 262
Undo Check Out ............................................................................................................ 263
Unlink CCM Booking .................................................................................................... 264
User Log ......................................................................................................................... 264
Virtual Numbers ............................................................................................................ 265
Vouchers......................................................................................................................... 269
Waitlist ........................................................................................................................... 272
Scan Passport & ID Card ............................................................................................... 273
Save List.......................................................................................................................... 273
Load List ......................................................................................................................... 273
Custom SQL Statements ................................................................................................ 274
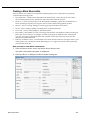
4 Block Reservation................................................................................................. 281
Creating a Block Reservation ........................................................................................ 283
Block Header .................................................................................................................. 295
Cut Off ..................................................................................................................... 295
Change Status.......................................................................................................... 295
Options .................................................................................................................... 296
Unlink Booking ....................................................................................................... 308
Block Grid....................................................................................................................... 309
Copying a Block ............................................................................................................. 311
New Res.......................................................................................................................... 314
Picked Up ....................................................................................................................... 315
Rooming List .................................................................................................................. 315
Block Traces.................................................................................................................... 318
Billing Instructions......................................................................................................... 319
Block Notes .................................................................................................................... 325
Block Correspondence ................................................................................................... 328
5 Group Reservations.............................................................................................. 341
Group Reservations ....................................................................................................... 341
Creating a Group Reservation ...................................................................................... 343
5
Creating Additional Reservations ................................................................................ 356
Group Reservation Options .......................................................................................... 361
Cancelling a group reservation ..................................................................................... 364
Reactivating a group reservation .................................................................................. 366
Group Rooming List ...................................................................................................... 367
Automatic Room Assignment ....................................................................................... 372
Group Changes .............................................................................................................. 374
Proforma......................................................................................................................... 375
Advance Invoice...................................................................................................... 375
Proforma Invoice..................................................................................................... 380
6 Waitlist ................................................................................................................. 383
Waitlist Reservations ..................................................................................................... 383
7 Offer ..................................................................................................................... 387
8 Acceptable Reservation ........................................................................................ 389
9 Financial Accounts ............................................................................................... 391
Financial Accounts on the reservation navigator ........................................................ 391
Financial Accounts......................................................................................................... 392
10 Room Move .......................................................................................................... 401
11 Quick Reservation ................................................................................................ 403
12 Index .................................................................................................................... 407
6
7
Preface
Audience
This user manual is intended for system users and system administrators.
Customer Support
To contact Oracle Customer Support, access My Oracle Support at the following URL:
https://support.oracle.com
When contacting Customer Support, please provide the following:
Product version and program/module name
Functional and technical description of the problem (include business impact)
Detailed step-by-step instructions to re-create
Exact error message received
Screen shots of each step you take
Documentation
Oracle Hospitality product documentation is available on the Oracle Help Center at
http://docs.oracle.com
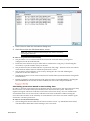
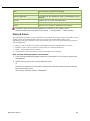
Revision History
Date
8
Description of Change
July, 2005
8.5.0.0 - First Issue Small Business
Edition
May, 2008
8.7 - Updated for Version 8.7
June, 2008
8.7.3.1 - Updated for Version 8.7.3.1
May, 2009
8.8 - Updates for Version 8.8
Sept, 2010
8.8 - Updates for Oracle 11gR1
Jan, 2012
8.9 - Updated for Version 8.9
Nov, 2012
8.9 - New cover page
July, 2015
8.9 – Oracle template applied
Preface
1
Introduction
The Suite8 Reservation Module is used for entering, searching and modifying reservations for
individuals and groups. A reservation can be made for various profile types including individual,
company, travel agent and source.
Many reservation options are available, including creating a confirmation letter, adding fixed
charges, entering a message and adding billing instructions. A reservation can be cancelled,
reinstated and no-show fees can be posted.
A reservation can be put on the waitlist if the room type or rate is not available. When the room
type or rate becomes available, the hotel can contact the guest and ask if they want the reservation.
You can easily make group reservations, create group templates and enter group rooming lists.
Block reservations can be used for detailed tour and allotment tracking.
User definable search screens and information templates in HTML format allow the property to
customize the reservation navigator to their requirements.
Logging In
To use Suite8 you must first log into the system. You must have a valid user identification and
password.
Logging into Suite8
1. From the desktop, click the Fidelio Suite8 icon.
The Suite8 Splash screen is displayed for several seconds with the Payment
Application Data Security Standard (PA-DSS) disclaimer
Introduction
9
The Fidelio V8 Login screen is then displayed.
2. Type your user identification (case sensitive) in the Login name box.
3. Tab to the Password box.
4. Type your secret password (case sensitive) in the Password box.
5. Click LOGIN, the Suite8 main menu screen appears.
You are now logged into the system.
Note: If one of the following tables: WMLG, WLOG, ZPOS, WDAT,
SHIS, SRPD, WRPD has no indices or a missing index, an alert is
displayed when starting Suite8 with a message to contact support. It
could happen that a table has no indices in the event that a table was
renamed for support purpose. Renaming a table carries the indices to
the renamed table. If an index is missing of one of the above
mentioned tables, the alert is displayed when starting Suite8.
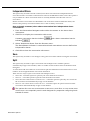
Reservations Shortcut Bar
The Suite8 main menu screen has nine coloured tabs located on the left of the screen. Each
coloured tab represents one of the main user modules.
To open the Reservations Shortcut Bar
1. Click RESERVATION from the coloured shortcut bar.
The Reservation shortcut bar opens.
10
Introduction
2. Alternatively you can click RESERVATIONS on the menu bar.
The Reservations menu is displayed.
Navigation Keys
Accelerator keys
Accelerator keys are used for fast access to a box on a screen or dialog box. When a letter is
underlined you can press the Alt + letter keys and the cursor moves into the appropriate box. For
example, on the Profile Search screen the letter “A” is underlined in the Name box. By pressing the
Alt + A keys, the cursor moves into the Name box.
To use the accelerator keys:
From the screen or dialog box, press Alt + letter to move the cursor into the appropriate box.
Introduction
11
Shortcut keys
Suite8 has shortcut keys that allow you to perform actions directly from the keyboard without
having to use the mouse. Using these keys saves you time.
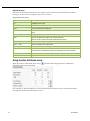
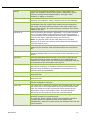
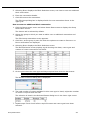
Suite8 Shortcut keys
Shortcut Key
Description
F1
Displays the help.
Alt + F4
Closes the active window.
F10
Closes all active windows.
F12
Moves the cursor from a data box to the first record on the
grid.
Alt + Down arrow
Displays a combo box.
Tab
Moves forward through the boxes/options.
Moves to the next box and confirms the entry.
Shift + Tab
Moves backward through the boxes/options.
Ctrl + Tab
Moves forward through tabs.
Ctrl + Shift + Tab
Moves backward through tabs.
Escape
Cancels the current action.
Removes a Combo box before a selection has been made.
Home
Moves the cursor to the beginning of a box.
End
Moves the cursor to the end of a box.
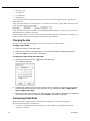
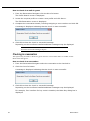
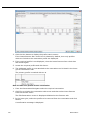
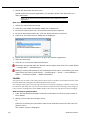
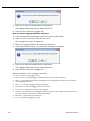
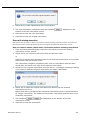
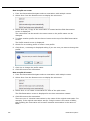
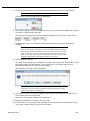
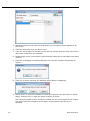
Using the blue drill down arrow
Many boxes have a blue drill down arrow
information that can be displayed.
next them indicating that there is additional
For example, on the House Status screen clicking the blue drill down arrow on the Out of Order
line displays the Out of Order Rooms screen.
12
Introduction
HTML View
Suite8 offers the possibility to view information in HTML format. HTML is the abbreviation for
"Hypertext Markup Language." This is the system of marking a document so it can be published
on the World Wide Web and viewed with a browser. The main areas where information can be
viewed in HTML format are as follows:
Reservation Navigator
Blocks
Profiles
Cashiering
Tasks and Activities
Events
Conference Reservation
The HTML display on the reservation navigator can be hidden so that the reservation grid is
expanded. Double-click in the blue reservation header bar or right-click and select/deselect
LOWER PART OF THE SCREEN from the short-cut menu to view or hide the HTML display. This
setting is stored per user and remains until the next time it is changed.
Expand the HTML tree
Introduction
Click the expand icon
to show all available folders.
13
Collapse the HTML tree
Click the collapse icon
to collapse all folders to the uppermost level.
Refresh the HTML View
Click the refresh icon
View information in HTML format
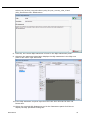
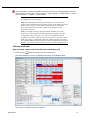
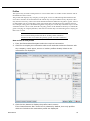
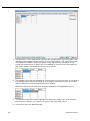
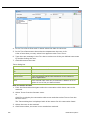
In this example we will display information in HTML format on the profile screen.
1. Click the CUSTOMER RELATION menu and select PROFILES to display the customer
profile screen.
This main customer profile screen is called the Navigator and is divided into 3
distinct areas:
Query - basic and advance profile search criteria
Query Results - the results of the query shown in a grid format
Tree Listing and HTML Page
14
A tree listing of all the details associated with this profile including address,
communications, links, reservations or history
A freely definable HTML display which by default has a 'big' format where
the details are displayed in a non-grid style format or a list format. The
HTML display can be printed by using the right mouse click.
Introduction
2. Enter the name to search for in the NAME box and click SEARCH.
4. The query results are shown in grid format in the middle section of the screen and
the tree and HTML formats are shown in the lower section of the screen.
5. In this instance the HTML view displays a summary of the profile details. The tree
listing is displayed by default expanded by one level. A plus sign next to a folder
indicates that it can be expanded to show more folders; a minus sign indicates
that it can be collapsed.
Change the display of the HTML
Two additional buttons on the html display allow you to change whether certain details
are displayed in a non-grid style or in a list format. By default the 'big' view is
displayed.
1. To view in list format click the
Introduction
button.
15
2. To view in a non-grid style, click the
button.
Copy to clipboard
It is possible to copy information from the HTML files to clipboard by selecting items
from HTML, using right mouse short cut menu and selecting COPY TO CLIPBOARD or short
cut key CTRL + C. This information can then be pasted to any open file by using right
mouse menu option PASTE or short cut key CTRL + V.
The menu option COPY TO CLIPBOARD is controlled by the user right COPY TO CLIPBOARD
FROM HTML under Users → User Definition → Rights → Miscellaneous
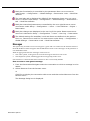
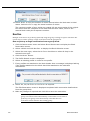
The Quick Keys
Suite8 allows you to select the Quick Keys main menu from any screen. The quick keys are
shortcuts to screens, searches, and desktop tools. Using these keys allows rapid access to
information without having to leave the section that you are currently working on. For example, a
customer is making a new reservation while at the same time asking questions about restaurants in
the area. You can use the Telephone Book quick key for restaurant information instead of aborting
the new reservation screen, looking up the restaurant information, closing the Telephone Book,
and reopening the new reservation screen.
16
Introduction
To access the Quick Keys main menu
Click the QUICK KEYS menu option.
The Quick Keys menu is displayed.
The Date Box
The format of the dates and the separators between the dates may vary from one hotel to another.
The date format is defined in the Control Panel Windows Regional Settings/Options.
Typical date formats include the following:
Introduction
dd/yy
17
MM/dd/yyyy
yy/MM/dd
yyyy-MM-dd
dd-MMM-YY
You can type the date directly in the date box; however it must be typed exactly as per the predefined format.
There are many date boxes in the system, for example, Arrival Date or From Date. The date can be
either a specific date or an as of date.
A specific date is when you need to see what happened on that day. For example, you need to see
which guests have departed 01/01/03.
An 'as of date' is when you need to find out information starting from that date. For example, you
need to read the room rack starting from 09/09/03 through 12/09/03.
Changing the date
The date can be changed by typing a new date or with the use of the calendar.
To type a new date
1. Place the cursor in the Date box.
2. Type the new date in the Date box, in the defined format including separators.
3. Press the Tab key, the date is changed.
To change a date using the calendar
1. Click the drop down arrow
next to the Date box.
The calendar appears.
2. Change the month to a previous month or future month by clicking the horizontal
arrows located on the top of the calendar or by pressing the Ctrl + Page Up or
Ctrl + Page Down key.
3. Place the cursor on the date and click the left mouse button or move the keyboard
arrow keys to locate the date and press Enter, the date is changed.
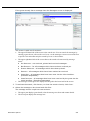
Customising Suite8 Grids
Many of the grids in Suite8 may be customised according to the needs of the property.
The customization options available are:
18
CUSTOMIZE - opens the customize dialog box so that columns on the grid can be added,
changed or removed.
Introduction
RESTORE DEFAULTS - applies the default settings for this grid.
SHOW DEFAULTS - applies the default settings to the current grid view, however, any
customised settings are used the next time the grid is displayed.
Select PRINT to print or export the existing grid layout, the possible export formats are ASCII
File, CSV Format, HTML Document or an Excel Document.
Note: The print or export function should be used before changes to
the grid will be saved.
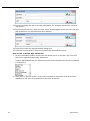
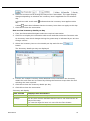
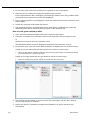
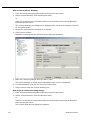
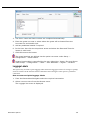
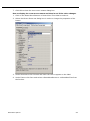
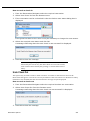
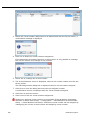
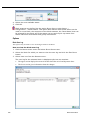
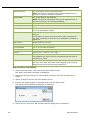
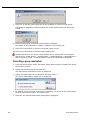
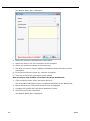
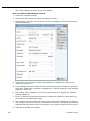
How to customize a grid
1. Place the cursor in the grid and right-click to display the short-cut menu.
2. Select CUSTOMIZE to open the customize screen.
The fields already used are marked with a green check mark.
3. Click the PENCIL button to view or change the column properties.
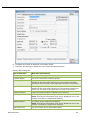
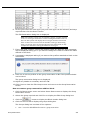
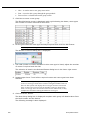
Column Properties
Field
Description
Field name
The field name as it is defined in the database table.
Caption
The field caption.
Fixed
Defines if the column will be fixed to the left side, when
scrolling to the right to view additional fields of the grid.
Columns marked as fixed are highlighted grey.
4. To move a field to the grid, select the field and drag it to the required position.
5. Click the
Introduction
in the top right-hand corner to close the customize screen.
19
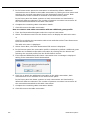
6. A message is displayed asking if you want to store the grid layout.
7. Select YES to save the changes or NO not to save any changes.
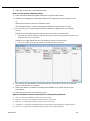
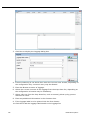
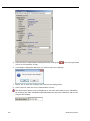
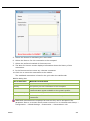
How to remove a column from a customized grid
1. Place the cursor in the grid and right-click to display the short-cut menu.
2. Select CUSTOMIZE to open the customize screen.
The fields already used are marked with a green check mark.
3. On the grid point to the column to be removed and drag it to the customize
screen; yellow arrows are displayed at each end of the column name.
Once the column has been removed the green check mark is removed from the
field name on the customize screen.
4. Click the
in the top right-hand corner to close the customize screen.
5. A message is displayed asking if you want to store the grid layout.
6. Select YES to save the changes or NO not to save any changes.
20
Introduction
How to create a customised grid view for profile search
Users familiar with the Fidelio Suite8 table structure and fields can create a
customised grid view for the profile search.
This functionality is controlled by the parameter CUSTOM VIEW IN PROFILE SEARCH
under Setup → Configuration → Global Settings → Miscellaneous → Search
Screens 2 tab.
To add fields to the Grid Customization dialog box, the view
V8_SYS_CUSTOMXCMSSEARCH has to be amended.
Example: "Adding the financial account long description to the profile navigator"
The view has to be changed as follows:
CREATE OR REPLACE FORCE VIEW v8_sys_customxcmssearch
(customxcmssearch_xcms_id, zfac_longdesc)
AS SELECT xcms_id customxcmssearch_xcms_id,
(select zfac_longdesc from zfac where zfac_actvalidfrom is not null and
zfac_actvaliduntil is null and xcms.xcms_id=zfac.zfac_xcms_id and rownum=1)
zfac_longdesc
from xcms;
The fields from the custom view are automatically added to the grid.
How to create a customised grid view for reservation search
Users familiar with the Fidelio Suite8 table structure and fields can create a
customised grid view for the reservation navigator.
This functionality is controlled by the parameter CUSTOM VIEW IN RES. NAVIGATOR
under Setup → Configuration → Global Settings → Miscellaneous → Search
Screens 2 tab.
To add fields to the Grid Customization dialog box, the view
V8_SYS_CUSTOMXCMSSEARCH has to be amended.
Example: "Adding the housekeeping status to the reservation navigator"
How to create a customised grid view for booking search
Users familiar with the Fidelio Suite8 table structure and fields can create a
customised grid view for the event booking search.
This functionality is controlled by the parameter CUSTOM VIEW IN BOOKING SEARCH
under Setup → Configuration → Global Settings → Miscellaneous → Search
Screens 2 tab.
To add fields to the Grid Customization dialog box, the view
V8_SYS_CUSTOMYBOMSEARCH has to be amended, however it must contain the field
customybomsearch_ybom_id.
Example: "How to display the function type description"
The view has to be changed as follows:
CREATE OR REPLACE FORCE VIEW V8_SYS_CUSTOMYBOMSEARCH
AS
SELECT
ybom_id customybomsearch_ybom_id,
Introduction
21
yfty_longdesc
from
ybom, yfty
where
ybom_yfty_id=yfty_id(+);
Customization functionality is controlled by the user right EDIT under Setup →
Configuration → Users → User Definition → Rights → Miscellaneous → Grid layout
Customization.
Print functionality is controlled by the user right PRINT GRID under Setup →
Configuration → Users → User Definition → Rights → Miscellaneous.
Customising the HTML display
The HTML display may be customised according to the requirements of the property.
The customization options available when placing the cursor on the HTML display and rightclicking are:
PRINT - prints an exact copy of the HTML display. The print page margins and the actions to
take if the HTML printout is too large for the defined paper size can be defined in the
configuration.
PRINT WITH SETUP - displays the printer options and then print the HTML display.
VIEW SOURCE - displays the HTML code; no changes can be made.
EDIT TEMPLATE WITH NOTEPAD - opens the relevant *.htm and *.qry in notepad. Users with
HTML programming knowledge can edit these files to meet the requirements of the property.
EDIT TEMPLATE WITH ASSOCIATED APPLICATION - opens the relevant *.htm and *.qry with the
program associated with these file types. Users with HTML programming knowledge can edit
these files to meet the requirements of the property.
How to use HTML Expressions to customize the HTML display
Properties can configure and store customised html files in the Version 8 directory for
htm files. The files are displayed in Suite8 either by logged in user, user language,
customised htm files for all users or language specific htm files for all users.
The priority Suite8 uses to determine which file to use is in the sequence as listed:
Customised htm file by user initials
To display a customised htm file by user initials, the htm file has to be called
USR_USERINTIALS_HTMFILENAME.HTM.
Example: For a user with the initials DS the file has to be called
usr_ds_quickinfo.htm.
Customised htm file by user language
To display a customised htm file by user language, the htm file has to be called
CUST_LANG_LANGUAGE SHORT DESCRIPTION_QUICKINFO .HTM.
Example: If the language short description is F for French, the user has to
select this language under User Settings → Startup → Language and the file,
such as quickinfo.htm has to be called cust_lang_f_quickinfo.htm.
Customised version for all users
To display a customised version of htm files for all users, the html files have to
be called CUST_HTMLFILENAME.HTM.
Example: cust_quickinfo.htm.
22
Introduction
Customised version by language
To display a customised version by language, the html files have to be called
LANG_SHORT DESCRIPTION OF THE LANGUAGE_HTMLFILE .HTM.
Example: lang_f_quickinfo.htm, where f stands for the short description of the
language.
If none of these files can be found then the standard htm file is displayed
How to hide or show expressions depending on activated features or license
The following expression can be used to hide for example, Conference Information on
the HTM file when working with the small business edition:
if ({const isBnB})=(1)}{/if}{else} {if {feature Meeting Planner}} Conference
{runquery 2}
Customization functionality is controlled by the user right HTML source view and
edit under Setup → Configuration → Users → User Definition → Rights →
Miscellaneous.
The print page margins and the actions to take if the HTML printout is too large for
the defined paper size are defined via the option HTML PRINTOUT under Setup →
Configuration → Global Settings → Miscellaneous → Visual Appearance 4.
Favourites
The Favourites shortcut toolbar allows you to keep your most frequently used options right where
you can find them. Your most used options can be added to the Favourites shortcut toolbar where
they are more noticeable and more easily organized to suit your purposes.
To make the most of the Favourites shortcut toolbar, you need to organize the options in it; this can
be done using drag and drop.
In user settings the Favourites shortcut toolbar can be set to be listed first and will then be the
default shortcut toolbar opened when logging on to Fidelio.
Note: The Favourites shortcut toolbar cannot be removed from the
toolbar.
How to add an option to the Favourites shortcut bar
1. Click one of the coloured shortcut toolbars on the left to list the options on that
toolbar.
2. Right-click the option that you want to add, and then click ADD TO FAVOURITES on
the shortcut menu.
The option is now listed on the Favourites shortcut toolbar.
3. Repeat Steps 1 and 2 for each option that you want to add.
Note: Options from Web Services cannot be added to the Favourites
shortcut toolbar.
How to delete an option from the Favourites shortcut bar
1. Click the FAVOURITES shortcut toolbar on the left to list the options.
2. Right-click the option that you want to remove, and then click DELETE BUTTON on
the shortcut menu.
The option is removed from the Favourites shortcut toolbar.
3. Repeat Steps 1 and 2 for each option that you want to remove.
Introduction
23
How to reorganise the options on the Favourites shortcut bar
1. Click the FAVOURITES shortcut toolbar on the left to list the options.
2. Select the option to be moved and then left-click and hold the mouse button while
you drag the option to its new location on the toolbar.
3. Repeat Steps 1 and 2 for each option that you want to move.
On the toolbar the Favourites shortcut bar can be listed first by selecting the
option FAVOURITE BUTTONS ON TOP under Miscellaneous → User Settings →
Appearance Tab.
Logging off, Exiting Suite8 and Locking the Station
The windows menu consists of the following options:
Close All - closes all open screens and dialog boxes.
Lock Station - locks the workstation.
Logout - closes all open screens and logs off Suite8.
Exit Application - closes all open screens and exits the application.
Options
Description
Close All
Click the WINDOWS menu and the option CLOSE ALL.
All open screens and dialog boxes are closed.
Logout
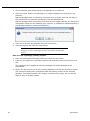
1. Click the WINDOWS menu and the option LOGOUT
All open screens and dialog boxes are closed and the Login
screen appears. A new user can now login.
2. To close the application completely click CANCEL.
Suite8 is closed and the desktop appears.
Exit
Application
Lock Station
Click the WINDOWS menu and the option EXIT APPLICATION.
Suite8 is closed and the desktop appears.
Click the WINDOWS menu and the option LOCK STATION.
All open screens and dialog boxes are closed and the Login
screen appears. A new user can now login.
Lock Station - the open screens and dialog boxes from the user who locked the
station will not be closed if the parameter LEAVE OPENED SCREEN ON SWITCH USER is
selected under Setup → Configuration → Global Settings → Generic → Generic 3
tab.
24
Introduction
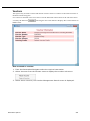
2
Reservations
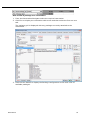
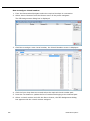
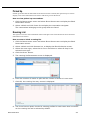
Reservation Navigator
The main reservation screen is called the RESERVATION NAVIGATOR and is divided into four distinct
areas:
Query - consists of multiple basic reservation search criteria, including Last Name,
Confirmation number, Reservation Type, Room No., Company, Agent, Block, Group and an
advanced query option.
Query Results - the results of the query shown in a grid format, including Name, No of rooms,
Arrival, Departure, Type, Reservation Status, Room no, Room Type, Agent, Company or
Source information, Group Name and Block Code.
Tree View - a tree listing of all the details associated with this reservation, including details
like Room Type, Market code, Source Code, Fixed Charges, attached Packages, Profile details,
including address, communications, links, history and future reservations.
HTML page - free definable HTML display which by default has a list format or a 'big' format
where the details are displayed in a non-grid style format. The HTML File can be printed by
using the right mouse click.
The HTML display on the reservation navigator can be hidden so that the reservation grid is
expanded. Double-click in the blue reservation header bar or right-click and select/deselect
LOWER PART OF THE SCREEN from the short-cut menu to view or hide the HTML display. This
setting is stored per user and remains until the next time it is changed.
Seven different pages of information are accessible by clicking the appropriate tab. Depending
from where you access the reservation navigator a specific tab may be selected and a selection
filter set.
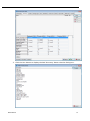
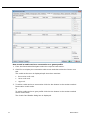
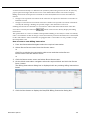
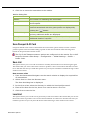
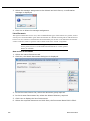
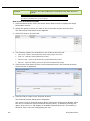
Reservation Search
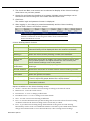
Entering a query on the reservation navigator
The query screen is split into three sections:
The basic search criteria
The advanced query options
The default search criteria
The basic search criteria
You may fill in multiple fields to narrow the search criteria. The actual query is
displayed in a script format in a window on the right hand side of the screen. If no
data is entered, the list of reservations is displayed in alphabetical order. The fields
are explained in the table below:
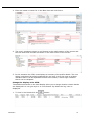
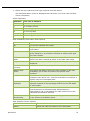
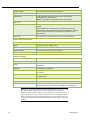
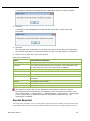
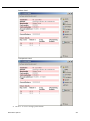
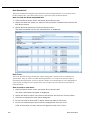
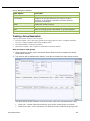
Reservation Search dialog box
Fill in this field
With this information
Name
The last name of the guest.
Reservations
25
First
The first name of the guest.
Confirmation #
The confirmation number.
Res. Type
Select a reservation type, such as definite or tentative,
from the drop-down list.
Room No
A specific room number.
Attributes
The attributes query consists of two selection fields:
The first allows you to select from a drop-down list of query
possibilities.
The second field requires the user to select a possible value from
a drop-down list.
Reservation attributes may be an item to be placed in the
guests' room. For example a specific newspaper, flowers
or chocolates. Specific requests like a foam pillow could
also be considered as reservation attribute.
Multi guest
Select this option to list all reservations with more than
one room and/or more than one adult. This option is
controlled by the parameter MULTIPLE GUEST PROFILE
FUNCTIONALITY.
Suite Slaves
26
Company
The company linked to the reservation. Click the dropdown arrow to display the profile search screen.
Agent
The agent linked to the reservation. Click the drop-down
arrow to display the profile search screen.
Block
The block code, if the guest is linked to a block
reservation. Click the drop-down arrow to display the
block reservations search screen.
Note: Block Reservation functionality requires an
additional license code.
Group
The group name, if the guest is part of a group. Click the
drop-down arrow to display the active group reservations.
On the group reservations search screen inactive and
historical groups can be included in the search if required.
Reservations
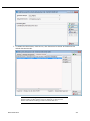
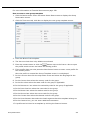
The advanced query options
The advanced query offers search on multiple fields and conditions. The available
fields are dependant on installed modules and additional functionality activated by
parameters.
The advanced query consists of three selection fields:
The first allows you to select from a drop-down list of query possibilities.
The second limits the query to a second level or gives a choice of conditions.
The third field requires either a free-format value or for the user to select a possible value
from a drop-down list.
For example if you would like to search for a reservation with a specific source code
you would select the field source code from the drop down list, the condition would be
equal to and the value for that condition would be the source code which can be
selected from the drop-down list.
The fields are explained in the table below:
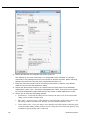
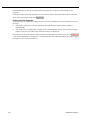
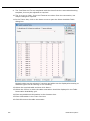
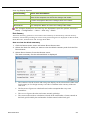
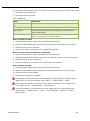
Advanced Reservation Search dialog box
Field
Choice/Condition
Value
Arrival
Equal to/From/
To/Between
A specific arrival date or a
range of arrival dates.
Booking ID
Equal to
The conference booking Id.
Cancellation no.
Start with/Equal to
The cancellation number.
Channel Code
Equal to/Not equal to
A channel code from the dropdown list.
City
Start with/Equal to
The name of the city.
Colour
Equal to/Not equal to
A reservation colour from the
drop-down list.
Compl./Houseuse
Equal to/Not equal to
Complimentary or House Use
from the drop-down list.
Country
Equal to
A country from the drop-down
list.
Created By
Start with/Equal to
The user name of the user who
created the reservation.
Created on
Equal
to/From/To/Between
The specific date the
reservation was created on or
a range of creation dates.
CRS No.
Start with/Equal to
A central reservation number.
Day Use
Only/Ignore
Displays either only day use
reservation or ignores day use
reservations.
Departure
Equal to/From/
To/Between
A specific departure date or a
range of departure dates.
Desired room
available
Only
Displays only the desired
room.
Early departure
.
Displays early departures.
Family Member
Start with/Equal to
The family members.
Reservations
27
28
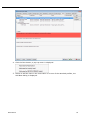
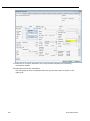
Guarantee Code
Equal to/Not equal
to/Empty
A guarantee code from the
drop-down list.
Guest link
missing
Only/Ignore
Will display either only profiles
with missing guest links or
ignore profiles with missing
guest links.
Only if multiple guest profile
functionality is activated.
Guest/Member
Card
Select one of the
defined membership
types.
The number for the selected
membership type.
Note: Results include
reservations where the main
profile or any linked profiles
matches the entered
guest/member card number.
Interest Code
Equal to/Not equal to
An interest code from the
drop-down list.
Inventory
Equal to
An inventory code from the
drop-down list.
Linked Profile
Start with/Equal to
Name of the linked profile.
Market Code
Equal to/Not equal to
A market code from the dropdown list.
No room for
today or
tomorrow
Only
Displays reservations that are
checked-in but have no room
assigned for today.
Option Date
Equal to/From/
To/Between
A specific option date or a
range of option dates.
Party
Equal to (Default)
Name of the party.
Rate Code
Equal to/Not equal to
A rate code from the dropdown list.
Reg Card
Printed/Not
printed/Should be
printed
Displays reservations whose
registration card was printed,
not printed or should be
printed.
Requested on
Equal to/From/
To/Between
A specific option date the
advanced billing query was
requested on or a range of
option dates.
Room Move
Only/Ignore
Displays either only scheduled
room moves or ignores
scheduled room moves.
Room Type
Equal to/Not equal to
A room type from the dropdown list.
Share
Yes/No
Displays either share
reservations or reservations
with no share.
Source Code
Equal to/Not equal to
A source code from the dropdown list.
Reservations
Special Code
Equal to/Not equal to
A special code from the dropdown list.
Transponder
card
Equal to
A transponder card number.
Available only if transponder
functionality is activated.
VIP Code
Equal to/Not equal to
A VIP Code from the dropdown list.
Walk In
Only/Ignore
Displays either only walk in
reservation or ignores walk in
reservations.
Customised SQL
statements
Custom SQL search
statements are enclosed in
brackets.
Note: The available memberships on which the search can be made
are dependant upon the memberships that have been configured by
your property under Setup → Configuration → CRM → Membership
types.
Note: Hotel Connector functionality requires an additional license
code for Cross Reservations and Availability.
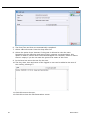
The default search criteria
There are seven tabs available on the reservation navigator to display reservations by
the different reservation statuses. The default reservation status selection for each tab
page is defined in the configuration; however this can be changed via the option
SELECTION on the reservation navigator.
The available tabs are:
Arrivals
In House
Departure
All
Waitlist
Q Rooms
Fin. Accounts
Reservation Navigator Tabs
Tab
Option
Arrival
Displays all the EXPECTED ARRIVALS for today's date. Expected
arrivals can be displayed for other dates by selecting the date
required from the date field next to the SELECTION box.
The available selections are: EXPECTED ARRIVAL, CHECKED-IN and
CANCELLED.
In House
Displays all the reservation that will be in-house on a specific
date.
If today's date is selected then all reservations with status
CHECKED-IN will be displayed by default.
If a future date is selected then all reservations with status
CHECKED-IN and EXPECTED ARRIVAL before the selected date are
shown by default.
Reservations
29
The available selections are: EXPECT ARRIVAL, CHECKED OUT and
DUE OUT.
Departure
Displays all the DUE OUT reservations for today's date. Expected
departures can be displayed for other dates by selecting the date
required from the date field next to the SELECTION box.
The available selections are: DUE OUT and CHECKED OUT.
All
This page displays all reservations regardless of status.
The available selections are: NO SHOW, HISTORY, CANCELLED,
WAITLIST, OFFER and RESERVATION.
Note: Depending on the amount of data in reservation history,
including HISTORY in the selection may slow the search.
Wait List
Displays all the reservations which are on the waiting list for a
specific date. Waitlisted reservations can be displayed for other
dates by selecting the date required from the date field next to
the SELECTION box.
Q Rooms
Displays all the reservations that have been placed on the checkin queue as no room was available at the time of arrival.
This tab will only be available if the parameter Q ROOMS HANDLING
has been activated.
The available selection is: EXPECTED ARRIVAL.
Financial
Accounts
Displays all expected financial accounts, regardless or arrival
date.
The available selections are: EXPECTED, CHECKED I N and HISTORY.
Note: Switching tabs does not clear the current search criteria. The
search criteria entered will be kept until new search criteria are
entered, the Clear button or F10 is pressed.
Note: The actual query is displayed in script format in a window on
the right hand side of the screen and as long as the Filter is not cleared
by pressing the Clear button, each additional query will be added to
the actual query list.
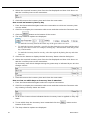
Wildcards
The search criteria can also be entered using wildcards (%). This is helpful in the name field, for
example, M%ller will return Miller, Muller, %Bank will return Investment Bank, American Bank
and Fidelio% will return Fidelio Gmbh or Fidelio Inc.
Search Name functionality
Names entered with an umlaut or special character, such as 'Müller' will automatically update the
search name field with the name without umlaut or special character, such as 'Muller'. When
entering Muller in the name field and pressing the SEARCH button, the search will return 'Muller'
and 'Müller'.
Activating the search
To activate the search the user must click the SEARCH button. Due to the time it may take to search
on a large database two different search options have been implemented. Clicking the SEARCH
button will return the maximum number of reservations defined in the configuration, with the
question to display more if there are more to be displayed. Clicking the FULL SEARCH button will
display all reservations matching the criteria.
A list of reservations that match what you have specified is displayed. For example, if you specify
a search for the Last Name "Thomas", the reservation list grid shows a list of all reservations that
have a last name starting with "Thomas". Clicking the CLEAR button resets the query criteria and
clears both the tree and html displays.
30
Reservations
Narrowing the search
Once the search has been performed the search can be further narrowed by using the FIND IN GRID
button.
The FIND IN GRID button allows the user to:
Search on all or specific columns within the grid.
Search for specific text.
Match the case or search for whole words only.
Control the direction of the search.
An empty list is displayed if no reservation was found that matches the search criteria.
Last Modified Reservations
Click the LAST MODIF. button to list the last 'x' number of reservations that were modified. The
number of reservations to be listed is defined in the configuration.
Scrolling in Edit Mode
Once the reservation is displayed in edit mode then the previous and next reservations can be
displayed as follows:
Press CTRL+PAGE UP to display the previous reservation in edit mode.
Press CTRL+PAGE DOWN to display the next reservation in edit mode.
A full explanation of the reservation screen search behaviour can be found in the
Suite8 Configuration Manual under Setup → Configuration → Global Settings →
Miscellaneous → Search Screens 2 tab.
The adding of the first reservation from the search results to the tree automatically
is controlled by the parameter ADD TO TREE AUTOMATICALLY under Setup →
Configuration → Global Settings → Miscellaneous → Search Screens 2 tab. If this
parameter is not activated then no reservation is added to the tree unless the Tree
Delay settings apply or the cursor is moved to another reservation.
The maximum number of lines displayed is controlled by the parameter MAXIMUM
LINES IN LIST under Setup → Configuration → Global Settings → Miscellaneous →
Search Screens 2 tab.
An entry in any of the fields and then pressing the tab key to exit the field,
performs an immediate reservation search if the parameter SEARCH ON KEYSTROKE is
selected under Setup → Configuration → Global Settings → Miscellaneous →
Search Screens 2 tab.
The default search criteria for each tab page is defined DEFAULT SEARCH CRITERIA ON
RESERVATION NAVIGATOR under Setup → Configuration → Global Settings →
Miscellaneous → Search Screens 2 tab.
The search option MULTI GUEST is displayed on the reservation navigator if the
parameter MULTIPLE GUEST PROFILE FUNCTIONALITY is activated under Setup →
Configuration → Global Settings → Reservation → Reservation2 tab.
Q room functionality is controlled by the parameter Q ROOMS HANDLING under Setup
→ Configuration → Global Settings → Reservation → Reservation 1 tab.
The number of last modified records to be displayed is defined via the option
NUMBER OF LAST MODIFIED RECORDS TO RETRIEVE under Setup → Configuration → Global
Settings → Miscellaneous → Search Screens 2.
Reservations
31
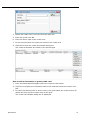
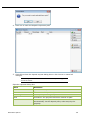
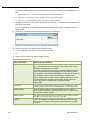
Custom SQL Statements
Custom SQL statements can be created for reservation search purposes. The custom queries are
listed in the advanced query option in the reservation search navigator. Custom SQL queries can
also be run in combination with other search criteria entered on the reservation navigator.
Custom SQL statements may be defined via:
Reservations → Reservation Navigator → Options button
Setup → Miscellaneous → System Maintenance → Database
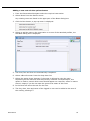
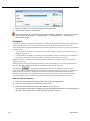
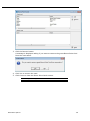
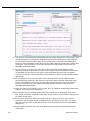
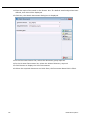
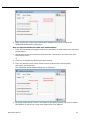
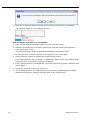
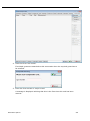
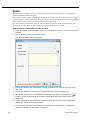
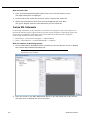
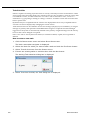
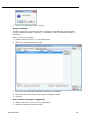
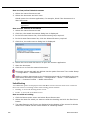
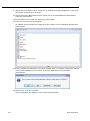
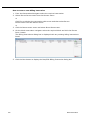
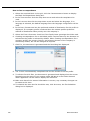
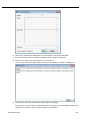
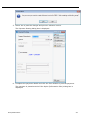
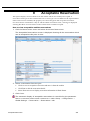
How to create a custom SQL group
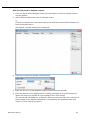
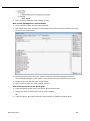
1. On the Reservation Navigator select CUSTOM SQL from the OPTIONS menu to display
the Custom SQL statements dialog box.
Note: A Custom SQL group must be created before any custom SQL
statements can be created.
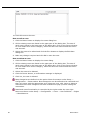
2. Place the cursor in the SQL Statements panel on the left-hand side of the screen
and right-click to display the short-cut menu.
3. Click NEW GROUP on the shortcut menu to display the Custom SQL group name
dialog box.
32
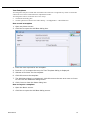
Reservations
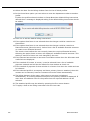
4. In the CODE box enter a code for the SQL group, up to five alphanumeric
characters is allowed.
5. In the DESCRIPTION box, enter the description of the SQL group.
6. Click OK to save the SQL Group.
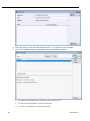
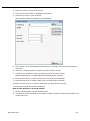
How to link a role to a custom SQL group
1. Click MISCELLANEOUS from the SETUP drop-down menu and then SYSTEM MAINTENANCE.
2. On the System Maintenance menu click DATABASE
3. Click CUSTOM SQL STATEMENTS on the Database menu to display the Custom SQL
statements dialog box.
4. Select the required SQL Group from the SQL Statements panel on the left-hand
side of the screen.
5. Click the ROLE button.
6. Select where in the application the statements from the selected group should be
available: Profile search, Reservation search, Room search or on the Custom SQL
grid.
7. Click OK to save the SQL Group Role assignment.
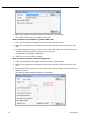
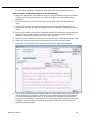
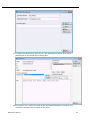
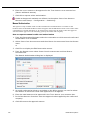
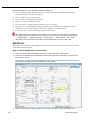
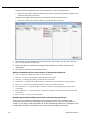
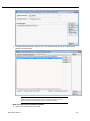
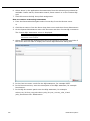
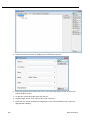
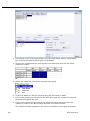
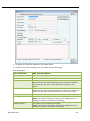
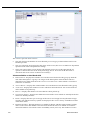
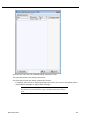
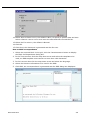
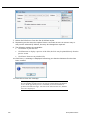
How to create a custom SQL statement
1. From the Reservation Navigator select CUSTOM SQL from the OPTIONS menu.
or
2. Click MISCELLANEOUS from the SETUP drop-down menu and then SYSTEM MAINTENANCE.
3. On the System Maintenance menu click DATABASE and then CUSTOM SQL STATEMENTS.
The Custom SQL statements screen is displayed.
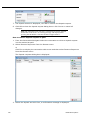
4. Select the required SQL Statements group from the panel on the left-hand side of
the screen and click NEW to display the Custom SQL Statement dialog box.
Reservations
33
5. In the CODE box enter a code for the SQL statement, for example RATE.
6. In the DESCRIPTION box, enter the description of the SQL statement, for example
RATE AMOUNT.
7. In the SQL STATEMENTS panel enter the SQL statement, for example:
34
Reservations
select yres_id from yres,ydet where ydet_id=yres_current_ydet_id and
ydet_rateamount like :RateAmount
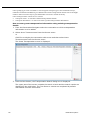
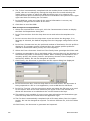
8. Click OK, the custom SQL statement is listed in the SQL statements panel.
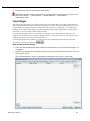
9. Selecting the statement description displays the SQL statement in the SQL text
panel in the lower right-hand side.
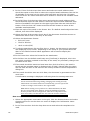
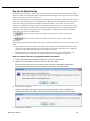
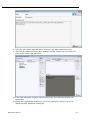
10. If the SQL statement requires input from the user then this can be done via
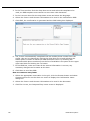
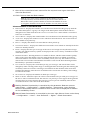
PARAMETERS.
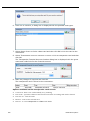
11. Select the required SQL Statement and in the Parameters panel click NEW to
display the SQL parameter dialog box.
Reservations
35
12. In the PARAMETER box enter the SQL parameter, for example RATEAMOUNT (max 20
characters).
13. In the DESCRIPTION box, enter the text which should appear when the user runs the
SQL statement, for example ENTER RATE AMOUNT.
14. Click OK to close the SQL parameter dialog box.
15. Click the CLOSE button to close the Custom SQL statements screen.
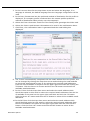
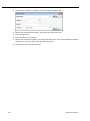
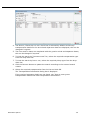
How to run a custom SQL statement
1. On the reservation search screen click the down arrow on the ADV. QRY. box and
select the required custom SQL statement.
Custom SQL Statements are listed at the end of the selection box and are enclosed
in brackets [].
2. Click the FULL SEARCH button; if the query contains a parameter then this will be
displayed in the form of a question for the user to answer.
36
Reservations
3. Complete the question and click OK.
All reservations matching the query are displayed.
Reservation Custom SQL Examples
Example 1: How to show all reservations with a specific source profile name:
Description: Source
SQL Text:
select yres.yres_id from yres, ydet, ycln, xcms where ydet.ydet_yres_id=yres.yres_id
and ycln.ycln_ydet_id=ydet.ydet_id
and ycln.ycln_xcms_id=xcms_id and
yres.yres_current_ydet_id=ydet.ydet_id=ydet.ydet_id and
ycln.ycln_xcca_internalcategory=3 and upper(xcms.xcms_name1) like upper('%' ||
:SOURCENAME || '%')
Parameter: SOURCENAME
Parameter Type: String
Example 2: How to show all reservations with a specific rate amount:
Description: Rate Amount
SQL Text:
select yres_id from yres,ydet where ydet_id=yres_current_ydet_id and
ydet_rateamount
like :RateAmount
Parameter: Rateamount
Parameter Type: Integer
Reservations
37
In order to define or use custom SQL statements a custom SQL group must be
created with the role RESERVATION SEARCH via the option CUSTOM SQL STATEMENTS
under Setup → Miscellaneous → System Maintenance → Database.
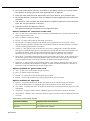
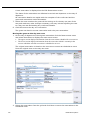
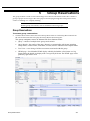
New/Edit Reservation
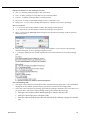
New Reservation
A reservation consists of two parts:
The profile - which contains the basic non-varying information: such as the guest name,
addresses, communications, language, as well as marketing information, links to other
profiles, notes and statistical information about future and previous hotel stays.
The reservation - which consists of details specifically referring to this one reservation or stay
of the guest, such as the arrival date, departure date, number of adults and the room rate.
Before entering a new reservation you would usually need to check the availability of rooms and
rates. This can be done via one of the quick keys:
Rate Query - CTRL + R
Availability - CTRL + D
Room Type Availability - CTRL +SHIFT + D
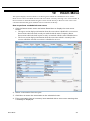
How to create a new reservation
1. Click NEW RESERVATION from the RESERVATIONS menu, press CTRL + N or click the
NEW button on the Reservation Navigator.
The profile search screen is displayed.
2. Create a new profile or locate an existing profile and click SELECT. (See: How to
create a new profile)
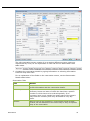
The Edit Reservation screen is displayed defaulted to the RESERVATION tab.
38
The upper section displays information from the guest profile.
The lower section is used to enter the main reservation details.
Reservations
The edit reservation screen consist of up to twelve different screens, each one
represented by a tab, for an explanation of each tab see the Reservation Tabs
table below.
3. Complete the reservation details by typing information or selecting information
from the drop-down lists.
For an explanation of the fields on the reservation screen, see the Reservation
Details table below:
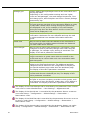
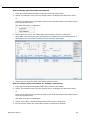
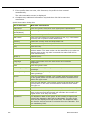
Reservation Tabs
Tab
Details
Reservation
The main reservation screen which consists of the basic
profile information and the reservation details.
Inventory
May be used to add an inventory item to a reservation.
Inventory items are items of which the hotel has a specific
number or which have to be ordered specially. If an
inventory item is only needed on certain days of the guest's
stay then the inventory item may be added on a by day
basis.
Profiles
May be used to link profiles or view existing linked profiles.
Profiles can be attached for the entire stay or only for specific
days of the reservation.
Reservations
39
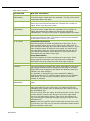
Package grid
Display details about packages linked to the reservation on a
day by day basis.
Depending on the configuration settings and user rights,
users can add packages, view and change frequencies, view
and change price, add multipliers and link or remove package
elements by day.
Grid
May be used to view the reservation details in grid format.
The grid gives an overview of the reservation details on a day
by day basis. Details which change during the guest's stay
are displayed in red, so for example, if the rate changes
during the stay then the RATE AMOUNT and CALCULATED PRICE
fields will be displayed in red.
Attributes
May be used to add daily and non-daily attributes to a
reservation. Attributes are user-definable and may be used
to collect additional non-standard information about the
guest.
Credit card
May be used to add credit card details to the reservation or
the guest profile. In addition approval details are displayed
for each credit card if entered.
Fixed Charges
May be used to enter fixed charges on a reservation. Fixed
charges are used to post daily charges other than room tax
or packages, for example a pet, parking or extra bed. The
display of this tab is parameter controlled.
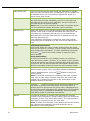
Notes
May be used to add reservation notes which are specific to a
single reservation or guest notes which are stored on the
profile and can be viewed with each new reservation made
with that profile.
Special attr.
This tab is for properties with more attributes that can be
added to the main attributes tab. The additional attribute
categories can be defined in the configuration to display on
the special attribute page rather than the attributes page.
The display of this tab is parameter controlled.
Meal Plan
May be used to view or change the number of breakfasts,
lunches and dinners scheduled per day. The display of this
tab is parameter controlled.
Amenity
May be used to attach amenities to a reservation. Amenities
are gifts or services a property provides to their guests, such
as a change of linen and towels, a bath robe, a fruit basket or
chocolates. The display of this tab is parameter controlled.
The display of the Fixed Charges tab is controlled by the parameter FIXED CHARGES
TAB BY DEFAULT under Miscellaneous → User Settings → Appearance tab.
The display of the Special attr. is controlled by the parameter SPECIAL ATTRIBUTES
PAGE under Setup → Configuration → Global settings → Reservation →
Reservations 1 tab.
The display of the Meal Plan tab is controlled by the parameter SHOW MEAL PLAN TAB
BY DEFAULT under Setup → Configuration → Global settings → Reservation →
Reservations 1 tab.
The display of the Amenity tab is controlled by the parameter AMENITY TAB under
Setup → Configuration → Global Settings → Reservation → Reservation 2 tab.
40
Reservations
Reservation Details
Fill this field
With this information
Arrival
(Mandatory)
Enter the reservation arrival date or click the drop-down
arrow and select a date from the calendar. The day of the week
is displayed above the date.
Nights
Enter the number of nights for the stay or enter the departure
date in the next field and Suite8 will calculate the number of
nights. Enter 0 for day-use rooms.
Departure
(Mandatory)
Enter the reservation departure date or click the drop-down
arrow and select a date from the calendar. If the number of
nights was entered the departure date will be calculated
automatically. The day of the week is displayed above the date.
Currency
From the drop-down list of defined currencies select a currency
in which to quote the rate. The default is the currency defined
as the Base Currency for rooms.
#. of rooms
Individual Reservation
Enter the number of rooms requested per room type. If you
need multiple rooms of one room type you can enter this on
one reservation and split the reservation before check in. If you
need multiple rooms of different room types you would enter
one reservation with one room type and then use the ADD ON
reservation functionality under OPTIONS to enter the second
reservation with the other room type.
Group Reservation
Enter the number of rooms requested per room type. If the
group requires more than one room type then a separate
reservation has to be made for each room type required.
Adults
Enter the number of adults per room.
Children
Enter the number of children per room. Depending on the child
age categories defined at the property there may be multiple
child fields to be completed, this allows for different rates and
statistics per child category.
For example, if categories have been defined for Babies,
Children aged from 1-5, Children aged from 6-12 and Children
aged above 12, there will be 4 fields in which to enter the
number of children.
Room type
(Mandatory)
Enter the room type or select from the list of defined room
types.
Rate code
Enter a rate code, or select from the rate availability grid the
open rate codes for each room type. For details on the rate
availability grid, please refer to Selecting a rate code from the
rate availability grid.
The CALCULATED PRICE per night, as well as the NET AMOUNT, EXTRA
CHARGES and RATE AMOUNT are shown in the lower right-hand
corner of the reservation screen. This is only an indicator as
any rate changes or package changes during the stay are not
reflected here.
Note: If the user right for ALLOW RESERVATION WITHOUT RATE CODE
is not active, the user can not exit the reservation detail screen
without entering a rate code.
Reservations
41
Rate Room type
Enter the room type the guest might get upgraded to without
having to pay the higher rate, for example if you are almost out
of standard rooms you may need to upgrade the guest to a
deluxe room upon arrival.
Rate amount
The rate amount is entered automatically when you choose a
rate code from the rate availability grid. If no rate code was
selected you can enter a price manually, the price entered in
this field will be the amount posted.
Note: Even if you have entered a rate code, the system allows
you to override the amount and enter a price manually.
Manual price
Select this check box to indicate that the rate was entered
without a rate code or that the calculated rate code price was
overridden by a manually entered price. If not selected the
calculated price from the rate code will be posted and not the
manually entered price.
If an individual reservation is linked to a block with manual
prices then this is indicated by a [B] next to the manual price
field.
Room
Individual Reservation
Most hotels assign the room number shortly before the guest
arrives or at check in, however a room number may be entered
when making the reservation. To check availability and status,
press the
next to the room number to open the room
search screen.
Group Reservation
As a group reservation is for multiple rooms you would not
enter the room number. However, if you select a room number
Suite 8 will prompt you with the question 'More than one room
is reserved. Do you want to split the reservation?' Select Yes to
split the reservation and No to leave the room number empty.
Block
If the reservation is not part of a block reservation this field
should remain empty, if the reservation should be deducted
from an available block, press the
button to select the
relevant block.
Note: If the block selected has a different rate code, market
code, source code and/or channel code then the system will
prompt you to change the entries on the reservation to the
codes as defined in the block.
42
Group
Click the
button to display the Group Reservations screen
and attach a group to the reservation. If the reservation is
already part of a group then the group name is displayed here.
On the main group reservation the group field is not accessible;
the group name is completed automatically when the group
reservation is split to individual reservations.
Market
The market segment. A market code indicates the general
purpose of the reservation, typical market codes are Individual,
Corporate, Group, Tour Series and Leisure. The market code is
often used in conjunction with the rate code.
Note: To make sure that each reservation and financial account
has a market code attached, this field should be set as
mandatory in the configuration.
Reservations
Source
The source of business indicates how the reservation was
made: For example, direct to the hotel by telephone, via the
Internet, through Central Reservations, through a local
company or agent or a walk in.
Channel
The channel indicates how the reservation arrived at the
property: For example, email, telephone, fax or web booking.
Discount
Enter a discount amount if applicable. The amount entered here
is deducted from the original rate amount and the deduction
and newly calculated rate are shown in the lower right-hand
corner of the screen. If a minus amount is entered, this will be
added to the rate.
Discount %
Enter a discount percentage if applicable. The number entered
here is the percentage to be deducted from the original price.
The percentage will be deducted and the newly calculated price
shown in the lower right-hand corner of the screen.
Note: You should either fill the field discount or the field
discount %. If both have values, both values will be deducted
from the original price.
Reason
If a discount amount or discount percentage is entered then a
reason for the discount must be selected from the drop-down
list.
C/I time
Enter the expected check in time. The actual check in time is
stored separately and can be accessed via the reservation user
log file.
C/O time
Enter the expected check out time; if no time is entered here
the default check out time as defined in the configuration is
entered. The actual check out time is stored separately and can
be accessed via the reservation user log file.
Res. Type
Select either DEF (Definite) or TENT (Tentative) to define if the
reservation is definite or tentative. Definite reservations are
deducted from availability and tentative reservations are not
deducted from the availability.
Guarantee c.
Enter a guarantee type or select a guarantee type from the
drop-down list.
Pay method
Enter a payment method or select a payment method from the
drop-down list
Credit Limit
Displays the credit limit for the selected payment method. This
may be changed as required.
Print rate
This check box is selected by default and indicates that the rate
will be printed on the registration card and confirmation letter.
Clear the check box if the rate should not be printed on the
registration card or confirmation letter. If group members
should not see the rate the check box must be cleared.
No post
Selecting the no post check box restricts the posting of
interface charges to a guest account.
For example, when a guest checks in the telephone interface
normally opens the telephone lines in the guests room
automatically; with the no post check box selected the lines will
not be opened.
Reservations
43
Note: The parameter SET NO POST FLAG FOR CASH DEPARTMENTS can
be set in the configuration so that the no post check box is
selected automatically for cash method of payments.
44
Room features
Select room features such as a smoking or non-smoking room,
preferred floor, near to elevator, etc. from the drop-down list. If
room features have been entered on the profile, they will be
copied over to the reservation. When you block the guest's
room or check the guest in the system searches only for rooms
with these features.
Reservation
colour
Defines the colour in which the reservation is displayed in the
room rack (Ctrl + L).
Note: The reservation colour takes priority over any other
colour definitions, such as a VIP Code colour.
Billing Info.
Enter any billing information, such as 'Room and Tax to
Company'. The billing information is displayed in the billing
screen on the standard HTML file.
Remarks
Enter any additional information. Remarks are displayed in the
billing screen on the standard HTML file.
CRS no
If the booking was made through a central reservation and
there is no interface, enter the confirmation number provided
by the CRS. If this booking came through an interface then the
confirmation number is filled automatically
Option date
If you made a tentative booking or just sent an offer and would
like to keep reference of this reservation then enter the date on
which the option for this reservation will expire or click the
drop-down arrow and select a date from the calendar.
It is possible to search by option date via the Adv. Qry. search
criteria and to run specific reports to retrieve this information.
Booker
The name of the person who made the reservation. Click the
drop-down arrow to open the profile search screen to select an
existing profile or create a new profile. The booker information
can be included reports and can be used in the case of nonarrival.
Specials
Select special requests such as flowers, chocolate, fruit or anti
allergic pillow from the drop-down list.
Calculated price
Displays the calculated price, including packages.
Net Amount
Displays the net amount of the rate excluding taxes.
Note: Rate changes or package changes during the stay are
not reflected here.
Extra Charges
Displays the sum of all extra charges, such as exclusive
packages and fixed charges.
Note: Rate changes or package changes during the stay are
not reflected here.
Rate Amount
Displays the original rate amount. If a rate code and a manual
price are entered, then the original rate amount field will
display the original rate amount of the rate code.
Note: Rate changes or package changes during the stay are
not reflected here.
Created
The user who created the reservation with the date and time
stamp.
Reservations
The user who last updated the reservation with date and time
stamp.
Updated
Note: The edit reservation screen can be customised; therefore it may
possibly look different in your property.
Profile options on the edit reservation screen
SELECT - opens the profile search screen; this can be used to change the profile currently linked
to the reservation.
EDIT - to edit or view the selected profile.
HTML - select this check box to see the profile details in HTML format.
If the reservation is linked to a Company, Travel Agent and/or Source profile the
profile name is displayed on the top right-hand side of the screen.
To search for and link a profile, click the down-arrow on the COMPANY, TRAVEL AGENT or
SOURCE fields.
To open the linked profile in edit mode double-click the COMPANY, TRAVEL AGENT or SOURCE
label.
How to switch between the different tabs
Fast access to the different tabs from the reservation edit screen can be completed by
pressing CTRL and the numbers 1-0.
CTRL + 1 for Reservation
CTRL + 2 for Inventory
CTRL + 3 for Profiles
CTRL + 4 for Package grid
CTRL + 5 for Grid
CTRL + 6 for Attributes
CTRL + 7 for Credit Card
CTRL + 8 for Fixed Charges
CTRL + 9 for Notes
CTRL + 0 for Meal plan or Special attr. if activated
Note: This accelerator keys are hard coded for these tabs, therefore
they will even open the corresponding tab if the parameter to show
this tab is turned off by default.
Configuration and Parameter Details
Currencies are defined via the option CURRENCIES under Setup → Configuration →
Cashiering.
The base currency for rooms is defined via the option BASE CURRENCY FOR ROOMS
under Setup → Configuration → Global Settings → Billing → Currency 4 Tab.
Child age categories can be defined via the option CHILD AGE CATEGORIES under
Setup → Configuration → Reservations.
Changes to the number of children are displayed in the user log if the option
RESERVATION NUMBER OF CHILDREN is selected in Setup → Configuration → Users →
User Log → Reservation.
Reservations
45
Market codes are defined via the option MARKET SEGMENTS under Setup →
Configuration → CRM.
Each reservation and financial account must have a market code attached if the
option MARKET CODE MANDATORY is selected in Setup → Configuration → Global
Settings → Reservation → Reservation 1 Tab.
Source codes are defined via the option SOURCE CODES under Setup →
Configuration → Reservations → Reservation Attributes.
Channel codes are defined via the option CHANNEL CODES under Setup →
Configuration → Reservations → Reservation Attributes.
Discount reasons are defined via the option RATE DIFFERENCE REASONS under Setup
→ Configuration → Reservations → Rate Management.
The default check-in time is defined via the option DEFAULT CHECK IN TIME under
Setup → Configuration → Global Settings → Reservation → Reservation 1 Tab.
Guarantee codes are defined via the option GUARANTEE CODES under Setup →
Configuration → Reservations.
Payment methods are defined via the option DEPARTMENT CODES under Setup →
Configuration → Cashiering.
The No Post check box can be selected automatically for cash method of payments
via the option SET NO POST FLAG FOR CASH DEPARTMENTS under Setup → Configuration
→ Global Settings → Reservation → Reservation 1 Tab.
Room Features are defined via the option ROOM FEATURES under Setup →
Configuration → Reservation → Room Management.
Special codes are defined via the option SPECIALS under Setup → Configuration →
CRM → Marketing Info.
The Net Amount is displayed on the reservation screen if the option SHOW NET
AMOUNT ON SCREEN is selected under Setup → Configuration → Global Settings →
Reservation → Reservation 1 tab.
The sum of Extra Charges is displayed on the reservation screen if the option SHOW
SUM OF EXTRA CHARGES is selected under Setup → Configuration → Global Settings →
Reservation → Reservation 1 tab.
The Rate Amount is displayed on the reservation screen if the option SHOW
ORIGINAL RATE AMOUNT is selected under Setup → Configuration → Global Settings →
Reservation → Reservation 1 tab.
A credit card entered or swiped on the reservation will be automatically attached
to the profile if the parameter AUTOMATIC LINK CREDIT CARDS TO PROFILES is active
under Setup → Configuration → Global Settings → Reservation → Reservation 1
tab.
The possibility to change reservation attributes after check-out is controlled by the
user right CHANGE ATTRIBUTES AFTER CHECKOUT under Setup → Configuration → Users
→ User Definition → Rights → Reservation. However, market, source and channel
codes cannot be changed even with this right activated.
46
Reservations
The possibility to change custom fields after check-out is controlled by the user
right CHANGE CUSTOM FIELDS AFTER CHECKOUT under Setup → Configuration → Users →
User Definition → Rights → Reservation.
Note: The Edit Reservation screen can be customised; therefore it may
look different in your property.
Note: The Central Reservation System label (yres_crssystem) will
display on the standard edit reservation screen on the upper right side
if the license code for a Central Reservation System is activated.
Screen customization allows the caption to be renamed or the
component removed.
Note: A warning message is displayed if the number of persons
entered on a reservation exceeds the maximum number of persons
configured for the room type or if a room is assigned then for the
assigned room. If the option COUNT IN OCCUPANCY is selected on the
child age category configuration then the children on the reservation
are included in the check for number of persons against the maximum
number of persons entered on the room type or room configuration.
Selecting a rate code
How to select a rate code from the rate availability grid
1. Click on the
button next to the rate code field.
The Rate Selection screen is displayed showing all available rates.
The screen is divided into two sections:
Reservations
47
48
The top section displays available room types, number of available rooms per room type, rate
codes and rates. An indicator shows to which type of profile the rate is linked.
The lower half of the screen displays the following information:
General Information - displays a description of the selected rate code, a description of the
room type and the gross and net room rates.
Rate Restriction Information - displays any restrictions on rates, such as closed to
arrivals or minimum length of stays. Rate restrictions can be set manually or by an
interface yield system. With equivalent user rights, the restricted rates can be displayed in
different colours by pressing the customize button.
Reservation Filter - may be used to filter the rate codes. Placing the cursor on the ALL
radio button displays a hint explaining each button. The filter can be changed by selecting
one of the filter options.
On the lower part of the screen the date of the reservation is displayed for the first night by
default. If the reservation is for multiple nights the NEXT button can be pressed to move
forward by day until the last date of the stay of the selected reservation. The PREVIOUS
button can be pressed to move back by day to the arrival date of the reservation.
On the right side of the screen are the available options.
Reservations
2. Select the rate code and room type required and click SELECT.
The Edit Reservation screen is displayed with the ROOM TYPE, RATE CODE and RATE
AMOUNT completed.
Profile Indicators
Indicator
The rate is linked to
I
An individual profile
C
A company profile
T
A travel agent profile
S
A source profile
V
A vendor profile
M
A meeting planner profile
Rate Availability Reservation Filter Options
Button
Definition
All
To view all available rate codes.
Reservation
Displays only the rate codes linked to the specific
reservation.
Private
Displays only rates linked to the profiles entered on the rate
query dialog box. An indicator will show to which profile type
the rate is linked.
Private and
Public
Displays only rates which are linked to a profile and rates
which have been marked as public on the rate code setup.
Only Valid Rates
If this field is selected only valid (no restricted) rates will be
displayed.
Rates in Base
Currency
This selection will only display rates in Base Currency.
Always show
rooms
This option will always show the room numbers on the rate
availability grid if rates are defined for specific room
numbers.
Stay view
This selection will display the amount for the whole stay. For
example if the rate is 100.- and the reservation is made for 4
nights, stay view will display 400.-
Price with
packages
If this field is selected, the rate will display including print
separate and add to rate packages defined on the rate detail
or rate header.
Promoted price
This selection is only available if the parameter CALCULATE
RATE PROMOTIONS is activated under Global Settings →
Reservation 2 tab. It will display the rate amount minus the
calculated promotional discount.
Inclusive
Overbooking
If this option is selected then overbooking levels are included
in the amount of available rooms.
Rate Selection Screen Options
Click this button
To do this:
Select
Select the rate and create a new reservation.
Reservations
49
Up
Down
Changes the display order of the rate codes.
Scope
Re-displays the rate query scope which allows you
to look up different rate queries.
This option is only available when the rate selection
screen is accessed via the quick key RATE QUERY.
Turnaway
Record a turnaway.
This option is controlled by the parameter USE
TURNAWAY FUNCTIONALITY.
Customize
Customize the rate grid.
Close
Close the rate query screen.
The default reservation filter is defined via the option RATE SELECTION FILTER under
Setup → Configuration → Global Settings → Miscellaneous → Search Screens 2
tab.
Turnaway functionality is controlled by the parameter USE TURNAWAY FUNCTIONALITY
under Setup → Configuration → Global Settings → Reservation → Reservation 1
tab.
Inventory Tab
This option may be used to add inventory item to a reservation and is accessible via the INVENTORY
tab on the Edit Reservation screen.
The inventory option is used to reserve and track items of which the hotel has a specific number or
which have to be ordered specially. If an inventory item is only needed on certain days of the
guest's stay then the inventory item may be added on a by day basis. For example, the guest's
family is joining for the weekend and so they require a baby cot only for the weekend and not for
the entire stay.
If an inventory item has been added to a reservation it will be indicated at the bottom of the edit
reservation screen by the indicator
.
How to add an inventory item
1. From the Reservation Navigator select the reservation to which an inventory item
is to be added.
2. Click EDIT to display the reservation edit screen and then select the INVENTORY tab.
50
The upper section of the inventory screen shows any inventory items currently reserved.
The lower section displays the number of inventory items available for each day of the
reservation.
Reservations
3. Click the ADD button to display the Add Inventory Items selection dialog box.
Reservations
51
4. Select the required inventory item from the list displayed and then click SELECT to
add the inventory item to the reservation.
5. Click OK to save the inventory item and close the reservation.
How to add an inventory item by day
1. From the Reservation Navigator select the reservation to which an inventory item
is to be added.
2. Click EDIT to display the reservation edit screen and then select the INVENTORY tab.
3. Click the
button at the bottom of the screen.
4. The days selection options are displayed.
To attach the inventory item for the whole stay of the guest select ALL DAYS.
To attach the inventory item after a specific day/date during the reservation until the end of
the stay select DAYS AFTER. For example, selecting day 3 will attach the fixed charge from
day 3 and onwards.
To attach the inventory item for one day, select the required day during the stay and select
ONE DAY.
5. Click the ADD button to display the Add Inventory Items selection dialog box.
6. Select the required inventory item from the list displayed and then click SELECT to
add the inventory item to the reservation.
An inventory item which changes during the guests stay is indicated by an x in the
Change column.
7. Click OK to save the inventory item and close the reservation.
How to view on which days an inventory item is attached
1. From the Reservation Navigator select the required reservation.
2. Click EDIT to display the reservation edit screen and then select the INVENTORY tab.
Any existing inventory items are listed.
3. An x in the CHANGE column indicates that the inventory item is applied on a by day
basis.
4. To see which days the inventory item is attached click the
bottom of the screen.
button at the
5. The days selection options are displayed.
52
Reservations
6. Click the arrows to scroll through the days of the reservation. The upper display
changes depending on whether the inventory item is applicable for the selected
day.
A check box with a tick mark
day.
A blank
indicates that the inventory item applies to this
check box indicates that the inventory item does not apply to this day.
7. Click OK to close the reservation.
How to view inventory details per day
1. From the Reservation Navigator select the required reservation.
2. Click EDIT to display the reservation edit screen and then select the INVENTORY tab.
An inventory item which changes during the guests stay is indicated by an x in the
Change column.
3. Select the inventory item to view details per day and click the
button.
The Inventory details per day are displayed.
4. If there are multiple inventory items attached to the reservation the inventory
details for each item can be viewed by clicking the INVENTORY drop-down list and
selecting the item required.
5. Click OK to close the inventory details per day.
6. Click OK to close the reservation.
Inventory tab display
This Column
Displays this information
Name
The name of the inventory item.
Change
An x in this column indicates that the item is not reserved for all
days of the stay.
To view the days the item is in use click the DAYS button.
No.
The number of inventory items.
Reservations
53
Options available on the Inventory tab
Button
To perform this task
Days
To see the inventory details for each day of the reservation.
Add
To reserve an inventory item.
+1
To increase the selected inventory item by one.
-1
To decrease the selected inventory item by one or to unselect the
inventory item.
Inventory Items are defined via the option MISCELLANEOUS ITEM DEFINITION under
Setup → Configuration → Reservations → Miscellaneous Items. Only items which
are defined as SHOW FO are displayed via the Inventory tab on the edit reservation
screen.
54
Reservations
Profiles
This option may be used to link profiles to a reservation and is accessible via the PROFILES tab on
the Edit Reservation screen.
The profiles tab displays any company, travel agent, source or individual profiles linked to the
reservation. Profiles can be attached for the whole stay or may be linked on a by day basis. This
may become necessary, if the reservation should be linked to different companies, agents, sources
or individuals only on certain days of the reservation and is usually done for statistical reasons.
For example, if the guest is booked through the company for several days and then stays over the
weekend on their own account, then the company profile can be linked for the days on which the
guest is staying on company business, and removed for the days on which the guest is staying on
their own account.
Note: If MULTIPLE GUEST PROFILE FUNCTIONALITY is active then the
lower section of the profiles tab shows all the profiles which are
attached to this reservation; the primary profile is marked with an x.
How to link a new profile
1. From the Reservation Navigator select the required reservation.
2. Click EDIT to display the reservation edit screen and then select the PROFILES tab.
Any company, travel agent, source or booker profiles already linked to the
reservation are displayed.
3. Click the ADD button to display the profile search screen.
If the LINKED PROFILES ONLY check box is selected by default, then only profiles
which are linked to the reservation profile are displayed.
Reservations
55
4. If the required profile is not displayed, clear the LINKED PROFILES ONLY check box
and search again.
5. Locate the required profile and click SELECT.
The profile is linked to the reservation and the profile name and type are listed.
6. Click OK to save the profile linkage and close the reservation.
How to link a new profile by day
1. From the Reservation Navigator select the required reservation.
2. Click EDIT to display the reservation edit screen and then select the PROFILES tab.
Any company, travel agent, source or booker profiles already linked to the
reservation are displayed.
3. Click the
button.
4. The days selection options are displayed.
To attach the profile for the whole stay of the guest select ALL DAYS.
To attach the profile after a specific day/date during the reservation until the end of the
stay select DAYS AFTER. For example, selecting day 3 will attach the fixed charge from
day 3 and onwards.
To attach the profile for one day, select the required day during the stay and select ONE
DAY.
5. Click the ADD button to display the profile search screen.
If the LINKED PROFILES ONLY checkbox is selected by default, then only profiles which
are linked to the reservation profile are displayed.
6. If the required profile is not displayed, clear the LINKED PROFILES ONLY checkbox and
search again.
7. Locate the required profile and click SELECT.
The profile is linked to the reservation and the profile name and type are listed.
A profile linkage which changes during the guests stay is indicated by an x in the
Change column.
8. Click OK to save the profile linkage and close the reservation.
How to remove a linked profile
1. From the Reservation Navigator select the required reservation.
2. Click EDIT to display the reservation edit screen and then select the PROFILES tab.
Any company, travel agent, source or booker profiles already linked to the
reservation are displayed.
56
Reservations
3. Clear the check box with the tick mark
to be unlinked.
next to the name of the profile which is
4. Click OK to save the change and close the reservation.
How to view on which days a profile is linked
1. From the Reservation Navigator select the required reservation.
2. Click EDIT to display the reservation edit screen and then select the PROFILES tab.
Any company, travel agent, source or booker profiles already linked to the
reservation are displayed.
3. An x in the CHANGE column indicates that the profile is linked on a by day basis.
4. To see which days the profile is linked click the
screen.
button at the bottom of the
5. The days selection options are displayed.
6. Click the arrows to scroll through the days of the reservation. The upper display
changes depending on whether the inventory item is applicable for the selected
day.
A check box with a tick mark
A blank
indicates that the profile is linked on this day.
check box indicates that the profile is not linked on this day.
7. Click OK to close the reservation.
How to view guest related profiles
1. From the Reservation Navigator select the required reservation.
2. Click EDIT to display the reservation edit screen and then click the PROFILES tab.
3. Click the GUEST RELATED button to display the Link Profiles screen.
Listed on the left-hand side are the PROFILES NOT
LINKED TO RESERVATION.
These are the profiles which are linked to the profile of this reservation but which are not
linked to the current reservation.
Listed on the right-hand side are the PROFILES LINKED TO RESERVATION.
Reservations
These are all the profiles which are linked to this reservation.
57
4. The profiles can be added or removed from the reservation via the ADD, REMOVE,
ADD ALL and REMOVE ALL buttons.
5. Select the DETAILS check box to display the html details for the selected profile.
6. Click OK to close the Link Profiles screen.
How to view profile related profiles
1. From the Reservation Navigator select the required reservation.
2. Click EDIT to display the reservation edit screen and then click the PROFILES tab.
3. Click the PROFILE RELATED button to display the Link Profiles screen.
Listed on the left-hand side are the PROFILES NOT
LINKED TO RESERVATION.
These are the profiles which are linked to the profile selected in the grid but which are not
linked to the current reservation.
Listed on the right-hand side are the PROFILES LINKED TO RESERVATION.
58
These are all the profiles which are linked to this reservation.
Reservations
4. The profiles can be added or removed from the reservation via the ADD, REMOVE,
ADD ALL and REMOVE ALL buttons.
5. Select the DETAILS checkbox to display the html details for the selected profile.
6. Click OK to close the Link Profiles screen.
Options available on the profiles tab
ADD - to link a profile to the reservation.
EDIT - to edit or view the selected profile.
GUEST RELATED - to view the profiles which are related to the guest profile of this reservation.
PROFILE RELATED - to view the profiles which are related to the profile selected in the grid.
RESERVATION - to return to the edit reservation screen.
Note: It is not possible to link two profiles of the same type (role). If
the role is already linked then another role must be selected or specific
days selected for the existing profile before adding a new profile of the
same role.
The display by default of only profiles which are linked to the reservation profile is
controlled by the parameter LINKED PROFILES CHECK ON under Miscellaneous → User
Settings → Search Screens tab. When searching for a profile, only profiles which
are linked to the primary reservation profile are displayed, however if the required
profile is not displayed, the LINKED PROFILES ONLY checkbox can be cleared and the
search performed again.
Multiple guest profile functionality is controlled by the parameter MULTIPLE GUEST
PROFILE FUNCTIONALITY under Setup → Configuration → Global Settings →
Reservation → Reservation2 tab.
The display and posting of the rate amount per guest is controlled by the
parameter RATE AMOUNT PER GUEST under Setup → Configuration → Global Settings
→ Reservation → Reservation2 tab.
Reservations
59
To display but not post the rate per guest the parameter DISABLE POSTING PER GUEST
can be selected under Setup → Configuration → Global Settings → Reservation →
Reservation2 tab. This parameter is available only if the parameter RATE AMOUNT
PER GUEST is selected.
The changing of the rate per guest is controlled by the user right MANUAL PRICE PER
GUEST under Setup → Configuration → Users → User Definition → Rights →
Reservation.
Package grid
This option may be used to display details about linked packages on a day by day basis and is
accessible via the PACKAGE GRID tab on the Edit Reservation screen.
Depending on the configuration settings and user rights, users can add packages, view and change
frequencies, view and change prices, add multipliers and link or remove package elements by day.
See Packages and Frequencies in the Suite8 Configuration Manual for more details on how to
define a package element or package frequency.
The package grid consists of either one or two tabs depending on the configuration:
Normal - opens the main package grid view.
Per Guest - this tab is displayed if the parameter Packages per guest is active; packages can be
assigned per guest, for example assigning a wellness package to one guest only.
Normal Package Tab
The package grid is displayed divided into either two or three main sections:
60
The upper section contains the display criteria for the package grid and information on the
calculated and package prices. The calculations displayed are dependant upon the display
parameters selected in the configuration.
The middle section displays the package grid with the packages attached to the reservation on
a day by day basis. The colour of the package on the grid indicates the following:
Reservations
Packages coloured blue indicate that the package is linked to the rate code.
Packages coloured grey have a frequency link.
Packages with no colour have no frequency link.
If the option Show default packages is selected in the display criteria then the lower section
displays a list of the available packages.
Package grid display options
Linked / not linked - to display packages linked to the reservation by day. A cross indicates
that the package is linked on that day.
Multiplier - to display the multiplier for each package linked to the reservation by day. The
number indicates how many times this package will be posted
Reservations
61
Price - to view the price for each package linked to the reservation by day.
SHOW DEFAULT PACKAGES - displays all packages configured as SHOW IN RESERVATION on the
lower part of the screen. This option can be selected in addition to one of the three display
options described above.
SHOW PACKAGE TREE - displays packages by package report group. Double-clicking a package
adds it to the reservation and removes it from the package group listing.
Package grid calculated and package prices
62
Field
Definition
Calculated price
Displays the calculated price, including packages for the day
selected in the grid. If there are rate changes or package
changes during the stay the amount is displayed in red.
Net Amount
Displays the net amount of the rate excluding taxes for the day
selected in the grid.
Extra Charges
Displays the sum of all extra charges, such as exclusive
packages and fixed charges for the day selected in the grid.
Rate Amount
Displays the original rate amount for the day selected in the
grid.
Packages (all)
Displays the total amount of packages attached to the
reservation for the day selected in the grid. If there are
package changes during the stay the amount is displayed in
red.
Include
Displays the total amount of all inclusive packages for the day
selected in the grid. If there are package changes during the
stay the amount is displayed in red.
Add to rate
Displays for the day selected in the grid the total amount of all
add to rate packages. If there are package changes during the
stay the amount is displayed in red.
Reservations
Options available on the package grid tab
ADD - to manually add a package to the reservation.
LINK - to link a package on a day that it is not currently linked.
UNLINK - to unlink a package that is currently linked.
RET/LOST - to mark a returnable package items as returned or lost.
FREQUENCY - to view, add or change the frequency schedule of the selected package.
MULTIPLIER/PRICE
+ 1 - to increase by one the number of times the package will be posted.
ONLY SELECT - select this check box to change the multiplier or price only for the packages
selected in the grid, even if a package frequency exists.
? - to display a help window which explains the colors and indicators used on the package
grid.
- 1 - to decrease by one the number of times the package will be posted.
PRICE - to display the package price dialog box for the selected package, with an option to
include the price.
Per Guest Package Tab
The upper section displays information on the calculated and package prices. The calculations
displayed are dependant upon the display parameters selected in the configuration.
The lower section displays the package grid with the packages attached to the reservation on a
per person basis. The colour of the package on the grid indicates the following:
Packages coloured blue indicate that the package is linked to the rate code.
Packages coloured grey have a frequency link.
Packages where no package price has been defined for the child age category are coloured
grey.
Reservations
63
Options available on the package per guest tab
PRICE - to display the price for the selected package.
MANUAL PACKAGES ONLY - select to display only manual packages and not rate code packages.
+ 1 - to increase by one the number of times the package will be posted.
- 1 - to decrease by one the number of times the package will be posted.
Packages by package report group can be displayed on the package tab when editing a reservation
and selecting: 'Show Package Tree'. The packages are displayed by report group and can be
selected or deselected for adding or removing a package from this list.
Master and Sub-Packages
Selecting a master package links the master package and all the sub-packages which have been
defined as part of the master package to the reservation; removing a master package removes also
the sub-packages.
If a sub-package is already included on the reservation then it is skipped when the master package
is linked. If the master package is then removed the skipped sub-package remains as it was added
to the reservation independently.
Master and sub-package frequencies can be amended as required; manual changes of master
package frequency do not affect sub-package frequencies.
Master packages can have a '0' price so it is not posted if the system is configured not to post 0
price items.
In the package grid, both master and sub packages are indicated as such and displayed separately.
64
Reservations
How to add a package to a reservation
1. From the Reservation Navigator select the required reservation.
2. Click EDIT to display the reservation edit screen and then select the PACKAGE GRID
tab.
The package grid is displayed with any packages currently attached to the
reservation.
3. Click the ADD button to display the Package configuration screen with a list of
available packages.
Reservations
65
3. Click the package name to display the package details in the column on the righthand side.
66
Reservations
4. Select the required package from the list displayed and then click SELECT to add
the package to the reservation.
The package is displayed in the grid on the days for which it is valid.
5. Click OK to save the package addition and close the reservation.
How to link a package
1. From the Reservation Navigator select the required reservation.
2. Click EDIT to display the reservation edit screen and then select the PACKAGE GRID
tab.
The package grid is displayed with any packages currently attached to the
reservation.
Packages can not be linked on days where the daily charges have already been
posted. The day/date column of such days is indicated in a light gray colour.
3. On the package grid select the day and package to be linked.
4. Click the LINK button, the package is displayed on the grid for day selected.
5. Click OK to save and close the reservation.
How to unlink a package
1. From the Reservation Navigator select the required reservation.
2. Click EDIT to display the reservation edit screen and then select the PACKAGE GRID
tab.
The package grid is displayed with any packages currently attached to the
reservation.
Packages can not be unlinked for days where the daily charges have already been
posted. The day/date column of such days is indicated in a light gray colour.
Reservations
67
3. On the package grid select the day and package to be unlinked.
4. Click the UNLINK button, the package is no longer displayed on the grid for day
selected.
Manual packages with no frequency link which are no longer valid for any day of
the reservation are removed completely from the package grid.
Manual packages with a frequency link which are no longer valid for any day of the
reservation remain on the package grid; however, a message is displayed asking if
the package should be removed completely.
5. Click YES to remove the package from the reservation.
6. Click OK to save and close the reservation.
Note: It is not possible to unlink packages, change the multiplier,
frequency or price of packages for days which have already been
posted.
How to view a package posting rhythm
1. From the Reservation Navigator select the required reservation.
2. Click EDIT to display the reservation edit screen and then select the PACKAGE GRID
tab.
The package grid is displayed with any packages currently attached to the
reservation.
3. Select any day on the row of the required package and click the FREQUENCY button.
The Frequency dialog box is displayed with the posting rhythm of the selected
package. This display shows if the charge is posted every night, just on the last
night or only on specific nights.
68
Reservations
4. Click CLOSE to close the frequency dialog box.
5. Click OK to save and close the reservation.
How to change a package price
1. From the Reservation Navigator select the required reservation.
2. Click EDIT to display the reservation edit screen and then select the PACKAGE GRID
tab.
The package grid is displayed with any packages currently attached to the
reservation.
3. On the package grid select the package price to be edited.
4. Click the PRICE button, the package price dialog box is displayed.
5. In the VALUE box enter the new amount to be posted.
If advanced package functionality s is enabled and depending on the package
setup a LIMIT box may be displayed.
6. In the LIMIT box enter the new allowance amount.
7. Select the INCLUDED check box to include the package price in the rate.
8. Click OK to close the package price dialog box and update the grid.
9. Click OK to save and close the reservation.
Reservations
69
The Net Amount is displayed on the package grid if the option SHOW NET AMOUNT ON
SCREEN is selected under Setup → Configuration → Global Settings → Reservation
→ Reservation 1 tab.
The sum of Extra Charges is displayed on the package grid if the option SHOW SUM
OF EXTRA CHARGES is selected under Setup → Configuration → Global Settings →
Reservation → Reservation 1 tab.
The Rate Amount is displayed on the package grid if the option SHOW ORIGINAL RATE
AMOUNT is selected under Setup → Configuration → Global Settings → Reservation
→ Reservation 1 tab.
Advanced package functionality is controlled by the parameter ADVANCED PACKAGE
HANDLING under Setup → Configuration → Global Settings → Billing → Billing 1 tab.
The changing of rate code packages on a reservation is controlled by the user right
ALLOW MANUAL CHANGE OF AUTOMATIC PACKAGES under Setup → Configuration → Users
→ User Definition → Rights → Reservations.
The changing of rate code package frequency on a reservation is controlled by the
user right ALLOW CHANGE OF RATE GENERATED PACKAGE FREQUENCY Setup → Configuration
→ Users → User Definition → Rights → Reservations.
Frequency link for manual packages is controlled by the parameter FREQUENCY LINK
FOR MANUAL PACKAGES ON PACKAGE GRID under Setup → Configuration → Global
Settings → Reservation → Reservation 2 tab. If activated the package frequency
will be recalculated for a manual package, for example on arrival date and length
of stay. If not activated the package link will not be recalculated for a manual
package.
Assigning packages per guest is controlled by the parameter PACKAGES PER GUEST
under Setup → Configuration → Global Settings → Reservation → Reservation 2
tab. This parameter is independent of the parameter MULTIPLE GUEST PROFILE
FUNCTIONALITY, however if PACKAGES PER GUEST is activated and multiple guest profile
functionality is not, then multiple guest records will be created but the posting is
performed only for the main guest.
If the parameter PACKAGES PER GUEST is active and the option SINGLE PER RESERVATION
selected on the package configuration screen then the package is by default
attached to the primary guest, but can be linked manually on the package screen
to the second guest.
The package multiplier on the price per guest dialog box can be changed if the
parameter RATE AMOUNT PER GUEST is activated under Setup → Configuration →
Global Settings → Reservation → Reservation 2 tab.
The master and sub packages are posted as one amount if the parameter POST
MASTER/SUB PACKAGES AS ONE AMOUNT is activated under Setup → Configuration →
Global Settings → Reservation → Reservation 3 tab. Note: If a master package is
marked as 'print separate' all sub packages are also 'print separate', regardless of
their configuration under packages.
Grid View
This option may be used to view the reservation details in grid format and is accessible via the
GRID tab on the Edit Reservation screen. The grid gives an overview of the reservation details on a
day by day basis. Details which change during the guest's stay are displayed in red, so for
70
Reservations
example, if the rate changes during the stay then the RATE AMOUNT and CALCULATED PRICE fields
will be displayed in red.
How to display the reservation grid
1. From the Reservation Navigator select the required reservation.
2. Click EDIT to display the reservation edit screen and then select the GRID tab.
The reservation fields are listed on the left and a column with the reservation
details is displayed for each day of the reservation. Details such as Rate amount
and Calculated price are summarized in a column on the right.
3. Click OK to close the reservation screen.
Attributes and Special Attributes
This option may be used to add daily and non-daily attributes to a reservation and is accessible via
the ATTRIBUTES tab on the Edit Reservation screen. Attributes are user-definable and may be used
to collect additional non-standard information about the guest.
A SPECIAL ATTRI. tab can be activated for properties with more attributes that can be added to the
main attributes tab. The additional attribute categories can be defined in the configuration to
display on the special attribute page rather than the attributes page.
How to add a daily or non-daily attribute
1. From the Reservation Navigator select the required reservation.
2. Click EDIT to display the reservation edit screen and then select the ATTRIBUTES tab.
Reservations
The upper section of the attribute screen shows non-daily attributes.
71
The lower section displays the daily attributes.
3. Select a NON DAILY or DAILY attribute by clicking on the drop-down list and selecting
the required attribute.
4. Click OK to save the selected attributes and close the reservation.
How to add an attribute by day
1. From the Reservation Navigator select the required reservation.
2. Click EDIT to display the reservation edit screen and then select the ATTRIBUTES tab.
3. Click the
button at the bottom of the screen.
4. The days selection options are displayed.
72
To attach an attribute for the whole stay of the guest select ALL DAYS from the drop-down
list.
To attach an attribute after a specific day/date during the reservation until the end of the
stay select DAYS AFTER from the drop-down list. For example, selecting day 3 will attach
the fixed charge from day 3 and onwards.
To attach an attribute for one day select the required day during the stay and select ONE
DAY from the drop-down list.
Reservations
5. Select a NON DAILY or DAILY attribute by clicking on the drop-down list and selecting
the required attribute.
6. Click OK to save the selected attributes and close the reservation.
Attribute categories (list boxes), where they are displayed and whether they are
mandatory or not are defined via the option ATTRIBUTE CATEGORIES under Setup →
Configuration → CRM.
For each attribute category defined a marketing info category is created. The
elements for each new list box are defined via the option MARKETING INFO under
Setup → Configuration → CRM.
The Special attr. tab can be activated via the option SPECIAL ATTRIBUTES PAGE under
Setup → Configuration → Global settings → Reservation → Reservations 1 tab.
Changes to reservation attributes are displayed in the user log if the option
RESERVATION ATTRIBUTE is selected in Setup → Configuration → Users → User Log →
Reservation.
The possibility to change reservation attributes after check-out is controlled by the
user right CHANGE ATTRIBUTES AFTER CHECKOUT under Setup → Configuration → Users
→ User Definition → Rights → Reservation. However, market, source and channel
codes cannot be changed even with this right activated.
Discrepant Persons functionality is controlled by the user right DISCREPANT PERSONS
under Setup → Configuration → Users → User Definition → Rights →
Housekeeping.
Credit Cards
This option may be used to add credit card details to the reservation and is accessible via the
CREDIT CARD tab on the Edit Reservation screen.
The credit card screen is displayed divided into three sections:
RESERVATION CREDIT CARDS - used to register credit cards which are valid for this reservation.
For example, for a company reservation where the guest is paying with a company credit card.
GUEST CREDIT CARDS - used to register credit cards which belong personally to the guest. Credit
cards which are linked to the guest profile can be moved from reservation credit cards to guest
credit cards and vice versa using drag and drop.
APPROVALS - displays the credit cards with an approval amount and code where the approval
amount has not been absorbed. Selecting the history option will display all credit cards
including those for which the approval amount has already been absorbed.
If the parameter AUTOMATIC LINK TO GUEST PROFILE is active then the credit card will be
automatically linked to the guest profile when entered or swiped on the reservation.
Reservations
73
How to add a credit card to a reservation or a guest profile
1. From the Reservation Navigator select the required reservation.
2. Click EDIT to display the reservation edit screen and then select the CREDIT CARD
tab.
The credit card screen is displayed split into three sections:
Reservation credit cards
Guest credit cards
Approvals
3. To add a credit card to a reservation click the ADD button in the section marked
Reservation credit cards.
or
To add a credit card to a gust profile click the ADD button in the section marked
Guest credit cards.
The Credit Card Details dialog box is displayed.
74
Reservations
4. Select the credit CARD TYPE from the drop-down list.
5. Enter the credit CARD NO.
6. Enter the EXPIRY date of the credit card.
7. In the HOLDER'S NAME box enter the name on the credit card.
8. Click OK to close the credit card details dialog box.
The credit card details are listed in the relevant grid.
How to edit a reservation or guest credit card
1. From the Reservation Navigator select the required reservation.
2. Click EDIT to display the reservation edit screen and then select the CREDIT CARD
tab.
3. In either the RESERVATIONS or GUEST CREDIT CARD grids select the credit card to be
edited and click the EDIT button next to the grid.
The Credit Card Details dialog box is displayed.
Reservations
75
4. Make any changes necessary and click OK to save the changes.
The credit card details are updated in the grid.
How to delete a reservation or guest credit card
1. From the Reservation Navigator select the required reservation.
2. Click EDIT to display the reservation edit screen and then select the CREDIT CARD
tab.
3. In either the RESERVATIONS or GUEST CREDIT CARD grids select the credit card to be
deleted and click the DELETE button next to the grid.
A confirmation message is displayed.
4. Click YES, the credit card is deleted.
How to enter a manual credit card approval
1. From the Reservation Navigator select the required reservation.
2. Click EDIT to display the reservation edit screen and then select the CREDIT CARD
tab.
3. In the RESERVATIONS CREDIT CARD grids select the required credit card and click the
APPROVAL button.
The Manual Authorization dialog box is displayed.
76
Reservations
4. As credit cards can be linked to a window on the billing screen you need to select
the WINDOW to which this credit card approval is to be applied.
5. Enter the total amount to be approved in the TOTAL AMOUNT
TO BE APPROVED
box.
6. In the NEW APPROVAL CODE box enter the approval code supplied by the credit card
company.
7. The APPROVAL TIME and date are automatically completed with the current date and
time, but can be adjusted if required.
8. Click OK to save the approval amount.
The approval details are displayed in the Approvals grid.
Options available for reservation credit cards
ADD - to add a new credit card to the reservation; if an EFT Interface is installed the credit card
can be swiped at this point.
EDIT - to edit the credit card details.
APPROVAL - this option is only accessible if you are not working with a credit card interface.
The approval amount and approval code which are provided by the credit card company can
be entered manually. With a credit card interface the approval amounts are completed
automatically according to the approval amount calculations defined by the property.
GUEST LINK - to link the credit card to the guest profile of the reservation - an X is displayed in
the linked to guest column indicating that the credit card is linked to the guest profile. If the
card is deleted from the reservation it will also be deleted from the guest profile.
WINDOWS - to link a credit card to a billing window. The window numbers the credit card is
linked to are indicated in the Windows column. A credit card must be linked to a window to
perform a credit card settlement from the cashier menu.
DELETE - to remove the credit card from the reservation.
GUARANTEE - to indicate which card should be used to guarantee the reservation - an X is
displayed in the guarantee column. This only indicates which credit card should be used and
does not actually guarantee the reservation.
Options available for guest credit cards
ADD - to add a new credit card to the guest profile.
EDIT - to edit the credit card details.
DELETE - to remove the credit card from the guest profile.
TO RES. - to move the credit card from the guest profile to the reservation.
Options available for approvals
HISTORY - select this check box to display all credit cards for which an approval has been
received, including those for which the approval amount has already been absorbed.
ALL CARDS - select this check box to display all credit cards including both open approvals and
settlements.
APPROVALS - displays credit cards for which the approval amount has not been absorbed.
SETTLEMENTS - displays only credit cards with an approval and for which a settlement has been
received.
Reservation credit cards display
Column Heading
Displays this information
Type
The type of the credit card.
Number
The credit card number.
Reservations
77
Holder name
The name of the credit card owner.
Expiry date
The expiration date of the credit card.
Guarantee
An x indicates that this card should be used to
guarantee the reservation.
Note: This does not guarantee the reservation.
Approval
Linked to guest
An x indicates that this credit card is linked to a guest
profile.
If the parameter AUTOMATIC LINK TO GUEST PROFILE is
active then the credit card will be automatically linked
to the guest profile when entered or swiped on the
reservation.
Windows
The windows to which this credit card is attached.
Guest credit cards display
Column Heading
Displays this information
Type
The type of the credit card.
Number
The credit card number.
Holder Name
The name of the credit card owner.
Expiry date
The expiration date of the credit card.
Approvals display
Column Heading
Displays this information
Card
The number of the credit card.
Code
The approval code supplied by the credit card
company.
Amount
The approved amount.
Time
The date and time stamp when the approval was
received.
Transid
If a credit card interface is installed the transaction ID
is displayed.
Window
The window to which this approval is applied.
Valid Until
The date the approval is valid until.
Settlement
If a credit card interface is installed settlements
submitted to the credit card company are displayed.
Note: If an approval amount has been requested and received, it is not
possible to delete either the credit card or the approval amount.
However, if the wrong credit card was attached to a reservation and
approval received, it is possible to clear the link to the billing window
via the option WINDOWS on the Reservation credit card grid. This will
remove the approval amount from the display of the approval amount
section.
78
Reservations
Note: If a credit card interface is installed the system records if the
card was read by a card reader or entered manually. The information
is written to the field YRCL_SWIPED in the table YRCL - a 1 indicates
that the card was swiped and a 0 that it was entered manually. This
information is not displayed on the screen but can be used on reports
and folios. Some countries are required to display this information on
the folio.
A credit card entered or swiped on the reservation will be automatically attached
to the profile if the parameter AUTOMATIC LINK CREDIT CARDS TO PROFILES is active
under Setup → Configuration → Global Settings → Reservation → Reservation 1
tab.
The relevant actions are displayed in the user log if the options NEW CREDIT CARD,
VIEW CLEAR CREDIT CARD NUMBER and CREDIT CARD DELETE are selected in Setup →
Configuration → Users → User Log → Credit Card.
Fixed Charges
This option may be used to enter fixed charges on a reservation and is accessible via the OPTIONS
menu of the Edit Reservation screen and via the FIXED CHARGES tab on the Edit Reservation screen.
Fixed charges are used to post daily charges other than room tax or packages, for example a pet,
parking or extra bed. Fixed charges are posted automatically during night audit or via the option
POST DAILY CHARGES on the Cashier Options menu.
If a fixed charge applies only for certain days of the guest's stay then the fixed charge may be
applied on a by day basis. For example, the guest hires a car for part of his stay and needs to rent a
parking space only for the days he has the hire car.
If a fixed charge has been applied to a reservation it will be indicated at the bottom of the edit
reservation screen by the indicator
.
How to add a fixed charge
1. From the Reservation Navigator select the reservation to which a fixed charge is to
be added.
2. Click EDIT to display the reservation edit screen and then select FIXED CHARGES from
the OPTIONS menu.
The Edit Reservation screen is displayed defaulted to the FIXED CHARGES tab.
Reservations
79
3. Click the ADD button to display the Fixed Charges dialog box.
4. Select the required DEPARTMENT CODE from the drop-down list.
5. Enter the QUANTITY.
6. Enter the AMOUNT to charge.
7. Select the required CURRENCY from the drop-down list if the fixed charge should be
posted in a currency other than the base currency.
8. Click OK to save the fixed charge.
80
Reservations
How to add a fixed charge by day
1. From the Reservation Navigator select the reservation to which a fixed charge is to
be added.
2. Click EDIT to display the reservation edit screen and then select FIXED CHARGES from
the OPTIONS menu.
The Edit Reservation screen is displayed defaulted to the FIXED CHARGES tab.
3. Click the
button at the bottom of the screen.
4. The day's selection options are displayed.
To attach the fixed charge during the whole stay of the guest select ALL DAYS from the
drop-down list.
To attach the fixed charge after a specific day/date during the reservation until the end of
the stay select DAYS AFTER from the drop-down list. For example, selecting day 3 will
attach the fixed charge from day 3 and onwards.
To attach a fixed charge for one day select the required day during the stay and select ONE
DAY from the drop-down list.
5. Click the ADD button to display the Fixed Charges dialog box.
6. Select the required DEPARTMENT CODE from the drop-down list.
7. Enter the QUANTITY and the AMOUNT to charge.
8. Select the required CURRENCY from the drop-down list if the fixed charge should be
posted in a currency other than the base currency.
9. Click OK to save the fixed charge.
How to view on which days the fixed charge is applicable
1. From the Reservation Navigator select the required reservation.
2. Click EDIT to display the reservation edit screen and then select FIXED CHARGES from
the OPTIONS menu.
Any existing fixed charges are listed.
3. An x in the CHANGE column indicates that the fixed charge is applied on a by day
basis.
4. To see which days the fixed charge is applied click the DAYS > button at the
bottom of the screen.
The day's selection options are displayed.
5. Click the arrows to scroll through the days of the reservation. The upper display
changes depending on whether the fixed charge is applicable for the selected day.
A blank
check box and zero AMOUNT and QUANTITY indicates that the fixed
charge does not apply to this day.
Reservations
81
A check box with a tick mark
and an AMOUNT and QUANTITY completed indicates
that the fixed charge is applicable for this day.
6. Click OK to close the fixed charges screen.
Fixed charges display
Field Heading
Gives this information
Department
The name of the department code.
Change
Indicates that the fixed charge should not be posted on all
days of the reservation. To view the days the fixed charge is
valid for press the DAYS button
Quantity
Indicates how many times the fixed charge should be posted
daily
Amount
Displays the amount of the fixed charge
Currency
Select the currency for the fixed charge posting from list box
Notes
This option may be used to enter guest or reservation notes and is accessible via the OPTIONS menu
of the Reservation Navigator and via the NOTES tab on the Edit Reservation screen.
You can add reservation notes which are specific to a single reservation or guest notes which are
stored on the profile and can be viewed with each new reservation made with that profile. Notes
are divided into user-definable categories and can be included on correspondence if marked as
viewable by the guest. Notes which are marked as guest viewable are highlighted in red. An
unlimited number of guest or reservations notes can be added. Reservation notes are indicated on
the edit reservation screen by the indicator
.
Adding a new note via the reservation
1. From the Reservation Navigator select the required reservation.
2. Click EDIT to display the reservation edit screen and then select NOTES from the
OPTIONS menu.
3. Click the NOTES tab to display the notes screen.
Any existing notes are listed in the upper part of the Notes dialog box.
82
Reservations
4. Click the NEW button, a pop-up menu is displayed.
5. Select to add the note to the reservation or to one of the attached profiles, the
Add Note dialog is displayed.
Reservations
83
6. The DATE/TIME and USER are automatically completed.
7. Select a NOTE CATEGORY from the drop-down list.
8. Select the option GUEST VIEWABLE if the guest is allowed to view the note.
Depending on the definition and setup of any customer correspondence, this
option is used to control which notes should appear on contracts, offers or letters.
Leave it empty if you do not want the guest to be aware of this note.
9. In the NOTE box enter the text for the note.
10. The day, date, time and name of the logged in user can be added to the text of
the note by pressing F7.
11. Click OK to save the note.
12. Click OK to close the Edit Reservation screen.
84
Reservations
Adding a new note via the options button
1. From the Reservation Navigator select the required reservation.
2. Select NOTES from the OPTIONS menu.
Any existing notes are listed in the upper part of the Notes dialog box.
3. Click the NEW button, a pop-up menu is displayed.
4. Select to add the note to the reservation or to one of the attached profiles, the
Add Note dialog box is displayed.
5. The DATE/TIME and USER are automatically completed.
6. Select a NOTE CATEGORY from the drop-down list.
7. Select the option GUEST VIEWABLE if the guest is allowed to view the note.
Depending on the definition and setup of any customer correspondence, this
option is used to control which notes should appear on contracts, offers or letters.
Leave it empty if you do not want the guest to be aware of this note.
8. In the NOTE box enter the text for the note.
9. The day, date, time and name of the logged in user can be added to the text of
the note by pressing F7.
Reservations
85
10. Click OK to save the note.
How to edit a note
1. Click the NOTES button to display the notes dialog box.
2. All the existing notes are listed in the upper part of the dialog box. The text of
each note is listed in the lower part of the dialog box. Click on the DETAILS button
to view details such as the category, when the note was entered and the time it
was entered.
3. Select the note to be edited and click the EDIT button to display the Edit Note
dialog box.
4. Make any changes required and click OK to save the note.
How to delete a note
1. Click the NOTES button to display the notes dialog.
2. All the existing notes are listed in the upper part of the dialog box. The text of
each note is listed in the lower part of the dialog box. Click on the DETAILS button
to view details such as the category, when the note was entered and the time it
was entered.
3. Select the note to be deleted.
4. Click the DELETE button, a confirmation message is displayed.
5. Click YES, the note is deleted.
Note Categories are defined via the option NOTES CATEGORIES under Setup →
Configuration → Reservations. Note Categories can be defined to be restricted and
then only users with the appropriate user rights can view, edit, insert or delete a
restricted note. Note categories can also be defined to pop-up when editing the
reservation.
Restricted notes functionality is controlled by the rights under the user right
RESTRICTED NOTES under Setup → Configuration → Users → User Definition → Rights
→ Miscellaneous.
86
Reservations
Text Templates
Text templates may be created and used where the same text is required very often or where the
same basic text can be used and minor adjustments made.
Text templates can be created in one of two ways:
Via the NOTES dialog box.
Via the option TEXT TEMPLATES under Setup → Configuration → Miscellaneous.
How to add a template
1. Open any NOTES screen.
2. Click NEW to open the Add Note dialog box.
3. Enter the text required for the template.
4. Press ALT + E to export the text, the Text Template dialog is displayed.
5. Allocate a FILE NAME for the template.
6. Click OK to save the template.
7. The Add Note dialog is re-displayed; click OK to save the text as a note or CANCEL
to exit from the Add Note dialog screen.
8. Click CLOSE to close the Notes dialog box.
How to import a template
1. Open the NOTES screen.
2. Click NEW to open the Add Note dialog screen.
Reservations
87
3. Place the cursor in the note box and press ALT + I to import a text template.
4. The Text Template dialog is displayed listing all available templates.
88
To search for a template, enter a template NAME, click SEARCH.
To edit an existing template, click the EDIT button.
To create a new template, click the NEW Button.
Reservations
5. Double-click the required template or highlight the required template from the list
and click OK.
6. The Add Note dialog box is displayed with the template in the NOTE box.
7. Make any adjustments necessary and click OK to save the note.
8. Click CLOSE to close the Notes dialog.
Note: Text template can also be imported in to the body part of the
print screen when sending emails.
Note categories are defined via the option NOTES CATEGORIES under Setup →
Configuration → CRM.
Text templates may also be defined via the option TEXT TEMPLATES under Setup →
Configuration → Miscellaneous.
Meal Plan
This option may be used to view or change the number of breakfasts, lunches and dinners
scheduled per day and is accessible via the OPTIONS menu of the Edit Reservation screen and via
the MEAL PLAN tab on the Edit Reservation screen. This option is parameter controlled.
The meal plan values are automatically completed based on rate code board type and the meal
plan default settings for the first day and the departure day. Possible board types are No Board,
Breakfast, Half Board Dinner, Half Board Lunch, Full Board and All Inclusive.
The meal plan values can be adjusted manually if required.
The following views may be used in reports to differentiate adults and children per child category:
V8_REP_MealplanPERXCACREGRP
V8_REP_MEALPLANPERXCAC
How to view or change the meal plan
1. From the Reservation Navigator select the required reservation.
2. Click EDIT to display the reservation edit screen and then select MEAL PLAN from the
OPTIONS menu.
The Edit Reservation screen is displayed defaulted to the MEAL PLAN tab.
Reservations
89
3. The BREAKFAST, LUNCH and DINNER columns are completed on a per day basis. The
example below shows a guest staying on a full board basis; this means the guest
is entitled to breakfast, lunch and dinner every day with the exception of the
arrival day where there is dinner but no breakfast or lunch and on the departure
day where there is breakfast and lunch but no dinner.
4. The default values can be changed by entering the new value directly in the grid or
by highlighting the days and meals to be changed, entering the value on the Set
Value number box and clicking the SET VALUE button.
Meal Plan values which have been adjusted manually are highlighted in grey.
5. To reset the meal plan values highlight the dates and meal to be reset and click
the RATE VALUE button; the values are reset to the rate code values.
6. Click OK to close the Meal Plan tab.
90
Reservations
Meal plan functionality is controlled by the parameter MEAL PLAN FUNCTIONALITY
under Setup → Configuration → Global Settings → Reservation 1 tab → Meal Plan
defaults.
The meal plan tab is displayed by default if the parameter SHOW MEAL PLAN TAB BY
DEFAULT is active under Setup → Configuration → Global Settings → Reservation 1
tab → Meal Plan defaults.
Meal plan manual adjustments are controlled by the user right MEALPLAN MANUAL
ADJUSTMENTS under Setup → Configuration → Users → User Definition → Rights →
Reservation.
Meal plan changes are displayed in the user log if the option RESERVATION MANUAL
MEALPLAN is selected in Setup → Configuration → Users → User Log → Reservation.
The default settings for breakfast, lunch and dinner are defined via the options
FIRST DAY, DEPARTURE DAY and DAY USE RESERVATIONS under Setup → Configuration →
Global Settings → Reservation 1 tab → Meal Plan defaults.
Amenity
This option may be used to attached amenities to a reservation and is accessible via the OPTIONS
menu of the both the Reservation Navigator and the Edit Reservation screen. This option is
parameter controlled.
Amenities are gifts or services a property provides to their guests, such as a change of linen and
towels, a bath robe, a fruit basket or chocolates. Amenities can be attached to a reservation and
each amenity can be linked to a frequency, similar to package frequencies. For example every
second day the linen is changed or each day the fruit basket is freshened up.
Amenities are automatically attached to a reservation if the rate code, room type, room number,
market or source code has been assigned an amenity cycle.
How default amenities are defined
An amenity is defined and is assigned a responsible department.
Amenities are then assigned to an amenity cycle, for example a standard cycle might have the
linen changed every second day and the towels every day.
Amenity cycles can then be assigned to rate codes, room types and room numbers.
How to add/view amenities
1. From the Reservation Navigator select the reservation to which amenities are to be
attached.
2. Select AMENITY from the OPTIONS menu.
or
Click EDIT to display the reservation edit screen and then select AMENITY from the
OPTIONS menu or select the AMENITY tab.
The Amenity grid is displayed. If amenities were assigned to the rate code, room
type or room selected for this reservation then the appropriate amenities will
already be listed. In the example below the flowers are changed every third day,
the linen every second day and the towels are changed on a daily basis.
Reservations
91
3. Click ADD to display the Amenity select dialog box.
4. Select the amenity required and click OK.
5. The amenity is added to the grid, select the day or days the amenity is valid for
and click LINK.
6. To select one of the pre-defined frequencies click the FREQUENCY button.
7. Select the frequency required; the appropriate options are selected under DAYS,
WEEKDAYS, SPECIAL DAYS, STARTING ON FIRST DAY OF, however the frequency can be
adjusted manually if required.
92
Reservations
8. Click the SELECT button to select the frequency and close the Frequency screen.
9. Click OK to close the Amenity Grid.
How to unlink an amenity
1. From the Reservation Navigator select the reservation from which amenities are to
be removed.
2. Select AMENITY from the OPTIONS menu.
or
Click EDIT to display the reservation edit screen and then select AMENITY from the
OPTIONS menu or select the AMENITY tab.
The Amenity grid is displayed.
3. Select the day or days the amenity is to be removed and click UNLINK.
4. Click OK to close the Amenity Grid.
This option is controlled by the parameter AMENITY FUNCTIONALITY under Setup →
Configuration → Global Settings → Reservation → Reservation 2 tab.
The display of the Amenity tab on the guest reservation is controlled by the
parameter AMENITY TAB under Setup → Configuration → Global Settings →
Reservation → Reservation 2 tab.
Amenities, cycles and cycle links are defined via the option AMENITY CONFIGURATION
under Setup → Configuration → Reservations.
Walk In Reservation
This option may be used to check-in a guest who arrives without a reservation and is accessible via
the Reservation Navigator. The walk-in option allows you to create or select a guest profile, enter
the reservation details, assign a room number and check-in the reservation all in one step.
Reservations
93
How to check-in a walk in guest
1. From the Reservation Navigator click the WALK IN button.
The Profile Search screen is displayed.
2. Locate the required profile or create a new profile and click SELECT.
The Edit Reservation screen is displayed.
3. Complete the reservation details, including assigning a room number and click OK.
A message is displayed indicating that the check-in was successful.
4. Click OK to close the check-in successful message.
Depending on the interfaces installed additional messages may be displayed.
Note: A walk in reservation is indicated on the House Status under
WALK INS and on the Manager Report.
Checking in a reservation
This option may be used to check-in a guest who has a reservation and is accessible via the
Reservation Navigator.
How to check-in a reservation
1. From the Reservation Navigator select the reservation to be checked-in.
2. Click the CHECK IN button.
A message is displayed indicating that the check-in was successful.
3. Click OK to close the check-in successful message.
Depending on the interfaces installed additional messages may be displayed.
For example, if an interface for key cards is installed, the Make Key dialog box is
displayed.
94
Reservations
4. Click the MAKE KEY button to print a key card.
The check in successful message is controlled by the parameter DISPLAY MESSAGE
WHEN CHECK IN WAS SUCCESSFUL under Miscellaneous → User Settings → Reservation.
Prompting for a credit card at check-in is controlled by the parameter ASK FOR
CREDIT CARD AT CHECK-IN under Setup → Configuration → Global Settings →
Reservation → Reservation 1 tab.
Daily charges can be posted automatically after check-in by selecting the
parameter POST DAILY CHARGES AFTER CHECK-IN under Setup → Configuration → Global
Settings → Reservation → Reservation 3 tab. The charges are posted using the
night audit cashier ID and there is no user notification that the daily charges have
been posted.
The cashier login and then the guest folio for the checked-in guest can be
displayed right after check in by selecting the parameter SHOW BILLING AFTER CHECKIN under Setup → Configuration → Global Settings → Reservation → Reservation 3
tab. If sharers were checked-in then the guest folio is displayed for all sharing
guests.
Cancelling a reservation
This option may be used to cancel a reservation and is accessible via the Reservation Navigator.
Depending on the configuration a cancellation fee can be posted at the same time the reservation is
cancelled. A cancelled reservation is indicated on the edit reservation screen by the indicator
.
In order to use the cancellation fee functionality a policy rule, a policy type and a financial account
group must be defined for cancelled reservations. The amount to be charged for a cancellation can
be defined in the configuration to be a fixed amount or as a percentage of the room rate for a
maximum number of days, for example, 80% of the room rate for up to a maximum of 3 days.
How to cancel a reservation
1. From the Reservation Navigator select the reservation to be cancelled.
2. Click the CANCEL RES. button.
The Cancel Reservation dialog box is displayed.
Reservations
95
2. Select the REASON the reservation is being cancelled from the drop-down list.
3. In the DESCRIPTION box, additional details can be added if required.
4. Click YES to cancel the reservation.
A message is displayed confirming that the reservation is cancelled and the
cancellation number.
5. Click OK to close the cancellation confirmation message.
The reservation is now listed in the reservation navigator with the Res. Status
CANCELLED.
How to cancel a reservation and post a cancellation fee
1. From the Reservation Navigator select the reservation to be cancelled.
2. Click the CANCEL RES. button.
The Cancel Reservation dialog box is displayed.
3. Select the REASON the reservation is being cancelled from the drop-down list.
4. In the DESCRIPTION box, additional details can be added if required.
5. Click YES to cancel the reservation.
A message is displayed asking if the configured cancellation fee should be posted.
96
Reservations
6. Click YES to post the cancellation fee, a message is displayed with the new
financial account number. At this point a financial account has been created,
checked-in and the cancellation fee posted.
7. Click OK to close the new financial account information.
A message is displayed confirming that the reservation is cancelled and the
cancellation number.
8. Click OK to close the cancellation confirmation message.
The reservation is now listed in the reservation navigator with the Res. Status
CANCELLED.
The guest folio can now be checked out via billing in the normal manner.
To allow the transfer of charges posted to reservations with the status not
checked-in (pre arrival) to a financial account if the reservation status turns to no
show or cancelled activate the option ENABLE ENHANCED PRE-ARRIVAL POSTING HANDLING
under Setup → Configuration → Global Settings → Billing → Billing 2 tab.
The policy rule for cancellations is defined via the option CANCELLATION under Setup
→ Configuration → Global Settings → Policies tab. This rule defines the type of
action, the department code, the posting text and the financial account group.
Policy types such as 'Standard Policy' or 'Policy for a Company with Contract' are
defined via the option POLICIES under Setup → Configuration → Reservations. This
option is used to configure the rules to calculate the cancellation fee to be
charged, for example 80% of the room rate for up to a maximum of 3 days.
Reservations
97
This functionality requires that a financial account group is defined via the option
FINANCIAL ACCOUNT GROUPS under Setup → Configuration → Cashiering. The type of
financial account group must be DEPOSIT, CANCELLATION AND NO SHOW and
Autonumber must be selected.
Special Functionality
Days Functionality
The days functionality may be used to add an item to a reservation on a by day basis and is
accessible via the following tabs on the edit reservation screen:
Inventory
Profiles
Attributes
Fixed Charges
It is possible to attach an item for the entire stay, for a single day during the stay or after a specific
day/date during the reservation until the end of the stay, for example, selecting day 3 will attach
the item from day 3 and onwards.
For example, if a guest hires a car for part of his stay and needs to rent a parking space only for the
days he has the hire car, then the charge for the parking space could be applied via a fixed charge
for the days he has the car.
To see the changes during the stay of the guest, select the appropriate tab and click on the DAYS
button and then use the arrow buttons to scroll through the days of the reservation.
Certain items are displayed in red when attached to the reservation on a by day basis, for example
a profile or a fixed charge which affects the rate amount.
How to add an item by day
1. From the Reservation Navigator select the reservation to which an item is to be
added.
2. Click EDIT to display the reservation edit screen and then select the appropriate
tab - INVENTORY, PROFILES, ATTRIBUTES or FIXED CHARGES.
The Edit Reservation screen is displayed defaulted to the appropriate tab.
3. Click the
button.
4. The days selection options are displayed.
98
Reservations
To attach an item for the whole stay of the guest select ALL DAYS.
To attach an item after a specific day/date during the reservation until the end of the stay
select DAYS AFTER. For example, selecting day 3 will attach the fixed charge from day 3
and onwards.
To attach an item for one day select the required day during the stay and select ONE DAY.
5. Continue to add the item in the normal manner.
Note: Package Frequencies can be added on a by day basis via the
package grid and billing instructions via the OPTIONS menu of the
both the Reservation Navigator and the Edit Reservation screen.
Guest Profiles
The multiple guest profiles functionality may be used to link multiple guest profiles to a single
reservation and is accessible via the option GUEST PROFILES on the OPTIONS menu of the Edit
Reservation screen and via the PROFILES tab on the Edit Reservation screen.
This option is parameter controlled and if activated each reservation with more than one adult
and/or more than one room will be considered as multi-guest reservation.
The Guest Profiles option enables you to register each guest in the room, even if there is only one
actual reservation for that room. The option opens the Edit Reservation screen defaulted to the
PROFILES tab, which is split into two sections.
The upper section shows the company, travel agent, source and booker profiles linked to the
reservation profile. See: Linking Profiles to a Reservation
The lower section shows the profiles which are attached to this reservation; the primary profile
is marked with an x.
If a reservation has multiple guest profiles attached it will be indicated at the bottom of the edit
reservation screen by the
indicator.
With the MULTIPLE GUEST PROFILE FUNCTIONALITY activated a new search field is available on the
reservation navigator. Selecting the check box MULTI GUEST will include in the search results, guest
profiles which are attached to reservations via the Guest Profiles option.
Note: With multiple guest profiles linked to a single reservation, the
reservation and therefore the guest folio is in the name of the primary
profile. If each guest requires a folio in his own name then share
reservations should be used.
How to attach an additional profile to a reservation
1. From the Reservation Navigator select the required reservation.
2. Click EDIT to display the reservation edit screen and then select GUEST PROFILES
from the OPTIONS menu.
The Edit Reservation screen is displayed defaulted to the PROFILES tab, which is
split into two sections.
The upper section shows the company, travel agent, source and booker profiles linked to
the reservation profile.
The lower section shows the profiles which are attached to this reservation; the primary
profile is marked with an x.
Reservations
99
3. Click the ADD button to display the profile search screen.
If the LINKED PROFILES ONLY check box is selected by default, then only profiles
which are linked to the reservation profile are displayed.
4. If the required profile is not displayed, clear the LINKED PROFILES ONLY check box
and search again.
5. Locate the required profile and click SELECT.
6. The additional profile is now attached to the reservation and is listed in the lower
grid on the PROFILES tab.
The primary profile is marked with an x.
How to remove a profile from a reservation
1. From the Reservation Navigator select the required reservation.
2. Click EDIT to display the reservation edit screen and then select GUEST PROFILES
from the OPTIONS menu.
The Edit Reservation screen is displayed defaulted to the PROFILES tab.
3. In the lower grid, select the profile to be removed from the reservation and click
REMOVE.
A confirmation message is displayed.
100
Reservations
4. Click YES to remove the profile.
5. Click OK to close the reservation.
How to change the primary profile on a reservation
1. From the Reservation Navigator select the required reservation.
2. Click EDIT to display the reservation edit screen and then select GUEST PROFILES
from the OPTIONS menu.
The Edit Reservation screen is displayed defaulted to the PROFILES tab.
The lower section shows the profiles which are attached to this reservation; the
primary profile is marked with an x.
3. Select the profile which is to become the main profile of this reservation and click
the PRIMARY button.
A confirmation message is displayed.
4. Click YES to mark the selected profile as the main customer of the reservation.
The selected profile is now marked with an x.
How to replace a profile on a reservation
1. From the Reservation Navigator select the required reservation.
2. Click EDIT to display the reservation edit screen and then select GUEST PROFILES
from the OPTIONS menu.
The Edit Reservation screen is displayed defaulted to the PROFILES tab.
Reservations
101
3. In the lower grid, select the profile to be replaced on the reservation.
4. Click the REPLACE button to display the profile search screen.
If the LINKED PROFILES ONLY checkbox is selected by default, then only profiles which
are linked to the reservation profile are displayed.
5. If the required profile is not displayed, clear the LINKED PROFILES ONLY checkbox and
search again.
6. Locate the required profile and click SELECT.
7. The selected profile is now attached to the reservation, replacing the previously
attached profile and is listed in the lower grid on the PROFILES tab.
How to view guest related profiles
1. From the Reservation Navigator select the required reservation.
2. Click EDIT to display the reservation edit screen and then click the PROFILES tab.
or
Select GUEST PROFILES from the OPTIONS menu.
The Edit Reservation screen is displayed defaulted to the PROFILES screen.
3. In the lower grid, click the GUEST RELATED button to display the Link Profiles screen.
Listed on the left-hand side are the PROFILES NOT
LINKED TO RESERVATION.
These are the profiles which are linked to the primary profile of this reservation but which
are not linked to the current reservation.
Listed on the right-hand side are the PROFILES LINKED TO RESERVATION.
These are all the guest profiles which are attached to this reservation.
4. The profiles can be added or removed from the reservation via the ADD, REMOVE,
ADD ALL and REMOVE ALL buttons.
5. Select the DETAILS checkbox to display html details for a profile linked to the
reservation.
102
Reservations
6. Click OK to close the Link Profiles screen.
How to view profile related profiles
1. From the Reservation Navigator select the required reservation.
2. Click EDIT to display the reservation edit screen and then click the PROFILES tab.
or
Select GUEST PROFILES from the OPTIONS menu.
The Edit Reservation screen is displayed defaulted to the PROFILES screen.
3. In the lower grid, click the PROFILE RELATED button to display the Link Profiles
screen.
Listed on the left-hand side are the PROFILES NOT
LINKED TO RESERVATION.
These are the profiles which are linked to the profile selected in the grid but which are not
linked to the current reservation.
Listed on the right-hand side are the PROFILES LINKED TO RESERVATION.
These are all the guest profiles which are attached to this reservation.
4. The profiles can be added or removed from the reservation via the ADD, REMOVE,
ADD ALL and REMOVE ALL buttons.
5. Select the DETAILS checkbox to display html details for a profile linked to the
reservation.
6. Click OK to close the Link Profiles screen.
Options available on the lower section of the guest profile tab
ADD - to attach an additional profile to the reservation.
REMOVE - to remove an attached profile from the reservation.
PRIMARY - to change the primary profile on the reservation.
ATTRIBUTES - to display the attribute options which have been defined for multiple guests.
REPLACE - to replace the selected attached profile with a different profile.
Reservations
103
GUEST RELATED - to view the profiles which are related to the primary guest profile of this
reservation.
PROFILE RELATED - to view the profiles which are related to each of the profiles linked to this
reservation.
EDIT - to edit or view the selected profile.
Multiple guest functionality parameters and warning messages
There are many additional parameters which can be defined for multiple guest
functionality and warning messages will be displayed if the required information is
missing. A full listing and explanation of all the available parameters is available in the
configuration manual. Listed below are some of the available parameters:
Number of adults must match linked guests - a warning message is displayed if the number of
adults on the reservation is not equal to the number of guest profiles attached. However the
number of adults will only be validated if the number of rooms entered on the reservation is 1.
The following parameters are only available if the parameter NUMBER OF ADULTS MUST
MATCH LINKED GUESTS is selected.
WARNING IF GUEST DOCUMENTS ARE NOT ENTERED WHEN SAVING - a warning message is
displayed if any of the guest profiles are missing Date of birth, Place of birth or Nationality.
DENY CHECK IN IF DOCUMENTS ARE NOT ENTERED - check in will be denied if any of the linked
guest profiles are missing Date of birth, Place of birth or Nationality.
MATCH CHILDREN NUMBER - the sum of adults and children will be used when checking the
match for number of persons against number of linked profiles.
The guest profiles option is controlled by the parameter MULTIPLE GUEST PROFILE
FUNCTIONALITY under Setup → Configuration → Global Settings → Reservation →
Reservation2 tab.
A full listing and explanation of all the available parameters for multiple guest
profile functionality is available via the section MULTI GUEST LINK under Setup →
Configuration → Global Settings → Reservation → Reservation 2 tab.
Displaying by default only profiles which are linked to the reservation profile is
controlled by the parameter LINKED PROFILES CHECK ON under Miscellaneous → User
Settings → Search Screens tab. When searching for a profile, only profiles which
are linked to the primary reservation profile are displayed, however if the required
profile is not displayed, the LINKED PROFILES ONLY checkbox can be cleared and the
search performed again.
Attribute categories are defined via the option ATTRIBUTE CATEGORIES under Setup →
Configuration → CRM. For each attribute category added a new category is created
under MARKETING INFO. The elements for each new list box may then be added
under the corresponding MARKETING INFO category under Setup → Configuration →
CRM.
Changes to multi-guest reservation attributes are displayed in the user log if the
option RESERVATION ATTRIBUTE is selected in Setup → Configuration → Users → User
Log → Reservation.
Attribute categories may be defined to be displayed only in specific locations, the
additional list boxes are shown in reservations on the first page, on the multiguest (profiles) tab, the attributes tab or on the special attributes tab. Additionally
an attribute can be defined to be copied from the profile to the reservation and/or
to multi guest indicating that attributes linked to a guest or company profile are
automatically copied to the multi guest page attributes when the attribute is
attached to a profile and this is linked to a reservation on the multi guest page.
104
Reservations
Linking a booker
With this functionality active the user is prompted to link the reservation booker entered via the
BOOKER field to the Company, Agent or Source profile attached to the reservation.
Upon selecting the booker the user is prompted to link the selected booker first to the company
attached, then the travel agent and lastly the source. Once the booker has been linked to the
relevant profile then the user is prompted to assign a role to the booker profile being linked.
This functionality also works in reverse; if a reservation already has a booker and a company,
travel agent or source profile is attached to the reservation then the user is prompted to link the
booker to the profile being attached.
How to link a booker
1. From the Reservation Navigator select the required reservation and click EDIT to
display the reservation edit screen.
2. Click the BOOKER drop-down list to display the profile search screen.
If the company linked to the reservation has individual profiles linked then a
message is displayed "Linked company has individuals. Do you want to select from
them?"
3. Select YES to display the individuals linked to the company, otherwise select NO to
display the profile search screen.
If the LINKED PROFILES ONLY check box is selected by default, then only profiles
which are linked to the reservation profile are displayed.
4. If required, clear the LINKED PROFILES ONLY check box and search again.
5. Create or locate the required profile and click SELECT.
A confirmation message is displayed asking if the booker should be linked to the
company. The user is prompted to link the selected booker first to the company
attached, then the travel agent and lastly the source.
6. Once the booker has been linked to the relevant profile then the user is prompted
to assign a role to the booker profile being linked.
Reservations
105
7. Select the ROLE from the drop-down list and click OK.
8. Click OK to close the reservation.
This functionality is controlled by the parameter LINK BOOKER TO COMPANY, SOURCE OR
TRAVEL AGENT under Setup → Configuration → Global Settings → Reservation →
Reservation 3 tab.
Promotions
Promotions functionality allows the property to define promotional rules that can be attached to a
regular rate in order to give a discount. A promotion can be limited by the dates when the
reservation can be booked and the dates for which the promotion is valid. Two types of promotion
can be defined:
A promotion for booking a reservation for a specific number of days; for example, stay for 5
nights and pay for 4.
A promotion for booking a reservation a specific number of days in advance; for example for a
reservation made 3 days in advance there is a 10% discount on the room rate.
With this feature, properties can launch promotions and reach a higher occupancy, especially
during low seasons.
When entering a new reservation and selecting a rate code which has a promotion attached, the
discount amount is completed and the rate amount automatically adjusted.
The indicator
is displayed at the bottom of the edit reservation screen and if the
promotions field was added to the edit reservation screen then the promotional type is indicated.
If the promotion indicator is displayed in red then this indicates that the discount amount is
different from the discount calculated by the promotion. Placing the cursor over the discount
amount field will display a hint with the discount amount as calculated by the promotion
How to view promotions
1. From the Reservation Navigator select the required reservation.
2. Click EDIT to display the reservation edit screen.
3. Click the PROMOTION indicator at the bottom of the screen.
The Promotion dialog box is displayed; the promotional discounts are displayed per
day per promotional rule in both base and foreign currency.
106
Reservations
4. Click CLOSE to close the Promotions dialog box.
5. Click OK to close the Edit Reservation screen.
Note: The total promotional discount per day can be viewed by
selecting the GRID tab.
In order to use promotional functionality
The parameter CALCULATE RATE PROMOTIONS must be activated and the posting rules
configured for the discount amount.
Promotion rules must be set up to either offer a reduction for a long stay or for booking the
reservation a specific number of days in advance.
The promotional rules are then linked to a promotion date range - the dates when reservations
can be booked and the dates for which the promotion is valid.
The promotion is then linked to a rate code by editing the rate code and attaching the
promotion on the rate detail level.
The Edit Reservation screen can be customised to include linked promotion details using Form
Customization.
Linked promotions can be displayed on the edit reservation screen (fResEdit) by selecting the
label TFIDRESPROMOTIONLABEL from the FIDRESLABEL tab on the Component Palette.
Calculating promotions based on the booking date
In order to calculate promotions based on booking date we need to know the actual date (sale date)
the reservation was made and not just the date it was entered into the system. This may be
required for agents who don't send their reservations to the hotel one by one, but combine them
and send the hotel a list of reservations with their reservation made dates. When entering the
reservation the sale date can be manually set to the date the reservation was made with the agent
and used to calculate promotions.
In order to use sale date functionality
The booking date must be added to the edit reservation screen - by default this field is filled
with the Fidelio Suite8 date when entering a new reservation.
Reservations
107
The user right CHANGE SALE DATE must be activated in order to enable the booking date field.
Users can then set the date to the date the reservation was made with the agent instead of the
date the reservation was entered into Fidelio.
The Edit Reservation screen can be customised to display the booking date using Form
Customization.
The BOOKING DATE can be displayed on the edit reservation screen (fResEdit) by selecting the
field TFIDRESSALEDATEEDIT from the FIDRESEDIT tab on the Component Palette.
Rate promotions functionality is controlled by the parameter CALCULATE RATE
PROMOTIONS under Setup → Configuration → Global Settings → Reservation →
Reservation 2 tab.
The sale date field is enabled by activating the user right CHANGE SALE DATE under
Setup → Configuration → Users → User Definition → Rights → Reservation.
Superblocking
Superblock functionality enables authorized users to block a room for a guest, while unauthorized
users will not be able to change that room or make a room move. The Edit Reservation screen has
to be customised in order to use the check box for locking rooms. Using the customised edit
reservation screen you can select the SUPERBLOCK check box to superblock a reservation.
A superblock means that the room number assigned to the reservation is locked and can only be
changed by a user with the appropriate user rights. This feature enables supervisors to gain more
control over room assignments where a specific room type and number is essential.
If a user tries to change a superblocked room number then a warning messages is displayed
informing the user that the room is locked for this guest and do they want to continue. With the
appropriate use rights, selecting YES will change the room to the newly selected room number.
In order to superblock a room from the edit reservation screen the field
TFIDRESLOCKROOMCHECKBOX must be added to the reservation edit screen via Setup
→ Miscellaneous → Form Customization. The field can be selected from the
component palette under the tab FIDRESCHECKBOX.
Superblock functionality is controlled by the user rights LOCK ROOM (SUPERBLOCK),
UNLOCK ROOM (CLEAR SUPERBLOCK) and CHANGE LOCKED ROOMS under Setup →
Configuration → Users → User Definition → Rights → Reservation.
Hints
Hints functionality can be used as a promotional tool; it can promote a special rate or package
targeted to the interests of the guest, it can also prompt the clerk to offer a welcome drink upon
check-in or to offer to book a future reservation upon check-out. Hints are basically short
reminders to offer the guest an additional service and to provide the staff with selling tips or
information about the rate code.
108
Reservations
Hints can be linked to conditions that are evaluated when the user is entering the reservation and
moving from field to field; if the condition is fulfilled at the specified field the hint is displayed. A
hint can also be linked to an action, such as at check-in, check-out or room move.
Hints can be displayed at the following points:
After entering the departure date
After entering the rate code
At Check in
At Check out
On the billing screen open
After payment
When performing Room Move
Hints are defined via the option HINTS under Setup → Configuration → Reservation.
Default Folio Styles
A folio style selection box can be added to the edit reservation screen so that when creating a new
reservation a folio style can be selected. The folio style assigned to the reservation is used as the
default folio style at check-out.
The Edit Reservation screen can be customised to include the folio style selection box using Form
Customization.
The Folio Style selection box can be displayed on the edit reservation screen (fResEdit) by
selecting the field fidresfoliostylecombo from the FidresSelect tab on the Component Palette.
Day Type Rates
Day types functionality may be used to adjust a rate according to the day type. A defined amount
or percentage can be added or deducted from the rate code depending on the type of day. This
functionality is parameter controlled.
For example, a property may increase its regular rate on days when the demand is high, such as a
fair or holiday period, or it may reduce the regular rate on days when the demand is low. This may
mean that for a reservation with the same rate code for the entire stay the price may vary per day
depending on the day type.
The rate on the reservation is adjusted automatically according to the day type calculation,
however the rate will only be marked as a manual rate automatically if the parameter DAY TYPE
RATES TURN TO MANUAL ON SAVE AUTOMATICALLY is active.
On the AVAILABILITY Screen (Ctrl + D) the day type can be added to the Control Panel via the
option CONFIGURABLE FIELDS.
On the RATE QUERY (Ctrl + R) an indicator can be configured for day type rates on the rate query
grid and day types can be viewed and adjusted via the Day Type Calendar option.
In order to use day types functionality:
The parameter CALCULATE DAY TYPE RATES must be activated.
Day types must be defined, for example, high season, low season, holidays, fairs or regular
days.
On the day type calendar day types can be assigned to certain days or periods.
Day type schemas must be defined so that different schema calculations can be defined for
different rate codes for the same day type. For example, rack rate could have a schema with a
'normal' schema calculation defined for day type A and corporate rate could have a schema
with a 'flexible' schema calculation for day type A.
The actual amount which should be added or deducted per day type and day type schema
must be configured; there are three day types/schema configuration possibilities:
Reservations
109
Normal - the amount entered is added or deducted for adults and all child age categories; it
will be multiplied with number of persons in the corresponding category.
Flat - the amount entered is a flat amount to be added or deducted from the rate amount;
this means the amount is independent from number of adults or children.
Flexible - the amount entered is added or deducted for up to 4 adults.
On the More field tab of the rate code the option Include Day Types Calculation must be
marked and the required schema linked.
Day type rate functionality is controlled by the parameter CALCULATE DAY TYPE RATES
under Setup → Configuration → Global Settings → Reservation → Rates tab.
Marking a rate as a manual rate automatically when the rate amount changes due
to the day type configuration is controlled by the parameter DAY TYPE RATES TURN TO
MANUAL ON SAVE AUTOMATICALLY under Setup → Configuration → Global Settings →
Reservation → Rates tab.
The posting of the average calculated day type per rate is controlled by the
parameter AVERAGE DAY TYPE RATE AMOUNT FOR THE STAY under Setup → Configuration
→ Global Settings → Reservation → Rates tab. Defines if the average calculated
day type rate amount is used per day.
The application of the day price on arrival being applied to each day of the stay is
controlled by the parameter APPLY FIRST DAY PRICE TO ALL DAYS IN CASE DAY TYPE IS
ATTACHED under Setup → Configuration → Global Settings → Reservation → Rates
tab.
Editing Multiple Reservations
Multiple reservations can be edited by selecting the required reservations from the Reservation
Navigator and then selecting the option EDIT.
A single reservation is displayed in the edit reservation screen and the remaining reservations are
listed on the right. Selecting a reservation from the list will display the respective reservation in the
edit reservation screen.
The editing of multiple reservations is parameter controlled.
How to edit multiple reservations
1. From the Reservation Navigator select the required reservations.
Multiple reservations can be selected by pressing the CTRL key and then clicking on
each of the required reservations.
2. Click EDIT; the edit reservation screen of one of the selected reservations is
displayed and the remaining reservations are listed on the right.
Selecting a reservation from the list will display the respective reservation in the
edit reservation screen.
3. For each reservation make any necessary changes and click OK to close the
reservation.
Multiple reservation edit functionality is controlled by the parameter USE MULTI RES
EDIT under Setup → Configuration → Global Settings → Reservation →
Reservation3 tab.
Guest Based Posting for Share Reservations
Guest based posting functionality for share reservations is designed for use in properties where
one room can be used by several individual persons.
110
Reservations
The price calculation takes in to consideration the total number of sharing guests as well as
different arrival and departure dates.
The price is calculated by taking the rate for the total number of persons, dividing this by the
number of persons to get the per person rate and then multiplying the per person rate with the
number of persons in each reservation.
The best way to explain how the rate is calculated is with an example:
The RACK rate code is configured as follows:
1 person = 100.00
2 persons = 150.00
3 persons = 200.00
Reservations
111
There are 2 sharing reservations with the rate code RACK.
Reservation A is for 2 persons
Reservation B is for 1 person
Number of Persons
Rate for # of persons
3
200
Reservation A is for 2 persons so 2 x 66.67 = 133.33
Reservation B is for 1 person so 1 x 66.67 = 66.67
Rate per person
66.67
Guest based posting functionality for share reservations is controlled by the
parameter CALCULATE SHARE PRICE TOGETHER under Setup → Configuration → Global
Settings → Reservation → Reservation 3 tab.
Note: Activating the parameter does not recalculate existing share reservations.
112
Reservations
3
Reservation Options
There are many reservation options, some of which are only available via the OPTIONS menu on the
reservation navigator and some of which are only available via the OPTIONS menu of the Edit
Reservation screen, however many of the options are available on both OPTIONS menus.
Some options are parameter controlled and are only displayed if the relevant parameter has been
activated in your property.
Depending on the reservation status some options are not available. For example if you select a
reservation with the status 'checked in', the option REINSTATE will not be available. This option is
only available on reservations with the status 'Cancelled' or 'No Show'.
Additional reservation information, such as Deposit requested, Fixed charges, Notes, Billing
instructions, Locators, Traces, Packages and Share reservations are indicated by an indicator lamp
on the bottom of the screen.
Add On
This option may be used to create a copy of the current reservation and is accessible via the
OPTIONS menu of the both Reservation Navigator and the Edit Reservation screen. This is useful
for a guest who needs another reservation in addition to his current reservation or for a guest who
needs a similar reservation but for a future date. All reservation details are copied with the
exception of the credit card and the guest and reservation notes information.
Depending on the parameter settings the add on option can work in one of two ways:
If the parameter ADD ON RESERVATION PROFILE SELECT FIRST is activate then the profile search
screen is opened when selecting ADD ON from the options menu. This allows for a different
profile to be selected before a duplicate reservation is created.
If the parameter ADD ON RESERVATION PROFILE SELECT FIRST is not active then the reservation
copy is displayed in edit reservation mode and can be changed as required. This is useful if the
guest asks for an identical reservation for a future date or if the guest needs more than one
reservation.
The behaviour of the Add On functionality is controlled by the parameter ADD ON
RESERVATION PROFILE SELECT FIRST under Setup → Configuration → Global Settings →
Reservation → Reservation 1 tab. If active then a different profile can be selected
before a duplicate reservation is created.
Add to Queue
This option is accessible via the OPTIONS menu of the Reservation Navigator and allows
reservations to be put on a check in queue when no room is available at the time of arrival.
If Queue Room Handling is used then an additional tab Q ROOMS is displayed on the default
search criteria on the reservation navigator. All reservations that have been put on the check in
queue are listed here. An additional field TIME ON Q counts the time that the rooms have been in
the check in queue. When performing the check in the room is removed from the queue.
How to add rooms to the queue
1. From the Reservation Navigator select the reservation to be added to the queue.
2. Select ADD TO QUEUE from the OPTIONS menu.
Reservation Options
113
A confirmation message is displayed.
3. Click YES to add the reservation to the queue.
The reservation is now listed under both the Arrival tab listing and the Q Rooms
tab. The time the reservation has been in the check in queue is listed in the
column TIME ON Q.
How to delete rooms from the queue
1. From the Reservation Navigator select the reservation to be removed from the
queue.
2. Select DELETE FROM QUEUE from the OPTIONS menu.
A confirmation message is displayed.
3. Click YES to delete the reservation from the check in queue.
The reservation is removed from the Q Rooms listing and is now listed under the
Arrival tab.
Queue room functionality is controlled by the parameter QUEUE ROOMS HANDLING
under Global Settings → Reservations → Reservation 1 tab.
Advanced Billing Authorization
This option may be used to create enter billing authorization and is accessible via the OPTIONS
menu of the both the Reservation Navigator and the Edit Reservation screen. The Advanced
Billing Authorization option is parameter controlled.
Billing authorization can be entered before the reservation has checked in and details include the
date the authorization was requested and received and the possibility to link a document such as a
fax, letter or email to the authorization.
If advanced billing authorizations are attached to a reservation it will be indicated at the bottom of
the edit reservation screen by the indicator
.
How to enter a new billing authorization
1. From the Reservation Navigator select the reservation to receive billing
authorization.
2. Select ADVANCED BILLING AUTHORIZATION from the OPTIONS menu.
The Advanced Billing Authorization screen is displayed.
114
Reservation Options
3. Click NEW to display the Advanced Billing Authorization dialog box.
4. Select the ADVANCED BILLING AUTHORIZATION GROUP from the drop-down list.
5. The ARRIVAL DATE is completed automatically and is not accessible.
6. Type the date the authorization was requested in the REQUESTED ON box or click the
drop down arrow and select a date from the calendar.
7. The VALID UNTIL date is the date until which the advanced billing authorization is
valid. This is automatically completed with the reservation departure date;
however this may be changed as required.
8. Type the date the authorization was received in the RECEIVED ON box or select a
date from the calendar.
9. Click SAVE to save the authorization.
10. Click CLOSE to close the Advanced Billing Authorization dialog box.
11. Click CLOSE to close the Advanced Billing Authorization screen.
How to edit/view an existing billing authorization
1. From the Reservation Navigator select the required reservation.
2. Select ADVANCED BILLING AUTHORIZATION from the OPTIONS menu.
The Advanced Billing Authorization screen is displayed.
Reservation Options
115
3. Select the billing authorization to be edited and click EDIT to display the Advanced
Billing Authorization dialog box.
4. Make any changes necessary and click SAVE to save the changes.
5. Click CLOSE to close the Advanced Billing Authorization dialog box.
6. Click CLOSE to close the Advanced Billing Authorization screen.
How to attach a document
1. From the Reservation Navigator select the required reservation.
2. Select ADVANCED BILLING AUTHORIZATION from the OPTIONS menu.
The Advanced Billing Authorization screen is displayed.
3. EDIT an existing billing authorization or select NEW to create a new billing
authorization.
The Advanced Billing Authorization dialog box is displayed.
4. Select the ATTACH DOC option.
116
Reservation Options
5. Click ADD, the Attach documents dialog box is displayed.
6. In the DOCUMENT GROUPS list, click the document group you want.
7. In the ALLOWED DIRECTORIES list, click the allowed directory you want.
8. Click BROWSE to display the list of documents.
9. Select the required document and click OPEN, the Document Name field is filled.
Reservation Options
117
10. To attach the document, click ATTACH, the document is shown as linked on the
attached documents screen.
11. Click CLOSE to close the Attached Documents dialog box.
12. Click CLOSE to close the Advanced Billing Authorization dialog box.
13. Click CLOSE to close the Advanced Billing Authorization screen.
How to delete a billing authorization
1. From the Reservation Navigator select the required reservation.
2. Select ADVANCED BILLING AUTHORIZATION from the OPTIONS menu.
The Advanced Billing Authorization screen is displayed.
3. Select the billing authorization to be deleted and click DELETE.
A warning message is displayed
4. Select YES to delete the Advanced Billing Authorization.
5. Click CLOSE to close the Advanced Billing Authorization screen.
Advanced Billing Authorization dialog box
118
Field
Description
Advanced Billing
Authorization Group
Defines the group for the billing authorization, such as
Contract or Accounts Receivables account.
Arrival Date
Displays the arrival date of the reservation.
Reservation Options
Requested On
The date on which the advanced billing authorization
was requested.
Valid until
The date until which the advanced billing authorization
is valid.
Received On
The date on which the advanced billing authorization
was received.
Advanced Billing Authorization functionality is controlled by the parameter SHOW
ADVANCED BILLING AUTHORIZATION MENU under Setup → Configuration → Global
Settings → Reservation → Reservation 1 tab.
An Advanced Billing Authorization Group must first be defined via the option
ACTIVITY & TRACE GROUPS under Setup → Configuration → CRM. The Advanced Billing
Authorization types are then defined via the option ADVANCED BILLING AUTHORIZATION
TYPES under Setup → Configuration → Reservations.
Allowances
This option may be used to view the package usage for packages with an allowance attached and
is accessible via the OPTIONS menu of the both the Reservation Navigator and the Edit Reservation
screen.
Reservation Options
119
How to view package allowances
1. From the Reservation Navigator select the required reservation.
2. Select ALLOWANCES from the OPTIONS menu.
or
Click EDIT to display the reservation edit screen and then select ALLOWANCES from
the OPTIONS menu.
The Allowances screen is displayed split into 3 sections:
The grid displays all the package allowances for today.
The package setup details are displayed in a column on the lower left-hand side of the
screen.
The department codes valid for this package and any postings which have been posted
against the package allowance are displayed on the lower right-hand side of the screen.
3. If a guest check is linked to a posting the guest check details can be viewed by
selecting the posting and clicking the GUEST CHECK button.
4. If the guest is part of a group then the financial account for routing the allowance
can be selected from the ROUTE TO FINANCIAL ACCOUNT box.
When saving the reservation, the APPLY CHANGES TO dialog box is displayed and the
change can be applied to all members of the group.
5. Click CLOSE to close the Allowances screen.
Allowance dialog box
120
Field Heading
Displays this information
Pkg
The code of the package.
Description
The description of the package.
From date
The date from which the package is valid.
Until date
The date until which the package is valid.
From time
Time the allowance is valid from.
Until time
Time the allowance is valid until.
Value
The package price.
Reservation Options
Limit
The amount the guest is allowed to consume.
Remaining
The amount left on the allowance, not yet absorbed by the
package.
Type
The type of the allowance:
NORMAL - the allowance is created according to the package
frequency.
FLOAT - the allowance will be created at the beginning of the
stay and the guest can make use of the element anytime
during the stay.
NEXT DAY - the allowance will be created for the next day,
usually used for defining breakfast elements.
Overage
Department code under which any package overage is
posted. If the amount posted against the allowance is more
than the allowance itself, the overage will be posted on the
guest folio. If no department code is defined, the overage is
posted to the package department code.
Profit
Department code under which any package profit is posted.
Profit is if the allowance was either only partially used or not
used at all by the guest.
Loss
Department code under which package loss is posted. Loss is
if the guest consumed more than the allowance amount.
Pck Type
Defines if the package price is per adult or a flat rate.
Autoincrement
If auto increment is marked as true then the allowance is
absorbed, i.e. it is incremented automatically if the charges
against this package exceed the allowance.
Note: This option is for all inclusive hotels where nothing is
ever charged to the guest.
Closed
Indicates if it is still possible to post against the allowance. It
is not possible to post against a closed allowance, for
example, a breakfast allowance for yesterday is not available
to be used today and will have been marked as closed during
the night audit.
Note: Allowances are updated automatically when packages are
added or removed from the reservation.
Amenity
This option may be used to attached amenities to a reservation and is accessible via the OPTIONS
menu of the both the Reservation Navigator and the Edit Reservation screen. This option is
parameter controlled.
Amenities are gifts or services a property provides to their guests, such as a change of linen and
towels, a bath robe, a fruit basket or chocolates. Amenities can be attached to a reservation and
each amenity can be linked to a frequency, similar to package frequencies. For example every
second day the linen is changed or each day the fruit basket is freshened up.
Amenities are automatically attached to a reservation if the rate code, room type, room number,
market or source code has been assigned an amenity cycle.
How default amenities are defined
An amenity is defined and is assigned a responsible department.
Amenities are then assigned to an amenity cycle, for example a standard cycle might have the
linen changed every second day and the towels every day.
Reservation Options
121
Amenity cycles can then be assigned to rate codes, room types and room numbers.
How to add/view amenities
1. From the Reservation Navigator select the reservation to which amenities are to be
attached.
2. Select AMENITY from the OPTIONS menu.
or
Click EDIT to display the reservation edit screen and then select AMENITY from the
OPTIONS menu or select the AMENITY tab.
The Amenity grid is displayed. If amenities were assigned to the rate code, room
type or room selected for this reservation then the appropriate amenities will
already be listed. In the example below the flowers are changed every third day,
the linen every second day and the towels are changed on a daily basis.
3. Click ADD to display the Amenity select dialog box.
4. Select the amenity required and click OK.
5. The amenity is added to the grid, select the day or days the amenity is valid for
and click LINK.
6. To select one of the pre-defined frequencies click the FREQUENCY button.
122
Reservation Options
7. Select the frequency required; the appropriate options are selected under DAYS,
WEEKDAYS, SPECIAL DAYS, STARTING ON FIRST DAY OF, however the frequency can be
adjusted manually if required.
8. Click the SELECT button to select the frequency and close the Frequency screen.
9. Click OK to close the Amenity Grid.
How to unlink an amenity
1. From the Reservation Navigator select the reservation from which amenities are to
be removed.
2. Select AMENITY from the OPTIONS menu.
or
Click EDIT to display the reservation edit screen and then select AMENITY from the
OPTIONS menu or select the AMENITY tab.
The Amenity grid is displayed.
3. Select the day or days the amenity is to be removed and click UNLINK.
4. Click OK to close the Amenity Grid.
This option is controlled by the parameter AMENITY FUNCTIONALITY under Setup →
Configuration → Global Settings → Reservation → Reservation 2 tab.
The display of the Amenity tab on the guest reservation is controlled by the
parameter AMENITY TAB under Setup → Configuration → Global Settings →
Reservation → Reservation 2 tab.
Amenities, cycles and cycle links are defined via the option AMENITY CONFIGURATION
under Setup → Configuration → Reservations.
Reservation Options
123
Billing
This option may be used to access the guest's folio and is accessible via the OPTIONS menu of the
both the Reservation Navigator and the Edit Reservation screen. This option is only available if the
status of the reservation is EXPECTED, CHECKED IN, DUE OUT or CHECKED OUT. In addition the user
must have a valid cashier number in order to access the guest's folio.
Multiple guest folios can be opened by selecting several reservations on the reservation navigator
and selecting BILLING from the OPTIONS menu. Each folio is opened on a separate tab and the first
folio on the reservation navigator is displayed with the open windows. If any of the select
reservations has a billing message then each message is displayed before the folio for the selected
reservation is opened.
Guest Folio - Expected Arrival
On the billing screen the user can view all folio windows and depending upon user rights access
the following menu options:
Postings - to post charges.
Payments - to enter payments.
Split - to split existing postings.
Transfers - to transfer postings to a different window, room, reservation or financial account.
Reservations to return to reservations.
Options - to access cashier options.
C/O Options - to access check out options.
Checkout - to check out the guest.
Billing Instructions
This option may be used to view and access the billing instructions and is accessible via the
OPTIONS menu of the both the Reservation Navigator and the Edit Reservation screen. Billing
Instructions are also accessible from the BLOCK NAVIGATOR and the BLOCK HEADER.
Billing instructions are used to direct specific charges to be posted automatically to different folios.
You can direct charges the same room but to a different billing window or to another name, room
or financial account. Billing instructions can be limited by date and a payment method can be set
for each instruction.
For example, for a guest on a business trip where the company is paying for the room and
breakfast charges, the billing instructions would be entered so that the room and breakfast charges
124
Reservation Options
are directed automatically to a different folio (window). When the guest checks out, he will only
pay his personal charges and the invoice for room and breakfast will be sent to the company.
Billing instructions and expected or checked in reservations/financial accounts are handled as
follows:
Charges of an expected reservation can be routed to an expected or checked in reservation or
financial account.
Charges of a checked in reservation can not be routed to an expected reservation or financial
account, the message: 'Routing not possible, target is not checked in' will occur.
If billing instructions are attached to a reservation it will be indicated at the bottom of the edit
reservation screen by the indicator
, which can be used to directly display the billing
instructions.
The option MANUAL CARD is available if transponder handling is activated; it is used to manually
enter a card number so that all charges can be automatically routed to the financial account linked
to this card number. If the workstation is equipped with a card reader it is also possible to swipe
the transponder card.
How to enter a new billing instruction
1. From the Reservation Navigator select the required reservation.
2. Select BILLING INSTRUCTIONS from the OPTIONS menu.
or
Click EDIT to display the reservation edit screen and then select BILLING
INSTRUCTIONS from the OPTIONS menu.
or
3. Click the RESERVATIONS menu and select BLOCK RESERVATION.
4. On the block reservation navigator select the required block and click the BILLING
INSTR. button.
The Billing Instructions dialog box is displayed with any existing billing instructions
listed.
5. Click the NEW button to display the New/Edit Billing Instruction dialog box.
Reservation Options
125
6. Select the WINDOW the charges should be routed to.
The default for the new instruction is in sequential order. Window 1 is always
reserved for all postings which are not routed to another window. When entering
billing instructions for the first time, the default window is 2.
7. Enter the FROM DATE and TO DATE the billing instruction is valid for, the default
dates are the arrival and departure dates.
8. Select the DEPARTMENT CODES to be routed from the drop-down list of available
department codes. The * will select all department codes. Use the EXCLUDE button
to exclude department codes and the INCLUDE button to add department codes.
9. Select any or all of the following options:
126
SAME ROOM - If selected, the charge will be routed to the same room, if not selected the
charge can be routed to another room.
BILL VIEW - If you are using a video interface select this option to allow the guest to view
this billing window from his room. Window one is the default window to view.
VIDEO CHECK OUT - If you are using a video interface select this option to allow the guest
to check-out this billing window from his room. Usually the video check out option is only
available for guests paying with a credit card.
Reservation Options
10. Select the NAME for the billing window from the list of linked profiles.
11. In the OTHER NAME option you can select to route the department codes to another
profile.
If either the profile selected via NAME or OTHER NAME has default billing instructions
defined then a message is displayed asking if the default billing instructions should
be added.
12. Click YES to add the default billing instructions.
13. If the option SAME ROOM is not selected then the charges could be routed to an
OTHER ROOM.
14. If the option SAME ROOM is not selected then the charges could be routed to a
financial account (OTHER ACCOUNT). Select from a list of available financial accounts
or create a new Financial Account.
The search criteria allow the user to easily locate the required financial account.
Selecting the option SHOW ON POPUP will display all available financial accounts. This
setting is saved for future use until changed by the user.
15. If the selected account has an accounts receivable number then the AR NUMBER and
credit limit are displayed.
16. If the method of PAYMENT is known, it can be selected from a list of available
payment methods and will be the default for that window at check out.
17. If the method of payment for that window is a CREDIT CARD then the credit card can
be selected.
18. If the selected profile is a company and has a primary CONTACT attached, then this
contact can be selected, however contacts will not be linked automatically.
19. The billing ADDRESS of the name, other name or account is displayed
automatically. If no billing address exists then the primary address is displayed. If
more than one address exits for the profile then the required address can be
selected.
20. The attached profile may be edited by pressing the EDIT PROFILE button.
21. To apply a limit to the billing instruction click the LIMIT tab.
Reservation Options
127
22. Enter the LIMIT for the selected billing instruction code.
23. Click OK to save the billing instructions.
24. Click OK to close the billing instructions screen.
If changes were made to existing billing instructions, the user is prompted with a
confirmation message to apply these changes.
Note: When an amount higher than the limit set for the billing
instruction is posted then a message is displayed that the posting is
split.
How to set a billing instruction limit
1. From the Reservation Navigator select the required reservation and display the
Billing Instructions dialog box.
128
Reservation Options
2. Select the billing instruction to which a limit is to be applied and click the LIMIT tab.
3. Enter the LIMIT for the selected billing instruction.
4. Click OK to save the billing instructions.
5. Click OK to close the billing instructions screen.
Billing Instruction functionality is controlled by the user rights under ROUTING
INSTRUCTIONS under Setup → Configuration → Users → User Definition → Rights.
Reservation Options
129
Billing instructions to another reservation are indicated in the user log if the option
NEW RESERVATION BILLING INSTRUCTION is selected in Setup → Configuration → Users
→ User Log → Billing Instruction.
If the parameter DEFAULT START DATE OF BILLING INSTRUCTIONS TO SYSTEM DATE under
Setup → Configuration → Global Settings → Billing 1 tab is activated then the start
date of the billing instructions will default to the system date. This defines if the
billing instructions are independent of the reservation dates and allows billing
instructions to be applied to posting's made on pre-arrival reservations. If not
activated then the start date of the billing instructions will default to the start date
of the reservation.
Transponder functionality is controlled by the parameter TRANSPONDER HANDLING
under Setup → Configuration → Global Settings → Generic → Generic 2 tab.
Bonus Point Cards
This option may be used to view, link or unlink bonus point cards from a reservation and is
accessible via the OPTIONS menu of the Edit Reservation screen. This option is parameter
controlled.
If a member of the bonus point program makes a reservation, a message is displayed asking if the
bonus point card of the guest should be linked to the reservation.
If the booker of the reservation has a bonus point card then the bonus points can be calculated for
the booker's card even if there is no bonus card linked to the reservation. The bonus card indicator
is displayed on the reservation and the bonus card information for the booker's card is displayed
when double clicking on the indicator.
Note: If the membership card has expired then a message to this effect
is displayed, however the card can still be linked. The guest can be
informed that the card has expired and the expiration date can be
changed manually.
How to add a bonus point card to a reservation
1. From the Reservation Navigator select the required reservation.
2. Click EDIT to display the reservation edit screen and then select BONUS POINT CARD
from the OPTIONS menu.
The Bonus Point Cards screen is displayed.
130
Reservation Options
3. Click the ADD button to display the Bonus Point Cards dialog box.
4. Select the required membership card and click SELECT.
The membership card is listed in the Bonus Point Cards screen.
Reservation Options
131
5. Click CLOSE to close the Bonus Point Cards screen.
The
button at the bottom of the reservation indicates that a bonus
membership card is attached to this reservation.
How to remove a bonus point card from a reservation
1. From the Reservation Navigator select the required reservation.
2. Click EDIT to display the reservation edit screen and then select BONUS POINT CARD
from the OPTIONS menu.
The Bonus Point Cards screen is displayed.
132
Reservation Options
3. Click the REMOVE button.
A message is displayed asking if you want to remove the guest Bonus Point Card
from the reservation.
4. Click YES to remove the card.
5. Click CLOSE to close the Bonus Point Cards screen.
Note: Multiple bonus point cards cannot be linked to a reservation.
Reservation Options
133
Cancellation Information
This option displays information about cancelled reservations and is accessible via the OPTIONS
menu of the Reservation Navigator. The cancellation information displayed includes the
cancellation number, the cancellation reason, the date and time the reservation was cancelled and
the name of the user who cancelled the reservation.
Cancellation information
Cancellation Information
Field
Description
Number
The cancellation number.
Hotel Date
The Suite8 date when the reservation was cancelled.
Time
The computer date and time when the reservation
was cancelled.
User
The last and first name of the user who cancelled the
reservation.
Reason
The reason the reservation was cancelled.
Note: This information is also displayed when editing the cancelled
reservation and pressing the CANCELLED indicator on the bottom of
the screen.
134
Reservation Options
City Ledger Authorization
This option may be used to authorize city ledger check out and is accessible via the OPTIONS menu
of the both the Reservation Navigator and the Edit Reservation screen. This option is parameter
controlled.
A reservation can be authorised for a city ledger check-out in one of two ways:
A reservation made with a profile which has been assigned the Credit Status A (Accounts
Receivable) is automatically authorized for city ledger check-out.
A reservation which is authorized via the CITY LEDGER AUTHORIZATION option is then
authorized for city ledger check-out. Authorization via this option does not require the user to
have the user right CITY LEDGER CHECK-OUT.
How to assign a city ledger check-out authorization
1. From the Reservation Navigator select the reservation to which city ledger checkout authorization is to be assigned.
2. Select CITY LEDGER AUTHORIZATION from the OPTIONS menu.
The City Ledger Authorization dialog box is displayed.
3. The guest's name is completed automatically.
4. Select AUTHORIZE FOR DIRECT BILLING (CITY LEDGER
CHECK-OUT).
5. In the REASON box type the reason for the authorization.
6. Click OK to save the authorization.
How to view a city ledger check-out authorization
1. From the Reservation Navigator select the required reservation.
2. Select CITY LEDGER AUTHORIZATION from the OPTIONS menu.
The City Ledger Authorization dialog box is displayed with the name of the guest,
the name of the user who entered the authorization and the reason for the city
ledger authorization.
Reservation Options
135
3. Click OK to close the City Ledger Authorization dialog box.
City Ledger authorization dialog box
Field
Description
Name
The last and first name of the guest reservation is
displayed.
User
The last and first name of the user who authorized for
direct billing is filled automatically.
Authorize for Direct Billing
(City Ledger Check Out)
Check: Authorized
Blank: Not Authorized
Reason
The reason for authorizing the city ledger check-out.
City ledger authorization functionality is controlled by the parameter ENABLE CITY
LEDGER AUTHORIZATION under Setup → Configuration → Global Settings → Billing →
Billing 2 tab.
City ledger authorization is controlled by the user right ALLOW USER TO AUTHORIZE FOR
DIRECT BILLING (CITY LEDGER CHECK OUT) under Setup → Configuration → Users →
User Definition → Rights → Cashiering.
City ledger check-out is controlled by the user right CITY LEDGER CHECK-OUT under
Setup → Configuration → Users → User Definition → Rights → Cashiering.
Correspondence
The CONFIRMATION LETTER option may be used to send letters, faxes, SMS's or email's to a selected
profile. This option is available on the reservation navigator screen and the edit reservation dialog
screen.
Reservation correspondence can be printed and sent via regular mail or sent via email, as an email
attachment or by fax. SMS's may be used for a regular confirmation, but may also be used to
advise a guest that their room is ready.
With the EASY LETTER option users can quickly and easily create letters with pre-defined text
blocks. A profile and address can be selected and one or more text blocks placed in a desired
sequence to quickly create a letter.
136
Reservation Options
The confirmation letter screen is split into four sections.
The first section is to choose a template from a list of predefined TEMPLATES and to select a
language for the correspondence. The preferred distribution method of the guest profile is also
displayed. Letter and form templates can be created in MISCELLANEOUS → REPORTS with the
section role CONFIRMATION LETTER.
The second section is the PROFILES section and contains information about the profiles linked
to the reservation.
The DETAILS section displays all addresses from all the profiles linked to the reservation. The
primary address of the selected profile and the preferred communication type is selected. If
there are several profiles attached, you can select which profile the confirmation letter, email or
fax should be send to. You also have the option to select another profile, if for some reason you
need to send the confirmation letter to a different address other than the reservation profile or
linked profiles. By pressing the PROFILE SEARCH button the profile search is activated. Profiles
linked to the reservation can be edited by pressing the EDIT PROFILE button.
The fourth section gives information about the HISTORY of sent correspondence for this
reservation. The template name, type of correspondence, print date and the name of the user
who created the confirmation letter are displayed. If a confirmation letter was edited and
saved but not printed then the template name will be displayed with (Saved) after the name
and the date and time it was saved. To edit a confirmation letter from History, select the
template from the History section and press EDIT HISTORY button. Confirmations sent via email
are saved using the email template defined in configuration. Select E-MAIL HISTORY to re-send
or re-print a confirmation which was sent via email.
Note: Email printing is available for emails sent as body text and not
for emails where the text is sent as an attachment.
Email printing functionality requires that an email template with the section role
EMAIL TEMPLATE be created under Miscellaneous → Reports. Using the Internal
Editor functionality email details can be added from the data source.
Reservation Options
137
Set the template defined with the section role EMAIL TEMPLATE via the option EMAIL
TEMPLATE PRINTOUT under Setup → Configuration → Global Settings → Miscellaneous
→ Reports → Report tab.
Default email subjects can be defined via the option DEFAULT EMAIL SUBJECTS under
Setup → Configuration → Miscellaneous → Simple Custom Text.
Default email body text can be defined via the option EMAIL BODY DEFAULT under
Setup → Configuration → Miscellaneous → Simple Custom Text.
The maximum size for email attachments is defined via the option MAX. EMAIL
ATTACHMENT SIZE (MB) under Setup → Configuration → Global Settings → Reports →
Reports tab.
Family functionality is controlled by the parameter ENABLE FAMILY WIZARD under
Setup → Configuration → Global Settings → Profile → Profile 1 tab.
SMS Sending functionality is controlled by the parameter ENABLE SMS SENDING
under Setup → Configuration → Global Settings → Interfaces → Misc. Interface 4
tab.
SMS sending requires that an SMS template with the section role CONFIRMATION
LETTER be created under Miscellaneous → Reports. Using the Internal Editor
functionality up to 160 characters can be added to the template.
How to print a confirmation letter
1. Select the appropriate reservation in the grid. Click the OPTIONS button and select
CONFIRMATION LETTER on the short-cut menu to display the Confirmation Letter
dialog box.
2. In the TEMPLATES box click the drop-down arrow and select the template to be
used.
3. In the LANGUAGE box click the drop-down arrow and select the language, if no
language is selected, the default language from the language configuration will be
used.
4. In the PREF. DISTRIBUTION box the preferred method of distribution for this profile is
displayed. If a company profile is selected then the contact profiles preferred
method of distribution takes priority over the company's.
5. Select the FAMILY GREETINGS check box if the family letter greetings should be used.
6. Select the PROFILE information to be used in the confirmation letter.
7. Select the CONTACT and ADDRESS information to be used in the letter.
8. Click EDIT, the letter is generated and displayed on the screen. Depending on the
setup of your system either MS Word or the Fidelio Internal editor application will
be used to display the letter.
9. Make sure that all the entered information is correct; any necessary changes can
be made at this time.
10. At this point the letter can be printed or saved to be printed at a later time.
11. To print the letter, click the PRINT icon or select PRINT from the file menu.
12. Close the edit screen, if changes were made you will be prompted to save the
changes.
13. Close the application, either MS Word or the Fidelio Internal Editor.
138
Reservation Options
14. If the confirmation letter was edited and saved but not yet printed then the
template name will be displayed with (Saved) after the name and the date and
time it was saved in the history section of the Confirmation dialog box.
15. If the confirmation letter was printed then the template name will be displayed and
the date and time it was printed in the history section of the Confirmation dialog
box.
How to print a saved confirmation letter
1. Select the appropriate reservation in the grid; click the OPTIONS button and select
CONFIRMATION LETTER on the short-cut menu to display the Confirmation Letter
dialog box.
2. Select the confirmation letter to be printed from the list of templates (letters) in
the HISTORY section of the screen.
3. Click EDIT HISTORY, the letter is displayed on the screen. Depending on the setup of
your system either MS Word or the Fidelio Internal editor application will be used
to display the document.
4. Make sure that all the entered information is correct; any necessary changes can
be made at this time.
5. Click the PRINT icon or select PRINT from the file menu to print the letter.
6. Close the edit screen.
7. Close the MS Word or the Fidelio Internal Editor application.
8. The confirmation letter template name will be displayed and the date and time it
was printed in the HISTORY section of the Confirmation dialog box.
How to email a confirmation letter
1. Select the appropriate reservation in the grid; click the OPTIONS button and select
CONFIRMATION LETTER on the short-cut menu to display the Confirmation Letter
dialog box.
2. In the TEMPLATES box click the drop-down arrow and select the template to be
used.
3. In the LANGUAGE box click the drop-down arrow and select the language, if no
language is selected, the default language from the language configuration will be
used.
4. In the PREF. DISTRIBUTION box the preferred method of distribution for this profile is
displayed. If a company profile is selected then the contact profiles preferred
method of distribution takes priority over the company's.
5. Select the FAMILY GREETINGS check box if the family letter greetings should be used.
6. Select the CONTACT and ADDRESS information to be used in the confirmation letter.
7. Click EMAIL, the confirmation letter is generated and the email dialog box
displayed.
Reservation Options
139
8. The TO box is automatically completed with the email address from the profile, this
can be changed by clicking the drop-down arrow and selecting the email address
to which this email should be sent or by selecting the required email addresses
from the list of available in the panel on the upper right-hand side and clicking the
TO button. Click the SELECT ALL button and then the TO button to select all the
available email addresses.
9. In the CC box click the drop-down arrow and select the email address which
should be copied on this email or select the required email addresses from the list
of available in the panel on the upper right-hand side and click the CC button.
Click the SELECT ALL button and then the CC button to select all the available email
addresses.
10. In the BCC box click the drop-down arrow and select the email address which
should be blind copied on this email or select the required email addresses from
the list of available in the panel on the upper right-hand side and click the BCC
button. Click the SELECT ALL button and then the BCC button to select all the
available email addresses.
11. Enter the topic of the email in the SUBJECT box. If a default email subject has been
defined, then this will be displayed.
12. In the BODY box the default email body text (if defined) is displayed, this is the
text which should be included in the body of the email, any necessary changes can
be made at this time.
13. If the email should be saved and sent later then click SAVE DRAFT, the email is
saved and the template name is displayed with (E-Mail)(Saved) after the name
and the date and time it was saved in the history section of the Correspondence
dialog box.
14. If the email should be sent now click SEND, the document is generated and the
email sent.
140
Reservation Options
A confirmation message is displayed confirming that the message was sent.
How to email a confirmation letter as an attachment
1. Select the appropriate reservation in the grid. Click the OPTIONS button and select
CONFIRMATION LETTER on the short-cut menu to display the Confirmation Letter
dialog box.
2. In the TEMPLATES box click the drop-down arrow and select the template to be
used.
3. In the LANGUAGE box click the drop-down arrow and select the language, if no
language is selected, the default language from the language configuration will be
used.
4. In the PREF. DISTRIBUTION box the preferred method of distribution for this profile is
displayed. If a company profile is selected then the contact profiles preferred
method of distribution takes priority over the company's.
5. Select the FAMILY GREETINGS check box if the family letter greetings should be used.
6. Select the CONTACT and ADDRESS information to be used in the document.
7. Click EMAIL, the document is generated and the email dialog box displayed.
8. The TO box is automatically completed with the email address from the profile, this
can be changed by clicking the drop-down arrow and selecting the email address
to which this email should be sent or by selecting the required email addresses
from the list of available in the panel on the upper right-hand side and clicking the
TO button. Click the SELECT ALL button and then the TO button to select all the
available email addresses.
Reservation Options
141
9. In the CC box click the drop-down arrow and select the email address which
should be copied on this email or select the required email addresses from the list
of available in the panel on the upper right-hand side and click the CC button.
Click the SELECT ALL button and then the CC button to select all the available email
addresses.
10. In the BCC box click the drop-down arrow and select the email address which
should be blind copied on this email or select the required email addresses from
the list of available in the panel on the upper right-hand side and click the BCC
button. Click the SELECT ALL button and then the BCC button to select all the
available email addresses.
11. Enter the topic of the email in the SUBJECT box. If a default email subject has been
defined, then this will be displayed.
12. Select the SEND AS ATTACHMENT check box if the document should be sent as an
attachment rather than in the body of the email.
13. Select the Attachment format:
Rich text Format
Word for Windows
Adobe Acrobat (PDF)
14. To edit the attachment click the EDIT ATTACH. button, the document is generated
and displayed on the screen. Depending on the setup of your system either MS
Word or the Fidelio Internal editor application will be used to display the
document.
15. In the FORMAT box select the format for the attachment.
16. In the BODY box the default email body text (if defined) is displayed, this is the
text which should be included in the body of the email, any necessary changes can
be made at this time.
17. If the email should be saved and sent later then click SAVE DRAFT, the email is
saved and the template name is displayed with (E-Mail) (Saved) after the name
and the date and time it was saved in the history section of the Correspondence
dialog box.
18. If the email should be sent now click SEND, the document is generated and the
email sent.
A confirmation message is displayed confirming that the message was sent.
Note: When sending a PDF file as attachment of an email, the file is
stored in rtf format allowing editing, changing and sending it locally.
Attachments sent in PDF format are automatically password protected
so that no changes can be made to the original PDF.
Note: When sending correspondence as a PDF attachment, the PDF
files are stored both in the database and in the Mailing Documents
directory defined in the configuration. After the correspondence has
been successfully sent the PDF files are removed from the database.
How to email a confirmation letter with an attachment
1. Select the appropriate reservation in the grid, Click the OPTIONS button and select
CONFIRMATION LETTER on the short-cut menu to display the Confirmation Letter
dialog box.
2. In the TEMPLATES box click the drop-down arrow and select the template to be
used.
142
Reservation Options
3. In the LANGUAGE box click the drop-down arrow and select the language, if no
language is selected, the default language from the language configuration will be
used.
4. In the PREF. DISTRIBUTION box the preferred method of distribution for this profile is
displayed. If a company profile is selected then the contact profiles preferred
method of distribution takes priority over the company's.
5. Select the FAMILY GREETINGS check box if the family letter greetings should be used.
6. Select the CONTACT and ADDRESS information to be used in the confirmation letter.
7. Click EMAIL, the confirmation letter is generated and the email dialog box
displayed.
8. The TO box is automatically completed with the email address from the profile, this
can be changed by clicking the drop-down arrow and selecting the email address
to which this email should be sent or by selecting the required email addresses
from the list of available in the panel on the upper right-hand side and clicking the
TO button. Click the SELECT ALL button and then the TO button to select all the
available email addresses.
9. In the CC box click the drop-down arrow and select the email address which
should be copied on this email or select the required email addresses from the list
of available in the panel on the upper right-hand side and click the CC button.
Click the SELECT ALL button and then the CC button to select all the available email
addresses.
10. In the BCC box click the drop-down arrow and select the email address which
should be blind copied on this email or select the required email addresses from
the list of available in the panel on the upper right-hand side and click the BCC
button. Click the SELECT ALL button and then the BCC button to select all the
available email addresses.
Reservation Options
143
11. Enter the topic of the email in the SUBJECT box. If a default email subject has been
defined, then this will be displayed.
12. Click ADD, the Attach documents dialog box is displayed.
13. In the DOCUMENT GROUPS list, select the document group required.
14. In the ALLOWED DIRECTORIES list, select the allowed directory required.
15. Click BROWSE to display the list of documents.
16. Select the required document and click OPEN, the Document Name field is filled.
144
Reservation Options
17. To attach the document, click ATTACH, the document is shown as a linked
attachment on the email report dialog box.
18. In the BODY box, make sure that all the entered information is correct; any
necessary changes can be made at this time.
Reservation Options
145
19. If the email should be saved and sent later then click SAVE DRAFT, the email is
saved and the template name is displayed with (E-Mail) (Saved) after the name
and the date and time it was saved in the history section of the Correspondence
dialog box.
20. If the email should be sent now click SEND, the document is generated and the
email sent.
A confirmation message is displayed confirming that the message was sent.
How to email a saved confirmation letter
1. Select the appropriate reservation in the grid; click the OPTIONS button and select
CONFIRMATION LETTER on the short-cut menu to display the Confirmation Letter
dialog box.
2. Select the confirmation email/letter to be sent from the list of templates (letters)
in the HISTORY section of the screen.
3. Click E-MAIL HISTORY, the email is displayed on the screen.
4. Make sure that all the entered information is correct; any necessary changes can
be made at this time.
5. Click SEND, the document is generated and the email sent.
6. The confirmation letter/email template name will be displayed and the date and
time it was printed/sent in the HISTORY section of the Confirmation Letter dialog
box.
How to fax a confirmation letter
1. Select the appropriate reservation in the grid; click the OPTIONS button and select
CONFIRMATION LETTER on the short-cut menu to display the Confirmation Letter
dialog box.
2. In the TEMPLATES box click the drop-down arrow and select the template to be
used.
3. In the LANGUAGE box click the drop-down arrow and select the language, if no
language is selected, the default language from the language configuration will be
used.
4. In the PREF. DISTRIBUTION box the preferred method of distribution for this profile is
displayed. If a company profile is selected then the contact profiles preferred
method of distribution takes priority over the company's.
5. Select the FAMILY GREETINGS check box if the family letter greetings should be used.
6. Select the CONTACT and ADDRESS information to be used in the confirmation letter.
7. Click FAX, the confirmation letter is generated and the fax dialog box displayed.
146
Reservation Options
8. The TO box is automatically completed with the fax number from the profile. Enter
the recipients fax number if it was not filled from the profile.
9. To edit the fax click EDIT, the confirmation letter is generated and displayed on the
screen. Depending on the setup of your system either MS Word or the Fidelio
Internal editor application will be used to display the confirmation letter.
10. Make sure that all the entered information is correct; any necessary changes can
be made at this time.
11. To schedule the time the fax should be sent, click ADVANCED, the Fax Scheduler
dialog box is displayed.
12. Select when to SEND THE FAX, the default is NOW, to specify a specific date and time
Select a SPECIFIC TIME IN THE DAY and enter the date and time to send the fax.
13. Select the FAX PRIORITY, the default is Normal.
14. Click OK.
15. Click SEND, the confirmation letter is generated and the fax sent.
Note: Default fax cover pages can be defined under Setup →
Configuration → Global Settings → Generic2 tab.
How to SMS a confirmation
1. Select the appropriate reservation in the grid; click the OPTIONS button and select
CONFIRMATION LETTER on the short-cut menu to display the Confirmation Letter
dialog box.
Reservation Options
147
2. In the TEMPLATES box click the drop-down arrow and select the template to be
used; an SMS template must contain no more than 160 characters.
3. In the LANGUAGE box click the drop-down arrow and select the language.
4. Select the CONTACT and ADDRESS information to be used in the confirmation SMS.
5. Click SMS, the confirmation is generated and the SMS dialog box displayed.
6. The TO box is automatically completed with the mobile phone number from the
profile, this can be changed by clicking the drop-down arrow and selecting the
mobile phone number to which this SMS should be sent or by selecting the
required mobile phone numbers from the list of available in the panel on the upper
right-hand side and clicking the TO button.
7. In the SMS box, make sure that all the entered information is correct; any
necessary changes can be made at this time.
8. Click SEND to send the SMS.
How to create an easy letter
1. Select the appropriate reservation in the grid; click the OPTIONS button and select
CONFIRMATION LETTER on the short-cut menu to display the Confirmation Letter
dialog box.
2. Select the CONTACT and ADDRESS information to be used in the document.
3. Click EASY LETTER, the Compose Easy Letter screen is displayed.
148
Reservation Options
4. Select the required template from the list of available TEMPLATES in the window on
the left, click the arrow button to move the template to the RESULTING DOCUMENT
window on the right.
5. Repeat step 2 for all the required templates.
6. Click the COMPOSE button to display the Internal Editor screen.
7. Make any additions or changes to the letter as required.
8. To print the letter, click FILE then PRINT.
9. To email the letter click FILE then E-MAIL.
10. To save the letter click FILE then SAVE AS.
11. Allocate a FILE NAME, choose the location to save the letter and click SAVE.
The letter is saved in RTF format.
Reservation Options
149
Note: All Confirmation Forms can be saved when editing the Form
and pressing the SAVE button, using the SAVE AS button from the
Toolbar, or using FILE → SAVE Options. On the template history the
letter or form will be marked with (SAVED) next to the Report name
until it has been printed.
Easy letter templates are defined via the option EASY LETTER TEMPLATES under Setup
→ Configuration → CRM.
The role allocated to the template determines under which easy letter option it
appears. Templates defined as GENERAL DOCUMENTS are available from the CRM
menu and from within both a profile and reservation. Templates defined as
RESERVATION LETTER are available from within a reservation and templates defined
as PROFILE LETTER are available from with a guest profile.
Credit Card Authorization
New / Additional Authorization
This option is only available with a Credit Card or EFT Interface installed and is accessible via the
OPTIONS menu of the both the Reservation Navigator and the Edit Reservation screen. This option
may be used to view the current approval amount and to request additional authorization from
the credit card company.
Rules are setup to calculate the approval amount which should be requested from the credit card
company. The calculation could be for example, the length of stay multiplied by the room rate plus
10% for the extra changes (LOS * Rate + 10%). During the guest's stay it may become necessary to
request additional approval from the credit card company if the folio balance exceeds the
approved amount.
How to view credit card authorization approval details
1. From the Reservation Navigator select the reservation to view credit card
authorization.
2. Select CREDIT CARD AUTHORIZATION and then NEW / ADDITIONAL AUTHORIZATION from
the OPTIONS menu.
or
3. Click EDIT to display the Edit Reservation screen.
4. From the OPTIONS menu select CREDIT CARD AUTHORIZATION and then NEW /
ADDITIONAL AUTHORIZATION.
The Additional Authorization dialog box is displayed.
150
Reservation Options
5. After viewing the credit card authorization details click CANCEL to close the
Additional Authorization dialog box.
How to request additional credit card authorization
1. From the Reservation Navigator select the reservation to add additional credit card
authorization.
2. Select CREDIT CARD AUTHORIZATION and then NEW / ADDITIONAL AUTHORIZATION from
the OPTIONS menu.
or
3. Click EDIT to display the Edit Reservation screen.
4. From the OPTIONS menu select CREDIT CARD AUTHORIZATION and then NEW /
ADDITIONAL AUTHORIZATION.
The Additional Authorization dialog box is displayed.
5. As credit cards can be linked to a window on the billing screen you need to select
the WINDOW to which this credit card approval is to be applied.
Reservation Options
151
6. Enter the TOTAL amount to be approved in the TOTAL AMOUNT
(Not an additional amount)
box.
TO BE APPROVED
7. Click OK to request online authorization.
Credit card approval methods are defined via the option CREDIT CARD APPROVAL
METHODS under Setup → Configuration → Cashiering.
Manual Authorization
This option is only available with a Credit Card Interface installed and is accessible via the
OPTIONS menu of the both the Reservation Navigator and the Edit Reservation screen. If the credit
card interface is off-line the MANUAL AUTHORIZATION option may be used to enter the approval
amount and the approval code manually given by the credit card company.
How to request manual credit card authorization
1. From the Reservation Navigator select the reservation to which manual credit card
authorization is to be added.
2. Select CREDIT CARD AUTHORIZATION and then MANUAL AUTHORIZATION from the OPTIONS
menu.
or
3. Click EDIT to display the Edit Reservation screen.
4. From the OPTIONS menu select CREDIT CARD AUTHORIZATION and then MANUAL
AUTHORIZATION.
The Manual Authorization dialog box is displayed.
5. As credit cards can be linked to a window on the billing screen you need to select
the WINDOW to which this credit card approval is to be applied.
6. Enter the total amount to be approved in the TOTAL AMOUNT
TO BE APPROVED
box.
7. In the NEW APPROVAL CODE box enter the approval code supplied by the credit card
company.
8. Click OK to save the approval amount.
152
Reservation Options
Day use on departure day
This option may be used to create a day use reservation for a reservation which is due out today
and is accessible via the OPTIONS menu of the Reservation Navigator. This option is only available
if the status of the reservation is DUE OUT.
Properties offering guests an extended stay or late departure can use this option to create a day use
reservation and move the guest to a different room. If the guest is staying in the same room then
the day use charge can be posted manually without the need to create a day use reservation.
A day use on departure date reservation is created in the same manner as an add on reservation
with the exception that the dates of the reservation are defaulted to arrival and departure on the
departure date. All reservation details are copied with the exception of the credit card and the
guest and reservation notes information.
The
reservation.
indicator on the original reservation can be used to switch to the day use
The
indicator on the day use reservation can be used to switch to the original
reservation.
Depending on the parameter settings the day use on departure date option can work in one of two
ways:
If the parameter ADD ON RESERVATION PROFILE SELECT FIRST is activate then the profile search
screen is opened when selecting ADD ON from the options menu. This allows for a different
profile to be selected before the day use reservation is created.
If the parameter ADD ON RESERVATION PROFILE SELECT FIRST is not active then the day use
reservation is displayed in edit reservation mode and can be changed as required.
How to create a day use on departure date reservation
1. From the Reservation Navigator select the required reservation.
2. Select DAY USE ON DEPARTURE
DATE
from the OPTIONS menu.
If the current rate code is not valid for day use then a message is displayed
advising that the rate code will be cleared for the day use reservation.
4. Click YES to continue.
If there are billing instructions on the original reservation then a message is
displayed asking if the billing instructions should be adjusted to the new dates.
6. Click YES to continue.
Reservation Options
153
A new reservation is displayed on the Edit Reservation screen.
The dates of the reservation are defaulted to arrival and departure on the day of
departure.
All reservation details are copied with the exception of the credit card and the
guest and reservation notes information.
7. Select the room number the guest will be moving to for the day use part of the
stay and make any other changes necessary; this may include adjusting the rate
to a day use rate and adding any credit card details.
8. Click OK to save the day use reservation.
The guest now has his current reservation and a day use reservation.
Moving the guest to the day use room
1. On the day of departure of the original reservation click the RESERVATIONS menu
and select ROOM MOVE to display the room move screen.
The upper section displays information about the reservations scheduled for a room move.
The lower section displays information about the reservation which is currently in the
room to which the selected reservation is scheduled to move to.
The original reservation is listed on the room move screen as scheduled to move
from the original room to the day use room.
2. Select the reservation from the grid and click MOVE to move the reservation to the
scheduled room.
154
Reservation Options
A message is displayed advising that the reservation check-in was successful.
3. Click OK.
A message is then displayed advising that the reservation room move was
successful.
4. Click OK.
The postings are transferred from original reservation to the day use reservation,
the original reservation is checked-out and the day use reservation is checked-in.
5. Click CLOSE to close the room move screen.
Room Move dialog box
Field
Information displayed
Name
The guest name.
Previous
The room the guest previously occupied. This information will
be filled after the room move has been completed.
Current
The room number the guest currently occupies.
Scheduled
The room number the guest is scheduled to move to.
Status
The current status of the move.
Occupied
An X indicates that the room the reservation will move to is still
occupied.
Arrival
The guest's arrival date.
Departure
The guest's departure date.
R.M. time
The time the room move is scheduled to take place.
The behaviour of the day use on departure functionality is similar to add on
functionality and is controlled by the parameter ADD ON RESERVATION PROFILE SELECT
FIRST under Setup → Configuration → Global Settings → Reservation → Reservation
1 tab. If active then a different profile can be selected before the day use
reservation is created.
Deposits Requested
This option may be used to view or enter deposit requests and is accessible via the OPTIONS menu
of the both the Reservation Navigator and the Edit Reservation screen. A deposit request may be
Reservation Options
155
entered manually or may be calculated automatically based on policy rules defined by the
property.
If a deposit request has been applied to a reservation it will be indicated at the bottom of the edit
reservation screen by the indicator
.
Policy rules for deposits
If your property uses policies for deposits, there are two possibilities as to how the policy rule can
be setup:
Automatic - if the rule is setup to automatic, then the deposit request will be attached
automatically.
Ask - if the rule is configured for asking, then a confirmation message "Do you want to apply
deposit policy for Guest last name, Guest first name" is displayed.
Discrepancies in deposit requests will be indicated on the edit reservation screen in red
. This will be displayed for example, if a standard deposit rule is defined and the question to apply
the deposit rule is answered with No.
156
Reservation Options
How to view/enter a deposit request
1. From the Reservation Navigator select the reservation to which a deposit request
is to be applied.
2. Select DEPOSITS REQUESTED from the OPTIONS menu.
or
Click EDIT to display the reservation edit screen and then select DEPOSITS REQUESTED
from the OPTIONS menu.
The Deposit requests dialog box is displayed.
4. Click NEW to open the Deposit edit dialog box.
5. Enter the DUE DATE of the deposit or select a date from the calendar.
6. Enter the AMOUNT of the deposit which is being requested or click the PERCENTAGE
option and enter the deposit as a percentage of the room charge.
The percentage calculation for a deposit is based on the room rate; the inclusion of
fixed charges in the deposit calculation is controlled by the parameter ADD FIXED
CHARGES TO TOTAL AMOUNT OF DEPOSIT
Reservation Options
157
7. The deposit amount is displayed; click OK to confirm the deposit request.
8. Click OK to close the deposit request dialog box or click CANCEL to cancel all
changes.
Note: The entered deposit amount or calculated percentage amount
should not result in zero. A warning message will display when
pressing the OK Button "Amount should be higher than 0".
How to mark a deposit request as paid
1. From the Reservation Navigator select the reservation to which a deposit request
is to be marked as paid.
2. Select DEPOSITS REQUESTED from the OPTIONS menu.
or
Click EDIT to display the reservation edit screen and then select DEPOSITS REQUESTED
from the OPTIONS menu.
The Deposit requests dialog box is displayed.
3. Select the deposit and click PAID, a confirmation message is displayed.
158
Reservation Options
4. Click YES to mark the deposit request as paid.
5. Click OK to close the deposit request dialog box or click CANCEL to cancel all
changes.
Note: A deposit marked as PAID can be unmarked by selecting the
NOT PAID button.
Deposits requests dialog box
Field
Definition
Due Date
The date the deposit is due.
Amount
The amount of deposit requested.
Percentage
The deposit percentage requested.
Paid
Indicates if the payment has been marked as paid.
Auto
Indicates deposit requests which have been calculated
automatically via the deposit policy rules setup by the
property.
Reservation Options
159
Options available on the deposits request dialog box
OK - to confirm changes and close the screen. (Only available when Deposits requested is
accessed from the reservation navigator.)
NEW - to enter a new deposit request.
CANCEL/CLOSE - to cancel all changes and close the screen.
EDIT - to edit an existing deposit request.
DELETE - to remove a deposit request.
PAID/NOT PAID - to mark a deposit request as paid or not paid.
RECALCULATE - to recalculate the deposit request. May be used when an automatic deposit
calculation was edited or deleted or there was a change in reservation dates.
The percentage calculation will be based on the room rate and all fixed charges if
the option ADD FIXED CHARGES TO TOTAL AMOUNT OF DEPOSITS is activated under Setup
→ Configuration → Global Settings → Reservation → Reservation 1 tab. If not
activated, the percentage calculation will be based only on the room rate.
Edit Sharers
This option may be used to edit multiple share reservations and is accessible via the OPTIONS menu
of the Reservation Navigator.
How to edit multiple share reservations
1. From the Reservation Navigator select the required share reservation.
2. Click EDIT to display the reservation edit screen and then select EDIT SHARERS from
the OPTIONS menu.
A list of the sharing guests is displayed on the right; selecting a guest from the list
will display the edit reservation screen for that guest.
3. Once any necessary changes have been made click OK to close the share list.
160
Reservation Options
4. Click OK to close the reservation edit screen.
Multiple reservation edit functionality is controlled by the parameter USE MULTI RES
EDIT under Setup → Configuration → Global Settings → Reservation →
Reservation3 tab.
Fixed Charges
This option may be used to enter fixed charges on a reservation and is accessible via the OPTIONS
menu of the Edit Reservation screen and via the FIXED CHARGES tab on the Edit Reservation screen.
Fixed charges are used to post daily charges other than room tax or packages, for example a pet,
parking or extra bed. Fixed charges are posted automatically during night audit or via the option
POST DAILY CHARGES on the Cashier Options menu.
If a fixed charge applies only for certain days of the guest's stay then the fixed charge may be
applied on a by day basis. For example, the guest hires a car for part of his stay and needs to rent a
parking space only for the days he has the hire car.
If a fixed charge has been applied to a reservation it will be indicated at the bottom of the edit
reservation screen by the indicator
.
How to add a fixed charge
1. From the Reservation Navigator select the reservation to which a fixed charge is to
be added.
2. Click EDIT to display the reservation edit screen and then select FIXED CHARGES from
the OPTIONS menu.
The Edit Reservation screen is displayed defaulted to the FIXED CHARGES tab.
Reservation Options
161
3. Click the ADD button to display the Fixed Charges dialog box.
4. Select the required DEPARTMENT CODE from the drop-down list.
5. Enter the QUANTITY.
6. Enter the AMOUNT to charge.
7. Select the required CURRENCY from the drop-down list if the fixed charge should be
posted in a currency other than the base currency.
8. Click OK to save the fixed charge.
162
Reservation Options
How to add a fixed charge by day
1. From the Reservation Navigator select the reservation to which a fixed charge is to
be added.
2. Click EDIT to display the reservation edit screen and then select FIXED CHARGES from
the OPTIONS menu.
The Edit Reservation screen is displayed defaulted to the FIXED CHARGES tab.
3. Click the
button at the bottom of the screen.
4. The day's selection options are displayed.
To attach the fixed charge during the whole stay of the guest select ALL DAYS from the
drop-down list.
To attach the fixed charge after a specific day/date during the reservation until the end of
the stay select DAYS AFTER from the drop-down list. For example, selecting day 3 will
attach the fixed charge from day 3 and onwards.
To attach a fixed charge for one day select the required day during the stay and select ONE
DAY from the drop-down list.
5. Click the ADD button to display the Fixed Charges dialog box.
6. Select the required DEPARTMENT CODE from the drop-down list.
7. Enter the QUANTITY and the AMOUNT to charge.
8. Select the required CURRENCY from the drop-down list if the fixed charge should be
posted in a currency other than the base currency.
9. Click OK to save the fixed charge.
How to view on which days the fixed charge is applicable
1. From the Reservation Navigator select the required reservation.
2. Click EDIT to display the reservation edit screen and then select FIXED CHARGES from
the OPTIONS menu.
Any existing fixed charges are listed.
3. An x in the CHANGE column indicates that the fixed charge is applied on a by day
basis.
4. To see which days the fixed charge is applied click the DAYS > button at the
bottom of the screen.
The day's selection options are displayed.
5. Click the arrows to scroll through the days of the reservation. The upper display
changes depending on whether the fixed charge is applicable for the selected day.
A blank
check box and zero AMOUNT and QUANTITY indicates that the fixed
charge does not apply to this day.
Reservation Options
163
A check box with a tick mark
and an AMOUNT and QUANTITY completed indicates
that the fixed charge is applicable for this day.
6. Click OK to close the fixed charges screen.
Fixed charges display
Field Heading
Gives this information
Department
The name of the department code.
Change
Indicates that the fixed charge should not be posted on all
days of the reservation. To view the days the fixed charge is
valid for press the DAYS button
Quantity
Indicates how many times the fixed charge should be posted
daily
Amount
Displays the amount of the fixed charge
Currency
Select the currency for the fixed charge posting from list box
Free Nights
This option may be used to assign or link free nights to a reservation and is accessible via the
OPTIONS menu of the Edit Reservation screen. Properties may for example, offer a free nights stay
to frequent guests, the guests can then use this to stay in your property or may transfer the free
night to another guest if allowed.
Free nights attached to a profile may be used by linking them to a reservation and are indicated on
the reservation edit screen as follows:
A
button with grey text indicates available free nights.
A
button with black text indicates free nights which are already linked to the
reservation.
How to enter new free nights
1. From the Reservation Navigator select the required reservation
2. Click EDIT to display the reservation edit screen and then select FREE NIGHTS from
the OPTIONS menu.
The Free Nights screen is displayed.
164
Reservation Options
3. Click the NEW button to display the Free Night dialog box.
4. In the NUMBER OF NIGHTS field enter the total free nights to be assigned.
5. Type the expiry date for the free nights in the EXPIRY DATE box or click the drop
down arrow and select a date from the calendar.
6. In the MAX NO OF ADULTS box enter the maximum number of adults allowed for the
free night stay.
Reservation Options
165
7. Select the TRANSFERABLE check box if the free night can be transferred to another
profile.
8. In the COMMENT box enter any additional information.
9. Click OK, the new free nights record is displayed in the Free Nights list.
10. Click CLOSE to close the Free Nights screen.
How to edit free nights
1. From the Reservation Navigator select the required reservation
2. Click EDIT to display the reservation edit screen and then select FREE NIGHTS from
the OPTIONS menu.
3. Select the free night record to be edited and click the EDIT button to display the
Free Night dialog box.
4. Make any changes necessary.
5. Click OK to save the changes.
6. Click CLOSE to close the Free Nights screen.
How to link free nights
1. From the Reservation Navigator select the required reservation
2. Click EDIT to display the reservation edit screen and then select FREE NIGHTS from
the OPTIONS menu.
The Free Nights screen is displayed.
166
Reservation Options
3. The days of the reservation are listed on the left; select the date the free night is
to be applied.
4. The available free nights are listed on the right; select the free night to be applied
to the selected date.
5. Click the LINK button to apply the free night to the selected date.
6. Repeat steps 3 to 5 if there are more free nights to be applied to this reservation.
7. Click CLOSE to close the Free Nights screen.
How to view absorbed free nights
1. From the Reservation Navigator select the required reservation
Reservation Options
167
2. Click EDIT to display the reservation edit screen and then select FREE NIGHTS from
the OPTIONS menu.
The Free Nights screen is displayed.
3. Select the free night record whose usage you want to view and click the USAGE
button.
The Free Night Usage screen is displayed.
4. Click CLOSE to close the Free Nights Usage screen.
5. Click CLOSE to close the Free Nights screen.
Note: The USAGE button is only available if the selected free night has
been linked to a reservation.
Free nights functionality is controlled by the parameter FREE NIGHTS under Setup →
Configuration → Global Settings → Reservation 2 tab.
Free nights functionality is controlled by the user right CREATE FREE NIGHTS under
Setup → Configuration → Users → User Definition → Rights → Reservation.
Assigning, viewing and maintaining the free nights linked to a guest profile is
controlled by the user right CREATE FREE NIGHTS under Setup → Configuration →
Users → User Definition → Rights → Reservations.
The rebate cards membership scheme which is controlled by the license code
MEMBERSHIP REBATE HANDLING also uses free nights functionality.
168
Reservation Options
Guest Comments
This option may be used to enter guest comments during the guest's stay and is accessible via the
OPTIONS menu of the both the Reservation Navigator and the Edit Reservation screen. In addition
to guest comments and complaints, information from guest questionnaires can also be entered.
There is no limit as to the number of guest comments that can be entered and the PREVIOUS and
NEXT buttons can be used to easily move between the different comments. Guest comments are
also viewable from room history.
How to enter a new guest comment
1. From the Reservation Navigator select the reservation to which a comment is to be
added.
2. Select GUEST COMMENTS from the OPTIONS menu.
or
Click EDIT to display the reservation edit screen and then select GUEST COMMENTS
from the OPTIONS menu.
The Guest Comments dialog box is displayed.
3. Click the NEW button to display the Guest Comments dialog box.
Reservation Options
169
4. The DATE defaults to today's date, but may be changed if required.
5. The USER defaults to the signed on user.
6. In the CATEGORY box select the category to which this type of comment belongs.
7. In the GUEST COMMENTS box enter the guest comment.
8. Click OK, the new comment is displayed on the Guest Comments list.
9. Click CLOSE to close the Guest Comments screen.
How to edit a guest comment
1. Search for and select the required reservation, then select GUEST COMMENTS from
the OPTIONS menu of the reservation navigator.
The Guest Comments screen is displayed.
2. Select the guest comment to be edited and click the EDIT button to display the
Guest Comments dialog box.
170
Reservation Options
3. Make any changes necessary.
4. Click OK to save the changes.
How to delete a guest comment
1. Search for and select the required reservation, then select GUEST COMMENTS from
the OPTIONS menu of the reservation navigator.
The Guest Comments screen is displayed.
2. Select the guest comment to be deleted and click the DELETE button, a
confirmation message is displayed.
3. Click YES to delete the guest comment.
Guest Comments categories are defined via the option GUEST COMMENTS under
Setup → Configuration → CRM.
Guest Profiles
The multiple guest profiles functionality may be used to link multiple guest profiles to a single
reservation and is accessible via the option GUEST PROFILES on the OPTIONS menu of the Edit
Reservation screen and via the PROFILES tab on the Edit Reservation screen.
This option is parameter controlled and if activated each reservation with more than one adult
and/or more than one room will be considered as multi-guest reservation.
The Guest Profiles option enables you to register each guest in the room, even if there is only one
actual reservation for that room. The option opens the Edit Reservation screen defaulted to the
PROFILES tab, which is split into two sections.
The upper section shows the company, travel agent, source and booker profiles linked to the
reservation profile. See: Linking Profiles to a Reservation
Reservation Options
171
The lower section shows the profiles which are attached to this reservation; the primary profile
is marked with an x.
If a reservation has multiple guest profiles attached it will be indicated at the bottom of the edit
reservation screen by the
indicator.
With the MULTIPLE GUEST PROFILE FUNCTIONALITY activated a new search field is available on the
reservation navigator. Selecting the check box MULTI GUEST will include in the search results, guest
profiles which are attached to reservations via the Guest Profiles option.
Note: With multiple guest profiles linked to a single reservation, the
reservation and therefore the guest folio is in the name of the primary
profile. If each guest requires a folio in his own name then share
reservations should be used.
How to attach an additional profile to a reservation
1. From the Reservation Navigator select the required reservation.
2. Click EDIT to display the reservation edit screen and then select GUEST PROFILES
from the OPTIONS menu.
The Edit Reservation screen is displayed defaulted to the PROFILES tab, which is
split into two sections.
The upper section shows the company, travel agent, source and booker profiles linked to
the reservation profile.
The lower section shows the profiles which are attached to this reservation; the primary
profile is marked with an x.
3. Click the ADD button to display the profile search screen.
If the LINKED PROFILES ONLY check box is selected by default, then only profiles
which are linked to the reservation profile are displayed.
172
Reservation Options
4. If the required profile is not displayed, clear the LINKED PROFILES ONLY check box
and search again.
5. Locate the required profile and click SELECT.
6. The additional profile is now attached to the reservation and is listed in the lower
grid on the PROFILES tab.
The primary profile is marked with an x.
How to remove a profile from a reservation
1. From the Reservation Navigator select the required reservation.
2. Click EDIT to display the reservation edit screen and then select GUEST PROFILES
from the OPTIONS menu.
The Edit Reservation screen is displayed defaulted to the PROFILES tab.
3. In the lower grid, select the profile to be removed from the reservation and click
REMOVE.
A confirmation message is displayed.
4. Click YES to remove the profile.
5. Click OK to close the reservation.
How to change the primary profile on a reservation
1. From the Reservation Navigator select the required reservation.
2. Click EDIT to display the reservation edit screen and then select GUEST PROFILES
from the OPTIONS menu.
The Edit Reservation screen is displayed defaulted to the PROFILES tab.
The lower section shows the profiles which are attached to this reservation; the
primary profile is marked with an x.
3. Select the profile which is to become the main profile of this reservation and click
the PRIMARY button.
A confirmation message is displayed.
Reservation Options
173
4. Click YES to mark the selected profile as the main customer of the reservation.
The selected profile is now marked with an x.
How to replace a profile on a reservation
1. From the Reservation Navigator select the required reservation.
2. Click EDIT to display the reservation edit screen and then select GUEST PROFILES
from the OPTIONS menu.
The Edit Reservation screen is displayed defaulted to the PROFILES tab.
3. In the lower grid, select the profile to be replaced on the reservation.
4. Click the REPLACE button to display the profile search screen.
If the LINKED PROFILES ONLY checkbox is selected by default, then only profiles which
are linked to the reservation profile are displayed.
5. If the required profile is not displayed, clear the LINKED PROFILES ONLY checkbox and
search again.
6. Locate the required profile and click SELECT.
7. The selected profile is now attached to the reservation, replacing the previously
attached profile and is listed in the lower grid on the PROFILES tab.
174
Reservation Options
How to view guest related profiles
1. From the Reservation Navigator select the required reservation.
2. Click EDIT to display the reservation edit screen and then click the PROFILES tab.
or
Select GUEST PROFILES from the OPTIONS menu.
The Edit Reservation screen is displayed defaulted to the PROFILES screen.
3. In the lower grid, click the GUEST RELATED button to display the Link Profiles screen.
Listed on the left-hand side are the PROFILES NOT
LINKED TO RESERVATION.
These are the profiles which are linked to the primary profile of this reservation but which
are not linked to the current reservation.
Listed on the right-hand side are the PROFILES LINKED TO RESERVATION.
These are all the guest profiles which are attached to this reservation.
4. The profiles can be added or removed from the reservation via the ADD, REMOVE,
ADD ALL and REMOVE ALL buttons.
5. Select the DETAILS checkbox to display html details for a profile linked to the
reservation.
6. Click OK to close the Link Profiles screen.
How to view profile related profiles
1. From the Reservation Navigator select the required reservation.
2. Click EDIT to display the reservation edit screen and then click the PROFILES tab.
or
Select GUEST PROFILES from the OPTIONS menu.
The Edit Reservation screen is displayed defaulted to the PROFILES screen.
3. In the lower grid, click the PROFILE RELATED button to display the Link Profiles
screen.
Reservation Options
175
Listed on the left-hand side are the PROFILES NOT
LINKED TO RESERVATION.
These are the profiles which are linked to the profile selected in the grid but which are not
linked to the current reservation.
Listed on the right-hand side are the PROFILES LINKED TO RESERVATION.
These are all the guest profiles which are attached to this reservation.
4. The profiles can be added or removed from the reservation via the ADD, REMOVE,
ADD ALL and REMOVE ALL buttons.
5. Select the DETAILS checkbox to display html details for a profile linked to the
reservation.
6. Click OK to close the Link Profiles screen.
Options available on the lower section of the guest profile tab
ADD - to attach an additional profile to the reservation.
PROFILE RELATED - to view the profiles which are related to each of the profiles linked to this
reservation.
EDIT - to edit or view the selected profile.
REMOVE - to remove an attached profile from the reservation.
PRIMARY - to change the primary profile on the reservation.
ATTRIBUTES - to display the attribute options which have been defined for multiple guests.
REPLACE - to replace the selected attached profile with a different profile.
GUEST RELATED - to view the profiles which are related to the primary guest profile of this
reservation.
Multiple guest functionality parameters and warning messages
There are many additional parameters which can be defined for multiple guest
functionality and warning messages will be displayed if the required information is
missing. A full listing and explanation of all the available parameters is available in the
configuration manual. Listed below are some of the available parameters:
176
Reservation Options
Number of adults must match linked guests - a warning message is displayed if the number of
adults on the reservation is not equal to the number of guest profiles attached. However the
number of adults will only be validated if the number of rooms entered on the reservation is 1.
The following parameters are only available if the parameter NUMBER OF ADULTS MUST
MATCH LINKED GUESTS is selected.
WARNING IF GUEST DOCUMENTS ARE NOT ENTERED WHEN SAVING - a warning message is
displayed if any of the guest profiles are missing Date of birth, Place of birth or Nationality.
DENY CHECK IN IF DOCUMENTS ARE NOT ENTERED - check in will be denied if any of the linked
guest profiles are missing Date of birth, Place of birth or Nationality.
MATCH CHILDREN NUMBER - the sum of adults and children will be used when checking the
match for number of persons against number of linked profiles.
The guest profiles option is controlled by the parameter MULTIPLE GUEST PROFILE
FUNCTIONALITY under Setup → Configuration → Global Settings → Reservation →
Reservation2 tab.
A full listing and explanation of all the available parameters for multiple guest
profile functionality is available via the section MULTI GUEST LINK under Setup →
Configuration → Global Settings → Reservation → Reservation 2 tab.
Displaying by default only profiles which are linked to the reservation profile is
controlled by the parameter LINKED PROFILES CHECK ON under Miscellaneous → User
Settings → Search Screens tab. When searching for a profile, only profiles which
are linked to the primary reservation profile are displayed, however if the required
profile is not displayed, the LINKED PROFILES ONLY checkbox can be cleared and the
search performed again.
Attribute categories are defined via the option ATTRIBUTE CATEGORIES under Setup →
Configuration → CRM. For each attribute category added a new category is created
under MARKETING INFO. The elements for each new list box may then be added
under the corresponding MARKETING INFO category under Setup → Configuration →
CRM.
Changes to multi-guest reservation attributes are displayed in the user log if the
option RESERVATION ATTRIBUTE is selected in Setup → Configuration → Users → User
Log → Reservation.
Attribute categories may be defined to be displayed only in specific locations, the
additional list boxes are shown in reservations on the first page, on the multiguest (profiles) tab, the attributes tab or on the special attributes tab. Additionally
an attribute can be defined to be copied from the profile to the reservation and/or
to multi guest indicating that attributes linked to a guest or company profile are
automatically copied to the multi guest page attributes when the attribute is
attached to a profile and this is linked to a reservation on the multi guest page.
Guest Transportation
This option may be used to enter transportation information and is accessible via the OPTIONS
menu of the both the Reservation Navigator and the Edit Reservation screen. The guest
transportation option may be used to provide a pick up service for guests or group members.
TRANSPORTATION INFORMATION is entered per reservation and includes transportation details and
reservation specific details.
The TRANSPORTATION DETAILS are not guest specific but are the details about the actual
transportation including the transportation type, code, date and time, pickup method and
destination. For example Lufthansa, LH401, 1/27/2008 12:11:00 PM, Hotel Car, Paris.
Reservation Options
177
Guest pickup types such as minibus or taxi and guest transport types such as British Airways,
Lufthansa and Deutsche Bahn are pre-defined. The actual transportation details such as the flight
number and arrival time may be pre-defined but can also be created on the fly.
Guest Transportation consists of two screens:
Transport search - to search for defined transportation details.
Transport information - to enter reservation specific transportation information.
How to enter guest transportation information using existing transportation
details
1. From the Reservation Navigator select the reservation to which transportation
information is to be added.
2. Select GUEST TRANSPORTATION from the OPTIONS menu.
or
Click EDIT to display the reservation edit screen and then select GUEST
TRANSPORTATION from the OPTIONS menu.
The Guest Transportation screen is displayed.
3. Click the NEW button; the Transportation Search dialog box is displayed.
The upper part of the screen contains the search criteria and the search results are
displayed in the grid below. The TIME INTERVAL criteria are completed by default
with details from the reservation.
178
Reservation Options
4. The ARRIVAL / DEPARTURE DAY ONLY check box is selected by default so that only
transportation details for the arrival and departure dates are displayed; this can be
changed if required.
5. The FROM and TO dates are completed with the guest's arrival and departure dates;
this can be changed if required.
6. To limit the search by TRANSPORTATION TYPE, select the required transportation type
from the drop-down list.
7. To limit the search by PICKUP TYPE, select the required pickup type from the dropdown list.
8. Click the REFRESH button to update the search according to the entered search
criteria.
9. Select the required transportation from the list and click OK.
The Transportation Information dialog box is displayed.
If the required transport details are not listed, see "How to enter guest
transportation details with new transportation information".
Reservation Options
179
10. The TRANSPORTATION , TIME and PICKUP TYPE are completed automatically, but can be
changed as required.
11. The number of PAX is taken from the reservation, but can be changed as required.
12. Select the PICKUP EMPLOYEE from the drop-down list.
13. In the NOTES box, enter any additional details.
14. Click OK to close the Transport Information dialog box.
15. Click OK to close the Guest Transportation screen.
How to enter guest transportation information with new transportation
details
1. From the Reservation Navigator select the reservation to which transportation
information is to be added.
2. Select GUEST TRANSPORTATION from the OPTIONS menu.
or
Click EDIT to display the reservation edit screen and then select GUEST
TRANSPORTATION from the OPTIONS menu.
The Guest Transportation screen is displayed.
3. Click the NEW button; the Transportation Search dialog box is displayed.
The upper part of the screen contains the search criteria and the search results are
displayed in the grid below. The TIME INTERVAL criteria are completed by default
with details from the reservation.
4. If the required transportation is not listed, click the NEW button to enter new
transportation details.
180
Reservation Options
5. Enter the CODE for the transportation, such as the flight number or train number.
6. Select the TRANSPORTATION TYPE from the drop-down list.
7. Click the drop-down arrow and select the Date and TIME of the transportation.
8. As this is a new entry there is no need to complete the CHANGED TIME details.
9. Select the PICKUP TYPE from the drop-down list.
10. Enter the DESTINATION of the transportation.
11. Select ARRIVAL for arrival transport details or DEPARTURE for departure transport
details.
12. Click OK to close the Transportation dialog box; the new transportation details are
now listed in the grid.
13. Select the transportation type just entered and click OK.
The Transportation Information dialog box is displayed.
14. The TRANSPORTATION , TIME and PICKUP TYPE are completed automatically, but can be
changed as required.
15. The number of PAX is taken from the reservation, but can be changed as required.
16. Select the PICKUP EMPLOYEE from the drop-down list.
17. In the NOTES box, enter any additional details.
18. Click OK to close the Transport Information dialog box.
19. Click OK to close the Guest Transportation screen.
How to edit guest transport information
1. From the Reservation Navigator select the required reservation.
2. Select GUEST TRANSPORTATION from the OPTIONS menu.
or
Click EDIT to display the reservation edit screen and then select GUEST
TRANSPORTATION from the OPTIONS menu.
The Guest Transportation screen is displayed.
Reservation Options
181
3. Select the transportation information to be edited and click the EDIT button to
display the Transportation Information dialog box.
4. Make any changes necessary.
5. Click OK to save the changes.
6. Click OK to close the Guest Transportation screen.
How to delete guest transport information
1. Search for and select the required reservation, then select GUEST TRANSPORTATION
from the OPTIONS menu of the reservation navigator.
The Guest Transportation screen is displayed.
2. Select the transportation detail to be deleted and click the DELETE button, a
confirmation message is displayed.
182
Reservation Options
3. Click YES to delete the guest transportation.
4. Click OK to close the Guest Transportation screen.
How to copy transport details
1. From the Reservation Navigator select the reservation to which transportation
information is to be added.
2. Select GUEST TRANSPORTATION from the OPTIONS menu.
or
Click EDIT to display the reservation edit screen and then select GUEST
TRANSPORTATION from the OPTIONS menu.
The Guest Transportation screen is displayed.
3. Click the NEW button; the Transportation Search dialog box is displayed.
The upper part of the screen contains the search criteria and the search results are
displayed in the grid below. The TIME INTERVAL criteria are completed by default
with details from the reservation.
4. If the required transportation is not listed but a similar transportation exists then
this can be copied and updated rather than entering completely new transportation
details.
5. Select the transportation type to be copied and then click the COPY button.
The Transportation Copy dialog box is displayed with the TIME INTERVAL criteria
completed by default with details from the reservation.
Reservation Options
183
6. Select the DAYS OF THE WEEK or the DAYS for which the transportation details should
be copied.
7. Click OK to create the transportation details; all details are identical with the
exception of the date.
If the copied transportation details meet the search criteria then the details are
listed in the Transportation Search grid.
Transportation Details dialog box
Field
Definition
Code
Code assigned to the transportation, such as flight
number or train number.
Transportation Type
The name of the transportation type, such as
Airport and Terminal number or Station.
Time
The date and time of the transportation.
Changed type
Defines if the arrival or departure of this
transportation has changed.
Pickup type
Defines the pickup type, such as Bus or taxi.
Destination
Defines the destination of the transportation.
Arrival
Defines it the transportation details are for arrival.
Departure
Defines if the transportation details are for
departure.
Transportations Information dialog box
184
Field
Definition
Transportation
Defines the transportation type, code and original
time.
Time
The date and time of the transportation.
Reservation Options
Pax
The number of persons to pickup.
Pickup type
The method of pickup, such as bus or taxi.
Pickup employee
The name of the employee who is responsible for the
pickup.
Arrival
Defines if it is arrival transportation.
Departure
Defines if it is departure transportation.
Notes
May be used to enter additional information.
Transport types and transport details are defined via the option GUEST
TRANSPORTATION CONFIGURATION under Setup → Configuration → Reservations.
History & Future
This option may be used to see past and future reservations for this guest and is accessible via the
OPTIONS menu of the both the Reservation Navigator and the Edit Reservation screen.
Depending on the past and future reservations of this guest, any or all of the following categories
may be displayed:
History - shows all past reservations including reservations with the status 'no-show'.
In House - shows all reservations arriving today or currently checked in.
Future - shows all future reservations.
Cancellations - shows all the reservations which have been cancelled.
How to view history & future reservations
1. From the Reservation Navigator select the reservation to view history and future
reservations.
2. Select HISTORY & FUTURE from the OPTIONS menu.
or
Click EDIT to display the reservation edit screen and then select HISTORY & FUTURE
from the OPTIONS menu.
The History & Future screen is displayed.
Reservation Options
185
3. Click the expand icon
to show all the available past and future reservations.
4. Click the collapse icon
to collapse all the reservations.
5. To expand or collapse by reservation category, click the
category name.
or
next to the
6. Each reservation can be edited by selecting the reservation and pressing the EDIT
RES. button.
7. Click CLOSE to close the History & Future screen.
History & Future Grid
Column
Information displayed
Room #
The room number at the time of departure or currently
blocked depending on the reservation status.
Rate
The room rate at the time of departure or currently reserved
depending on the reservation status.
Arrival
The arrival date of the reservation.
Departure
The departure date of the reservation.
Nights
The number of nights the guest stayed or is reserved to stay.
Adult Nights
The number of nights multiplied with the number of adults on
the reservation.
Revenue
The total revenue for the stay. Only available on history
reservations.
Leisure Bookings
This option may be used to list, edit, create, delete, schedule and post leisure bookings, and is
accessible via the OPTIONS menu of the both the Reservation Navigator and the Edit Reservation
screen. Leisure booking functionality requires an additional licence code.
186
Reservation Options
The V8 Leisure module integrates with the Spa Wellness Software BellaVita. BellaVita software
maintains the multiple leisure facilities a property might offer, including sports or wellness
treatments such as massages or facials. When selecting a leisure booking BellaVita is opened so
that Offers, Employees, Schedules and all Leisure bookings can be maintained.
Note: The view BV FOREIGNGUEST used with the V8 Leisure Module
and BellaVita installation is updated if a profile is changed. This view
is read by the BellaVita Module.
How to enter a new leisure booking
1. From the Reservation Navigator select the required reservation.
2. Select LEISURE BOOKINGS from the OPTIONS menu.
or
Click EDIT to display the reservation edit screen and then select LEISURE BOOKINGS
from the OPTIONS menu.
The Leisure Booking List dialog box appears.
3. Click NEW, the New Booking dialog box is displayed.
4. Select the required BellaVita PLAN from the drop-down list.
Reservation Options
187
5. Type the booking date required in the DATE box or click the drop down arrow and
select a date from the calendar.
6. Click OK, the BellaVita plan selected is displayed.
7. On the plan grid, point to the facility and start time required, then right-click and
select NEW BOOKING from the short-cut menu.
The new booking dialog box for the leisure facility selected is displayed.
188
Reservation Options
8. Complete the leisure booking details and click OK to save the booking.
The leisure booking is closed and the BellaVita main screen is displayed.
9. To close BellaVita, click the FILE menu and select EXIT.
10. The Leisure Booking List is displayed; click SEARCH to update the list.
The leisure booking is listed for this guest.
Reservation Options
189
How to edit a leisure booking
1. From the Reservation Navigator select the required reservation.
2. Select LEISURE BOOKINGS from the OPTIONS menu.
or
Click EDIT to display the reservation edit screen and then select LEISURE BOOKINGS
from the OPTIONS menu.
The Leisure Booking List dialog box is displayed with the leisure bookings reserved
for this guest listed.
3. Search for and locate the booking to be edited.
4. Click the EDIT button.
BellaVita is opened and the selected leisure booking displayed.
5. Make any required changes and click OK to save.
The leisure booking is closed and the BellaVita main screen is displayed.
6. To close BellaVita, click the FILE menu and select EXIT.
7. Click CLOSE to close the Leisure Booking List.
How to post a leisure booking charge
1. From the Reservation Navigator select the required reservation.
2. Select LEISURE BOOKINGS from the OPTIONS menu.
or
Click EDIT to display the reservation edit screen and then select LEISURE BOOKINGS
from the OPTIONS menu.
The Leisure Booking List dialog box appears.
190
Reservation Options
3. The check box NEED TO BE POSTED can be selected to display all the leisure bookings
which have not yet been posted.
4. Search for and locate the booking to be posted. Multiple leisure bookings can be
selected from the list using the CTRL button and left mouse click.
5. Click POST.
The cashier login and password screen is displayed.
6. After logging in, the charge is posted automatically and the leisure booking
marked with a cross in the POSTED column.
Note: Leisure postings can be performed directly from the leisure
module to a financial account for guests with a rebate card linked and
checked in financial account.
Leisure Booking Search Criteria
Fill this field
With this information
Facility
From the drop-down list select one of the facility names. Only the
selected facility will be displayed when the search is activated.
Date
Enter the date for which to search for leisure bookings.
Booking #
Enter the leisure activity booking number from BellaVita.
Include History
Select this check box to include historical leisure booking records.
Need to be
posted
Select this check box to display only leisure bookings which have
not yet been posted. This option allows the user to easily see
which leisure bookings need to be posted.
Only
Problematic
Select this check box to display only problematic leisure
bookings.
Include Inactive
Select this check box to include inactive leisure booking records.
Last Name
Enter the guest's last name.
First Name
Enter the guest's first name.
Description
Enter the description of the leisure activity, for example entering
'Tennis' will list all guests booked for a tennis lesson.
Reservation ID
Enter the ID number of the reservation. Defaults to the ID of the
reservation selected.
Options available on the leisure booking screen
SEARCH - activates the search for leisure bookings according to the entered criteria.
POST - to post the leisure booking charge from BellaVita to the guest's account. Posting
functionality resides in V8 so no additional interface is needed to post to PMS. Posted leisure
charges are indicated with a cross in the field POSTED, when viewing leisure bookings.
RESET FILTER - resets the search criteria.
EDIT PROFILE - to view or change profile details.
EDIT RESERVATION - to view or change reservation details.
NEW - to create a new leisure booking in BellaVita.
EDIT - to switch to BellaVita and open the booking edit screen of the selected leisure booking.
All details related to the leisure booking can be viewed and/or edited.
Reservation Options
191
Leisure booking posting functionality is controlled by the user right POST under
Setup → Configuration → Users → User Definition → Rights → Cashiering.
Linked Documents
This option enables the user to view, edit or add different types of documents to a profile, task or
activity. It is recommended to place these documents on a shared network path to which all users
have access. If a scanner is connected to the workstation you can also scan and attach documents
such as contracts, letters or pictures. The scanner needs to be ‘Twain’ compatible.
Note: The linked documents dialog box may be viewed from various
access points, access is via the linked documents tab or via the options
button, if available.
How to link a document
1. Select the LINKED DOCUMENTS tab.
2. Click ADD, the Attach documents dialog box is displayed.
3. In the DOCUMENT GROUPS list, select the document group required.
4. In the ALLOWED DIRECTORIES list, select the allowed directory required.
5. Click LOAD to display the list of documents.
6. Select the required document and click OPEN, the Document Name field is filled.
192
Reservation Options
7. To attach the document, click ATTACH, the document is shown as linked on the
linked documents tab.
Note: Pictures or images may be attached in JPG or BMP format. The
default setting is JPG, but this may be changed via the OPTIONS
button. The selected settings will be saved for that user.
How to view/edit a linked document
1. Select the LINKED DOCUMENTS tab.
Reservation Options
193
2. Select the document and click VIEW.
Suite8 opens the relevant application, for example, Word if the document is a
Word document.
Note: The document may be edited directly from within the opened
application.
How to scan and link a document
1. Select the LINKED DOCUMENTS tab.
2. Click ADD, the attach documents dialog box is displayed.
3. In the DOCUMENT GROUPS list, click the document group required.
4. In the ALLOWED DIRECTORIES list, click the allowed directory required.
5. Click SCAN, the select source dialog box is displayed.
6. Select the source and click SELECT to open the scanner application.
7. Scan the document.
8. Click ATTACH to link the scanned document.
Document groups and path are defined via the option DOCUMENT TYPES under Setup
→ Configuration → Miscellaneous.
Adding or editing documents on the linked documents tab is controlled by the user
right LINKED DOCUMENTS under Setup → Configuration → Users → User Definition →
Rights → Customer Profiles → Attach documents.
Locator
This option may be used to enter the guests location and is accessible via the OPTIONS menu of the
both the Reservation Navigator and the Edit Reservation screen.
For example, if the guest is not in going to be in his room and is expecting a call then a locator can
be entered so that when the call is received it can be transferred to the location given by the guest
Guest locators are displayed on the HTML details of the room rack and the reservation navigator.
How to enter a guest locator
1. From the Reservation Navigator select the reservation to which a guest locator is
to be added.
2. Select LOCATOR from the OPTIONS menu.
or
Click EDIT to display the reservation edit screen and then select LOCATOR from the
OPTIONS menu.
The Locator screen is displayed.
194
Reservation Options
3. The GUEST name and ROOM number are completed automatically.
4. Enter the guest LOCATION or select where the guest will be located from the
LOCATION LIST and double click.
5. Add any additional details if required.
6. In the UNTIL box click the drop-down arrow and select the Date and Time the
locator is valid until.
7. Click OK to save the locator.
The guest locations are defined via the option LOCATIONS under Setup →
Configuration → Reservations.
Locator functionality is controlled by the user rights VIEW, INSERT, EDIT and DELETE
under Setup → Configuration → Users → User Definition → Rights → Locators.
Luggage Labels
This option may be used to print luggage labels and enter luggage locations for storage or pickup
and is accessible via the OPTIONS menu of the Reservation Navigator. This option is parameter
controlled.
How to enter and print luggage labels
1. From the Reservation Navigator select the required reservation.
2. Select LUGGAGE LABELS from the OPTIONS menu.
The Luggage list screen is displayed.
Reservation Options
195
3. Click NEW to display the Luggage dialog box.
4. If auto-numbering is not active then enter the LUGGAGE LABEL NUMBER; depending on
the configuration only a numeric entry may be allowed.
5. Enter the NUMBER OF PIECES of luggage.
6. Select the current LOCATION of the luggage from the drop-down list; depending on
the configuration a location may be mandatory.
7. Select a STATUS from the drop-down list, such as normal, picked up by guest or
delivered to room.
8. Enter any additional information in the COMMENTS box.
9. If the luggage label is to be printed click the PRINT button.
10. Click OK to add the luggage label details to the luggage list.
196
Reservation Options
11. Click CLOSE to close the Luggage List.
How to mark a luggage detail as picked up
1. From the Reservation Navigator select the required reservation.
2. Select LUGGAGE LABELS from the OPTIONS menu.
The Luggage list screen is displayed.
3. Select the luggage detail to be marked as picked up.
4. Click the PICK UP button, a confirmation message is displayed.
Reservation Options
197
5. Click YES to mark the selected item as picked up.
The luggage detail now has the status PICKED UP.
6. Click CLOSE to close the Luggage List.
How to mark a luggage detail as delivered
1. From the Reservation Navigator select the required reservation.
2. Select LUGGAGE LABELS from the OPTIONS menu.
The Luggage list screen is displayed.
3. Select the luggage detail to be marked as delivered.
4. Click the DELIVERED button, a confirmation message is displayed.
5. Click YES to mark the selected item as delivered.
The luggage detail now has the status DELIVERED.
6. Click CLOSE to close the Luggage List.
Options available on the Luggage List screen
198
NEW - to enter a new luggage detail.
PICK UP - to mark the luggage detail as picked up.
REFRESH - to update the current display.
EDIT - to edit an existing luggage detail, this option is parameter controlled.
PRINT - to print the luggage detail; depending on the configuration it may not be possible to
reprint luggage details.
DELIVERED - to mark the luggage detail as delivered.
LOCATION - to change the location of the luggage.
DELETE - to delete the selected luggage detail; depending on the configuration it may not be
possible to delete printed and/or not printed details.
LOG - to display the luggage user log.
Reservation Options
Luggage Dialog Box
Fill in this field
With this information
Luggage label number
If auto-numbering is not active then enter the luggage
label number; depending on the configuration only a
numeric entry may be allowed.
Number of pieces
The number of pieces of luggage to be stored or picked up.
Locator
The location of the luggage.
Status
Completed by default with the status NORMAL. The status
changes to PICKED UP or DELIVERED when the luggage detail
is marked as picked up or delivered.
Comments
Any additional details about the luggage.
Luggage label functionality is controlled by the parameter LUGGAGE LABEL
FUNCTIONALITY under Setup → Configuration → Global Settings → Reservation →
Luggage 5 tab. All the luggage label configuration options are displayed when the
option is activated.
Luggage locations are defined via the option LUGGAGE LOCATION under Setup →
Configuration → Reservations.
Meal Plan
This option may be used to view or change the number of breakfasts, lunches and dinners
scheduled per day and is accessible via the OPTIONS menu of the Edit Reservation screen and via
the MEAL PLAN tab on the Edit Reservation screen. This option is parameter controlled.
The meal plan values are automatically completed based on rate code board type and the meal
plan default settings for the first day and the departure day. Possible board types are No Board,
Breakfast, Half Board Dinner, Half Board Lunch, Full Board and All Inclusive.
The meal plan values can be adjusted manually if required.
The following views may be used in reports to differentiate adults and children per child category:
V8_REP_MealplanPERXCACREGRP
V8_REP_MEALPLANPERXCAC
How to view or change the meal plan
1. From the Reservation Navigator select the required reservation.
2. Click EDIT to display the reservation edit screen and then select MEAL PLAN from the
OPTIONS menu.
The Edit Reservation screen is displayed defaulted to the MEAL PLAN tab.
Reservation Options
199
3. The BREAKFAST, LUNCH and DINNER columns are completed on a per day basis. The
example below shows a guest staying on a full board basis; this means the guest
is entitled to breakfast, lunch and dinner every day with the exception of the
arrival day where there is dinner but no breakfast or lunch and on the departure
day where there is breakfast and lunch but no dinner.
4. The default values can be changed by entering the new value directly in the grid or
by highlighting the days and meals to be changed, entering the value on the Set
Value number box and clicking the SET VALUE button.
Meal Plan values which have been adjusted manually are highlighted in grey.
5. To reset the meal plan values highlight the dates and meal to be reset and click
the RATE VALUE button; the values are reset to the rate code values.
6. Click OK to close the Meal Plan tab.
200
Reservation Options
Meal plan functionality is controlled by the parameter MEAL PLAN FUNCTIONALITY
under Setup → Configuration → Global Settings → Reservation 1 tab → Meal Plan
defaults.
The meal plan tab is displayed by default if the parameter SHOW MEAL PLAN TAB BY
DEFAULT is active under Setup → Configuration → Global Settings → Reservation 1
tab → Meal Plan defaults.
Meal plan manual adjustments are controlled by the user right MEALPLAN MANUAL
ADJUSTMENTS under Setup → Configuration → Users → User Definition → Rights →
Reservation.
Meal plan changes are displayed in the user log if the option RESERVATION MANUAL
MEALPLAN is selected in Setup → Configuration → Users → User Log → Reservation.
The default settings for breakfast, lunch and dinner are defined via the options
FIRST DAY, DEPARTURE DAY and DAY USE RESERVATIONS under Setup → Configuration →
Global Settings → Reservation 1 tab → Meal Plan defaults.
Messages
This option may be used to leave a message for a guest and is accessible via the OPTIONS menu of
the both the Reservation Navigator and the Edit Reservation screen. Messages can be printed in a
user definable format.
With an appropriate interface messages can be sent via:
The video system, so the guest can view the message on the television screen.
The telephone system, which triggers the message lamp in the room.
If an interface is connected the NOTIFY INTERFACE box is selected by default.
How to enter a new guest message
1. From the Reservation Navigator select the reservation to which a message is to be
added.
2. Select MESSAGES from the OPTIONS menu.
or
Click EDIT to display the reservation edit screen and then select MESSAGES from the
OPTIONS menu.
The Message dialog box is displayed.
Reservation Options
201
3. In the MESSAGE FROM box enter the name of the person who is leaving the
message.
4. Enter the CONTACT INFO. such as a telephone number.
5. The NOTIFY INTERFACE option is selected by default if an appropriate interface is
active.
6. Enter the guests MESSAGE or select a standard message text from the MESSAGE TEXT
LIST and double click.
7. Add any additional details if required.
8. Click OK to save the message without printing or click PRINT to save and print the
message. A warning message is displayed that the message must be saved before
printing.
9. Click YES to save and print the message.
10. Click OK to close the message dialog box.
How to view or edit a guest message
1. From the Reservation Navigator select the required reservation.
2. Select MESSAGES from the OPTIONS menu.
or
Click EDIT to display the reservation edit screen and then select MESSAGES from the
OPTIONS menu.
202
Reservation Options
If the guest already has a message then the Messages screen is displayed.
The screen is split into 3 sections:
The upper left-hand side of the screen is the search area. You can search for messages by
entering a guest NAME, a ROOM NO or a DATE. As the messages screen was accessed from
a specific reservation then only the search by DATE is relevant here.
The upper right-hand side of the screen allows the search to be narrowed by message
status:
ALL MESSAGES - not received, printed and received messages.
NOT RECEIVED - for all messages which have not been received yet.
PRINTED MESSAGES - all messages which have been printed.
RECEIVED - all messages which have been marked as received.
VIDEO SENT - all messages that have been sent via the video interface.
(Interface Dependant)
VIDEO RECEIVED - all messages that have been received by the guest via the
video interface. (Interface Dependant)
The messages for this guest are displayed in the grid in the lower half of the screen.
3. To activate the search, click SEARCH, to clear the search criteria, click CLEAR.
4. Select the message to be viewed and click EDIT.
The message screen is split into two sections:
The upper part displays guest details, who the message was from and contact details.
The lower part displays the message text.
Reservation Options
203
5. Make any changes if required to the message and click OK to close the message
without printing or click PRINT to print the message.
6. Click CANCEL to exit the message dialog box without saving any changes.
How to print a guest message
1. From the Reservation Navigator select the required reservation.
2. Select MESSAGES from the OPTIONS menu.
or
Click EDIT to display the reservation edit screen and then select MESSAGES from the
OPTIONS menu.
If the guest already has a message then the Messages screen is displayed.
3. Select the message to be printed and click PRINT.
4. Click CLOSE to exit the messages screen.
Options available on the messages screen
NEW - to enter a new message.
EDIT - to edit an existing message.
RECEIVED - to mark the selected message as received.
RECEIVED ALL - to mark all messages as received.
PRINT - to print the selected message.
FIND IN GRID - to further narrow the search.
Standard message texts can be defined via the option MESSAGES under Setup →
Configuration → Reservations.
204
Reservation Options
Notes
This option may be used to enter guest or reservation notes and is accessible via the OPTIONS menu
of the Reservation Navigator and via the NOTES tab on the Edit Reservation screen.
You can add reservation notes which are specific to a single reservation or guest notes which are
stored on the profile and can be viewed with each new reservation made with that profile. Notes
are divided into user-definable categories and can be included on correspondence if marked as
viewable by the guest. Notes which are marked as guest viewable are highlighted in red. An
unlimited number of guest or reservations notes can be added. Reservation notes are indicated on
the edit reservation screen by the indicator
.
Adding a new note via the reservation
1. From the Reservation Navigator select the required reservation.
2. Click EDIT to display the reservation edit screen and then select NOTES from the
OPTIONS menu.
3. Click the NOTES tab to display the notes screen.
Any existing notes are listed in the upper part of the Notes dialog box.
4. Click the NEW button, a pop-up menu is displayed.
Reservation Options
205
5. Select to add the note to the reservation or to one of the attached profiles, the
Add Note dialog is displayed.
6. The DATE/TIME and USER are automatically completed.
7. Select a NOTE CATEGORY from the drop-down list.
8. Select the option GUEST VIEWABLE if the guest is allowed to view the note.
Depending on the definition and setup of any customer correspondence, this
option is used to control which notes should appear on contracts, offers or letters.
Leave it empty if you do not want the guest to be aware of this note.
9. In the NOTE box enter the text for the note.
10. The day, date, time and name of the logged in user can be added to the text of
the note by pressing F7.
11. Click OK to save the note.
12. Click OK to close the Edit Reservation screen.
Adding a new note via the options button
1. From the Reservation Navigator select the required reservation.
2. Select NOTES from the OPTIONS menu.
206
Reservation Options
Any existing notes are listed in the upper part of the Notes dialog box.
3. Click the NEW button, a pop-up menu is displayed.
4. Select to add the note to the reservation or to one of the attached profiles, the
Add Note dialog box is displayed.
5. The DATE/TIME and USER are automatically completed.
6. Select a NOTE CATEGORY from the drop-down list.
7. Select the option GUEST VIEWABLE if the guest is allowed to view the note.
Depending on the definition and setup of any customer correspondence, this
option is used to control which notes should appear on contracts, offers or letters.
Leave it empty if you do not want the guest to be aware of this note.
8. In the NOTE box enter the text for the note.
9. The day, date, time and name of the logged in user can be added to the text of
the note by pressing F7.
Reservation Options
207
10. Click OK to save the note.
How to edit a note
1. Click the NOTES button to display the notes dialog box.
2. All the existing notes are listed in the upper part of the dialog box. The text of
each note is listed in the lower part of the dialog box. Click on the DETAILS button
to view details such as the category, when the note was entered and the time it
was entered.
3. Select the note to be edited and click the EDIT button to display the Edit Note
dialog box.
4. Make any changes required and click OK to save the note.
How to delete a note
1. Click the NOTES button to display the notes dialog.
2. All the existing notes are listed in the upper part of the dialog box. The text of
each note is listed in the lower part of the dialog box. Click on the DETAILS button
to view details such as the category, when the note was entered and the time it
was entered.
3. Select the note to be deleted.
4. Click the DELETE button, a confirmation message is displayed.
5. Click YES, the note is deleted.
Note Categories are defined via the option NOTES CATEGORIES under Setup →
Configuration → Reservations. Note Categories can be defined to be restricted and
then only users with the appropriate user rights can view, edit, insert or delete a
restricted note. Note categories can also be defined to pop-up when editing the
reservation.
Restricted notes functionality is controlled by the rights under the user right
RESTRICTED NOTES under Setup → Configuration → Users → User Definition → Rights
→ Miscellaneous.
Text Templates
Text templates may be created and used where the same text is required very often or where the
same basic text can be used and minor adjustments made.
Text templates can be created in one of two ways:
Via the NOTES dialog box.
Via the option TEXT TEMPLATES under Setup → Configuration → Miscellaneous.
How to add a template
1. Open any NOTES screen.
2. Click NEW to open the Add Note dialog box.
208
Reservation Options
3. Enter the text required for the template.
4. Press ALT + E to export the text, the Text Template dialog is displayed.
5. Allocate a FILE NAME for the template.
6. Click OK to save the template.
7. The Add Note dialog is re-displayed; click OK to save the text as a note or CANCEL
to exit from the Add Note dialog screen.
8. Click CLOSE to close the Notes dialog box.
How to import a template
1. Open the NOTES screen.
2. Click NEW to open the Add Note dialog screen.
Reservation Options
209
3. Place the cursor in the note box and press ALT + I to import a text template.
4. The Text Template dialog is displayed listing all available templates.
To search for a template, enter a template NAME, click SEARCH.
To edit an existing template, click the EDIT button.
To create a new template, click the NEW Button.
5. Double-click the required template or highlight the required template from the list
and click OK.
6. The Add Note dialog box is displayed with the template in the NOTE box.
7. Make any adjustments necessary and click OK to save the note.
8. Click CLOSE to close the Notes dialog.
Note: Text template can also be imported in to the body part of the
print screen when sending emails.
Note categories are defined via the option NOTES CATEGORIES under Setup →
Configuration → CRM.
Text templates may also be defined via the option TEXT TEMPLATES under Setup →
Configuration → Miscellaneous.
210
Reservation Options
Party
This option may be used to link individual reservations and is accessible via the OPTIONS menu of
the both the Reservation Navigator and the Edit Reservation screen.
Party reservations can be used to link individual reservations without creating a group
reservation. Party is a common word for a group of people, such as a family event, a wedding or
birthday party where several rooms are booked.
Reservations which are linked to a party can be located by selecting PARTY and the party name
from the drop-down list on the Adv. Qry.
A reservation which is linked to a party has the party name displayed on the reservation html
under INDICATORS.
The Edit Reservation screen can be customised to include party details using Form Customization.
A PARTY button can be added to the edit reservation screen (fResEdit) by selecting the button
FidRespartyBitBtn from the FidResButton tab on the Component Palette.
The PARTY NAME can be displayed on the edit reservation screen (fResEdit) by selecting the
field FidResEditParty from the FidResEdit tab on the Component Palette.
How to create a party reservation
1. From the Reservation Navigator select the required reservation.
2. Select PARTY from the OPTIONS menu to display the party sub-menu.
or
Click EDIT to display the reservation edit screen and then select PARTY from the
OPTIONS menu.
The Party sub-menu is displayed.
3. Select CREATE PARTY, the party dialog box is displayed.
4. The NAME of the party defaults to the reservations last name; this may be changed
if required.
Reservation Options
211
5. The CONTACT Name defaults to the reservation name; this may be changed by
selecting a different name via the profile search.
6. Enter a COMMENT, such as the reason for the party reservation.
7. Click OK to save.
How to join a party reservation
1. From the Reservation Navigator select the required reservation.
2. Select PARTY from the OPTIONS menu to display the party sub-menu.
or
Click EDIT to display the reservation edit screen and then select PARTY from the
OPTIONS menu.
The Party sub-menu is displayed.
3. Select JOIN PARTY, the join party dialog box is displayed.
4. Select the party from the list of available parties.
If the last member of a party has checked out, the party is not available for selection unless
INCLUDE CHECKED OUT is selected.
To view party reservations with a status which is not affecting the availability such as
cancelled or tentative reservations, select INCLUDE NOT AFFECTING AVAILABILITY.
5. Click SELECT to join the selected party.
How to clear a party reservation
1. From the Reservation Navigator select the required reservation.
2. Select PARTY from the OPTIONS menu to display the party sub-menu.
or
Click EDIT to display the reservation edit screen and then select PARTY from the
OPTIONS menu.
212
Reservation Options
The Party sub-menu is displayed.
3. Select CLEAR PARTY, a warning message is displayed.
4. Click YES to clear the party linkage for the selected reservation.
How to edit a party reservation
1. From the Reservation Navigator select the required reservation.
2. Select PARTY from the OPTIONS menu to display the party sub-menu.
or
Click EDIT to display the reservation edit screen and then select PARTY from the
OPTIONS menu.
The Party sub-menu is displayed.
3. Select EDIT PARTY, the reservation party edit screen is displayed.
4. Make any required changes to the NAME, CONTACT or COMMENT.
5. Click OK to save any changes and close the Reservation Party Edit dialog box.
How to join a party reservation via the edit reservation screen
1. From the Reservation Navigator select the required reservation.
2. Click EDIT to display the reservation edit screen.
3. On the reservation edit screen click the PARTY button.
Note: The PARTY button can be added to the Reservation Edit screen
via Setup → Miscellaneous → Form Customization.
The Reservation Party dialog box is displayed.
Reservation Options
213
4. Select the party from the list of available parties.
If the last member of a party has checked out, the party is not available for selection unless
INCLUDE CHECKED OUT is selected.
To view party reservations with a status which is not affecting the availability such as
cancelled or tentative reservations, select INCLUDE NOT AFFECTING AVAILABILITY.
5. Click SELECT to join the selected party.
Note: An add on reservation created from a reservation linked to a
party is also linked to the party.
Reservations which are split from a reservation linked to a party are
linked to the same party.
Party functionality is controlled by the parameter PARTY FUNCTIONALITY under
Configuration → Global Settings → Reservation 1 tab.
Party linking can be tracked in the user log by activating the option RESERVATION
PARTY LINK under Setup → Configuration → Users → User Log>Reservation.
Post No Show Fees
This option may be used to post no show charges and is accessible via the OPTIONS menu of the
Reservation Navigator. In order to use this functionality a policy rule, a policy type and a financial
account group must be defined for no show reservations. This option is only available if the status
of the reservation is NO SHOW. A no-show reservation is indicated on the edit reservation screen by
the indicator
.
No-show charges may be posted automatically or manually. If the no-show policy rule has been
set to automatic then the no-show charges will be posted to a financial account during night audit.
No-show fees can be posted manually to a single guest or multiple guests by selecting the guest or
guests and then selecting the option POST NOSHOW FEE.
214
Reservation Options
The amount to be charged for a no-show can be defined in the configuration to be a fixed amount
or as a percentage of the room rate for a maximum number of days, for example, 80% of the room
rate for up to a maximum of 3 days.
There are two options when posting no-show charges manually:
New financial account - posts the no show charge to a new financial account.
To selected financial account - posts the no show charge to an existing financial account.
How to post the no show fee to a new financial account
1. From the Reservation Navigator select a reservation with the status no show.
2. Select POST NOSHOW FEE from the OPTIONS menu to display the sub-menu.
3. Select NEW FINANCIAL ACCOUNT.
A message is displayed indicating that the no show fee has been posted to a new
financial account in room number 'x'.
The folio can now be checked out via billing in the normal manner.
How to post the no show fee to a selected financial account
1. From the Reservation Navigator select a reservation with the status no show.
2. Select POST NOSHOW FEE from the OPTIONS menu to display the sub-menu.
3. Select TO SELECTED FINANCIAL ACCOUNT, the billing guest search screen is displayed
defaulted to display only financial accounts.
Reservation Options
215
4. Complete the search criteria and click REFRESH.
All the financial accounts meeting the entered search criteria are listed.
5. Locate the required financial account and then click SELECT.
A message is displayed indicating that the no show fee has been posted.
The folio can now be checked out via billing in the normal manner.
The policy rule for no show reservations is defined via the option NO SHOW under
Setup → Configuration → Global Settings → Policies tab. This rule defines the type
of action, the department code, the posting text and the financial account group.
Policy types such as 'Standard Policy' or 'Policy for a Company with Contract' are
defined via the option POLICIES under Setup → Configuration → Reservations. This
option is used to configure the rules to calculate the no show fee to be charged,
for example 80% of the room rate for up to a maximum of 3 days.
This functionality requires that a financial account group is defined via the option
FINANCIAL ACCOUNT GROUPS under Setup → Configuration → Cashiering. The type of
financial account group must be DEPOSIT, CANCELLATION AND NO SHOW and
Autonumber must be selected.
Post Departure Keys
This option may be used to issue a post departure key for charging purposes and is accessible via
the OPTIONS menu of the Reservation Navigator and via the C/O OPTIONS menu on the guest folio.
In order to use this functionality a financial account group must be defined for post departure
accounts and financial account numbers defined.
This option is useful if the guest has vacated the room but is remaining at the property; a postdeparture key can be issued to the guest for charging purposes.
216
Reservation Options
How does post departure keys work?
The guest is checked-out using the Post Departure Key option.
A financial account is created and checked-in; the key for the original reservation is deleted
and a 'make key' command is sent to the interface.
The charges are transferred from the room account to the post departure financial account.
Charges are transferred to the relevant windows and any existing billing instructions are
copied.
A post departure key is printed and linked to the post departure financial account.
With the post departure key the guest can continue to use the facilities of the property and
charge to the post departure account.
When the guest is actually leaving the property:
The folio is checked out in the normal manner.
The post check out financial account is closed.
How to issue a post departure key
1. From the Reservation Navigator select the reservation to be issued with a post
departure key.
2. Click the POST DEPARTURE button.
A message is displayed indicating that the post check out was successful.
3. Click OK to close the post check-out successful message.
A financial account was created and checked-in, and a make key request sent to
the interface.
4. A post departure key is printed and linked to the post departure financial account.
The guest can continue to use the facilities of the property and charge to the post
departure account.
Note: The POST DEPARTURE KEY option is also available on the cashier
C/O OPTIONS menu.
How to check-out a post departure
1. Click the CASHIER menu and select BILLING or press CTRL+B.
The Cashier Login screen is displayed.
2. Enter your CASHIER NUMBER and PASSWORD, click LOGIN.
The billing search screen is displayed; make sure that POST DEPARTURE financial
accounts are selected to be displayed.
3. Select the required reservation and double-click or click the SELECT button to
display the guest folio.
4. Select CHECKOUT and complete the checkout in the normal manner.
Reservation Options
217
Post departure keys functionality is controlled by the parameter POST DEPARTURE
KEYS under Setup → Configuration → Global Settings → Billing → Billing 3 tab and
works in conjunction with a key card interface.
This functionality requires that a financial account group is defined via the option
FINANCIAL ACCOUNT GROUPS under Setup → Configuration → Cashiering; the type of
financial account group must be POST DEPARTURE ACCOUNT.
Note: Post Departure keys functionality cannot work in conjunction
with Advance Package Handling functionality and may not work
with all key card systems.
Pre Arrival Keys
This option may be used to issue a pre-arrival key for charging purposes and is accessible via the
PRE ARRIVAL button and via the OPTIONS menu of the Reservation Navigator.
In order to use this functionality a financial account group must be defined for pre-arrival accounts
and financial account numbers defined.
This option is useful for when the guest arrives to check-in and the room is not yet available.
How does pre-arrival key check-in work?
The guest is checked-in using the pre-check in option.
A financial account is created and checked-in; the original reservation remains as an expected
arrival.
A pre-arrival key is printed and linked to the pre-check in financial account.
With the pre-arrival key the guest can now use the facilities of the property and charge to the
pre-check in account.
When the room is available:
The guest is checked in to their room in the normal manner.
The charges are transferred from the financial account to the room account.
The pre-check in financial account is closed.
How to issue a pre arrival key
1. From the Reservation Navigator select the reservation to be issued with a prearrival key.
2. Click the PRE ARRIVAL KEYS button.
A message is displayed indicating that the pre check in was successful.
3. Click OK to close the pre check in successful message.
A financial account was created and checked-in, and a make key request sent to
the interface.
4. A pre-arrival key is printed and linked to the pre-check in financial account.
The guest can now use the facilities of the property and charge to the pre-check in
account.
218
Reservation Options
How to check-in a pre arrival reservation
1. From the Reservation Navigator select the reservation to be checked-in.
2. Click the CHECK IN button.
A message is displayed indicating that the check in was successful and that the pre
check-in account was closed.
3. Click OK to close the check-in successful message.
Any charges on the pre-check in account are automatically transferred to the room
account.
Depending on the interfaces installed additional messages may be displayed.
Pre arrival keys functionality is controlled by the parameter PRE ARRIVAL KEYS under
Setup → Configuration → Global Settings → Billing → Billing 3 tab and works in
conjunction with a key card interface.
This functionality requires that a financial account group is defined via the option
FINANCIAL ACCOUNT GROUPS under Setup → Configuration → Cashiering; the type of
financial account group must be PRE ARRIVAL ACCOUNT.
Note: Pre arrival keys functionality cannot work in conjunction with
Advance Package Handling functionality and may not work with all
key card systems.
Registration Card
This option may be used to print a registration card and is accessible via the OPTIONS menu of the
both the Reservation Navigator and the Edit Reservation screen.
This option is useful for walk in guests, where the reservation and check in takes place at the same
time.
How to print a registration card
1. From the Reservation Navigator select the required reservation.
2. Select REGISTRATION CARD from the OPTIONS menu.
or
Click EDIT to display the reservation edit screen and then select REGISTRATION CARD
from the OPTIONS menu.
The Print Registration Card dialog box is displayed.
Reservation Options
219
3. Select the REGISTRATION CARD template required from the drop-down list.
4. Click PRINT to print the registration card.
How to register a guest with JetWeb
1. From the Reservation Navigator select the required checked-in reservation.
2. Select REGISTRATION CARD from the OPTIONS menu.
or
Click EDIT to display the reservation edit screen and then select REGISTRATION CARD
from the OPTIONS menu.
The Print Registration Card dialog box is displayed.
3. Select the REGISTRATION CARD template required from the drop-down list.
4. Click JETWEB to open the JetWeb Interface Process Status dialog box.
220
Reservation Options
5. Click START to register the guest with JetWeb.
Registration card templates are defined under Miscellaneous → Reports → Text
Templates.
The default registration card template is defined under the option REGISTRATION
CARD TEMPLATE under Setup → Configuration → Global Settings → Reservation 3
tab.
Multiple guest names can be printed on a single registration card by activating the
parameter PRINT REGCARD PER MULTIGUEST under Setup → Configuration → Global
Setting → Reservation 3 tab.
A number cycle can be added to registration card printing by activating the
parameter NUMBER CYCLE FOR REGISTRATION CARDS under Setup → Configuration →
Global Settings → Reservation 3 Tab. This is useful for countries that need the
registration cards to be printed with a sequential number.
With the parameter NUMBER CYCLE FOR REGISTRATION CARDS activated then the same
registration card number can be printed for sharing guest by activating the
parameter SAME REGISTRATION CARD NO. FOR SHARERS under Setup → Configuration →
Global Settings → Reservation 3 tab.
JetWeb functionality is controlled by the licence JETWEB INTERFACE under Setup →
Miscellaneous → License → V8 Sublicenses → Software Interfaces
Reservation Options
221
Registration Card Batch
This option may be used to print multiple registration cards and is accessible via the OPTIONS
menu of the Reservation Navigator. This option is only available when reservations are displayed
via the arrivals tab of the reservation navigator.
Registration card batch is useful for printing registration cards for guests arriving tomorrow or for
group members.
How to preview or print batch registration cards
1. From the Reservation Navigator select the ARRIVAL tab and use the search criteria
to display the required arrivals.
2. Select REGISTRATION CARD BATCH from the OPTIONS menu.
3. Select the REGISTRATION CARD template required from the drop-down list.
4. Click PRINT to print registration cards.
or
5. To preview the registration cards before printing, select the PREVIEW check box.
The Registration Card Batch screen is displayed.
222
Reservation Options
6. For an explanation of the options available on the preview screen, see the Options
available on the registration card batch screen below:
7. Click PRINT to print the registration cards.
or
8. Click CANCEL to exit the screen without printing the registration cards
Options available on the registration card batch screen
PRINT - to print the registration cards.
EXPORT - to export the registration card batch to a file or an application.
SETUP - to change the printer setup.
FIRST - to display the first registration card in the batch.
PREV - to display the previous registration card in the batch.
NEXT - to display the next registration card in the batch.
LAST - to display the last registration card in the batch.
FIND - to search for specific text - enter the text to be located and press the Find button.
ZOOM - to adjust the size of the display.
CANCEL - to exit the screen without printing the registration cards.
The functionality to apply the same registration number to all group members is
controlled by the parameter NUMBER CYCLE FOR REGISTRATION CARDS under Setup →
Configuration → Global Settings → Reservation → Reservation 3 tab.
Reservation Options
223
Reinstate
This option may be used to reinstate a cancelled or no-show reservation and is accessible via the
REINSTATE button on the reservation navigator and via the OPTIONS menu of the Reservation
Navigator. The Reinstate option is only available on cancelled or no-show reservations which have
a departure date which is equal to or greater than the current hotel date.
When the reservation being reinstated has an original arrival date prior to the current hotel date
then a new reservation is created. If the reservation being reinstated has an original arrival date
which is equal to or greater than the current hotel date then the original reservation is reinstated.
How to reinstate a cancelled reservation with a current or future arrival date
1. From the Reservation Navigator select the required reservation.
2. Select REINSTATE from the OPTIONS menu.
or
Click the REINSTATE button.
The Reinstate Reservation dialog box is displayed.
3. Select the REASON the reservation is being reinstated from the drop-down list.
4. In the DESCRIPTION box, the reason for reinstating the reservation is listed and
additional details can be added if required.
5. Click YES to reinstate the reservation, a message is displayed indicating that the
reservation reinstate was successful.
224
Reservation Options
Reinstate dialog box
Fill in this field
With this information
Reason
The reason for reinstating the reservation.
History
The cancellation/no show history of the reservation.
Description
The reinstate reason is completed by default, add any
additional details if required.
How to reinstate a cancelled reservation for a past arrival date
1. From the Reservation Navigator select the required reservation.
2. Select REINSTATE from the OPTIONS menu.
or
Click the REINSTATE button.
The Reinstate Reservation dialog box is displayed.
3. Select the REASON the reservation is being reinstated from the drop-down list.
4. In the DESCRIPTION box, the reason for reinstating the reservation is listed and
additional details can be added if required.
5. Click YES to reinstate the reservation, if there are billing instructions then a
message is displayed
Reservation Options
225
6. Click YES to adjust the billing instructions to the new dates.
7. The Edit Reservation screen is displayed with a new reservation which is identical
to the cancelled reservation with the exception of the arrival date which has been
changed to the current hotel date. The departure date remains the same as on the
original reservation.
8. Make any changes necessary and click OK to save the reservation.
A message is displayed advising that the departure date of the original cancelled
reservation has been changed to the current hotel date.
The new reservation is displayed as an expected arrival for the current day.
How to reinstate a no-show reservation
1. From the Reservation Navigator select a reservation with the status no-show.
2. Select REINSTATE from the OPTIONS menu.
or
Click the REINSTATE button.
3. If there are billing instructions then a message is displayed
4. Click YES to adjust the billing instructions to the new dates.
5. The Edit Reservation screen is displayed with a new reservation which is identical
to the no-show reservation with the exception of the arrival date which has been
changed to the current system date. The departure date remains the same as on
the original reservation.
6. Make any changes necessary and click OK to save the reservation.
A message is displayed advising that the departure date of the original no-show
reservation has been changed to the current hotel date.
226
Reservation Options
The new reservation is displayed as an expected arrival for the current day. The
original reservation remains in the system with the status no-show and a
departure date equal to the current hotel date.
Room Assignment
This option may be used to search for and assign a room to a reservation and is accessible via the
OPTIONS menu of the both the Reservation Navigator and the Edit Reservation screen.
Several search criteria on the room search screen are completed with details from the reservation,
but these may be changed and additional criteria may be entered in order to further define the
room search.
If a room type change occurs during a stay it will be reflected on the room search screen so that
room numbers can be assigned for the different room types.
Selecting more than one reservation on the reservation navigator and then selecting the option
Room Assignment from the Options menu will display the Room Blocking dialog box and not the
Room Assignment dialog box.
How to search for available rooms
1. From the Reservation Navigator select the required reservation.
2. Select ROOM ASSIGNMENT from the OPTIONS menu.
or
Click EDIT to display the reservation edit screen and then select ROOM ASSIGNMENT
from the OPTIONS menu.
The Edit Reservation screen is displayed first and then the Room Search screen is
displayed.
Note: If a room type change occurs during a stay then this is
displayed on the room search screen, so that room numbers can be
assigned for the different room types.
Reservation Options
227
Several criteria are completed with details from the reservation, but these may be
changed as required.
3. The STARTING DATE defaults to the reservation arrival date.
4. The number of NIGHTS defaults to the number of nights in the reservation.
5. The ROOM TYPES box is completed with the reservation room type.
6. To search for a specific room number, enter the room number in the ROOM NO.
field.
7. If ROOM FEATURES were entered on the guest profile or reservation then these are
displayed.
8. In the FLOORS field select the required floors from the floor selection list and then
click CLOSE.
9. Select DUE OUT ROOMS to include rooms which are due to depart.
10. Select INCL. OUT OF SERVICE to include rooms which have the status out of service.
11. Select the room statuses to include from the HOUSEKEEPING STATUS list.
12. Click SEARCH to display the rooms available according to the entered criteria.
13. Select the required room from the grid and click the SELECT button.
The Edit Reservation screen is displayed with the assigned room.
14. Click OK to close the reservation.
Note: The housekeeping statuses on which the search can be made are
dependant upon the statuses that have been configured by your
property.
Room search dialog box search criteria
228
Fill in this field
With this information
Starting Date
The date for which to search for available rooms. Defaults to
the reservation arrival date.
Nights
The number of night's to search for available rooms.
Defaults to the number of nights in the reservation.
Room Types
Select specific room types if required. Defaults to the
reservation room type.
Room Number
Enter a specific room number if required.
Room Features
Select specific room features. Room features entered on the
guest profile or reservation are displayed by default.
Floors
Select specific floors if required.
Due out rooms
Select this option to include rooms currently in-house but
are due to check-out. Due out rooms can be included by
default by activating the parameter DUE OUT ROOMS ON ROOM
SEARCH (DEFAULT) in configuration.
Include out of service
Select this option to include rooms with the status out of
service.
Housekeeping Status
Select the required housekeeping statuses.
Reservation Options
Rooms search dialog box grid names
Field Name
Explanation of the field
Room No
The room number.
Room Type
The room type.
Description
The room type description.
Features
The room features, for example, CN – Connecting Door.
Floor
The floor number.
Housekeeping Status
The housekeeping status of the room, for example, CL –
Clean, DI – Dirty or INS – Inspected
No. of pax
The maximum number of people that under normal
occupancy conditions could sleep in the room (excluding
cots and/or cribs).
Next Block
The next arrival date for which the room is blocked.
Assignments
Displays information about rooms that have special
housekeeping or general assignments. For example, TRI
may indicate to housekeeping that the room needs to be set
up as a triple.
The housekeeping statuses are defined under Setup → Configuration →
Reservations → Room Management → Housekeeping.
Due out rooms can be included by default in the room search by selecting the
parameter DUE OUT ROOMS ON ROOM SEARCH (DEFAULT) under Setup → Configuration →
Global Settings → Miscellaneous → Search Screens 2 tab.
Room Move Reasons
This option may be used to enter a reason and a time for a schedule room move and is accessible
via the OPTIONS menu of the Edit Reservation screen.
The ROOM MOVE REASONS option is only available if the guest checked-in prior to today and is
currently scheduled to move rooms.
On the Room Rack (Ctrl + L) placing the cursor on a reservation which is scheduled to move
rooms will display an information box with the room move time and reason.
Room move reason functionality requires that the edit reservation screen be customised using
Form Customization to display the room move reason and time.
How to enter room move reason and time
1. From the Reservation Navigator select the required reservation.
2. Click EDIT to display the reservation edit screen and then select ROOM MOVE
REASONS from the OPTIONS menu.
The Room move reasons dialog box is displayed.
Reservation Options
229
3. Select the date and click the EDIT button to display the Room move reason dialog
box.
4. Select the TIME the guest is scheduled to move rooms.
5. Enter the REASON the guest is moving rooms.
6. Click OK to save the time and reason.
230
Reservation Options
7. Click OK to close the room move reason dialog box.
How to display the room move reason and time in red if the value changes
1. Click on the Room Move Reason or Room Move Time label to select it.
2. Select the OBJECT INSPECTOR dialog box in order to change the properties of the
button.
3. Under APPEARANCE click CAPTION and enter the text to appear on the label.
4. Under FIDELIO click DATA and select
the list box.
Reservation Options
DVROOMMOVEREASON
or
DVROOMMOVETIME
from
231
5. Close the form customization dialog boxes by clicking the
corner of the FRESEDIT screen.
in the top right hand
6. A message is displayed asking if you want to save the changes.
7. Select YES to save the changes and close all the dialog boxes.
8. Click CLOSE to close the Form customization screen.
The ROOM MOVE REASON can be displayed on the edit reservation screen (fResEdit)
by selecting the field TFIDRESEDITROOMMOVEREASON from the FIDRESEDIT tab on the
Component Palette.
232
Reservation Options
The ROOM MOVE TIME can be displayed on the edit reservation screen (fResEdit) by
selecting the field TFIDRESEDITROOMMOVETIME from the FIDRESEDIT tab on the
Component Palette.
The room move reason and time can be displayed in red when the value changes
by selecting the label FIDRESDATACHANGELABEL from the FIDRESLABEL tab on the
Component Palette on the edit reservation screen (fResEdit).
Share Reservations
There are two types of share reservations:
INDEPENDENT SHARE - individual reservations which are sharing the same room. They are
totally independent of each other for all functionality including check-in, check-out and
postings.
MASTER/SLAVE SHARE - master and slave reservations are individual reservations which in
general behave as a single reservation. The master is the primary reservation and the slave is
the secondary reservation.
Automatic billing instructions are set from the slave to the master reservation at the time of
share creation.
Tasks such as changing the arrival or departure dates are applied to all share reservations
without confirmation messages.
Master/slave reservations can be checked-in individually, so at check-in the user is
prompted to check-in the sharing reservations.
The dependencies of share reservations can be changed at any time:
Master/Slave shares can be converted to independent shares via the option INDEPENDENT
SHARE on the Edit Reservation screen.
Independent shares can be converted to a master/slave share via the option MASTER SHARE on
the Edit Reservation screen.
To create a share reservation where the double rate is split equally between
two reservations
Create the reservations as follows:
Enter the first reservation with 2 ADULTS; the RATE AMOUNT will default to the price for 2
adults.
Enter the second reservation with 0 ADULTS, the RATE AMOUNT will default to zero.
On the Shares screen spread the price between the two reservations. See Display Shares
Reservation Options
233
Share with new reservation
This option may be used to share a reservation with a new reservation and is accessible via the
OPTIONS menu of the both the Reservation Navigator and the Edit Reservation screen.
How to create a master/slave share reservation with a new reservation
1. From the Reservation Navigator select the reservation to which a new reservation
is to be shared.
2. Select SHARE WITH NEW RESERVATION from the OPTIONS menu.
or
Click EDIT to display the reservation edit screen and then select SHARE WITH NEW
RESERVATION from the OPTIONS menu.
The Profile search screen is displayed.
3. Search for an existing profile or enter a new profile.
4. Click SELECT, a copy of the original reservation is created and a message is
displayed asking if you want to make the original reservation the master
reservation.
5. Select YES to make the original reservation the MASTER and the new reservation the
SLAVE.
Master and slave reservations are individual reservations which in general behave
as a single reservation. The master is the primary reservation and the slave is the
secondary reservation.
6. The indicators
reservation screen.
are displayed on the bottom of the edit
7. Click OK to close the reservation.
How to create independent share reservations with a new reservation
1. From the Reservation Navigator select the reservation to which a new reservation
is to be shared.
2. Select SHARE WITH NEW RESERVATION from the OPTIONS menu.
or
Click EDIT to display the reservation edit screen and then select SHARE WITH NEW
RESERVATION from the OPTIONS menu.
The Profile search screen is displayed.
3. Search for an existing profile or enter a new profile.
4. Click SELECT, a copy of the original reservation is created and a message is
displayed asking if you want to make the original reservation the master
reservation.
234
Reservation Options
6. Select NO to create independent share reservations.
7. The new reservation is displayed with the indicator
bottom of the edit reservation screen.
displayed on the
8. Click OK to close the new reservation.
9. Click OK to close the original reservation.
Share with existing reservation
This option may be used to share a reservation with an existing reservation and is accessible via
the OPTIONS menu of the both the Reservation Navigator and the Edit Reservation screen.
How to create a master/slave share reservation with an existing reservation
1. From the Reservation Navigator select the reservation to which an existing
reservation is to be shared.
2. Select SHARE WITH EXISTING RESERVATION from the OPTIONS menu.
or
Click EDIT to display the reservation edit screen and then select SHARE WITH EXISTING
RESERVATION from the OPTIONS menu.
The reservation navigator is displayed with a list of reservations with the same
arrival date and same room type as the selected reservation.
3. Search for the required reservation and click SELECT, a message is displayed asking
if you want to make the original reservation the master reservation.
4. Select YES to make the original reservation the MASTER and the selected
reservation the SLAVE.
Master and slave reservations are individual reservations which in general behave
as a single reservation. The master is the primary reservation and the slave is the
secondary reservation.
5. The indicators
reservation screen.
are displayed on the bottom of the edit
6. Click OK to close the reservation.
Reservation Options
235
How to create independent share reservation with an existing reservation
1. From the Reservation Navigator select the reservation to which an existing
reservation is to be shared.
2. Select SHARE WITH EXISTING RESERVATION from the OPTIONS menu.
or
Click EDIT to display the reservation edit screen and then select SHARE WITH EXISTING
RESERVATION from the OPTIONS menu.
The reservation navigator is displayed with a list of reservations with the same
arrival date and same room type as the selected reservation.
3. Search for the required reservation and click SELECT, a message is displayed asking
if you want to make the original reservation the master reservation.
4. Select NO to create independent share reservations.
5. The reservation is displayed with the indicator
of the edit reservation screen.
displayed on the bottom
6. Click OK to close the reservation.
Display Shares
This option may be used to display the share information screen and is accessible via the OPTIONS
menu of the Reservation Navigator. This option is only available for share reservations and may
also be displayed by clicking on the SHARE indicator at the bottom of the Edit Reservation screen.
Various types of information can be displayed on the shares screen; if more than one option is
selected then the values are displayed separated by a vertical line. Select the option ONE AT A TIME
to display each of the available options individually; select CLEAR to remove all the selected
options.
The total row displays totals per day according to the selected criteria; totals are always shown in
base currency regardless of the reservation currency.
The options selected are stored per user and are automatically selected each time the share screen
is opened until the selection is changed.
236
Reservation Options
Shares - lists all share reservations for the entire stay with the selected reservation displayed
in red.
Legend
Indicates
N
Reservation is not shared on this day.
S
Reservation is shared but no room number has been assigned.
R
Reservation is shared and a room number has been assigned.
Price - displays the price that will be charged for each share reservation; the default is the rate
amount entered on the original reservation.
In this example the price displayed is the rate amount as entered on the original
reservation.
In this example the FULL PRICE option has been applied so that the entire room
charge is to be charged to one of the share reservations and the remaining share
reservations have a zero room charge.
Calculated Price - displays the price calculated by the system according to the rate code and
number of persons on the reservation including any packages and discounts.
In the example above the first figure is the PRICE as it will be charged to the guest
and the second figure is the system CALCULATED PRICE.
Room - displays the room number assigned to each reservation.
Reservation Options
237
Persons - displays the number of persons for each reservation; adults, adults plus children or
each of the individual child age categories can be selected for display.
How to display the shares screen
1. From the Reservation Navigator select the required reservation.
2. Select DISPLAY SHARES from the OPTIONS menu.
or
Click EDIT to display the reservation edit screen and then click the SHARE indicator
at the bottom of the screen.
The Edit Reservation screen is displayed first, followed by the Shares screen.
3. Click CLOSE to close the Shares screen.
4. Click OK to close the reservation edit screen.
238
Reservation Options
How to apply a manual price
1. Display the Shares screen and select the PRICE option.
The current price per reservation per day is displayed on the grid.
2. On the grid select the reservation and date the manual price should be applied to.
Multiple reservations and dates can be selected using the SHIFT button.
3. Enter a price in the PRICE box and click the APPLY PRICE button.
The price is updated on the grid.
4. Click CLOSE to close the Shares screen.
Note: A price can also be selected by first clicking the price required in
the grid and then using the SHIFT button to select the reservations and
dates the price should be applied to.
Note: Discounts are taken into consideration when setting a manual
price. For example, if a manual price of 80.00 € is entered but the guest
has a 10.00 € discount on his reservation then the price applied will be
70:00 €.
Reservation Options
239
How to apply full price
1. Display the Shares screen and select the PRICE option.
The current price per reservation per day is displayed on the grid.
2. On the grid select the reservation and date the full price should be applied to.
Multiple reservations and dates can be selected using the SHIFT button.
3. Click the FULL PRICE button.
The full price is applied to the selected reservation and a zero price is applied to
the remaining share reservations.
4. Click CLOSE to close the Shares screen.
How to apply the calculated price
1. Display the Shares screen and select the PRICE option.
The current price per reservation per day is displayed on the grid.
2. On the grid select the reservation and date the calculated price should be applied
to.
Multiple reservations and dates can be selected using the SHIFT button.
3. Click the CALCULATED PRICE button.
The price is set to the price calculated by the system according to the rate code
and number of persons in the reservation including all discount and package
calculations for the selected reservation and dates.
4. Click CLOSE to close the Shares screen.
How does spread price work?
240
The spread price is the calculated price from each reservation divided by the number of share
reservations.
Discounts are taken into consideration per reservation and reduced from the split price.
Packages are taken into consideration.
Reservation Options
How to spread the price
1. Display the Shares screen and select the PRICE option.
The current price per reservation per day is displayed on the grid.
2. On the grid use the SHIFT button to select the reservations and dates the spread
price should be applied to.
3. Click the SPREAD PRICE button.
The price is split between the selected reservations.
4. Click CLOSE to close the Shares screen.
Options available on the shares screen
EDIT RESERV. - opens the edit reservation screen for the selected reservation.
DON'T SHARE - breaks the share for the days selected; select all days to break the share
completely.
UP - changes the display order of the share reservations and moves the selected reservation up.
CLOSE - closes the shares screen and returns to the edit reservation screen.
SHARE - marks the selected reservations as sharing on the dates selected. For example, if two
reservations are marked as sharing for the first night and not the second night then they can be
shared by selecting the second night of each reservation and clicking the share button.
DOWN - changes the display order of the share reservations and moves the selected reservation
down.
Reservation Options
241
Additional options available with the Price option
APPLY PRICE - applies the price entered in the PRICE box to the selected reservation dates.
FULL PRICE - applies the full price to selected reservation and sets the price to zero for the
remaining share reservations. This would be used when the entire room charge is to be
charged to one of the share reservations and the remaining share reservations have a zero
room charge.
CALCULATED PRICE - applies the price calculated by the system according to the rate code and
number of persons in the reservation including all discount and package calculations for the
selected reservation and dates. Changes are considered during the stay.
SPREAD PRICE - press this button to spread the entered price among all selected share
reservations. For example if the price entered is € 200.00, select all days and all names and
press SPREAD PRICE. If there were 2 names, the price on each reservation will be €100.00.
Master Share
This option may be used to change an independent or a slave reservation into a master reservation
and is accessible via the OPTIONS menu of the Edit Reservation screen. This option is available on
independent share reservations and on a share reservation which is currently defined as the SLAVE
reservation.
Master and slave reservations are identified as one reservation with two different names; the
master is the primary reservation and the slave is the secondary reservation.
How to change a slave reservation to a master reservation
1. From the Reservation Navigator select the required reservation.
2. Click EDIT to display the reservation edit screen.
A slave reservation has the indicator
reservation screen.
at the bottom of the edit
3. Select MASTER SHARE from the OPTIONS menu.
The indicator changes from SLAVE to MASTER; this reservation is now defined as the
master reservation.
4. Click OK to close the reservation edit screen.
How to change an independent share reservation into a master reservation
1. From the Reservation Navigator select the required reservation.
2. Click EDIT to display the reservation edit screen.
An independent share reservation has the indicator
edit reservation screen.
at the bottom of the
3. Select MASTER SHARE from the OPTIONS menu.
The indicator
is now displayed next to the
reservation is now defined as the master reservation.
indicator; this
4. Click OK to close the reservation edit screen.
The share reservations connected to this reservation are automatically defined as
SLAVE reservations.
242
Reservation Options
Independent Share
This option may be used to break a master/slave share reservation into independent share
reservations and is accessible via the OPTIONS menu of the Edit Reservation screen. This option is
only available on a share reservation which is currently defined as the MASTER or SLAVE
reservation.
Master and slave reservations are identified as one reservation with two different names; the
master is the primary reservation and the slave is the secondary reservation.
How to break a master/slave share reservation into independent share
reservations
1. From the Reservation Navigator select either the master or the slave share
reservation.
2. Click EDIT to display the reservation edit screen.
A master reservation has the indictor
indicator
and a slave reservation has the
.
3. Select INDEPENDENT SHARE from the OPTIONS menu.
The Slave/Master indicator is removed and both reservations are now defined as
independent shares.
4. Click OK to close the reservation edit screen.
Save
This option may be used to save changes to the guest reservation without closing the reservation.
Split
This option may be used to split a reservation with multiple rooms with the option to
automatically assign room numbers, and is accessible via the OPTIONS menu of the Reservation
Navigator.
A reservation with more than one room must be split into individual reservations before a room
number can be assigned and the reservation checked-in.
There are four ways to split a reservation with multiple rooms:
SPLIT ONE - select this option to split only one room from the reservation.
SPLIT ALL - select this option to split all rooms from the reservation.
SPLIT ONE AND ASSIGN ROOM AUTOMATICALLY - select this option to split only one room from
the reservation and automatically assign a room number.
SPLIT ALL AND ASSIGN ROOM AUTOMATICALLY - select this option to split all rooms from the
reservation and automatically assign a room number.
The options SPLIT ONE AND ASSIGN ROOM AUTOMATICALLY and SPLIT ALL AND ASSIGN ROOM
AUTOMATICALLY are especially used in and designed for properties configuring beds
instead of rooms.
Reservation Options
243
How to split one room
1. From the Reservation Navigator select a reservation with multiple rooms.
2. Select SPLIT from the OPTIONS menu to display the sub-menu.
3. Select SPLIT ONE, a copy of the reservation is created and the Edit Reservation
screen is displayed.
The reservation can be saved in the same name or the profile name can be
changed.
4. To select another profile click the SELECT button at the top of the Edit Reservation
screen.
The Profile search screen is displayed.
5. Search for an existing profile or enter a new profile.
6. Click SELECT, a message is displayed asking if you are sure you want to change the
profile.
7. Click YES to change the profile name.
8. Click OK to save the reservation.
How to split all rooms
1. From the Reservation Navigator select a reservation with multiple rooms.
2. Select SPLIT from the OPTIONS menu to display the sub-menu.
3. Select SPLIT ALL to create a reservation for each of the split rooms.
The Edit Reservation screen is displayed for the last reservation created.
4. Click OK to save the reservation.
There are now 'x' identical reservations in the name of the original reservation. For
example, if the original reservation was for 5 single rooms in the name of Miller,
then splitting the reservation will create 5 identical reservations in the name of
Miller.
244
Reservation Options
How to split one and assign room automatically
1. From the Reservation Navigator select a reservation with multiple rooms.
2. Select SPLIT from the OPTIONS menu to display the sub-menu.
3. Select SPLIT ONE AND ASSIGN
ROOM AUTOMATICALLY,
the following happens:
A copy of the reservation is created with the same profile name.
The room blocking screen is displayed with the split reservation selected.
Auto room assignment starts automatically.
Once the room assignment has been completed an information box is displayed with
details of the automatic room assignment.
4. Click OK to close the room assignment summary.
The room blocking screen is closed and the reservation navigator is displayed with
the room which was split listed.
How to split all and assign room automatically
1. From the Reservation Navigator select a reservation with multiple rooms.
2. Select SPLIT from the OPTIONS menu to display the sub-menu.
3. Select SPLIT ALL AND ASSIGN
ROOM AUTOMATICALLY,
the following happens:
A reservation is created with the same profile name for each of the split rooms.
The room blocking screen is displayed with the split reservations selected.
Auto room assignment starts automatically.
Once the room assignment has been completed an information box is displayed with
details of the automatic room assignment.
Reservation Options
245
4. Click OK to close the room assignment summary.
The room blocking screen is closed and the reservation navigator is displayed with
the rooms which were split listed.
How to change the profile name
1. From the Reservation Navigator select the required reservation.
2. Click EDIT to display the reservation edit screen.
3. Click the SELECT button at the top of the Edit Reservation screen.
The Profile search screen is displayed.
4. Search for an existing profile or enter a new profile.
5. Click SELECT, a message is displayed asking if you are sure you want to change the
profile.
6. Click YES to change the profile name.
7. Click OK to close the reservation.
Suite add on
This option may be used to create a copy of the current reservation with billing instructions
pointing to the original reservation and is accessible via the OPTIONS menu of the Reservation
Navigator. This option is parameter controlled.
This is useful for creating a simple suite reservation 'on the fly' or for creating an identical
reservation for a guest who needs another reservation in addition to his current reservation.
246
Reservation Options
Suite add on functionality
Only one add on reservation can be created using the SUITE ADD ON functionality.
A room number must already be assigned in the original reservation in order to create an
identical reservation.
All reservation details are copied with the exception of the credit card and the guest and
reservation notes information.
Billing instructions are created automatically from the add-on reservation to the original
reservation.
NOTE: If the reservation does not have a room number assigned then
selecting SUITE ADD ON will display the room search screen and the
selected room number is assigned to the reservation, no add-on
reservation will be created.
How to create a suite add on reservation
1. From the Reservation Navigator select the required reservation.
Note: The selected reservation must already have a room number
assigned.
2. Select SUITE ADD ON from the OPTIONS menu.
The Room Search screen is displayed.
Several criteria are completed with details from the reservation, but these may be
changed as required.
3. Complete the search criteria and click SEARCH to display the available rooms.
4. Select the required room from the grid and click the SELECT button.
An identical reservation is created with the selected room number and billing
instructions pointing to the original reservation.
Reservation Options
247
Room search dialog box search criteria
Fill in this field
With this information
Starting Date
The date for which to search for available rooms. Defaults to
the reservation arrival date.
Nights
The number of night's to search for available rooms.
Defaults to the number of nights in the reservation.
Room Types
Select specific room types if required. Defaults to the
reservation room type.
Room Number
Enter a specific room number if required.
Room Features
Select specific room features. Room features entered on the
guest profile or reservation are displayed by default.
Floors
Select specific floors if required.
Due out rooms
Select this option to include rooms currently in-house but
are due to check-out. Due out rooms can be included by
default by activating the parameter DUE OUT ROOMS ON ROOM
SEARCH (DEFAULT) in configuration.
Include out of service
Select this option to include rooms with the status out of
service.
Housekeeping Status
Select the required housekeeping statuses.
Suite add on functionality is controlled by the parameter SIMPLIFIED SUITE HANDLING
under Setup → Configuration → Global Settings → Reservation → Reservation 3
tab.
Swap room
This option may be used to switch rooms between two reservations and is accessible via the
OPTIONS menu of the Reservation Navigator.
Swap room may be used to ease the changing of rooms between checked-in or arrivals when the
property is fully booked and there is no where to 'park' the rooms.
How to swap a room
1. From the Reservation Navigator select the reservation for the room exchange.
2. Select SWAP ROOM from the OPTIONS menu.
A list of checked in and due out reservations is displayed.
3. Select a reservation for the room exchange and click SELECT.
The Reservation swap room dialog box is displayed.
248
Reservation Options
4. Select EVERYDAY if you wish to swap rooms for all the reservation dates.
5. Select DATE RANGE if you would like to enter a date range for the room exchange.
The days to be swapped can also be selected in the grid using the CTRL button.
6. Click the SWAP button to apply the room swap, the room numbers are changed for
the selected dates.
7. Click the SAVE button to save the changes and close the screen.
8. Press the CLOSE button to cancel changes and close the dialog box.
Swap room dialog box
Fill in this field
With this information
Reservation A
Displays the reservation name and arrival and departure dates.
This is the reservation initially selected for room swapping; to
select a different reservation press
Reservation B
.
Displays the reservation name and arrival and departure dates.
This is the reservation selected from the available in-house
reservations; to select a different reservation press
.
Everyday
Select this option to swap rooms for every day.
Date Range
Select this option to enter a start and end date for the room
swap.
Swap
Applies the room swap.
Save
Saves the changes and closes the dialog box.
Close
Closes the screen without saving.
Reservation Options
249
Table Reservation
This option may be used to reserve or view a table reservation and is accessible via the OPTIONS
menu of the both the Reservation Navigator and the Edit Reservation screen. If a table is reserved
for this reservation it will be indicated at the bottom of the edit reservation screen by the indicator
. Selecting the TABLE RES. indicator opens the Table Reservation search screen.
How to create a new table reservation
1. From the Reservation Navigator select the required reservation.
2. Select TABLE RESERVATION from the OPTIONS menu to display the table sub-menu.
or
Click EDIT to display the reservation edit screen and then select TABLE RESERVATION
from the OPTIONS menu.
The table sub-menu is displayed.
3. Select CREATE NEW; the Table Reservation Edit screen is displayed.
250
Reservation Options
4. In the PROFILES panel the reservation profile is selected by default and in the
RESERVATIONS panel the reservation is selected by default.
5. If the guest has more than one reservation, click the down arrow in the
RESERVATIONS box and select the required reservation.
In the DATES panel each date of the reservation is listed and by default all dates
are selected.
6. Select the dates for which a table reservation is to be made; the SELECT ALL,
DESELECT ALL and SET DATES buttons may be used.
7. Select the RESTAURANT required.
8. In the TEMPLATE box the first available reservation booking time is selected by
default. Click the drop-down arrow to select the required reservation booking time.
Reservation Options
251
9. The TIME FROM and TO are completed with the times from the reservation booking
template, but may be adjusted as required.
10. The # OF ADULTS, BABY, CHILD and TEENAGER are taken from the reservation, but
maybe changed if required.
11. In the TABLES box, click on the down arrow to open the Select Available Table
dialog box.
Multiple tables can be selected if required and tables can be displayed according to
attribute type such as smoking or non-smoking.
12. Select the required table and then click SELECT.
13. Select the COLOUR in which the table reservation should be displayed in the Table
Reservation Availability grid.
14. Enter any additional information in the COMMENTS box.
15. Enter information in the TABLE CARD box.
16. Click OK to save the table reservation.
252
Reservation Options
How to display attached table reservations
1. From the Reservation Navigator select the required reservation.
2. Select TABLE RESERVATION from the OPTIONS menu to display the table sub-menu.
or
Click EDIT to display the reservation edit screen and then select TABLE RESERVATION
from the OPTIONS menu.
The table sub-menu is displayed.
3. Select SHOW ATTACHED, the Table Reservation Search screen is displayed.
Only table reservations for this reservation are displayed as the RESERVATION # is
defaulted to the reservation number of the selected reservation.
4. Click CLOSE to close the table reservation search screen.
How to create a table reservation for multiple reservations
1. From the Reservation Navigator select the required reservation.
2. Select TABLE RESERVATION from the OPTIONS menu to display the table sub-menu.
or
Click EDIT to display the reservation edit screen and then select TABLE RESERVATION
from the OPTIONS menu.
The table sub-menu is displayed.
3. Select CREATE NEW; the Table Reservation Edit screen is displayed.
4. In the PROFILES panel the reservation profile is selected by default.
Reservation Options
253
5. In the RESERVATIONS panel the reservation is selected by default. Additional
reservations can be added to this table reservation by clicking the ADD button and
selecting the required reservation from the Reservation Search screen. Both
reservations are then marked as selected in the RESERVATIONS panel.
In the DATES panel the dates common to both reservations are listed and by
default all dates are selected. The number of persons now takes into account all
the reservations attached to this table reservation.
6. Complete the remaining table reservation details.
7. Click OK to save the table reservation.
How to create a new table reservation with an additional guest profile
1. From the Reservation Navigator select the required reservation.
2. Select TABLE RESERVATION from the OPTIONS menu to display the table sub-menu.
or
Click EDIT to display the reservation edit screen and then select TABLE RESERVATION
from the OPTIONS menu.
The table sub-menu is displayed.
3. Select CREATE NEW; the Table Reservation Edit screen is displayed.
4. In the PROFILES panel the reservation profile is selected by default. Additional guest
profiles can be added to this table reservation by clicking the ADD button and
selecting the required profile from the Profile Search screen.
5. If the selected additional profile has a reservation then a message is displayed
asking if the reservation should be attached.
6. Click YES to attach the additional reservation to the table reservation; both
reservations are now selected in the RESERVATIONS panel.
In the DATES panel the dates common to both reservations are listed and by
default all dates are selected. The number of persons now takes into account all
the reservations attached to this table reservation.
7. Complete the remaining table reservation details.
8. Click OK to save the table reservation.
254
Reservation Options
Traces
This option may be used to create a trace and is accessible via the OPTIONS menu of the both the
Reservation Navigator and the Edit Reservation screen.
Traces are internal messages attached to a reservation noting that a specific action is required on a
specific date. They are used to remind other departments or co-workers of actions to take or
information about the reservation. A trace could be set, for example to the housekeeping
department to ask them to put an extra bed into the guest room during the stay. Traces require an
instruction (trace text) and an instruction date.
How to enter a trace
1. From the Reservation Navigator select the required reservation.
2. Select TRACES from the OPTIONS menu.
or
Click EDIT to display the reservation edit screen and then select TRACES from the
OPTIONS menu.
The Traces dialog box is displayed.
3. Click NEW to display the new Trace dialog box.
Reservation Options
255
4. In the TRACE DATES FROM and TO boxes select the date for the trace.
5. In the TRACE DEPARTMENTS box select the department the trace is for.
A list of texts that you may select from appears under TRACE TEXTS.
6. Type the trace message in the TEXT box or select one of the pre-defined trace texts
by double-clicking the text.
7. Click OK to save the trace.
Trace dialog box
Field
Definition
Trace Date From To
The date the trace is for.
Trace Departments
Defines the department the trace is for.
Trace Texts
The pre-defined traces texts belonging to the selected
trace department.
Text
Free-format trace text can be entered in addition to or in
place of one of the pre-defined texts.
How to resolve a trace
1. From the Reservation Navigator select the reservation which has a trace to be
resolved.
2. Select TRACES from the OPTIONS menu.
or
Click EDIT to display the reservation edit screen and then select TRACES from the
OPTIONS menu.
The Traces dialog box is displayed with all the traces for this reservation listed.
3. Select the trace to be resolved.
4. Click RESOLVE NOW, the trace is now marked as resolved.
256
Reservation Options
5. Click CLOSE to close the Trace dialog box.
How to mark a resolved trace as unresolved
1. From the Reservation Navigator select the required reservation.
2. Select TRACES from the OPTIONS menu.
or
Click EDIT to display the reservation edit screen and then select TRACES from the
OPTIONS menu.
The Traces dialog box is displayed with all the traces for this reservation listed.
3. Select the trace to be unresolved.
4. Click CLEAR RESOLVE, the trace is now marked as not resolved.
5. Click CLOSE to close the Trace dialog box.
How to delete a trace
1. From the Reservation Navigator select the required reservation.
2. Select TRACES from the OPTIONS menu.
or
Click EDIT to display the reservation edit screen and then select TRACES from the
OPTIONS menu.
The Traces dialog box is displayed with all the traces for this reservation listed.
3. Select the trace to be deleted.
4. Click DELETE, the trace is deleted.
5. Click CLOSE to close the Trace dialog box.
Options available on the traces screen
NEW - to enter a new trace.
EDIT - to edit an existing trace.
RESOLVE NOW - to mark the selected trace as resolved.
CLEAR RESOLVE - to mark the selected trace as not resolved.
DELETE - to delete an existing trace.
CLOSE - to close the trace dialog box.
Trace group's control where the traces appear in Fidelio and are defined via the
option ACTIVITY AND TRACE GROUPS under Setup → Configuration → CRM. Traces can
be linked to Blocks, Accounts Receivable Accounts or Reservations.
Trace types are linked to the trace groups and are defined via the option TRACE
TYPES under Setup → Configuration → Reservations.
Trace changes are displayed in the user log if the options RESERVATION TRACE IS
ADDED, RESERVATION TRACE IS EDITED, RESERVATION TRACE IS DELETED, RESERVATION TRACE
IS RESOLVED, RESERVATION TRACE IS UNRESOLVED are selected in Setup → Configuration
→ Users → User Log → Reservation.
Trace functionality is controlled by the user rights VIEW, EDIT, NEW and DELETE
under Setup → Configuration → Users → User Definition → Rights → Traces →
Reservation traces.
Reservation Options
257
Note: When entering or resolving traces on a group member via
group editing, the system will prompt users with the message to
apply changes to other group members. However, when entering or
resolving traces on a group member via the edit reservation screen,
the apply changes to other group members message is not displayed,
the transaction applies only to the selected group member.
Transponder cards
This option may be used to link transponder or rebate cards to a reservation and is accessible via
the OPTIONS menu of the both the Reservation Navigator and the Edit Reservation screen. This
option is parameter controlled.
Transponder handling is used in resort properties operating without cash. The guests receive a
card upon check in which can be used for all purposes and services the property provides. The
resort can be divided into special areas where guests receive treatments or can use more
functionality of a resort such as a water world, special slides or special wellness areas for water
orientated resorts offering such facilities. Automatic ticket entry fees are posted when guests pass
certain access points.
A transponder is a control device that picks up and automatically responds to an incoming signal.
The term is a combination of the words transmitter and responder. Suite8 uses a passive
transponder that allows a computer to identify an object. Magnetic labels, such as those on credit
cards are common examples. The Suite8 transponder functionality has been tested with Legic
Cards and Legic Card Readers. A passive transponder must be used with an active sensor that
decodes and transcribes the data the transponder contains.
How to link a transponder or rebate card
1. From the Reservation Navigator select the required reservation.
2. Select TRANSPONDER CARDS from the OPTIONS menu to display the Transponder
Cards dialog box.
or
3. Click EDIT to display the reservation edit screen and then select TRANSPONDER CARDS
from the OPTIONS menu.
The Edit Reservation screen is displayed defaulted to the TRANSPONDERS tab.
258
Reservation Options
4. Click the SCAN CARD button.
If multiple guests are attached to this reservation then the required guest has to
be selected.
5. Enter the CARD NUMBER or swipe a card.
A message is displayed advising that this is the first time this card has been
entered.
Reservation Options
259
6. Click YES to continue, a dialog box is displayed with the possible card types.
7. Select REBATE CARDS to link a rebate card and then click OK to link the card to the
reservation.
8. Select TRANSPONDER CARD WITH
click OK.
FINANCIAL ACCOUNT
to link a transponder card and then
The Transponder Financial Account Creation dialog box is displayed with the guest
name and credit limit for the financial account.
9. Make any changes if required and click OK.
The transponder card is linked to the reservation.
Options available on the transponder cards screen
260
CARD SCAN -links a new card manually or by scanning.
LINK CARD - opens the rebate account screen from where an existing card can be selected.
LINK FOR ALL - links all cards.
REMOVE - removes the selected card.
DETAILS - to view transponder or rebate card details.
Reservation Options
Rebate Card
Transponder Card
PROFILE - to view or change profile details.
Reservation Options
261
BILLING - to display both the main billing account and the financial account for the transponder
card.
BILLING INSTR. - to display billing instructions.
FIN. ACCOUNT - to display the financial account settings for this card.
CARD HISTORY - to display the card history
Billing instruction options available on the transponder cards screen
AUTO BI - creates billing instructions automatically according to the settings in configuration.
BI TO FA -> - creates billing instructions from the reservation to the selected financial account.
<- BI TO RES - creates billing instructions from the selected transponder financial account to the
reservation.
DELETE BI - removes the selected billing instructions.
The functionality to link transponder cards to a reservation is controlled by the
parameter TRANSPONDER LINK TO RESERVATIONS under Setup → Configuration → Global
Settings → Reservation → Reservation3 tab.
Undo Check In
This option may be used to undo a check-in and is accessible via the OPTIONS menu of the
Reservation Navigator. A check-in can only be undone if the reservation was checked-in today and
no charges have been posted to the guest's account.
262
Reservation Options
How to undo a check in
1. From the Reservation Navigator select the required reservation.
2. Select UNDO CHECK IN from the OPTIONS menu.
3. If the reservation can be unchecked in then the Select room status dialog box is
displayed.
If the guest has been to the room it may be necessary to change the room status.
4. Select the required room status and click OK.
A message confirming that the undo check in was successful is displayed.
5. Click OK to close the message.
Note: A message is displayed if the check in cannot be undone
followed by the reason why the undo check in was not successful,
such as 'Reservation already has postings' or 'Guest did not arrive
today'.
Undo Check Out
This option may be used to undo a check-out and is accessible via the OPTIONS menu of the
Reservation Navigator. A check-out can only be undone if the reservation was checked-out today.
If Interfaces are installed then the relevant interface messages may be displayed.
How to undo a check-out
1. From the Reservation Navigator select the required checked-out reservation.
2. Select UNDO CHECK OUT from the OPTIONS menu.
A message confirming that the undo check out was successful is displayed.
3. Click OK to close the message.
Reservation Options
263
Undo check-out functionality is controlled by the user right REINSTATE/UNDO
CHECKOUT under Setup → Configuration → Users → User Definition → Rights →
Cashiering.
Unlink CCM Booking
This option may be used to unlink a reservation from a conference and catering booking and is
accessible via the OPTIONS menu of the Reservation Navigator. The Unlink CCM Booking option is
only available on reservations which are linked to a CCM booking.
Reservations which are part of a conference and catering booking may be located by selecting
BOOKING ID in the advance query and entering the event booking ID number or by opening the
Booking Master and clicking the ATTACHED button under Individual Reservations.
How to unlink a CCM booking
1. From the Reservation Navigator select the required reservation.
2. Select UNDO CCM BOOKING from the OPTIONS menu.
or
Click EDIT to display the reservation edit screen and then select UNDO CCM BOOKING
from the OPTIONS menu.
3. The reservation is unlinked and is no longer part of the conference and catering
booking.
User Log
This option may be used to view the changes made to a reservation and is accessible via the
OPTIONS menu of the both the Reservation Navigator and the Edit Reservation screen.
How to display the user log
1. From the Reservation Navigator select the required reservation.
2. Select USER LOG from the OPTIONS menu.
or
Click EDIT to display the reservation edit screen and then select USER LOG from the
OPTIONS menu.
The User Log is displayed split into 2 sections:
264
The upper section displays the name of the guest and the arrival and departure date.
The lower section displayed information about the changes to this reservation.
Reservation Options
3. Once all changes have been viewed, click OK to close the user log.
User Log Display Options
Field Heading
Gives this information
Date
The date and time the change was made. This is the system
date of the computer on which the change was made.
Text
A short description about the changes that were made.
User
The name of the user who made the change.
Workstation
The Computer Name on which the change was made.
The reservation changes that should be tracked are defined via the option
Reservation under Setup → Configuration → Users → User Log.
Virtual Numbers
This option may be used to view or assign a virtual number and is accessible via the OPTIONS
menu of the Reservation Navigator. This option is only available if the status of the reservation is
CHECKED IN.
Virtual numbers serve the guest as the guest's private line once they check in until they check out.
Virtual numbers can be assigned to guests on an as required basis, automatically, upon request or
for the duration of the guest's stay. Virtual numbers can also be assigned permanently to an
individual guest profile.
Note: The use of Virtual numbers and the available functionality
depends entirely on the capabilities and the feature set of the external
system and the interface used in the hotel.
Reservation Options
265
How to assign a virtual number
1. From the Reservation Navigator select the required checked-in reservation.
2. Select VIRTUAL NUMBERS from the OPTIONS menu of the profile navigator.
The DID Assignments dialog box is displayed.
3. Click NEW to assign a new virtual number, the Virtual Numbers screen is displayed.
4. Click the POOL drop-down arrow and select the required virtual number pool.
5. Press the TAB button to update the list of numbers belonging to the selected pool.
6. Select a virtual number and click the SELECT button, the DID Assignments dialog
box appears with the virtual number assigned.
266
Reservation Options
7. Click SAVE to close the dialog box and save the assigned number.
A confirmation screen is displayed with the virtual numbers assigned.
8. Click PRINT to print the screen.
9. Click CLOSE to exit the virtual number assignment.
How to delete a virtual number assignment
1. From the Reservation Navigator select the required checked-in reservation.
2. Select VIRTUAL NUMBERS from the OPTIONS menu of the profile navigator.
The DID Assignments dialog box is displayed.
Reservation Options
267
3. Select the virtual number assignment to be deleted and click the DELETE button, a
confirmation message is displayed.
4. Click YES to delete the virtual number assignment.
If the parameter ASSIGNMENT REQUIRED is active then it is only possible to unassign
the current number and reassign a new number.
5. Select YES to unassign the virtual number.
6. The Virtual Numbers screen is displayed, select a new virtual number and click the
SELECT button.
The DID Assignments dialog box is displayed with the virtual number assigned.
7. Click SAVE to close the dialog box and save the assigned number.
A confirmation screen is displayed with the virtual numbers assigned.
8. Click PRINT to print the screen.
9. Click CLOSE to exit the virtual number assignment.
Deleting an assigned virtual number is not possible if the parameter ASSIGNMENT
REQUIRED is active under Setup → Configuration → Miscellaneous>Virtual Number
Setup → Virtual Number Pool Setup. A different virtual number can be assigned by
unassigning the current virtual number and assigning a new number.
268
Reservation Options
Vouchers
This option may be used to attach and detach vouchers and is accessible via the OPTIONS menu of
the Reservation Navigator.
If a voucher is attached to the reservation it will be indicated at the bottom of the edit reservation
screen by the indicator
html format.
. Selecting the VOUCHER indicator displays the voucher details in
How to attach a voucher
1. From the Reservation Navigator select the required reservation.
2. Select VOUCHERS from the OPTIONS menu to display the vouchers sub-menu.
3. Select ATTACH VOUCHER; the Voucher Management Search screen is displayed.
Reservation Options
269
4. Complete the search criteria and click SEARCH.
All the vouchers meeting the entered search criteria are displayed.
5. Locate the required voucher and click SELECT.
The voucher is attached to the reservation.
Note: Only ARRANGEMENT type vouchers can be attached to a
reservation.
How to detach a voucher
1. From the Reservation Navigator select the required reservation.
2. Select VOUCHERS from the OPTIONS menu to display the vouchers sub-menu.
3. Select DETACH VOUCHER; a message is displayed advising that the voucher has been
successfully unlinked from the reservation.
4. Click OK to close the message.
The voucher is detached from the reservation.
270
Reservation Options
Voucher Management Search dialog box
Fill in this field
With this information
Number
Enter the voucher number to limit the search to a specific
voucher number.
Description
Enter the voucher description to limit the search to a specific
voucher description.
Article
Select the vouchers types to be displayed.
Redeemed
All
Select this option to display all vouchers.
Redeemed
Select this option to display only redeemed vouchers.
Not redeemed
Select this option to display only not redeemed vouchers.
Finalized
All
Select this option to display all vouchers.
Finalized
Select this option to display only finalized vouchers.
Not Finalized
Select this option to display only not finalized vouchers.
On Hold
All
Select this option to display all vouchers.
On Hold
Select this option to display only vouchers on hold.
Not on Hold
Select this option to display only vouchers which are not on
hold.
Include Voided
Select this option to include voided vouchers.
Not paid
completely
Select this option to include partially paid vouchers in the
search.
Last Name
Enter the last name of the person who ordered the voucher.
First Name
Enter the first name of the person who ordered the voucher.
Order Reason
Enter the reason for ordering the voucher.
Created By
Enter the name of the user who created the voucher.
Created From To
Enter the dates to limit the search to specific creation dates.
Send By Mail
All
Select this option to display all vouchers.
To be sent
Select this option to display vouchers which are to be sent by
mail.
Sent
Select this option to display vouchers which have already
been sent by mail.
Displayed once the search has been performed
Total Voucher
The total number of displayed vouchers.
Total Amount
The total amount of displayed vouchers.
Vouchers to be
paid
The number of vouchers not yet paid.
Amount not paid
The amount of not paid vouchers in the displayed selection.
Redeemed amount
The redeemed amount of vouchers in the displayed selection.
Reservation Options
271
Waitlist
This option may be used to move a reservation to the waitlist and is accessible via the OPTIONS
menu of the Reservation Navigator.
Reservations on the waitlist are displayed on the WAITLIST tab of the reservation navigator, which
is also accessible via the menu option WAITLIST on the reservations drop-down menu or by drilling
down on the WAITLIST option on the Availability screen (Ctrl+D).
If a reservation is cancelled for a day on which waitlist reservations exist, then the system will
prompt the user that there are reservations on waitlist which can be accepted.
How to move a reservation to the waitlist
1. From the Reservation Navigator select the reservation which is to be moved to the
waitlist.
2. Select WAITLIST from the OPTIONS menu.
The Waitlist dialog box is displayed.
3. Select the REASON the reservation is being moved to the waitlist from the dropdown list.
4. Select the waitlist PRIORITY for this reservation from the drop-down list.
5. Select the COMMUNICATION method for contacting this guest by clicking the
button; all the communication methods associated with this guest profile are
displayed.
6. If this reservation was previously waitlisted then the reason and any additional
details are listed in WAITLIST HISTORY.
7. In the DESCRIPTION box, the reason for waitlisting the reservation is listed and
additional details can be added if required.
272
Reservation Options
8. Click YES to move the reservation to the waitlist.
Waitlist Dialog Box
Fill in this field
With this information
Reason
The reason for waitlisting the reservation.
Priority
The priority for this reservation to be moved from the waitlist
and accepted.
Communication
The preferred communication method. All the communication
methods associated with this guest profile are displayed by
clicking the
button.
Waitlist History
If this reservation was previously waitlisted then the reason
and any additional details are displayed.
Description
The waitlist reason is completed by default, add any
additional details if required.
Scan Passport & ID Card
Passports and ID cards can be scanned from the reservations options menu, from the customer
profiles options menu and when editing a profile on the more fields tab when selecting 'New'
button on the personal document section.
The Fuji-fi-60F Passport scanner options are configured via the section FUJI-FI-60F
PASSPORT SCANNER under Setup → Configuration → Global Settings → Profile →
Profile 2 tab.
Save List
This option allows you to save the reservations currently listed in the reservation navigator grid.
This means that you can use the search criteria to produce a list of reservations and then save this
list so that the next time you need this specific list you can just load the list without having to enter
all the search criteria.
How to save a list
1. From the Reservation Navigator use the search criteria to display the required list
of reservations.
2. Select SAVE LIST from the OPTIONS menu.
The Save As dialog box is displayed.
3. In the SAVE IN box select the directory in which the list should be saved.
4. Enter a FILE NAME for the list; there is no need to enter a FILE TYPE.
5. Click SAVE to save the list.
Load List
This option allows you to load a list of previously saved reservations. This means that you can use
the search criteria to produce a list of reservations and then save this list so that the next time you
need this specific list you can just load the list without having to enter all the search criteria.
Reservation Options
273
How to load a list
1. From the Reservation Navigator select LOAD LIST from the OPTIONS menu.
The Open dialog box is displayed.
2. In the LOOK IN box select the directory which contains the saved list.
3. Select the required FILE NAME from the list displayed and click OPEN.
The grid is display with the reservations as per the saved list.
Custom SQL Statements
Custom SQL statements can be created for reservation search purposes. The custom queries are
listed in the advanced query option in the reservation search navigator. Custom SQL queries can
also be run in combination with other search criteria entered on the reservation navigator.
Custom SQL statements may be defined via:
Reservations → Reservation Navigator → Options button
Setup → Miscellaneous → System Maintenance → Database
How to create a custom SQL group
1. On the Reservation Navigator select CUSTOM SQL from the OPTIONS menu to display
the Custom SQL statements dialog box.
Note: A Custom SQL group must be created before any custom SQL
statements can be created.
2. Place the cursor in the SQL Statements panel on the left-hand side of the screen
and right-click to display the short-cut menu.
274
Reservation Options
3. Click NEW GROUP on the shortcut menu to display the Custom SQL group name
dialog box.
4. In the CODE box enter a code for the SQL group, up to five alphanumeric
characters is allowed.
5. In the DESCRIPTION box, enter the description of the SQL group.
6. Click OK to save the SQL Group.
How to link a role to a custom SQL group
1. Click MISCELLANEOUS from the SETUP drop-down menu and then SYSTEM MAINTENANCE.
2. On the System Maintenance menu click DATABASE
3. Click CUSTOM SQL STATEMENTS on the Database menu to display the Custom SQL
statements dialog box.
Note: A Custom SQL group must be created before any custom SQL
statements can be created.
4. Select the required SQL Group from the SQL Statements panel on the left-hand
side of the screen.
5. Click the ROLE button.
Reservation Options
275
6. Select where in the application the statements from the selected group should be
available: Profile search, Reservation search, Room search or on the Custom SQL
grid.
7. Click OK to save the SQL Group Role assignment.
How to create a custom SQL statement
1. From the Reservation Navigator select CUSTOM SQL from the OPTIONS menu.
or
2. Click MISCELLANEOUS from the SETUP drop-down menu and then SYSTEM MAINTENANCE.
3. On the System Maintenance menu click DATABASE and then CUSTOM SQL STATEMENTS.
The Custom SQL statements screen is displayed.
Note: A Custom SQL group must be created before any custom SQL
statements can be created.
4. Select the required SQL Statements group from the panel on the left-hand side of
the screen and click NEW to display the Custom SQL Statement dialog box.
5. In the CODE box enter a code for the SQL statement, for example RATE.
6. In the DESCRIPTION box, enter the description of the SQL statement, for example
RATE AMOUNT.
7. In the SQL STATEMENTS panel enter the SQL statement, for example:
select yres_id from yres,ydet where ydet_id=yres_current_ydet_id and
ydet_rateamount like :RateAmount
276
Reservation Options
8. Click OK, the custom SQL statement is listed in the SQL statements panel.
9. Selecting the statement description displays the SQL statement in the SQL text
panel in the lower right-hand side.
10. If the SQL statement requires input from the user then this can be done via
PARAMETERS.
11. Select the required SQL Statement and in the Parameters panel click NEW to
display the SQL parameter dialog box.
Reservation Options
277
12. In the PARAMETER box enter the SQL parameter, for example RATEAMOUNT (max 20
characters).
13. In the DESCRIPTION box, enter the text which should appear when the user runs the
SQL statement, for example ENTER RATE AMOUNT.
14. Click OK to close the SQL parameter dialog box.
15. Click the CLOSE button to close the Custom SQL statements screen.
How to run a custom SQL statement
1. On the reservation search screen click the down arrow on the ADV. QRY. box and
select the required custom SQL statement.
Custom SQL Statements are listed at the end of the selection box and are enclosed
in brackets [].
2. Click the FULL SEARCH button; if the query contains a parameter then this will be
displayed in the form of a question for the user to answer.
278
Reservation Options
3. Complete the question and click OK.
All reservations matching the query are displayed.
Reservation Options
279
Reservation Custom SQL Examples
Example 1: How to show all reservations with a specific source profile name:
Description: Source
SQL Text:
select yres.yres_id from yres, ydet, ycln, xcms where ydet.ydet_yres_id=yres.yres_id
and ycln.ycln_ydet_id=ydet.ydet_id
and ycln.ycln_xcms_id=xcms_id and
yres.yres_current_ydet_id=ydet.ydet_id=ydet.ydet_id and
ycln.ycln_xcca_internalcategory=3 and upper(xcms.xcms_name1) like upper('%' ||
:SOURCENAME || '%')
Parameter: SOURCENAME
Parameter Type: String
Example 2: How to show all reservations with a specific rate amount:
Description: Rate Amount
SQL Text:
select yres_id from yres,ydet where ydet_id=yres_current_ydet_id and
ydet_rateamount
like :RateAmount
Parameter: Rateamount
Parameter Type: Integer
In order to define or use custom SQL statements a custom SQL group must be
created with the role RESERVATION SEARCH via the option CUSTOM SQL STATEMENTS
under Setup → Miscellaneous → System Maintenance → Database.
280
Reservation Options
4
Block Reservation
The BLOCK RESERVATION module is used to enter and manage flexible group reservations such as
allotments or tour groups, and convention bookings with a variety of room types and a range of
arrival and departure dates. It offers detailed block statistics and it allows different user definable
block statuses.
The GROUP RESERVATION module is used to enter and manage reservations with similar needs,
such as a group of people all arriving on the same purpose and staying through the same period of
time, such as a wedding or a company meeting. It is possible to create a block reservation and
within that block create group reservations, the group reservations are then directly linked to the
block. See: Group Reservations page 341.
To access block reservations
Click the Reservations menu and select Block Reservation or click Block Reservation from the
coloured shortcut bar to display the Block Reservation navigator.
The Block Reservation navigator is divided into four distinct areas:
Query - consists of multiple basic block reservation search criteria such as Block Code,
Full Name, Block Status, Start Date and Date.
Query Results - the results of the query shown in a customizable grid format, including
Block Code, Full Name, Start Date, End Date and Block Status.
Tree View - a tree listing of the block header.
HTML page - free definable HTML display which by default has a list format or a 'big'
format where the details are displayed in a non-grid style format. The HTML page can be
printed by right mouse click.
The Basic Search Criteria
You may fill in multiple fields to narrow the search criteria and a list of blocks that match what
you have specified is displayed. The actual query is displayed in a script format in a window on
the right hand side of the screen. If no data is entered, the list of block reservations is displayed in
alphabetical order. To activate the search the user must click the SEARCH button. The query criteria
can be easily reset by clicking the CLEAR button.
Wildcards
The search criteria can also be entered using wildcards (%). This is helpful in the name field, for
example, M%ller will return Miller, Muller, %Bank will return Investment Bank, American Bank
and Fidelio% will return Fidelio Gmbh or Fidelio Inc.
Narrowing the search
Once the search has been performed the search can be further narrowed by using the FIND IN GRID
button.
The FIND IN GRID button allows the user to:
Search on all or specific columns within the grid
Search for specific text
Match the case or search for whole words only
Control the direction of the search.
Block Reservation
281
Block Search Criteria
Fill in this field
With this information
Block Code
This is the key to access the block throughout the system.
Full Name
The Name on the Block Header
Block Status
Select a block status to search for from the drop-down list
Start Date
The first arrival date of the block
Date
Enter a date within the block range
Contract #
The contract number on the block header.
Hide History
Selected by default to exclude all blocks with block details
for past dates. Clear this check box to display blocks for
past dates.
Block Navigator Options
This Option
Does this
Search
Activates the search.
Clear
Clears the search criteria.
New Block
Enters a new block reservation.
Edit Block
Edits an exiting block.
Grid
Enter block details and view differences.
Copy
Copy the block and create a tour series.
Find in Grid
Narrows the group search further.
New Res.
Creates a new reservation for an exiting block.
Picked Up
Opens the reservation navigator to view all picked up
reservations, this includes any group reservations
which have been entered as part of the block and may
or may not have been split into individual
reservations.
Rooming List
Enter a rooming list for the block reservation.
Unlink Booking
Only available if the CCM license is activated. Unlinks
a conference and catering booking from the block.
Traces
Used to add, edit, edit or resolve block traces.
Billing Instructions
Used to add, edit, edit or delete Billing Instructions.
Notes
Used to add, edit or delete block notes
Correspondence
Used to add, edit or delete correspondence.
Block reservation functionality is controlled by the user right VIEW under Setup →
Configuration → Users → User Definition → Rights → Block Reservations.
Note: Block Reservation functionality requires an additional license
code.
282
Block Reservation
Creating a Block Reservation
A block consists of a number of components linked together; these components are generally
created in the following order:
BLOCK HEADER - contains basic information about the block, such as the block code, name,
arrival and departure dates, default rate and a link to the financial account.
PROFILES - is used to link profiles to the block header. Multiple profiles may be attached to a
block, including company, travel agent, source, booker and meeting planner profiles.
GROUPS - allows viewing, linking or removing groups to the block reservation
NOTES - allows adding, editing or deleting notes to the block header.
PACKAGES - used to add packages to the block header.
BLOCK GRID - the number of rooms of each type blocked for each night are entered on the grid.
Rates may also be entered. As changes are made to the grid, in addition to the actual block,
you may view grids of the initial block, the available rooms, the picked up rooms and the
changes from the initial block.
INDIVIDUAL RESERVATIONS - an individual reservation must be made for each guest who is part
of the group. This can be done via the Rooming List or a single reservation can be picked up
via the option New Res.
How to enter a new block reservation
1. Click the RESERVATIONS menu and select BLOCK RESERVATION.
The block reservation navigator is displayed.
2. Click NEW BLOCK to display the Block Header dialog box.
Block Reservation
283
The Block Header dialog box consists of three screens, each one represented by a
tab:
BLOCK HEADER - is used to view/enter details for the block header.
PROFILES - used to view, link or unlink profiles to the block header
GROUPS - is used to create a group reservation within the block.
3. Complete the block information by typing information or selecting information from
the drop-down lists.
For an explanation of the fields on the block header dialog box, the Block Header
table below.
4. Click SAVE, the Select Block Status dialog box is displayed.
5. Select the required BLOCK STATUS from the drop-down list.
6. Click OK to close the Select Block Status screen.
7. To link profiles to the block click the PROFILES tab.
or
8. Click CLOSE to close the block header screen.
Block Header dialog box
284
Fill in this field
With this Information
Block Code
Enter a code for the block reservation. This field can contain
up to 10 alphanumeric characters. This code is the unique
identifier throughout the system.
If a block code format has been pre-defined then the block
code is automatically created based on the defined setup.
For example, the format CCCDDMMYY is the first 3 letters of
the company name and the starting day, month, year.
When creating a new block with a starting date of the 17th
July 2009 and the company profile BBC linked, then the
block code field is automatically completed with
BBC170709.
Full Name
The full name of the block, this field can contain up to 60
alphanumeric and is the long description of the block code.
Search Name
Enter a search name or keyword which can be used to
easily locate the block when entered in the FULL NAME field
on the block search screen.
Starting date
The date of the first arrival of the block reservations. Enter
the date or select a date from the calendar.
Nights
Enter the number of nights for the stay. Or enter the end
date in the next field and Suite8 will calculate the number
of nights.
Block Reservation
End date
The date of the last departure of the block. If the number of
nights was entered the departure date will be calculated.
The end date can also be entered manual or selected from
the calendar.
Rate Code
Enter the rate code name or select a rate code from the
drop-down list. The rate code will be copied to all
reservations.
Market
Enter the Market Code or select one from the drop down list
to select from the predefined market codes. The entered
marked code will be copied to all individual reservations and
can then be changed
Source
Enter the Source Code for the block or select one from the
drop down list of predefined Source Codes. The source code
will be copied to all reservations.
Channel
Enter the Channel Code for the block or select one from the
drop down list of predefined Channel Codes. The channel
code will be copied to all reservations.
Cut off Date
Enter a date on which the rooms not picked up from the
block should be cut off and released to house or block
availability. If a date is entered Suite8 will release all rooms
from the block not yet picked up during night audit of the
date entered. You can still see the original booked rooms on
the initial view.
Cut off Days
Enter a number of days if you would like to cut off the
rooms on a fixed number of days before each arrival date of
the block. For example if the first arrival is on June 12 and
the cut off days have been set to 4, Suite8 will cut off all
rooms for June 12 during Night Audit of June 8, the rooms
for June 13 during Night Audit of June 9 and so forth.
Elastic Block
Select this check box to mark the block elastic. If the block
is elastic, the start and end date as well as the number of
rooms are flexible. If this check box is cleared then the
block dates and number of rooms are fixed.
Financial Account
Select a financial account or create a new financial account
from the financial account search dialog box. The financial
account will be checked in automatically if a date range is
not entered when creating the financial account.
Rooming List Date
The date by which the rooming list should be received.
Block ID
This is the block ID number provided by Suite8, it can not
be changed.
Booker
The name of the booking contact.
Contact #
Select a contract number or create a new contract.
Web Promotion
Used to enter a promotion code; this code can then be
given to agents and individuals. On the Suite8 home page
the promotion code can be entered when queering
reservation dates and can be used to pick up rooms from
the block with the promotion code assigned.
Block Reservation
285
Back to house after
Cutoff
Defines if the rooms will be released to house or to the
block if the cut off date has been reached and a reservation
from the block is cancelled. For example if the field is
selected and the block cut off date has been reached, the
room will be return to house availability. If it is not selected
then the room will be returned to the block grid.
Online Interface
Enabled
Defines if the online interface is enabled.
Autogroup
Defines if all picked up reservations should be automatically
linked to a group reservation.
When a reservation is picked up from the block either as a
single reservation or via the rooming list then a group is
automatically created. The functionality is the same as
when creating a group reservation from the block manually.
If a group already exists for the block then all newly pickedup reservations will be linked to existing group
automatically.
Add to mealplan
Defines if the block reservation is included or excluded from
the meal plan count on the availability grid.
If the parameter BLOCKS IN MEAL PLAN FORECAST is selected
then blocks can be defined to be included by default or can
be included or excluded manually by selecting this option.
How to select an existing contract or create a new contract
1. On the block header click the CONTRACT # field.
The Contract Search dialog box is displayed.
286
Block Reservation
2. Enter a CONTRACT # and click SEARCH.
3. If the required contract is displayed, click SELECT.
4. Click NEW to enter a new contract.
The Contract Definition dialog box is displayed.
5. The CONTRACT # is automatically assigned by the system, but may be changed as
required.
6. Click the + PROFILE button to open the profile search screen.
7. Create a new profile or locate an existing profile and click SELECT.
Repeat steps 6 and 7 to add additional profiles to this contract.
8. Enter a START DATE or select a date from the drop-down calendar.
9. Enter an END DATE or select a date from the drop-down calendar.
10. Enter a SIGN UP DATE or select a date from the drop-down calendar.
11. Click OK to save the contract definition.
How to link profiles to a block header
1. On the block header click the PROFILES tab.
2. The BOOKER profile selected on the Block Header is listed on the Linked Profiles tree
under INDIVIDUAL.
Block Reservation
287
3. Click the PROFILES button to display the Profile Select screen.
4. Enter the profile name and press TAB or click the drop-down arrow to open the
Profile Search screen.
5. Locate the required profile and click SELECT.
6. Repeat steps 4 and 5 for each profile type required.
7. Click OK; the linked profiles are displayed in the Linked Profiles tree under the
appropriate heading.
288
Block Reservation
8. Click CLOSE to close the block header screen.
How to add packages to a block header
1. On the block header click the PACKAGES tab.
2. Any LINKED PACKAGES are listed in the upper section of the screen and the AVAILABLE
PACKAGES are listed below.
3. In the list of AVAILABLE PACKAGES double-click the required package to select it.
The selected package is now listed in the LINKED PACKAGES section of the screen.
4. Repeat step 3 for all the required packages.
5. Click CLOSE to close the block header screen.
How to block rooms on the block grid
1. Click the RESERVATIONS menu and select BLOCK RESERVATION.
2. Select the block required and click the GRID button.
or
3. Click EDIT BLOCK and then select the GRID button to display the Block Grid.
Block Reservation
289
3. If the block is still in the initial phase, only the Initial Block, Rates, Cutoff Dates,
No. of Adults and Manual Rates grids are available.
4. On the grid, highlight all the room types for all dates that will have the same
number of rooms.
or
5. Select the check box next to the required room types.
6. A range of dates can also be selected using the FROM and TO fields.
7. If the room types were selected via the GRID then type the number of rooms to
automatically update the grid.
8. If the room types were selected via the ROOM TYPE check box then enter the
number of rooms in the NO OF ROOMS box and click the SET button.
The specified number appears in the grid for all selected room types and dates.
290
Block Reservation
9. Once all the rooms have been entered for the required room types click OK to
close the Block Grid.
10. Click CLOSE to close the Block Header.
Note: If you want to add or subtract from the number of rooms
currently blocked, select the INCREASE/DECR. box and in the NO. OF
ROOMS box enter a positive number to increase the number of rooms
or a negative number to decrease the number of rooms, then click SET.
Views available on the Block Grid
INITIAL BLOCK - Displays the number of rooms that were blocked for this group up until the
end of the initial phase. A group is no longer in the initial phase when the block status is
changed from a status which DOES NOT AFFECT AVAILABILITY to a status which is considered
TENTATIVE or DEFINITE.
ACTUAL BLOCK - Displays the actual number of rooms that have been blocked for this group.
PICK UP - Displays the number of rooms that have been picked up.
RATES - Displays the rates per room type. If the rate is in a foreign currency then the foreign
currency rate and the currency symbol are displayed. This view is always available no matter
of the block status.
BOOKING POSITION - Booking Position is available for blocks with the status tentative pickup
and is used to enter the number of rooms which should be shown as definite reservations
instead of tentative reservations on the Availability screen (Ctrl + D). The number of rooms
entered can not exceed the actual number of tentative rooms for the block. Booking Position
functionality is parameter controlled.
CUT OFF DATES - Displays the cut off date per day per room type. The cut off dates can be
changed by either selecting a date range or selecting the dates from the grid, then entering the
cut off days in the DAYS field or selecting a cut off date from the calendar in the DATE field.
Click the SET button to enter the new cut off date and overwrite the cut off day/date settings
from the block header.
NO OF ADULTS - Displays the number of adults per room type.
AVAILABLE - Displays the number of rooms which are left in the block - the rooms which are
still available to be picked up.
CHANGES TO INITIAL - Displays the difference between the rooms which are actually blocked to
what were initially blocked.
MANUAL RATES - Select this option in order to enter manual rates per adult per room type via
the NO. OF ADULTS and PRICE fields. The rates for one person per room appear in the grid and
selecting SHOW ALL RATES displays the rates for 2 or more persons. Manually entered rates
override rates from a rate code on the block header.
Booking Position functionality is controlled by the parameter BOOKING POSITION
under Setup → Configuration → Global Settings → Reservation 1 tab. Booking
Position functionality defines if tentative block rooms can be displayed as definite
on the availability screen.
Manual Rates functionality is controlled by the user right MANUAL RATES under Setup
→ Configuration → Users → User Definition → Rights → Block Reservation.
Block Reservation
291
Options on the Block Grid
Option/Field
Description
Room Type
The room types for which rooms are to be blocked.
From
The start date of the range for which rooms are to be
blocked.
To
The last date of the range for which rooms are to be
blocked.
No. of Rooms
Defines the number of rooms to be blocked for the
selected room types and dates.
Increase/Decr.
Rooms
Increases or decreases the rooms blocked by the number
specified in the No. of Rooms field.
Set Rooms based on
Week Days
After selecting a room type this option may be used to
enter the number of rooms required per day of the week.
This is useful when you are creating a block extending
over a period of a number of months as for an allocation
or an airline crew. In this case, you may wish to block
only certain days of the week throughout the range of the
block.
Set
Blocks the specified number of rooms for the selected
room types and dates.
Block Code
Displays the block code. (Read Only)
Block Name
Displays the full name of the block. (Read Only)
How to create a group reservation within the block
1. Click the RESERVATIONS menu and select BLOCK RESERVATION.
2. Select the block required and click EDIT BLOCK to display the Block Header dialog
box.
3. Click the GROUPS tab to display the groups dialog box.
The Groups dialog box consists of four options:
ADD - is used to add additional rooms to a group reservation
NEW - is used to enter a new group reservation
EDIT - is used to edit a group through the group module
FIND IN GRID - to further narrow the group search
4. Click NEW to enter a new group.
The Block Selection screen is displayed with a grid showing the dates, room types
and number of rooms reserved for this block.
292
Block Reservation
5. On the grid select the room type and days required then click the ADD button.
Note: Only one room type can be selected at a time
The Number of Rooms dialog box is displayed.
6. The total number of rooms available for this room type is listed, adjust the number
of rooms if required and click OK.
The selection is listed in the Selected Rooms dialog box in the lower right corner.
7. Repeat steps 5 and 6 until all the required rooms and room types have been
selected.
Note: Occasionally, when you are entering a group, you may want to
reserve a room type which does not have enough available rooms. In
this case the system will display the room type selection screen and
allow rooms to be "borrowed" from another room type. Borrowing
from a room type does not increase the total size of the block; it only
readjusts the allocation among the different room types.
8. Click the SELECT button.
The New Group dialog box is displayed complete with group info details taken from
the block header and the booker. The group name is the block name with a
sequential number and the arrival date added.
The following message is also displayed:
Note: If the profile of the booker on the block header has no country
code then an error message is displayed requiring that the country
code be added before continuing.
9. Click YES/YES TO ALL to link the profiles to the group reservation or NO/NO TO ALL if
the profiles should not be linked.
The group reservation dialog box is displayed.
10. Adjust any details as necessary and click OK.
11. If more than one room type was selected then a reservation is displayed for each
room type, repeat step 10 for each reservation.
Block Reservation
293
The New Group dialog box is re-displayed with the group reservations listed in the
grid.
12. Click CLOSE to close the New Group screen and return to the Block Header dialog
box.
Note: If more than one group is created through the block then the
group template created for the first group is used for all subsequent
groups. As each new group is created sequential numbers are added
to each group name.
Available options from the block header
SAVE - to save changes to the block header.
ROOMING LIST - to split rooms from the group reservation and enter individual reservations.
CUT OFF - to release all available rooms from the block.
CHANGE STATUS - to change the block status.
GRID - to enter block details and view differences.
OPTIONS - USER LOG to view the all changes made to the block.
OPTIONS - BLOCK SUMMARY - to view block statistics for this block.
OPTIONS - TRACES - to add, edit or resolve block traces.
NEW RES. - to pick up a single reservation from the group block.
PICKED UP - to display a list of the individual (picked up) reservations which are part of this
block.
UNLINK BOOKING - to break the link between the block reservation and the conference booking.
BILLING INSTR. - to add billing instructions to the block header.
CORRESPONDENCE BOOKING - to display the edit booking master.
EVENTS - to display the event details.
CCM Blocks
Two additional options are displayed on the Edit Block screen for blocks which were
created via the rooms section of a booking master in the meeting planner module:
Booking - to access the booking master screen.
Events - to access the event detail screen.
See: Suite 8 Meeting Planner Manual → Booking Master → Rooms Details.
The changing of a block code once the block has been saved is controlled by the
user right CHANGE BLOCK CODE under Setup → Configuration → Users → User
Definition → Rights → Block Reservations.
A block code format can be pre-defined via the option BLOCK CODE FORMAT under
Setup → Configuration → Global Settings → Reservations → Reservation 3 tab.
Block statuses are defined via the option BLOCK STATUS under Setup →
Configuration → Reservations. This option also defines which block status can be
used in a new block, the sequence of the block statuses, the 'Next Status' that can
be selected for the block and if the status can be used to pick up rooms from
within individual reservations and group reservations.
294
Block Reservation
Web promotion functionality is controlled by the parameter USE PROMOTION CODES IN
BLOCKS under Setup → Configuration → Global Settings → Reservations →
Reservation 3 tab.
The inclusion of block reservations in the meal plan count is controlled by the
parameter BLOCKS IN MEAL PLAN FORECAST under Setup → Configuration → Global
Settings → Reservation → Reservation 1 tab.
Block Header
Cut Off
This option may be used to release rooms from a block at any time. If a CUTOFF DATE or a number
of CUTOFF DAYS has been specified, then the cut off occurs automatically during the night audit.
However, there may be situations in which rooms are still available in the block and need to be
released.
There are three ways rooms can be released from the block:
The CUT OFF button- all rooms from the whole block will be released.
The CUTOFF DATE - all rooms that are not picked up until that date will be released during the
night audit of the entered Cutoff Date.
CUTOFF DAYS - the rooms are released a fixed number of days before each arrival date of the
block.
How to cut off all rooms from the block
1. Click the RESERVATIONS menu and select BLOCK RESERVATION.
2. Select the block for which you want to cut off rooms and click the EDIT BLOCK
button.
3. Select CUT OFF, a warning message is displayed.
4. Select YES to release all rooms from the block.
Cut off day's example
If the first arrival is June 12th and the number of cut off days has been set to 4:
All rooms for June 12th will be released during the Night Audit of June 8th.
All rooms for June 13th during the Night Audit of June 9th and so forth.
Change Status
Once the block detail has been entered, the block status can be changed to the next available status.
1. Click the RESERVATIONS menu and select BLOCK RESERVATION.
2. Select the block for which you want to change the status and click the EDIT BLOCK
button.
3. Click CHANGE STATUS on the Block Header.
Block Reservation
295
4. Select the next available status
5. Click OK.
Block statuses are defined via the option BLOCK STATUS under Setup →
Configuration → Reservations. This option also defines which block status can be
used in a new block, the sequence of the block statuses, the 'Next Status' that can
be selected for the block and if the status can be used to pick up rooms from
within individual reservations and group reservations.
Options
Block User Log
This option may be used to view all changes made to the block.
How to view the block user log
1. Click the RESERVATIONS menu and select BLOCK RESERVATION.
2. Select the block for which you want to view the user log and click the EDIT BLOCK
button.
3. Select USER LOG from the OPTIONS menu.
The user log for the selected block is displayed split into two sections:
296
The upper section displays the name of the block and the arrival and departure dates.
The lower section gives information about the changes.
Block Reservation
User Log Display Options
Field Heading
Gives this information
Date
The date and time the change was made. This is the system
date of the computer on which the change was made.
Text
A short description about the changes that were made.
User
The name of the user who made the change.
Workstation
The Computer Name on which the change was made.
The changes displayed in the user log are dependant upon the options selected in
Setup → Configuration → Users → User Log → Block.
Block Summary
The block summary generates a room and revenue summary for the block by selected currency.
Potential, Actual and a percentage of actual versus potential figures are displayed for Rooms Sold,
Room Revenue, Total Revenue and Average Room Rate.
How to view the block summary
1. Click the RESERVATIONS menu and select BLOCK RESERVATION.
2. Select the block for which you want to view the block summary and click the EDIT
BLOCK button.
3. Select BLOCK SUMMARY from the OPTIONS menu.
The block summary for the selected block is displayed.
The CURRENCY for the revenue and average rate display can be selected to be either in the
local currency or if a foreign currency rate code is used then in the currency of the rate
code used.
The POTENTIAL figures are calculated based on the assumption that every room
materialises.
The ACTUAL figures show the total rooms currently picked up.
The AVERAGE ROOM RATE calculation is based on the total number of rooms entered on
the block grid divided by the total number of adults entered on the block grid.
Block Reservation
297
Block Extended Info
The block extended info displays information from the blockinfo.htm file, such as block status,
booker market code, reservation status, notes, expected revenue and block details.
How to view the block extended info
1. Click the RESERVATIONS menu and select BLOCK RESERVATION.
2. Select the block for which you want to view the block extended info and click the
EDIT BLOCK button.
3. Select BLOCK EXTENDED INFO from the OPTIONS menu.
The block extended info for the selected block is displayed.
Block Traces
Traces are internal messages attached to a block noting that a specific action is required on a
specific date. They are used to remind other departments or co workers of actions to take or
information about the block. Traces for blocks could be set to the banquet or sales department to
check for the rooming list on a specific date. Traces require an instruction (trace text) and an
instruction date.
How to enter a new trace
1. Click the RESERVATIONS menu and select BLOCK RESERVATION.
The block reservation navigator is displayed.
2. Select the block to which you want to add a trace and click the TRACES button.
3. Click NEW to display the new Trace dialog box.
4. In the TRACE DATES FROM and TO boxes select the date for the trace.
5. In the TRACE DEPARTMENTS box select the department the trace is for.
A list of texts that you may select from appears under TRACE TEXTS.
298
Block Reservation
6. Type the trace message in the TEXT box or select one of the pre-defined trace texts
by double-clicking the text.
7. Click OK to save the trace.
Trace dialog box
Field
Definition
Trace Date From To
The date the trace is for.
Trace Departments
Defines the department the trace is for.
Trace Texts
The pre-defined traces texts belonging to the selected
trace department.
Text
Free-format trace text can be entered in addition to or in
place of one of the pre-defined texts.
How to resolve a trace
1. Click the RESERVATIONS menu and select BLOCK RESERVATION.
2. Select the block which has the trace to be resolved and click the TRACES button.
3. Select the trace to be resolved.
4. Click RESOLVE NOW, the trace is now marked as resolved.
How to mark a resolved trace as unresolved
1. Click the RESERVATIONS menu and select BLOCK RESERVATION.
2. Select the block which has the trace to be unresolved and click the TRACES button.
3. Select the trace to be unresolved.
4. Click CLEAR RESOLVE, the trace is now marked as not resolved.
How to delete a trace
1. Click the RESERVATIONS menu and select BLOCK RESERVATION.
2. Select the block which has the trace to be deleted and click the TRACES button.
3. Select the trace to be deleted.
4. Click DELETE, the trace is deleted.
Trace group's control where the traces appear in Fidelio and are defined via the
option ACTIVITY AND TRACE GROUPS under Setup → Configuration → CRM.
Trace types are linked to the trace groups and are defined via the option TRACE
TYPES under Setup → Configuration → Reservations.
Trace functionality is controlled by the user rights VIEW, EDIT, NEW and DELETE
under Setup → Configuration → Users → User Definition → Rights → Traces →
Block traces.
Block Reservation
299
Tasks & Activities
Suite8 is capable of tracking any kind of task or activity. Generally activities are attached to a date
and a specific time when they need to be carried out, but it is also possible to create an activity that
is not linked to a time, it is then referred to as a Task. A task is more like a 'to do', a note or a
reminder for e.g. preparing a mailing or calling a customer. A task has a start date and a due date
but no specific time.
By default only not completed tasks & activities are displayed but all or only completed tasks &
activities can also be displayed by changing the search criteria.
Tasks and activities are also linked to at least one manager (employee). It is mandatory to assign a
manager as primary and optional to link additional managers as required. The Sales Manager
logged on to the system is automatically marked as the primary assigned manager for the activity;
however this can be changed as required.
Once a new task or activity has been entered, it can then be edited, copied, moved, printed or
deleted.
How to enter a new task
1. Click the RESERVATIONS menu and select BLOCK RESERVATION.
The block reservation navigator is displayed.
2. Select the block for which you want to add a task and click the EDIT BLOCK button.
3. Select TASKS & ACTIVITIES from the OPTIONS menu.
4. If there are existing tasks or activities then click the NEW button.
The Activity/Task selection dialog box is displayed.
5. Select TASK then click OK, the Task dialog box is displayed.
300
Block Reservation
6. Complete the fields as detailed in the table below.
7. Click OK, the task is displayed in the tasks and activities grid.
Task Dialog Box
Fill in this field
With this information
Company Name
Link to a company profile.
Contact Name
Link to an individual (contact) profile.
Company T&A
Click this option to display the activity search screen. By
default all the tasks and activities for the selected company
are shown for one year in the past and one year in the
future.
Contact T&A
Click this option to display the activity search screen. By
default all the tasks and activities for the selected contact are
shown for one year in the past and one year in the future.
Communication
Preferred communication method for the task.
Booking ID
The ID number of the booking master.
Note: This field is information only and is displayed only if
the task is linked to a conference booking.
Booking Name
The name of the conference booking.
Note: This field is information only and is displayed only if
the task is linked to a conference booking.
Block Reservation
301
Reservation ID
The ID number of the reservation block.
Note: This field is information only and is displayed only if
the task is linked to a block reservation.
Arrival Date
The arrival date or the booking.
Note: This field is information only and is displayed only if
the task is linked to a conference booking.
Resp. Employee
Employee for whom this task belongs.
Task Type
Type of Task.
Description
Free format field to further define the purpose of the task or
to give a description of task.
Check Availability
Select this checkbox to check availability when a task is
entered.
If this option is active then each time a task is entered for
the resp. employee for that day, the availability message is
displayed.
Start Date
Starting date of the task.
Status
The status of the task, e.g. Not Started, Deferred, etc.
% Completed
The % of the task completed.
Due Date
Due date of the task.
Priority
Task priority - Normal, Low, High.
Date Completed
Date the task was completed - select from calendar.
Also updates the STATUS field to completed and the field %
COMPLETED to 100%.
Notes
Free format field to add any additional notes or information.
The day, date, time and name of the logged in user can be
added to the text of the note by pressing F7.
How to enter a new activity
1. Click the RESERVATIONS menu and select BLOCK RESERVATION.
The block reservation navigator is displayed.
2. Select the block for which you want to add an activity and click the EDIT BLOCK
button.
3. Select TASKS & ACTIVITIES from the OPTIONS menu.
4. If there are existing tasks or activities then click the NEW button.
The Activity/Task selection dialog box is displayed.
5. Select ACTIVITY then click OK, the New Activity dialog box is displayed.
302
Block Reservation
6. Complete the fields as detailed in the table below.
7. Click OK, the activity is displayed in the tasks and activities grid.
Activity Edit dialog box
Fill in this field
With this information
Company Name
Link to a company profile.
Contact Name
Link to an individual (contact) profile.
Company T&A
Click this option to display the activity search screen. By
default all the tasks and activities for the selected company
are shown for one year in the past and one year in the future.
Contact T&A
Click this option to display the activity search screen. By
default all the tasks and activities for the selected contact are
shown for one year in the past and one year in the future.
Communication
Preferred communication method for the activity.
Booking ID
The ID number of the booking master.
Note: This field is information only and is displayed only if the
activity is linked to a conference booking.
Booking Name
The name of the conference booking.
Note: This field is information only and is displayed only if the
activity is linked to a conference booking.
Reservation ID
The ID number of the reservation block.
Block Reservation
303
Note: This field is information only and is displayed only if the
task is linked to a block reservation.
Arrival Date
The arrival date or the booking.
Note: This field is information only and is displayed only if the
activity is linked to a conference booking.
Resp. Employee
Employee for whom this activity belongs.
Activity Type
Type of Activity.
Activity Description
Free format field to further define the purpose of the activity
or to give a description of activity. By default the field is
completed with the activity type as defined in the previous
field.
All Day Event
Checking this field will mark the activity as an all day event.
An activity marked as an all day event is displayed at the top
of the column under the date field and not on the grid itself.
Check Availability
Select this checkbox to check availability when an activity is
entered. If this option is active then each time an activity is
entered for the resp. employee for that day and time, the
availability message is displayed.
Start Date
The starting date of the activity.
Start Time
The starting time of the activity. The default starting time is
defined in the Global Settings → Profile 1 tab.
End Date
The ending date of the activity.
End Time
The ending time of the activity. The default ending time is
defined in the Global Settings → Profile 1 tab.
Show As
Selecting an entry from this list box shows whether the
activity is taking place out of the office, if the Sales Manager
is busy or free, etc.
Private
Checking this field will mark the activity as private.
Note: Functionality not yet implemented.
Reminder
A reminder can be set, ranging from 5 minutes to one month.
Users then have the option to choose to 'Dismiss' or 'Snooze'
the activity. The reminder is sent to the responsible manager
and any assigned managers.
Date Completed
Date the activity was completed - select from calendar.
Free format field to add any additional notes or information.
The day, date, time and name of the logged in user can be
added to the text of the note by pressing F7.
How delete a task or activity
1. Click the RESERVATIONS menu and select BLOCK RESERVATION.
The block reservation navigator is displayed.
2. Select the required block and click the EDIT BLOCK button.
3. Select TASKS & ACTIVITIES from the OPTIONS menu.
A list of existing tasks and activities is displayed.
4. Select the task or activity to be deleted and click DELETE.
A confirmation message is displayed.
304
Block Reservation
5. Click YES to delete the task or activity.
Assign a manager
The RESP. EMPLOYEE entered for the task or activity is automatically marked as the
primary assigned manager. However, it is possible to link an unlimited number of
managers.
How to add a new manager
1. Display either the ACTIVITY or TASK dialog box.
2. Select the MANAGER ASSIGNMENT tab.
3. Click NEW, the Unassigned Managers dialog box is displayed.
4. Select the check box next to the required manager's name.
5. Click OK.
How to delete a manager assignment
1. Display either the TASK or ACTIVITY dialog box.
2. Select the MANAGER ASSIGNMENT tab.
Block Reservation
305
3. Select the manager assignment to be deleted and click DELETE, a confirmation
message is displayed.
4. Click YES to delete the manager assignment.
Linked Documents
This option enables the user to view, edit or add different types of documents to a profile, task or
activity. It is recommended to place these documents on a shared network path to which all users
have access. If a scanner is connected to the workstation you can also scan and attach documents
such as contracts, letters or pictures. The scanner needs to be ‘Twain’ compatible.
Note: The linked documents dialog box may be viewed from various
access points, access is via the linked documents tab or via the options
button, if available.
How to link a document
1. Select the LINKED DOCUMENTS tab.
2. Click ADD, the Attach documents dialog box is displayed.
3. In the DOCUMENT GROUPS list, select the document group required.
4. In the ALLOWED DIRECTORIES list, select the allowed directory required.
5. Click LOAD to display the list of documents.
6. Select the required document and click OPEN, the Document Name field is filled.
306
Block Reservation
7. To attach the document, click ATTACH, the document is shown as linked on the
linked documents tab.
Note: Pictures or images may be attached in JPG or BMP format. The
default setting is JPG, but this may be changed via the OPTIONS
button. The selected settings will be saved for that user.
Block Reservation
307
How to view/edit a linked document
1. Select the LINKED DOCUMENTS tab.
2. Select the document and click VIEW.
Suite8 opens the relevant application, for example, Word if the document is a
Word document.
Note: The document may be edited directly from within the opened
application.
How to scan and link a document
1. Select the LINKED DOCUMENTS tab.
2. Click ADD, the attach documents dialog box is displayed.
3. In the DOCUMENT GROUPS list, click the document group required.
4. In the ALLOWED DIRECTORIES list, click the allowed directory required.
5. Click SCAN, the select source dialog box is displayed.
6. Select the source and click SELECT to open the scanner application.
7. Scan the document.
8. Click ATTACH to link the scanned document.
Document groups and path are defined via the option DOCUMENT TYPES under Setup
→ Configuration → Miscellaneous.
Adding or editing documents on the linked documents tab is controlled by the user
right LINKED DOCUMENTS under Setup → Configuration → Users → User Definition →
Rights → Customer Profiles → Attach documents.
Unlink Booking
Two additional options are displayed on the Edit Block screen for blocks which were created via
the rooms section of a booking master in the meeting planner module:
Booking - to access the booking master screen.
Events - to access the event detail screen.
How to unlink a booking
1. Click the RESERVATIONS menu and select BLOCK RESERVATION.
2. Select the block for which you want to unlink the booking and click the EDIT BLOCK
button.
3. Two tabs BOOKING and EVENTS are displayed at the bottom of the screen for blocks
which were created via the rooms section of a booking master
308
Block Reservation
4. Click UNLINK BOOKING, a warning message is displayed.
4. Select YES to unlink the booking.
5. Click SAVE, the BOOKING and EVENTS tabs are no longer displayed at the bottom of
the screen.
Block Grid
The block grid is used to enter the number of rooms to be blocked per room type per date. In
addition the various grid views allow you to view the initial block, the actual block, the available
rooms, the picked up rooms and the changes from the initial block. Additional grids display the
rates, booking position, cut off dates and number of adults and the manual rates grid may be used
to manually enter rates per adult per room type.
Note: The grid views available are dependant upon the block status
and parameter settings.
How to access the block grid
1. Click the RESERVATIONS menu and select BLOCK RESERVATION.
2. Select the block required and click the GRID button.
or
3. Click EDIT BLOCK and then select the GRID button to display the Block Grid.
Block Reservation
309
The screen is split into three sections:
The grid displays the number of rooms blocked per room type per date and the total rooms
blocked per date.
The view selections are displayed in the centre of the screen; the views available are dependant
upon the block status and parameter settings.
The lower section of the screen displays the defined room types on the right and the set
options on the left. Rooms can be set by date range, the no. of rooms can be increased or
decreased and rooms can be set based on week days.
Views available on the Block Grid
310
INITIAL BLOCK - Displays the number of rooms that were blocked for this group up until the
end of the initial phase. A group is no longer in the initial phase when the block status is
changed from a status which DOES NOT AFFECT AVAILABILITY to a status which is considered
TENTATIVE or DEFINITE.
ACTUAL BLOCK - Displays the actual number of rooms that have been blocked for this group.
PICK UP - Displays the number of rooms that have been picked up.
RATES - Displays the rates per room type. If the rate is in a foreign currency then the foreign
currency rate and the currency symbol are displayed. This view is always available no matter
of the block status.
BOOKING POSITION - Booking Position is available for blocks with the status tentative pickup
and is used to enter the number of rooms which should be shown as definite reservations
instead of tentative reservations on the Availability screen (Ctrl + D). The number of rooms
AVAILABLE - Displays the number of rooms which are left in the block - the rooms which are
still available to be picked up.
CHANGES TO INITIAL - Displays the difference between the rooms which are actually blocked to
what were initially blocked.
Block Reservation
entered can not exceed the actual number of tentative rooms for the block. Booking Position
functionality is parameter controlled.
CUT OFF DATES - Displays the cut off date per day per room type. The cut off dates can be
changed by either selecting a date range or selecting the dates from the grid, then entering the
cut off days in the DAYS field or selecting a cut off date from the calendar in the DATE field.
Click the SET button to enter the new cut off date and overwrite the cut off day/date settings
from the block header.
NO OF ADULTS - Displays the number of adults per room type.
MANUAL RATES - Select this option in order to enter manual rates per adult per room type via
the NO. OF ADULTS and PRICE fields. The rates for one person per room appear in the grid and
selecting SHOW ALL RATES displays the rates for 2 or more persons. Manually entered rates
override rates from a rate code on the block header.
Booking Position functionality is controlled by the parameter BOOKING POSITION
under Setup → Configuration → Global Settings → Reservation 1 tab. Booking
Position functionality defines if tentative block rooms can be displayed as definite
on the availability screen.
Manual Rates functionality is controlled by the user right MANUAL RATES under Setup
→ Configuration → Users → User Definition → Rights → Block Reservation.
The display order of rooms on the Block Grid is controlled by the parameter BLOCK
GRID. SHOW FIRST ROOMS WHICH HAVE BLOCK DETAILS ASSIGNED under Setup →
Configuration → Global Settings → Miscellaneous → Visual Appearance 4 tab. With
this parameter activated room types linked to a block detail are displayed first on
the block grid
Copying a Block
The block copy function may be used to duplicate a block for reoccurring groups such as a tour
series.
Two types of series may be entered:
Custom Series - this option is used when a new block code and arrival date are required for
each tour.
Fixed Series - this option should be used if the arrival date and interval of each tour is known.
For example, if each tour arrives every second week of the month or if between each arrival
date there is an interval of 5 days.
How to enter a custom series
1. Click the RESERVATIONS menu and select BLOCK RESERVATION to display the block
reservation navigator.
2. Select a block in the grid and click COPY, the Block Copy dialog box is displayed
defaulted to Custom Series.
Block Reservation
311
3. Select the BLOCK STATUS from the drop-down list, this status will be applied to all
the blocks.
4. Click NEW and then enter the BLOCK CODE.
5. Type the arrival date for the Block in the ARRIVAL box or click the drop down arrow
and select a date from the calendar.
6. Repeat steps 4 and 5 until all the required block codes and arrival dates have been
entered.
7. Click OK, a message is displayed asking if the contract numbers should also be
copied.
8. Click YES or NO as required, the blocking status dialog is displayed.
9. Select INITIAL to copy the number of rooms entered when the block was in 'Initial'
status. Select ACTUAL to copy the actual number of rooms.
The required number of tour series are created. All are exact copies of the original
tour series with the exception of the dates, and the block code which you
specified.
312
Block Reservation
How to enter a fixed series
1. Click the RESERVATIONS menu and select BLOCK RESERVATION to display the block
reservation navigator.
2. Select a block in the grid and click COPY, the Block Copy dialog box is displayed
defaulted to Custom Series.
3. Select FIXED SERIES to display the Fixed Series Block Copy dialog box.
4. Select the BLOCK STATUS from the drop-down list, this status will be applied to all
the blocks.
5. Enter the BLOCK CODE; the block code can be a maximum of 10 digits long.
6. Enter the FREQUENCY, this is the weeks or days between the start of each tour.
7. Click either WEEKS or DAYS, depending on the frequency of the tours.
8. Type the arrival date of the next tour in the NEXT ARRIVAL box or click the drop
down arrow and select a date from the calendar.
9. Type the arrival date of the last tour in the LAST ARRIVAL box or click the drop down
arrow and select a date from the calendar.
10. In the CUTOFF DAYS box, enter the number of days before each arrival date to
release the rooms.
11. Click OK, a message is displayed asking if the contract numbers should also be
copied.
12. Click YES or NO as required, the blocking status dialog is displayed.
Block Reservation
313
13. Select INITIAL to copy the number of rooms entered when the block was in initial
status. Select ACTUAL to copy the actual number of rooms.
The required number of tour series are created. All are exact copies of the original
tour series with the exception of the dates and the block name, which is the
entered block code plus a sequence number.
New Res.
Multiple reservations are picked up (entered) using the group rooming list option. The New Res.
option may be used to pick up a single reservation from the group block.
How to pick up a single reservation from a group block
1. Click the RESERVATIONS menu and select BLOCK RESERVATION to display the Block
Reservation screen.
2. Select a block and click NEW RES. to display the Block Selection screen.
3. Select the room type; select the ALL DAYS check box to select all days in the
selected room type.
4. Click the SELECT button.
5. The Profile Search screen is displayed.
6. Select an existing profile or create a new profile.
7. If any profiles are attached to the block header then a message is displayed asking
if the profiles attached to the block should be attached to the individual
reservations.
8. Select YES, NO, NO TO ALL or YES TO ALL as required.
The Edit Reservation screen is displayed completed with reservation details taken
from the group block.
9. Make any changes if required and click OK to save the reservation.
Note: If the option AUTOGROUP is selected in the block header then a
group reservation will be automatically created when a reservation is
picked up. If a group reservation already exists then the new
reservation will be linked to the existing group.
314
Block Reservation
Picked Up
Picked up means that an individual reservation has been created; this option may be used to
display a list of the individual reservations which are part of this block.
How to view picked up reservations
1. Click the RESERVATIONS menu and select BLOCK RESERVATION to display the Block
Reservation screen.
2. Select a block and click PICKED UP to display the reservation navigator.
The reservations belonging to this group block are listed.
Rooming List
This option is used to enter individual names and split rooms from the block reservation into
individual reservations.
How to enter a block rooming list
1. Click the RESERVATIONS menu and select BLOCK RESERVATION to display the Block
Reservation screen.
2. Select a block and click ROOMING LIST to display the Block Selection screen.
3. Select the room type; select the ALL DAYS check box to select all days in the
selected room type.
4. Click the SELECT button.
5. The rooming list Parameters screen is displayed.
6. Enter the number of rooms to split and the number of sharers in one room.
7. Click OK, the rooming list entry screen is displayed.
8. The CHECK PROFILE option checks for existing profiles for each name that is entered
on the rooming list and is selected by default.
Block Reservation
315
9. Select the SHOW EXTRA FIELDS check box to display child age categories on the grid,
this allows children to be entered.
10. Select the ENABLE NEW RESERVATIONS check box to create additional reservations
from the rooming list.
11. In the NAME box on each row enter the guest name.
12. Click SAVE to save the rooming list.
An update screen shows the progress of the creation of the individual profiles and
reservations.
13. If any profiles are attached to the block header then a message is displayed asking
if the profiles attached to the block should be attached to the individual
reservations.
14. Answer YES or NO as required.
Upon completion the update screen closes automatically.
316
Block Reservation
Available options on the rooming list dialog box
SAVE - to save the rooming list
PROFILE EDIT - to edit the selected profile
PROFILE SEARCH - to search for an existing profile
REMOVE - to remove the selected profile
BLOCK GRID - to display the block grid
How to customize the rooming list grid
1. Display the rooming list entry screen.
2. Right-click to display the short-cut menu and click CUSTOMIZE.
The Rooming list column order setup dialog box is displayed.
3. Use the UP and DOWN arrows to arrange the columns in the required order.
4. Click OK to save the new column order; this change is permanent until the grid is
next customized.
5. Complete the update of the rooming list in the normal manner.
Block Reservation
317
Note: If the check profile option is selected and a profile marked as
BLACK LIST or CASH LIST is selected for the group rooming list a
message is displayed. Only users with the right to create a reservation
with a profile status of C or R can continue to create a reservation.
Note: If the option AUTOGROUP is selected in the block header then a
group reservation is automatically created when the rooming list is
entered. If a group reservation already exists then the new
reservations will be linked to the existing group.
The display order of rooms on the Block Selection screen is controlled by the
parameter BLOCK GRID. SHOW FIRST ROOMS WHICH HAVE BLOCK DETAILS ASSIGNED under
Setup → Configuration → Global Settings → Miscellaneous → Visual Appearance 4
tab. With this parameter activated room types linked to a block detail are
displayed first on the block selection.
Block Traces
Traces are internal messages attached to a block noting that a specific action is required on a
specific date. They are used to remind other departments or co workers of actions to take or
information about the block. Traces for blocks could be set to the banquet or sales department to
check for the rooming list on a specific date. Traces require an instruction (trace text) and an
instruction date.
How to enter a new trace
1. Click the RESERVATIONS menu and select BLOCK RESERVATION.
The block reservation navigator is displayed.
2. Select the block to which you want to add a trace and click the TRACES button.
3. Click NEW to display the new Trace dialog box.
4. In the TRACE DATES FROM and TO boxes select the date for the trace.
5. In the TRACE DEPARTMENTS box select the department the trace is for.
A list of texts that you may select from appears under TRACE TEXTS.
6. Type the trace message in the TEXT box or select one of the pre-defined trace texts
by double-clicking the text.
7. Click OK to save the trace.
Trace dialog box
Field
Definition
Trace Date From To
The date the trace is for.
Trace Departments
Defines the department the trace is for.
Trace Texts
The pre-defined traces texts belonging to the selected
trace department.
Text
Free-format trace text can be entered in addition to or in
place of one of the pre-defined texts.
How to resolve a trace
1. Click the RESERVATIONS menu and select BLOCK RESERVATION.
2. Select the block which has the trace to be resolved and click the TRACES button.
318
Block Reservation
3. Select the trace to be resolved.
4. Click RESOLVE NOW, the trace is now marked as resolved.
How to mark a resolved trace as unresolved
1. Click the RESERVATIONS menu and select BLOCK RESERVATION.
2. Select the block which has the trace to be unresolved and click the TRACES button.
3. Select the trace to be unresolved.
4. Click CLEAR RESOLVE, the trace is now marked as not resolved.
How to delete a trace
1. Click the RESERVATIONS menu and select BLOCK RESERVATION.
2. Select the block which has the trace to be deleted and click the TRACES button.
3. Select the trace to be deleted.
4. Click DELETE, the trace is deleted.
Trace group's control where the traces appear in Fidelio and are defined via the
option ACTIVITY AND TRACE GROUPS under Setup → Configuration → CRM.
Trace types are linked to the trace groups and are defined via the option TRACE
TYPES under Setup → Configuration → Reservations.
Trace functionality is controlled by the user rights VIEW, EDIT, NEW and DELETE
under Setup → Configuration → Users → User Definition → Rights → Traces →
Block traces.
Billing Instructions
This option may be used to view and access the billing instructions and is accessible via the
OPTIONS menu of the both the Reservation Navigator and the Edit Reservation screen. Billing
Instructions are also accessible from the BLOCK NAVIGATOR and the BLOCK HEADER.
Billing instructions are used to direct specific charges to be posted automatically to different folios.
You can direct charges the same room but to a different billing window or to another name, room
or financial account. Billing instructions can be limited by date and a payment method can be set
for each instruction.
For example, for a guest on a business trip where the company is paying for the room and
breakfast charges, the billing instructions would be entered so that the room and breakfast charges
are directed automatically to a different folio (window). When the guest checks out, he will only
pay his personal charges and the invoice for room and breakfast will be sent to the company.
Billing instructions and expected or checked in reservations/financial accounts are handled as
follows:
Charges of an expected reservation can be routed to an expected or checked in reservation or
financial account.
Charges of a checked in reservation can not be routed to an expected reservation or financial
account, the message: 'Routing not possible, target is not checked in' will occur.
If billing instructions are attached to a reservation it will be indicated at the bottom of the edit
reservation screen by the indicator
, which can be used to directly display the billing
instructions.
The option MANUAL CARD is available if transponder handling is activated; it is used to manually
enter a card number so that all charges can be automatically routed to the financial account linked
to this card number. If the workstation is equipped with a card reader it is also possible to swipe
the transponder card.
Block Reservation
319
How to enter a new billing instruction
1. From the Reservation Navigator select the required reservation.
2. Select BILLING INSTRUCTIONS from the OPTIONS menu.
or
Click EDIT to display the reservation edit screen and then select BILLING
INSTRUCTIONS from the OPTIONS menu.
or
3. Click the RESERVATIONS menu and select BLOCK RESERVATION.
4. On the block reservation navigator select the required block and click the BILLING
INSTR. button.
The Billing Instructions dialog box is displayed with any existing billing instructions
listed.
5. Click the NEW button to display the New/Edit Billing Instruction dialog box.
320
Block Reservation
6. Select the WINDOW the charges should be routed to.
The default for the new instruction is in sequential order. Window 1 is always
reserved for all postings which are not routed to another window. When entering
billing instructions for the first time, the default window is 2.
7. Enter the FROM DATE and TO DATE the billing instruction is valid for, the default
dates are the arrival and departure dates.
8. Select the DEPARTMENT CODES to be routed from the drop-down list of available
department codes. The * will select all department codes. Use the EXCLUDE button
to exclude department codes and the INCLUDE button to add department codes.
9. Select any or all of the following options:
SAME ROOM - If selected, the charge will be routed to the same room, if not selected the
charge can be routed to another room.
BILL VIEW - If you are using a video interface select this option to allow the guest to view
this billing window from his room. Window one is the default window to view.
VIDEO CHECK OUT - If you are using a video interface select this option to allow the guest
to check-out this billing window from his room. Usually the video check out option is only
available for guests paying with a credit card.
Block Reservation
321
10. Select the NAME for the billing window from the list of linked profiles.
11. In the OTHER NAME option you can select to route the department codes to another
profile.
If either the profile selected via NAME or OTHER NAME has default billing instructions
defined then a message is displayed asking if the default billing instructions should
be added.
12. Click YES to add the default billing instructions.
13. If the option SAME ROOM is not selected then the charges could be routed to an
OTHER ROOM.
14. If the option SAME ROOM is not selected then the charges could be routed to a
financial account (OTHER ACCOUNT). Select from a list of available financial accounts
or create a new Financial Account.
The search criteria allow the user to easily locate the required financial account.
Selecting the option SHOW ON POPUP will display all available financial accounts. This
setting is saved for future use until changed by the user.
15. If the selected account has an accounts receivable number then the AR NUMBER and
credit limit are displayed.
16. If the method of PAYMENT is known, it can be selected from a list of available
payment methods and will be the default for that window at check out.
17. If the method of payment for that window is a CREDIT CARD then the credit card can
be selected.
18. If the selected profile is a company and has a primary CONTACT attached, then this
contact can be selected, however contacts will not be linked automatically.
19. The billing ADDRESS of the name, other name or account is displayed
automatically. If no billing address exists then the primary address is displayed. If
more than one address exits for the profile then the required address can be
selected.
20. The attached profile may be edited by pressing the EDIT PROFILE button.
21. To apply a limit to the billing instruction click the LIMIT tab.
322
Block Reservation
22. Enter the LIMIT for the selected billing instruction code.
23. Click OK to save the billing instructions.
24. Click OK to close the billing instructions screen.
If changes were made to existing billing instructions, the user is prompted with a
confirmation message to apply these changes.
Note: When an amount higher than the limit set for the billing
instruction is posted then a message is displayed that the posting is
split.
Block Reservation
323
How to set a billing instruction limit
1. From the Reservation Navigator select the required reservation and display the
Billing Instructions dialog box.
2. Select the billing instruction to which a limit is to be applied and click the LIMIT tab.
3. Enter the LIMIT for the selected billing instruction.
4. Click OK to save the billing instructions.
324
Block Reservation
5. Click OK to close the billing instructions screen.
Billing Instruction functionality is controlled by the user rights under ROUTING
INSTRUCTIONS under Setup → Configuration → Users → User Definition → Rights.
Billing instructions to another reservation are indicated in the user log if the option
NEW RESERVATION BILLING INSTRUCTION is selected in Setup → Configuration → Users
→ User Log → Billing Instruction.
If the parameter DEFAULT START DATE OF BILLING INSTRUCTIONS TO SYSTEM DATE under
Setup → Configuration → Global Settings → Billing 1 tab is activated then the start
date of the billing instructions will default to the system date. This defines if the
billing instructions are independent of the reservation dates and allows billing
instructions to be applied to posting's made on pre-arrival reservations. If not
activated then the start date of the billing instructions will default to the start date
of the reservation.
Transponder functionality is controlled by the parameter TRANSPONDER HANDLING
under Setup → Configuration → Global Settings → Generic → Generic 2 tab.
Block Notes
This option may be used to enter block notes and is accessible via the Block Navigator and via the
NOTES tab on the Edit Block screen.
You can add notes which are specific to a block Notes are divided into user-definable categories
and can be included on correspondence if marked as viewable by the guest. An unlimited number
of block notes can be added. Block notes are indicated on the edit block screen by the indicator
.
Adding a new note from the block header
1. From the Block Navigator select the required block reservation.
2. Click EDIT to display the block edit screen and then select NOTES tab to display the
notes screen.
Any existing notes are listed in the upper part of the Notes dialog box.
Block Reservation
325
4. Click NEW button, the Add Note dialog is displayed.
5. The DATE/TIME and USER are automatically completed.
326
Block Reservation
6. Select a NOTE CATEGORY from the drop-down list, only categories configured as
block notes are available.
7. Select the option GUEST VIEWABLE if the guest is allowed to view the note.
Depending on the definition and setup of any customer correspondence, this
option is used to control which notes should appear on contracts, offers or letters.
Leave it empty if you do not want the guest to be aware of this note.
8. In the NOTE box enter the text for the note.
9. The day, date, time and name of the logged in user can be added to the text of
the note by pressing F7.
10. Click OK to save the note.
11. Click OK to close the Edit Block screen.
Block Reservation
327
How to edit a note
1. Click the NOTES button to display the notes dialog box.
2. All the existing notes are listed in the upper part of the dialog box. The text of
each note is listed in the lower part of the dialog box. Click on the DETAILS button
to view details such as the category, when the note was entered and the time it
was entered.
3. Select the note to be edited and click the EDIT button to display the Edit Note
dialog box.
4. Make any changes required and click OK to save the note.
How to delete a note
1. Click the NOTES button to display the notes dialog.
2. All the existing notes are listed in the upper part of the dialog box. The text of
each note is listed in the lower part of the dialog box. Click on the DETAILS button
to view details such as the category, when the note was entered and the time it
was entered.
3. Select the note to be deleted.
4. Click the DELETE button, a confirmation message is displayed.
5. Click YES, the note is deleted.
Note Categories are defined via the option NOTES CATEGORIES under Setup →
Configuration → Reservations. Note Categories can be defined to be restricted and
then only users with the appropriate user rights can view, edit, insert or delete a
restricted note. Block notes are displayed on the block.htm and blockinfo.htm.
Block Correspondence
The BLOCK CORRESPONDENCE option may be used to send letters, faxes, SMS's or email's to a
selected profile from within the block.
This option is accessible via the Block Navigator and via the Edit Block screen.
Block correspondence can be printed and sent via regular mail or sent via email, as an email
attachment or by fax. SMS's may be used for a regular confirmation, but may also be used to
advise a guest that their room is ready.
The correspondence option opens the print dialog window. The screen is split into three sections.
The first section is to choose a template from a list of predefined TEMPLATES and to select a
language for the correspondence. Letter and form templates can be created in Miscellaneous →
Reports with the section role BLOCK.
The second section is the LINK INFORMATION section and contains information about the
profiles linked to the block. The DETAILS section displays all the addresses from all the linked
profiles. The primary address of the selected profile and one communication type is selected. If
there are several profiles attached, you can select which profile the letter should be sent to.
Both the profile and any linked profiles can be edited by pressing the EDIT PROFILE button.
If the correspondence is opened from a company profile all linked individuals are displayed
and the primary contact is selected by default and if opened from the individual profile all
linked companies are displayed.
328
The third section gives information about the HISTORY of sent correspondence for this profile.
The template name and the print date are displayed. If a letter was edited and saved but not
printed then the template name will be displayed with (Saved) after the name and the date and
time it was saved.
Block Reservation
Correspondence functionality is controlled by the user right CORRESPONDENCE under
Setup → Configuration → Users → User Definition → Rights → Customer Profiles →
Profile Details.
Default email subjects can be defined via the option DEFAULT EMAIL SUBJECTS under
Setup → Configuration → Miscellaneous → Simple Custom Text.
Default email body text can be defined via the option EMAIL BODY DEFAULT under
Setup → Configuration → Miscellaneous → Simple Custom Text.
The maximum size for email attachments is defined via the option MAX. EMAIL
ATTACHMENT SIZE (MB) under Setup → Configuration → Global Settings → Reports →
Reports tab.
Family functionality is controlled by the parameter ENABLE FAMILY WIZARD under
Setup → Configuration → Global Settings → Profile → Profile 1 tab.
SMS Sending functionality is controlled by the parameter ENABLE SMS SENDING
under Setup → Configuration → Global Settings → Interfaces → Misc. Interface 4
tab.
SMS sending requires that an SMS template with the section role PROFILE LETTER be
created under Miscellaneous → Reports. Using the Internal Editor functionality up
to 160 characters can be added to the template.
How to print correspondence
1. Select the required block in the grid; click the CORRESPONDENCE button to display
the Block Correspondence dialog box.
2. In the TEMPLATES box click the drop-down arrow and select the template to be
used.
3. In the LANGUAGE box the language of the selected individual profile is selected by
default, this can be changes as required. If no language is selected, the default
language from the language configuration will be used.
Block Reservation
329
4. In the PREF. DISTRIBUTION box the preferred method of distribution for this profile is
displayed. If a company profile is selected then the contact profiles preferred
method of distribution takes priority over the company's.
5. Select the FAMILY GREETINGS check box if the family letter greetings should be used.
6. Creating correspondence for an individual profile requires that only the ADDRESS be
selected as the profile is selected by default. When creating correspondence for a
company profile, the primary CONTACT and primary ADDRESS of the company is
selected by default, but can be changed as required.
7. Click EDIT, the document is generated and displayed on the screen. Depending on
the setup of your system either MS Word or the Fidelio Internal editor application
will be used to display the document.
8. Make sure that all the entered information is correct; any necessary changes can
be made at this time.
9. At this point the letter can be printed or saved to be printed at a later time.
10. To print the letter, click the PRINT icon or select PRINT from the file menu.
11. Close the edit screen, if changes were made you will be prompted to save the
changes.
12. If using MS Word as the editor, click EXIT to close the application.
13. If the document was edited and saved but not yet printed then the template name
will be displayed with (Saved) after the name and the date and time it was saved
in the history section of the Print dialog box.
14. If the document was printed then the template name will be displayed and the
date and time it was printed in the history section of the Print dialog box.
How to print saved correspondence
1. Select the required block in the grid; click the CORRESPONDENCE button to display
the Block Correspondence dialog box.
2. Select the document to be printed from the list of templates in the HISTORY section
of the screen.
3. Click EDIT HISTORY, the letter is displayed on the screen. Depending on the setup of
your system either MS Word or the Fidelio Internal editor application will be used
to display the document.
4. Make sure that all the entered information is correct; any necessary changes can
be made at this time.
5. Click the PRINT icon or select PRINT from the file menu to print the letter.
6. Close the edit screen.
7. If using MS Word as the editor, click EXIT to close the application.
8. The document template name will be displayed and the date and time it was
printed in the HISTORY section of the Print dialog box.
How to edit correspondence
1. Select the required block in the grid; click the CORRESPONDENCE button to display
the Block Correspondence dialog box.
2. In the TEMPLATES box click the drop-down arrow and select the template to be
used.
3. In the LANGUAGE box click the drop-down arrow and select the language, if no
language is selected, the default language from the language configuration will be
used.
330
Block Reservation
4. In the PREF. DISTRIBUTION box the preferred method of distribution for this profile is
displayed. If a company profile is selected then the contact profiles preferred
method of distribution takes priority over the company's.
5. Select the FAMILY GREETINGS check box if the family letter greetings should be used.
6. Select the CONTACT and ADDRESS information to be used in the document.
7. Click EDIT, the document is generated and displayed on the screen.
8. At this point the document can be printed or saved to be printed at a later time.
9. To print the document, click the PRINT icon.
10. To save the document, click the SAVE icon, enter a file name to save the
document.
11. Click SAVE.
12. Close the edit screen.
How to email correspondence
1. Select the required block in the grid; click the CORRESPONDENCE button to display
the Block Correspondence dialog box.
2. In the TEMPLATES box click the drop-down arrow and select the template to be
used.
3. In the LANGUAGE box click the drop-down arrow and select the language, if no
language is selected, the default language from the language configuration will be
used.
4. In the PREF. DISTRIBUTION box the preferred method of distribution for this profile is
displayed. If a company profile is selected then the contact profiles preferred
method of distribution takes priority over the company's.
5. Select the FAMILY GREETINGS check box if the family letter greetings should be used.
6. Creating correspondence for an individual profile requires that only the ADDRESS be
selected as the profile is selected by default. When creating correspondence for a
company profile, the primary CONTACT and primary ADDRESS of the company is
selected by default, but can be changed as required.
7. Click EMAIL, the document is generated and the email dialog box displayed.
Block Reservation
331
8. The TO box is automatically completed with the email address from the profile, this
can be changed by clicking the drop-down arrow and selecting the email address
to which this email should be sent or by selecting the required email addresses
from the list of available in the panel on the upper right-hand side and clicking the
TO button. Click the SELECT ALL button and then the TO button to select all the
available email addresses.
9. In the CC box click the drop-down arrow and select the email address which
should be copied on this email or select the required email addresses from the list
of available in the panel on the upper right-hand side and click the CC button.
Click the SELECT ALL button and then the CC button to select all the available email
addresses.
10. In the BCC box click the drop-down arrow and select the email address which
should be blind copied on this email or select the required email addresses from
the list of available in the panel on the upper right-hand side and click the BCC
button. Click the SELECT ALL button and then the BCC button to select all the
available email addresses.
11. Enter the topic of the email in the SUBJECT box. If a default email subject has been
defined, then this will be displayed.
12. In the BODY box, make sure that all the entered information is correct; click the
EDIT BODY button to make any necessary changes.
13. If the email should be saved and sent later then click SAVE DRAFT, the email is
saved and the template name is displayed with (E-Mail)(Saved) after the name
and the date and time it was saved in the history section of the Correspondence
dialog box.
14. If the email should be sent now click SEND, the document is generated and the
email sent.
332
Block Reservation
A confirmation message is displayed confirming that the message was sent.
How to email correspondence as an attachment
1. Select the required block in the grid; click the CORRESPONDENCE button to display
the Block Correspondence dialog box.
2. In the TEMPLATES box click the drop-down arrow and select the template to be
used.
3. In the LANGUAGE box click the drop-down arrow and select the language, if no
language is selected, the default language from the language configuration will be
used.
4. In the PREF. DISTRIBUTION box the preferred method of distribution for this profile is
displayed. If a company profile is selected then the contact profiles preferred
method of distribution takes priority over the company's.
5. Select the FAMILY GREETINGS check box if the family letter greetings should be used.
6. Creating correspondence for an individual profile requires that only the ADDRESS be
selected as the profile is selected by default. When creating correspondence for a
company profile, the primary CONTACT and primary ADDRESS of the company is
selected by default, but can be changed as required.
7. Click EMAIL, the document is generated and the email dialog box displayed.
8. The TO box is automatically completed with the email address from the profile, this
can be changed by clicking the drop-down arrow and selecting the email address
to which this email should be sent or by selecting the required email addresses
from the list of available in the panel on the upper right-hand side and clicking the
TO button. Click the SELECT ALL button and then the TO button to select all the
available email addresses.
Block Reservation
333
9. In the CC box click the drop-down arrow and select the email address which
should be copied on this email or select the required email addresses from the list
of available in the panel on the upper right-hand side and click the CC button.
Click the SELECT ALL button and then the CC button to select all the available email
addresses.
10. In the BCC box click the drop-down arrow and select the email address which
should be blind copied on this email or select the required email addresses from
the list of available in the panel on the upper right-hand side and click the BCC
button. Click the SELECT ALL button and then the BCC button to select all the
available email addresses.
11. Enter the topic of the email in the SUBJECT box. If a default email subject has been
defined, then this will be displayed.
12. Select the SEND AS ATTACHMENT check box if the document should be sent as an
attachment rather than in the body of the email.
13. To edit the document click the EDIT ATTACH. button, the document is generated and
displayed on the screen. Depending on the setup of your system either MS Word
or the Fidelio Internal editor application will be used to display the document.
14. In the FORMAT box select the format for the attachment.
15. Click the EDIT BODY button to enter the text which should be included in the body
of the email. If a default email body text has been defined, then this will be
displayed and any required changes can be made.
16. If the email should be saved and sent later then click SAVE DRAFT, the email is
saved and the template name is displayed with (E-Mail) (Saved) after the name
and the date and time it was saved in the history section of the Correspondence
dialog box.
17. If the email should be sent now click SEND, the document is generated and the
email sent.
A confirmation message is displayed confirming that the message was sent.
Note: Attachments sent in PDF format are automatically password
protected so that no changes can be made to the original PDF.
Note: When sending correspondence as a PDF attachment, the PDF
files are stored both in the database and in the Mailing Documents
directory defined in the configuration. After the correspondence has
been successfully sent the PDF files are removed from the database.
How to email correspondence with an attachment
1. Select the required block in the grid; click the CORRESPONDENCE button to display
the Block Correspondence dialog box.
2. In the TEMPLATES box click the drop-down arrow and select the template to be
used.
3. In the LANGUAGE box click the drop-down arrow and select the language, if no
language is selected, the default language from the language configuration will be
used.
4. In the PREF. DISTRIBUTION box the preferred method of distribution for this profile is
displayed. If a company profile is selected then the contact profiles preferred
method of distribution takes priority over the company's.
5. Select the FAMILY GREETINGS check box if the family letter greetings should be used.
334
Block Reservation
6. Creating correspondence for an individual profile requires that only the ADDRESS be
selected as the profile is selected by default. When creating correspondence for a
company profile, the primary CONTACT and primary ADDRESS of the company is
selected by default, but can be changed as required.
7. Click EMAIL, the document is generated and the email dialog box displayed.
8. The TO box is automatically completed with the email address from the profile, this
can be changed by clicking the drop-down arrow and selecting the email address
to which this email should be sent or by selecting the required email addresses
from the list of available in the panel on the upper right-hand side and clicking the
TO button. Click the SELECT ALL button and then the TO button to select all the
available email addresses.
9. In the CC box click the drop-down arrow and select the email address which
should be copied on this email or select the required email addresses from the list
of available in the panel on the upper right-hand side and click the CC button.
Click the SELECT ALL button and then the CC button to select all the available email
addresses.
10. In the BCC box click the drop-down arrow and select the email address which
should be blind copied on this email or select the required email addresses from
the list of available in the panel on the upper right-hand side and click the BCC
button. Click the SELECT ALL button and then the BCC button to select all the
available email addresses.
11. Enter the topic of the email in the SUBJECT box. If a default email subject has been
defined, then this will be displayed.
12. Click ADD, the Attach documents dialog box is displayed.
Block Reservation
335
13. In the DOCUMENT GROUPS list, select the document group required.
14. In the ALLOWED DIRECTORIES list, select the allowed directory required.
15. Click BROWSE to display the list of documents.
16. Select the required document and click OPEN, the Document Name field is filled.
336
Block Reservation
17. To attach the document, click ATTACH, the document is shown as a linked
attachment on the email report dialog box.
18. In the BODY box, make sure that all the entered information is correct; click the
EDIT BODY button to make any necessary changes.
16. If the email should be saved and sent later then click SAVE DRAFT, the email is
saved and the template name is displayed with (E-Mail) (Saved) after the name
and the date and time it was saved in the history section of the Correspondence
dialog box.
17. If the email should be sent now click SEND, the document is generated and the
email sent.
A confirmation message is displayed confirming that the message was sent.
How to email saved correspondence
1. Select the required block in the grid; click the CORRESPONDENCE button to display
the Block Correspondence dialog box.
2. Select the email to be sent from the list of templates in the HISTORY section of the
screen.
3. Click E-MAIL HISTORY, the email is displayed on the screen. Depending on the setup
of your system either MS Word or the Fidelio Internal editor application will be
used to display the email.
4. In the BODY box, make sure that all the entered information is correct; click the
EDIT BODY button to make any necessary changes.
5. Click SEND, the document is generated and the email sent.
6. The document template name is displayed and the date and time it was sent in the
HISTORY section of the Correspondence dialog box.
Block Reservation
337
How to fax correspondence
1. Select the required block in the grid; click the CORRESPONDENCE button to display
the Block Correspondence dialog box.
2. In the TEMPLATES box click the drop-down arrow and select the template to be
used.
3. In the LANGUAGE box click the drop-down arrow and select the language, if no
language is selected, the default language from the language configuration will be
used.
4. In the PREF. DISTRIBUTION box the preferred method of distribution for this profile is
displayed. If a company profile is selected then the contact profiles preferred
method of distribution takes priority over the company's.
5. Select the FAMILY GREETINGS check box if the family letter greetings should be used.
6. Creating correspondence for an individual profile requires that only the ADDRESS be
selected as the profile is selected by default. When creating correspondence for a
company profile, the primary CONTACT and primary ADDRESS of the company is
selected by default, but can be changed as required.
7. Click FAX, the document is generated and the fax dialog box displayed.
8. The TO box is automatically completed with the fax number from the profile.
9. To edit the fax click EDIT, the document is generated and displayed on the screen.
Depending on the setup of your system either MS Word or the Fidelio Internal
editor application will be used to display the document.
10. Make sure that all the entered information is correct; any necessary changes can
be made at this time.
11. To schedule the time the fax should be sent, click ADVANCED, the Fax Scheduler
dialog box is displayed.
338
Block Reservation
12. Select when to SEND THE FAX, the default is NOW, to specify a specific date and time
select a SPECIFIC TIME IN THE DAY and enter the date and time to send the fax.
13. Select the FAX PRIORITY, the default is Normal.
14. Click OK.
15. Click Send, the document is generated and the fax sent.
How to SMS correspondence
1. Select the required block in the grid; click the CORRESPONDENCE button to display
the Block Correspondence dialog box.
2. In the TEMPLATES box click the drop-down arrow and select the template to be
used; an SMS template must contain no more than 160 characters.
3. In the LANGUAGE box click the drop-down arrow and select the language.
4. Select the ADDRESS information to be used in the SMS.
5. Click SMS, the correspondence is generated and the SMS dialog box displayed.
Block Reservation
339
6. The TO box is automatically completed with the mobile phone number from the
profile, this can be changed by clicking the drop-down arrow and selecting the
mobile phone number to which this SMS should be sent or by selecting the
required mobile phone numbers from the list of available in the panel on the upper
right-hand side and clicking the TO button.
7. In the SMS box, make sure that all the entered information is correct; any
necessary changes can be made at this time.
8. Click SEND to send the SMS.
How to export correspondence
1. Select the required block in the grid; click the CORRESPONDENCE button to display
the Block Correspondence dialog box.
2. In the TEMPLATES box click the drop-down arrow and select the template to be
used.
3. In the LANGUAGE box click the drop-down arrow and select the language, if no
language is selected, the default language from the language configuration will be
used.
4. In the PREF. DISTRIBUTION box the preferred method of distribution for this profile is
displayed. If a company profile is selected then the contact profiles preferred
method of distribution takes priority over the company's.
5. Select the FAMILY GREETINGS check box if the family letter greetings should be used.
6. Creating correspondence for an individual profile requires that only the ADDRESS be
selected as the profile is selected by default. When creating correspondence for a
company profile, the primary CONTACT and primary ADDRESS of the company is
selected by default, but can be changed as required.
7. Click EXPORT, the document is generated and the export dialog box displayed.
8. In the DESTINATION box, click the drop-down arrow and select if the document is
being exported to a file or to an application, such as MS Word or MS Excel.
9. In the FILE TYPE box, click the drop-down arrow and select the file type to be used
for the export. One of the most commonly file types is Rich Text Format as it
allows the document to be edited and the correct format to be kept.
10. This option is only available if TOAPPLICATION was selected as the Destination type.
Click the drop-down arrow and select the application type.
11. The FILE box is automatically completed with a file name taken from the reports
section, but can be changed as required. To select a different file, click the folders
button.
12. Click EXPORT, the document is generated and exported.
340
Block Reservation
5
Group Reservations
The group module is used to enter and manage reservations with similar needs. This could be a
group of people all arriving for the same purpose and staying through the same period of time,
such as a wedding or a company meeting.
Note: The BLOCK RESERVATION module should be used for more
flexible group reservations, such as allotments and tour groups.
Group Reservations
To access group reservations
Click the Reservations menu and select Group Reservation or click Group Reservation from
the coloured shortcut bar to display the Group Reservation Navigator.
The group navigator screen is divided into four distinct areas:
Query - consists of multiple basic group search criteria.
Query Results - the results of the query shown in a customizable grid format, including
Group Name, Contact Name, From Date, To Date, Inactive indicator and Template Name.
Tree View - a tree listing of all the reservations associated with this group
HTML page - free definable HTML display which by default has a list format or a 'big'
format where the details are displayed in a non-grid style format. The HTML page can be
printed by right mouse click.
Group Reservations
341
View selection
The group reservation navigator consists of two tabs:
Groups - displays group information such as arrival and departure dates or rooming lists.
Templates - displays the group profile template with contact information and attached
profiles. All active groups linked to the template are listed in the tree view.
The Basic Search Criteria
You may fill in multiple fields to narrow the search criteria. A list of groups that match what you
have specified is displayed, for example, if you specify a search for the Group Name "Thomas
Cook", the group list grid shows a list of all groups with the group name Thomas Cook. The actual
query is displayed in a script format in a window on the right hand side of the screen. If no data is
entered, the list of group reservations is displayed in alphabetical order. To activate the search the
user must click the SEARCH button. The query criteria can be easily reset by clicking the CLEAR
button.
Wildcards
The search criteria can also be entered using wildcards (%). For example, M%ller will return Miller,
Muller, %Bank will return Investment Bank, American Bank and Fidelio% will return Fidelio
Gmbh or Fidelio Inc.
Narrowing the search
Once the search has been performed the search can be further narrowed by using the FIND IN GRID
button.
The FIND IN GRID button allows the user to:
Search on all or specific columns within the grid
Search for specific text
Match the case or search for whole words only
Control the direction of the search.
Group reservation search criteria
Fill in this field
With this information
Group Name
The name of the group.
Contact
The last name of the group contact.
Start Date
The arrival date of the group.
Company
The company attached to the group.
Travel Agent
The travel agent attached to the group.
Source
The source attached to the group.
Include History
Select this check box to include past group reservations.
Include Inactive
Select this check box to include inactive groups.
Group template search criteria
342
Fill in this field
With this information
Group Template Name
The group template name.
Contact
The last name of the group contact.
Include Inactive
Select this check box to include inactive group
templates.
Group Reservations
Group Navigator Options
This Option
Does this:
Search
Activates the search.
Full Search
Displays all groups matching the search criteria,
however, if no search criteria are entered then all
groups are displayed.
Clear
Clears the search criteria.
New
Enters a new group reservation or group template.
Edit
Edits an exiting group reservation or group template.
Find in Grid
Narrows the group search further.
Creating a Group Reservation
A group reservation consists of several parts:
Group Template - this is the group profile and each group has to have a template attached,
however a single template can be used multiple times.
Group Information - basic group details.
Reservation Details - this is similar to individual reservation details.
How to enter a new group
1. Click the RESERVATIONS menu and select GROUP RESERVATION to display the Group
Reservation screen.
2. The GROUPS tab is displayed by default, click NEW to display the New Group screen.
The New Group screen consists of three screens, each one represented by a tab:
Group Info - contains information about the group profile and the group reservations.
Financial Account - used to attach and view financial accounts linked to the group profile.
Group Reservations
343
Linked Profiles - used to view, link or unlink profiles to the group template.
3. Click the
button next to the TEMPLATE box to open the Group Templates
search screen.
4. Search for and select an existing template or enter a new group template.
The New Group screen is displayed completed with the template details.
344
Group Reservations
5. The NAME of the group is completed with the name on the group template;
however, this must be changed to be a unique group name as no two groups can
have the same name.
6. The name of the CONTACT person is taken from the group template; click the
button to select a different contact profile.
7. The LANGUAGE is taken from the group template; click the drop-down arrow to
select a different language.
8. The COUNTRY is taken from the group template; click the drop-down arrow to select
a different country code for the group.
9. In the STATE box click the drop-down arrow and select the state code for the group
if applicable.
10. In the NATIONALITY box click the drop-down arrow and select the nationality for the
group if applicable.
11. Type the STARTING DATE or click the drop down arrow and select a date from the
calendar.
12. Enter the number of NIGHTS.
or
Type the END DATE or click the drop down arrow and select a date from the
calendar.
13. Enter the date by which the ROOMING LIST should be received.
14. The ACTIVE check box is selected by default.
15. Enter any additional information in the COMMENT box.
16. Click the SAVE button.
The group edit reservation screen is displayed with the name of the group and the
dates already completed.
Group Reservations
345
17. Enter the # OF ROOMS and ROOM TYPE required and complete the remaining
reservation details.
18. Click OK to save the reservation.
The edit group screen is displayed with the group reservation is shown in the
upper grid.
346
Group Reservations
Group Info Tab Details
Fill in this field
With this information
Template
The name of the group template.
Name
The name of the group as entered on the group template; this
may be changed as required. A group name must be unique.
Contact
The name of the contact person as entered on the group
template; this may be changed as required.
Language
The language as entered on the group template, this may be
changed as required.
Country
The country as entered on the group template, this may be
changed as required.
State
The country as entered on the group template, this may be
changed as required.
Nationality
The nationality as entered on the group template, this may be
changed as required. This option is parameter controlled.
Block Name
If this group is part of a block reservation then the name of the
block is displayed. The block can be accessed by clicking the
BLOCK button.
Starting date
The arrival date of the group, the default is today's date.
Nights
The number of nights the group will stay. If the departure date
is entered the number of nights is calculated automatically.
End date
The departure date of the group. If the number of nights is
entered the departure date is calculated automatically.
Rooming List
The date by which the rooming must be received.
Active
Selected by default. Only clear this check box if the group
profile should be marked as inactive.
Group Reservations
347
Note: An existing group can be set to inactive only if all
reservations have been cancelled.
Comment
Additional information can be added as required.
Reservation Details
348
Fill this field
With this information
Arrival
(Mandatory)
Enter the reservation arrival date or click the drop-down
arrow and select a date from the calendar. The day of the week
is displayed above the date.
Nights
Enter the number of nights for the stay or enter the departure
date in the next field and Suite8 will calculate the number of
nights. Enter 0 for day-use rooms.
Departure
(Mandatory)
Enter the reservation departure date or click the drop-down
arrow and select a date from the calendar. If the number of
nights was entered the departure date will be calculated
automatically. The day of the week is displayed above the date.
Currency
From the drop-down list of defined currencies select a currency
in which to quote the rate. The default is the currency defined
as the Base Currency for rooms.
#. of rooms
Individual Reservation
Enter the number of rooms requested per room type. If you
need multiple rooms of one room type you can enter this on
one reservation and split the reservation before check in. If you
need multiple rooms of different room types you would enter
one reservation with one room type and then use the ADD ON
reservation functionality under OPTIONS to enter the second
reservation with the other room type.
Group Reservation
Enter the number of rooms requested per room type. If the
group requires more than one room type then a separate
reservation has to be made for each room type required.
Adults
Enter the number of adults per room.
Children
Enter the number of children per room. Depending on the child
age categories defined at the property there may be multiple
child fields to be completed, this allows for different rates and
statistics per child category.
For example, if categories have been defined for Babies,
Children aged from 1-5, Children aged from 6-12 and Children
aged above 12, there will be 4 fields in which to enter the
number of children.
Room type
(Mandatory)
Enter the room type or select from the list of defined room
types.
Rate code
Enter a rate code, or select from the rate availability grid the
open rate codes for each room type. For details on the rate
availability grid, please refer to Selecting a rate code from the
rate availability grid.
The CALCULATED PRICE per night, as well as the NET AMOUNT, EXTRA
CHARGES and RATE AMOUNT are shown in the lower right-hand
corner of the reservation screen. This is only an indicator as
any rate changes or package changes during the stay are not
reflected here.
Group Reservations
Note: If the user right for ALLOW RESERVATION WITHOUT RATE CODE
is not active, the user can not exit the reservation detail screen
without entering a rate code.
Rate Room type
Enter the room type the guest might get upgraded to without
having to pay the higher rate, for example if you are almost out
of standard rooms you may need to upgrade the guest to a
deluxe room upon arrival.
Rate amount
The rate amount is entered automatically when you choose a
rate code from the rate availability grid. If no rate code was
selected you can enter a price manually, the price entered in
this field will be the amount posted.
Note: Even if you have entered a rate code, the system allows
you to override the amount and enter a price manually.
Manual price
Select this check box to indicate that the rate was entered
without a rate code or that the calculated rate code price was
overridden by a manually entered price. If not selected the
calculated price from the rate code will be posted and not the
manually entered price.
Room
Individual Reservation
Most hotels assign the room number shortly before the guest
arrives or at check in, however a room number may be entered
when making the reservation. To check availability and status,
press the
next to the room number to open the room
search screen.
Group Reservation
As a group reservation is for multiple rooms you would not
enter the room number. However, if you select a room number
Suite 8 will prompt you with the question 'More than one room
is reserved. Do you want to split the reservation?' Select Yes to
split the reservation and No to leave the room number empty.
Block
If the reservation is not part of a block reservation this field
should remain empty, if the reservation should be deducted
from an available block, press the
button to select the
relevant block.
Note: If the block selected has a different rate code, market
code, source code and/or channel code then the system will
prompt you to change the entries on the reservation to the
codes as defined in the block.
Group
Click the
button to display the Group Reservations screen
and attach a group to the reservation. If the reservation is
already part of a group then the group name is displayed here.
On the main group reservation the group field is not accessible;
the group name is completed automatically when the group
reservation is split to individual reservations.
Market
The market segment. A market code indicates the general
purpose of the reservation, typical market codes are Individual,
Corporate, Group, Tour Series and Leisure. The market code is
often used in conjunction with the rate code.
Note: To make sure that each reservation and financial account
has a market code attached, this field should be set as
mandatory in the configuration.
Group Reservations
349
350
Source
The source of business indicates how the reservation was
made: For example, direct to the hotel by telephone, via the
Internet, through Central Reservations, through a local
company or agent or a walk in.
Channel
The channel indicates how the reservation arrived at the
property: For example, email, telephone, fax or web booking.
Discount
Enter a discount amount if applicable. The amount entered here
is deducted from the original rate amount and the deduction
and newly calculated rate are shown in the lower right-hand
corner of the screen. If a minus amount is entered, this will be
added to the rate.
Discount %
Enter a discount percentage if applicable. The number entered
here is the percentage to be deducted from the original price.
The percentage will be deducted and the newly calculated price
shown in the lower right-hand corner of the screen.
Note: You should either fill the field discount or the field
discount %. If both have values, both values will be deducted
from the original price.
Reason
If a discount amount or discount percentage is entered then a
reason for the discount must be selected from the drop-down
list.
C/I time
Enter the expected check in time. The actual check in time is
stored separately and can be accessed via the reservation user
log file.
C/O time
Enter the expected check out time; if no time is entered here
the default check out time as defined in the configuration is
entered. The actual check out time is stored separately and can
be accessed via the reservation user log file.
Res. Type
Select either DEF (Definite) or TENT (Tentative) to define if the
reservation is definite or tentative. Definite reservations are
deducted from availability and tentative reservations are not
deducted from the availability.
Guarantee c.
Enter a guarantee type or select a guarantee type from the
drop-down list.
Pay method
Enter a payment method or select a payment method from the
drop-down list
Credit Limit
Displays the credit limit for the selected payment method. This
may be changed as required.
Print rate
This check box is selected by default and indicates that the rate
will be printed on the registration card and confirmation letter.
Clear the check box if the rate should not be printed on the
registration card or confirmation letter. If group members
should not see the rate the check box must be cleared.
No post
Selecting the no post check box restricts the posting of
interface charges to a guest account.
For example, when a guest checks in the telephone interface
normally opens the telephone lines in the guests room
automatically; with the no post check box selected the lines will
not be opened.
Group Reservations
Note: The parameter SET NO POST FLAG FOR CASH DEPARTMENTS can
be set in the configuration so that the no post check box is
selected automatically for cash method of payments.
Room features
Select room features such as a smoking or non-smoking room,
preferred floor, near to elevator, etc. from the drop-down list. If
room features have been entered on the profile, they will be
copied over to the reservation. When you block the guest's
room or check the guest in the system searches only for rooms
with these features.
Reservation
colour
Defines the colour in which the reservation is displayed in the
room rack (Ctrl + L).
Note: The reservation colour takes priority over any other
colour definitions, such as a VIP Code colour.
Billing Info.
Enter any billing information, such as 'Room and Tax to
Company'. The billing information is displayed in the billing
screen on the standard HTML file.
Remarks
Enter any additional information. Remarks are displayed in the
billing screen on the standard HTML file.
CRS no
If the booking was made through a central reservation and
there is no interface, enter the confirmation number provided
by the CRS. If this booking came through an interface then the
confirmation number is filled automatically
Option date
If you made a tentative booking or just sent an offer and would
like to keep reference of this reservation then enter the date on
which the option for this reservation will expire or click the
drop-down arrow and select a date from the calendar.
It is possible to search by option date via the Adv. Qry. search
criteria and to run specific reports to retrieve this information.
Booker
The name of the person who made the reservation. Click the
drop-down arrow to open the profile search screen to select an
existing profile or create a new profile. The booker information
can be included reports and can be used in the case of nonarrival.
Specials
Select special requests such as flowers, chocolate, fruit or anti
allergic pillow from the drop-down list.
Calculated price
Displays the calculated price, including packages.
Net Amount
Displays the net amount of the rate excluding taxes.
Note: Rate changes or package changes during the stay are
not reflected here.
Extra Charges
Displays the sum of all extra charges, such as exclusive
packages and fixed charges.
Note: Rate changes or package changes during the stay are
not reflected here.
Rate Amount
Displays the original rate amount. If a rate code and a manual
price are entered, then the original rate amount field will
display the original rate amount of the rate code.
Note: Rate changes or package changes during the stay are
not reflected here.
Created
The user who created the reservation with the date and time
stamp.
Group Reservations
351
Updated
The user who last updated the reservation with date and time
stamp.
Note: The edit reservation screen can be customised; therefore it may
possibly look different in your property.
How to link a financial account
1. Click the RESERVATIONS menu and select GROUP RESERVATION to display the Group
Reservation screen.
2. Select the group to which you want to link a financial account and click EDIT.
The Edit Group reservation screen appears.
3. Click the FINANCIAL ACCOUNT tab.
4. The following options are available on the Financial Account tab:
NEW LINK - links a new financial account to the group reservation.
EDIT FA - edits the selected financial account.
DELETE LINK - removes the link to the selected financial account.
BILLING - opens the billing screen for the selected financial accounts.
5. Click the NEW LINK button to link a new financial account; the Financial Accounts
Search screen is displayed.
6. Click NEW FA to create a new financial account.
The financial account dialog box is displayed.
The search criteria, financial account NAME, DESCRIPTION and ACCOUNT NUMBER allow
the user to locate the required financial account easily. In addition selecting the
option SHOW ON POP-UP will display all available financial accounts. This setting is
saved for future use until changed by the user.
352
Group Reservations
For more information on Financial Accounts see page 392.
How to enter a new group template
1. Click the RESERVATIONS menu and select GROUP RESERVATION to display the Group
Reservation screen.
2. Click the TEMPLATES tab, click NEW to display the new group template screen.
3. Enter the NAME of the template.
4. The INACTIVE check box is by default not selected.
5. Enter the contact name or click the
button next to the CONTACT box to open
the profile search screen and select an existing profile.
6. If the profile does not exist press the NEW PROFILE button to enter a new profile for
the contact person.
Once the profile is created the Group Template screen is re-displayed.
7. In the LANGUAGE box click the drop-down arrow and select the language for the
group.
8. In the COUNTRY box select the country code for the group.
9. In the STATE box select the state code for the group if applicable.
10. In the NATIONALITY box select the nationality code for the group if applicable.
11. In the RATE CODE box select the rate code for the group.
12. In the MARKET box select the market code for the group.
13. In the SOURCE box select the source code for the group.
14. In the CHANNEL box select the channel code for the group.
15. In the HOTEL SEGMENT box select the hotel segment that this template belongs to.
16. In the COMMENT box, you can enter additional comments.
17. A profile can be linked to a template by clicking the PROFILES button.
Group Reservations
353
18. Enter the profile name to be linked to the template or click the drop-down arrow to
open the profile search screen and select an existing profile.
19. Click OK to close the profile select dialog box.
20. Click OK to save the template.
The group reservation navigator screen is displayed.
Template Details
354
Fill in this
field
With this information
Name
(Mandatory)
The name of the template.
Inactive
Only select this check box if the group template should be marked
as inactive.
Contact
(Mandatory)
Enter the contact name or click the three dots button to open the
profile search screen and create or select an existing profile.
Language
(Mandatory)
The language for the group template.
Country
(Mandatory)
The country code for the group template.
State
The state code for the group template if applicable.
Nationality
The nationality code for the group template if applicable.
Rate Code
The rate code for the group template.
Market
The market code for the group template.
Source
The source code for the group template.
Channel
The channel code for the group template.
Comment
Additional information about the template can be entered.
Group Reservations
Configuration Details
Currencies are defined via the option CURRENCIES under Setup → Configuration →
Cashiering.
The base currency for rooms is defined via the option BASE CURRENCY FOR ROOMS
under Setup → Configuration → Global Settings → Billing → Currency 4 Tab.
Child age categories can be defined via the option CHILD AGE CATEGORIES under
Setup → Configuration → Reservations.
Market codes are defined via the option MARKET SEGMENTS under Setup →
Configuration → CRM.
Each reservation and financial account must have a market code attached if the
option MARKET CODE MANDATORY is selected in Setup → Configuration → Global
Settings → Reservation → Reservation 1 Tab.
Source codes are defined via the option SOURCE CODES under Setup →
Configuration → Reservations → Reservation Attributes.
Channel codes are defined via the option CHANNEL CODES under Setup →
Configuration → Reservations → Reservation Attributes.
Discount reasons are defined via the option RATE DIFFERENCE REASONS under Setup
→ Configuration → Reservations → Rate Management.
The default check-in time is defined via the option DEFAULT CHECK IN TIME under
Setup → Configuration → Global Settings → Reservation → Reservation 1 Tab.
Nationality can be entered on the group template if the option GROUPS NATIONALITY
HANDLING is selected in Setup → Configuration → Global Settings → Reservation →
Reservation 1 Tab.
Guarantee codes are defined via the option GUARANTEE CODES under Setup →
Configuration → Reservations.
Payment methods are defined via the option DEPARTMENT CODES under Setup →
Configuration → Cashiering.
The No Post check box can be selected automatically for cash method of payments
via the option SET NO POST FLAG FOR CASH DEPARTMENTS under Setup → Configuration
→ Global Settings → Reservation → Reservation 1 Tab.
Room Features are defined via the option ROOM FEATURES under Setup →
Configuration → Reservation → Room Management.
Special codes are defined via the option SPECIALS under Setup → Configuration →
CRM → Marketing Info.
Changing the active status of group reservations and templates is controlled by
the user right INACTIVE under Setup → Configuration → Users → User Definition →
Rights → Group Reservations and Group Templates. If the user right INACTIVE is
assigned, users are allowed to set cancelled group reservations and templates to
inactive, however, a group or group template can only be changed to inactive if all
attached reservations are cancelled.
Group Reservations
355
The JetWeb export will handle group reservations as individual reservations if the
option NO GROUP JETWEB PROCESSING is selected when editing the group. This
option is only available if the JetWeb Interface is active.
Hotel segmentation functionality is controlled by the parameters HOTEL
SEGMENTATION and SEGMENTATION HANDLING FOR GROUPS under Setup →
Configuration → Global Settings → Reservations → Reservation 4 tab.
Creating Additional Reservations
If the group requires more than one room type then a separate reservation has to be made for each
room type required.
ADD ON functionality can be used to make additional reservations for a different room type. For
example if the group requires 3 single rooms and 1 double room you would need to create 2
reservations, one for the single rooms and one for the double room.
If the group reservation is part of a block then clicking the NEW button will give the option to
create an Individual or Block reservation.
INDIVIDUAL - creates a group reservation which is not linked to the block and therefore takes
rooms from general availability.
BLOCK - opens the block selection screen and rooms are taken from the block allocation and not
from general availability.
How to create an add on reservation
1. Click the RESERVATIONS menu and select GROUP RESERVATION to display the Group
Reservation screen.
The GROUPS tab is displayed by default.
2. Select the group to which you want to add an additional reservation and click EDIT.
The Edit Group reservation screen appears.
3. Select the group reservation which is to be duplicated.
4. Select ADD ON from the OPTIONS menu to display a new edit reservation screen.
All the details are identical to the original reservation with the exception of the
number of rooms which is defaulted to one.
5. Make any changes required to the reservation, such as number of rooms and room
type.
6. Click OK to save the reservation.
The Edit Group dialog box is displayed with the new reservation shown in the
upper grid.
How to enter an additional reservation
1. Click the RESERVATIONS menu and select GROUP RESERVATION to display the Group
Reservation screen.
The GROUPS tab is displayed by default.
2. Select the group to which you want to add a new or additional reservation and
click EDIT.
The Edit Group reservation screen appears.
3. Click NEW; if the group reservation is part of a block then you will be given the
option to create an INDIVIDUAL or BLOCK reservation.
4. Selecting INDIVIDUAL displays the Edit Reservation dialog box.
356
Group Reservations
5. Selecting BLOCK displays the Block Selection screen; see How to enter an additional
block reservation.
6. Enter the reservation details.
7. Click OK to save the reservation.
The Edit Group dialog box is displayed with the new reservation shown in the
upper grid.
How to enter an additional block reservation
1. Click the RESERVATIONS menu and select GROUP RESERVATION to display the Group
Reservation screen.
The GROUPS tab is selected by default.
2. Select the group to which you want to add a new or additional reservation and
click EDIT.
The Edit Group reservation screen appears.
3. Click NEW; as the group is part of a block the options to create an INDIVIDUAL or
BLOCK reservation are displayed.
4. Selecting BLOCK displays the Block Selection screen.
The Block Selection screen displays a grid showing the dates, room types and
number of rooms reserved for this block.
5. On the grid select the room type and days required then click the ADD button.
Note: Only one room type can be selected at a time
The Number of Rooms dialog box is displayed.
6. The total number of rooms available for this room type is listed, adjust the number
of rooms if required and click OK.
The selection is listed in the Selected Rooms dialog box in the lower right corner.
7. Repeat steps 5 and 6 until all the required rooms and room types have been
selected.
Group Reservations
357
Note: Occasionally, when you are entering a group, you may want to
reserve a room type which does not have enough available rooms. In
this case the system will display the room type selection screen and
allow rooms to be "borrowed" from another room type. Borrowing
from a room type does not increase the total size of the block; it only
readjusts the allocation among the different room types.
8. Click the SELECT button.
The Edit Group dialog box is displayed complete with group info details taken from
the block header and the booker. The group name is the block name with a
running number and the date added.
The following message is also displayed:
9. Click YES to link the profiles to the group reservation or NO if the profiles should
not be linked.
The group reservation dialog box is displayed.
10. Adjust any details as necessary and click OK.
11. If more than one room type was selected then a reservation is displayed for each
room type, repeat step 9 and 10 for each reservation.
The Edit Group dialog box is re-displayed with the group reservations listed in the
upper grid.
How to link a group reservation to a block
1. Click the RESERVATIONS menu and select GROUP RESERVATION to display the Group
Reservation screen.
2. Select the group required and click EDIT to display the Edit Group dialog box.
3. Select the required group reservation from the grid and click EDIT to display the
Edit Reservation dialog box.
4. Click the
box.
button next to the BLOCK field to display the Block Selection dialog
Only bocks with dates which fall within the dates of the group are displayed.
5. Select the required block, the grid showing the dates, room types and number of
rooms reserved for this block is displayed.
358
Group Reservations
6. On the grid select the room type (only one room type can be selected) and days
required then click the SELECT button.
The Edit Reservation dialog box is displayed.
Note: Occasionally, when you are entering a group, you may want to
reserve a room type which does not have enough available rooms. In
this case the system will display the room type selection screen and
allow rooms to be "borrowed" from another room type. Borrowing
from a room type does not increase the total size of the block; it only
readjusts the allocation among the different room types.
7. If the rate code, market, source and channel codes are different then messages
will be displayed asking you if you want to change the codes to match the codes
defined in the block.
8. A message is displayed asking if you want to link profiles attached to block to the
reservation.
9. Click YES to link the profiles to the group reservation or NO if the profiles should
not be linked.
The group reservation dialog box is displayed.
11. Adjust any details as necessary and click OK.
12. Click CLOSE to close the Edit Group screen and return to the Group Reservation
screen.
How to create a group reservation within a block
1. Click the RESERVATIONS menu and select GROUP RESERVATION to display the Group
Reservation screen.
2. Select the group required and click EDIT to display the Edit Group dialog box.
3. Click the
button to display the Block Header dialog box.
4. Click the GROUPS tab to display the groups dialog box.
The Groups dialog box consists of four options:
ADD - is used to add additional rooms to a group reservation.
Group Reservations
359
NEW - is used to enter a new group reservation.
EDIT - is used to edit a group through the group module.
FIND IN GRID - to further narrow the group search.
5. Click NEW to enter a new group.
The Block Selection screen is displayed with a grid showing the dates, room types
and number of rooms reserved for this block.
6. On the grid select the room type and days required then click the ADD button.
Note: Only one room type can be selected at a time
The Number of Rooms dialog box is displayed.
7. The total number of rooms available for this room type is listed, adjust the number
of rooms if required and click OK.
The selection is listed in the Selected Rooms dialog box in the lower right corner.
8. Repeat steps 6 and 7 until all the required rooms and room types have been
selected.
Note: Occasionally, when you are entering a group, you may want to
reserve a room type which does not have enough available rooms. In
this case the system will display the room type selection screen and
allow rooms to be "borrowed" from another room type. Borrowing
from a room type does not increase the total size of the block; it only
readjusts the allocation among the different room types.
9. Click the SELECT button.
The New Group dialog box is displayed complete with group info details taken from
the block header and the booker.
The following message is also displayed:
360
Group Reservations
Note: If the profile of the booker on the block header has no country
code then an error message is displayed and the country code must be
added before continuing.
10. Click YES to link the profiles to the group reservation or NO if the profiles should
not be linked.
The group reservation dialog box is displayed.
11. Adjust any details as necessary and click OK.
12. If more than one room type was selected then a profile link message and a
reservation is displayed for each room type, repeat steps 10 and 11 for each
reservation.
The New Group dialog box is re-displayed with the group reservations listed in the
grid.
13. Click CLOSE to close the New Group screen and return to the Block Header dialog
box.
14. Click CLOSE to close the Block Header screen and return to the Edit Group dialog
box.
15. Click CLOSE to close the Edit Group dialog box and return to the Group Reservation
screen.
Group Reservation Options
The edit group screen is divided into 3 sections:
Group Info Tab/Financial Account/Linked Profiles - depending on the tab selected the upper
section of the screen displays group information, linked financial accounts and the profiles
linked to the group.
Group Reservations - the middle section lists the group reservations according to the Status
selection.
Individual Reservations - the lower section lists the individual reservations that have been
split from the group reservation.
Available options on the edit group screen
SAVE - to save changes to the group information.
GROUP CHECK IN - if the group reservation has been split into individual reservations and each
reservation has a room number assigned then the group members can be checked via this
option.
CREATE MESSAGE - to send a message to each member of the group. If the telephone interface
or television system can handle multiple messages then the message can be displayed on the
television or sent to the telephone interface by selecting the option NOTIFY INTERFACE.
AUTOMATIC ROOM ASSIGNMENT - to automatically assign room numbers to the group members.
This option is only available for group reservations that have been split into individual
reservations.
Group Reservations
361
Set Guest IFC Rights
NEW - to create a new group reservation. Using this option to create additional reservations
does not copy the details entered on the original group reservation.
EDIT - to edit the group reservation.
SPLIT - splits the group reservation into individual reservations which are then displayed in the
lower grid of the group edit screen. The number of rooms that should be split can be entered
and all details from the group are copied to each individual reservation. The profile name for
each individual reservation is the group name and a consecutive number.
UNLINK BOOKING - to unlink a conference and catering booking from the group. This option is
only available on groups with linked conference bookings.
CANCEL - to cancel the group reservation.
REACTIVATE - to reactivate the group reservation.
OPTIONS - to access additional group options.
ROOMING LIST - this option is used to enter a group rooming list by splitting rooms from the
group reservation and entering individual names.
Note: A group financial account is not created automatically when the
group reservation is split.
Edit Profile - to edit profile information of the selected profile, either group or group member.
Additional options on the edit group screen
Add On - selecting Add On while positioned on a group master reservation will create a
duplicate group reservation with all the details from the original reservation without opening
the profile search screen. This feature should be used to make additional reservations for a
different room type. For example if the group requires 3 single rooms and 1 double room you
would need to create 2 reservations, one for the single rooms and one for the double room.
Selecting Add On while positioned on a group member reservation will first open the profile
search screen. This allows for a different profile to be selected before a duplicate reservation of
the one you are currently positioned on is created.
BILLING INSTRUCTIONS - to enter, delete or edit billing instructions for the group. A financial
account is not created automatically so in order to route all charges to the paymaster a
financial account has to be attached first.
CHECK IN - to check in an individual group member. This option is only available for groups
where the rooms have been split or a rooming list has been entered. Select a reservation from
the group rooming list and choose CHECK IN from the Options menu to perform a check in for
a single group member.
CONFIRMATION LETTER - to send confirmation letters.
MESSAGES - to enter a message for the selected group member.
ROOM BLOCKING - to assign rooms for a group reservation where the rooms have been split.
SET WAKE UP - to enter wake up calls for the entire group or selected group members.
TRACES - to enter traces for the group.
PROFORMA - to create a proforma invoice for the entire group.
How to set the guest IFC rights for the checked in rooms of a group
1. Click the RESERVATIONS menu and select GROUP RESERVATION to display the Group
Reservation screen.
2. Select the group for which you want set guest rights and click EDIT.
The Edit Group reservation screen appears.
3. Click the GROUP OPTIONS button and select SET GUEST IFC RIGHTS.
362
Group Reservations
The Active interface screen is displayed.
4. Select the required interface and click the SELECT button.
The Set Guest Rights screen for the selected interface is displayed with a list of the
checked in rooms.
The Filter criteria can be used to search for a specific EXTENSION TYPE or ROOM
NUMBER.
5. Depending on the type of interface selected the following criteria are also
available.
Class of Service
Message Light
Do not Disturb
TV Tights
Video Rights
Minibar Rights
6. Complete the filter criteria as required and click the SET FOR WHOLE GROUP button.
A confirmation message is displayed.
Group Reservations
363
7. Click YES to set the guest rights for all the checked in rooms for this group.
A message is displayed confirming that the guest rights have been set for all
rooms.
8. Click the OK button to close the confirmation message.
The status of the checked in rooms is updated in the rooms grid.
9. Click the CLOSE button to exit the set guest rights screen.
10. Click the CLOSE button to exit the edit group screen.
Default statuses for the query result display can be configured via the option
GROUP STATUS under Setup → Configuration → Global Settings → Miscellaneous →
Search Screens 2 Tab → Default Search Criteria on Reservation Navigator.
Cancelling a group reservation
1. Click the RESERVATIONS menu and select GROUP RESERVATION to display the Group
Reservation screen.
2. Select the required group and click EDIT.
The Edit Group reservation screen is displayed.
3. Select the reservation to be cancelled and click CANCEL.
The Group Cancellation dialog box is displayed.
4. By default CANCEL SELECTED RESERVATION is selected; to cancel all the reservations
for this group select CANCEL ALL RESERVATIONS.
5. Click OK; the Cancel Reservation dialog box is displayed.
364
Group Reservations
6. Select the REASON the reservation or reservations are being cancelled.
7. In the DESCRIPTION box, additional details can be added if required.
8. Click YES to cancel the reservation or reservations.
A list of the cancelled reservations and their cancellation number is displayed.
9. Click OK to close the cancellation confirmation message.
If there are no more active reservations for the group then a message is displayed
asking if you want to set the group status to inactivate.
Group Reservations
365
10. Click YES to inactivate the group.
Reactivating a group reservation
1. Click the RESERVATIONS menu and select GROUP RESERVATION to display the Group
Reservation screen.
2. Select the required group and click EDIT.
The Edit Group reservation screen is displayed.
3. Select the reservation to be reactivated and click REACTIVATE.
The Reinstate Group dialog box is displayed.
4. By default REINSTATE SELECTED RESERVATION is selected; to reinstate all the
reservations for this group select REINSTATE ALL RESERVATIONS.
5. Click OK; the Reinstate Reservation dialog box is displayed.
366
Group Reservations
6. Select the REASON the reservation or reservations are being reinstated.
7. In the DESCRIPTION box, the reason for reinstating the reservation is listed and
additional details can be added if required.
8. Click YES to reinstate the reservation or reservations.
A message is displayed for each reservation indicating that the reservation
reinstate was successful.
9. Click OK to close the reinstate message.
Group Rooming List
This option is used to split rooms from the group reservation and enter individual names for the
selected group.
How to enter a group rooming list
1. Click the RESERVATIONS menu and select GROUP RESERVATION to display the Group
Reservation screen.
2. Select the group to which you want to enter a rooming list and click EDIT.
The Edit Group reservation screen appears.
3. Select the required group reservation and click the ROOMING LIST button.
The rooming list parameters screen is displayed.
4. Enter the number of rooms to split and the number of sharers in one room.
5. Click OK, the rooming list entry screen is displayed.
Group Reservations
367
6. The CHECK PROFILE check box checks for existing profiles for each name that is
entered on the rooming list and is selected by default.
7. Select the SHOW EXTRA FIELDS check box to display child age categories on the grid,
this allows children to be entered.
8. Select the ENABLE NEW RESERVATIONS check box to create additional reservations
from the rooming list.
9. In the NAME box on each row enter the guest name.
10. Click SAVE to save the rooming list.
An update screen shows the progress of the creation of the individual profiles and
reservations.
11. Upon completion the update screen closes automatically and the Edit Group screen
is displayed with the individual reservations displayed in the grid in the lower part
of the screen.
Note: If the check profile option is selected and a profile marked as
BLACK LIST or CASH LIST is selected for the group rooming list a
message is displayed. Only users with the right to create a reservation
with a profile status of C or R can continue to create a reservation.
368
Group Reservations
Note: Columns on the rooming list can be sorted by clicking the
header.
Available options on the rooming list dialog box
SAVE - to save the rooming list.
PROFILE EDIT - to edit the selected profile.
PROFILE SEARCH - to search for an existing profile.
REMOVE - to remove the selected profile.
EXCEL IMPORT - to import a rooming list in excel format.
How to customize the rooming list grid
1. Display the rooming list entry screen.
2. Place the cursor in the grid and right-click to display the short-cut menu.
3. Select CUSTOMIZE to open the customize screen.
Group Reservations
369
The fields already used are marked with a green check mark.
4. Click the PENCIL button to view or change the column properties.
5. To move a field to the grid, select the field and drag it to the required position.
6. To remove a field from the grid, point to the column to be removed and drag it to
the customize screen; yellow arrows are displayed at each end of the column
name.
7. Once the column has been removed the green check mark is removed from the
field name on the customize screen.
8. Click the
in the top right-hand corner to close the customize screen.
9. A message is displayed asking if you want to store the grid layout.
10. Select YES to save the changes or NO not to save any changes.
11. Complete the update of the rooming list in the normal manner.
Column Properties
Field
Description
Field name
The field name as it is defined in the database table.
Caption
The field caption.
Fixed
Defines if the column will be fixed to the left side, when
scrolling to the right to view additional fields of the grid.
Columns marked as fixed are highlighted grey.
Note: The rooming list is fully customizable; however, many of the
columns on the rooming list are required and cannot be removed due
to the business logic. Columns for attribute categories as well as
mandatory market, channel or source codes are added to the grid
automatically in the event that they are or become mandatory.
Custom fields from the tables 'YRCF' and 'YRDF' can be added to the
grid as required.
How to import a group rooming list
1. Click the RESERVATIONS menu and select GROUP RESERVATION to display the Group
Reservation screen.
2. Select the group for which you want to enter a rooming list and click EDIT.
The Edit Group reservation screen appears.
3. Select the required group reservation and click the ROOMING LIST button.
The rooming list parameters screen is displayed.
4. Enter the number of rooms to split and the number of sharers in one room.
5. Click OK, the rooming list entry screen is displayed.
370
Group Reservations
6. The CHECK PROFILE check box checks for existing profiles for each name that is
entered on the rooming list and is selected by default.
7. Select the SHOW EXTRA FIELDS check box to display child age categories on the grid,
this allows children to be entered.
8. Select the ENABLE NEW RESERVATIONS check box to create additional reservations
from the rooming list.
9. Click EXCEL IMPORT; the Select Excel dialog box is displayed.
10. Click OPEN FILE and select the required excel file; click OPEN.
11. Select the required EXCEL FORMAT TEMPLATE.
12. Click the IMPORT button; the names are imported and displayed on the rooming list
grid.
13. Click OK to save the rooming list.
An update screen shows the progress of the creation of the individual profiles and
reservations.
Group Reservations
371
14. Upon completion the update screen closes automatically and the Edit Group screen
is displayed with the individual reservations displayed in the grid in the lower part
of the screen.
Note: If the rooming list consists of different room types then a
question will be displayed asking if you want to import all
reservations with different room types.
If there are not enough available rooms then a question is displayed
asking if you want to overbook.
Automatic Room Assignment
This option allows automatic room assignment for group rooms that have been split either by
entering a ROOMING LIST or using the SPLIT functionality.
How to assign rooms using automatic room assignment
1. Click the RESERVATIONS menu and select GROUP RESERVATION to display the Group
Reservation screen.
2. Select the group to which you want to assign rooms and click EDIT.
The Edit Group reservation screen appears.
3. Select AUTOMATIC ROOM ASSIGNMENT from the GROUP OPTIONS menu.
The Automatic Room Assignment dialog box appears displaying a list of the
individual group reservations.
372
Group Reservations
4. Complete the selection criteria as required. The rooms to be assigned can be
defined by completing the various selection criteria including limiting the rooms to
a particular floor and defining from which room number the room assignment
should start. See the Automatic Room Assignment table for an explanation of all
the selection criteria.
5. Select the reservations to which rooms are to be assigned by selecting the check
box next to the name. To assign rooms to all the reservations listed click the
SELECT ALL button. Click the UNSELECT ALL button to unselect all the reservations.
6. Once the reservations to be assigned rooms are selected, click the START button.
The room numbers assigned by the system are displayed in the ROOM NO column
on the grid.
7. Click CLOSE to return to the Edit Group screen.
Automatic Room Assignment Dialog Box
Fill in this field
With this information
Floor
If you would like to assign rooms on a specific floor, select
the floor numbers from the list.
Start from room
Enter the room number from which the automatic room
assignment should start.
Rooms vacant last
night
This is selected by default to make sure that only vacant
rooms will be assigned.
Rooms checked out
today
Select this box if you would like to auto assign rooms
which are due out today.
Clean only
This box is selected by default to assign only rooms with
the status clean.
Incl. out of service
Select this check box if you would like to auto assign
rooms which have the housekeeping status 'Out of
service'.
Group Reservations
373
Override Existing
Rooms
Select this box to override room numbers that have been
previously assigned.
Group Changes
Changes made on reservations that are part of a group, such as entering and changing billing
instructions, changing market code, source code, rate code, arrival date or departure date can be
applied to all members, selected members or partial members of a group.
When entering or resolving traces on a group member via group editing, the system will prompt
users with the message to apply changes to other group members. However, when entering or
resolving traces on a group member via the edit reservation screen, the apply changes to other
group members message is not displayed, the transaction applies only to the selected group
member.
How to apply group changes
1. Click the RESERVATIONS menu and select GROUP RESERVATION to display the Group
Reservation screen.
2. Select the group to which you want to apply a change and click EDIT.
The Edit Group reservation screen appears.
3. Select the individual reservation to be changed and click the EDIT button.
The edit reservation screen is displayed.
4. Make the necessary change on the reservation and click OK.
5. A dialog box is displayed which allows users to apply the changes to other
members of the group.
6. Select if the change should be applied to:
374
All guests in the group
Only guests with the same arrival date
Only guests with the same departure date
Guest in-house between x and x
Select reservations to apply changes
Group Reservations
The reservations belonging to the group are displayed; right-click to customize the
grid and click on the column heading to sort the columns.
Only guests with the same room type
Only selected guest
7. Click OK to apply the changes according to the selected option.
Proforma
Advance Invoice
This option may be used to post the daily charges and print an advance invoice and is accessible
via the group reservations OPTIONS menu. This option is only available for group members
arriving today and who have billing instructions to the same financial account. Daily charges
include the room rate and any packages or fixed charges attached to the reservation. This option is
parameter controlled.
Advance Invoice Key Points
An advance invoice can be created for an in-house or a future reservation.
An advance invoice can only be created for a reservation with one room.
All charges posted via this option will have the future posting date of the relevant room night.
There is no possibility to undo the posting of daily charges when posted through this option.
The advance invoice folio number is stored on the Posting Details tab of the View Posting
Details dialog box under FOLIO(S).
An advance invoice with payment requires the parameter NOREPRINT to be active.
How to create an advance invoice
1. Click the RESERVATIONS menu and select GROUP RESERVATION to display the Group
Reservation screen.
2. Select the group for which you want to print a proforma invoice and click EDIT.
The Edit Group reservation screen appears.
3. Select PROFORMA from the GROUP OPTIONS menu, and then select ADVANCE INVOICE.
The Cashier Login screen is displayed.
4. Enter your CASHIER NUMBER and PASSWORD, click LOGIN.
A confirmation message is displayed asking if you are sure you want to create an
advanced invoice for the group.
5. Select YES to post the charges and print an advance invoice.
The room charges for today's expected arrivals are posted for all days of the stay
and routed to the financial account according to the billing instructions and then
the Folio Styles dialog box is displayed.
Group Reservations
375
6. Select the folio STYLE from the list of defined styles.
7. Depending on the setup the option DISPLAY TELEPHONE DETAILS ON INVOICE may or
may not be selected by default, but may be changed as required.
8. The following options are available:
Click PRINT to print the folio.
Click PREVIEW to display a preview of the folio, the folio may be printed directly from the
preview screen.
Click DON'T PRINT not to print the folio.
9. Click PRINT, a message is displayed informing you that the Advance Invoice has
been created.
10. Click OK to close the message.
How to create an advance invoice with mandatory payment
1. Click the RESERVATIONS menu and select GROUP RESERVATION to display the Group
Reservation screen.
2. Select the group for which you want to print a proforma invoice and click EDIT.
The Edit Group reservation screen appears.
3. Select PROFORMA from the GROUP OPTIONS menu, and then select ADVANCED INVOICE.
The Cashier Login screen is displayed.
4. Enter your CASHIER NUMBER and PASSWORD, click LOGIN.
A confirmation message is displayed asking if you are sure you want to create an
advanced invoice for the group.
376
Group Reservations
5. Select YES to post the charges and print an advance invoice.
The Payment Posting dialog box is displayed.
6. Complete the payment details and click the POST button to post the payment.
The payment is posted and the Folio Styles (Information folio) dialog box is
displayed.
Group Reservations
377
7. Select the folio STYLE from the list of defined styles.
8. Depending on the setup the option DISPLAY TELEPHONE DETAILS ON INVOICE may or
may not be selected by default, but may be changed as required.
9. The following options are available:
Click PRINT to print the folio.
Click PREVIEW to display a preview of the folio, the folio may be printed directly from the
preview screen.
Click DON'T PRINT not to print the folio.
10. Click PRINT, a message is displayed informing you that the Advance Invoice has
been created.
11. Click OK to close the message.
Note: All postings printed on an advance invoice will receive an
invoice number and the invoice can not be printed unless the balance
is zero. If the payment process is cancelled, no invoice number is
produced and the message: 'Can not create Advance Invoice, balance
is not 0' is displayed.
378
Group Reservations
Payment Posting dialog box
Fill in this field
With this information
Payment
Department
Select the payment department code from the list. Entering
the first letter or number of the department code will jump to
the first match in the list.
If there are any credit cards attached to the reservation, the
payment department is completed with the first credit card
listed and the credit card details are automatically completed.
A different credit card can be selected from those attached to
the reservation or can be entered manually.
Amount
Enter the amount of the payment; by default the total amount
of the selected window is displayed.
Foreign Amount
If the payment department selected is a foreign currency then
the payment amount is displayed in the selected foreign
currency. The exchange rate is displayed in the centre of the
screen.
Comment
Additional remarks regarding the payment.
Arrangement
Select the arrangement code to be used on the folio from the
list. Entering the first letter or number of the arrangement
code will jump to the first match in the list box.
Credit Card
Details
Depending on the method of payment selected the credit card
details may be completed automatically or can be entered
manually.
Card Type
The type of the credit card, this is completed based on the
Payment Department selection.
Card No.
The credit card number.
Expiry (MM/YY)
The expiration date of the credit card.
Holder's Name
The name of the credit card owner.
Folio Styles dialog box
Field
Definition
Customer
The last and the first name of the guest or financial
account.
Window
The window number being checked-out.
Balance
The balance of the window.
Style
Select the folio style to be used for the print-out from the
list of defined styles.
Display telephone
details on invoice
Select this option to print the telephone details on the folio.
Print
Prints the folio on the pre-defined printer.
Preview
Displays a preview of the folio, the folio may be printed
directly from the preview screen.
Don’t Print
Checks-out the guest without printing the folio; the folio is
still exported to billing history.
Advance Invoice functionality is controlled by the parameters ENABLE PROFORMA
INVOICE, TYPE 1: ADVANCE INVOICE and ENABLE ADVANCED POSTINGS under Setup →
Configuration → Global Settings → Billing → Billing 1 tab.
Group Reservations
379
Advance Invoice functionality with payment is controlled by the parameter NOREPRINT under
Setup → Configuration → Global Settings → Country Specifics → Country Specifics 2 tab is
activated.
Proforma Invoice
This option may be used to print a group proforma invoice and is accessible via the group
reservations OPTIONS menu. This option is only available for group members arriving today and
who have billing instructions to the same financial account. This option is parameter controlled.
Proforma Invoice Key Points
A proforma invoice can be created for an in-house or a future reservation with one or more
rooms.
All charges posted via this option will have the future posting date of the relevant room night,
however the postings are temporary and are displayed greyed out on the folio.
The temporary posting's are deleted once the proforma invoice has been created. If for any
reason the delete process fails the proforma charges are displayed greyed out and deleted by
night audit.
Proforma invoice postings do not affect the balance calculations.
There is no possibility to undo the posting of daily charges when posted through this option.
How to print a group proforma invoice
1. Click the RESERVATIONS menu and select GROUP RESERVATION to display the Group
Reservation screen.
2. Select the group for which you want to print a proforma invoice and click EDIT.
The Edit Group reservation screen appears.
3. Select PROFORMA INVOICE from the GROUP OPTIONS menu, and then select PROFORMA
INVOICE.
The Cashier Login screen is displayed.
4. Enter your CASHIER NUMBER and PASSWORD, click LOGIN.
5. A confirmation message is displayed asking if you are sure you want to create a
proforma invoice for the group.
6. Click YES to create the proforma invoice.
The room charges for today's expected arrivals are posted for all days of the stay
and routed to the financial account according to the billing instructions and then
the Folio Styles dialog box is displayed.
380
Group Reservations
7. Click PRINT, a message is displayed informing you that the Proforma Invoice has
been created.
8. Click OK to close the message.
Proforma functionality is controlled by the parameter ENABLE PROFORMA INVOICE and
TYPE 2: PROFORMA INVOICE (INFO ONLY, NO POSTINGS ARE STORED) under Setup →
Configuration → Global Settings → Billing → Billing 1 tab.
Group Reservations
381
6
Waitlist
Waitlist Reservations
A reservation can be put on the waitlist if the rate or room type is not available for the required
dates. If the room becomes available, the property can contact the guest and accept the reservation.
The total number of reservations which are waitlisted are displayed, per day on the availability
screen Ctrl + D.
If the parameter DISPLAY ACCEPTABLE RESERVATIONS AUTOMATICALLY is active then reservations on
the waitlist are displayed as soon as they can be accepted. If a reservation is cancelled for a day on
which waitlist reservations exist, then the system will display a message that there are waitlist
reservations which can be accepted. Waitlisted reservations are displayed first by priority level
and then by the order in which they were entered.
The waitlist module may be accessed via several options:
The reservations menu or toolbar
The waitlist tab on the reservation navigator
Via the Options button on the reservation navigator
Via the Options button on the reservation edit screen
How to view waitlisted reservations
1. Click the RESERVATIONS menu and select WAITLIST.
The Reservation Navigator screen is displayed defaulted to the Waitlist tab.
2. Select a reservation from the grid and select one of the available options:
Select ACCEPTABLE ONLY to check availability and display only the reservations which
can be accepted. The column ACCEPTABLE on the grid indicates if the reservation is
acceptable in the entered room type or a different one.
Select NEW WAITLIST to create a new reservation and place it immediately on the waitlist.
Click EDIT to edit the reservation details.
Click CANCEL RES. to cancel the waitlisted reservation.
Click ACCEPT to accept the reservation and move it from the waitlist.
Select CHANGE PRIORITY on the OPTIONS menu to change the priority level of a waitlisted
reservation.
Click the UP and DOWN arrows to change the order of the waitlisted reservation within the
specific priority level.
How to move a reservation to the waitlist
1. Click the RESERVATIONS menu and select UPDATE RESERVATION .
The Reservation Navigator screen is displayed defaulted to the All tab.
2. Search for and select a reservation from the grid.
3. Click OPTIONS then select WAITLIST.
Waitlist
383
The Waitlist dialog box is displayed.
4. Select the REASON for waitlisting the reservation.
5. Select the PRIORITY for this reservation to be accepted.
6. Select the preferred method of COMMUNICATION.
7. The WAITLIST HISTORY section displays information about the history of this
reservation.
8. In the DESCRIPTION box enter any relevant comments.
9. Click YES to move the reservation to the waitlist.
How to enter a new waitlist reservation from the waitlist tab
1. Click the RESERVATIONS menu and select WAITLIST.
The Reservation Navigator screen is displayed defaulted to the Waitlist tab.
2. Select NEW WAITLIST, the profile search screen is displayed.
3. Complete the profile and reservation details as normal.
4. Click OK to save the reservation.
The Waitlist dialog box is displayed.
384
Waitlist
5. Select the REASON for waitlisting the reservation.
6. Select the PRIORITY for this reservation to be accepted.
7. Select the preferred method of COMMUNICATION.
8. The WAITLIST HISTORY section displays information about the history of this
reservation.
9. In the DESCRIPTION box enter any relevant comments.
10. Click YES to move the reservation to the waitlist.
The waitlisted reservation is listed in the grid under the waitlist tab.
Waitlist dialog box
Fill in this field
With this information
Reason
The reason for waitlisting the reservation.
Priority
The priority for this reservation to be accepted.
Communication
The preferred method of communication. Select from the
communication types available on the guest's profile.
Waitlist History
The waitlist history of the reservation.
Description
A description of the waitlist reason and any other relevant
comments.
Waitlisted reservations are displayed as soon as they can be accepted if the
parameter DISPLAY ACCEPTABLE RESERVATIONS AUTOMATICALLY is selected under Setup →
Configuration → Global Settings → Reservation → Reservation 1 tab.
Waitlist
385
7
Offer
A reservation can be entered with the status offer; this means that the reservation is not definite
and does not affect availability.
Offer reservations are entered with an option date by which the reservation must be cancelled or
accepted as a definite reservation. The option date can be set to be completed automatically with a
defined number of days which is then added to the current Suite8 date.
How to create an offer reservation
1. Click the RESERVATIONS menu and select OFFER.
The Reservation Navigator is displayed.
2. Click the NEW OFFER button.
The profile search screen is displayed.
3. Create a new profile or locate an existing profile and click SELECT. (See: How to
create a new profile)
The Edit Reservation screen is displayed defaulted to the RESERVATION tab.
4. Complete the reservation details by typing information or selecting information
from the drop-down lists.
For an explanation of the fields on the reservation screen, see How to create a new
reservation
Note: The OPTION DATE field is mandatory; the option date can be set
in the configuration to be completed automatically with the defined
number of days added to the current Suite 8 date.
How to view reservations with the status offer
1. Click the RESERVATIONS menu and select UPDATE RESERVATION or OFFER.
The Reservation Navigator screen is displayed defaulted to the ALL tab.
2. Enter the required search criteria and in the SELECTION box select OFFER.
3. Click SEARCH.
All reservations meeting the entered search criteria with the status OFFER are
displayed.
How to accept an offer reservation
1. Click the RESERVATIONS menu and select OFFER.
The Reservation Navigator screen is displayed defaulted to the ALL tab.
2. Enter the required search criteria and click SEARCH.
All reservations meeting the entered search criteria with the status OFFER are
displayed.
3. Select a reservation from the grid and click ACCEPT.
A message is displayed asking if you want to transfer the reservation from offer to
reservation.
Offer
387
4. Click YES to change the status of the reservation from OFFER to DEFINITE.
Offer functionality is controlled by the parameter OFFERS under Setup →
Configuration → Global Settings → Reservation → Reservation 3 tab.
The default number of days for calculating the option date is defined via the
parameter OPTION DATE IN DAYS FOR OFFERS under Setup → Configuration → Global
Settings → Reservation → Reservation 3 tab.
388
Offer
8
Acceptable Reservation
This option displays all reservations from the waitlist which can currently be accepted. A
reservation can be put on the waitlist if the rate or room type is not available for the required dates.
If the room becomes available, the property can contact the guest and accept the reservation.
If a reservation is cancelled for a day on which waitlist reservations exist, a message is displayed
advising that there are reservations on the waitlist which could be accepted.
How to view acceptable waitlist reservations
1. Click the RESERVATIONS menu and select ACCEPTABLE RESERVATION.
The Acceptable Reservations screen is displayed showing all the reservations which
can be accepted at this point in time.
2. Select a reservation from the grid.
Click ACCEPT to accept the reservation and move it from the waitlist.
Click EDIT to edit the reservation details.
Select HTML DETAILS to display reservation information in Html format.
3. Click CLOSE.
The automatic display of acceptable reservations is controlled by the parameter
DISPLAY ACCEPTABLE RESERVATIONS AUTOMATICALLY under Setup → Configuration →
Global Settings → Reservation → Reservation 1 tab.
Acceptable Reservation
389
9
Financial Accounts
Financial Accounts on the reservation navigator
Financial accounts are accounts that do not affect the properties availability and are used to post
charges to non-guest accounts. For example, permanent accounts such as staff accounts, POS
Accounts or other internal accounts used to post no-show and cancellation fees, corrections or
charges for non staying guests. Financial accounts are also used for conference bookings and
conference telephone charges and internal lost postings such as interface late charges.
Select FINANCIAL ACCOUNTS from the RESERVATION menu or toolbar to open the financial account
page on the reservation navigator. The financial account option may be used to open, edit or create
a financial account.
Financial Account options
Click NEW to create a new financial account.
Click EDIT to edit a financial account.
Click CHECK IN To check in a financial account.
USE FIND IN GRID to further narrow the financial account search.
Click OPTIONS to display the following options:
BILLING - along with the appropriate cashier number and password opens the billing
screen for the selected financial account. The user can then carry out all the billing
transactions for which they have user rights.
CREDIT CARDS - used to add, edit, delete, guarantee or get approval for credit cards.
DELETE FA - deletes the financial account. This option is only available for financial
accounts with no postings or billing instructions attached.
FIXED CHARGES - used to enter fixed charges on the Financial Account. Fixed charges are
used to post daily charges other than room, tax or packages, for example conference
equipment rental from external locations. Fixed charges are posted automatically during
night audit or by selecting the option post daily charges in the cashiering module.
VIRTUAL NUMBERS - used to assign virtual numbers (DID) to a financial account.
Financial Account Search Screen
Fill in this field
With this information
Name, First
The name and first name of the profile attached to the
financial account.
Starting Date
The date the financial account is due to check in.
End Date
The date the financial account is due to check out.
Account No
The number of the account.
Description
The financial account group and account number.
Company
Enter the name of the company attached to the financial
account or click the drop-down arrow to search for existing
company profiles.
Agent
Enter the name of the agent attached to the financial account
or click the drop-down arrow to search for existing agent
profiles.
Financial Accounts
391
Enter the name of the source attached to the financial
account or click the drop-down arrow to search for existing
source profiles.
Source
Financial Accounts
Financial Accounts are accounts that do not affect the properties availability and are used to post
charges to non-guest accounts. For example, permanent accounts such as staff accounts, POS
Accounts or other internal accounts used to post no-show and cancellation fees, corrections or
charges for non staying guests. Financial Accounts are also used for conference bookings and
conference telephone charges and internal lost postings such as interface late charges.
Note: In the Meeting Planner module the financial accounts option
and postings functionality are available if the PMS license and/or the
CCM Billing Component license are activated.
Financial accounts may be accessed via several options in Suite8:
Reservations
Front Desk
Meeting Planner
Cashiering
How to access via Reservations
The financial account option in reservations may be used to open, edit or create a
financial account.
1. Click the RESERVATIONS menu and select FINANCIAL ACCOUNTS.
The Reservation Navigator screen is displayed defaulted to the Financial Accounts
tab.
2. Click NEW to display the New Financial Account dialog box.
How to access via Front Desk
The financial account menu option in front desk may be used to open a new financial
account.
1. Click the FRONT DESK drop down menu and select NEW FINANCIAL ACCOUNT.
The financial account dialog box is displayed.
An existing account may be edited by selecting the financial account page on the
reservation navigator via the Arrivals or Inhouse Guests menu options.
392
Financial Accounts
How to access via Meeting Planner
There are several ways to access Financial Accounts from with the Meeting Planner
module:
1. On the Conference Diary, right-click on a booking, select BOOKING OPTIONS to
display the short-cut menu.
or
From Event Management, locate the booking and select OPTIONS or EDIT the
booking and select OPTIONS to display the short-cut menu.
or
From Event Management, click EVENTS and select OPTIONS to display the short-cut
menu.
2. Click FINANCIAL ACCOUNTS on the short-cut menu to display the Financial Accounts
Search screen.
3. Click NEW FA to create a new financial account.
The financial account dialog box is displayed.
The search criteria, financial account Name, Description and Account Number allow
the user to locate the required financial account easily. In addition selecting the option
Show on pop-up will display all available financial accounts. This setting is saved for
future use until changed by the user.
Note: The financial account can also be displayed via Event
Management when selecting Postings. However, as this option allows
postings you must enter a cashier number.
How to access via Cashiering
1. Click the CASHIER menu and select BILLING.
The Cashier Login screen is displayed.
2. Enter your CASHIER NUMBER and PASSWORD, click LOGIN.
The Billing Search screen is displayed.
3. Click NEW FA to display the New Financial Account dialog box.
How to create a new financial account
1. Access the New Financial Account dialog box via one of the access methods
described above.
Financial Accounts
393
2. Complete the financial account details by typing information or selecting
information from the drop-down lists.
For an explanation of the fields on the financial account screen, see the New
Financial Account table below.
3. Click OK.
If the new financial account was created via cashiering then the posting screen is
displayed.
New Financial Account dialog box
394
Fill in this field
With this information
Group
Select the type of financial account required from
the list of predefined groups.
Date Range
If required select the date range check box and
enter the date range (from/to) you would like to
keep the Financial Account in your system. Usually
it is not necessary to enter a date range on a
financial account.
Profile
Each financial account must be linked to a profile;
click the button next to the profile box to open the
profile search screen and select an existing profile
or create a new one.
Financial Accounts
Account Number
Each financial account must have an account
number before it can be checked into the system.
Click the drop-down arrow and select an account
number; if the account number was defined with a
description then this is updated in the NUMBER
DESC. box.
Number Desc.
The description defined for this account number is
displayed.
Market
If no default market code has been defined, click
the drop-down arrow and select a market code. If
this field is defined as mandatory then a market
code has to be attached.
When setting up a financial account in meeting
planner the market is filled by default with the
market segment from the booking master.
Description
Displays the financial account group and financial
account number.
Credit Limit
Select a credit limit from the list box.
Limit Value
The credit value associated with the selected
credit limit is displayed. This may be changed as
required.
Transponder
The transponder card number is displayed if the
financial account was created upon swiping or
entering a transponder card.
Note: This option only displayed if TRANSPONDER
functionality is active.
Source Code
Select from a list of predefined source codes.
Channel Code
Select from a list of predefined channel codes.
Tax Exemption
Defines if the financial account is tax exempt.
Contracted Curr
Select the contracted currency for the financial
account.
Billing Info
Enter any billing information, such as 'Room and
Tax to Company'. The billing information is
displayed in the billing screen on the standard
HTML file.
Remarks
Enter any additional information. Remarks are
displayed in the billing screen on the standard
HTML file.
Note: If the start date selected equals the system date and the OK
button is clicked, the financial account will be checked in. If the start
date does not match the system date the financial account status will
be ‘Expected’.
Financial Accounts
395
How to edit financial account settings
1. Select the required financial account and click EDIT to display the Financial Account
Settings dialog box.
In cashiering display the billing screen of the required financial account and click
the FA SETTINGS button to display the Financial Account Settings dialog box.
In Meeting Planner display the Financial Accounts Search screen via one of the
access methods described above, select the required financial account and click
SELECT to display the Financial Account Settings dialog box.
2. Make any changes necessary and click OK to close the financial account settings.
How to link profiles to financial accounts
This option is used to link Company, Agent, Source, Meeting Planner or Vendor
profiles to the financial account.
1. Access the Financial Account Settings dialog box via one of the access methods
described above.
2. Click PROFILES to display the Profile Select dialog box.
3. On the profile type required click the drop-down arrow.
The Profile Search dialog is displayed.
4. Search for the required profile, click SELECT.
396
Financial Accounts
The Profile Select dialog box is displayed with the profile selected.
5. Click OK to return to the Financial Account Settings dialog box.
How to unlink profiles to financial accounts
This option is used to unlink Company, Agent, Source, Meeting Planner or Vendor
profiles to the financial account.
1. Access the Financial Account Settings dialog box via one of the access methods
described above.
2. Click PROFILES to display the Profile Select dialog box.
3. Select the profile to be unlinked.
4. Click DELETE LINK.
5. Click OK to return to the Financial Account Settings dialog box.
How to enter notes for financial accounts
This option is used to add, edit, delete and view notes related to the selected financial
account.
1. Access the Financial Account dialog box via one of the access methods described
above.
2. Click NOTES to display the Notes dialog box.
See: Notes on page 82 for more details.
How to link billing instructions to financial accounts
This option is used to link billing instructions to the Financial Account.
1. Access the Financial Account Settings dialog box via one of the access methods
described above.
2. Click BILLING INSTR. to display the Billing Instructions dialog box.
See: Billing Instructions on page 124 for more details.
How to link credit cards to financial accounts
This option is used to add, edit, delete, guarantee or get approval for credit cards. For
example the charges of conference bookings or group members might be routed to a
financial account and paid by a company credit card.
1. Access the Financial Account Settings dialog box via one of the access methods
described above.
2. Click CREDIT CARDS to display the financial account credit cards dialog box.
See: Credit Cards on page 73 for more details.
This option is only available if the status of the financial account is expected, checked
in or closed.
How to enter fixed charges for financial accounts
This option is used to enter fixed charges on the Financial Account. Fixed charges are
used to post daily charges other than room, tax or packages, for example conference
equipment rental from external locations. Suite 8 posts fixed charges automatically
during night audit or when choosing the option post daily charges in the cashiering
module.
1. Access the Financial Account Settings dialog box via one of the access methods
described above.
2. Click FIXED CHARGES to display the Fixed Charges dialog box.
Financial Accounts
397
See: Fixed Charges on page 79 for more details.
How to unlink a CCM financial account
1. Locate the required booking.
2. Click the OPTIONS button to display the short-cut menu.
3. Click FINANCIAL ACCOUNTS on the short-cut menu to display the Financial Accounts
Settings dialog box.
4. Click UNLINK, the message "Unlink CCM Booking?" is displayed to confirm the
unlinking, select YES.
5. If no postings have been made the Financial Account will be unlinked. If postings
have been made then a message is displayed to "Transfer postings of the selected
booking?" select YES.
6. The cashier folio is displayed; click the TRANSFERS button to display the Transfer
Posting dialog box.
7. In the TO ROOM field select the account to transfer the postings to or create and
then select a new financial account.
8. The charges may be transferred in the normal manner or transferred by checking
the TRANSFER POSTINGS OF SELECTED CCM BOOKING check box. This option transfers all
postings that have been made via the MANUAL POST option under the EVENTS menu.
9. Click OK to transfer the charges.
398
Financial Accounts
10. Click the CLOSE button to close the cashier screen.
11. Click OK on the Financial Account Settings dialog box to complete the transaction.
Note: Financial Accounts will be unlinked only when the OK button
on the FA edit screen is pressed. If CANCEL is pressed then the FA is
still linked even if postings have been transferred.
Note: Postings that have been made via the option POSTINGS on the
OPTIONS menu are not linked to the CCM booking and posted directly
to the Financial Account. These postings have to be transferred
individually.
How to display the user log
This option is used to view the changes related to the selected financial account.
1. Access the Financial Account dialog box via one of the access methods described
above.
2. Click USER LOG to display the User Log dialog box.
The User Log is displayed split into 2 sections:
The upper section displays the name of the financial account and the arrival and departure
dates.
The lower section displayed information about the changes to this financial account.
3. Once all changes have been viewed, click OK to close the user log.
User Log Display Options
Field Heading
Gives this information
Date
The date and time the change was made. This is the system
date of the computer on which the change was made.
Financial Accounts
399
Text
A short description about the changes that were made.
User
The name of the user who made the change.
Workstation
The computer name on which the change was made.
The financial account groups and numbers are defined via the options FINANCIAL
ACCOUNT GROUPS and FINANCIAL ACCOUNT NUMBERS under Setup → Configuration →
Cashiering.
Financial account functionality is controlled by the user rights VIEW, EDIT, INSERT
and DELETE under Setup → Configuration → Users → User Definition → Rights →
Cashiering → Financial Accounts.
400
Financial Accounts
10
Room Move
This option displays all reservations or in-house guests which are scheduled to move rooms.
Room moves can be scheduled from the edit reservation screen by selecting a new room number. If
the reservation is checked-in then the guest can be moved directly to the new room or the room
can be blocked and the guest schedule to be moved later in the day.
How to perform a scheduled room move
1. Click the RESERVATIONS menu and select ROOM MOVE to display the room move
screen.
The upper section displays information about the reservations scheduled for a room move.
Reservations which checked in today are marked with the status Temporary Room.
Reservations which checked in prior to today are marked with the status Scheduled move.
The lower section displays information about the reservation which is currently in the
room to which the selected reservation is scheduled to move to.
2. Select a reservation from the grid.
3. Click MOVE to move the reservation to the scheduled room.
4. If the reservation has an inventory item attached with a room move warning then
a message is displayed.
Room Move
401
5. Click YES to perform the room move or click NO to cancel the room move.
6. Click CLOSE to close the room move screen.
Options available on the room move screen
MOVE - to move the reservation to the scheduled room.
EDIT RES. - to edit the reservation details.
REFRESH - to refresh the screen.
HTML - to display the reservation information in Html format.
Room Move dialog box
Field
Information displayed
Name
The guest name.
Previous
The room the guest previously occupied. This information will
be filled after the room move has been completed.
Current
The room number the guest currently occupies.
Scheduled
The room number the guest is scheduled to move to.
Status
The current status of the move.
Occupied
An X indicates that the room the reservation will move to is
still occupied.
Arrival
The guest's arrival date.
Departure
The guest's departure date.
R.M. time
The time the room move is scheduled to take place.
Note: Scheduled room moves are indicated on the reservation
navigator in the room field, for example "100 → 102" indicates that the
guest is scheduled to move from room number 100 to room number
102.
402
Room Move
11
Quick Reservation
The Quick Reservation Wizard speeds up the creation of reservations. Instead of going through the
process of searching for and/or creating a new profile and then entering all the reservation details,
only the essential profile and reservation information needs to be entered on the quick reservation
screen.
The profile search screen will only open if a name match applies, otherwise the profile will be
created automatically. If a profile match is found, the profile screen will open and prompt users
with profile matches, if none of the profiles are a match, then pressing the CONTINUE button
indicated by a red arrow on the profile search screen will create a new profile and open the edit
reservation screen complete with the details already entered on the quick reservation screen.
How to enter a quick reservation
1. Click the RESERVATIONS menu and select QUICK RESERVATION or press CTRL + Q.
The Quick Reservation screen is displayed.
2. Complete the options as detailed in the table below.
3. Click OK.
If the name entered on the quick reservation screen matches existing profiles then
the profile search screen is displayed.
4. If the profile required exists, select it from the grid and click SELECT.
Quick Reservation
403
5. If the profile does not exist, click CONTINUE, the profile is then created
automatically.
The edit reservation screen is displayed.
6. Complete any additional information required then click OK to save the
reservation.
Quick Reservation dialog box
404
Fill in this field
With this information
Last name
Enter the guest's last name with appropriate capitalization.
MI (Middle
Initial/Name)
Enter the guest's middle initial or name.
First name
Enter here the guest's first name or initial.
Mail name
Enter here the name the guest prefers to use, e.g. if the name
is David, but he prefers to be called Dave.
Country
Select the country from the drop-down list.
Zip
Enter here the zip code or postal code.
City
Enter the city.
State
Enter the state code here or select from a drop-down list of
defined states. The state codes can be attached to zip codes so
that as soon as the zip code is entered the state field will be
filled automatically.
Street 1
Address line 1.
Street 2
Address line 2.
Language
Select a language from the drop-down list of defined
languages.
Title
Enter the guest's title.
Address greeting
Select an address greeting from the drop-down list of defined
greetings.
Letter greeting
Select the letter greeting from the drop-down list of defined
letter greetings.
Phone
Enter the telephone details. The number entered will be saved
on the guest profile on the first communication method found
within the type PHONE.
Fax
Enter the fax details. The number entered will be saved on the
guest profile on the first communication method found within
the type FAX.
Arrival
Select the arrival date from the calendar, the default is today.
Nights
Enter the number of nights for the stay. Or enter the departure
date in the next field and Suite8 will calculate the number of
nights. Enter 0 for day-use rooms.
Departure
The departure date of the guest. If the number of nights was
entered the departure date will be calculated. The day of the
week will be displayed on top of the field. The departure date
can also be entered manual or selected from the calendar. This
is a mandatory field.
Adults
Enter the number of adults for the reservation.
Quick Reservation
Room type
Enter the room type or select from the list of defined room
types. This is a mandatory field.
Rate
Enter a rate code, or select from the rate availability grid the
open rate codes for each room type.
When selecting a profile or creating a new profile via quick reservation the default
address type defined via the option DEFAULT ADDRESS TYPE under Setup →
Configuration → Global Settings → Profile → Profile 1 tab is used.
Quick Reservation
405
12
A
Add On Reservations .............................. 113
Confirmation Letter ................................. 136
by Email .............................................. 136
by Fax................................................. 136
Creating an Easy Letter....................... 136
Printing ............................................... 136
Adding Attributes to a Reservation ............ 71
Custom Tour Series ................................ 311
Adding Credit Cards to a Reservation........ 73
Cutting off block rooms ........................... 309
Adding Guest Cards to a Reservation........ 73
D
Adding Inventory to a Reservation ............. 50
Date field
Changing a date using the calendar ...... 18
Typing a new date ................................. 18
Accelerator keys ....................................... 11
Acceptable Waitlist Reservations ............ 389
Additional Authorization........................... 150
Advanced Billing Authorization ................ 114
Advanced Reservation Search .................. 25
Allowances ............................................. 119
Amenity............................................. 91, 121
Approvals
Group Billing Instructions ..................... 361
Automatic Room Assignment .................. 372
B
Billing ...................................................... 124
Billing Instruction ............................. 124, 319
Block Details
Changing block status ......................... 309
Cutting off block rooms ........................ 309
Block Header .......................................... 283
Block Reservation
Block Copy .......................................... 311
Block Details ....................................... 309
Block Header ....................................... 283
Block Reservation Search.................... 281
New Block Reservation........................ 283
Rooming List ....................................... 315
Tour Series.......................................... 311
Block Reservation Search
Block Statuses..................................... 283
Block Statuses ........................................ 283
Group Check In ................................... 361
Blue drill down arrow ................................. 12
Booking Master Block ............................. 308
C
Cancellation Information.......................... 134
Cancelling a reservation ............................ 95
CCM Blocks ............................................ 308
Changing the date
Typing a new date ................................. 18
Using the calendar................................. 18
Index
Index
Day use on departure day....................... 153
Days Functionality .................................... 98
Deposits Requested ............................... 155
Display Shares ....................................... 236
E
Entering Reservation Details
Edit financial account settings ............. 392
Entering a New Financial Accounts ..... 392
Financial Accounts .............................. 392
New financial account ......................... 392
Options
Billing .............................................. 391
Credit Card ...................................... 391
Deleting ........................................... 391
Fixed Charges ................................. 391
Virtual Numbers ............................... 391
Postings .............................................. 392
F
Fixed Charges ...................................79, 161
Fixed Tour Series ................................... 311
Frequencies.............................................. 60
Accessing Group Reservations ........... 341
New Group Screen.............................. 341
G
Grid View.................................................. 70
Group Reservation
Add On ............................................... 361
Automatic Room Assignment ....... 361, 372
Billing Instructions ............................... 361
Group Changes................................... 374
Group Check In ................................... 361
Group reservation search .................... 341
Group Rooming List ............................ 367
New Group Reservation ...................... 343
New Group Template .......................... 343
Rooming List ....................................... 361
407
Split Reservations................................ 361
Quick keys................................................ 16
Guest Profiles ................................... 99, 171
Quick Reservation .................................. 403
H
R
Hints ....................................................... 108
Registration Card.................................... 219
History & Future ...................................... 185
Registration Card Batch .......................... 222
HTML
Change the HTML display ..................... 13
Collapse HTML Tree.............................. 13
Expand HTML Tree ............................... 13
View HTML display ................................ 13
Reinstate a reservation ........................... 224
HTML View ............................................... 13
I
Independant Share Reservation .............. 243
Independent Share.................................. 243
Inventory ................................................... 50
L
Linking Profiles.......................................... 55
Linking Profiles to a Reservation ............... 55
Locator ................................................... 194
Logging In ................................................... 9
Luggage Labels ...................................... 195
M
Manual Authorization .............................. 152
Master Share .......................................... 242
Master Share Reservation ....................... 242
Meal Plan.......................................... 89, 199
Messages ............................................... 201
Multiple Guest Profiles ...................... 99, 171
N
Navigation keys
Accelerator keys .................................... 11
Quick keys............................................. 16
Shortcut keys......................................... 11
New Reservation....................................... 38
Notes ................................................ 82, 205
Adding New Notes ......................... 82, 205
P
Package Grid ............................................ 60
Packages .................................................. 60
Party Reservation ................................... 211
Post No Show Fees ................................ 214
Postings .................................................. 124
Profile Screen – Individual Guest .............. 38
Promotions ............................................. 106
Q
408
Reinstate Reservation ............................ 224
Add On ............................................... 113
Adding Attributes................................... 71
Adding Inventory ................................... 50
Additional Authorization ....................... 150
Advanced Billing Authorization ............ 114
Advanced Reservation Search .............. 25
Advanced Search Criteria...................... 25
Amenity..........................................91, 121
Basic Search Criteria............................. 25
Billing .................................................. 124
Billing Instruction .......................... 124, 319
Cancellation Information ...................... 134
Cancelling a reservation ........................ 95
Confirmation Letter.............................. 136
Credit Cards.......................................... 73
Adding Credit Cards .......................... 73
Guest Credit Cards ............................ 73
Reservation Credit Cards................... 73
Day use on departure day ................... 153
Days Functionality ................................. 98
Entering a New Financial Accounts ..... 392
Entering Reservation Details
Edit financial account settings .......... 392
Entering a New Financial Account.... 392
Financial Accounts .......................... 392
New financial account ...................... 392
Options............................................ 391
Postings .......................................... 392
Fixed Charges................................79, 161
Frequencies .......................................... 60
Grid View .............................................. 70
Guest Cards
Adding Guest Cards .......................... 73
Guest Profiles ................................99, 171
Hints ................................................... 108
History & Future .................................. 185
Independant Share.............................. 243
Linking Profiles...................................... 55
Locator................................................ 194
Manual Authorization........................... 152
Master Share ...................................... 242
Meal Plan .......................................89, 199
Messages ........................................... 201
New Reservation................................... 38
Notes
Adding New Notes ......................82, 205
Notes..........................................82, 205
Package Grid ........................................ 60
Packages
Adding Packages to a Reservation .... 60
New Package .................................... 60
Index
Packages ........................................... 60
Party ................................................... 211
Profile Screen – Individual Guest ........... 38
Promotions .......................................... 106
Quick Reservation ............................... 403
Registration Card................................. 219
Registration Card Batch....................... 222
Reinstate ............................................. 224
Reservation Navigator ........................... 25
Reservation Options
Add On ............................................ 113
Additional Authorization.................... 150
Advanced Billing Authorization ......... 114
Billing Instructions .................... 124, 319
Confirmation Letter........................... 136
Deposits Requested ......................... 155
Fixed Charges ........................... 79, 161
History & Future ............................... 185
Independent Share........................... 243
Locator ............................................ 194
Manual Authorization ....................... 152
Master Share ................................... 242
Messages ........................................ 201
Postings ........................................... 124
Registration Card ............................. 219
Share Reservations.......................... 234
Traces ............................................. 255
User Log .......................................... 264
Room Assignment ............................... 227
Room Move ......................................... 401
Scheduled Room Move ....................... 401
Search Criteria ...................................... 25
Share Reservations ............................. 234
Split ..................................................... 243
Traces ................................................. 255
Transponder Cards.............................. 258
User Log ............................................. 264
Wait List .............................................. 272
Waitlist Reservations ........................... 383
Walk In .................................................. 93
Walk In Reservation .............................. 93
Reservation Navigator Selection tabs ........ 25
Reservation Notes ............................ 82, 205
Reservation Options
Add On ................................................ 113
Additional Authorization ....................... 150
Advanced Billing Authorization ............. 114
Allowances .......................................... 119
Billing Instructions........................ 124, 319
Confirmation Letter .............................. 136
Deposits Requested ............................ 155
Display Shares .................................... 236
Fixed Charges ............................... 79, 161
History & Future .................................. 185
Independent Share .............................. 243
Locator ................................................ 194
Luggage Labels ................................... 195
Manual Authorization ........................... 152
Master Share....................................... 242
Index
Messages ........................................... 201
Post No Show Fees ............................ 214
Postings .............................................. 124
Registration Card ................................ 219
Reinstate a reservation ....................... 224
Reservation Notes..........................82, 205
Share Reservations............................. 234
Split .................................................... 243
Traces................................................. 255
Undo Check In .................................... 262
Undo Check Out ................................. 263
Unlink CCM Booking ........................... 264
User Log ............................................. 264
Waitlist ................................................ 272
Reservation Search .................................. 25
Room Move ........................................ 401
Wildcards .............................................. 25
Room Assignment .................................. 227
Room Move ............................................ 401
Rooming List
Excel Import ........................................ 367
Rooming List (Blocks) ............................. 315
Rooming List (Groups)............................ 367
S
Scheduled Room Move........................... 401
Share Reservations ................................ 234
Master and slave reservations ............. 234
Share with existing reservation ............ 234
Share with new reservation ................. 234
Shortcut keys............................................ 11
Split Reservation .................................... 243
Splitting reservations .............................. 243
T
Text Templates..................................82, 205
Tour Series
Custom Tour Series ............................ 311
Fixed Tour Series ................................ 311
Traces .................................................... 255
Transponder Cards ................................. 258
U
Undo Check In ........................................ 262
Undo Check Out ..................................... 263
Unlink Booking ....................................... 308
Unlink CCM Booking............................... 264
User Log................................................. 264
W
Waitlist ................................................... 272
Acceptable Waitlist .............................. 389
Viewing Waitlisted Reservations .......... 383
Waitlisting a Reservation ..................... 383
409
Waitlist Reservations............................... 383
410
Walk In Reservation.................................. 93
Index