1
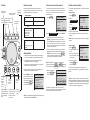
To select an Internet radio station:
1. Press SOURCE, then
select Internet Radio .
2. Highlight your desired
browsing method and press
SELECT.
3. Continue selecting your
browsing options until you
reach a list of radio stations
(denoted by the
icon to
the left of the station name)
and press SELECT to
connect.
Source
Internet Radio
My Music
FM Radio
Aux In
Internet Radio
Genres
Locations
Languages
Most Popular Stations
My Stations
Alternative
1.fm Indie 104
1.fm X
Buzz Radio
Free Radio Santa Cruz
Indie Airplay
4. Depending on the catalog
09:25 am
of radio stations available
on the Internet, your
Private Stream for Free
browsing experience may
differ. A typical session may
Free Radio Santa Cruz
Alternative
go through several levels
United States
of options - for example:
Locations
North America
Sample of Internet radio
United States
station playing
California
Alternative
NOTE: Stations can perform differently based on Internet
conditions. If you experience problems when listening to Internet
radio, try going back to re-connect to the station.
NOTE: The My Music feature requires additional setup for
networking and file-sharing configuration on your computer.
Please refer to the IS9181 user’s manual for complete setup
instructions.
To listen to FM radio:
1. Press SOURCE, then select
FM Radio
.
2. You can press
and
to seek stations, or use the
rotary dial to manually tune
into a station. Press
to
mute and unmute the system.
Source
Internet Radio
My Music
FM Radio
Aux In
IS9181 WiFi Internet radio
Quick start guide
The IS9181 Internet Radio provides
the ability to listen to audio from any
source that can connect through a
standard headset jack. Connect one
end of the supplied auxiliary audio
cable to the headset jack (audio/
line out) of your device, and plug
the other end of the cable into the
AUX IN port on the back of the IS9181.
1. Press SOURCE, then select
Aux In
.
2. You can now listen to your
external audio source
through the IS9181. Please
note that the IS9181 does
not provide power or control
to your external audio
source.
www.vtechphones.com/IS9181
Source
Internet Radio
My Music
FM Radio
Aux In
Weather forecast
After you have set up the
weather settings, press
WEATHER (INFO) and rotate
the dial to view the 5-day
weather forecast.
If you do not press a key within
one minute, the IS9181 will
return to your playing screen.
Weather
Rotate dial to view 5-day forecast
Playing Your Music
VTECH TELECOMMUNICATIONS LTD.
A member of THE VTECH GROUP OF COMPANIES.
Distributed in the U.S.A. by VTech Communications, Inc.
Beaverton, Oregon
Distributed in Canada by VTech Technologies Canada, Ltd.,
Richmond, B.C.
Copyright ©2009 for VTECH TELECOMMUNICATIONS LTD.
Printed in China.
Version 3
The IS9181 WiFi Internet radio allows you to:
• Listen to thousands of free Internet radio stations
from around the world without turning on the
computer.
• Listen to the digital music collection stored on
your computer in any room of the house.
• Listen to music from an MP3 player or connect
to a home audio system.
Remove the IS9181 from the box and verify that
you have the following components:
� IS9181 WiFi Internet Radio
� Auxiliary audio cable
� Remote control
� Power adapter
� Quick start guide
� User’s manual
Controls
Before you begin
Connect to your wireless network
Set the clock and weather
Show settings
and options.
A wireless network with Internet access is required to
complete the setup of your IS9181. For easier setup, write
the required information in the table below.
You can either allow the system to search for a wireless
network, or enter the name of a known available network.
To connect to your wireless network by searching for
available networks:
To complete the setup of the IS9181, you need to set the clock
and weather.
Adjust
listening
volume.
Show a list of saved
favorite stations.
Select music source
(Internet Radio,
My Music, FM Radio,
Aux In).
Select the
highlighted
item.
Wireless Network
1.Select CHANGE .
Your Network Name
(SSID)
Show weather
information.
Current Settings:
Status: Not Connected
SSID: None
Your Password (Network
Key)
Your Time Zone
(Newfoundland, Atlantic,
Eastern, Central,
Mountain, Pacific,
Hawaii, Alaska)
CHANGE
3.Find the name of your network in the list and press
SELECT. If at first you do not see your network in the
list, press BACK and try searching again. If you still do
not see your network after a few tries, you may need to
enter the network name manually. Please see the IS9181
manual for more instructions.
Your 5 digit zip code
(USA)
or
6 character postal code
(Canada)
Getting started
1. Peel both of the clear plastic protective sheets away from
the top and the display of the IS9181 WiFi Internet Radio.
2. Plug the small end of the power adapter into the jack
labeled DC 14V on the back of the IS9181.
3. Plug the large end of the power adapter into an electrical
wall outlet not controlled by a switch.
The IS9181 displays a progress bar while it initializes - this
could take up to three minutes to complete.
Press to
turn the
IS9181
system on
and off.
Rotate clockwise or
counter-clockwise to
navigate through the
menu and display
items
Skip to
previous
station or
song.
Skip to next
station or
song.
Set up IS9181 system
Steps:
1. Connect to a Wireless Network
2. Adjust the Clock
3. Enter location for Weather
4.To enter your network password, move the rotary dial to
highlight the first character of your password and press
SELECT to add it to the entry line. Select DELETE to
erase the last character. Repeat this character selection
process until the entire password is displayed.
NOTE: Passwords are case sensitive. If capital letters or
symbols are used, select CAPS or SYMBOLS to display
a list of characters. Select SPACE to insert a blank space.
5.Move the rotary dial to
highlight DONE and
then press SELECT.
Enter Password (Key):
a b c d e f g h i j k l m
n o p q r s t u v w x y z
1 2 3 4 5 6 7 8 9 0
SPACE
CAPS
SYMBOLS
DELETE
DONE
CANCEL
Continue Setup ?
YES
My Music: play and
pause current song.
Internet and FM
Radio: mute and unmute audio.
EXIT
2.Select Search for Network and then press SELECT.
Weather Settings
NO
Return to
the previous
menu.
NOTE: To highlight and select items listed on the display, simply
rotate the dial and press the SELECT key.
1. Select CHANGE .
Clock
2. Select
Current Settings:
Auto (from Internet) .
3. Select your time zone from
the list.
Key: None
Clock
Press STANDBY to activate
the system. When the IS9181
system is ready, the system
setup screen appears on the
YES
display. Select
�������
to�
continue the system setup.
Wireless Network
Setting the clock
The IS9181 now attempts to connect to your wireless
network (this could take up to one minute). Once connected,
you will be asked to set the clock and weather.
4.Select On or Off for
daylight saving.
Time: 12:00 AM
Mode: Manual
CHANGE
EXIT
The IS9181 will automatically
retrieve and update the current time for your time zone from
the Internet.
NOTE: Daytime saving time adjustments must be changed
manually.
Weather settings
Weather Settings
1. Select CHANGE .
Current Settings:
2. Choose your country from
Country: None
the list.
ZIP or Area Code: None
3. Enter your 5 digit zip code
(USA) or 6 character postal
CHANGE
EXIT
code (Canada).
4.Move the rotary dial to
highlight DONE and
then press SELECT.
The IS9181 will automatically retrieve and update the
current weather information for your zip/postal code from the
Internet.
NOTE: Like a personal computer, the IS9181 is exposed to a
multitude of Internet traffic and signals which can sometimes result
in unexpected operations. If you find that the IS9181 is behaving
abnormally we recommend that you reset it by unplugging power
for a few minutes and then plugging it back in.