1
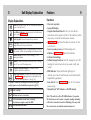
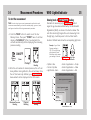
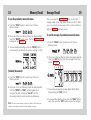
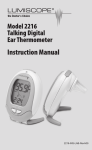
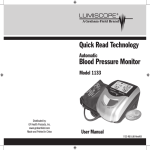
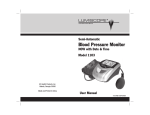
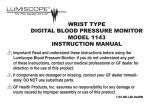
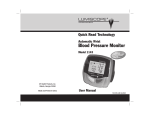
Model 1134
AccuRead
Blood Pressure Monitor & Clock
User Manual
Distributed by:
The Lumiscope Co., Inc
www.lumiscope.net
Repair Department: 1-800-672-8293
Made and Printed In China
2
Table of Contents
Introduction .................................................................... 3
How This Monitor Works.................................................. 4
About Blood Pressure ..................................................... 5
Parts Identification ......................................................... 6
Unit Display Symbols ...................................................... 7
Unit Display Explanation ................................................. 8
Features .......................................................................... 9
Installing the Batteries .................................................. 10
Correct Measuring Posture ............................................ 11
Applying the Cuff .................................................... 12, 13
Measurement Procedures.............................................. 14
WHO Lighted Indicator .................................................. 15
Irregular Heartbeat Detection ........................................ 16
Heartbeat Readings ...................................................... 17
Memory Recall .............................................................. 18
Average Recall ............................................................... 19
Clock Settings ......................................................... 20, 21
Maintaining & Storing Unit ............................................ 22
Troubleshooting ............................................................ 23
Specifications ............................................................... 24
Warranty ....................................................................... 25
Introduction
3
Congratulations on your purchase of the new Lumiscope
model 1134. This fully-automatic, blood pressure
monitor is both easy-to-use and ideally suited for daily
measurements. The large display includes systolic blood
pressure reading, diastolic blood pressure reading and
the pulse rate, all clearly shown at the completion of
each reading.
You can store up to 99 measurements in each of the unit's
4 memory zones, ideal for users who want to monitor and
track their blood pressure on a regular basis. The 1134 is
compact and portable, making it perfect for home use and
travel.
Blood pressure measurements determined with your 1134
are equivalent to those obtained by a trained observer
using cuff/stethoscope auscultation method, within the
limits prescribed by the American National Standard,
Electronic or Automated Sphygmomanometers.
Please read this manual carefully before use. For specific
information on your own blood pressure, contact your
physician. Please be sure to keep this manual.
4
How the 1134 Works
About Blood Pressure
5
Your model 1134 uses the oscillometric method to detect
What is Blood Pressure?
your blood pressure. Before the cuff starts inflating,
Blood pressure is the pressure exerted on the artery
the device will establish a baseline cuff pressure, which
tube while blood flows through the arteries. The pressure
is equivalent to the air pressure. The measurement of
measured when the heart contracts and sends blood
your blood pressure is based on this baseline pressure.
out of the heart is systolic (highest) blood pressure. The
After the cuff inflates to block your blood in the artery,
pressure measured when the heart dilates with blood
the deflation process starts. During the deflation of the
flowing back into the heart is called diastolic (lowest)
cuff, the monitor is detecting the pressure oscillations
blood pressure.
generated by the beat-to-beat pulsatile. Any muscle
movement during this period of time will cause
Why Measure Your Blood Pressure?
measurement error. After detecting the amplitude and
Among the various health problems afflicting people today,
the slope of the pressure oscillations during the deflation
problems associated with high blood pressure are by far
process, your 1134 will determine the systolic and
the most common. High blood pressure's dangerously
diastolic pressures for you; and your pulse rate is detected
strong correlation with cardiovascular disease has made
at the same time.
measuring blood pressure a necessity for identifying those
at risk.
6
Parts Identification
7
Unit Display Symbols
Display Symbols
Date/
Time
KPa
AVG
Systolic
Pressure
1
2
3
Start/Power
Pre-formed Cuff
Memory Zone
Select
Air Tube
Average Selection
USB Plug /PC Link
Memory Select
Cuff Plug Outlet
WHO Indicator
AC Adaptor Outlet
4
Diastolic
Pressure
Pulse
Value
Unit Display Explanation
8
Display Explanations
User 1-4: Appears when the unit is being operated by
User 1 through User 4.
Low Battery Indicator: Appears when the batteries are
low or need replacement.
Pulse Symbol: Shows the pulse rate per minute.
Features
Functional
• One touch operation
• Large LCD display
• Irregular Heartbeat Detector: This unit can detect a
disturbance in the regular rhythm of the heartbeat, which
may cause or indicate cardiovascular disease.
KPa
Kilopascal: Measures the amount of air pressure that is
being inflated into the pre-formed cuff.
• Automatically determines the ideal air pressure for the
AVG
Memory Average: Shows the average values for an hour, a
day, a week, a month and all readings in the Memory Zone.
• 4-person memory zones with 99-readings each.
Memory Recall: Shows the past readings. (1~99
readings available)
• 4 Alarm Clock settings.
Memory : Holds the memory reads for User 1 through
User 4, for up to 99 readings each.
Irregular Heartbeat Detector: Indicates when an
irregular heartbeat is detected.
WHO Light Indicator: Displays six different light signs
of Blood Pressure readings against the guidelines set by
the World Health Organization. (See Pg. 15)
If anyone of these error messages occur while taking your
reading, please see the Troubleshooting section. (Pg 23)
Fails to Inflate
Deflates too fast or too slowly.
A. Arm movement caused error in reading
B. Interference signal around the BPM
Incorrect measured result
9
cuff inflation.
• 2 Modes: Blood Pressure Mode & Clock Mode.
• 5-Mode Average Function: Sets the average for up to 99
readings for each zone by hour, day, week, month and
overall.
• WHO Indicator: Shows 6 different light signs to
indicate your state of health based on the World Health
Organization guidelines.
• Auto shut-off: Unit automatically turns off in 3 minutes;
power saving.
• Operated by 4 "AA" batteries or AC/DC adapter.
Note: This unit also offers PC-LINK software. If you order
this function, you will receive a separate package including
a CD and a connection line with a USB plug. You may order
this accessory at our website www.lumiscope.net.
10
Installing the Batteries
1. To insert the batteries
A. Press down on the latch and lift the cover towards you
to open the battery compartment.
B. Insert 4 "AA" batteries as indicated. Make sure to match
polarities (+, –) on the batteries.
C. Replace the battery cover by inserting the two hooks at
the bottom into the slot, then push on the top area.
Note:
Please remove
batteries when not in
use for an extended
period of time. Do not
dispose batteries with
household garbage.
2. To Connect the AC/DC Adapter
A. Plug the AC/DC adapter (6V 500mA), into the jack
located at the bottom of this
unit. (shown in the diagram).
B. Use only the adapter
included with this unit.
Note:
Remove batteries
when using the AC
adapter for an extended
period of time.
11
Correct Measuring Posture
1. Place your elbow on a table
so that the cuff is at the same
level as your heart. (Fig. A.)
Fig. A
Note: The level of your heart is
slightly below your armpit.
Relax your entire body,
especially the area between
your elbow and fingers.
2. If the cuff is not at the same
level as your heart or if
you can not keep your arm
completely still throughout the
reading, use a soft object such
as a folded towel to support
your arm. (Fig. B) Do not
allow hard objects to come in
contact with the wrist cuff.
3. Turn your palm upwards.
4. Sit upright in a chair, and take
5-6 deep breaths.
Avoid leaning back or
crossing your legs while the
measurement is being taken.
(Fig. C)
Fig. B
(X)
Fig. C
12
Applying the Cuff
To apply the cuff
A. Plug the end of the tubing on the
cuff into the connector at the base
of the monitor.
2~3 cm
(0.8” ~ 1.2”)
Main Artery
Left Arm
B. Remove any clothing that restricts the upper left arm.
Wrap the cuff around your upper left arm. The rubber
tube should point in the direction of your hand. The
bottom edge of the cuff should be 0.8" ~ 1.2" (2~3
cm) above your elbow with the tube positioned over the
middle of your arm.
13
Applying the Cuff
D. To have a secure fit, pull the end of the cuff towards
you, wrap it over, then press it for closure. If the Index
line falls within the OK range, indicated at the edge of
the cuff, this cuff is suitable for your use. If the Index
line falls out of the OK range, you may need a cuff
with larger circumference.
This cuff fits arm sizes 9.2" - 18.2".
Main
Artery
E. Position your arm so that the cuff is aligned at heart
level, as shown in the diagram.
) over the main artery (on
C. Position the artery mark (
the inside of your arm) in the upper arm.
Main
Artery
Note:
To locate the main artery, press two fingers approximately 1" (2cm)
above the bend of your elbow on the inside of your left arm
14
Measurement Procedures
WHO Lighted Indicator
15
To start the measurement
Showing levels of Blood Pressure Reading
Note:
Standards for assessing high blood pressure, without
regard to age, have been established by the World Health
Organization (WHO), as shown in the chart as below. This
unit offers 6-color light signs after user's measuring. From
the light sign, it will help users to find out their health
situation. Different levels show the corresponding light color.
In order to get your correct measurement result and to avoid
erroneous measurements you should be seated quietly, your arm, hand,
and fingers should be still during measurement procedure.
A. Push the "PAGE" button to select one of the four
Memory Zones. Then push "POWER" twice. It will then
display a "FLASHING 0". After a few moments the
unit will automatically inflate displaying the increasing
pressure reading.
ON/OFF
Memory
Zone
Example: If your Blood
Pressure reading is
122/75, then light sign
will indicate the color
Blue Green which means
your reading is Normal
Blood Pressure
Reading
Power
Flashing 0
Pressure
Reading
Grade 3 hypertenslon (severe) (Red)
180
Grade 2 hypertenslon (moderate)
(Yellow)
160
Grade 1 hypertenslon (mlld)
(Purple)
140
Hlgh-normal (Green)
130
120
Maximum Pressure
Reading
Pressure
Deflating
Blood Pressure
Reading
• Grade 1 Hypertension — Purple
• Grade 2 Hypertension — Yellow
• Grade 3 Hypertension — Red
• Optimal – Blue
• Normal – Sky Blue
• High-Normal – Green
Systolic Pressure mmHg
B. After the unit reaches its desired pressure, the cuff will
slowly deflate. During deflation, the unit will beep. Once
the cuff has been fully deflated, your blood pressure
measurement will be displayed on the LCD screen.
Light Sign
Indicator
Normal
(Sky Blue)
Optlmal (Blue)
90
100
80 85
Diastolic Pressure mmHg
110
16
Irregular Heartbeat Dectection
An irregular heartbeat may cause or indicate
cardiovascular disease. This unit has a unique function
that alerts the user to the presence of an irregular
heartbeat.
Heartbeat Readings
17
Regular Heartbeat reading but below normal
When taking your blood pressure reading, if your reading
displays a value below 60 beats/sec, then the unit will
display the Pulse Value and "LO" symbols alternately.
Example: (58/LO)
Irregular Heartbeat reading
When taking your blood pressure reading, If you are
experiencing an irregular heartbeat the unit will display
the Pulse Value and "IH" symbols alternately.
Example: (90/IH)
Regular Heartbeat reading but above normal
When taking your Blood Pressure reading, if your reading
displays a value above 100 beats/sec, then the unit will
display the Pulse Value and "HI" symbols alternately.
Example: (102/HI)
Note: It is advised that you consult your physician if the irregular
heartbeat symbol "IH" appears often.
18
Memory Recall
To see the previously measured values
A. Push the "PAGE" button to select one of the four
Memory Zones.
B. Once one of the four Memory Zones has been selected,
push the "MEMO" button twice. The first blood pressure
reading will be displayed.
C. To view additional readings, push the "MEMO" button
successively to go through the various readings. (1~99)
19
Average Recall
This unique monitor automatically offers a set of five
average values: (Hour, Day, Week, Month and All). It offers
you or your doctor an easy way to find out the cariation in
Systolic, Diastolic and Pulse values.
To see the average of previously measured values
A. Push the "PAGE" button to select one of the four
Memory Zones.
B. Once one of the four Memory Zones have been selected.
Push the "AVG" button twice. The average for the Hour
will be displayed.
To delete the memory
AVG
AVG
AVG
AVG
AVG
A. Push the "PAGE" button to select one of the four
Memory Zones.
B. Once one of the four Memory Zones has been selected,
hold the "MEMO" & "PAGE" button together for 5
seconds. The LCD will dispaly "ALL EE" and the
decreasing memory recall number simultaneously.
Note:
The most recent reading is shown first. After all 99 readings are
recorded, new readings replace the oldest reading in memory.
C. To view the averages for the Day, Week, Month & All,
keep pushing the "AVG" button.
D. To view another Memory Zone, push the "PAGE" button
once, then push the "AVG" button to view the averages.
20
Clock Settings
1. To set time and date
A. Press the " " button and hold for at least 5 seconds. You
can start setting the year when the "YEAR" digit blinks.
B. Then press " MEMO " to increase the year and
"PAGE " to decrease the year.
C. After finishing "YEAR" setting, press " " button again.
Now you can adjust Month/Date/Hour and Minute
digits as you desire.
2. How to set Alarm Clock
A. Press " " button and hold for at least 5 seconds. The
"YEAR" digit blinks. At this point, adjust the Date/Time
accordingly.
B. The LCD display blinks the word "ON". You may press
" " and adjust desired time for the alarm by pressing
the "MEMO" or "PAGE" buttons.
C. Keep LCD display in the "ON" position, and press "
button to continue second alarm setting.
"
D. If you need to stop alarm setting, you may press.
"MEMO" or "PAGE" buttons to let the LCD display transfer
to the "OFF" position. Then the Alarm setting will stop.
Clock Settings
21
E. During the setting, if there is any confusion you may
simply press the "
" button and this unit will redisplay TIMER function.
F. This unit offers 4-Alarm setting. Each alarm will ring for
45 seconds, or you may stop the alarm by pressing the
" " button.
22
Maintaining & Storing Unit
A. Use a dry, soft cloth to clean the unit. If desired, use a
cloth lightly dampened with tap water.
B. Do not use alcohol, benzene thinner or other harsh
chemicals to clean the device or cuff.
Problem
Nothing is displayed
when the "ON/OFF"
key is pressed.
C. Before measuring, please wash your hands. Do not wash
or wet the arm cuff.
D. When storing this unit, keep it away from direct
sunlight, high humidity or dust.
23
Troubleshooting
"Err P" shown on LCD
Check Point
Solution
Are the batteries
exhausted?
Replace the
batteries with
new ones.
Have the batteries
polarity been
positioned
correctly?
Fails to inflate
Note: If the unit is being stored for a long period of time,
please remove the batteries before storing to avoid leaking.
Re-insert the
batteries in the
correct position.
Make sure the cuff
is connected to
the unit properly.
Check air tube. If
broken, replace it.
"Err 1" shown on LCD
Deflates too fast
Return for
servicing.
"Err 2" shown on LCD
Movement has
occurred.
Keep still
when taking
measurement.
Signal interference
around BPM
"Err 3" shown on LCD
Incorrect results
Remove
interference
source. example:
magnets & cell
phones.
Measure again
Note: If correct measurement is impossible after troubleshooting, consult
store of purchase or Lumiscope repair department. (Do not disassemble
unit). In some rare cases, there may be error due to the physical condition
of the person. In such cases, please consult your physician. If the clock
doesn't show on the LCD, please adjust the clock settings.
24
Specifications
Two Year Limited Warranty
25
Model
: 1134
Power source
: 4 "AA" Alkaline batteries or AC/DC
adapter
Measurement method
: Oscillometric
Measurement range
: Pressure: 20~280 mmHg
Pulse: 40~195 beats/minute
Accuracy
: Pressure: ±3 mmHg
Pulse: within ±5% of reading
Pressure sensor
: Semi-conductor
Inflation
: Pump driven
purchase.
Deflation
: Automatic Pressure release valve
To obtain warranty service on your Lumiscope Blood Pressure Monitor,
Auto shut-off
: 3 minutes after last key operation
please contact the Lumiscope Repair Department at 1-800-672-8293
Operating environment : 50˚F~104˚F / 30%~85% RH max.
Lumiscope guarantees this product free from defects in material and
workmanship for a period of two years from the date of purchase, except
as noted below:
This Lumiscope product warranty does not cover damage caused by misuse
or abuse, the attachment of any unauthorized accessory, alteration to the
product, or any other conditions whatsoever that are beyond the control of
Lumiscope. Lumiscope shall not be responsible for any type of incidental,
consequential, or special damage. All implied warranties, including, but
not limited to those implied warranties of fitness and merchantability,
are limited to the total duration of two years from the original date of
or visit www.lumiscope.net. There is a $15 fee for return shipping and
handling. Please make checks payable to The Lumiscope Co., Inc.
Upon receipt, Lumiscope will repair or replace, as appropriate, this blood
Storage environment
: -20˚C~60˚C (14˚F~140˚F)
10%~95% RH max.
Weight
: 344g (w/o batteries), cuff 120g
Arm circumference
: 9.2" ~18.2"
Users
: Adults
Dimensions
: 5.3" (L) x 4.8" (W) x 6"(H)
may also have other rights which vary from state to state.
PC-Link
: Via USB plug & software. (available
separately)
Some states do not allow the exclusion or limitation of incidental or
*Specifications are subject to change without notice.
pressure monitor and return it to you. Warranty is solely through the
Lumiscope Repair Department. Service of this product by anyone other
than the Lumiscope Repair Department voids warranty.
In the event that Lumiscope does not abide by the terms of this warranty,
the consumer may seek breach of contract remedies in the New York State
Federal courts of law. This warranty gives you specific legal rights and you
consequential damages, so the above limitation may not apply to you.