1
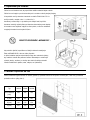
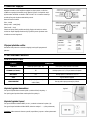
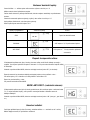
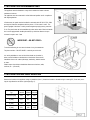
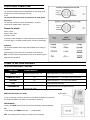
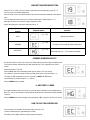
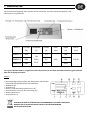
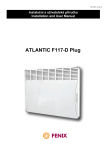
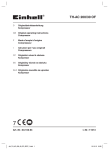
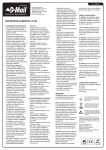
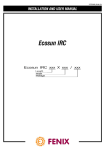
N406/R04 (15.12.16) Instalační a uživatelská příručka / User manual and installation guide Montage- und Bedienungsanleitung ECOFLEX PREMIER 1. VLASTNOSTI Elektronické ovládání tohoto zařízení bylo zkonstruováno pro dosažení maximálního pohodlí a úsporu energie. Typ Výkon [W] PREMIER 10 1000 PREMIER 15 1500 PREMIER 20 2000 Napětí [V] 1/N 230 V 50 Hz Proud [A] Výška [mm] 4,3 6,5 8,7 Šířka [m] Hloubka [mm] 600 450 800 115+22 1000 Štítek s uvedením výkonu je umístěn na spodní straně (u řídící skříňky) zařízení, což umožňuje jeho identifikaci. Podrobnosti: A — kompletní referenční číslo topného tělesa včetně výrobního čísla (pro případ reklamace) B — Výkon ve Wattech C — Napětí ve voltech D,E,G — Bezpečnostní symboly a normy H — Týden a rok výroby I — Kód výrobce J — Výrobní číslo ELEKTRICKÝ ODPAD SE NESMÍ LIKVIDOVAT S DOMÁCÍM ODPADEM. RECYKLUJTE NA VYHRAZENÝCH MÍSTECH (podle místně platné legislativy). 2. Doporučení pro instalaci Zařízení se musí instalovat tak, aby topné těleso zahřálo maximální objem vzduchu. Zařízení se musí zapojit v pevné horizontální pozici v souladu s místně platnými předpisy. V koupelnách musí být konvektor instalován ve shodě s ČSN 33 200-7-701 a smí být umístěn v souladu s obr. 1 i v zónách 2 a 3. Konvektor je zařízení třídy II a je chráněn proti stříkající vodě, krytí IP24. Konvektor nesmí být umístěn přímo pod zásuvkou elektrického proudu. Napájení konvektoru musí zajišovat odpojení ve všech pólech, u něhož se vzdálenost rozpojených kontaktů rovná nejméně 3,5mm. DŮLEŽITÉ UPOZORNĚNÍ: «NEZAKRÝVAT » Aby nedošlo k přehřátí, topné těleso za žádných okolností nezakrývejte. Štítek «NEZAKRÝVEJTE» vám toto riziko připomíná. Je přísně zakázáno zakrývat nebo blokovat rolety nebo vzduchové výdechy, aby nedošlo k nehodě nebo poškození zařízení. Neinstalujte u vzduchových výdechů (komíny, ventilace), za závěsy nebo dveřmi. Dodržujte minimální montážní vzdálenosti k podlaze, zdem, nábytku, atd. (Obrázek B) 3. Montáž a upevnění na zeď Pomocí šroubováku vyjměte konzolu ze zařízení (položka 1). Upevněte konzolu na zeď pomocí 4 šroubů (Ø 5, 5 mm max.) při dodržení správného směru a výšky (Obr. C). Typ 1000W 1500W 2000W Osová základna [mm] 248 405 525 H [mm] 257 257 257 B [mm] 145 275 270 C [mm] 270 270 270 4. Elektrické zapojení Napájení konvektoru musí zajišovat odpojení ve všech pólech, u něhož se vzdálenost rozpojených kontaktů rovná nejméně 3,5mm. V koupelnách musí být konvektor instalován ve shodě s ČSN 33 200-7-701. Konvektor nesmí být umístěn přímo pod zásuvkou elektrického proudu. Barevné označení vodičů: Fáze – hnědá Nulový vodič – modrý/šedý Pilotní vodič – černý Pokud není pilotní vodič používán musí být připojen do krabice na volnou svorku bez napětí. Napájecí kabel smí být vyměněn pouze výrobcem nebo schválenou servisní organizací. Připojení pilotního vodiče: Konvektor bude pracovat v souladu se signály, které vysílá programovací jednotka 5. JAK ZAŘÍZENÍ POUŽÍVAT REŽIM VOLBY NABÍZÍ 5 FUNKCÍ: FUNKCE ZOBRAZENÍ COMFORT Zobrazuje teplotu (např. 19) Drží teplotu podle nastavení termostatu ECONOMY (SET BACK) EC Udržuje teplotu cca -3,5°C pod komfortní teplotou ANTI-FROST HG Udržuje teplotu v místnosti na cca 7°C -- Vypne veškeré vytápění STOP PROGRAMOVÁNÍ Zobrazují signál programátoru (funkční světlo PROG) Pracuje podle naprogramovaných příkazů. Zapínání/vypínání konvektoru: Pro zapnutí topného tělesa uveďte spínač (na boku zařízení) do polohy 1. Pro úplné vypnutí topného tělesa uveďte spínač do polohy 0. Zapínání/vypínání topení: Pro zapnutí stiskněte tlačítko MODE (viz obr.) a zobrazí se komfortní teplota (19). Pro vypnutí topení stiskněte tlačítko MODE, dokud se neobjeví “- - “ (režim pohotovost). Poznámka: Vaše nastavení zůstane v paměti; topné těleso je pouze v režimu pohotovosti. Vypínač Nastavení komfortní teploty: Pomocí tlačítka + a – můžete teplotu snižovat nebo zvyšovat v krocích po 1°C. Můžete nastavit vlastní požadovanou teplotu. Zavřete dveře místnosti a počkejte několik hodin, dokud se teplota nestabilizuje na požadovanou hodnotu. Pokud vám nastavená teplota nevyhovuje, zvyšte ji nebo snižte v krocích po 1 °C. Opět počkejte několik hodin, zda vám teplota vyhovuje. Rada: Doporučujeme referenční teplotu 19 °C. Signály v programátoru Zobrazené symboly Funkce STOP Topení se okamžitě zastaví ECONOMY Sníží teplotu o 3,5°C pod komfortní teplotu ANTI-FROST Drží teplotu na ~7°C aby nedošlo k poškození zamrznutím Přepnutí do úsporného režimu: Při krátkodobé nepřítomnosti (přes 2 hodiny) vám tento režim umožní šetřit náklady na energii a vytápění. Tato úsporná poloha sníží teplotu v místnosti o 3.5°C proti zvolené komfortní teplotě. Udělejte následující: Stiskněte a podržte tlačítko MODE, dokud se na displeji nezobrazí pozice“EC” (viz obrázek). Úsporné nastavení lze zkontrolovat krátkým stisknutím jednoho ze dvou tlačítek + nebo -. Pro změnu teploty “EC”: stiskněte na 3 vteřiny MODE a začne blikat “EC”. Úpravu lze provést tlačítky + nebo -. Pro potvrzení stiskněte tlačítko MODE. REŽIM «ANTI-FROST» (zabránění námraze): Při dlouhodobé nepřítomnosti (přes 24 hodin) pomáhá tento režim udržovat teplotu v místnosti kolem 7°C. To zajistí maximální úspory, aniž by došlo k nevratným škodám v důsledku zamrznutí. Udělejte následující: Stiskněte a podržte tlačítko MODE, dokud se na displeji nezobrazí pozice “HG” (hors-gel - „proti námraze“). Uzamčení ovládání: Zvolili jste například úsporný režim (Economy), stiskněte tlačítka + a – současně na asi 3 vteřiny. Blikání displeje znamená, že je klávesnice zamknutá. Pokud stisknete jakékoliv tlačítko na klávesnici, displej oznámí pomocí symbolu "FF" nemožnost pokračovat s dalšími příkazy. Pro odstranění zámku klávesnice stiskněte tlačítka + a – současně na asi 3 vteřiny. Režim «PROG»: Tento režim umožňuje automatický provoz za pomocí programovací jednotky. Udělejte následující: Stiskněte tlačítko MODE, dokud se nerozsvítí funkční LED světlo “PROG”. Specifika: Nezapomeňte, že pokud uživatel vybere režim Economy, Comfort nebo Anti-Frost, prioritu mají příkazy Anti-Frost a STOP, které vydává programovací jednotka. Pokud zařízení zrovna přijímá příkazy, funkční světlo "PROG” bliká. Režim, zvolený uživatelem Režim, zvolený programátorem Signál Anti-Frost Signál STOP 19 EC HG NASTAVENÍ DISPLEJE (TERMOSTAT / TEPLOMĚR) Výjimečně může nastat rozdíl mezi zobrazenou teplotou a teploměrem. V takovém případě lze obojí nastavení sladit. Toto nastavení lze provést, pouze pokud je zařízení nastaveno mezi 17 a 23 °C. Všechna okna i dveře musí být zavřeny. Počkejte, až se teplota v místnosti stabilizuje (nejméně 6 hodin) a snažte se nezdržovat se v místnosti Ovládání teploty by se mělo umístit doprostřed místnosti 1.20 m nad podlahu. Nepokládejte na nábytek. Pomocí tlačítka MODE nastavte teplotu "Comfort", např. 19 Stiskněte na 6 vteřin tlačítko MODE, tím se nabídnou dvě možnosti: 1. Na displeji bliká 19, je možná úprava: • Upravte tlačítky + a • Potvrďte pomocí MODE 2. Zobrazí se FF, je možná úprava (pokud je delta teploty větší, než 3°C, nebo není komfortní teplota nastavena mezi 17°C-23°C): Pokud do 15 vteřin nestisknete + nebo -, vrátí se display do původního zobrazení (19). 6. ÚDRŽBA Pro udržení výkonnosti topného tělesa je nutné pravidelně odstraňovat prach v zařízení vysáváním přední mřížky. Pro odstranění vnějšího prachu používejte měkkou tkaninu. Pro odstranění skvrn tkaninu navlhčete. Nikdy nepoužívejte brusné látky, které by mohly poškodit nátěry. NIKDY NEPOUŽÍVEJTE BRUSIVA NEBO ACETON, KTERÉ BY MOHLY POŠKODIT EPOXIDOVÝ NÁTĚR! DOPORUČENÍ: Dávejte pozor, aby si s topným tělesem nehrály děti. Do zařízení nic nevkládejte. Po prvním zapnutí se objeví zápach, ale tento jev po pár minutách provozu zmizí. Pokud je zařízení připojeno k zátěžově regulované síti: Pokud je regulace zátěže nastavena jako priorita, je možné, že topné těleso nebude při momentálním vysokém odběru fungovat (pračka + trouba + žehlička). Po obnovení normálního odběru začne zařízení opět topit. Toto topné těleso je určeno k připojení do sítě 230 V 50 Hz. Nesmí jej používat lidé (včetně dětí) s fyzickým, smyslovým nebo mentálním hendikepem, nebo lidé, kteří postrádají potřebnou zkušenost nebo znalost, pokud nejsou pod dohledem nebo pokyny člověka, který zodpovídá za jejich bezpečnost. Zásahy do našeho zařízení může provádět pouze kvalifikovaný profesionál s potřebnou licencí. 7. ODSTRANĚNÍ POTÍŽÍ: Zařízení netopí: Zkontrolujte správné zapojení napájení; na samotném topném tělese i na základní desce, a zda zátěžová regulace (pokud ji máte) neodpojuje napájení zařízení. Topné se neřídí programem: Zkontrolujte, zda používáte programovací jednotku správně (přečtěte si návod). Zařízení topí neustále: Zkontrolujte, zda není zařízení umístěno v proudu vzduchu nebo zda nebylo změněno nastavení teploty. V případě potíží s termostatem odpojte napájení (pojistka, jistič...) na cca 5 minut a zařízení restartujte. Pokud problém přetrvává, kontaktujte kvalifikovanou osobu, dodavatele. Při prvním použití se může krátkodobě objevit slabý zápach. 8. Záruční podmínky Dodavatel poskytuje na výrobky záruku 24 měsíců od data prodeje. Záruka se nevztahuje na vady způsobené dopravou, nedbalou manipulací a neodbornou montáží. Záruka se rovněž nevztahuje na běžné opotřebení výrobku. Jakýkoliv zásah do výrobku je považován za porušení záručních podmínek. Kompletní záruční podmínky naleznete na stránkách www.fenixgroup.cz. Potvrzení o prodeji: Datum prodeje: ................................................... Výrobní číslo: ........................................ Prodejce: ............................................................................. Fenix Trading s.r.o. Slezská 2, 790 01 Jeseník tel.: +420 584 495 304, fax: +420 584 495 303 e-mail: [email protected] , http://www.fenixgroup.cz 1. CHARACTERISTICS The electronic control of this appliance has been designed to give you a maximum comfort and economy. Typ Rating [W] PREMIER 10 1000 PREMIER 15 1500 PREMIER 20 2000 Tension Intensity [V] [A] 1/N 230 V 50 Hz Height [mm] 4,3 6,5 8,7 Width [m] Depth [mm] 600 450 800 1000 A rating plate is located on the bottom (near control box) of the appliance, permitting its identification. Details: The complete reference number of the heater including its manufacturing code (A) (To mention for any warranty claim) The rating in Watt (B) The tension in Volt (C) Security and Norms symbols (D-E-F-G) Week and year of manufacturing (H) Manufacturer’s code number (I) Serial number (J) ELECTRICAL WASTE MUST NOT BE DISPOSED WITH HOUSEHOLD WASTE. PLEASE RECYCLE IN APPROPRIATE CENTERS (following the legislation in your country). 115+22 2. INSTALLATION RECOMMANDATIONS This appliance must be installed in a way that it enables the heater to brew a maximum air volume. The appliance must be connected in a fixed horizontal position and in compliance with legal regulations. In Bathrooms, the panel must be installed in conformity with IEC 364-7-701:1984 and may be located in compliance with the picture 1 in the zones 2 and 3. The panel is gadget of the class II and is protected against spraying water, protection IP 24. The panel must not be located directly under mains outlet. Electrical installation is to be equipped with double pole switch, by which the distance of open contacts is equal to min. 3 mm IMPORTANT: « DO NOT COVER » To avoid overheating, do not cover the heater in any circumstances. The picture sticker « DO NOT COVER » reminds you of this risk. It is strictly forbidden to cover or block the shades or air outlets in order to avoid incidents or deterioration of the device. Please avoid installation close to air outlets (chimneys, ventilation), behind curtains or doors. Please respect the minimum installation distances to the floor, walls, furniture, etc ... (Picture B) 3. INSTALLATION AND WALL MOUNTING Remove the bracket of the appliance using a screwdriver (Item 1). Attach the bracket to the wall using 4 screws (Ø 5, 5 mm max.) ensuring the right direction and at the right height (Fig. C). Typ 1000W 1500W 2000W Axle base [mm] 248 405 525 H [mm] 257 257 257 B [mm] 145 275 270 C [mm] 270 270 270 4. ELECTRICAL CONNECTION The electrical installation must be equipped with an Omni polar circuit breaker with a contact opening gap of at least 3 mm. The pilot wire (black) must never be connected to the earth (yellowgreen wire). The electrical connection requires no disassembly. The device should not be installed under a wall socket. Respect the polarity: Phase = Brown Neutral = Blue / Grey Pilot Wire = Black If the power cord is damaged, it must be replaced by the manufacturer or its service agent or a similarly qualified person in order to avoid danger. Installation: The electrical installation must comply with standards in the country of installation Check the tight fit of the wires into the terminals of the wall outlet. Note: The instructions for programming are sent by the sidecons signals, measured from the Neutral. 5. HOW TO USE YOUR APPLIANCE THE SELECTOR MODE ENABLES 5 FONCTIONS : FONCTIONS COMFORT SCREEN DISPLAY Displays temperature (e.g. 19) Holds temperature as to thermostat settings. ECONOMY (SET BACK) EC Holds temperature at ~-3.5°C below comfort temperature. ANTI-FROST HG Holds temperature at ~7°C to avoid frost damage. STOP PROGRAMMATION -Displays signal of programmer (function light PROG) Stops all heating functioning. Enables functioning as of programmed orders. ON/OFF SETTING (Picture here under): To turn on the heater, put the on/off switch (on the side of the appliance) on position 1. For complete shutdown of the heater, turn the switch to position 0. HEATING ON/OFF: To start, push MODE button (picture cons) and the will display comfort temperature (19). To stop heating, push MODE button until “- - “ (stand-by mode). Note: Your settings remain in memory; the heater is just on standby. On/Off Switch COMFORT TEMPERATURE SETTING: Using the + and – button, you can increase or decrease the set temperature by steps of 1°C. You can set your own desired temperature. Close the doors of the room and wait several hours until the temperature stabilizes at the desired value. If the set temperature does not suit you, increase or decrease the value by steps of 1 °C. Wait again a few hours to check the comfort temperature value. Advise: We suggest you a reference temperature of 19 °C. Signals through the programmer Displayed symbols Operation STOP Heating stops instantly ECONOMY Set back of 3,5°C below the comfort temperature ANTI-FROST Holds temperature at ~7°C to avoid frost damage. ECONOMY OVERRIDE FACILITY: For short-term absence (more than 2 hours), this mode helps you to save energy and heating costs. This economic position will decrease the room temperature by 3.5°C compared to the chose n comfort temperature setting. To do this: Press the MODE button until the display shows you the position “EC” (see picture). It is possible to check the Economic setting by briefly pressing one of the two buttons + or -. To change the “EC” temperature: press for 3 seconds on MODE and “EC” flashes. The modification is possible using the + or - buttons. Press the MODE button to validate. « ANTI-FROST » MODE: For long-term absence (more than 24 hours), this mode helps to maintain the room temperature at about 7°C. This en sures maximum savings without taking the risk of irreversible freezing damages. To do this: Press the MODE button until the display shows the position “HG” (hors-gel i.e. Anti-Frost in French). HOW TO LOCK THE CONTROL BOX: You have chosen, for example, the Economy mode, press the + and - buttons simultaneously for approximately 3 seconds. The flashing of the display indicates that the keypad is locked up. If you press any button on the keyboard, the display announces, by the symbol "FF", the impossibility to proceed for any orders. To remove the keypad lock, operate as above. « PROG » MODE: This mode permits the automatic operation through a programming unit. To do this: Press the MODE button until the LED function light “PROG” is on. PARTICULARITES: Please note that when Economy, Comfort or Anti-Frost MODE is chosen by the user, priority is given to the Anti-Frost and STOP orders sent by a programming unit. The function light "PROG” flashes orders are received by the appliance. MODE chosen by user MODE by programmer Anti-Frost Signal STOP Signal 19 EC HG DISPLAYS SETTINGS (THERMOSTAT / THERMOMETER) Exceptionally, it may occur that there is a gap between the displayed temperature and your thermometer. In this case, it is possible to harmonize the two settings. This setting can be achieved only if your appliance is set between 17 and 23 °C. All doors and windows must be closed. Wait for the stabilization of the temperature in the room (at least 6 hours) and avoid as much as possible whereabouts in the room. The temperature control should be placed in the middle of the room to 1.20m from the ground. Do not place it on any furniture. Set the "Comfort" temperature with MODE button, e.g. 19 Push for 6 seconds MODE, this will open two possibilities: 1. Display is flashing 19, a modification is possible: • Correct with the + and - buttons • Confirm with MODE 2. FF is displayed, a modification is impossible (if temperature delta is more than 3°C or the comfort temperature s etting is not within 17°C-23°C): Note: If no action on + or - for 15 seconds, the display returns to its initial position (19). 6. MAINTENANCE To maintain the performance of the heater, it is necessary to regularly remove dust inside the device by vacuuming the front grid. To remove outside dust, use a soft cloth. To remove a stain, moisten the cloth. Never use abrasives that can damage the various coatings. NEVER USE ABRASIVE OR ACETONE WHICH COULD DAMAGE THE EPOXY COATING! SUGGESTIONS: Children should be monitored in order to avoid them to play with the heater. Do not insert anything into the device. When switched on for the first time, a smelling can be noticed, this phenomenon disappears after a few minutes of operation. If your device is connected to a load-shedding network: When load shedding is set as a priority, it is possible that the heater does not work, in case of momentary over-consumption (washing machine + oven + iron). This is normal. Upon restoration of normal consumption, the unit will re-heat. This heater is intended to be connected to a mains supply of 230V 50Hz. This device is not intended to be used by persons (including children) with physical, sensory or mental disability, or persons lacking experience or knowledge, unless they are supervised or have been instructed by a person responsible for their safety. All interventions on our devices must be carried out by a qualified and licensed professional. 7. PROBLEMS? SOME SUGGESTIONS The appliance is not heating: Ensure that the power installation is connected properly; on the heater itself as well as on the main board and that the load shedding device (if you have one) does not cut power to the appliance. The heater does not follow the programming instructions: Make sure that you use the programming unit as intended (see its manual). The appliance is heating permanently: Verify that the device is not located in a current of air or the temperature setting has not been changed. In case of a thermostat problem, cut the power (fuse, circuit breaker ... ..) for about 5 minutes and restart the device. If the problem occurs frequently, check with your energy supplier. In all other cases contact a qualified person. At the first use, a light smell related to the normal evacuation process during the manufacturing may occur. 8. WARRANTY CONDITIONS The supplier provides for the products 24-month-guarantee since sale-by date. The guarantee does not refer to defects caused by transport, careless handling and unauthorized mounting. The guarantee does not also refer to unauthorized intervention in panel and to ordinary wear and tear of the product. Certificate of sale: Sell–by date:........................................................................ Serial numer:......................................................... Seller:....................................................................................................... Fenix Trading s.r.o. Slezská 2, 790 01 Jeseník tel.: +420 584 495 304, fax: +420 584 495 303 e-mail: [email protected] , http://www.fenixgroup.cz 1. EIGENSCHAFTEN Die elektronische Regelung dieses Gerätes wurde entwickelt, um Ihnen maximalen Komfort und Heizersparnis zu garan eren. MODELL LEISTUNG [W] PREMIER 10 1000 PREMIER 15 1500 PREMIER 20 2000 SPANNUNG [V] 1/N 230 V 50 Hz STRÄKE [A] HÖHE [mm] 4,3 6,5 8,7 LÄNGE [m] BREITE [mm] 600 450 800 115+22 1000 Das Typenschild des Gerätes, angebracht auf der Hinterseite (in der Nähe des Bedienelements), gibt Auskun über die Geräteeigenscha en. Details: • • • • • • • Die vollständige Ar kelnummer des Heizgerätes und der Fabrika onsindex (A)(Kundendienst-Informa onen) Wa stärke (B) Voltstärke (C) Normen- und Sicherheitssymbole (D-E-F-G) Kalenderwoche und –jahr der Herstellung (H) Bauherr-Nummer (I) Seriennummer (J) ELEKTRISCHE ABFÄLLE DÜRFEN NICHT ZUSAMMEN MIT HAUSMÜLL ENTSORGT WERDEN. BITTE GEBEN SIE DIESES PRODUKT IN ENTSPRECHENDEN RECYCLINGCENTERN AB. 2. SICHERHEITSHINWEISE Das Gerät muss so installiert werden, das seine maximale Lu verwirbelung möglich wird. Das Gerät muss in einer stabilen horizontalen Posi on an der Wand befes gt werden und muss na onalen und/oder baugerechten Sicherheitsvorschri en entsprechend mon ert werden. Sicherheitsvolumen (Bild A) Dieses Heizgerät classe II, IP 24 kann in Volumen 2 oder 3 installiert werden, vorausgesetzt dass die elektrische Versorgung durch einen Differen al-Reststrom-Schutz von mindestens 30mA abgesichert wird. Bild A WICHTIG: « NICHT BEDECKEN » Um Überhitzungsschäden zu vermeiden, bedecken Sie Ihr Heizgerät unter keinen Umständen. Der obige Bildau leber auf dem Gerät soll Sie an diese Warnung erinnern. Es ist strengstens verboten, die Lu austri söffnungen zu bedecken oder zu blockieren, um Hitzeunfälle oder – Schäden zu vermeiden. Bi e vermeiden Sie eine Installa on in unmi elbarer Nähe zu Fenstern oder Lu öffnungen (Kamine, Ven latorenschächte), hinter Gardinen oder Türen. Bi e respek eren Sie die angegebenen Mindestabstände zu Decken, Böden und anderen in der Nähe befindlichen Gegenständen. (Bild B). Bild B 3. INSTALLATION UND MONTAGE En ernen Sie die angeschraubte Halterung mit Hilfe eines Schraubendrehers. Fixieren Sie die Wandhalterung mit Hilfe 4 Schrauben (Ø 5, 5 mm max.) wobei Sie die entsprechenden Abmessungen der untenstehenden Skizze und Tabelle entnehmen. (Bild C). Modell 1000W 1500W 2000W MITTELBASIS [mm] 248 405 525 H [mm] 257 257 257 B [mm] 145 275 270 C [mm] 270 270 270 Bild C 4. ELEKTRISCHER ANSCHLUSS Die Installierung muss mit einem allpoligen Abschaltsystem gesichert sein, dessen Kontaktöffnung mindestens 3mm weit ist. Die elektrische Versorgung des Gerätes muss durch einen Differen al-Reststrom-Schutz von höchstens 30mA abgesichert sein, insbesondere wenn das Gerät im Badezimmer angebracht wird. Das schwarze Pilotkabel darf in keinem Fall an das Erdungskabel (gelb‐grün) angeschlossen werden! Der elektrische Anschluss ist ohne Ausbau oder Demontage des Heizgerätes möglich. Der Heizkörper sollte nicht unter einer Steckdose mon ert werden. Das Gerät wird mit einem Anschlusskabel mit 3 Leitern geliefert. Dieses muss an eine Wandanschlussdose angeschlossen werden. Beachten Sie folgendes Anschlussschema: Phase = Braun Nullleiter = Blau/Grau Pilotkabel = Schwarz Falls das Anschlusskabel beschädigt ist oder fehlt, muss es unbedingt vom Hersteller, seinem Kundendienst oder einem autorisierten Elektriker ausgetauscht werden, um Gefahren auszuschließen. Anschluss: Der elektrische Anschluss muss gül gen na onalen, regionalen oder gebäudespezifischen Normen und Sicherheitsvorschri en entsprechend durchgeführt werden (für Frankreich Norm NFC 15-100). Überprüfen Sie die korrekte Verbindung der Stromdrähte an die Wandanschlussdose. Achtung: Die Impulse eines etwaigen Programmiergerätes werden durch die neben stehenden Signale übermi elt (gemessen am Nullleiter). FUNKTION ANZEIGE KOMFORT Gewählte Temperatur (z.B.19) ABSENKUNG (ECO) EC FROSTSCHUTZ HG STOP -Anzeige des angeschlossenen Programmiergerätes (Kontrollleuchte PROG an) PROGRAMMIERUNG Hält die eingestellte Raumtemperatur. Bewirkt eine Temperaturabsenkung von ca. 3.5°C (gemessen zur eingestellten Raumtemperatur). Hält eine Raumtemperatur von ca. 7.5°C um Frostschäden zu vermeiden. Heizung stoppt. Das Heizgerät folgt den gesendeten Programmiersignalen. AN / AUS (Bild untenstehend): An/Aus-Schalter Zur Inbetriebnahme stellen Sie den Schalter (an der Seite) auf die Posi on 1. Zur komple en Abschaltung des Gerätes stellen Sie den Schalter auf die Posi on 0. AN‐ / AUSSCHALTEN DES HEIZBETRIEBES: Betä gen Sie den MODE-Schaltknopf (Bild nebenstehend). Im Anzeigefenster erscheint die Komfort-Temperatur (19). Um den Heizbetrieb auszuschalten, betä gen Sie den MODESchaltknopf bis « ‐‐« erscheint (Stand-by Modus). Achtung: Alle Einstellungen bleiben erhalten; das Gerät befindet sich nur in Stand-by. EINSTELLUNG DER KOMFORT TEMPERATUR: Durch Betä gen der + und – Knöpfe, können Sie die eingestellte Komfor emperatur (19) in 1°C-Schri en je nach Ihrem Belieben verändern. Haben Sie die Einstellung getä gt, warten Sie mehrere Stunden bis sich die Raumtemperatur stabilisiert hat. Falls die erreichte Temperatur Ihnen missfällt, erhöhen oder verringern Sie erneut den eingestellten Wert in 1°C-Schri en. Warten Sie erneut einige Stunden. Signale durch Programmiergerät Anzeigesymbole Steuerung STOP Heizbetrieb aus. ECONOMY (Absenkung) Absenkung von 3.5°C unter Komfort-Temperatur FROSTSCHUTZ Betrieb bei ~7°C zur Vermeidung von Frostschäden Hinweis: Wir raten Ihnen zu einer Komfor emperatur von 19°C (Werkseinstellung). EINSTELLUNG DES ABSENK‐MODUS (ECO): Dieser Modus erlaubt einen sparsamen Energie- und Heizverbrauch während einer kurzzei gen Abwesenheit (über 2 Stunden). Die ECO-Posi on erlaubt eine Raumtemperatur– absenkung von 3.5°C. Gehen Sie wie folgt vor: Betä gen Sie den MODE‐Schaltknopf bis « EC » in der Anzeige erscheint (siehe Bild). Durch kurzes Betä gen von + oder – können Sie die Absenkeinstellung überprüfen. Um die « EC » Absenktemperatur zu verändern, betä gen Sie 3 Sekunden lang den MODESchaltknopf bis « EC » blinkt. Erhöhen oder senken Sie die Temperatur mit Hilfe der + oder – Tasten. Betä gen Sie den MODE –Schaltknopf um Ihre neue Einstellung zu bestä gen. EINSTELLUNG DES FROSTSCHUTZ‐MODUS: Bei langfris ger Abwesenheit (mehr als 24 Stunden), erlaubt Ihnen diese Einstellung eine konstante Raumtemperatur von ca. 7°C. Dieser Modus verhindert durch minimalen Energieverbrauch eine irreversible Beschädigung des elektronischen Gerätes durch Frost. Zur Einstellung gehen Sie wie folgt vor: Betä gen Sie den MODE‐Schaltknopf bis “HG” (Hors‐Gel frz. für Frostschutz) in der Anzeige erscheint. VERRIEGELUNG DER BEDIENUNG: Betä gen Sie die + und – Tasten gleichzei g für ca. 3 Sekunden. Das Blinken der Anzeige bestä gt die Verriegelung der Bedienung. Jegliche Bedienung einer Taste ist nun unmöglich, die Anzeige bestä gt mit “FF”, dass keine Bedienbefehle ausgeführt werden. Um die Bedienung zu entriegeln, verfolgen Sie wie oben stehend. PROGRAMMIER‐MODUS: Dieser Modus ermöglicht die automa sche Steuerung durch ein externes Programmiergerät. Betä gen Sie den MODE-Schaltknopf bis die Programmleuchte « PROG » erscheint BESONDERHEITEN: Bi e beachten Sie dass die vom Benutzer eingestellten Bediensignale ECONOMY (Absenkung), KOMFORT oder FROSTSCHUTZ vom Programmiergerät überschrieben werden können. Priorität haben FROSTSCHUTZ- und STOP-Signale der Programmiersteuerung. Die Kontrollleuchte “PROG” blinkt wenn Programmiersignale empfangen werden. MODE Einstellung Benutzer MODE Programmiergerät Frostschutz‐Signal Stop‐Signal 19 EC HG KORREKTUR DER ANZEIGE (THERMOSTAT / THERMOMETER): In seltenen Fällen kann es vorkommen, dass die angezeigte Temperatur nicht mit der gemessenen Raumtemperatur übereins mmt. In diesem Fall ist es möglich beide Anzeigen zu harmonisieren. Die manuelle Korrektur kann nur erreicht werden, wenn Ihr Gerät zwischen 17 und 23°C eingestellt ist. Alle Türen und Fenster müssen geschlossen sein. Warten Sie auf die Stabilisierung der Raumtemperatur (mindestens 6 Stunden) und vermeiden Sie es, sich in dieser Zeit im Raum zu bewegen. Das Thermometer sollte in Raummi e in 1.20m Bodenhöhe platziert werden, stellen Sie es nicht auf Möbel oder Gegenstände. Wählen Sie die gewünschte Temperatur durch Betä gung des MODE-Schaltknopfs, z.B. 19. Halten Sie MODE für 6 Sekunden, dies eröffnet Ihnen zwei Möglichkeiten: 1. Die Anzeige 19 blinkt, Sie können nun die Raumtemperatur anpassen (laut Thermometeranzeige): • Korrigieren Sie mit + oder ‐ • Bestä gen Sie mit MODE 2. Falls « FF » angezeigt wird ist eine Korrektur nicht möglich (dies geschieht wenn das Temperaturdelta größer als 3°C ist oder falls sich die Komfor emperatur unter 17°C oder über 23°C befindet). Hinweis: Ohne Betä gung auf + oder ‐, springt die Anzeige nach 15 Sekunden in die Ausgangsstellung (19) zurück. 6. WARTUNG Zur Aufrechterhaltung der Leistungsfähigkeit der Heizung, ist es notwendig, regelmäßig Staub im Gerät durch Absaugen des Frontgi ers zu en ernen. Zur äußeren Stauben ernung benutzen Sie ein weiches Tuch, für hartnäckigere Flecken feuchten Sie dieses an. Verwenden Sie niemals Scheuermi el, das die verschiedenen empfindlichen Lacke und Beschichtungen angreifen kann. VERWENDEN SIE NIEMALS SCHEUERMITTEL ODER ACETON DIE DIE EPOXYBESCHICHTUNG BESCHÄDIGEN KÖNNTEN! Alle Eingriffe an unseren Geräten dürfen nur von einem qualifizierten und lizenzierten Fachtechniker im ausgeschalteten spannungsfreien Zustand durchgeführt werden. HINWEISE: Kleine Kinder sollten immer unter der Aufsicht eines Erwachsenen bleiben, damit sie nicht mit dem Gerät spielen. Stecken Sie keine Gegenstände in das Gerät. Bei der ersten Inbetriebnahme des Geräts kann ein leichter Geruch wahrgenommen werden, dieser verliert sich nach einigen Minuten Betriebsdauer. Ihr Gerät ist an ein elektrisches Lastverteilnetzwerk angeschlossen: Falls ein Lastabwurfsverteiler installiert ist, ist es möglich dass das Heizgerät wegen momentanem Überkonsum automa sch abschaltet (z.B. bei gleichzei ger Bedienung von Waschmaschine + Herd + Bügeleisen etc.). Dies ist normal. Bei Rückkehr zu einem normalen Ener‐ gieverbrauch, schaltet sich das Heizgerät automa sch wieder ein. Dieses Gerät ist für ein Stromnetz von 230V 50Hz bes mmt. Die Bedienung darf nicht durch Personen (einschließlich Kinder) mit eingeschränkten physischen, sensorischen oder geis gen Fähigkeiten oder unerfahrene Benutzer ohne Beaufsich gung oder Einweisung einer verantwortlichen Person verwendet werden. 7. HILFE ZUR FEHLERBESTIMMUNG Das Gerät heizt nicht: Versichern Sie sich, dass die elektrische Installa on korrekt durchgeführt wurde, überprüfen Sie die Wandanschlussdose als auch elektrische (Wand-)Sicherungen. Schließen Sie aus, dass ein eventueller Lastabwurfsverteiler die elektrische Stromversorgung kappt (siehe Vermerk oben). Das Gerät berücksich gt keine Programmiersignale: Überprüfen Sie die korrekte Benutzung des Programmiergerätes (lesen Sie sorgfäl g dessen Benutzeranweisung). Das Gerät heizt ununterbrochen: Überprüfen Sie, dass das Gerät nicht in Zuglu steht (offenes Fenster) oder dass die Temperatureinstellung verändert wurde. Im Falle einer Thermostat-Blockade, schalten Sie das Gerät komple für 5 Minuten vom Strom ab und starten Sie die Elektronik erneut. Wenn dieses Problem häufig au ri , erkundigen Sie sich bei Ihrem Energieversorger. In allen anderen Fällen wen‐ den Sie sich bi e an einen qualifizierten Techniker. Bei der ersten Inbetriebnahme des Gerätes kann ein leichter Geruch au reten, hervorgehend aus der Verbrennung von Ölrückständen während des Fabrika onsprozesses auf den Heizelementen. 8. GARANTIEBEDINGUNGEN Der Lieferant gewährt für die Produkte die Garan e von 24 Monaten ab dem Verkaufsdatum. Die Garan e bezieht sich nicht auf die durch Transport, nachlässige Manipula on oder unsachgemäße Montage verursachten Mängel. Die Garan e ist nicht einmal für unsachgemäßen Eingriff in die Pla e und für gewöhnliche Abnutzung des Produkts gül g. Verkaufsbestätigung: Verkaufsdatum:……………………………………… Produktionsnummer:……………………………… Verkäufer:.…………………………………………………………………… Fenix Trading s.r.o. Slezská 2, 790 01 Jeseník tel.: +420 584 495 304, fax: +420 584 495 303 e-mail: [email protected] , http://www.fenixgroup.cz