1
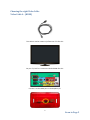
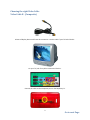
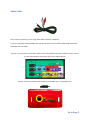
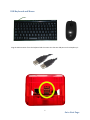
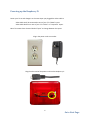
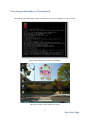
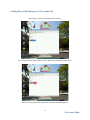
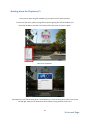
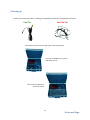
Table of Contents Parts List ............................................................................................ 1 Choosing the right Video Cable ........................................................... 2 Video Cable A (HDMI) ........................................................................... 2 Video Cable B (Composite) ................................................................... 3 Audio Cable ........................................................................................ 4 USB Keyboard and Mouse .................................................................. 5 Powering up the Raspberry Pi ............................................................ 6 Getting files off the Raspberry Pi ........................................................ 8 Shutting down the Raspberry Pi ....................................................... 10 Cleaning up ...................................................................................... 11 Troubleshooting ............................................................................... 12 Parts List Raspberry Pi Computer Raspberry Pi Case 16GB SD Card USB Mini Keyboard USB Mouse Video Cable A HDMI to HDMI Video Cable B Composite to Composite Audio Cable 3.5mm to Stereo USB Flash Drive 8GB Power Cord Ethernet Cable 1 Choosing the right Video Cable Video Cable A -‐ (HDMI) This cable is used on newer style flatscreen TV's like this: On your TV, look for a connection labeled HDMI like this: Connect it to the HDMI port on the Raspberry Pi: 2 Go on to Page 5 Choosing the right Video Cable Video Cable B -‐ (Composite) Almost all display devices will have this connection. Use this cable if your TV looks like this: On your TV, look for a yellow connection like this: Connect the cable to the Composite port on the Raspberry Pi: 3 Go to next Page Audio Cable Only connect this cable if you are using Video Cable B (Yellow, Composite) If you are using Video Cable A (HDMI) then you do not need to use this cable. HDMI sends both Video and Audio with one cable! On your TV, connect the red and white cables to the red and white connection. Make sure you connect it to the red and white connections right next to Video Cable A: Connect the other end of the Audio Cable into the Audio port on the Raspberry Pi: 4 Go to Page 5 USB Keyboard and Mouse Plug the USB connector from the keyboard and the mouse into the two USB ports on the Raspberry Pi: 5 Go to Next Page Powering up the Raspberry Pi Power your TV on and change it to the same input you plugged the video cable in. Video Cable A will be connected to one of your TV's "HDMI" inputs. Video Cable B will be on one of your TV's "Video" or "Composite" inputs. Most TV remotes have a button labeled "Input" to change between the inputs. Plug in the power cord to an outlet: Plug the other end of the power cord into the Raspberry Pi: 6 Go to Next Page Powering up the Raspberry Pi (continued) The Raspberry Pi should begin to boot up and you will see text scrolling by on your TV screen. Once it's done booting you will see the desktop. Now you're ready to start using the 3P K-‐LO! 7 Go to Next Page Getting files off the Raspberry Pi If you have internet access at home, you can just email a copy your work to yourself. You will then have a copy of you work saved in your email account! The 3P K-‐LO comes with an 8GB flash drive for getting your work off the Raspberry Pi. If you have any trouble saving your files to the Flash drive, don't worry. Someone can help you when you return the Raspberry Pi to the Library. The first step is to make sure all your work is saved somewhere on the Raspberry Pi. Now because the Raspberry Pi only has two USB ports you will have to disconnect the keyboard while you are copying files to the USB flash drive. Disconnect the keyboard from the USB port on the Raspberry Pi then plug the USB flash drive into the USB port. You will see a popup window on the screen asking you what to do: Click "Ok" to open the flash drive. 8 Go to Next Page Getting files off the Raspberry Pi (continued) Now copy all your files to the flash drive window. Once all your files are saved, click the "Eject" button next to the flash drive name: Now you can unplug the flash drive and reconnect the USB Keyboard. 9 Go to next Page Shutting down the Raspberry Pi Once you are done using the Raspberry Pi you need to shut it down properly. First save all your work. (Refer to page 8 for help with getting files off the Raspberry Pi) Now click the Menu Launcher in the bottom left hand corner and click "Logout" Now click "Shutdown" The Raspberry Pi will start shutting down. The Raspberry Pi is done shutting down when you only see one red light. Now you can disconnect all the cables starting with the Power cord. 10 Go to next Page Cleaning up Neatly tie up each of the cables, including the USB cables attached to the keyboard and mouse: Like This Not Like This Place each part back into the right spot in the carrying case: First put the Raspberry Pi, mouse, and cables in first. Then lay the keyboard on top of the cables 11 Go to next Page Troubleshooting I was using the Raspberry Pi and my screen went black The Raspberry Pi screensaver turns the screen black to save energy after not being used for a couple of minutes. Just move the mouse or press a key on the keyboard to wake the screen back up. I’m not getting any display on the TV • • • Make sure all the cables are plugged in tight on the Raspberry Pi and on your TV Make sure the SD Card is inserted into the Raspberry Pi all the way Make sure your TV is powered on and on the input that the Raspberry Pi is plugged into. The text is too small or too big to read, or if the display does not fill your TV. 1. Click on the Menu Launcher in the bottom left hand corner. 2. Go to “System Tools” > “Screen Resolution Changer” 3. Now you need to choose a new resolution. a. If the text is too big on the screen then choose “1024x768”. b. If the text is too small on the screen then choose “800x768”. c. If the picture doesn’t fill the TV screen then choose “Auto” 4. The Raspberry Pi will automatically reboot with the new resolution! If you are having any other difficulty with the Raspberry Pi contact Kathy Malone in the Computer Lab Room 200. 12