1
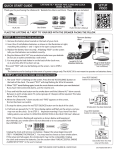
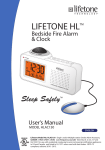
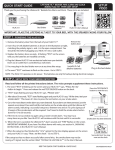
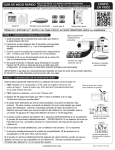
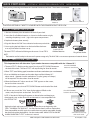
QUICK START GUIDE
– LIFETONE HL™ BEDSIDE FIRE ALARM AND CLOCK
MODEL HLAC150
Thank you for purchasing the Lifetone HL™ Bedside Fire Alarm and Clock. These items are included:
WARNING! DO NOT COVER
AC POWER
Bed Shaker
HLAC150
4 D Cell Alkaline
Batteries
HLAC150 User’s Manual
PLACE THE LIFETONE HL™ NEXT TO YOUR BED WITH THE SPEAKER FACING THE PILLOW.
STEP 1 - POWERING THE HLAC150™
1. Remove the battery door located on the back of your clock.
TEST/SILENCE
2. Insert four D cell alkaline batteries, as shown in the illustration at right,
matching the polarity (+ and –) signs in the open compartment.
BED SHAKER
3. Replace the battery door securely.
4. Plug the Lifetone HLAC150™ into an electrical outlet near your bedside.
5. You may plug the bed shaker in on the back of the clock now
or at any time after it has been set up.
The word “TEST” will now be flashing on the screen. Go to STEP 2.
Install 4 D Cell
Alkaline Batteries
Plug in Bed Shaker
NOTE:
The batteries are for backup in the event of a power outage only. The HLAC150 is not meant to operate on batteries alone.
STEP 2 - SMOKE ALARM COMPATIBILITY
This important test will determine if your smoke alarms are compatible with the Lifetone HL™.
1. The word “TEST” is flashing on the screen. Press the red TEST/SILENCE button on
the back of the clock. The word “TEST” will stop flashing for 30 to 50 seconds.
Press TEST/SILENCE
button to start the test.
2. When “TEST” starts flashing again, locate the most distant smoke alarm you want detected.
TEST/SILENCE
3. Press and hold the test button on the smoke alarm until the Lifetone HL™
alarm sounds. Between 2 and 6 smoke alarm T3 cycles (groups of 3 beeps)
will be required. This takes about 10 to 30 seconds.
4. When the Lifetone HL™ alarm sounds and “FIRE” appears on the screen,
the test has been successful.
5. To stop the alarm, press the red TEST/SILENCE button on the back of the clock.
6. If all tests are passed, the “12 hr” time display option will flash on the
screen, and you may now set the clock. Go to STEP 3.
NOTE: If the clock is flashing all segments as shown below and beeping at
short intervals, your smoke alarm was not detected or is not compatible with
the LIFETONE HL™.
BED SHAKER
T3 ALARM
SIGNAL
Smoke alarm has been detected.
Press TEST/SILENCE
button to silence alarm.
TEST/SILENCE
BED SHAKER
BEEP!
Unplug the clock and remove one battery. Repeat the set up beginning with
STEP 1- POWERING THE PRODUCT. You may need to choose a closer smoke alarm.
If the compatibility test fails again, the smoke alarm may not be compatible. Unplug
the clock and remove the batteries. See the section titled “UNSUCCESSFUL SMOKE
ALARM COMPATIBILITY TEST” in the user’s manual.
KEEP THIS QUICK-START GUIDE IN A SAFE PLACE
Successful test. You may
now set the clock.
Doc# LTQSG150 110831
STEP 3 - SETTING THE CLOCK
Buttons on the top of the Lifetone HL™
1. On the time display, “12hr” is flashing. To select 24 hour time, press + or – .
2. Press SET CLOCK. The hour will flash. To change the hour, press + or – .
3. Press SET CLOCK. The minute will flash. To change the minute, press + or – .
4. Press SET CLOCK. The year will flash. To change the year, press + or – .
5. Press SET CLOCK. The small “m” and “d” will flash. To change to a day-first
display of the date, press + or – .
6. Press SET CLOCK. The month will flash. To change the month, press + or – .
7. Press SET CLOCK. The day will flash. To change the day, press + or – .
HOUR
MINUTE
8 . Press SET CLOCK. The “E” (for English) will flash. To change
to Spanish or French, press + or – . Press SET CLOCK again.
YEAR,
LANGUAGE,
DAY OF WEEK
9. The clock will show the day of the week to the right of the date.
If you prefer to display the year instead, press SET CLOCK again.
NOTE: Any time that you need to reset the clock, press and hold SET CLOCK
until the flashing “12hr” appears, and repeat all parts of STEP 3.
MONTH OR
DAY FIRST
STEP 4 - SETTING THE WAKE-UP ALARM
MONTH
(OR DAY)
DAY
(OR MONTH)
1. Press and hold SET ALARM until the wake-up hour flashes. To set the hour , press + or – .
2. Press SET ALARM. The minute will flash. To set the minute, press + or – .
BELL
3. Press ON/OFF to enable or disable the wake-up alarm. The bell icon at lower
left will appear or disappear to indicate whether the alarm is active or inactive.
You can adjust the volume of your wake-up alarm to high or low with the HI - LO slider
switch on top. If there is a fire emergency the alarm will sound at maximum volume.
NOTE: Any time that you need to reset the wake-up alarm time, press and hold
SET ALARM until the hour is flashing and repeat all parts of STEP 4.
WAKE-UP TIME
TROUBLESHOOTING ERROR MESSAGES
Batteries: If the clock is flashing “BATT” and beeping at one minute intervals, the
batteries were not installed, were installed with the wrong polarity, or are below
the required voltage. Remove and insert them again or replace them if necessary.
Be sure to match the polarity (+ and –) signs in the battery compartment. To keep
your compatibility set-up, leave the clock plugged in while you change batteries.
Bedshaker: If the screen is flashing “beds” and the clock beeps, the bed shaker has come
Battery ERROR
BEEP!
unplugged. Seat the bed shaker plug firmly into the jack on the back of the clock.
NOTE: If you decide you don’t want to use the bed shaker after it has been installed,
unplug the bed shaker then press and hold the red TEST/SILENCE button on the back of
the clock for 2 seconds. That starts a manual self-test that will display “TEST” for 10 to 20
seconds, sound the fire alarm once, and “retrain” the clock to operate without a bed shaker.
NOTE: Any time that you want to restore use of the bed shaker, simply plug it in.
BEEP!
Bed shaker ERROR
Bed shaker unplugged
PLEASE READ THE USER’S MANUAL COMPLETELY AND THOROUGHLY FOR
FURTHER DIRECTIONS, PRODUCT FEATURES AND WARRANTY INFORMATION
800 Research Parkway, Suite 339
Oklahoma City, OK 73104
For more information, go to www.lifetonesafety.com
or call Customer Service 1-800-648-7923
MODEL HLAC150
KEEP THIS QUICK-START GUIDE IN A SAFE PLACE
Doc# LTQSG150 110831