1
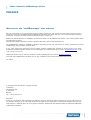
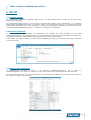
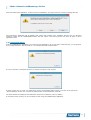
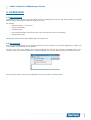
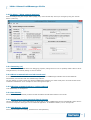
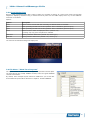
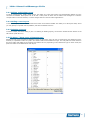
Manual
LedSBmanager2012e
Version: 2014v1
Table of Contents
PREFACE......................................................................................................3
1. INTRODUCTION.......................................................................................4
2. SETUP......................................................................................................5
2.1
2.2
2.3
2.4
Install Location............................................................................................................5
Directory Contents.......................................................................................................5
Running the Application................................................................................................5
Connection Setup.........................................................................................................6
3. OPERATION.............................................................................................7
3.1 Basic Principle..............................................................................................................7
3.2 Intro Screen................................................................................................................7
3.3 File Menu: “Show general Settings”................................................................................8
3.3.1 Intensity (%)........................................................................................................8
3.3.2 Wired communication to led Scoreboard...................................................................8
3.3.3 Wireless communication to Led Scoreboard..............................................................8
3.3.4 ResultDelay..........................................................................................................8
3.3.5 Partic Layout, Race Layout & Result Layout...............................................................8
3.3.6 LED Display Testing...............................................................................................8
3.3.7 LED SB Node Programming.....................................................................................9
3.3.8 Font Display Test.................................................................................................10
3.4 File Menu: “Show list of Layouts”..................................................................................10
3.4.1 Editing an Existing Layout.....................................................................................11
3.4.2 Adding a new Layout............................................................................................11
3.4.3 Deleting a Layout.................................................................................................11
3.5 File Menu: “Show types of Datasources”........................................................................11
4. LAYOUT CONTROL.................................................................................13
4.1 Datasources...............................................................................................................13
4.1.1 Scale & Speed.....................................................................................................13
4.1.2 Show.................................................................................................................13
4.1.3 Datasource Type..................................................................................................13
4.1.4 Prefix & Suffix.....................................................................................................13
4.1.5 Text to Display....................................................................................................13
4.1.6 Font...................................................................................................................13
4.1.7 Color..................................................................................................................13
4.1.8 Position (Xpos and Ypos)......................................................................................14
4.1.9 Dimensions (Width and Height).............................................................................14
4.2 Display Racetime after First Finish................................................................................14
4.3 Erase SB...................................................................................................................14
4.4 Update SB.................................................................................................................14
4.5 Program SB with RaceTime Settings..............................................................................14
5 LAYOUT EXAMPLES.................................................................................15
5.1 100m Demo Layout....................................................................................................15
5.1.1 Displaying ”100m MEN” on the Scoreboard.............................................................15
5.1.2 Displaying the Running Race Time on the Scoreboard...............................................15
5.1.3 Displaying a More Accurate Race Time....................................................................16
5.1.4 Displaying the Current Wind Speed........................................................................16
5.1.5 The End Result....................................................................................................16
5.2 800m Demo Layout....................................................................................................17
www.timetronics.be
TimeTronics NV
Lammerdries-Oost 23B
B-2250, Belgium
Tel +32 (0)14 23 19 11
Fax +32 (0)14 23 20 24
VAT BE0440 224 404
HR Turnhout 64540
KBC Bank 414-4191871-52
SWIFT : KREDBE22
IBAN : BE64 4144 1918 7152
2014v1 Manual LedSBmanager 2012e
5.2.1
5.2.2
5.2.3
5.2.4
5.2.5
The Envisioned End Result....................................................................................17
Preparations........................................................................................................17
Stages 1 & 2.......................................................................................................17
Stage 3..............................................................................................................17
Finishing touches.................................................................................................18
2
2014v1 Manual LedSBmanager 2012e
PREFACE
Welcome to the "LedSBmanager" user manual.
May we recommend you to gently leaf through the entire manual first, just to have an initial idea of how the book is
structured. As we cannot possibly explain all details simultaneously, this might help you a bit in understanding and tracing
things back. Of course, the table of contents will also help you in doing so.
Please note that all pictures are examples, the delivered version can be different than shown in this manual please inform
yourself before purchase.
Also take note that this software is a work in progress. Not every option is fully developed yet.
The LedSBmanager software is available for Windows operating systems only. We provide no working guarantee for running
LedSBmanager using emulation tools like Wine.
If you, after reading this document, have any further question regarding the operation or service of this or any other
TimeTronics equipment, please contact your local distributor or TimeTronics directly, by email: [email protected], or call
us at +32 (0) 14 23 19 11
Please also contact us if you have any remarks or advise regarding this user manual: [email protected].
Good luck with LedSBmanager and thank you for your confidence in the TimeTronics products and services.
The editors.
© Copyright 2014 TimeTronics. All rights reserved.
TimeTronics
Lammerdries 23b
B-2250 Olen
Belgium
Tel.: +32 (0) 14 23 19 11
Disclaimer
Under no circumstances shall TimeTronics be liable for any loss, damage or expense suffered or incurred with respect to
any defective product. In no event shall TimeTronics be liable for any incidental or consequential damages that you may
suffer directly or indirectly from use of any product. Windows, Windows XP and Windows VISTA are registered trademarks
of Microsoft Corporation.
3
2014v1 Manual LedSBmanager 2012e
1. INTRODUCTION
Scoreboards are evolving. A decade ago, most still consisted of combinations of simple 7-segment displays. Fast-forward
10 years, and LED matrix displays are the de facto standard. TimeTronics offers a variety of boards differentiating in sizes,
colors and capabilities. These boards are controlled by the LedSBmanager application. This manual offers a guide through
the different menu's and user interfaces the user is exposed to.
In later parts of the manual, a more thorough look into layout control is provided, describing every option available. To
further illustrate the functionality of layouts, 2 example configurations are explained in detail.
Warning: MacFinish data is used for several datasources. To properly use them, TimeTronics MacFinish II/III Ethernet, 2D
200 or 2D 300 version 7.7.2.4 or higher is required. For MacFinish 2D 100 you need to use at least 8.0.0.34 or higher
Warning: The RaceTime datasource update speed of 10 Hz is only for TimeTronics Led scoreboards with software version
3.21 or higher.
4
2014v1 Manual LedSBmanager 2012e
2. SETUP
2.1 Install Location
The LedSBmanager application is portable, which means it can be unpacked from it's archive file, and then placed
wherever the user desires.
The recommended location though, is in the system's “Program Files” directory, under “TimeTronics”, e.g. “C:/Program
Files/TimeTronics/LedSBmanager 2012/”. To place the folder in the Program Files directory, you might need elevated
(administrator) privileges on your current host system. In that case, either install the application to your home folder (e.g.
“C:/Users/JohnDoe/LedSBmanager 2012/”), or contact your company's IT administrator.
2.2 Directory Contents
In the folder you have just installed, two subdirectories are available, one called “Datafiles” and one called
“LedSBmanagersoftware”. The first folder contains an off-line database used for storing collected application settings. The
second folder contains the actual LedSBmanager software used to control the LED boards.
In this fashion, it is possible to back-up your personalized LedSBmanager settings and rules by simply copying “Datafiles”
to a secure directory.
2.3 Running the Application
The LedSBmanager executable is found in the sub-folder “LedSBmanagersoftware” and is called
“LedSBmanager2012e.exe”. If for some reason, the “.exe” part is not showing, look for the file with the medal icon.
f.e.
For easy access in the future, you could add a shortcut to your desktop by right-clicking the executable, choose “Send To”
and selecting “Desktop (create shortcut)”.
5
2014v1 Manual LedSBmanager 2012e
When first starting the application, or after moving the installation, you might encounter a warning message like this:
This indicates the application lost its datafile. Click “Open” and navigate to the “Datafiles” directory (see 2.2 Directory
Contents). Select the file “datafileSBdriver.4DD” and click “Open”. This warning should not show up again in future
application starts.
2.4 Connection Setup
Start the LedSBmanager application (see 2.3 Running the Application). If you set-up the cables correctly, you are greeted
by a message similar to “The serial port nr:3 is now opened for SB-communication.”
If not you will have a message that warns you that the serial port could not open
If this is not the case, re-check your cable setup (see the corresponding cable manual), or set the correct port in the
“General Settings” section (see 3.3.2 Wired communication to led Scoreboard). Click OK.
The board should now display the first LED layout it has found (“Welcome”, ID 0 by default).
If everything check out okay, we can now begin to start using the LedSBmanager application.
6
2014v1 Manual LedSBmanager 2012e
3. OPERATION
3.1 Basic Principle
LedSBmanager uses a defined set of rules called “layouts”. By utilizing these layouts, LED board operators can display
different groups of information at different stages in the event.
For example:
•
Welcome message + current time
•
Listing of participants
•
Wind speed data
•
Race timing information (like total race time, time of first finisher, time of next finishers)
•
Listing of race results
Manipulating these layouts is what LedSBmanager was designed for.
3.2 Intro Screen
When you start LedSBmanager and successfully connected to a serial interface, a sub-windows “Application” is visible. This
is the container which will hold the user controls.
Using the “File” menu item, different parts of the program can be accessed. The majority of operation will be in the
“Layouts” section and is further explained in 4. LAYOUT CONTROL. For now, the different sections are explained in order.
When switching sections, first close the “Application” window, then select a different section.
7
2014v1 Manual LedSBmanager 2012e
3.3 File Menu: “Show general Settings”
Save the settings using the “Accept” button (floppy icon) on the left side bar, cancel your changes by using the “Cancel”
button (cross icon).
3.3.1 Intensity (%)
Control the intensity of the LED board. For debugging purposes, settings as low as 1% are perfectly usable. When in direct
sunlight however, an intensity setting of 100% is desired.
3.3.2 Wired communication to led Scoreboard
If the MacFinish software is installed on the same computer as the LedSBmanager software than the the MacFinish
automatically communicates with the LedSBmanager software
The only setting you have to make is to tell the LedSBmanager software over which serial port it can send the data to the
TimeTronics Scoreboard. In out example we do this through serial port 3
3.3.3 Wireless communication to Led Scoreboard
To be added later, on development
3.3.4 ResultDelay
Sets the interval (in milliseconds) at which the LED scoreboard should switch between race results.
3.3.5 Partic Layout, Race Layout & Result Layout
Like the description says, these fields define the layout IDs to which LedSBmanager should automatically switch when it
receives the respective data types from the MacFinish application. To disable this feature, use “0” as layout ID.
3.3.6 LED Display Testing
Used to test if all LED's are working, the buttons are self-explanatory.
8
2014v1 Manual LedSBmanager 2012e
3.3.7 LED SB Node Programming
When using a set-up with multiple inter-connected LED scoreboards next to each other, each scoreboard (“node”) can be
programmed individually.
Edit the first value (before the slash “/” sign) to edit a node on the vertical axis, and the second value (after the slash “/”
sign) to edit a node on the horizontal axis.
E.g.:
Node 0/0
Node 0/1
Node 0/2
Node 1/0
Node 1/1
Node 1/2
Warning: Only insert one LED scoreboard at a time when programming, because all connected (and powered on)
scoreboards will be programmed with the indicated node number.
9
2014v1 Manual LedSBmanager 2012e
3.3.8 Font Display Test
Because a LED scoreboard works with a matrix of LED's, it's resolution is limited. As a result, fonts need to be specially
adapted to displaying characters using a minimal amount of pixels. Use the FONT display test to try out how different
fonts look on the board.
Options:
Option
Description
Font
Select a font to use the test with. Currently, 15 different fonts are available.
Xpos
Start generating the test text on this x position. See 4.1.8 Position (Xpos and Ypos).
Ypos
Start generating the test text on this y position. See 4.1.8 Position (Xpos and Ypos).
Color
Selects a color in which to display the font in (default: red).
Currently, only red, green and yellow are available.
Start char
Starting character ASCII value (default: 64, meaning '@').
End char
Ending character ASCII value (default: 100, meaning 'd').
The result of the standard settings font display test:
3.4 File Menu: “Show list of Layouts”
The Layouts section is where most of the application operation will take place.
The listed layouts are actually database records, hence the typical database
controls at the bottom.
By default, some example layouts should be installed for you to test with.
Some advanced layouts will be discussed in chapter 4. LAYOUT CONTROL.
10
2014v1 Manual LedSBmanager 2012e
3.4.1 Editing an Existing Layout
To edit an existing layout, simply double click it. This takes you to the layout editor, and automatically displays it on the
connected scoreboard. Each layout has an ID and a name, both of which can be edited. Save changes to it with the
“Accept” button on the left tool-bar, or cancel changes with the “Cancel” button right above it.
3.4.2 Adding a new Layout
To add a new layout, click the “Add a New Record” button on the bottom toolbar. This takes you to the layout editor, where
you may specify a LayoutID and LayoutName, and add new datasources to it.
3.4.3 Deleting a Layout
To delete a layout, first start editing it (see 3.4.1 Editing an Existing Layout), the click the “Delete Record” button on the
left tool-bar (trash bin icon).
3.5 File Menu: “Show types of Datasources”
Displays the list of pre-programmed datasource types. At this point, users can not yet create their own datasource types.
However, it is possible to alter the “prefix” and “suffix” fields of each datasource type. The real prefix and suffix values in
the layout editor will default to the prefixes and suffixes set here, depending on the datasource type. In other words, the
prefix and suffix can be different for each layout.
11
2014v1 Manual LedSBmanager 2012e
List of Datasource Types with Descriptions.
NOTE: The list in this manual is sorted alphabetically. In the application, the list is sorted by number / ID. Fields noted
with an asterisk (*) require a connection with MacFinish 7.7.0.16.
Name
Description
CameraID
The ID of the capturing device
CameraStatus
The status of the capturing device
Date
The current date (uses the LedSBmanager's host PC system date)
Daytime
The current time (uses the LedSBmanager's host PC system time)
FinishDistance
The distance at which the finish line is located*
FinishSpeed
The speed at which the finish line was crossed*
FinishTimeFirst
The finish time of the first athlete*
FinishTimeNext
The finish time of the latest athlete (except the first) to cross the finish line*
LapDistance
The distance from the start at which lap time is registered*
LapSpeed
The average running speed for the last passed lap on the specified lap distance*
LapTime
The last completed lap time*
OfficialTime
Official finish time*
Picture
A picture (not yet available)
RaceEventName
The event name of a race*
RaceTime
The (current total) running time of a race*
RaceWindSp
The latest wind speed data captured by the TimeTronics Windspeed measuring device*
RaceWindType
The measuring type of wind speed*
ResultAthleteInfo
Additional info about the currently displayed athlete*
ResultAthleteName
The name of the currently displayed athlete*
ResultEventName
The event name of the currently displayed results
ResultID
The ID of the currently displayed athlete*
ResultLane
The lane in which the currently displayed athlete competed*
ResultPlace
The result place number of the currently displayed athlete*
ResultTime
The time at which the currently displayed athlete crossed the finish line*
ResultType
Type of contest*
ResultWindSp
The wind speed data of the currently displayed athlete*
ResultWindType
The measuring type of wind speed of the currently displayed result*
SplitDistance
The distance to the next split point*
SplitSpeed
The speed at the last passed split point*
SplitTime
The race time at the last passed split point*
Text
A user configurable line of text
12
2014v1 Manual LedSBmanager 2012e
4. LAYOUT CONTROL
4.1 Datasources
When opening the layout editor, the lower part of the interface contains the list of datasources. Each datasource has a
scale, speed (update rate), show, datasource type, prefix, suffix, position (x and y), font, colour and dimension (width and
height). Adding a new datasource can be done by double-clicking somewhere in the empty region of datasources. Editing
and deleting datasources works the same way as editing or deleting layouts.
NOTE: The datasources are rendered in their added order, so the last items are displayed “on top”. When two datasources
overlap though, the scoreboard may show a flickering effect. This is because for a brief second, the underlying field is
rendered again and is placed on top. Then, some milliseconds later, the overlapping datasource jumps back on top. The
speed of this effect is directly in relation to the speed of the serial connection.
4.1.1 Scale & Speed
Scale determines the scale at which the font is rendered. This can be useful when connecting multiple scoreboards
together. A scale of 3 results in every pixel to correspond to a 3x3 LED matrix. The minimum value is obviously 1.
Speed sets the update speed at which LedSBmanager should send updates of this field to the scoreboard. This is useful
when displaying a race time that updates every 100 milliseconds (and, as a result, is accurate to 100 milliseconds). The
allowed value of this field is 1 or 10 (updates per second). Any other value would simply has no effect, since the speed of
the serial connection is the limiting factor here. This field is only used with a RaceTime datasource and only works in
TimeTronics Led scoreboards with software version 3.21 or higher.
4.1.2 Show
The “Show” flag enables or disables the visibility of its datasource on the scoreboard.
4.1.3 Datasource Type
A datasource type is the blueprint of a datasource and determines which data is displayed in which manner. In
programming terms, one could say the datasource type is a class, and the datasource is an object (an instantiation of a
datasource type).
Several datasource types are available. More on datasource types can be found in 3.5 File Menu: “Show types of
Datasources”.
4.1.4 Prefix & Suffix
In the datasources types section (again, see 3.5 File Menu: “Show types of Datasources”), default values for these fields
can be set.
So when creating a new datasource it automatically sets the “Prefix” and “Suffix fields to what was set in the datasource
types section. These can be manually overridden for each layout separately
In short, the values here will be the ones actually used.
4.1.5 Text to Display
In case the datasource type equals “Text”, you can input the desired string in this field. Make sure the text fits on the LED
scoreboard, or excess characters will be trimmed off.
4.1.6 Font
Select a font to generate the characters with. Click on the field to see a list of fonts. To test out fonts, please refer to 3.3.8
Font Display Test.
4.1.7 Color
Set the colour of the font with which the text is generated. Currently, three options are available: red, green and yellow
(red + green).
13
2014v1 Manual LedSBmanager 2012e
4.1.8 Position (Xpos and Ypos)
Xpos and Ypos determine the starting position of a generated string, relative to the top-left pixel of the LED scoreboard.
Text is then rendered relative to the pixel selected with Xpos and Ypos.
E.g.: This LED scoreboard is 10x10px in dimensions. A datasource with font “A = 5x7 pixels” and text to show “A” is
created. Xpos is set at 1, Ypos is set at 2. This is how it will be generated on the LED scoreboard (the white square is also
dark in real life):
The white pixel here signifies where the text will start: 1 pixels to the right ( Xpos) and 2 pixels to the bottom (Ypos) of the
top-left-most pixel of the board. The “A” character is displayed starting at the white pixel and is 5 pixels wide and 7 pixels
high (font).
NOTE: This example assumes that the datasource's width and height settings are above 5px and 7px respectively.
4.1.9 Dimensions (Width and Height)
Width and height can be used to achieve the “crop” effect. If the width or height is smaller than the the amount of pixels
required to generate a line of characters, the remaining pixels will be cut off, and not displayed as a result.
E.g.: A single line text datasource with text “TimeTronics” and font A = 5x7 has a width of 30 and a height of 8. The result
is the LED scoreboard only displaying “TimeT”.
NOTE: When a character can not be displayed fully, the entire character is not displayed. E.g.: a cropped “L” will never
display as “I”.
NOTE 2: These options will be more useful in the future when displaying pictures is supported.
4.2 Display Racetime after First Finish
When enabled, a field with datasource type “Racetime” continues to be displayed even after the first contestant finishes.
Disabling this option can be useful to replace the running race time with the time of the first finisher. For an example of
this usage, see 5.2 800m Demo Layout.
4.3 Erase SB
This button resets the scoreboard, so any artefact LED's are now turned off.
4.4 Update SB
This button force updates any changes to datasources to the scoreboard.
4.5 Program SB with RaceTime Settings
When your layout contains a datasource with a “RaceTime” datasource type (indicated with a red background), the
scoreboard needs to be specifically programmed to use this datasource type. Click this button to program such a
datasource to the scoreboard.
NOTE: If you have a problem with how your programming is displayed on the scoreboard, there are a few steps to follow
before you have to try it again. Just close the software LedSBmanager on your computer and plug out the battery
of your scoreboard for a few seconds. Then plug back in your battery and restart the program LedSBmanager.
14
2014v1 Manual LedSBmanager 2012e
5 LAYOUT EXAMPLES
The LedSBmanager contains several example layouts for you to try out and use as a base for your custom layout. To
illustrate the versatility of layouts, some examples are described step-by-step in this chapter.
In these examples, a scoreboard with a 64x24 pixel matrix is used.
5.1 100m Demo Layout
5.1.1 Displaying ”100m MEN” on the Scoreboard
•
Create a new layout by going to the “Layouts” section in the file menu and clicking the “New Record” button at the
bottom toolbar.
•
Enter a “layout ID”. We will be using an ID of “100” in this example.
•
Enter a “layout name”. We will be using “100m demo layout” in this example.
•
Start by adding a Text datasource.
◦
Double click somewhere in the (empty) list of datasources.
◦
The “Layout ID” and “Layout name” fields are already filled in correctly. These values link the datasource to the
correct layout.
◦
Select a datasource type by clicking on the empty datasource field. Choose “Text” and click “OK”. The “Type”
field automatically switches to the correct datasource type ID.
◦
Enable the “Show” check-box.
◦
Make sure the “Prefix” and “Suffix” fields are empty. We don't want this feature for our text string right now.
◦
Pick a font to render the text with. Let's just use the standard “A = 5x7 pixels”.
◦
As colour, choose “Red”.
◦
Leave the fields “Xpos”, “Ypos”, “Width”, “Height”, “Zoom” and “Speed” alone for now.
◦
In “Text to show”, enter “100m MEN”.
◦
Click “Accept” on the left toolbar.
•
The datasource editor clears its fields to their default values so you can instantly add more fields. We'll just start by
testing out the text datasource we just added.
•
Click “Cancel” in the datasource editor (“We're done adding new datasources”), next click “Accept” in the layout
editor (“Save the current layout”). You're now back in the layouts list.
•
To test out your new layout, just open it up! If everything went correct, you should now see “100m MEN” on your
scoreboard, in the upper left corner.
5.1.2 Displaying the Running Race Time on the Scoreboard
•
Start by opening up our previously made “100m demo layout” layout.
•
Create a new RaceTime datasource with these settings:
•
◦
Datasource: RaceTime
◦
Show: yes / enabled
◦
Font: A
◦
Color: Green
◦
Leave the other settings to their defaults.
Save changes to the layout:
◦
Click “Accept” to save this datasource.
◦
Click “Cancel” to exit the datasource editor.
◦
Click “Accept” to save changes to the layout.
•
Now, open up the 100m demo layout again.
•
What should immediately pick your attention, is that the RaceTime datasource we just set-up is nowhere to be seen
on the scoreboard. This is because a datasource with type “RaceTime” needs to be programmed into the scoreboard
directly. To do this, click the “Program SB with RaceTime settings” button.
15
2014v1 Manual LedSBmanager 2012e
•
Still no results, huh? That's because this datasource (like MANY others) require data send by the MacFinish
application (version 7.7.0.16 or higher). Remember: LedSBmanager is designed to parse data (from MacFinish) to a
format the LED scoreboard can read. So fire up a test race in MacFinish (see the <TODO MacFinish manual
reference> manual).
•
Now the seconds are displaying, but something is flickering in the background. This is the “100m MEN” Text
datasource we added earlier. The RaceTime datasource is rendering at an overlapping location, conflicting with the
Text datasource. To fix this, simply reposition either one datasources.
•
Because the static Text is of lesser importance than the dynamically changing RaceTime, it is good practise to place
the static item on a less important location, like the lower part of the scoreboard. Change the “Xpos” and “Ypos”
values of the “100m MEN” Text datasource to “10” and “16” respectively.
•
Click “Program SB with RaceTime settings” and your scoreboard should not have display conflicts any more.
5.1.3 Displaying a More Accurate Race Time
•
Start by opening up our previously made “100m demo layout” layout.
•
Alter the “Speed” field of the RaceTime datasource to “10”. This causes the scoreboard to poll for race time updates
from MacFinish every 100 milliseconds (every 10th of a second).
•
Click “Program SB with RaceTime settings”.
5.1.4 Displaying the Current Wind Speed
•
Start by opening up our previously made “100m demo layout” layout.
•
Add a new “RaceWindSpeed” datasource with these specific settings:
•
◦
Datasource: RaceWindSpeed
◦
Show: yes / enabled
◦
Font: A
◦
Color: Green
◦
Xpos: 5
◦
Ypos: 8 (so it goes in between the two other datasources we set before)
◦
Prefix: W=
◦
Suffix: m/s
Now, in MacFinish, start a race and measure the wind speed. It will display on the scoreboard.
5.1.5 The End Result
If you followed all steps correctly, your layout should look like this in LedSBmanager:
And like this on the scoreboard itself (before and after wind measuring):
16
2014v1 Manual LedSBmanager 2012e
5.2 800m Demo Layout
This time around, we will be taking on a different approach. Say we have already envisioned what we want the scoreboard
to look like when we're done. Which steps do we need to undertake to realize that vision?
5.2.1 The Envisioned End Result
The goal this time is to have a scoreboard that displays data from a running MacFinish instance, with these properties:
1.
2.
Stage 1: Before the race
•
The race time should be displayed in green, and at the top of the board. At this point the race time is 0.
•
The race name should be displayed in red, at the bottom of the board.
Stage 2: During the race, before the first finisher
•
3.
The same as stage 1.
Stage 3: During the race, after the first finisher but before the next
•
The race time should continue to tick, even after the first athlete finishes.
•
The time of the first finisher should be displayed yellow, in the vertical centre of the board.
5.2.2 Preparations
Create a new layout “800m demo layout” with ID 101, and make sure your MacFinish is set-up for testing.
5.2.3 Stages 1 & 2
•
Add a “RaceTime” datasource (Show, Speed 10, Font A, Color Green, Ypos 0).
•
Add a “Text” datasource (Show, Font A, Color Red, Ypos 16, Text to display “800M Race”).
The result should look like this (while running):
5.2.4 Stage 3
•
Add a “FinishTimeFirst” datasource (Show, Prefix “F=”, Font A, Color Yellow, Ypos 8).
•
Enable “Display RaceTime also after first finish”.
•
Modify the “RaceTime” datasource's Xpos value to 13, so it aligns up nicely with the first finisher time.
17
2014v1 Manual LedSBmanager 2012e
The result should look like this (after the first finisher):
5.2.5 Finishing touches
Say we want to show the finish times of the other athletes as well, then a problem arises: there is no more space on this
scoreboard. You could add an additional scoreboard, but what if there is only one currently available?
The most logical solution is to remove the least essential piece of data off the scoreboard. In this case, that's the race
name.
Now, it's impossible to show the finish time of every athlete, because again there is not enough room. So we'll only show
the finish time of the latest athlete to have crossed the finish line (except the first finisher). We can do that with a
datasource called “FinishTimeNext”. To signify this is the finish time of the next athlete, we add an “N:” prefix.
For completeness, we should also signify what the green coloured time is. Since this is the running race time, we'll have to
add an “R=” prefix. However, the “RaceTime” datasource doesn't allow prefixes or suffixes. How do we fix this? Simply by
adding a static “Text” datasource with text “R=” at position (1,0).
To summarize:
•
Remove or hide (uncheck the “Show” field) the race name datasource.
•
Add a new “FinishTimeNext” datasource (Show, Prefix “N:”, Font A, Color Red, Ypos 16).
•
Add a new “Text” datasource (Show, Font A, Color Green, Xpos 1, Ypos 0, Text to display “R=”).
The end result should look like this (board after at least the second finisher):
Good Luck with your operation and use of the LedSBmanager application !
If you have whatever question or advise to us concerning this user manual.
Please contact us by email on [email protected]
18
2014v1 Manual LedSBmanager 2012e
© Copyright 2012 TimeTronics. All rights reserved.
TimeTronics
Lammerdries 23b
B-2250 Olen
Belgium
Tel. : +32 (0) 14 23 19 11
Fax : +32 (0) 14 23 20 24
19


![English [2014v1]](http://vs1.manualzilla.com/store/data/005775879_1-a83e57144a66539570f80a48a6e80397-150x150.png)

![English [2012v1]](http://vs1.manualzilla.com/store/data/005666127_1-015c2c1b906ab908850f1f1f8721a849-150x150.png)
![English [2012v1]](http://vs1.manualzilla.com/store/data/005947215_1-83afe423bc1815c8427a220bc0eb1bc7-150x150.png)


![English [2015v1]](http://vs1.manualzilla.com/store/data/005829431_1-1fdc30543d444fb0915a40c3aab945a8-150x150.png)


![English [2012v1]](http://vs1.manualzilla.com/store/data/005770981_1-8c196de42073f8db3e58cd387e9490be-150x150.png)