1
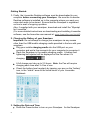
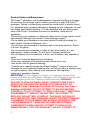
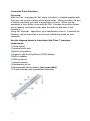
Livescribe Pulse Smartpen
Overview:
With this Pen, using special “dot” paper (notebook / notepad supplied with
Pen) you can record a lecture while taking notes. While recording, the pen
is linking everything you hear to everything you write. When you tap
anywhere in your written notes with the Pen, it locates the position where
you’re tapping, and starts to play back the audio at that point in the
recording.
Using the “Myscript” application, your handwritten notes in “Livescribe for
Desktop” can be converted to text format, edited and saved on your
computer.
Use the diagram below to learn about the Pulse™ smartpen
components.
1.Power button
2.Headset/Audio jack
3.Built-in microphone
4.Organic Light-Emitting Diode (OLED) display
5.Built-in speaker
6.USB connector
7.Infrared camera
8.Replaceable ink tip
9.Rechargeable lithium battery (non-removable)
10.Pulse smartpen cap (purchased separately
1
Getting Started:
1. Firstly, the Livescribe Desktop software must be downloaded to your
computer before connecting your Smartpen. Be sure the Livescribe
Desktop software is installed on to the computer where you want your
notes and audio to be stored. Ensure that the Smartpen is registered
on-line to avail of ongoing up-dates.
Also, if supplied with your smartpen, download and install the “Myscript
for Livescribe” .
(For more detailed instructions on downloading and installing Livescribe
software, see the livescribe user manual at www.livescribe.com/install)
2. Charging the Battery of your Smartpen:
Important: Do not attempt to charge your smartpen via any means
other than the USB mobile charging cradle provided in the box with your
smartpen.
Plug your mobile charging cradle into the USB port on your
computer and wait a few moments for your computer to recognise it.
Place the Smartpen in the mobile charging cradle. A battery and
lightening bolt symbol will be displayed on the Pen when it is
charging.
A full charge can take up to 2.5 hours. Note: the Pen will require
charging each time after 3-4 hrs of use.
Check the battery level regularly by tapping your pen on the “battery”
icon, in the “status” area on the inside cover of your Livescribe
Notebook.
3. Setting the Date and Time:
Press the Power button to turn on your Smartpen. As the Smartpen
2
starts up, the display shows the words Livescribe and then Starting.
After start-up is complete, the display shows the time. Before using
your Smartpen, you must set the Date.
Set the Date by tapping the pen on the relevant printed buttons in the
“Settings” area on the inside cover of your Livescribe Notebook.
It is critical that the correct date and time is set because audio files
you create are named using the time & date they were created. Also,
the Smartpen presents the date format as mm/dd/yy by default.
If you make a mistake in setting the time, simply tap on the “Set
Time” button again and start over.
4. Renaming your Smartpen:
Open Livescribe Desktop
Dock the Smartpen
Choose Tools > Smartpen > Rename
At the prompt, type the new name you have chosen and click OK.
When finished, press the Power Button to turn it off.
5. Writing and Recording:
Power on your Pulse™ smartpen by pressing the power button.
If needed, remove the protective plastic coating from your ink
cartridge tip. All new ink cartridges have this coating to prevent the
ink from drying up.
To begin recording audio while you write, tap the tip of the Smartpen
on the record button
on the bottom of your notebook. While
the Pen is recording, an incrementing timer is on display.
Begin writing on your Livescribe™ dot paper notebook. As long as
the smartpen is on, it will capture any handwritten notes and
drawings.
To pause recording at any time, tap the tip of the Smartpen on the
“pause” button, and tap the “record button” to restart.
3
When finished tap the “stop” button.
To listen back to your recorded audio, tap on your handwritten notes.
Myscript for Livescribe
(this application converts your handwritten notes to digital text. The
activation code is included with the Pulse Smartpen.)
The myscript for Livescribe (trial version) can be downloaded from
http://www.livescribe.com/vo and the “activation code” supplied with the
Smartpen entered.
Convert handwritten notes to digital text:
1. Open the LiveScribe Desktop and the MyScript programmes on your
computer
2. Connect the Smartpen cradle to your computer.
3. After taking notes in your “dot paper” notebook, place the Smartpen on
the cradle.
Note: In order to use the features of the Smartpen, the LiveScribe
Desktop and the MyScript programmes must be open on the
computer.
4. The handwritten notes will automatically appear in your Livescribe
Desktop programme.
5. In the Livescribe Desktop, select the notes/page(s) that you want to
convert.
6. Click “Share”, “selected pages” , “with Myscript”. The MyScript
programme will open showing the handwritten page(s) and the “text”
page(s) in text format.
7. Click “file”, select “Export” and “Export Conversion Result”..
Use the down arrow to select the folder in which you wish to save the
document and insert a file name. Click “save”.
8. Edit the text document as necessary.
4
Helpful Notes:
You must turn on the smartpen when you want it to capture your written
notes or record audio. Your smartpen will not record audio unless you tap
the Record button on a notebook.
When asked to dock your smartpen, make sure to use the USB Mobile
charging cradle.
Livescribe notebooks provide printed buttons you can use to view and
change settings. It is best to tap in the centre of these buttons
You can configure your smartpen display for either left- or right-handed
use. Tap the appropriate button to configure your display orientation.
Renaming your audio files
It is advisable to rename the files on your computer.
It is also advisable to add to the existing name (i.e. date/time), date of
lectures may be very relevant when searching through audio files later.
Viewing Storage available:
Tap the storage button once to see amount of remaining storage and tap a
second time to see the remaining recording time. (based on current
settings)
If you see a circled exclamation mark indicator on the right side of the
display, check available memory as it is almost full.
It is advisable to carry a spare ink cartridge. The Smartpen does not
warn you before the cartridge is suddenly empty!
Replacing the Ink Cartridge:
You can use the USB mobile charging cradle to remove and replace ink
cartridges and styluses.
Insert the smartpen ink tip into the ink cartridge removal ring.
Tilt the smartpen so that it firmly rests against the removal ring and lift
the smartpen away from the ring.
Lifting the smartpen away from the cradle will safely separate the ink
cartridge from the magnet inside the smartpen that holds it in place.
Place your new ink cartridge in the smartpen.
Before using the smartpen, be sure to remove the protective plastic
5
coating from your ink cartridge tip. (all new cartridges have this coating
in place to prevent the ink from drying up.)
Calculator:
The calculator located on the inside covers of your notebook performs
basic math functions, as well as many useful scientific functions. To use
the calculator, tap on the printed keys with the tip of the Smartpen.
It is advisable to download from the internet Livescribe Pulse Smartpen
updates from time to time.
For filing / easy access
If you wish, you may use one notebook at a time and remove pages
relating to a specific lecture. Afterwards, you may wish to file these pages
with other material on that topic,
If, for any reason, you’re unable to write complete lecture notes in your “dot
paper” notebook, just write the slide number on the “dot paper” each time
the lecturer presents a new slide. In this way, you will be able to select to
listen to the audio relating to any specific slide.
Troubleshooting:
If you notes don’t appear on the screen when the smartpen has been
connected to the computer, remove your pen from the cradle and write
any text in the relevant notebook, on the last pages which appears on the
screen, tap “record” and tap “stop” buttons. When you reconnect the
smartpen to the cradle, this problem should be resolved.
6
Product Safety and Maintenance:
The Pulse™ smartpen may be damaged by improper handling or storage.
Do not drop, throw, bend, crush, deform, puncture or open the Pulse™
smartpen. Failure to follow these instructions could result in electric shock,
fire, personal injury, property damage or damage to your smartpen, as well
as voiding your limited warranty. It is also essential that you take proper
care of the Pulse™ smartpen to ensure its durability. Here are our
guidelines:
•Do not drop your smartpen or allow any other kind of strong impact, which
can severely damage it or prevent it from working properly.
•Do not place your smartpen in any area where it could be crushed (i.e.
back pocket, bottom of backpack, etc.)
•Do not store your smartpen in extreme high or low temperatures. Store it
in a cool, dry place.
•Do not expose your smartpen to water or any other liquids. It is not
waterproof or water resistant. Do not leave it in damp conditions.
•Do not dispose of your smartpen in a fire, as the battery may explode or
ignite.
•Only use Livescribe-approved ink cartridges.
•Store your smartpen in its protective case when not in use.
•Use a soft cloth for general cleaning.
•Transfer your important notes and Paper Replay™ sessions from your
smartpen to your Livescribe Desktop often so that you have a backup copy
on your computer. Also, backup your computer’s files regularly.
•Keep your smartpen charged.
IMPORTANT: Do not attempt to charge your smartpen via any other
means other than the USB mobile charging cradle provided in the box with
your smartpen or the Pro Charging Cradle accessory.WARNING:
FAILURE TO FOLLOW THESE SAFETY INSTRUCTIONS COULD
RESULT IN FIRE, ELECTRIC SHOCK, OR OTHER INJURY OR
DAMAGE. Pulse™ Smartpen User Guide 96 Cleaning Your Pulse™
Smartpen WARNING: DO NOT ATTEMPT TO DO ANY REPAIRS
YOURSELF. DO NOT ATTEMPT TO OPEN THE PULSE™ SMARTPEN,
DISASSEMBLE IT, REMOVE THE BATTERY, OR ATTEMPT TO
REPLACE THE BATTERY YOURSELF. THIS RUNS THE RISK OF
ELECTRIC SHOCK, FIRE, PERSONAL INJURY, PROPERTY DAMAGE
OR DAMAGE TO YOUR SMARTPEN, AS WELL AS VOIDING THE
LIMITED WARRANTY. THERE ARE NO USER-SERVICEABLE
COMPONENTS INSIDE AND ANY ATTEMPT TO OPEN YOUR
SMARTPEN WILL VOID THE WARRANTY. DO NOT ATTEMPT TO
7
ACCESS THE BATTERY. THE RECHARGEABLE BATTERY IS NOT
ACCESSIBLE AND IS NOT INTENDED TO BE REMOVED, REPLACED,
OR TOUCHED. THE BATTERY CONTENTS CAN BE HAZARDOUS IF
INGESTED. THE BATTERY TECHNOLOGY IS COMBUSTIBLE AND
ONLY CHEMICAL FIRE RETARDANTS OR SAND SHOULD BE USED
TO EXTINGUISH FLAMES. DO NOT USE WATER. IF THE BATTERY
LEAKS, DO NOT ALLOW THE LIQUID TO COME IN CONTACT WITH
THE SKIN OR EYES. IF IT DOES COME IN CONTACT WITH SKIN OR
EYES USE LARGE AMOUNTS OF WATER TO WASH THE AFFECTED
AREA AND IMMEDIATELY SEEK MEDICAL ADVICE.
Cleaning Your Pulse™ Smartpen
If your smartpen appears sluggish or non-responsive when you interact
with printed controls, the infrared lens at its tip may be dirty. Clean this lens
with an alcohol wipe.
Clean the exterior of your smartpen with a clean, soft cloth dampened
slightly with water.
Disposal
Do not dispose of this product in the trash. As with any product containing
batteries, check with your local waste or recycling company to determine
the correct disposal method and location in your area.
Brid McGann
September 2010
8