1
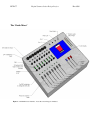
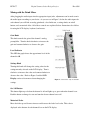
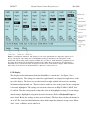
ECE 477
Rev 8/09
Digital Systems Senior Design Project
Homework 13: User Manual
Team Code Name:
Group No. 2
Drink Mixer
User Manual Outline:
Brief (marketing-style) product description
Product illustration annotated with callouts for each control/display
Product setup instructions
Product use instructions
Product troubleshooting instructions
Evaluation:
SCORE
DESCRIPTION
Excellent – among the best papers submitted for this assignment. Very few
corrections needed for version submitted in Final Report.
Very good – all requirements aptly met. Minor additions/corrections needed for
9
version submitted in Final Report.
Good – all requirements considered and addressed. Several noteworthy
8
additions/corrections needed for version submitted in Final Report.
Average – all requirements basically met, but some revisions in content should
7
be made for the version submitted in the Final Report.
Marginal – all requirements met at a nominal level. Significant revisions in
6
content should be made for the version submitted in the Final Report.
Below the passing threshold – major revisions required to meet report
*
requirements at a nominal level. Revise and resubmit.
* Resubmissions are due within one week of the date of return, and will be awarded a score of
“6” provided all report requirements have been met at a nominal level.
10
Include this sheet as a cover page for your report
ECE 477
Digital Systems Senior Design Project
Look no further than the Drink Mixer for your audio mixing needs!
This eight channel audio mixer provides as many conveniences as
possible to you, the user, without sacrificing mixing abilities.
Panning, reverb, delay, all are within your grasp! Adjust the gain,
change your levels, and never fear that your perfect combination
will be lost! With the flick of a finger on the keyboard you can
save your settings and recall them at a moment’s notice. Easy to
use, reliable, and capable of fulfilling all of your mixing dreams:
the Drink Mixer.
Rev 8/09
ECE 477
Digital Systems Senior Design Project
Cautions
•
The Drink Mixer is not meant to be used in a high humidity
environment and can be damaged by liquids. Do not allow the
device to get wet.
•
Do not open device. Do not open the power supply. Do not obscure
the openings of the vents. High voltages are contained inside.
•
Do not use device if the power cord has been torn, become frayed,
or has been compromised in any way.
Rev 8/09
ECE 477
Digital Systems Senior Design Project
The “Drink Mixer”
Figure 1: Drink Mixer user interface. Note that screen image is simulated.
Rev 8/09
ECE 477
Digital Systems Senior Design Project
Setting Up the Drink Mixer
Setup is easy and straightforward. Plug the Drink Mixer’s power
cord into a standard household 120VAC outlet. The screen should
light up. Next, attach a USB keyboard or mouse to the top USB
port on the right side of the unit. After a few seconds, the default
user interface will be displayed on the LCD display. Next, attach
either XLR balanced or ¼” unbalanced audio cables to the audio
input channels you desire to use. The last step is plugging in your
¼” output cables into Aux1, Aux2, Main Left, and Main Right,
located above the LCD screen. Now you’re ready to go! Refer to
the next section for instructions on how to use to controls to mix
audio.
Rev 8/09
ECE 477
Digital Systems Senior Design Project
Rev 8/09
Mixing with the Drink Mixer
After plugging the audio inputs into the appropriate input jacks, adjustments can be made to mix
the audio inputs according to your desire. As you can see in Figure 2, below the audio inputs for
each channel you will find an analog gain knob, a level indicator, a settings knob, an on/off
button, and a motorized fader. All of these controls are explained below. Instructions also follow
for using the LCD display, keyboard, and mouse.
Gain Knob
This knob controls the gain of the channel’s analog
preamplifier. Turn the knob clockwise to increase the
gain and counterclockwise to decrease the gain.
Level Indicator
This LED bar graph shows the approximate level of the
channel in dB.
Settings Knob
Turning this knob will change the setting value for the
setting currently selected on the LCD display. Turn it
clockwise to increase the value and counterclockwise to
decrease the value. Refer to Figure 3 and the LCD
Display section to learn more about changing the
Figure 2: Controls for only one channel
settings.
On / Off Button
This button lights up red when the channel is off and lights up as green when the channel is on.
Push the button to change its state and turn the chosen channel on or off.
Motorized Fader
Move the fader up and down to increase and decrease the fader level value. This value is
displayed at the bottom of each channels box on the LCD display.
ECE 477
Digital Systems Senior Design Project
Rev 8/09
Figure 3: LCD Display simulation. The settings for each of the eight channels are displayed in eight boxes on
the top of the display. The setting value of the highlighted setting is adjustable by the settings knob of that
channel. The current setting value is displayed in dB at the top of the box. Each channel has a pushbutton below
the settings knob which controls whether the channel is ON or OFF. Keyboard shortcuts control channel and
main fader modes. Current fader values are displayed at the bottom of each channel’s display. Main and effects
fader values are shown below the channel indicators. Menus are on the bottom row.
LCD Display
This displays useful information about the Drink Mixer’s current mix. See Figure 3 for a
simulated display. The settings for each of the eight channels are displayed in eight boxes on the
top of the display. The boxes are in order from left to right with the left most box containing
information about channel one. The first value in each box is the setting value for the setting that
is currently highlighted. The settings you can choose between are High G, Mid G, Mid F, Low
G, and Pan. Turn the settings knob to adjust the value of the highlighted setting. You can change
which setting is highlighted using the keyboard or the mouse. Refer to Keyboard Usage for
more details. Below the settings are three more indicators. The first shows whether the channel is
on or off. The second and third indicators show which output the channel is being sent to (Main,
Aux1, Aux2, or Effects) and at what level.
ECE 477
Digital Systems Senior Design Project
Rev 8/09
Each channel’s controls may be configured to adjust Main, Aux1, Aux2, or Effects. The user
may select one of these settings by using the keyboard or the mouse. This setting also affects the
main faders. The main and effects fader values are shown in the box below the channel boxes.
The bottom box on the LCD display allows access to several menus. The System menu allows
adjustment of the master equalizer for output. The Scenes menu allows the user to store and
recall six different scene settings. The Effects menu contains selections for various effects that
can be applied to each channel and the main output such as delay or reverb. It also has settings
specific to each effect such as delay time. The selected effect can then be applied at will to any
channel and the main output by using the effects fader or the channel faders when in effects
mode.
Keyboard Usage
Instead of using the settings knob to change which setting is highlighted on the LCD display, you
can rotate through the available settings by pushing the key for the channel number (1-8) on the
keyboard, and then selecting ‘A’, ‘S’, ‘D’, ‘F’, or ‘G’ for High Gain, Mid Gain, Mid Frequency,
Low Gain, and Pan, respectively. You can also rotate through the available settings for each
channel’s fader functions by pressing ‘Q’, ‘W’, ‘E’, or ‘R’ for access to Main, Aux1, Aux2, and
Effects settings.
Mouse Usage
When using the mouse, click on items on the LCD display to select them.
Saving/Loading Settings
Settings can be saved for use later. To save the scene settings, choose Scenes → Save Scene
Settings. Choose Scene → Load Scene Settings to load the settings. When the saved settings are
loaded, the faders will automatically move to the appropriate setting and the both the LED
display and level indicator will indicate the saved settings.
ECE 477
Digital Systems Senior Design Project
Rev 8/09
Troubleshooting
Problem
Possible Cause
Solution
LCD display, level indicators, or
on/off buttons do not light up.
1. No power.
1. Ensure power cord is not
damaged and is connected to a
standard 120 VAC outlet.
2. Contact manufacturer for
maintenance.
1. Unplug power cord. Wait at
least 15 seconds and then plug
cord back into the outlet.
2. Contact manufacturer for
maintenance.
1. Ensure power cord is not
damaged and is connected to a
standard 120VAC outlet. LCD
display should be lit.
2. Try using another channel. If
none of the channels work,
contact manufacturer for
maintenance.
3. Contact manufacturer for
maintenance.
1. Contact manufacturer. Do not
use the Drink Mixer, as sudden
changes in volume can damage
equipment and your ears.
1. Remove power from device to
prevent fader motor from
overheating. Contact
manufacturer for maintenance.
LCD display does not display
correct information or is garbled.
2. Device’s main microcontroller is
damaged.
1. Microcontroller needs to be
reset.
No sound.
2. Device’s main microcontroller is
damaged.
1. No power.
2. There is a nonfunctioning
channel.
3. Main microcontroller is
damaged.
Output volume changes
erratically.
1. Firmware error.
Faders move erratically.
1. Firmware error.
ECE 477
Rev 8/09
Digital Systems Senior Design Project
Disposal
If the Drink Mixer is damaged beyond repair then please dispose
of the device properly. The outer case is aluminum and can be
turned in to any recycling center that accepts aluminum cans.
Many of the internal components contain materials that are
harmful to the environment if not disposed of properly. If no avid
digijock(ette) is interested in scavenging the insides of the mixer
for parts, please dispose of the Drink Mixer through a household
hazardous waste collection center. You can find the center nearest
to
you
at
the
following
www.epa.gov/osw/hazard/tsd/mercury/collect.htm.
website: