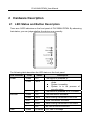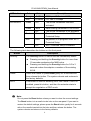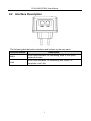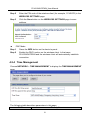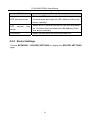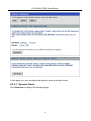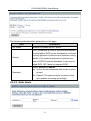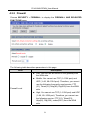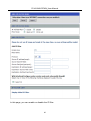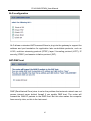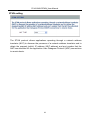
1
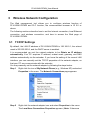
200Mbps Powerline
PLV-200AV-PEWN
User Manual
V1.0
PLV-200AV-PEWN_User Manual
Contents
1
Overview ............................................................................................................ 1
2
Hardware Description......................................................................................... 3
2.1
LED Status and Button Description ....................................................... 3
2.2
Interface Description.............................................................................. 5
2.3
3
4
Hardware Installation............................................................................. 6
2.3.1
System Requirements ................................................................ 6
2.3.2
Before You Begin ........................................................................ 6
2.4
Operation Range ................................................................................... 6
2.5
How to Improve the Transmission Capacity .......................................... 6
Wireless Network Configuration......................................................................... 8
3.1
TCP/IP Settings ..................................................................................... 8
3.2
Log In to the Web Page....................................................................... 11
Web Configuration ........................................................................................... 12
4.1
4.2
Status................................................................................................... 12
4.1.1
Device Information.................................................................... 12
4.1.2
Network Information.................................................................. 12
4.1.3
User Information ....................................................................... 13
Network ............................................................................................... 15
4.2.1
Network Settings....................................................................... 15
4.2.2
LAN Settings............................................................................. 18
4.2.3
4.2.4
4.2.5
4.2.6
4.3
WLAN Settings ......................................................................... 20
4.2.3.1
Radio settings ............................................................... 22
4.2.3.2
Wireless Settings .......................................................... 23
4.2.3.3
Wireless Security Mode ................................................ 24
Time Management.................................................................... 29
Router Settings ......................................................................... 30
4.2.5.1
Dynamic Route ............................................................. 31
4.2.5.2
Static Route................................................................... 32
Powerline Settings .................................................................... 33
4.2.6.1
Local Device Configure................................................. 35
4.2.6.2
Remote Device Configure............................................. 35
4.2.6.3
Advance Configuration.................................................. 36
Security................................................................................................ 36
i
PLV-200AV-PEWN_User Manual
4.4
4.5
5
6
4.3.1
WAN Access Configuration....................................................... 37
4.3.2
Firewall ..................................................................................... 38
4.3.3
MAC Filter................................................................................. 39
4.3.4
Port Filter .................................................................................. 39
Application ........................................................................................... 41
4.4.1
DDNS Configuration ................................................................. 41
4.4.2
Advanced NAT Configuration ................................................... 42
4.4.3
UPnP Configuration .................................................................. 46
4.4.4
IGMP Settings........................................................................... 46
4.4.5
Microsoft LLTD Settings............................................................ 47
Management........................................................................................ 47
4.5.1
Device Management................................................................. 47
4.5.2
User Management .................................................................... 48
4.5.3
Log File Management ............................................................... 49
How to Use the Security Pushbutton ............................................................... 50
5.1
Forming a HomePlug AV logical network ............................................ 51
5.2
Joining a Network ................................................................................ 51
5.3
Leaving a Network............................................................................... 52
Parameter and Specification ............................................................................ 54
ii
PLV-200AV-PEWN_User Manual
About User Manual
This user manual mainly describes how to install and configure the
PLV-200AV-PEWN wireless extender.
Organization
This user manual is organized as follows:
Chapter
Chapter 1 : Overview
Description
Provides a general overview of the
PLV-200AV-PEWN wireless router, and the
package list.
Chapter 2 : Hardware
Describes the front panel and the rear panel of
Description
the PLV-200AV-PEWN and the procedure for
hardware installation.
Chapter 3 :Wireless
Describes how to configure network settings of
Network Configuration
your PC, and then connect to the
PLV-200AV-PEWN.
Chapter 4 : Web
Describes how to navigate through the Web
Configuration
pages and how to configure the parameters.
Chapter 5 : How to Use the
Describes how to use the Security Pushbutton
Security Pushbutton
Chapter 6 : Parameter and
Introduce the product system specification
Specification
Features
PowerLine Feature
Power supply range of 100 ~ 240VAC 50/60Hz
Comply with HomePlug AV, and Co-existence with HomePlug 1.0 Nodes
PowerLine PHY rate up to 200 Mbps
iii
PLV-200AV-PEWN_User Manual
Support QAM 1024/256/64/16/8, QPSK, BPSK, and ROBO modulation
schemes
128-bit AES Link Encryption with key management for secure power line
communications
Windowed OFDM with noise mitigation based on patented line
synchronization techniques improves data integrity in noisy conditions
Dynamic channel adaptation and channel estimation maximizes throughput
in harsh channel conditions
Priority-based CSMA/CA channel access schemes maximize efficiency and
throughput
Integrated Quality of Service (QoS) Enhancements: contention-free access,
four-level priority based contention access, and multi segment bursting
ToS and CoS Packet Classifiers
Supports IGMP managed multicast sessions
Wireless Feature
Support IEEE802.11b, IEEE802.11g, IEEE802.11n, IEEE802.3, IEEE802.3u,
IEEE802.11i, and IEEE802.11e
Support 1T1R mode and transmission data rate is up to 150 Mbps
Support WEP and WPA for data transmission security
Support DHCP Server and Client
Support firmware version upgrade via Web page
Support restoring factory default settings
Support wireless security authentication modes, including OPEN, WEP,
WPA-PSK, WPA2-PSK, WPA/WPA2-PSK, 802.1X, WPA/WPA2-Enterprise.
Support system status display
Support system log
iv
PLV-200AV-PEWN_User Manual
1
Overview
Thank you for choosing PLV-200AV-PEWN.
PLV-200AV-PEWN (also called PLC Wireless Extender) is compatible with
HomePlugAV, HomePlug 1.0, and 802.11b/g/n standards. PLV-200AV-PEWN
supports CCK and OFDM. Its PowerLine PHY rate is up to 200 Mbps and wireless
PHY rate up to 150 Mbps under the 11n mode.
PLV-200AV-PEWN supports 128-bit AES encryption in PowerLine communication,
and WEP, WPA, and IEEE 802.1X authentication in wireless communication, to
ensure wireless communication security.
Package list
Please check whether your package list includes the following items:
PLV-200AV-PEWN x 1
CD-ROM x 1
RJ45 x 1
Security Notes
PLV-200AV-PEWN is intended for connection to the AC power line. For installation
instructions, please refer to the installation section of this user manual. Before
operating PLV-200AV-PEWN, read the following precaution information carefully:
Follow all warnings and instructions marked on the product.
Unplug the device from the wall outlet before cleaning. Use a damp cloth to
clean the device. Do not use liquid cleaners or aerosol cleaners.
Keep the device away from water.
Keep the device away from radiators or heat registers.
Do not use an extension cord to connect the device and the AC power
source.
Do not open the device to perform maintenance on your own. Otherwise,
you may get an electric shock. Ask professional technicians to maintain the
device.
Unplug the device from the wall outlet and contact professional service
personnel for help if you encounter the following situations:
–
Liquid is spilled into the device.
–
The device is exposed to rain or water.
1
PLV-200AV-PEWN_User Manual
–
The device fails to operate normally when you follow the operation
–
The performance of the device changes obviously.
instructions to operate it.
2
PLV-200AV-PEWN_User Manual
2
Hardware Description
2.1 LED Status and Button Description
There are 4 LED indicators on the front panel of PLV-200AV-PEWN. By observing
their status, you can judge whether the device runs normally.
The following table describes the LED status on the front panel.
LED Indicator
Power
Ethernet
Data
Color
Status
Description
Green
On
Green
Blink
-
Off
The device is powered on.
System enters the power save
mode.
System is resetting.
System is in the process of
security setup.
The device is powered off or it is down.
Green
On
LAN connection succeeds.
Green
Blink
Data is being transmitted in the LAN.
Red
On
WAN connection succeeds.
Red
Blink
Data is being transmitted in the WAN.
-
Off
No LAN or WAN connection
Green
On/Blink
PLC rate > 40 Mbps
3
PLV-200AV-PEWN_User Manual
LED Indicator
WLAN/WPS
Color
Status
Orange
On/Blink
20 Mbps < PLC rate < 40 Mbps
Description
Red
On/Blink
PLC rate < 20 Mbps
Green
On
The WLAN connection has been
activated.
Green
Blink
Data is being transmitted in the WLAN.
-
Off
The WLAN connection is not activated.
Red
On
Connection succeeds under Wi-Fi
Protected Setup.
Red
Blink
-
Off
Negotiation is in progress under Wi-Fi
Protected Setup.
Wi-Fi Protected Setup is disabled.
The following table describes the buttons on the front panel.
Button
Security
Description
The Security button is used to set the membership status.
Pressing and holding the Security button for more than
10 seconds randomizes the NMK value.
Pressing and holding the Security button for 0.5 to 3
seconds makes the adapter a member of the existing
AVLN.
Reset
Use a fine needle to press Reset gently for 4 seconds and
then release the button. The system reboots and restores to
the factory defaults.
WPS
This button is used for enabling WPS PBC mode. If WPS is
enabled, press this button, and then the extender starts to
accept the negotiation of PBC mode.
Note:
Do not press the Reset button unless you want to clear the current settings.
The Reset button is in a small circular hole on the rear panel. If you want to
restore the default settings, please press the Reset button gently for 4 seconds
with a fine needle inserted into the hole and then release the button. The
system reboots and returns to the factory defaults.
4
PLV-200AV-PEWN_User Manual
2.2 Interface Description
The following table describes interfaces and buttons on the rear panel.
Interface/Button
WAN
LAN
Description
RJ45 WAN interface, for connecting WAN or the uplink
network devices.
RJ45 LAN interfaces, for connecting hub, switch, or
computer in an LAN.
5
PLV-200AV-PEWN_User Manual
2.3 Hardware Installation
2.3.1 System Requirements
Before installing PLV-200AV-PEWN, please make sure that the following items are
available.
At least one Ethernet RJ45 cable (10Base-T/100Base-T)
One PLV-200AV-PEWN
One PLC device for PowerLine communication
A PC is already installed with the TCP/IP protocol and it can access the
Internet.
2.3.2 Before You Begin
Before you install PLV-200AV-PEWN, please pay attention to the following items:
The Ethernet cables that are used to connect to a computer, hub, router or
switch should be less than 100 meters.
Do not place this device on an uneven or unstable surface or support. Do not
put this device on the ground.
Keep the device clean. Prevent the device from direct sunlight. Avoid any
metal in the device.
Place the device in the center of the area, and try to optimize the wireless
coverage.
2.4 Operation Range
The operation range of PLV-200AV-PEWN depends on the actual environment.
The path and effect of signal transmission vary with the deployment in a house or
an office. For PLC networks, the typical coverage is up to 5000 square feet, but the
actual coverage varies with the power grid and the number of connected PLC
terminal devices. For wireless transmission, the outdoor straight transmission
distance for some devices can reach up to 300 meters, and the indoor straight
transmission distance can reach up to 100 meters.
2.5 How to Improve the Transmission Capacity
6
PLV-200AV-PEWN_User Manual
It is recommended to plug PLV-200AV-PEWN directly into a wall socket, not to a
power strip. In this way, network transmission capacity can be optimized.
7
PLV-200AV-PEWN_User Manual
3
Wireless Network Configuration
The Web management tool allows you to configure wireless function of
PLV-200AV-PEWN and PLC function, the recommended browser is IE 5.0 or
above.
The following sections describe how to set the Internet connection, local Ethernet
connection, and wireless connection, and how to access the Web page of
PLV-200AV-PEWN.
3.1 TCP/IP Settings
By default, the LAN IP address of PLV-200AV-PEWN is 192.168.0.1, the subnet
mask is 255.255.255.0, and the DHCP server is enabled.
It is recommended you set the network adapter to be Obtain an IP address
automatically. Your PC acquires IP address, subnet mask, gateway, and DNS
address automatically via the extender. If you know the setting of the current LAN
interface, you can manually set the TCP/IP properties of the network adapter, so
that your PC can communicate with the extender.
You may manually set the network adapter by following the steps below:
Step 1
Right click the icon of My Network Places (e.g., Windows XP) and select
Properties in the menu. The Network Connections page appears.
Step 2
Right click the network adapter icon and select Properties in the menu.
The Local Area Connections Properties appears. (Note: If there are
8
PLV-200AV-PEWN_User Manual
several network cards on your PC, it may not display the Local Area
Connections Properties page. It may display other dialog boxes.)
Step 3
Double click the Internet Protocol (TCP/IP) to display the Internet
Protocol (TCP/IP) Properties page.
9
PLV-200AV-PEWN_User Manual
Step 4
Select Use the following IP address and enter the IP address of the
network adapter. The IP address should belong to the IP network
segment 192.168. 0.X (X is a number between 2 and 254).
Step 5
Set the subnet mask and then click the OK button to finish manual
Step 6
After finishing setting, you may ping the default IP address of the
setting.
extender, to check whether the current connection between PC and the
extender is normal. Click RUN… in the lower left corner on the desktop,
and then enter ping 192.168.0.1 in the dialog box. See the following
figure:
Note:
10
PLV-200AV-PEWN_User Manual
192.168.0.1 is the default IP address of the LAN interface. If this IP address is
changed and you need to ping the IP address of the extender, you should enter
the current IP address in the dialog box above.
Step 7
If PC can ping through the default IP address of the extender and the
following page appears, it indicates that the connection between PC and
AP is normal.
3.2 Log In to the Web Page
Run the Internet Explorer (IE), enter http://192.168.0.1/ (the default IP address of
PLV-200AV-PEWN) in the address bar, and press Enter.
Enter the user name (admin, by default) and the password (Password, by default)
on the login page.
After clicking the Login button on the login page, you can log in to the Web page of
the PLV-200AV-PEWN.
11
PLV-200AV-PEWN_User Manual
4
Web Configuration
4.1 Status
After logging in to the Web page, system automatically displays the STATUS page.
The submenu of STATUS contains DEVICE INFORMATION, NETWORK
INFORMATION, and USER INFORMATION.
4.1.1 Device Information
Choose STATUS > DEVICE INFORMATION to display the BASIC INFORMATION
OF DEVICE page.
In this page, you can view the device model, the ID, the hardware version, and the
software version.
4.1.2 Network Information
Choose STATUS > NETWORK INFORMATION to display the NETWORK
INFORMATION page.
12
PLV-200AV-PEWN_User Manual
In this page, you can view WAN and uplink information of the device.
4.1.3 User Information
Choose STATUS > USER INFORMATION to display the USER INFORMATION
page.
13
PLV-200AV-PEWN_User Manual
This page shows you the device WLAN interface information, Ethernet information,
and PLC device information.
14
PLV-200AV-PEWN_User Manual
4.2 Network
The submenu of NETWORK contains NETWORK SETTINGS, LAN SETTINGS,
WLAN
SETTINGS,
TIME
MANAGEMENT,
ROUTER
SETTINGS,
and
POWERLINE SETTINGS.
4.2.1 Network Settings
Choose NETWORK > NETWORK SETTINGS to display the NETWORK
CONNECTION SETTINGS page.
Access point mode
Do as follows to configure the AP mode:
(1)
Select Enable Access Point Mode.
(2)
Click OK in the window displayed.
15
PLV-200AV-PEWN_User Manual
The device now works in the AP mode.
Router mode
Unselect Enable Access Point Mode and the device works in the router mode.
Setting DHCP connection
(1)
Select the connect type of DHCP.
(2)
Click the Save button to save the setting.
The device will automatically get an IP address from DHCP server.
Setting static connection
(1)
Select the connect type of Static.
16
PLV-200AV-PEWN_User Manual
(2)
Enter the following parameters
–
IP address
–
Subnet mask code
–
Default Gateway
–
Preferred DNS
–
Alternative DNS
(3)
Click the Save button to save the setting.
Setting PPPOE connection
(1)
Select the connect type of PPPOE.
17
PLV-200AV-PEWN_User Manual
(2)
Enter the user name and password provided by the ISP. If you are not
sure of the service name, you can leave it blank.
(3)
Select the preferred dial-up mode from the drop-down list. The default
dialup mode is automatic connection.
(4)
Click the Save button to save the setting.
Deleting an internet connection
Click Delete Connection to delete an internet connection.
4.2.2 LAN Settings
Choose NETWORK > LAN SETTINGS to display the LAN SETTINGS page.
18
PLV-200AV-PEWN_User Manual
In this page, you can configure the parameters of the LAN port and DHCP server
parameters. You can modify the IP address of the LAN port according to the actual
network environment.
The following table describes parameters and buttons in this page:
Field
Router IP Address
Description
The IP address of the LAN interface. The default IP
address is 192.168.0.1.
Router Subnet
The subnet mask of the IP address of the LAN interface.
Mask
The default subnet mask is 255.255.255.0.
19
PLV-200AV-PEWN_User Manual
Field
Enable DHCP
Description
Enable or disable DHCP service.
Server
Starting IP address
The first address in a consecutive IP address pool.
Ending IP address
The last address in a consecutive IP address pool.
Subnet Mask
The subnet mask that the DHCP server assigns.
Leased Time
After the DHCP lease time elapsed, the router
automatically assigns new IP addresses for all connected
computers.
New Reserved IP
Add a map relationship between the reserved IP address
and MAC address. To reserve an IP address:
z
Under Reserved IP address List, click New
Reserved IP
Delete Reserved IP
z
Enter the MAC address and IP address
z
Click the Save button to save the settings.
Select an entry of a reserved address and click the button
to delete it.
4.2.3 WLAN Settings
Choose NETWORK > WLAN SETTINGS to display the WIRELESS SETTINGS
page.
20
PLV-200AV-PEWN_User Manual
21
PLV-200AV-PEWN_User Manual
4.2.3.1 Radio settings
In this page, you may set parameters of the wireless mode, channel, and
transmission power.
The following table describes parameters in this page:
Field
Description
Enable Radio
Enable or disable the wireless LAN interface.
Mode
Select the appropriate wireless mode.
Channel
Select the working channel of the wireless network.
The default channel is channel 6.
Transmission Power
Set transmit power. The default is 1, that is, the
Channel Expansion
Select a channel mode from the drop-down list.
greatest transmit power.
Mode
Dynamic (default)
Static
22
PLV-200AV-PEWN_User Manual
Field
Aggregation
Description
Enable or disable A-MSDU.
MSDU is the aggregation of multiple MSDUs by using
certain method and the multiple MSDUs forms a
greater load.
Tx Chainmask
The stream number mask of wireless antenna
Rx Chainmask
The stream number mask of wireless antenna
transmits.
receivers.
4.2.3.2 Wireless Settings
In this page, you may set the parameters of SSID, Short GI, RTS/CTS and so on.
The following table describes parameters in this page:
Field
Description
Select SSID
Select an SSID from the drop-down list.
Enable Wireless
Enable or disable the wireless function for the selected
SSID.
Cancel Broadcast
Enable or disable SSID broadcast. If it is enabled, the
device broadcasts its SSID in the wireless network.
Wireless clients can scan the SSID and access the
corresponding wireless network.
SSID
Network name. The SSID can contain up to 32
23
PLV-200AV-PEWN_User Manual
Field
Description
characters and can be letters, numerals, underlines,
and any combinations of them. The SSID is
case-sensitive.
BSSID
The MAC address of the wireless interface.
Short GI
Set the short guard interval. You may select Yes or No.
The default guard interval is set to Yes.
Yes: guard interval 400us
No: guard interval 800us
WMM
Enable or disable WMM. After WMM is enabled, AP
can process different types of wireless data by their
priority levels.
HT40 coexist
RTS/CTS
You may select Yes or No. The default coexist is No.
Set the CTS/RTS threshold. The default RTS threshold
is off. The value ranges from 256 to 2346.
Fragmentation
The default fragment threshold is off. The value ranges
from 1 to 2347.
4.2.3.3 Wireless Security Mode
In this page, you can set parameters of wireless security.
In order to protect your privacy, you can configure wireless security, including WEP,
WPA-PSK, WPA2-PSK, and 802.1X.
(1)
WEP
24
PLV-200AV-PEWN_User Manual
The following table describes parameters in this page:
Field
Basic Authentication Mode
Key length
Description
You can select Open, Share, and Both.
Select the length of a key. You can select
64-bit,128-bit and 152-bit
The Index of Current Network
Select an index as the WEP key.
Key
Network Key (1/2/3/4)
64-bit : 10 Hex or 5 ASCII characters.
128-bit: 26 Hex or 13 ASCII characters.
152-bit: 32 Hex or 16 ASCII characters.
(2)
WPA-PSK
25
PLV-200AV-PEWN_User Manual
The following table describes parameters in this page:
Field
WPA Passphrase Key
Description
Enter 8 to 63 ASCII characters or no more than
64 hexadecimal numbers
WPA Encryption
(3)
Select TKIP , AES or TKIP AES.
WPA2-PSK
The following table describes parameters in this page:
Field
WPA Passphrase Key
Description
Enter 8 to 63 ASCII characters or no more than
64 hexadecimal numbers
WPA Encryption
(4)
Select TKIP , AES or TKIP AES.
WPA/WPA2-PSK
26
PLV-200AV-PEWN_User Manual
For parameter descriptions, refer to WPA-PSK.
(5)
802.1X
The following table describes parameters in this page:
Field
Rekey Period
Auth Server Address
Auth Server Port
Auth Server Secret
Description
Defines the period after which new keys will be issued
to prospective originators.
The IP address of the RADIUS server.
The default port number is 1812. You may change it
according to the server setting.
The key that the RADIUS server needs for
authentication.
(6)
WPA-Enterprise, WPA2-Enterprise, or WPA/WPA2-Enterprise
27
PLV-200AV-PEWN_User Manual
The following table describes parameters in this page:
Field
WPA Encryption
Description
Select TKIP, AES, or TKIP AES.
Robust Security Network (RSN), define the key
RSN Preauth
generation and distribution. This function is disabled
by default.
Reauth Period
Defines the period for Reauth.
Auth Server Address
The IP address of the RADIUS server.
Auth Server Port
Auth Server Secret
The default port number is 1812. You may change it
according to the server setting.
The key that the RADIUS server needs for
authentication.
WPS Progress
WPS modes include PIN and PBC modes. WPS supports two operation modes,
including the Enrollee and PBC mode. The Enrollee mode needs to apply PIN
code negotiation.
Enrollee Mode
Step 1
Select Enrollee mode on the wireless client and the software of wireless
client will generate a random PIN code, for example, 12345670.
28
PLV-200AV-PEWN_User Manual
Step 2
Enter the PIN code of the wireless client (for example, 12345670) in the
WIRELESS SETTINGS page.
Step 3
Click the Save button on the WIRELESS SETTINGS page to save
settings.
PBC Mode
Step 1
Press the WPS button on the device’s panel.
Step 2
Enable the PBC function on the wireless client. In that case,
PLV-200AV-PEWN and the wireless client will automatically establish
connection.
4.2.4 Time Management
Choose NETWORK > TIME MANAGEMENT to display the TIME MANAGEMENT
page.
The following table describes parameters in this page:
Field
Description
29
PLV-200AV-PEWN_User Manual
Field
Description
Select an NTP first time server from the drop-down list.
NTP first time server
Or select other and enter the URL address of the time
server manually.
NTP
second
server
Time Zone
time
Select an NTP second time server from the drop-down
list. Or select other and enter the URL address of the
time server manually.
Select the time zone from the drop-down list.
4.2.5 Router Settings
Choose NETWORK > ROUTER SETTINGS to display the ROUTER SETTINGS
page.
30
PLV-200AV-PEWN_User Manual
In this page, you can configure the dynamic router and static router.
4.2.5.1 Dynamic Route
Click New Item to display the following page.
31
PLV-200AV-PEWN_User Manual
The following table describes parameters in this page:
Field
RIP Mode
Description
Enable or Disable the RIP mode.
RIP1 broadcasts a route to discover and maintain
routing tables. RIP2 can be broadcast or multicast
Version
routing approach to discover and maintain routing
tables. If the network approach to optimize the
use of CIDR IP address allocation, it can only be
used RIP2, RIP1 does not support CIDR
Select Active or Passive.
Active: Routers advertise their routes to other
Operation
routers.
Passive: The passive router receives notice
and updates its routing accordingly.
4.2.5.2 Static Route
32
PLV-200AV-PEWN_User Manual
In this page, enter the destination IP address, subnet mask, and the gateway
provided by you ISP.
4.2.6 Powerline Settings
Choose NETWORK > POWERLINE SETTINGS to display the POWERLINE
SETTINGS page.
33
PLV-200AV-PEWN_User Manual
In this page, you can change powerline settings.
34
PLV-200AV-PEWN_User Manual
4.2.6.1 Local Device Configure
You can configure a PLC device and the network password.
4.2.6.2 Remote Device Configure
In this page, you can view the remote device list and set the remote device
security.
35
PLV-200AV-PEWN_User Manual
Set Security to Enable and you can set the password and MAC address for a
remote device. Users can set up to eight devices at one time.
4.2.6.3 Advance Configuration
The PLC QOS setting is only for traffic on the PLC, not for the whole router or AP’s
QOS. It contains VLAN tags and TOS bits. Each VLAN tag or TOS bit has eight bits
to identify the QOS settings, and four levels are available. By default the QOS
setting is disabled:
Under the priority mapping rules section, classify a special flow to a certain priority
by clicking the New Rule button to generate a new configuration item to edit. Click
the Save button to save the settings.
4.3 Security
The submenu of SECURITY contains WAN ACCESSS CONFIGURATION,
FIREWALL, MAC FILTER, and PORT FILTER.
36
PLV-200AV-PEWN_User Manual
4.3.1 WAN Access Configuration
Choose SECURITY > WAN ACCESSS CONFIGURATION to display the URL
FILTER page.
Enable URL Filter and select Black list or White list. Click the Save button to save
the settings.
Black List: Indicates to prevent data that complies with the rule from passing
through.
White List: Indicates to allow data that complies with the rule to pass through
only.
Do as follows to add a URL filter rule:
Step 1
Click New URL Filter to generate a URL rule.
Step 2
Enter a URL in the URL Address field.
Step 3
Click Save to save the settings.
37
PLV-200AV-PEWN_User Manual
4.3.2 Firewall
Choose SECURITY > FIREWALL to display the FIREWALL AND RELEATED
FUNCTIONS page.
The following table describes parameters in this page:
Field
Description
Low: You can use all service in the gateway from
the WAN side.
Middle: You cannot use TCP (1~1024 port) and
UDP (1~66, 69~1024 port). Therefore, you cannot
use the following frequently-used service: FTP
Firewall Level
(21), Telnet(23), Http(80), Rip(520) from the WAN
side.
High: You cannot use TCP (1~1024 port) and UDP
(1~66, 69~1024 port). Therefore, you cannot use
the following service: FTP (21), Telnet(23),
Http(80), Rip(520), zebra(2601) from the WAN
side.
38
PLV-200AV-PEWN_User Manual
4.3.3 MAC Filter
Choose SECURITY > WAC FILTER to display the THE MAC ADDRESS FILTER
RULES UNDER THE ROUTER MODE page.
In this page, you can enable or disable the MAC filter. Enter MAC address in the
text field and click Save to add the address to the MAC list. The format of MAC
address is xx:xx:xx:xx:xx:xx (x is a hexadecimal value ranging from 0~9 or A~F).
4.3.4 Port Filter
Choose SECURITY > PORT FILTER to display the ADD IP FILTER RULE page.
39
PLV-200AV-PEWN_User Manual
In this page, you can enable or disable the IP filter.
40
PLV-200AV-PEWN_User Manual
The following table describes parameters in this page:
Field
IP Address Filter
Description
Select Enable or Disable.
Filter Mode
Select Black List or White List.
Protocol
You can select TCP, UDP, or ICMP.
Source IP Address
Source Subnet Mask
Enter the source IP Address range, for example
192.168.0.100~192.168.0.200.
Enter the source subnet mask.
Enter a port number or a port range to define the
Source Port
access to the Internet. If this parameter is left blank,
all ports will be refused or allowed according to the
filer rule.
Destination IP Address
Enter the destination IP address range.
4.4 Application
The submenu of APPLICATION contains DDNS CONFIGURATION, ADVANCED
NAT CONFIGURATION, UPNP CONFIGURATION, IGMP CONFIGURATION, and
MICROSOFT LLTD SETTINGS.
4.4.1 DDNS Configuration
Choose APPLICATION > DDNS CONFIGURATION to display the DDNS
CONFIGURATION page.
41
PLV-200AV-PEWN_User Manual
Dynamic DNS (DDNS) is mainly used to realize resolution between fixed domain
names and dynamic IP addresses. For a user that uses a dynamic IP address,
after the user obtains a new IP address when accessing to the Internet, the
dynamic domain name software installed in the host sends the IP address to the
dynamic domain name resolution server provided by the DDNS service provider
and updates the domain name resolution database. When another user on the
Internet tries accessing the domain name, the dynamic domain name resolution
server returns the correct IP address.
Do as follows to add a DDNS provider:
Step 1
Select Enable Rules.
Step 2
Select a DDNS provider.
Step 3
Enter the Domain Name, user name, and password.
Step 4
Click Save to save the settings.
4.4.2 Advanced NAT Configuration
Choose APPLICATION > NAT CONFIGURATION to display the ADVANCED NAT
CONFIGURATION page.
42
PLV-200AV-PEWN_User Manual
ALG configuration
ALG allows customized NAT traversal filters to plug into the gateway to support the
address and port translation for application later control/data protocols, such as
H.323, real-time streaming protocol (RTSP), layer 2 tunneling protocol (L2TP), IP
security (IPSEC) and session initiation protocol (SIP).
NAT-DMZ host
DMZ (Demilitarized Zone) aims to solve the problem that external network can not
access internal server behind firewall if you enable DMZ host. The router will
forward the WAN IP packets to the DMZ host. But this also makes the computer
face security risks, so this is the last resort.
43
PLV-200AV-PEWN_User Manual
STUN setting
The STUN protocol allows applications operating through a network address
translator (NAT) to discover the presence of a network address translator and to
obtain the mapped (public) IP address (NAT address) and port number that the
NAT has allocated for the application User Datagram Protocol (UDP) connections
to remote hosts.
44
PLV-200AV-PEWN_User Manual
NAT-Virtual server
Do as follows to add a virtual server:
Step 1
Enter the server IP address.
Step 2
Enter the internal server name
Step 3
Specify the external port, protocol, internal port, and source IP.
Step 4
Click Save to save the settings and the NAT-Virtual Server list will
display the virtual server list
45
PLV-200AV-PEWN_User Manual
4.4.3 UPnP Configuration
Choose APPLICATION > UPNP CONFIGURATION to display the UPNP
CONFIGURATION page.
You can enable or disable UPNP (Universal Plug and Play).
4.4.4 IGMP Settings
Choose APPLICATION > IGMP SETTINGS to display the IGMP SETTINGS page.
IGMP Snooping is used for multicast management and control.
IGMP proxying enables a PC in the LAN to receive desired multicast traffic from the
Internet. Disable IGMP proxying if you do not need this function.
46
PLV-200AV-PEWN_User Manual
4.4.5 Microsoft LLTD Settings
Choose APPLICATION > MICROSOFT LLTD CONFIGURATION to display the
LLTD CONFIGURATION page.
LLTD (Link Layer Topology Discovery), Windows Vista automatically discovers
other device’s link topology, and these devices are also compatible with LLTD.
4.5 Management
The submenu of MANAGEMENT contains DEVICE MANAGEMNT, USER
MANAGEENT, and LOG FILE MANAGEMENT.
4.5.1 Device Management
Choose MANAGEMENT > DEVICE MANAGEMNT to display the DEVICE
MANAGEMNT page.
47
PLV-200AV-PEWN_User Manual
The following table describes parameters in this page:
Field
Restart
Description
Click the Restart button to restart the device.
If you want to upload the firmware of the device,
Update the firmware
click Browse to choose the new firmware and
then click Apply. The system begins to upgrade
the firmware.
Restore Defaults
Click the Load Default button, the system returns
to the factory default settings.
4.5.2 User Management
Choose MANAGEMENT > USER MANAGEMNT to display the USER
MANAGEMNT page.
48
PLV-200AV-PEWN_User Manual
Set the user name and password in this page.
Note:
For security, it is strongly recommended to change the default user name and
password. If you forget the password, you can press the Reset button to restore
the device to the default settings. The default user name and password are
admin and admin respectively.
4.5.3 Log File Management
Choose MANAGEMENT > LOG FILE MANAGEMNT to display the LOG FILE
MANAGEMNT page.
49
PLV-200AV-PEWN_User Manual
If the record mode is enabled and a record level is selected, the events with the set
level or higher are recorded.
Click Access Records and the log information page is displayed.
5
How to Use the Security Pushbutton
This chapter describes how to use the security pushbutton to add new devices to
or remove devices from a HomePlug AV logical network (AVLN).
50
PLV-200AV-PEWN_User Manual
You can monitor the operation progress and outcome by observing the Power LED
status.
5.1 Forming a HomePlug AV logical network
When two devices with different NMK values are connected to the same powerline,
do as follows to form a logical network:
Step 1
Press the Security button on the A or B for at least 10 seconds. The
device will reset and restart with a random NMK.
Step 2
Press the Security button on the first device A for less than 3 seconds.
Step 3
Press the Security button on the second device B for less than 3
seconds. Press the button on B within 1 minute.
Step 4
Wait for connection to complete.
The Power LED on both devices will flash evenly at 1-second intervals until the
operation succeeds or fails. It will illuminate steadily on successful completion. If an
error occurs, the Power LED on the ‘adder’ will flash unevenly until the pushbutton
on the ‘adder’ is pressed again or the ‘joiner’ is reset by holding the pushbuttons
down for more than 10 seconds.
5.2 Joining a Network
In a scenario where a new device (the joiner) attempts to join an existing network,
any devices on the network can become the ‘adder’.
Step 1
Press the Security button on the ‘joiner’ for at least 10 seconds. The
device will reset and restart with a random NMK.
Step 2
Press the Security button on the ‘joiner’ for at least 3 seconds.
51
PLV-200AV-PEWN_User Manual
Step 3
Press the Security button on any network device for less than 3
seconds, making it the ‘adder’. Please press the Security button within 1
minute.
Step 4
Wait for connection to complete.
The Power LED on both devices will flash at 1-second intervals until the process
succeeds or fails. It will illuminate steadily on success. If an error occurs, the Power
LED on the ‘adder’ will flash unevenly until the Security button on the ‘adder’ is
pressed again or the ‘joiner’ is reset by pressing the Security button for more than
10 seconds.
5.3 Leaving a Network
A network exists. The user wants to remove one device, the ‘leaver’, from that
network, for whatever reason. He may want to remove the device from service
altogether or have it join another logical network.
Step 1
Press the Security button on the ‘leaver’ for at least 10 seconds. The
device will reset and restart with a random NMK.
Step 2
Wait for reset to complete.
The Power LED on the ‘leaver’ will momentarily extinguish during reset, flash
during restart then illuminate steadily. No errors can occur.
Once the process completes, the user may disconnect the device from the medium
or join it to another logical network on the same medium.
52
PLV-200AV-PEWN_User Manual
53
PLV-200AV-PEWN_User Manual
6
Parameter and Specification
PLC Module SPEC
Chipset
Intellon INT6400/INT1400
SDRAM:
64 Mbits
Firmware
Support North America/Europe/APAC/Japan
Protocol
HomePlug AV
IEEE 802.3
10/100 Ethernet (100Mbps)
IEEE 802.3u
Fast Ethernet
Co-exists with existing HomePlug 1.0
PLC Rate
200Mbit/s
Data Rate -
65Mbps TCP, 90Mbps UDP
TCP/UDP
Modulation Band
2-30MHz
Modulation
Supports 1024/256/64/16/8-QAM, QPSK,BPSK and ROBO
Schemes
Encryption
QoS
128-bit AES
Support contention-free access, four-level priority based
contention access, and multi segment bursting
Support VLAN Priority
Support ToS and CoS Packet Classifier
Work Mode
TDMA and priority based CSMA/CA
Multicast Support
Supports IGMP managed multicast sessions
WiFi Module SPEC
Chipset
Atheros AR9331
Serial Flash
64 Mbits
DDR SDRAM:
256 Mbits
Protocol
IEEE 802.11b/g/n
IEEE 802.3/3x/3u
Wireless
2.4GHz to 2.484GHz
Frequency Range
Channel
1~13
Wireless Signal
11b: 11/5.5/2/1 Mbps
54
PLV-200AV-PEWN_User Manual
Rates With
11g: 54/48/36/24/18/12/9/6 Mbps
Automatic
11n: 150Mbps in 40MHz mode 72Mbps in 20MHz mode
Fallback
Transmit Output
11n: 13-20dBm
Power
11g: 14-21dBm
11b: 16-22dBm
Receiver
11n: 150Mbps/-69dbM
Sensitivity
11g: 54Mbps/-75dBm
Work mode
1Tx/1Rx
multi-BSSID
Up to 8 BSSIDs
Security
WPA,WPA2,64/128/152-bit,WEP,802.1X,WPA/WPA2-Enter
11b: 11Mbps/-88dBM
prise SSID hide,
MAC Address Access Control List
System SPEC
System Support
Windows 98SE, 2000, ME, XP 32/64 bit and Vista 32/64bit
LED’s
Power: Power on and off
PLC: double color, indicator PLC Link and Activity
WLAN: indicator Wireless Link and Activity
WPS: indicator the status of WPS Authenticator.
LAN: indicator the Ethernet Link and Activity
Power Socket
Support British, Euro, Japan, US and China power
Ethernet Interface
2 x RJ45 for 10/100 Ethernet (Auto MDI/MDI-X)
Antenna interface
R/SMA x 1
Push Button
Reset: reset system or restore default setup
connector
NMK: use to synchronized network password in PLC
WPS: use to authenticated for wireless provide service
Software update
Support software update from WEB
Consumption
6 W (Typed)
Environment Requirement
Operating
0 ºC to 40 ºC
Temperature
Storage
-10 ºC to 70 ºC
Temperature
55
PLV-200AV-PEWN_User Manual
Operating
10% to 85% Non-condensing
Humidity
Storage Humidity
5% to 90% Non-Condensing
Input Rating
100-240 VAC, 50/60Hz
EMC and Safety
Regulatory
FCC Part 15 Class B, CE
Compliance
Safety
UL
Regulations
Green Standard
RoHS
Physical Feature
Physical
L×W×H: 105mm×61mm×46mm
Characteristics
Weight
160g
56