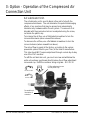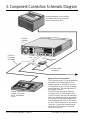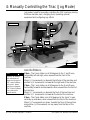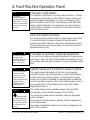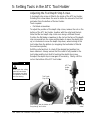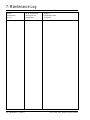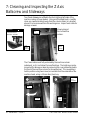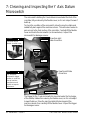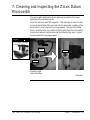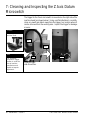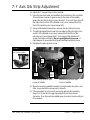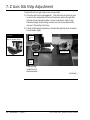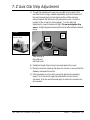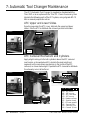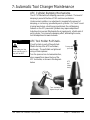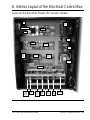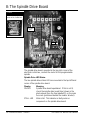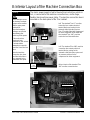
1
Total Commitment to Education and Training WorldWide.
Triac Series
CNC Machine
User's Manual.
approved
Denford Limited reserves the right to alter any specifications and documentation without prior notice. No part of
this manual or its accompanying documents may be reproduced or transmitted in any form or by any means,
electronic or mechanical, for any purpose, without the express written permission of Denford Limited.
All brands and products are trademarks or registered trademarks of their respective companies.
Copyright Denford Limited - Version 1.06.02. All rights reserved.
Contact Information
Address:
Denford Limited,
Birds Royd,
Brighouse,
West Yorkshire,
HD6 1NB,
UK.
Telephone:
General Enquiries 01484 712264
ISDN:
01484401157:01484401161
Fax:
01484 722160
e-mail:
for sales enquiries contact, [email protected]
for machine servicing enquiries contact, [email protected]
for customer services, contact [email protected]
Technical Support:
Telephone: 01484 722733
e-mail: [email protected]
Monday to Friday 8.30am - 4.30pm GMT
For international dialling: +44 and remove first 0 in each city code
Notes
2 - Contents
Triac Series CNC Machine User's Manual
Contents
Preface
Contact Information ....................................................................... 2
Warning Notices ........................................................................... 6
About this Manual ......................................................................... 7
Section 1: Introduction
Introducing your Triac Series CNC machine ................................. 8
Triac Series Model Variants .......................................................... 9
What is CNC? ............................................................................... 10
Before Beginning to Setup... ......................................................... 11
Section 2: Safety Features
Safety Features Overview and Precautions .................................. 13
The Emergency Stop Button ......................................................... 14
The Interlock Guard Switch ........................................................... 15
Section 3: CNC Machine Installation
Unpacking & Lifting your Triac ...................................................... 16
Deciding on a Site for your Triac .................................................. 17
Levelling your Triac ..................................................................... 18
PC version only - Connecting your computer to the Triac PC ........ 18
Connecting the Mains Supply ....................................................... 21
Electrical Diagrams ....................................................................... 24
Option - Compressed Air Connection Unit ..................................... 25
Operation of the Compressed Air Connection Unit ......................... 26
Option - Flood Coolant System ..................................................... 29
Automatic Slide Lubrication System ................................................ 31
Removal of Protective Coatings .................................................... 33
Component Connection Schematic Diagram .................................. 34
Section 4: CNC Machine Operation
Using your Triac - Overview ........................................................ 36
General Location of Triac Components ......................................... 37
Switching the Triac On .................................................................. 39
Switching the Triac Off .................................................................. 40
Homing the Machine Axes (Home Mode) ..................................... 41
Manually Controlling the Triac (Jog Mode) ................................... 42
Understanding Offsets ................................................................... 45
Configuring a Workpiece Offset ..................................................... 47
Configuring a Tool Length Offset ................................................... 48
Running a CNC Program (Auto Mode) ......................................... 49
Front Machine Operators Panel .................................................... 50
Triac Series CNC Machine User's Manual
Contents - 3
Contents
Section 5: Preparing Tooling Hardware
The Easychange Tooling System .................................................. 52
Removing an Easychange Tool Holder ........................................ 53
Fitting an Easychange Tool Holder ............................................... 54
Setting Tools in the Easychange Tool Holder ................................. 55
Requesting a Tool Change - Easychange .................................... 59
The Automatic Tool Changer System ............................................ 61
Setting up the ATC ........................................................................ 62
Setting Tools in the ATC Tool Holder ............................................. 64
Requesting a Tool Change - ATC ................................................. 68
Section 6: Work Holding
Option - The Datum Plate .............................................................. 70
Fitting and Removing the Datum Plate ........................................... 71
Setting the Datum Plate ................................................................. 72
Option - Miteebite Clamps ............................................................. 75
How does a Miteebite Clamp work? .............................................. 76
Using Miteebite Clamps ................................................................. 77
Option - Hydraulic Vice ................................................................. 78
Hydraulic Vice Operation .............................................................. 79
Option - Pneumatic Safety Guard Door ......................................... 81
Section 7: Maintenance
Planning Procedure for Maintenance Work ................................... 82
Maintenance Log .......................................................................... 83
Maintenance Schedule ................................................................. 85
Lubrication Chart .......................................................................... 86
General Work Area Cleaning ........................................................ 87
Lubrication of Ballscrews and Slideways ....................................... 88
Cleaning and Inspecting the X Axis Ballscrew and Slideways ........ 89
Cleaning and Inspecting the Y Axis Ballscrew and Slideways ........ 90
Cleaning and Inspecting the Z Axis Ballscrew and Slideways ........ 92
Cleaning and Inspecting the X Axis Datum Microswitch .................. 93
Cleaning and Inspecting the Y Axis Datum Microswitch .................. 94
Cleaning and Inspecting the Z Axis Datum Microswitch .................. 95
Gib Strip Adjustment ...................................................................... 97
X Axis Gib Strip Adjustment ........................................................... 98
Y Axis Gib Strip Adjustment ........................................................... 99
Z Axis Gib Strip Adjustment ........................................................... 100
Automatic Tool Changer Maintenance ........................................... 102
Pneumatic Safety Guard Door Maintenance .................................. 104
Hydraulic Vice Maintenance ......................................................... 104
Compressed Air Connection Unit Maintenance .............................. 105
Flood Coolant System Maintenance .............................................. 106
4 - Contents
Triac Series CNC Machine User's Manual
Contents
Section 8: Machine Electronics
Accessing the Electrical Diagrams ................................................. 107
Interior Layout of the Electrical Control Box ................................... 108
The Eurostep Motion Control Board .............................................. 110
The Spindle Drive Board .............................................................. 112
Interior Layout of the Machine Connection Box ............................. 113
Section 9: Technical Support
Technical Support ......................................................................... 114
Troubleshooting - VR CNC Milling Software .................................. 115
Troubleshooting - DOS CNC Milling Software ............................... 118
Troubleshooting - Cutting Problems .............................................. 121
Troubleshooting - Mechanical Problems ....................................... 122
Troubleshooting - Electrical Problems ........................................... 124
Section 10: Appendix
Specification of Triac PC ............................................................... 126
Specification of Triac VMC ............................................................ 128
What is a Part Program? ............................................................... 130
Composition of a Part Program ..................................................... 131
G Codes List ................................................................................ 132
M Codes List ................................................................................ 133
List of Program Address Characters .............................................. 134
Denford Directives ........................................................................ 135
EC Declaration of Conformity ........................................................ 137
Triac Series Noise Level Test Results ........................................... 139
Section 11: Glossary
Glossary ...................................................................................... 141
Section 12: Index
Index ........................................................................................... 145
Notes ........................................................................................... 148
Triac Series CNC Machine User's Manual
Contents - 5
Warning Notices
Warranty Disclaimer.
The Warranty on your Denford Triac CNC machine will be invalidated if any modifications,
additional ancillary equipment is fitted, or any adjustments made to the controlling devices
without prior notification from Denford Limited. Please refer to the information held in your
separate Warranty pack, for specific details.
Do not carry out any portable appliance testing (PAT) on any of the supplied equipment.
Maintenance Disclaimer.
Always obtain permission from the person responsible for machinery in your establishment,
before accessing your Denford Triac CNC machine and/or the electrical panels in the control
box to carry out any maintenance work. All work must be carried out by personnel suitably
qualified for each maintenance task, to avoid damage to both the machine systems and the
maintenance personnel. Denford Limited cannot accept responsibility for any damage
and/or loss that may occur through incorrect maintenance of your CNC machine.
Foreseen Use of Machine.
Your Denford Triac CNC machine is designed for milling non-hardened ferrous metals,
aluminium, hard woods and plastics. In each case, the appropriate tooling, spindle speeds
and feedrates should be used as recommended by the material supplier.
Only use water based soluble oil cutting fluids, do not use parafinic or potentially explosive
cutting fluid.
Do not attempt to use your CNC machine for manual operations.
Never attempt to fit an abrasive wheel to the machine spindle.
If you have any doubts and/or questions regarding the specification, servicing, or features of
your machine, please contact Denford Customer Services.
Denford Limited reserves the right to change the specification and/or operating features
regarding this CNC machine without notice or documentation.
6 - Contents
Triac Series CNC Machine User's Manual
About this Manual
Using this manual
Disclaimer
Screenshots
Language
Contact
This manual provides information describing how to transport, site,
setup and operate the basic functions of your Denford Triac CNC
machine, including any optional equipment associated with the Triac
series.
This manual does not provide any information regarding the software
packages used to control your Denford Triac CNC machine - please
refer to your separate CNC machine control software manual.
Please note that the Electrical Diagrams for your Triac CNC machine
are held in a folder, fixed inside the electrical control box. Hazard
Voltages exist in the electrical control box - only attempt to access these
diagrams after isolating the power and leaving the electrical control box
untouched for at least 5 minutes.
If you have any doubts and/or questions regarding the specification,
servicing, or features of your Triac CNC machine, please contact
Denford Customer Services. Denford Limited reserves the right to
change the specification and/or operating features regarding this CNC
machine without notice or documentation.
We take great pride in the accuracy of information given in this manual,
but due to nature of hardware and software developments, be aware
that specifications and features of this product can change without notice.
The information contained in this manual is correct at the date of printing
only - May, 2002. No liability can be accepted by Denford Limited for
loss, damage or injury caused by any errors in, or omissions from, the
information supplied in this manual.
Please note that any screenshots are used for explanation purposes
only. Any numbers, wording, window or button positions may be
different for the configuration of the CNC machine control software
being used to control your Denford Triac CNC machine.
This manual is written using European English.
Any comments regarding this manual should be referred to the
following e-mail address: [email protected]
Triac Series CNC Machine User's Manual
Contents - 7
1: Introducing your Triac Series CNC machine
Congratulations on your purchase of a Denford Triac Series CNC
machine. In this manual you will learn how to setup and use your CNC
machine.
The Triac is a versatile three axes CNC milling machine, suitable for all
levels of Education, Training and Prototyping. Traditionally a metal
cutting machine, it is also suitable for prototyping complex 3D designs in
a wide range of materials.
Main Features:
• Designed specifically for Education, Training and Prototyping.
• Manufactured to industrial standards.
• Capable of cutting resistant materials, such as wax, plastics, acrylics,
copper, aluminium and steel.
• Links to CAD/CAM software including Pro/DESKTOP, ArtCAM,
Techsoft, Mill CAM Designer, AutoCAD and other industrial
packages
• Totally enclosed high visibility interlocked guard.
• Feedrate and spindle speed override controls
• CE approved for safety.
• Programming via International Standards Organisation format.
• Flexible workholding capabilities.
• Easily upgradeable for inclusion in FMC/FMS/CIM systems.
• Optional software allows programming via ISO Format,
incorporating controls such as FANUC & Heidenhein.
8 - Introduction - Section 1
Triac Series CNC Machine User's Manual
1: Triac Series Model Variants
Triac PC
Model shown: Triac
PC with optional
ATC, pneumatic
guard, vice and PC
workstation.
Note:
Electrical
control box
not shown in
photograph.
Main options available:
• 8 station Automatic tool changer.
• Flood coolant.
• Machine table.
• Pneumatic guard door.
• Pneumatic vice.
Triac VMC
Note:
Electrical
control box
not shown in
photograph.
Main options available:
• Machine table.
• Pneumatic guard door.
• Pneumatic vice.
Triac Series CNC Machine User's Manual
Section 1 - Introduction - 9
1: What is CNC?
CNC (Computer Numerical Control) is the general term used for a
system which controls the functions of a machine using coded
instructions, processed by a computer. CNC machines are a very
important part of the modern manufacturing process. Indeed, many
of the different types of products you use everyday have been made
using some sort of CNC machine.
The CNC Manufacturing Process - Example.
The sequence shown below defines the main steps involved in
producing a component using a CNC system.
1) A part program is written using G and M codes. This describes
the sequence of operations that the machine must perform, in
order to manufacture the component.
2) The part program is loaded into the machines computer, called
the controller. At this stage, the program can still be edited or
simulated using the machine controller.
3) The machine controller processes the part program and sends
signals to the machine components. These direct the machine
through the required sequence of operations necessary to
manufacture the component.
What are the advantages of CNC?
CNC systems are automated and very accurate. Once
programmed, a CNC machine will perform repeat tasks until
instructed to stop. Each component produced will be exactly the
same size and shape, saving money on designing any jigs and
fixtures that might have otherwise been required.
Using CNC machines can reduce waste material, since a CNC
machine is much less likely to make an error than a human operated
machine. CNC machines can also run 24 hours a day, if necessary,
with no signs of fatigue.
Companies can estimate the manufacturing costs for CNC
production much more accurately, compared to a production line
with conventional production machines.
Jargon Buster
-
x
CNC refers to Computer Numerical Control, the automatic system used to
control a machine tool.
A Part Program is a list of coded instructions which describes how the designed
part, or component, will be manufactured. The part program is also referred to as
the CNC file, program, or G and M code program.
A G and M code is a series of letters and numbers that make up the language
used by CNC machinery.
10 - Introduction - Section 1
Triac Series CNC Machine User's Manual
1: Before Beginning to Setup...
Before beginning to setup your Denford Triac CNC machine, take a
moment to check your separate order documentation, making sure that
all items have been delivered to your establishment. Any missing or
damaged items should be reported to Denford Customer Services as
soon as possible.
Note
-
x
The standard
equipment listed here
is correct at the time of
printing - June, 2002 but is liable to change
through continuous
development of our
products.
Please refer to your
invoice for the
definitive list of
standard equipment
shipped with your
machine.
* Note
-
x
* Short 9-25 pin serial
link adaptor cables can
be used to convert the
RS232 connectors
according to the type
of COM port fitted to
your computer.
The following equipment is supplied as standard with your Triac Series
CNC machine:
PC versions:
• Denford Triac PC CNC machine. Note that the precise specification
of your Triac will depend on any options selected at the time of
ordering (see next page).
• Separate electrical control box.
• 1 x Electrical control box key.
• 1 x RS 232 serial link cable (25-9 pin connection)*. Note CNC
machine controller PC not included as standard.
VMC versions:
• Denford Triac VMC CNC machine. Note that the precise
specification of your Triac will depend on any options selected at the
time of ordering (see next page).
• Separate electrical control box, including built-in PC.
• Integrated DeskTop Tutor controller and monitor.
• 8 station automatic tool changer and tooling.
• Flood coolant system.
All versions:
• 1 x Guard door interlock switch - torx bit.
• 1 x Operators toolkit (metric allen/hex keys [2mm, 2.5mm, 3mm, 4mm,
5mm, 6mm]; spare fuse package).
• 1 x Easy change toolholder package.
• 1 x Triac Series CNC machine warranty pack.
• 1 x Triac Series CNC machine inspection certificate.
• 1 x Triac Series CNC machine manual (this book) plus additional
OEM product manuals (as required).
• 1 x CNC Machine Control Software manual.
• 1 x CNC Machine Control Software CD-ROM and/or floppy disks.
• Machine commissioning and basic instruction.
• 1 Day training course, for 2 persons, at Denford Limited (UK).
Triac Series CNC Machine User's Manual
Section 1 - Introduction - 11
1: Before Beginning to Setup...
The following optional equipment may also be supplied with, or ordered
for, your Triac Series CNC machine:
• IBM or 100% compatible PC, keyboard, mouse and monitor (PC
version).
• 8 station automatic tool changer and tooling (PC version).
• Flood coolant system (PC version).
• Desk top tutor (PC version).
• Spray mist coolant system.
• Hydraulic vice.
• Pneumatic safety guard door.
• Upgrade pack for integration into Denford FMC, FMS or CIM
systems.
• Courseware and project books.
• Various tooling packages.
• Additional training packages.
• Additional CNC control software licences.
• Machine work bench.
• Video conferencing system.
12 - Introduction - Section 1
Triac Series CNC Machine User's Manual
2: Safety Features Overview and Precautions
Safety Features Overview.
The following safety features are standard on your Denford Triac
CNC machine:
• Emergency stop button.
• Totally enclosed guard door with interlock switch.
• Electronic shear key built into spindle controller.
• Axis limit microswitches, adjustable on Z slide.
• Automatic tool retraction and spindle stop during a tool change
operation on the (optional) Automatic Tool Changer.
• Option on control software to check CNC programs prior to
machining.
Safety Precautions.
Safety is very important when working with all forms of machinery
but particularly when working with CNC equipment, due to the
hazardous voltages, speeds and forces that exist in the hardware.
Follow the rules below at all times, when using your Denford Triac
CNC machine.
General Safety Precautions :
• Wear clothing suitable for machine operation and follow the safe
working procedures in place at your establishment.
• Do not place any objects so that they interfere with the guards or
the operation of the machine.
• Never try to clean the machine if any part of it is rotating or in motion.
• Always secure the work on the table or in a fixture or vice.
• Ensure that the correct cable for the power source is used.
• If power fails turn off the yellow/red isolator (found on the front of
the electrical control box) immediately.
• Hazardous voltages can still exist immediately after switching the
electrical control box isolator to the OFF position. Always wait at
least 5 minutes before entering the electrical control box.
• Ensure the power is switched off before starting any maintenance
work on the machine. Always post a warning informing others
that the machine is undergoing essential maintenance.
• Lubricate the required machine areas at the intervals specified in
this manual, to prevent the axes from seizing (see the
Maintenance section for further details).
• Observe caution when adding or removing machine tooling.
• When an emergency stop is required, press the circular red emergency
stop button, located on the front machine operators panel.
Triac Series CNC Machine User's Manual
Section 2 - Safety Features - 13
2: Safety Features - Emergency Stop Button
Location of Emergency Stop Button:
Triac PC without flood coolant - Mounted on the vertical operator
panel, which is located on the front, right side of the machine
cabinet.
Triac PC with flood coolant - Mounted on the operator panel
housing, which is located on the front, right side of the machine
cabinet.
Triac VMC - Mounted on the operator panel, which is located on the
front, right side of the monitor housing. The monitor housing is
attached to the right end of the machine cabinet.
To active an
emergency stop,
press the button
fully in until it clicks.
Emergency stop
button located on
operator panel.
Model shown:
Triac PC with
optional flood
coolant.
A circular, red emergency stop button is mounted on the front
operators panel. When pressed, it has the effect of stopping all
axes, toolchanger and spindle movements immediately. The
interlock switch will also close. When the safety guard door is in its
closed position, this will prevent access to the working area of the
machine.
To active an emergency stop, press the button in until it clicks. The
emergency stop button will continue to cut all power to the machine
drives and continue to keep the interlock switch closed, until the
release sequence is performed.
To release a closed emergency stop button, push in and turn the
button clockwise until it springs back out.
14 - Safety Features - Section 2
Triac Series CNC Machine User's Manual
2: Safety Features - Interlock Guard Switch
Model shown: Triac
PC with optional
ATC, pneumatic
guard and vice.
Guard door
lock plate.
Location of interlock
guard switch,
mounted on the
righthand side panel
of the machine casing.
An interlock safety switch is fitted to the guard door, on the righthand
side panel of the machine cabinet. The switch must be manually
released to enter the working area when the 24 volt circuit has failed
and the door is clamped electrically. Note - For manual interlock
release, the power supply must be switched off.
1) Remove security screw A, B or C (whichever is easiest to reach)
using the supplied Torx T-20 adapter.
2) Insert a 2.5mm diameter tool (such as a small flat screwdriver)
into the hole until it pushes the
manual release lever.
Interlock
Trip Lever
3) Whilst holding the tool against
this manual release lever, open
the guard.
4) Remove the tool from the hole
and replace the security screw.
A
C
B
1)
T-20
Triac Series CNC Machine User's Manual
2)
2.5mm diameter 3)
4)
T-20
Section 2 - Safety Features - 15
3: Unpacking & Lifting your Triac
Cut the top of the delivery box open and remove any packaging
carefully.
To obtain better access to the Triac and any additional pieces of
equipment, remove all the sides from the delivery box, leaving the
Triac standing on its wooden delivery pallet.
Lift the Triac from the packaging. Use a professional hoist and a
single 500KG (1120 lb), 5 metre (200”) endless nylon sling to lift the
Triac, arranged as shown in the diagram below. Always use
sensible lifting precautions in accordance with Health and Safety
Regulations in your establishment.
Use caution when removing the separate electrical control box,
since it weighs 70 KG (154 lb). If possible, lift the electrical control
box using a porters trolley.
Ensure that your Triac is both secure and balanced before lifting.
Perform an assisted lift, whereby the hoist operator can manually
monitor the balance and security of the load as is it moved. To
transport your Triac over longer distances, use a suitably sized
wheeled trolley.
Data Panel
-
Use a
professional
hoist to lift the
machine.
x
Machine Weights:
Standard Triac PC 240
KG (529 lb).
Triac PC with optional
ATC 320 KG (705 lb).
Triac VMC 320 KG (705
lb).
Electrical control box
weight 70KG (154 lb).
Use one single 5 metre
x 500 KG nylon sling
with a professional hoist
to lift.
Thread one single 5 metre
(200”) 500 KG (1120 lb)
nylon sling through the
eyebolt on the top of the
machine column.
16 - CNC Machine Installation - Section 3
Triac Series CNC Machine User's Manual
3: Deciding on a Site for your Triac
Note
-
x
Optional machine tables
and industrial cabinets,
designed specifically for
the Triac CNC machine
series, are available
from Denford Limited.
Data Panel
-
x
Dimensional Data.
Standard Triac PC
Dimensions:
Total machine width
1285mm (50 5/8”).
Total machine height
1060mm (41 3/4”).
Total machine depth
900mm (35 7/16”).
Triac PC with ATC
Dimensions:
Total machine width
1285mm (50 5/8”).
Total machine height
1060mm (41 3/4”).
Total machine depth
935mm (36 13/16”).
Site your Triac in a well ventilated room. The Triac is a bench
mounted machine, so it should be sited on a bench of sturdy
construction to take the weight of the machine and of a height which
enables comfortable operating and programming to take place.
Ideally, the user will operate the machine when standing at its front,
with a clear view of both the machine working area (through the
transparent guard window) and the computer being used as the
controller unit (which should be angled towards the user), as shown
in the diagram below.
We recommend the separate electrical control box is sited under the
machine table, leaving a space of at least 1000mm (40”), to allow full
opening of its access door.
Sufficient room should also be provided for effective maintenance to
be carried out around the CNC machine itself.
Denford Triac
PC CNC Milling
Machine.
Triac VMC Dimensions:
Total machine width
2120mm (83 15/32”).
Total machine height
1060mm (41 3/4”).
Total machine depth
935mm (36 13/16”).
Electrical Control Box
Dimensions:
Total width 600mm
(23 5/8”).
Total height 780mm
(30 11/16”).
Total depth 360mm
(14 3/16”).
Computer desk,
monitor, keyboard
and mouse angled
towards Operator.
Electrical
Control Box
under table.
Machine
Operator.
Electrical Control Box access
door shown open (dotted).
Plan View showing Ideal Machine Operating Positions (PC version shown).
Triac Series CNC Machine User's Manual
Section 3 - CNC Machine Installation - 17
3: Levelling your Triac
Your Triac rests level on the two hollow sections which run beneath
the machine cabinet. The machine itself has been levelled to the
machine cabinet prior to dispatch, so it is only necessary to level the
table on which the Triac is to be situated.
3: PC version only Connecting your computer to the Triac PC
Warning
-
x
Do not connect cables
between any electrical
hardware with the mains
power switched on,
since this could
seriously damage
components inside your
personal computer and/
or CNC machine.
Note
-
x
The RS232 connection
is not fitted to Triac
VMC electrical control
boxes, since these
versions have a hard
wired (permanent) link
between the CNC
machine and the
controller computer.
Your Triac PC is controlled using a standard IBM compatible
personal computer. In this role, the computer can be referred to as
the machine controller. Ideally, the computer you intend to use
should be placed next to your Triac and its electrical control box,
with easy access to a mains power supply.
Your computer must be equipped with hardware that allows it to:
1) run the CNC machine control software.
2) be physically connect to the Triac electrical control box.
The specification of computer required to control your Triac will
depend upon the type of CNC machine controlling software being
used. Please refer to your separate CNC machine controlling
software manual for details regarding the exact computer
specification required.
Note
-
x
PC Terminology:
The COM ports on your PC may be labelled as Serial ports. Most COM ports
have a 9 pin D MALE connector, though some older computers may be fitted with
additional PCI COM cards having a 25 pin D MALE connection. In this case, a 9
to 25 pin adaptor cable can be added to the RS 232 cable supplied with your
machine. The RS 232 cable supplied with your machine must always be used,
since this cable features crossovers on some of the pin connections.
You must also configure the machine control software to recognise which
numbered COM port is being used by the RS232 machine lead. Details on this
procedure are outlined in your separate CNC machine control software manual.
The Parallel port on your PC may be labelled as the Printer port. The printer port
has a 25 pin FEMALE connector.
18 - CNC Machine Installation - Section 3
Triac Series CNC Machine User's Manual
3: PC version only Connecting your computer to the Triac PC
Warning
-
x
Do not connect cables
between any electrical
hardware with the mains
power switched on,
since this could
seriously damage
components inside your
personal computer and/
or CNC machine.
To connect your computer to the Triac PC:
1) Connect the elements of your computer together as described in
your original computer manufacturers operating manual. At this
stage, the computer should not be switched on.
2) The computer must be physically connected to the Triac electrical
control box, using the supplied RS232 cable. This is the long,
thin serial link cable fitted with a 25 pin D male connector at one
end and a 9 pin D female connector at the opposite end, as
shown bottom right.
3) Connect the 25 pin D male end
of the RS 232 cable to the 25
pin D female port mounted on
the side panel of the Triac
electrical control box, as
shown below and right. The
port is labelled RS 232.
25 pin D female
connector fitted to
electrical control box
side panel.
25 pin D male
connector
fitted to
RS232 cable.
RS232 Cable.
Location of RS 232
port on electrical
control box.
Triac Series CNC Machine User's Manual
9 Pin D
Female
Connector.
25 Pin D
Male
Connector.
Section 3 - CNC Machine Installation - 19
3: PC version only Connecting your computer to the Triac PC
Warning
-
x
Do not connect cables
between any electrical
hardware with the mains
power switched on,
since this could
seriously damage
components inside your
personal computer and/
or CNC machine.
4) Connect the remaining 9 pin D female end of the RS 232 cable to
the 9 pin D male COM port on your computer, ideally COM 2.
Most computers usually have two COM ports situated on the
back panel. If you cannot identify any of the ports, please refer to
your original computer manufacturers operating manual for
further guidance. Note that older computers may be fitted with a
25 pin D male COM port, which may require the fitting of an
additional 9 to 25 pin adaptor to your RS 232 cable.
Long (PCI card
mounted) 25 pin D
COM port.
25 pin D male
connector fitted
to computer
(back) panel.
Short (standard)
9 pin D COM
port.
25 pin D female
connector fitted to
RS232 cable (using a
9 to 25 pin adaptor).
9 pin D female
connector
fitted to
RS232 cable.
9 pin D male
connector fitted
to computer
(back) panel.
5) Do not confuse the 25 pin D female
parallel (printer) port on your computer
with the 25 or 9 pin male D COM ports.
If your CNC machine control software is
supplied with a security key, the 25 pin
D male connector of this key must be
fitted to the 25 pin D female parallel
port, as shown right. Security keys are
also referred to as dongles.
A schematic diagram illustrating these
component connections is shown on
pages 32 to 33.
20 - CNC Machine Installation - Section 3
25 pin D male 25 pin D female
connector on connector fitted
security key
to computer
(dongle).
(back) panel.
Triac Series CNC Machine User's Manual
3: Connecting the Mains Supply
Warning
-
x
Do not connect cables
between any electrical
hardware with the mains
power switched on,
since this could
seriously damage
components inside your
personal computer and/
or CNC machine.
The mains power supply is fed to the electrical control box, which in
turn, is connected to the Triac CNC machine. There are two
electrical connections that exit the control box:
• The machine power cable (this is the large diameter flexible hose).
• The mains supply cable (the small diameter cable).
The Machine Power Cable.
The machine power cable must be attached to the Triac CNC
machine. The machine power cable is housed in the large, black,
flexible hose, approximately 30mm in diameter.
One end of the machine power cable is permanently connected to
the side panel of the electrical control box, whilst the free end is
fitted with a male connector plug, as shown in the diagram below
left.
The back panel of your Triac PC is fitted with a machine connection
box, containing a fixing bracket with the female connector plug, as
shown in the diagram below right.
The male
connecter plug
is located on the
free end of the
machine power
cable, fitted to
the side panel
of the electrical
control box.
The female connector plug is
fitted to the fixing bracket,
mounted on the side of the
machine connection box,
located on the back panel of
the Triac cabinet.
continued...
Triac Series CNC Machine User's Manual
Section 3 - CNC Machine Installation - 21
3: Connecting the Mains Supply
Warning
-
x
The Machine Power Cable.
continued...
Do not connect cables
between any electrical
hardware with the mains
power switched on,
since this could
seriously damage
components inside your
personal computer and/
or CNC machine.
Male pin layout on
machine power cable.
Warning
-
x
Do not attempt to fit the
male and female
connector plugs
together the wrong way
round. This could
damage the connector
pins.
Female pin layout on machine
connection box bracket.
The male and female connector plugs are shaped so they can only
be connected in the correct orientation - the cutaway parts of the
connector housings and the numbered segments printed on the pin
faces must match in order to achieve an electrical connection.
Position the male connector
plug (on the end of the
machine power cable)
against the female bracket
(on the machine connection
box) in the correct
orientation - the flexible
machine power cable hose
should exit the male
connector plug facing directly
down, as shown in the photo
opposite. Push the
connector plug fully into the
bracket.
Roller clips (circled) secure the
plug against the bracket.
Cable
exits
plug
facing
down.
Tighten the electrical connection by using the two roller clips, located
at the top and bottom of the bracket. Fully press each roller clip until
they “click” against the locating pins on the outside surface of the
male connector plug, then check the junction is secure.
22 - CNC Machine Installation - Section 3
Triac Series CNC Machine User's Manual
3: Connecting the Mains Supply
Warning
-
x
Do not connect cables
between any electrical
hardware with the mains
power switched on,
since this could
seriously damage
components inside your
personal computer and/
or CNC machine.
Note
-
-
Machine power
cable (connects to
CNC machine).
x
Depending on the CNC
machine specification,
some electrical control
box doors may be fitted
with locks.
Warning
Mains supply cable
(connects to mains
plug socket).
x
Never attempt to access
the electronic hardware
systems in the CNC
machine or electrical
control box with the
mains power switched
ON.
Note that hazardous
voltages can still exist
immediately after
switching off the power.
If the machine has
previously been
switched on, wait at least
5 minutes before
attempting to access any
electronic components.
Many electronic
components are
sensitive to electrostatic
damage - ensure
components and/or
personnel are suitably
earthed to minimise this
risk.
Plastic yellow
sealing tag.
Mains isolator
switch.
Electrical control
box door.
Electrical Control Box Seal.
The electrical control box is inspected then sealed with a plastic
yellow sealing tag. If this seal is broken on delivery, inform the
suppliers immediately. The seal should only be broken for the initial
mains power connection.
Connecting the Mains Supply.
The electrical control box is delivered with the mains supply cable
connected directly into the isolator, including approximately 3 metres
of standard mains specification cable. The cable should be fitted
with a standard 13 amp plug (or equivalent) suitable for the mains
power supply.
Triac Series CNC Machine User's Manual
Section 3 - CNC Machine Installation - 23
3: Connecting the Mains Supply
Warning
-
x
Do not connect cables
between any electrical
hardware with the mains
power switched on,
since this could
seriously damage
components inside your
personal computer and/
or CNC machine.
Electrical Connection Data.
•
•
•
•
Mains supply required: 240 Volts, AC, 1 Phase, 50 Hz, 13 AMP.
Cable required: 3 Core, 1.5mm2 per core.
Spindle motor: 1.1 Kw, DC, 1.5 hp.
Stepper motors: 200 steps/rev, DC
Mains Isolator Switch.
The CNC machine is switched on/off using
the isolator switch, mounted on the electrical
control box door.
The photo right shows the isolator
switch in the off “0” position.
Isolator Position “0” = Power OFF.
Isolator Position “I” = Power ON.
3: Electrical Diagrams
Warning
-
x
Never attempt to access
the electrical diagrams
folder with the mains
power switched ON.
Note that hazardous
voltages can still exist
immediately after
switching the isolator to
the OFF position.
Always wait at least 5
minutes before
attempting to open the
electrical control box
door.
PC version (shown in photo below) - The electrical diagrams are
held in a folder on the inside face of the door. Note that the door
cannot be opened with the mains isolator switch set in the on “I”
position. Depending on the CNC machine specification, some
electrical control box doors may be fitted with locks.
VMC version - The electrical diagrams are stored in the base of the
control box or supplied separately in the standard equipment box
supplied with your machine.
24 - CNC Machine Installation - Section 3
PC version - The
electrical diagrams
are held in a folder,
attached to the
inside face of the
electrical control
box door.
Triac Series CNC Machine User's Manual
3: Option - Compressed Air Connection Unit
Note
-
x
The compressed air
connection unit is fitted
as standard to the Triac
VMC.
The compressed air
connection unit is fitted
to the Triac PC when
any of the following
options are included:
• ATC.
• Hydraulic vice.
• Pneumatic door.
Compressed Air Connection Unit.
A compressed air connection unit is fitted to the back panel of the
Triac cabinet, comprising of three main elements:
• The air supply connection and isolator valve.
• The air pressure regulator and air filter regulator unit.
• The air lubricator unit.
The single airline connection supplies compressed air for the
standard automatic lubrication system, the optional pneumatic guard
door and the optional hydraulic vice.
The air compressor must be fitted with a SCHRADER quick release
connector. The connection fitted onto the end of the unit is
SCHRADER part number SC 8Ø51-11 1/8 BSP MALE. The female
connector required on the 1/4" pipe leading to the air compressor is
SCHRADER part number 9793C-12 1/4" BSP FEMALE.
Air lubrication
adjustment screw.
Pressure
adjuster.
Air supply
isolator.
SCHRADER
connection.
To machine.
Air
lubricator
unit.
Air drain
exhaust
valve.
Removable air
lubrication oil
container.
Air pressure
dial.
Air filter
regulator
container.
Air filter
(water)
drain plug.
Compressed
airline
valve.
To compressed
air source.
Triac Series CNC Machine User's Manual
Section 3 - CNC Machine Installation - 25
3: Option - Operation of the Compressed Air
Connection Unit
Air Supply Isolator Unit.
The air supply isolator unit is used to pressurise or drain the
compressed air system.
To pressurise (switch on) the system, turn the control fully
anticlockwise (when viewed from above), until the flat surface of the
handle aligns with the general airflow direction.
To depressurise (switch off) the system, turn the control fully
clockwise (when viewed from above), until the flat surface of the
handle lies at ninety degrees to the general airflow direction.
When the system is depressurised, the conical air drain exhaust
valve, positioned directly under the air supply isolator, is used to
dump any remaining air pressure.
View
Direction
...to pressurise the system.
...to drain air pressure
26 - CNC Machine Installation - Section 3
Triac Series CNC Machine User's Manual
3: Option - Operation of the Compressed Air
Connection Unit
Air Filter Regulator Unit.
The air regulator unit is used to adjust the air pressure level, with a
readout being displayed on the dial gauge.
The normal operating pressure (as supplied, preset on the machine)
is 1ØØ PSI (6.6 Bar). Maximum pressure for the air regulator is 15Ø
PSI (9.9 Bar).
Always check the main supply pressure before adjusting pressure at
the regulator. To adjust the pressure, pull up the rotary control to
unlock it from its current position. Turn the control clockwise (when
viewed from above) to increase pressure, or anticlockwise (when
viewed from above) to decrease pressure. Push the rotary control
down to relock it in its new position.
View
Direction
Increase air pressure
Decrease air pressure
Air filter (water)
drain plug.
The air filter unit, positioned below the dial gauge, cleans and
removes any water particles from the compressed airstream.
Regularly drain any water collected in the filter container (the bottle
below the dial) using the removable plug positioned at the bottom of
the container. The interval at which this operation is required will
depend on the type and condition of the air compressor being used.
Triac Series CNC Machine User's Manual
Section 3 - CNC Machine Installation - 27
3: Option - Operation of the Compressed Air
Connection Unit
Air Lubricator Unit.
The oil lubricator unit is used to blend a fine mist of oil with the
compressed airstream. The unit eliminates the potential damaging
effects of any moisture that may be present and automatically
lubricates any hardware within the air system. The amount of oil
blended with the pressurised air can be adjusted using the screw,
set inside the plastic cap.
To increase the oil flow, use a flat bladed screwdriver to turn the
screw anticlockwise (when viewed from above).
To decrease the oil flow, use a flat bladed screwdriver to turn the
screw clockwise (when viewed from above).
The rate of flow is preset at the factory, according to the various
pneumatic options fitted to your Triac, at the time of manufacture.
This rate should NOT require adjustment through normal day-to-day
use of the CNC machine.
To refill the air lubricator unit, you must unscrew and withdraw the
entire oil container, positioned directly below the oil flow adjustment
screw and cap. Refill the container using oil grade - ISO VG 32.
View
Direction
Oil flow adjustment screw
set into plastic cap.
Decrease oil flow
Increase oil flow
Removable air
lubrication oil
container.
28 - CNC Machine Installation - Section 3
Triac Series CNC Machine User's Manual
3: Option - Flood Coolant System
The System.
Coolant is driven from the storage tank (under the machine floor) to
the flood hose pipe (on the right side of the machine column) using
an electric pump. When operating, coolant is continually circulated
around this system.
The Pump.
Back panel
The electric pump is located inside
the working area of the machine,
against the back panel and to the
right of the machine column. The
easiest method of accessing the
pump is by opening the safety
guard door and reaching in
(around the table) towards the
back of the machine.
Machine floor
Coolant Delivery Hose.
Right side of
machine head
Flow adjustment tap.
Coolant delivery nozzle.
Pump
Flexible hose
The Storage Tank.
When not being used, coolant is
stored in a tank, located in the
base of the machine cabinet.
The tank capacity is 14.75 litres.
Angle the flexible coolant
delivery hose towards the
cutting tool tip, ensuring that the
piping is routed (where possible)
to avoid hitting any part of the
billet. Adjust the rate of flow
using the tap - full flow is
achieved by positioning the flat
section of the tap handle in line
with the direction of coolant flow
through the pipe.
Drain grill
Drain grill 2
Drain grill 1
Triac Series CNC Machine User's Manual
Section 3 - CNC Machine Installation - 29
3: Option - Flood Coolant System
Checking the Coolant Level.
To check the coolant level, use the viewing window, positioned in the
lower part of the machine right end panel.
Viewing window
Drain plug
Location of
viewing window
Removing Coolant.
Old (excessively dirty or used) coolant should be drained and
replaced with a fresh coolant mix. To drain off coolant, unscrew the
drain plug, located below the coolant level viewing window. Ensure
that any unwanted coolant is collected and disposed of in a
responsible manner.
Adding Coolant.
Note
-
x
The sequence of events
required to manually
enter an M code will
depend on the type of
CNC control software
being used.
In addition, many of
these miscellaneous
functions may be
controlled directly using
buttons and commands
available in your CNC
control software.
Please refer to your
separate CNC Control
Software User’s Manual
for specific details.
To fill or top-up the tank, open the safety guard door, then pour the
required amount of coolant mix directly into the working area of the
machine. The coolant is channelled into the storage tank via the two
drain grills located in the front right and left corners of the machine
floor. The grills can be removed for cleaning by unscrewing the allen
(hex) bolts in the centre of each grill. Recommended coolant Cincinnati Millacron Simcool C60. New coolant should be mixed in
accordance with coolant suppliers instructions. Denford
recommends using a minimum 2.5% mix.
M Codes for Delivery of Flood Coolant.
The following M codes can be manually entered to control the
operation of the flood coolant system:
M08 - Coolant on
M09 - Coolant off
M13 - Coolant on and spindle forward
M14 - Coolant on and spindle reverse
30 - CNC Machine Installation - Section 3
Triac Series CNC Machine User's Manual
3: Automatic Slide Lubrication System
Note
-
x
The automatic slide
lubrication system is
fitted as standard to all
Triac versions.
The system does not
automatically lubricate
the slides on Automatic
Tool Changers (which
are standard on VMC
versions, optional on PC
versions).
The automatic slide lubrication system, located on the back panel of
the Triac cabinet, is comprised from an oil reservoir tank and an
automatic pump unit. The system is designed to automatically
supply oil to the slides and ballscrews on the X, Y and Z axes only.
Oil is automatically pumped to the required areas upon activation of
the machine head spindle. Do not let the oil level drop below the
minimum mark, printed on the side of the reservoir tank.
To top-up the slide lubrication system, lift the yellow filling cap and
pour sufficient oil into the reservoir tank. Take care NOT to overfill
the system. The reservoir tank has a maximum capacity of 0.5
litres. Refill the reservoir using oil grade - BP. CS 68.
Filling the
automatic slide
lubrication
system.
Location of automatic
slide lubrication
system.
Plastic filling
oil cap.
Low oil level
marker.
Triac Series CNC Machine User's Manual
Section 3 - CNC Machine Installation - 31
3: Automatic Slide Lubrication System
The hand priming pump should only be used if the oil level falls
below the minimum oil level mark, printed on the side of the
reservoir tank. To prime the system, lift and depress the spring
loaded hand pump, until oil begins appearing on the slideways.
The amount of oil supplied to the slideways can be adjusted using
the hand priming pump. Release the locking nut on the top of the
hand priming pump, so the knurled collar can be freely rotated.
Turning the knurled collar raises or lowers the sleeve, which in turn
shortens or lengthens the stroke. Note that 5ml graduated marks
are machined into the surface of the sleeve, to assist setting.
Automatic slide
lubrication
system hand
priming pump.
Increase oil flow
Decrease oil flow
View
Direction
Sleeve locking nut.
Knurled collar.
Graduated sleeve.
To increase the oil flow, turn the knurled collar clockwise (when
viewed from above). The sleeve will move down (increasing the
stroke).
To decrease the oil flow, turn the knurled collar anticlockwise (when
viewed from above). The sleeve will move up (decreasing the
stroke).
The rate of oil flow is preset at the time of CNC machine
manufacture. This rate should NOT require adjustment through
normal day-to-day use of the CNC machine.
32 - CNC Machine Installation - Section 3
Triac Series CNC Machine User's Manual
3: Removal of Protective Coatings
Warning
-
x
Potential risk of ignition /
explosion!
Do not use any aerosol
based / flammable
products to lubricate
your CNC machine.
Carefully read and
follow any instructions
or notices included with
lubrication products.
Once your Triac has been sited and connected electrically, the
protective coatings must be removed to prepare the machine for
running.
The protective coatings applied to the slideways and bright surfaces
can be removed using a kerosene based solvent. The coatings
must be removed from the slideways before any attempt to move
them is made. Only use kerosene based solvents in accordance
with the solvent manufacturers instructions and safety
recommendations. Ensure that no naked flames are present and
adequate ventilation is provided. To avoid the potential risk of
ignition / explosion, ensure that all solvent vapours can exit fully from
any enclosed areas on the CNC machine. Wait at least 1 hour
before attempting to operate the CNC machine.
Once all protective coatings have been removed, all untreated
surfaces should be coated with a light covering of machine oil grade
- BP. CS 68.
The protective plastic sheeting on the guard windows should be
removed and the glass and perspex cleaned with an anti-static
cleaner.
Triac Series CNC Machine User's Manual
Section 3 - CNC Machine Installation - 33
3: Component Connection Schematic Diagram
Ancillary Equipment, such as printers
or scanners, may also be connected
to the Parallel port on the PC.
Personal
Computer
(PC).
9 to 25 Pin
Connectors
(if required).
To COM 1
Port.
To
COM 2
Port.
To Parallel
Port.
Security Dongle
(if required).
Desktop Tutor (when
ordered) connects to
the PC port labelled
COM 1.
34 - CNC Machine Installation - Section 3
Notes for Triac PC connections:
The COM ports on your PC may be labelled as
Serial ports. All COM ports have a 25 pin
(adaptor required) or 9 pin MALE connector.
The Parallel port on your PC may be labelled
as the Printer port. The printer port has a 25
pin FEMALE connector.
The RS232 cable connects the Electrical
Control Box to the PC port labelled COM 2.
The RS232 cable is the long, thin cable fitted
with a 9 pin female connector at one end and
a 25 pin male connector at the opposite end.
Connect the male end of the RS 232 cable to
the 25 pin RS232 female port on the electrical
control box. Connect the remaining female
end of the RS 232 cable to the 9 pin male
COM2 port on your PC.
Triac Series CNC Machine User's Manual
3: Component Connection Schematic Diagram
Note *
-
Denford Triac Series CNC Machine.
PC version with
ATC, pneumatic
guard and
hydraulic
vice shown.
x
Ensure the male
connector plug is fitted
to the female bracket on
the machine connection
box in the correct
orientation.
Male
connector
plug*.
Mains Power
Supply Plug.
Mains power is supplied
from the Electrical Control
Box to the Triac using the
machine power cable.
Notes for Triac VMC connections:
Ignore all references and
connections to the PC shown on
pages 18 to 20. The RS232
connection is not fitted to Triac VMC
electrical control boxes, since these
versions have a hard wired
(permanent) link between the CNC
machine and the controller computer.
The operator controls are mounted
in a separate housing on the right
side of the Triac cabinet.
Triac Series CNC Machine User's Manual
To the Port
labelled RS 232.
Triac Electrical Control Box
(Note - the physical layout on
individual boxes may vary).
Section 3 - CNC Machine Installation - 35
4: Using your Triac - Overview
Several steps must be completed before the final manufacture of a
part. The flowchart below lists the general steps that should be
followed for CNC file creation, simulation and final part manufacture, in
the recommended order. However, miscellaneous factors may warrant
the user to complete the steps in a different order to that shown.
Note *
-
x
For more detailed
information regarding
these steps please refer
to your separate CNC
Machine Control
Software User's Manual.
Note
-
x
Steps F and G are not
required when working
with a simulated CNC
machine (for example,
Virtual Reality).
Billet data is taken from
Denford directives
written in the CNC
program - step B.
Tooling data is taken
from the configuration of
the software tooling step C.
A: Switch on the Triac, then start the CNC Control Software
(see section 4: page 39 and see Note * left)
B: Load or create the CNC program
(see Note * left)
C: Configure the tooling files in the CNC Control Software
(see Note * left)
D: Simulate the CNC program in 2D or 3D
(see Note * left)
E: Establish communications and home the Triac
(see section 4: page 41 and see Note * left)
F: Prepare any tooling hardware for the Triac
(see section 5 - Preparing Tooling Hardware: pages 52 to 69)
G: Load the billet into the Triac
(see section 6 - Work Holding: pages 70 to 81)
H: Configure the workpiece offset file and tool length offsets
(see section 4: pages 45 to 48 and see Note * left)
I: Manufacture the part
(see section 4: pages 49 to 51 and see Note * left)
36 - CNC Machine Operation - Section 4
Triac Series CNC Machine User's Manual
4: General Location of Triac Components
Front View.
Machine
spindle.
Photograph features optional
equipment.
* Location of optional
equipment indicated but item
not shown in photograph.
Machine
head.
Machine
column.
Automatic tool
changer.
Guardmaster
interlock switch.
Enclosed safety
guard door.
Flood coolant
drain plug and
level viewing
window *.
Pneumatic
vice.
Safety guard door
handle *.
Front and rear
machine cabinet
support feet
sections.
Operators panel (feed and
spindle overrides, emergency
stop button, axis override and
pneumatic guard buttons).
Rear View.
Photograph features optional
equipment.
* Location of optional
equipment indicated but item
not shown in photograph.
Machine head
and column.
Compressed air
connection unit.
Machine
connection box.
Automatic tool
changer.
Enclosed safety
guard door.
Connector plug
for cable from
separate
electrical control
box.
Automatic slide
lubrication
system.
Triac Series CNC Machine User's Manual
Hydraulic
intensifier.
Section 4 - CNC Machine Operation - 37
4: General Location of Triac Components
Electrical
Control
Box.
Door
lock.
Machine
identification
panel.
Mains supply cable
(connects to mains
plug socket).
CD-ROM and
floppy drives *
(VMC versions
only).
Photograph depicts a
Triac PC electrical
control box.
Machine power
cable (connects to
CNC machine).
RS 232
connection on
(hidden) end
panel (PC
versions).
Door
lock.
Mains isolator
switch.
Electrical control
box door.
Inside the Triac Cabinet
(working
Machine
head.
Machine
column.
Worklight.
Automatic
tool changer
carousel.
Flood
coolant
pipe *.
Pneumatic vice.
Table.
Flood coolant
pump * (near
back of
column).
Photograph features
equipment.
* Location of optional
equipment indicated but item
not shown in photograph.
Flood
coolant
drain grill *.
38 - CNC Machine Operation - Section 4
Machine
column
base.
Machine
spindle. Saddle
(under
table).
Flood
coolant
drain grill *.
Triac Series CNC Machine User's Manual
4: Switching the Triac On
Warning
-
x
Do not connect cables
between any electrical
hardware with the mains
power switched on,
since this could
seriously damage
components inside your
CNC machine.
Warning
-
x
Never attempt to access
the electronic hardware
systems in the CNC
machine or electrical
control box with the
mains power switched
ON.
Note that hazardous
voltages can still exist
immediately after
switching off the power.
If the machine has
previously been
switched on, wait at least
5 minutes before
attempting to access any
electronic components.
Many electronic
components are
sensitive to electrostatic
damage - ensure
components and/or
personnel are suitably
earthed to minimise this
risk.
Follow these instructions to switch on your Triac:
1) PC versions only - Check the RS232 machine lead is fitted
securely between the serial (COM) port socket on the machine
controller personal computer and the RS232 socket on the
separate black electrical control box.
2) PC versions only - Check the RS232 controller lead is fitted
securely between the serial (COM) port socket on the machine
controller personal computer and the RS232 socket on the
DeskTop Tutor controller keypad.
3) All versions - Check that all access panels and doors are in
position and securely fastened.
4) All versions - Check that all inlet/exhaust vents are clear from
obstructions.
5) Compressed air equipped versions only - Switch on the air
compressor. Open the compressed airline valve and adjust the
pressure, if necessary.
6) All versions - Plug the mains supply cable from the separate
black electrical control box into an available power socket.
Switch the power socket on.
7) All versions - Power up the Triac by turning the yellow isolator
switch from the off (0) position to the on (I) position. The isolator
switch is mounted on the front door of the separate black
electrical control box. If the Triac does not begin its power-up
routine, switch off the mains power supply to the CNC machine.
Check all connections and fuses, referring to Section 8 - Machine
Electronics, if necessary.
8) PC versions only - Switch on the machine controller PC and start
the CNC control software. Establish a communication link
between the CNC control software and the Triac - please refer to
your separate CNC Control Software User’s Manual for details
outlining this procedure. If a communication link cannot be
established, recheck the connections on the RS232 machine
lead, followed by the communication settings of your CNC control
software, referring to Section 9 - Technical Support, if necessary.
VMC versions only - Note that the integrated computer will start,
then load the CNC control software automatically. Establish a
communication link between the CNC control software and the
Triac - please refer to your separate CNC Control Software
User’s Manual for details outlining this procedure.
Triac Series CNC Machine User's Manual
Section 4 - CNC Machine Operation - 39
4: Switching the Triac Off
Follow these instructions to switch off your Triac:
1) All versions - Wait for the Triac to fully complete any machining or
processing of any operational instructions.
2) All versions - Open the safety guard door and remove any
finished parts from the working area.
3) All versions - Close down the communication link between the
CNC control software and the Triac, then exit the CNC control
software, as described in your separate CNC Control Software
User’s Manual.
4) PC versions - Shut down and switch off the machine controller
personal computer.
VMC versions - Close down the Windows operating system on
the integrated computer. Using the Windows startbar menu, click
“Start”, “Shut Down”, select the “Shut Down” option, then click the
[Okay] button.
5) All versions - Power down the Triac by turning the yellow isolator
switch from the on (I) position to the off (0) position. The isolator
switch is mounted on the front door of the separate black
electrical control box.
Note that cutting the machine power will trigger the closing of the
interlock guard switch. This will lock a closed safety guard door
in position, preventing access to the machine working area. The
interlock guard switch will automatically reopen when power is
next supplied to the Triac.
40 - CNC Machine Operation - Section 4
Triac Series CNC Machine User's Manual
4: (Home Mode)
Note
-
x
The sequence of events
required to home the
Triac will depend on the
type of CNC control
software being used please refer to your
separate CNC Control
Software User’s Manual
for specific details.
Note
-
x
The CNC control
software Jog and Auto
Modes will not become
available until the
machine has been
configured by homing all
three machine axes.
Note
-
Immediately after establishing a communication link between the
CNC control software and the Triac, all three axes of the CNC
machine must be homed.
Homing the CNC machine defines:
• The constraints of three dimensional co-ordinate grid system
used for plotting any programmed movements - effectively the
working envelope of the CNC machine.
• The machine datum - the zero reference point for the CNC
machine - so the controlling software can calculate where the tool
is positioned in relation to our working envelope.
The process is commonly referred to
as homing the machine, or datuming
each axis. Each of the three
machine axes are sent to their fixed
zero positions, as shown in the
diagram right.
x
The machine datum
position is set by
Denford and can never
be moved, since it
defines the physical
movement capability of
the CNC machine.
After homing the machine, the zero position of the three dimensional
co-ordinate grid system is referred to as the machine datum. You
can find the position of the machine datum by switching the coordinate display in your CNC control software to read Machine Coordinates. The position of the machine datum is achieved when the
X, Y and Z panels of the co-ordinate display all read zero (this
assumes that no offsets are loaded).
In addition to homing the CNC machine after it has first been
switched on, we also recommend homing the CNC machine after
loading or configuring any offsets.
Triac Series CNC Machine User's Manual
Section 4 - CNC Machine Operation - 41
4: Manually Controlling the Triac (Jog Mode)
Jog mode is used for manually controlling the CNC machine, moving
the three machine axes, changing tools, operating optional
equipment and configuring any offsets.
Z+
Machine Back
Column slide
Z axis
Z-
Y+
Y axis
Table slide
Crosslide
Y-
XX axis
X+
Machine Front
Axis Definitions.
Note
-
The keys for manual
axis movement will
depend on the type of
CNC control software
being used - please
refer to your separate
CNC Control Software
User’s Manual for
specific details.
x
X Axis - The X axis slides run at 90 degrees to the Y and Z axes,
horizontally left and right, when viewed from the front of the
machine.
Minus (-) X movements run towards the left end of the machine and
positive (+) X movements run towards the right end of the machine.
Y Axis - The Y axis slides run at 90 degrees to the X and Z axes,
horizontally forwards and backwards, when viewed from the front of
the machine.
Minus (-) Y movements run towards the front of the machine and
positive (+) Y movements run towards the back of the machine.
Z Axis - The Z axis slides runs at 90 degrees to the X and Y axes,
vertically up and down, when viewed from the front of the machine.
Minus (-) Z movements run down, towards the floor of the machine
and positive (+) Z movements run up, away from the floor of the
machine.
42 - CNC Machine Operation - Section 4
Triac Series CNC Machine User's Manual
4: Manually Controlling the Triac (Jog Mode)
Co-ordinate Display Systems.
The co-ordinate display can be changed, according to datum (zero
position) required:
Machine Co-ordinates
Display System.
The co-ordinate position
values are displayed relative
to the fixed machine datum.
The co-ordinate display
always shows the true
position of the machine.
Work Piece Co-ordinates
Display System.
The co-ordinate position
values are displayed relative
to the programmed
(moveable) workpiece
datum, described through
use of the offset facility.
Offsets temporarily shift the
entire co-ordinate based grid
system of the machine. It is
common to configure the
workpiece datum as the
location from which all
machining co-ordinates will
be taken.
Triac Series CNC Machine User's Manual
Section 4 - CNC Machine Operation - 43
4: Manually Controlling the Triac (Jog Mode)
Note
-
x
The sequence of events
required to manually
enter an M code will
depend on the type of
CNC control software
being used.
In addition, many of
these miscellaneous
functions may be
controlled directly using
buttons and commands
available in your CNC
control software.
Please refer to your
separate CNC Control
Software User’s Manual
for specific details.
M codes can be manually entered for control of miscellaneous
functions, such as switching the spindle on and off, or operating an
ATC (automatic toolchanger).
List of M codes for Standard & Optional Equipment.
M03 - Spindle forward (standard on all versions)
M04 - Spindle reverse (standard on all versions)
M05 - Spindle stop (standard on all versions)
M08 - Coolant on (optional flood coolant system)
M09 - Coolant off (optional flood coolant system)
M10 - Vice open (optional hydraulic vice)
M11 - Vice close (optional hydraulic vice)
M13 - Coolant on and spindle forward (optional flood coolant system)
M14 - Coolant on and spindle reverse (optional flood coolant system)
M20 - ATC arm in towards machine spindle (optional ATC)
M21 - ATC arm out away from machine spindle (optional ATC)
M22 - ATC arm down from beneath storage cover (optional ATC)
M23 - ATC arm up into storage cover (optional ATC)
M24 - Drawbar Unclamp (release tool holder) (optional ATC)
M25 - Drawbar Clamp (grip tool holder) (optional ATC)
M27 - ATC reset carousel (optional ATC)
M32 - Rotate carousel clockwise (viewed from above) (optional ATC)
M33 - Rotate carousel counter-clockwise (viewed from above) (optional ATC)
M34 - Rotate carousel one half turn (optional ATC)
M38 - Guard open (optional pneumatic safety guard door)
M39 - Guard close (optional pneumatic safety guard door)
M62 - Auxiliary output number 1 on (option)
M63 - Auxiliary output number 2 on (option)
M64 - Auxiliary output number 1 off (option)
M65 - Auxiliary output number 2 off (option)
M66 - Wait auxiliary output number 1 on (option)
M67 - Wait auxiliary output number 2 on (option)
M76 - Wait auxiliary output number 1 off (option)
M77 - Wait auxiliary output number 2 off (option)
44 - CNC Machine Operation - Section 4
Triac Series CNC Machine User's Manual
4: Understanding Offsets
Note
-
x
Further information
regarding configuration
of workpiece and tool
length offsets can be
found in your separate
CNC Machine Control
Software User's Manual.
What are offsets?
Offsets are a collection of numerical values used to describe the
location of the workpiece datum. The moveable workpiece datum
defines the zero point on the billet (the material you want to
machine). This is the starting point for any cutting co-ordinates
supplied by the machine controller.
Two types of offset file are used, in combination, to describe this
location:
i) The workpiece offset file - This file allows global offset values to
be set for the X, Y and Z axes. In other words, every tool profile
will use the workpiece offset values.
ii) The tool length offset files - Every tool has its own individual tool
length offset file, containing a single Z offset value. They are
used to compensate for the differences in length between tools.
How is a workpiece datum calculated?
The X position of the workpiece datum is defined by the X value
entered into the workpiece offset file.
The Y position of the workpiece datum is defined by the Y value
entered into the workpiece offset file.
The Z position of the workpiece datum is defined by the combination
of the Z value entered into the workpiece offset file and the value
entered into the tool length offset file belonging to the tool profile
currently in use.
How is the workpiece datum used?
The software uses the workpiece datum as the starting point (zero
reference) for any co-ordinate movements it receives. These coordinate movements are read from the loaded CNC file. In other
words, the position of the workpiece datum will determine the place
on the CNC machine where the part is manufactured.
What actually happens when I program my workpiece datum
position?
Configuring the workpiece datum position shifts, or offsets, the entire
three dimensional co-ordinate grid system used by the CNC
machine. The workpiece datum will now be read by the CNC
machine as its zero position, rather than the machine datum. The
machine datum is a fixed point, defined when you first switch on and
home the CNC machine.
Triac Series CNC Machine User's Manual
Section 4 - CNC Machine Operation - 45
4: Understanding Offsets
Note
-
x
Further information
regarding configuration
of workpiece and tool
length offsets can be
found in your separate
CNC Machine Control
Software User's Manual.
Where should I position the workpiece datum on my billet?
This depends on the position of the part datum set in your CNC
program. The part datum is the zero reference, or starting point,
used when plotting all the co-ordinates that describe the shape of
your design.
The part datum could have been set by the programmer, when
manually writing the CNC program from a traditional engineering
drawing, or automatically set by a CAD/CAM software package.
For example, if you used the CAD/CAM software package, Denford
MillCAM Designer, your design would have been drawn within a
fixed area, representing the size of the billet you intend to use. The
software would then have generated the CNC program,
automatically setting the front, left upper corner of this imaginary
billet as the part datum. In this case, you would need to position the
workpiece datum in the front, left upper corner of the real billet on
the machine table.
What happens if I don’t use any offsets with my CNC file?
If no offset is programmed, the machine controlling software will use
the machine datum as the starting point (zero reference) for any coordinate movements it receives. Since it is unlikely that the position
of the machine datum is the place where you want any machining to
begin, your CNC machine will attempt to manufacture your design in
the wrong place in its working area. Offsets are very important
because without them, the CNC machine will not know where to
begin cutting on your billet. Offsets must always be configured
before manufacturing the part.
Are standard offset files supplied?
No, you must set your own. We DO NOT supply any standard offset
files with your CNC control software. However, once you have
configured and saved your offset files, the same files may be used
over and over again, so long as the following holds true:
• The same cutting tools are used.
• The next billet to be machined is the same size as the last billet
used.
• The next billet to be machined is placed in the working area in
exactly the same position as the last billet used.
46 - CNC Machine Operation - Section 4
Triac Series CNC Machine User's Manual
4: Configuring a Workpiece Offset
Note
-
x
Further information
regarding configuration
of workpiece and tool
length offsets can be
found in your separate
CNC Machine Control
Software User's Manual.
The workpiece offset file contains three values, used to describe the
location of your workpiece datum. They determine how much you
want to shift the zero reference position of the CNC machine along
the X, Y and Z axes.
However, if your CNC file uses two or more tool profiles, the
workpiece offset file will not account for the difference in length
between the tools. To achieve this, you must also configure a tool
offset value for each tool profile you intend to use (see the next
page).
Before you can begin entering the workpiece offset values, you must
position the tool over your workpiece datum. Move the tool so its
cutting tip just touches your chosen workpiece datum position, as
shown in the diagram below. Take care not to damage the cutting
tip, when manoeuvring the tool.
In this example, the workpiece datum is set
at the front left upper corner of the billet,
positioned onto a temporary (MDF) machine
sub-table.
Alternatively, if this point needs to be inside
the boundary of the material, a small mark
could be made on the surface to identify the
proposed location of the workpiece datum.
Machine Head.
Tool.
Workpiece Datum.
Billet (grey).
Machine Table.
Triac Series CNC Machine User's Manual
Section 4 - CNC Machine Operation - 47
4: Configuring a Tool Length Offset
Note
-
x
Further information
regarding configuration
of workpiece and tool
length offsets can be
found in your separate
CNC Machine Control
Software User's Manual.
The tool length offset files each contain a single Z value. A separate
tool length offset file must be configured for every tool we want to
use. They allow us to establish a common workpiece datum
position, no matter what length of tool is used with the CNC file.
Select a point on your billet that can be reached by all the tools you
intend to use. All tool length offsets are configured against this
common tool offset reference point. When values are entered into
each individual Z length tool offset file, each tool will use this
reference point as their zero co-ordinate along the Z axis. It is this
figure that compensates for the differences in length when various
tools are used together on the same job, as shown in the diagram
below.
Machine Head
Home Position.
Tool 1.
Difference in length
between tools 1 and 2.
Tool Length
Offset value
for Tool 2.
Tool Length
Offset value
for Tool 1.
Plane of
Tool
Reference
Position.
Billet.
Tool 2.
Billet.
Move the Tool over the chosen Tool Offset Reference Position. Take
care not to damage the cutting tip, when manoeuvring the tool.
48 - CNC Machine Operation - Section 4
Triac Series CNC Machine User's Manual
4: Running a CNC Program (Auto Mode)
Note
-
x
The sequence of events
required to begin part
manufacture on the
Triac will depend on the
type of CNC control
software being used please refer to your
separate CNC Control
Software User’s Manual
for specific details.
Auto mode is used for controlling the CNC machine when running a
CNC program.
Part Manufacture Checklist.
Before beginning to manufacture your part, check to see that the
following tasks have been completed:
• Billet mounted and secure.
• Tools prepared and numbered ready for use, according to your
CNC file.
• Safety guard door closed.
• CNC file loaded and checked via simulation.
• Workpiece and Tool Offset files configured or loaded.
• Machine homed (datumed).
• CNC control software switched to Auto mode.
Triac Series CNC Machine User's Manual
Section 4 - CNC Machine Operation - 49
4: Front Machine Operators Panel
Axis
limit
switch
override
button.
Optional
pneumatic
guard
door
Emergency
button. stop
Feedrate
button.
override
potentiometer
control.
Model shown:
Triac PC with
optional flood
coolant.
Spindle
speed
override
potentiometer
control.
The Machine Operators Panel:
The panel contains the following controls:
• Axis Limit Switch Override.
• Pneumatic Guard Door (optional equipment).
• Emergency Stop.
• Feedrate Override.
• Spindle Speed Override.
Note
-
x
Additional features on
the Triac VMC monitor
housing:
• A pull-out qwerty
keyboard is mounted
under the front of the
DeskTop Tutor casing.
• A pull-out mousemat
is mounted under the
right side of the
DeskTop Tutor casing.
Location of the Panel:
Triac PC without flood coolant - Mounted directly on the front,
right side of the lower machine cabinet.
Triac PC with flood coolant - Mounted on an extension to the front,
right side of the lower machine cabinet (shown in photo above).
Triac VMC - Mounted on the front, right side of the monitor housing.
The monitor housing is attached to the right end of the machine
cabinet.
50 - CNC Machine Operation - Section 4
Triac Series CNC Machine User's Manual
4: Front Machine Operators Panel
Note
-
x
Activating an
emergency stop will
also trigger the interlock
guard switch. This will
prevent a closed safety
guard door from being
opened.
Emergency Stop Button.
The emergency stop button is a circular red push button. Pressing
the emergency stop button has the effect of stopping all axes and
spindle movements immediately. To active an emergency stop,
press the button in until it clicks. The emergency stop button will
remain closed (continuing to cut all power to the machine drives)
until the button is released. To release, turn the button clockwise
until it springs back out.
Axis Limit Switch Override.
The axis limit switch override control is a square green push button.
If an axis limit switch has been activated, to move the axis in
question press and hold the axis limit switch override button and at
the same time jog (move) the axis away from the switch using the
appropriate axis jog key.
Note
-
x
M-codes for manual
operation of the
pneumatic guard door:
M38 - Guard open
M39 - Guard close
Note
-
The control for the optional pneumatic guard door is a square green
push button. When the CNC control software is operating in Home
or Jog Mode, press the button to open or close the pneumatic guard
door.
x
Spindle Speed and/or
Feedrate override
changes will only be
registered when an
actual spindle speed or
feedrate is being
applied by the CNC
control software.
Warning
-
Never attempt to open
the safety guard door
and enter the working
area when the spindle
or machine axes are
moving.
Pneumatic Guard Door (optional equipment):
x
Spindle Speed and Feedrate Override Controls.
The spindle speed and feedrate of the Triac can be manually
overridden during a machining operation, using the potentiometer
controls fitted to the operators panel. On machines where these
controls are not fitted, or disabled, the spindle speed and feedrate
must be overridden using the CNC control software (please refer to
your separate CNC Control Software User’s Manual for details
regarding this feature).
The spindle speed can be overridden between 50% and 120%.
The feedrate can be overridden between 0% and 150%.
To increase the spindle speed or feedrate, rotate the appropriate
control clockwise.
To decrease the spindle speed or feedrate, rotate the appropriate
control anticlockwise.
The degree of adjustment applied to each value is displayed in the
CNC control software.
Triac Series CNC Machine User's Manual
Section 4 - CNC Machine Operation - 51
5: The Easychange Tooling System
Standard Easychange Tooling System.
The easychange tooling system is supplied as standard with the Triac
PC, unless the optional ATC - Automatic Tool Changer has been fitted.
The system comprises of two elements:
i) The Easychange collar (shown below), which is permanently
attached to the spindle under the machine head. Tool holders
are held in the collar using a spring closed mechanism.
Easychange
Tool Collar.
ii) The tool holders (shown below), containing the different cutting tool
profiles. Each cutting tool must be fitted into a collet (a tubular split
metal casing), especially designed to fit securely in the tool holder.
Different sized collets are available to accept the various sizes of
cutting tool shaft diameters.
Easychange
Tool Holder.
Tool and Collet
Assembly.
52 - Preparing Tooling Hardware - Section 5
Triac Series CNC Machine User's Manual
5: Removing an Easychange Tool Holder
Removing a Tool Holder from the Tool Collar.
To physically remove a tool from the Easychange collar, grip the
knurled collar and fully depress the quick-release pin on its
circumference.
Warning
-
x
Never open the safety
guard door and enter
the working area when
the spindle or machine
axes are moving.
Warning
-
Caution.
If the cutting tool has
been recently used, it
may still be HOT.
Quick-release pin.
Knurled collar.
Tool holder.
x
The mechanism in the Easychange collar is spring loaded. The collar
needs to be rotated approximately one third of a turn to fully open the
mechanism.
Whilst keeping the quick-release pin fully depressed, hold the tool
holder still and the rotate the collar in a clockwise direction (when
viewed from above the machine head).
View
Direction
B
A
C
Removing a tool holder from an
Easychange collar:
A: Press and hold the quick-release
pin.
B: Whilst keeping the quick-release pin
depressed, rotate the knurled collar
clockwise (when viewed from above
machine head).
C: Pull the tool holder downwards
away from the Easychange
spring mechanism.
Remove the tool holder downwards, whilst keeping the quick-release
pin still depressed. This prevents the mechanism in the Easychange
collar from closing.
Triac Series CNC Machine User's Manual
Section 5 - Preparing Tooling Hardware - 53
5: Fitting an Easychange Tool Holder
Fitting a Tool Holder in the Tool Collar.
To refit a new tool holder into the
empty Easychange collar, align the
two locating slots on the tool holder
with the two driving dogs on the
Easychange collar. Push the tool
holder up into the Easychange collar.
The spring loaded mechanism will
close to grip the new tool holder
securely.
Easychange
collar.
Quick-release
pin.
Driving dog.
Tool holder.
If the spring loaded mechanism in
Locating slot.
the Easychange collar is closed
before the new tool holder is fitted,
Tool and collet
press and hold the quick-release
assembly.
pin. Push the tapered end of the
tool holder into the empty Easychange collar as far as it will travel.
Begin to turn the tool holder in an anticlockwise direction (when
viewed from above the machine head), whilst continuing to push the
tool holder upwards. At the same time, turn the knurled collar in a
clockwise direction (when viewed from above the machine head) to
reopen the spring mechanism.
When the driving dogs on the Easychange collar and the locating slots
on the tool holder align, the tool holder will move up into the collar and
the spring mechanism will close.
Warning
-
x
View
Direction
Never open the safety
guard door and enter
the working area when
the spindle or machine
axes are moving.
C
A
B
C
54 - Preparing Tooling Hardware - Section 5
Fitting a tool holder in a closed
Easychange collar:
A: Press and hold the quick-release
pin.
B: Push the tool holder upwards and
hold it against the closed
Easychange spring mechanism.
C: Rotate the knurled collar clockwise
and the tool holder anticlockwise
(both when viewed from above
machine head).
Triac Series CNC Machine User's Manual
5: Setting Tools in the Easychange Tool Holder
Diagram showing layout of Easychange Tool
Holder components and fitting tools.
Easychange tool holder body
(depth stop screw inside body).
Collet.
45-50mm
C Spanner
for nut
around collet
assembly.
Cutting
tool.
2mm Allen
Key for
depth stop
adjustment.
30-32mm
C Spanner
for tool holder
body.
Nut for holding collet
assembly.
Triac Series CNC Machine User's Manual
Section 5 - Preparing Tooling Hardware - 55
5: Setting Tools in the Easychange Tool Holder
Fitting Tools to the Collet.
Each cutting tool must be fitted into the appropriate sized collet,
before attempting to fit the assembly into the tool holder. The collet
is the tubular split metal casing, especially designed to fit securely in
the tool holder. Different sized collets are available to accept the
various sizes of cutting tool shaft diameters.
A Collet
Assembly,
ready to fit to
the Tool
Holder.
Collet.
Cutting Tool.
Changing the Collet Assembly.
The collet assembly is changed using the nut at the bottom of the
Easychange tool holder body.
The easiest method for changing collet assemblies is when the tool
holder is fitted to the CNC machine, since the changing procedure is
a two handed operation.
Tools required:
• 30-32mm C Spanner - this fits around the middle segment of the
Easychange tool holder body.
• 45-50mm C Spanner - this fits around the nut at the bottom of the
Easychange tool holder body.
continued...
56 - Preparing Tooling Hardware - Section 5
Triac Series CNC Machine User's Manual
5: Setting Tools in the Easychange Tool Holder
Warning
-
x
Never open the safety
guard door and enter
the working area when
the spindle or machine
axes are moving.
Warning
-
x
Removing a Collet Assembly.
Place a soft cloth under the tool holder, incase the collet assembly
unexpectedly falls out of the tool holder during the operation. Using
the 30-32mm C spanner, loosen the nut at the bottom of the
Easychange tool holder body, by turning in a clockwise direction
(when viewed from above). Position the 45-50mm C spanner on the
middle segment of the tool holder, in the opposite direction, to stop
the tool holder from rotating on the spindle (see the lefthand
diagram below).
Adding a Collet Assembly.
Caution.
If the cutting tool has
been recently used, it
may still be HOT.
Insert the collet, containing the new tool profile, as far as it will travel into
the bottom of the tool holder. Continue to slide the tool itself up inside
the collet until it hits the depth stop screw. The depth stop screw
determines how much of the tool will protrude from the bottom of the tool
holder - see the next page for details on how to adjust the depth stop
screw. Hand turn the nut at the bottom of the Easychange tool holder
body anticlockwise (when viewed from above) until it grips the collet
assembly. Using the 30-32mm C spanner, continue to tighten the nut,
by turning in an anticlockwise direction (when viewed from above).
Position the 45-50mm C spanner on the middle segment of the tool
holder, in the opposite direction, to stop the tool holder from rotating on
the spindle (see the righthand diagram below).
Removing a Collet Assembly.
View
Direction
Adding a Collet Assembly.
View
Direction
45-50mm
C spanner.
45-50mm
C spanner.
30-32mm
C spanner.
30-32mm
C spanner.
Triac Series CNC Machine User's Manual
Section 5 - Preparing Tooling Hardware - 57
5: Setting Tools in the Easychange Tool Holder
Adjusting the Tool Depth Stop Screw.
A tool depth stop screw is fitted to the inside of the Easychange tool
holder. Rotating this screw allows the user to define the amount of
tool that protrudes from the bottom of the tool holder.
Tools required:
• 2mm allen key.
To adjust the position of the depth stop screw, remove the nut on the
bottom of the Easychange tool holder, together with the collet and the
tool.
Note that the tool depth stop screw runs along a lefthand thread.
Insert the 2mm allen key into the depth stop screw and turn the allen
key anticlockwise to move the depth stop up, or clockwise to move
the depth stop down, when looking at the tool holder from the
bottom (ie. imagining the toolholder is fitted to the machine spindle).
Refit the collet and tool, to check if the desired tool position has
been obtained. Always ensure that the collet is fully seated in the
tool holder and the tool itself is touching the depth stop screw.
Readjust the depth stop screw again if necessary. Finally, refit the
nut on the bottom of the Easychange tool holder.
Warning
-
x
Never open the safety
guard door and enter
the working area when
the spindle or machine
axes are moving.
Easychange
Tool Holder
Body.
Tool Depth Stop
Screw (2mm
hexagon hole).
Up.
Down.
2mm Allen
Key.
View
Direction
View looking into the bottom of the
Easychange tool holder.
58 - Preparing Tooling Hardware - Section 5
Adjusting the tool depth stop
screw.
Triac Series CNC Machine User's Manual
5: Requesting a Tool Change - Easychange
Warning
-
x
Never open the safety
guard door and enter
the working area when
the spindle or machine
axes are moving.
Warning
-
Caution.
If the cutting tool has
been recently used, it
may still be HOT.
x
Manually Calling an Easychange Tool Change.
Before calling the tool change, we recommend you home all three
machine axes. When all three machine axes are at their home
positions, the maximum amount of free space will be available in the
working area, allowing easier access to the tool holder and
Easychange collar.
There are two methods used to manually call an Easychange tool
change:
1) Switch your CNC control software to Jog mode and use the manual
tool change function commands.
2) Write and execute a small “M06” tool change program in your CNC
control software editor (see the section on the next page).
Always wait for the spindle and machine axes to stop moving, before
attempting to open the safety guard door.
On calling a tool change, the CNC control software will pause and a
message window will be displayed, prompting you to manually change
tools. Ensure the new tool profile that is placed in the machine head
matches the tool profile expected by your CNC control software.
After changing to the new tool number/profile requested, close the
safety guard door, then confirm via any CNC control software message
windows that machine control can be resumed.
Manual Pneumatic Safety Guard Door Control.
The following M codes can be manually entered to control the
operation of the (optional) pneumatic safety guard door:
M38 - Guard open
M39 - Guard close
Triac Series CNC Machine User's Manual
Section 5 - Preparing Tooling Hardware - 59
5: Requesting a Tool Change - Easychange
Manually writing a Tool Change Program.
The Miscellaneous Function M06 is used to program a manual tool
change operation.
The M06 code activates the request for a tool change and is followed
by the code T_ _ _ _, indicating the new tool number (the first two
numerical digits) using the stated tool length offset file number (the last
two numerical digits).
For example,
M06 T0305 ;
This command is read request a tool change, from the current tool
number to tool number 3, using tool length offset file number 5.
Automatic Calling of an Easychange Tool
Change (during the running of a CNC program).
Before starting to run your CNC program, we recommend that you
number each easychange tool holder, then fit the appropriate tool
profile to each holder, according to the number/profile combinations
used in your CNC program. The tool profiles allocated to each tool
number are listed at the beginning of your CNC program and may also
be programmed into your CNC control software. This will reduce the
possibility of the incorrect tool number/profile being placed into the
machine head, when the first tool change operation is called.
On reading a tool change request in your CNC program, all three
machine axes will move to their home positions, via an intermediate
point, if programmed. At this point, the CNC control software will pause
the CNC program and a message window will be displayed, prompting
you to manually change tools.
Wait for all machine movements to stop before opening the safety guard
door, then change to the new tool number/profile requested. Close the
safety guard door and confirm via any CNC control software message
windows that machining can be resumed.
60 - Preparing Tooling Hardware - Section 5
Triac Series CNC Machine User's Manual
5: The Automatic Tool Changer System
The ATC (Automatic Tool Changer) is supplied as standard with the
Triac VMC or as an option with the Triac PC.
The system is designed to automatically transfer tools, when required,
between the machine head and the storage carousel, positioned to the
left of the machine column. Each of the eight numbered carousel slots,
or pockets, are designed to contain one tool holder.
Preparing the Compressed Air Supply.
The ATC is driven using compressed air. Before switching on your air
compressor, check all air hose connections are secure and the correct
operating pressure is set on the regulator, mounted on the back panel
of the Triac cabinet. The normal operating pressure (as supplied,
preset on the machine) is 1ØØ PSI (6.6 Bar). Maximum pressure for
the air regulator is 15Ø PSI (9.9 Bar). See Section 3 - CNC Machine
Installation, pages 25 to 28, for detailed information on the compressed
air connection unit.
ATC storage cover (carousel and
ATC mechanism retracts under this
cover when not in use).
Location of ATC.
Machine
head.
Numbered
carousel
pockets
(eight
available).
Tool holder
carousel shown in
down position.
Tool holder.
The optional ATC Automatic Tool Changer.
When using the ATC, it is essential that the correct tool profiles are
placed in the numbered carousel pockets that exactly match the tool
profiles and tool numbers used in your CNC program.
For example,
If your CNC program uses three tool profiles assigned as follows:
Tool 1 = 2mm slot cutter
Tool 2 = 4mm slot cutter
Tool 5 = Engraving cutter
...then the ATC carousel would be set-up as follows:
Carousel Pocket Number 1 = Tool holder containing 2mm slot cutter
Carousel Pocket Number 2 = Tool holder containing 4mm slot cutter
Carousel Pocket Number 5 = Tool holder containing Engraving cutter
Triac Series CNC Machine User's Manual
Section 5 - Preparing Tooling Hardware - 61
5: Setting up the ATC
Warning
-
x
Never open the safety
guard door and enter
the working area when
the spindle or machine
axes are moving.
Warning
-
Removing Tool Holders from the Carousel.
The tool holder is lightly held in the carousel pocket by two cylindrical
grippers. Markers on the top surface of these grippers indicate the
number of the carousel pocket. The tool holder cannot be withdrawn
vertically, since a single flange on the inside of the carousel pocket
engages with the groove around the tool holder body.
x
Caution.
If the cutting tool has
been recently used, it
may still be HOT.
Remove the tool holder by pulling it
horizontally away from the centre of
the ATC carousel.
To remove a tool holder, gently pull the tool holder body horizontally
away from the inside of the pocket. The two cylindrical grippers will
automatically separate. Withdraw the tool holder, taking care not to
damage the cutting tool tip on any part of the machine casings.
62 - Preparing Tooling Hardware - Section 5
Triac Series CNC Machine User's Manual
5: Setting up the ATC
Warning
-
x
If a tool holder is held
in the machine head
never place a tool
holder in the carousel
pocket directly facing
the spindle. When a
tool change is
requested, the ATC
will release the
currently held tool
holder into this empty
space, before rotating
and installing the new
tool holder in the
empty machine head.
Adding Tool Holders to the Carousel.
Carefully align the top surface of the tool holder double flange (the
widest part of the tapered body) against the top surfaces of the two
spring loaded cylindrical grippers on the carousel pocket.
(a) Align the top surface of the tool
holder flange with the top surfaces
of the cylindrical grippers.
(b) Horizontally push the tool holder
into the pocket - the two grippers
will automatically separate.
(c) Ensure the single flange inside
the pocket aligns with the groove
around the tool holder.
Push the tool holder into the pocket,
ensuring that the groove between the
tool holder flanges aligns with the single
flange inside the carousel pocket.
Check the tool holder is correctly
seated, as shown in the photo opposite
- you should not be able to move the
tool holder vertically.
Triac Series CNC Machine User's Manual
Section 5 - Preparing Tooling Hardware - 63
5: Setting Tools in the ATC Tool Holder
Diagram showing layout of ATC
Tool Holder components and
fitting tools.
Pull
stud.
ATC tool
holder body
(depth stop
screw inside
body).
Collet.
24mm
spanner for
nut around
collet
assembly.
Cutting
tool.
Nut for
holding collet
assembly.
45-50mm C
spanner for tool
holder body.
Flat blade screwdriver for
depth stop adjustment.
64 - Preparing Tooling Hardware - Section 5
Triac Series CNC Machine User's Manual
5: Setting Tools in the ATC Tool Holder
Fitting Tools to the Collet.
Each cutting tool must be fitted into the appropriate sized collet,
before attempting to fit the assembly into the tool holder. The collet
is the tubular split metal casing, especially designed to fit securely in
the tool holder. Different sized collets are available to accept the
various sizes of cutting tool shaft diameters.
A Collet
Assembly,
ready to fit to
the Tool
Holder.
Collet.
Cutting Tool.
Changing the Collet Assembly.
The collet assembly is changed using the nut at the bottom of the
ATC tool holder body.
The easiest method for changing collet assemblies is when the tool
holder is fitted to the CNC machine, since the changing procedure is
a two handed operation.
Tools required:
• 45-50mm C Spanner - this fits around the middle segment of the
ATC tool holder body.
• 24mm Spanner - this fits around the nut at the bottom of the ATC
tool holder body.
continued...
Triac Series CNC Machine User's Manual
Section 5 - Preparing Tooling Hardware - 65
5: Setting Tools in the ATC Tool Holder
Warning
-
x
Never open the safety
guard door and enter
the working area when
the spindle or machine
axes are moving.
Warning
-
Caution.
If the cutting tool has
been recently used, it
may still be HOT.
x
Removing a Collet Assembly.
Place a soft cloth under the tool holder, incase the collet assembly
unexpectedly falls out of the tool holder during the operation. Using
the 24mm spanner, loosen the nut at the bottom of the ATC tool
holder body, by turning in a clockwise direction (when viewed from
above). Position the 45-50mm C spanner on the middle segment of
the tool holder, in the opposite direction, to stop the tool holder from
rotating on the spindle (see the lefthand diagram below).
Adding a Collet Assembly.
Insert the collet, containing the new tool profile, as far as it will travel into
the bottom of the tool holder. Continue to slide the tool itself up inside
the collet until it hits the depth stop screw. The depth stop screw
determines how much of the tool will protrude from the bottom of the tool
holder - see the next page for details on how to adjust the depth stop
screw. Hand turn the nut at the bottom of the ATC tool holder body
anticlockwise (when viewed from above) until it grips the collet
assembly. Using the 24mm spanner, continue to tighten the nut, by
turning in an anticlockwise direction (when viewed from above).
Position the 45-50mm C spanner on the middle segment of the tool
holder, in the opposite direction, to stop the tool holder from rotating on
the spindle (see the righthand diagram below).
Removing a Collet Assembly.
Adding a Collet Assembly.
View
Direction
View
Direction
45-50mm
C spanner.
45-50mm
C spanner.
24mm
spanner.
24mm
spanner.
66 - Preparing Tooling Hardware - Section 5
Triac Series CNC Machine User's Manual
5: Setting Tools in the ATC Tool Holder
Adjusting the Tool Depth Stop Screw.
A tool depth stop screw is fitted to the inside of the ATC tool holder.
Rotating this screw allows the user to define the amount of tool that
protrudes from the bottom of the tool holder.
Tools required:
• Flat blade screwdriver.
To adjust the position of the depth stop screw, remove the nut on the
bottom of the ATC tool holder, together with the collet and the tool.
Note that the tool depth stop screw runs along a lefthand thread.
Position the flat blade screwdriver in the slot on the face of the depth
stop screw and turn the screw anticlockwise to move the depth stop
up, or clockwise to move the depth stop down, when looking at the
tool holder from the bottom (ie. imagining the toolholder is fitted to
the machine spindle).
Refit the collet and tool, to check if the desired tool position has
been obtained. Always ensure that the collet is fully seated in the
tool holder and the tool itself is touching the depth stop screw.
Readjust the depth stop screw again if necessary. Finally, refit the
nut on the bottom of the ATC tool holder.
Warning
-
x
ATC Tool
Holder
Body.
Never open the safety
guard door and enter
the working area when
the spindle or machine
axes are moving.
Tool Depth
Stop Screw.
Up.
Down.
View
Direction
View looking into the bottom of the
Easychange tool holder.
Triac Series CNC Machine User's Manual
Adjusting the tool depth stop
screw.
Section 5 - Preparing Tooling Hardware - 67
5: Requesting a Tool Change - ATC
Warning
-
x
Never open the safety
guard door and enter
the working area when
the spindle or machine
axes are moving.
Warning
-
Caution.
If the cutting tool has
been recently used, it
may still be HOT.
x
Manually Calling an ATC Tool Change.
Wait for any spindle and machine axis movements to finish before
calling a tool change operation.
Ensure the tool profiles that are placed in the numbered carousel
pockets exactly match the tool profiles and tool numbers programmed
into your CNC control software.
There are two methods used to manually call an ATC tool change:
1) Switch your CNC control software to Jog mode and use the manual
tool change function commands.
2) Write and execute a small “M06” tool change program in your CNC
control software editor (see th section on the next page).
After calling a manual ATC tool change, the ATC will perform the
necessary tool change operations automatically.
Please refer to your separate CNC Control Software User’s Manual for
further information.
The following M codes can be manually entered to control the
operation of an ATC:
M20 - ATC arm in towards machine spindle
M21 - ATC arm out away from machine spindle
M22 - ATC arm down from beneath storage cover
M23 - ATC arm up into storage cover
M24 - Drawbar Unclamp (release tool holder)
M25 - Drawbar Clamp (grip tool holder)
M27 - ATC reset carousel
M32 - Rotate carousel clockwise (viewed from above)
M33 - Rotate carousel counter-clockwise (viewed from above)
M34 - Rotate carousel one half turn
Manual Pneumatic Safety Guard Door Control.
The following M codes can be manually entered to control the
operation of the (optional) pneumatic safety guard door:
M38 - Guard open
M39 - Guard close
68 - Preparing Tooling Hardware - Section 5
Triac Series CNC Machine User's Manual
5: Requesting a Tool Change - ATC
Manually writing a Tool Change Program.
The Miscellaneous Function M06 is used to program a manual tool
change operation.
The M06 code activates the request for a tool change and is followed
by the code T_ _ _ _, indicating the new tool number (the first two
numerical digits) using the stated tool length offset file number (the last
two numerical digits).
For example,
M06 T0305 ;
This command is read request a tool change, from the current tool
number to tool number 3, using tool length offset file number 5.
Automatic Calling of an ATC Tool Change
(during the running of a CNC program).
Before starting to run your CNC program, ensure the tool profiles that
are placed in the numbered carousel pockets exactly match the tool
profiles and tool numbers used in your CNC program.
On reading a tool change operation line in your CNC program, the
ATC will perform the necessary tool change operations automatically.
Triac Series CNC Machine User's Manual
Section 5 - Preparing Tooling Hardware - 69
6: Option - The Datum Plate
The datum plate is an L shaped bracket, used for helping to remove
and replace work in identical positions on the machine table. This
allows projects to be configured using the same workpiece and tool
offsets, since the billet can always be placed accurately in position
on the machine table - hence the name “datum” plate.
It is fixed against the machine table using two tee nut assemblies
which can be moved to the required position for the datum plate.
The tee nuts slide along T shaped channels that run horizontally
along the machine bed - these trap the datum plate in position when
the allen headed bolts are tightened.
To loosen bolts - turn
anticlockwise (viewed
from above).
To tighten bolts - turn
clockwise (viewed
from above).
Allen headed bolt.
Datum Plate
(L-shaped
work locating
bracket).
Tee-nut.
70 - Work Holding - Section 6
Triac Series CNC Machine User's Manual
6: Fitting and Removing the Datum Plate
Removal of Datum Plate.
To remove the datum plate, loosen the 2 allen headed bolts, by
turning them in an anticlockwise direction. Slide the datum plate
along the machine table, until the Tee-nuts are released from their
channels, then withdraw the datum plate from the machine table.
Fitting of Datum Plate.
To fit the datum plate in position on the machine table, place it at the
end of the T shaped channels. Align each Tee-nut with its
respective channel and slide it into position. Slide the datum plate
along the machine table to the required position. Note that the
datum plate can be slightly adjusted forwards and backwards (ie.
parallel to the Y axis), if required, according to whether the front or
back two T shaped channels are used. Once the datum plate has
been approximately positioned in the correct place, tighten each of
the allen headed bolts, by turning them in a clockwise direction until
they just begin to grip the plate to the table surface. It must still be
possible to move the datum plate, since it may require final
adjustments if it needs to be lined up square with respect to the
machine axes.
Allen
headed bolt.
Tee-nut.
Triac Series CNC Machine User's Manual
Datum plate
(L-shaped
work locating
bracket).
Machine
table.
T shaped
channel.
Section 6 - Work Holding - 71
6: Setting the Datum Plate
The following diagrams illustrate the various methods that can be
used when positioning the datum plate square with respect to the
machine table (ie. the edges of the datum plate run exactly parallel
with the X and Y machine axes). Each method varies according to
the level of position accuracy required.
Datum Plate Setting Method 1.
Datum Plate.
Machine Table.
Flat piece of steel bar.
This method is useful if the front face of the datum plate can be
positioned exactly level with the front edge of the machine table.
Use the true flat face of a section of material, such as a piece of flat
steel bar. Press the steel bar firmly against the front edge of the
table and adjust the datum plate so its front face also touches the
surface of the steel bar. Tighten the allen headed bolts. Note that
although this method is quick, it is also fairly inaccurate.
Datum Plate Setting Method 2.
Datum Plate.
Machine Table.
Engineers Square.
To obtain a better degree of accuracy, use an engineers square lined
up against the front edge of the machine table. Adjust the datum
plate so it touches the engineers square and tighten the allen
headed bolts. This method has the added advantage of allowing the
datum plate to be fixed further into the middle of the machine table.
72 - Work Holding - Section 6
Triac Series CNC Machine User's Manual
6: Setting the Datum Plate
Datum Plate Setting Method 3.
Pointer Tool.
Machine Table.
Datum Plate.
Set up the machine so a pointer is held in place of the cutting tool.
Align the pointing tool so it is positioned slightly above one of the 2
edges of the datum plate, which run parallel with the Y axis.
Start with the pointer near the back of the datum plate edge you
have chosen. Move the pointer towards the front of the datum plate,
checking that the tip of the pointer is still lined up exactly over the
edge you have chosen. If the pointer does not align, readjust the
position of the datum plate. Keep repeating these steps, moving the
pointer forwards and backwards along the datum plate edge, until a
suitable degree of accuracy has been obtained.
For a final check, the pointer can be moved above and along one of
the datum plate edges which run parallel to the X axis. Finally,
tighten the allen headed bolts to fix the datum plate firmly in place.
Triac Series CNC Machine User's Manual
Section 6 - Work Holding - 73
6: Setting the Datum Plate
Datum Plate Setting Method 4.
Dial gauge.
Machine Table.
Datum Plate.
Set up the machine so a dial gauge is held in place of the cutting
tool. Align the dial gauge so it is positioned along one of the 2 sides
of the datum plate, which run parallel with the Y axis.
Start with the dial gauge near the back of the datum plate edge you
have chosen. Move the dial gauge towards the front of the datum
plate, checking that the values indicated on the dial gauge do not
alter. If the values do alter, readjust the position of the datum plate
until the values are constant. Keep repeating these steps, moving
the dial gauge forwards and backwards along the datum plate edge,
until a suitable degree of accuracy has been obtained. Finally,
tighten the allen headed bolts to fix the datum plate firmly in place.
74 - Work Holding - Section 6
Triac Series CNC Machine User's Manual
6: Option - Miteebite Clamps
Miteebite clamps are a quick and versatile method of securing most
pieces of work to the machine table. In the example shown below,
two miteebite clamps are used with a datum plate to clamp a sheet
of MDF. This MDF is used as a sub-table - a safety measure to
prevent damage occurring to the machine table itself, should a
problem occur when milling.
Miteebite clamp shown in closed
position.
Machine
table.
Datum
plate.
Sub-table
(eg. sheet
of MDF).
Miteebite
clamps.
Loading the Billet.
The actual workpiece, such as a sheet of plastic, would be held in
place on the sub-table using double sided tape. The billet is usually
positioned with its front and lefthand edges aligned with the front and
lefthand edges of the sub-table, as shown below.
Plastic workpiece (billet).
Strips of double sided tape.
Sub-table
(eg. sheet of MDF).
(Towards fro
nt
Triac Series CNC Machine User's Manual
of machine
table).
Section 6 - Work Holding - 75
6: How does a Miteebite Clamp work?
The base of the Miteebite clamp consists of a Tee-nut, with 2
threaded holes passing right through its section from top to bottom.
One of these threaded holes contains a grubscrew. When this is
tightened, the base of the grubscrew pushes against the surface of
the T channel in which it has been placed, securing the Tee-nut in
position.
The other threaded hole contains a bolt which has its head and allen
key hole machined slightly off centre. A hexagon washer spins
freely around this bolt head. The bolt behaves in a similar way to a
cam when rotated. If the allen key hole is facing away from the
grubscrew, then the hexagon washer is slack against the work (ie.
the miteebite is open). If the bolt is then turned through 180 degrees
so that the allen key hole is now facing towards the grubscrew, then
the hexagon washer will be tight against the work (ie. the miteebite
is closed).
Continual turning of the bolt is unnecessary, since the full range of
movement for the hexagon washer is covered in a single 360 degree
rotation of the bolt. In this respect, the hexagon washer will not
tighten further if the bolt is continually turned clockwise.
Bolt - both the head
and the allen key
holes are machined
slightly off centre.
Hexagon
washer.
Grub screw
passes through
the base of the
Tee-nut.
To loosen grubscrew
turn anticlockwise
(viewed from above).
To tighten grubscrew
turn clockwise
(viewed from above).
Tee-nut.
76 - Work Holding - Section 6
Triac Series CNC Machine User's Manual
6: Using Miteebite Clamps
The example used in the
description below explains the
fitting procedure for a temporary
MDF sub-table, onto which a
plastic sheet can be attached
using double sided tape.
Set the Datum Plate into position, then place the temporary MDF
sub-table onto the machine table, so it is located correctly against
the edges of the datum plate.
Next, position the miteebites into their respective T channels and
slide them along until they touch the sub-table. Ensure that one of
the six flat sides of the hexagon washers press against the subtable, not one of the hexagon points. The hexagon washers should
be positioned at this stage so they are open (ie. the off-centre allen
key holes on the bolts should be facing away from the grubscrews).
Now tighten the grubscrews in each miteebite to lock them firmly in
position. At this stage, it should still be possible to remove the subtable. Remember, the grubscrews only lock the miteebites in
position on the machine table - it is the hexagon washers which
actually lock the sub-table in position.
To lock the temporary MDF bed firmly in place, turn the bolts with
the off-centre allen key holes 180 degrees so the hexagon washers
are in the closed position (ie. the off-centre allen key holes on the
bolts should now be facing towards the grubscrews).
Now that the miteebites have been set, the sub-table can be
continually withdrawn from the machine table, then replaced, always
to the same position. This is an advantage for jobs involving the
repeat milling of pieces of work, such as a small production run or a
college class/group project.
Hexagon washer set
in open position.
Triac Series CNC Machine User's Manual
Hexagon washer set
in closed position.
Section 6 - Work Holding - 77
6: Option - Hydraulic Vice
The hydraulic vice
(shown right) is
supplied as an option
with the Triac PC or
Triac VMC.
The vice jaws are driven
using a hydraulic
intensifying cylinder
(circled left), mounted
on the back panel of the
Triac cabinet. The
intensifier itself is driven
from the compressed air
system.
The hydraulic vice is designed to automatically clamp a billet during
the running of a CNC program, through the calling of the appropriate
vice open or close M code function. The same M codes are also
used to manually control the operation of the vice jaws.
The vice body itself is secured to the machine table using a series of
allen headed bolts and tee nuts and can be repositioned as
necessary.
78 - Work Holding - Section 6
Triac Series CNC Machine User's Manual
6: Option - Hydraulic Vice Operation
Preparing the Compressed Air Supply.
Before switching on your air compressor, check all air hose
connections are secure and the correct operating pressure is set on
the regulator, mounted on the back panel of the Triac cabinet. The
normal operating pressure (as supplied, preset on the machine) is
1ØØ PSI (6.6 Bar). Maximum pressure for the air regulator is 15Ø
PSI (9.9 Bar). See Section 3 - CNC Machine Installation, pages 25
to 28, for detailed information on the compressed air connection unit.
Adjusting the Pressure of the Vice Jaws.
The compressed air passes through a separate pressure regulator
unit, before reaching the hydraulic intensifier. This regulator unit is
used to adjust the clamping pressure of the vice jaws. To adjust the
vice pressure, pull up the rotary control to unlock it from its current
position. Turn the control clockwise (when viewed from above) to
increase the vice pressure, or anticlockwise (when viewed from
above) to decrease the vice pressure. Push the rotary control down
to relock it in its new position.
Lubrication
unit.
Increase air pressure
Decrease air pressure
View
Direction
Hydraulic
intensifier.
Pressure
adjuster.
Air
pressure
dial.
Triac Series CNC Machine User's Manual
continued...
Section 6 - Work Holding - 79
6: Option - Hydraulic Vice Operation
Lubrication unit.
Add oil to the
lubrication
unit through
top filler cap.
Vice jaws
pressure
regulator
unit.
Hydraulic
intensifier.
The hydraulic intensifier unit includes a lubrication unit which
automatically distributes oil to the hydraulic system and the vice. To
top-up the lubrication unit, lift the cap on the top of the oil storage
reservoir and pour in the required amount of oil. Refill the reservoir
using oil grade ISO VG 32.
Note
-
x
The sequence of events
required to manually
enter an M code will
depend on the type of
CNC control software
being used.
In addition, many of
these miscellaneous
functions may be
controlled directly using
buttons and commands
available in your CNC
control software.
Please refer to your
separate CNC Control
Software User’s Manual
for specific details.
M Codes for Hydraulic Vice Operation.
The following M codes can be manually entered to control the
operation of the (optional) hydraulic vice:
80 - Work Holding - Section 6
M10 - Vice/work
clamp open
M11 - Vice/work
clamp close
Triac Series CNC Machine User's Manual
6: Option - Pneumatic Safety Guard Door
The pneumatic safety guard door is
supplied as an option with the Triac
PC or Triac VMC. Operation of the
door is achieved through use of a
pneumatic cylinder, driven from the
compressed air system. The cylinder
(circled right) is mounted to the left of
the machine column.
The pneumatic safety guard door can be
opened or closed automatically during
the running of a CNC program, through
the calling of the appropriate door open
or close M code function. The same M
codes are also used to manually control
the operation of the door.
Preparing the Compressed Air Supply.
Before switching on your air compressor, check all air hose
connections are secure and the correct operating pressure is set on
the regulator, mounted on the back panel of the Triac cabinet. The
normal operating pressure (as supplied, preset on the machine) is
1ØØ PSI (6.6 Bar). Maximum pressure for the air regulator is 15Ø
PSI (9.9 Bar). See Section 3 - CNC Machine Installation, pages 25
to 28, for detailed information on the compressed air connection unit.
Note
-
x
The sequence of events
required to manually
enter an M code will
depend on the type of
CNC control software
being used.
In addition, many of
these miscellaneous
functions may be
controlled directly using
buttons and commands
available in your CNC
control software.
Please refer to your
separate CNC Control
Software User’s Manual
for specific details.
M Codes for Pneumatic Safety Guard Door Operation.
The following M codes can be manually entered to control the
operation of the (optional) pneumatic safety guard door:
M38 - Guard open
M39 - Guard close
Triac Series CNC Machine User's Manual
Section 6 - Work Holding - 81
7: Planning Procedure for Maintenance Work
Safety First !
-
x
Caution.
Wear safety glasses
and a suitable
respiratory mask
when cleaning the
machine.
Safety First !
-
x
Never open the safety
guard door and enter
the working area when
the spindle or machine
axes are moving.
Safety First !
-
x
Caution.
If the cutting tool has
been recently used, it
may still be HOT.
When carrying out any maintenance, pay special attention to the
following items, ensuring safe and correct working procedures in
accordance with Health and Safety Regulations in your establishment:
• Before starting any maintenance work, define the task and obtain the
information relevant to carry out the maintenance. Also, define the
time period needed to complete the task, to obtain the correct tools
and order any spare parts, if required.
• During the maintenance work period, display a suitable notice
stating that the machine is under maintenance and should not be
used until the notice is removed.
• Safety must be a priority when carrying out any maintenance work.
Covers and safety guards that are removed during the maintenance
work must be replaced after the task is completed.
• All work must be carried out by suitably qualified personnel.
• When replacing electrical components, ensure the new parts are of
suitable replacement specification.
• All work completed on the machine, whether progressive, or
preventative, should be logged to ensure a complete service record
is available for future referral. We recommend the following two
pages are used to log any maintenance tasks undertaken.
• When maintenance work has been completed, check that the
replaced or serviced parts work correctly, before allowing general
operation of the machine.
82 - Maintenance - Section 7
Triac Series CNC Machine User's Manual
7: Maintenance Log
Date of
maintenance
work.
Name of personnel
carrying out the
maintenance.
Triac Series CNC Machine User's Manual
Details of
maintenance work
completed.
Section 7 - Maintenance - 83
7: Maintenance Log
Date of
maintenance
work.
84 - Maintenance - Section 7
Name of personnel
carrying out the
maintenance.
Details of
maintenance work
completed.
Triac Series CNC Machine User's Manual
7: Maintenance Schedule
Daily
• Clean and remove any swarf.
• Check and top-up oil level in various reservoirs.
• Clean tooling and tool holders.
Weekly
• Clean the machine thoroughly.
• Check all exposed screws and nuts for tightness.
• Oil optional ATC slides and pivot points.
• Check and tighten ATC tool holder pull studs.
Bi-annually
• Check and adjust the machine head, crosslide and table gib strips.
• Check the condition of any electrical connections.
• Check and thoroughly clean all components of the tooling system fitted.
• Check all cables for kinks and breaks.
• Clean the microswitches.
Annually
• Check machine alignments and accuracy.
• Check spindle bearing adjustment, regrease.
• Check and regrease axis bearings.
• Check spindle drive belt for wear.
• Check axis drive belts for wear.
Note
-
x
If your CNC machine is used intensively, we recommend that the
maintenance tasks listed in the above schedule are performed on a more
regular basis.
If you have any doubts concerning any of the above checks, please contact
Denford Customer Services for clarification and/or assistance.
Triac Series CNC Machine User's Manual
Section 7 - Maintenance - 85
7: Lubrication Chart
Lubrication Point
Lubricating System Frequency
Slideways and
Ballscrews
Automatic pump
lubrication
system
Activated on
BP : CS 68
spindle rotation Shell : Vitrea 68
Check level daily Castrol : Perfecto NN
Reservoir
capacity
0.5 litres
Headstock
Grease Seal
On maintenance
of machine head
Kluber Isoflex NBU 15
4 cc/Bearing
Axis Bearings
Grease Seal
Once a year
BP : LS 3
Shell : Alvania No. 3
2 cc/Bearing
Coolant
Electric pump
flood system
As required
(CNC software
controlled)
Cincinnati Millacron
Simcool 60
Dilution minimum 2.5%
Storage tank
capacity
14.75 litres
Optional ATC
and/or pneumatic
safety guard door
Pump oilcan
(manual)
Weekly
BP : CS 68
Shell : Vitrea 68
Castrol : Perfecto NN
As required
Optional
compressed air
connection unit
Automatic
lubricator unit
Check level daily ISO VG 32
Top-up as
required
Optional
hydraulic vice
Hydraulic intensifier Check level daily ISO VG 32
lubricator unit
Top-up as
required
Warning
Recommended Oil/Grease
Quantity
-
x
Risk of Ignition or Explosion!
Denford recommends that aerosol based lubrication products should NOT be
used, since these products may cause potentially explosive vapours to buildup in enclosed areas of the CNC machine.
86 - Maintenance - Section 7
Triac Series CNC Machine User's Manual
7: General Work Area Cleaning
Safety First !
-
x
Never open the safety
guard door and enter
the working area when
the spindle or machine
axes are moving.
Safety First !
-
x
Caution.
If the cutting tool has
been recently used, it
may still be HOT.
Thoroughly clean and lubricate the CNC machine, paying special
attention to the working area, according to the Maintenance Schedule
listed on page 85. In particular, ensure the build up of swarf and debris
in the following areas is prevented:
• The X axis leadscrew, running under the machine table.
• The two X axis slides, running under the machine table.
• The X axis microswitch, mounted in the front, left side of the crosslide
end casing.
• The two Z axis slides, running right and left down the front of the
machine column.
• The Z axis microswitch, mounted on the right side of the machine
column.
• The front and rear sections of the flexible cover on the crosslide.
• The upper surface and T shaped channels on the machine table.
• The (optional) datum plate and miteebite clamps on the machine
table.
• The (optional) hydraulic vice.
• The machine head and spindle.
• The (optional) Automatic Tool Changer slides and carousel.
• The components of the tooling system used with your CNC
machine.
• The two (optional) flood coolant drain grills in the front corners of the
working area.
Triac Series CNC Machine User's Manual
Section 7 - Maintenance - 87
7: Lubrication of Ballscrews and Slideways
The automatic slide lubrication system, located on the back panel of the
Triac cabinet, is comprised from an oil reservoir tank and an automatic
pump unit. The system is designed to automatically supply oil to the
slides and ballscrews on the X, Y and Z axes only.
Oil is automatically pumped to the required areas upon activation of the
machine head spindle. Do not let the oil level drop below the minimum
mark, printed on the side of the reservoir tank.
To top-up the slide lubrication system, lift the yellow filling cap and pour
sufficient oil into the reservoir tank. Take care NOT to overfill the
system. The reservoir tank has a maximum capacity of 0.5 litres. Refill
the reservoir using oil grade - BP. CS 68.
Location
-
x
The automatic
slide lubrication
system.
Look at right side of
machine back panel.
Plastic filling
oil cap.
Low oil level
marker.
If the oil level drops below the minimum level mark, the unit must be
hand primed before use - see Section 3 - CNC Machine Installation,
page 32 for this procedure.
88 - Maintenance - Section 7
Triac Series CNC Machine User's Manual
7: Cleaning and Inspecting the X Axis
Ballscrew and Slideways
Two X axis slideways are located under the machine table. Run the
machine table fully to the left, exposing the left portion of the slides (as
shown below). Using a soft bristled brush, carefully clean any swarf
and debris away from the front and back table slides, to a location
where it can be removed from the working area. Inspect each slide for
damage or wear.
Location
-
x
Machine table.
Look under the
machine table.
Table
ballscrew.
Back
slideway.
View from left side
of machine.
Front
slideway.
Column base (left side).
Run the machine table fully to the right (as shown below), to expose the
remaining portion of the slides and repeat the process.
View from right
side of machine.
Machine table.
Front
slideway.
Table
ballscrew.
Back
slideway.
Column base (right side).
The X axis ballscrew runs centrally along the underside of the machine
table. Run the machine table fully to the left, exposing the left portion of
the ballscrew (as shown top), then carefully clean any swarf and debris
away, using a soft bristled brush. Inspect the ballscrew for damage or
wear. Run the machine table fully to the right (as shown above), to
expose the remaining portion of the ballscrew and repeat the process.
Triac Series CNC Machine User's Manual
Section 7 - Maintenance - 89
7: Cleaning and Inspecting the Y Axis
Ballscrew and Slideways
Two Y axis slideways are located under the sides of the flexible cover
at the base of the machine column. Run the machine table and saddle
fully back against the machine column. Lift the cover sides (as shown
below), then using a soft bristled brush, carefully clean any swarf and
debris away from the crosslides, to a location where it can be removed
from the working area. Inspect each slide for damage or wear.
Location
-
x
Machine table.
Lift flexible cover at
machine column base.
View from right
side of machine.
Right
crosslide.
Column base (front).
View from left side
of machine.
Machine table.
Left
crosslide.
Column base (front).
Run the machine table and saddle fully forwards and repeat the
process for the remaining parts of the slides.
continued...
90 - Maintenance - Section 7
Triac Series CNC Machine User's Manual
7: Cleaning and Inspecting the Y Axis
Ballscrew and Slideways
The Y axis ballscrew is fully enclosed by the flexible cover, so it is not
subject to swarf build-up. Run the machine table and saddle fully back
against the machine column, then lift and move the cover to one side.
Take care not to overstretch or tear the flexible cover. Inspect the
ballscrew for damage or wear.
Location
-
x
Machine column.
Lift flexible cover at
machine column base.
View from right
side of machine.
Crosslide
ballscrew.
Column base (right side).
Machine table.
Run the machine table and saddle fully forwards and repeat the
process for the remaining part of the ballscrew (as shown above).
Triac Series CNC Machine User's Manual
Section 7 - Maintenance - 91
7: Cleaning and Inspecting the Z Axis
Ballscrew and Slideways
Two Z axis slideways are fitted to the front right and left sides of the
machine column (shown below). Using a soft bristled brush, carefully
clean any swarf and debris away from the column slides, to a location
where it can be removed from the working area. Inspect each slide for
damage or wear.
Location
-
x
View looking at
front of machine
column.
Machine
head
(underside).
Look at front of
machine column.
Right
column
slideway.
Left
column
slideway.
The Z axis ballscrew is fully enclosed by the machine column
metalwork, so it is not subject to swarf build-up. The ballscrew can be
inspected for damage or wear by removing the cover plate attached to
the front of the machine column (as shown below). The coverplate is
held in position using two screws, accessible from the underside of the
machine head, using a 2.5mm allen (hex) key.
Machine
head
(underside).
1
Machine
head
(underside).
2
Remove two
screws...
...withdraw
coverplate.
92 - Maintenance - Section 7
Inspect
ballscrew
condition.
Triac Series CNC Machine User's Manual
7: Cleaning and Inspecting the X Axis Datum
Microswitch
The microswitch defining the X axis datum is mounted in a small alcove,
on the left front upper corner of the saddle, when viewed from the front
of the machine.
Drive the machine table fully to the left. This will make is easier to gain
access to the left side of the saddle, where the condition of the
microswitch can be checked (as shown below). Using a soft bristled
brush, carefully clean any swarf and debris away from the microswitch,
to a location where it can be removed from the working area. Inspect
the microswitch for damage or wear.
Location
-
View looking at left
side of saddle.
x
Look at left side of
saddle from below.
Microswitch.
Saddle (left side).
The trigger for the X axis microswitch is mounted under the left, front
side of the machine table (as shown below). Using a soft bristled
brush, carefully clean dust and debris away from the trigger, to a
location where it can be removed from the working area. Inspect the
trigger for damage or wear.
Location
-
x
Machine table (front).
Look at left, front side of
table from below.
Trigger.
-
Note
x
The moveable
microswitch trigger
position is set at the
time of machine
manufacture and
should not require
adjustment.
Machine table (left end).
View looking at
right, front of
machine table.
Triac Series CNC Machine User's Manual
Section 7 - Maintenance - 93
7: Cleaning and Inspecting the Y Axis Datum
Microswitch
The microswitch defining the Y axis datum is mounted at the front of the
crosslide, fully enclosed by the flexible cover, so it is not subject to swarf
build-up.
To check the condition of the microswitch, drive the machine table and
saddle fully back against the machine column. This will make it easier to
gain access to the front section of the crosslide. Carefully lift the flexible
cover and locate the microswitch (as shown below). Inspect the
microswitch for damage or wear.
Location
-
x
Machine table.
Look under front of
flexible crosslide cover.
View from right
side of machine.
Microswitch.
Trigger under
saddle.
Column base (right side).
Note
-
View from left side
of machine.
x
The moveable
microswitch trigger
position is set at the
time of machine
manufacture and
should not require
adjustment.
Microswitch.
Trigger under
saddle.
Column base (left side).
The trigger for the Y axis microswitch is mounted under the front edge
of the saddle, hidden from view by the flexible cover, so it is not subject
to swarf build-up. Drive the machine table fully back against the
machine column, then carefully lift the flexible cover. Inspect the trigger
for damage or wear.
94 - Maintenance - Section 7
Triac Series CNC Machine User's Manual
7: Cleaning and Inspecting the Z Axis Datum
Microswitch
The microswitch defining the Z axis datum is mounted on the lower,
right side of the machine column.
Drive the machine head fully upwards. This will make is easier to gain
access to the left side of the machine column, where the condition of the
microswitch can be checked (as shown below). Using a soft bristled
brush, carefully clean any swarf and debris away from the microswitch,
to a location where it can be removed from the working area. Inspect
the microswitch for damage or wear.
Location
-
x
Look at lower, right side
of machine column.
Worklight.
Back panel
of machine.
Microswitch.
Microswitch.
View from right
side of machine.
continued...
Triac Series CNC Machine User's Manual
Section 7 - Maintenance - 95
7: Cleaning and Inspecting the Z Axis Datum
Microswitch
The trigger for the Z axis microswitch is mounted on the right side of the
machine head (as shown below). Using a soft bristled brush, carefully
clean any swarf and debris away from the trigger, to a location where it
can be removed from the working area. Inspect the trigger for damage
or wear.
Location
-
x
Look at right side of
machine head.
Machine
head.
Machine
column.
Note
-
The moveable
microswitch trigger
position is set at the
time of machine
manufacture and
should not require
adjustment.
x
Trigger.
Trigger.
View from right
side of machine.
96 - Maintenance - Section 7
Triac Series CNC Machine User's Manual
7: Gib Strip Adjustment
A gib strip is an angled section of metal, tapered along its length, which
is fitted to one side of a machine slide. One gib strip is fitted to each of
the three machine slides on your Triac. Essentially, driving one of
these metal wedges further along a slide will gradually decrease the
amount of free play in the axis. The photo below shows a gib strip
being fitted to the Z axis of a machine head and column.
Gib strip.
Production of a machine
head and column, showing
the fitting of a Z axis gib
strip.
During the day-to-day use of your Triac, wear will occur in each of the
gib strips. This wear is normal and if checked regularly will not affect
the performance of your machine.
Denford recommends that the gib strips be checked twice a year. Any
slack present in the slides should be rectified, by adjusting the gib strips,
as described on the next pages.
Checking the Condition of the Gib Strips.
As the gib strips wear down, varying degrees of free play will become
noticeable in each of the three machine axes.
You can quickly judge the slack available in each slide, by holding the
table, saddle, and machine head at their extreme ends. Try to move,
or wobble them from side to side, across the width of the slide. Any
excessive movement will indicate that the slide in question requires
adjustment.
To accurately assess the condition of each slide, Denford recommends
the use of a dial gauge.
Note that a slight degree of movement will always be present in every
slide. If there is no free movement whatsoever, then the slides would
be too tight to move.
Triac Series CNC Machine User's Manual
Section 7 - Maintenance - 97
7: X Axis Gib Strip Adjustment
To adjust the X axis gib strip on the table slide:
1) Drive the machine table to the mid-point of the saddle. This will
make is easier to gain access to the left, front side of the saddle,
where the gib strip locking screw is located (as shown below).
2) Using a flat bladed screwdriver, release the gib strip lock screw.
Location
-
View looking
under the
machine table at
the left side of
the saddle.
x
Look at front left side of
saddle.
Gib strip
locking
screw.
Front of
machine.
Left
side of
saddle.
3) The gib strip adjustment screw is accessible from the right, front side
of the saddle (as shown below). Turn the gib strip adjustment screw
clockwise until tight. Do not overtighten this screw. A slight
degree of movement must be left to allow the slide to move.
Location
-
View looking
under the
machine table at
the right side of
the saddle.
x
Look at front right side
of saddle.
Gib strip
adjustment
screw.
Front of
machine.
Right
side of
saddle.
4) Retighten the gib strip lock screw.
5) Move the machine table left and right along the saddle, to ensure
that the movement is smooth.
6) If the movement is not smooth, loosen the gib strip by repeating
steps 1) to 4), but turn the gip strip adjustment screw counterclockwise. Run the machine table again to assess the smoothness
of movement.
98 - Maintenance - Section 7
Triac Series CNC Machine User's Manual
7: Y Axis Gib Strip Adjustment
To adjust the Y axis gib strip on the crosslide:
1) Drive the machine table and saddle to the mid-point of the crosslide.
This will make is easier to gain access to the back of the saddle,
where the gib strip locking screw is located. To access the screw, lift
the right, back section of the flexible cover, when viewed from the
front of the machine (as shown below left).
2) Using a flat bladed screwdriver, release the gib strip lock screw.
3) The gib strip adjustment screw is accessible by lifting the right, front
section of the flexible cover, when viewed from the front of the
machine (as shown below right). Turn the gib strip adjustment
screw clockwise until tight. Do not overtighten this screw. A
slight degree of movement must be left to allow the slide to move.
4) Retighten the gib strip lock screw.
Location
-
x
Look front and back at
right side of saddle.
Gib strip
adjustment
screw.
Gib strip
locking
screw.
Right
side of
saddle.
Flexible
cover at
back of
saddle.
View looking at back, right
corner of saddle.
Flexible
cover at
front of
saddle.
Right
side of
saddle.
View looking at front, right
corner of saddle.
5) Move the machine saddle forwards and backwards along the cross
slide, to ensure that the movement is smooth.
6) If the movement is not smooth, loosen the gib strip by repeating
steps 1) to 4), but turn the gip strip adjustment screw counterclockwise. Run the machine saddle again to assess the smoothness
of movement.
Triac Series CNC Machine User's Manual
Section 7 - Maintenance - 99
7: Z Axis Gib Strip Adjustment
To adjust the Z axis gib strip on the column slide:
1) Drive the machine head upwards. This will make is easier to gain
access to the underside of the machine head, where the gib strip
locking screw is located under a cover in the back, right corner.
Remove the gib strip locking screw cover (as shown below left),
using a 2.5mm allen (hex) key.
2) Using a flat bladed screwdriver, release the gib strip lock screw (as
shown below right).
Location
-
x
Look under front, right
edge of machine head.
Underside
of machine
head.
Remove
cover...
...to access gib
strip locking screw.
Front of
machine
column.
View looking
under front of
machine head.
continued...
100 - Maintenance - Section 7
Triac Series CNC Machine User's Manual
7: Z Axis Gib Strip Adjustment
3) The gib strip adjustment screw is accessible from the back of the
machine head. Using a suitable stepladder, work from the back of
the machine and reach across the top surface of the machine
column towards the left corner of the machine head. Locate the
position of the screw (as shown below). Turn the gib strip
adjustment screw clockwise until tight. Do not overtighten this
screw. A slight degree of movement must be left to allow the slide to
move.
Location
-
x
Look at back, left of
machine head.
Back of
machine
head.
Gib strip
adjustment
screw.
Top of
machine
column.
View looking at
top surface of
machine head.
4) Retighten the gib strip locking screw and replace the cover.
5) Move the machine head up and down the column, to ensure that the
slideway movement is smooth.
6) If the movement is not smooth, loosen the gib strip by repeating
steps 1) to 4), but turn the gip strip adjustment screw counterclockwise. Run the machine head again to assess the smoothness
of movement.
Triac Series CNC Machine User's Manual
Section 7 - Maintenance - 101
7: Automatic Tool Changer Maintenance
The ATC (Automatic Tool Changer) is supplied as standard with the
Triac VMC or as an option with the Triac PC. Clean if necessary, then
lubricate the following parts of the ATC system, using oil grade BP. CS
68 in a manual pump action oilcan.
ATC Upper and Lower Slides.
Reaching up under the ATC cover, lubricate the upper and lower
slides. Run the ATC to distribute the oil evenly across both slides.
Location
-
x
Oil upper slide.
Look under ATC cover.
Oil lower slide.
View under
ATC cover.
ATC Carousel Mechanism and Cylinders.
Apply a light coating of oil to both cylinders above the ATC carousel
mechanism, as shown below left. Lubricate the pivot points and
segments on the cam driven mechanism, in the centre of the ATC
carousel, as shown below right. Operate the ATC carousel to distribute
the oil evenly across all surfaces.
Location
-
x
ATC cover.
Oil each segment.
Look at ATC carousel.
Oil cylinders.
ATC carousel.
ATC M Codes
ATC carousel.
102 - Maintenance - Section 7
-
x
M20 - ATC arm in
M21 - ATC arm out
M22 - ATC arm down
M23 - ATC arm up
M24 - Drawbar unclamp
M25 - Drawbar clamp
M27 - ATC reset carousel
M32 - Carousel CW
M33 - Carousel CCW
M34 - Carousel 1/2 turn
Triac Series CNC Machine User's Manual
7: Automatic Tool Changer Maintenance
ATC Cylinder Damping Mechanisms.
The ATC is fitted with self-damping pneumatic cyclinders. The level of
damping is preset at the time of CNC machine manufacture.
Under normal conditions, no adjustment is required to the amount of
damping, or cushioning, provided by each cyclinder. If a “clunk” sound
is being heard when a toolchange is performed, the self-damping
features on the ATC pneumatic cylinders may require adjustment.
Adjustment screws are fitted beside the air supply ports, at both ends of
each cylinder. To increase the damping effect, eliminating the noise,
turn the adjustment screws clockwise.
Safety First !
-
x
Caution.
If the cutting tool has
been recently used, it
may still be HOT.
ATC Tool Holder Pull Studs.
Check for slack in each of the pull studs
fitted to the top of the ATC tool holders,
each week. The pull studs are tightened
using a 13mm spanner.
Turn the spanner in a clockwise direction,
when viewed from above the top of the
ATC tool holder, as shown in the diagram
below.
Removable
pull stud.
ATC
tool
holder
body.
Turn clockwise to
tighten the pull stud.
Triac Series CNC Machine User's Manual
Section 7 - Maintenance - 103
7: Pneumatic Safety Guard Door Maintenance
Location
-
x
Look at left side of
machine column.
Door M Codes
-
x
M38 - Guard open
M39 - Guard close
The pneumatic safety guard door is
supplied as an option with the Triac PC
or Triac VMC. Operation of the door is
achieved through use of a pneumatic
cylinder, driven from the compressed air
system. The cylinder (circled right) is
mounted to the left of the machine
column.
Each week, clean if necessary, then
lubricate the cylinder using oil grade BP.
CS 68 in a manual pump action oilcan.
Check the security of any screws, hoses
and connections. Open and close the
pneumatic safety guard door to distribute
the oil evenly across the cylinder
surface.
Oil cylinder.
Left side
of
machine
column.
Column base.
7: Hydraulic Vice Maintenance
Location
-
x
Vice mounted on
machine table.
Hydraulic intensifier on
back panel of cabinet.
The hydraulic vice is supplied as an option with the Triac PC or Triac
VMC. The vice jaws are driven using a hydraulic intensifying cylinder,
mounted on the back panel of the Triac cabinet. The intensifier itself is
driven from the compressed air system.
Clean the vice surfaces, the components of the hydraulic intensifier and
check the security of any screws, hoses and connections on a weekly
basis.
The hydraulic intensifier unit includes a lubrication unit which
automatically distributes oil to the hydraulic system and the vice. Check
the oil level on a daily basis. To top-up the lubrication unit, lift the cap
on the top of the oil storage reservoir and pour in the required amount
of oil. Refill the reservoir using oil grade ISO VG 32.
Further details regarding the parts of the hydraulic vice system are
explained in Section 6 - Work Holding - pages 78 to 80.
Door M Codes
-
x
M10 - Vice open
M11 - Vice close
104 - Maintenance - Section 7
Triac Series CNC Machine User's Manual
7: Compressed Air Connection Unit
Maintenance
Location
-
Compressed air
connection on back
panel of cabinet.
x
The compressed air connection unit is fitted as standard to the Triac
VMC (supplying the standard ATC system). The compressed air
connection unit is fitted to the Triac PC when any of the following options
are included; ATC; hydraulic vice; pneumatic safety guard door. The
components of the compressed air connection unit are mounted on the
back of the Triac cabinet.
Clean each unit and check the security of any screws, hoses and
connections on a weekly basis.
The oil lubricator unit is used to blend a fine mist of oil with the
compressed airstream. The rate of flow is preset at the factory,
according to the various pneumatic options fitted to your Triac, at the
time of manufacture. This rate should NOT require adjustment through
normal day-to-day use of the CNC machine. Check the oil level on a
daily basis. To top-up the oil level in the air lubricator unit, unscrew
and withdraw the entire oil container, positioned directly below the oil
flow adjustment screw and cap. Refill the container using oil grade ISO VG 32.
Further details regarding parts of the compressed air connection unit
are explained in Section 3 - CNC Machine Installation - pages 25 to
28.
Triac Series CNC Machine User's Manual
Section 7 - Maintenance - 105
7: Flood Coolant System Maintenance
-
Location
x
Flood coolant system:
a: storage tank.
b: coolant delivery hose.
c: electric pump.
d: drain grill.
e: viewing window
and drain plug.
c
d
b
a
d
e
The flood coolant system is supplied as an option with the Triac PC or
Triac VMC. Coolant is driven from the storage tank (under the machine
floor) to the coolant delivery hose (on the right side of the machine
column) using an electric pump (to the right of the machine column).
Clean each part of the flood coolant system and check the security of
any screws, hoses and connections on a weekly basis.
To fill or top-up the tank, open the safety guard door, then pour the
required amount of coolant mix directly into the working area of the
machine. The coolant is channelled into the storage tank via the two
drain grills located in the front right and left corners of the machine floor.
Check and clear and obstructions from these grills, each week. The
grills can be removed for cleaning by unscrewing the allen (hex) bolts
in the centre of each grill.
The storage tank tank has a capacity of 14.75 litres. Use coolant grade
- Cincinnati Millacron Simcool C60. New coolant should be mixed in
accordance with coolant suppliers instructions. Denford recommends
using a minimum 2.5% mix.
Old (excessively dirty or used) coolant should be drained and replaced
with a fresh coolant mix, when applicable. To drain off coolant, unscrew
the drain plug, located below the coolant level viewing window, on the
right end panel of the Triac cabinet. Ensure that any unwanted coolant is
collected and disposed of in a responsible manner.
Further details regarding parts of the flood coolant system are
explained in Section 3 - CNC Machine Installation - pages 29 to 30.
106 - Maintenance - Section 7
Triac Series CNC Machine User's Manual
8: Accessing the Electrical Diagrams
Warning
-
x
Open the electrical control box to access the electrical diagrams for
your Triac.
Door cannot be opened unless the
isolator switch is in the off (0) position.
Never attempt to access
the electronic hardware
systems of the machine
with the mains power
switched ON.
Door lock.
Note that hazardous
voltages can still exist
immediately after
switching off the power.
If the machine has
previously been
switched on, wait at least
5 minutes before
attempting to open the
electrical control box
door.
If necessary, cut yellow
plastic sealing tag.
Door lock.
Depending on the
specification of the
machine, some
electrical control box
doors may be fitted with
locks.
Note
-
x
Further electrical
schematics are
available on request
from Denford Customer
Services.
Electrical
Panels.
PC version (shown in photos above) - Electrical diagrams are
held in a folder on the inside face of the door.
VMC version - Electrical diagrams are stored in the base of
the control box or supplied separately in the standard
equipment box supplied with your machine.
Triac Series CNC Machine User's Manual
Section 8 - Machine Electronics - 107
8: Interior Layout of the Electrical Control Box
Warning
-
x
Never attempt to access
the electronic hardware
systems of the machine
with the mains power
switched ON.
Note that hazardous
voltages can still exist
immediately after
switching off the power.
If the machine has
previously been
switched on, wait at least
5 minutes before
attempting to open the
electrical control box
door.
PC Version.
The photo on the next page labels all important electrical
components inside the Triac PC electrical control box.
Please note that the layout of your electrical panel may differ from the
photo, depending on components and options fitted to your Triac PC.
Before commencing any work, refer to the schematic diagram of the
electrical panels, held in a folder on the inside face of the electrical
control box door.
VMC Version.
The layout of the electrical panels differs from the Triac PC in the
following areas:
• An IBM compatible personal computer is attached to the
electrical control box door.
• Floppy disk and CD-ROM drives are built into the electrical
control box door.
In all other respects, layout of the major electrical components are
identical to the Triac PC electrical control box photo, shown on the
next page.
Before commencing any work, refer to the schematic diagram of the
electrical panel, held inside the electrical control box or supplied
separately in the standard equipment box supplied with your
machine.
108 - Machine Electronics - Section 8
Triac Series CNC Machine User's Manual
8: Interior Layout of the Electrical Control Box
Layout of the Electrical Panels (PC Version shown).
Ferrite
Core.
Spindle
Drive
Board.
Main Fuse Rack.
Relay
Modules.
Isolator.
Ferrite
Core.
Relay
Modules.
Terminal
Block.
Spindle
Choke.
24V
Power
Supply
Unit.
Space for
optional
I/O Unit.
Standard
I/O Unit.
Axis Drive
Transformer.
Backplane.
Eurostep
Motion
Control
Board.
Custom
Card.
Space
for 24V
I/O
Card.
Triac Series CNC Machine User's Manual
Z Axis
Drive
Board.
Y Axis
Drive
Board.
X Axis
Drive
Board.
Control
Transformer.
Section 8 - Machine Electronics - 109
8: The Eurostep Motion Control Board
The eurostep motion control board is mounted in the bottom left
corner of the electrical control box, fitted into the far left slots of the
card rack. In conjunction with the custom card and axis drive
boards, it controls the motors that drive the three CNC machine
axes.
Location
-
x
Left panel
of electrical
control box.
Look in the bottom left
corner of the control box,
from the right-hand side.
Eurostep
Motion
Control
Board.
Seven
Segment
LED
Display.
Backplane.
Custom
Card.
110 - Machine Electronics - Section 8
Fuses.
Triac Series CNC Machine User's Manual
8: The Eurostep Motion Control Board
Location
-
x
Look in the bottom left
corner of the control box,
from the front.
Eurostep
Motion
Control
Board.
Custom
Card.
Seven
Segment
LED
Display.
LED Status and Fault Display.
Look directly at the end of the eurostep motion control card to read
the seven segment LED display.
Display. Meaning.
0
No comms board address fault.
Servo power off.
8
Servo power up and idle.
Cam profiling (subscript symbol).
Cam table (superscript symbol).
C
Circular interpolation.
Encoder following mode.
F
Flying shear (static symbol).
H
Homing (datuming).
J
Jogging (velocity) mode.
Offset mode.
P
Linear positional mode.
Torque control mode.
S
Stop asserted.
U
Pulse following mode.
Errors are all shown with a flashing dot.
Display. Meaning.
External error.
E
Software abort or interpreter error.
F
Maximum servo following error exceeded.
L
Limit switch open.
Triac Series CNC Machine User's Manual
Section 8 - Machine Electronics - 111
8: The Spindle Drive Board
Location
-
x
Look in the top right
corner of the control box.
Two Spindle
Drive Status
LEDs.
Fuse.
The spindle drive board, mounted in the top right corner of the
electrical control box, controls the motor for the programmable
spindle.
Spindle Drive LED Status.
The two spindle drive status LEDs are mounted in the top left-hand
corner of the spindle drive board.
Display.
Meaning.
ON LED
Spindle drive board operational. If this is not lit,
check the spindle drive board fuse (shown in the
photo above) then the fuse labelled F1 on the main
fuse rack (positioned behind the isolator bracket).
STALL LED Motor stall. This indicates a faulty motor or
component on the spindle drive board.
112 - Machine Electronics - Section 8
Triac Series CNC Machine User's Manual
8: Interior Layout of the Machine Connection Box
Warning
-
x
Never attempt to access
the electronic hardware
systems of the machine
with the mains power
switched ON.
Note that hazardous
voltages can still exist
immediately after
switching off the power.
If the machine has
previously been
switched on, wait at least
5 minutes before
attempting to open the
machine connection box
door.
The mains power supply is fed to the electrical control box, which in
turn, is connected to the machine connection box, via the large,
flexible, black machine power cable. The machine connection box is
mounted on the back panel of the Triac cabinet.
Machine
mains
cable
connection.
Removable
door plate.
Left: The standard Triac PC machine
connection box contains electrical
terminal blocks and routing for the
automatic slide lubrication system.
Triac PC models fitted with compressed
air driven equipment will be fitted with
the (standard Triac VMC) machine
connection box illustrated below.
Left: The standard Triac VMC machine
connection box contains electrical
terminal blocks, routing for the
automatic slide lubrication system and
air pressure switches for the
compressed air driven equipment.
Note that machine
connection box doors
are fitted with either a
key operated lock or
removable door plate.
Machine
mains
cable
connection.
Door Lock.
Below: Interior of the standard Triac
VMC machine connection box.
Mains
electrical
connection.
Air pressure switches.
Terminal
blocks.
Triac Series CNC Machine User's Manual
Section 8 - Machine Electronics - 113
9: Technical Support
Denford Limited provides unlimited telephone and e-mail Technical
Support on this CNC machine to registered users. On-site visits by
our engineers may be chargeable. Please refer to the information
held in your separate Warranty pack, for specific details.
Before contacting Denford for support, please read your hardware
and software manuals and check the Denford websites for support.
Internet (access technical support and FAQ sections):
Denford UK: http://www.denford.co.uk
Denford USA: http://www.denford.com
When you request support, please be at your CNC machine, with
your hardware and software documentation to hand. To minimise
delay, please be prepared to provide the following information:
•
•
•
•
CNC Machine Serial Number (from the machine ID panel).
Registered user's name / company name.
The CNC machine control software name and version number.
The wording of any error messages that appear on your
computer screen, if applicable.
• A list of the steps that were taken to lead up to the problem.
• A list of any maintenance work that has been carried out on the
CNC machine.
Contact Details:
Denford Limited,
Birds Royd, Brighouse, West Yorkshire, HD6 1NB, UK.
Telephone: 01484 722733
Fax: 01484 722160
ISDN: 01484401157:01484401161
E-mail: [email protected]
Technical Support: Monday to Friday 8.30am - 4.30pm GMT
For international dialling: +44 and remove first 0 in each city code.
114 - Technical Support - Section 9
Triac Series CNC Machine User's Manual
9: Troubleshooting - VR CNC Milling Software
Note
-
x
Your screen may display
the message "Error 50
Mint 3.28 Disconnect"
(or similar, depending
on the hardware fitted).
Note
-
x
The password used to
access the "Machine
Properties" window can
be changed by the user.
Remember that the
default password listed
here will not be
recognised if you have
changed it.
If you change any
passwords, we
recommend you make a
note of them in the
Notes section in this
manual.
VR CNC Milling Software Communications Troubleshooting:
1) PC versions - Your computer communicates with Triac PC
versions using an RS232 serial cable. Check the RS232 cable is
securely plugged into a valid COM port on the computer. Note
that COM ports are sometimes labelled as serial ports. Identify
whether the COM port being used is labelled as COM1 or COM2.
The opposite end of this cable is securely plugged into the
RS232 port located on the side panel of the electrical control box.
VMC versions - The RS232 connection is not fitted, since VMC
versions have a hard wired (permanent) link between the CNC
machine and the controller computer.
2) All versions - Check all mains power connections are correctly
fitted and secure. Power up the Triac, using the yellow isolator
switch, mounted on the electrical control box door - position I=on,
position 0=off. If no power is present, switch off the mains
supply, then wait at least 5 minutes before attempting to open the
electrical control box door. Check the condition of the isolator
switch and fuses. For more information, refer to Section 8 Machine Electronics.
3) PC versions - Start the VR CNC Milling software (from the
default installation, click “Start | Programs | Denford | VR Milling”).
From the main menubar at the top of the VR CNC Milling
software screen, click “Setup | Setup Machine Parameters”. You
may be required to enter a password. The default password is
“denny”. Type the password and click [OK]. The “Machine
Properties” window will open. You can configure the type (name)
of CNC machine attached to your pc and any COM port settings
from this window.
VMC versions - The VR CNC Milling software will load
automatically.
continued...
Triac Series CNC Machine User's Manual
Section 9 - Technical Support - 115
9: Troubleshooting - VR CNC Milling Software
Note
-
x
Any optional equipment
fitted to your Triac can
be configured using the
options available in the
“Machine Properties”
window.
4) All versions - The “Machine Properties” window will open with
the name of the current (active) machine highlighted and its
listing expanded. Note that there are a number of Triac versions
to choose from. The active machine name in the software must
match the name and version of your CNC machine - this
information is printed on the CE identification panel, usually
applied to the side panel of the electrical control box. For
example, if “Triac PC” is printed on your CE identification panel,
the VR CNC Milling software must have “Triac PC” set as the
active machine. If the correct machine name is NOT listed as the
active machine, right click over the required machine name title to
display a pop-up menu. Click “Make Active”, then click [OK] and
restart the VR CNC Milling software. Re-open the "Machine
Properties" window to check that the changes have been applied.
5) All versions - In the “Machine Properties” window, click the
“Communications” property title. Change the “COM Port” setting
to match the number of the COM port being used by your pc.
Note that the hardware resources ( IRQ. etc.) are those specified
in the Windows Control Panel. The “Baudrate” must be set to
read “19200”. Baudrate is the speed at which data can be
transferred through your COM ports. The “Stop Bits” must be set
to read “2”. Stop Bits are the data signals sent after each data
character has been transferred. Click the [OK] button to save
and apply any changes made to the property listings.
6) All versions - Check the LED display status on the Eurostep
Motion Control Board. The card is located in the bottom of the
electrical control box, on the far left of the card rack. For more
information, refer to Section 8 - Machine Electronics. A problem
with this card can cause problems with communications. Look
for the LED display mounted on the main control card. A blinking
dot with an L or the number 8 should be shown. If the LED is not
lit, check the control board fuse. If no display continues to be
shown, call Denford Customer Services for assistance.
Warning - Risk of electric shock. Note that in order to check the
readout, the CNC machine must be powered up with the
electrical control box open. Exercise extreme caution - do not
touch any live electrical components since damage may occur to
the hardware or technician inspecting the equipment. Remember
to shutdown the CNC machine, then close and lock the electrical
control box door, on completion of this step.
116 - Technical Support - Section 9
Triac Series CNC Machine User's Manual
9: Troubleshooting - VR CNC Milling Software
7) All versions - Check the COM port on your pc is functioning
correctly. Consult your IT person or Computer Support Centre for
help with these issues. Check the COM port settings in Windows
by accessing the Device Manager. Check the com ports enabled
and labelled properly in the computer BIOS. Check the physical
COM port itself functional. For example, Windows and the BIOS
may show that the COM ports are fine, but the port is not seen by
any external devices.
VMC versions - The main body of the machine controller
computer is mounted on the inside face of the electrical control
box door.
8) When all else fails....
PC versions - Thoroughly check the condition of the RS232
cable. If the cable is bad, communication will not occur. Try
using a different pc to connect to the CNC machine.
All versions - Check for help on the technical support, FAQ and
download sections of the Denford websites and/or contact
Denford Customer Services (see page 114 for details).
Incorrect registration of tool offsets, when using multiple tools
of the same diameter :
All tool offset data is saved in the tooling library according to the tool
diameter, rather than the tool number used with the machine. This
can present problems when you wish to use two or more tools of
different lengths but identical tool diameters, for example, a 4mm
roughing tool and a 4mm finishing tool. Only one tool offset can be
registered, since the standard tooling library only contains one 4mm
tool. In this example, separate entries must be created in the tooling
library for both the 4mm roughing and finishing tools, then each tool
added to the machine tooling window, to allow separate tool offset
values to be registered.
Triac Series CNC Machine User's Manual
Section 9 - Technical Support - 117
9: Troubleshooting - DOS CNC Milling Software
DOS CNC Milling Software Communications Troubleshooting:
1) PC versions - Your computer communicates with Triac PC
versions using an RS232 serial cable. Check the RS232 cable is
securely plugged into a valid COM port on the computer. Note
that COM ports are sometimes labelled as serial ports. Identify
whether the COM port being used is labelled as COM1 or COM2.
The opposite end of this cable is securely plugged into the
RS232 port located on the side panel of the electrical control box.
VMC versions - The RS232 connection is not fitted, since VMC
versions have a hard wired (permanent) link between the CNC
machine and the controller computer.
2) All versions - Check all mains power connections are correctly
fitted and secure. Power up the Triac, using the yellow isolator
switch, mounted on the electrical control box door - position I=on,
position 0=off. If no power is present, switch off the mains
supply, then wait at least 5 minutes before attempting to open the
electrical control box door. Check the condition of the isolator
switch and fuses. For more information, refer to Section 8 Machine Electronics.
3) All versions - The DOS CNC Milling software is started by
executing the “FANUC.GO” file. Check the COM port being used
on your machine controller computer matches the COM port
number specified in the “FANUCMD.GO” file. If you are unsure,
assume the COM port being used is COM1. The GO file can be
opened using Notepad on a Windows system.
Find the line ending with the word “MACHINE”. If the RS232
cable is plugged into COM1, the line should read $3F8 4
MACHINE. If the RS232 cable is plugged into COM2, the line
should read $2F8 3 MACHINE. Change the line to read the
correct port number being used, then save the file.
4) All versions - Remove the “HIMEM.SYS” line from the
"CONFIG.SYS" file. Often times environmental factors will
interfere with proper communication.
continued...
118 - Technical Support - Section 9
Triac Series CNC Machine User's Manual
9: Troubleshooting - DOS CNC Milling Software
6) All versions - Check the LED display status on the Eurostep
Motion Control Board. The card is located in the bottom of the
electrical control box, on the far left of the card rack. For more
information, refer to Section 8 - Machine Electronics. A problem
with this card can cause problems with communications. Look
for the LED display mounted on the main control card. A blinking
dot with an L or the number 8 should be shown. If the LED is not
lit, check the control board fuse. If no display continues to be
shown, call Denford Customer Services for assistance.
Warning - Risk of electric shock. Note that in order to check the
readout, the CNC machine must be powered up with the
electrical control box open. Exercise extreme caution - do not
touch any live electrical components since damage may occur to
the hardware or technician inspecting the equipment. Remember
to shutdown the CNC machine, then close and lock the electrical
control box door, on completion of this step.
7) All versions - Check the COM port on your pc is functioning
correctly. Consult your IT person or Computer Support Centre for
help with these issues. Check the COM port settings in Windows
by accessing the Device Manager. Check the com ports enabled
and labelled properly in the computer BIOS. Check the physical
COM port itself functional. For example, Windows and the BIOS
may show that the COM ports are fine, but the port is not seen by
any external devices.
VMC versions - The main body of the machine controller
computer is mounted on the inside face of the electrical control
box door.
8) When all else fails....
PC versions - Thoroughly check the condition of the RS232
cable. If the cable is bad, communication will not occur. Try
using a different pc to connect to the CNC machine.
All versions - Check for help on the technical support, FAQ and
download sections of the Denford websites and/or contact
Denford Customer Services (see page 114 for details).
Triac Series CNC Machine User's Manual
Section 9 - Technical Support - 119
9: Troubleshooting - DOS CNC Milling Software
The “FANUCMD.GO” file.
The “FANUCMD.GO” file, usually supplied on floppy disk, defines
the computer settings and drivers used by the DOS CNC control
software. The file indicates the order in which the drivers are loaded
into memory, when the system first starts up.
Default “FANUCMD.GO” file listed below:
IBM.RS2 2
$3F8 4 COM1
$3E8 4 MACHINE
DENFORD.KBD 1
18.2 $2F8 3
EGA.CRT 0
FANUCMD.APP
Some drivers require a number of additional lines as parameters.
The amount of lines required by the driver is shown by a number
written after the driver name. For example, The IBM.RS2 driver
loads COM1 at the address $3F8 using interrupt 4 and MACHINE at
the address $3E8 using interrupt 4.
The last line in the file executes the software specified, ie,
FANUCMD.APP.
120 - Technical Support - Section 9
Triac Series CNC Machine User's Manual
9: Troubleshooting - Cutting Problems
The part is being cut at an incorrect depth :
Check the validity of the following:
1) The Z value entered in the tool length offset.
2) The Z value entered in the workpiece offset file.
3) The number (size) used for defining the depth of cut used in your
CNC program.
4) The sign (+ or -) used for defining the depth of cut used in your
CNC program. If your workpiece datum is aligned with the upper
surface of your billet, any Z values cutting into this billet will have
a minus sign.
The machine begins cutting the part at the wrong location :
Check the following:
1) The workpiece and tool offset files have been configured and
applied successfully. If no offsets have been configured, the
CNC machine will use the machine datum as the starting point for
any machining co-ordinates read.
2) The X and Y values entered in the workpiece offset file are
correct.
Poor surface finishes are obtained :
Check the following:
1) The correct feedrates, spindle speeds and coolant are being
used, appropriate for the cutting tool profile and type of material
being machined. Recommended feed and speed values should
be available from your tool and material supplier. Note that
running incorrect feeds, speeds or no coolant can severely
shorten the life expectancy of your tools.
2) The billet being machined is securely clamped.
3) The correct tool profile, appropriate to the finish required, is being
used. Check that the cutting edges are sharp and undamaged.
4) Any machine drive belts are correctly tensioned and not slipping.
5) The tool profile is held securely in the tool holder, which in turn is
held securely in the machine spindle.
6) If a poor surface finish is still being obtained after completing
checks 1) to 5), it is possible that one or more axis gib strips
need adjusting - see Section 7 - Maintenance - pages 97 to 101.
Triac Series CNC Machine User's Manual
Section 9 - Technical Support - 121
9: Troubleshooting - Mechanical Problems
The safety guard door cannot be opened :
In most cases, this is because the interlock guard switch has locked
the door in the closed position. The interlock guard switch is
mounted on the right end panel of the Triac cabinet.
Check the following:
1) Mains power is reaching the CNC machine. Check the large,
flexible, machine cable is fitted securely to the machine
connection box on the back of the Triac cabinet. Check the
mains plug from the electrical control box is fitted to an available
power socket and the socket is switched on. Check the isolator
on the electrical control box is switched on.
2) The emergency stop button is not pressed in. To release, push
and turn the button counterclockwise until it springs back out to
its ready position.
3) No CNC program is running. Wait for all machining operations to
finish, then switch the software to operate in jog mode.
4) On CNC machines fitted with pneumatic (powered) safety guard
doors, check the compressed air connection unit is functioning
correctly, the air compressor is connected and switched on and
the correct air pressure level is set (1ØØ PSI or 6.6 Bar) - see
Section 3 - CNC Machine Installation - pages 25 to 28. Check
the security and condition of all hose connections.
The ATC system is not working effectively :
Check the following:
1) The compressed air connection unit is functioning correctly, the
air compressor is connected and switched on and the correct air
pressure level is set (1ØØ PSI or 6.6 Bar).
2) Check the security and condition of all hose connections.
3) The slides, cylinders and pivot points on the ATC may require
cleaning and lubrication. The ATC system does not have an
automatic lubrication system, unlike the axis slides and
ballscrews.
4) If a “clunk” sound is being heard when a toolchange is performed,
the self-damping features on the ATC pneumatic cylinders may
require adjustment. Adjustment screws are fitted beside the air
supply ports, at both ends of each cylinder. To increase the
damping effect, eliminating the noise, turn the adjustment screws
clockwise.
122 - Technical Support - Section 9
Triac Series CNC Machine User's Manual
9: Troubleshooting - Mechanical Problems
The hydraulic vice is not holding the billet :
Check the following:
1) The correct pressure has been set for the vice jaws. The
pressure is adjusted using the single air regulator fitted to the left
of the hydraulic intensifier, on the back panel of the Triac cabinet
(do not confuse this with the regulator from the compressed air
connection unit) - see Section 6 - Work Holding - pages 78 to 80.
2) The compressed air connection unit is functioning correctly, the
air compressor is connected and switched on and the correct air
pressure level is set (1ØØ PSI or 6.6 Bar) - see Section 3 - CNC
Machine Installation - pages 25 to 28.
3) Check the security and condition of all hose connections.
No lubrication is being delivered to the machine slides :
Check the following:
1) Oil is supplied by the automatic slide lubrication system, mounted
to the right of the machine connection box, on the back panel of
the Triac cabinet. Check that oil is filled in the reservoir to the
correct level.
2) Inspect the lubrication outlets and check they have not become
blocked with dust, debris or swarf. Check the security and
condition of all hose connections.
3) Check the flow adjustment on the system is set correctly - see
Section 3 - CNC Machine Installation - pages 31 to 32.
The flood coolant system is not working :
Check the following:
1) Check that coolant is filled in the Triac base reservoir tank to the
correct level - see Section 3 - CNC Machine Installation - pages
29 to 30.
2) If coolant has been unused for a long period of time, check for
the presence of any air locks in the system.
3) Check the security and condition of all hose connections. If the
coolant is excessively dirty, drain, flush and refill the system.
Triac Series CNC Machine User's Manual
Section 9 - Technical Support - 123
9: Troubleshooting - Electrical Problems
Note
-
x
Always refer to your
electrical schematic
diagrams for the
definitive labelling and
placement of
components and fuses.
Information contained
on this page is correct at
the time of printing June 2002 - but is liable
to change through
continuous development
of our products.
Warning.
Never attempt to access the electronic hardware systems,
connections or fuses in the CNC machine with the mains isolator
power switched ON.
Note that hazardous voltages can still exist immediately after
switching off the power. If the machine has previously been
switched on, wait at least 5 minutes before attempting to access any
electronic components.
The spindle drive is not working :
Check the validity of the following:
1) Confirm that none of the axis drives are on overtravel.
2) Check the spindle drive fuse (F1), referring to the electrical
schematic diagrams - see Section 7 - Machine Electronics pages 107 to 110 and page 112.
The axis drives do not respond :
Check the validity of the following:
1) Check the emergency stop button is not depressed.
2) Confirm that none of the axis drives are on overtravel or tripped
their limit switches.
3) Check the axis drive fuse (F4), referring to the electrical
schematic diagrams - see Section 7 - Machine Electronics pages 107 to 111.
4) Check the axis override on pendant.
The worklight is not working :
Check the validity of the following:
1) Check the bulb.
2) Check the worklight fuse (F6), referring to the electrical
schematic diagrams - see Section 7 - Machine Electronics pages 107 to 109.
124 - Technical Support - Section 9
Triac Series CNC Machine User's Manual
9: Troubleshooting - Electrical Problems
Note
-
x
Always refer to your
electrical schematic
diagrams for the
definitive labelling and
placement of
components and fuses.
Information contained
on this page is correct at
the time of printing June 2002 - but is liable
to change through
continuous development
of our products.
No ATC is not working :
Check the validity of the following:
1) Work through the mechanical troubleshooting section first.
2) Check the ATC fuse (F5), referring to the electrical schematic
diagrams - see Section 7 - Machine Electronics - pages 107 to
109.
The flood coolant system is not working :
Check the validity of the following:
1) Check the flood coolant system fuse (F8), referring to the
electrical schematic diagrams - see Section 7 - Machine
Electronics - pages 107 to 109.
The machine controller computer is not working :
Check the validity of the following:
1) Ensure the computer is plugged in, switched on and all cables
and connections are secure.
2) On VMC versions, check the computer fuse (F9), referring to the
electrical schematic diagrams - see Section 7 - Machine
Electronics - pages 107 to 109.
Triac Series CNC Machine User's Manual
Section 9 - Technical Support - 125
10: Specification of Triac PC
Standard Equipment:
• Triac PC CNC milling machine.
• Electrical power box.
• Easychange toolholder.
• CNC machine control software.
• Installation, maintenance and instruction
manuals.
• Set of maintenance tools and spare parts
list.
• Machine commissioning and basic
instruction.
• Training (UK Only).
Optional Extra Equipment:
• IBM or 100% compatible PC, keyboard,
mouse and monitor.
• 8 station automatic toolchanger and
tooling.
• Flood coolant system.
• Spray mist coolant system.
• Desk top tutor.
• Hydraulic vice.
• Pneumatic safety guard door.
• Upgrade pack for integration into Denford
FMC, FMS or CIM systems.
• Courseware and project books.
• Various tooling packages.
• Additional training packages.
• Additional CNC machine control software
licences.
• Machine work bench.
• Video conferencing system.
126 - Appendix - Section 10
Safety Features:
• Manual operation, totally enclosed,
interlocked, safety guard door.
• Emergency stop button.
• Axis limit microswitches, adjustable on Z
slide.
• 2D/3D toolpath graphics to verify part
programs prior to machining.
• Automatic tool retraction & spindle stop
for tool changing.
CAD/CAM/CNC Software options:
• MillCAM Designer.
• Techsoft 2D Design Tools.
• MiniCAM.
• AutoCAD and additional Autodesk
products.
• MasterCAM.
• Pro/DESKTOP.
• CNC Tutor.
• ArtCAM.
Triac Series CNC Machine User's Manual
10: Specification of Triac PC
Dimensions:
• Total machine width 1285mm (50 5/8”).
• Total machine height 1060mm (41 3/4”).
• Total machine height with guard open
1160mm (45 11/16”).
• Total machine depth (non ATC) 900mm
(35 7/16”).
• Total machine depth (with ATC) 935mm
(36 13/16”).
• Electrical control box width 600mm
(23 5/8”).
• Electrical control box height 780mm
(30 11/16”).
• Electrical control box depth 360mm
(14 3/16”).
Height
Depth
Width
Height
Depth
Width
• Machine table size width (X axis) 500mm
(19 11/16”).
• Machine table size depth (Y axis) 160mm
(6 5/16”).
• Spindle to table (Z axis) 275mm
(10 13/16”).
• Spindle centre to column front edge
170mm (6 11/16”).
• Machine table 3 tee slots 10mm (25/64”)
width, 31.5mm (1 1/4”) centres.
• X, Y, Z ballscrews 16mm (5/8”) diameter x
5mm (13/64”) pitch.
Triac Series CNC Machine User's Manual
Mechanical Details:
• Longitudinal travel (X axis) 290mm (11 7/
16”).
• Cross travel (Y axis) 170mm (6 11/16”).
• Vertical travel (Z axis) 235mm (9 1/4”).
• Spindle taper ISO 30.
• Spindle speed range - programmable 100
to 4000 rpm.
• Spindle speed override potentiometer 50
to 120%.
• Maximum feedrate (X,Y) : 2500mm/min.
• Maximum feedrate (Z) : 1000mm/min.
• Feedrate override potentiometer 0 to 150%.
• Machine resolution 0.01mm (0.0004”).
• System resolution 0.005mm (0.0002”).
Weights:
• Machine weight (non ATC) 240 KG (529 lb).
• Machine weight (with ATC) 320 KG (705 lb).
• Electrical control box weight 70KG (154 lb).
Electrical Details:
• Mains supply required: 240 Volts, AC, 1
Phase, 50 Hz, 13 AMP.
• Spindle motor: 1.1 Kw, DC, 1.5 hp.
• Stepper motors: 200 steps/rev, DC.
Compressed Air Connection:
• Preset in the factory at 1ØØ PSI
(6.6 Bar).
• Maximum pressure 15Ø PSI
(9.9 Bar).
Tooling:
• Tool type ATC: BT30.
• Tool capacity ATC: 8.
• Tool type non-ATC: Quick (Easy) Change.
Section 10 - Appendix - 127
10: Specification of Triac VMC
Standard Equipment:
• Triac VMC CNC milling machine.
• Electrical power box.
• 8 station automatic toolchanger and
tooling.
• Flood coolant system.
• CNC machine control software.
• Installation, maintenance and instruction
manuals.
• Set of maintenance tools and spare parts
list.
• Machine commissioning and basic
instruction.
• Training (UK Only).
Optional Extra Equipment:
• IBM or 100% compatible PC, keyboard,
mouse and monitor.
• Spray mist coolant system.
• Hydraulic vice.
• Pneumatic safety guard door.
• Upgrade pack for integration into Denford
FMC, FMS or CIM systems.
• Courseware and project books.
• Various tooling packages.
• Additional training packages.
• Additional CNC machine control software
licences.
• Machine work bench.
• Video conferencing system.
128 - Appendix - Section 10
Safety Features:
• Manual operation, totally enclosed,
interlocked, safety guard door.
• Emergency stop button.
• Axis limit microswitches, adjustable on Z
slide.
• 2D/3D toolpath graphics to verify part
programs prior to machining.
• Automatic tool retraction & spindle stop
for tool changing.
CAD/CAM/CNC Software options:
• MillCAM Designer.
• Techsoft 2D Design Tools.
• MiniCAM.
• AutoCAD and additional Autodesk
products.
• MasterCAM.
• Pro/DESKTOP.
• CNC Tutor.
• ArtCAM.
Triac Series CNC Machine User's Manual
10: Specification of Triac VMC
Dimensions:
• Machine width 1285mm (50 5/8”).
• Total machine width (including monitor
housing) 2120mm (83 15/32”).
• Total machine height 1060mm (41 3/4”).
• Total machine height with guard open
1160mm (45 11/16”).
• Total machine depth 935mm (36 13/16”).
• Electrical control box width 600mm
(23 5/8”).
• Electrical control box height 780mm
(30 11/16”).
• Electrical control box depth 360mm
(14 3/16”).
Height
Depth
Width
Height
Depth
Width
Mechanical Details:
• Longitudinal travel (X axis) 290mm
(11 7/16”).
• Cross travel (Y axis) 170mm (6 11/16”).
• Vertical travel (Z axis) 235mm (9 1/4”).
• Spindle taper ISO 30.
• Spindle speed range - programmable 100
to 4000 rpm.
• Spindle speed override potentiometer 50
to 120%.
• Maximum feedrate (X,Y) : 2500mm/min.
• Maximum feedrate (Z) : 1000mm/min.
• Feedrate override potentiometer 0 to 150%.
• Machine resolution 0.01mm (0.0004”).
• System resolution 0.005mm (0.0002”).
Weights:
• Machine weight 320 KG (705 lb).
• Electrical control box weight 70KG (154 lb).
Electrical Details:
• Mains supply required: 240 Volts, AC, 1
Phase, 50 Hz, 13 AMP.
• Spindle motor: 1.1 Kw, DC, 1.5 hp.
• Stepper motors: 200 steps/rev, DC.
Compressed Air Connection:
• Preset in the factory at 1ØØ PSI
(6.6 Bar).
• Maximum pressure 15Ø PSI
(9.9 Bar).
• Machine table size width (X axis) 500mm Tooling:
(19 11/16”).
• Tool type ATC: BT30.
• Machine table size depth (Y axis) 160mm • Tool capacity ATC: 8.
(6 5/16”).
• Spindle to table (Z axis) 275mm
(10 13/16”).
• Spindle centre to column front edge
170mm (6 11/16”).
• Machine table 3 tee slots 10mm (25/64”)
width, 31.5mm (1 1/4”) centres.
• X, Y, Z ballscrews 16mm (5/8”) diameter x
5mm (13/64”) pitch.
Triac Series CNC Machine User's Manual
Section 10 - Appendix - 129
10: What is a Part Program?
A Part Program is a list of coded instructions which describes how
the designed part, or component, will be manufactured. The part
program is also called the CNC File.
These coded instructions are called data - a series of letters and
numbers. The part program includes all the geometrical and
technological data to perform the required machine functions and
movements to manufacture the part.
The part program can be further broken down into separate lines of
data, each line describing a particular set of machining operations.
These lines, which run in sequence, are called blocks.
A block of data contains words, sometimes called codes. Each word
refers to a specific cutting/movement command or machine function.
The programming language recognised by the CNC, the machine
controller, is an International Standards Organisation code, which
includes the G and M code groups.
Each program word is composed from a letter, called the address,
along with a number.
These terms are illustrated on the following pages.
130 - Appendix - Section 10
Triac Series CNC Machine User's Manual
10: Composition of a Part Program
A component is designed using a CAD/
CAM software package, such as Mill
CAM Designer.
The CAD/CAM software package
automatically generates the part
program, including all the G and M
codes required to manufacture the
component.
Part Program example (Mill CAM Designer - triang.MCD)
(3/3/1997)
(metric)
(Post fanucm:1.2Ø 24 June 1994)
G21
[BILLET X8Ø Y55 Z1Ø
Denford Directive Example - [BILLET
[EDGEMOVE XØ YØ
[TOOLDEF T1 D2
NØØ1Ø G91G28XØYØZØ;
Address example - G
NØØ2Ø M6T1;
NØØ3Ø G43H1;
NØØ4Ø M3S15ØØ;
NØØ5Ø G9ØGØX4ØY48;
NØØ6Ø Z2;
NØØ7Ø G1Z-Ø.5F1ØØ;
Word example - G1
NØØ8Ø X72Y16F15Ø;
NØØ9Ø X8;
NØ1ØØ X4ØY48;
NØ11Ø GØZ2;
NØ12Ø X24Y32;
NØ13Ø G1Z-1F1ØØ;
Block example - NØ13Ø G1Z-1F1ØØ;
NØ14Ø X56F15Ø;
NØ15Ø X4ØY16;
NØ16Ø X24Y32;
NØ17Ø GØZ2;
NØ18Ø M5;
NØ19Ø G91G28XØYØZØ;
NØ2ØØ M3Ø;
Triac Series CNC Machine User's Manual
Section 10 - Appendix - 131
10: G Codes List
Note
-
x
G codes from group Ø
are non-modal (they
must be programmed
into every program
block when required).
All other G codes are
modal (they remain
active through
subsequent program
blocks, until replaced or
cancelled by a G code
from their particular
group).
The G codes indicated
by an asterisk (*) are
reactivated as defaults
when the machine
started.
132 - Appendix - Section 10
Note - Not all G codes may apply to your CNC machine.
G Code. Group.
Function.
GØØ
1
Positioning (Rapid Traverse)
GØ1
1
Linear Interpolation (Cutting Feed)
GØ2
1
Circular Interpolation CW
GØ3
1
Circular Interpolation CCW
GØ4
Ø
Dwell, Exact Stop
G2Ø
6
Imperial Data Input (Inches)
G21
6
Metric Data Input (Millimetres)
G28
Ø
Reference Point Return
G4Ø
7
Cutter Compensation Cancel
G41
7
Cutter Compensation Left
G42
7
Cutter Compensation Right
G73
9
Peck Drilling Cycle
G74
9
Counter Tapping
G76
9
Fine Boring
G8Ø*
9
Canned Cycle Cancel
G81
9
Drilling Cycle, Spot Boring
G82
9
Drilling Cycle, Counter Boring
G83
9
Peck Drilling Cycle
G84
9
Tapping
G85
9
Boring Cycle
G86
9
Boring Cycle
G87
9
Back Boring Cycle
G89
9
Boring Cycle
G9Ø*
3
Absolute Zero
G91
3
Incremental Command
G94*
5
Feed per Minute
G95
5
Feed per Revolution
G98*
1Ø
Return to Initial Point in Canned Cycle
G99
1Ø
Return to R in Canned Cycle
G17Ø
Ø
Circular Pocket
G171
Ø
Circular Pocket
G172
Ø
Rectangular Pocket
G173
Ø
Rectangular Pocket
Code listing full and correct at the time of printing.
Triac Series CNC Machine User's Manual
10: M Codes List
Note
-
x
Not all M codes listed
are available, all M
codes marked with an
asterisk (*) will be
performed at the end of
a program block (ie,
after any axis
movement).
Note - Not all M codes may apply to your CNC machine.
M code. Function.
MØØ*
Program Stop
MØ1*
Optional Stop
MØ2*
Program Reset
MØ3
Spindle Forward (clockwise)
MØ4
Spindle Reverse (counter clockwise)
MØ5*
Spindle Stop
MØ6
Automatic Tool Change
MØ8
Coolant On
MØ9*
Coolant Off
M1Ø
Vice/Work Clamp Open
M11
Vice/Work Clamp Close
M13
Spindle Forward and Coolant On
M14
Spindle Reverse and Coolant On
M19
Spindle Orientation
M2Ø
ATC Arm In
M21
ATC Arm Out
M22
ATC Arm Down
M23
ATC Arm Up
M24
ATC Drawbar Unclamp
M25
ATC Drawbar Clamp
M27
Reset Carousel to Pocket One
M3Ø
Program Reset and Rewind
M32
Carousel CW
M33
Carousel CCW
M38
Guard Door Open
M39
Guard Door Close
M62
Auxiliary Output 1 On
M63
Auxiliary Output 2 On
M64
Auxiliary Output 1 Off
M65
Auxiliary Output 2 Off
M66*
Wait for Auxiliary Output 1 On
M67*
Wait for Auxiliary Output 2 On
M7Ø
Mirror in X On
M71
Mirror in Y On
M76
Wait for Auxiliary Output 1 Off
M77
Wait for Auxiliary Output 2 Off
M8Ø
Mirror in X Off
M81
Mirror in Y Off
M98
Sub Program Call
M99
Sub Program End and Return
Code listing full and correct at the time of printing.
Triac Series CNC Machine User's Manual
Section 10 - Appendix - 133
10: List of Program Address Characters
N - Program Sequence (line) number.
X - Primary motion in X axis.
Y - Primary motion in Y axis.
Z - Primary motion in Z axis.
G - Preparatory functions.
I - Incremental distance parallel to X axis.
J - Incremental distance parallel to Y axis.
K - Incremental distance parallel to Z axis.
R - Radius.
M - Miscellaneous functions.
T - Tool numbers.
S - Spindle speeds.
F - Feed rates.
134 - Appendix - Section 10
Triac Series CNC Machine User's Manual
10: Denford Directives
Directives are program terms defined by Denford Limited. They are
used to help generate the 2D and 3D graphics used by the machine
controlling software.
[BILLET
This directive allows a billet that appears in a simulation window to
be given a size. The billet definition should be placed at the start of
a program, after the units of measurement have been set.
Example:
G21
[BILLET X1ØØ.Ø Y9Ø.Ø Z2Ø.Ø
This sets the measure to metric (Note - if set to Imperial the units
would be inches) and defines the billet as1ØØmm long by 9Ømm
wide, with a depth of 2Ømm.
[SUBPROGRAM
This directive allows a program with a non-numeric name to be
called as a subprogram.
Example:
[SUBPROGRAM Ø2ØØ FRED
M98 PØ2ØØ
This example assigns a subprogram number of Ø2ØØ to the
program named FRED, then calls the subprogram Ø2ØØ.
[TOOLDEF
This directive sets the length and diameter of a cutting tool. The
length of a tool is the distance from the spindle nose to the bottom of
the cutter.
Example:
G21
[TOOLDEF T1 D8 Z65
This example defines tool number 1 as being 8mm in diameter, and
65mm long.
Triac Series CNC Machine User's Manual
Section 10 - Appendix - 135
10: Denford Directives
[STEP
This directive runs an on-screen program in single steps. This
means the program will run one program line, then wait for the
operator to prompt it to move to the next line; this continues until the
program is instructed to stop this function. The directive applies to
both simulation and actual machining with a program.
[NO STEP
This directive runs an on-screen program without single steps. This
means the program will run as originally intended with no pausing,
unless a pause is requested from within the program itself.
The directive applies to both simulation and actual machining with a
program.
[SHOW
This directive allows the machining operations to be graphically
simulated on-screen.
[NOSHOW
This directive stops the machining operations from being graphically
simulated on-screen.
136 - Appendix - Section 10
Triac Series CNC Machine User's Manual
EC Declaration of Conformity
The responsible person ....................... Mr J.M. Boyle.
Business Name ................................... Denford Limited.
Address ............................................... Birds Royd,
Brighouse,
West Yorkshire,
HD6 1NB,
United Kingdom.
Declares that the machinery described:
Manufacturer ....................................... Denford Limited.
Model Name ........................................ Triac Series CNC Milling Machine.
Serial Number ..................................... (please refer to warranty card and/or machine
casing).
conforms to the following directives: .... The EC machinery directive 89/392/EEC as
ammended by directive 91/368 EEC and
directive 93/44/EEC and CE marking directive
93/68/EEC
and the following standards ...........................................................................................
(where applicable) .........................................................................................................
and complies with the relevant ......................................................................................
health and safety requirements. ....................................................................................
Signature .............................................
Position within company ...................... Senior Design Engineer.
Signed at ............................................. Denford Limited,
Birds Royd,
Brighouse,
West Yorkshire,
HD6 1NB,
United Kingdom.
Back of the EC Declaration of Conformity Certificate.
138 - Appendix - Section 10
Triac Series CNC Machine User's Manual
Triac Series Noise Level Test Results
Test Report No:
Machinery Manufacturer:
Machinery Type/Model:
Date compiled:
Test site:
Test specification:
NL - TR5 - 01.
Denford Limited.
Triac Series CNC Milling Machine.
14-12-94.
Inspection Dept.
In accordance with BS4813 : 1972.
Equipment.
Meter ref:
Cirrus CRL 2.35A - 1 off.
Denford Triac Series CNC machine: 1 off.
General Machine Test Conditions.
Chuck on size: Standard.
Splash on guard:
Standard.
Machine mounting:
Floor.
Additional equipment: None.
Test Positions.
C
D
E
Diagram Key:
A, B, C, D, E and F
are measurement
positions 1 metre
from the machine.
Front of machine.
B
A
F
continued on reverse...
Triac Series Noise Level Test Results
Test Conditions:
Spindle speed:
Spindle Direction:
Ambient background noise:
4,000 RPM.
Counter-clockwise.
<61 dB (A).
Spindle Speed
Sound Levels dB (A)
Position
RPM Range Ins/rev
100
A
B
C
D
E
F
Mean
N/A
N/A
61
62
61
61
61
62
61
1000 N/A
N/A
62
62
62
61
62
62
62
2000 N/A
N/A
63
62
62
61
62
63
62
3000 N/A
N/A
62
62
62
62
63
63
62
4000 N/A
N/A
63
62
62
62
64
63
62
Test Conditions:
Spindle speed:
Spindle Direction:
Ambient background noise:
4,000 RPM.
Clockwise.
<61 dB (A).
Spindle Speed
Sound Levels dB (A)
Position
RPM Range Ins/rev
100
A
B
C
D
E
F
Mean
N/A
N/A
61
61
61
61
62
62
61
1000 N/A
N/A
62
62
62
61
62
62
62
2000 N/A
N/A
61
63
62
62
61
61
62
3000 N/A
N/A
62
62
62
62
63
61
62
4000 N/A
N/A
63
63
63
63
64
62
63
140 - Appendix - Section 10
Triac Series CNC Machine User's Manual
11: Glossary
ABSOLUTE ......................... In absolute programming, zero is the point from which all other dimensions are
described.
ALLEN HEAD ...................... A hexagon shaped hole on the head (top) of a set screw. These are tightened
and loosened using allen keys/wrenches.
ARC ..................................... A portion of a circle.
ATC ..................................... Automatic Tool Changer.
AUTOMATIC CYCLE ........ A mode of control operation that continuously runs a cycle or stored program
until a program stop or end of program word is read by the controller.
AUXILIARY FUNCTION ...... The function of the CNC machine (ie, F, S, T, M codes etc.), other than co-ordinate
based commands.
AXIS (AXES) ....................... The planes of movement for the cutting tool, usually referred to as X (horizontal left
and right, parallel to the front of the machine), Y (horizontal forward and backwards,
parallel to the side of the machine) and Z (directly vertical). Combinations of all 3
allow precise co-ordinates to be described. Axes are also referred to as slides or
slideways.
BILLET ................................. The actual material being machined, sometimes referred to as the "workpiece" or
"stock".
BLOCK ................................ A collection of program words that collectively describe a machining operation. A
single program line in the CNC file.
CHARACTER ...................... A number, letter or symbol as entered into a CNC program.
CIM ...................................... Computer Integrated Manufacturing (System).
CIRCULAR INTERPOLATION G-code term for a programmed arc movement.
COMMAND ......................... A signal (or group of signals) instructing one step / operation to be carried out.
CONTEXT SENSITIVE ....... When the type of input signal of an event automatically changes the output signal.
CO-ORDINATES ................. Positions or relationships of points or planes. Co-ordinates are usually described
using three numbers referring to the (X,Y,Z) axes, e.g. the co-ordinate (23,35,45)
means X axis = +23 units, Y axis = +35 units and Z axis = +45 units.
CNC ..................................... Computer Numerical Control.
CNC FILE ............................ The sequence of commands describing the manufacture of a part on a CNC
machine, written using G and M codes, also called the CNC program.
CUTTER SPEED ................ The velocity of the cutting edge of the tool relative to the workpiece. With circular
tools, the cutting speed is related to the tool when new (maximum cutting diameter).
Usually the effect of feedrate is ignored.
CYCLE ................................. A sequence of events or commands.
DATUM ................................ The zero point (co-ordinate) from which a series of measurements are taken.
DATUM PLATE ................... The L-shaped bracket used to help locate pieces of work in position on the
machine table.
Triac Series CNC Machine User's Manual
Section 11 - Glossary - 141
11: Glossary
DESKTOP TUTOR ............ The input control keypad for the machine. Keypad overlays are interchangeable
according to the type of controller required.
DIRECTORY ...................... An area of a disk containing the names and locations of the files it currently
holds.
DISK ..................................... A computer information storage device, examples, C: (drive) is usually the
computers hard (internal) disk and A: (drive) is usually the floppy (portable 3.5"
diskette) disk.
DRIVE .................................. The controller unit for a disk system.
DRY RUN ............................ An operation used to test how a CNC program will function without driving the
machine itself.
DWELL ................................ A programmed time delay.
EDIT ..................................... The mode used for altering the content of a CNC program via the Desktop Tutor or
qwerty keyboard.
END OF BLOCK SIGNAL ... The symbol or indicator ( ; )that defines the end of a block of data. The equivalent of
the pc [return] key.
ERROR ................................ The deviation of an attained value from a desired value.
G-CODE .............................. The programming language understood by the machine controller.
FEEDRATE ......................... The rate, in mm/min or in/min at which the cutting tool is advanced into the
workpiece. For milling and drilling, the feedrate applies to the reference point on the
end of the axis of the tool.
FILE ..................................... An arrangement of instructions or information, usually referring to work or control
settings.
FORMAT .............................. The pattern or way that data is organised.
FMC ..................................... Flexible Manufacturing Cell.
FMS ..................................... Flexible Manufacturing System.
FNC ..................................... FANUC Miller file, extension ".fnc". Contains G and M codes describing the machine
and cutting operations.
G CODE .............................. A preparatory code function in a CNC program that determines the control mode.
HARDWARE ........................ Equipment such as the machine tool, the controller, or the computer.
HOME .................................. Operation to send the axes of the CNC machine to their extreme limits of movement.
Defines the co-ordinate based grid system of the CNC machine. Commonly referred
to as homing the machine, or sending the machine to its home position.
INCREMENTAL ................... Incremental programming uses co-ordinate movements that are related from the
previous programmed position. Signs are used to indicate the direction of
movement.
INPUT ................................. The transfer of external information (data) into a control system.
INTERFACE ........................ The medium through which the control/computer directs the machine tool.
142 - Glossary - Section 11
Triac Series CNC Machine User's Manual
11: Glossary
JOG CONTROL ................. Manual movement mode for the machine axes, using very small pre-defined
movements, called jog steps. One stepped movement is applied per movement key/
button press.
M CODE .............................. A miscellaneous code function in a CNC program used to indicate an auxiliary
function (ie, coolant on, tool change etc.).
MACHINE CODE ................ The code obeyed by a computer or microprocessor system with no need for further
translation.
MACHINE DATUM .............. A fixed zero reference point set by the machine manufacturer. The machine datum is
used to define the co-ordinate based grid system of the CNC machine. All machining
co-ordinates originate from this point. However, this point can be temporarily moved
using the machine offset facility.
MDI ...................................... Manual Data Input - A method used for manually inserting data into the control
system (ie, Desktop Tutor, qwerty keyboard etc.).
MITEEBITE CLAMP .......... Method of securing work to the machine table, using the series of machine table
T channels.
MODAL ................................ Modal codes entered into the controller by a CNC program are retained until
changed by a code from the same modal group or cancelled.
NC ........................................ Numerical control.
OFFSET .............................. Combination of two types of file, the workpiece offset and the tool offset. Used to
describe the workpiece datum, a zero reference used on the CNC machine to ensure
machining occurs in the correct place on the billet. Offsets are used to shift parts of
the three dimensional co-ordinate based grid system, used by the CNC machine.
PART DATUM ...................... Used as a zero reference point in a CNC file. All machining co-ordinates originate
from this point.
PART PROGRAM ............... A list of coded instructions which describes how the designed part, or component, will
be manufactured. The part program is also referred to as the CNC file, program, or G
and M code program.
PC ........................................ Personal computer.
PRJ ...................................... Denford CNC Project file, extension ".prj". Project files contain global information
about user defined settings in the VR CNC Milling software, such as toolpost setup,
tooling library, offsets, toolbar and window positions etc.
PROGRAM .......................... A systematic arrangements of instructions or information to suit a piece of equipment.
RAPID TRAVERSE ............. Fast movement of the cutting tool through the 3 machine axes between cutting
settings.
REFERENCE POINTS ....... The machine has 3 reference points used in setting the limits of movement for its
slides (axes).
RPM .................................... Revolutions per minute (rev/min) - a measure of spindle speed.
SIMULATION OFFSET ..... The workpiece offset file only used with VR CNC Milling software 2D and 3D
graphics.
Triac Series CNC Machine User's Manual
Section 11 - Glossary - 143
11: Glossary
SLIDES ................................ The 3 machine axes - see axis.
SPINDLE SPEED ................ The rate of rotation (velocity) of the machine head / cutting tool, measured in RPM.
SOFTWARE ....................... Programs, tool lists, sequence of instructions etc...
SUB-TABLE ........................ A secondary table that is clamped to the actual machine table. The work is then
fastened to this secondary table. Used as a safety feature to prevent damage
occurring to the actual machine table, should a problem occur when milling. For
example, a sheet of MDF. Sometimes referred to as a temporary table or platen.
TOOL OFFSET .................. When machining, allowances must be made for the size of tools being used,
since they all differ in length. The tool offset is the amount the Z value must be
moved (or offset), so that all the different cutting tool tips used line up with each
other, so they can all be used by one CNC file. Sometimes referred to as the
tool length offset. See OFFSET.
TRAVERSE ......................... Movement of the cutting tool through the 3 machine axes between cutting settings.
TXT ...................................... Standard Windows text only file, extension ".txt".
WORK (WORKPIECE) ........ The actual material being milled. The work is sometimes referred to as the billet or
stock.
WORKPIECE DATUM ......... Used as a zero reference point on the real billet. All machining co-ordinates originate
from this point, when offset files are used.
WORKPIECE OFFSET ....... A file containing X, Y and Z values that can shift the entire three dimensional coordinate based grid system, used by the CNC machine. See OFFSET.
WORD ................................. A combination of a letter address and digits, used in a CNC program (ie, G42, M04
etc.).
VIRTUAL REALITY ............. A fully interactive, three dimensional, computer based simulation of a real world
object or event.
XNC ..................................... Denford Compiled CNC file, extension ".xnc". A compiled file is a FANUC Miller file
that is formatted to allow 3D elements such as the 3D Viewer to run as quickly as
possible. XNC files can also be used to drive an attached CNC machine when run
through the VR CNC Milling software.
Z TOOL OFFSET ................ See Tool Offset
144 - Glossary - Section 11
Triac Series CNC Machine User's Manual
12: Index
A
D
About this manual ................................................ 7
Address characters list ........................................ 134
Advantages of CNC ............................................ 10
Auto mode ........................................................... 49
Automatic slide lubrication system
filling the reservoir .......................................... 31
hand priming the pump .................................. 32
maintenance .................................................. 88
troubleshooting .............................................. 123
Automatic tool changer system
adding a collet assembly ............................... 66
adding tool holders to the carousel ............... 63
adjusting the depth stop screw ...................... 67
calling a tool change automatically ................ 69
calling a tool change manually ...................... 68
description ...................................................... 61
fitting tools to the collet .................................. 65
maintenance .................................................. 102
preparing the compressed air supply ............ 61
removing a collet assembly ........................... 66
removing tool holders from the carousel ....... 62
tool holder components ................................. 64
troubleshooting .............................................. 122, 125
Axis defintions ..................................................... 42
Axis limit switch override ..................................... 51
Datum plate
components ................................................... 70
fitting ............................................................... 71
removing ........................................................ 71
setting methods .............................................. 73
Denford directives list .......................................... 135
Disclaimer ............................................................ 7
B
Ballscrew
lubrication ....................................................... 88
x axis inspecting and cleaning ....................... 89
y axis inspecting and cleaning ....................... 90
z axis inspecting and cleaning ....................... 92
C
Co-ordinate display systems ............................... 43
Component connection schematic diagram ....... 34
Compressed air connection unit
air filter regulator unit ..................................... 27
air lubricator unit ............................................ 28
air supply isolator unit .................................... 26
connection ...................................................... 25
maintenance .................................................. 105
Computer connections for Triac PC versions ..... 19
Configuring offsets .............................................. 47
Contact information ............................................. 2
Triac Series CNC Machine User's Manual
E
Easychange system
adding a collet assembly ............................... 57
adjusting the depth stop screw ...................... 58
calling a tool change automatically ................ 60
calling a tool change manually ...................... 59
description ...................................................... 52
fitting the tool holder ...................................... 54
fitting tools to the collet .................................. 56
removing a collet assembly ........................... 57
removing the tool holder ................................ 53
tool holder components ................................. 55
EC declaration of conformity ............................... 137
Electrical control box
connection data ............................................. 24
interior layout ................................................. 108
opening .......................................................... 107
outside layout ................................................. 38
seal ................................................................. 23
Electrical diagrams (accessing) .......................... 107
Electronics
accessing the electrical diagrams .................. 107
eurostep motion control board ....................... 110
interior layout of the electrical control box ..... 108
interior layout of the machine connection box 113
spindle drive board ........................................ 112
troubleshooting .............................................. 124
Emergency stop button ....................................... 14
Eurostep motion control board ............................ 110
F
Feedrate override control .................................... 51
Flood coolant system
checking the level .......................................... 30
components ................................................... 29
filling and draining .......................................... 30
maintenance .................................................. 106
operating m codes ......................................... 30
troubleshooting .............................................. 123, 125
Section 12 - Index - 145
12: Index
G
M
G codes list (full) .................................................. 132
General layout of Triac components ................... 37
Gib Strip
adjustment theory .......................................... 97
x axis adjustment ........................................... 98
y axis adjustment ........................................... 99
z axis adjustment ........................................... 100
Glossary ............................................................... 141
M codes list (partial) ............................................ 44
M codes listing (full) ............................................. 133
Machine co-ordinates display system ................. 43
Machine power cable connections ...................... 21
Mains supply ........................................................ 21
Maintenance
automatic slide lubrication system ................. 88
general work area cleaning ........................... 87
gib strip adjustment ........................................ 97
log .................................................................. 83
lubrication chart .............................................. 86
planning procedure ........................................ 82
schedule ......................................................... 85
x axis ballscrew and slideways ...................... 89
x axis datum microswitch ............................... 93
x axis gib strip ................................................ 98
y axis ballscrew and slideways ...................... 90
y axis datum microswitch ............................... 94
y axis gib strip ................................................ 99
z axis ballscrew and slideways ...................... 92
z axis datum microswitch ............................... 95
z axis gib strip ................................................ 100
Manufacturing process overview ........................ 36
Microswitch
x axis inspecting and cleaning ....................... 93
y axis inspecting and cleaning ....................... 94
z axis inspecting and cleaning ....................... 95
Miteebite clamps
description ...................................................... 75
fitting, removal and adjustment ...................... 76
using (example) ............................................. 77
Moving (jogging) the machine axes .................... 42
H
Help (technical support) ...................................... 114
Home mode ......................................................... 41
Hydraulic vice
asjusting the pressure of the vice jaws .......... 79
components ................................................... 78
lubrication unit ................................................ 80
maintenance .................................................. 104
operating m codes ......................................... 80
preparing the compressed air supply ............ 79
troubleshooting .............................................. 123
I
Installation
automatic slide lubrication system ................. 31
before you start .............................................. 11
component connection schematic diagram ... 34
compressed air connection unit ..................... 25
flood coolant system ...................................... 29
levelling your Triac ......................................... 18
mains supply connection ............................... 21
removal of protective coatings ....................... 33
siting your Triac .............................................. 17
Interlock guard switch .......................................... 15
Introduction
Triac series and variants ................................ 8
what is CNC? ................................................. 10
Isolator (mains) switch ......................................... 24
J
Jog mode ............................................................. 42
L
Layout of Triac components ................................ 37
Levelling your Triac ............................................. 18
Lifting your Triac .................................................. 16
Location of Triac components (photo) ................ 37
Lubrication chart .................................................. 86
146 - Index - Section 12
N
Noise level test results ........................................ 139
Notes ................................................................... 148
O
Offsets
theory ............................................................. 45
tool length ...................................................... 48
workpiece ....................................................... 47
Operators panel ................................................... 50
Optional equipment ............................................. 12
Overriding the spindle speed or feedrate ............ 51
Triac Series CNC Machine User's Manual
12: Index
P
T
Part manufacture checklist .................................. 49
Part program
composition (example) ................................... 131
description ...................................................... 130
Pneumatic safety guard door
description ...................................................... 81
maintenance .................................................. 104
operating m codes ......................................... 81
preparing the compressed air supply ............ 81
switch on front operators panel ..................... 51
troubleshooting .............................................. 122
Technical support ................................................ 114
Tooling system
Automatic Tool Changer ................................ 61
easychange .................................................... 52
Troubleshooting
cutting problems ............................................. 121
DOS CNC milling software ............................ 118
electrical problems ......................................... 124
mechanical problems ..................................... 122
VR CNC milling software ............................... 115
U
R
Unpacking your Triac .......................................... 16
Removal of protective coatings ........................... 33
Running a CNC program .................................... 49
W
S
Safety
emergency stop button .................................. 14
interlock guard switch .................................... 15
overview ......................................................... 13
precautions .................................................... 13
Schedule (maintenance) ..................................... 85
Siting your Triac ................................................... 17
Slideways
lubrication ....................................................... 88
x axis inspecting and cleaning ....................... 89
y axis inspecting and cleaning ....................... 90
z axis inspecting and cleaning ....................... 92
Specification
PC version ..................................................... 126
VMC version .................................................. 128
Spindle drive board ............................................. 112
Spindle Speed override control ........................... 51
Standard equipment ............................................ 11
Switching
the Triac off .................................................... 40
the Triac on .................................................... 39
Triac Series CNC Machine User's Manual
Warning notices ................................................... 6
What is CNC? ...................................................... 10
Work Piece co-ordinates display system ............ 43
Section 12 - Index - 147
12: Notes
Use this page to make a note of any parts of the software you have changed or configured,
for example, common tooling set-ups, machine parameters, changes to installation paths or
passwords etc.
148 - Index - Section 12
Triac Series CNC Machine User's Manual