1
VAG-COM
Printable Manual
Diagnostic Software for
VW/Audi/SEAT/Skoda
User’s Manual Release 512.1
Copyright (c) 2000-2006
by Ross-Tech, LLC.
920 South Broad Street
Lansdale, PA 19446
+1-215-361-8942
www.Ross-Tech.com
Disclaimer:
All rights reserved, No part of this publication may be reproduced, stored in a retrieval
system, or transmitted in any form or by any means, electronic, mechanical, photocopying,
recording, or otherwise, without the prior written permission of Ross-Tech, LLC. The
information contained herein is designed only for use with this VAG-COM Professional Kit.
Ross-Tech, LLC. is not responsible for any use of this information as applied to this or other
diagnostic equipment.
Neither Ross-Tech, LLC. nor its affiliates shall be liable to the purchaser of this product or
third parties for damages, losses, costs, or expenses incurred by purchaser or third parties
as a result of: accident, misuse, or abuse of this product or unauthorized modifications,
repairs, or alterations to this product, or failure to comply with Ross-Tech, LLC’s written
instructions.
By using VAG-COM, you acknowledge that this Program is provided "as is" and "with all
faults, defects and errors" and that all use of the Program is at your own full risk. It has
been extensively tested, but we cannot guarantee it will work correctly with every system in
every car. We will make our best effort to fix any bugs and to enhance the program, but we
specifically disclaim any liability for damage to your computer or your car, and we do not
promise to have any particular enhancements available on any specific date.
Copyright © 2006 by Ross-Tech, LLC
1
VAG-COM
Table of Contents
Getting Started
Main Screen
Select Control Module
Open Controller
Fault Codes
Measuring Blocks
Data Logging
Single Reading
Readiness
Advanced Identification
Login
7-digit PIN/SKC Dialog
Basic Settings
Output Tests
Recode
Adaptation
Security Access
Auto-Scan
Control Module Finder
Generic OBD2
Applications
Options
About
Appendix A: Problems & Issues
Appendix B: FAQ (Frequently Asked Questions)
Appendix C: VAG-Scope
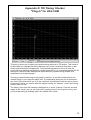
Appendix D: TDI Timing Checker
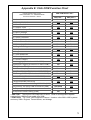
Appendix E: VAG Functions
3-7
8
9
10-11
12-13
14-16
17-18
19
20-21
22
23-24
25-26
27-28
29-31
32-36
37-38
39-40
41-44
45
46-47
48-49
50-53
54
55-56
57-65
66-69
70-71
72
2
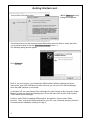
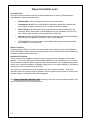
VAG-COM - Getting Started
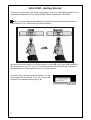
Thank you for purchasing VAG-COM, which allows you to turn a Windows-based PC into a
sophisticated diagnostic tool for VW/Audi/SEAT/Skoda models from 1990-2006.
(Go to our website www.ross-tech.com to download and install the latest version of
VAG-COM. Click on: “Download VAG-COM Software”.)
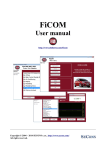
F Connect the Serial end of your Serial Interface or the USB end of your USB Interface to
the correct port on your PC. If your PC is further from the vehicle than 6 feet, connect an
approved Extension Cable between the PC and the Interface.
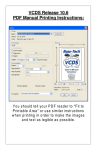
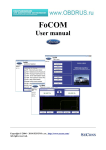
If you are using a 9-male pin Serial Interface, you can
skip to page 6 of this manual. If you are using a USB
Interface, this message should pop up: H
3
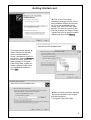
Getting Started cont.
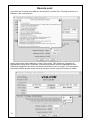
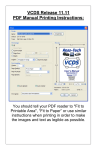
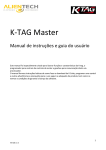
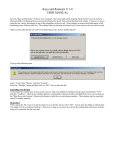
I Click on the Found New
Hardware message and the Found
New Hardware Wizard should start
up. If you are prompted with the
choice, pick “Not This Time” when
asked if you want to connect to the
Internet to search for drivers. Select
"Install from a list or specific location
(Advanced)" then click [Next >]
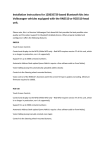
This dialog should appear. H
Select "Search for the best
driver in these locations"
Check "Include this location in
the search:" Use the [Browse]
button to find the VAG-COM
folder (Usually C:\Program
Files\VAG-COM\, unless you
chose a different folder when
you installed the software)
Click [OK]
I Make sure that you have checked
“Include this location in the search:”
and that it points to
C:\Program Files\VAG-COM.
4
Getting Started cont.
IClick [Next >] and this
dialog should appear:
This dialog warns you that we haven't paid Microsoft a pound of flesh to certify the driver.
You're going to have to click the [Continue Anyway] button..:-)
The following dialog should appear:
Click [Finish] H
Note: If, for some reason, you installed the USB Interface without following the above
instructions, and VAG-COM does not work correctly, go into your PC’s Device Manager
while the USB Interface is connected.
In Windows XP, you can find the Device Manager by right-clicking on My Computer. Select
Manage to bring up Computer Management. On the left side of the screen under System
Tools, select Device Manager.
Find the “VAG-COM Compatible USB Interface” and delete it. Check under “Other
Devices”. Then, unplug the USB Interface from your PC, wait 5 seconds and plug it back in.
Proceed with the installation starting on Page 4.
5
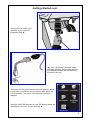
Getting Started cont.
Connect the car end of your
Interface to your vehicle’s
Diagnostic Port. H
I If your vehicle has a 2x2 port (some
pre-1996 vehicles), then use the optional
2x2 Adapter between the Interface and
the ports in the car.
Turn the vehicle’s ignition switch to the ON position. Make
sure the key is turned far enough that the dash lights are
fully illuminated. The engine may either be running or
stopped.
Start the VAG-COM program on your PC through either the
Start Menu or the icon on your Desktop. H
6
Getting Started cont.
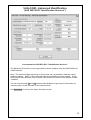
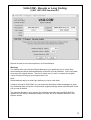
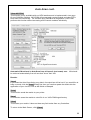
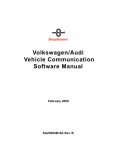
From the Main Screen in VAG-COM click the [Options] button to go into the Options
screen.
I Select the correct port for your PC’s Serial
Port (typically COM1 or COM2) or USB Port
(USB) and click the [Test] button. Ensure that
VAG-COM finds your interface. You should
see a message like this.
•
•
•
•
If the Interface Status is “Not Found!” check the connections at the car and PC.
Make sure both are plugged in securely. Serial Interfaces get their power from
the vehicle so they will not be recognized at all if not plugged into the car.
Adapter Type should always be “Ross-Tech” followed by the name of the
Interface.
Version indicates the firmware version of your Interface. It may be updated by
new versions of VAG-COM, if so follow the prompts on the screen.
If K1 or K2 status are not “OK”, you may have a short or an open circuit in the
car’s diagnostic port (most likely caused by the Aftermarket Radio Problem, as
shown in the FAQ in Appendix B of this manual). CAN status indicates whether
or not the vehicle uses CAN-Bus for diagnostics.
Once you have tested successfully, click [OK] then click [Save] to apply this configuration,
you will be returned to the Main Screen.
Click on [Select] to view the Select Control Module Screen. Select one of your car's
Control Modules such as Engine.
After VAG-COM has connected, click on [Fault Codes] to check for Fault Codes (DTC’s).
Repeat the process for each of your car's Control Modules. If you encounter problems, see
the FAQ in Appendix B of this Manual first. If you still have problems, feel free to contact us
with full details about your PC and vehicle, preferably while you are in front of both.
Note: Your car will not have all the Control Modules listed in VAG-COM, only the ones that
were installed in your vehicle. See the Applications Page for your car on our Website for
more info:
www.Ross-Tech.com/vag-com/cars/applications/
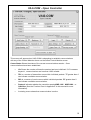
7
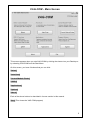
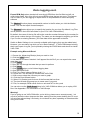
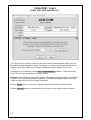
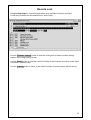
VAG-COM - Main Screen
This screen appears when you start VAG-COM by clicking the shortcut on your Desktop or
by selecting VAG-COM from the Start Menu.
On this screen, you have 8 buttons that you can click:
[Select]
[Auto-Scan]
[Control Module Finder]
[OBD-II]
[Applications]
[Options]
[About]
Each of the above buttons is described in its own section in this manual.
[Exit] (This closes the VAG-COM program)
8
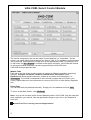
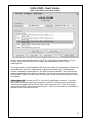
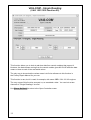
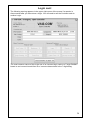
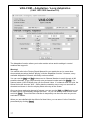
VAG-COM- Select Control Module
The various computers in the car are called “Control Modules” or “Controllers”. On this
screen, you select which Control Module you want to "talk" to. To establish communications
with a particular Control Module, simply click on the appropriate button. For example, click
on the button for [01 – Engine] to connect to the engine controller. VAG-COM has buttons
for all control module addresses currently supported by the VAS-5051 and
VAS-5052 factory diagnostic tools.
Module Tabs
Each tab on the top of this screen contains a number of different controllers grouped by
category: Common, Drivetrain, Chassis, Comfort/Conv., Electronics 1,and
Electronics 2. Each possible controller is listed as a number and a description, i.e.,
[01-Engine]. The number corresponds to the controller number that you'd find in your
Factory Repair Manual in the instructions for using a VAG-1551 or other factory diagnostic
tool.
Direct Entry
You can also enter any address manually. Simply put in the address and click [Go!]
To return to the Main Screen, click [Go Back]
Note: Your car will not have all the Control Modules listed in VAG-COM, only the ones that
were installed in your vehicle. See the Applications Page for your car on our Website for
more info:
www.Ross-Tech.com/vag-com/cars/applications/
9
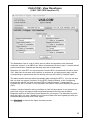
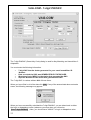
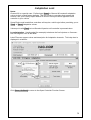
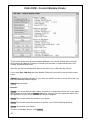
VAG-COM - Open Controller
This screen will appear when VAG-COM is attempting to establish communications
with any of the Control Modules shown on the Select Control Module screen.
Comm Status Shows the status of the current communications session. Once
communications have been established:
•
IC= Shows the number of times the session has been initialized. If IC increases
beyond 1, communications are less than 100% reliable.
•
TE= is a counter of transmitter errors within individual packets. TE greater than 0
can indicate unreliable communication.
•
RE= is a counter of receive errors within individual packets. RE greater than 0
can indicate unreliable communication.
•
Protocol indicates whether the controller speaks KWP-1281 , KWP-2000 , or
CAN-Bus. (See the Function Chart in Appendix E in this manual for more
information).
•
A rotating cursor shows that communication is active.
10
Open Controller cont.
Controller Info
Once the communications session has been established, all of the Control Module’s
"Identification" data is presented here.
•
VAG Number is the VW/Audi part number for this controller.
•
Component contains more identification information about the controller and
may contain a version number for the controller's internal firmware.
•
Soft. Coding is the Software Coding that determines various options for the
controller. Note: Some older Control Modules are not "codeable" and you may
see a Bosch part number or other information in this field.
•
Shop # identifies the WorkShopCode stored in the scan-tool that performed the
last Recode or Adaptation procedure in this Control Module.
•
The Extra fields can show VIN and Immobilizer information or slave controller
part numbers in some vehicles.
Basic Functions
This grouping of "Safe" functions are used to read various data from the Control Module.
VAG-COM checks which functions are supported by each control module and enables the
buttons for supported functions only.
Advanced Functions
These functions are capable of making various "programming" changes to the Control
Module. You should refer to the Factory Repair Manual for your particular car (or to other
documented procedures) before "playing" with these functions. It is completely possible to
render your vehicle inoperable or damage components if you make changes in this section
without the correct information and training.
It is normal for some buttons to be grayed out on some control modules. This is an
indication that the control module in question doesn't support those functions. Each of the
function buttons is detailed on the following pages.
Use [Close Controller, Go Back - 06] to properly close the communications session and
return to the Select Control Module screen.
11
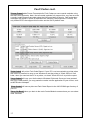
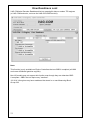
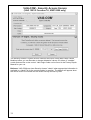
VAG-COM - Fault Codes
(VAG 1551/1552 functions 02 and 05)
On this screen, VAG-COM shows you any DTC's (“Diagnostic Trouble Codes” or Fault
Codes). VAG-COM shows the DTC numbers and also decodes each DTC into
meaningful text.
The 5-digit number is a standardized VAG fault code, which can be searched in the Factory
Repair Manuals. The text is a description of the part and failure mode. The letter and
number combination in parentheses is the DIN Component Identifier. This is followed by
elaborators describing the condition of the fault. The second line contains the P-code, or
generic OBD-II code (if it exists, there are thousands of VAG codes without generic OBD-II
equivalents).
[Clear Codes - 05] will erase the DTC's from the Control Module's memory. Be aware,
this is does not fix the problem that caused the fault! DTC's should only be erased after
correcting the condition(s) that caused them in the first place. Note: There is no way to
erase individual DTC's while leaving others alone. This is not a limitation in VAG-COM. It's
just the way the VAG protocols work.
12
Fault Codes cont.
[Freeze Frame] adds Freeze Frame data for Fault Codes on some control modules using
the KWP-2000 protocols. Note: Not all control modules fully support this; very few cars can
currently handle freeze-frame data using the VAG proprietary protocols. Self-explanatory
messages will appear in place of data when this function is not supported. Currently, the
only known ECU's that support this function are the Golf 5 platform cars.
[Print Codes] will print a Fault Code Report. If your PC is not connected to a printer when
this button is pressed, be sure to use Windows to set the printer to "Work Off-Line" first!
Later, when you connect the PC to a printer, un-check "Work Off-Line" to print the report.
[Copy Codes] will copy your fault codes to Windows Clipboard. Once you have pressed
the Copy Codes button, you may paste the results into the application of your choice, such
as MS Word or Notepad.
[Save Codes] will save a plain-text Fault Code Report to the VAG-COM/Logs directory of
your PC.
[Done, Go Back] takes you back to the main Control Module screen where you can select
other functions.
13
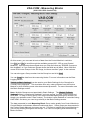
VAG-COM - Measuring Blocks
(VAG 1551/1552 function 08)
On this screen, you can read all sorts of data from the Control Module in real-time.
Use [Up] and [Dn] to scroll through the available groups (000 - 255 on most Control
Modules). Don't become discouraged when you find some that say "ERROR: Group xxx
Not Available" or if you find some groups where the fields are all blank. Most 1996 and
newer ECU's have Groups in the 200 range, but there are often "gaps" in the numbers.
You can also type a Group number into the Group box and click [Go!]
You can [Log] the data from the measuring blocks. For more information see the Data
Logging section.
[Switch to Basic Settings] can be used to go to Basic Settings for the Group that is
currently being displayed. This should be done only under guidance from the Service
Manual or when following some other documented procedure. For more information see
the Basic Settings section.
Note: Multiple Groups are not permitted in Basic Settings. The [Switch To Basic
Settings] button is intentionally disabled if you have groups "running" in the second and
third rows. To stop a running group, click on the box that displays the group number (as
though you wanted to enter a new number). The button is also disabled on controllers using
KWP-2000. On those, you need to go directly to the Basic Settings screen.
The data presented in each Measuring Block Group varies greatly from Control Module to
Control Module and between different models and years. Some groups are documented in
the Factory Repair Manuals, but many are not. Feel free to explore the Control Modules in
your car by scrolling through all the Groups. You can't hurt anything with the Measuring
Blocks function!
14
Measuring Blocks cont.
VAG-COM will attempt to "scale" the raw data coming from the Control Module into realworld units like degrees C, km/h, etc. At the present time, all scaling conversions are to
metric units.
Note: Group 000 and any other group that displays 10 fields instead of 4 is an
exception. No scaling is possible because the Control Module provides no "Data
Type" information with the data for these. Groups of this type can only be
displayed in the top row of the screen.
VAG-COM also tries to elaborate as much as possible what the data means. Unfortunately,
the "Data Type" information coming from the Control Module is not that precise. For
example: VAG-COM can tell that a particular field contains a Temperature, but the
data from the Controller doesn't tell us whether this is the Coolant Temperature or the
Intake Air Temperature.
To reduce the confusion, VAG-COM supports Label Files and will display the name of the
Label File on the top left corner of the screen. If you click on the name of the Label File, the
file will open in Notepad or whatever program you have set to handle *LBL files. When a
Label file for the Control Module you are looking at does not exist, VAG-COM will come up
with an "educated guess" for what a particular Data Type means. The dealers' VAG-1551
and 1552 scan-tools do not provide any elaboration; they only show what’s in the display
fields!
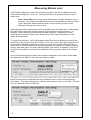
Group 000 supports special Labels. Due to space constraints on the screen, these labels
are displayed in a "balloon" when the user clicks on a field:
Label Files also allow a third label field to be defined for each of the normal measuring
block fields. This label is displayed in a balloon when the user clicks on the field. The idea
is to put "specified values" in this field:
15
Measuring Blocks cont.
Sample Rate: We can get just over 4.0 samples per second from our '97 VR6 ECU (single
group) with the most aggressive protocol-timing settings. This ECU runs at 9600 baud.
Most newer ECU's run at 10400 and should give proportionately more. Naturally, if two
groups are being displayed simultaneously, the sample rate drops to around 2.0, and 3
groups simultaneously runs at around 1.3. Sample Rate will vary from controller to
controller and the PC used will also have some effect. Some controllers (particularly AG4
transmissions and Digifant-III ECU's) use a "hybrid" data-type that requires reading a long
header when changing group numbers. Viewing multiple groups still works with these data
types, but the sample rate becomes extremely slow. If you see "Reading Header" all the
time under the Sample Rate display, you'll know you've got one of these.
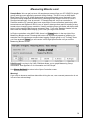
In Engine controllers using KWP-2000, there is a [Turbo] button in the top right of the
Measuring Blocks screen. Pressing this button can significantly speed up sampling, for
example over 30 samples per second when logging a single group in our Touareg. Once
you have pressed [Turbo] you will remain in this High-Speed mode until you exit the
Measuring Blocks screen:
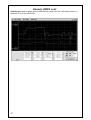
[VAG-Scope] is a plug-in for VAG-COM that allows you to graph Measuring Group
Information. See Appendix C for information on VAG-Scope.
Use [Done, Go Back] to return to the Open Controller screen.
Warning!
If you wish to observe real-time data while driving the car, use a second person who is not
in front of an active airbag!
16
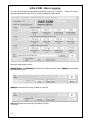
VAG-COM - Data Logging
You can log the data from the Measuring Blocks screen to a .CSV file. These files can be
opened and analyzed with Excel or other spreadsheet applications.
While the Log Dialog is open;
[Start], [Stop], and [Resume] can all be done with the same button. [Start] begins saving
the data to a log file.
[Stop] discontinues the saving of data to a log file
[Resume] continues the saving of data to a log file.
17
Data Logging cont.
Export RPM Only when checked will record only RPM from the first field and will not
record other fields. Also, this will only record RPM values that are non-zero. This feature
can be useful if you are logging to output the file to a spreadsheet or other third party
software
The [Marker] function places a sequential number in the file when you click the Marker
button. This can be helpful for data analysis.
The [Browse] button allows you to specify the location for your logs. By default, Log Files
will be placed in the LOGS sub-folder in your PC’s VAG-COM directory.
By default, the name of the log file will be the controller number followed by the number for
each group number that you are logging. The name can be changed to anything you'd like.
If you re-use an existing filename, your new data will be appended to that file.
Switch to Basic Settings is not currently available while logging (but may be added later).
However, you can start a log while you're in Basic Settings. If VAG-COM keeps insisting
that it can't open a Log file, you're probably missing the LOGS folder and should re-install
VAG-COM.
Example using Microsoft Excel:
1. Choose the Measuring Block(s) that you want to view.
2. Click the [LOG] button
3. Use default file name if desired. It will append the old file if you use a particular name
more than once.
4. Click [Start]
5. Drive the car through the tests that you want to perform
6. Click [Stop]
7. Click [DONE] when you're finished logging data.
8. Open Microsoft Excel
9. Click File->Open (change filetype to all *.*)
10. Locate the *.csv file that you created with VAG-COM
11. With mouse select the columns you want to graph.
12. Click the Chart Wizard button.
13. Select XY (Scatter) and click one of the formats that has lines.
14. The chart wizard will prompt you to name axes if you want.
15. Pick, for example, RPM values for the x-axis and IAT for the y-axis
You can also use the [VAG-Scope] plug-in for VAG-COM that allows you to replay LOG
files. See Appendix C for information on VAG-Scope.
Warning!
If you're going to use VAG-COM while you're driving, please use a second person! Let
one drive while the other observes the data, making sure the person holding the PC is not
in front of an active airbag! Obviously, do not break any laws, speeding or otherwise while
using VAG-COM!
18
VAG-COM - Single Reading
(VAG 1551/1552 function 09)
This function allows you to look at real-time data from control modules that support it.
However, the data stream coming from the control module gives NO CLUE what the data
means or how to scale it into real-world values.
The only way to know what the values mean is to find a reference to this function in
the Factory Repair Manual for your car.
This function is rare, but it is used, for example, with some OBD-I 2.8L 12V V6 engines.
The very name of this function annoyed us, so we added a twist. You can look at two
channels of "Single Readings" at once!
Use [Done, Go Back] to return to the Open Controller screen.
19
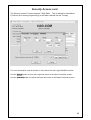
VAG-COM - View Readiness
(VAG 1551/1552 function 15)
The Readiness Code is a set of 8 bits, each of which corresponds to one monitored
emissions "system" in an OBD-II car. When all readiness bits show "pass", it means that all
systems have been checked and that they pass the on-board tests.
Whenever you clear DTC's or remove power from the ECU, all readiness bits will be set to
"fail". Most cars do not have all 8 systems, so as soon as you apply power again, the bits
corresponding to systems that are not actually in the car will come up "Passed" again.
The above screen-shot was taken immediately after clearing the DTC's. You can see that
this car does not support "monitors" for the EGR, Catalyst Heating, or Air Conditioning
because this specific car does not have EGR or Catalyst Heating. It does have Air
Conditioning, but a "monitor" is only required if the system uses ozone-depleting refrigerant
(R12).
It takes a variety of specific driving conditions to "test" all the systems. It can be done in a
short time using a very specific and complicated procedure found in the On Board
Diagnostic section of the Factory Repair Manual for your engine. The alternative is just to
drive the car for 2-3 days. Make sure you include at least one short highway trip and your
Readiness Bits should all read "Pass" again.
Use [Go Back] to return to the Open Controller screen.
20
View Readiness cont.
VAG-COM also Decodes Readiness bits into meaningful data on modern TDI engines
(a VAG-COM exclusive, not even the VAS-5051/5052 do this!):
Note:
This function is only available on Engine Controllers that are OBD-II compliant (all 1996
and newer US-Model gasoline engines).
Non-US models may not support this function even though they are otherwise OBDII compliant. OBD-I did not require any "monitors".
12V 2.8L V6 engines may have readiness bits stored in or near Measuring Block
Group 029.
21
VAG-COM - Advanced Identification
(VAS 5051/5052 “Identification Services”)
Corresponds to VAS-5051/5051 "Identification Services"
The Advanced ID function is only supported by control modules using the KWP-2000 and
CAN Protocols!
Note: The amount of data appearing on this screen will vary based on what the control
module supports. "N/A" in red means that data isn't available from that module. Some
fields (like Chassis Number) may be blank if the module has never had a chassis number
"installed".
You can use the small [<] and [>] buttons under Software to get version information for
various portions of the firmware in the control module.
Use [Go Back] to return to the Open Controller screen.
22
VAG-COM - Login
(VAG 1551/1552 function 11)
The Login Function must be used on some (but not all) Control Modules before you can
Recode or change Adaptation values. On others, it "enables" certain features like cruise
control. Valid Login codes can be found in the Factory Repair Manual for your car.
If working on an Immobilizer, select [Use 7-digit PIN/SKC] to enter a 7-digit Secret Key
Code. This function is described in its own section.
Balloons: VAG-COM can show Login "charts" when appropriate information is available in
a Label File for the control module in question. The balloon will appear when the mouse
cursor is hovered over the Enter Login Code field.
Use the [Do It!] button to save the Login and return to the Select Function Screen.
Use the [Cancel] button to cancel the Login and return to the Select Function Screen.
23
Login cont.
The following warning appears in the upper right corner of the screen if a session is
disconnected after you have done a Login. You will need to exit the Controller and do
another Login.
The most common cause of this is the use of an incorrect login code or a 7-digit PIN/SKC
based on an incorrect Immobilizer ID or incorrect data entered in the 7-digit dialog.
24
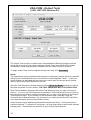
VAG-COM - 7-digit PIN/SKC
The 7-digit PIN/SKC (Secret Key Code) dialog is used for Key Matching and Immobilizer 3
Adaptation.
You must enter the following information:
•
•
•
•
7-digit SKC that the dealer generated for your exact Immobilizer ID
Number.
Date on which the SKC was GENERATED BY THE DEALER.
Workshop Code (WSC) for the dealer that generated the SKC.
Importer Number for the dealer that generated the SKC.
The 7-digit SKC is useless without ALL of these items.
When you have filled in all of the data click [OK]. If any of the entered data does not make
sense, the following message may appear:
When you have successfully submitted the 7-digit PIN/SKC, you are taken back to either
the Login or Adaptation screen (wherever you were when you clicked on
[Use 7-digit PIN/SKC] ). Now, you should have “XXXXX” in Login or Adaptation value.
25
7-digit PIN/SKC cont.
Notes:
Important: Please see the FAQ number 4.15 for information on SKC availability.
Unlike the factory diagnostic tools, with VAG-COM, the same PIN can be used for a
particular car at any time in the future, as long as you keep track of the PIN, along with the
Date on which the PIN was GENERATED BY THE DEALER, the dealer's Workshop Code
(WSC) and the Importer number.
If you obtain a 7-digit SKC, but the dealer has not provided the WSC, look at the window
stickers of vehicles on the dealer's lot. The dealer number will be listed next to the name
and address of the dealer. In the US, the dealer number will be a 4 followed by five more
digits, for example 401742. To obtain the WSC, delete the 4 and simply use the remaining
five digits, 01742 in the above example.
The Importer number should be:
444 for all dealerships in the US
999 for all dealerships in Canada
995 for all dealerships in France
Use the [OK] button to save the 7-digit information and return to the Login or Adaptation
screen
Use the [Cancel] button to return to the Login or Adaptation screen without saving.
26
VAG-COM - Basic Settings
(VAG 1551/1552 function 04)
This screen is presented when a Control Module is in Basic Settings mode.
Basic Settings mode is very similar to Measuring Blocks, and the contents of each display
group is the same. The difference between the functions is that the Control Module may try
to perform various calibrations while in Basic Settings mode.
Warning!
You should refer to the Factory Repair Manual for your particular car (or some other
documented procedure) before "playing" with the Basic Settings function. Failure to follow
the proper procedures can result in serious damage to the vehicle.
Although you can use the [Up] and [Dn] buttons to scroll through the available groups just
like on the Measuring Blocks screen, this is probably not a good idea since you may put the
Controller into Basic Settings for a Group that you did not intend.
You can also enter a Group number directly and click [Go!]
[Switch to Meas. Blocks] will switch back to the passive (and "safe") Measuring Blocks
mode.
Notes:
Multiple Groups are not permitted in Basic Settings. The data presented in each Basic
Settings Group varies greatly from Control Module to Control Module and between
different models and years. Some groups are documented in the Factory Repair
Manuals, but many are not.
27
Basic Settings cont.
VAG-COM also tries to elaborate as much as possible what the data means. Unfortunately,
the "Data Type" information coming from the Control Module is not that precise. For
example: VAG-COM can tell that a particular field contains a Temperature, but the
data from the Controller doesn't tell us whether this is the Coolant Temperature or the
Intake Air Temperature. To reduce the confusion, VAG-COM supports Label Files and will
display the name of the Label File on the top left corner of the screen. When a Label file for
the Control Module you are looking at does not exist, VAG-COM will come up with an
"educated guess" for what a particular Data Type means. The dealers' VAG-1551 and 1552
scan-tools do not provide any elaboration; they only show what’s in the display fields! Basic
Setting will display a popup balloon when the mouse if hovered over each value, if the
Label File contains information for that field in that controller. See the Measuring Blocks
section for more information.
Use [Done, Go Back] to return to the Open Controller screen.
The most common use for the Basic Settings function is to recalibrate the Throttle Body.
Another common use for Basic Settings is to bleed the ABS Hydraulic Unit on newer cars.
Please refer to a Factory Repair Manual for your car before attempting to do this!
You can begin and end a Data [Log] while in Basic Settings. See the next section in this
manual for information on Data Logging.
Basic Settings in KWP-2000:
On Controllers using KWP-2000, there is an [ON/OFF/Next] button that allows you to
initiate and exit Basic Settings while still being able to see the values in the measuring
groups.
28
VAG-COM - Output Tests
(VAG 1551/1552 function 03)
The Output Tests function is used to test a Control Module's Electrical Outputs (and the
wiring that connects it to the various devices). Output Tests under KWP-2000 includes
simultaneous measuring data when available from the control module in question.
To begin Output Tests, and to progress through each step, click [Start/Next].
Notes:
The Outputs that can be tested and the sequence in which they become active is controlled
strictly by the Control Module; this is not a function of the Diagnostic Tester. To find out
which Outputs can be tested and the sequence in which they will become active, please
refer to the Factory Repair Manual for your car.
Once the Test Sequence has been started, clicking [Done, Go Back] will take you back to
the Open Controller Function Screen. THE TEST SEQUENCE WILL STILL BE ACTIVE!
Most Control Modules will permit the Output Test Sequence to be run only one time per
session. If you run the Test Sequence to completion, VAG-COM will allow you to return to
the previous screen without closing the session, but you may not be able to run the Output
Test Sequence again. If you need to run the Sequence again, manually Close the
Controller and re-start the session. On some cars, you must cycle the key OFF and ON or
even start the engine (to clear the cylinders of fuel).
Some Outputs require additional action before they become active. Fuel Injectors are a
common example. To activate a Fuel Injector, you must press (and in some cases release)
the gas pedal. Exact details can be found in your Factory Repair Manual.
29
Output Tests cont.
On most systems, the Output Tests function is only available when the Engine is not
running.
It is perfectly normal to see a "short to ground" message in the process of running Output
Tests. The ECU identifies which output it is currently testing by sending a fault-code
number. On many ECU's the full text for this fault code includes "short to ground". Why?
Because one side of the actuator in question has 12V on it all the time and the ECU
completes the circuit (and turns the actuator on) by pulling the other side to ground.
Selective Output Tests. On those modules which support it, this is a more sophisticated
version of the traditional (sequential) Output Test function. It allows the user to select a
particular output and activate it directly without going through a pre-defined sequence to get
there. Some modules have outputs which can only be tested this way. Selective Output
Tests requires supporting data in a label file. There is no way to efficiently query a control
module to find out which outputs are supported.
30
Output Tests cont.
Warning:
Do not use the Output Tests function on any system while the car is in motion! Running
Output Tests on the ABS brake system can temporarily disable the brakes entirely and
cause individual wheels to lock and unlock.
We strongly suggest you refer to the Factory Repair Manual for your specific car before
running Output Tests on any Control Module so you will know what to expect!
If you try to perform Output Tests on an Airbag controller, the following warning will pop up:
For example, in the VW Touareg, a specific procedure must be performed to be able to
start the vehicle if Output Tests on the Airbag Controller have been performed.
Use [Done, Go Back] to return to the Open Controller screen.
31
VAG-COM - Recode or Long Coding
(VAG 1551/1552 function 07)
Recode is used to set various options in a Control Module.
Warning!
You should refer to the Factory Repair Manual for your particular car (or some other
documented procedure) before attempting to Recode a Control Module. At the very least,
write down the original values. There is no other way to "undo" or restore the original
values if what you're trying to do doesn't work out.
Note:
Some Modules require a valid Login before you can re-code them.
A feature unique to VAG-COM: You can leave the WorkShop Code unchanged, or enter
any workshop code you desire. Certain other programs always leave a tell-tale WSC when
you re-code a module.
The Importer Number is only relevant for recoding controllers that use KWP-2000. By
default, this will remain unchanged unless you have set up an Importer Number in the
Options screen.
32
Recode cont.
Up to 20 lines of coding chart data can be included in a Label File. This data is shown in a
balloon on the coding screen:
When coding new Airbag Modules in many VW models, VAG-COM can "Suggest" an
appropriate Coding value. Disclaimer: We cannot guarantee that the coding which VAGCOM may suggest will be correct, but there should be no harm in trying it. If it's not correct,
the control module should simply refuse to accept it and the coding will remain at 00000.
33
Recode cont.
In case where VAG-COM would offer Airbag module coding suggestions but cannot
determine the Index automatically, VAG-COM gives you the ability to manually enter an
Index (found on the Airbag controller sticker or work order) to get the suggested coding.
Long Coding. This function is needed to Recode some control modules (especially
Gateways) in the newest cars that use CAN for diagnostics. Due to the complexity of Long
Coding strings (up to 255 bytes of hexadecimal data) we've accommodated (and urge) the
use of Copy & Paste in this function:
Coding of Slave Modules. On the latest cars, many "slave" modules are codeable. The
coding screens (both regular and "long") now present a drop-list of available modules which
can be selected for coding:
34
Recode cont.
Note: There are some instances where a master and its slaves support a combination of
"long" and regular codings. In that case, a message box will appear, asking whether you
want to do "long" or "regular" coding. Once you make a the choice, you will only be able to
code those modules which use the selected coding format. To code the ones using the
other format, exit the coding function and go back in, making the other selection.
35
Recode cont.
Long Coding Helper is used with applications such as Niels Ezerman's excellent
LCode.exe (included with this distribution of VAG-COM):
Use the [Transfer Coding] button to send the coding from LCode to the New coding
section of the Long Coding Screen,
Use the [Do It!] button to save the new Soft Coding to the controller and return to the Open
Controller Function screen.
Use the [Cancel] button to return to the Open Controller Function screen without saving.
36
VAG-COM – Adaptation / Long Adaptation
(VAG 1551/1552 function 10)
The Adaptation function allows you to alter certain values and/or settings in control
modules that support it.
Warning!
You should refer to the Factory Repair Manual for your particular car (or some other
documented procedure) before "playing" with the Adaptation function. However, many
available Adaptation Channels are totally undocumented!
You can use the [Up] and [Dn] buttons next to Channel Number to scroll through all 99
possible channels, or you can manually enter a channel number and click [Read]. If a
channel exists, VAG-COM will show you the Stored Value. If a channel does not exist, the
Stored Value will show as "N/A". Other data the controller may or may not send will be
decoded and shown in the four display fields at the top of the screen.
Once you have reached a channel of interest, you can use the [Up] and [Dn] buttons next
to New Value to incrementally change the value. Or you can directly enter a New Value
and click [Test]. This will tell the controller to temporarily use the new value so you can
evaluate it's effects.
When you are satisfied with the effect of a New Value, you can store it in the Controller
permanently by clicking [Save].
37
Adaptation cont.
Notes:
Channel 00 is a special case. Performing a [Save] to Channel 00 resets all adaptation
values to their original factory defaults. This only works in controllers that support this
function, see your Factory Repair Manual to find out if this procedure applies to each
controller in your vehicle.
Some Engine and Immobilizer controllers will require a valid Login before permitting you to
[Test] or [Save] Adaptation values.
Values put in with [Test] but not Saved will persist until controller is powered-down.
Long Adaptation. Used/needed (for example) to balance the fuel injectors on CommonRail TDI engines such as the BKN.
Label Files can support values and description for Adaptation channels. This help chart is
displayed in a balloon:
Click [Done, Go Back] to return to the Open Controller Function Screen.
38
VAG-COM - Security Access Screen
(VAG 1551/2 Function 16, KWP-2000 only)
The Security Access Function must be used on some (but not all) KWP-2000 Control
Modules before you can Recode or change Adaptation values. On others, it "enables"
certain features like cruise control. Valid Login codes can be found in the Factory Repair
Manual for your car.
Balloons: VAG-COM can show Security Access "charts" when appropriate information is
available in a Label File for the control module in question. The balloon will appear when
the mouse cursor is hovered over the Enter security access key field.
39
Security Access cont.
The Security Access Function supports 7-Digit SKCs. This is needed for Immobilizer
Functions (such as key programming) on the latest vehicles like the Touareg:
For more information, see the section in this manual for the 7-digit PIN/SKC function.
Use the [Do It!] button to save the Login and return to the Open Controller screen.
Use the [Cancel] button to cancel the Login and return to the Open Controller screen
40
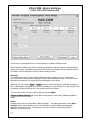
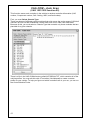
VAG-COM – Auto Scan
(VAG 1551/1552 function 00)
This function scans each controller in the vehicle to retrieve controller information (VAG
number, Component number, Soft. Coding, WSC, and fault codes).
First, you must Select Chassis Type:
There are dozens of different control modules that exist across the entire range of VW/Audi
vehicles. No one car has all Modules! Newer cars have more, older cars have fewer.
Because of this, you must select a Chassis Type that contains only those modules that are
plausible for a given chassis.
There is a file in the VAG-COM directory called AUTOSCAN.TXT, which contains all of the
vehicle profiles. You may edit this with a Text editor (like Notepad) to create a custom
profile for your vehicle. To help you figure out which controllers are in your car, you can run
the Control Module Finder.
41
Auto Scan cont.
[Start]
This begins the Auto Scan. Beware; this process can take several minutes. While the scan
is running, VAG-COM will cycle through the Open Controller and Fault Code screens for
each controller before returning to the Auto Scan screen. Beware; this process can take
several minutes. Double-clicking on any of the Control Module names in RED will open the
Fault Codes screen for that controller and allow you to clear the codes.
[Stop]
This stops the Auto-Scan.
42
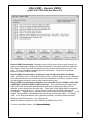
Auto-Scan cont.
[Gateway Installation List]
Usually available only on Gateways in cars using a direct CAN connection for diagnostics
(new A8 and all Golf-5 chassis cars). This very fast function takes about 3 seconds to
query the car's Gateway to find out what modules are installed in the car and what their
status is. Any modules having fault codes should show a "Malfunction" and will be
highlighted in RED. Double-clicking on any of the Control Module names in RED will open
the Fault Codes screen for that controller and allow you to clear the codes. Modules are
directly accessible from this screen by double clicking on the appropriate line. The
following screen-shot is from a Golf-5 in Europe:
43
Auto-Scan cont.
[Clear All DTC's]
This function is only available with our HEX Interfaces and is implemented in two ways.
On pre-CAN-Bus vehicles, VAG-COM will access each control module and clear DTCs
from each one individually. On vehicles using CAN-Bus for diagnostics, VAG-COM
performs this function without accessing all the control modules individually.
Automatic VIN retrieval in Auto-Scan from all Immo-3 (and newer) cars. VIN should
be retrieved automatically from all cars that "know" their VIN.
Results:
[Copy]
If you close the Auto-Scan dialog, any data in its output box will be lost. If you would like to
keep a record, click the [Copy] button first, then you can then paste the results into the
application of your choice, such as MS Word or Notepad.
[Print]
This function sends the results to your printer.
[Save]
This function saves the results to a text file in our VAG-COM\Logs directory.
[Clear]
This erases your results. It does not clear any fault codes from any Controllers.
To return to the Main Screen, click [Close]
44
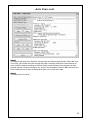
VAG-COM - Control Module Finder
This function cycles through each possible address in the vehicle, finding each controller
and reporting its Address, Protocol, Controller VAG Number, Component Number, Soft.
Coding, and WorkShop Code.
Note: No one car has all Modules! Newer cars have more, older cars have fewer.
If you check Use CAN Only then the Module Finder will not check for any modules on the
K-line.
[Start] begins the finder. Beware; a "full" scan can take 45 minutes or more. Of course, you
can scan selected address ranges.
[Stop] stops the finder.
Results:
[Copy] If you close the Auto Scan dialog, any data in its output box will be lost. If you would
like to keep a record, click the [Copy] button first, then you can then paste the results into
the application of your choice, such as MS Word or Notepad.
[Print] This function sends the results to your printer.
[Save] This function saves the results to a text file in our VAG-COM\Logs directory.
[Clear] This erases your results.
To return to the Main Screen, click [Close]
45
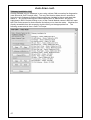
VAG-COM – Generic OBD2
(VAG 1551/1552 Address Word 33)
Generic OBD-II functionality. Because many of VW's recent factory repair manuals no
longer have traditional 01-Engine "On Board Diagnostic" information and have replaced it
with "Generic Scan Tool" data, this has become much more important than it was in the
past. For now, we'll let the screens speak for themselves. Click each of the Mode
buttons to for each OBD-II function.
Generic OBD-II functionality is "Supported" only on VW, Audi, Seat, and Skoda
cars. It will likely work on many other brands of cars. We'd be happy to receive feedback
as to what other brands and models of cars it does and does not work on, however, we do
not feel obligated to make it work on other manufacturer's cars.
Generic OBD-II functionality is limited to cars using ISO 9141-2 ("CARB"), ISO 14230
("KWP-2000") and ISO-15765 ("CAN") protocols. Our interfaces do not support the
SAE J1850-VPW and J1850-PWM protocols used by most US-market GM and Ford
products, so this cannot work on those cars. Most early (1996-2000) OBD-II compatible
Chrysler cars used ISO-9141-2. Many newer Chrysler cars use SAE-J1850 and are
incompatible. Most European and Asian cars use ISO and should be compatible. In US
models, Generic OBD-II compatibility was required as of model year 1996. In Canada,
1998. In the European Market, 2001 (gasoline-powered) and 2004 (diesel-powered).
Please see the FAQ question 1.10 in Appendix B:
What's the difference between VAG-COM and an OBD-II Scan-Tool?
To return to the Main Screen, click [Done, Go Back]
46
Generic OBD2 cont.
VAG-Scope is able to graph generic OBD-2 Mode 1 data. See the VAG-Scope section in
Appendix C for more information.
47
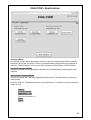
VAG-COM - Applications
Transport Mode
On vehicles using CAN for diagnostics, there is a special Transport Mode that is used by
the factory to put the cars into a "sleep" to conserve battery charge during long periods of
inactivity. These functions only work on Golf V based cars, B6 Passat, and D3 Audi A8.
[Activate Transport Mode]
Clicking this button will put applicable vehicles into Transport Mode, shutting down most
systems.
[De-activate Transport Mode]
Clicking this button will "wake up" applicable vehicles from Transport Mode, powering up
most system.
In the B7 Audi A4, Transport Mode works a little differently. To take the car out of transport
mode, go into
[Select]
[17 Instruments]
[Adaptation - 10]
Enter channel 99
Put in a new value of 0
[Test]
[Save]
48
Applications cont.
Check for and erase faults
[Gateway Installation List]
Usually available only on Gateways in cars using a direct CAN connection for diagnostics
(like the new A8 and all Golf-5 chassis cars). This very fast function takes about 3 seconds
to query the car's Gateway to find out what modules are installed in the car and what their
status is. Any modules having fault codes should show a "Malfunction". Any modules
having fault codes should show a "Malfunction" and will be highlighted in RED. Doubleclicking on any of the Control Module names will open that controller. The following
screen-shot is from a Golf-5 in Europe:
[Clear All DTC’s]
On vehicles using CAN-Bus for diagnostics, VAG-COM clears all of the fault codes in all
control modules in the car without accessing all the control modules individually.
[Controller Channels Map]
Rapidly scans through all 255 possible
Measuring Block groups or Adaptation
Channels on any ECU and writes a "map"
file. Output is your choice of .CSV or .PLB
("Prototype Label, Blocks"). Useful for
creating new label files or taking a
"snapshot" of all available data from an
ECU.
49
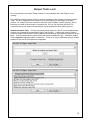
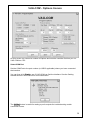
VAG-COM - Options Screen
On this screen you can set a number of Options and must be used the first time you run
VAG-COM on a PC.
Select COM Port
Set the COM Port to the port number (or USB if applicable) where you have connected
the Interface.
You can then click [Test] to see if VAG-COM can find the Interface. See the Getting
Started section in this manual for more information.
The [LED’s] button is useful for testing a port's outputs for troubleshooting certain
connection issues.
50
Options Screen cont.
User Interface
•
256 Color Mode for old PC's This display mode changes the background color
from blue to white, and looks better on some older monitors. The change will take
effect after you close and restart VAG-COM.
•
Left Margin Printing This is the number of spaces that printed pages are shifted
to the right.
•
Window Size This function allows you to change the apparent size of the VAGCOM window on your screen. Adjust this in small increments since it is possible
to make VAG-COM so large that it is much bigger than your screen! To see the
resizing take effect, do a Test and Save, then close VAG-COM. When you restart
VAG-COM, the new window size should be shown.
Protocol Options
51
•
Start Baud is the first baud rate that VAG-COM will try when connecting to a
controller. The current default value is 0. This means VAG-COM will determine
the correct start baud on its own. With the HEX Interfaces, this field is
unavailable.
•
KW2 Delay has to do with the amount of time used during the initialization of a
session between the PC and the car. The current default value is 30. Do not
change this value from the default unless you are
having difficulties communicating with a particular controller. Contact us for
advice if you are.
•
TST Addr. has to do with the packet addresses used by KWP-2000. The current
default value is -1. Do not change this value from the default unless you are
having difficulties communicating with a particular controller. Contact us for
advice if you are.
•
Debug Level controls how much debugging information VAG-COM records. A
zero in this field (the default) means NO debug output will be generated
whatsoever. This should decrease VAG-COM's susceptibility to interference by
things like virus scanners (except when logging data). There should be no reason
to set Debug to anything other than zero unless you are instructed to do so by
Ross-Tech.
•
Blk Int affects the protocol timing. The current default value is 55. To get the
highest sample rate possible in the Measuring Blocks screen, set this to 25.
Note, however, that this may cause unreliable communications with some
controllers.
•
Char lnt also affects the protocol timing. The current default value is 1. To get
the highest sample rate possible in the Measuring Blocks screen, set this to 0.
Note, however, that this may cause unreliable communications with some
controllers.
•
KP2 Time only applies to controllers using the KWP-2000 protocol. The current
default value is 25. Decreasing it increases the sample rate in Measuring Blocks
on control modules that use the KWP-2000 protocols. The default value should
be safe for all applications, but if it's not, you can always increase it (to a
maximum of 99).
Options Screen cont.
Protocol Options cont.
•
CAN Timeout affects how long VAG-COM will try to initiate a CAN-Bus session.
Do not change this value from the default value of zero unless you are
having difficulties communicating with a particular controller. Contact us for
advice if you are.
Init Parameters
•
Bypass OBD-II Fastinit should only be checked if you are
experiencing difficulty connecting to a vehicle using generic OBD-II.
•
Force K on Engine is used on controllers that use the CAN-Bus for
diagnostics. This can often delivers faster sample rates while
datalogging than does the CAN-Bus.
•
Bypass CAN Init should only be checked if you do not want VAGCOM to try connecting to vehicles using the CAN-Bus.
•
Force Dumb Mode is used to prevent VAG-COM from automatically
determining the baud rate for connections..
Reduce CPU Usage checkboxes will greatly increase responsiveness of other apps
running at the same time as VAG-COM. The disadvantage is somewhat reduced sample
rate.
•
KWP-1281: The default value is unchecked. This reduces CPU usage
when connected to controllers using KWP-1281. Using this feature
*may* make the session with some control modules unreliable.
•
KWP-2000: The default value is unchecked. This reduces CPU usage
when connected to controllers using KWP-2000
[Restore Defaults] will reset all Protocol Options (except WorkShop Code and VZ/Importer
number) to their "as-delivered" settings.
Workshop Identification
•
•
Shop Name is displayed on reports, such as the Fault Code Report.
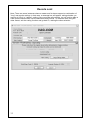
The WorkShop Code (known as the WSC) is found on the Admin screen of a
dealer's VAS-5051, as well as on the dealer's stamp. The default value is 00000.
For example, using the stamp below, the dealer's number is 401/742. To derive
the WorkShop Code, drop the first digit and use the remaining digits in order.
So, Evergreen Terrace Volkswagen has a WSC of 01742. This only applies to US VW
dealers. Canadian dealerships use a 4-digit number on their stamp. To find the WSC, place
a 9 before their number.
52
Options Screen cont.
Note: If you are an individual user or independent mechanic, just leave the WorkShop Code
set to "00000". This allows VAG-COM to operate in “stealth” mode, keeping whatever WSC
that was already in the controller. If you are using VAG-COM at a Dealership, enter your
Dealer's Workshop Code. The Work Shop Code is not easily changed once set on this
screen. Contact us for advice if you need to do so.
•
The VZ/Importer number is essentially a "region code" extension to the Work
Shop Code (should be 444 for US, 999 for Canada). The default value is 000.
Note: If you are an individual user or independent mechanic, just leave the
VZ/Importer number set to "000". This allows VAG-COM to operate in “stealth”
mode, keeping the Importer number that was already in the controller. If you are
using VAG-COM at a Dealership, enter your Dealer's VZ/Importer number. The
VZ/Importer number is not easily changed once set on this screen. Contact us for
advice if you need to do so.
[Save] causes the current options to be stored. You need to Save the first time you use
VAG-COM on a PC.
[Apply] lets you use and test the options without storing them.
[Cancel] takes you back to the Main Screen without any effect.
53
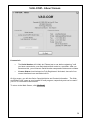
VAG-COM - About Screen
License Info
•
The Serial Number will initially be “Please test on car before registering” until
you have connected to a car and checked fault codes in a controller. After you
have done this, you will have a Serial Number composed of letters and numbers.
•
License Status should always be Fully Registered / Activated, since all of our
current Interfaces have activation built-in.
On this screen, you will also find a Copyright Notice and Contact Information. The Web
and E-Mail "links" open up your browser or mail program, respectively and can be used if
your PC is connected to the Internet.
To return to the Main Screen, click [Go Back].
54
Appendix A: VAG-COM Problems & Issues
Possible Issues, all versions:
•
We have some reports indicating that VAG-COM does not get along with the
Zone Alarm firewall application. If you are using Zone Alarm, turn it off while
using VAG-COM.
•
SP1 (Service Pack 1) for Windows 2000 adversely affects VAG-COM's ability to
do real-time and makes communications with some controllers unreliable. If
using Windows 2000 with Service Pak 1, you should apply Service Pak 2 or
Service Pak 3.
1997 VW Passat B5 Central Convenience System
These controllers seem to have a bug that causes them to drop the communications
session when VAG-COM requests the door-slave controller "Extra" info. A work-around is
available in Version 0.70e which simply does not request any "Extra" info. If you have a
1997 B5 Passat (non-US models only), use 0.70e on the Central Convenience system.
1998 and newer Passats do not have this problem.
1990-1993 VW Cabrio/Cabriolet Airbags
These controllers do not communicate with VAG-COM. In fact, they do not communicate
with Volkswagen's VAG-1552 scan tool either, unless the 1552 has an old, outdated
program card installed.
Audi Concert and Symphony Radios
These are made by Matsushita. The Concerts have blatant bugs in the diagnostic
protocols. We've added one work-around to the low level protocol drivers that works in
some, but not all Concerts, and it is not 100% reliable in any case.
Some Concerts occasionally get "stuck" in an undesirable mode after attempting
communications. If your Concert gets "stuck", the way to reset it is to remove all power
from the radio for at least 10-15 seconds. This can be done by any of these methods:
•
•
•
Removing the radio from the car.
Disconnecting the car's battery
Pulling the fuse for the radio.
Note: Some radios will require you to enter the "security code" using the radio's front panel
after loosing power. See the your owner's manual for the radio for instructions.
It appears that there is something not quite up to snuff in the Symphony's ability to drive
the K-line. We've had some reports that they work better with non-optically isolated
interfaces, and they may work better with the engine running (which means there is a
higher voltage on the VBatt lines in the car).
55
Appendix A: Problems/Issues cont.
1994-1997 Audi C4 (A6/S6) Instrument Clusters
These have a high bit-error rate. We suspect they use a software-UART and "stretch" bits
sometimes. The error-detection/correction logic built into VAG-COM's low-level protocol
drivers as of version 0.70 seems to take care of this in a majority of cases, but we still had
few reports of customers not being able to communicate with these clusters. In version
0.75 or newer, please ensure that Char Int on the Options Screen is set to approximately 3
(which is the default). On some PC's, it may be necessary to adjust this value to
something other than 3. On very fast PC's try a higher value than 3. On very slow PC's, try
a value lower than 3.
We have received reports from users who cleaned the terminals on the wiring connections
at the back of their instrument cluster with electronics cleaner. This appeared to fix the
problem with communicating with these clusters.
1996-1997 Audi A6 2.8L 12V V6 Engine
There is a bug in the Hitachi ECU that does not allow reliable monitoring or logging of
multiple measuring groups. For these vehicles, we recommend only viewing or logging one
group at a time.
2003+ 01J (CVT) Transmissions
These have rather unusual timing requirements. When used with a HEX Interface,
increase Char Int on the Options Screen to approximately 4 or 5.
56
Appendix B: VAG-COM
Frequently Asked Questions FAQ
1.1 Will VAG-COM work with my car?
VAG-COM will work with most Volkswagen and Audi models sold World-Wide 1994
through 2006. It will work with some cars all the way back to model year 1990. It will also
work with most late-model SEAT, and Skoda models sold in markets other than North
America. If your VW or Audi has a 16-pin "OBD-II style" Data Link Connector, VAG-COM
will definitely work. If your car has the old "2x2" Data Link Connection, check if there is a
wire going to each pin. If there are four wires, VAG-COM should work. If there are only
three, it won't.
Please see these Application Charts at:
www.Ross-Tech.com/vag-com/cars/applications/ where you can select your model and
see which modules can communicate with VAG-COM. Also see the Issues page for a few
things that may not work as expected. If in doubt, e-mail us.
1.2 Will VAG-COM work even if my car is "chipped"?
Yes. If it doesn't work in a "chipped" car, the chip-vendor did something seriously wrong!
Chips from reputable vendors are fully VAG-1551 (and VAG-COM) compliant.
1.3 What functions are included in the current release?
VAG-COM is a software program that turns your PC into sophisticated VW/Audi diagnostic
tool, which performs the functions of a factory VAG-1551 or VAG-1552 scan tool. Please
see the Function Chart in Appendix E for the current feature set.
1.4 What are the computer requirements?
A PC running Windows: We recommend at least a Pentium-100 (or AMD equivalent) with
16MB of RAM and Windows 95 or newer. VAG-COM may work on some lesser PC's, but
anything less than the above recommendation is unsupported. Windows 95, 98, ME, NT4,
2000, and XP are all fine. Available disk-space should be a non-issue, VAG-COM requires
less than 10 MB. If you are using a power supply for a laptop, it should be one specifically
designed for that purpose, NOT a "universal" adapter.
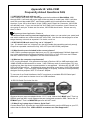
To use one of our Serial Interfaces, the PC must have an available RS-232 Serial port!
Otherwise, you'll need to choose one of our USB Interfaces.
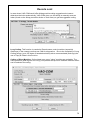
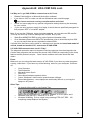
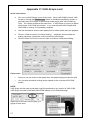
A RS-232 Serial Port looks like this:
Observe the port we surrounded with the GREEN oval. Notice the 9 MALE pins? That is a
SERIAL port and WILL work! Observe the port circled and crossed in RED. Notice the 15
FEMALE pins? That is a MONITOR port and will NOT work!
1.5 What if my Laptop doesn't have a Serial Port?
Contact Ross-Tech. We offer our own USB Interfaces which use the USB port on your PC,
rather than the Serial Port. USB<->RS232 converters are "Not Supported."
57
Appendix B: VAG-COM FAQ cont.
1.6 What if the PC I wish to use with VAG-COM doesn't have Internet access?
To update VAG-COM, you’ll need to download and install the latest version from our
website. Because our updates are provided to you via our download page, rather than on
floppy disks or CD's, you will need a way to transfer the Self-Installing EXE file to the PC
that you will be using with VAG-COM. The file fits easily on a portable USB memory device
and can also be burned onto a CD-R or CD-RW. Make sure that you do not run the EXE
file until you have copied it onto the PC where you would like VAG-COM to be installed.
You do not need to be connected to the Internet while using VAG-COM.
1.7 Can I use VAG-COM on a desk-top computer?
Yes, use the Serial (DB9M to DB9F) extension cord included with your kit to extend up to
25 ft. You can extend an additional 25 ft. by purchasing a second Serial Extension Cable.
USB versions can be extended using the 16-ft active USB extension in the kit.
1.8 Will there be a Mac or Linux version?
There will be no "native" Mac or Linux versions. The time and effort required to "port" VAGCOM to these platforms would never be worthwhile. One person has gotten VAG-COM
running under Linux using WINE and another person has managed to get VAG-COM
working on a MAC with Virtual PC. Neither of those examples are supported by Ross-Tech.
1.9 Will there be a Windows-CE/PocketPC/WindowsMobile or Palm-OS version?
Possibly at some point in the future, but we don't have a timetable yet. We conducted a poll
of current and potential VAG-COM users about where we should concentrate development
efforts. The results:
75 % Improving and adding features to the Windows version
11 % Porting VAG-COM to Windows CE / PocketPC
9 % Porting VAG-COM to Palm
3 % Porting VAG-COM to LINUX
2 % Porting VAG-COM to Macintosh
Some of our customers use VAG-COM on a tablet PC such as a Fujitsu Stylistic or on an
ultra-portable PC such as a Toshiba Libretto. These can be purchased inexpensively on
auction sites. These REAL PC's work wonderfully and have very small form factors (the
Libretto is about the size of a VHS video cassette).
1.10 What's the difference between VAG-COM and an OBD-II Scan-Tool?
OBD-II is a government mandated diagnostic protocol that is primarily aimed at diagnosing
emissions-related problems. An OBD-II scan tool will work in many different brands of
cars. VAG-COM uses VW's proprietary diagnostic protocol and will only work in VW/Audi
vehicles. Although you can use an OBD-II Scan Tool in an OBD-II compliant (1996 or
newer) VW or Audi, an OBD-II Scan Tool can only talk to the engine, not the numerous
other "intelligent" systems in the car. Want to reprogram your central locks or your Radio?
Diagnose a problem with your ABS, Airbags, or Automatic Transmission? Re-align your
Immobilizer after swapping ECU's? Reset your Service Reminder Indicators?
Communicate with a pre-1996 model (not OBD-II compliant) car? An OBD-II Scan-Tool
can't do any of these things. Our latest version of VAG-COM adds Generic OBD-II
functionality, see the Generic OBD-II section in this manual for more information.
1.11 Can I use VAG-COM to roll back my electronic odometer?
A: No. A brand new instrument cluster (with less than 100 km on it) can be rolled forward,
one time only. Of course, this assumes that the instrument cluster is "diagnostics capable".
Not all instrument clusters with electronic odometers are.
58
Appendix B: VAG-COM FAQ cont.
1.12 Can I use VAG-COM to "Flash" the chip in my ECU?
No, we have investigated flashing, but found that there are several different methods of
encryption for various VW/Audi vehicles, as well as delicate licensing issues to overcome.
Therefore, we do not intend to pursue flashing any further at this time. You cannot alter
boost, timing, fueling, rev limiter, or speed limiter with VAG-COM. You should contact a
chiptuner if you wish to have those parameters altered.
1.13 Is there anything else I need to make full use of VAG-COM?
Yes. A good Factory Repair Manual containing the VAG Scan-Tool procedures for your
car. VAG-COM is a tool, not an on-line service manual. We could not possibly document
everything you can do with it in every year and model of VW/Audi that VAG-COM can be
used with. The most cost-effective manuals with good Scan-Tool procedures for
US/Canadian vehicles are the CD-ROMs from Robert Bentley Publishers. We offer these
at a discount to registered VAG-COM users. Beware, however, that many of the paper
"Service Manuals" published by Bentley do not contain Scan-Tool Procedures. If a paper
Bentley manual is called a "Service Manual" it usually does not have scan-tool procedures.
If it is called "Official Factory Repair Manual", it does. An additional source of manuals that
contain Scan-Tool procedures is Dyment Distribution Services (1-800-544-8021).
Since the above Bentley Factory information only applies to US/Canadian vehicles, if
your car is European-spec or from the rest of the World, they may be of little use to you.
For Rest-of-World VW, Audi, and SEAT manuals, check erwin-portal.com
For Rest-of-World Skoda manuals, check skoda-haendlershop.de (German-only)
2.1 How do I Register/Activate my software?
All of our Current Interfaces have Activation built-in, so VAG-COM should always be Fully
Activated once it has been tested on a car.
2.2 What’s the difference between the Shareware version and the fully registered
version?
When you first download a new version of VAG-COM from our website. it operates in a
limited Shareware mode until you plug in the HEX Interface and test it on a car.
2.3 Is Product Support included in the price?
A: Absolutely. If you have a question or problem, please post it to the VAG-COM mailing
list, mail it to us directly, or give us a call. However, please understand that we don't know
everything about every VW/Audi ever made.
2.4 Why can't I get VAG-COM to communicate at all?
Check the following:
•
•
•
•
59
Is the adapter plugged into the car? A Serial Interface that is not plugged into the car
will always be "Not Found". It gets power from the car!
Is the car's ignition switch in the ON position?
Is it plugged into the correct serial port? Some PC's have the ports mis-labeled.
Are the serial ports on your PC properly configured?
Appendix B: VAG-COM FAQ cont.
2.4 Why can't I get VAG-COM to communicate at all? Cont.
•
Disable Palm HotSync or Microsoft ActiveSync software!
•
If you have a 1997 or newer car with an aftermarket radio, read this page:
•
•
http://www.ross-tech.com/vag-com/aftermarket-radio.html
Check our Issues page for any special configuration settings that may be necessary
for your vehicle
If you are using a power supply for a laptop, it should be one specifically designed for
that purpose, NOT a "universal" adapter.
Note: If you test the COM port, but an hourglass appears, you may have an IRQ conflict.
This may not show up in Device Manager as a conflict. But, try this:
•
Start>Run>MSINFO32.EXE to bring up the System Information utility.
•
Go to Hardware Resources>IRQs This should show a list of all devices by their IRQ,
so you can see if there are any repeated or shared IRQs.
If all else fails, feel free to call or email us, making sure to provide the brand and model of
vehicle, brand and model of PC, and version of VAG-COM.
2.5 VAG-COM communicates, but it's "flaky".
The diagnostic protocols require a degree of real-time response from the diagnostic tool.
Certain other programs and services can prevent VAG-COM from responding in the timely
fashion that the protocols require. Some control modules are fussier about this than
others.
Fixes:
Make sure you are using the latest version of VAG-COM. If you have any other programs
running, close them. If you have any of the following active on your computer, turn them
off:
•
•
•
•
•
•
•
Virus Scanners
Task Scheduler
Microsoft Active-Synch
Fast-Find
Some Novell Netware network drivers
Canon "Multipass" multi-function printer/scanner software
Power Management -- some laptops are notoriously difficult, try running the
laptop on AC power!
Other Tips:
•
Go through all the stuff in your System Tray:
•
•
Right-Click on each little icon. If there's a "Disable" or "Exit" option, do it!
Windows 2000 with SP1: Install IE 5.5 or SP2.
Windows 95/98/Me: Pull up a task list by pressing CTRL-ALT-DEL. Kill
everything except Explorer and Systray.
60
Appendix B: VAG-COM FAQ cont.
2.5 VAG-COM communicates, but it's "flaky". Cont.
• Most versions of Windows: Start -> Run -> MSCONFIG. Take a look at what
other non-essential stuff Windows is loading and disable it.
• STOP or remove PCMCIA Cards, especially anything made by Xircom. Some
IBM brand cards are also problematic.
• Try turning Off your COM Port's FIFO buffers. Open the properties sheet for the
COM Port in Device Manager. Select the Port Settings tab. Click the Advanced
button. Uncheck the "use FIFO buffer" checkbox.
• Some Windows installations, especially ones that have had numerous program
installed and uninstalled over the years may be hopeless. Try installing a clean
copy of Windows in a different folder than the original.
• If you have an older, slower PC running Windows XP, try setting the Display
Properties>Appearance to Windows Classic Style instead of Windows XP Style.
• If you are using a USB Interface, go to Device Manager, USB Root Hub,
Properties, Power Management, and uncheck "Allow Windows to turn off this
device to save power"
If all else fails, feel free to call or email us, making sure to provide the brand and model of
vehicle, brand and model of PC, and version of VAG-COM.
2.6 Why does my dash BEEP when I access my ABS controller?
In many of the newer models, there will be a series of BEEPs from the dash when you
access the ABS controller (and the ABS light will be ON while you are talking to it). This
perfectly normal and is done to notify the driver that the ABS is non-functional while in
diagnostic mode.
2.7 Are there any Fault-Codes that can and should be ignored?
Yes. Most 1995 and earlier Bosch ECU's will show you a DTC 00513 - Engine Speed
Sensor (G28) if you scan them when the engine is not running. This fault code goes away
by itself once you start the engine. If this sensor were truly defective, the engine would not
run at all! Please ignore this code. In addition, many Automatic Transmission Control
Modules will show a DTC 00526 or 17087 that indicates a faulty brake light switch. This
can also be ignored and will not appear if you press the brakes once before checking for
Fault Codes.
2.8 Are there any known Bugs / Problems / Issues?
Please check the Issues Page in Index A and the Revision History Page online:
http://www.ross-tech.com/vag-com/revisions.html
2.9 What's the Work Shop Code?
Every VW/Audi dealer in the world is assigned a unique Work Shop Code. A brand-new
factory VAG-1551/1552 or VAS-5051/5052 scan tool will not function until a WSC is
entered, and once it has been entered, it cannot be changed. Whenever a Control Module
is Re-Coded, or certain Adaptations are performed, the scan tool sends its WSC to the
control module and the control module records it for posterity. Thus, if a scan-tool is used
to do something like disable certain airbags, in principle, it should be possible to tell who
(which dealer) did that. Like the factory scan-tools, VAG-COM will accept a WSC once on
the Options Screen. If you enter a WSC there, it will be sent to the control modules exactly
like it's supposed to be. If you leave the WSC on the Options Screen at it's default of
00000, VAG-COM will operate in "stealth mode". Instead of sending a fixed WSC, it will put
back whatever was already in the control module, with one exception: If it finds the
"telltale" WSC (30011) that VWTool/VDS-PRO likes to leave behind, VAG-COM will replace
it with something more innocuous.
61
Appendix B: VAG-COM FAQ cont.
2.10 What's with the DEBUG files?
VAG-COM uses these to record a lot of the data being exchanged between the car and
your PC. Having these can be very useful if there is some sort of unexpected problem
communicating with a controller in your car. By default, the Debug Level is set to 0. If
you're having a problem, we may ask you to set the Debug level to something other than
zero, and to send us a specific Debug file. The best way to send Debug files is to ZIP them
first.
3.1 Do I need an Interface Adapter?
Yes. The ISO-9141 port in your car is not directly compatible with any standard PC port.
The ISO-9141 port in your car is somewhat RS-232 like, but you can't just wire up a cable -you must put electronics in between to allow a PC to communicate with the car.
3.2 Can I use an Interface adapter that came with another software package?
The current version of VAG-COM (versions 500.x and newer) are not compatible with 3rd
party interfaces at all, even in shareware mode. To use the latest version of VAG-COM,
you need to use a genuine KEY or HEX Interface purchased directly from Ross-Tech or
from one of our distributors.
3.3 Can I buy an Interface adapter somewhere else?
The current version of VAG-COM (versions 500.x and newer) are not compatible with 3rd
party interfaces at all, even in shareware mode. To use the latest version of VAG-COM,
you need to use a genuine KEY or HEX Interface purchased directly from Ross-Tech or
from one of our distributors.
3.4 Can I build my own Interface Adapter?
The current version of VAG-COM (versions 500.x and newer) are not compatible with 3rd
party interfaces at all, even in shareware mode. To use the latest version of VAG-COM,
you need to use a genuine KEY or HEX Interface purchased directly from Ross-Tech or
from one of our distributors.
3.5 Why does VAG-COM require Activation?
All of our Current Interfaces have Activation built-in so users never have to worry about
Activation, De-Activation, etc. However, VAG-COM versions prior to 5xx.x will also run
through "dumb" interfaces, which are not particularly difficult to make and we would like to
get paid for our work! The reality is that there many people in this world that just won't pay
for software unless they have to. We've invested a large amount of time and expense into
reverse-engineering the VAG protocols, and we're trying to make a living with this product.
Further more, we're trying to sell it at a price that makes it affordable to everyone. The
activation scheme is intended to ensure that we get paid by every user, not to make life
difficult for registered customers.
3.6 What if I need to run VAG-COM on more than one PC?
All of our current Interfaces have Activation built-in, so you can download and install VAGCOM onto as many PC's as you'd like, so VAG-COM is fully Registered and Activated once
you test it on a car.
3.7 How do I permanently move VAG-COM from one PC to another?
All of our current Interfaces have Activation built-in, so you can download and install VAGCOM onto as many PC's as you'd like, so VAG-COM is fully Registered and Activated once
you test it on a car.
62
Appendix B: VAG-COM FAQ cont.
3.8 What's the De-Activate button for? Why would I want to do that?
All of our Current Interfaces have Activation built-in, so there is neither a need nor a choice
to De-Activate.
3.9 Why has VAG-COM become De-Activated on its own?
All of our Current Interfaces have Activation built-in, so VAG-COM should always be Fully
Activated once it has been tested on a car. If you have a Current Interface and VAG-COM
has become De-Activated, please contact us
3.10 Can I sell my VAG-COM System to someone else?
You can sell the hardware, but the software license and support are not transferable. All of
our Current Interfaces act as "dongles" for VAG-COM, so the software should be fully
functional on any PC that meets our requirements. However, we only provide support to
the original purchaser. If you purchase a second-hand "dongle" Interface and want to be a
"registered user" and get technical support, you'll still need to pay $99 to register.
4.1 Why and How should I test VAG-COM prior to Activating it?
All of our Current Interfaces that have built-in Activation, are fully Registered and Activated
once you test them on a car. With these Interfaces, the license is built in, you do not have
to Activate VAG-COM, but obviously you'll want to test VAG-COM when you get it to make
sure everything works properly. First, Download and install VAG-COM on your PC. Find
your vehicle on the Applications Page to see which control modules are in your car.
Connect your Interface to your car's Diagnostic Port and to your PC. Turn the ignition ON
(turn the key so the Instrument Cluster lights up, but do not start the car -OR- start the car).
Go into the Options screen, select the correct port, and click the TEST button. Ensure that
VAG-COM finds your interface, you should see a message that says Interface Found. Now
click SAVE. Select one of your car's Control Modules (note: your car will not have all the
Control Modules listed in VAG-COM, only the ones on your Applications Page). After VAGCOM has Connected, check Fault Codes. Repeat the process for each of your car's Control
Modules. If you encounter problems, please try the FAQ Suggestions first. If you still have
problems, feel free to Contact Us with full details about your PC and vehicle, preferably
while you are in front of both.
4.2 Can I use VAG-COM while I am driving?
We strongly recommend against reading data while driving -- that would be an accident
waiting to happen. Almost everything that changes while you drive can be LOGGED to a
.CSV file, which you can analyze to your heart's content using VAG-Scope or Excel (or a
number of other programs) preferably while the vehicle is not in motion..:-) If you find it
necessary to read data while the vehicle is in motion, we strongly urge you to use a second
person -- one to drive, one to look at the PC. This second person should sit in the back
seat, because a laptop used in the front passenger's seat becomes potentially lethal if an
airbag drives it back into the passenger's head or torso in case of an accident.
4.3 What is "The Aftermarket Radio Problem"?
If you are working on a 1997 or newer car with an aftermarket radio read this page:
http://www.ross-tech.com/vag-com/aftermarket-radio.html
63
Appendix B: VAG-COM FAQ cont.
4.4 How do I upgrade my existing VAG-COM software to the newest version?
You should be able to simply Download and install the latest release of VAG-COM in your
PC. All of our Current Interfaces have built-in Activation, so the new version should be fully
Registered and Activated once you test on a car. If you'd like to be notified when a new
version of VAG-COM becomes available, you should sign up for our Announcements List.
If you purchase a genuine Ross-Tech Interface directly from us, or from one of our
Distributors, you are entitled to free software updates for at least one year from date of
purchase.
4.5 What is the purpose of the "OBD-II" button? Why would I want to press it?
See the Generic OBD2 section of this manual for more information on how to use VAGCOM on ISO-9141 compliant OBD2 vehicles. This function nothing to do with the VAG
protocol that VW uses, and the results of this test have nothing to do with VAG-COM
working with any VW/Audi/SEAT/Skoda vehicle. No VW or Audi products prior to model
year 1996 are OBD-II compliant! Please note that most vehicles sold outside of the US are
NOT OBD-II compatible, and even some US-market TDI's are not OBD-II compatible.
4.6 How do I print screens or data in VAG-COM?
You can print reports from VAG-COM's Fault Code, Auto-Scan, Control Module Finder, and
Gateway Installation screens. You can save data to a Log file and print using a
spreadsheet program. To print screens, we highly recommend the HardCopy (freeware)
program.
4.7 What are Label Files?
In Measuring Blocks, Basic Settings, Adaptation, or Recode, VAG-COM tries to elaborate
as much as possible what the data means. Unfortunately, the "Data Type" information
coming from the Control Module is not that precise. For example: VAG-COM can tell that a
particular field contains a Temperature, but the data from the Controller doesn't tell us
whether this is the Coolant Temperature or the Intake Air Temperature.
To reduce the confusion, VAG-COM supports Label Files and which provide more
information about the data being displayed in Measuring Blocks and can also provide
additional information for the Coding function and Adaptation Channels. When a Label file
for the Control Module you are looking at does not exist, VAG-COM will base the
elaboration is based on an "educated guess" what a particular Data Type means.
For more information about Label Files, see this page:
http://www.ross-tech.com/vag-com/labels.html
4.8 How can I speed up my sample rate in VAG-COM?
The sample rate at which you can view and log data is largely determined by each
controller in the car. There are a few things you can do to speed up the rate for a given
controller. First, logging one group at a time, rather than two or three, will help greatly. In
order to get the highest sample rate possible go to the Options screen and set Blk Int to 25
and Char Int to 0. Note, however, that this may cause unreliable communications with
some controllers. The KP2 Time parameter only applies to controllers using the KWP-2000
protocol. Decreasing it speeds up the sample rate in Measuring Blocks on control modules
that use the KWP-2000 protocols. Try setting it to 0. If any of these adjustments cause
unreliable communications, change them back closer to the defaults. If in doubt, use the
Restore Defaults button! In Engine controllers using KWP-2000, there is a [Turbo] button in
the latest version of VAG-COM. This can significantly speed up sampling, in some cases to
over 30 samples per second. See the Measuring Blocks page for more information.
64
Appendix B: VAG-COM FAQ cont.
4.9 What kinds of cool stuff can I do with VAG-COM? See our Car Info & Procedures
Page where you can look up Vehicle Specific Application Charts for your car to see which
control modules exist and can communicate with VAG-COM. Additionally, there are some
very useful links to pages about Key Matching, Immobilizers, as well as some excellent
spreadsheets submitted by our customers.
http://www.ross-tech.com/vag-com/cars/index.html
4.10 How do I set up my USB Interface?
To use one of our USB Interfaces, you'll need to download and install the latest version
VAG-COM with USB Support. After you have installed VAG-COM, you will need to follow
the instructions in the Getting Started section of this manual.
4.11 Does Ross-Tech make diagnostic software for other makes of cars?
Currently, we sell only VAG-COM, which works on VW/Audi/SEAT/Skoda. We are
developing diagnostic software for BMW/MINI vehicles, but are in the very early
development stages. Specification, functions, pricing, and release date information for the
new product are not yet available. We do not currently have plans to develop software for
any other makes of cars, but of course, all plans are subject to change. We do not know of
any other makers of similar software for other makes of vehicles. Our latest Version of
VAG-COM adds Generic OBD-II functionality, see the OBD-II Page for more info.
4.12 Can I use VAG-COM to retrieve my Radio Code to get it out of "SAFE" mode?
No, You'll need to get the radio code from your dealer (it should also be on a card that
came with your car). Most likely, the dealer will need to physically remove the radio to read
its chassis number, then the chassis number is input into a database at the dealership to
retrieve the radio code. Neither VAG-COM nor the factory scan tools can retrieve the radio
code for you.
4.13 Does VAG-COM work with cars that require direct CAN access for diagnostics?
Yes! We have integrated CAN compatibility into the latest version of VAG-COM, but since
CAN uses different hardware, new interfaces are required. The HEX-COM+CAN and
HEX-USB+CAN interfaces are fully compatible with the latest cars that require a direct CAN
connection as well as being backwards-compatible with the older cars that use k-lines.
4.14 Can I use VAG-COM to make my windows roll up and down using my keyfob
remote?
Many Audi vehicles can be recoded to allow this function, see this example. Unfortunately,
most VW models do not have the same capability except the Mk5 Golf platform cars and
the B6 Passat. In order to make your windows roll up and down using your remote in an
older VW, you'll need to add extra hardware such as the Remote Window Controller from:
http://www.alientech.net
4.15 How do I obtain an SKC for Immobilizer and Key-Matching functions?
We do not know of any way to retrieve an SKC for VW/Audi/SEAT/Skoda vehicles other
than getting it from an official dealership. Prior to 2002, some vehicles were delivered with
a 4-digit SKC on a scratch-off panel on a plastic tag. Starting in 2002, dealerships
implemented the WIN2 system to provide 7-digit SKC's to their technicians and customers.
Recently, many dealerships have switched to the new GEKO system, whereby their factory
scan tools dial up the factory while connected to a car. Under this system, the technician no
longer sees the SKC at all. VAG-COM does not interact with the GEKO system.
65
Appendix C: VAG-Scope
Graphing "Plug-In" for VAG-COM
66
Appendix C: VAG-Scope cont.
Quick Instructions:
•
You can use VAG-Scope in one of two ways: Allow VAG-COM to launch VAGScope by clicking the [VAG-Scope] button on the Measuring Blocks screen, or
manually start VAG-Scope in stand-alone mode to play back VAG-COM Log
Files. You cannot do both at the same time. If VAG-Scope is running in Standalone mode, VAG-COM will not start. If you manually start VAG-Scope while
VAG-COM is running, it will probably complain.
•
Use the checkboxes next to each display field to select which items are graphed.
•
Click on a field to select it for vertical scaling. VagScope will remember all
scaling values for a particular control module by part number.
•
Click the Ross-Tech Icon for a menu item to access a Preferences Dialog:
Preferences:
•
Here you can set colors for the graph lines, the graph background and the grid.
•
You can also set default scaling values (based on the units that VAG-COM
sends)
NOTE:
VAG-Scope can be used to play back Log files produced by any version of VAG-COM.
VAG-Scope included in the latest VAG-COM release on our Download page.
Right-click on the color box to open up a
gauge for that value.
67
Appendix C: VAG-Scope cont.
VAG-Scope -- FAQ:
Q: What are those numbers on the left of the graph?
A: They are the scaling numbers. They define the min and max values that will be graphed
in the window. For instance, a temperature could be graphed between -10 and 130*C.
Q: Great, but I don't like the current ones.
A: Don't worry, everything is fully customizable. You have two different ways of choosing
your scaling factors:
•
In the preferences screen, you can either modify the values for an existing units,
or add a new unit with its values. Make sure the unit is spelled exactly (including
the case) as it appears in the measuring blocks/graphing data.
•
In the main screen, click on a field (or use the blue horizontal arrow) to display its
scaling values. The field you're working on is surrounded by a frame. You can
then change the min and max scaling factors for this particular field
Both settings are saved, so that next time you won't have to do it all over again!
Q: So what's the difference between these two different ways?
A: First, you need to understand how the values are stored/retrieved. When Vag-Scope
graphs data from a controller it doesn't know, it applies the values in the preferences
screen, for the units that are defined. If a unit is "unknown", the min will be 0 and the max
will be 100.
Setting the values in the main screen allows you to override these defaults. For instance,
let's say you set the rpm (/min) value in the preferences screen at 7000. This is fine for
gasoline engines. But a friend visits you with his TDI. What you do is you set the /min fields
in the main screen at 4500, to keep a good resolution in your graph.
At that point, as soon as you stop graphing, the values are stored in the "scaling" directory,
in a file named by the controller part number. And next time you connect to the same
controller, VAG-Scope will automatically remember your settings.
Q: What's the deal with the horizontal scaling?
A: This enables you to tell VAG-Scope the value of the horizontal shift (in pixels) each time
a new sample is delivered by VAG-COM. This is customizable because of the range of
sample rates you can experiment with VAG-COM: you can go from 30 samples per second
on a '02 A4 3.0Q (engine, 1 measuring block at a time) to 0.4 on a Eurovan (transmission,
3 measuring blocks). The default is 3, but you may want to increase it if your sample rate is
low. This way your graphs will be more readable.
This value is also saved automatically for each control module.
Q: Why do I have a big blank after I hit "pause" in live mode?
A: This is intentional. It shows the graph has been paused and avoids having a big
discontinuity in the curves (for instance going from 800 to 7500 rpm in 0.2 second...).
The "pause" button ( II ) can be handy to make screenshots of a particular situation, like a
boost spike for example.
68
Appendix C: VAG-Scope cont.
VAG-Scope – FAQ cont. :
Q: VAG-Scope says "unexpected end of values". What's wrong?
A: At this time, VAG-Scope does not support appended log files. More precisely, it will only
read the first part of them. The solution is to give your files a more specific name than
"LOG-001-003-xxx-xxx" :-)
Q: "This is not an original VAG-COM log file"
A: Guess what, you altered the file in some way. For instance, just reading and saving the
file in excel adds comas to it, and this is what VAG-Scope relies on to parse the file.
Solution: make a copy of the file before you edit it with a program that modifies the comas.
Q: I'd like to write my own VAG-Scope. Is this possible?
A: Yes, that's one of the reasons why VAG-Scope is open source (the other being we don't
want to be bothered by 10 different feature requests a day). VAG-Scope was written using
MS Visual C++ 6 and you will find the source code on our website.
www.ross-tech.com/vag-scope/
Feel free to improve/write your own VAG-Scope and publish it. Obviously your file has to be
called VagScope.exe so that VAG-COM can "spawn" it.
Q: But I can't program/all I know is VB!
A: Then stop complaining or learn! ;-)
69
Appendix D: TDI Timing Checker
"Plug-In" for VAG-COM
This plug-in allows you to check the injection timing setting on a TDI engine. This needs to
be done after you changed the timing belt and every once in a while to keep tabs on belt
stretch and pump/pulley misalignment. The standard procedure for this is to have the
engine idling at operating temperature (coolant temp >85*C), go to measuring block 000 for
the engine, switch to basic settings and report fields #2 (injection timing) and #9 (fuel
temperature) on a special graph.
This plug-in reports the timing on the graph in real-time, so you don't need to have your
manual sitting on your lap at the same time. The application also gives you a comment in
the "result" field, that will tell you if all the conditions are fulfilled to check the timing (some
people don't realize you need to have the engine running, for instance...) and if your timing
is within specs or not.
The history of the last 100 samples is displayed as a "cloud" of points. From the size and
shape of this "cloud" you can see how much "jumping around" your engine is doing, and
your average timing is probably right in the middle of the cloud.
70
Appendix D: TDI Timing Checker cont.
Step by step:
•
Start your engine
•
Start VAG-COM
•
Press the [Select] button
•
Press the [01-Engine] button
•
Press the [Measuring blocks-08] button
•
Go to group 000
•
Press the [Switch to basic settings] button
•
Now press the [TDI Timing] button.
Note:
The TDI Timing Checker works only as a “plug-in”. You must start it using the [TDI Timing]
button in VAG-COM. Starting it any other way will result in error messages and it won’t
work.
71
Appendix E: VAG-COM Function Chart
Factory Diagnostic Tools:
VAG-1551/1552 or VAS-5051/5052
Function Number / Name
VAG-COM Release 512.1
KWP-1281 *
KWP-2000 **
00 Auto-Scan
Yes
Yes
01 Control Unit Info
Yes
Yes
02 Read Fault Codes
Yes
Yes
03 Output Tests
Yes
Yes
Not Used
Yes
04 Basic Settings
Yes
Yes
05 Clear Fault Codes
Yes
Yes
06 Close Controller
Yes
Yes
07 Code Module
Yes
Yes
Not Used
Yes
08 Measuring Blocks
Yes
Yes
09 Single Reading
Yes
Not Used
10 Adaptation
Yes
Yes
11 Login
Yes
Yes
15 View Readiness
Yes
Yes
16 Security Access
Not Used
Yes
33 Generic OBD-II
Yes
Yes
Data Logging (Exclusive to VAG-COM!)
Yes
Yes
HighSpeed Logging (Exclusive to VAG-COM!)
No
Yes
Not Used
Yes
Real-Time Graphs (Exclusive to VAG-COM!)
Yes
Yes
Real-Time Gauges (Exclusive to VAG-COM!)
Yes
Yes
TDI Timing Checker (Exclusive to VAG-COM!)
Yes
Yes
Module Finder (Exclusive to VAG-COM!)
Yes
Yes
Dual K-Line Support
Yes
Yes
7-Digit SKC/PINs (VAS only)
Yes
Yes
Code Database current through MY 2006 (VAS)
Yes
Yes
Diagnostics via direct CAN connection (VAS)
Not Used
Yes
Transport Mode (VAS)
Not Used
Yes
No
No
Selective Output Tests
Code Slave Modules
Freeze-Frame Data
(mis)Guided Fault Finding (VAS)
* KWP-1281: The original VAG Diagnostic Protocol. Used on all diagnostic-capable
systems from 1990 through model-year 2000.
** KWP-2000: The "new" VAG Diagnostic Protocol. Used on a few 2001+ ABS systems
and many 2002+ Engines, Transmissions, and Airbags.
72
Notes:
73