1
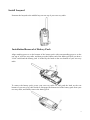
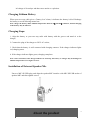
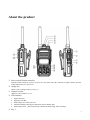
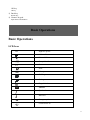
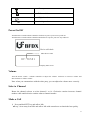
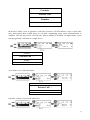
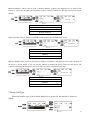
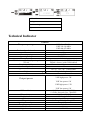
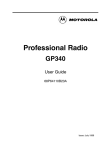
Procurement and use of this device is a behavior setting and using radio station that
should be approved legally for establishing a station and authorized with a radio station
license. During use, operate this device in accordance with items permitted in the radio
station license. Setting and using radio stations without authorization and interfering with
radio services, not to work as licensed and other behaviors in violation of regulations in the
radio administration act will be administratively punished by the radio administration
authority. Serious violation of radio usage would even offend against article 288 of "Criminal
Law" or article 28 of "Public Security Punishment" that would be sentenced to fixed-term
imprisonment of not more than three years, criminal detention or public surveillance and also
be subject to fine, or subject to fine alone or be punished with "administrative detention" by a
public security bureau.
Acknowledgement
Thank your for buying BEIFENG series professional radio communications products!
Since 1989, BEIFENG has been always engaging in research and exploration of radio
communications technologies for dozens of years to lead intelligent technologies in the
industry. We still make every effort to research and design products according to modern
complicated communications environment, and are well positioned to customize special
communications solutions adapting to your industrial properties. Excellent performance and
outstanding communications strength allow our products being your ideal options for getting
the big picture and also intelligent dispatch and command delivery, no matter what field your
are in.
Applicable model
VHF/UHF FM digital two-way radio: BF-TD501
Need-to-Know
u The government decree forbids use of a radio transmitter without authorization within the
territorial jurisdiction.
u Apply for frequency point to local radio management committee before using a two-way
radio. Illegal operation may be subject to fine or arrestment.
u Repair
only donethat
byaauser
specialist.
Security:
it isisimportant
fully understands general risks using a two-way radio.
Warnings:
Explosive environments (gas, dust or smoke)
The product is prohibited to be used in following environments, including but not limited to:
1. Do not use the product in the therapy area and ward of a hospital;
2. Do not use the product on the airplane;
3. Please wear earphones when driving a car;
4. Do not use the product in an examination;
5. Power the two-way radio off when refueling or parking near a filling station.
1
If you want to use this product for secondary development, please contact BEIFENG or local BEIFENG
vendor.
Precautions
Please follow following precautions to prevent fire, personal injury or damage to the machine:
l The recommended usage rate for the two-way radio is less than 1 minute for TX and less than 4
minutes for RX. Long and continuous TX will result in heating of the rear panel. Do not allow
the rear panel of the two-way radio to contact surface of a plastic object.
l Do not let the two-way radio placed in direct sunlight for a long time or place it near a heating
source.
l Do not place the two-way radio in a extremely dusty, moist or splash place, or on a unstable
surface.
l If unusual odor or smoke is found, power the two-way radio off. Then contact your local BEIGENG vendor.
l In no circumstances can the product be modified without authorization. The company is not
liable for any adverse consequence resulting from unauthorized modification.
Unpack and Inspection......................................................................................................................... 3
Supplied accessories ............................................................................................................................ 3
Unpack and Inspection......................................................................................................................... 1
Installation of Accessories ................................................................................................................... 4
Installation/Removal of Antenna ......................................................................................................... 5
Installation/Removal of Belt Clip ........................................................................................................ 5
Installation/Removal of Battery Pack .................................................................................................. 6
Use of Lithium Battery ........................................................................................................................ 7
Features: ........................................................................................................................................ 7
Charging Lithium Battery ............................................................................................................. 8
Charging Steps: ............................................................................................................................. 8
Installation of External Speaker/Mic ............................................................................................ 8
About the product ................................................................................................................................ 9
About the product ................................................................................................................................ 1
Basic Operations ................................................................................................................................ 11
LCD Icon .................................................................................................................................... 11
Basic Operations .................................................................................................................................. 1
Power On/Off............................................................................................................................ 12
Volume ........................................................................................................................................ 12
Select a Channel.......................................................................................................................... 12
Make a Call ................................................................................................................................. 12
RX ............................................................................................................................................... 13
Introduction to Operations ................................................................................................................. 13
2
Digital channel ............................................................................................................................ 13
Address book ..............................................................................................错误!未定义书签。
Scan............................................................................................................................................. 18
Zone ............................................................................................................................................ 19
Message....................................................................................................................................... 20
Call Log ...................................................................................................................................... 21
Settings........................................................................................................................................ 23
Analog Channel .......................................................................................................................... 26
Technical Indicator............................................................................................................................. 27
Declaration......................................................................................................................................... 28
Unpack and Inspection
Unpack and Inspection
Note: Following unpacking notes are only for local BEIFENG vedors, authorized BEIFENG agents
or factories.
Please take the two-way radio out of the package carefully. It is recommended to check accessories
according to the following checklist before discarding its package. If any item is missed or damaged,
please immediately contact your local BEIFENG vendor.
Supplied accessories
Items
Antenna
Lanyard
Belt clip
Charger
Battery
Operating Manual
Warranty card
Certificate
Accessory No.
Quantity
BF-RA101S
BF-RL801
BF-BS102
BF-B19
BF-A19
1
1
1
1
1
1
1
1
Antenna
3
Belt clip
Charger
Battery
Lanyard
Installation of Accessories
Warning!
l Do not make battery contacts short circuited; do not put the battery into fire; It is at
risk of explosion.
l Do not try to remove the housing for battery pack.
l Do not install the battery pack in a dangerous environment. Spark may result in
4
Installation/Removal of Antenna
Hold the antenna seat and turn it clockwise into the connection on the top of your two-way
radio till it stops.
Turn the antenna anti-clockwise to remove it.
Installation/Removal of Belt Clip
Install the belt clip along the groove till a "click" sounds and the belt clip is locked into the
groove.
5
Install Lanyard
Penetrate the lanyard to the middle loop on rear top of your two-way radio.
Installation/Removal of Battery Pack
Align catching grooves on the bottom of the battery pack with corresponding grooves on the
rear top of your two-way radio, and then press the bottom end of the battery pack till you hear a
"click" sound and the battery pack is locked by the latch on the rear bottom of your two-way
radio.
To remove the battery pack, power your two-way radio off, and push the latch on the rear
bottom of your two-way radio inside to disengage the bottom end of the battery pack from your
two-way radio, and finally remove the battery pack.
6
Warning
l
Do not over charge the battery pack!
If the battery pack is not fully charged within the specified time (4-6 hours), please stop
charging. Otherwise, the battery may be overheated, bursted or fired.
Do not place the battery pack into microwave bulb or high pressure vessel!
The battery may be overheated, bursted or fired.
Do not let cracked and leaked battery pack close to fire to prevent explosion!
If the battery pack is leakedd (or smells penetrating odor), immediately keep it away from
flammable and explosive environment. Electrolyte leaked from the battery is flammable that
may result in smoke or fire.
Do not use unusual battery pack!
If the battery is exceptional due to deformation or any reason, please remove it from the
charger or your two-way radio and discard it.
Use the BF-TD501-specific charger!
BF-TD501-specific charger is specifically designed for this model providing more scientific,
reasonable, secure and reliable charging.
l
l
l
l
Use of Lithium Battery
l
The original battery is activated in the factory. Charge the lithium battery pack before use.
Alternate charging / discharging twice or three times to make the battery capacity in the
best status.
To try to reduce consumption of the battery pack, take the battery out of your two-way
radio if it is left unused and put it in a shaded and dry place.
When the battery pack is left unused:
l
l
1. Take the battery pack from the device;
2. If possible, discharge the battery pack;
3. Put the battery pack in a shaded (lower than 25°C) and dry place.
Features:
l
l
l
l
The battery pack, after repeated charging and discharging, will deteriorate its capacity.
Even if the battery is left unused, it may also be deteriorated (capacity deteriorated).
Charging the lithium battery pack in a shaded and dry place (lower than 25℃) may charge
the battery to the best capacity.
Charging the battery pack in a high temperature condition will deteriorate it and shorten
its lifecycle. Do not leave it inside a car or place it near a heating source.
If the service time of the battery pack is shortened, even if it is fully charged, please
replace it with a new one. Continuing to charge and discharge the battery pack will result
7
in leakage of electrolyte and thus cause smoke or explosion.
Charging Lithium Battery
When your two-way radio gives a "battery low" alarm, it indicates the battery is died. Recharge
the battery to avoid affecting normal use.
Note: charge the battery under ambient temperature between 0℃ and 40℃; othewise, normal charging
of the battery may be affected.
Charging Steps:
1. Align the battery or your two-way radio with battery with the groove and attach it to the
charger;
2. Connect the plug of the charger to 220V AC socket;
3. Check that the battery is well contacted with charging contacts. If the charger indicator lights
red, charging starts.
4. If the charger indicator lights green, charging completes.
Note: After connection, if the charger indicator is not lit up, the battery or charger may be damaged or
ambient temperature is too high or too low.
Installation of External Speaker/Mic
Uncover MIC-SP-USB plug, and align the speaker/MIC interface with MIC-SP-USB socket of
speaker/MIC and then tighten screws.
About the product
8
About the product
① Power switch/Volume controller
Turn the switch clockwise to power on your two-way radio; rotate the controller to adjust volume. Turn the
switch anti-clockwise to power off.
② Orange key
Allow a user to change setting. (see key 1)
③ Channel encoder
Rotate to select channel 1 to 16.
④ LED indicator
1. Light red for TX.
2. Light green for RX.
3. Flash orange once when power on.
4. Alternate flashing red and green indicators when a channel idles.
5. Flash orange when phase-locked loop is unlocked (flash orange when scanning)
⑤ Key 1
9
Allow a user to change setting.
Key programming functions including:
●Unassigned: Not assign functions to programmable keys.
●One Touch Call 1-6: Allow a user to initiate digital group call, digital private call, call alert or send quick
message via the One Touch Calll function.
●Manual Dial For Private: Allow a user to flexibly dial any personal number not listed in the
address list (only for a digital model with display screen).
●Emergency On/Off: Allow a user to make an emergency call.
Note: this function can only be set to the orange key.
●Backlight auto ON/OFF: switch on/off the backlight.
●Keypad lock: lock keys on the keypad.
●Scan ON/OFF: Allow a user to enable or disable the scan function.
●All Alert Tones On/Off: Allow a user to simultaneously enable or disable all alert tones.
● Message: send edited message or quick message.
●Zone Toggle: Allow a user to toggle between 50 zones.
●Address list: Allow a user to access the contact list for session or to start any additional
conversation function.
Device Enable: start Device Enable function.
●Device Disable: start Device Disable function.
●Device Check: start Device Check function.
●Remote Monitor: start Remote Monitor function.
●High/Low power: Allow a user to switch between high power and low power.
●Strict/normal squelch: allow a user to switch SQ mode as required.
●Relay/talkaround: allow your handheld set to connect through relay or achieve standalone
communication in talkaround mode.
Note: above key functions can be realized by long or short press of keys.
⑥
(Press to talk) On
Press and talk to the Mic for Tx.
⑦ Key 2
Allow a user to change setting. (see key 1)
⑧ Key 3
Allow a user to change setting. (see key 1)
⑨ MIC-SP-USB socket
Connect to optional speaker/MIC and USB cable.
⑩ MIC-SP-USB Plug (uncover plug)
。
Protect the socket to allow better contact with speaker/Mic and USB cable.
⑪ Left key
Scroll to left
⑫ MENU key
Access to menu settings
⑬ Right key
Scroll to right
⑭
10
OK key
Ok key
⑮ Back key
Return key
⑯ Numeric keypad
Input letters and numbers
Basic Operations
Basic Operations
LCD Icon
H/L
High/low power
Address List
Private Call
Group/all call
Scan
Zone
Message
Call Log
Settings
Keypad lock
Unread
Speaker On
Horn Off
Emergency Alarm
Connected to PC
11
Battery status
Talkaround On
Digital mode
Analog mode
Power On/Off
Turn the Power switch/Volume controller clockwise to power your two-way radio on.
Turn the Power switch/Volume controller anticlockwise to power your two-way radio off.
Device self-check
显示设备名称
Show device name
BF - TD 501
Display Intro screen
Volume
Turn the Power switch - Volumn controller to adjust the volume: clockwise to increase volume and
anti-clockwise to reduce volume.
Note: when you communicate with the other party, you can adjust the volume more correctly.
Select a Channel
Rotate the channel selector to select channel 1 to 16. Clockwise rotation increases channel
number while anticlockwise rotation reduces channel number.
Make a Call
1) Press and hold PTT key and talk to Mic:
●Keep 3-4 cm away from Mic and talk to Mic with normal tone to obtain the best quality.
12
●When pressing the PTT key, if the LED lights red, Tx is in progress.
Call
Private call
2) Releasing the PTT key, your two-way radio exits from TX status and enters RX status.
RX
When the channel you are using is called, LED lights green. This call can be heard only when a
correct code is received. When this call is received, if the calling parting exists in the address
list, contact name and call type display; if the contact does not exist in the address list, ID
number and call type display.
Call
Group call
Introduction to Operations
Digital channel
Address list: press this key
NU
to view the address list
1. Private call type
When the member type of the selected address list is private call, the interface is shown as follow:
13
Contacts
Private Call
Number
●Call alert: Allow a user to generate a call alert via menu. Call alert allows a user to alert other
users and request them (called party) to call back (originating party) when communication is
available. The call alert can be received only when a channel is available. In digital mode, a user
can only generate a call alert to a single device.
Contacts
Private Call
1
Number
Call indication
View number: view calling ID number.
Contacts
Private Call
1
Number
View number
Edit name: rename a contact in the address list
.
14
Contacts
Private Call
1
Number
Edit name
Edit number: modify a number in the address list.
●Ring tone: select tone 1-10 or leave it unselected.
Contacts
Private Call
Number
Edit number
Delete: delete unwanted contacts from the address list.
Contacts
Private Call
Number
Delete?
●Device check: Allow a user to check if the two-way radio in the system is active without showing
any indication to the user.
Contacts
Private Call
Number
Device check
15
●Remote Monitor: Allow a user to send a "Remote Monitor" request to the target device via menu. If the
request is successful, the MIC and transmitter will be remotely enabled for the target device for remote
monitor.
Contacts
Private Call
Number
Remote monitor
●Device Enable: "Device Enable" command is used to enable the disabled target device.
Contacts
Private Call
Number
Device enable
●Device Disable: allow a user to send "Device Disable" command to the target two-way radio via menu. If
the device is lost or stolen, a user can use this function to disable the device. However, this device will
continue monitoring air interface to receive its "Device Enable" command at any time.
Contacts
Private Call
Number
Device disable
2.Group Call Type
When the member type of the selected address list is group call, the interface is shown as
follow:
16
Contacts
Group Call
Number
●View number: view group call ID in the address list.
Contacts
Group Call
Number
View number
3.All Call Type
When the member type of the selected address list is all call, the interface is shown as follow:
Contacts
All Call
●View number: view all call ID in the address list.
Contacts
All Call
View number
4. New Contact
You can create a contact with call type being Private Call. After pressing OK key, input a
number and then press OK key again, and then input a name (press # key to switch input method
17
and * key to delete). Then press OK key to enter the tone selection interface, where you can select
tone 1 to 10 or leave it unselected. Finally, press Ok to confirm your operation. The screen prompts
you with a "contact saved" message.
Contacts
New contact
5. Manual dial
You can manually input a number with call type as private call or group call.
Contacts
Manual dial
When the call type is set to private call, press OK and you can select call alert, device check,
remote monitor and device enable; press OK key and then PTT for TX.
②Scan
●Scan
On/Off
Allow a user to enable or disable scan function for the current channel via menu. Scanning allows the device to search
the scan list connected to the current channel to locate qualified channel for receiving or voicing.When scan function is
enabled,
on the screen is lit up and LED indicator flashes orange.
18
Scan
On
Scan Off: press MENU key to access the scan list again, disable the scan function and then press
OK key.
Scan
Off
●View/Edit
List
Allow a user to edit the scan list via menu, "Edit List" allows a user to execute some operations to the scan list, such as
viewing the scan list, changing priority of scan member, adding a new member to the scan list or deleting a member
from the scan list. It is not allowed to create a new scan list or delete existing scan lists from the device.
Scan
View/edit list
③Zone
Your two-way radio supports up to 50 zones that can be selected by the left and right keys. When a
specific zone is selected, and OK key is pressed, the screen prompts you with "zone selected"
message.
Zone
Total
19
④Message
●Inbox
In inbox, press OK key to view messages, where you can reply to a message, forward or
delete a message or select to delete all messages.
SMS
SMS
Inbox
Message content
Sender
●Edit
Edit a new message (up to 144 characters) to send it to an individual or group. When editing a
message in the edit box, press * key to delete and modify and press # key for switching input
method. key 1 a symbol key and key 0 is a space key. You can select a contact from the address list
which the message is sent to or manually dial a number to send to. A message fails to be sent can be
re-sent, forwarded, edited or deleted.
SMS
New message
Edit SMS screen
●Preset Message
Messages predefined using a programming software can be directly sent by pressing Ok key or
a saved message can be edited before sending. (up to 10 quick messages supported)
SMS
Preset SMS
Message content
Note: when editing a message, key * is a deletion key.
20
●Sent
In Sent box, you can press Ok key to view sent message, and press this key again to re-send,
forward, edit and delete sent messages; or press the right mouse button to delete delete all messages
in the outbox. (
displayed in the Sent list indicates sending failure, while
indicates sending
success)
SMS
SMS
Sent SMS
Text
Number
⑤Call Log
●Missed
Allow a user to keep track of the last missed or response failed incoming calls. A user can access the
Call Log via menu. This log also provides a user with a shortcut to originate a call.
Call log
Missed call
Press OK key to view missed call log. A missed call number can be stored into the address list or
directly deleted or all deleted.
Call log
Missed call
21
Delete all
●Answered
Allow a user to keep track of the last answered incoming calls. A user can access the Call Log
via menu. This log also provides a user with a shortcut to originate a call.
Call log
Answered call
Press OK key to view answered call log. A answered call number can be stored into the address
list or directly deleted or all deleted.
Call log
Answered call
Delete all
●Dialed
Allow a user to keep track of last calls originated by this user and for easy re-dialing. A user can
access the Call Log via menu. This log also provides a user with a shortcut to originate a call.
Call log
Dialed call
Press OK key to view dialed call log. A dialed call number can be stored into the address list or
directly deleted or all deleted.
22
Call log
Dialed call
Delete all
⑥Settings
1. Device settings
Allow a user to perform basic settings for the two-way radio.
●LCD contrast: used to adjust the brightness of the screen. Press left key to reduce the contract
while pressing the right key to increase the contrast. Too high or too low contrast will make the
screen fuzzy.
Settings
Device settings
LCD contrast
●Tone/alert: allow a user to enable or disable alert tone via menu. Tone alerts include all tones, call
permit, call ring and key tone.
Settings
Device settings
Tone/alerts
●Tx power: allow a user to set Tx power to high or low via menu. (high power: 5w, low power: 1w)
23
Settings
Device settings
Tx power
●Backlight: allow a user to change backlight setting via menu or key definition, i.e. auto On or auto
Off.
Settings
Device settings
Backlight
●Intro screen; allow a user to enable or disable Intro screen during start-up.
Settings
Device settings
Intro screen
●Keypad lock: allow a user to enable or disable keypad lock via menu or key definition.
Settings
Device settings
Keypad lock
●Language: Chinese and English are available.
Settings
Device settings
Language
●LED indicator: allow a user to enable or disable LED indicators via menu.
24
Settings
Device settings
LED indicator
●Talkaround: allow a user to set his device to Talkaround mode via menu. When the repeater is
disconnected, talkaround mode is required. This function allows nearby two-way
radio to communication without the repeater.
Note: To enable this function, TX frequency should be different from RX frequency.
Settings
Device settings
Talkaround
Application:
l Within in communication range of the handheld two-way radio, when long time
communication is required, to avoid busy repeater, you can invite the other party to
communicate in the same frequency in talkaround mode.
l 2) Communicate in the effective coverage range of the repeater.
Note: exit from the talkaround mode after communication; otherwise, you may be unable to
communicate with other members in the network.
2. Device Information
Allow a user to check information abount the two-way radio.
Battery status: allow a user to view battery status and know battery usage and charge the
battery when necessary.
Settings
Device information
Battery capacity
Battery status
●My number: allow a user to view his/her ID number, which is same as device ID.
25
Settings
Device information
My number
●Firmware version: view firmware version information.
Settings
Device information
Firmware version
●CP version: view CP version information.
Settings
Device information
CP version
Analog Channel
For analog channel, there are three parts for user operation in the menu list, including scan, zone
and setting. This is the same as those for digital channel.
Address list
SQ level : when setting the analog channel, a user can set SQ mode. This function can filter
incoming signal with strength insufficient to generate clear Tx to eliminate unwanted noise. You can
choose strict or normal SQ, and set an appropriate SQ mode as required.
26
Address list
Settings
Device settings
SQ
Technical Indicator
General
VHF:136-174MHz
UHF:350-390 MHz
UHF:400-470 MHz
160
50
12.5KHz
DC 7.5V(±20%)
2000mAh
Digital 20 hours (with GPS disabled)
Digital 14 hours (with GPS disabled)
±1.5ppm
Frequency range
Total number of channels
Zone
Channel spacing
Operating voltage
Battery capacity
(5/5/90)Average battery operating time
(5/5/90)
Frequency stability
Antenna impedance
Appearance dimension
Weight
50Ω
60(L)*39(W)*103(H) mm
291g(including battery)
For Tx
Output power
VHF high power: 5W
VHF low power: 1W
UHF high power: 5 W
4FSK modulation
FM modulation
Modulation limit
FM noise
TX spurious
Adjoining channel power
Frequency response
Audio distortion
Digital vocoder
UHF low power: 1W
12.5kHz, data only: 7K60FXD
12.5kHz, data and voice: 7K60FXE
12.5 kHz: 8K50F3E
+/- 2.5kHz @ 12.5kHz
-40dB
-36 dBm≤1GHz/-30 dBm≥1GHz
≤-60dB
+1/-3 dB
3%
AMBE+2™
27
For Rx
Digital sensitivity
Analog sensitivity
Intermodulation
5% BER:0.25 uV
0.25 uV (12 dB SINAD)
60dB
Declaration
This manual is deemed to be compiled to be accurate and complete. For any doubt, please contact
us. We will give you professional answers. As radio communication technologies develop rapidly,
BEIFENG reserves the right to change product design and specification without prior notice.
28