1
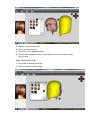
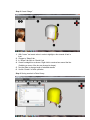
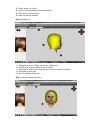
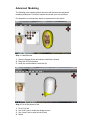
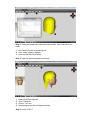
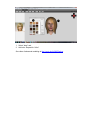
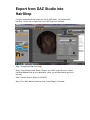
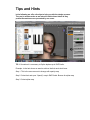
HairShop 1.0
QuickStart
and
User Manual
www.abalonellc.com, [email protected]
Second edition
June 2014
Abalone LLC.
Author’s copyright holder of the HairShop program is Abalone LLC. ©AbaloneLLC 2014.
Publishing copyright holder of the HairShop program is 2014 Abalone LLC . ©AbaloneLLC
2014.
Copying, merchandizing, public exhibiting or other commercial utilization of the software
without licence is strictly prohibited.
The HairShop User’s Manual is under global author and publishing copyright.
© 2014 AbalonLLCe. This User’s Manual was written and edited by Laslo Vespremi,
Abalone LLC.
Copying, extraction or translation to another language is forbidden without the written
approval of the holder of this right.
Abalone LLC
190 Arbor Lane,
Moss Beach CA 94038, USA
Web:
www.abalonellc.com
E-mail:
[email protected]
ABALONE LLC IS IN NO CASE RESPONSIBLE FOR THE DIRECT OR INDIRECT
DAMAGES ARISING FROM THE USAGE OF THE HAIRSHOP PROGRAM OR
THE HAIRSHOP USER’S MANUAL.
Abalone LLC and the HairShop are the registered trademarks of Abalone LLC
Windows is the trademark of Microsoft.
About the manual
Chapter 1 – QuickStart – Simple Hair
Chapter 2 – Advanced Modeling
.
System requirements
Required hardware
WIN: HairShop runs with the following minimal hardware:
A Windows-based personal computer or laptop with the following minimal requirements:
Windows computer
1 GB RAM internal memory
TrueColor video card
Screen of a resolution 1024x768
250 MB free disk space
Needed system software
HairShop runs under the following system software:
Windows VISTA, WIN7 and WIN8 operating systems.
To read pdf manuals Adobe Acrobat is recommended
To watch “How-to” videos Windows Media player is recommended:
https://www.youtube.com/watch?v=rkELnRgRHP4
Installation
HairShop is delivered with an installer. To run installer you will need a license key
Default installation installs HairShop on the C drive.
Chapter 1.
QuickStart – Simple Dress
In the following we will describe the steps needed to finish a simple project in
HairShop and integrate it with a Genesis figure in DAZ Studio 4.6.
Create or find a suitable sketch that will serve as a template for the project.
Note: for convenience we have included this photo in the “library” folder.
Launch HairShop 1.0 by double-clicking on the HairShop icon.
The first time you launch HairShop, a tutorial pane appears. This pane will be
shown as long as you don’t click the bottom right checkbox “Do not show this
panel again”. If you want to revisit the tut pane again, it can be accessed from the
Help menu on the main work screen.
Here’s the Browser screen.
Step 1. Select image you want to use as a template. Image will appear in the box
and the file name displayed below.
Step 2. Choose a “Project Name”. Enter project name in the box labeled “Project
name”.
Step 3. Create a new destination folder. IMPORTANT! This destination folder will
contain all files for your new project.
Step 4. You may either launch a new project or reopen a saved project. If you chose to
reopen a saved project, you need to browse to its location.
Press Apply
The Selection screen appears
Step 1. Here you need to select one of the three models (Male, Female or
Child)
Step 2. Note: the three icons on the right are Manual (?), Video (►) and About
(i).Manual button will launch PDF Manual, Arrow will launch “How-to” video and “i”
button will launch About.
Click on “Next”
Step 3. The main interface opens at Style Tab (default)
The main screen is divided into two halves:
1. Sample photo on the left
2. 3D model on the right.
3. There are six tabs on top: Style, Cut, Shape, Accessories, Color and Stage.
By default program starts with the “Style” tab.
4. Each tab comes with a set of buttons and tools
5. Navigational controls are all located on the right; on top you have pan, rotate,
zoom and center icons (note: if you want to use tools please deselect
navigational icons) Below you will find the Fastview cross: Left, Top, Right
and Bottom (Back).
6. Style library also opens, It contains 8 hair styles. Using the “Add New” new
button you can add additional OBJ hairs.
Get familiar with the screen controls. Click on any of the navigational icons to
see how they work. Also, try using the Fastview cross and see how it turns the
models 90 degrees.
Step 4 Now we start to construct a hair similar to the one in our sketch.
Note: You can watch a video of the process under the Help menu (Video Tutorial
QuickStart). https://www.youtube.com/watch?v=rkELnRgRHP4
1.
2.
3.
4.
Select the hair by clicking on it.
Drag it into the work area
Now move it to its intended position
Click on the navigational cross to ensure that the hair is in its proper position
from all views
Step 5. Establish hair length
1. Move slider to change hair length
2. Observe how hair length changes
Step 6. Cut Hair in “Cut” tab
1.
2.
3.
4.
5.
Click on “Cut” tab
Click on “Cut” tool
Select “Straight line” tool
Create straight line as shown
Unclick “Cut” button to finish cut
Step 7. Discard cut hair
1.
2.
3.
4.
Select “Lasso” tool
Create shape around the cut-off part
Unclick “Lasso” to highlight all parts in the lasso area
Click “Delete” button to eliminate cut-off parts
Step 8. Create “Bangs”
1. With “Lasso” tool create a box in order to highlight a few strands of hair in
front
2. Change to “Shape” tab
3. In “Shape” tab click on “Stretch” tool
4. Create a straight line as shown. Right click to create a box around the line.
(Grabbing a corner of the box can change its shape).
5. Use the slider to change length of selected strands
6. Unclick “Stretch” to finish operation
Step 9. Saving new hair to Parts Library
1.
2.
3.
4.
Select “Lasso” on Cut tab
Using “Lasso” highlight all of the remaining hair
Click “Save” to save new hair
Save new hair as “Newhair”
Step 10. Shape hair
1.
2.
3.
4.
5.
Highlight hair. In the “Shape” tab click on “Shape” tool
Create a line as shown at the bottom of the hair
Right click to create a box. Grab corners to make box wider or narrower
Use slider to pull in hair
Unclick “Shape to finish step
Step 11. Repeat shaping from front
1. Use “Shape” tool
2. Create line at the bottom of the hair. Right Click to create box. Adjust box by
grabbing its corner
3. Use slider to pull in hair slightly
4. Unclick “Shape” to finish step.
Step 12. Add Accessories
1.
2.
3.
4.
Click on “Accessories” tab
Open Accessories library via “Open” button”
Choose and drag an item to the right position.
Caution! Use navigational cross to ensure that items is in the right position
from front and side!
Step 13. Color Tab
Click on the “Color” tab
Open Color Library via the “Open” button
Highlight (select) hair
Click on desired hair color
Highlight sunglasses. Click on white box next to “Pick Solid Colors”.
This will open a standard color picker. Pick and add color. Click on “Picl Solid
Color” to add color to glass.
7. Change color from 256 to 200 (semi-transparent)
1.
2.
3.
4.
5.
6.
Step 14. Using Stage and creating snapshots. Exporting.
1. Click on Stage tab
2. Open Stage library via the Open button
3. Select background image (you can add your own via the Add New button
4.
5.
6.
7.
Add pose with double-clicking on a pose (smile)
and use the slider
Take snapshots with “Photo” button
Export via the Export button. This will save two Poser or DAZ Studio
compatible OBJ files, one each for hair and accessories.
See How-to video at https://www.youtube.com/watch?v=rkELnRgRHP4
Advanced Modeling
The following is an example project where we will discuss some advanced
modeling techniques. Feel free to explore and create your own solutions!
Our template is a contemporary hairdo as represented in this sketch.
Step 1. Load Base hair
1. Observe sample picture and choose a hair that is closest
2. Drag Hair #3 it into position
3. Later you would combine it with Hair #4
Step 2. Cut off the bottom of hair
1.
2.
3.
4.
Go to “Cut” tab
Use “Arch” tool to create arch shape and cut
Use “Lasso” tool to select all cut-off hair
Delete
Step 3. Cutting will create many individual mesh strands. Save new hair as one
mesh
1. Use “Lasso” to select all remaining hair
2. Click “Lasso” again to highlight
3. Save new hair into Parts Library
Step 4. Load Hair #4 and separate front bangs
1.
2.
3.
4.
Load Hair #4 from Style tab
Go to Cutting tab
Click on “Cut” tool
Select polygon tool and cut shape as shown
Step 5. Saving “FruFru”
1.
2.
3.
4.
Lasso cut-off parts
Highlight cut-offs
Delete cut-offs
Lasso and save front part as “frufru”
Step 6. Combine “base” hair with “frufru”
1. Open “Parts Library” under Menu
2. Click on Load Library” and add previous Part Library that contains saved
parts. Hide all but “Base” and “frufru”
3. In Shape tab select “Shape” tool
4. Create center line and box as shown
5. With slider slim down hair as shown
Step 7. Add color and texture
1. Select “base” and
2. Add color. Repeat for “frufru”
See video of advanced modeling at http://youtu.be/AjG09RGgHvw
Export from DAZ Studio into
HairShop
It may be necessary to alter a hair you own in DAZ Studio. You can do this in
HairShop. Here’s how to export hair from DAZ Studio into HairShop.
Step 1. Drag desired hair onto stage.
Step 2. Hide all other items. Select “”Export” and “OBJ” under File menu. Select
HairShop/Models/Style as your destination. (Note: you will also need a jpg icon of
the hair)
Step 3. Set the scale to Poser (0.410105%)
Step 4. Set “Write Material Libraries” and “Collect Maps”. Hit Accept.
Add new item to Style Library
Step 1. Hit “Add New” button. Dialog will ask you to select an OBJ first. Select
the item you just exported. Next dialog will ask for an icon. Pls. use a jpg that you
created.
Step 2. Once hair appears in library, drag it over to the 3D head.
Step 3. Make sure it is properly positioned.
Same method applies for adding accessories, colors, etc.
Tips and Hints
In the following we offer a few tips to help you with the design process.
They are in random order as we intend to add to these ideas as they
present themselves or are presented by our users.
TIP 1. Sometime it is necessary to flip the alpha map in DAZ Studio.
Example: In the hair above we want to achieve that hair ends look loose.
Step 1. This is the area we want to change with opacity map
Step 2. Select hair and open “Opacity” map in DAZ Studio. Browse for alpha map
Step 3. Select alpha map.
Step 4. We click again on the Opacity map and ask for “Layered Image Editor”
Step 5. Click on “Flip vertical” button
Step 6. As you can see we achieved the desired effect.
Step 7. If needed, adjust “Vertical Offset” slider


![[1]Oracle® Services Tools Bundle (STB)](http://vs1.manualzilla.com/store/data/005848189_1-e343ea18c466a636d9f3da1a6d7dc0f8-150x150.png)