1
Version 1.0
Translation of original instruction
manual
Instruction manual
Software tool
FastStart 2.0
Effective as of 03.11.2014
FastStart 2.0
1
Table of Contents
1 Notes .................................................................................................................................. 2
1.1
1.2
1.3
1.4
Explanation of notes ....................................................................................................................... 2
Data, figures and modifications ..................................................................................................... 2
Trademarks ...................................................................................................................................... 2
Copyright .......................................................................................................................................... 2
2 FastStart 2.0 documentation ............................................................................................ 3
2.1
Supported hardware platforms ...................................................................................................... 3
3 Description ........................................................................................................................ 4
3.1
3.2
3.3
3.4
3.5
3.6
3.6.1
3.6.2
3.6.3
3.7
3.8
3.9
Program description ....................................................................................................................... 4
Installation ........................................................................................................................................ 4
Command line parameters ............................................................................................................. 7
Setting up FastStart as shell .......................................................................................................... 7
Overview of desktop ....................................................................................................................... 8
Initial startup of FastStart and configuration ............................................................................... 9
Creating clusters and tiles in shell view........................................................................................ 10
Control panel ................................................................................................................................ 17
Drive view and write filters ............................................................................................................ 18
Assignment of rights with FastStart 2.0 ...................................................................................... 22
Autostart programs ....................................................................................................................... 23
Configuring clusters ..................................................................................................................... 25
4 Service & support ........................................................................................................... 26
4.1
4.2
ads-tec support .............................................................................................................................. 26
Company address ......................................................................................................................... 26
© ads-tec GmbH • Heinrich-Hertz-Str. 1 • 72622 Nürtingen
FastStart 2.0
2
1 Notes
Relevant documentation
The following documentation is relevant for installation and use:
Instruction manual (this document):
Contains information on installation and operation of the software application as well as the
requirements for its use.
Website
You can download drivers, software, user manuals, leaflets and flyers from the Download section of our
website www.ads-tec.de.
1.1 Explanation of notes
Information:
The symbol "Information" indicates notes, terms and/or conditions that strictly
need to be observed to ensure optimised and/or zero-defect operation. Tips
and suggestions for the efficient use of the device and software optimisation
are also provided.
1.2 Data, figures and modifications
All data, text and figures were prepared to the best of our knowledge. They do not represent any
assurance for the properties themselves. Despite taking utmost care, no liability can be assumed for
accuracy, completeness and actuality of the information. Subject to changes.
1.3 Trademarks
It is noted that any software and/or hardware trademarks and any company brand names mentioned in
this documentation are all subject to the general trademark protection rights.
®
®
StoraXe and Big-LinX are registered trademarks of ads-tec.
All other third-party trademarks used are hereby acknowledged.
In the case of infringement of trademark rights, ads-tec reserves the right to exercise all rights.
1.4 Copyright
This instruction manual is protected by copyright. For the authorised user, simple usage rights are
granted within the scope of the intent of the contract. Any modified use or exploitation of the provided
content, particularly duplication, modification or publishing in whatever form is permitted only with the
prior consent of ads-tec.
In the case of copyright infringement, ads-tec reserves the right to exercise all rights.
© ads-tec GmbH • Heinrich-Hertz-Str. 1 • 72622 Nürtingen
FastStart 2.0
3
2 FastStart 2.0 documentation
The software tool FastStart 2.0 is supplied as an installer package. It is used for graphical composition
of the desktop interface and uses the integrated user and rights management of Windows.
FastStart is a program that offers shell functionalities for ads-tec embedded systems.
2.1 Supported hardware platforms
The ads-tec FastStart application contains both 32 bit and 64 bit components and can be installed on
the following operating systems:
Microsoft® Windows Embedded Standard 7
Microsoft® Windows Embedded 8 Standard
Microsoft® Windows Embedded 8.1 Industry Pro
The following command line parameters are relevant for operation of FastStart:
Full-screen mode: With "/fullscreen", FastStart.exe starts without Chrome, i.e.
borderless in full-screen mode like a Windows 8 app
Shell: With "/shell", FastStart.exe starts in shell mode. The autostart programs
are executed when FastStart is started
© ads-tec GmbH • Heinrich-Hertz-Str. 1 • 72622 Nürtingen
FastStart 2.0
4
3 Description
3.1 Program description
The following functionalities are included:
Display of startable programs on an interface resembling the Windows 8
Launcher
Display and operation functionality for control panel applets
Configuration of the local hard drives for write filter technologies
Autostart of programs
3.2 Installation
Execute the setup file of the FastStart application by double-clicking and then confirm with Next.
© ads-tec GmbH • Heinrich-Hertz-Str. 1 • 72622 Nürtingen
FastStart 2.0
5
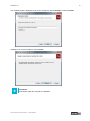
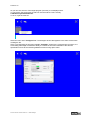
The installation path is displayed. This can be changed by clicking Change. Confirm with Next.
Installation can now be started by clicking Install.
Information:
Administrator rights are required for installation.
© ads-tec GmbH • Heinrich-Hertz-Str. 1 • 72622 Nürtingen
FastStart 2.0
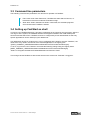
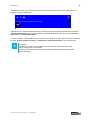
Following successful installation, you can close the setup wizard by clicking Finish.
© ads-tec GmbH • Heinrich-Hertz-Str. 1 • 72622 Nürtingen
6
FastStart 2.0
7
3.3 Command line parameters
The following command line parameters are relevant for operation of FastStart:
Full-screen mode: With "/fullscreen", FastStart.exe starts without Chrome, i.e.
borderless in full-screen mode like a Windows 8 app.
Shell: With "/shell", faststart.exe starts in shell mode; the autostart programs
are executed when FastStart is started
3.4 Setting up FastStart as shell
In order to use FastStart effectively, it should be configured as the "shell" for the typical user. After the
user logs in at the system, the FastStart interface then appears instead of the usual desktop with
shortcuts and the Start menu. FastStart can then be configured by a local administrator so that only
specific applications can be called up by the default user.
If an application other than "explorer.exe" is to be configured as the shell for the user "FastUser", the
value of the entry "Shell" must be set to the desired application in the registry path
"[HKEY_CURRENT_USER\Software\Microsoft\Windows NT\CurrentVersion\Winlogon]".
To do so, log in as the user "FastUser" and make the following change using the registry editor:
[HKEY_CURRENT_USER\Software\Microsoft\Windows NT\CurrentVersion\Winlogon]
“Shell”=”C:\Program Files\ads-tec\Faststart\faststart.exe /fullscreen /shell”
This change causes FastStart to start as the shell as soon as the user "FastUser" is logged in.
© ads-tec GmbH • Heinrich-Hertz-Str. 1 • 72622 Nürtingen
FastStart 2.0
8
3.5 Overview of desktop
Shell icon:
Used to switch over to the shell view
Control icon:
Used to access the control panel
Drive icon:
Opens the view showing the drives and write filters
Shield icon:
Allows access with elevated rights
Close icon:
Closes the current application
Cluster name:
Header of the cluster
Individual link
Group of various tiles
Tile:
Cluster:
© ads-tec GmbH • Heinrich-Hertz-Str. 1 • 72622 Nürtingen
FastStart 2.0
9
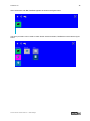
3.6 Initial startup of FastStart and configuration
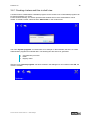
When FastStart is started for the first time on a system by an unprivileged user (not administrative) or by
a local administrator for whom User Account Control is active, the following icons will appear top right
on the FastStart interface:
This view is referred to below as the shell view. The Close icon (right) is used to close the application.
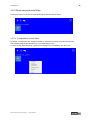
If the Shield icon (left) is clicked, the application is restarted with elevated access rights:
This is necessary in order to configure the application. The Shield icon is now no longer visible. This
button is only available if the process is running without elevated access rights.
To configure, right-click the background. A context menu appears:
© ads-tec GmbH • Heinrich-Hertz-Str. 1 • 72622 Nürtingen
FastStart 2.0
10
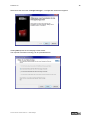
3.6.1 Creating clusters and tiles in shell view
A cluster must be created before a startable program can be created. A set of associated programs can
be grouped together in a cluster.
For the shell functionality, the cluster represents the smallest unit for which authorisations can be
issued. To create a cluster, select the item "Add Cluster" in the context menu:
The name "System programs" is entered here as an example. In the text below, the aim is to create
administration programs as individual tiles. The following tiles are then to be generated:
Command line processor
Editor
Registry editor
After the name "System programs" has been entered in this dialogue box and confirmed with OK, the
cluster is created:
© ads-tec GmbH • Heinrich-Hertz-Str. 1 • 72622 Nürtingen
FastStart 2.0
11
Due to its length, the text of the cluster is abbreviated with ellipsis points ("..."). A tile for starting a
command prompt (cmd.exe) is now to be added to the cluster. To do so, right-click the text of the newly
created cluster; the following context menu appears:
Here, select the menu item "Add Tile to Cluster".
The corresponding dialogue box appears:
© ads-tec GmbH • Heinrich-Hertz-Str. 1 • 72622 Nürtingen
FastStart 2.0
12
The fields in this dialogue box have the following meaning:
Required field:
Title: Name of the tile; this text appears on the tile
Target: Path to the file to be started (document or executable)
Optional field:
Tile color with Alpha value: Colour of the tile with transparency value (0
(transparent) – 255 (full opacity))
Text color with Alpha value: Colour of the tile text with
transparency value (0-255)
Show: Used to specify the startup type of the document/program (normal,
minimised, maximised)
Directory: Working directory for the document/program.
Parameters: Command line parameters for the document/program.
Verb: Used to specify the shell command to be executed when the tile is
clicked.
Bitmap with Bitmap Alpha: Bitmap to be displayed on the tile, with
transparency value. If this field is left empty, the default icon for the
document/program is displayed
© ads-tec GmbH • Heinrich-Hertz-Str. 1 • 72622 Nürtingen
FastStart 2.0
The following search path details are required in order to create the "Command line processor" tile;
environment variables or the fully qualified path must be specified in the Directly field.
After the dialogue box is confirmed with OK, the tile is created as follows:
Clicking the tile starts the command line processor:
© ads-tec GmbH • Heinrich-Hertz-Str. 1 • 72622 Nürtingen
13
FastStart 2.0
As you can see, the icon of the target program (cmd.exe) is not displayed here.
To correct this, the proper path of cmd.exe must be entered. This is usually
C:\Windows\system32\cmd.exe.
To do so, right-click the tile:
Select the menu item "Configure Tile". The dialogue window that appears is the same as that when
creating the tile.
Since a corresponding environment variable "ComSpec" exists for the command line processor, it is
worth taking advantage of FastStart's ability to evaluate environment variables of the relevant
specifications for a tile and selecting additional colours using Alpha value:
© ads-tec GmbH • Heinrich-Hertz-Str. 1 • 72622 Nürtingen
14
FastStart 2.0
15
After confirmation with OK, FastStart appears as shown in the figure below:
The same procedure can be used to create further clusters and tiles; FastStart then looks like the figure
below:
© ads-tec GmbH • Heinrich-Hertz-Str. 1 • 72622 Nürtingen
FastStart 2.0
16
To change the order of the tiles in the first cluster and to adapt the cluster header with the ellipsis points
("..."), proceed as follows:
Right-click the cluster header, but select the menu item "Configure Cluster" in the context menu:
To move the registry editor from the second to the third position, select the entry "Registry Editor" in
the list field and click the "Down" button once. Then set the "Show cluster header in full width" check
mark so that the complete cluster header is displayed. Confirm the dialogue box with OK:
© ads-tec GmbH • Heinrich-Hertz-Str. 1 • 72622 Nürtingen
FastStart 2.0
3.6.2 Control panel
Clicking the Tool icon opens the control panel view as shown in the following figure:
Clicking a tile then starts the associated control panel applet.
The display can be scrolled easily by swiping the background horizontally. This can be done by touch
operation, by dragging the background with the mouse and also using the bottom scroll bar.
© ads-tec GmbH • Heinrich-Hertz-Str. 1 • 72622 Nürtingen
17
FastStart 2.0
3.6.3 Drive view and write filters
Clicking the Drive icon opens the view displaying the drives and write filters:
3.6.3.1 Configuration of write filters
By default, no write filters are configured initially. A write filter technology must first be selected.
The available technologies depend on the used operating system.
To select a write filter technology, right-click the background of FastStart in the drive view:
© ads-tec GmbH • Heinrich-Hertz-Str. 1 • 72622 Nürtingen
18
FastStart 2.0
Select there the menu item "Change filter type"; a configuration wizard then appears:
Clicking Next opens the second page of this wizard.
The required write filter technology can be preselected here:
© ads-tec GmbH • Heinrich-Hertz-Str. 1 • 72622 Nürtingen
19
FastStart 2.0
20
The presetting which switches on the "Enhanced Write Filter" here in the example (depending on the
Windows version) is selected. Confirming this page with Next opens the finish page of the wizard:
When this page is confirmed with Finish, the user is prompted to restart the system.
Information:
If the write filter technology is to be changed at a later time or the write filter is to be
switched off across the entire system, this wizard can be called again and run
through with different specifications.
© ads-tec GmbH • Heinrich-Hertz-Str. 1 • 72622 Nürtingen
FastStart 2.0
21
Following the restart, the write filter technology that is currently being used is then displayed on the
page for drives and write filters:
Depending on the used write filter technology, the write protection is already activated for a hard drive
("Enhanced Write Filter") or must be activated or deactivated separately for each drive ("File based
write filter" and "Unified Write Filter").
In order to activate or deactivate the write protection in the latter case, right-click the drive tile and select
the item "Protect volume (run time)" or "Unprotect volume (design time)" in the context menu.
Information:
If a padlock is visible in the top right corner of a drive tile, this means that a write
filter is currently active for the drive.
When the mouse pointer is moved onto a drive tile, additional information about the
drive is displayed.
© ads-tec GmbH • Heinrich-Hertz-Str. 1 • 72622 Nürtingen
FastStart 2.0
22
3.7 Assignment of rights with FastStart 2.0
The view showing the control panel applets and the drives for local administrators with elevated rights
can be controlled as follows:
Firstly as a local administrator with elevated rights, right-click the background in the shell view and
select the item "Configuration" in the context menu.
An authorization dialogue box then opens:
Here you can see that the options for displaying the shell, the control panel view and the drive view are
set as user rights ("Show programs", "Show control panel" and "Show drives/filters").
By adding further security principals in this dialogue box and by allocating or removing rights, it is
possible to achieve a fine-grained assignment of rights according to the semantics of Windows NT
security.
Furthermore, it is also possible to make rights settings to allow changes to be made to the write filter
("Make write filter changes"), the clusters ("Add/delete/reorder clusters") and the autostart
programs.
To change the visibility settings for an individual cluster, simply select the cluster name from the
"Cluster security..." pop-up menu in the above-mentioned context menu.
For each individual cluster, the visibility is determined here using the user right "Show Tiles" and the
editability using the user right "Add/delete/reorder tiles".
© ads-tec GmbH • Heinrich-Hertz-Str. 1 • 72622 Nürtingen
FastStart 2.0
3.8 Autostart programs
If FastStart is operated in shell mode, i.e. with the command line "/shell", the autostart programs
configured for FastStart are started.
To create an autostart program, press the right mouse key and select the menu item "Configure
autostart programs" in the context menu that then appears:
Pressing the "Add" button opens the wizard used to add autostart applications:
© ads-tec GmbH • Heinrich-Hertz-Str. 1 • 72622 Nürtingen
23
FastStart 2.0
24
If you change from the Welcome page to the next page using Next, you can then enter specifications for
the autostart application to be created:
The information entered on this wizard page is identical to the information for an individual tile.
"Delay (s)" is new. This is used to specify the number of seconds that is to be waited after this program
is started until the next autostart program is started.
Confirming this page with Next opens the finish page of the wizard:
© ads-tec GmbH • Heinrich-Hertz-Str. 1 • 72622 Nürtingen
FastStart 2.0
25
When the wizard is ended with Finish, a new entry for this autostart program is created in the dialogue
box for the autostart programs:
Beginning with this dialogue box, it is now possible to create further autostart programs in a similar way
and then accept them by confirming this dialogue box with OK.
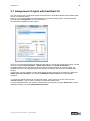
3.9 Configuring clusters
To configure cluster, right-click the background of the shell view and then select the menu item
"Configure Clusters".
A dialogue box like the one shown in the figure below then appears:
In this dialogue box, the order of clusters can be changed with "Up" or "Down" or individual clusters
can be deleted with "Delete".
© ads-tec GmbH • Heinrich-Hertz-Str. 1 • 72622 Nürtingen
FastStart 2.0
26
4 Service & support
ads-tec and its partner companies offer you comprehensive maintenance and support services,
ensuring quick and competent support should you have any questions or concerns with regard to adstec products and equipment.
Since the devices, as well as the preinstalled software from ads-tec, are also used by partner
companies, these devices may have customised configurations. Should any questions arise with regard
to such specific configurations and software installations, please contact the system supplier in question
as ads-tec will not be able to answer such questions.
ads-tec does not provide support services for any device that was not purchased directly from ads-tec.
In this case, maintenance and support is provided by the partner company.
4.1 ads-tec support
The ads-tec support team is available for inquiries from direct customers between 8:30am and 5:00pm,
Monday to Friday.
The support team can be reached via phone, fax or e-mail:
Phone: +49 7022 2522-202
Fax:
+49 7022 2522-400
Email: [email protected]
4.2 Company address
ads-tec
Heinrich-Hertz-Str.1
72622 Nürtingen
Germany
Phone:
Fax:
Email:
Web:
+49 7022 2522-0
+49 7022 2522-400
[email protected]
www.ads-tec.de
© ads-tec GmbH • Heinrich-Hertz-Str. 1 • 72622 Nürtingen