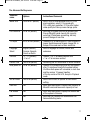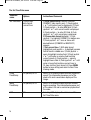
1
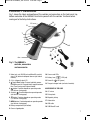
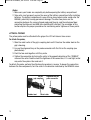
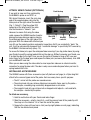
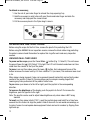
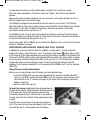
M5154-0612-HHB660_awb 6/14/12 10:55 AM Page 1 User’s Guide Shop online at omega.com ® e-mail: [email protected] For latest product manuals: omegamanual.info MADE IN CHINA HHB660 Waterproof Recording Video Inspection System M5154-0612-HHB660_awb 6/14/12 10:55 AM Page 2 OMEGAnet ® Online Service omega.com Internet e-mail [email protected] Servicing North America: U.S.A.: ISO 9001 Certified Canada: Omega Engineering, Inc., One Omega Drive, P.O. Box 4047 Stamford, CT 06907-0047 Toll-Free: 1-800-826-6342 Tel: (203) 359-1660 FAX: (203) 359-7700 e-mail: [email protected] 976 Bergar Laval (Quebec), H7L 5A1 Canada Toll-Free: 1-800-826-6342 FAX: (514) 856-6886 TEL: (514) 856-6928 e-mail: [email protected] For immediate technical or application assistance: U.S.A. and Canada: Sales Service: 1-800-826-6342/1-800-TC-OMEGA® Customer Service: 1-800-622-2378/1-800-622-BEST® Engineering Service: 1-800-872-9436/1-800-USA-WHEN® Mexico Latin America En Español: 001 (203) 359-7803 [email protected] Benelux: Managed by the United Kingdom Office Toll-Free: 0800 099 3344 TEL: +31 20 347 21 21 FAX: +31 20 643 46 43 e-mail: [email protected] Czech Republic: Frystatska 184 733 01 Karviná, Czech Republic Toll-Free: 0800-1-66342 FAX: +420-59-6311114 FAX: 001 (203) 359-7807 e-mail: [email protected] Servicing Europe: France: TEL: +420-59-6311899 e-mail: [email protected] Managed by the United Kingdom Office Toll-Free: 0800 466 342 TEL: +33 (0) 161 37 29 00 FAX: +33 (0) 130 57 54 27 e-mail: [email protected] Germany/Austria: Daimlerstrasse 26 D-75392 Deckenpfronn, Germany Toll-Free: 0800 6397678 FAX: +49 (0) 7056 9398-29 United Kingdom: ISO 9001 Certified TEL: +49 (0) 7056 9398-0 e-mail: [email protected] OMEGA Engineering Ltd. One Omega Drive, River Bend Technology Centre, Northbank Irlam, Manchester M44 5BD United Kingdom Toll-Free: 0800-488-488 TEL: +44 (0) 161 777-6611 FAX: +44 (0) 161 777-6622 e-mail: [email protected] It is the policy of OMEGA Engineering, Inc. to comply with all worldwide safety and EMC/EMI regulations that apply. OMEGA is constantly pursuing certification of its products to the European New Approach Directives. OMEGA will add the CE mark to every appropriate device upon certification. The information contained in this document is believed to be correct, but OMEGA accepts no liability for any errors it contains, and reserves the right to alter specifications without notice. WARNING: These products are not designed for use in, and should not be used for, human applications. M5154-0612-HHB660_awb 6/14/12 10:55 AM Page 3 TABLE OF CONTENTS Introduction . . . . . . . . . . . . . . . . . . . . . . . . . . . . . . . . . . . . . . . 4 – 5 Key Features . . . . . . . . . . . . . . . . . . . . . . . . . . . . . . . . . . . . . . . . . 5 Safety Instructions . . . . . . . . . . . . . . . . . . . . . . . . . . . . . . . . . . . . . 6 What’s in the Case . . . . . . . . . . . . . . . . . . . . . . . . . . . . . . . . . . . . . 6 Product Overview . . . . . . . . . . . . . . . . . . . . . . . . . . . . . . . . . . . 7 – 8 Setup Instructions . . . . . . . . . . . . . . . . . . . . . . . . . . . . . . . . . 9 – 12 Install Batteries . . . . . . . . . . . . . . . . . . . . . . . . . . . . . . . 9 – 10 Attach Probe . . . . . . . . . . . . . . . . . . . . . . . . . . . . . . . . . . . . 10 Attach Video Cable (Optional) . . . . . . . . . . . . . . . . . . . . . . . 11 Installing Accessories . . . . . . . . . . . . . . . . . . . . . . . . . 11 – 12 Operating Instructions . . . . . . . . . . . . . . . . . . . . . . . . . . . . . 12 – 19 Viewing Real-Time Video. . . . . . . . . . . . . . . . . . . . . . . 12 – 13 Recording and Viewing Videos and Still Images . . . . . 13 – 16 Taking Pictures and Recording Videos . . . . . . . . 13 – 14 Viewing Saved Videos and Pictures . . . . . . . . . . 14 – 16 Using the Three Menus . . . . . . . . . . . . . . . . . . . . . . . . 16 – 19 Specifications. . . . . . . . . . . . . . . . . . . . . . . . . . . . . . . . . . . . . . . . 19 Maintenance Tips . . . . . . . . . . . . . . . . . . . . . . . . . . . . . . . . . . . . . 20 3 M5154-0612-HHB660_awb 6/14/12 10:55 AM Page 4 INTRODUCTION Thank you for purchasing Omega Engineering’s HHB660 Waterproof Recording Video Inspection System. Please read this user’s manual carefully and thoroughly before using the instrument. The HHB660 is one of only two video inspection systems on the market with an IP67 waterproof grip and monitor as well as an IP67 waterproof camera-tipped probe. The HHB660’s water tightness makes the system ideal for plumbing-related tasks like inspecting water or sewer lines carrying running water. The system also can be used to inspect parts of boats, ships or bridges just below the surface. Because the entire unit is impervious to water you can use it freely around water without worrying about accidentally “dunking” the grip and monitor. The HHB660 shares many of the features and benefits of other Omega Engineering’s video inspection systems. It comes with a 0.39 in. (10mm) diameter, 3.3 ft. (1m) long flexibleobedient camera-tipped probe with adjustable LED lighting that is in focus from 0.6 to 6 in. (15 to 150mm). Three handy probe tip accessories are also included: a 45° mirror, a pickup hook and a magnetic pickup. Operated in real-time video mode, the HHB660 has only three controls (a Power/Mode button, a joystick, and a button for zooming in on video up to 4X in 0.5X steps), making it very easy to learn to use. Video within the probe’s field of view is displayed on a large, crystal-clear 3.4 in. (86.4mm) diagonal color LCD. Alternatively, video can be viewed on an NTSC- or PAL-format television by plugging a supplied cable into a jack on the side of the scope’s monitor. The joystick controls three functions: 1) Video brightness 2) Inversion (“flipping”) of video 180°. This feature allows you to align the probe’s field of view with its real-world surroundings, making it easier to read upside-down equipment labels and serial numbers by flipping them right-side up. 3) Up/down and left/right panning of video. The ability to pan video helps you reacquire viewing targets that zooming may have pushed out of the probe’s field of view. The HHB660’s recording capabilities make it possible to document—with high-resolution videos and images—what the probe “sees.” Pressing the front-panel button stores either a still image or an AVI video (depending on how long the button is pressed) of the probe's field of view on a 2GB MicroSD memory card supplied with the system. The same button is used to view (play back) recorded images and videos on the unit's 3.4 in LCD. Alternatively, recorded images and videos can be viewed on a larger screen by ejecting the SD card and plugging it into a laptop or desktop PC, or by connecting the Video System to a PC via the supplied USB cable. 4 M5154-0612-HHB660_awb 6/14/12 10:55 AM Page 5 The HHB660’s recording functions are controlled by a familiar menu-driven interface. Behind the front-panel MENU button is a hierarchical control structure that lets you: • Enter the current date and time • Choose whether to date- and time-stamp still images and videos as you save them The HHB660 and all of its accessories are packaged in a hard plastic protective case along with this user’s manual. The unit is powered by four “AA” batteries, which are not included. KEY FEATURES • Makes it possible to inspect water and sewer lines carrying running water. Other “waterproof” inspection systems lack watertight grips and monitors • Allows a diver or snorkeler to view inspection video under water in real time. Ideal for marine search and rescue operations • For plumbers and boat owners, eliminates concerns about accidentally dropping or dunking grip or monitor in water • Grip, probe and monitor are guaranteed leakproof to depth of 1m; all three components will also resist leaks at depths up to 2m for short periods (1 hour, max) • Includes 0.39 in. (10mm) diameter, 3.3 ft. (1m) long close-focus camera-tipped probe with adjustable LED lighting • Waterproof probe is flexible-obedient, meaning it retains its shape • 3.4 in. (86.4mm) color LCD makes videos and images large and crystal-clear • Video shown on monitor can be inverted 180°, zoomed up to 4x, and panned left/right and up/down in zoom mode • Video Out jack for connection to NTSC or PAL television • Records high-resolution videos and still images with date and time stamps on MicroSD memory card • Recorded media can be played back on monitor, or uploaded to a PC via MicroSD card or USB cable for viewing on a larger screen • Selectable video resolution and contrast • Delete files individually or in bulk • Choice of five menu languages • Custom hard plastic carrying case • Includes three probe tip accessories, 2GB MicroSD card, USB and video cables • One-year warranty • Powered by four “AA” batteries 5 M5154-0612-HHB660_awb 6/14/12 10:55 AM Page 6 SAFETY INSTRUCTIONS • Do not use the system to inspect environments known or suspected to contain exposed electrical wiring. • Do not use it in the presence of flammable or explosive gases. • Read and understand all of the instructions in this manual before using the system. • Stay alert, watch what you are doing, and use common sense. A moment of distraction can result in serious personal injury. • Do not over-reach. Keep proper footing and balance at all times, especially where water is underfoot. • Always use protective eyewear. A dust mask, non-skid safety shoes, a hard hat or hearing protection may also be appropriate for certain inspection environments and tasks. • Do you use the system to perform medical inspections. WHAT’S IN THE CASE The HHB660 and its accessories come in a custom molded plastic case. The instrument itself has two main components: a pistol grip permanently connected to an LCD monitor, and a 10mm flexible-obedient camera-tipped probe. Also in the case is a large Ziploc plastic bag containing: • Three probe tip accessories (a 45° mirror, a pickup hook and a magnetic pickup) in their own small Ziploc bag • A 2GB MicroSD memory card • A USB cable with a mini B-type plug at one end and an A-type plug at the other. • A composite video cable with a black mini-plug on one end and a yellow RCA plug on the other • This user’s manual 6 M5154-0612-HHB660_awb 6/14/12 10:55 AM Page 7 PRODUCT OVERVIEW Fig. 1 shows the labels and positions of the controls and connectors on the front panel, top, bottom and sides of the HHB660. Familiarize yourself with the controls’ functions before moving on to the Setup Instructions. 13 12 2 11 10 1 7 6 5 4 3 9 14 15 17 16 8 18 Fig. 1. The HHB660’s controls, connectors and accessories 1. Video jack, mini-B USB jack and MicroSD card slot (see p. 10) (behind waterproof door on right side of monitor) 2. 3.4 in. (diagonal) color LCD 3. Power/Mode button. Pressed and held, powers HHB660 on and off. Pressed briefly, toggles between Real-Time Viewing and Playback modes. 4. button. Function depends on operating mode (see table on facing page). 5. Joystick . Function depends on operating mode (see table on facing page). 6. button. Function depends on operating mode (see table on facing page). 7. MENU button. Function depends on operating mode (see table on facing page). 8. Battery compartment (on bottom) 9. Camera-tipped probe 19 10. Camera and LEDs 11. Battery Low ( 12. Power On ( ) LED (red) ) LED (green) 13. Triangular hanger hook (on front of monitor) ACCESSORIES IN THE CASE 14. 45° mirror 15. Pickup hook 16. Magnetic pickup 17. Video cable 18. USB cable 19. 2GB MicroSD card 7 M5154-0612-HHB660_awb 6/14/12 10:55 AM Page 8 The HHB660's multi-function controls Camera button Real-Time Viewing mode Playback mode Press briefly to take a picture Press and hold to start/stop recording a video Press to pause/resume video playback (Joystick) With zoom off Push and to decrease and increase display brightness Push to invert video vertically and undo inversion With Push ,, zoom on and to pan video in that direction Push , and to navigate saved videos and images Push to exit video being viewed Menu modes 8 [No function] Use to navigate menus, switch between menus, and set date and time and date format Zoom button MENU button Press once to activate zoom function at 1x level. Each subsequent press increases zoom level by 0.5 to maximum of 4x Press to enter Main Menus mode and open Advanced Setting menu Press to display saved videos and images as thumbnails. Press again to switch to folder view of saved media [No function] Press to open Playback menu Press to open selected sub-menu or save selected setting M5154-0612-HHB660_awb 6/14/12 10:55 AM Page 9 SETUP INSTRUCTIONS INSTALL BATTERIES The HHB660’s battery compartment is accessible from the bottom of the pistol grip (Fig.1, Callout 8). To open the battery compartment, 1. Use a Phillips-head screwdriver to turn the screw securing the compartment’s cover counterclockwise until the head of the screw pops up, flush with the surface. It is not necessary to remove the screw. 2. Turn the cover slightly counterclockwise (about 2°) to release it from the grip (see figure below). Set the cover (still holding the screw) aside. 3. Extract the yellow battery magazine from the grip by pulling on the tab at its end (see left figure below). 4. Load four “AA” batteries into the magazine, using the polarity markings within it as a guide (see right figure below). 5. Push the loaded magazine back into the grip (it fits only one way). 6. Retrieve the battery compartment cover and position it 2° left of center, relative to the bottom of the grip. 7. Pressing on the cover, twist it 2° clockwise until it “catches” the grip housing. 8. Turn the Phillips-head screw clockwise until it is tight, with its head below the surface. 9 M5154-0612-HHB660_awb 6/14/12 10:55 AM Page 10 Notes: 1. Make sure your hands are completely dry before opening the battery compartment. 2. Take extra care to properly secure the cover of the battery compartment after installing batteries. The battery compartment is one of three places where water could enter the HHB660, potentially causing permanent damage. The other two places are the connection between the camera-tipped probe and the grip, and the waterproof door protecting the Video out and USB jacks and MicroSD card slot. The remainder of this section explains the proper procedures for maintaining water tightness at these points. ATTACH PROBE The yellow probe must be attached to the grip or the LCD will show a blue screen. To attach the probe, 1. Slide the metal collar of the grip’s coupling back until it touches the rubber boot on the grip’s housing. 2. Line up the alignment key on the probe connector with the flat on the coupling (see photo below). 3. Push the two ends together until they mate. 4. Tighten the connection by turning the collar in the opposite direction of the “REMOVE” arrow on the collar. Double-check the tightness of the connection; if it is not tight, water may enter the system later and ruin it. To detach the probe, perform the attachment procedure in reverse. To loosen the connection between the two components, turn the collar in the direction indicated by the REMOVE arrow. Flat on grip coupling Rubber boot 10 Alignment key on probe connector Metal collar M5154-0612-HHB660_awb 6/14/12 10:55 AM Page 11 ATTACH VIDEO CABLE (OPTIONAL) Push latch up If you wish to view real-time captured by the HHB660’s probe on an NTSC- or Slide door PAL-format television, insert the mini-plug to the end of the supplied video cable into the right Video jack on the right side of the monitor (Fig. 1, Callout 1). Plug the yellow RCA connector at the other end of the cable into the television’s “Video In” jack. However, be aware that using the video cable exposes the HHB660 monitor to water Mini-USB Video jack damage because doing so requires leaving MicroSD jack card slot the waterproof door on the right side of the grip open. With the video cable attached, you can still use the probe to perform underwater inspections. But if you accidentally “dunk” the unit, it will be permanently damaged. Such “accidental damage” is specifically NOT covered by the HHB660's limited warranty (see p. 19). To access the Video jack, open the waterproof door covering it (see top photo above) by using your thumb to push the spring-loaded latch on the door up. Without removing your thumb, use it to slide the door to the right. Once you see the metal of the door’s hinge at left, use your index finger to flip the door open and expose the Video jack (see lower photo above), mini-USB jack and MicroSD card slot. When you are done using the video cable to view inspection video on an external monitor, remember to swing the door shut. The door is only secure and waterproof when you hear its spring-loaded latch click. INSTALLING ACCESSORIES The HHB660 comes with three accessories (see left photo on next page) in a Ziploc bag that attach to the camera-tipped end of the probe. Each accessory has a specific purpose: • The 45° mirror lets the probe see around corners. • The pickup hook lets you retrieve otherwise inaccessible items seen by the probe— for example, a wedding ring accidentally dropped down a sink drain. • The magnetic hook lets you retrieve lost or dropped metal objects—nuts and bolts, for example—located by the probe. To attach an accessory, 1. Hold its metal stem with your thumb and index finger. 2. Slide the accessory—plastic clasp first—past the camera head at the probe tip until the clasp is in the channel 1/4 in. from the end of the probe. 3. Squeeze the clasp until you hear a click (see top right photos on next page), indicating that the two halves have joined. 11 M5154-0612-HHB660_awb 6/14/12 10:55 AM Page 12 To detach an accessory, 1. Use the nail of your index finger to unhook the clasp, opening it up. 2. Hold the accessory’s metal stem with your thumb and index finger and slide the accessory and clasp past the camera head. 3. Put the accessory back in the Ziploc bag it came in. OPERATING INSTRUCTIONS Before using the scope for the first time, remove the plastic film protecting the LCD. Before using the HHB660 for an inspection session, remove the black rubber ring protecting the probe’s camera head. Remember to replace this ring after each and every inspection session. VIEWING REAL-TIME VIDEO To power on the scope, press the Power/Mode ( ) button (Fig. 1, Callout 3). This will cause the green Power On ( ) LED (Callout 12) to light. The LCD will illuminate and show real-time video from the camera at the tip of the probe. To zoom in on real-time video, press the zoom ( ) button. Each subsequent press of the button increases the zoom level by 0.5 from a base of 1.0 (no zoom). The maximum zoom level is 4x. When video is being zoomed, it also can be panned (moved) horizontally and vertically under control of the joystick (Callout 5). Panning allows you to reacquire viewing targets that zooming may have pushed out of the probe's field of view. To pan video up or down or to the left or right, push the joystick in the corresponding direction. To increase the brightness of the display, push the joystick to the left. To increase the brightness, push the joystick to the right. Note: The joystick can be used to adjust video brightness only when video is NOT being zoomed. To invert real-time video (rotate it 180°), push the joystick down and hold it for at least one second. Use this feature to align the probe's field of view with its real-world surroundings, or to make it easier to read upside-down equipment labels and serial numbers by flipping them right-side up. 12 M5154-0612-HHB660_awb 6/14/12 10:55 AM Page 13 To undo video inversion, push the joystick down and hold it for at least one second. Real-time video exported to a TV monitor cannot be "flipped", but it can be zoomed and panned. Because the probe is flexible-obedient, you can maneuver it into various positions to aim at different targets and it will hold its shape. The HHB660 is designed to be powered for up to ten hours by a set of four “AA” batteries. When the batteries’ total charge drops below a preset threshold, the red Battery Low indicator LED (Callout 11) will flash. To replace the batteries, follow the procedure in the Setup Instructions section of this manual on p. 8. The HHB660 can be set up to power off automatically after ten minutes of inactivity (during which no buttons are pushed). To enable the Auto Power Off function, follow the instructions in the table for the Advanced Setting menu on p. 16. To manually power off the HHB660, press and hold the display a “Goodbye” message. button. The screen will turn blue and RECORDING AND VIEWING VIDEOS AND STILL IMAGES In addition to capturing real-time video, the HHB660 can document—via high-resolution videos and images—what the probe “sees.” Pressing the front-panel button stores either a still image or an AVI video (depending on how long the button is pressed) of the probe’s field of view on a 2GB MicroSD memory card supplied with the system. The same button is used to view (play back) recorded images and videos on the grip’s 3.4 in. LCD. Alternatively, recorded images and videos can be viewed on a larger screen by ejecting the memory card and plugging it into a laptop or desktop PC, or by connecting the HHB660 to a PC via the supplied USB cable. Taking Pictures and Recording Videos Before you can record videos and still images, you must do two things: • Insert the 2GB MicroSD memory card supplied with the system (or another MicroSD card of up to 16GB capacity) into the HHB660. Until the memory card is inserted, an SD card icon with a red “X” overlay will appear at the upper left of the display, below the battery charge icon • Set the current date and time To insert the memory card, open the waterproof door on the side of the monitor, using the photos and instructions on p. 9 to guide you. Retrieve the memory card from the accessories bag and insert it into the slot in the middle of the side panel with the contacts facing upward (see photo at right). Push the card in until you feel it spring back and hear a click. If the card has been inserted properly, the SD card icon with the red “X” will disappear from the display. 13 M5154-0612-HHB660_awb 6/14/12 10:55 AM Page 14 To set the current date and time, follow the instructions on p. 17. To take a picture, make sure the unit is in Real-Time Viewing mode, with the current date and running clock at the bottom of the display. Press the button briefly. Within less than a second, a yellow icon will appear briefly in the center of the display to indicate that a picture was taken. Simultaneously, a (storage) icon will appear at the bottom right of the display to confirm that the picture was stored (on the MicroSD card). To begin recording a video, press the button and hold it for at least 2 seconds. This will cause a white count-up timer to appear at the upper right of the display above a flashing red icon •REC. The timer will count up from 00:00:00 to indicate the duration of the video clip already recorded. To stop recording a video, press the button again. This will simultaneously cause the timer and •REC icon to disappear from the top right of the display and a (storage) icon to appear at the bottom right. The icon confirms that a video clip was saved in memory, just as it indicated storage of a still image. You cannot pause the recording of a video. You must stop recording and start again, creating a new file in the process. Viewing Saved Videos and Pictures You have three options for viewing (playing back) videos you have recorded and pictures you have taken: 1. View them on the HHB660’s 3.4 in. monitor 2. View them on a desktop or laptop PC by ejecting the MicroSD memory card from the and plugging it into the PC 3. View them on a desktop or laptop PC by connecting the PC to the HHB660 with the supplied USB cable The second and third options offer an additional benefit. As you view your recorded inspection videos and pictures, you can copy them to your PC. Once the videos and images are in your computer, you can share them as attachments to e-mails to others experienced at spotting and diagnosing problems in your field. To view recorded videos and pictures on the HHB660’s monitor, power on the unit and press the ( ) button briefly to switch from Real-Time Viewing mode to Playback mode. In the switch to Playback mode: • The Battery Charge icon at the upper left of the display is replaced by an icon of a camera or a camcorder, corresponding to the type of recording made most recently. • The screen switches from showing “live” video to showing a static image that is either a saved image or the first frame of a saved video. • The current date and running clock at the bottom of the screen are replaced by four pieces of information about the static image on screen: 1) The date it was captured; 2) The time it was captured; 3) The name of the subfolder in which the image or video file resides; and 4) The image or video file name. 14 M5154-0612-HHB660_awb 6/14/12 10:55 AM Page 15 To play a recorded video, press the button. Once the video starts playing, a running clock will appear at the upper right of the display to track the playback position. A red (pause) icon will also appear, at lower left. To pause the video, press the button. This will cause the red pause icon to change to a green (play) icon. To resume playing the video, press the button again. This will cause the pause icon to reappear. To exit the video being played, push the joystick up. To view recorded videos and pictures on a PC directly from the MicroSD memory card, open the waterproof door on the side of the monitor. Eject the memory card by firmly pushing on it with a fingertip until the card springs back and you hear a click. If you are in Real-Time Viewing mode, the SD card icon with a red “X” overlay will reappear at the upper left of the display. If you are in Playback mode, the HHB660 will switch to Real-Time Viewing mode. If you press the ( ) button briefly to try to switch back into Playback mode, the display will go dark, except for the words “No File” at the center. Many newer PCs (and flat-screen TVs) are equipped with a slot for a standard-size SD card. If you want to plug your MicroSD card into such a slot, you will need a MicroSD to SD adapter. They are widely available for $5 or less from most consumer electronics retailers. Plug the MicroSD card with your recorded inspection videos and picture into the adapter, and then plug the adapter into your PC’s SD card slot. If you have configured your PC to automatically play external media, plugging in the adapter will open an AutoPlay box that verifies insertion of an “SD card”. Clicking on “Open folder to view files” reveals one folder, named “CCTV”, which contains all of the videos and pictures stored on the card. Double-click on the CCTV folder icon to view the subfolders containing the individual video and picture files. The subfolders’ names use the YYMMDD00 format to reflect the date on which files were added to them. For example, a subfolder named “11103100” would contain media recorded on October 31, 2011. Video clips are in .AVI format and pictures are in .JPG format. To view recorded videos and pictures on a PC via a USB connection, open the waterproof door on the side of the monitor, using the photos and instructions on p. 9 to guide you. Retrieve the supplied USB cable from the carrying case and insert the mini-USB plug at one of the cable into the mini-USB jack behind the door. Plug the full-size USB plug at the other end of the cable into a USB port of your PC. Inserting the USB plug should cause an icon in your PC’s system tray to become active. Clicking on the icon opens an on-screen Driver Software Installation dialog box to track the automated process of finding software drivers for the HHB660’s memory. The PC treats the unit as a removable disk drive. The unit responds by turning its display all blue, except for the letters “MSDC” (for Mass Storage Device Class) overlaid in white. When the PC has finished downloading drivers for the HHB660, the notification “Installing Drivers” will change to “Your device is ready to use” and green “Ready to use” check marks will appear next to “USB Mass Storage Device” and “Generic USB Storage USB Device” in the Driver Software Installation dialog box. Click the Close button. 15 M5154-0612-HHB660_awb 6/14/12 10:55 AM Page 16 If you have configured your PC to automatically play external media, plugging in the adapter will open an AutoPlay box that verifies connection of a “Removable Disk”. Clicking on “Open folder to view files” reveals one folder, named “CCTV”, which contains all of the videos and pictures stored on the card. Double-click on the CCTV folder icon to view the subfolders containing the individual video and picture files. The subfolders’ names use the YYMMDD00 format to reflect the date on which files were added to them. For example, a subfolder named “11103100” would contain media recorded on October 31, 2011. Video clips are in .AVI format and pictures are in .JPG format. USING THE THREE MENUS The HHB660 provides three menus which you can use to change many of the system’s operating parameters and display characteristics. Two of the three menus are accessible from the MENU button with the unit in Real-Time Viewing mode. Press the button, and the first menu to appear is the Advanced Setting menu. To open the second menu—the Set Time/Date menu—push the joystick or (left or right). To access the third menu—the Playback menu—press the MENU button with the HHB660 in Playback mode. All three menus are navigated in identical fashion. When a menu is open, its name is displayed in a red banner over the names of submenus on a black background. Each submenu lets you choose between or among two or more options for that functional category. To open any submenu, first navigate to its line by pushing the joystick or (down or up). Navigating to a submenu changes the background color of its line from back to blue. Then press the MENU button to select the submenu. To select any of the available options inside a submenu, use the same two-step procedure. First use the joystick to navigate to the option’s line, changing its background color to blue. Then press the MENU button to select the desired option. The only difference between selecting a submenu and selecting an option is the presence of a white check mark next to the option that is currently in effect. Note that pressing the MENU button to change any function or parameter moves the check mark next to the new option to be put into effect. To exit any menu or submenu, navigate to the bottom of the list to the EXIT line and press the MENU button. 16 M5154-0612-HHB660_awb 6/14/12 10:55 AM Page 17 The Advanced Setting menu Submenu name Options Instructions/Comments Movie Size QVGA or D1 (default) Select QVGA to record videos with 320 x 240 pixel resolution; select D1 to record with 720 x 480 pixel resolution. D1 files offer higher video quality but take up more storage space File Overwrite On or Off (default) Selecting On allows new files to overwrite old files on MicroSD cards close to full capacity; selecting Off disallows overwriting, but may prevent storage of new files TV Output NTSC or PAL (default) Choose NTSC in North America, Central America, Japan, South Korea and Taiwan; choose PAL in Europe, Africa and much of Asia and Africa Language Select English (default), German, Spanish, French or Dutch Selects language of screens, menus and submenus Contrast -2, -1, 0 (default), +1 or +2 Choose -1 or -2 to reduce contrast and +1 or +2 to increase contrast Format Card Yes or No (default) Formatting the SD card erases its entire contents Auto power off On or Off (default) Choose On to automatically shut off the HHB660 after 10 minutes of inactivity to extend battery life. When Auto power off is enabled, a clock icon and the number 10 appear together at the top center of the LCD, except in Playback mode Set to Default Yes or No (default) Select Yes to reset all options to their default setting Disk Info NA Not a selectable option. Displays total capacity of MicroSD card, and how much capacity is free FW version NA Not a selectable option. Displays the Version No. of the system’s firmware EXIT NA Selecting EXIT displays the submenus of the Advanced Setting menu 17 M5154-0612-HHB660_awb 6/14/12 10:55 AM Page 18 The Set Time/Date menu Submenu name Options Instructions/Comments Set Time/Date Current date, date format, current time A) Enter current date in default format of DD/MM/YY (day, month, year). 1) Push joystick or until current year is displayed in YY field. 2) Push joystick to enter MM field. 3) Push joystick or until current month is displayed. 4) Push joystick to enter DD field. 5) Push joystick or until current day is displayed. B) Change date format (optional). 1) Push joystick to highlight DD/MM/YY in bottom row. 2) Push joystick or once or twice until desired format (YY/MM/DD or MM/DD/YY) appears C) Set current time. 1) With date format highlighted, push joystick to highlight seconds field of clock in middle row. 2) Push joystick again to highlight minutes field. 3) Push joystick or until value in minutes field matches current minute. 4) Push joystick again to highlight hours field. 5) Push joystick or until value in hours field matches current hour in 24-hour (military time) format. 6) Press MENU button to save setting and return to Real-Time Viewing mode. Photo TimeStamp On (default) or Off Select On to record the date and time a photo is saved. This information becomes part of the photo’s file and is overlaid on displays of the image. Move TimeStamp On (default) or Off Select On to record the date and time a video begins recording. This information becomes part of the video’s file and is overlaid on playbacks of the video. EXIT NA Selecting EXIT displays the submenus of the Set Time/Date menu 18 M5154-0612-HHB660_awb 6/14/12 10:55 AM Page 19 The Playback menu Submenu name Options Instructions/Comments File Delete Single, All Files in Folder, All, Cancel Selecting any option (other than Cancel) by pressing the MENU button opens a “Delete Yes or No” screen. Choose Yes to delete either: 1) the movie or photo file currently on-screen; 2) all files in its folder; or 3) all files on the MicroSD memory card. Format Card Yes or No Formatting the SD card erases its entire contents EXIT NA Selecting EXIT displays the submenus of the Advanced Setting menu SPECIFICATIONS Camera-tipped Probe Type/Diameter/Length Flexible-obedient/0.39 in. (10mm); 3.3 ft. (1m) Probe Minimum Bending Radius 1.77 in. (45mm) Camera Field of View 54° Camera Depth of Field 0.6 to 6 in. (15 to 150mm) Camera Resolution 640 x 480 pixels Camera Sensitivity 1.8V/lux-sec Camera Exposure Automatic Camera Light Source 2 white LEDs Display Type/Size Color TFT/3.4 in. (86.4mm) diagonal Display Resolution 320 x 240 pixels Video Out Resolution/Format 640 x 480 pixels/NTSC or PAL Video Out Cable Length 59 in. (1.5m) Auto Power Off Trigger 10 minutes of inactivity (no button is pushed) Power Consumption 400mA max @ 6VDC Operating Temperature 32° to 113°F (0° to 45°C) Dimensions of Carrying Case 13.0 x 10.5 x 4.5 in. (330 x 267 x 114mm) Weight of Carrying Case with Instrument, Probe and All Accessories 51.2 oz. (1.45kg) Power Source (4) “AA” batteries (not included) 19 M5154-0612-HHB660_awb 6/14/12 10:55 AM Page 20 MAINTENANCE TIPS The HHB660 is not shock-resistant. Do not use it as a hammer or drop it. Also, do not use the camera-tipped probe to clear debris If condensation forms inside the lens, let it evaporate before using the system again. Remove the batteries if planning to store the unit for months or longer. Properly dispose of used batteries. Exposure to high temperatures can cause batteries to explode, so do not incinerate them. Some countries regulate battery disposal. Please follow all applicable rules. M5154-0612-HHB660_awb 6/14/12 10:55 AM Page 21 NOTES: 21 M5154-0612-HHB660_awb 6/14/12 10:55 AM Page 22 NOTES: 22 M5154-0612-HHB660_awb 6/14/12 10:55 AM Page 23 WARRANTY/DISCLAIMER OMEGA ENGINEERING, INC. warrants this unit to be free of defects in materials and workmanship for a period of 13 months from date of purchase. OMEGA’s WARRANTY adds an additional one (1) month grace period to the normal one (1) year product warranty to cover handling and shipping time. This ensures that OMEGA’s customers receive maximum coverage on each product. If the unit malfunctions, it must be returned to the factory for evaluation. OMEGA’s Customer Service Department will issue an Authorized Return (AR) number immediately upon phone or written request. Upon examination by OMEGA, if the unit is found to be defective, it will be repaired or replaced at no charge. OMEGA’s WARRANTY does not apply to defects resulting from any action of the purchaser, including but not limited to mishandling, improper interfacing, operation outside of design limits, improper repair, or unauthorized modification. This WARRANTY is VOID if the unit shows evidence of having been tampered with or shows evidence of having been damaged as a result of excessive corrosion; or current, heat, moisture or vibration; improper specification; misapplication; misuse or other operating conditions outside of OMEGA’s control. Components in which wear is not warranted, include but are not limited to contact points, fuses, and triacs. OMEGA is pleased to offer suggestions on the use of its various products. However, OMEGA neither assumes responsibility for any omissions or errors nor assumes liability for any damages that result from the use of its products in accordance with information provided by OMEGA, either verbal or written. OMEGA warrants only that the parts manufactured by the company will be as specified and free of defects. OMEGA MAKES NO OTHER WARRANTIES OR REPRESENTATIONS OF ANY KIND WHATSOEVER, EXPRESSED OR IMPLIED, EXCEPT THAT OF TITLE, AND ALL IMPLIED WARRANTIES INCLUDING ANY WARRANTY OF MERCHANTABILITY AND FITNESS FOR A PARTICULAR PURPOSE ARE HEREBY DISCLAIMED. LIMITATION OF LIABILITY: The remedies of purchaser set forth herein are exclusive, and the total liability of OMEGA with respect to this order, whether based on contract, warranty, negligence, indemnification, strict liability or otherwise, shall not exceed the purchase price of the component upon which liability is based. In no event shall OMEGA be liable for consequential, incidental or special damages. CONDITIONS: Equipment sold by OMEGA is not intended to be used, nor shall it be used: (1) as a “Basic Component” under 10 CFR 21 (NRC), used in or with any nuclear installation or activity; or (2) in medical applications or used on humans. Should any Product(s) be used in or with any nuclear installation or activity, medical application, used on humans, or misused in any way, OMEGA assumes no responsibility as set forth in our basic WARRANTY / DISCLAIMER language, and, additionally, purchaser will indemnify OMEGA and hold OMEGA harmless from any liability or damage whatsoever arising out of the use of the Product(s) in such a manner. RETURN REQUESTS/INQUIRIES Direct all warranty and repair requests/inquiries to the OMEGA Customer Service Department. BEFORE RETURNING ANY PRODUCT(S) TO OMEGA, PURCHASER MUST OBTAIN AN AUTHORIZED RETURN (AR) NUMBER FROM OMEGA’S CUSTOMER SERVICE DEPARTMENT (IN ORDER TO AVOID PROCESSING DELAYS). The assigned AR number should then be marked on the outside of the return package and on any correspondence. The purchaser is responsible for shipping charges, freight, insurance and proper packaging to prevent breakage in transit. FOR WARRANTY RETURNS, please have the following information available BEFORE contacting OMEGA: 1. Purchase Order number under which the product was PURCHASED, 2. Model and serial number of the product under warranty, and 3. Repair instructions and/or specific problems relative to the product. FOR NON-WARRANTY REPAIRS, consult OMEGA for current repair charges. Have the following information available BEFORE contacting OMEGA: 1. Purchase Order number to cover the COST of the repair, 2. Model and serial number of theproduct, and 3. Repair instructions and/or specific problems relative to the product. OMEGA’s policy is to make running changes, not model changes, whenever an improvement is possible. This affords our customers the latest in technology and engineering. OMEGA is a registered trademark of OMEGA ENGINEERING, INC. © Copyright 2012 OMEGA ENGINEERING, INC. All rights reserved. This document may not be copied, photocopied, reproduced, translated, or reduced to any electronic medium or machine-readable form, in whole or in part, without the prior written consent of OMEGA ENGINEERING, INC. M5154-0612-HHB660_awb 6/14/12 10:55 AM Page 24 Where Do I Find Everything I Need for Process Measurement and Control? OMEGA…Of Course! Shop online at omega.com SM TEMPERATURE ⻬ 䡺 Thermocouple, RTD & Thermistor Probes, Connectors, Panels & Assemblies ⻬ 䡺 Wire: Thermocouple, RTD & Thermistor ⻬ 䡺 Calibrators & Ice Point References ⻬ 䡺 Recorders, Controllers & Process Monitors ⻬ 䡺 Infrared Pyrometers PRESSURE, STRAIN AND FORCE ⻬ 䡺 Transducers & Strain Gages ⻬ 䡺 Load Cells & Pressure Gages ⻬ 䡺 Displacement Transducers ⻬ 䡺 Instrumentation & Accessories FLOW/LEVEL ⻬ 䡺 Rotameters, Gas Mass Flowmeters & Flow Computers ⻬ 䡺 Air Velocity Indicators ⻬ 䡺 Turbine/Paddlewheel Systems ⻬ 䡺 Totalizers & Batch Controllers pH/CONDUCTIVITY ⻬ 䡺 pH Electrodes, Testers & Accessories ⻬ 䡺 Benchtop/Laboratory Meters ⻬ 䡺 Controllers, Calibrators, Simulators & Pumps ⻬ 䡺 Industrial pH & Conductivity Equipment DATA ACQUISITION ⻬ 䡺 Data Acquisition & Engineering Software ⻬ 䡺 Communications-Based Acquisition Systems ⻬ 䡺 Plug-in Cards for Apple, IBM & Compatibles ⻬ 䡺 Data Logging Systems ⻬ 䡺 Recorders, Printers & Plotters HEATERS ⻬ 䡺 Heating Cable ⻬ 䡺 Cartridge & Strip Heaters ⻬ 䡺 Immersion & Band Heaters ⻬ 䡺 Flexible Heaters ⻬ 䡺 Laboratory Heaters ENVIRONMENTAL MONITORING AND CONTROL ⻬ 䡺 Metering & Control Instrumentation ⻬ 䡺 Refractometers ⻬ 䡺 Pumps & Tubing ⻬ 䡺 Air, Soil & Water Monitors ⻬ 䡺 Industrial Water & Wastewater Treatment ⻬ 䡺 pH, Conductivity & Dissolved Oxygen Instruments M5154/0612