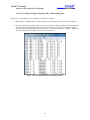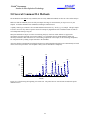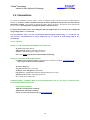
1
FIAlab® Instruments
Leaders in Flow Injection Technology
Manual for the FIAlab-2500 System
Version 2.0
1
FIAlab® Instruments
Leaders in Flow Injection Technology
Table of Contents
1.0 INTRODUCTION .................................................................................................................................................3
2.0 PHYSICAL SYSTEM SETUP .............................................................................................................................4
2.0.1 FIALAB-2500 UNIT ........................................................................................................................................... 5
2.0.2 FIA-LOV MANIFOLD ........................................................................................................................................ 6
2.0.3 AUTOSAMPLER .................................................................................................................................................. 8
2.0.4 SPECTROMETER ............................................................................................................................................... 10
2.0.5 LIGHT SOURCE................................................................................................................................................. 11
2.0.6 FIBER OPTIC CABLES ....................................................................................................................................... 13
2.0.7 FT-HEATER ..................................................................................................................................................... 14
3.0 LOGGING ONTO THE SYSTEM .................................................................................................................... 16
3.0.1 FIALAB-2500 UNIT .......................................................................................................................................... 17
3.0.2 SPECTROMETER ............................................................................................................................................... 18
3.0.3 AUTOSAMPLER ................................................................................................................................................ 20
4.0 INITIAL TESTS .................................................................................................................................................. 22
4.0.1 FLOW RATE TEST ............................................................................................................................................. 22
4.0.2 BLUE DYE LINEARITY TEST ............................................................................................................................ 25
4.0.3 BLUE DYE PRECISION TEST ............................................................................................................................. 37
5.0 SEVERAL COMMON FIA METHODS ........................................................................................................... 45
5.0.1 NITRATE/NITRITE ............................................................................................................................................ 46
5.0.2 AMMONIA ........................................................................................................................................................ 48
5.0.3 TOTAL KJELDAHL NITROGEN (TKN): ............................................................................................................. 49
5.0.4 PHOSPHATE ..................................................................................................................................................... 50
5.0.5 IRON ................................................................................................................................................................ 53
5.0.6 CHLORIDE ........................................................................................................................................................ 54
5.0.7 SULFATE .......................................................................................................................................................... 55
5.0.8 BORON ............................................................................................................................................................. 56
5.0.9 SILICA.............................................................................................................................................................. 57
6.0 ASSAY OPTIMIZATION .................................................................................................................................. 58
6.0.1 SAMPLE LOOP .................................................................................................................................................. 58
6.0.2 EXTENDED RANGE OPTION.............................................................................................................................. 59
6.0.3 REACTION MANIPULATION .............................................................................................................................. 61
6.0.4 SPECTROMETER WAVELENGTHS ...................................................................................................................... 62
7.0 MAINTENANCE................................................................................................................................................. 63
7.0.1 PERISTALTIC PUMP TUBES ............................................................................................................................... 63
7.0.2 INJECTION VALVE ROTOR................................................................................................................................ 64
8.0 NOTES ON FIA ................................................................................................................................................... 65
2
FIAlab® Instruments
Leaders in Flow Injection Technology
1.0 Introduction
The FIAlab-2500 system is designed to be a user friendly, reliable laboratory “workhorse” for serial assays. A large
number of colorimetric procedures have been automated by FIA, and the FIAlab-2500 will handle the majority of
these. FIA based colorimetric assays have been used for analysis of water, foodstuffs, pharmaceuticals, soils, and
fertilizers. In the area of plant, soil and water analysis, phosphate, nitrate, nitrite, chloride, and ammonia are
routinely analyzed by flow injection in many laboratories.
This manual will provide simple instructions on how to configure and run a single channel FIAlab-2500 unit.
The manual will cover the basic operation of the FIAlab-2500 system and usage of the FIAlab for Windows
software. This manual also includes methods and brief technical discussions of the specific chemistries however for
a more detailed discussion regarding the science of FIA, please contact FIAlab. An informative tutorial CD on FIA
and SIA is available free upon request. For additional information on the FIAlab for Windows software, please
review the separate FIAlab for Window Software user’s manual.
Note: On the computer that accompanied your instrument, the software and software drivers have already
been installed prior to shipping. There is no need to install FIAlab or Ocean Optics software as described in
this manual. All proper software settings have already been made. Installation instructions are provided for
cases where software needs to be reinstalled (e.g. in connection with a computer update).
The computer regional settings (found in MS Windows control panel, Regional Settings) should be set up such that
numerical values use periods (“.”, as used in the USA) instead of commas for the decimal location. For example, 10
½ should be written as 10.5, not 10,5. Make sure that this convention is utilized, and is also set up in Regional
Settings this way,
3
FIAlab® Instruments
Leaders in Flow Injection Technology
2.0 Physical System Setup
The FIAlab-2500 system is most commonly used for colorimetric assays. This section of the manual shows the basic
system setup for this type of assay.
Upon unpacking your FIAlab system configured for absorbance measurements you should find:
-(1) Basic FIAlab-2500 unit with FIA-LOV
-(1) Desktop Computer pre-configured with FIAlab for Windows software
-(1) Autosampler (optional)
-(1) USB4000UV/VIS or USB4000VIS/NIR Spectrometer (other types available)
-(1) Tungsten light source (LED light sources also available)
-(2) SMA terminated fiber optic cables
-(1) Heater-FT (optional)
-(1) Fittings and tubing kit (which has been used to plumb your instrument)
-(1) USB stick with a backup copy of the software and electronic copies of the FIAlab-2500 and FIAlab for
Windows manual as well as quality control test data on your specific instrument.
4
FIAlab® Instruments
Leaders in Flow Injection Technology
2.0.1 FIAlab-2500 Unit
To setup the FIAlab-2500 unit:
1) Make sure the switch on the back of the FIAlab-2500 is in the off position.
2) Using the supplied serial cable, connect the FIAlab-2500’s IN port to the computer’s native/COM 1 serial port.
3) Plug the 24 VDC power supply into the FIAlab-2500.
Figure 2.1 – FIAlab-2500 back panel and hookup to computer
4) Wind the Tygon peristaltic pump tubes around the wheel of the pump so that they are held in place by the
tubing stops. The pump tube connecting to the “S” port on the LOV should be wound around the pump channel
marked “S”; the pump tube connecting to the “C” port on the LOV should be wound around the pump channel
marked “C”; the pump tube connecting to the “R1” port on the LOV should be wound around the pump channel
marked “R1”; and the pump tube connecting to the “R2” port on the LOV should be wound around the pump
channel marked “R2”;
Figure 2.2 – Peristaltic pump tubing connections
5
FIAlab® Instruments
Leaders in Flow Injection Technology
2.0.2 FIA-LOV Manifold
Figure 2.3 – Classical FIA Configuration
The FIA Lab-On-Valve Manifold is used to organize the fluidic connections for your FIAlab-2500. Figure 2.3
shows the classical FIA layout, Figure 2.4 shows the equivalent FIA Integrated Manifold, and Table 2.1 describes
specific fitting connections.
Figure 2.4 – FIA Lab-On-Valve Manifold
6
FIAlab® Instruments
Leaders in Flow Injection Technology
LOV Ports
Connection
M1 to M1
Mixing Coil 1
M2 to M2
Mixing Coil 2 (or heating coil)
B to B
Bridge or Cadmium Column
R1
Reagent 1
R2
Reagent 2
C
Carrier
S
Sample
W
SL
Waste
Sample Loop
Comments
Recommend 69” (175cm) clear
tubing of 0.03” (0.75mm) ID -coiled.
Recommend 69” (175cm) clear
tubing of 0.03” (0.75mm) ID coiled.
This coil may be replaced by a flow
through heater coil of the same
length. Turn the heater off when
heating isn’t required. One end of
mixing coil 2 (or heater coil) will
attach to the lower port on the flow
cell.
For Nitrate assays use a Cadmium
Column here, else connect B to B
with 3.5” (8.9cm) clear tubing of
0.03” (0.75mm) ID.
Peristaltic pump tubing connects to
first reagent to mix with sample.
Peristaltic pump tubing connects to
second reagent to mix with sample.
Peristaltic pump tubing connects to
carrier that pushes sample through
system. Usually bubble free water,
but must match sample matrix.
Connects to autosampler (through
peristaltic pump tubing). If an
autosampler is not used, put sample
line into appropriate vial as needed.
Connects to waste.
Length and ID adjustable to alter
concentration range of assay.
Standard for 1cm flow cell – 3”
(7.6cm) of 0.03” (0.75mm) ID clear
tubing.
Table 2.1 FIA Lab-On-Valve Manifold Connections
Notes on common assay manifold configurations can be found in section 5.0.
To change Teflon tubing on the LOV manifold:
1) Remove the used or unwanted tubing by unscrewing the appropriate fittings on the FIA-LOV.
2) Slide a P-286 1/16th ¼-28 nut onto one end of the new tubing and follow with a P-200 1/16th ferrule
(cone pointed towards the nut).
3) Screw the Teflon tube into the appropriate LOV port(s), pushing the tubing in as far as it will
comfortably go.
4) Gently tug on the tubing once screwed in to make sure it is secure.
Figure 2.5 – Basic tubing connection
To change peristaltic pump tubing please see section 7.0
7
FIAlab® Instruments
Leaders in Flow Injection Technology
2.0.3 Autosampler
2.0.3A Cetac ASX-260/520
Figure 2.6 – Front view of Cetac ASX-260 autosampler
To setup a Cetac autosampler:
1) Setup the autosampler according to the manufacturer’s instructions. If there are multiple probes included
with the autosampler, choose the probe that uses 0.03” (0.75mm) ID Teflon tubing.
2) The assembled autosampler should be placed to the left of the FIAlab-2500 unit. It should be in close
proximity to the FIAlab so that the sample line from the probe to the FIAlab can be as short as possible. *
3) Attach the Cetac autosampler to the computer by connecting the 9-pin, female-to-female serial cable that
came with the autosampler from the autosampler’s “COM 1” port to the “COM3” port on the back of the
computer.
Figure 2.7 – Cetac autosampler back panel and hookup to computer
4) Cut the autosampler’s Teflon probe tubing to the appropriate length and connect it to the free end of the
peristaltic pump tubing on the S channel by either method described in section 7.0.
5) Plug the autosampler in with its included power supply and cord.
*
It is critical that the tubing between the Autosampler probe and the FIAlab system is just long enough to allow
free motion of the probe to each corner of the autosampler’s sample racks.
8
FIAlab® Instruments
Leaders in Flow Injection Technology
2.0.3B AIM-3200/3300
Figure 2.8– Front view of AIM-3200 autosampler
To setup an AIM autosampler:
1) Setup the autosampler according to the manufacturer’s instructions. If there are multiple probes included
with the autosampler, choose the probe that uses 0.03” (0.75mm) ID Teflon tubing.
2) The assembled autosampler should be placed to the left of the FIAlab-2500 unit. It should be in close
proximity to the FIAlab so that the sample line from the probe to the FIAlab can be as short as possible.
3) Attach the AIM autosampler to the computer by connecting the serial cable that came with the
autosampler from the autosampler’s “HOST” port to the “COM3” port on the back of the computer.
Figure 2.9 – AIM autosampler side view and hookup to computer
4) Cut the autosampler’s Teflon probe tubing to the appropriate length and connect it to the peristaltic
pump tubing of the S channel by either method described in section 7.0.
5) Plug the autosampler in with its included power cord.
9
FIAlab® Instruments
Leaders in Flow Injection Technology
2.0.4 Spectrometer
Figure 2.10 – Ocean Optics USB4000 Spectrometer
To install the spectrometer onto the instrument’s light bracket execute the following steps:
1) Unscrew the top two screws on the instrument’s back panel and slide the light bracket off of the instrument.
2) Place the spectrometer into the rectangular slot on the right side of the light bracket so that two of the
mounting holes on the spectrometer line up with two of the holes on the bracket’s bottom and the USB port on
the spectrometer protrudes out of the bracket’s back.
3) Screw the spectrometer into the bracket using two 4/40, 3/8” pan head screws. Tighten each screw loosely at
first and then tighten both.
Figure 2.11 – Installing an Ocean Optics USB4000 spectrometer onto a FIAlab-2500 light bracket
4) Do not reattach the light bracket if using an HL-2000-LL as a light source. The HL-2000-LL will also need
to be installed on the bracket. If not using an HL-2000-LL, reattach the light bracket to the instrument’s back
panel. Once the light bracket is reattached, plug the spectrometer into the computer using the provided USB
cable.
10
FIAlab® Instruments
Leaders in Flow Injection Technology
2.0.5 Light Source
2.0.5A HL-2000-LL
Figure 2.12 – Ocean Optics HL-2000-LL Light Source
To setup the HL-2000-LL:
1) The HL-2000-LL comes with an optional attenuator which can be attached to its SMA connection. If
when running the system you experience high light levels or very low integration times, attach the
attenuator by screwing it onto the light source.
Figure 2.13 – Attaching the attenuator to the HL-2000-LL
2) Place the HL-2000-LL into the left side of the light bracket so that its rubber feet line up with the four
holes on the interior of the bracket. Make sure the power switch on the light source protrudes out of the
bracket’s back.
3) Screw the HL-2000-LL into the bracket using the four provided M3 screws. Tighten each screw loosely
at first and then tighten all.
Figure 2.14 – Installing an Ocean Optics HL-2000-LL light source onto a FIAlab-2500 light bracket
4) Reattach the light bracket to the back of the instrument and plug the HL-2000-LL into the wall.
11
FIAlab® Instruments
Leaders in Flow Injection Technology
2.0.5B DCON-LED
Figure 2.15 – FIAlab Instruments DCON-LED
To connect the DCON-LED:
1) Unscrew the cap of the DCON-LED and attach it onto the SMA connector on the left side of the flow
cell.
2) Place the LED’s bulb and socket up and inside the cap and screw the LED’s base up onto the cap. Screw
the base onto the cap until just finger tight to secure the bulb in place.
Figure 2.16 – Attaching a DCON-LED to an SMA-Z flow cell
12
FIAlab® Instruments
Leaders in Flow Injection Technology
2.0.6 Fiber Optic Cables
Figure 2.17 – FIAlab Instruments P600-20 fiber optic cables
To attach the fiber optic cables:
1) Connect one end of a fiber optic cable to the SMA connector on the right side of the flow cell. Connect the
other end of this fiber to the SMA connector on the spectrometer.
2) If using a HL-2000-LL, connect the other fiber optic cable between the SMA connector on it and the SMA
connector on the left side of the flow cell.
Figure 2.18 – Attaching fiber optic cables to flow cell and spectrometer/light source
13
FIAlab® Instruments
Leaders in Flow Injection Technology
2.0.7 FT-Heater
Figure 2.19 – FIAlab Instruments FT-Heater
If your system came with a heater, its heated coil will be used in place of mixing coil 2.
To install the Heater-FT:
1) Unscrew mixing coil 2 by removing one end the coil from the FIA-LOVs “M2” port. Remove the other
end of the coil from the entry (lower) port of the flow cell.
2) Attach the heater’s coil to the FIAlab-2500 by placing a P-286 nut and P-200 ferrule on either end of the
heater tubing and screwing it into the “M2” port on the LOV. Push the tubing into the M2 port as far as it
will comfortably go and tighten.
3) Place a P-286 nut and P-200 ferrule on the other end of the heater coil and screw this into the entry
(lower) port on the flow cell. Do not push tubing into the port more than 0.5 cm to prevent obstruction of
the light path.
Figure 2.20 – FT-Heater’s fluidic connections
14
FIAlab® Instruments
Leaders in Flow Injection Technology
To control the Heater-FT:
1) Turn on the heater via the switch in the back.
2) Set the heater to the appropriate temperature (°C) by using the arrow keys on the right side of the
display. The green number represents the set-point temperature; the red number, the actual temperature of
the heater’s heating rod. Start the assay once the red number has stabilized; when both the red and green
numbers are the same.
Figure 2.21 – Controlling the FT-Heater
15
FIAlab® Instruments
Leaders in Flow Injection Technology
3.0 Logging onto the System
In the desktop computer provided by FIAlab, all software settings should already be set to your specific
configuration.
1) Turn on the FIAlab-2500 and the autosampler via the switches on the back of each unit.
2) Open the FIAlab for Windows software and in the main tool bar under systems make sure that “FIAlab2500” is checked, under detectors that “spectrometer” is checked and under accessories that “autosampler”
is checked. If you have additional detectors or accessories make sure these items are checked as well.
Figure 3.1 – Complete setup from software’s main toolbar
16
FIAlab® Instruments
Leaders in Flow Injection Technology
3.0.1 FIAlab-2500 unit
1) Click on the FIAlab button in the software’s main toolbar.
Figure 3.2 – FIAlab button on software’s main toolbar
2) Make sure that Serial Port 1 is selected in the upper left hand corner of the FIAlab window that has just
popped up.
3) Hit logon in the lower left hand corner of this window. If successful, after a few seconds the upper left
hand corner of the window should read “FIAlab-2500 Detected and Ready”. Do not close out of this screen.
Figure 3.3 – FIAlab window with settings and logon message
4) Verify that the system is communicating by clicking on the peristaltic pump icon. The pump should start
turning. Click the pump icon again to stop the pump.
5) Click on the injection valve icon. The valve should switch positions from load to inject (you should be able
to hear this). Click on the icon again to return the valve to the load position.
Figure 3.4 – Description of icons in FIAlab window
17
FIAlab® Instruments
Leaders in Flow Injection Technology
3.0.2 Spectrometer
1) Click on the Spectrometer button in the software’s main toolbar.
Figure 3.5 – Spectrometer button on software’s main toolbar
2) On the right hand side of the setup tab in the spectrometer window make sure Omnidriver (beta) is selected.
3) Hit logon in the bottom left hand corner of the setup window.
Figure 3.6 – Spectrometer Setup tab with Omnidriver selected
18
FIAlab® Instruments
Leaders in Flow Injection Technology
4) Once logged on, verify that both the spectrometer serial number and the coefficients listed on the
spectrometer setup tab match the serial number and coefficients listed on the paper insert that came with
your spectrometer. The serial number is also physically listed on the bottom of the spectrometer.
Figure 3.7 – Spectrometer Coefficients and Serial Number
5) The user must logon to the spectrometer from the spectrometer window each time the software is opened.
19
FIAlab® Instruments
Leaders in Flow Injection Technology
3.0.3 Autosampler
1) From the software’s main toolbar click on the autosampler button.
Figure 3.8 – Autosampler Button
2) Make sure that Serial Port 3 is selected in the upper left hand corner of the autosampler window.
3) In the autosampler type drop down menu make sure that the appropriate model is selected.
4) In the Sub-address menu make sure that Comm is selected.
Figure 3.9 – Autosampler window settings
20
FIAlab® Instruments
Leaders in Flow Injection Technology
5) Hit Logon in the autosampler window’s lower left hand corner. The message should read Logon Complete
and you should be able to hear the autosampler initialize.
Figure 3.10 – Autosampler logon message
21
FIAlab® Instruments
Leaders in Flow Injection Technology
4.0 Initial Tests
4.0.1 Flow rate test
1) If not already done, log onto the instrument from the FIAlab screen of the software. Set the pump rate to
50% in the upper left hand corner of the screen and switch the valve from the load to the inject position by
clicking on the valve icon.
Figure 4.1 – FIAlab screen with pump rate selected for flow rate test
2) Place the carrier, reagent 1 and reagent 2 lines coming from the bottom of the peristaltic pump into a large
(250ml) container of deionized (DI) water. At this point the pump’s tension arm should be loose.
3) Get a container for waste and into it insert the tubing coming out of the exit (top) port of the flow cell.
Figure 4.2 – Initial system setup for flow rate test
22
FIAlab® Instruments
Leaders in Flow Injection Technology
4) Start the pump by clicking on its icon in the FIAlab screen and while it runs lift the tension up and over the
bottom of the peristaltic pump plate. Manually tighten by screwing the tension arm against the plate until
there is smooth flow of water through each of the carrier, reagent 1 and, reagent 2 lines.
5) Once flow is smooth, to prime the system, let the pump run for an additional 45sec. Stop the pump by
clicking on its icon in the FIAlab screen.
Figure 4.3 – Tightened peristaltic pump
6) Place 10ml of DI water into a thin graduated cylinder and then move the carrier line from the large
container of DI water to the cylinder.
7) Set a timer for 1:00 minute and start the pump again by clicking on its icon. After the minute has passed,
stop the pump and remove the carrier line from the cylinder. Take the current level of water in the cylinder
and subtract it from the original 10ml volume to get the carrier line’s flow rate per minute.
8) Place the carrier line back into the large container of DI water and refill the cylinder to the 10ml mark.
9) Repeat steps 7 and 8 for both reagent 1 and reagent 2 lines, making sure to measure the flow rate of only
one line at a time.
Figure 4.4 – Graduated cylinder for flow rate test
23
FIAlab® Instruments
Leaders in Flow Injection Technology
10) The instrument has passed the flow rate test if the rate on each of the measured lines is about 2ml/min.
More importantly, all three lines must draw at similar flow rates (a total span of 0.2ml or less). If any line
draws below 1.9ml/min or above 2.3ml/min OR if flow rates are inconsistent between lines, the tension arm
on the pump may have to be readjusted and the test ran again.
24
FIAlab® Instruments
Leaders in Flow Injection Technology
4.0.2 Blue Dye Linearity Test
4.0.2A System Setup
1) At this point the FIAlab-2500, spectrometer and autosampler should all be communicating with the FIAlab
software. The pump should be clamped and the lines should be primed from the flow rate test. If you have
not logged onto the system’s components please see section 3. If the lines are not primed, place carrier,
reagent1 and reagent 2 lines into a large container of DI water (250ml) and run the pump for 45 seconds,
making sure the pump is clamped and the lines all draw from the container smoothly.
2) Turn on the light source
3) Place the line coming from the LOV’s waste (W) port into the waste container used in the flow rate test.
The line coming from the top of the flow cell should also be in this container.
Figure 4.5 – LOV’s waste port
4) With the system primed, check the flow cell for any bubbles that may be stuck in the corners of the fluidic
path. If bubbles are present try to dislodge them physically by knocking on the flow cell or by running the
pump at a variety of speeds.
Figure 4.6 – Air bubble caught in corner of flow cell’s fluidic path
5) Make 30uM, 45uM and 60uM standard solutions of Erioglaucine (Sigma p/n 861146). Make at least 15ml
of each standard. Also “make” a blank/0 standard and a wash with using DI water.
25
FIAlab® Instruments
Leaders in Flow Injection Technology
4.0.2B Initial Spectrometer Scans
1) Turn off the light source and open the spectrometer window from the button on the software’s main
toolbar. The spectrometer should already be communicating with the software from the steps taken in
section 3. If using any model other than a USB4000 UV/VIS or USB4000 VIS/NIR and you have
closed out of the software since initially setting up the system, you will need to logon to the
spectrometer again from the lower left hand corner of the spectrometer window.
2) Under the spectrometer graphing tab, with the light source off, make sure the voltage button on the
bottom of the window is depressed and click on dark scan in the lower left hand corner. A jagged line
fluctuating roughly around 0 voltage counts should appear in the top graph.
Figure 4.7 – Picture of dark scan graph centered around 0 volts
3) Turn on the light source, make sure the voltage button is still depressed, and hit single scan on the
bottom toolbar of the window. The spectrum that appears should be a broad peak. For
USB4000UV/VIS and USB4000 VIS/NIR models the peak should reach its maximum between 600nm
and 700nm and should max out between 30,000 to 60,000 voltage counts.
Figure 4.8 – Picture of single scan graphs for USB4000UV/VIS (left) and USB4000VIS/NIR (right)
4) If the peak has a very low (less than 10,000 count) maximum, there is likely a bubble in the flow cell.
Try to dislodge the bubble by hand or by flowing water through the system and manipulating the pump
rate. Then take the single scan again.
26
FIAlab® Instruments
Leaders in Flow Injection Technology
4.0.2C Organizing Standards in an Autosampler
*If not using an autosampler, keep the blank, wash and Erioglaucine standards in the containers they
were made in and skip this section.*
1) Take five of the autosampler’s standard tubes and into one pour your blank/standard0, into another
your wash, and into the other three the 30uM, 45uM and 60uM Erioglaucine standards. Label each
standard tube with its contents. Make sure if using Cetac standard tubes the fluid level is above the
10ml mark at minimum and fill AIM standard tubes at least halfway.
2) Each autosampler rack has set positions. Place the solutions in the autosampler’s standard rack in the
following order:
Position 1 – Blank
Position 2 – 30uM Erioglaucine Standard
Position 3 – 45uM Erioglaucine Standard
Position 4 – 60uM Erioglaucine Standard
Position 5 – Wash
Figure 4.9 – Standard rack configuration for Cetac ASX-260 autosampler (above) and AIM-3200
autosampler (below).*
*
A Cetac ASX-520 autosampler has standard positions 1 – 10 in line with one another from left to right.
27
FIAlab® Instruments
Leaders in Flow Injection Technology
4.0.2D Creating the Sample Definition File
1) From the software’s main toolbar click on the program button.
Figure 4.10 – Program Button
2) In the upper right hand corner of the window that appears select sample definition file and then hit
“Select/Edit/Create File”. This will open the sample definition file window.
Figure 4.11 – Opening the sample definition file window
28
FIAlab® Instruments
Leaders in Flow Injection Technology
3) In the sample definition window that appears make sure that the file edit format that is selected is Notepad
and that the system selected is single channel. Hit Create New File.
Figure 4.12 – The sample definition file window
4) In the window that appears name the file “blue dye linearity test” and hit open. When the software then
asks if you want to create the file click yes. A standard template in notepad with your file name will appear.
Figure 4.13 – Standard sample definition file template
29
FIAlab® Instruments
Leaders in Flow Injection Technology
5) The sample definition file contains one line per sample (or standard), defining the sample name, position in
the autosampler, concentration (if it is a standard), number of replicate injections, and time delays between
each injection. The standard template will need to be edited according to the instructions below so that the
computer knows what to expect during the linearity test.
a) Field 1 (the first column/entry in the line) is the Rack name. For all six entries in the blue dye test
assay this should read “std rack”.
b) Field 2 (the second column/entry in the line) is the Sample Position. Each rack has positions labeled
one through num, where num is the capacity of the rack named in field 1. For entries in the blue dye
test assay this should read (going down the column), 1, 1, 2, 3, 4, 5.
c) Field 3 (the third column/entry in the line) is the Sample name. The name is arbitrary. However
having multiple samples with the same name will cause the software to group these samples and give
such statistical information on the Analysis page such as the mean and standard deviations. For all
entries in the blue dye test assay this should read (going down the column), blank, 0uM, 30uM, 45uM,
60uM, wash.
d) Field 4 (the fourth column/entry in the line) is them nominal concentration. This field is used if the
specific defined vial is a standard. If the vial contains an unknown, this field should have a question
mark (?). A blank should have concentration “B”. Use “0.0” to include a blank in the calibration curve
(i.e., standard concentration of 0.0). For all entries in the blue dye test assay this should read (going
down the column), B, 0.0, 30.0, 45.0, 60.0, ?.
e) Field 5 (the fifth column/entry in the line) is the time to measure (hours). This is the time in hours
after the start of the run that the first measurement will be made. When multiple samples have the
same start time, the software will start at the first sample with this time and work its way down. The
values in this column should be set to zero for all entries in the blue dye test.
f) Field 6 (the sixth column/entry in the line) is the number of measurements. The specified sample will
be measured this number of times. The values in this column should be set to one for all entries in this
blue dye test.
g) Field 7 (the seventh column/entry in the line) is the period between measurements in hours. The values
in this column should be set to zero for all entries in the blue dye test.
6) When finished editing, the sample file should be identical to that shown below. Use the Save As command
to save this file in a known location and exit out of the screen.
Figure 4.14 – Linearity test sample definition file
30
FIAlab® Instruments
Leaders in Flow Injection Technology
7) From the lower left hand corner of the autosampler screen hit “Select Existing File” and then go to the
location the file is saved in. Make sure “All files (*,*)” is selected so that the appropriate file will
appear/can be chosen.
Figure 4.15 –Selecting the sample definition file
8) After selecting the file, its name will appear at the top of the sample definition file window. In the total
number of vials box type “6” and then hit refresh. The sample definition file window should now look as it
does below.
Figure 4.16 –Complete linearity test sample definition file
31
FIAlab® Instruments
Leaders in Flow Injection Technology
4.0.2E Running the Method
1) If not already open, open the program window by clicking on the program button in the software’s main
toolbar.
Figure 4.17 – Program Button
2) In the top of the program window go to “FIA templates” then FIA and select “Generic”.
Figure 4.18 – Script Selection
32
FIAlab® Instruments
Leaders in Flow Injection Technology
3) In the script that appears change the mode from safe lock to edit in the top center of the program window’s
toolbar. Then change the initial sample delay to 45seconds and the spectrometer scanning delay to
35seconds. Relock the script.
Figure 4.19 – Script Modifications
4) If using an autosampler, connect the sample line coming from the bottom of the FIAlab-2500’s peristaltic
pump to the sampler’s probe tubing using two P-286 nuts, two P-200 ferrules and a PEEK union.
Figure 4.20 – Autosampler Fluidic Connection
33
FIAlab® Instruments
Leaders in Flow Injection Technology
5) Also if using an autosampler, click on Sample Definition File in the upper right hand corner of the program
window and make sure that “Use Sample Definition File” is checked and that “User Sample Prompt” is
unchecked
6) For manual operation click on Sample Definition File in the upper right hand corner of the program
window and make sure that both “Use Sample Definition File” and “User Sample Prompt” are checked.
When the script is run in manual mode it will give a prompt to the user when it is time to put the sample
line in the next vial. Make sure the new sample has fully passed through the sample loop and out the FIALOV’s waste port before clicking ok.
7) Hit start in the bottom of the program window.
Figure 4.21 – Starting the program
8) As the lines begin to prime watch the flow cell for any bubbles that may get stuck. Attempt to dislodge
them by knocking on the flow cell if necessary.
34
FIAlab® Instruments
Leaders in Flow Injection Technology
4.0.2F Analyzing the Results
1) From the software’s main toolbar click on the analysis button.
Figure 4.22 – Analysis Button
2) Click on the plots tab in the analysis window and select channel 1 in the lower right hand corner. Observe
the peak shapes. Peaks should be smooth for all samples containing blue dye. Absolute values of
absorbance should range from close to 0.2absorbance units (AU) for the 30uM standard to close to 0.4AU
for the 60uM standard.
Figure 4.23 – Example plots from linearity test
35
FIAlab® Instruments
Leaders in Flow Injection Technology
3) Select the calibration tab in the analysis window. In the bottom right hand corner select “Local Maximum”
from the pull down menu. Then select “1 st Order Polynomial” under “Fitting Coefficients” near the left
side. Observe the R-Square value also on the left side of the window.
4) Save the data by clicking on the button in the bottom left of the analysis window
Figure 4.24 – Example calibration from linearity test
36
FIAlab® Instruments
Leaders in Flow Injection Technology
4.0.3 Blue Dye Precision Test
The initial setup and script are the same for the blue dye precision test as they were for the linearity test. The only
thing that needs to be changed is the sample definition file.
4.0.3A-1 Creating the Sample Definition File – Cetac Autosampler
The standard tubes of Cetac autosamplers can hold up to 50ml of solution so all analyses necessary from this run can
be drawn from the same vial.
1) Make 40ml of a 60uM Erioglaucine solution and pour into a Cetac standard tube. Put DI Water in two other
standard tubes; one to serve as a blank and 0std and one to serve as a wash.
2) Place the vials into the standard rack in the following order:
Position 1 – Blank/0std
Position 2 – 60uM Erioglaucine Standard
Position 3 – wash
3) Create a new file from the sample definition window as done in the linearity test and name it “Precision
Sample File – Cetac”. Edit the file so that it matches that shown below. Save and close out of the file.
Figure 4.25 – Precision sample file for Cetac autosampler
37
FIAlab® Instruments
Leaders in Flow Injection Technology
4) Select the file just created from the sample definition file window as done in the linearity test. Enter 4 in the
total number of vials box and hit refresh.
Figure 4.26 – Final sample definition window for precision test with Cetac autosampler
5) Close out of the window and start the program.
38
FIAlab® Instruments
Leaders in Flow Injection Technology
4.0.3A-2 Creating the Sample Definition File – AIM Autosampler
The standard tubes of AIM autosamplers hold up to 10ml of solution. The solution made for the precision test must
be split between three standard vials to account for the number of measurements required for the test.
1) Make 40ml of a 60uM Erioglaucine solution and use it to fill three AIM standard tubes. Put DI Water in
two other standard tubes; one to serve as a blank and 0std and one to serve as a wash.
2) Place the vials into the standard rack in the following order:
Position 1 – Blank/0std
Position 2 – 60uM Erioglaucine Standard
Position 3 – 60uM Erioglaucine Standard
Position 4 – 60uM Erioglaucine Standard
Position 5 – wash
3) Create a new file from the sample definition window as done in the linearity test and name it “Precision
Sample File – AIM”. Edit the file so that it matches that shown below. Save and close out of the file.
Figure 4.27 – Precision sample file for AIM autosampler
39
FIAlab® Instruments
Leaders in Flow Injection Technology
4) Select the file just created from the sample definition file window as done in the linearity test. Enter 6 in the
total number of vials box and hit refresh.
Figure 4.28 – Final sample definition window for precision test with AIM autosampler
5) Close out of the window and start the program.
40
FIAlab® Instruments
Leaders in Flow Injection Technology
4.0.3A-C Creating the Sample Definition File – Manual Operation
Since there is no autosampler involved, positions of samples are irrelevant.
1) Make 40ml of a 60uM Erioglaucine solution and use extra DI Water to serve as a blank/ 0std and wash.
2) In manual operation the computer doesn’t recognize the number of repeats column in the sample definition
file. Therefore each measurement must have its own line in the file. Create a new file from the sample
definition window as done in the linearity test and name it “Precision Sample File – Manual”. Edit the file
so that it matches that shown below. Save and close out of the file.
Figure 4.29 – Precision sample file for manual operation
41
FIAlab® Instruments
Leaders in Flow Injection Technology
3) Select the file just created from the sample definition file window as done in the linearity test. Enter 13 in
the total number of vials box and hit refresh.
Figure 4.30 – Final sample definition window for precision test in manual operation
4) Close out of the window and start the program.
42
FIAlab® Instruments
Leaders in Flow Injection Technology
4.0.3B Analyzing the Results
1) From the software’s main toolbar click on the analysis button.
Figure 4.31 – Analysis Button
2) Click on the plots tab in the analysis window and select channel 1 in the lower right hand corner. Observe
the peak shapes (right click and drag to zoom in). Peaks should be smooth for all measurments containing
blue dye. Absolute values of absorbance should be close to 0.4AU for the 60uM standard.
Figure 4.32 – Example plots from precision test
43
FIAlab® Instruments
Leaders in Flow Injection Technology
3) Select the summary tab in the analysis window. In the bottom right hand corner select “Local Maximum”
from the pull down menu. Observe the standard deviation “Std(%)” value for the 60uM erioglaucine. A
good value is 1.5% or less.
4) Save the data by clicking on the button in the bottom left of the analysis window
Figure 4.33 – Example RSD from precision test
44
FIAlab® Instruments
Leaders in Flow Injection Technology
5.0 Several Common FIA Methods
The methods listed are not the only available; there are many additional methods for these as well as other analytes.
Make sure that the standards you create fully encompass the range of concentrations you expect to see in your
samples. At absolute minimum four standards (including 0) should be used.
A quality control (QC) solution is also recommended and measured every “N”th (e.g., 12) sample. This QC sample
is used to correct for any drift in response caused for example by degradation of the Cadmium column or shifts in
room temperature during a long run.
Many FIA methods are subject to effects of interfering analytes, which can either enhance or suppress the
colorimetric response and result in erroneous readings. It is critical that the user understands the underlying
chemistry and ensures that either there are no interfering components in the sample, or the interfering components
are compensated for by adding in equal amounts to the standards.
Also note that the recommended wavelength selections for each method described below are automatically set based
on the selected script from the “FIA Template” library (not all methods have templates).
40
1.5
1.3
1.2
1.1
Abs
U6
U2
U1
U5
0.9
1849
U4
0.6
1848
0.5
0.3
0.2
0.0
50
4
BlankDriftcor 0
100
150
1
200
chk std
250
1843
U3
16
0.8
1842
1840 1841
300
350
400
450
500
Time (sec)
Figure 5.0-1, Plot showing the beginning of a Nitrate run. The peaks between 150 and 300 seconds make up the
calibration curve.
45
FIAlab® Instruments
Leaders in Flow Injection Technology
5.0.1 Nitrate/Nitrite
To convert the manifold to process Nitrate, connect a Cadmium column between the FIA LOV Manifold ports
labeled “B”. If there is a heater installed on the unit, the heater should be turned off or the coil removed from
the heated waterbath. Two reagents are utilized for Nitrate, and one for Nitrite. The flowrate of the pump should
be set to 50-60. Recommended wavelengths 540 primary and 650 reference.
For typical Nitrate/Nitrite assays (0.5 to 100 ppm), make the sample loop from 3” (7.6cm) of .02” (0.50mm) ID
orange tubing and use a 1 cm flowcell.
Low Concentration Assays: For low concentrations (below 0.5 ppm) consider using a 5 - 10 cm flow cell.
Also for lower concentrations use a longer sample loop (e.g., 6” (15.2cm) of green tubing which is .03”
(0.75mm) ID).
Carrier: DI Water
Reagent 1: 1.6 M Ammonium Chloride Buffer (for Nitrate only).
43 grams Ammonium chloride
500 ml TOTAL: Balance with Degassed DI water
4 drops of dishwashing liquid, or Brij per 500 ml
Note - For Nitrite, plug this port with an included Teflon Plug
Reagent 2: Colorimetric Sulfanilamide Solution.
LC13280 Color reagent for Nitrate From Fisher Sci (search for LC13280 at www.fishersci.com)
. This reagent works for Nitrate and Nitrite.
Alternative Reagent 2:
20 grams Sulfanilamide [172.21 FW]
50 ml 85% Conc. Phosphoric Acid (H3PO4)
0.50 grams N-1-naphthylethylenediamine dihydrochloride [259.18 FW]
500 ml TOTAL: Balance with Degassed DI water
Mix well and store in dark bottle.
Cadmium Column: Cadmium column can be prepared/packed by user (see next page) or purchased ready
for use from FIAlab Instruments, Inc.
Nitrate/Nitrite Standards:
100ml ICNAT-100 (Nitrate standard)
100ml ICNIT-100 (Nitrite standard)
Exaxol 727-524-7732 [email protected] www.exaxol.com
46
FIAlab® Instruments
Leaders in Flow Injection Technology
Cadmium Column Production
5-6 grams Cadmium granules (30-80 mesh) for a 1cc column [0.5mm ID by 5cm long]
2% solution of Cupric Sulfate (2 grams in 100 ml water)
Acetone as needed
1N HCL as needed
Place cadmium in a 100-ml beaker and wash with 25 ml of acetone followed by a 25-ml wash of water.
CAUTION: Cadmium is very toxic and all washes should be collected and disposed carefully in accordance to
regulations. Wear gloves and wash thoroughly after handling.
Expose a fresh surface on the cadmium by washing the granules twice with 25 ml of 1N HCL. Follow acid
washings with three water rinses.
Add 50 ml of the 2% cupric sulfate solution to the cadmium and stir gently for 5 minutes. Repeat with a fresh
addition of cupric sulfate solution. Cadmium should be a dark gray-black in color. Follow with 3-5 DI water
rinses. Decant off any fine suspended matter.
Pack column with copperized cadmium in water, making sure that all air bubbles are removed. Store column in
the ammonium chloride buffer.
47
FIAlab® Instruments
Leaders in Flow Injection Technology
5.0.2 Ammonia
Water Ammonia:
Water Bath Heater should be turned on to 60 C. The flowrate of the pump should be set to 45-55. The FIA LOV
connections B should be bridged by short green tubing. Recommended wavelengths: 650 nm primary and 525
nm reference. 825 nm can also be used as the reference.
For most Ammonia assays (> 0.5 ppm) make the sample loop from 3” (7.6cm) of 0.03” (0.75mm) ID green
tubing.
Low Concentration Assays: For low concentrations (below 0.5 ppm) consider using the 10 cm flow cell. Also
for lower concentrations (.01 to .2 ppm), use a longer sample loop (e.g., 12” (30.5cm) of .03” (0.75mm) ID
tubing). For the low end of this range, care must be taken to use clean glassware and extended washouts of
tubing on the system to prevent crossover contamination.
Carrier: De-ionized (DI) water.
Reagent 1: Hypochloride Solution.
10-mL of a 6% Sodium hypochloride solution (common household bleach)
5-grams NaOH (s)
Balance Degassed DI water (1 L)
Place a 10ml solution of bleach into a 1-liter volumetric flask and fill with 700-mL of degassed DI water.
Dissolve all other chemicals and fill flask to the 1-liter mark.
Reagent 1 degrades with time, should be prepared daily.
Note: If bubbles become an issue, sticking in the flow cell and other parts of the manifold then add 1gram Brij-35 (detergent) to Reagent 1.
Reagent 2: Salicylate/Catalyst Solution.
100-grams Sodium Salicylate [160.11 FW]
0.40-grams Sodium Nitroferricyanide (III) dihydrate [297.95 FW] catalyst
5-grams NaOH (s)
Balance Degassed DI water(1 L)
Place the sodium salicylate into a 1-liter volumetric flask and mix with 700-mL of degassed DI water until
dissolved. Add the sodium nitroferricyanide and mix until dissolved. Add NaOH to adjust the pH to the ~12.0
range. Add the Brij 35, mix and fill flask to the mark. Transfer solution into a dark, airtight glass bottle for
maximum longevity. Prepare fresh weekly due to limited storage life.
Ammonia Standard:
100ml ICAMU-100 (Ammonia standard)
Source: 727-524-7732 [email protected] www.exaxol.com
48
FIAlab® Instruments
Leaders in Flow Injection Technology
5.0.3 Total Kjeldahl Nitrogen (TKN):
Water Bath Heater should be turned on to 60 C. The flowrate of the pump should be set to 45. The FIA LOV
connections B should be bridged by short green tubing. Recommended wavelengths: 650 primary and 525
reference.
For most TKN assays make the sample loop from 6” (15.2cm) of 0.03” (0.75mm) ID green tubing.
For Macro-TKNs, dilute sample 5 fold with De-ionized (DI) water.
Use all PEEK fittings in LOV manifold (normal fittings may be damaged by high NaOH content).
Low Concentration Assays: For low concentrations (below 10.0 ppm) consider using a 5-10 cm flow cell.
Increase the sample loop to 12” (30.5cm) of 0.03” (0.75mm) ID tubing. Also, carrier matrix matching
becomes critical. The carrier should be identical with the 0 standard 0.
Carrier: For high concentrations, De-ionized (DI) water will work (use the 1 cm flow cell). For low
concentrations, the carrier should be identical with the standard 0 (blank). See discussion above.
Reagent 1: Hypochloride Solution.
10-mL of a 6% Sodium hypochloride solution (common household bleach)
50-grams NaOH (s) (note 10 fold increase of NaOH over water Ammonia assays)
Balance Degassed DI water (1 L)
Place a 10ml solution of bleach into a 1-liter volumetric flask and fill with 700-mL of degassed DI water.
Dissolve all other chemicals and fill flask to the 1-liter mark.
Reagent 2: Salicylate/Catalyst Solution.
100-grams Sodium Salicylate [160.11 FW]
0.40-grams Sodium Nitroferricyanide (III) dihydrate [297.95 FW] catalyst
5-grams NaOH (s)
Balance Degassed DI water(1 L)
Place the sodium salicylate into a 1-liter volumetric flask and mix with 700-mL of degassed DI water until
dissolved. Add the sodium nitroferricyanide and mix until dissolved. Add NaOH to adjust the pH to the ~12.0
range. Add the Brij 35, mix and fill flask to the mark. Transfer solution into a dark, airtight glass bottle for
maximum longevity. Prepare fresh weekly due to limited storage life.
Ammonia Standard:
100ml ICAMU-100 (Ammonia standard)
Source: 727-524-7732 [email protected] www.exaxol.com
Standards must be made in TKN matrix and treated identical (diluted same way) as samples.
49
FIAlab® Instruments
Leaders in Flow Injection Technology
5.0.4 Phosphate
Ortho Phosphate:
A heater is not always necessary, but may be turned on to 50C for increased sensitivity. The flowrate of the pump
should be set to 50 for Phosphate. The FIA LOV connections B should be bridged by a simple tubing (no
Cadmium Column). Recommended wavelengths: either 660 or 860 nm for the primary and 490 reference
For most Phosphate assays make the sample loop from 3” (7.6cm) of 0.03” (0.75mm) ID green tubing.
Low Concentration Assays: For low concentrations (below 1.0 ppm) consider using the 10 cm flow cell.
Increase the sample loop to 18” (45.7cm) of 0.03” (0.75mm) ID green tubing. Adjustments to the selected
wavelengths may be necessary to compensate for any natural color in the samples.
Carrier: DI Water
1-Liter Degassed DI Water.
Reagent 1: 6 mM Ammonium Molybdate.
10.0 grams Ammonium molybdate tetra-hydrate [1235.81 FW]
0.2 grams Antimony Potassium Tartrate half-hydrate [333.94 FW] catalyst
40 mL conc. H2SO4 acid (36N) ACS grade (Sigma-Aldrich 38,337-6)
1-Liter Degassed DI Water. Place acid into 800mL of DI water, mix and let cool to room temperature. Add
molybdate and antimony potassium tartrate and mix until dissolved. Fill flask to the mark. Transfer solution
into a dark and airtight glass bottle for maximum longevity. This solution is stable for several weeks.
Reagent 2: Reagent Carrier Stream of 300mM Ascorbic Acid.
30 grams Ascorbic acid [176.12 FW]
1.0 grams Sodium dodecyl sulfate [288.38 FW] surfactant (Sigma-Aldrich 436143-25G)
1-Liter Degassed DI Water. Place the ascorbic acid into a 1-liter volumetric flask and mix with 600 cc of DI
water until dissolved. Add the sodium dodecyl sulfate and mix slowly (prevent foaming) until dissolved. Fill
flask to the mark. Transfer solution into an airtight light sensitive glass bottle for maximum longevity.
Minimize exposure to air and prepare fresh weekly since this solution is unstable.
Phosphate Standard:
100ml ICPHO-100 (Phosphate standard)
Source: 727-524-7732 [email protected] www.exaxol.com
50
FIAlab® Instruments
Leaders in Flow Injection Technology
Olsen (Sodium Bicarb) Phosphate:
The carrier and reagent mixture is the same as for Ortho Phosphate (previous page). Due to common
“brown” coloring in samples, Olsen phosphate must usually be run using 880 nm for the primary and 925 nm for
the reference wavelength. The flowrate of the pump should be set to 65.
The sample loop should be made of 3” (7.6cm) of 0.02” (0.50mm) ID orange tubing.
Heat is (typically) set to 45C.
For lower concentrations (commonly occurring in soil samples), the 10 cm flow cell is recommended. Do not
increase the sample loop size.
Important Note: The provided LS1 light source has a very high output at around 700 nm. This can cause
saturation and bleed over of the detectors when the spectrometer is optimized for the Olsen wavelengths (880925nm). For this reason, please insert an Edmund Optics TS Longpass filter (included with the FIAlab “Olsen Kit”)
into the slit of the LS1 lamp.
Special Notes for Olsen Phosphate:
Problem : Olsen (Sodium Bicarb) extracted samples contain high quantities of sodium bicarbonate, which normally
causes large number of bubbles (foam) to be created when the sample comes in contact with the acidic reagents.
This will cause significant problems with accurate absorbance measurements in the flow cell.
Solution: By putting a 20 PSI pressure restrictor (see PN “P-785” at www.upchurch.com ) on the flow cell output
line, and running the pump at 65%, the resulting overpressure prevents gas from coming out of solution. In this
fashion, Olsen phosphate can then be run like other phosphate extractions (e.g., Bray).
Bray Phosphate:
The carrier and reagent mixture, wavelength selection, and configuration is the same as for Ortho Phosphate.
Alternatively, Bray phosphate may be run using the exact configuration as described above for Olsen.
51
FIAlab® Instruments
Leaders in Flow Injection Technology
Total Phosphate (TP):
A heater is not always necessary, but may be turned on to 50C for increased sensitivity. The flowrate of the pump
should be set to 50. The FIA LOV connections B should be bridged by a simple tubing (no Cadmium Column).
Recommended wavelengths: either 660 or 860 nm for the primary and 490 reference
For most TP assays make the sample loop from 3” (7.6cm) of 0.03” (0.75mm) ID green tubing.
Carrier: DI Water and H2SO4 acid
1-Liter Degassed DI Water. Recommend carrier line to be DI water
Add 60 mL conc. H2SO4 acid (36N) ACS grade (Sigma-Aldrich 38,337-6). The acid is to match the total
phosphate matrix. For low concentrations, the carrier should be identical to the standard 0 (blank).
Reagent 1: Sample Carrier Stream of 6 mM Ammonium Molybdate.
10.0 grams Ammonium molybdate tetra-hydrate [1235.81 FW]
(Sigma-Aldrich 22,123-6)
0.2 grams Antimony Potassium Tartrate half-hydrate [333.94 FW] catalyst
(Sigma-Aldrich 38,337-6)
1-Liter Degassed DI Water. Add molybdate and antimony potassium tartrate to 800 mL DI water and mix
until dissolved. Fill flask to the mark with DI water. Transfer solution into a dark and airtight glass bottle for
maximum longevity. This solution is stable for several weeks.
Reagent 2: Reagent Carrier Stream of 300mM Ascorbic Acid.
30 grams Ascorbic acid [176.12 FW]
1.0 grams Sodium dodecyl sulfate [288.38 FW] surfactant (Sigma-Aldrich 436143-25G)
1-Liter Degassed DI Water. Place the ascorbic acid into a 1-liter volumetric flask and mix with 600 cc of DI
water until dissolved. Add the sodium dodecyl sulfate and mix slowly (prevent foaming) until dissolved. Fill
flask to the mark. Transfer solution into an airtight light sensitive glass bottle for maximum longevity.
Minimize exposure to air and prepare fresh weekly since this solution is unstable.
Phosphate Standard:
100ml ICPHO-100 (Phosphate standard)
Source: 727-524-7732 [email protected] www.exaxol.com
52
FIAlab® Instruments
Leaders in Flow Injection Technology
5.0.5 Iron
A heater is not necessary. The flowrate of the pump should be set to 55 for Iron. The FIA LOV connections B
should be bridged by a simple tubing (no Cadmium Column).
For typical Iron assays (.5 to 100 ppm), make the sample loop from 3” (7.6cm) of 0.03” (0.75mm) ID green
tubing.
Recommended wavelengths 510 primary and 650 reference
Carrier: DI Water
1-Liter DI Water with surfactant. 4 drops of dishwashing liquid, or Brij per 500
ml
Reagent 1: 1,10-phenanthroline chelation chemistry
AQUANAL-plus reagent kit for iron analysis is used and is based on 1,10phenanthroline chelation chemistry to Fe2+. This Fe-complex has an absorbance
maximum around 510nm.
Source - Look up product number 37404 or 37444 at
http://www.sigmaaldrich.com.
Dilute reagent by mixing one drop per one ml of DI water.
Reagent 2: Not used
Plug R2 port with Teflon Plug
Iron Standard:
500ml I-4784-500 (Iron standard)
Source: 727-524-7732 [email protected] www.exaxol.com
Alternative: A common alternative Iron method is based on Ferrozine, For use with Iron (II) and total
dissolved iron, especially for ultra-low level (< 100 nmol/l), consider using the method described in this paper:
“COLORIMETRIC FLOW-INJECTION ANALYSIS OF DISSOLVED IRON IN HIGH DOC WATERS”,
MICHAEL J. PULLIN1 and STEPHEN E. CABANISS*
Department of Chemistry and Water Resources Research Institute, Kent State University, Kent,
OH 44242, USA.
53
FIAlab® Instruments
Leaders in Flow Injection Technology
5.0.6 Chloride
A heater is not necessary. The flowrate of the pump should be set to 55 for Chloride. The FIA LOV connections B
should be bridged by a simple tubing (no Cadmium Column). Recommended wavelengths 480 primary and
650 reference
For typical Chloride assays (0.5 to 100 ppm), make the sample loop from 3” (7.6cm) of 0.03” (0.75mm) ID
green tubing.
Carrier: DI Water
1-Liter DI Water
Reagent 1: Hg(SCN)2+Fe(III)
Labchem's Color Reagent Cat No LC13260.
Go to http://www.labchem.net/catalog/search_catalog.asp
type in LC13260 under catalog # , and click search.
Alternative source - Chloride Color Reagent (Technicon No. T01-0352).
Additional information can be found at
http://www.epa.gov/glnpo/lmmb/methods/methd140.pdf
Note: If bubbles become an issue, sticking in the flow cell and other parts of the manifold then add 1gram Brij-35 (detergent) to Reagent 1.
Reagent 2: Not used
Plug R2 port with Teflon Plug
Chloride Standard:
100ml ICCHL-100 (Chloride standard)
Source: 727-524-7732 [email protected] www.exaxol.com
54
FIAlab® Instruments
Leaders in Flow Injection Technology
5.0.7 Sulfate
Sulfate in the sample is precipitated with acidified barium chloride. This precipitate scatters light producing a signal
proportional to sulfate concentration. The following method should work for concentrations from 10 ppm to 200
ppm. Please inquire for suggestions on how to measure lower or higher concentrations than these ranges.
For most Sulfate assays make the sample loop from 12” (30.5cm) of 0.03” (0.75mm) ID tubing. Use a 10 cm flow
cell for concentrations of 10 ppm to 200 ppm. Use a 1 cm flow cell for concentrations consistently greater than 100
ppm. Recommended monitored wavelength is 500 nm, though any wavelength from 400 to 800 nm will work.
Critical : Do not use a reference wavelength.
Sulfur can be added to the reagent to “seed” the precipitate. This is necessary for the lower concentrations.
Above plot shows response for Sulfate concentrations of 0, 50, 100, 200 ppm.
Carrier: Matrix Match
Matrix Match. If samples are water then use water as carrier. If soil extract, then (typically) add KCL in
proportion with the extracted samples, e.g., 12 g KCL per liter of water. The matrix matching isn’t critical if
samples have greater than 100 ppm Sulfate concentration.
Reagent 1: Barium Chloride + HCL + Sulfur (for one liter)
30.0 grams BACl Dihydride
10 ml Hydrochloric acid
0.004 grams Sulfur of DI Water (this is not needed for sample sulfate conc. > 10 ppm)
1-Liter DI Water. Stir until dissolved.
Reagent 2: No Reagent 2 – plug this channel port
55
FIAlab® Instruments
Leaders in Flow Injection Technology
5.0.8 Boron
Boron reacts with azomethine-H to form a colored complex which absorbs at 430 nm. The increase in absorbance is
proportional to the boron concentration. The following method should work for concentrations from 0.2 ppm to 15
ppm. For higher concentrations than this increase pump speed to 50%, though this will also increase the limit of
detection.
Warning, the reagents in this assay have a very strong and possibly hazardous odor. It is recommended that
preparation and use be performed in a well ventilated location or under a fume hood.
The Boron assay color development is very slow. The “M2” coil should be twice as long as standard (use two coils
in series), both submerged in a water bath set to 65C. The M1 coil should be the standard length. The peristaltic
pump speed should be set to 25% and a sample loop of 12’ (30.5cm) utilized. The timing in the script should be
adjusted accordingly. A 10 cm flow cell is required. Use 430 nm as the primary wavelength, and 480 nm as the
reference. The pump speed can be increased to 45% for sample batches of Boron concentrations > 5 ppm.
Boron samples should be taken in plastic bottles or alkali-resistant boron-free glassware. No preservation is
required. Samples should be analyzed within 28 days.
Carrier: Matrix Match
Matrix Match. If samples are water then use water as carrier. The salinity should be matched if applicable.
Reagent 1: Buffer/Masking Solution
1) Measure out the following into a 1-liter beaker.
200 g ammonium acetate
20 g tetrasodium salt of EDTA
8.0 g disodium salt of NTA (nitrilotriacetic acid)
2) Add 500 mL distilled water and stir to dissolve.
3) Add 100 mL concentrated acetic acid (use hood).
4) Add stir bar and mix well until the solution becomes transparent.
5) Transfer to a plastic bottle
Reagent 2: Azomethine-H Solution (use hood)
1) Measure out the following into a 1-liter beaker.
5 g ascorbic acid
2.25 g Azomethine-H, monosodium salt, monohydrate
2) Add 600 mL distilled water and stir to dissolve.
Reagent 2 stays good for 3-5 days. Keep refrigerated in the dark.
56
FIAlab® Instruments
Leaders in Flow Injection Technology
5.0.9 Silica
Soluble silica species react with molybdate under acidic conditions to form a yellow silicamolybdate
complex. This complex is subsequently reduced with ANSA (1-amino-2-napthol-4-sulfonic acid) and bisulfite
to form a heteroploy blue complex which has an absorbance maximum at 820 nm.
Comments:
A heater is necessary, and should be set to 60C. The flowrate of the pump should be set to 55C. Recommended
wavelengths: 800 nm for the primary and 500 nm for reference. Make the sample loop from 10” (25.4cm) of 0.03"
(0.75mm) ID tubing. To some degree, phosphate creates a positive interferes with the silica assay.
Carrier: DI Water. The quality of the DI water should be watched, since silica is often encountered as a
contaminant in water. Silica contamination typically appears as the filters on the DI apparatus approach the end of
their life cycle.
Reagent 1: Indicator solution.
250 mL of 0.02 M Ammonium Molybdate solution.
750 mL Degassed DI Water.
A volume of ~1 M Hydrochloric Acid corresponding to 0.33 mol acid equivalents. For example, 330 mL of 1.000 N
HCl, or 333 mL of 0.990 N HCl.
0.02 M Ammonium Molybdate solution: 25.0 grams Ammonium molybdate tetra-hydrate [1235.81 FW].
Dissolve in water under gentle warming and dilute to 250 mL. Filter. Make sure the filter is free of silica (do not use
glass filters). Adjust pH to 7-8 with silica-free NaOH (approx. 7-8 mL of 50% NaOH). Store in a plastic container.
Reagent 2: Reducing Agent & Phosphate Suppressant solution.
250 mL of 0.15 M Oxalic Acid solution.
750 mL of [0.23 M ascorbic acid solution with 1.3 mL sodium dodecyl sulfate] solution.
0.15 M Oxalic Acid solution: 18.75 grams Oxalic acid dihydrate [126.07 FW]. Dissolve in water and dilute to
250 mL. Store in a plastic container.
0.23 M Ascorbic Acid with 1.3 g/L Sodium Dodecyl Sulfate: 30 grams Ascorbic acid [176.12 FW] plus 1
grams Sodium dodecyl sulfate [288.38 FW] surfactant (Sigma-Aldrich 436143-25G)
0.75 Liter Degassed DI Water. Place the ascorbic acid into a 1-liter container and mix with 500 cc of DI water until
dissolved. Add the sodium dodecyl sulfate and mix slowly (prevent foaming) until dissolved. Fill the container to
750 mL. Transfer solution into an airtight light sensitive glass bottle for maximum longevity. Minimize exposure to
air and prepare fresh weekly since this solution is unstable.
57
FIAlab® Instruments
Leaders in Flow Injection Technology
6.0 Assay Optimization
There are a number of ways to optimize your run. Whether you need to cover a greater concentration range or need
an improved signal, the FIAlab’s flexibility can provide the solution.
6.0.1 Sample Loop
The internal dimensions of the sample loop on the FIA-LOV determine the quantity of sample that is injected for
reaction. A larger sample loop will introduce a greater volume of sample and thus result in more reaction product,
yielding a higher signal.* Because of this relationship long sample loops are advantageous when targeting low
concentrations while short sample loops are vital to high concentrations.
A 3” (7.6cm) piece of 0.03” (0.75mm) ID tubing is generally used for 1cm flow cells while a 6” (15.2cm) piece of
the same tubing is used for 10cm flow cells. If the sample loop is made longer than 6” (15.2cm) then the valve
delay in the script must be modified.
To change the sample loop:
1)
2)
3)
4)
Remove the current sample loop by unscrewing it from the SL ports on the LOV.
Cut a piece of tubing to the desired length and slide a P-286 nut and P-200 ferrule on each end.
Screw both ends into the sample ports on the LOV.
If the tubing is longer than 6” (15.2cm), adjust the valve delay near the top of the script. The valve delay
tells the valve how long to remain in the inject position and it is essential that the valve stays in this
position long enough for the entire sample to flush through. The valve delay maximum is 12000 msec (12
seconds) however the length of time is more than adequate to flush most sample loops.
Figure 6.1 – LOVs with sample loop lengths of 3” (7.6cm), 6” (15.2cm) and 12” (30.5cm) respectively
*
Increasing the sample loop volume will increase signal only up to a certain point. Beyond that point, peaks will
grow wider and progressively more flat topped but peak height itself will no longer increase.
58
FIAlab® Instruments
Leaders in Flow Injection Technology
6.0.2 Extended Range Option
Figure 6.2 – FIAlab-2500 configured for extended range
If you wish to measure high concentration samples and low concentration samples within the same run the extended
range option may prove the best solution.
This configuration requires an extra spectrometer, bifurcated cable and both flow cells (1cm and 10cm) that came
with the unit. One spectrometer will read the signal from the low concentration samples on the 10cm path flow cell
and the other spectrometer will read the signal from the high concentration samples on the 1cm flow cell. Each
spectrometer reads two wavelengths.
As an example of how the analysis works:
Spectrometer 1 is connected via fiber optic cable to the 1cm flow cell and is set to measure wavelength 1 at 540nm
and wavelength 2 at 600nm. The 1cm flow cell yields the best signal for high concentration samples. In the analysis
window the calibration for these high samples corresponds to channel 1 and channel 2. Low concentration samples
should be taken out of these calibration curves by changing their true concentration to a “?” in the analysis window
at the end of a run.
59
FIAlab® Instruments
Leaders in Flow Injection Technology
Spectrometer 2 is connected via fiber optic cable to the 10cm flow cell and is set to measure wavelength 3 at 540nm
and wavelength 4 at 600nm. The 10cm flow cell yields the best signal for low concentration samples. In the
analysis window the calibration for these low samples corresponds to channel 3 and channel 4. High concentration
samples should be taken out of these calibration curves by changing their true concentration to a “?” in the analysis
window at the end of a run.
To set up the extended range option:
1) Mount a 10cm flow cell in addition to the 1cm flow cell on your instrument.
2) Remove the waste line from the 1cm flow cell and in its place put a piece of tubing linking its outlet to the
inlet of the 10cm flow cell. Attach a waste line to the 10cm flow cell outlet.
Figure 6.3 – Flow cell configuration in extended range option
3) Plug both spectrometers into the computer, open the spectrometer setup tab, and check the box below that
says use multiple spectrometers. Click Omnidriver on the right hand side and hit Logon.
4) Configure one of the spectrometers in the spectrometer setup tab.
a. Under Selected Spectrometer, pick Master
b. Under “Serial Number”, pick one of the spectrometer’s serial numbers and make note of
which you choose. Also make note of which flow cell it connects to.
c. Check the enabled box.
5) Configure the other spectrometer in the setup tab.
a. Under Selected Spectrometer, pick Slave 1
b. Under “Serial Number”, pick the other available serial number.
c. Check the enabled box.
6) Go to the Spectrometer Graphing Tab and under Select Wavelength, set the top two wavelengths’ pull
down menus to Master.
7) Set the bottom two wavelengths’ pull down menu to Slave 1.
8) Exit the software to save your settings and reopen.
9) Attach the single end of the bifurcated fiber to your light source and one of each of the bifurcated ends to
the 1cm and 10cm flow cell respectively.
10) Attach one spectrometer to the SMA connector on the right side of the 1cm flow cell via fiber optic cable.
11) Attach one spectrometer to the SMA connector on the right side of the 10cm flow cell via fiber optic cable.
12) In the script set the wavelengths you wish the spectrometers to read at.
13) Increase the delay while the spectrometer is scanning to give the peak adequate time to clear both flow
cells.
When the script has finished, the calibration and data on channels 1 and 2 correspond to the master
spectrometer and the calibration and data on channels 3 and 4 correspond to slave 1.
60
FIAlab® Instruments
Leaders in Flow Injection Technology
6.0.3 Reaction Manipulation
Various parameters adjustable on the FIAlab will alter the extent of reaction and change the magnitude of the
absorbance signal. Three common methods are as follows and can be used alone or in conjunction with one another.
1) Pump rate
a. Increasing the pump rate will give less time for the reaction to complete before the sample
segment enters the flow cell. In general, because of this phenomenon, absorbance values with an
increased pump rate read lower whereas absorbance signals with an decreased pump rate read
higher.
2) Mixing coils
a. Similar to the pump rate, the length and volume of mixing coils changes the residence time of the
sample before it enters the flow cell. A longer coil means the sample will take longer to get to the
flow cell and the extent of reaction has increased by the time it is detected. A shortened mixing
coil has the opposite effect. *
3) Reaction temperature
a. For many reactions the reaction rate is greatly dependent on temperature. To increase the
concentration of reaction products, raise the temperature on the FT-Heater. To decrease the
concentration, lower the temperature. †
*
Making the mixing coil too short will lead to inadequate time for smooth dispersion of the sample zone and will
read as choppy peaks. Making the mixing coil too long will lead to excessive dilution of the sample zone.
†
Do not set the heater above 70C
61
FIAlab® Instruments
Leaders in Flow Injection Technology
6.0.4 Spectrometer Wavelengths
Each assay product has a unique absorption spectrum. FIAlab software allows monitoring of up to four wavelengths
along this spectrum simultaneously. To look at low concentrations a wavelength with a high absorbance should be
chosen. To look at high concentrations a wavelength with a low absorbance should be chosen. Choosing different
wavelengths allows for an increased usable concentration range per run.
To optimize your run using monitored wavelengths:
1) Observe the reaction product’s spectra
a. Set up the assay as usual and run a high concentration standard. When the sample zone reaches
the flow cell stop the program Go to the spectrometer graphing tab, make sure absorbance is
selected in the bottom of this window and take a single scan. The spectra will appear in the upper
half of the screen.
2) Select the wavelengths
a. Select the desired wavelengths from the spectra. Generally three wavelengths are chosen to
monitor for absorption signal and a fourth is chosen to monitor as a reference wavelength. The
reaction product should not absorb at the reference wavelength and adequate light should be
available. If these two conditions are met the reference wavelength will monitor noise throughout
the system and its signal we be subtracted from the signal of the other three channels, giving
smoother peaks. The signal subtraction is performed via the hardware settings use wavelength 4
as reference command.
Figure 6.4 – Blue dye absorbance spectra
62
FIAlab® Instruments
Leaders in Flow Injection Technology
7.0 Maintenance
7.0.1 Peristaltic Pump Tubes
Peristaltic pump tubing should be replaced every 4 – 6 weeks at minimum and more often depending on use. Using
worn out tubing will lead to inconsistent and slow flow rates throwing off accuracy and script timing.
1) Insert green PEEK tubing into one end of each of 4 pieces of 2-stop, 1.02mm ID Tygon tubing. PEEK
should stick in approximately 3-4mm. Cut the green PEEK tubing so that a little less than a cm sticks out
and is unsheathed by the pump tube.
2) Slide a P-330 PEEK nut followed by a P-300 Tefzel ferrule onto the side of pump tubing where PEEK is
inserted.
3) Cut four 12” (30.5cm) pieces of 0.03” (0.75mm) ID Teflon tubing (if using an autosampler, its probe tubing
counts as one piece, regardless of length) and stick one piece into the free end of each of the four peristaltic
pump tubes. Pinch the Tygon pump tubing in order to fit the Teflon inside. Do not pinch the Teflon tubing;
each Teflon tube should stick into the pump tube by about 2-3mm.
Figure 7.1 – Peristaltic Pump Tubing
4) Screw the peristaltic pump tubing into the appropriate ports on the LOV (S, C, R1 and R2) by placing the
peek end of tubing into the LOV and tightening the nut and ferrule.
Figure 7.2 – Inserting pump tubing in LOV
5) Gently tug on the tubing to check that it is secure.
63
FIAlab® Instruments
Leaders in Flow Injection Technology
7.0.2 Injection Valve Rotor
The injection valve rotor should be replaced every 6 months to prevent shedding which can clog the system and lead
to inaccuracy.
1) Use a 7/64 hexagonal wrench to carefully remove the FIA-LOV. Tubing may be removed from the LOV
prior to this however it is unnecessary if the technician is careful.
2) Remove and replace the exposed rotor disc.
Figure 7.3 – Valve Rotor Disc
3) Screw the LOV back onto the instrument. To prevent cracking, gently tighten all three screws before firmly
tightening any.
Figure 7.4 – Gently tightening all LOV screws
64
FIAlab® Instruments
Leaders in Flow Injection Technology
8.0 Notes on FIA
Matrix Matching
Probably one of the most common problems encountered in FIA occurs when the matrix is not adequately matched
to the samples. In other words, the carrier is not similar enough to the samples in terms of color, pH, and index of
refraction. For instance, measuring nitrite in seawater, the carrier must have salinity content similar to the samples.
The extent of the similarity is dependent upon the concentration of the nitrite. The lower the levels to measure, the
more critical it becomes for accurate matrix matching.
To test for matrix affects, run some sample blanks through (0 concentration of the analyte being tested). Matrix
mismatch is suspect when negative or positive peaks appear.
Perfect matrix matching is generally not possible. Several iterations may be required to determine the required
degree of closeness for satisfactory results. Again, the lower the levels to measure, the more critical it becomes for
accurate matrix matching.
Interferences
Many FIA methods are subject to effects of interfering analytes, which can either enhance or suppress the
colorimetric response, and result in erroneous readings. It is critical that the user understands the underlying
chemistry and ensures that either there are no interfering components in the sample, or the interfering components
are compensated for (e.g., added in equal amounts to the standards).
Surfactants
In most assays it is important that surfactant be added to either reagent 1 or reagent 2. The type of surfactant is
dependent upon the type of assay, which is discussed in section 5.0. Sodium dodecyl sulfate [288.38 FW]
surfactant (Sigma-Aldrich 436143-25G), works for most assays.
65