1
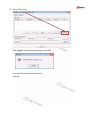
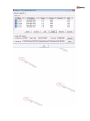
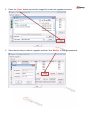
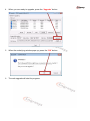
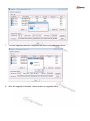
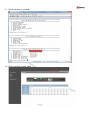
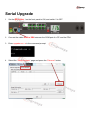
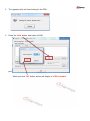
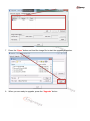
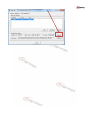
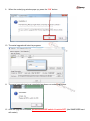
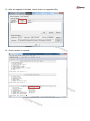
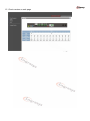
PDU Upgrade Utility
User Manual
Network Upgrade
1
You can use follow two method to add Devices
1.1 Press “Add” and fill in device IP address, account and password and then press “OK”.
When you click “OK” button, device will display in “PDU List table”.
1.2 Press “Discover”.
The upgrade utility will start looking for the PDU.
It can be found all the devices in the
network.
2
Press the “Open” button and load the image file to start the upgrade procedure.
3
Select device that you want to upgrade, and then click “Modify” to fill in the password.
4
When you are ready to upgrade, press the “Upgrade” button
5
When the underlying window pops up, press the “OK” button.
6
The web upgrade will start its progress
7
The web upgrade has been completed as shown on underlying picture.
8
After the upgrade is finished, check version on upgrade utility.
9
Check version on console.
10 Check version on web page.
Serial Upgrade
1
Set the DIP switch 1 on the front panel to ON, and switch 2 to OFF.
2
Connect the cable RJ45 to DB9 between the COM port of a PC and the PDU.
3
Enter upgrade.exe –s in the command prompt.
4
Select the “Serial Upgrade” page and press the “Discover” button
5
The upgrade utility will start looking for the PDU.
6
Press the “Add” button, and select a COM
port.
When you click “OK” button, device will display in “PDU List table”.
7
Press the “Open” button and load the image file to start the upgrade procedure.
8
When you are ready to upgrade, press the “Upgrade” button
9
When the underlying window pops up, press the “OK” button.
10 The serial upgrade will start its progress
11 The serial upgrade has been completed as shown on underlying picture.
12 After the upgrade is finished, please set the DIP switch 1 back to OFF, (the SNMP/WEB card
will restart)
13 After the upgrade is finished, check version on upgrade utility.
14 Check version on console.
15 Check version on web page