1
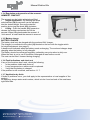
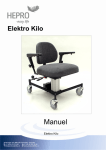
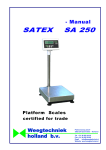
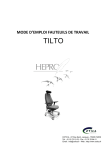
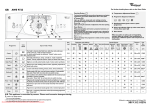
Elektro Kilo
Manuel
Elektro Kilo
Jachtwagen 29—3897 AM—Zeewolde - Netherlands
℡+31 (0)36 53 53 580
+31 (0) 36 522 30 46
[email protected] www.prestonability.nl
Manuel Elektro Kilo
HEPRO – The manufacturer of technical aids for adults and disabled.
HEPRO is a Norwegian industrial company developing, producing and marketing technical aids for
disabled persons. The company was established in 1987 and employs about 50 people. The main office
and factory is located in Rognan, Norway.
Technical service
Technical support is given both from the head office and our sales representatives, to secure first class
service when needed.
Special adaptations
Hepro is able to offer individual adaptations of the products when necessary. Special adaptations to satisfy
individual needs, is a part of the daily tasks at the factory. If adaptations are requested our sales representatives can be contacted.
Guarantee
When the product is used in accordance with the User Instructions, Hepro gives two years guarantee
on material- and production faults.
The serial number of the chair must be given as reference, by complaints or product applications.
The product is designed, developed, tested and approved in accordance with the following standards
of demands:
•
•
•
•
•
•
•
EN 1441 Medical Devices – Risk analysis.
EN 12182 Technical aids for disabled persons. General requirements.
EN 1335 Office furniture – Office work chair, Part 1, 2 and 3
EN 1021-1/2 Ignitability of upholstered furniture, smouldering cigarette / light fire.
EN-60601-1-2 EMC-test of Medical electrical equipment.
Nordic specification of demands for work chairs – functional demands. (Edition: 2000-05-31)
Directive 93/42/EEC The product is branded: Œ
Jachtwagen 29—3897 AM—Zeewolde - Netherlands
℡+31 (0)36 53 53 580
+31 (0) 36 522 30 46
[email protected] www.prestonability.nl
Manuel Elektro Kilo
TABLE OF CONTENTS
0. General Page 4
0.1 Brief product description
0.2 Safety regulations
0.3 Warning
1.1 Instructions for use
1.1.1 Mounting
1.1.2 Regulation and operation of the seat unit
1.1.3 Operating the brake function
1.1.4 Regulation and operation of the armrests
1.1.5 Battery charge (ELEKTRO- models)
1.1.6 Fault indications and check out
1.1.7 Application by faults
1.2 User manual
1.2.1 Model and type information
1.2.2. Technical specifications
1.2.3 Supplement information about use
1.2.4 Cleaning executed by the user
1.2.5 Positioning the brake lever
1.2.6 Adjustment of armrest width
1.2.7 Maintenance executed by the user
1.2.8 Adjustments
1.2.9 Storage when the product is not use
Jachtwagen 29—3897 AM—Zeewolde - Netherlands
℡+31 (0)36 53 53 580
+31 (0) 36 522 30 46
[email protected] www.prestonability.nl
Manuel Elektro Kilo
0. General
0.1 Brief product description
“Elektro Kilo” is a work chair tested and approved in accordance with northern specification of demands for
maximum 230 kg user weight. The wheelbase has four arms and is welded and lacquered with black coating powder, which provide a robust and durable surface. The seat unit is mounted on a lifting pillar with an
embedded actuator. The wheels have wide tracks (125mm diameter). The rear wheels have hand operated central brake that locks both rolling and rotation. Hjulene har bred bane og diameter 125mm.
The seat unit is based on the standard seat base, but the seat angling is removed. Cushions: The backrest
cushion is exchangeable, but the seat cushion is fixed to the seat plate. Regulations: Seat height, backrest
angle, backrest height and armrest height. Adjustments: Armrest width and brake lever positioning.
0.2 Safety regulations
•
•
•
The chair is an aid and shall not be used as a “toy” for children.
Exceeding approved user weight can be dangerous for the user or damage the chair.
If you notice that the chair does not function as described or as you are used to, contact your local
representative.
0.3 Warning
•
•
•
•
If Foot Support is mounted, the user must not stand on those. The chair will probably overturn. The
foot support is for leg resting only.
The seat height must not be heightened with more distance rings to a higher position than stated in
section 1.2.2.
Even if the upholstery is flameproof is must not be exposed to open fire, the light of a cigarette or
similar.
Maintenance beyond the descriptions in section ”1.2.7. Maintenance executed by the user” shall be
taken care of by your local representative or an authorized service company.
1.1 Instructions for use
1.1.1 Mounting
UNPACKING
Remove the packing by:
•
Cut the tightening straps.
•
Remove the top cover.
•
Remove the side carton cover.
•
Lift the chair out of the carton bottom.
•
Remove the plastic protection from the wheels.
Jachtwagen 29—3897 AM—Zeewolde - Netherlands
℡+31 (0)36 53 53 580
+31 (0) 36 522 30 46
[email protected] www.prestonability.nl
Manuel Elektro Kilo
BACKREST MOUNTING
The chair is delivered with the backrest dismounted. Mounting:
•
Remove the plastic protection
•
Place the backrest carefully down onto the backrest pillar.
•
Press the locking mechanism for height adjustment.
•
When having the regulation button pressed inn, the backrest is pressed into the lowest position.
•
The backrest is now correctly mounted.
•
By operating the regulation button the backrest can be adjusted to the desired height.
BRAKE LEVER MOUNTING
All models are delivered with the brake lever dismounted. The lever is thread down onto the adaptor
mounted on the hexagon bar between the rear wheels.
FOOT SUPPORT KILO ¼ RING MOUNTING
Described in section 1.2.8, “Adjustments”.
1.1.2 Regulation and operation of the seat unit
Regulation of the seat unit:
•
Backrest height – Press the locking bow (1) and adjust the backrest to the desired height position.
Barbs ensure that the backrest can’t involuntary be removed.
•
Backrest angle – Lift the handle (2) to regulate the backrest angle and release the handle to lock the
desired position.
•
Sittehøyde– The toggle switch (5) operates the electrical seat lift.
•
The seat height is raised when the switch is pushed forwards.
•
The seat height is reduced when the switch is pulled backwards.
1.1.3 Operating the brake function
The brake lever operates the brakes on the rear wheels.
The brake lever – By lifting the lever
(15), the brakes are activated. Pushing
the lever downward release the brakes.
The chair can be delivered with opposite
working brakes if desirable.
•
Jachtwagen 29—3897 AM—Zeewolde - Netherlands
℡+31 (0)36 53 53 580
+31 (0) 36 522 30 46
[email protected] www.prestonability.nl
Manuel Elektro Kilo
1.1.4 Regulation and operation of the armrests
ARMREST COMFORT
The armrest can be height adjusted and lifted.
•
Height adjustment – By twisting the wheel
anticlockwise (18) the armrest can be adjusted
into the desired height. Secure the desired
position by turning the wheel (18) clockwise.
•
Lifting – Push the handle (19) forwards to
release the locking mechanism and lift the
armrest. When tilting backwards the armrest. A
“click-sound” is heard and the armrest is secured.
1.1.5 Battery charge
BATTERY CHARGE
The battery shall only be charged with the enclosed 24V charger.
The charger is connected to the outlet (12) located on the box with the toggle switch
for height adjustment (see page 5).
A beep-sound indicates when the battery needs recharging. The enclosed charger stops
charging when the battery is fully charged.
The battery should be recharged regularly, preferably every day when in daily use.
When the chair is not in use it should be recharged at least once a month.
The seat can be lifted / lowered during charging.
1.1.6 Fault indications and check out
If any of the functions don’t work, check the following:
•
Is the problem visible and obvious?
•
Loose components or cables must be replaced.
•
Verify that the battery is charged.
If the problem is still unsolved, see section 1.1.7.
1.1.7 Application by faults
If faults or problems occur, you shall apply to the representative or local supplier of the
product.
On applying, always state serial number, which is to be found on back of the seat base
right hand side.
Jachtwagen 29—3897 AM—Zeewolde - Netherlands
℡+31 (0)36 53 53 580
+31 (0) 36 522 30 46
[email protected] www.prestonability.nl
Manuel Elektro Kilo
1.2 User Manual
1.2.1 Model and type information
The user manual covers the following types and models:
Item number
Model
18090311
ELEKTRO Kilo Standard
1.2.2 Technical specifications
Nominal values in standard execution based upon measurements in accordance with methods
stated in EN 1335.
Measurements and dimensions
Standard
Total width
cm
63
Total length (depth)
cm
70
Seat size (W x D)
cm
57 x 50
Seat depth
cm
46 - 60
Seat height
cm
43 - 53
Seat height (adjustment w/dist. brackets)
cm
+10
Backrest (W x H)
cm
41 - 36
Backrest (Height adjustment)
cm
+8
Backrest (Angle adjustment)
°
+3 - -26
Armrests (Internal width adjustment)
cm
46 - 63
Armrests (Height adjustment)
cm
19 - 28
User weight (max)
kg
230
Weight (standard chair, complete)
kg
39
MATERIALS AND COMPONENTS
Wheel base
Powder coated steel
Backrest covers
Moulded plastics
Backrest cushion
Moulded PUR-foam
Seat
Seat plate made of waterproof 15mm plywood. PURFoam laid-on.
Upholstery
Furniture fabrics 100% Trevira CS
Central unit
Aluminium pillar with embedded actuator.
Front wheels
Steel fork and ball bearing wheels 125mm with PURtrack.
Back wheels
Steel fork with built-in locking function and 125mm
ball bearing wheels w/ PUR-track
Jachtwagen 29—3897 AM—Zeewolde - Netherlands
℡+31 (0)36 53 53 580
+31 (0) 36 522 30 46
[email protected] www.prestonability.nl
Manuel Elektro Kilo
1.2.4 Cleaning executed by the user
The upholstery can be washed at 60o C or cleaned with foam detergents.
All frame parts can be cleaned with a damp cloth and mild soap.
All parts and spaces can be vacuum cleaned.
1.2.5 Positioning the brake lever
BRAKE LEVER POSITION
To amend the position of the brake lever, the position of the adaptor has to be changed.
The adaptor is fastened to the hexagon bar with a setscrew on the underside of the
adaptor.
To change positioning, the following must be done:
•
The hexagon key fixed below the seat is used for the adjustment.
•
Loosen the setscrew on the underside of the adaptor so that the adaptor can be positioned as desired.
•
Verify that the brake lever is “free from” the chair after the removal.
•
Secure the setscrew firmly.
•
The hexagon key is replaced below the seat.
BRAKE LEVER SIDE POSITION
The brake lever is mounted on the right side as standard. If the user wants to move the
lever to the left hand side, do the following:
•
Pull off the lever.
•
The adaptor is loosened as described in “Brake lever position” above and moved to the left hand
side. Replace the brake lever.
•
Placing and fastening is done as described in “Brake lever position” above.
1.2.6 Adjustment of armrest width
The armrest is mounted in a slot below the seat cover and fastened with 2 setscrews.
Changing of armrest width often lead to moving of the brake lever.
If an armrest width different from the pre-regulated is desired, do the following:
•
Use the hexagon key fastened below the seat for the regulation.
•
Loosen the two setscrews below each armrest.
•
The extreme screw is placed into a slot in the armrest and serves as a safety-catch to avoid the armrest from slipping out and fall off in case of loosening.
•
The length of the slot limits the width adjustment.
•
The armrests are moved to the desired position.
•
The setscrews on both sides are firmly secured. The hexagon key is fastened below the seat.
Jachtwagen 29—3897 AM—Zeewolde - Netherlands
℡+31 (0)36 53 53 580
+31 (0) 36 522 30 46
[email protected] www.prestonability.nl
Manuel Elektro Kilo
1.2.7 Maintenance executed by the user
The user should execute cleaning and vacuum cleaning of the chair.
1.2.8 Adjustments
BRAKE LEVER LOCKING FORCE
The “power” that locks the rear wheels when the brake is activated can be adjusted:
•
Unscrew the screw placed on the rear wheel fork body.
•
Twisting the ring over the bearing 180º will increase (clockwise) or decrease (anticlockwise) the locking force.
•
When the desired locking power is found, the screw is replaced.
MOUNTING OF FOOT SUPPORT KILO ¼ RING
Remove the plastic plugs on the wheel base front arms by the help of a screwdriver.
Remove the rubber bands from the expansion bolt before mounting.
The foot support hinge is pushed down onto the wheelbase. Secure the hexagon screw to lock the
foot support.
•
The foot support must be mounted so that the head of the expansion bolt in not visible when the foot
support is tilted forwards.
•
•
•
Dismount by loosening the screw 2-3 turns and kick it down. The expansion effect
ceases and the foot support including the expansion bolt can be pulled off. Make sure
that the expansion casing parts do not fall out.
CUSHION EXCHANGING
The backrest cushion is fastened with “snap lock”.
•
The cushion is removed by bending is loose from the bottom cover. Use your hands or a screwdriver.
•
The new cushion is snapped on. A “snap” sound is heard when the snap lock is secured.
•
The seat cushion is fixed with screws directly to the seat base. In order to remove it the screw under
the seat must be unscrewed.
1.2.9 Storage when the product is not use
If the work chair is supposed to be stored for a long period of time, it should be
cleaned and placed on a dry place. Cover the chair if necessary. When the chair is not
in use it should be recharged at least once a month.
Jachtwagen 29—3897 AM—Zeewolde - Netherlands
℡+31 (0)36 53 53 580
+31 (0) 36 522 30 46
[email protected] www.prestonability.nl
Øvermoan 9
8250 Rognan
Tel: 0047 (0)75 69 47 00
Fax: 0047 (0)75 69 47 10
[email protected]
Norway
Jachtwagen 29
3897 AM Zeewolde
Tel: 0031 (0)36 53 53 580
Fax: 0031 (0)36 522 30 46
[email protected]
Netherlands
Jachtwagen 29—3897 AM—Zeewolde - Netherlands
℡+31 (0)36 53 53 580
+31 (0) 36 522 30 46
[email protected] www.prestonability.nl