1
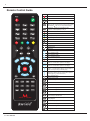
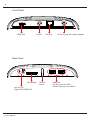
Contents V1.0
ONE Product Introduction..............................................................02
Package contents..............................................................02
Features........................................................02
Product specifications ................................................03
Remote control guide ................................................04
Touch buttons & connection ports.........................................05
TWO Activating media player.................................................07
Setting ..............................................................08
Display ..............................................................08
Language ..............................................................09
Photo setup ..................................................................09
Movie setup....................................................................10
Music setup .............................................................10
Text setup.......................................................................11
Defaul .......................................................................11
About .......................................................................12
Upgrade ......................................................................12
THREE About UPnP Network ................................................13
FOUR UPnP Setting on the Media Player ...........................15
FIVE Getting started with the Media Player...........................18
Movie ..............................................................18
Photo ..............................................................19
Music ..................................................................20
Text ....................................................................21
Flash ...............................................................22
File .......................................................................22
SIX FAQ.................................................................................23
ONE
2
Product Introduction
Thank you for choosing KWorld products. This media player supports a wide variety of
video, audio, music, text and subtitle file formats and you will be able to view these files
on your wide TV screen in the comfort of your living room. This user manual will guide you
how to use this product.
Package contents
• M200
• Remote Control & Battery (2*AAA batteries included)
• Power Adapter DC 5V@2A AC 100-240V,50/60Hz adapter
• User Manual
• AV cable
• YPbPr cable
• Format Factory CD
Features
• Full HD up to 1080p
• Playback wide range of video formats: RM/RMVB/MPEG/VOB/Dat/Divx/Xvid/MKV/MP4/
AVIi/MOV/SWF
• H.264 decode technology with 1080p resolution
• UPnP network streaming
• Supports HDMI, YPbPr & AV outputs
• SRT, SUB, SMI, SSA subtitle formats
• AC3/DTS audio with HDMI 1.3 output
• Playback Resume & time setting(set the playback time)
• Multi-Languages OSD
© 2010 KWorld
3
Product specifications
Audio & Video Decoding
Real Video
RM/RMVB (up to 720p decode)
MPEG1/2
Dat
VOB
MPG/MPEG
MPEG 4(DIVX 3/4/5/6 ; Xvid)
AVI (up to 1080p decode)
MP4 (up to 1080p decode)
Video
MKV (up to 1080p decode)
H.264
AVI (up to 1080p decode)
MKV (up to 1080p decode)
M2TS (up to 1080p decode)
MOV (up to 1080p decode)
MP4 (up to 1080p decode)
SWF
Flash
Audio
WMA, WAV, OGG, AAC, AC3, M4A, RA/RM
Picture
JPEG, BMP, PNG
Subtitle
SRT, SUB, SMI, SSA
Hardware Specifications
Card Reader
USB
LAN port
AV
DC
Button
LED
2 in 1
MMC/SD
USB2.0 Host interface
*2
RJ45 female
*1
AV / Y(the two share the same port)
Green RCA JACK
Pb
Blue RCA JACK
Pr
Red RCA JACK
Coaxial/Optical
Coaxial *1
Audio L/R
White/Red RCA Jack
HDMI
HDMI 1.3 interface
DC connector
DC: 5V 2A
6 buttons
6 function keys
AV LED
*1
YPbPr/HDMI LED
*1
M200
4
Remote Control Guide
Key
Function
Turn on or enter the stand by mode
Mute on/off
Number & letter/alphabet keys(0~9 & A~Z)
Vol- /Backspace : volume down or back a space
when you key in (performs the same function as the
“Backspace ” key on your computer keyboard)
Vol+/Input: volume up or change the input
(number or letter/alphabet) for key in.
Switch device(USB1 & USB2)
Directory: List or Thumbnail mode
Sorting Mode: By name or by date
Search supported media files
Rewind
Fast forward
Play / Pause
Stop
Previous One
Next One
Go to the Movie page
Go to the Music page
Go to the Photo page
Go to the Network page
(if you have set up UPnP network)
Enter/Confirm
Up arrow button
(use it to choose items /options on the page)
Down arrow button
(use it to choose items /options on the page)
Left arrow button
(use it to choose items /options on the page or
return to the previously accessed page)
Right arrow button (use it to choose items /options
on the page or go to the sub menu)
Go to the Main Menu
Exit the current page
Open subtitle options
Adjust audio
Time
Turn on the OSD menu
Go to the Setting page
Display
Go to the File page
Copy or delete files
Performs playback memory so you can view it
from where you left last time
Set playback time: Set which part of the movie to
start playback
Switch the display ratio – 4:3 or 16:9
Zoom in/out the image
Turn on/off background music
Change video output standard
© 2010 KWorld
5
Touch buttons & connection ports
The unit
The Panel
OK
Connection Ports
AV/Y: the one to plug in the yellow one of AV cable or the “Y”
(the green one) of YPbPr cable
Pb: the port to plug in the “Pb” (the blue one) of YPbPr cable
Pr: the port to plug in the “Pr” (the red one) of YPbPr cable.
L: the left audio output port
R: the right audio output port
Up
Down
Left
Right
Exit/Back
M200
6
Front Panel
HDMI Port
Coaxial
LAN Port
DC IN: to plug in the power adapter
Rear Panel
Card Reader
Left:AV LED
Right:YPbPr/HDMI LED
© 2010 KWorld
Remote
sensor
USB ports
(the left one is the USB 1
and the right one is the USB 2)
TWO
7
Activating media player
Once you have properly set up the media player following the instructions on the
Connection Diagram section, please turn on your TV to enter the main menu screen.
It is suggested that you plug your USB storage device before turning on your TV so
that you can see the function icons such as “Movie” and “Music”.
USB device indicator: it indicates
whether an USB device is
connected. If you have 2 USB
devices on the media player,
use the “Device” key on the
remote to switch USB devices(It
is suggested to use the left USB
port as the primary one)
However, you might encounter a black screen.
To see the pictures, please follow the tips below:
1.Switch the video source of your TV. Your TV
comes with multiple video source such as TV, AV,
Components, HDMI and/or so on. Please switch to
the correct source. For instance, if you connect the
media player to TV through YPbPr cables, please
switch the video source of the TV to “Components”.
You may do that with the buttons on your TV remote
or buttons on the television.
Tip: your remote should have a button with a function like the video source
switch, as the picture shown below
The video input button for this particular remote.
This picture is for reference only.
2.Switch the video output standard for the media player. To do so, use the Display button
on the media player remote. The video output standard is switched in the following
order each time you press the button.
” NTSC / PAL / 480i/576i/480p/576p/720p/1080i/1080p”
NTSC / PAL is outputted via AV cables, while the rest are by YPbPr/HDMI.
M200
8
Setting
Use the arrow keys on the remote to select
“Setting” and press “OK” to enter.
You will see a list of items once you have
entered the “Setting” page.
The items include “Display”, “Language”,
“Photo setup”, “Movie setup”, “Music setup”,
“Text setup”, “Default”, “About” and “Upgrade”.
Display
1.Use the Up and Down arrow keys to select
“Display” on the list and press the “Right” arrow
key to access the setting functions.
a.Display: use the Left and Right arrow keys to
change Display mode –PAL/NTSC/480i/576i/
480p/576p/720p/1080i/1080p.
NTSC / PAL is output via AV cables, and the
rest are by YPbPr/HDMI.
b.TVMode: use the Left and Right arrow keys
to change the TVMode – 16:9 and 4:3. Note:
this TVMode means the aspect ratio.
To confirm the choice you made, just press “OK” and return to last page.
© 2010 KWorld
9
Language
Use the Up and Down arrow keys to select
“Language” on the list and then press the “Right”
arrow key to access it.
This page shows the languages that this media
player supports: English, Chinese (simplified,
means in simplified characters), Chinese
(Traditional, means in traditional characters),
German, French, Spanish, Italian, Portuguese,
Netherlands, and Russian.
Use the Up and Down arrow keys to select the
language.
To confirm the choice you made, just press “OK”
and return to last page.
Photo setup
To enter the “Photo setup” setting, use the Up
and Down arrow keys on the remote to select it
and press the Right arrow key.
On the “Photo setup” page, you can do the
following settings for Photo functions:
*Use the Up and Down arrow keys to select the
item you want to configure
*Use the Left and Right arrow keys to change
the options of the item you choose
View: set your viewing preferences in
“Thumbnail” or “List”
Sorting: sort your files “By file name” or “By file
date”
Directory: enable/disable directory
Repeat: set repeat preference in “Repeat all”, “Repeat directory” or “Repeat off”.
Cropping: set picture viewing styles in “Smart crop”, “Stretch photo”, or “Entire photo”.
M200
10
Slideshow duration: set slideshow duration period in “3s”, “5s”, “10s”, “30s”, “60s” or “5m”
(s=seconds, m = minutes)
Transition effect: turn on or off the transition effect
To confirm the choice you made, just press “OK” and return to last page.
Movie Setup
To enter “Movie setup” setting, use the Up and
Down arrow keys on the remote and press the
Right arrow key.
On the “Movie setup”, you can configure the
following options:
*Use the Up and Down arrow keys to select the
item you want to configure.
*Use the Left and Right arrow keys to configure
the options of the item you choose.
View: set your viewing preferences in
“Thumbnail” or “List”
Sorting: sort your files “By file name” or “By file
date”
Directory: enable/disable directory
Repeat: set repeat preference in “Repeat
movie”, “Repeat all”, “Repeat directory” or
“Repeat off”.
Subtitle: set subtitle preferences in “Middle”,
“Big”, “Huge”, “Off”, “Small” and “Tiny”
Resume Play: turn on or off the Resume play function
Subtitle Encoding: choose your subtitle encoding formats – “Default”, “Unicode
(UTF16_LE)”, “Unicode (UTF8)”, “Simplified Chinese (GB)”, “Traditional Chinese
(BIG5)” or “Western languages”
To confirm the choice you made, just press “OK” and return to last page.
Music setup
To access the “Music setup” setting, use the Up
and Down arrow keys to select it and press the
Right arrow key.
On the “Music setup” page, you can configure
the following options:
*Use the Up and Down arrow keys to select an
item you want to configure.
*Use the Left and Right arrow keys to change
setting of the item you choose.
© 2010 KWorld
11
View: “Thumbnail” or “List”
Sorting: “By file name” or “By file date”
Directory: enable/disable directory
Repeat: choose your repeat preference –
“Repeat directory”, “Repeat song”, “Repeat off”,
or “Repeat all”.
Lyrics: enable or disable lyrics
To confirm the choice you made, just press “OK”
and return to last page.
Text setup
To configure the “Text” functions, use the Up and
Down arrow keys to select “Text setup” on the
list and press the Right arrow key to enter it.
On the “Text setup” page, you can do the
following settings for “Text”:
*Use the Up and Down arrow keys to select an
item you want to configure.
*Use the Left and Right arrow keys to configure
the setting of the item you choose.
Sorting: “By file name” or “By file date”
Directory: enable or disable directory
Font Color: “Black”, “White”, “Blue” or “Green”
Background Color: set background color in “Effect 1” , “Effect 2”, or “Effect 3”
Auto Browser Speed: “Normal”, “Slow”, “Fast”
Resume Play: turn “On” or “Off” the Resume play function
To confirm the choice you made, just press “OK” and return to last page.
Default
To access the “Default” setting, use the arrow
keys to select it and press the Right arrow key to
enter.
M200
12
Please choose “Yes” or “No” whether you would
like to return to the default setting.
If you press “OK” on “Yes”, the media player will
return to its default setting.
About
Use the Up and Down arrow keys
to select “About” and press the
Right arrow key to enter it.
When you enter “About”, you
can view the version and model
number of this media player.
Upgrade
Updating the Firmware
1.Please download the latest
updated firmware at KWorld’s official
website (go to KWorld website
and then “Product” ► “Home Media
Center”►“Home Media Center M200”),
and save into your USB portable disk.
2.Plug the USB portable disk into the
USB 1 port (the left one) onto the media
player M200.
3.Enter the main menu of the media player (turn on the media player if you haven’t
turned it on)
4.Go to “Settings”►“Upgrade”►“Install Now”.
5.The update may take a while and please do not turn off the power of the media
player. Once the update is completed, the media player will reboot itself.
Notes: the default video output may be different from the one you have configured,
so that you might encounter “black screen”. Please press the “Display” key to switch
your video output mode (you might need to press couple times to get to the right video
output).
© 2010 KWorld
THREE
13
About UPnP Network
About UPnP Network
Universal Plug and Play (UPnP) is a set of networking protocols defined by the UPnP
Forum. The objective of UPnP is to enable devices and/or facilities at home to connect
each other cordlessly, while simplifying the installation of networks at home (data
sharing, communication and entertainment), or establishing a corporate setting with
simplified network connecting computer related devices.
Once the UPnP is implemented, users can share multimedia files through UPnP Server
terminal such as PC or NAS. On the other hand, there are products in the market like
Media Player, PS3 and Xbox 360 that are built with UPnP Client terminal. User can
directly open and play files shared on UPnP Server through network.
This Media Player (Model M200) supports UPnP Client function, but it requires WIFI or
Ethernet to connect to UPnP Server to make it work. Users can then play files on the
UPnP Server through Network Streaming.
Please remember that only the WIFI USB wireless devices built with Atheros (ZD1211B)
chipset can be employed in this function.
Card name
Chipset
Antenna
Trendnet TEW-429UB C1
Zydas zd1211b
Internal
ZyXEL G-202
Zydas zd1211b
Internal
We will post it on our website for any further updates.
Media Player: UPnP Application
UPNP Server
LCD TV
Projector
PC
HDMI/YPbPr/CVBS
M200
UPNP
Intranet
UPNP Client
Note
book
USB/Memory Card
External
HDD
Camera
HD-DVR
NAS
M200
14
Additional Tips for UPnP Server and Player Setup
For Windows Media Player
Check option in “Library”►“Media Sharing” or “Media Streaming”. This will run the
execution process that will handle UPnP server.
Note: It works independently and doesn’t need to run WMP (Windows Media Player)
but you do need to access to it for all media library management.
Note: Windows Media Player can act as UPnP Server and Player (However, latter only
if used on Vista)
For more information, please refer to Microsoft official website that has FAQ on media
sharing.
For XBMC Media Center
Previously known as Xbox Media Center, this software has become a massive open
source with multiple media applications. It can act as UPnP server, player and renderer.
To enable the server, go to Setting > Network > UPnP and add the content that you
want to share.
For viewing the content, please add your UPnP share as the source when choosing a
media file for playback.
© 2010 KWorld
FOUR
15
UPnP Setting on the Media Player
1.Please go to “Setting” and then select “Network
setup”.
2.Press “OK” on the remote to enter the “Network
setup”.
3.There are options of ”Setting-Wifi-Auto / SettingWifi-Manual / Setting-Ethernet-DHCP / Setting
-Ethernet-Manual / Current Net Property / Default
MAC Address”.Please use the Up and Down
arrow buttons on the remote to select.
Setting-WIFI-Auto: Automatically search for the
WIFI connection and perform the setting
Note: you must have WIFI installed to perform
the “Setting –WIFI-Auto” option.
Setting-WIFI-Manual: perform the WIFI setting
manually. You can enter an IP address that
you would like to connect to. You also need to
configure for other items such as “Subnet Mask”,
“Gateway” and “DNS Server”. Once you have
configured the setting, please press “OK” on
the remote to confirm. (You need to have WIFI
installed first)
M200
16
Setting-Ethernet-DHCP : automatically search
and perform IP setting through DHCP protocol.
If the media player can not detect your Ethernet
DHCP, please go to “Setting-Ethernet-Manual” to
manually do the setting.
Note: you must have plugged the Ethernet cable
to the media player at first to perform this setting.
Setting-Ethernet-Manual: manually enter the IP
address. An easier way to do it is follow all the IP
information, including IP Address, Subnet Mask,
Gateway and DNS Server of your PC and enter
the same information on “Setting-Ethernet-Manual”.
Note: you can find the information by going to “Start”►“Control Panel”►“Network and
Internet Connection”►Right click on “Local Area Network”►“Properties”, and then you
can obtain your IP or DHCP address.
Current Net Property: displays the current
conditions of the network.
Default MAC address: Press “OK” to load default
MAC address.
© 2010 KWorld
17
Once you have established the network (either
by WIFI or Ethernet), you will see the “Network”
icon on the main menu. You can select it and
press “OK” to enter it.
When you see the “UPNP” icon, please press
“OK” to access it.
When you enter UPnP, you will see the page that
is similar to the main menu. There are icons such
as “Movie”, “Photo”, “Music” and “Text”. You can
then choose the types of file for playback through
network. For instance, you can play the multimedia
file in your PC through this media player.
You will see a list like the figure below when you
enter the “Movie”, “Photo”, “Music” or “Text”. A
“net_upnp1” folder indicates that you have one
UPnP Server. You will see 3 folders on the list if
you have 3 UPnP Servers. Then, just select one of
the servers and choose the file you want to play.
M200
FIVE
18
Getting started with the Media Player
On the main menu screen, you will see
“Movie”, “Photo”, “Music”, “Text”, “Flash”, “File”
and “Setting” icons. These icons indicate the
categories of files from the USB storage device
you inserted. For instance, if you enter the
“Movie” icon, you will access to the video files in
your USB storage device.
If you have set up the UPnP network, the “Network” icon will appear.
Movie
1. Use the left and right arrow keys on the
remote to select the “Movie” icon on the
main screen and click “OK” to enter.
2.You must have your USB device connected
to the media player first in order to access
the files.
3.Once you enter the “Movie” icon, you will
see a page displaying the list of folders
and/or video files in your USB device.
4.Use the arrow keys on your remote to select
a file and press “OK” to playback it.
OSD control bar
Press the “OSD” button on the remote to enable
the OSD control bar
© 2010 KWorld
19
Control functions on the OSD
You can use the left and right arrow keys to select functions on the OSD control bar
once it is activated.
Subtitle options
Play/Pause
Rewind
Go to the last file
Switch Audio source
Zoom
Fast forward
Go to the next file
Resume the video: this media player features
the resume function. This function enables you
to resume the video you were watching from
where you left off last time.
Photo
1.Use the left and right arrow keys on the remote
to select the “Photo” icon on the main screen
and click “OK” to enter.
2. You must connect your USB device or insert a
memory card to the media player first in order to
access the files.
3.Once you enter the “Photo” icon, you will see a
page displaying the list of folders and/or image
files in your USB device.
Note: please keep in mind that if some files in
your USB device or memory do not show up
after you insert it, it may indicate that this media
player is not compatible with those file formats.
M200
20
4.Use the arrow keys on your remote to select a
file and press “OK” to playback it.
OSD control bar
Zoom
Rotate
Play/Pause
Go to the last file
Music
Cropping
Go to next file
Note: Cropping means ways of photo presentation. This media player offers “Smart”,
“Stretch” and “Entire” cropping styles.
Music
1. Use the left and right arrow keys on the remote
to select the “Music” icon on the main screen
and click “OK” to enter.
2. You will see a page displaying the audio files in
your USB device. Please keep in mind that you
must have your USB device connected to your
media player to see the files.
Note: please keep in mind that if some files in
your USB device or memory do not show up
after you insert it, it may indicate that this media
player is not compatible with those file formats.
© 2010 KWorld
21
OSD control bar
Stop
Play/Pause
Rewind
Go to the last file
Repeat all
Repeat
Fast forward
Go to the next file
Text
1. Use the arrow keys on the remote to select “Text”
on the main screen and press “OK”.
2.Once you have accessed into the “Text”, a page
will display the playable text files.
Note: please keep in mind that if some files in
your USB device or memory do not show up
after you insert it, it may indicate that this media
player is not compatible with those file formats.
3.Use the arrow keys to select a file and press “OK”
to playback it.
M200
22
Flash
1. Use the arrow keys on the remote to select “Text”
on the main screen and press “OK”.
2. You will be able to view the flash file list.
Please keep in mind that the flash file format is
in “SWF”.
3.Select a file with the arrow keys on the remote
and press “OK” to playback it.
File
1.Use the arrow keys to select
“File” on the main screen and
press “OK”
© 2010 KWorld
2.You can browse and select the
files with the arrow keys on the
remote.
SIX
23
FAQ
Q1: The media player unit does not function and the buttons on it do not
work. What should I do?
A: It could be that the unit is loading data from the USB storage device and it may
take a while. However, if you are sure that the unit does not function, please try
to unplug the power adapter and plug it again.
Q2: There is no picture on the screen. What to do?
A:Please check the followings:
1.Please check if the power adapter is properly connected.
2.Please make sure if the AV, YPbPr or HDMI cable is connected appropriately.
3.Remove the SD memory card or USB device and then plug in again after the unit
is turned on normally.
4.Switch your video source to the appropriate one. Use the “Display” button on the
remote to do so. The order of the source switch is as followed -- PAL/NTSC/480i/
576i/480p/576p/720p/1080i/1080p. Just press it until you see the picture.
Q3: Why can’t I play my movie file?
A:Please double check the movie formats supported by this media player and then
make sure the media player functions normally. If the movie format you wish to
play is supported by this media player, please try to reboot the unit. If it still does
not work, perhaps this format is not supported by this media player.
Q4: Why can’t I adjust subtitle ?
A:Please keep in mind that some videos or movies you download from the Internet
come with subtitles, which means once you have downloaded the movie, the
subtitles are there already. In that case, you can not use the subtitle functions of
this media player to make any change for the subtitles of these movies.
M200
24
End-user License Agreement
Please read this agreement carefully before using the product:
Please ensure:
(1)Do not dismantle the product for improper purposes.
(2)Do not read and refresh the firmware of the product by improper means.
(3)Do not conduct inverse engineering and disassembling for related software and codes of
the product
(4)The product and this license agreement can be transferred to a third party who accepts the
terms and conditions of the agreement. When you transfer the full or part of the product to
a third party, the license agreement for you to use the product terminates automatically.
How to use this user Manual:
Please read this user manual carefully before using the product. The content of the manual as
well as the hardware and software of the product have been processed with intensive care.
No responsibility is assumed for any direct or indirect losses arising from hardware damage,
program damage, file loss or system breakdown due to improper operations. As you have
carefully read this agreement, it is ensured that the terms and conditions have been fully
understood and will be strictly followed.
Precautions
Please carefully read and pay close attention to the following before using the product:
(1)Do not expose the product to rains or damp environments to prevent fire or electric shock.
(2)Do not expose the product to moisture, dripping or splashing in order to reduce the danger
of fire, electric shock or product damage.
Safety Instructions
(1)Use the original adapter for the product, and do not share an adapter with any other
devices.
(2)Do not place the power cord and plug of the adapter near heat sources.
(3)Do not dismantle and repair the adapter and its power cord.
(4)Do not open the enclosure of the product to ensure your safety. Please ask trained
professionals to conduct maintenance if necessary.
Maintenance Tips
(1)The product is of complicated and sophisticated structure, so only trained professionals are
allowed to open the product to prevent damage from happening.
(2)Do not dismantle components of the product on your own .The warranty mark will be invalid
automatically if you dismantle and repair the product on your own.
(3)Please contact our local warranty department to arrange for maintenance if necessary.
To replace devices or accessories, please select the original ones designated by the
manufacturer.
© 2010 KWorld
25
WARNING
This User’s Manual is for specific product, and all its contents are processed with due care but
are not ensured fully correct. We assume no responsibility for any loss arising from use of this
manual. The right to interpret all contents of this User’s Guide belongs to the company. The
manual is subject to change without notice. This User’s Manual is not authorized to any party
and no reproduction or copy, in part or whole, of the manual in any way is permitted.
KWorld Website: www.kworld-global.com
Technical Support
Thank you for reading this manual. If there is any further inquiry, please contact us at www.kworld-global.com
The information contained in this documentation is for reference only. The text, images and charts of this
documentation have been processed with intensive care and we have been dedicated to ensure the accuracy
and completeness. However, the content of this document is subject to change without notice and no liability
nor responsibility is assumed for any loss or damage arising from any kind of misunderstood, improper uses of
the hardware, software, and documents.
KWorld Computer Co., Ltd.
6/F, No. 113, Jian 2nd Road
Jhonghe City, Taipei County 235
Taiwan (R.O.C.)
http://global.kworld-global.com
@ 2010 KWorld Computer Co., Ltd. All rights reserved. All KWorld trademarks and logos are registered
trademarks of KWorld Computer Co., Ltd. All other trademarks and logos presented in this material are the
property of their respective owner. KWorld Computer Co. Ltd. reserves the right to revise the specifications
mentioned above. No part of this documentation can be copied, reproduced or distributed in any kind of print or
electronic forms without legal permission.
M200