1
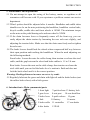
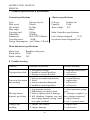
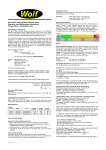
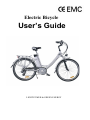
Electric Bicycle User’s Guide LIGHT POWER & GREEN ENERGY INSTRUCTION Introduction By making the decision to use an electric bike you are helping to safeguard our environment by saving our planets precious and not adding to carbon pollution. Thank for choosing this electric bicycle. Our bikes are manufactured under rigorous control to the most stringent European and UAS safety standards and are constantly spot checked both here and in the factory. For many years we have been engaged in the research and development of electric bicycles and cars and this electric bicycle is the culmination of those efforts. Before you use it, it is important that you read this manual carefully. If there is anything you do not understand completely please do not hesitate to. Please observe traffic regulations, and don’t lend your bicycle to anyone who is unfamiliar with it. The bicycle can only legally be used on the queen’s highway by a person aged 14 years or older. We strongly advise you to always wear a cycle helmet when using your bicycle and to attend a Cycle proficiency course prior to using on the open road. It is not a toy and should be considered as a serious mode of transport. 1. Before you set off Check handlebars are properly tightened. Check brake isolator is functioning properly. Check tyre pressures are correct. Make sure battery is fully charged. Load battery into bicycle and turn on with power key. Please read this manual carefully. Only on full understanding of all the functions of this electric bicycle should you use the product. For your safety, pleas turn off the power key when stopped or walking the bike. 2. Battery care 2.1 Before setting off on any journey it is always better to have a fully charged battery. 2.2 Always remember that you use up to three times more power when setting off under the twist throttle or riding up steep hills. -1- INSTRUCTION MANUAL MANUAL To preserve the life of each charge always set off and climb hills using 1:1 pedal assist rather than the twist throttle. 2.3 Do not expose the bicycle or battery package to fire, extreme heat sources or alkaline substances. 2.4 When leaving your bicycle during hot weather always try to leave in a shaded well ventilated area. 2.5 For best results always recharge the battery at room temperature. 2.6 To maximize the life of the battery always leave it fully charged when not in use and if possible recharge once every 4 weeks. 2.7 Before unloading the battery, first raise the saddle and unload the battery using its handle. Important notice Worn out batteries should be disposed of properly or returned to us for a credit against the cost of a replacement. 3. Recharging your battery 3.1 First connect the output connector plug with the battery, and then connect to the mains. A red lamp on the charger indicates the battery is charging, when this turns green the battery fully charged. Please disconnect from the mains after charging. Always disconnect the charger from the mains before disconnecting form the battery. It is possible that the battery will take up to 6 hours to charge on the first three charges. 3.2 When charging the battery always do so in a ventilated area. 3.3 Do not leave the charger connected to the mains when not in use. 4. Water and your electric bicycle 4.1 Your electric bicycle is rain and splash proof and can be used in all weathers. 4.2 The electrical components of the vehicle, such as motor, battery, and controller, must not be submerged in water. -2- INSTRUCTION 5. Maintenance and adjustments 5.1 Do not attempt to open the casing of the battery, motor, or regulator or all warrantees will become void. If you experience a problem contact our service department. 5.2 Wheel spokes should be adjusted after 6 months. Handlebar and saddle tubes should never be on the nuts positioning the handlebar, handlebar vertical tube, bicycle saddle, saddle tube and front wheels is 18NM. The minimum torque on the nuts on the pedal bearing axle and rear wheel is 30NM. 5.3 If the chain becomes loose or frequently comes off the front cog, you can easily adjust the chain tension by loosening the rear axle nuts slightly, and adjusting the tension bolts. Make sure that the chain runs freely and re tighten the axle nuts. 5.4 The brake leavers should lock the wheels when compressed half way between their open position and touching the handlebars. When the need adjusting use the following methods: Front brake: Loosen the nuts the cable clamp, then tension or release the steel cable, until the gap between the wheel and brake rubber is 1.5 to 2.0 mm. Rear brake: Loosen the nuts on the cable clamp, then tension or release the steel cable until you can feel the brake lever’s motion is fluid and does not lock the back wheel until it is the correct position. Warning: Braking distances increase on wet or icy roads. 5.5 Regularly lubricate the gears and chain with light oil and the brake bushes (not the rubber brake shoes) with a little grease. 6. Introduction to Main components/parts 1.front light 7.quick release 13.battery lock 2.gear lever 8.seat post 14.rear derailleur 3.brake lever 9.quick release 15.gears 4.fork 10.battery 16.motor 5.brake cable 11.controller 17.rear brake 6.disc brake 12.PAS -3- INSTRUCTION MANUAL MANUAL 7. Technical specifications & performance General specifications Battery specifications Type Electric bicycle Cell type Lithium ion Max speed 32km/h Capacity 10Ah Net weight 24.5kgs Rate voltage 36V Max range 60km Carrying load 100kgs Main Controller specifications Wheelbase 1200mm Dimension 1820*620*1000mm Low voltage safeguard 31.5V Traveling noise <60db Overload current safeguard 16A Energy consumption per 100km<1.2kw/h Main hub motor specifications Motor type Brushless with gears Rated power 350W Rated voltage 36V 8. Trouble shooting Problem Reasons for problem 1. low battery voltage 2. handlebar control problem 3. damage to motor driveline 1. battery not connected position Power on but motor 2. fused not working 3. motor connection damaged 4. handlebar control problem Top speed too slow Trouble shooting 1. recharge battery fully 2. call service 3. call service 1. reinstall battery 2. replace fuse 3. call service 4. call service Driving shorter distance per charge 1. type pressure too low 2. undercharge or charger fault 3. battery capacity loss or damage 4. hill climbing, frequent stop and start riding against strong wind or weight overload 1. check pressures, pump tyres 2. recharge complete or have charger inspected 3. replace battery 4. use 1:1 power assist Charger not working 1. charger fuse blown 2. charger damage 1. replace fuse 2. call service -4- INSTRUCTION MANUAL 9. Repair or replacement of components Only use this product in accordance with this user manual. We offer a limited warrantee of on the following items. 9.1 Welds on the main frame, front forks, splashboard, or wheel rims. Two years 9.2 Gears, bearings, motor shell, hub motor. Two years 9.3 Handlebar controls, brakes (excluding rubber brake shoes), controller, charger, or battery capacity. One year 9.4 Paintwork (excluding deliberate damage or scratching) Six months 9.5 Front and rear axle, flywheel, chain wheel, or driveline Six months 9.6 Battery casing, battery leak, battery capacity step-down more than 40%. One year 9.7 Electro plating, on handlebars, wheel rims, crank, bracket, or kickstand. Three months Additional Limited Warrantees 1. If the product has any quality fault within 15 days if sale you may choose to have the bike repaired or replaced. 2. The period of assurance shall commence from the day the sale was made. 3. Beyond the period of assurance, we offer lifelong repair, but the cost of labor, parts and delivery will be charged. Exception to Limited Warrantees 1. Damage resulting from misuse, not maintaining the vehicle or not following the guidelines within this user guide. 2. Accidental or deliberate damage. 3. Damage due to private repair by user or unauthorized service center. 4. Failure to produce invoice or proof of purchase. -5-