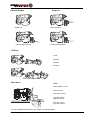
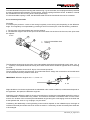
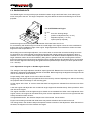
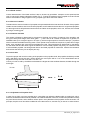
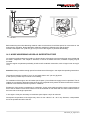
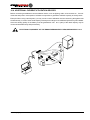
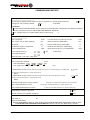
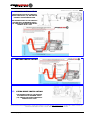
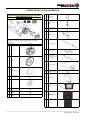
1
STEYR MARINE ENGINES 4 CYLINDERS + 6 CYLINDERS INSTALLATION INSTRUCTION P/N Z001007/0 5th Edition August 2011 www.steyr-motors.com STEYR MOTORS GmbH Im Stadtgut B1, A-4407 Steyr-Gleink, AUSTRIA PREFACE There are two main purposes in publishing this book: a) To assist in the selection of suitable engines and auxiliary equipment for marine craft. b) The provide information in the form of technical data and installation "know - how" built up from our marine diesel engine business, enabling 4 & 6 Cylinder STEYR MARINE engines of series to be installed in a manner which will ensure safety, reliability and ease of servicing. Make sure to comply with all laws and regulations valid in the country of operation and for the respective type of boat. It is particularly important too, to ensure that the engine installation complies with the Health and Safety Legalization of the country of intended operation. Before starting work, make a detailed planning, use true scale drawings and consider all assembly data available. To guarantee a proper function of the engine and its built-on parts, the correct installation is of utmost importance. These works are to be carried out with greatest care. Make sure prior to assembly that true scale drawings and installation data are available, which will enable you to realize a satisfactory technical pre-planning and installation. The engine compartment is to be designed in such a way that maintenance work on the engine will not be impeded. Consult the Operating Manual of the engine and the drawings. There should also be enough space to permit an inward- and outward lifting of the engine. The installation is to be done in such a way that the engine is easily accessible for regular routine and maintenance works, in order to avoid unnecessary maintenance costs for the owner. Product description, illustration and technical data When reference is made in this manual to a brand name, a product number, a product or specific tool, an equivalent product may be used in place of the product or tool referred to, unless specifically stated otherwise. To exclude any possible danger, the operator has to provide for respective safety precautions. All data, illustrations and specifications in this manual are based on the latest product data available at the time of printing. But it cannot be guaranteed that this manual will always be up to date. Revised versions with a later date of edition will replace all previous editions. Warranty: This may be invalidated if the engine is not installed or operated / maintained according to STEYR MOTORS instructions. The illustrations in this manual do not always come up to the actual equipment or components, and serve first of all as a reference. STEYR MOTORS GmbH reserves the right to make changes at any time, without notice, as to technical data or models, and also to discontinue certain models. STEYR MOTORS GmbH also reserves the right to change any technical data or components at any time, without incurring any obligation to equip same on models manufactured prior to the date of such change. Z001007/0_05_August 2011 PREFACE 1.GENERAL Hybrid paragraph included 2.GENERAL INFORMATION ON INSTALLATION Hybrid paragraph included 3.QUALITY DIRECTIVES FOR ASSEMBLY Hybrid paragraph included 4.VariantS ENGINE - PROPULSION Hybrid paragraph included 5.ENGINE INSTALLATION Hybrid paragraph included 6.COOLING SYSTEM Hybrid paragraph included 7.FUEL SYSTEM 8.EXHAUST SYSTEM Hybrid paragraph included 9.AIR INtake AND VENTILATION 10.AUXILIARY PROPULSION Hybrid paragraph included 11.SAFETY COVERS Hybrid paragraph included 12.BILGE PUMPS 13.CABIN HEATING 14.noise attenuation Hybrid paragraph included 15.CONTROL STATION Hybrid paragraph included 16.eleCTRICAL EQUIPMENT AND INSTRUMENTS Hybrid paragraph included 17.DRILL TEMPLATES 18.COMMISSIONING OF INSTALLATION 19.APPENDIX Z001007/0_05_August 2011 PREFACE VERSIONS OF MANUAL Version 1.0 2.0 3.0 4.0 5.0 Date 01. 11. 1998 01. 03. 1999 01. 04. 2006 01. 09. 2007 01. 10. 2010 Modification First edition Modification Modification Modification Modification Z001007/0_05_August 2011 1. GENERAL The installation of a marine engine is a very comprehensive task to be carried out with greatest care and attention. Before beginning, plan the execution and the works very carefully. There should be space for the following components: Control, manoeuvring apparatus, instrument panel with laced wiring harness, fuel tanks, pipings, batteries, engine compartment blower, air-vent conduits. Don't forget that the engine compartment, the tank compartment and the battery box must be separated from each other, to reduce the danger of fire. In addition, separate fire extinguishers must be available, e.g. in the pantry, depending on boat size and type. 1.1. REGULATIONS Note that each country has its own safety regulations as to installation. It is necessary, therefore, that the boat-builder/engine fitter is aware of the safety regulations in his country, before beginning works. 1.2. RESPONSIBILITIES OF BOAT OWNERS As a boat owner, you have certain responsibilities to others. You are legally responsible for all occupants of your boat. Show all assistants the location of the emergency equipment and how to use it. Your are required by law to have aboard one proper life jacket for each person, plus one approved throwable device for man overboard protection. Learn the local waterway rules for boats and ships. Navigable waterways are controlled by Federal regulations. Obey these regulations to protect yourself, your passengers and your fellow boating enthusiasts. Thoroughly familiarize yourself with weather station warning systems and waterway nautical signals. Contact your local Coast Guard station and take advantage of their seasonal boat inspections and training courses. The manner and circumstances of the application, installation and use of the engine is not under the direct control of STEYR MOTORS and Steyr cannot be held liable for any loss or damage where the installer or user has not followed advise given by the Company. 1.3. HYBRID INSTALLATION Note that this Manual is also intended to describe the installation of an entire Hybrid unit as manufactured by STEYR MOTORS GmbH. If a Hybrid unit is to install,consider beside normal requirements special paragraphs for this extra equipment. Z001007/0_05_August 2011 THIS PAGE IS INTENTIONALLY BLANK Z001007/0_05_August 2011 2. GENERAL INFORMATION ON INSTALLATION TABLE OF CONTENTS 2.1. WEIGHT-DISTRIBUTION BALANCE .......................................................... 3 2.2. ACCESSIBILITY .......................................................................................... 3 2.2.1. Hybrid accessibility ................................................................................... 3 2.3. DISPLACEMENT OF WATER ..................................................................... 4 2.3.1. Examples for block coefficient .................................................................... 4 2.4. SAFETY IN DEALING WITH FUEL AND OIL ............................................. 5 2.5. LIST OF FUEL AND OIL ............................................................................. 6 2.5.1. Manuals .................................................................................................... 7 2.6. SI-System .................................................................................................... 8 2.7. ABBREVIATIONS ........................................................................................ 9 2.8. GENERAL INFORMATION ON SAFETY .................................................. 10 2.8.1. Hybrid general information on safety ......................................................... 10 2.9. GUIDELINES FOR DAMAGE PREVENTION . .......................................... 10 2.9.1. Hybrid guidelines . ................................................................................... 10 2.10. LEGAL RULES . ....................................................................................... 10 2.11. DISPOSAL OF AUTOMOTIVE WASTE PRODUCTS .............................. 10 2.12. SAFETY IN DEALING WITH FUEL AND OIL ......................................... 11 2.13. MEASURES IN CASE OF ACCIDENTS .................................................. 11 Z001007/0_05_August 2011 2. GENERAL INFORMATION ON INSTALLATION NOTES Z001007/0_05_August 2011 2. GENERAL INFORMATION ON INSTALLATION 2.1. WEIGHT-DISTRIBUTION BALANCE It is important that the heavy components, such as fuel tanks, water tanks and batteries are installed in such a way that the best possible planing position of the boat will be kept. Of course the optimum gliding position differs from boat to boat but the best possible weight-distribution balance should always be the aim. ATTENTION! ON ACCOUNT OF THE risk OF EXPLOSION AND FIRE THE FUEL TANKS, BATTERIES AND ENGINES ARE TO BE PLACED IN well VENtILATED compartments SEPARATED FROM EACH OTHER. MORE DETAILS WILL FOLLOW. 2.2. ACCESSIBILITY During assembly of the engine, take greatest care as to accessibility for service works. An easy exchange of pump wheels, oil filters, air filters, water filters, fuel filters, V-belts etc. must be guaranteed. ATTENTION! THERE SHOULD ALSO BE ADEQUATE SPACE FOR SOUND-ABSORBING MATERIAL. DIMENSIONAL DRAWINGS OF THE RELEVANT ENGINE MAY BE FOUND IN THE FOLLOWING CONTENTS. 2.2.1. Hybrid accessibility Coupling actuator r min=25cm do not bend! r min=25cm do not bend! Electrical connections and shifting cable must be accessible for maintenance as below illustrated. Generator Generally consider schematic mounting positions for Hybrid components 2180662-0 Z001007/0_05_August 2011 2.3. DISPLACEMENT OF WATER In order to determine the displacement of water of a boat, the weight of the boat should if possible be measured. If this is not possible and if there is also no model of the hull with the boat-builder, a computation is to be made. Before beginning computing, the position of the water line should be checked on different points of the hull, and this with normal boat loading, since every change in weight has a strong effect on the speed of the boat. At first, subdivide the hull into different sectors. Overlapping of the individual sectors with the actual waterline will result in different fields with different volumes, and by adding these volumes the displacement of water can be calculated. For the accuracy of calculation the number of subdivisions is determining (e.g. Simpson's First Rule, Murphy's Law...). The displacement of water can also be determined by the BLOCK COEFFICIENT which, however, is more inaccurate. In this case, the difference between the volume of the keel and that of a body which intersects the outer edges of the boat is determined. But in practice it is very difficult to compute the volume of the keel. 2.3.1. Examples for the block coefficient By means of the "BLOCK COEFFICIENT" the displacement of water can be estimated for every type of boat. The value in ill. 14 refers to a section of the hull at the widest spot. Z001007/0_05_August 2011 2.4. SAFETY IN DEALING WITH FUEL AND OIL Dangerous materials, according to accident prevention, are all explosive, fire-provoking, easy flammable, poisonous, injurious to health and corrosive materials. In particular: - cleaning gasoline - mineral oil - battery acid - antifreeze - varnish and dilutions - solvent. In case of fire of such materials, do not extinguish with water. Use carbon dioxide extinguishers or powder extinguishers. Notify the fire department. In case of spilling such materials, e.g. while refueling, these are to be absorbed with sand, earth or suitable binding agents, and to be eliminated. Attention: To avoid health troubles, the following items are to be considered: - Avoid direct contact with dangerous materials. - Change clothing contaminated with dangerous materials as soon as possible. - Do not keep oily cloths in your overalls. - Clean oily parts of your body only with skin-care products (never use abrading sand or solvent). - Never put such materials into drinks bottles. - Wear protective gloves when using Loctite (risk of skin irritation). - Wear protective gloves to minimize risk of cutting. - Caution when positioning the cylinder block: risk of squeezing Z001007/0_05_August 2011 2.5. LIST OF FUEL AND OIL Mounted parts from a third party, which are not in the standard scope of delivery from STEYR MOTORS, have to be designed properly in dimensions and protected accordingly in order to prevent accidents. Modifications of Hybrid system have to be approved by a STEYR MOTORS authorized dealer. Further maintenance and inspection through authorized technicians should be secured. All parts delivered in the standard scope of delivery from Hybrid system (2180673-0 for 4 cylinders and 2180674-0 for 6 cylinders), which are covered against misapplication and accordingly signed through warning notices (see illustrations below), are only allowed to be opened, maintained and repaired from authorized technicians. Order No. Qty. Designation VR00207/0 1 set of fuel and oil for engine service, consisting of: Z010058/0 3 - STEYR Turbo Diesel motor oil SAE 5W-50 (4l. can.) Z011785/0 3 - STEYR MOTORS engine coolant (5l. can.) 9000190/0 2 - hydraulic oil ATF (1l. bottle) Z012222/0 1 - grease, Never - Seez; NS-160 B (1 kg can.) Z909570/0 1 - caoutchouc sealing / electric contacts (148 ml can.) 9000059/1 1 - thread protection 243 (10 ml flask) * 9000297/1 1 - surface sealing 509 (315 ml cartridge) 9000298/1 1 - surface sealing 5900 (300 ml cartridge) 9000019/1 1 - construction adhesive 620 (50 ml flask) 9000017/1 1 - construction adhesive 262 (50 ml flask) Z010207/0 1 - contact grease (100 ml tube) Z010226/0 1 - corrosion protection spray (400 ml can.) Z010227/0 1 - corrosion protection wax (120 ml can.) Z010084/0 1 - grease STABURAX NBU4 (1 kg can.) Z010205/0 1 - fuel rust protection additive (5 lt can.) 9000197/0 1 - electric contact spray Z011627/0 1 - silver varnish, RAL 9006 (1 lt can) Z010074/0 1 - hardener varnish (0,5 lt can) Z010075/0 1 - dilution for varnish (5 lt can) 50490 1 - wet protector spray Hybrid * for Hybrid as well 12381 1 - Ultra Clean ( 400 ml can.) 50466 1 - Gleitmo high performance grease paste ( 1 kg can.) Z001007/0_05_August 2011 2.5.1. Manuals Following documents are available in English language on our website http://www.steyr-motors.com/downloadcenter Select below mentioned chapters to find: .../Manuals/Marine: • Service - Manual (valid for all Marine engines) • Operation, Maintenance and Warranty - Manual (valid for all Marine engines)* • Installation - Manual (valid for all Marine engines) P/N Z001019/0 P/N Z001022/0 P/N Z001007/0 * also available in German French, Italian, Chinese, Finnish, Greek, Croatian, Dutch, Russian, Swedish, Spanish, Norwegian .../Manuals/Accessories: • Hybrid - Installation Manual • Hybrid - Operation Manual • Integrated Flywheel Generator (IFG) - Manual • Steyr Control Center (SCC) - User Manual • Steyr Control Center (SCC) - Technical Documentation • ZF gearboxes - Operation Manual (valid for: ZF25-A, ZF25, ZF45-A, ZF45-1, ZF63-A, ZF63, ZF63-IV, ZF80-A,ZF80-1A, ZF80-IV, ZF80-1IV, ZF85-A, ZF85-IV) .../Spare Parts/Marine: 4 Cylinder Engines • 84 Marine + Solas (valid for all model years) • 94 Marine + Solas (valid for all model years) • 114 Marine + Solas (valid for all model years) • 144vti Marine + Solas (valid for all model years) • 164 Marine + Solas (valid for all model years) • 174 Marine + Solas (valid from model year 2003 till 2006) • 174 Marine + Solas (valid from model year 2009) 6 Cylinder Engines • 126 Marine + Solas (valid from model year 2007 • FDE 236 Marine + Solas (valid till model year 1998) • 166+236 Marine + Solas (valid from model year 1999 till 2006) • 166 Marine + Solas (valid from model year 2007) • 196 Marine + Solas (valid from model year 2007) • 236 Marine + Solas (valid from model year 2007) • 246 Marine + Solas (valid for all model years) • 256 Highpower Marine + Solas (valid for all model years) • 286 Highpower Marine + Solas (valid from model year 2009) • 306 Highpower Marine + Solas (valid from model year 2009) P/N Z001044/0 P/N Z001045/0 P/N Z001041/0 P/N Z001071/0 P/N Z001073/0 P/N Z001003/0 P/N Z001025-0 P/N Z001023-0 P/N Z001032-0 P/N Z001005-0 P/N Z001015-0 P/N Z001011-0 P/N Z001011-1 P/N Z011798-0 P/N Z011796-0 P/N Z011796-1 P/N Z011797-0 P/N Z011799-0 P/N Z011796-2 P/N Z011800-0 P/N Z011810-0 P/N Z011815-0 P/N Z011817-0 .../Tools: • Tool Catalog (valid for all Marine engines), Kit 1, Kit 2, Kit 3 • Engine Diagnostic Tool (SMO-EDT) - User Manual • Steyr Control Center (SCC Configuration Software - User Manual P/N Z001002/1 P/N Z001042/0 P/N Z001075/0 .../Schematics/Marine: • Diagrams marine engine function on CD P/N Z001021/0 Documentation CD-ROM (including all above mentioned documents) P/N Z001009/0 Z001007/0_05_August 2011 2.6. SI-SYSTEM The following units are used: units of length km = m = mm= "= ft= yd= le = units of pressure and tension kilometer bar =bar meter Pa =Pascal millimeter N/mm2 = Newton per square millimeter inch foot yard line units of area units of energy m2 cm2 ft2 yd2 J kW/h = = = = square meter square centimeter square foot square yard = joule = kilowatt-hour units of volume units of energy = m3 cm3 = dm3 = mm3 = ft3 = yd3 = l= kW PS cubic meter cubic centimeter cubic decimeter cubic millimeter cubic foot cubic yard liter = kilowatt = horsepower units of measure units of temperature t = ton kg = kilogram g= gram K ° C units of force units of time N kN daN h min s = = = Newton kilo Newton deca Newton electric units speeds A = V = W= µF= km/h m/s ampere volt ohm mikrofarad fuel consumption speeds g/kWh rpm = gram per kilowatt-hour = degree Kelvin = degree centigrade =hour = minute = second = kilometer per hour = meter per second = revolutions per minute Z001007/0_05_August 2011 2.7. ABBREVIATIONS ill.illustration Cucopper HGrpmaster unit Max.maximum OTtop dead center PTOPOWER TAKE OFF on crankshaft SWhead width wcwater column Z001007/0_05_August 2011 2.8. GENERAL INFORMATION ON SAFETY This section does not include the scope of general knowledge and the training of personnel as well as the "general rules of safety technics" and machine safety regulations - MSV. Inappropriate behavior and the ignorance of hazards during repair works may result in injuries to persons. The personnel on duty is to be trained accordingly and to be urged to respect the safety regulations. 2.8.1. Hybrid general information on safety Installer must be authorised by certificate to work on electrical systems with operational voltages at 400 VAC. 2.9. GUIDELINES FOR DAMAGE PREVENTION This section does not include the scope of general knowledge and the training of material maintenance personnel as well as the "general rules of safety technics" and machine safety regulations - MSV. Inappropriate behavior and the ignorance of material maintenance may result in considerable material damages. While operating with fuel and oil, take care not to apply them on the surface of optical systems. Lubricants should form a thin film on the surface, surplus lubricants must be removed. 2.9.1. Hybrid guidelines Do not apply grease or dissolvent on generator winding. 2.10. LEGAL RULES The following rules and guidelines are valid in Austria. For other countries, follow the local regulations. 2.11. DISPOSAL OF AUTOMOTIVE WASTE PRODUCTS Used fuel and oil is to be collected in separate containers to permit an eventual subsequent treatment. the disposal of any Fuel and oil for the engine is subject to the special waste act. the "special waste catalogue" ÖNORM S2100 refers to the NECESSARY disposal in austria. please follow the local regulations of your country. The operating and maintenance personnel has to take care that fuel and oil as well as other material ranking as special waste are deposited at the respective collecting points. Code No. 31 423 54 102 54 104 54 202 54 207 54 917 54 927 54 928 55 510 Designation oil contaminated ground or oil binder waste oil fuel grease vaseline compact sealing material oil contaminated scouring cloth used oil- and air filters color- or varnish containing waste Z001007/0_05_August 2011 2.12. SAFETY IN DEALING WITH FUEL AND OIL Dangerous working materials, according to accident prevention, are all explosive, fire-provoking, easy flammable, poisonous, injurious to health and corrosive materials. In particular: -spirit - mineral oil - battery acid -antifreeze - varnish and dilutions -solvents. In case of fire of such materials, do not extinguish with water. Use carbon dioxide extinguishers or powder extinguishers. Notify the fire department. In case of spilling such materials, e.g. while refueling, these are to be absorbed with sand, earth or suitable binding agents, and to be eliminated. ATTENTION: To avoid health troubles, the following items are to be considered: - Avoid direct contact with dangerous materials. - Change clothing contaminated with dangerous materials as soon as possible. - Do not keep oily cloths in your overalls. - Clean oily parts of your body only with skin-care products (never use abrading sand or solvent). - Never put working materials into drinks bottles. 2.13. MEASURES IN CASE OF ACCIDENTS Products First Aid Skin Eyes Swallowing Diesel fuel DO NOT VOMIT and mineral oil remove contaminated rinse extensively with The greatest hazard after inadvertent taking consists in lubricating grease clothing and thorough- water for at least 10 min. the fact that through aspiration liquid reaches the lung. antifreeze ly clean the skin brake fluid with water and soap SEE THE VOMIT SHOULD NOT BE STIMULATED. IMMEDIATELY battery acid DOCTOR SEE THE NEAREST DOCTOR Z001007/0_05_August 2011 THIS PAGE IS INTENTIONALLY BLANK Z001007/0_05_August 2011 3. Quality DIRECTIVES FOR ASSEMBLY TABLE OF CONTENTS 3.1. SPECIFICATION OF SPARE PARTS........................................................... 3 3.1.1. Hybrid installation ...................................................................................... 3 3.2. WORKSHOP PROFILE ............................................................................... 3 3.2.1. For Hybrid ................................................................................................. 3 3.3. ASSEMBLY OF PLUG CONNECTIONS ..................................................... 4 3.3.1. Plug connection for steel tube ..................................................................... 4 3.3.2. Plug connection for plastic tube................................................................... 4 3.3.4. Checking of plug connections 3.3.5. Assembly of Raufoss plug systems.............................................................. 5 3.3.6. Sealing of screwed pipe joints .................................................................... 5 3.3.7. Tightening torque....................................................................................... 6 3.3.8. Pipe relaying ............................................................................................. 7 ..................................................................... 5 3.4. ELECTRICAL CONNECTIONS.................................................................... 8 3.4.1. Tightening torques for electrical connections . .............................................. 8 3.5. TIGHTENING TORQUES ............................................................................ 8 3.6. CHECKING OF TORQUE WRENCH . ......................................................... 9 3.7. NONDESTRUCTIVE TESTING OF MATERIALS . ...................................... 9 3.8. USE OF ADHESIVE AND SEALING MATERIALS ..................................... 9 3.9. SOLVENT FREE SEALING MATERIALS ................................................... 9 3.9.1. General directions for use ......................................................................... 10 Z001007/0_05_August 2011 3. QUALITY DIRECTIVES FOR ASSEMBLY NOTES Z001007/0_05_August 2011 3. QUALITY DIRECTIVES FOR ASSEMBLY For the assembly of spare parts, the manufacturer's instructions as well as legal regulations are to be considered. If repaired components or units are used as spare parts, the machining directives of the manufacturer are to be kept. Safety components are components which due to a change of their initial form, their surface and material resistance will no more guarantee operating reliability and traffic safety and may cause considerable material damage or even personal damage. Such components may only be repaired or assembled if all testing and measuring instruments required for determination of component quality resp. proper conditions of installation are guaranteed. Model-depending units and parts are components which are subject to approval in the course of standardization of the boat. Their failure means a risk for traffic safety. Parts subject to design approval are components which are of particular importance for traffic safety and operating reliability, and which are approved with regard to their effectiveness, irrespective of the vehicle. In case of an exchange, such components may be replaced by design-approved parts only. 3.1. SPECIFICATION OF SPARE PARTS Your STEYR diesel engine with direct fuel injection has been designed for high output. Only use GENUINE - STEYR - spare parts to avoid any loss of efficiency. You, therefore, should insist on the known quality of GENUINE - STEYR spare parts and should never use parts of unknown quality. Chapter 17 (appendix) contains a proposal on spare parts. 3.1.1. Hybrid installation Only use genuine recommended spare parts and spare part assemblies for Hybrid system. Never try to repair spare parts, which have been delivered as assembly by STEYR MOTORS. If necessary contact your STEYR MOTORS distributor, dealer or STEYR MOTORS AUSTRIA. Specification of Hybrid spare part assemblies see STEYR MOTORS Hybrid spare part catalogue. For standard scope of delivery see schematic 2180673-0 for 4-cylinder and 2180674-0 for 6-cylinder (see chapter 19/Appendix). 3.2. WORKSHOP PROFILE Irrespective of the individual repair steps and legal regulations, the workshop should meet the following requirements: - clean, dry and dust-free ambience / no metal debree - lifting device (crane) with a carrying capacity of at least 5 000 N - cleaning accommodation (washbasin) for contaminated components - tool pertaining to commercial customs - proper testing and measuring appliances - collecting trays for fuel and oil. Depending on the repair step to be carried out, tools according to the TOOL catalogue are to be procured. In addition, procurement and stock of required fuel and oil, spare- and wear parts (e.g. seals, filters, anodes,..) is to be considered. For authorized dealers and workshops, a minimum standard as to tools of stage 1 / service tools is required. 3.2.1. For Hybrid For authorized dealers and workshops STEYR MOTORS tool equipment KIT 1, 2, 3 (see tool catalogue Z001002/1) is required. Z001007/0_05_August 2011 3.3. ASSEMBLY OF PLUG CONNECTIONS 3.3.1. Plug connections for steel tube For tubes with an outside diameter up to 10 mm it is recommended to screw the relevant sockets of the plug connections into the respective devices, and to carry out assembly of the piping on the installation site. The prepared end of tube with union nut and cutting ring is plugged directly into the threaded socket and the union nut is done up by hand to the tangible stop on the cutting ring. Now press the tube against the stop in the threaded socket, and tighten the union nut for approx. one 3/4 turn. In the course of this, the tube must not turn. Since the cutting ring has now picked up the tube, a further pressing of the tube is unnecessary. Final tightening is done by repeated screwing down of the union nut for approx. 1 turn. After this, disengage the union nut and check if the cutting ring's edge has penetrated the outer skin of the tube and if the collar in front of the edge is visible. If necessary, the union nut is to be tightened once again. It is insignificant if the cutting ring at the end of tube can be turned. After completion of the connection as well as after any loosening, tighten the union nut by means of a standard wrench, without increased expenditure of energy. 3.3.2. Plug connection for plastic tube For tubes with an outside diameter up to 10 mm it is recommended to screw the relevant sockets of the plug connections into the respective devices, and to carry out assembly of the piping on the installation site. The end of tube with socket and union nut is done up by hand to the tangible stop on the cutting ring. Now press the tube against the stop in the threaded socket and tighten the union nut with the torque specified. In the course of this, the tube must not turn. Z001007/0_05_August 2011 3.3.4. Checking of plug connections After having tightened the union nut, unscrew it again and check if the cutting edge of the cutting ring has penetrated the outer skin of the tube and if the elevated collar in front of the edge is visible. 3.3.5. Assembly of Raufoss plug systems ATTENTION: FOR SAFETY REASONS, SOCKETS MUST NOT BE DISMANTLED. Before insertion, mark the plastic tube at gape "x", depending on its diameter, and then push it into the socket up to this mark. Afterwards check clamping of the plastic tube by a quick traction in direction "B". NOTE: THE PLASTIC TUBE MUST NOT TURN IN THE SOCKET. 3.3.6. Sealing of screwed pipe joints Before assembly of the plug connections, thinly coat the outer side of the cutting ring with a "sealing agent for screwings" (A). For screwed pipe joints of hydraulic piping, coat the point of contact tube : screwed pipe joint with "standard grease" (B). ATTENTION: GREASE AND SEALING AGENTS MUST NOT ENTER INTO PIPING Z001007/0_05_August 2011 3.3.7. Tightening torques cutting ring connections for steel tubes: Tube Torque 6 10 - 12 Nm cutting ring connections for plastic tubes: Tube Torque 6 16 - 20 Nm 8 25 - 30 Nm ATTENTION: ABSOLUTELY USE SLIP-On SLEEVES! clamping ring connections for plastic tubes: Tube Torque 12 30 - 50 Nm screwed pipe-joints in aluminum housings: Thread Torque M 10x1 20 Nm M 12x1,5 26 Nm M 14x1,5 28 Nm M 16x1,5 35 Nm M18x1,5 38 Nm M22x1,5 40 Nm M26x1,5 50 Nm Z001007/0_05_August 2011 3.3.8. Pipe relaying During assembly of pipings, take care of a non-chafing and, for plastic tubes, even of a non-twisting relaying. Grooves or other damages of the tube surface are to be avoided. Damaged tubes are to be exchanged. If plastic tubes are clamped with cable bond, it is to be ensured that the tubes are not constricted. Relaying is to be done with sufficient safety distance to chafe marks. In case of possible chafing, use an edge protection or a spacer. 3.4. ELECTRICAL CONNECTIONS Indication for correctly connected mating connectors is an audible click! Z001007/0_05_August 2011 Z001007/0_05_August 2011 3.4.1. Tightening torques for electrical connections Thread Torque M5 6 Nm M6 8 Nm M8 11 Nm M10 16 Nm Z001007/0_05_August 2011 3.5. TIGHTENING TORQUES The values in this table refer to industrial standards and are to be applied in case of no indication of specific tightening torques. For studs, the tightening torques are to be reduced for 50 %. µ total *) grade of strength nominal 0,100 µ total MA in Nm µ total MA in NM grade of strength 8,8 10,912,9 metric control thread Ø nominal 0,125 MA in NM grade of strength 8,8 10,912,9 metric control thread Ø nominal 0,140 Ø 8,810,92,9 metric control thread M 4 2,43,3 4 M 4 2,73,88 4,6 M 4 2,9 4,1 4,9 M 5 4,9 8 M 5 5,5 9,5 M 5 6 8,5 10 M 6 (M 7) 7 8 8 12 14 M 6 9,5 13 16 M 6 10 14 17 13 19 23 (M 7) 15 22 26 (M 7) 16 23 28 M 8 20 2834 M 8 233239 M 8 2535 41 M 10 40 56 M 10 46 M 10 49 83 67 64 77 69 M 12 69 98 115 M 12 80 110 135 M 12 86 120 145 M 14 110 155 185 M 14 125 180 215 M 14 135 190 230 M 16 170 240 285 M 16 195 275330 M 18 235330395 M 18 270390 455 M 16 210 295355 M 18 290 405 485 M 20330 465 560 M 20385 540 650 M 20 410 580 690 M 22 620 750 M 22 720 870 M 22 550 780 930 445 510 M 24 570 800 960 M 24 660 930 1100 M 24 710 1000 1200 M 27 840 1200 1400 M 27 980 1400 1650 M 27 1050 1500 1800 M 30 1150 1600 1950 M 30 1350 1850 2250 M 30 1450 2000 2400 metric metric metric control thread nominal Ø nominal Ø nominal Ø control thread control thread M 8x1 223036 M 8x1 2535 42 M 8x1 2738 45 M 10x1,25 42 59 71 M 10 x 1,25 49 68 82 M 10x1,25 52 73 88 M 12x1,25 76 105 130 M 12x1,25 88 125 150 M 12x1,25 95 135 160 M 12x1,5 72 100 120 M 12x1,5 83 115 140 M 12x1,5 90 125 150 M 14x1,5 120 165 200 M 14x1,5 140 195 235 M 14x1,5 150 210 250 M 16x1,5 180 250300 M 16x1,5 210 295350 M 16x1,5 225315380 M 18x1,5 260365 425 M 18x1,5325 435 M 18x1,5305 510 460 550 M 20x1,5360 510 610 M 20x1,5 425 600 720 M 20x1,5 460 640 770 M 22x1,5 680 810 M 22x1,5 570 800 960 M 22x1,5 610 860 1050 480 M 24x2 610 860 1050 M 24x2 720 1000 1200 M 24x2 780 1100 1300 M 27x2 900 1250 1500 M 27x2 1050 1500 1800 M 27x2 1150 1600 1950 M 30x2 1250 1750 2100 M 30x2 1450 2050 2500 M 30x2 1600 2250 2700 If the tightening torque of a screw connection is not achieved, the strength of the screw / nut is insufficient or the ratio of friction does not correspond. In any of these cases, the screw / nut is to be exchanged *) µ total = total friction coefficient Z001007/0_05_August 2011 3.6. CHECKING OF TORQUE WRENCH The torque wrench requires regular checking as to the values adjusted. For signaling torque wrenches the release value is tested, and for measuring torque wrenches the scale accuracy . 3.7. NONDESTRUCTIVE TESTING OF MATERIALS To detect and locate surface cracks, nondestructive testing based on the color penetration testing process is recommended. In this case, the workpiece is sprayed or coated with a penetrating agent, and after drying a developer is sprayed on. After a development period of approx. 10 min., defects on the workpiece appear as points or lines. 3.8. USE OF ADHESIVE AND SEALING MATERIALS The workshop manual names adhesive and sealing materials for the repair of engines and aggregates, which may be used at operating temperatures up to 150°C and with mediums such as water, cooling and hydraulic liquids, engine and transmission lubricants as well as fuels. Solvent free sealing material Hardening without loss in volume; tightening of screw joints hence not required. Anaerobic sealing materials are used for securing, fixing and sealing, and will only harden with exclusion of air. Sealing material containing solvent Their volatile ingredients will cause a loss of volume during hardening. For repair works, their exhaust period is to be considered. If such sealing material is used, the workshop manual will contain a particular reference. 3.9. SOLVENT FREE SEALING MATERIALS Silicon sealing materials consist of silicon and fillers, and are solvent-free. From the tube or cartridge, the product is applied in a straight line on the cleaned surface. Residues of sealing material are removed by means of cleaning agent. Silicon sealing material is to be stored at temperatures below 30° C. Anaerobic sealing materials consist of single-component synthetic in fluid form. The product is applied on the assembly parts and remains fluid as long as it is in touch with the ambient air (oxygen). Only as soon as the parts are assembled, the chemical reaction, the transformation of fluid into a synthetic built up by molecular chains, begins through exclusion of atmospheric oxygen and through metal contact. Any surplus remaining after assembly or being forced out of the connection remains fluid and can be removed easily. Z001007/0_05_August 2011 3.9.1. General directions for use of anaerobic sealing materials Cleanliness of components Non-metallic surface protection must be removed. In case of repair works, soiled and oily components are to be cleaned and residues of adhesive synthetic are to be removed. Tapholes are recut with an appropriate tap and blown off with compressed air. If solvents or degreasing agents are used for cleaning, make sure that they have volatilized before application of the synthetic. Storage At temperatures below 28° C, 1 year minimum. Directions for securing (S) Indication: SM ....... Medium-tight Securing (the connection can be loosened without problems) Indication: SF ........ Tight Securing (the connection is difficult to loosen) Application: Screw joints Fixing procedure In general, it is sufficient to apply the synthetic on the screw thread. If screws are screwed into socket threads, only wet the tap hole in order to let the air escape during screwing. Screws or nuts to be tightened with a specified torque are slightly oiled on their contact surface or housing section. Directions for fixing (B) Indication: BM ....... Medium-tight Fixing Indication: BF ........ Tight Fixing Application: Joint connections, sleeves, gear wheels, pulleys, bearings etc. Jointing procedure For jointing connections, both jointing parts are to be wetted. Wetting should completely cover the jointing surfaces. In case of sliding fits, the parts are encased by turning. No strength may be exerted to the connection until sturdiness is reached (for duration see table 1). Directions for sealing (D) Indication: DR ....... Sealing of pipe joint connections Indication: DF ........ Sealing of plane surfaces Application: Sealing of threads, screwings, joint connections and plane surfaces. Hardening time Z001007/0_05_August 2011 4. VariantS ENGINE - PROPULSION TABLE OF CONTENTS 4.1. VERSIONS FOR 6 CYLINDER MARINE ENGINES ................................... 3 4.2. VERSIONS FOR 4 CYLINDER MARINE ENGINES ................................... 6 Z001007/0_05_August 2011 4. VARIANTS ENGINE - PROPULSION NOTES Z001007/0_05_August 2011 4. VARIANTS ENGINE - PROPULSION 4.1. VERSIONS FOR 4 CYLINDER MARINE ENGINES Bobtail - Version Equipment with side mounted raw water pump with side mounted raw water pump, power steering pump Hybrid - Version Inborder i.e. ZF 45 Marinegear Down angle Inborder i.e. ZF 63 Marinegear For exact installation dimensions, see chapter 17 "Drill templates" Z001007/0_05_August 2011 Lifeboat Engine Equipment Bobtail "B" Direct gearbox A-down angle gear box Parallel offset gearbox For exact installation dimensions, see chapter 17 "Drill templates" Z001007/0_05_August 2011 Jet Drive TYPE Alamarin Hamilton Castoldi Stern Drive TYPE Mercury Alpha Bravo I, II & III Volvo DP 290 Volvo DP 290 Hydraulic SX - Stern Drive For exact installation dimensions, see chapter 17 "Drill templates" Z001007/0_05_August 2011 4.2. VERSIONS FOR 6 CYLINDER MARINE ENGINES Bobtail - Version Equipment with side mounted raw water pump with side mounted raw water pump, power steering pump and front mounted auxiliary drive-PTO Hybrid - Version Inborder i.e. ZF 63 Marine gear Down angle For exact installation dimensions, see chapter 17 "Drill templates" Transmission i = 2.5V, shaft angle 12° i = 2.0V, shaft angle 12° Z001007/0_05_August 2011 Lifeboat Engine Bobtail "B" A-down angle gear box Equipment Direct gearbox Parallel offset gearbox Jet Drive TYPE Alamarin Hamilton Castoldi Stern drive TYPE Mercury Bravo II & III Volvo DP 290 Stern Power Drive Volvo DP 290 ZF Hydraulic Pump Volvo SX - Drive King Cobra Drive For exact installation dimensions, see chapter 17 "Drill templates" Z001007/0_05_August 2011 4.3. TaBLE ENGINE FAMILY & Parts NUMBErS Table engine-family & part numbers of emission relevant components Zeichnungsnummern der abgasrelevanten Bauteile Description Engine Family Bezeich- nung der Motorenfamilie / Motorengruppe M14TCAM M14TCAM M14TCAM M14TCAM M14TCAM M16TCAM M16TCAM M16TCAM M16TCAM M16TCAM M16TCAM M16TCAM M16TCAM M16TCAM Engine Model Motortyp MO114K33 MO144V38 MO144M38 MO164M40 MO174V40 MO156K25 MO126K25 MO166M28 MO196K35 MO236K42 MO256K43 MO256H45 MO286H43 STAMMMOTOR = MO306H43W J Cylinderblock Camshaft Zylinder- block Nocken- welle Ladeluft- kühler Turbo Lader 2203230-3 2203230-3 2203230-3 2203230-3 2203230-3 2205184-E 2205184-E 2205184-2 2205184-2 2205184-2 2205184-2 2205184-2 2205184-E 2205184-E TurboAfter-cooler charger 2203266-6 2203706-0 MOTA 2203266-6 2203706-0 MOTA 2203266-6 2203706-0 MOTA 2203266-6 2203706-0 MOTA 2203266-1 2203706-0 MOTA 2177843-0 2179781-0 MOTA ND 2177843-0 2179781-0 MOTA ND 2177843-0 2178443-0 MOTA 2177843-0 2178443-0 MOTA 2177843-0 2178443-0 MOTA 2177843-0 2178443-0 MOTA 2177843-0 2178443-0 MOTA 2177843-0 2179781-0 MOTA ND 2179202-0 2177843-0 2179781-0 MOTA ND 2200380-0 or optional 4032394 2203505-2 2203756-1 2205221-3 2205221-3 2203892-0 or optional 7632635003S 2203505-2 2203505-2 2205221-3 2173969-0 2173969-0 2173969-0 2179202-0 Piston Fuel pump Unit Injector SMO-Software No. Kraftstoffpumpe Pumpe Düse Nr. SMO-Soft-ware Nr. 2179594-0 2173396-4 or optional 7.50038.00 2176557-0 2176844-1 2179594-0 2173396-4 or optional 7.50038.00 2176557-0 2176844-6 2179594-0 2173396-4 or optional 7.50038.00 2176557-0 2176844-2 2179594-0 2173396-4 or optional 7.50038.00 2176557-0 2176844-4 2205770-3 2173396-4 or optional 7.50038.00 2176552-1 2176844-9 2205770-3 2173396-6 or optional 7.00228.50 2176552-1 2176845-0 2205770-3 2173396-6 or optional 7.00228.50 2176552-1 2176845-2 2179594-0 2173396-4 or optional 7.50038.00 2176557-0 2176846-6 2179594-0 2173396-4 or optional 7.50038.00 2176555-5 2176846-4 2179594-0 2173396-4 or optional 7.50038.00 2176557-0 2176806-L 2179594-0 2173396-4 or optional 7.50038.00 2176557-0 2176846-2 2179594-0 2173396-4 or optional 7.50038.00 2176557-0 2176846-3 2205770-3 2173396-6 or optional 7.00228.50 2176552-1 2176846-5 2205770-3 2173396-6 or optional 7.00228.50 2176552-1 2176846-8 Kolben Z001007/0_05_August 2011 5. ENGINE INSTALLATION TABLE OF CONTENTS 5.1. FOUNDATION . .......................................................................................... 3 5.2. POWER TRANSMISSION.......................................................................... 3 .................................................................................................. 3 5.2.1. Coupling 5.2.2. Universal joint shafts . ............................................................................... 4 5.2.3. Additional cooling circuit on engine............................................................. 5 5.2.4. Hybrid coupler. ......................................................................................... 5 5.3. ENGINE BASE . ......................................................................................... 6 5.3.1. Engine base on synthetic boats .................................................................. 5 5.4. SPACE FOR MAINTENANCE.................................................................... 6 5.4.1. Hybrid - Space for Maintenance .................................................................. 6 5.5. ENGINE INCLINATION . ........................................................................... 7 5.6. LIFTING EYES .......................................................................................... 7 5.7. CHECKING OF ENGINE BASE ............................................................... 8 5.8. PROPELLER SHAFT FLANGE . .............................................................. 8 5.9. ENGINE SUSPENSION............................................................................. 9 5.9.1. Adjustment of engine on flexible engine supports . ....................................... 9 5.10. ELASTIC SHAFT COUPLING.................................................................. 10 5.11. STEP BEARING . ..................................................................................... 10 5.12. ADJUSTMENT OF ENGINE DRIVE UNIT................................................ 11 5.13. TWIN INSTALLATION.............................................................................. 12 5.14. SHAFT AND STEM TUBE........................................................................ 12 5.15. PROPELLER ........................................................................................... 13 Z001007/0_05_August 2011 5. ENGINE INSTALLATION TABLE OF CONTENTS 5.15.1. Dimensions.......................................................................................... 13 5.15.2. Propeller pitch...................................................................................... 13 5.15.4. Sense of rotation................................................................................... 14 5.15.5. Number of blades ................................................................................. 14 5.15.6. Axle hub .............................................................................................. 14 5.15.7. Adjustment of propeller pitch ................................................................. 14 5.15.8. Space between propeller and boat .......................................................... 15 5.15.9. Sediments ........................................................................................... 15 5.15.10. Choice of propeller ............................................................................... 15 5.15.11. Cavitation ............................................................................................ 16 5.15.3. Blade surface ....................................................................................... 14 5.16. PROPELLER - THRUST BEARING RESP. STEP BEARING . ............... 16 Z001007/0_05_August 2011 5. ENGINE INSTALLATION After pre-planning, assembly of the engine usually begins with the engine base. Then the stem bearings, if available, the step- or thrust bearing and the propeller shaft are mounted. After that, the fuel tanks, the water tanks with control device and the battery box are installed. The engine is attached to the base and aligned in relation to the propeller shaft. Then the exhaust pipes, the air pipe to the engine, the aeration pipes and the sound-absorbing material for the engine compartment are mounted. Manoeuvring apparatus, instruments and electrical equipment are installed last. After the final trial run, a precise check with final inspection is to be carried out. Test results to be noted. 5.1. FOUNDATION The individual aggregates and parts of the marine propulsion unit must be aligned precisely to each other, in order to guarantee a trouble-free operation. The distortion rigidity of the foundation should thus be to such an extent that ship distorsions due to motion of the sea or loading resp. unloading of the ship are not transmitted onto the propulsion unit. In addition, the foundation must absorb the propeller thrust of the thrust bearing and transmit it onto the hull. The foundation's supporting surface for the propulsion unit should be for approx. 3/8 - 13/16" (10 - 20 mm) under the nominal size in order to permit, during assembly and alignment of the unit, the balancing of unevenness and differences by means of fitting pieces. All fitting pieces should be of the same material, e.g. steel or cast steel. Soft material, e.g. copper, must not be used for fitting pieces and shims. For boats made of wood or synthetics as well as for ships not built for a self-contained propulsion or where a considerably stronger unit should be installed, it may be useful to attach a subframe for reinforcement of the foundation. 5.2. POWER TRANSMISSION 5.2.1. Coupling For power transmission from the engine to the gear we recommend a turn-elastic coupling. In all other cases of suspension of engine and gear, a turn- and radial elastic or an articulated coupling with torsion spring plate is required between engine and gear. Coupling size depends on the maximum engine torque to be transmitted, the torque peaks due to the degree of irregularity of the engine, and the alternating moments of torsional vibration at critical speeds of the boat . Based on a torsional-vibration computation it must be checked whether the chosen coupling as well as dimensioning and arrangement of the unit could lead to undue torsional vibrations causing severe damages. For couplings using rubber as spring elements and for power transmission, it is to be considered that the transferable alternating moment of oscillation decreases very fast with increasing temperature of the rubber. Based on the information of a known manufacturer of elastic couplings, the temperature factor at 60°C is 1, and at 80°C 0,5 only. Therefore an effective aeration of the coupling is useful since the rubber expands or contracts with ambient temperature. For assembly of the clutch and alignment of the coupling flanges, the manufacturer's instructions are to be considered. When assembling a coupling, or a connecting shaft between engine and gear, or when flanging a gear, the end clearance of the engine's crankshaft must not be affected. V-belts, gear couplings or similar connecting links thus should permit to be engaged easily. Also when flanging a gear onto the engine, make sure that after tightening of the fastening screws no axial load or tension is transmitted onto the crankshaft. It is, therefore, necessary to check the end clearance of the crankshaft journal before and after assembly. During both checks, the clearance must be equal. The crankshaft must not spring back after pressing it against the front and rear collar of the lapped bearing. Z001007/0_05_August 2011 On boats destined for frequent reversing and manoeuvring, e.g. service boats, the couplings are heavily stressed by start-up impacts and acceleration. For this reason, a larger coupling should be chosen. In addition, it should be considered not to drive too long at the critical speed range. If a disconnectable coupling is used, the admissible axial load of the crankshaft must not be exceeded. 5.2.2. Universal joint shafts Principles: A universal joint produces a more or less strong irregularity on the driving axle, depending on the diffraction angle. This irregularity is compensated by providing a second universal joint, under the following conditions: 1. The two forks of the intermediate part must be coplanar. 2. The diffraction angle of the second joint must be of the same size as that of the first one; both joints must be coplanar. ill. 5/1 1 forks of intermediate shaft 2marking The illustration shows how the two forks of the intermediate shaft should be positioned to each other (acc. to 1. - coplanar). The splined shaft ends mostly show index arrows which should be opposite when connecting the shaft. The following illustration shows the Z- layout of a universal-joint shaft. The two angles ß1 and ß2 must be equal. This means that with Z- design the contact faces of the shaft ends for drive and drift must be parallel to each other. IMPORTANT: diffraction angle ß min = 1°, ß max = 6° ill. 5/2 Slight deviations from these requirements are admissible under certain conditions; to what extent depends on the application, the speed, the diffraction angle etc. Depending on the diffraction angle of the two universal joints of a shaft, the intermediate shaft will be more or less accelerated or retarded with every rotation. This causes a stimulation of oscillation which is to be considered for the location of the universal-joint shaft between engine and gear. Overhanging mass on the shaft end at the flywheel side, such as e.g. couplings, may be critical. Considering the additionally occurring bending moment which depends on the initiated torque, the length of individual universal-joint shafts cannot be chosen at random. If necessary, several universal-joints shafts are to be arranged. Z001007/0_05_August 2011 5.2.3. Additional cooling circuit on engine (e.g. transmission oil cooling etc.) For additional cooling circuit fitted on engine's tandem/triple cooler following specification must be kept: • Tandem cooler valid for engine type: MO84K32, MO94K33, MO114K33, MO144M38, MO144V38, MO164M40, MO174V40, MO126M28, MO166M28, MO196K35, MO236K42 gear oil side: Transmission oil: Shell Donax TA Max. oil flow: 24,5 l /min Max. pressure drop: 500 mbar @ 24,5 l/min and 90°C oil inlet temperature Rated cooling performance: oil flow 24,5 l/min, oil inlet: 95°C; oil outlet: 80°C; at 35°C water temperature by efficiency min. 25%; capacity min. 10,3 kW Specified for below mentioned raw water cooling supply: Max. raw water flow: 150 l/min Max. raw water inlet temperature: 35°C Max. pressure drop: 290 mbar @ 150 l/min and 35°C • Triple cooler valid for engine type: MO256K43, MO256H45, MO286H43 gear oil side: Transmission oil: Shell Donax TA Max. oil flow: 24,5 l/min Max. pressure drop: 500 mbar @ 24,5 l/min and 90°C oil inlet temperature Rated cooling performance: oil flow 24,5 l/min, oil inlet: 95°C; oil outlet: 80°C; at 35°C water temperature by efficiency min. 25%; capacity min. 10,3 kW Specified for below mentioned raw water cooling supply: Max. raw water flow: 150 l/min Max. raw water inlet temperature: 35°C Max. pressure drop: 290 mbar @ 150 l/min and 35°C •Triple cooler valid for engine type: MO306H43WJ gear oil side: Transmission oil: Shell Donax TA Max. oil flow: 24,5 l/min Max. pressure drop: 500 mbar @ 24,5 l/min and 90°C oil inlet temperature Rated cooling performance: oil flow 24,5 l/min, oil inlet: 95°C; oil outlet: 80°C; at 35°C water temperature by efficiency min. 25%; capacity min. 10,3 kW Specified for below mentioned raw water cooling supply: Max. raw water flow: 200 l/min Max. raw water inlet temperature: 35°C Max. pressure drop: 150 mbar @ 200l/min and 35°C Z001007/0_05_August 2011 5.2.4. Hybrid coupler For 4 cylinder marine engines recommended propulsion: (STEYR MOTORS coupling for 4 cylinder - art. no. 2179164-N) Shaft • ZF25 • ZF45 Sterndrive • Mercruiser Bravo 1 • Mercruiser Bravo 2 • Mercruiser Bravo 3 Saildrive SD 12 only for MO54NA33 and MO84K32 For 6 cylinder marine engines recommended propulsion: (STEYR MOTORS coupling for 6 cylinder - art. no. 2179952-N) Shaft Sterndrive • ZF45 • Mercruiser Bravo 1 • ZF63 • Mercruiser Bravo 2 • Mercruiser Bravo 3 Jetdrive not to use with engine model MO126M28 and MO156K25 If any other propulsion is applied a torsional vibration analysis is recommended and has to be approved by STEYR MOTORS authorised dealer. If any drive shaft is connected between engine PTO and subsequent transmission approval has to be given by component supplier. 5.3. ENGINE BASE The engine base should be of a very rigid design. Its suspension is to be distributed on the maximum surface over the ship bottom. The engine base should be strong enough to absorb with free play the compressive- and shearing forces of the propeller. Strains through heavy sea and dynamic load are also to be considered. 5.3.1. Engine base on synthetic boats On synthetic boats, the engine base may be made of flat irons (see ill. 5/3) casted in the boat. The base (3) should be constructed as a box, and filled with damp-proof material (4). The flat irons (1) should be long enough to distribute the load of the engine over a surface as large as possible. To facilitate screwing of the engine mounts, nuts (2) can also be cast . 5.4. SPACE FOR MAINTENANCE The engine compartment is to be designed in such a way that maintenance work will not be impaired by bottom plates or other equipment. Compare these requirements to the maintenance chart in the operating manual. Also take care that there is enough space for lifting and lowering the engine. Before beginning the assembly, make sure that scale drawings for the engine and its equipment are available (see appendix). All necessary dimensions for assembly follow from the scale drawings, e.g. the distance from the crankshaft centre to the engine bearers (reversing gear bearers) and to the centre line of the propeller shaft. ill. 5/4 IMPORTANT: Keep sufficient distance between base frame, oil pan and starter motor (< 3/4" / < 20 mm). Z001007/0_05_August 2011 r min=25cm do not bend! Electrical connections and shifting cable must be accessible for maintenance as illustrated: Coupling actuator Generally consider schematic mounting positions for Hybrid components 2180662-0 (see chapter 19/Appendix). r min=25cm do not bend! 5.4.1. Hybrid - Space for Maintenance Generator 5.5. ENGINE INCLINATION Max. permissible engine inclination (backwards in direction of flywheel) corresponds to angle A, see table. The engine must not be inclined downward in direction of the heat exchanger, since such an installation could affect the cooling due to remaining air pockets. When installing the engine with the flywheel side in direction of the bow, the inclination in direction of the flywheel should be 3° at least. Such an installation with inverted engine occurs with a miter gear. During course, A may be up to 3° larger and B up to 3° smaller (the stern is lower). Maximum engine inclination for assembly: max. inclination in ° A B C D D 4 & 6 Cyl. 10° 10° 10° 5° ill. 5/5 5.6. LIFTING EYES To permit an easy lifting of the engine, strong lifting eyes are provided bow- and stern-sided. See ill. 5/6 and 5/7. 6 Cyl. Engine 4 Cyl. Engine ATTENTION: NEVER PLACE THE ENGINE DIRECTLY ONto THE FLOOR. THE OIL PAN AND OTHER PARTS COULD BE DAMAGED. JACK UP THE ENGINE ON THE ENGINE BEARERS SO THAT ITS LOWER PART IS TRAILING, OR KEEP THE ENGINE IN THE TRANSPORT BOX UNTIL IT IS LIFTED INTO THE BOAT. Do not lift the engine from any single lifting point, damage to the engine or personnel injury could accrue. When having to tilt the engines for installation use an adjustable load leveler to aid in installation. Z001007/0_05_August 2011 5.7. CHECKING OF ENGINE BASE When preparing the engine base, make sure that the upper contact surfaces of the bearers are parallel to the centre line of the propeller shafts and are not swung. For assistance during assembly and checking of the engine base, a short traversing slide with the same diameter as the propeller shaft may be used stern-sided; see ill. 5/8. Through a bore (1/12" / 2 mm diameter) in the slide a 1/12" (2 mm) copper wire is strained to a holder. Then adjust the holder in such a way that the wire is in the centre of the front end of the propeller shaft sleeve. Then measure the base bearers and check their correct height and that they are not swung. ill. 5/8 checking of engine base 1 steel rulers 2 stem tube 3 traversing slide (dimensions correspond to respective shaft size) 4 5 6 copper wire holder with chuck distance engine base surface - propeller shaft centre (depending on type of engine and reversing gear) 5.8. PROPELLER SHAFT FLANGE At delivery, the flange to the reversing gear is rough-drilled only. The bores are to be made with utmost accuracy and have to correspond to the guiding edge on the flange. Max. admissible radial stop: 0,05 mm ill. 5/9 In many cases it is recommended to bore the coupling flange to the reversing gear with the same conicity as for the propeller. Thus the shaft will be equal on both ends and can, therefore, be turned in case of being worn out in the stem bearing. Z001007/0_05_August 2011 5.9. ENGINE MOUNTS The flexible engine mounts provide proper insulation between engine and base frame, thus reducing the noise conveyed to the hull. This engine suspension may also absorb the thrust and shearing forces of the propeller. For all STEYR Marine Engine ill. 5/10 A B C D bore dim. bearing flange position of adjustment nut (~ 5 mm) adjustment space (+/- 5 mm) spacer plate (if required) Install the engine mounts directly onto the member of the base frame see ill. 5/3 For an assembly with flexible engine mounts the overall height of the engine mounts is to be considered to achieve the proper installation height of the engine. Height Adjustment recommended to achieve accurate alignment of the suspended unit. When fitting mounts with height adjusters, care must be taken to ensure that excessive bending forces are not imposed on the center spindle (screw).Mountings fitted with height adjusters are designed to allow a variation of ± 5 mm on nominal mean height (see illustration 5 mm distance between adjustment nuts). Any larger variations need to be accommodated by fitting shims or packers under the mounting base. Vertical and horizontal alignment should then be effected using the height adjusters and slotted holes in the mounting base. Recheck alignment after fixings are tightened to the specified torque values (nut center spindle screw 110 – 120 Nm). 5.9.1. Adjustment of engine on flexible engine mounts The settings of the height adjusters should be equal right and left. Between the front and rear of the engine a difference in adjustment is admissible and often unavoidable. Before beginning the alignment the engine should rest on the mounts for about 48 hours. Proper setting of the engine mounts can be done as follows: Roughly align the engine with the propeller shaft on the mounts by means of adjusting nuts, without connecting the propeller shaft to the flange on the reversing gear. Lift the engine at the front to such an extent that both front supports are released from the lower nuts of the mounts. Lower the engine and adjust the nuts so that both engine supports sit simultaneously. Same procedure at the rear side of the engine. The engine foundation must be rigid enough to absorb the concentrated load. After correct adjustment of the engine mounts, the engine can be balanced by front and rear adjustment of the two nuts right and left with exactly the same number of turns. In longitudinal direction, the vibration dampers are to be mounted free of tension. Engine mounts being mounted with initial stress may transmit vibrations and sound into the hull. The oblong holes in the vibration damper feet permit a lateral correction of the adjustment. When the boat is in the water, the alignment is to be checked once again. Z001007/0_05_August 2011 5.10. ElastiC SHAFT COUPLING For engines with elastic suspension and a rigid stem bushing, an elastic shaft coupling is always to be mounted. Even for a rigid engine suspension, an elastic propeller shaft coupling should be mounted if there is any risk that the engine may change its position with regard to the propeller shaft, e.g. with different load of the boat. Never use the elastic shaft coupling together with the elastically supported stem bushing. This may result in heavy vibrations. Elastic engine suspension and elastically supported shaft bushing may, however, be used without elastic coupling. Engines provided for operation under heavy conditions, e.g. way through ice, are always to be equipped with elastic propeller shaft coupling. A special thrust bearing for the propeller shaft is also to be mounted. The elastic coupling should be situated between reversing gear and thrust bearing, to avoid tensions between the parts. 5.11. STEP BEARING If the distance between the supports (a in ill. 12 and 13) exceeds 6 1/2 ft (2 m), a step bearing is to be mounted. The correct distance between the step bearing and the engine is of utmost importance, which requires a computation of vibrations. Examples: Elastic engine suspension, elastic stem tube and bearing at 8° for reversing gear 1 elastic engine suspension 2 gland in rubber suspension 3 grease gun ill. 5/11 Engine with elastic suspension and fixed stem bearing 1 elastic engine suspension 2 elastic shaft coupling 3 butt-supported stem bearing Attention: The stem bearing must not be elastic. ill. 5/12 A max. distance between supports 6 1/2 ft (2 m) Engine with elastic suspension and elastically supported stem bearing 1 elastic engine suspension 2 elastically supported stem bearing Attention: The shaft coupling must not be elastic. ill. 5/13 A max. distance between supports 6 1/2 ft (2 m) Z001007/0_05_August 2011 5.12. ADJUSTMENT OF ENGINE DRIVE UNIT As soon as the base frame has been finished, the propeller shaft mounted and the other preparation works done, the engine and the reversing gear can be mounted. For engines with double reversing gears, the reversing gear is to be mounted first and exactly aligned to the propeller shaft. Then the couplings are mounted, and the engines are aligned towards the reversing gear. First adjustment of the engine on the boat can be done either on land or on the seas. Before final adjustment, the boat should, however, be on the seas for some days so that the body can take its final shape. When mounting a marine reversing gear, it is recommended to check the parallelism of the flanges by means of a dial gauge. In this case, the propeller shaft is to be moved sternwards for approx. 3/8" (10 mm) and be well supported so that the clearance in the stem tube is uniformly distributed (exactly center the shaft). Rotate the reversing gear shaft and measure at first the radial off-size. Correct the position of the reversing gear. Then check the axial off-size by a hinge dial gauge on the contact surfaces of the flange. In both cases, max. possible off-size is 0,1 mm. ill. 5/14 A checking of radial off-size B checking of axial off-size (hinge dial gauge) 1 2 3 4 1 2 3 4 dial gauge flange on reversing gear propeller shaft support of propeller shaft dial gauge flange on reversing gear propeller shaft support of propeller shaft After having finished the adjustment, prepare supporting disks fitting between the engine-reversing gear bearers and the rests on the engine. Measure the distances and prepare steel disks to be ground to the dimensions found. Make all bores for the bearers, and screw on the engine and the reversing gear. Take care that all setscrews for the high position are unscrewed so that the bearers do not rest on the screws but on the supporting disks. After alignment, remove the setscrews for high position. After launching the boat, check the adjustment once again. The boat with filled tanks and the required equipment should have been on the seas for some days. Ship bodies are elastic and do not have the same shape when they are propped up. In case of a necessary readjustment, distance plates can be mounted under the bearers. After start-up of the boat, verify at regular intervals that the adjustment of the machine unit has not changed due to deformations of the body. A bad alignment of engine and propeller shaft may cause a lot of disturbances and operating troubles. Such troubles may also result in vibrations in the hull, in the reversing gear, and in a quick wear of the propeller shaft bearings, the shaft and the stem tube supports. Z001007/0_05_August 2011 5.13. TWIN INSTALLATION When mounting engines with one propeller each, choose the reversing gears in such a way that the starboard propeller rotates clockwise and the port side propeller counterclockwise, seen in the direction of the bow. ill. 5/15 centre distance of shafts A (min. dimension) approx.: > 31" (> 787 mm) 5.14. SHAFT AND STEM TUBE To choose the right components of engine, reversing gear and propeller with regard to the respective ratio of load, follow the recommendations as to power and speed of various engines, to be found in the product information "marine engines". The combination of reduction of speed, shaft diameter and propeller size may be computed based on our recommendations on propellers, included in a separate pamphlet. Computation and determination of the propeller size may also be done by STEYR Motorentechnik (claim in time, together with drawing). Consider a sufficient distance between propeller, hull, keel, stem tube and oar. To permit a dismantling of the reversing gear or the coupling, a sternward displacement of the propeller shaft for at least 8" (200 mm) should be possible. Also take care that no transept bulkheads do interfere with dismantling. Between propeller and stem bearing a min. distance of 1" (25 mm) is to be kept in order to prevent the propeller from bucking against the stem bearing. Before mounting the shaft, its straightness is to be controlled. Check by means of a dial gauge that the shaft flanges do not twist. Max. admissible axial fault 0,1 mm. Before launching the boat, make sure that a propeller with correct pitch and diameter has been mounted. Also check that the propeller shows the correct thread (R or L) for the provided sense of rotation. The exact alignment of the whole drive unit on the foundation is a condition for trouble-free operation. On principle, assembly and alignment is done in the order driving shaft - engine. Flange connections and couplings (even elastic ones) must be released when aligning the parts connected. For elastic couplings follow the manufacturer's instructions. For alignment of the parts to be mounted a dial gauge with suitable holder and eventually a thickness gauge will be necessary. Alignment always requires two checks: vanishing check (contact accuracy) and angularity check (no bends). With two dial gauges, both checks can be done simultaneously. For each check, the part at which the dial gauge is fixed is to be moved for at least one turn. An exact alignment of the part to be mounted mostly requires several checks. Because of that it is advisable to fix the dial gauge on that part which can be turned more easily. Z001007/0_05_August 2011 5.15. PROPELLER Too less attention is paid to the propeller and in particular to its efficiency even though it is responsible for transformation of engine energy into movement. Sizing and selection of the propeller mean a positive or negative decision as to driving qualities as well as fuel consumption. Voluminous books have been written about right sizing and computation of a propeller. For this reason, the following information shall serve for better understanding of the complexity and impart basic knowledge. Of all driving possibilities developed so far, the propeller shows the best efficiency. Sizing of the propeller is determined by the boat type, the engine power and speed. 5.15.1. Dimensions A propeller is designated by diameter, pitch, number of blades, blade surface, sense of rotation and hole in the hub. Diameter of the propeller is determined by: a) engine power in horsepower or kilowatt-hours b) propeller speed (number of revolutions of engine divided through reduction of gear) c) speed of the boat. It is a wrong assumption that the propeller determines the speed, but it is the combination of engine power with adapted hull and matching propeller. The propeller diameter can be approximately computed based on the diagram enclosed, but this only for "water displacers". Before using the diagram, the max. speed of the ship is to be computed. Only use this diagram for an approximate computing of the diameter, e.g. for determining the height of the propeller frame. Computing of the correct diameter and of the pitch is to be done by a specialist. STEYR MOTORENTECHNIK offers this service to their dealers and customers. If required, please fill in the enclosed form. 5.15.2. Propeller pitch The pitch is the theoretical distance the boat runs at one rotation of the propeller, which is being determined for 100 % by the speed of the boat. Every propeller rotating in water will have a slip. Thus the advance of the boat will be approx. 60 to 75 % per rotation of the pitch. Computation of pitch: speed (m/min) pitch = pitch = pitch = 0,357 m rotation of propeller 300 1200 x slip (%) x 0,7 (30% slip) A propeller the pitch of which is not exactly adapted to the speed of the boat, will always show a lower efficiency. To reduce the diameter and then increase the pitch for the same size, which sometimes is required when the actual diameter cannot be housed, will thus reduce the efficiency. Z001007/0_05_August 2011 5.15.3. Blade surface Correct determination of the blade surface is also to be done by specialists. It depens on the speed and the type of boat, and is always indicated in relation Fa / F; F being the total area of the propeller circle and Fa the surface of all blades or wings together. Every propeller type has a fixed Fa/F relation. 5.15.4. Sense of rotation To determine the sense of rotation of a propeller, always stand behind the boat and look forward. If the propeller rotates counterclockwise, then it is a left-hand propeller, and if rotates clockwise then it is a right-hand propeller. It is the engine which always determines the sense of rotation of the propeller, which can, however, be reversed by using a reversing gear. 5.15.5. Number of blades The number of blades is determined by the speed of the boat, the number of rotations of the propeller, and the type of boat (dumb barge, fisher boat, glider .....), and is first of all a matter of experience. In general, for standard boats up to a length of approx. 70 ft (20 m), with an engine speed of more than 800 rpm., propellers with more than three blades are being used. If much speed at low revolutions is required, in particular on larger boats, even propellers with more than three blades are used. This should also be determined by specialists. For the same boat and the same engine the diameter of a four-blade propeller may be by 10 % less than that of a three-blade propeller. On sailing boats often a two-blade propeller is used which lessens the resistance and reduces the efficiency for an aliquot part only. 5.15.6. Axle hub To permit a proper and centric mounting of the propeller on the propeller shaft, the propeller should be provided with a well fitting conical hub and a spline. Mostly the cone's pitch will be 1:10. In the United States and in England one may also find cones with 1:12 and 1:16. Conicity of a hub is told by the difference between the largest and the smallest diameter, divided through the hub length. ill. 5/16 cone = D-d L 5.15.7. Adjustment of Propeller Pitch In case of a too high or too low propeller pitch, a specialist may adjust the blades within a certain limit, which, however, should be avoided as far as possible. It is a difficult task and, moreover, it is almost impossible to modify the pitch close to the hub, and to obtain a uniform pitch in every diameter of the propeller chosen at random. On principle, the pitch never should be modified for more than some cm, and this only in case of no other solution. Z001007/0_05_August 2011 5.15.8. Space between Propeller and Boat The maximum propeller diameter results from the shape of the hull. The illustration shows a displacer but even for a glider the conditions are similar. The most important size A, the space between propeller and hull, should be at least 2" (50 mm) resp. 10 % of the propeller diameter (noise, malicious vibrations). Size B should be approx. 30 % of size D. C = 3/4" (20 mm) more than the propeller hub length in order to avoid a dismantling of the oar in case of a propeller change. X = space propeller - stem bearing 1" (25 mm) ill. 5/17 5.15.9. Sediments When removing sediments from the hull, pay special attention to the propeller. Salt water in particular, but also sediments and vegetation cause additional resistance, and thus a smaller efficiency resulting in a lower speed. In general, lower propeller speeds bring about higher efficiency and less vibrations compared to high speeds. 5.15.10. Choice of Propeller There are a couple of coarse rules: In general, for a "water displacer" a 3-blade propeller with Fa/F of approx. 0,51 will be sufficient. More or larger blades do not make sense. For semi-gliders we generally recommend 3- or 4-blade propellers with Fa/F of 0,54 to 0,74. For gliding boats, 4-blade propellers with Fa/F of 0,54 to 0,74 may be considered. Most propellers are made of bronze, but propellers made of metal or aluminum are also available. Various propellers with examples of application: ill. 5/18 3-blade high-speed propeller Z001007/0_05_August 2011 ill. 5/19 3-blade propeller for commercial use ill. 5/20 3-blade propeller to be applied in regions with strong alga and algae vegetation ill. 5/21 2-blade propeller to be applied on sailing boats ill. 5/22 2-blade folding propeller to be applied on sailing boats 5.15.11. Cavitation Propellers which have not been computed correctly (e.g. a propeller with a too large pitch) may cause cavitation (formation of steam bubbles). Cavitation may damage the propeller and occurs in case of a too high underpressure on the suction side of the propeller. 5.16. Propeller - THRUST BEARING RESP. STEP BEARING All reversing gears covered by our product offer are provided with attached axial bearings for the traction and shearing forces of the propeller shafts. In case of normal load conditions, no other thrust bearings are required. For very strong loads, e.g. industrial operation on ice, separate thrust bearings may be required. In such cases, an elastic coupling between reversing gear and thrust bearing is always to be installed in order to avoid axial tensions between the two thrust bearings. With a shaft length exceeding the standard size, a separate step bearing is to be installed. The step bearing cannot take axial forces. 1 thrust bearing 2 elastic coupling ill. 5/23 Z001007/0_05_August 2011 6. COOLING SYSTEM TABLE OF CONTENTS 6.1. RAW WATER PICK UP AND BOTTOM VALVE ......................................... 3 6.2. RAW WATER FILTER ................................................................................. 4 6.3. RAW WATER PIPES.................................................................................... 4 6.4. EXHAUST CONNECTION ........................................................................... 4 6.5. ADDITIONAL COOLING CIRCUITS ON ENGINES.................................... 5 6.5.1. Standard gear box cooling from STEYR MOTORS ......................................... 5 6.6. SCHEME OF A RAW WATER COOLING WITH GEAR BOX..................... 5 6.7. SCHEME OF A RAW WATER COOLING WITH STERN DRIVE................ 6 6.8. SCHEME OF RAW WATER COOLING WITH JET DRIVE ......................... 6 6.9. SchemE OF COOLING with KEEL COOLER ......................................... 7 6.9.1. Keel cooling dimensioning ......................................................................... 8 6.10. HYBRID - COOLING VARIANTS FOR HYBRID..................................... 10 6.10.1. Hybrid - Standard raw water cooling ........................................................ 10 6.10.2. Hybrid - Dual cooling system .................................................................. 12 6.10.3. Hybrid - Keel cooling system .................................................................. 14 Z001007/0_05_August 2011 6. COOLING SYSTEM NOTES Z001007/0_05_August 2011 6. COOLING SYSTEM Steyr Motors marine engines are equipped with a dual cooling circuit. The most important advantage of this system is that the engine block is not in contact with raw water. The heat is transferred to the raw water by heat exchangers. To clean the raw water guiding pipes and heat exchangers for maintenance, the STEYR MOTORS FLUSH system (art.nr. 2180209-0) can be used. 6.1. RAW WATER PICK UP AND BOTTOM VALVE The raw water pick up is to be provided within appropriate distance to the raw water pump of the engine, to avoid a suction of air when the boat rolls. Max. (raw water) suction height is approx. 9 ft (3 m) for standard installation. If required, the suction height may be increased by loop-laying of the suction pipe so that the pump can start filled up with water. On top of the loop an air cock is to be provided which is to be closed when the engine is stopped, to avoid a rising effect. Before starting, the cock is to be opened. On wooden boats the raw water inlet should preferably be made of red metal (brass unsuited: corrosion due to high zinc content). On steel boats red metal is recommended too. If the materials used for the hull and the raw water inlet are very different with regard to their galvanic characteristics, the inlet is to be electrically insulated from the hull. Flow area of raw water inlet and screen should be large enough to avoid a throttling and thus a smaller water supply to the pump. The pipe should be laid in smooth curves to avoid unnecessary throttling, and preferably be made of coppernickel tube. To eliminate tensions, lay it in a curve and terminate it with a reinforced rubber hose at the raw water pump. The hose should be designed with steel spiral, otherwise the underpressure in the suction pipe may cause a collapse of the hose, thus no more guaranteeing a sufficient natural water supply. Inside diameter of the floor cock should at least be equal to the suction pipe diameter, see "dimensions raw water pipe". Make sure that the cock does not cause a reduction in flow. On wooden boats, connect the bottom valve to the ship bottom through a board lead-in with through screws. Provide a proper sealing between valve and ship bottom. 1 raw water pick up 2 stop cock 3hose ill. 6/1 NOTE: On motor boat installation the grid of the water pick up must be aligned to the front (driving direction), therewith on increasing boat speed the water will be pressed into the external cooling system. On sailing boat installation the grid of the water pick up must be aligned to the rear (aft), therewith water can´t be pressed into the external cooling system, when the boat is under sailing conditions with stopped engine. The bottom valve must be closed if the boat rides at anchor. Apply a proper sealing agent, e.g. Permatex, on the screw passages. Sheet boats should have a screwed pipe joint welded to the ship bottom, on which the bottom valve is fastened with screws. On the bottom side, a screen is to be fixed. Apply a proper sealing agent between valve and screwing thread. When fixing the floor valve, there should be sufficient free space around the valve to permit an easy opening and closing of the valve. If this space is too small, an intermediate piece can be fixed below the valve. In many cases a remote control will be required. Z001007/0_05_August 2011 6.2. RAW WATER FILTER During coasting trade, on the pier etc., it cannot be avoided that small particles of mud, sand and other dirt enter into the water inlet. A filter in the suction pipe must be fitted so that these contaminations can be separated. A raw water filter also helps to increase the pump life, thus preventing engine defects due to insufficient cooling water supply. Ill. 6/2 shows one of the Sherewood filters which may be installed with easy acceSs in a bulkhead. In case of severe contaminations it may be necessary to install a filter of special size. ill. 6/2 Dimensioning of raw water filter: The minimum flow through the filter is 150 l/min (excl. MO306H43WJ). The minimum flow through the filter is 200 l/min (only for MO306H43WJ). 6.3. RAW WATER PIPES 4 + 6 Cyl. Raw Water Pipes Dimensions in mm and inches Engine suction and pressure pipe, inside diameter suction and pressure pipe, inside diameter for MO306H43WJ suction and pressure pipe, outside diameter suction and pressure pipe, outside diameter for MO306H43WJ min. rate of flow of raw water in l/min and gal./min (excl. MO306H43WJ) min. rate of flow of raw water in l/min and gal./min for MO306H43WJ 32 50 42 60 >150 >200 1 1/4" 2" 1 5/8" 2 3/8" >40 >53 6.4. EXHAUST CONNECTION All STEYR MOTORS MARINE Diesels are equipped with a water cooled exhaust gas elbow, as shown on ill. 6/3 . At the exhaust gas muzzle the raw water is injected into the tail pipe for cooling of the exhaust gases. ill. 6/3 When designing the exhaust elbow particular importance was attached to a relatively high exhaust duct in order to avoid the entering of back wash. In the adjoining exhaust pipe a splash flap is to be installed in addition. In case of insufficient difference in level between exhaust gas outlet and sea water surface (boat loaded) a high riser exhaust elbow (optional) is to be installed. See section 8 Exhaust System. 1 2 3 4 exhaust gas elbow connecting piece splash flap tail pipe with flange Z001007/0_05_August 2011 6.5. ADDITIONAL COOLING CIRCUITS ON ENGINES Additional cooling circuit of tandem-/triple-coolers (see schematic raw water circuit 2179999-0) mounted on STEYR MOTORS engines are capable to dissipate up to 3% of engine power. 6.5.1. Standard gearbox cooling from STEYR MOTORS STEYR MOTORS provides oil cooling connections for corresponding gear box models as mentioned in the spare parts catalogue of the selected engine model. Use oil cooling connections only for the gearbox models as specified in the spare parts catalogue. For spare parts catalogue go to STEYR MOTORS homepage www.steyr-motors.com 6.6. SCHEME OF RAW WATER COOLING WITH GEARBOX 1 2 3 4 raw water inlet bottom valve raw water filter exhaust- and raw water gate ill. 6/4 Z001007/0_05_August 2011 6.7. SCHEME OF RAW WATER COOLING WITH STERNDRIVE ill. 6/5 6.8. SCHEME OF RAW WATER COOLING WITH JET DRIVE NOTE: Take care for pressure-rate of raw water filter if raw water is supplied over jet drive and raw water filter is mounted on pressure side! Z001007/0_05_August 2011 6.9. SCHEME OF COOLING WITH KEEL COOLER STEYR MOTORS marine engines can also be used with a keel cooling system. A set with the required parts (4 cyl. art.nr. MS0906030, 6 cyl. art.nr. MS0906040 - keel cooler and external parts not included!) related to the engine can be ordered from Steyr motors. Also expansion tanks can be ordered at STEYR MOTORS. The SMO keel cooling system uses two cooling circuits: One for the engine water (high temperature circuit) and one for charge air, fuel, and transmission oil cooling (low temperature circuit). For the low temperature (LT) system the raw water pump is used. For maintenance interval see STEYR MOTORS Operation, Maintenance and Warranty Manual (art.nr. Z001022/0) . The LT circuit is pressurized. An expansion tank with a pressure cap has to be used. The high temperature (HT) circuit uses the engine water pump. At the HT circuit the pressure cap has to be on the engine (provided in the keel cooling set). A expansion tank is still needed, but it is used open (do not close the expansion tank completely, it has to breath). As exhaust system is not water cooled, consider specially chapter 8.3 DRY EXHAUST PIPE and 8.5 DIMENSIONS FOR EXHAUST PIPE CONNECTION / Dry Exhaust Pipe. Z001007/0_05_August 2011 Z001007/0_05_August 2011 Low temperature circuit 40 32 47 89 130150 300350 200 35 15 130 200 300 350 200 3535 98 174 175190 350350 4045 5393 106 183 175 190 350 350 coolant coolant/ raw / rawwater water glycol glycol- water - water(50/50) (50/50) 65 119 145130 350300 40 32 40 32 40 35 40 35 40 80 39 80 32 71 30 61 depends dependsononapplication, application,has hastotobebeadded addedtotothe thevalue valueabove above 120150 120150 100150 100140 300350 300350 300350 300300 200 200200 200 200 35 15 35 15 35 20 35 20 1212 83 157 160160 350350 coolant coolant/ raw / rawwater water glycol glycol- water - water(50/50) (50/50) 9090 82 157 71 140 160150 145150 350350 350350 100 100 3535 2222 100120 300250 100 35 25 40 40 28 52 62 102 145100 350150 - 120 - 250 100 - 25 - 40 - 39 44 77 90 100 350150 MO174V40 MO306H43 MO164M40 MO286H43MO144M38 MO256H45MO144V38 MO256K43MO114K33 MO236K42 MO94K33 MO196K35 MO84K32 MO166K28MO54NA33 MO126K28 Marine Marine4 6cylinder cylinder [liters] 2,1 3,2 90[kW] 125 215 205 120 184 106 184 106 16581 14066 12055 9040 2800 [rpm] 4000 4300 4300 4000 4500 3800 4300 3800 4200 3300 3500 3300 2800 3200 2800 3300 MO126K28 typ of cooler coolant / raw water of coolant glycoltyp - water (50/50) max.90engine outlet temperature t [°C] 157 heat from the140 engine coolant119 102 Q 77[kW] 150 coolant mass150 flow at rated speed 130 100 q 100 [l/min] max. pressure drop of keel 300 cooler 350 350 150 Δ p 150 [mbar] max.100 pressure drop of piping to keel cooler Δ p hose [mbar] max.35raw water temperature t max-raw [°C] max.22coolant volum in keel cooler and piping [liter] High temperature circuit Keel cooler / radiator specification MO256K43 MO236K42 MO196K35 MO166K28 application Marine 6 cylinder displacement 3,2 184 rated power 165 140 120 4300 rated speed4200 3500 2800 typ of cooler coolant / raw water of coolant glycoltyp - water (50/50) max. coolant (charge air cooler) outlet 32 32temperature (NOT 35 TO EXCEED) 35 40 t 40[°C] 80 80heat from charge 71 air, oil, fuel61 52 Q 39[kW] heattofrom transm.tooilthe value above Q trans. [kW] epends on application, has be added 150 150 coolant mass150 flow at rated speed 140 120 q 120 [l/min] max. pressure drop of keel 300 cooler 350 350 350 250 Δ p 250 [mbar] 200 200 max. pressure 200 drop of piping200 to keel cooler100 Δ p hose 100 [mbar] 15 15max. raw water 20 temperature*20 25 T max-raw25[°C] max.12coolant volum in keel cooler and piping [liter] 157 160 350 184 4500 MO256H45 For dimensioning of the keel coolers the following two tables can be used. This information can also be sent to the keel cooler supplier. For further information please contact STEYR MOTORS Service agent. NOTE: Maintenance and mounting position for keel coolers consider manufacturer`s instructions. 35 130 300 40 53 106 175 350 125 4000 35 130 300 40 47 98 175 350 83 160 350 35 40 40 depends 120 300 120 4000 MO174V40 MO164M40 MO144 6.9.1. Keel cooling dimensioning Z001007/0_05_August 2011 typ of cooler typ of coolant max. coolant (charge air cooler) outlet temperature (NOT TO EXCEED) heat from charge air, oil, fuel heat from transm. oil coolant mass flow at rated speed max. pressure drop of keel cooler max. pressure drop of piping to keel cooler max. raw water temperature* max. coolant volum in keel cooler and piping Low temperature circuit typ of cooler typ of coolant max. engine outlet temperature heat from the engine coolant coolant mass flow at rated speed max. pressure drop of keel cooler max. pressure drop of piping to keel cooler max. raw water temperature max. coolant volum in keel cooler and piping High temperature circuit application displacement rated power rated speed Keel cooler / radiator specification t Q Q trans. q Δp Δ p hose T max-raw t Q q Δp Δ p hose t max-raw [°C] [kW] [kW] [l/min] [mbar] [mbar] [°C] [liter] [°C] [kW] [l/min] [mbar] [mbar] [°C] [liter] [liters] [kW] [rpm] 200 350 200 35 45 93 183 190 350 215 4300 MO306H43 157 160 350 184 4500 MO256H45 coolant / raw water glycol - water (50/50) coolant / raw water glycol - water (50/50) 90 157 140 150 150 350 350 100 35 22 MO256K43 MO236K42 Marine 6 cylinder 3,2 184 165 4300 4200 119 130 300 140 3500 MO196K35 32 32 35 35 80 80 71 61 depends on application, has to be added to the value above 150 150 150 150 140 350 350 350 350 300 200 200 200 200 200 15 15 15 20 20 12 32 89 174 190 350 205 4300 MO286H43 120 250 100 25 40 52 102 100 150 120 2800 MO166K28 120 250 100 25 40 39 77 100 150 90 2800 MO126K28 130 300 35 35 40 47 98 175 350 83 160 350 10 380 35 40 40 depends on a 120 300 120 4000 130 300 40 53 106 175 350 125 4000 MO174V40 MO164M40 MO144M38 NOTE: Maintenance and mounting position for keel coolers consider manufacturer`s instructions. 6.10. HYBRID - COOLING VARIANTS FOR HYBRID NOTE: Pick the right cooling system for your application 6.10.1. Hybrid - Standard raw water cooling (see schematic 2180654-0 / chapter 19/Appendix) • Important Installation Requirements ... NOTE: Ensure below points in E-Mode operation and D-Mode operation! 1) Min. flow rate of Raw water circuit - Hybrid: 8 l/min (2,2 gal/min) at max. 35°C → measure flow rate on Raw water circuit outlet (see point B - schematic 2180654-0 / chapter 8/Appendix) Attention: If the flow rate is less than 8 liters (2,2 gal/min), the system power is limited from HCU. HCU will reduce power in first instance and then turn off if it gets too hot. 2) Ensure raw water of Raw water circuit - Hybrid is filtered 3) Min. flow rate - HCU: 4 l/min (1,1 gal/min) (measure if limitation is displayed on SCC at 1st start up) 4) Min. flow rate - Generator: 4 l/min (1,1 gal/min) (measure if limitation is displayed on SCC at 1st start up) 5) Coolant Pump Hybrid is self-priming up to 3 m/0,3 bar (underpressure) 6) Max. pressure altitude of Coolant Pump Hybrid (see point A to point B - schematic 2180654-0) ≤ 1 m Z001007/0_05_August 2011 7) Install Coolant Pump Hybrid to 12V - Ensure Coolant Pump Hybrid does not run dry - Coolant Pump Hybrid are switched on as soon as ignition signal exists - Specification of Coolant Pump Hybrid: • 12V working voltage • Power E-motor: 120 W • Power input: 7,4 A • Suction lift: 3 m • Safety class: IP65 - Wiring dimensions: The wire length is the local distance from the battery to the pump and back to the battery. Max. wire length in m 12V24V Wire size 1,5 mm2 2,5 mm2 4,0 mm2 6,0 mm2 10,0 mm2 #16AWG #14AWG #12AWG #10AWG #6AWG 3,714,6 6,124,4 9,8 14,6 24,4 • Procedure to check Installation Requirements and Leakages ... 1) Open raw water supply to Raw water circuit - Hybrid 2) Connect Coolant Pump Hybrid to 12V 3) Ensure Coolant Pump Hybrid does not run dry → check visually flow of raw water through Raw water circuit - Hybrid NOTE: If Hybrid raw water flow rate is on point B below 8 l/min (2,2 gal/min) consider Installation Requirements under chapter 6.10.1/Important Installation Requirements 4) Measure from Hybrid raw water outlet (see point B - schematic 2180654-0) min. 8 l/min (2,2 gal/min) 5) Check visually for leakages acc. schematic 2180654-0 • Check at Service ... 1) Measure on Hybrid raw water outlet (see point B - schematic 2180654-0) min. 8 l/min (2,2 gal/min) at every Service Z001007/0_05_August 2011 6.10.2. Hybrid - Dual cooling system (see schematic 2180652-0 / chapter 19/Appendix) NOTE: Standard Hybrid Cooling System since model year 2011 • Important Installation Requirements ... 1) Min. flow rate of Conventional raw water circuit: 16 l/min (4,4 gal/min) at max. 35°C → measure flow rate on Conventional raw water circuit outlet (see point B - schematic 2180652-0) Attention: If the flow rate is less than 16 liters (4,4 gal/min), the system power is limited from HCU. HCU will reduce power in first instance and then turn off if it gets too hot. 2) Min. flow rate of Internal cooling circuit: 8 l/min (2,2 gal/min) → measure flow rate as described below if limitation is displayed on SCC at 1st start up: - Min. flow rate - HCU: 4 l/min (1,1 gal/min) (measure flow rate between HCU-outlet to Connection Block) - Min. flow rate - Generator: 4 l/min (1,1 gal/min) (measure flow rate between Generator-outlet to Connection Block) NOTE: Max. 40°C and approximately 100 mbar are appearing in internal cooling circuit if STEYR MOTORS installation recommendations are ensured. Attention: If the flow rate is less than 8 liters (2,2 gal/min), the system power is limited from HCU. HCU will reduce power in first instance and then turn off if it gets too hot. 3) Min. raw water mass flow through Heat Exchanger: 16 liters/min (4,4 gal/min) 4) Connection diameter of raw water pipes to Heat Exchanger: ½" 5) Ensure raw water of Conventional raw water circuit is filtered 6) Coolant Pump Hybrid is self-priming up to 3 m/0,3 bar (under-pressure) 7) Max. pressure altitude of Coolant Pump Hybrid (see point A to point B - schematic 2180652-0) ≤ 1 m Z001007/0_05_August 2011 8) Voltage supply to Coolant Pumps Hybrid with STEYR MOTORS supplied wiring harness and 48V/12V DC/DC converter to 48VDC: - Ensure Coolant Pumps Hybrid do not run dry - Coolant Pumps Hybrid are switched on as soon as ignition signal is on - Specification for Coolant Pump Hybrid: • 12V working voltage • Power E-motor: 120 W • Power input: 7,4 A • Suction lift: 3 m • Safety class: IP65 - Wiring dimensions: The wire length is the local distance from the battery to the pump and back to the battery. Max. wire length in m 12V24V Wire size 1,5 mm2 2,5 mm2 4,0 mm2 6,0 mm2 10,0 mm2 #16AWG #14AWG #12AWG #10AWG #6AWG 3,714,6 6,124,4 9,8 14,6 24,4 9) Mounting position of Expansion Tank (item 4 schematic 2180652-0 / chapter 19/Appendix): - The Expansion Tank must be in a higher position than the Connection Block, HCU and Generator - Pipes to the Expansion Tank must be routed only rising - Connection for the inflow to the Expansion Tank is the highest component 10) Mounting position of Connection Block (item 5 schematic 2180652-0 / chapter 19/Appendix): - The Connection Block must be in a higher position than HCU and Generator - The Connection Block must be in a lower position than the Expansion Tank - The Connection Block can be mounted in every position from 0° to 130° (see ill 6/6) - If Connection Block mounted on the bottom, use insulation sleeve or rubber silent block. 130° 0° ill. 6/6 ill. 6/7 - Ill. 6/7 shows the fastening bores and the connections of the Connection Block. 11) Mounting position of Hoses: - All hose connections on the Connection Block, HCU and Generator must conform to schematic 2180652-0 and to the labels on the Connection Block, HCU and Generator. - The max. hose length from the Connection Block to the HCU is 2.0 m (78¾"). - Connection hoses which are not in scope of delivery → see chapter 19/Appendix / Hybrid Installation Schematics Z001007/0_05_August 2011 Procedure to check Installation Requirements and Leakages ... 1) Fill expansion tank till max. level with recommended STEYR MOTORS engine coolant water 2) Connect Coolant Pump Hybrid responsible for Internal cooling circuit to 12V NOTE: This is only necessary if boat is not in water and no raw water supply to conventional raw water circuit exists. Otherwise wiring harness to 48VDC can be left connected. 3) Ensure Coolant Pumps Hybrid do not run dry → check visually flow of Conventional raw water circuit from Conventional raw water outlet (point B schematic 2180652-0 / chapter 19/Appendix) 4) The internal cooling circuit is self-bleeding (no bleeding valve must be opened!). 5) Investigate if coolant level in Expansion Tank is kept constant and watch out for coolant leakages in system. 6) The system is completely bleeded, when no further air bubbles appear in Expansion Tank during operation. 7) Measure on Conventional raw water outlet (see point B - schematic 2180652-0) min. 16 l/min (4,4 gal/min) NOTE: If Conventional raw water flow rate is on point B below 16 l/min (4,4 gal/min) consider Installation Requirements under chapter 6.10.2/Important Installation Requirements 8) Measure flow rate between HCU outlet and Connection Block → min. 4 l/min (2,2 gal/min) 9) Measure flow rate between Generator outlet and Connection Block → min. 4 l/min (2,2 gal/min) 10) Check visually for leakages acc. schematic 2180652-0 / chapter 19/Appendix 11) In case wiring harness to 48VDC has been disconnected, reconnect. • Check at Service ... 1) Measure on Conventional raw water circuit-outlet (see point B - schematic 2180652-0) min. 16 l/min (4,4 gal/min) at every Service (restriction over water strainer!) 2) Check coolant level in Expansion Tank. 6.10.3. Hybrid - Keel cooling system (see schematic 2180653-0 / chapter 19/Appendix) Z001007/0_05_August 2011 • Important Installation Requirements ... 1) Min. flow rate through Keel cooling circuit 8 l/min (2,2 gal/min) → measure flow rate on Coolant Pump Hybrid-outlet (see point A - schematic 2180653-0) Attention: If the flow rate is less than 8 liters (2,2 gal/min), the system power is limited from HCU. HCU will reduce power in first instance and then turn off if it gets too hot. NOTE: Max. 40°C and approximately 100 mbar are appearing in Keel cooling circuit if STEYR MOTORS installation recommendations are ensured. - Keel cooling dimensioning see Installation Manual Z001007/0 / chapter 6 - Max. pressure drop of heat exchanger 100 mbar@12 l/min - Max. coolant outlet temperature of heat exchanger38°C - Heat exchanger capacity 2,5 kW - Hose connections to Keel Cooler ½" hose 2) Min. flow rate - HCU: 4 l/min (1,1 gal/min) (measure if limitation is displayed on SCC at 1st start up) → measure flow rate between HCU-outlet to Connection Block 3) Min. flow rate - Generator: 4 l/min (1,1 gal/min) (measure if limitation is displayed on SCC at 1st start up) → measure flow rate between Generator-outlet to Connection Block 4) Coolant Pump Hybrid is self-priming up to 3 m/0,3 bar (under-pressure) 5) Max. pressure altitude of Coolant Pump Hybrid (see point A to point B - schematic 2180653-0) ≤ 1 m 6) Voltage supply to Coolant Pump Hybrid with STEYR MOTORS supplied wiring harness and 48V/12V - DC/DC converter to 48VDC: - Ensure Coolant Pump Hybrid does not run dry - Coolant Pump Hybrid is switched on as soon as ignition signal exists - Specification of Coolant Pump Hybrid: • 12V working voltage • Power E-motor: 120 W • Power input: 7,4 A • Suction lift: 3 m • Safety class: IP65 - Wiring dimensions: The wire length is the local distance from the battery to the pump and back to the battery. Max. wire length in m 12V24V Wire size 1,5 mm2 2,5 mm2 4,0 mm2 6,0 mm2 10,0 mm2 #16AWG #14AWG #12AWG #10AWG #6AWG 3,714,6 6,124,4 9,8 14,6 24,4 7) Mounting position of Expansion Tank (item 4 schematic 2180653-0 / chapter 19/Appendix): - The Expansion Tank must be in a higher position than the Connection Block, HCU, Generator and Keel Cooler - Pipes line to the Expansion Tank must be routed only rising - Connection for the inflow to the Expansion Tank is the highest component Z001007/0_05_August 2011 8) Mounting position of Connection Block (item 5 schematic 2180653-0 / chapter 8/Appendix): - The Connection Block must be in a higher position than HCU, Generator and Keel Cooler - The Connection Block must be in a lower position than the Expansion Tank - The Connection Block can be mounted in every position from 0° to 130° - If Connection Block mounted on the bottom, use insulation sleeve or rubber silent block. ill. 6/10 - Ill. 6/10 shows the fastening bores and the connections of the Connection Block. 9) Mounting position of Hoses: - All hose connections on the Connection Block, HCU and Generator must conform to schematic 2180653-0 and to the labels on the Connection Block, HCU and Generator. - The max. hose length from the Connection Block to the HCU is 2.0 m (78¾"). - Connection hoses which are not in scope of delivery → see chapter 19/Appendix / Hybrid Installation Schematics. Procedure to check Installation Requirements and Leakages ... 1) Fill expansion tank till max. level with recommended STEYR MOTORS engine coolant water 2) Connect Coolant Pump Hybrid with wiring harness and 48V/12V DC/DC-converter to 48VDC NOTE: Ensure by test trials, Keel cooling circuit is cooled over Keel cooler from Conventional raw water circuit. 3) Ensure Coolant Pump Hybrid does not run dry 4) The Keel cooling circuit is self-bleeding (no bleeding valve must be opened!). 5) Investigate if coolant level in Expansion Tank is kept constant and watch out for coolant leakages in system. 6) The system is completely bleeded, when no further air bubbles appear in Expansion Tank during operation. 7) Measure min. flow rate of 8 l/min (2,2 gal/min) on Coolant Pump Hybrid-outlet (see point A - schematic 2180653-0) NOTE: If flow rate on Coolant Pump Hybrid outlet is below 8 l/min (2,2 gal/min) consider Installation Requirements under chapter 6.10.3/Important Installation Requirements 8) Check visually for leakages acc. schematic 2180653-0 / chapter 19/Appendix • Check at Service ... 1) Ensure with test trials no limitation exists over SCC from HCU- and Generator- coolant temperature 2) Check coolant level in Expansion Tank. Z001007/0_05_August 2011 7. FUEL SYSTEM TABLE OF CONTENTS 7.1. GENERAL.................................................................................................... 3 7.2. FUEL TANKS............................................................................................... 5 7.3. MATERIALS................................................................................................. 6 7.4. TWIN FUEL TANKS..................................................................................... 6 7.5. FUEL PIPES................................................................................................. 6 Z001007/0_05_August 2011 7. FUEL SYSTEM NOTES Z001007/0_05_August 2011 7. FUEL SYSTEM 7.1. GENERAL Assembly of the individual components of the fuel system must ensure an optimum sealing and fire-resistance. Before starting these works, plan the location as well as the type of fuel tanks. Decide for a good quality in order to avoid a leakage of fuel on the cocks. A leak fuel system always means the risk of trouble and fire. The fuel quantity may be split up to several fuel tanks, thus keeping the center of gravity low and retaining certain trim potentials for the hull. When installing the fuel tanks adequate room is to be provided with ventilation. Connect filling fixture and tank with an impregnated cable, unless being already connected electrically. Also provide grounding of the tank. When planning the assembly, always try to store the tanks in a separate area in order to minimize as far as possible the risk of fire in case of an eventual fuel leakage. For assembly of the fuel tanks, proceed with greatest care, to avoid leakage or water inlet. STEYR MOTORS insist that a water separator is fitted into the fuel system before the fuel pump, as drops of water in the fuel are ideal transporters of dirt and rust through narrow pipes. One drop of water may cause a locking of the fuel pump, thus cutting the fuel supply. Particularly with diesel engines, small deposits of dirt or rust may result in heavy damages on the injection pump and nozzles. The water separator should be installed as close as possible to the tank, but with enough space for water drain and exchange of filter inserts. For selection and dimensioning additional filters and water separator fuel systems according ill. 7.1. must have an flow of min. 300 l/h or 65 gal/h, as the rate of flow of the electric fuel pump must not be reduced. 1 2 3 4 5 6 7 fuel pump fuel return fuel filter feed line coarse filter water separator anti-syphon valve ill. 7/1 Z001007/0_05_August 2011 For below listet engine types is following valid (see ill. 7.2): * MO174V40, MO126K25, MO156K25, MO286H43, MO306H43WJ Basically no fuel pre filter is required on these engine models as a water separator is as a standard mounted to the fuel filter on all engines. To what the operator needs to pay attention to is, that if water separator is full, that water is drained otherwise the water separator will no longer work properly. Therefore this should be investigated from operator by his daily checks. If the change interval want to be increased to the values of conventional service- and maintenance- schedule, then an additional pre filter/water separator with following specification is recommended: Min. 150 l/h flow amount Water separation 93% by 150 l/h Particle separation:30 micro-meter or 10 % particle separation at 3 - 5 micro-meter ill. 7/2 1 2 3 4 fuel pump fuel return fuel filter feed line 5 coarse filter 6 water separator 7 anti-syphon valve Z001007/0_05_August 2011 7.2. FUEL TANKS If possible, arrange the fuel tanks at engine level or higher. In case of a lower arrangement, max. suction height of the feed pump is to be considered which is 0,5 m for all kinds of engines. Please consider that the suction head is calculated from the lower end of the suction pipe, i.e. approx. 1" (2,5 cm) over the tank bottom. The return pipe should lead into the tank at the level of the screen but with some distance to it, to avoid a foam formation of fuel. In case of arrangement of the tanks at a level lower than the admissible suction height of the feed pump, the fuel is to pumped up to a daily tank by a manually operated pump or motor pump. In this case, the fuel flowing back from the engine is pumped into the daily tank. ill. 7/3 1 2 3 4 5 6 7 8 9 10 11 12 water separator, rate of flow > 65 Brit. gal/h (> 300 l/h) * see chapter 7.1 fuel stop cock fuel pipe, outside diameter 3/8" (10 mm) for a length of 20 ft (6 m). For longer lines, use a 1/2" (12 mm) pipe. inspection cover filler socket - cover lead-in sleeve made of fuel-resistant rubber, with drain possibility air-vent pipe, diameter at least 1 1/2" (38 mm) guide bulkhead ground connection return pipe suction pipe, complete with screen (distance to tank bottom 1" / 25 mm) anti-siphon valve NOTE: If demanded by THE US COAST GUARD install a anti-siphone valve which must be opened by fuel pump suction to withdraw fuel from the tank and which will remain closed without fuel pump suction, preventing siphon action created by a break at any point in the fuel feed system. The valve shall be designed and sized to provide the required fuel flow of 65 Brit.gl/h (300 l/h) to the engine. Z001007/0_05_August 2011 7.3. MATERIALS If possible, the fuel tanks should be made of stainless steel (Nirosta) . Light metal, steel plate or plastic may be used too. Copper plate, galvanized or pot-galvanized plate are no suitable materials for fuel tanks. 7.4. TWIN FUEL TANKS For a lateral arrangement of the tanks in the boat, a construction acc. to ill. 7/4 may be chosen. Connect the tanks on top and on bottom with pipe lines equipped with stop cocks. Min. inside diameter of the lower connecting pipe should be 3/4" (19 mm) in order to permit a filling of the tanks, if they are installed alongside, from both sides of the boat. The fuel pipe from the engine has to depart from the lower connecting pipe of the tank (only valid for tanks with bottom drain). An additional fuel filter or water separator is to be installed in front of the feed pump on the injection pump. In case of a daily tank, it is recommended to connect the fuel return pipe to this tank which reduces the filling intervals. ill. 7/4 7.5. FUEL PIPES Min. inside diameter of the fuel filler socket should be 1 1/2" (38 mm). Length of the socket should be chosen in such a way that the distance to the tank bottom is approx. 2" (50 mm). Connect the filler socket from the tank to the deck union by means of a pipe joint to the tank socket. On the deck lead-in a sleeve made of fuel-resistant rubber is to be provided. If possible, rubber hoses should be avoided. When using a rubber hose, it should be of fuel-resistant, reinforced quality. Always connect tank and deck union by a grounding cable, unless there is a metallic contact. Z001007/0_05_August 2011 The air-vent pipe is to be laid from the highest point of each tank to a protected area on deck. On the upper end of these pipes a curve of 180° is to be provided which avoids the entering of water into the tanks. The airvent pipes should also be arranged in such a way that e.g. flowing out gas cannot be ignited or enter into the rooms aboard. The fuel pipes for the engine can be made of seamless, tempered copper tubes or of steel tubes type Bundy tube. Steel tubes are much stronger than copper tubes, and should, therefore, be used as far as possible. The hose pipes have to comply with specific conditions of use and respective local waterway regulations (see hints in the preface). Specific data for fuel hoses: synthetic rubber hose with plies of fabric size DN 8 resistant to Diesel fuel fire proof temperature range: -30 to +30 °C operating pressure 145 psi (10 bar) Up to lengths of 20 ft (6 m), outside diameter of the fuel suction pipe should be 3/8" (10 mm). A longer suction pipe will require a larger diameter, e.g. 1/2" (12 mm). From the overflow valve on the engine a fuel return pipe to the tank, or to the daily tank if available, is to be laid. Min. outside diameter of the fuel return pipe should be 3/8" (10 mm). On the engine side, fuel pipes are always to be installed. ill. 7/5 fuel pipe with brazed tapered piece ill. 7/6 flanged fuel pipe The connections of the fuel pipes are to be flanged with a special tool. Loose or soft soldered tapered pieces must not be used. When using tapered pieces, these are to be fixed on the pipes by brazing. The best solution is, however, a flanging of pipes. Well tighten the fuel pipes on planks or rigid supports, to avoid vibrations or pipe fracture. Z001007/0_05_August 2011 THIS PAGE IS INTENTIONALLY BLANK Z001007/0_05_August 2011 8. EXHAUST SYSTEM TABLE OF CONTENTS 8. 1. GENERAL.................................................................................................... 3 8. 2. MATERIALS................................................................................................. 3 8. 3. DRY EXHAUST PIPE................................................................................... 3 8. 4. WET EXHAUST PIPE.................................................................................. 4 8.4.1. Exhaust for inboard engines above water line. .............................................. 5 8.4.2. Exhaust for inboard engines below water line............................................... 5 8.4.3. Hybrid - Exhaust for inboard engines below water line for Hybrid installations....... 6 8.4.4. Exhaust for Stern Drive engines. ................................................................. 7 8. 5. DIMENSIONS FOR EXHAUST PIPE CONNECTION ................................ 8 8.5.1. Measuring of backpressure. ...................................................................... 10 8. 6. CONDENSED-WATER COLLECTOR....................................................... 10 Z001007/0_05_August 2011 8. EXHAUST SYSTEM NOTES Z001007/0_05_August 2011 8. EXHAUST SYSTEM 8.1. GENERAL Install the exhaust line with as few as possible bends and as high as possible curve radius. Provide sufficient pipe diameter to keep the backpressure within admissible values (see 8.7). The exhaust system may be designed in 3 different ways: • Dry exhaust pipe, insulated • Wet exhaust pipe (water flow in the pipe) • Exhaust pipe with water jacket (double-walled, water-cooled) The dry exhaust pipe releases large amounts of heat into the engine compartment thus requiring good insulation. The wet exhaust pipe and the exhaust pipe with a water jacket are cooled and therefore mostly do not need insulation. The water flow in the exhaust pipe also has a noise-absorbing effect. 8.2. MATERIALS Exhaust gases from a Diesel engine also contain sulfur compounds which mixed with water may corrode the metals. For this reason, copper tubes are unsuited for exhaust pipes. Exhaust pipes with cooling jackets are to be made of acid-proof steel tubes, to guarantee satisfactory service life. In case of water inlets into the exhaust pipe, the line may be made completely or partially of special exhaust rubber hose. Dry exhaust pipes are preferably made of acid-proof steel tubes. Pipes made of stainless or galvanized steel tube also guarantee a relatively satisfactory service life. 8.3. DRY EXHAUST PIPE Scheme of a dry exhaust pipe for 2 engines ill. 8/1 Z001007/0_05_August 2011 8.4. WET EXHAUST PIPE Wet exhaust pipes for turbo engines are designed according to Ill. 8/1. All rubber hoses are to be connected at each end by 2 corrosion-resistant hose clamps. ill. 8/1 wet exhaust pipe with muffler TWIN-MI 236 TD (example) 1 2 3 4 wet exhaust elbow exhaust rubber hose water-cooled muffler exhaust pipe, bend over water line 5 board lead-in with rubber expansion piece sealing the bore in the boat transom 6 bore diameter in boat transom 5" +/- 0,5 line (127 +/- 1 mm) With all kinds of exhaust pipes assembly is always to be done avoiding the entering of water from the exhaust pipe into the engine, otherwise severe damage to the engine due to hydro lock and corrosion of cylinders may occur. ATTENTION: When laying the exhaust pipe through bulkheads and similar make sure that the pipe does not touch material which transmit vibrations onto the hull, thus causing resonance noise. In case of lead-in pipes, take special care that the exhaust pipe will not cause a combustible heating of the surrounding material. ATTENTION: For the assembly of exhaust pipes to turbo charged engines; The turbo charger must never have to support the weight of the exhaust system. Z001007/0_05_August 2011 8.4.1. Exhaust for inboard engines above water line The exhaust outlet in the hull should be 12" (300 mm) below the exhaust elbow. For correct installation the highest part of the exhaust system must be at least 12" (300 mm) above the water line with a loaded boat, see ill. 8/2. Install the drain cocks at the lowest points of the exhaust pipe. ill. 8/2 8.4.2. Exhaust for inboard engines below water line Variant A - combined waterlock / muffler 2180632-0 Z001007/0_05_August 2011 Variant B - water separator and muffler (recommended for long wet exhaust systems) 2180632-1 8.4.3. Hybrid - Exhaust for inboard engines below water line for Hybrid installations Z001007/0_05_August 2011 8.4.4. Exhaust for Stern Drive Engines Precondition for a correct installation is compliance with the min. height of 14" (350 mm) from the exhaust system highest point to the water line A (ill. 8/3). If required, launch the boat with its real load resp. load distribution (weight of drive unit plus working load) in order to determine the water line. ill. 8/3 Z001007/0_05_August 2011 8.5. DIMENSIONS FOR EXHAUST PIPE CONNECTION • Dry exhaust pipe: engine model exhaust elbow flange type MO54NA33 MO144V38 MO84K32 MO94K33 MO114K33 MO144M38 MO164M40 MO126M28 MO126K28 MO126K25 MO156K25 MO166K28 MO166M28 MO196K35 MO236K42 MO236K43 MO256K43 MO174V40 Z001007/0_05_August 2011 MO256H45 MO144V38 • Dry exhaust pipe: MO84K32 MO94K33 MO114K33 MO144M38 MO164M40 MO126M28 MO126K28 MO126K25 MO156K25 MO166K28 MO166M28 MO196K35 MO236K42 MO236K43 MO256K43 MO174V40 MO256H45 MO286H43 MO306H43WJ • Wet exhaust pipe: engine wet exhaust pipe (industrial rubber hose) * outside diameter 6 Cyl. Engine (all engine models) 4 Cyl. Engine (all engine models) mm inch mm inch 90 3,5" 90 3,5" * NOTE: Outside diameter valid for all exhaust elbows and high riser exhaust elbows supplied from STEYR MOTORS. Z001007/0_05_August 2011 8.5.1. Measuring of backpressure After assembly of the exhaust system, always check the backpressure; most simply by a pressure gauge connected by means of an adaptor instead of the temperature sensor for exhaust raw water. Measuring is then to be done with nominal capacity of the engine. The max. admissible exhaust backpressure for STEYR Marine Engines is 1000 mm WS = 100 mbar (WS = water column) Exhaust backpressure: 4 cylinder Exhaust back pressure* Set-point (mbar) MO54NA33 MO84K32 MO94K33 MO114K33 MO144V38 MO144M38 MO164M40 MO174V40 6 cylinder Engine Type 80 100 100 100 100 100 100 150 MO126M28 150 MO126K25- MO126K28- MO156K25 150 MO156K25-D 150 MO166M28 150 MO196K35 150 MO236K42 150 MO236K43 150 MO256K43 150 MO256H45 150 MO286H43 150 MO306H43WJ 150 Admissible tolerance SMP (mbar) +0 / -50 +/- 50 +/- 50 +/- 50 +/- 50 +/- 50 +/- 50 +0 /- 50 +/- 50 - - +/- 50 +/- 50 +/- 50 +/- 50 +/- 50 +/- 50 +/- 50 +/- 50 +0 / -50 +0 / -50 exhaust mass flow @ rated power (kg/h) 186,2 351,2 267,5 409,6 495,4 531,8 643,6 729,4 529,8 461,5 556,4 612,7 801,1 1038,4 1123,5 1122,0 1121,4 1272,2 * measured 100-250 mm (4-10") after turbo-outlet in a straight exhaust pipe section 8.6. CONDENSED-WATER COLLECTOR Exhaust gases of an internal-combustion engine contain water vapor which may condense and be converted into water which in the worst case flows back into the engine. With an exhaust pipe inclined in direction of the engine, therefore always install a condensed-water collector behind the water-cooled standbend. Provide the condensed-water collector with a cock or a drain plug at its bottom. Min. diameter of the condensed-water collector should be 1" (25 mm) and its length 12" (300 mm) Z001007/0_05_August 2011 9. AIR intake AND VENTILATION TABLE OF CONTENTS 9.1. GENERAL................................................................................................... 3 9.2. DESIGN REQUIREMENTS ........................................................................ 3 9.3. TEMPERATURE REQUIREMENTS............................................................ 4 9.4. CALCULATION OF AIR QUANTITY, VENTILATION AND FAN-BLAST....... 4 9.5. EXAMPLE................................................................................................... 6 9.6. HYBRID SYSTEM REQUIREMENTS......................................................... 6 Z001007/0_05_August 2011 9. AIR intake AND VENTILATION NOTES Z001007/0_05_August 2011 9. AIR INTAKE AND VENTILATION 9.1. GENERAL Power of the engine is influenced by a number of different factors. The most important ones are air pressure, air temperature and exhaust gas counterpressure. In case of large deviations from the standard values the diesel engine loses power. To guarantee a proper function of the engine and its full power it is vital that the supply- and exhaust air ducts are designed large enough and functionally. Two main demands are to be fulfilled: 1.) Sufficient supply of air (oxygen) to the engines, in order to ensure a fuel combustion without residues. 2.) Ventilation of the engine compartment to keep the temperature level in the compartment low. An adequate ventilation also improves the operating conditions for the whole electrical equipment of the engine. ATTENTION: If people are in the engine compartment, the ventilation is to be adapted. Local safety rules and legal regulations are to be followed. Satisfactory function of air inlets and air outlets must also be guaranteed with bad weather conditions. They should have water guards, and normally sound insulation, too. ATTENTION: If the distance between inlet and outlet is too short, the air may circulate which results in a bad ventilation effect. 9.2. DESIGN REQUIREMENTS It is of great advantage to consider the supply- and exhaust air ducts already during construction and to provide them in the hull or superstructure, thus avoiding exposed pipes. To supply the engine with sufficient combustion air is relatively easy but it is much more difficult to carry off the radiation heat. The engine itself sucks in the air very effectively and takes it from everywhere. If dimensions of the supplyand exhaust air ducts are too small, the engine will suck in the air from the exhaust air ducts. Due to missing ventilation high temperatures will arise in the engine compartment. Most of the engine's radiation heat is to be conducted from the engine compartment. This is an imperative requirement for keeping the engine temperature under the max. limiting value. Air inlet and air ducts are to be dimensioned spaciously in order to achieve a very low velocity of airflow. Lay the pipes for air supply of the engine up to the air filter's side, but with a lateral distance of 8" - 12" (20 - 30 cm), to absolutely avoid any entering of water into the engine. Air inlets and air outlets must never be installed in the stern transom. In this area the air is mixed with water and exhaust gases and, therefore, never may be conducted into the boat. For Diesel engines, the air supply pipes should end at low level in the engine compartment, but not too low to cause a fluidity stop (brackish water) which chokes the air supply. Exhaust air pipes are to be provided diagonally on the opposite side of the engine. Z001007/0_05_August 2011 9.3. TEMPERATURE REQUIREMENTS Indicated engine power is based on an air temperature of +25°C, an atmospheric pressure of 997 mbar, a relative atmospheric moisture of 30%, a fuel temperature of +20°C and a sea water temperature of +25°C (acc. to test standards). Pay particular attention to good air supply and ventilation, to achieve engine power and life as high as possible. Max. temperature for areas where electric components are installed is 85°C (valid for starter, generator, HCU, etc. special regulations are to be applied however). 9.4. CALCULATION OF AIR QUANTITY, VENTILATION AND FAN-BLAST Min. requirement for proper ventilation and air supply for "pleasure" boats are 4 pipes: 1) two pipes for engine supply air 2) one pipe for ventilation of engine compartment 3) one pipe, equipped with a fan (efficiency 440 ft³/min / 11 m³/min.), for exhaust air of engine compartment. AIR QUANTITY The engine needs a certain quantity of air for the combustion process, which requires a certain min. flow area for the air stream. This area may be calculated with the following formula: A = 1,9 x engine power in kW (Diesel engines) = cross section of area in cm² For example: 256 marine 164 marine A = 1,9 x 184 kW = 54,2 inch² (349,6 cm²) = 8 1/4" (210 mm diameter) A = 1,9 x 120 kW = 35,4 inch² (228,0 cm²) = 6 3/4" (170 mm diameter) Engine type MO54NA33 MO84K32 MO94K33 MO114K33 MO144V38 MO144M38 MO164M40 MO174V40 MO126M28 MO156K25 MO126K25 MO166M28 MO196K35 MO236K42 MO256K43 MO256H45 MO286H43 MO306H43WJ air mass flow @ rated power (kg/h) cross section [cm²] equivalent diameter [mm] 189 337 350 391 469 505 612 696 508 530 440 586 767 994 1073 1070 1069 1218 65 115 120 133 160 172 210 240 175 180 150 200 261 338 365 365 365 415 91 121 124 130 143 148 164 175 149 151 138 160 182 207 216 216 216 230 Z001007/0_05_August 2011 The values are based on free influx and a pipe length up to 3 feet (one meter) with a max. bend of 90°. When using longer pipes or several pipe bends, correct the cross section by multiplication with a coefficient (see chart). number of pipes length of pipe in meters/yrd 1 2 3 4 5 1 1 1,04 1,09 1,13 1,20 2 1,39 1,41 1,43 1,45 1,49 3 - 1,70 1,72 1,74 1,78 VENTILATION The supply- and exhaust air pipe should be of the same size, to achieve a low velocity of flow and thus a low sound level. Pipe cross section for supply- and exhaust air is computed with the following formula: A = 1,65 x engine power in kW = cross section of area in cm² For example: 256 marine 164 marine A = 1,65 x 184 = 47,1 inch² (303,6 cm²) = 8" (200 mm) diameter A = 1,65 x 120 = 32,0 inch² (198,0 cm²) = 6 1/4" (160 mm) diameter FAN-BLAST To permit an effective ventilation of the engine compartment, which keeps the temperatures low, a suction fan is to be installed in the exhaust air duct. Attention: Never install the fan in the supply air duct. This would cause an excess pressure in the engine compartment with the risk of gas- and air leakage in the other compartments of the boat. The blast is to be provided for the following air volume flow: air volume flow (m³/min) = 0,07 x engine power in kW For example: 256 marine 164 marine 0,07 x 184 = approx. 17 yd³/min (13 m³/min) 0,07 x 120 = approx. 11,8 yd³/min (9 m³/min) Total pressure rise by the blast should be 3/8" wc (10 mm WS) (100 Pa). Based on these two values, air volume flow and total pressure rise, the blast may be chosen. Z001007/0_05_August 2011 9.5. EXAMPLE Ill. 9/1 Example for air inlet and ventilation of engine on sport boats, and similar applications. 1 2 3 air inlet, water separator (effective surface: see chart) air pipes (dimensions: see chart) sound absorber (see section "insulation") In the sound absorber no restriction may occur. Inner distance between walls = pipe diameter 4 5 6 sound-absorbing engine compartment (see section "insulation") outlet for exhaust air, with inactive engines. For running engines air will be sucked in at 1 and 5. Cross section as for 1. sound-absorbing hatches 9.6. HYBRID SYSTEM REQUIREMENTS No special requirements for Hybrid installations are valid as long as for all original STEYR MOTORS Hybrid components the specifications as listed from 9.1 to 9.5 are kept from the installing party. Z001007/0_05_August 2011 10. EXTERNAL CONSUMERS TABLE OF CONTENTS 10.1. GENERAL .................................................................................................. 3 10.2. HYBRID AUXILIARY ELECTRIC ............................................................... 3 Z001007/0_05_August 2011 10. EXTERNAL CONSUMERS NOTES Z001007/0_05_August 2011 10. EXTERNAL CONSUMERS 10.1. GENERAL STEYR Marine engines optionally may be equipped with an auxiliary propulsion at the front end of the crankshaft. See ill. 10/1 and 10/2. Max. decline of output of the auxiliary propulsion is limited however (see chart). outside diameter of belt pulley on crankshaft propulsion, max. output 4 Cyl. Engine * 5,3" (135 mm) 100 Nm (28,3 kW) at 2700 rpm. 6 Cyl. Engine * 6,5" (165 mm) 100 Nm (28,3 kW) at 2700 rpm. engine 4 Cyl. Engine * valid for all engine models 6 Cyl. Engine ill.10/1 ill.10/2 10.2. HYBRID AUXILIARY ELECTRIC External consumers (e.g. 230 VAC inverter) must be connected only to 48 V output of Hybrid battery bank directly! NOTE: External consumers may reduce driving-range and charging-efficiency. Instructions to use: 1) DC/DC - converter 2) DC/AC - converter 3) 230VAC inverter Input voltage: 48V Max. current consumption: 100 Amps cross section table 5m/16ft 10m/33ft 15m/49ft 20m/66ft 25m/82ft 10Amps 20Amps 30Amps 40Amps 50Amps 60Amps 70Amps 80Amps 90Amps 100Amps 1,5mm²/AWG16 2,5mm²/AWG14 4mm²/AWG12 6mm²/AWG10 10mm²/AWG8 16mm²/AWG6 25mm²/AWG4 35mm²/AWG2 50mm²/AWG1 70mm²/AWG00 1,5mm²/AWG16 2,5mm²/AWG14 4mm²/AWG12 6mm²/AWG10 10mm²/AWG8 16mm²/AWG6 25mm²/AWG4 35mm²/AWG2 50mm²/AWG1 70mm²/AWG00 2,5mm²/AWG14 4mm²/AWG12 6mm²/AWG10 10mm²/AWG8 16mm²/AWG6 25mm²/AWG4 35mm²/AWG2 50mm²/AWG1 70mm²/AWG00 70mm²/AWG00 2,5mm²/AWG14 4mm²/AWG12 6mm²/AWG10 10mm²/AWG8 16mm²/AWG6 25mm²/AWG4 35mm²/AWG2 50mm²/AWG1 70mm²/AWG00 70mm²/AWG00 2,5mm²/AWG14 4mm²/AWG12 6mm²/AWG10 10mm²/AWG8 16mm²/AWG6 25mm²/AWG4 35mm²/AWG2 50mm²/AWG1 70mm²/AWG00 70mm²/AWG00 Z001007/0_05_August 2011 THIS PAGE IS INTENTIONALLY BLANK Z001007/0_05_August 2011 11. SAFETY INSTRUCTIONS TABLE OF CONTENTS 11.1.GENERAL................................................................................................... 3 11.2.HYBRID....................................................................................................... 3. Z001007/0_05_August 2011 11. sAFETY INSTRUCTIONS NOTES Z001007/0_05_August 2011 11. SAFETY INSTRUCTIONS 11.1. GENERAL All rotating shafts and belt drives being exposed are to be provided with safety covers. Their construction and size must prevent accidents, e.g. if somebody slips and, in falling, comes close to a source of danger. To permit an inspection of the engine control, its protection is to be constructed as net or grate. Fix the protection by means of screws and nuts, to allow an easy removal for maintenance. ill. 11/1 example for a belt drive cover ill. 11/2 example for a stem shaft cover 11.2. HYBRID Mounted parts from a third party, which are not in the standard scope of delivery from STEYR MOTORS, have to be designed properly in dimensions and protected accordingly in order to prevent accidents. Modifications of Hybrid system have to be approved by a STEYR MOTORS authorized dealer. Further maintenance and inspection through authorized technicians should be secured. 11.2.1 Protected Hybrid components All parts delivered in the standard scope of delivery from Hybrid system (2180673-0 for 4 cylinders and 2180674-0 for 6 cylinders), which are covered against misapplication and accordingly signed through warning notices (see illustrations below), are only allowed to be opened, maintained and repaired from authorized technicians. trained stuff only danger of electric shock HCU: cover U,V,W protection cap B+, B- Z001007/0_05_August 2011 Generator: cover U,V,W recommended connection of STEYR MOTORS supplied 48V battery - pack 11.2.2 Integration of main switch 1) A main switch has to be mounted between B+ and HCU+ (additional to the standard main switch of engine) Integration of a main switch between B- and HCU- could lead to defects in the Hybrid system! 2) Capacity of the main switch should be min. 400 Amp. 11.2.3 Connection of battery, HCU and ground-connections 1) Always connect battery cables to ground connection first! Do not disconnect Hybrid battery Minus before Hybrid battery Plus from HCU as this will lead to defects in HCU. CAUTION: Wrong polarity during connection to the battery will result in a permanent damage to the electronic regulator! This damage can happen in the first instant that the connection was made even if the unit has not been turned ON yet. 2) The cables should be laid as close as possible together all the way to the battery bank/main switch to reduce interferences in HCU! 3) It is recommended to place a fuse (300 Amp) on the positive pole of the battery bank to protect the Hybrid system against short circuit! 4) It is of high importance that 48V battery, 12V battery-, HCU- and engine ground are connected. Otherwise a non-reliable system condition will appear! (see installation schematic Hybrid 2180525-0 / chapter 19/Appendix) 11.2.4 Charge Control System for Hybrid battery Charge Control System for Hybrid battery to alarm operator regarding overload or complete discharge of Hybrid battery is NOT IN SCOPE OF DELIVERY. NOTE: If necessary (depends on battery type!) an adequate control system for chosen Hybrid battery must be provided from Installing Party to prevent Hybrid battery from damage and operator from accident! Z001007/0_05_August 2011 12. BILGE PUMPS TABLE OF CONTENTS 12.1. GENERAL................................................................................................... 3 Z001007/0_05_August 2011 12. BILGE pumpS NOTES Z001007/0_05_August 2011 12. BILGE PUMPS 12.1. GENERAL To achieve max. Lenz power, pumps and piping are to be chosen as follows. length of boat (m) <8 < 10 < 15 < 20 < 24 hand bilge pumps volume flow (m³/h) 3 5 5 6 6 power-driven bilge pumps (m³/h) 5 6 7,5 9 10,5 nominal width of bilge pipes main bilge/branch bilge pipe (mm) 32 32 40 50 60 40 40 permanent pipe, copper tube 3/8", outside diameter ill. 12/1 From the suction side of the pump a copper tube or reinforced rubber hose is to be laid towards the keel. Provide the suction pipe at its lower end with a relief valve and a screen, the latter to permit easy cleaning. The relief valve prevents a reflux of water of the permanent pipe in case of a damage on the pump wheel. The bilge pump always should have constant water supply, to avoid dry operation. Connect the permanent pipe at the delivery side of the pump. Board lead-in at the delivery side of the bilge pump should be at higher level as the permanent pipe connection. Equip the permanent pipe with a stop cock. This cock must be closed with inactive engine. Otherwise, sea water may be pressed into the boat through the permanent pipe, passing the bilge pump, unless the suction pipe is provided with an effective relief valve. At the lowest points of the pipes drain cocks are to be installed, so that water can be drained in case of danger of frost. To avoid pumping out of dirty water in the port or close to the beach, install a cock on the suction pipe of the bilge pump. If drainage is not required, this cock should let pass the air onto the pump, thus preventing that water is sucked in from the keel. Z001007/0_05_August 2011 THIS PAGE IS INTENTIONALLY BLANK Z001007/0_05_August 2011 13. CABIN HEATING TABLE OF CONTENTS 13.1. SEPARATE HEATING................................................................................ 3 13.2. CABIN HEATING, CONNECTED TO ENGINE........................................... 3 Z001007/0_05_August 2011 13. CABIN HEATING NOTES Z001007/0_05_August 2011 13. CABIN HEATING 13.1. SEPARATE HEATING Heating for the ship's cabin or for passenger rooms may be connected to a separate generating set run by petroleum, Diesel, liquid gas etc. Separate heating is always to be preferred, for large heating installations anyway, to prevent the engine from running at too low operating temperature. Such an installation also guarantees a uniform heat input, wether the engine runs or not. Several products are available on the market. For assembly, current safety rules are to be considered. However, heat can also be taken from the engine's cooling system, and be supplied to a small radiator. But this heat is only available when the engines runs. 13.2. CABIN HEATING, CONNECTED TO ENGINE ill. 13/1 1 2 3 4 5 hot water outlet from engine water return to engine heating pump (STEYR option) angle with stopcock thermal-lag switch opening temperature 70-74 °C. 6 hose with twin hose clips 7 cabin heating (event. with fan) 8 venting screw 9 filler socket 10drain cock (at lowest point) In a Diesel engine 35 to 40 % of the energy supplied by the fuel are used as motive power. The rest fades as exhaust heat, frictional losses, radiation and through the cooling system. The heat passing off the cooling system may be used to some extent to heat the cabin. In such case, it is extremely important that not too much heat is taken, which causes the engine to run at too low operating temperature. A quick rise of the engine temperature to operating temperature is also important. If the engine operates too cold (below 65°C approx.) wear will increase considerably. This means that too large heating and too soon starting heating, i.e. heating starting before the operating temperature of the engine is reached, may cause severe damages on the engine. Z001007/0_05_August 2011 It is recommended to install in the feed line to the radiator a thermostat with the same or about 2° lower opening temperature as the engine thermostat. A circulating pump may also be required. This maintains the operating temperature of the engine at normal speed and keeps it at the correct level. At the same time, the radiator gets maximum heat. Never run the engine at idle motion just to keep the heat in the cabin. To ease water circulation through the heating water pipes should be large enough. If one of the radiators is situated higher than the engine, separate compensating tanks are to be installed. The compensating tank should be higher than the radiator, but max. height over the engine must not exceed 2 m. Attention: When installing a separate compensating tank for the engine's cooling system, this tank should be the the highest part of the cooling system. The heating's inlet and outlet connections on the engine must be provided with stop-cocks in order to permit a disconnection of the heating, if required. Provide the heating installation with drain cocks at the lowest points and with relief cocks at the highest points. For connecting the water pipes to the engines, bores are provided (ex works equipped with paddings). The arrows on the illustrations show the direction of the water stream. Z001007/0_05_August 2011 14. noise attenuation TABLE OF CONTENTS 14.1. GENERAL.................................................................................................. 3 14.2. NOISE REDUCTION.................................................................................. 3 14.3. NOISE-ABSORBING HOODS AS SUPERSTRUCTURE.......................... 4 14.4. NOISE-ABSORBING MATERIAL.............................................................. 5 14.5. HYBRID...................................................................................................... 5 Z001007/0_05_August 2011 14. noise attenuation NOTes Z001007/0_05_August 2011 14. NOISE ATTENUATION 14.1. GENERAL In most cases a low noise level is required, which implies an insulation of the machine unit. The disturbing engine noise is transmitted through the hull - i.e. engine base and body - and by the air. To avoid a propagation of the engine noise through the hull, as first step engine and reversing gear are to be provided with elastic suspensions and elastic propeller shaft coupling (see chapter 3) which results in a reduction of the hull-latent noise. In addition, the acoustic source is to be shielded as far as possible, to reduce the air-latent noise. This measure above all is a very simple way to reduce the high-frequency noise. However, a small opening in the shielding may already cause a considerable noise leakage. Therefore, insulating material should also be provided below the engine bed, down to the hull, and all inlets are to be sealed with rubber bellows. 14.2. NOISE REDUCTION ill. 14/1 ill. 14/2 Equip the unit with a noise insulation to keep the sound level as low as possible. Provide noise catchers in the engine compartment. Various type are available. Ill. 14/1 shows a construction with a water drain. If a water drain is not possible, the air tubes may be bent like a swanneck (ill. 14/2), to avoid the entering of water. Design of the engine compartment should consider enough space for maintenance of the engine. In addition, thickness of the noise-absorbing material is to be considered. Carefully shield the acoustic source. Shielding should go down to the hull. Gaps on hatches and bench covers to be sealed with insulating material (see ill. 14/3) If the engine is under the bottom plate, cover all bulkheads and sheets. ill. 14/3 Z001007/0_05_August 2011 ill. 14/4 Before attaching the noise-absorbing material, make sure that there is sufficient space for movements of the engine during operation. Noise-absorbing material is available in different types and thickness. Provide a free space of 8" (180 mm) (ill. 14/4) in front of the engine, to permit its dismantling. 14.3. NOISE ABSORBING HOODS AS SUPERSTRUCTURE On small commodity boats and normally on all sport boats, at first engine and reversing gear are provided with an elastic suspension - see chapter 3. However, in case of an elastic stem tube, no elastic coupling may be mounted. Then the engine compartment preferably is built as self-contained construction, with a hinged cover as top (ill. 14/3). Attention: Always consider enough space for maintenance of the engine - see respective operating instructions. The engine protection is made of 1/12" (2 mm) steel plate or 3/4" (19 mm) plywood. A 3/8" (10 mm) rubber strip is used as cover sealing. For ventilation of the engine, two air intakes (see chapter 7) for sufficient air supply are to be provided. The air intakes are connected to the bottom edge of the engine compartment by means of rubber hoses which ensures sufficient noise reduction without any further measures. Exhaust air of the engine compartment is conducted via two noise catchers with the some cross section as that of the air intakes. These noise catchers must be insulated on both sides with the same material used for the inner side of the engine protection. In hot regions it may be necessary to install fans (see chapter 7.8) for air exhaust. Atmospheric temperature of the engine may rise to a max. value of 40 - 45°C only. However, a temperature as low as possible should be the aim. Z001007/0_05_August 2011 14.4. NOISE-ABSORBING MATERIAL ill. 14/5 noise-absorbing material for engine hood made of wood (plywood 5/8" / 15 mm) or 1/12" (2 mm) steel plate ill. 14/6 noise-absorbing material for engine hood made of 1/12" (2 mm) steel plate or wood (plywood 5/8" / 15 mm) 1 2 3 4 5 1 2 3 engine hood lead sheet, 0,5 line (1 mm) mineral cotton, 2" (50 mm) plastics foil perforated aluminum sheet, 0,5 line (1 mm), perforation 20% engine hood flame-proof absorbing mat, e.g.: "Porolon", "Revertex Acoustics" or Baryfoil. flame-proof reflecting sound- absorbing foil (ferruginous PVC, thickness 1/10" / 2,5 mm) 15% of the engine-sided surface to be provided with absorbing mat. Noise-absorbing material on ill. 14/5 shows a construction for extremely high insulation requirements, also containing a lead sheet layer. This construction is very stable and is also recommended for engine compartments the walls of which are for different reasons weaker than recommended. Under the same conditions as shown on ill. 14/5, one single layer of a flame-proof insulating mat, e.g. "Porolon", "Revertex Acoustics" or "Barifoil" may be glued directly onto the inner side of the engine protection. This noiseabsorbing material will in many cases be sufficient. Use contact glue. Such material requires little space and is easy to handle. All surfaces to be glued must be completely greaseand moisture-free, to achieve and maintain good adherence. Many different noise-absorbing materials are available on the market, but only materials meeting the current requirements as to fire protection and noise reduction may be used. Finished noise-absorbing mats with absorbing layers for soundproofing are also available on the market. 14.5. HYBRID Noise emission levels according actual standard (= October 2010) EN ISO 14509-1 must be kept. Refer to below table: Single Engine Power in kW Maximum Noise Pressure Level = LpASmax in dB PN≤10 67 10<PN≤40 72 PN>40 75 where PN = rated engine power in kW at rated speed and LpASmax = maximum noise pressure level in dB. For twin-engine and multiple-engine units of all engine types an allowance of 3 dB may be applied. To meet the specifications, follow recommendations under chapter 14.1 to 14.4. Z001007/0_05_August 2011 THIS PAGE IS INTENTIONALLY BLANK Z001007/0_05_August 2011 15. CONTROL STATION TABLE OF CONTENTS 15.1. GENERAL................................................................................................... 3 15.2. CONTROL SYSTEMS ............................................................................... 3 15.2.1. Mechanical control.................................................................................... 3 15.2.2. Hydraulic control...................................................................................... 4 15.2.3. Electronic control . ................................................................................... 4 15.3. CONTROL LEVERS................................................................................... 5 15.3.1. Kinds of control levers . ............................................................................ 6 15.3.2. Possible functions of control lever.............................................................. 6 15.4. CONTROL CABLE..................................................................................... 6 15.5. CONTROL STATIONS................................................................................ 7 15.6. INSTRUMENT PANELS.............................................................................. 8 15.6.1. Scheme for second instrument .................................................................. 8 15.6.2. Scheme for instrument panel and SCC . ...................................................... 9 15.6.3 Scheme for instrument panel and SCC with GPS......................................... 10 15.6.4 Scheme for instrument panel and SCC with GPS and I/O box........................ 11 15.6.5 Scheme for instrument panel with two SCC, GPS and four I/O boxes (max. amount) ... 12 Cut out drawings 15.6.6 Cut out drawing for CAN panel .................................................................. 15 15.6.7 Cut out drawing for CAN panel SOLAS ...................................................... 17 15.6.8 Cut out drawing for switch panel ............................................................... 19 15.6.9 Cut out drawing for push button panel SOLAS ............................................ 21 15.6.10 Cut out drawing for SCC ......................................................................... 23 15.6.11 Cut out drawing for two SCC ................................................................... 25 Z001007/0_05_August 2011 15. CONTROL STATION TABLE OF CONTENTS 15.7. HYBRID..................................................................................................... 27 15.7.1 Hybrid General ........................................................................................ 27 15.7.2 SCC............................................................................................................................. 27 15.7.3 Hybrid panel............................................................................................................... 28 15.7.4 Hybrid - Cut out drawing for Hybrid panel.............................................................. 31 Z001007/0_05_August 2011 15. CONTROL STATION 15.1. GENERAL The design of the control station should enable a functional placement of operating elements, boat control, instruments, navigation equipment and alarm system. That applies for both single and twin control stations. ill. 15/1 1 instruments - top control station 2 steering - top control station 3 control lever - top control station 4 instruments - lower control station 5 steering - lower control station 6 control lever - lower control station 15.2. CONTROL SYSTEMS For STEYR MOTORS Marine Engines a mechanically operated control is provided. However, other control systems may be used, too. 15.2.1. Mechanical control With mechanical control, movement of the lever is transmitted through a steel cable in a plastic sleeve onto the engine and reversing gear. This cable is called pressure- and tension cable. Illustration shows the most current mechanical control with a combined lever for accelerator potentiometer (acceleration) and reversing gear (forward or backward). For special applications (industrial use), control of accelerator potentiometer and reversing gear may also be done by one separate lever each. Z001007/0_05_August 2011 15.2.2. Hydraulic control Hydraulic control is designed for ships where the distance between engine and control station is too large and pressure- and tension cables often cause undesired play. In this case control is done by means of hydraulic cylinders triggered by individual control valves. These control valves receive the control commands via the hydraulic liquid of the control levers. A separate hydraulic tank is to be installed. Quality of the hydraulic liquid requires special attention since liquids with a low modulus of extension and a very low viscosity may be used only. In no case may the hydraulic liquid be merged with different qualities. 15.2.3. Electronic control With electronic control, movement of the control lever are converted into electric signals. In this case, the microprocessor unit plays a central role. It is attached as close as possible to the engine and controls via short tension- and pressure cables the engine and the reversing gear. ill. 15/3 1 2 3 microprocessor unit tension- and pressure cable accelerator tension- and pressure cable reversing gear A so-called potentiometer on the control handle imparts the respective position of the handle to the microprocessor unit. In the processor unit this signal is converted via servo-motors into mechanical movements. Depending on manufacturer and design of this processor unit several control levers may be connected. For the control of twin engines two processor units are required. Compared to mechanical control mechanical differential devices are not necessary. Z001007/0_05_August 2011 1 2 3 4 one single-lever control microprocessor unit tension- and pressure cable accelerator tension- and pressure cable reversing gear ill. 15/4 1 2 3 4 two single-lever controls microprocessor unit tension- and pressure cable accelerator tension- and pressure cable reversing gear ill. 15/5 1 2 3 4 four single-lever controls two microprocessor units tension- and pressure cable accelerator tension- and pressure cable reversing gear ill. 15/6 15.3. CONTROL LEVERS Speed and control levers should be of good quality to ensure a reliable control of the boat. For hydraulic reversing gears we recommend the combined lever control for single- and twin engines. This control is designed in such a way that control of engine speed and hydraulically actuated reversing gear can be done by one single lever. If the engine is equipped with a clutch for mechanical operation, the engine speed is to be controlled by means of a separate gearshift. Z001007/0_05_August 2011 ATTENTION: WHEN ENGAGING REVERSING GEARS OR CLUTCHES, THE ENGINE SPEED NEVER SHOULD EXCEED 800 RPM. 15.3.1. Kinds of control levers 1 single-lever control, for top assembly 2 single-lever control for twin-engine plant, for top assembly 3 single-lever control for lateral assembly 4 twin-lever control for top assembly ill. 15/7 15.3.2. Possible functions of a control lever 1 safety key: only by pressing key 1, control lever may be moved forward or backward. 2 trimming switch 3 by pressing key 3, engine speed may be changed without putting in a gear ill. 15/8 15.4. CONTROL CABLE Cables provided for the control devices described are designed for function in two operating directions (pushpull function) and available in many different lengths. Cables should not be shortened or extended respectively connected piece by piece. Cables for reversing gear and engine normally have different lengths. These lengths are to be considered and/ or measured exactly when planning the cable run. The cables must be laid unrestricted and only be clipped at the spots provided. If necessary, cables may be laid in cable-protection pipes. The speed cable must not be clipped closer than 0,9 m to the control, since this cable moves a slightly back and forth during operation. The speed and reversing gear cables are to be laid in as few as possible smooth curves, to avoid unnecessary friction and clearance losses. Min. curve radius is 150 mm. Z001007/0_05_August 2011 15.5. CONTROL STATIONS For boats with a top control station (fly bridge), the control of engine and gear may be done via an electrically controlled servo unit or a mechanical shift unit. Manoeuvring and control apparatus are installed twice. Conversion of the control levers between the individual control stations may be done automatically if an omnibus implement is provided. The speed cables of the two controls are connected to the actuator solenoid unit. Automatic commutation of the connecting cables between the control stations, one for every engine, should be placed as close as possible to the reversing gear. ill. 15/9 Z001007/0_05_August 2011 15.6. INSTRUMENT PANELS 15.6.1 Scheme for second instrument panel standard equipment instrument panel with cable 7 m Stick decal (delivered with Y-branch) onto the dashboard close to each instrument panel. optional equipment instrument panel with cable 1,5 m Y-branch extension cable 6,3 m ill. 15/10 NOTE: Oil pressure sender for twin installation must be changed. Z001007/0_05_August 2011 15.6.2 Scheme for instrument panel and SCC standard equipment instrument panel with cable 7 m SCC ill. 15/11 NOTE: Oil pressure sender for twin installation must be changed. Z001007/0_05_August 2011 15.6.3 Scheme for instrument panel and SCC with GPS Z001007/0_05_August 2011 15.6.4 Scheme for instrument panel and SCC with GPS and I/O box Z001007/0_05_August 2011 15.6.5 Scheme for instrument panel with two SCC, GPS and three I/O boxes (max. amount) Z001007/0_05_August 2011 CUT OUT DRAWINGS CAUTION These electronic mounting templates are provided for reference purposes only. Every STEYR MOTORS panel and SCC includes a full-scale cutting template in the box. When using electronic templates for planning, be certain to compare the printed measurements on the template against an actual ruler or other measuring device. Some printer drivers will rescale these templates to fit on a single sheet of paper. For optimum results, STEYR MOTORS recommends printing electronic templates on DIN A4 paper at 100% scaling. Always measure twice, and then cut once! Z001007/0_05_August 2011 THIS PAGE IS INTENTIONALLY BLANK Z001007/0_05_August 2011 ill. 15/12 15.6.6 Cut out drawing for CAN panel THIS PAGE IS INTENTIONALLY BLANK Z001007/0_05_August 2011 ill. 15/13 15.6.7 Cut out drawing for CAN panel SOLAS THIS PAGE IS INTENTIONALLY BLANK Z001007/0_05_August 2011 15.6.8 Cut out drawing for switch panel 105 mm 5,31" 135 mm 4,13" Z001007/0_05_August 2011 THIS PAGE IS INTENTIONALLY BLANK Z001007/0_05_August 2011 15.6.9 Cut out drawing for push button panel SOLAS 105 mm 5,31" 135 mm 4,13" Z001007/0_05_August 2011 THIS PAGE IS INTENTIONALLY BLANK Z001007/0_05_August 2011 15.6.10 Cut out drawing for SCC Z001007/0_05_August 2011 THIS PAGE IS INTENTIONALLY BLANK Z001007/0_05_August 2011 15.6.11 Cut out drawing for two SCC Z001007/0_05_August 2011 THIS PAGE IS INTENTIONALLY BLANK Z001007/0_05_August 2011 15.7. HYBRID 15.7.1. Hybrid general Hybrid installations offer basically two different operation modes: • D-Mode for conventional operation of the combustion engine • E-Mode for electric operation D-Mode and E-Mode can be simply operated over the conventional CONTROL SYSTEMS as described in section 15.2. To switch from D-Mode into E-Mode, the "E-Mode"- button (see ill. 15/12) of Hybrid panel has to be pushed after ignition on standard instrument panel (see ill. 15/13) has been turned on. To come back in D-Mode "E-Mode" button has to be pushed again or ignition is turned off over key-switch (or push-button) of instrument panel. ill. 15/12 ill. 15/13 ill. 15/13 15.7.2. SCC For appropriate connection of SCC, use only genuine STEYR MOTORS supplied parts; see scope of delivery schematics: 2180673-0 for 4 cylinders and 2180674-0 for 6 cylinders / use also connection schematic - Hybrid 2180526-0. On SCC/HCU-Mode only the status of system condition (see below ill. 15/14) is displayed to the operator. No governing (e.g. acceleration/deceleration) is possible over SCC! Selection On the right the display shows you the menu bar. Simply by pressing any of the menu buttons it switches to the appropriate menu. When the main menu is active and the Hybrid engine is available it is possible to switch between main and Hybrid menu by repeated pressing of the menu button. Z001007/0_05_August 2011 Status on SCC in D-MODE (= Diesel Engine Operation) Status on SCC in E-MODE (= Electric Motor) green red green red green green 15.7.3. Hybrid panel For appropriate connection of Hybrid panel, use only genuine STEYR MOTORS supplied parts and see connection schematic - hybrid 2180526-0. On the Hybrid panel following 3 functions are selected over push buttons: - E-Mode - Manual Drive - 12V Start E-Mode Toggling between D-Mode and E-Mode. Ignition off always puts the system into D-Mode automatically. The activated E-Mode is indicated to the operator by LED of E-MODE button and on SCC. By pushing the E-MODE button, the coupling actuator (item 8 / installation schematic Hybrid 2180525-0.) is activated and moves a push- cable which is mounted to the generator- lever (item 7 / installation schematic Hybrid 2180525-0.). Z001007/0_05_August 2011 The generator- lever disengages the coupling shaft (located between electric motor and Diesel engine) from conventional Diesel engine. r max.: 25 cm r max.: 25 cm NOTE: Shifting cable has to be mounted as illustrated below Laying and mounting of shifting cable The shifting cable has to be mounted on the actuator clutch. Do not bend the shifting cable below a radius of 25 cm (10"). The shifting cable has to be connected to the coupling lever on the generator; coupling slack = 2 mm (0,08"). Coupling slack in D-Mode = 2 mm (0,08"). Coupling actuator in D-MODE position (D-MODE sensor must be activated) Coupling actuator in E-MODE position (E-MODE sensor must be activated) Manual Drive Speed Speed Mode 1 Mode 2 Operates the E-MODE in case communication to ECU fails and the main operation condition of the system is okay. The Manual Drive button can be used to operate the generator (E-Mode) in two different, fixed speed- modes. Following two speed-modes are available: Speed Mode 1 - first position - 50% of E-Mode power available Speed Mode 2 - second position - 70% of E-Mode power available If LED is activated the Manual Drive button is in Speed Mode 1 or Speed Mode 2. 12V Start The Diesel engine is conventionally started by Hybrid installations over the generator if key-switch (start push button) on instrument panel is turned on. In case Diesel engine cannot be started over generator (e.g. 48V battery- bank is empty etc.) the starter- motor of Diesel engine can be used. The 12V Start- button has to be pushed in the same time as the key-switch (start push button) is turned into start position. Z001007/0_05_August 2011 THIS PAGE IS INTENTIONALLY BLANK Z001007/0_05_August 2011 (0,1 7") 4,3 m m 15.7.4. Cut out drawing for Hybrid panel 103 mm (4,05") 100 mm (3,94") 116 mm (4,57") 90 mm (3,54") Z001007/0_05_August 2011 THIS PAGE IS INTENTIONALLY BLANK Z001007/0_05_August 2011 16. EleCTRICAL EQUIPMENT TABLE OF CONTENTS 16.1. GENERAL................................................................................................... 3 16.2. BATTERIES................................................................................................ 3 16.3. BATTERY CABLE LENGTHS AND CROSS-SECTIONS.......................... 4 16.4. ADDITIONAL CURRENT UTILIZATION DEVICES.................................... 5 16.5. COMPUTATION OF CABLE-CROSS SECTION FOR ADDITIONAL EQUIPMENT................................................................ 6 16.6. CABLE CROSS-SECTION......................................................................... 6 16.7. HYBRID....................................................................................................... 7 16.7.1. General ................................................................................................... 7 16.7.2. Hybrid battery - calculation for capacity and duration in E-MODE .................. 7 16.7.3. Cable lengths and cross sections from HCU to Hybrid battery ....................... 8 16.7.4. Hybrid battery - control system for charge condition .................................... 9 16.7.5. Length of STEYR MOTORS connection cables . ........................................... 9 16.7.6. Hybrid - Mounting instructions for Hybrid parts ......................................... 13 Z001007/0_05_August 2011 16. EleCTRICAL EQUIPMENT Notes Z001007/0_05_August 2011 16. ELECTRICAL EQUIPMENT 16.1. GENERAL Cable laying is to be planned and carried out precisely and carefully. Cables must be approved for marine operation. Pull the cables through appropriate protective sleeves to be fixed properly. Make sure that cables are not too close to hot parts of the engine. Cables must not be exposed to mechanical wear and mechanical abrasion. If necessary, pull the cables through protection tubes. Attention: Never fix a cable in such a way that it could lay in bilge water. 16.2. BATTERIES Install the batteries in a battery box situated low in the boat to avoid leaking of battery acid due to motion of the sea. Provide easy access to the box for servicing the batteries, as well as proper ventilation, as the batteries generate small amounts of explosive gas. Install main switches at the positive side only. In case of one single switch, install it easily accessible at the positive side. Required capacity of main switch: min. 300 A (short-circuit current) fuse on positive battery terminal 300 A. Attention: Only bipolar systems may be installed otherwise galvanic streams may occur which cause corrosion. 1 air tube, at least 25 mm (1"), conducted outwards 2 cover, same material as box 3 clamping bar, which fixes the battery by securing the nuts (L-iron or flat bar) 4 studs 5 box made of steel plate (min. 3 mm) acid-proof 6 clamps with tightening screws (use pole grease) 7 rubber sleeves for cable passage 4 Cyl. Engine rated capacity: 12V / 92 Ah cold test current: 450 A Z001007/0_05_August 2011 6 Cyl. Engine rated capacity: 12V / 115 Ah for 24V installation: 2 x 12V/ 115 AH cold test current: 650 A 16.3. BATTERY CABLE LENGTHS AND CROSS-SECTIONS Determine the length of the positive cable from the positive pole (+) of the battery to connection no. 30 at the starter. Total length is the sum of cable length of positive cable (+) and ground cable (-). For example: positive cable =3,0 m ground cable =2,0 m ----------------------------Total length = 5,0 m ===> cable cross section = 70 mm² For ground connection, determine corresponding cross-sections as per chart. For 4 cyl. engines only starter engine: 2 kW - 12 V battery size: 92 AH length in m cable cross-section in mm² AWG 0,0 - 4,0 4,1 - 5,0 5,1 - 6,0 50 70 95 0 00 0000 length in m cable cross-section in mm² AWG 0,0 - 3,0 3,1 - 4,5 4,6 - 5,5 50 70 95 0 00 0000 For 6 cyl. engines only starter engine: 3 kW - 12 V battery size: 110 AH In general, take care that battery cable lengths are kept as short as possible. Z001007/0_05_August 2011 16.4. ADDITIONAL CURRENT UTILIZATION DEVICES Before connecting an additional current utilization device, such as lighting, radio, echo-sounder etc., first calculate the total power consumption of all these components to guarantee sufficient capacity of the dynamos. Example: When using a 50A dynamo you may connect current utilization devices consuming all together 50A simultaneously. In case of a too small capacity of the dynamo a larger or an additional dynamo may be installed. Since the starting quality of the battery must be guaranteed max. 90 % (45A) of the rated capacity may be consumed simultaneously and permanently. electrical equipment of the engine permanently requires approx. 15 A. Z001007/0_05_August 2011 16.5. CALCULATION OF CABLE CROSS-SECTION FOR ADDITIONAL EQUIPMENT Use this table to find the cable cross-section required for a specific power requirement. Example: A current-utilization device (24V) of 300 watt is to be installed. In this case distance from the currentutilization device to the battery is four meters. Required cable length is 8 meters, since cable length back and forth is to considered. In the table a straight line is drawn from 8 in the length (m) column sloping downwards to 300 in the power column. This straight line crosses the cross-sectional column at 4,5. Therefore, a cable with a cross-section of 4,5 mm² min. is to be used. This value is rounded up to the next cable size available. 16.6. CABLE-CROSS SECTION The cable cross-section is determined by the rated current of the fuse. Rule of thumb for dimensioning: a maximum of 10 Amp per mm2 Z001007/0_05_August 2011 16.7. HYBRID 16.7.1 Scope of Delivery - STEYR MOTORS provides ... 1) For scope of delivery see Hybrid schematics under chapter 19/Appendix :2180673-0 for 4 cylinders and 2180674-0 for 6 cylinders 2) Use only genuine STEYR MOTORS connection-cables and parts as delivered in scope of delivery. 3)NOTE: If standard cables are extended or replaced by installing party, the installation has to be approved from a STEYR MOTORS authorized dealer. Otherwise STEYR MOTORS won't take any responsibility for the operation of the system (electric motor and conventional Diesel engine) as specified! 16.7.2 NOT in Scope of delivery by STEYR MOTORS ... 1) Hybrid battery If Hybrid battery is provided form STEYR MOTORS, installation requirements of battery manufacturer are in package and must be followed from installing party. NOTE: If Hybrid battery is not provided from STEYR MOTORS follow installation specification acc. battery manufacturer. 2) Charge Control System for Hybrid battery to alarm operator regarding overload or complete discharge of Hybrid battery. NOTE: If necessary (depends on battery type!) an adequate control system for chosen Hybrid battery must be provided from Installing Party to prevent Hybrid battery from damage and operator from accident! 3) Main switch is to be mounted between B+ and HCU+ (additional to the standard main switch of engine). - Capacity of the main switch should be min. 400 Amp. NOTE: Integration of a main switch between B- and HCU- leads to defects in the Hybrid system! 4) Fuse on positive 48V battery terminal - 300 Amp. 5) Cables from HCU to Hybrid battery - Basically cable lengths should be kept as short as possible and laid next to each together. NOTE: Use same cable cross section for PLUS and Ground cable. Hybrid: 48V battery: min 120 Amph length in m cable cross section in mm² AWG ≤3 3-6 ≤ 10 70 95 120 00 000 0000 Cable socket according to DIN46235, hexagonal swaging acc. to DIN48083, isolation with hot melt coated heat shrink tubing. false false Z001007/0_05_August 2011 correct correct false false 16.7.3 Selection of Hybrid battery ... Most battery types can be used following below mentioned requirements: 1) Nominal voltage: 48V (4 x 12V or 2 x 24V or 24 x 2V) 2) Min. capacity: 120 Amph 3) Max. voltage supply to HCU: ≤ 57V NOTE: If voltage supply form Hybrid battery to HCU is > 57V system cannot be started in D-Mode with Generator. 4) Max. charge voltage to Hybrid battery: 55,9V / 100 Amp 5) Ensure max. charge/discharge current of battery is kept below battery specification Approximate calculation with following formula: P=U*I P (= electrical system power consumption = 9 kW) = U (= discharge cut off voltage acc. to battery specification) * I (= max charge / discharge current) For example: P = 9000 W U = 44,8 VDC (discharge cut off voltage acc. to battery specification) I = ? max charge / discharge current P=U*I I=P/U = 9000 W / 44,8 VDC I=200,9 Amp → Conclusion: Battery has to fulfil a max. charge / discharge current of 200,9 Amp! Minimum range calculation in E-MODE: min. Operation Time [h] = (Capacity of Battery [Amph] x (Depth Of Discharge (DOD) from Battery [%] / 100)) / 200 Amp. NOTE: DOD depends on battery type. For example: Capacity of Battery = 214 Amph DOD = 80% min. Operation Time [h] = (214 Amph x (80% / 100)) / 200 Amp = 0,856 h NOTE: - AUXILIARY ELECTRIC (e.g. 230VAC inverter) must be connected only to 48V output of Hybrid battery bank directly! External consumers (= AUXILIARY ELECTRIC) may reduce driving-range and charging-efficiency. - Only 24V (max. 30V, power consumption of Relay box Hybrid: max 7W, 300mA) supply to Hybrid relay box is allowed to be connected to center tap (24V) of 48V Hybrid battery pack! Z001007/0_05_August 2011 16.7.4 Selection of Hybrid battery Control System (not supplied from STEYR MOTORS) ... 1) Discharge of Hybrid batteries -Hybrid system peak discharge current: 235 Amps. NOTE: If 235 Amps. are consumed permanently, system reduces voltage accordingly to draw max. 9 kW out of Hybrid battery- pack. 9 kW are consumed under WOT continuously from Hybrid battery pack till batteries are empty if only STEYR MOTORS standard Hybrid system parts (2180673-0 for 4 cylinders and 2180674-0 for 6 cylinders / chapter 19/Appendix) are in use. 2) Overload protection: - Max. charge voltage from HCU to Hybrid batteries: 55,9V / 100 Amps. 3) If below mentioned battery types are in use, discharge and overload warnings on Hybrid Battery Control System as following: - ODYSSEY PC 1800 FT (art. no. 2180398-0) discharge alarm at: 45V (+1,0V/-0,0V) (Voltage displayed on SCC menu "HCU" - parameter "BATTERY") NOTE: If Battery voltage drops below 45V (+1,0V/-0,0V), operator must stop E-Mode operation. overload alarm at: ODYSSEY PC 1800 FT cannot be overloaded → no overload alarm necessary - MASTERVOLT MLI 24/160 (art. no. 2180727-0) discharge alarm at: 44V (+1,0V/-0,0V) (Voltage displayed on SCC menu "HCU" - parameter "BATTERY") NOTE: If Battery voltage drops below 44V (+1,0V/-0,0V), operator must stop E-Mode operation. overload alarm at: 58,4V (Voltage displayed on SCC menu "HCU" - parameter "BATTERY") NOTE: Stop charging over shore-power or D-Mode if battery voltage is over 58,4V (-1,0V/+0,0V). 16.7.5 Mounting position of STEYR MOTORS supplied electrical parts ... 1) Only genuine STEYR MOTORS connection-cables as supplied in scope of delivery must be used. NOTE: - If standard cables are extended or replaced by installing party, the installation has to be approved from a STEYR MOTORS authorized dealer. Otherwise STEYR MOTORS won't take any responsibility for the operation of the system (electric motor and conventional Diesel engine) as specified! - Make sure that cables are not too close to any hot parts of the engine. - Cables must not be exposed to mechanical wear and mechanical abrasion. - If necessary, pull the cables through protection tubes. ATTENTION: Never fix a cable or electrical component in such a way that it could get in permanent water-contact (e.g. bilge water). Z001007/0_05_August 2011 2) Use „Installation Schematic-Hybrid“ 2180525-0 (see chapter 19/Appendix) and schematic “Mounting position for Hybrid components” 2180662-0 (see below and chapter 19/Appendix) to define mounting position for standard Hybrid system parts. 3) Limitation of cable extensions - Max. 15 m cable extension (max. total cable length = 26 m) possible from Hybrid panel to Relay Box Hybrid. Standard cable length form Hybrid panel to Relay Box Hybrid supplied by STEYR MOTORS = 11 m. NOTE: Only possible with Hybrid Dual Cooling System or Hybrid Keel Cooling System. 4) Hybrid battery -Provide easy access to the box for servicing the batteries -Provide proper ventilation -Follow installation instructions acc. Hybrid battery manufacturer 5) Instrument panel (item 1 / 2180525-0 / see chapter 19/Appendix) - Select an appropriate flush place in your dashboard. Use a gasket or silicone between panel and dashboard -Mounting brackets are enclosed to each panel. NOTE: Instruments on instrument panel meet IP 54 and by SOLAS IP 67. • STANDARD instrument panel = IP 54 • SOLAS instrument panel = IP 67 • CAN panel = IP 54 • CAN panel SOLAS = IP 67 • SWITCH panel = IP 54 (standard supplied in Hybrid scope of delivery 2180673-0 for 4 cylinders and 2180674-0 for 6 cylinders) • Push button panel = IP 54 • Push button panel SOLAS = IP 67 Z001007/0_05_August 2011 6)SCC (item 2 / 2180525-0 see chapter 19/Appendix) -SCC has to be mounted with from STEYR MOTORS delivered mounting brackets. -Is the SCC mounted correctly it is according to IP 67. -Possible mounting position for SCC see schematic 2180662-0 (see chapter 19/Appendix). - Keep a safe distance from SCC to all appliances and objects that can be affected or damaged by magnetism. -For further installation instructions see SCC user manual Z001071/0, chapter "installation". 7) Hybrid panel (item 3 /2180525-0 / see chapter 19/Appendix) -Hybrid panel has to be mounted with from STEYR MOTORS delivered mounting brackets. -Use appropriate screws according to the drill hole of the mounting brackets. -Use a gasket or silicone between panel and dashboard. -Hybrid panel mounted correctly it is according to IP 54. -Mounting position see schematic 2180662-0 / see chapter 19/Appendix. 8) Relay box - Hybrid (item 4 / 2180525-0 / see chapter 19/Appendix) -Relay box has to be mounted with from STEYR MOTORS delivered mounting brackets. -Use appropriate screws according to the drill hole of the mounting brackets. -Relay box mounted correctly it is according to IP 65. -Mounting position see schematic 2180662-0 / see chapter 19/Appendix. -Power supply is ensured over "red" wire to Relay box - Hybrid: max. 30V; power consumption: 7W, 300mA 9)HCU (item 5 / 2180525-0 / see chapter 19/Appendix) -HCU has to be mounted with from STEYR MOTORS delivered mounting brackets (already mounted on HCU). -Use appropriate screws according to the drill hole of the mounting brackets. -HCU mounted correctly it is according to IP 54. -Mounting position see schematic 2180662-0 / see chapter 19/Appendix. ATTENTION: Do not disconnect Hybrid battery Minus before Hybrid battery Plus from HCU as this will lead to defects in HCU. -HCU mounting up side down not allowed as air could remain in the internal Hybrid cooling system. Possible HCU mounting positions, see below: Z001007/0_05_August 2011 10)Generator (item 7 / 2180525-0 / see chapter 19/Appendix) Generator is already in mounted condition (assembled to Diesel engine) supplied from STEYR MOTORS. Removing of the electric motor from the Diesel engine is only allowed to be done from STEYR MOTORS authorized technicians. 11) Coupling actuator (item 8 / 2180525-0 / see chapter 19/Appendix) - The coupling actuator is specified by IP 55. - Mounting material has to be chosen according to drill hole of coupling actuator bracket. - Movability of actuator clutch must be guaranteed. NOTE: Investigate no blockage of coupling actuator lever is present in D-Mode and E-Mode position! - Mounting position must ensure installation instruction of shifting cable - see illustration below. Caution: No influencing magnetic fields within a distance of 30 cm (12"). r min=25cm do not bend! r min=25cm do not bend! Mounting instruction of shifting cable: Coupling actuator Generator 12) Fuse F12 (item 9 / 2180525-0 / see chapter 19/Appendix) In respect to replace and check fuse F12, an easy access should be ensured. 13) Hall sensor (item 12 / 2180525-0 / see chapter 19/Appendix) Hall sensor is already in mounted condition (assembled to generator) supplied from STEYR MOTORS. Removing of hall sensor from generator is only allowed to be done from STEYR MOTORS authorized technicians. Z001007/0_05_August 2011 16.7.6. Hybrid Performance Adjustment 1) Generally a performance adjustment of E-Mode is possible over „Speed0“- and „Speed1“- wires as shown in schematic 2180525-0 /see chapter 19/Appendix. 2) „Red“ wire (from Relay box - Hybrid) must be always connected to 24V of 48V Hybrid battery pack to ensure a voltage supply to relay-box (max. 30V, power consumption of Relay box - Hybrid: 7W, 300mA - 2180525-0 / see chapter 19/Appendix). 3) Ensure min. rated RPM for SPEED MODE selection(as mentioned below) is achieved in E-Mode under WOT (=Wide Open Throttle). ATTENTION: If for selected SPEED MODE min. rated RPM is not achieved in E-Mode enormous damage could occur to the Hybrid System! SPEED MODE min. rated rpm max. possible rpm (to achieve under WOT in E-Mode) (load controlled) low880rpm 1180rpm mid11050rpm 1350rpm mid21200rpm 1450rpm high1350rpm 1550rpm 4) To adjust different SPEED MODES follow beolw description and table For location and connection of "Speed 0" - and "Speed 1" - cable see schematic 2180526-0 / chapter 19/Appendix „0“ = no connection to 24V of „Speed 0“- or „Speed 1“-cable „1“ = connection to 24V of „Speed 0“- or „Speed 1“-cable PROP_SPEED1 PROP_SPEED0 0 0 1 1 SPEED MODE 0low 1mid1 0mid2 1high Performance characteristics of Generator in Power E-Mode - see below schematics Electric 8 7 6 Power 5 E-Motor performance Speed setting low Speed setting mid1 Speed setting mid2 Speed setting high 4 3 2 1 0 800 900 1000 1100 1200 1300 Rpm 1400 1500 1600 1700 1800 Generally note: To ensure best performance of Hybrid engine, settings according above table should be tested. Z001007/0_05_August 2011 THIS PAGE IS INTENTIONALLY BLANK Z001007/0_05_August 2011 17. DRILL TEMPLATES For drill templates see http://www.steyr-motors.com In case of a missing template please mail to [email protected]. Z001007/0_05_August 2011 THIS PAGE IS INTENTIONALLY BLANK Z001007/0_05_August 2011 18. COMMISSIONING OF INSTALLATION For commissioning of a new engine, please use following documents for appropriate hand over to customer and warranty- approval by STEYR MOTORS: 1.template: STEYR MOTORS WARRANTY REGISTRATION CARD (to find under: Operation, Maintenance and Warranty Manual Z001022/0 / chapter WARRANTY) 2.template: COMMISSIONING REPORT (to find under: Installation Manual Z001007/0 / chapter 19. APPENDIX) 3. INSTALLATION GUIDE (to find under: Installation Manual Z001007/0 / chapter 19. APPENDIX) *) START UP OF HYBRID SYSTEM (to find under: HYBRID Installation Manual Z001044/0 / chapter 5) 4. RECORD A LOG- FILE with SMO-EDT PROGRAM → FORWARD FILLED OUT DOCUMENTS TO [email protected] Any product handed over to an end user must have a literature with proper operation instructions for the operator. STEYR MOTORS issues an Operation, Maintenance and Warranty Manual (art. no.:Z001022) that is sent with the product. Inside this manual instructions are given for a recommended procedure to break-in the engine (see chapter START-UP AND FUNCTIONS/ Engine Break- In procedure). These instructions are essential to achieve best performance from their new product. However if this instruction interfere the need to perform a propeller assessment on a new built vessel, STEYR MOTORS recommend as following: To enable a boat builder or installer to perform the necessary propeller selection test, STEYR MOTORS permits to operate a new engine for a limited time of 5 to 10 minutes during the mentioned Engine Break In- procedure to max power on rated engine speed. This period shall be more then efficient to choose the right propeller and record obtained engine operation parameters. Z001007/0_05_August 2011 THIS PAGE IS INTENTIONALLY BLANK Z001007/0_05_August 2011 19. APPENDIX TABLE OF CONTENTS PROPELLER CALCULATION FORM COMMISSIONING REPORT INSTALLATION GUIDE HYBRID INSTALLATION SCHEMATICS Z001007/0_05_August 2011 19. APPENDIX NOTes Z001007/0_05_August 2011 PROPELLER CALCULATION FORM Manufacturer of boat:................................................................................................................................. Boat type: ..................................................................................................................................... Own weight: W min.................................................... kg Total weight: W max................................................... kg Over-all length of boat: LOA....................................................... m Length of boat, over waterline: LWL....................................................... m Load centre of gravity, endwise (from transom): LCG...................................................... m Over-all width of boat: B max.................................................... m Width of boat, at water line: Bc max.................................................. m Width of boat, at transom: Bct......................................................... m Over-all height of boat: H........................................................... m V-angle boat centre: ß at........................................................ ° V-angle at transom: ß t.......................................................... ° Engine model: ..................................................................................................................................... Gear: Gear type: Propeller Data: ..................................... Diameter: .............................. inch Reduction of speed: .................................. :1 Pitch: .............................. inch Shaft diameter: ............................... mm Number of blades: ..................................... Slope of shaft: ....................................° Sense of rotation: ..................................... Cone: 1:.................................. Material: Costs contribution to propeller computation Euro 62,-- excl. VAT Z001007/0_05_August 2011 ..................................... THIS PAGE IS INTENTIONALLY BLANK Z001007/0_05_August 2011 Commissioning REPORT COMMISSIONING REPORT Engine- serial number: Engine- model: *) Hybrid- serial number: Boat Owner: Company/Name: Address/Phone: Dealer: Company: Address/Phone: Type of boat: Dimension of propellers: Model No.: Special Equipment from STEYR MOTORS (SCC, IFG, Cabin Heating etc.): Boat length: m Boat weight: kg Driving system: *) Hybrid- Battery specification: Gear reduction: Extended Storage Preservation Procedure (acc. SERVICE Manual / GENERAL / D3 ) Date of Preservation: #1 #2 ENGINE- CHECK POINTS: Installation checked according to the installation guide. Following points are in compliance: 1 2 3 4 5 6 7 8 9 10 Notes: *) HYBRID ELECTRICAL CONNECTIONS according schematic “CONNECTION SCHEMATIC- HYBRID” (see Hybrid Installation Manual- schematic with art.nr. 2180526-0) Notes (e.g.: wiring extensions etc.): SYSTEM GROUNDS connected ( see Hybrid Installation Manual- schematic with art.nr. 2180526-0) PROTECTION COVERS mounted on: HCU(U,V,W and B+,B-) Generator(U,V,W) Hybrid battery(+/-) END POSITON / FREE MOVEMENT of Coupling Actuator (D-Mode, E-Mode) ensured MAIN SWITCH capacity(between Hybrid battery+ and HCU+) : Amp (min. 400Amp) CONSUMERS mounted to Hybrid battery (only to 48V, max. 100Amp): Hybrid –Cooling: Raw water cooling Dual circuit cooling Keel cooling Z001007/0_05_August 2011 AS010.DOT 02.08 / Kundendienst Seite 1 von 2 THIS PAGE IS INTENTIONALLY BLANK Z001007/0_05_August 2011 COMMISSIONING REPORT Commissioning REPORT BEFORE MEASURING DATA: Correct level of operating fluids (motor oil, gear oil, hydraulic oil, cooling agent) confirmed Leakage (oil, fuel, coolant) checked: ok yes if not detail: *) HYBRID full filled STEYR MOTORS Dealer Check List (find in Hybrid Operation, Maintenance and Warranty Manual) and send signed document to STEYR MOTORS GENERAL Distributor Max. Voltage supply from Hybrid- battery bank to HCU( 57V): V MEASURING DATA: Max. boat speed: knots Fuel flow amount on return-line in idle: l/min Max. engine- rpm by WOT (CMD=5) rpm Motor oil pressure (SMO-EDT): bar Idle speed: rpm Engine coolant temp. (SMO-EDT): °C Temperature engine compartment: °C Exhaust raw water temp. (SMO-EDT): °C Exhaust backpressure: mbar Boost-pressure at max. rpm (SMO-EDT): mbar Active engine warnings: YES Instruments adjusted: YES NO if YES which: LOG FILE (Idle – Full Load – Idle) name: *) HYBRID Max. boat speed in E-Mode: - with Speed Mode: low mid1 mid2 - max. engine rpm achieved in E-Mode: knots high rpm D- Mode status on SCC E-Mode ready-red, D-Mode ready- green, HCU-Mode ready-green, GENERATOR YES (see SCC User Manual Z001071-0; chapter Hybrid menu) Notes: E- Mode status on SCC E-Mode ready-green, D-Mode ready-red, HCU-Mode ready-green, E-Drive YES (see SCC User Manual Z001071-0; chapter Hybrid menu) Notes: Flow-rate through Hybrid cooling- system: Max. HCU temperature on SCC: Max. E-MOTOR temperature on SCC: l/min (see in Hybrid cooling schematics mentioned above) °C (see SCC User Manual Z001071-0; chapter Hybrid menu) °C (see SCC User Manual Z001071-0; chapter Hybrid menu) Safeguarding instruction carried out YES Manual, warranty and operation explained YES Test made on: , by (Name in block letters) Please immediately return a copy of this report and the Warranty registration card to your STEYR MOTORS GENERAL DISTRIBUTOR. Failure to do say may affect factory warranty. Z001007/0_05_August 2011 AS010.DOT 02.08 / Kundendienst Seite 2 von 2 INSTALLATION GUIDE 1 2 BY ADAPTER SHAFT 6hole or 8hole (Z002098-0, Z002099-0): REAR ENGINE MOUNTS mounted on flywheel housing! IF A GEARBOX IN USE: ENSURE REAR ENGINE MOUNTS always mounted on gearbox! FALSE O.K 3 4 Z001007/0_05_August 2011 5 6 7 conventional fuel system new fuel system Z001007/0_05_August 2011 8 EXHAUST SYSTEM DIMENSIONS AFTER ASSEMBLY OF THE EXHAUST SYSTEM ALWAYS CHECK BACKPRESSURE. engine type THIS CAN EASILY BE DONE BY CONNECTING A GAUGE TO THE POSITION WHERE THE EXHAUST WATER TEMPERATURE SENSOR IS NORMALLY MOUNTED ON THE EXHAUST ELBOW / HIGH RISER. 80 + 0 / -50 MO84K32 100 +/- 50 MO94K33 100 +/- 50 MO114K33 100 +/- 50 MO144V38 100 +/- 50 MO144M38 100 +/- 50 MO164M40 100 +/- 50 MO174V40 150 + 0 / -50 MO126M28 150 +/- 50 MO156K25 150 +/- 50 BOAT INSTALLATION Exhaust System outside diameter MO166M28 150 +/- 50 MO196K35 150 +/- 50 min. D MO236K42 150 +/- 50 MO236K43 150 +/- 50 MO256K43 150 +/- 50 MO256H45 150 +/- 50 MO286H43 150 + 0 / -50 MO306H43WJ 150 + 0 / -50 RECOMMENDATION for BOAT INSTALLATION - Exhaust System outside diameter D NOTE: BACK PRESSURE- tolerance values as in beside table must be ensured! d 4 Cyl. Engine 90mm (3,5“) 6 Cyl. Engine 90mm (3,5“) 4 Cyl. Engin e 90mm (3,5“) Admissible tolerance SMP (mbar) MO54NA33 FOR MAXIMUM ALLOWED BACK PRESSURE SEE ENCLOSED TABLE; HIGHER EXHAUST BACKPRESSURE MAY CAUSE ENGINE DAMAGE AND POWER REDUCTION STEYR MOTORS Exhaust elbow outside diameter (valid for all exhaust elbows and high risers supplied from SMO) Exhaust back pressure (P40) set point (mbar) 6 Cyl. Engine (valid up to model MO256) 90mm (3,5“) 6 Cyl. Engine (valid above model MO256) 102mm (4,0“) Z001007/0_05_August 2011 9 9 10 FOR FULL INSTALLATION REQUIREMENTS REFER TO THE INSTALLATION INSTRUCTIONS ONLINE UNER WWW:STEYR-MOTORS. COM – TECHNICAL INFO – MANUALS – INSTALLATION STEYR MOTORS GmbH RESERVES THE RIGHT TO MODIFY THESE REQUIREMENTS WITHOUT PRIOR NOTICE Z001007/0_05_August 2011 HYBRID INSTALLATION SCHEMATICS Scope of Delivery- Hybrid components for 4 cylinder STEYR MOTORS engines 90 2 Mount Bracket Generator 100 2 Engine Mount Assy 55SH 110 8 HEX.SOCk. HD.CAP SCR. DIN 912-M12x358.8-A3C 120 1 Coupling Actuator Assy. 130 1 Gear Shift Cable Assy. 140 3 U,V,W- connection cable 150 1 Hall Sensor Assy. (ALREADY MOUNTED on GENERATOR) 160 1 HCU- Hybrid Control Unit • RED MARkED PARTS ARE ALREADY ASSEMBLED FROM STEYR MOTORS (when ordered as Hybrid Configuration from STEYR MOTORS) Pos. Qty. Designation 10 20 1 1 Illustration Generator Flywheel 2180673-0_00_101115_Tedoc 30 1 Additional Flywheel Weigth 170 2 Hose Nipple for HCU 40 9 HEX.SOCk. HD.CAP SCR. DIN 912-M8x60-8.8A2C 180 1 Relay Box Assy. 50 1 Coupler 190 1 SCC- Steyr Control Center 200 1 Instrument Panel (standard: key switch) 210 1 Hybrid Panel 60 2 70 HEX.SOCk.HD CAP 12 SCR. DIN912-M8x5010.9- DAC 80 12 2180673-0_00_101115_Tedoc Fitting Sleeve Washer DIN125-8.4140HV-A2 2180673-0_00_101115_Tedoc 2180673-0_00_101115_Tedoc Z001007/0_05_August 2011 Scope of Delivery- Hybrid components for 6 cylinder STEYR MOTORS engines • RED MARkED PARTS ARE ALREADY ASSEMBLED FROM STEYR MOTORS (when ordered as Hybrid Configuration from STEYR MOTORS) Pos. 10 20 Qty. Designation 1 1 90 1 Coupling Actuator Assy. 100 1 Gear Shift Cable Assy. 110 3 U,V,W- connection cable 120 1 Hall Sensor Assy. (ALREADY MOUNTED on GENERATOR) 130 1 HCU- Hybrid Control Unit 140 2 Hose Nipple for HCU 150 1 Relay Box Assy. Illustration Generator Flywheel 2180674-0_00_101115_Tedoc 30 1 2180674-0_00_101115_Tedoc Coupler 40 2 Fitting Sleeve 50 12 HEX.SOCk.HD CAP SCR. DIN912-M8x2510.9 60 2 Mount Bracket Generator 70 2 Engine Mount Assy 55SH 80 8 HEX.SOCk. HD.CAP SCR. DIN 912-M12x358.8-A3C 160 1 SCC- Steyr Control Center 170 1 Instrument Panel (standard: key switch) 180 1 Hybrid Panel 2180674-0_00_101115_Tedoc 2180674-0_00_101115_Tedoc Z001007/0_05_August 2011 Z001007/0_05_August 2011 Z001007/0_05_August 2011 Z001007/0_05_August 2011 Z001007/0_05_August 2011 Z001007/0_05_August 2011 Z001007/0_05_August 2011 Z001007/0_05_August 2011 9 HCU - Hybrid Control Unit View Easy Digital AC 1 x 6A 11 USB Interface 8 Master Bus terminator ChargeMaster 24/30-3 9 MASTERVOLT MLI 24/160 6 7 10 Shunt 500 5 4 * Fuse 300 Amps 3 * Main Switch min. 400 Amps STEYR MOTORS HYBRID 1 2 6 ry tte BaAh n 0 o i Li-V/16 24 7 6 * Master Bus cable * Power Supply cable * Ground cable * Battery Alarm Protection Charge/Discharge *) part not supplied from STEYR MOTORS KIT: HYBRID Option Parts not in scope of delivery! Steyr Motors - HYBRID 24 VDC ry tte BaAh n io 0 Li-V/16 24 0 3 4 Cable cross section recommendation: min 70mm2 <= 3 m 70 mm2 3 - 6 m 95 mm2 <= 10 m 120 mm2 NOTE: Use for PLUS cable and for GROUND cable same cable cross section! 48 VDC 7 8 2 10 W UV X25 1 W V U www.steyr-motors.com 5 9 X25/PIN 4 = Clutch closed HYBRID Installation with MASTERVOLT 2 x MLI 24/160 ChargeMaster 24/30-3; Digital AC 1x6A; Shunt 500; View Easy; USB Interface X25/PIN 5 = Clutch open Z001007/0_05_August 2011 Fuse 300 Amps 11 Relaisbox A11/PIN 87 11 Coupling Actuator X28/PIN 6 2180800-0_01_110427 CLEAN EFFICIENT POWER Note: Schematic diagram HCU - Hybrid Control Unit * Main Switch min. 400 Amps * Fuse 300 Amps Shunt 500 4 x ODYSSEY PC 1800FT 2 3 4 5 6 6 24 VDC STEYR MOTORS HYBRID 4 10 9 8 7 View Easy Master Bus terminator USB Interface ChargeMaster 24/30-3 7 9 8 2 W UV 10 1 W V U www.steyr-motors.com 5 9 HYBRID Installation with ODYSSEY 4 x PC 1800FT and MASTERVOLT ChargeMaster 24/30-3; Shunt 500; View Easy; USB Interface 1 0 3 7 Fuse 300 Amps Z001007/0_05_August 2011 *) part not supplied from STEYR MOTORS KIT: HYBRID Option Steyr Motors - HYBRID * Master Bus cable * Power Supply cable * Ground cable 2180801-0_01_110427 Cable cross section recommendation: min 70mm2 <= 3 m 70 mm2 3 - 6 m 95 mm2 <= 10 m 120 mm2 NOTE: Use for PLUS cable and for GROUND cable same cable cross section! CLEAN EFFICIENT POWER Note: Schematic diagram Z001007/0_05_August 2011 HCU - Hybrid Control Unit * Main Switch min. 400 Amps * Fuse 300 Amps Shunt 500 4 x ODYSSEY PC 1800FT 3 4 5 6 6 2 0 STEYR MOTORS HYBRID 7 3 10 9 8 7 View Easy Master Bus terminator USB Interface Mass Combi 48/5000-70 8 9 5 2 10 U VW 1 W V U www.steyr-motors.com 9 HYBRID Installation with ODYSSEY 4 x PC 1800FT and MASTERVOLT Mass Combi 48/5000-70 ; Shunt 500; View Easy; USB Interface 1 4 Fuse 300 Amps *) part not supplied from STEYR MOTORS KIT: HYBRID Option Parts not in scope of delivery! Steyr Motors - HYBRID * Master Bus cable * Power Supply cable * Ground cable 2180863-0_00_110427 Cable cross section recommendation: min 70mm2 <= 3 m 70 mm2 3 - 6 m 95 mm2 <= 10 m 120 mm2 NOTE: Use for PLUS cable and for GROUND cable same cable cross section! CLEAN EFFICIENT POWER Note: Schematic diagram 6 HCU - Hybrid Control Unit Master Bus terminator View Easy Digital AC 1 x 6A 11 8 9 ChargeMaster 24/30-3 USB Interface 7 10 MASTERVOLT MLI 24/160 6 *) part not supplied from STEYR MOTORS KIT: HYBRID Option Parts not in scope of delivery! Shunt 500 5 * Master Bus cable * Power Supply cable * Ground cable * Battery Alarm Protection Charge/Discharge 6 ry tte BaAh n io 0 Li-V/16 24 7 Steyr Motors - HYBRID 9 3 4 * Fuse 300 Amps 3 * Main Switch min. 400 Amps STEYR MOTORS HYBRID 1 ry tte BaAh n io 0 Li-V/16 24 2 4 0 Cable cross section recommendation: min 70mm2 <= 3 m 70 mm2 3 - 6 m 95 mm2 <= 10 m 120 mm2 NOTE: Use for PLUS cable and for GROUND cable same cable cross section! 5 8 9 X25/PIN 5 = Clutch open 10 W UV X25 1 W V U www.steyr-motors.com 2 X25/PIN 4 = Clutch closed HYBRID Installation with MASTERVOLT 2 x MLI 24/160 Mass Combi 48/5000-70; Digital AC 1x6A; Shunt 500; View Easy; USB Interface Fuse 300 Amps Z001007/0_05_August 2011 11 Relaisbox A11/PIN 87 11 Coupling Actuator X28/PIN 6 2180864-0_01_110427 CLEAN EFFICIENT POWER Note: Schematic diagram Z001007/0_05_August 2011 Z001007/0_05_August 2011 Z001007/0_05_August 2011 Z001007/0_05_August 2011