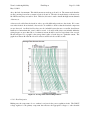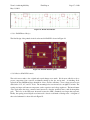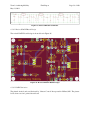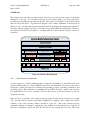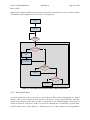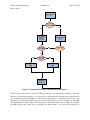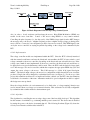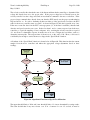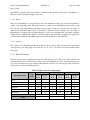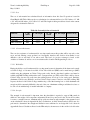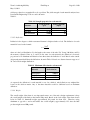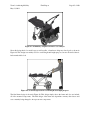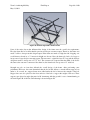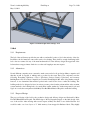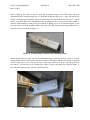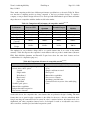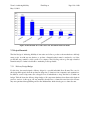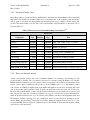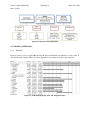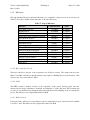
1
CALVIN COLLEGE ENGINEERING Final Report Team 3 Daniel Evans, Matthew Last, Matthew Rozema, Robert VanderVennen ENGR 340: Senior Design 12 May 2011 Abstract The following senior design project designed and distributed a customized electronic wheelchair (hereon referred to as a stroller because of its layout) for a particular customer with Spinal Muscular Atrophy, a neuromuscular, degenerative disorder affecting all muscles of the body. This design is meant specifically for this customer, but could be expanded to any number of individuals with similar needs. Since the customer must remain horizontally positioned, the stroller has a completely horizontal layout. It has the capability of being manually pushed or controlled electronically. The user interface for the electronic controls is a single touch button which the user can press whenever the stroller is in the desired directional state. There are four directional states which change at a set interval, signified by a series of four LEDs. Also, there is a camera feeding live video of the forward direction to an LCD for the user to safely navigate the device. The following report summarizes the final design of this stroller, including the major design decisions involved as well as the feasibility of the device from both technical and financial viewpoints. Financial estimates reveal a wholesale selling price for the stroller of approximately $14,000. These estimates also show that the manufacturing of this product would produce profits after two years, estimating sales of roughly 100 strollers per year. The final product is a working prototype of this electronic stroller, which was distributed to the customer. This prototype was a representative of a final design that could be either created into an individual business or sold to an existing rehabilitative wheelchair manufacturer. The device was completed and presented May 7, 2010. i Table of Contents Abstract .......................................................................................................................................................... i Table of Contents .......................................................................................................................................... ii List of Figures .............................................................................................................................................. vi List of Tables ............................................................................................................................................. viii 1. Introduction........................................................................................................................................... 1 2. Project Requirements ............................................................................................................................ 3 2.1 Functional Requirements .............................................................................................................. 3 2.2 Mechanical Requirements ............................................................................................................. 3 2.2.1 Weight Capacity.................................................................................................................... 3 2.2.2 Product Weight ..................................................................................................................... 3 2.2.3 Size ........................................................................................................................................ 3 2.2.4 Storage .................................................................................................................................. 3 2.2.5 Material ................................................................................................................................. 4 2.2.6 Transportation ....................................................................................................................... 4 2.2.7 Bedding ................................................................................................................................. 4 2.2.8 Mounting ............................................................................................................................... 4 2.2.9 Encasings .............................................................................................................................. 4 2.2.10 Maintenance .......................................................................................................................... 4 2.2.11 Weather ................................................................................................................................. 4 2.3 Electrical Requirements ................................................................................................................ 5 2.3.1 Motor..................................................................................................................................... 5 2.3.2 Power .................................................................................................................................... 5 2.3.3 LCD Monitor ........................................................................................................................ 5 2.3.4 Camera .................................................................................................................................. 5 2.3.5 Software ................................................................................................................................ 5 2.3.6 Reliability .............................................................................................................................. 6 2.4 Safety Requirements ..................................................................................................................... 6 2.4.1 Speed ..................................................................................................................................... 6 2.4.2 Brakes ................................................................................................................................... 6 2.4.3 Harnessing............................................................................................................................. 6 2.4.4 Transportation ....................................................................................................................... 6 2.4.5 Electrical Shock Safety ......................................................................................................... 6 2.5 Design Norms ............................................................................................................................... 7 3. 2.5.1 Caring.................................................................................................................................... 7 2.5.2 Integrity ................................................................................................................................. 7 2.5.3 Trust ...................................................................................................................................... 7 2.5.4 Transparency ......................................................................................................................... 8 System Design ...................................................................................................................................... 8 3.1 Electrical Hardware....................................................................................................................... 9 3.1.1 3.1.2 3.1.3 Microcontroller ................................................................................................................... 10 Touch Button ...................................................................................................................... 10 Sensors ................................................................................................................................ 10 ii 3.1.4 Battery ................................................................................................................................. 10 3.1.5 Power Regulation ................................................................................................................ 10 3.1.6 LCD..................................................................................................................................... 10 3.1.7 Video Camera ..................................................................................................................... 10 3.1.8 Motor Control Circuitry ...................................................................................................... 11 3.1.9 Electrical Safety .................................................................................................................. 11 3.2 Software ...................................................................................................................................... 12 3.2.1 Information Display ............................................................................................................ 12 3.2.2 Velocity Control Algorithm ................................................................................................ 14 3.2.3 Operating System ................................................................................................................ 15 3.2.4 PC Interface ........................................................................................................................ 15 3.2.5 PC Interface ........................................................................................................................ 16 3.3 Mechanical Hardware ................................................................................................................. 16 4. 3.3.1 Frame .................................................................................................................................. 16 3.3.2 User Interface ...................................................................................................................... 16 3.3.3 Bed ...................................................................................................................................... 16 3.3.4 Storage ................................................................................................................................ 16 3.3.5 Wheels................................................................................................................................. 16 3.3.6 Motors ................................................................................................................................. 17 3.3.7 Brakes ................................................................................................................................. 17 3.3.8 Enclosures ........................................................................................................................... 17 Electrical Design ................................................................................................................................. 17 4.1 Hardware ..................................................................................................................................... 17 4.1.1 Motor Controller ................................................................................................................. 17 4.1.2 Electronic Control Unit ....................................................................................................... 20 4.1.3 Hardware Topology ............................................................................................................ 22 4.1.4 Microcontrollers .................................................................................................................. 23 4.1.5 Sensors ................................................................................................................................ 24 4.1.6 Communication Protocols ................................................................................................... 25 4.1.7 Power Supply ...................................................................................................................... 25 4.1.8 Power Regulation ................................................................................................................ 29 4.1.9 Connectors and Cables ........................................................................................................ 40 4.1.10 LCD Screens ....................................................................................................................... 42 4.1.11 Camera ................................................................................................................................ 43 4.1.12 Motor Control Hardware..................................................................................................... 43 4.2 Software ...................................................................................................................................... 44 4.2.1 Cyclic Executive Architecture ............................................................................................ 44 4.2.2 Directional Control ............................................................................................................. 45 4.2.3 Diagnostics .......................................................................................................................... 48 4.2.4 Velocity Control.................................................................................................................. 49 4.2.5 Device Drivers .................................................................................................................... 53 4.2.6 Debugging ........................................................................................................................... 53 4.2.7 Temperature Control ........................................................................................................... 56 4.3 Future Work: Production Design ................................................................................................ 57 4.3.1 4.3.2 4.3.3 Hardware Topology ............................................................................................................ 57 Motor Control Circuitry ...................................................................................................... 58 MCU Selection.................................................................................................................... 59 iii 5. 4.3.4 PCB Design ......................................................................................................................... 59 Mechanical Design ............................................................................................................................. 60 5.1 Frame .......................................................................................................................................... 60 5.1.1 Requirements ...................................................................................................................... 60 5.1.2 Material Selection ............................................................................................................... 61 5.1.3 Material Size ....................................................................................................................... 64 5.1.4 Final Design ........................................................................................................................ 64 5.1.5 Feasibility ............................................................................................................................ 68 5.1.6 Financials ............................................................................................................................ 69 5.2 Wheels......................................................................................................................................... 69 5.3 Storage ........................................................................................................................................ 70 5.3.1 Requirements ...................................................................................................................... 70 5.3.2 Alternatives ......................................................................................................................... 70 5.3.3 Financials ............................................................................................................................ 71 5.3.4 Final Design ........................................................................................................................ 71 5.4 Bed .............................................................................................................................................. 72 5.4.1 Requirements ...................................................................................................................... 72 5.4.2 Alternatives ......................................................................................................................... 72 5.4.3 Proposed Design ................................................................................................................. 72 5.4.4 Feasibility ............................................................................................................................ 74 5.5 Motors ......................................................................................................................................... 74 5.5.1 Research .............................................................................................................................. 74 5.5.2 Requirements ...................................................................................................................... 75 5.5.3 Alternatives ......................................................................................................................... 75 5.5.4 Selection Criteria................................................................................................................. 78 5.5.5 Design ................................................................................................................................. 80 5.5.6 Financials ............................................................................................................................ 83 5.6 Brakes ......................................................................................................................................... 84 5.6.1 Research .............................................................................................................................. 84 5.6.2 Requirements ...................................................................................................................... 84 5.6.3 Design ................................................................................................................................. 85 5.6.4 Financials ............................................................................................................................ 89 5.7 Encasings .................................................................................................................................... 90 5.7.1 Requirements ...................................................................................................................... 90 5.7.2 Alternatives ......................................................................................................................... 91 5.7.3 Design ................................................................................................................................. 93 5.7.4 Financials ............................................................................................................................ 95 5.8 Mounting ..................................................................................................................................... 96 6. 5.8.1 Brakes ................................................................................................................................. 96 5.8.2 Camera ................................................................................................................................ 98 5.8.3 Printed Circuit Boards....................................................................................................... 101 5.8.4 LCD................................................................................................................................... 101 5.8.5 Motor................................................................................................................................. 103 5.8.6 Touch Button .................................................................................................................... 105 5.8.7 Financials .......................................................................................................................... 106 Testing .............................................................................................................................................. 108 iv 6.1 Component Test Plans .............................................................................................................. 108 6.1.1 Software ............................................................................................................................ 109 6.1.2 LCD/Camera System ........................................................................................................ 111 6.1.3 Power Regulation Circuit Board ....................................................................................... 112 6.1.4 Temperature of Electrical Components ............................................................................ 112 6.1.5 Battery/Charger ................................................................................................................. 113 6.1.6 Motor................................................................................................................................. 113 6.1.7 Brakes ............................................................................................................................... 113 6.1.8 Structure ............................................................................................................................ 114 6.2 Integration Test Plans ............................................................................................................... 114 6.2.1 Electrical Testing .............................................................................................................. 114 6.2.2 Mechanical Testing ........................................................................................................... 117 Business Plan .................................................................................................................................... 119 7. 7.1 Business Models ....................................................................................................................... 119 7.1.1 User ................................................................................................................................... 119 7.1.2 Wheelchair Supplier.......................................................................................................... 120 7.2 Competition............................................................................................................................... 120 7.3 Market Research ....................................................................................................................... 122 7.3.1 Customer Base .................................................................................................................. 122 7.3.2 Market Size ....................................................................................................................... 123 7.4 Target Market............................................................................................................................ 125 7.5 Project Financials ...................................................................................................................... 126 7.5.1 Delivery Design Budget .................................................................................................... 126 7.5.2 Production Design Budget ................................................................................................ 128 7.5.3 Sell Price ........................................................................................................................... 130 7.5.4 Fixed and Variable Costs .................................................................................................. 131 7.5.5 Three year financial outlook ............................................................................................. 131 Project Management ......................................................................................................................... 133 8. 8.1 Work Division ........................................................................................................................... 133 8.1.1 Hardware ........................................................................................................................... 133 8.1.2 Software ............................................................................................................................ 133 8.1.3 Mechanical ........................................................................................................................ 134 8.2 Team Organization and Management ....................................................................................... 134 8.3 Schedule and Milestones........................................................................................................... 136 8.3.1 Schedule ............................................................................................................................ 136 8.3.2 Milestones ......................................................................................................................... 137 Acknowledgements ........................................................................................................................... 139 9. 10. Conclusions ................................................................................................................................... 140 11. References ..................................................................................................................................... 141 12. Appendices.................................................................................................................................... 147 12.1 Appendix A. Work Breakdown Structure ................................................................................. 147 v 12.2 Appendix B. Stress Calculations ............................................................................................... 152 12.3 Appendix C. Motor Power, Speed, and Torque Calculations ................................................... 158 12.4 Appendix D. LTSpice Power Regulation Circuit ..................................................................... 160 12.5 Appendix E. Voltage Regulator Calculations ............................................................................... 1 12.6 Appendix F. PCB Heat Dissipation Calculation ........................................................................... 2 12.7 Appendix G. Brake Mounting Stress Calculations ....................................................................... 6 List of Figures Figure 1: Picture of Team 3 (L to R: Matt Last, Rob VanderVennen, Matt Rozema, Dan Evans) .............. 2 Figure 2: Top-level System Architecture ...................................................................................................... 8 Figure 3: Use Case Diagram of Achieving Mobility .................................................................................... 9 Figure 4: Display Option 1 – Overlaid Arror System ................................................................................. 13 Figure 5: Display Option 2 – LED System ................................................................................................. 13 Figure 6: Labeled Picture of the LM3S2965 CAN Board8 ......................................................................... 21 Figure 7: Block Diagram of Delivery Design Hardware Topology ............................................................ 22 Figure 8: Block Diagram of LM3S2616 MCU9 .......................................................................................... 23 Figure 9: Battery Monitor ........................................................................................................................... 24 Figure 10: CAN Message Identifier Fields5 ................................................................................................ 25 Figure 11: Seal Lead Acid Deep-Cycle Battery.......................................................................................... 27 Figure 12: Lithium-Ion Battery13 ................................................................................................................ 27 Figure 13: 24V, 6A Battery Charger........................................................................................................... 29 Figure 14: Voltage Regulator for Camera................................................................................................... 30 Figure 15: Average Time for Breaking of Fuse16 ....................................................................................... 31 Figure 16: Heat Dissipation Calculations ................................................................................................... 32 Figure 17: Examples of Common Heatsinks .............................................................................................. 33 Figure 18: Over-Voltage Protection Schematic .......................................................................................... 33 Figure 19: Power Switch used on final product .......................................................................................... 34 Figure 20: LTSpice Circuit ......................................................................................................................... 35 Figure 21: Bode Plot of 100uF Capacitor ................................................................................................... 35 Figure 22: Bode Plot of 0.01uF Capacitor .................................................................................................. 36 Figure 23: EAGLE Schematic .................................................................................................................... 37 Figure 24: EAGLE Board Layout ............................................................................................................... 37 Figure 25: Revised EAGLE Schematic ...................................................................................................... 38 Figure 26: Revised EAGLE Board Design ................................................................................................. 38 Figure 27: Version 1 of Power Regulation Circuit ..................................................................................... 39 Figure 28: Final Version of Power Regulation Circuit ............................................................................... 39 Figure 29: CAN Socket5 ............................................................................................................................. 40 Figure 30: Battery Connector...................................................................................................................... 41 Figure 31: Battery Charger Connection ...................................................................................................... 41 Figure 32: Motor Power Connection .......................................................................................................... 42 Figure 33: Liquid Crystal Display Monitor ................................................................................................ 43 Figure 34: Software Block Diagram ........................................................................................................... 44 vi Figure 35: System Boot and Cyclic Executive Software Flowchart ........................................................... 45 Figure 36 : Event-Driven State Machine Software Flow Diagram ............................................................. 46 Figure 37: Algorithmic Flowchart of Button Debouncing Process ............................................................ 47 Figure 38: Block Diagram of Closed-Loop Voltage Control System ......................................................... 50 Figure 39: Algorithmic Flowchart of Velocity Control Software ............................................................... 51 Figure 40: Algorithmic Flowchart of Speed Check Function ..................................................................... 52 Figure 41: Drawing of LCD Screen Used for Debugging .......................................................................... 54 Figure 42: Sample UART Output of Debugging Data................................................................................ 55 Figure 43: Example Graph of Motor Status Data ....................................................................................... 56 Figure 44: Proposed Production Design Hardware Topology .................................................................... 58 Figure 45: Schematic Diagram of Simple H-Bridge Circuit ....................................................................... 58 Figure 46: Mechanical Design Breakdown ................................................................................................. 60 Figure 47: Preliminary design used for base case analysis ......................................................................... 65 Figure 48: Second design used for overall height and length purposes ...................................................... 65 Figure 49: Final design of the stroller frame............................................................................................... 66 Figure 50: CAD Drawing of Frame Weldment........................................................................................... 67 Figure 51: Tie Down Angles....................................................................................................................... 68 Figure 52: Final Design of the Storage Area .............................................................................................. 72 Figure 53: Main Bedding Cushion .............................................................................................................. 73 Figure 54: Side Cushion.............................................................................................................................. 73 Figure 55: Restraint System ........................................................................................................................ 74 Figure 56: Parts of a PMDC motor25........................................................................................................... 76 Figure 57: Comparison of PMDC and SWDC motors26 ............................................................................. 76 Figure 58: Parts of a BLDC motor28 ........................................................................................................... 77 Figure 59: Diagram of the motors engaged and disengaged ....................................................................... 78 Figure 60: Test setup for donated motor functionality................................................................................ 81 Figure 61: Invacare Nutron R51 motors used for delivery design .............................................................. 83 Figure 62: Comparison of foot lever and hand lever for attendant-controlled braking system33, 34 ............ 85 Figure 63: Comparison of different braking mechanisms for attendant-controlled brakes35, 36, 42 .............. 86 Figure 64: Rim brakes and hand lever used in final product ...................................................................... 87 Figure 65: Donated parking brake being used in delivery design ............................................................... 88 Figure 66: On-off toggle switch for emergency braking ............................................................................ 88 Figure 67: Resulting temperature of PCB due to natural convection ......................................................... 92 Figure 68: Resulting temperature of PCB due to forced convection .......................................................... 93 Figure 69: Motor controller, ECU, and power regulation PCB encasing delivery design .......................... 94 Figure 70: Donated battery encasing for final product ............................................................................... 95 Figure 71: Mounting of rim brake for delivery design ............................................................................... 97 Figure 72: Parking brakes mounted onto frame .......................................................................................... 98 Figure 73: First design of camera mounting system ................................................................................... 98 Figure 74: Second design of camera mounting system............................................................................... 99 Figure 75: Prototype of second camera design ........................................................................................... 99 Figure 76: Second prototype of third camera mounting system ............................................................... 100 Figure 77: Final camera mounting system for final product ..................................................................... 100 Figure 78: Mounting of PCB encasing ..................................................................................................... 101 vii Figure 79: Comparison of LCD Screen mounting alternatives54, 55 .......................................................... 102 Figure 80: Prototype of LCD mount ......................................................................................................... 103 Figure 81: Final LCD mounting system ................................................................................................... 103 Figure 82: Clamp-style mount system ...................................................................................................... 104 Figure 83: Final motor mounting system .................................................................................................. 104 Figure 84: Design of strap-in arm rest with touch button attached ........................................................... 105 Figure 85: Three strap-in arm rest prototypes that were built and used to test on the customer............... 106 Figure 86: Magnetic strap-in arm rest storage device ............................................................................... 106 Figure 87: Acceleration Testing Results ................................................................................................... 110 Figure 88: Velocity Control Test Results ................................................................................................. 111 Figure 89: LM317 Temperature as a Function of Time ............................................................................ 112 Figure 90: Calculations for Speed Testing ................................................................................................ 115 Figure 91: Motor Deceleration from 2.5 mph as a Function of Time ....................................................... 116 Figure 92: Competitive models in the market58, 59, 60................................................................................. 120 Figure 93: Product Flow Chart ................................................................................................................. 125 Figure 94: Breakdown of revenue source for wheelchair market in 199670 ............................................. 126 Figure 95: Cumulative weekly hours for the team .................................................................................... 135 Figure 96: Overall team organization ....................................................................................................... 136 Figure 97: WBS outlying major tasks and completion dates .................................................................... 136 Figure 98: Simplified model used for hand calculations .......................................................................... 152 Figure 99: Bed stress analysis showing a max stress of approximately 1850psi based on 200lb load ..... 155 Figure 100: Deflection analysis showing a max deflection located in the bed of approximately 1/64” ... 156 Figure 101: Max stress in the frame of approximately 510 psi located in the front supports with a 200lb load on the bed and a 100lb load on the storage shelves .......................................................................... 156 Figure 102: Max stress in the storage area is approximately 6000psi with 125lb load ............................ 157 Figure 103: Max deflection in the storage area of 0.053” with 125lb load............................................... 157 List of Tables Table 1: List of Acronyms ............................................................................................................................ x Table 2: Pros and Cons of PID Algorithm with Optical Encoder ............................................................... 14 Table 3: Basic Evaluation of Pros and Cons of an RTOS........................................................................... 15 Table 4: List of Development Kit Alternatives ........................................................................................... 18 Table 5: Qualitative Assessment of Development Kit Alternatives4, 5, 6, 7................................................... 20 Table 6: Typical Power Values of Components ......................................................................................... 26 Table 7: Assessment of Battery Types ........................................................................................................ 28 Table 8: Battery Type Decision Matrix ...................................................................................................... 28 Table 9: Frame material decision matrix .................................................................................................... 61 Table 10: Cost analysis for each material ................................................................................................... 62 Table 11: Strength properties for each material .......................................................................................... 63 Table 12: Maximum deflection for each material ....................................................................................... 63 Table 13. Material Weight Comparison ...................................................................................................... 64 Table 14: Total tube length needed for the frame. ...................................................................................... 69 Table 15: Storage Shelf Dimensions........................................................................................................... 71 Table 16: Motor Design Decision Matrix 24, 27, 29, 30 .................................................................................... 78 viii Table 17: Required power, speed, and torque for motor and wheel ........................................................... 81 Table 18: Comparison of Invacare motors32 ............................................................................................... 82 Table 19: Production Design Costs for the Motor ...................................................................................... 83 Table 20: Delivery Design Costs for the Motor .......................................................................................... 84 Table 21: Decision Matrix for Braking Mechanism Alternatives 43, 44, 45 .................................................... 86 Table 22: Comparison of Parking Brake Alternatives ................................................................................ 87 Table 23: Production Design Costs for the Braking Systems ..................................................................... 89 Table 24: Delivery Design Costs for the Braking Systems......................................................................... 90 Table 25: Decision Matrix for Encasing Material....................................................................................... 91 Table 26: Electronic Component and Encasing Dimensions ...................................................................... 91 Table 27: Values used to roughly estimate cooling of PCBs by convection .............................................. 92 Table 28: Design Selection for Electronic Component Encasings ............................................................. 93 Table 29: Production design costs for the encasing systems ...................................................................... 95 Table 30: Delivery design costs for the encasing systems .......................................................................... 96 Table 31: Component Mounting Type ........................................................................................................ 96 Table 32: Calculated bending and torsional stress in the brake support arm .............................................. 97 Table 33: Comparison of LCD screen mounting system .......................................................................... 102 Table 34: Comparison of the two touch button mounting design alternatives.......................................... 105 Table 35: Production design costs for the mounting systems ................................................................... 107 Table 36: Delivery design costs for the encasing systems ........................................................................ 108 Table 37: Directional Software Test Plan ................................................................................................. 110 Table 38: Time Trials to Calculate Speed of Stroller ............................................................................... 115 Table 39: Comparison of Performance of competitive models58, 59, 60 ...................................................... 121 Table 40: Comparison of features in competitive models58, 59, 60 .............................................................. 121 Table 41: Cost comparison of competitive models61, 62 ............................................................................ 122 Table 42: Leading conditions associated with wheelchair use63 ............................................................... 123 Table 43: Wheelchair Use by Age Group in 200263 ................................................................................. 124 Table 44: Home Medical Equipment Market Breakdown67...................................................................... 124 Table 45: Annual births per year in the United States for conditions most likely requiring horizontal powered wheelchair68, 64, 69 ........................................................................................................................ 124 Table 46: Estimated final prototype budget for Achieving Mobility ........................................................ 127 Table 47: Total Donations ........................................................................................................................ 128 Table 48: Final product BOM for Achieving Mobility............................................................................. 129 Table 49: Total assembly time and cost .................................................................................................... 130 Table 50: Selling price for the stroller ...................................................................................................... 130 Table 51: Fixed costs associated with forming a new business71, 71 .......................................................... 131 Table 52: Projected net income for first three years of business operation .............................................. 132 Table 53: Estimated cash balance at the end of each year. ....................................................................... 132 Table 54: Hardware work division............................................................................................................ 133 Table 55: Main software components ....................................................................................................... 134 Table 56: Mechanical task breakdown...................................................................................................... 134 Table 57: Project Milestones .................................................................................................................... 137 ix Acronym AC BDC BLDC CAD CAN DC EE EMF FPGA GPIO GUI HW I/O I2C IDE JTAG LCD LED MCU ME MOSFET NTSC OS PCB PID PMDC PWM QEI ROM RTOS SMA SPI SW SWDC UART UI USB VGA WBS Table 1: List of Acronyms Definition Alternating Current Brushed DC Brushless DC Computer-Aided Design Controller Area Network Direct Current Electrical Engineer Electromotive Force Field Programmable Gate Array General Purpose Input/Output Graphical User Interface Hardware (electronic) Input and Output Inter-Integrated Circuit Integrated Development Environment Joint Test Action Group Liquid Crystal Display Light Emitting Diode MicroController Unit Mechaincal Engineer Metal-Oxide Semiconductor Field Effect Transistor National Television System Committee Operating System Printed Circuit Board Proportional-Integral-Derivative Permanent Magnet DC Pulse Width Modulation Quadrature Encoder Interface Read-Only Memory Real Time Operating System Spinal Muscular Atrophy Serial Peripheral Interface Software Shunt-Wound DC Universal Asynchronous Receiver/Transmitter User Interface Universal Serial Bus Video Graphics Array Work Breakdown Structure x © 2011, Calvin College and Daniel Evans, Matthew Last, Matthew Rozema, Robert VanderVennen xi Team 3: Achieving Mobility May 11, 2011 Final Report Page 1 of 160 1. Introduction 1.1 Problem Definition The main focus of our project was directed toward an individual named Isaac Postma. He is a ten year-old boy who was diagnosed with Spinal Muscular Atrophy (SMA) as an infant. This is a rare genetic disorder that causes his muscles to deteriorate over time. Currently, he has lost virtually all voluntary muscle ability in his body except for the use of his left index finger and slight facial expressions. Unfortunately, he may lose the ability to use these muscles as well but at this time it is hard to say when that will happen according to his doctors. He has two primary means of transportation – a stroller in which he lies down while someone pushes him as well as an electric wheelchair in which he sits up and controls with his finger. Unfortunately, both means of transportation are no longer suitable for Isaac. He has outgrown his stroller and the manufacturer does not make one large enough to fit his growing body. In addition, he cannot use his electric wheelchair for more than twenty minutes due to the amount of strain that it puts on his back and breathing difficulties encountered while sitting up. After hearing about Isaac, the team knew that this was a project worth pursuing and that this was a great way to make an impact in the community. 1.2 Course Overview Engineering 339 and 340 are a two course sequence offered at Calvin College to give senior engineering students experience with how the design process works. These two courses, often referred to as Senior Design, are capstone courses offered at Calvin College where students tackle a design problem over the course of two semesters. The first semester places an emphasis on team formation, identifying a viable design problem, and conducting an in depth feasibility study. Researching and prototyping are conducted with an emphasis placed on accomplishing design norms to incorporate the reformed Christian worldview. The second semester focuses on completing the work initiated in the first semester. This typically includes designing the final product on paper and producing a working prototype to demonstrate the design with functionality in mind. The final part of the class entails testing and performing engineering analyses, which are completed with the design norms in mind. Finally, teams present their projects to faculty, family, and friends at the Senior Design Banquet in May. 1.3 Project Statement The main objective of this project was to design, prototype, and deliver a motorized stroller that would provide Isaac with adequate mobility and comfort. The focus of the design was in the areas of safety, reliability, and ease of use. Isaac controls the stroller with the touch of his finger and he sees where he is going via an LCD that is wired to a camera in the front of the stroller. With two electrical and two mechanical engineering concentration students, this project presented several electrical and mechanical design challenges that were appropriate for this team. Even though this product has been specifically designed for Isaac Postma, it has the potential to benefit individuals with similar disorders. Providing the gift of mobility to otherwise immobile people was the overall goal of this project. Team 3: Achieving Mobility May 11, 2011 1.4 Final Report Page 2 of 160 Meet the Team The team is comprised of four senior engineering students; two with a mechanical engineering concentration and two with an electrical and computer concentration concentration.. Pictured from left to right in Figure 1 are Matt Last (ME), Rob VanderVennen (ME), Matt Rozema (EE), and Dan Evans (EE). L to R: Matt Last, Rob VanderVennen, Matt Rozema, Dan Evans) Figure 1: Picture of Team 3 (L Matt Last is from Syracuse, NY and will be graduati graduating ng with a degree in engineering with a mechanical concentration. For the past two summers, Matt has been interning at Sensis Corporation as a System Integration and Test Engineer working on testing the components of a radar system used in airports. Currently he has accepted a full-time time job at Bechtel Plant Machinery in Pittsburgh, PA. He will be working as a project engineer on nuclear power plants for submarines and air craft carriers used in the Navy. After working a couple years, he hopes to obtain a mas master’s ter’s degree in business administration. Rob VanderVennen is from Grandville, MI and will be graduating with a degree in engineering with a mechanical concentration. Rob interned for two years at Progressive Surface Inc. as a mechanical design engineer working rking on pneumatic blasting machines. Currently, he works at Gentex Corporation as a Production Support Engineer in the outside electrochromic mirror division. He has dealt heavily with manufacturing and machine design over the last several years. Rob plan planss on going back to school within a couple years to start working on his MBA. Matt Rozema is from Zeeland, MI and will be graduating with a degree in engineering with an electrical and computer concentration. Matt currently holds a part part-time position in software oftware engineering at Johnson Controls and will be working there full full-time time after graduation. He is currently working on analyzing, debugging, and maturing software that will be used in 2012 Mazda Hands Hands-Free Free Bluetooth car audio systems. He plans to attendd graduate school for computer engineering with an emphasis in software systems after working a couple years in the industry. Dan Evans is from Chelmsford, MA and will be graduating with a degree in engineering with an electrical and computer concentration. n. Dan has had three internships – two at Avid Technology and one at Raytheon Company. He spent last summer conducting research on the electrophysiology of the brain, Team 3: Achieving Mobility May 11, 2011 Final Report Page 3 of 160 lacrimal gland, and duct cells at Calvin College. He will be attending Worcester Polytechnic Institute in Worcester, MA next year as he pursues his PhD in biomedical engineering. 2. Project Requirements This section describes the top-level requirements for the device. It has been divided into functional, mechanical and electrical requirements. Refer to Figure 2 for a conceptual block diagram of the system. 2.1 Functional Requirements The device provides users with the ability to drive themselves around in a stroller while lying down. The user will be able to drive the device utilizing a touch button control system with LED directional display as well as an LCD showing video output from a camera in the front of the stroller. The stroller will move in the desired direction of the user as long as the touch button is engaged. Whenever the touch button is not engaged, the device will be stationary. The stroller shall also be able to be disengaged for attendants to manually push it. 2.2 Mechanical Requirements 2.2.1 Weight Capacity The device shall be designed to support up to a 200 pound user. 2.2.2 Product Weight The device itself shall not exceed 250 pounds. Most electric wheelchairs are around 300 pounds; therefore, this will ensure that the stroller is light enough to be lifted by a hydraulic wheelchair lift. 2.2.3 Size The size of the device shall be compatible with the customer’s current environment. This includes being able to drive through a standard doorway that is no more than 32” wide. In addition, the overall length must adjust in size so that the smallest length is at least 56” and the longest length is at least 60”. The height of the center of the stroller shall be at least 25” tall so that the customer can be at an appropriate level to children his age per customer request. 2.2.4 Storage The device shall be capable of securely storing all customer medical equipment. The customer’s suction motor weighs approximately 8 pounds and is 9” wide x 14” long x 10” tall. The customer’s feeding bag is approximately 4 pounds when full and is 9” long x 5” wide” x 13” tall. Team 3: Achieving Mobility May 11, 2011 2.2.5 Final Report Page 4 of 160 Material The device shall consist of material that is rust-free and strong enough to support the desired weight requirement. 2.2.6 Transportation The device must be able to fit on a wheelchair hydraulic lift that is approximately 40” long and 36” wide. In addition, there must be tie down hooks to lock the stroller in place in a wheelchair accessible van. The hooks must be approximately 24” apart on the stroller to ensure they are compatible with the locking system currently in the customer’s van. 2.2.7 Bedding The bedding material shall provide enough cushioning to keep the user comfortable and shall be made from a material which provides enough friction to prevent the user from sliding around. The bedding shall also include a restraint system for when the customer is being transported in a vehicle. 2.2.8 Mounting Component mounting for the LCD, touch button, and camera shall be in a convenient location for the user and be flexible enough to adjust to the user’s needs. 2.2.9 Encasings The encasings shall provide adequate protection for all electronic components from precipitation as well as enough heat dissipation to avoid overheating. 2.2.10 Maintenance The stroller shall be essentially maintenance free. The only maintenance that may be required is replacing the motor brushes after five years based on usage, greasing the bearings if the front wheels start to stick, and inflating the rear tires if they become soft. 2.2.11 Weather The stroller shall be rain proof and be completely operable in all forms of weather precipitation. The stroller shall also have attachments to attach a wheelchair compatible canopy. Team 3: Achieving Mobility May 11, 2011 Final Report Page 5 of 160 2.3 Electrical Requirements 2.3.1 Motor The motors shall be powerful enough to provide the necessary torque to move the wheelchair from rest for the maximum combined weight requirement of 450 pounds. This includes enough torque to travel up a ramp with the maximum incline requirement of 10°. The minimum required motor power based on the necessary torque is 0.295 horsepower (Appendix C. Motor Power, Speed, and Torque Calculations. The motors also require an emergency braking mechanism in case the electronic brakes fail. The motors must also be able to provide a minimum angular velocity of 2,259 rpm (Appendix C. Motor Power, Speed, and Torque Calculations). Finally, the motors must have the capability of being disengaged in order to provide the possibility of manual operation. 2.3.2 Power The battery provides the power to the system. The customer has communicated to the team that the product will be primarily used during recess at Isaac’s school and after school activities, and should not be needed for more than two hours. The battery needs to provide enough energy to the device so that it is operable for over two hours when the device is traveling at full speed for a quarter of the time with maximum occupant weight. The battery is recharged by use of a standard American outlet in less than 8 hours so that the batteries will have completed recharging while the customer is sleeping during the night. 2.3.3 LCD Monitor There shall be one color LCD monitor mounted to the device that will show the front view of the device. The LCD shall provide an image that is readable in direct sunlight as well as in dim lighting. The LCD monitor must be compatible with the video camera, have a colored display, and a resolution of at least 300,000 pixels. The monitors must also measure at least 4.5” diagonally so that the user can easily see the display. 2.3.4 Camera There shall be one camera that captures the view of what is in front of the device. The camera needs to output the same video format that the LCD receives. The frame rate should be over 25 frames per second. Autofocus is not necessary, but would be preferred. 2.3.5 Software The software shall directly control the speed of the vehicle by making real-time calculations. It shall also provide an informational display to the customer by means of LEDs and a character LCD screen (separate from the color LCD in section 2.3.3). Each LED shall remain illuminated for 2 seconds before cycling to the next. The software shall contain self-test functions to determine the state of the device upon start up. If there is a problem, the user will be notified via a sequence of LED flashes, which is documented in the Team 3: Achieving Mobility May 11, 2011 Final Report Page 6 of 160 user manual. Finally, software shall ensure that the stroller maintains a speed of 2.5 ± 1.0 mph for an incline range of -10° to 10°, which will handle most normal situations. Moreover, the software shall be able to carry out any task associated with other design requirements. 2.3.6 Reliability The electrical system should be able to withstand jolts due to pot holes and speed bumps. It should also be able to withstand the vibration of traveling on surfaces of gravel, bricks, and asphalt. The electrical components shall be able to perform for at least 5 years. The electrical system shall be able to operate between the temperatures of 0˚C and 50˚C. 2.4 Safety Requirements 2.4.1 Speed The device shall not exceed 3.5 mph (2.5 ± 1.0 mph). This includes traveling up/down an incline/decline with a ±10° slope. 2.4.2 Brakes The device shall be able to stop in less than 2 feet from full speed. Applying the brakes can be accomplished by three different methods: user-controlled touch button system, attendant-controlled hand brake, and attendant-controlled emergency brake switch. 2.4.3 Harnessing The device shall include a seatbelt to secure the user in place. This seatbelt will be an adjustable strap that will run comfortably across the user’s waist and shoulders. It will be mounted to the frame and be secured and unsecured by use of a buckle mechanism. 2.4.4 Transportation The device shall be able to be secured in the family’s van. The van consists of four adjustable snap hooks mounted to the floor. The snap hooks need four locations on the stroller to hook to. 2.4.5 Electrical Shock Safety Since the device uses electricity, the proper precautions must be taken in order to protect people from electrocution. Large currents of electricity flowing through one’s body can burn tissue, freeze muscles, and fibrillate one’s heart. This has a potential to occur when a voltage difference is applied between two points on that body. Therefore the user should not be able to contact two different nodes of the wiring and all open nodes should be covered. Team 3: Achieving Mobility May 11, 2011 Final Report Page 7 of 160 2.5 Design Norms Design norms are a set of moral guidelines that try to incorporate ethical issues with technical engineering issues. Ethical judgments are often made in engineering and design norms heavily affect this decision process. There are several different design norms that the team has focused on throughout the course of this project. These design norms include caring, integrity, trust, and transparency. 2 2.5.1 Caring The design norm of caring should show care towards all individuals affected by the end product. The final product should take into account the social, physical, and psychological effects of all individuals involved. This product shows caring because its main function is to give mobility to those in need. This product is specifically designed to give individuals, namely Isaac Postma, a new perspective on life. The goal is that individuals will be able to experience life with a new appreciation for the gift of mobility. The device will also affect those around Isaac as it will make their life easier, so taking care of Isaac is not as burdensome. Each member of this team felt a special calling to help out Isaac and completing this project will impact the design team just as much as him. 2.5.2 Integrity The design norm of integrity should promote completeness and portray harmony of form and function. The end product should promote human values and relationships and be pleasing to the end user. The final product will show integrity because it is designed specifically for Isaac Postma and the final design will be a working, reliable, and safe product. Even though this project targets Isaac specifically, any future product will be tailored specifically to an individual. Therefore, strong relationships will be formed between the customer and the team. This product promotes human values because even though it is a product that will likely never see a large demand, the team is designing it to dramatically improve the lives of a few individuals. 2.5.3 Trust The design norm of trust should promote a design that is dependable and reliable for the customer. Trust can be seen by steps that are being taken in order to provide a safe product to the customer. This is a very important design norm for this project since an individual could be harmed if the product is not designed with safety and trust in mind. Safety features on the final design include three independent braking systems; one for the person pushing the vehicle, one for the driver, and one emergency stop built into the motor. There is a control system implemented to trigger the brakes if any electric or system failure occurs. In addition, detailed testing has been performed on all mechanical and electrical components to ensure that no one will be injured from this product. A safety factor of two has been used on the frame to ensure that the user feels safe using the product. Team 3: Achieving Mobility May 11, 2011 2.5.4 Final Report Page 8 of 160 Transparency The design norm of transparency should demonstrate a design that is easily understandable and predictable to the user. There should be little confusion with how to operate the final product and each feature functions. This design norm is also very important for this project since an individual needs to learn how to drive the vehicle easily and in a relatively short amount of time. This product will typically be designed for people with physical and possible mental disabilities; therefore, it must function in a way that people can understand very easily. This design norm may conflict with the design norm of trust because if more safety features are added to the product it will complicate the design and make it less transparent. Therefore, the team has assessed the individual in each circumstance to see what balance is best for the particular situation. 3. System Design The following section examines the system design at a component level. Achieving Mobility is divided into three systems based on functionality: electronic hardware, software, and mechanical systems. These systems are further broken down in several subsystems or components. A diagram of the system architecture is shown in Figure 2. Blue blocks represent electronic components, yellow blocks represent mechanical components, and green blocks represent user interface components. A use-case diagram of the device is shown in Figure 3. This diagram shows all major operations available to any type of potential user. Figure 2: Top-level System Architecture Team 3: Achieving Mobility May 11, 2011 Final Report Page 9 of 160 Figure 3: Use Case Diagram of Achieving Mobility 3.1 Electrical Hardware The electrical hardware includes all physical electronic components that are needed in order for the stroller to function according to the requirements. These can be either digital hardware components, such as the microcontrollers, or analog, such as sensors and power regulation circuitry. The following section provides a brief overview of each major piece of electrical hardware. Team 3: Achieving Mobility May 11, 2011 3.1.1 Final Report Page 10 of 160 Microcontroller The microcontroller can be thought of as the “brain” of the electronic hardware. A microcontroller (MCU) is needed in the design because the control algorithms needed for this device exceed the capabilities of a simple, digital circuit. As seen in Figure 2, the MCU processes all the information coming in from sensors and the touch button and determines the proper response through software algorithms. It also controls the LED user interface. 3.1.2 Touch Button Since the customer is incapable of lateral movement with his fingers and wrists, a touch button was used as the user’s method of control for the stroller. A joystick system is more typical for electric wheelchairs and is more convenient to navigate; however, moving a joystick is impossible for the customer. 3.1.3 Sensors The sensors in the system include a circuit board temperature sensor and battery voltage sensor. The circuit board temperature sensor is used to regulate the temperature to make sure the electrical components maintain a safe operating temperature. The battery voltage sensor is used to display the percent of battery power left to the customer so they know how much longer they may operate the vehicle. 3.1.4 Battery The battery is needed to supply the necessary power to the system. Since the device relies solely on the battery for power, the battery provides sufficient energy for the entire use of the device. 3.1.5 Power Regulation The allocation of power through the system has been carefully designed so that the device can be operable for an extended amount of time. If power is improperly regulated, the device will not function properly because power will be converted to heat. Thus, if a significant amount of power dissipation occurs, the device may only be operable for a short amount of time. 3.1.6 LCD The LCD provides the user with the ability to see what is in front of the device. 3.1.7 Video Camera The video camera sends the live video feed directly to the LCD. The camera is mounted to the front of the wheelchair so the user knows what is ahead when driving forward. Team 3: Achieving Mobility May 11, 2011 3.1.8 Final Report Page 11 of 160 Motor Control Circuitry The motor control circuitry contains all the electronic components that connect the digital outputs of the MCU to the motor. It is designed for high current motor control and utilizes safety components in order to protect the components. 3.1.9 Electrical Safety For electrocution to occur, one needs to be touching two different conductive pieces that have different voltages between the two parts. Current cannot travel through a person’s body without a voltage difference, so for that reason voltage levels have been examined in order to find out what is dangerous for the user. The average person can only perceive electricity flowing through them that is about 4mA. Using Ohm’s law of ܸ = ݁݃ܽݐ݈ሺݐ݊݁ݎݎݑܥሻሺܴ݁݁ܿ݊ܽݐݏ݅ݏሻ it can be determined how much voltage is needed to make a person notice electricity running through them. Since the product is being powered by 24V DC battery, this is the voltage that the calculations use in order to err on the cautious side. Although the electrical resistance of the human body varies, the resistance between two dry hands is approximately 1 MΩ, and the resistance between two wet hands is 17kΩ. Therefore the voltage needed for one with wet hands to perceive the electrical current is ܸ = 4݉ ∗ ܣ17݇Ω = 68ܸ Therefore, one cannot perceive electrocution from the product with dry hands or even wet hands. If a person has wet hands and touches a terminal with a metal object, such as a ring, the resistance between their hands greatly decreases to about 1kΩ. Therefore the voltage needed is ܸ = 4݉ ∗ ܣ1݇Ω = 4ܸ The product does provide this much voltage, so there is a small risk. The customer should not be worried about electrical shock from the product because the voltage is insignificant. According to most industry standards, 30 Volts is considered to be a conservative threshold for a dangerous voltage1. In order to provide the safest product possible, the terminals are covered with insulation, including the terminals of the battery. Also, the batteries are sealed in order to avoid the risk of acid spill. Since the battery is charged with 120V 60 Hz standard outlet, there is also the possibility of electrocution from the outlet. A frequency of 60 Hz is more dangerous than a DC voltage because alternating currents flow bidirectional, which may cause one’s heart into fibrillation due to the twitching of the muscles. Team 3: Achieving Mobility May 11, 2011 Final Report Page 12 of 160 When dealing with 60 Hz AC, a dangerous amount of current is approximately 15mA. Therefore the resistance needed from one’s body to prevent this dangerous current amount is calculated. ܸ = ܴ݅ 120ܸ = ሺ15݉ܣሻሺܴሻ ܴ = 8݇Ω This resistance is high enough that in order for it to be dangerous, one needs to touch the outlet with a wet finger or a metal instrument. Although this may be a possibility, it is slim enough that the team is confident in the safety of the product. One may also believe there is a significant risk of electrocution if the device is accidentally driven into a lake or pool. Electrocution in a bathtub may be possible, but lakes and pools are much larger. Due to the high volume of water, it has a high resistance and the electrical current disperses throughout the water. Therefore, there is not a significant risk of electrocution if the customer accidently drives into a lake or pool. The team greatly discourages this though because the device will be ruined. 3.2 Software The software provides a dynamic user interface and utilizes directional and velocity control algorithms. In order to properly understand the directional software, a distinction must be made between the directional state of the software and the directional state of the device. The directional state of the software is a result of the directional state machine (refer to section 4.2.2 for more detail) and the directional state of the machine is the direction in which the device is physically moving. These terms must be distinguished in order to properly understand the functionality of the software. 3.2.1 Information Display The information display component of the user interface provides information regarding the directional state of both the software and the device as well as takes directional commands from the user. This component displays the current directional state of the software to the user, which allows him or her to navigate in their desired direction. The information display also provides diagnostic information to the user in case of a system warning or failure, such as high temperature, current, and voltage. 3.2.1.1 Display Alternatives There were two main mechanisms considered for the directional display. The first mechanism is overlaying a system of four arrows onto the corner of the LCD screen, as shown below in Figure 4. This would be the most aesthetic option for the user, but it would also be rather difficult to implement with software because it would require overlaying the graphic on top of the video being displayed on the screen. This option would require LCD drivers and software written specifically for the LCD screen. Additionally, interfacing to an external LCD would mean that the LCD drivers included in the software SDK would most likely not work, so custom drivers would need to be built. Team 3: Achieving Mobility May 11, 2011 Final Report Page 13 of 160 LCD Figure 4: Display Option 1 – Overlaid Arror System The alternative to the overlaid arrow system is an LED system mounted beneath the LCD screen, as shown in Figure 5. This is less visually appealing to the user, but has the same functionality and provides the same information. Also, the software for this option is much simpler than the overlaid arrows. This option would not require LCD drivers or software written for the LCD; rather, it would require LED drivers, which are very simple to implement in software. Figure 5: Display Option 2 – LED System 3.2.1.2 Display Selection The selected form of directional display was the LED system shown in Figure 5. Due to the time constraints inherent to this project, the time that was saved by using LEDs instead of an overlaid arrow Team 3: Achieving Mobility May 11, 2011 Final Report Page 14 of 160 system on an LCD was very desirable. Also, the aesthetic appeal gained by the overlaid arrow system from Figure 4 was determined to be minimal. 3.2.2 Velocity Control Algorithm Since the interface between the user and the motor control system is a simple touch button, there is no means for variable speed control by the user. In other words, the user is not able to control the speed of the device directly. Therefore, it was necessary to implement a speed control algorithm to drive motors at a constant speed. Initially, the chosen method for velocity control was closed-loop PID control using an optical encoder. This method was well-documented in the Project Proposal and Feasibility Study (PPFS). However, as the semester progressed, we realized that using encoders may not be the best idea. The main reason why encoders would not work well is because there is not enough room on the motor shaft for both an electronic brake and the optical encoder. Therefore, using an encoder would require removing the electronic brake. However, if this brake was removed, the device would have no means of braking in case of an emergency, such as software failure. Keeping the brake on the motor allows the attendant to quickly stall the motors, regardless of the state of the electronic system. Also, the team decided that such precise velocity control was not necessary for the customer’s safety. A PID algorithm could easily maintain a speed within 0.5 mph, but the required speed window is 1 mph. Finally, after looking for optical encoders to buy, it was discovered that it would cost over $100 per encoder, which is quite expensive. Table 2 shows a list of the pros and cons of using the PID algorithm with an optical encoder as feedback. Table 2: Pros and Cons of PID Algorithm with Optical Encoder Pros Cons -Provides precise speed -Would require removing control (within 0.5 mph) electronic brake -Selected motor controllers have built-in encoder interface (QEI). -Not necessary for safety -Encoders are expensive (about $100) - Increased design time After carefully evaluating the pros and cons of each velocity control method, the chosen technique was a voltage control algorithm. The algorithm utilizes a closed-loop control system that maintains a constant voltage to each motor unless the current is above or below specific thresholds (discussed in 4.2.4). The current samplings of the motors are used as feedback to determine if there is positive or negative torque on the motors and therefore determine if the speed of the motors needs adjusting. While this is not as precise as a PID algorithm, it does maintain the required speed window on a ±10° slope. See section 4.2.4 for a detailed description of the voltage control algorithm. Team 3: Achieving Mobility May 11, 2011 3.2.3 Final Report Page 15 of 160 Operating System The software to control the execution of functions and applications is called the operating system. For this design, there were two main options for executive software: a commercial OS (more specifically, an RTOS) or a custom designed cyclic executive. Examples of possible RTOSs include QNX, VxWorks, or eCos. These are commercial operating systems with a relatively small overhead and could be used to control the flow of the software. Cyclic executive software would be designed by the team and customized to meet the needs of the device. A table evaluating the pros and cons of an RTOS is shown below in Table 3. Table 3: Basic Evaluation of Pros and Cons of an RTOS Pros Come with device drivers Cons Increased code space (Flash/ROM) and necessary RAM space Priority based preemptive multitasking High learning curve to write code for RTOS Built-in memory management Can be expensive to purchase (if not open source), up to several thousand dollars for licenses. For this project, the cons of an RTOS severely outweigh the pros. In fact, none of the advantages to using an RTOS would be highly beneficial for the project. No TCP/IP, USB, video, or file system drivers were needed for the device, and there was no need for extensive memory management. Also, priority based preemptive multitasking was not necessary because the software is not complex enough to need it. A round-robin scheduling approach was used, which was implemented in a cyclic executive. A cyclic executive is a control structure or program for explicitly scheduling the execution of several periodic processes on a single CPU. This scheduling is done in a deterministic fashion, such that the execution of any program is predictable.3 This determinism is necessary for this real time system because any extensive timing latency could cause harm to the user. Additionally, the cyclic executive initializes the system on startup by performing self-test and initializing global configurations, such as maximum speed, temperature, peripheral initialization and interrupts. Then, after the initialization sequence, the cyclic executive cycles between polling for the state of the touch button every 1 ms and responding to CAN interrupts from the motor controllers as well as servicing the directional state machine (refer to section 4.2.2). The cyclic executive is discussed in-depth in section 4.2.1. 3.2.4 PC Interface The PC interface allows a technician to connect the device to a PC in order to install future software and firmware upgrades. For the delivery model, the firmware installation can be done using the LM Flash Programmer application provided in the evaluation kit. This is a PC application provided by Luminary Team 3: Achieving Mobility May 11, 2011 Final Report Page 16 of 160 Micro that allows software downloads to the device through a USB-JTAG interface. In the case of a software update, the binary file would be provided by the software developer (i.e., a member of Achieving Mobility). A USB cable will be provided with the stroller which can be connected to the Electronic Control Unit and programmed with the upgraded binary. Also, it should be noted that the socalled technician would be a member of the team, since they will be living in close proximity to the customer. 3.2.5 PC Interface The PC interface allows a technician to connect the device to a PC in order to install future software and firmware upgrades. For the delivery model, the firmware installation can be done using the LM Flash Programmer application provided in the evaluation kit. This is a PC application provided by Luminary Micro that allows software downloads to the device through JTAG interface. 3.3 Mechanical Hardware 3.3.1 Frame The frame provides support for the entire stroller and is strong enough to hold the weight of the equipment and passenger. It provides adequate areas for storage as well as mounting capabilities for all necessary equipment. 3.3.2 User Interface The mechanical user interface consists of a touch button and a system of LEDs which allows the user to control the motion of the wheelchair. 3.3.3 Bed The bed provides the user with a comfortable place to lie while operating the device. 3.3.4 Storage Storage provides the user with a location to store his or her medical equipment so it is easily accessible and always nearby. For this prototype, medical equipment includes a feeding bag as well as a suction device. 3.3.5 Wheels The wheels allow the vehicle to facilitate movement. They provide the necessary traction and strength to support and transport a load. Team 3: Achieving Mobility May 11, 2011 3.3.6 Final Report Page 17 of 160 Motors The motors convert electrical energy from the battery into mechanical energy to the shaft giving the wheelchair the ability to move. The motors have enough torque to provide the required speed for the maximum weight capacity. They are controlled by the user and have a fixed operating speed. Finally, the motors have the ability to be disengaged by hand for manual drive. 3.3.7 Brakes The braking system consists of a mechanical hand brake, a mechanical parking brake, an electrical brake, and an electrical emergency brake. The mechanical hand brake provides an attendant pushing the wheelchair in manual drive the ability to slow/stop the wheelchair. The mechanical parking brake consists of an independent lever system on both wheels that provide the user the ability to lock the wheels in place. The electrical brake provides the ability to stop when the user releases the touch-button. Finally, the emergency electrical brake provides an attendant with the ability to shut-off the motors using a button. The emergency brake also automatically shuts-off the motors if the batteries die. 3.3.8 Enclosures The enclosures protect the critical electronic components including the battery, motor controller PCB, ECU PCB, and the power regulation PCB from harsh environments. 4. Electrical Design This section describes the design of the electrical system for the device. The electrical design is split up into two main subsections: hardware and software. Hardware sections describe the physical components of the device, including their selection and how they work together within the system. The software sections describe the software architecture plans. 4.1 Hardware Electronic hardware serves as the central nervous system of the device, providing all the necessary physical electronic components and connections to allow the system to perform as desired. The electronic hardware is primarily responsible for executing software, connecting each component with necessary interfaces, and providing stable power inputs to each component. 4.1.1 Motor Controller A motor controller is an electronic control system that uses both digital and analog components to control the behavior of a motor. For this project, the motor controller needed to control two 24 Volt motors independently. The circuitry of a motor controller typically includes at least: an MCU, PWM digital interface, an H-Bridge, and other protection circuitry such as diodes, fuses, and capacitors. Refer to Team 3: Achieving Mobility May 11, 2011 Final Report Page 18 of 160 4.1.12 for more information on the motor controller analog hardware. Motor controllers are very intricately and precisely designed for safe usage, and therefore there was not enough time to design a motor controller from scratch; in fact, designing a motor controller could be a design project by itself. Therefore, a pre-made development kit was used instead of designing our own. A development kit, although a very general term, is a product that utilizes a certain processor and contains connections to a vast array of peripherals. This is a very helpful tool when learning how to use a particular processor and interface it with a set of peripherals. In general, they are used primarily as a learning tool and not often used in a final design because they are often too expensive to include in a mass produced product and they often contain much more peripherals and extra features than needed in the final design. They are especially useful when attempting to quickly evaluate the effectiveness of a given processor. For the design of this project, the selection of a development kit was pivotal for the design of several other components; specifically, the MCU, hardware topology, and communication protocols. While adapting the design to available development kits is often not very cost effective, the benefit of using a pre-constructed development kit far surpassed the increased cost of the device. Moreover, the production design of the device will differ from delivery design in ways that make the device less expensive with similar functionality (see section 4.3 for more information). However, as mentioned earlier, the time saved by designing the system around the development kit will be crucial to finishing the project on time. 4.1.1.1 Alternatives Due to the time constraints resulting from a team of only two electrical engineers, it was necessary to find a motor control development kit (or set of kits) that would work for the project with a fairly small learning curve. Therefore, a large amount of research was conducted on these development kits, and several alternatives were considered before making the final decision. The selection of development kit options was limited severely because the vast majority of kits were made for brushless DC motors. There were four main options for development kits, each with their own pros and cons. These development kits were evaluated with regard to the needs of this project and the relative ease of implementation and integration with the rest of the stroller. Table 4 shows a list of the development kit options that were considered along with the associated MCU/FPGA. Table 4: List of Development Kit Alternatives MCU/FPGA Part # Manufacturer Model # Family Texas TMDS1MTRPFCKIT TMS320C2000 Piccolo Instruments RDK-BDC24 Stellaris LM3S2616 Stellaris DM163029 Microchip PIC16F917 PicMICRO Mid-Range DE2 Altera EP2C35F672C6 Cyclone II Series C2000 Cortex-M3 16F91x 2C35 There were several criteria that were pivotal in the development kit decision. First, it was desirable for the kit to include the analog power components necessary to drive the motor(s). These components Team 3: Achieving Mobility May 11, 2011 Final Report Page 19 of 160 include (but are not limited to) an H-bridge with power transistors and protection diodes (refer to section 4.1.12 for the more information on these components). Second, built-in hardware-based PWM output drivers were an advantage so we would not need to construct them from scratch or through software, which is less reliable. Third, an expandable peripheral set including UART, LCD, LED, and even video I/O drivers was also an advantage for the kit so that it could be easily expandable to provide a more robust UI and more communication protocol options. The software package (SDK), including IDE and driver libraries, was also considered in the selection process. Finally, the amount of certainty we had that the kit would drive our particular DC motors was considered heavily. Cost was certainly a factor, especially with a limited budget, but since the choice of development kit is critical to the overall design, even expensive kits were considered, providing that they fulfilled the given criteria. A summary of the pros and cons for each development kit alternative is shown in Table 5. 4.1.1.1.1 TMDS1MTRPFCKIT4 This is a motor control development board from Texas Instruments combining both digital and analog hardware on a single board, including a single 32-bit MCU designed to control two motors. This board uses the F28035 controlCARD, programmed by the Code Composer v3.3 software development package. It is also designed to power two 200 W permanent magnet motors. 4.1.1.1.2 RDK-BDC245 This is a motor control reference design kit from Luminary Micro that serves as a variable speed motor controller for both 12 V and 24 V brushed DC motors at up to 40 A continuous current. This module is powered by the ARM® Cortex™-M3 based 32-bit LM3S2616 MCU with CAN, UART, and advanced motion control capabilities. It also includes the analog components necessary to run DC motors, such as an H-bridge, voltage regulators, and a current-shunt monitor. The kit includes an extensive driver SDK, hardware design files, and software design files. The RDK-BDC24 uses CAN to communicate between individual modules. 4.1.1.1.3 DM1630296 This is a Picdem™ Mechatronics development kit from Microchip which serves as a learning tool for motor control systems. It makes use of the PIC16F917 MCU as well as LEDs, an LCD display, switches, and a built-in DC motor. It also includes all the necessary analog amplification components necessary, and is easily customizable for a vast number of applications. 4.1.1.1.4 DE27 This is a general-purpose development kit from Altera that is based on the Cyclone II FPGA. The softcore processor used on the FPGA is the Altera Nios 2 processor. This FPGA-based MCU provides extra flexibility and expandability to any design. It also includes a vast array of peripherals, such as LEDs, an LCD screen, buttons, switches, UART, USB, and VGA. This development kit is familiar to students of Calvin College Electrical Engineering, but it is not specifically designed for digital motor control. Team 3: Achieving Mobility May 11, 2011 Final Report Page 20 of 160 4.1.1.2 Selection The final decision was to use RDK-BDC24 as a development kit for motor control. This decision was based on the fact that it was powerful enough to drive our motors, which is critical for early testing capabilities. The temperature control capabilities were also an advantage because it helped us create a safer device. Also, as stated earlier, Texas Instruments offered to supply us with these kits free of charge. However, since these only control one motor and do not have an expandable set of GPIO pins for peripheral interfacing, another development kit was needed to provide the user interface and to control the operation of each motor controller independently. This development kit will be referred to as the Electronic Control Unit (ECU) from now on. While the term ECU is primarily used in the automotive electronics industry, the purpose of this unit is the same as in the automotive industry – to coordinate and synchronize the actions of several independent MCUs over a single CAN bus. Refer to section 4.1.2 for the selection of the ECU. Table 5: Qualitative Assessment of Development Kit Alternatives4, 5, 6, 7 Kit Pros Cons Unsure if it works with brushed Enough power to run both motors; dc motors; limited peripheral high resolution PWM signals; built-in connectivity; several unnecessary TMDS1MTRPFCKIT QEI inputs; impressive motor control components; most expensive SDK; GUI PC control application; solution; does not fit optimal HW includes analog HW. topology. Powerful enough to run one motor; certain it will work with brushed dc motors; PWM and/or CAN based No LCD or video drivers; less RDK-BDC24 closed loop speed control; built-in QEI extensive motor control libraries. inputs; temperature control options; includes analog HW. Simple design and layout; certain it will work with brushed dc motors; Insufficient power to run our built-in QEI inputs; example SW DM163029 motors; 8-bit MCU; less helpful included; plenty of peripheral SDK. expandability; inexpensive; includes analog HW. Very flexible FPGA solution; plenty Does not include any necessary Altera DE2 of peripheral expandability; relatively analog HW; no motor control inexpensive; experience with this kit. libraries; no PWM drivers. 4.1.2 Electronic Control Unit As mentioned in section 4.1.1.2, an Electronic Control Unit (ECU) was needed in our design to coordinate the behavior of each motor controller and also to provide a user interface. Since the motor controllers were decided first, the selection of ECU was limited to choices that would be compatible with the motor controllers. Team 3: Achieving Mobility May 11, 2011 Final Report Page 21 of 160 Since the motor controllers came with a full set of CAN drivers, the selection of ECU was limited to a development kit that uses the same set of CAN drivers. However, this was an acceptable limitation to overcome because the use of CAN as the inter-MCU communication protocol is a feasible solution and the hardware topology created by this design is also feasible (see 0 for more detail on the hardware topololgy). This limited the selection of kits to those using a Stellaris Cortex-M3 MCU, which was also not a severe limitation because this is a very widely-used and well-documented microcontroller. Also, the development kit used for the ECU needed to have all the necessary CAN hardware, such as CAN bus connections for the protocol’s Physical Layer compatibility and a CAN transceiver and controller for protocol’s Data Link Layer compatibility. Finally, the development kit needed to have expansion GPIO ports for interfacing with the touch button, LEDs, and character LCD. After researching all potential options for the ECU, there was only one option that fit all of the above requirements. The selected development kit was the LM3S2965 CAN Board by Luminary Micro. This board uses a Stellaris Cortex-M3 MCU and uses the same driver library as the motor controllers. This board has all the necessary CAN components for complete compatibility with both the CAN protocol and the motor controllers. Finally, this board has a full set of expansion headers, which allow for easy external peripheral interfacing8. A labeled picture of the LM3S2965 CAN Board is shown below in Figure 6. As Luminary Micro continues to improve their lines of MCUs, a concern could be that the board would not be replacable in case it ever broke. However, newer lines of Stellaris MCUs, such as the upcoming Stellaris Cortex-M4, will be backwards compatible with the M3 series. Figure 6: Labeled Picture of the LM3S2965 CAN Board8 Team 3: Achieving Mobility May 11, 2011 4.1.3 Final Report Page 22 of 160 Hardware Topology One of the most important design considerations of the electronics system is the topology of the hardware. The main factors in designing the hardware topology are the number of MCUs and how they interface with each other. Since the MCU(s) must control and calculate the speed correction factors two motors independently, the number of MCUs and their layout are critical decisions such that no MCU is given too much work (i.e., such that no MCU is over-utilized) at any given time. However, the chosen topology for the delivery design had additional constraints stemming from the selection of motor control development boards, as discussed in the following sections. The hardware topology for the delivery design is shown below in Figure 7. Figure 7: Block Diagram of Delivery Design Hardware Topology This topology is necessary because of the restrictions imposed by the motor controllers. Since they can only run one motor each, it was necessary to have two motor controllers, and then one main controller (i.e., the ECU) to synchronize the actions of each motor controller. The ECU is necessary to provide the I/O interfaces to the user and to coordinate the responses of each of the motor controllers independently, receiving status updates from each motor controller and sending commands to each motor controller Team 3: Achieving Mobility May 11, 2011 Final Report Page 23 of 160 based on the sampled data. Overall, a third MCU is not needed to alleviate the computation limitations of the motor controllers, but rather it is needed to provide the functionality that is required. It should also be noted that the voltage, current and temperature sensors as seen in Figure 7 are built into the motor controllers. 4.1.4 Microcontrollers The microcontroller (MCU) is the central computational unit for the system which must perform all the necessary real-time calculations as well as provide a platform on which to run software. The communication between sensors and other peripherals is coordinated by the MCU, making it necessary for the MCU to be able to interface with the peripherals. The MCU also serves as a bridge between the UI and the desired output of the device. As mentioned in section 4.1.1, the selection of the motor controllers dictated the selection of MCU for the delivery design. The motor controller kits include the Luminary Micro Cortex-M3 microcontroller, specifically the LM3S2616, so this particular MCU was be used in the delivery design. This MCU operates at 50 MHz with 256 kB Flash memory and 96 kB SRAM. It includes all the necessary features, such as PWM outputs and extensive serial interfaces. A block diagram summarizing the features of this MCU is shown below in Figure 8, retrieved from Luminary Micro’s product brief. Figure 8: Block Diagram of LM3S2616 MCU9 Team 3: Achieving Mobility May 11, 2011 Final Report Page 24 of 160 Also, the selection of development kit for the ECU dictated the particular selection of MCU. The ECU also includes a Luminary Micro Cortex-M3 microcontroller, specifically the LM3S2965. This MCU operates at 50 MHz with 256 kB Flash memory and 64 kB SRAM. It includes all necessary features, such as fully configurable GPIO pins, timers, and 2 CAN modules with 32 message objects with individual identifier masks8. Overall, this MCU is very similar to the LM3S2616 used in the motor controllers, and they can essentially be viewed as the same unit for the purposes of this project. 4.1.5 Sensors There are sensors for three independent values: current, temperature, and battery life. These sensors are discussed in the following sections. 4.1.5.1 Current Sensor The velocity control system cannot be utilized unless there is a feedback sensor to provide data to the ECU regarding the current draw of the motors. The current sensor will actually measure the current that is being applied to each motor. Refer to section 4.2.4 for more detail about the velocity control system. 4.1.5.2 Temperature Sensor The ambient temperature of the motor controllers is monitored by the ECU on a periodic basis. The selected motor controllers come with a temperature sensor that monitors the temperature. This sensor is vital to the temperature control system discussed in section 4.2.7. 4.1.5.3 Battery Monitor The battery monitor was purchased from Argus Analyzers. It is designed specifically for 12 V, deep cycle AGM batteries10. This monitor was mounted to the battery so the customer could check the capacity of the battery at the present time. The monitor provides the voltage of a battery as well as the capacity of the battery as a percentage. These values give the customer a better indication of when the batteries need to be recharged. The selected battery monitor is shown below in Figure 9. Figure 9: Battery Monitor Team 3: Achieving Mobility May 11, 2011 4.1.6 Final Report Page 25 of 160 Communication Protocols The Stellaris MCU has several options for peripheral communication; namely, these are UART, SPI, I2C, and CAN. For the purpose of communicating between the three MCUs, any of these protocols would theoretically work. However, since CAN is the primary built-in method of communication with the MDL-BDC24 motor controllers, it was decided to use a CAN bus for bus communication. CAN is considerably more reliable than the alternative protocols, such as UART, SPI, and I2C because it has excellent error detection and confinement capabilities. It has a much more robust error correction field than any other alternative, including three error detection mechanisms at the message level and two at the bit level, which is important for safety-critical systems11 operating in harsh environments. The tradeoff of using CAN is that it is slower than SPI and I2C; however, a high-speed CAN bus with data transfer speeds up to 1 Mbit/s are fast enough to maintain accurate, timely data12. Causes of bandwidth reduction and increased latency would be mainly due to poor timing of CAN signals being sent. If two messages are sent at the same time, the one with a higher priority will be sent and the other will be ignored12. Therefore, efficient timing of these messages will be important in order to reduce the latency in the CAN bus. The CAN interface provides a large number of possible commands, grouped together by the type of command. The types of commands include broadcast messages, system level commands, motor control commands, configuration commands and status information. The message fields for a CAN message on the RDK-BDC24 board is shown below in Figure 10. Figure 10: CAN Message Identifier Fields5 Bits 6 through 10 represent the API class and the second 4-bit field is the API index which determines the particular API class to use5. Refer to [5] for more information on the CAN protocol with this device. 4.1.7 Power Supply The power source of the stroller is a fundamental design decision. The power supply provides electrical energy to the device. Most of this energy is converted into mechanical energy through the motors in order to move the stroller, but some is needed to power the MCU, LCD, and camera. The battery is rechargeable so that the customer does not need to continuously buy new batteries for the device. The charger can be used in the home of the customer, and it is not designed to travel with the device while it is in use because it would add extra weight as well as occupy necessary space. Team 3: Achieving Mobility May 11, 2011 Final Report Page 26 of 160 4.1.7.1 Requirements The stroller shall be operable for at least two hours of continuous use. The power supply must be able to provide the adequate amount of energy to all of these components simultaneously. A chart of the amount of power necessary for each component is shown below in Table 6. Table 6: Typical Power Values of Components Device Voltage (V) Current (A) Power (W) Quantity Total Power (W) LCD Monitor 12.0 0.46 5.52 1 5.52 Camera 9.0 0.051 0.46 1 0.459 LED 2.5 0.006 0.02 4 0.0600 Motor 24 5 120.00 2 240.0 Brake Lock 24 0.425 10.20 2 20.4 ECU 5.0 0.108 0.54 1 0.5 266.98 4.1.7.2 System Current Draw The system requires a battery to supply a current that standard batteries (e.g., NiMH, NiCad) are not capable of. The motors alone require an average of about 5 A each. Therefore a battery with large ampere-hours is needed so the device can be operable for at least two hours of continuous use. A power supply with 50 Ah was used in the Power Tiger wheelchair. The stroller, however, is heavier and less efficient, and operable for a shorter time than the Power Tiger. Therefore, 55 Ah is desired for the stroller in order to err on the cautious side. 4.1.7.3 Battery Type There are several options for the type of battery. Although reaching the minimum specifications of 24 V and 50 Ah is a necessity, the team is also seeking to reduce the physical size and weight of the battery as much as possible. A standard car battery cannot be used because it is designed to provide large amounts of power for only a few seconds, whereas the battery needed for the device needs to be used for at least two continuous hours. An analysis of the two primary battery options is required in order to choose the best battery type. 4.1.7.3.1 Deep Cycle Sealed Lead Acid Battery These types of batteries are used primarily in wheelchairs, scooters, and industrial equipment. An example of a sealed lead acid battery is shown below in Figure 11. Team 3: Achieving Mobility May 11, 2011 Final Report Page 27 of 160 Figure 11: Seal Lead Acid Deep-Cycle Battery The Power Tiger wheelchair, which was donated to the team, used this type of battery. This battery is 402 cubic inches, weighs 38.8 lbs and is rated for 12 V, 55 Ah. The strong track record of using this type of battery in most wheelchairs suggests that this type of battery is capable of providing sufficient power to the product. 4.1.7.3.2 Lithium-Ion Battery Lithium-ion batteries, shown in Figure 12, are known for their high energy density, which makes them lighter than other leading battery types. A lithium-ion power source would make the stroller easier to manually push, provide more storage, and require less torque from the motors. Therefore, lithium-ion batteries were heavily researched as a possible alternative. Figure 12: Lithium-Ion Battery13 4.1.7.4 Battery Selection The selection of a battery type was necessary for the design of the device. The different pros and cons of both sealed lead acid batteries and lithium-ion batteries are shown below in Table 7. Team 3: Achieving Mobility May 11, 2011 Battery Type Specifications Sealed Lead Acid 24 Volts; 55 ampere-hours LithiumIon 24 Volts; 30 ampere-hours Final Report Page 28 of 160 Table 7: Assessment of Battery Types Total Price Manufacturer Pros (Dollars) Proven to work Interstate 270.00 effectively; Batteries Readily available; Cost Weighs 16.5 lbs; PingBattery 495.00 288 inches cubed Cons 804 inches cubed; weighs 77.6 pounds Limited documentation; Cost; This table illustrates the overall evaluation of the two different battery types. By clearly stating the benefits and drawbacks of each type, a decision matrix was constructed in order to help determine the best fit battery for the power supply of the device. The most important factor when considering the battery type was whether the battery would work properly. Sealed lead acid batteries are almost exclusively used in wheelchairs so it was obvious that this type of battery worked well. Lithium-ion, on the other hand, is not highly used in wheelchairs because this type of battery is usually used for smaller devices that do not need as much power. Size and weight are also very important because storage is needed for the medical equipment of the customer. Also, a lighter battery would cause less strain on an attendant pushing the stroller during manual operation. The final decision matrix is shown in Table 8. Table 8: Battery Type Decision Matrix Sealed Lead Acid Selection Criteria Weight (0-10) Cost Lithium-Ion Score (0-10) Weighted Score Score (0-10) Weighted Score 5 5 25 2 10 Weight 7 2 14 8 56 Size 6 4 24 7 42 Proven Performance 10 9 90 3 30 Ease of Distribution 7 8 56 3 21 Sum 209 159 Rank 1 2 The decision matrix above shows that sealed lead acid batteries are the clear choice. This battery type has been very successful in past wheelchairs. Although the size and weight of a lithium-ion battery would be beneficial, this advantage does not outweigh the negative aspects; thus, the use of a lithium-ion battery is unacceptable. Team 3: Achieving Mobility May 11, 2011 Final Report Page 29 of 160 When talking to an Interstate Batteries representative14 who specializes in batteries, he confirmed the decision to choose deep cycle lead acid batteries. He described lithium-ion batteries as “too delicate”, meaning the technology for lithium-ion batteries has not reached the point where they would be reliable enough to use in an electronic vehicle. 4.1.7.5 Battery Charging A charger for the lead acid battery will be provided to the customer. The charger is necessary so that the battery can be recharged when the product is not in use. The charger connects to a standard American outlet and hook up to the batteries through a simple connection. The present battery charger was donated to the team, and is being used in the final design due to the cost or purchasing a new one. A picture of the battery charger is shown in Figure 13. Figure 13: 24V, 6A Battery Charger 4.1.8 Power Regulation The power regulation circuit is used to ensure that each component is receiving a sufficient amount of power. The circuit also protects against damaging levels of current and voltage, as well as unwanted noise. The circuit has been fabricated on a printed circuit board. A schematic of the power regulation circuit in LTSpice is shown in Appendix D. LTSpice Power Regulation Circuit. 4.1.8.1 Voltage Regulation The motor controllers, motor brake releases, LCD screen, camera, and ECU all need their own voltage level. The motor controller is powered directly from the battery because they use approximately 24V. Team 3: Achieving Mobility May 11, 2011 Final Report Page 30 of 160 They should not have more than 30 V and may become damaged at 35 V. When the batteries were first purchased and fully charged, they put out 26 V. There is no reason to believe that the total voltage should be higher than 30 V, let alone 35 V. The motor brake releases need more than 18 V of initial voltage in order to unlock the brake, therefore the motor brake releases are also connected directly to the batteries. The LCD needs 12 V, the camera needs 9 V, and the ECU needs 5 V. The battery provides between approximately between 19 and 26 V, depending on the state of the charge. In order to provide all the components with the correct voltage, several voltage regulators were utilized and they are set up in cascade for efficiency reasons. The LM317 was used as the voltage regulator device. A diagram of the voltage regulator for the camera is shown below in Figure 14. Figure 14: Voltage Regulator for Camera Although R1 could be any value, R1 was chosen to be 240Ω because that was a recommended value. The value for R2 was determined from the equation ܴ2 ܸ௨௧ = 1.25ܸ ∗ ൬1 + ൰ + ܫௗ ∗ ܴ2 ܴ1 This equation was provided by the LM317 datasheet. Iadj was measured to be 50µA using a ammeter. Using the equation, R2 was determined to be approximately 1.5kΩ. The voltage regulator calculations for each component can be found in Appendix E. Voltage Regulator Calculations. 4.1.8.2 Current In this particular circuit, the current is a concern because the batteries are able to output 825A if the circuit is short circuited. If this much current travels through the electrical components they would burn up. Therefore protection is added into the circuit design in order to provide safety. The most significant amount of current goes to the motors. Through extensive testing of the motor control system by the electrical engineers on the team, it was determined how much current the motors can draw from the batteries. The current when the stroller initially starts moving requires the most current Team 3: Achieving Mobility May 11, 2011 Final Report Page 31 of 160 due to the lack of momentum. This initial current can reach up to about 18 A. The current used when the stroller is moving forward at a constant velocity is about 6 A. The wires from the battery to the motor are 10 AWG because they are rated for 30 A. Therefore, this wire is rated to handle the high current demands of the motors. A fuse was also added into the circuit in order to provide additional protection to the circuit. If for some reason the circuit is short circuited, a fuse needs to be available to break so that the electrical components are not destroyed. An 80 A fast-blow fuse was also included because the motor controller should never handle more current than this, even for half a second. A slow-blow 20 A fuse was included within the wiring because no more than 20 A of continuous current should be used for longer than a few seconds. Shown in Figure 15 is a graph for the average time it takes to break fuses at a particular current. The graph shows that at 40 A the 20 A slow-blow fuse would blow in about 10.5 seconds. Figure 15: Average Time for Breaking of Fuse16 4.1.8.3 Heat Dissipation Making sure the components do not overheat is an issue in the power regulation circuit. The LM317 voltage regulator is the primary component that allocates the appropriate voltages to each electrical Team 3: Achieving Mobility May 11, 2011 Final Report Page 32 of 160 device. The LM317 is a linear device and it “burns” off the extra power as heat. The first voltage regulator that transforms 24 V to 12 V is at the highest risk of overheating due to the large change in voltage, and also because there is about 500 mA going through it. The Mathcad calculations show that better heat dissipation is required for the particular voltage regulator. These calculations are shown in Figure 16. Figure 16: Heat Dissipation Calculations Since the integrated circuit is not able to dissipate the generated heat fast enough, better heat dissipation is needed. In order to fix this problem a heatsink and a fan were added in order to keep theLM317at an acceptable temperature. Examples of heatsinks that were used for testing and the final design are shown in Figure 17. Team 3: Achieving Mobility May 11, 2011 Final Report Page 33 of 160 Figure 17: Examples of Common Heatsinks 4.1.8.4 Over Voltage Protection The motor controllers should not have more than 30 V applied to them, and at 35 V the motor controllers may get damaged. The team is confident that this voltage from the batteries will never reach 30 V because they are 26 V when fully charged and this maximum voltage should only decrease as the batteries age. The batteries were also hooked up to an oscilloscope in order to check if there was a voltage spike. During testing there was a spike of approximately 1.5 V. This spike paired with a fully charged battery would be 27.5 V. Yet there are nodes of 12 V, 9 V, and 5 V within the power regulation circuit that could potentially rise above the desired voltage if a voltage regulator would stop working. Therefore, instead of destroying the LCD, camera, or ECU, the over voltage protection would break a fuse instead. Therefore over voltage protection was added to the 12 V, 9 V, and 5 V nodes on the power regulation circuit. After reading Andy Collinson’s article15 and discussing it with him, the crowbar method was used to protect the motor controllers from a voltage exceeding the desired value. The figure below in Figure 18 shows over voltage protection part for the 5 V node of the circuit. Figure 18: Over-Voltage Protection Schematic Team 3: Achieving Mobility May 11, 2011 Final Report Page 34 of 160 If the voltage gets above 5.6 V, the zener diode will close and current will to the following node. This will then open the 2N1595 thyristor, which is rated for 1.6 A. This will create a short circuit, causing the 1.6 A fast-blow fust to break. This produce an open circuit and the LCD, camera, and ECU will lose power. The 4.7 kΩ resistor was recommended by Collinson so that the majority of the current travels through the thyristor. 4.1.8.5 Switch A mechanical switch is in the circuit as another precautionary measure. If the switch is flipped, the circuit will become an open circuit and thus cut off power to everything. The most important thing that cutting the power does is reapplying the brakes and the stroller will come to a stop immediately. This would be extremely important if Isaac’s finger gets tired and he is not able to lift it up from the touch pad, which has happened in his previous wheelchair. Also, if the software malfunctions causing the stroller does not stop, an attendant who notices this can flip the switch so that the stroller stops. The switch can be seen in Figure 19. Figure 19: Power Switch used on final product 4.1.8.6 Filter Capacitors Filter capacitors are at each node in the circuit in order to reduce noise from the surroundings. The wires, which carry DC voltages, will have ripples or spikes in it from the surroundings. A capacitor can even out the voltage by absorbing peaks and filling in the valleys. An electrolytic, large value filter capacitor of 100uF is added in order to smooth the DC and remove unwanted lower frequency noise. Small value non-polarized (ceramic) capacitor of 0.01uF is more effective in shorting very high frequency noise spikes to ground. In order to prove that each capacitor is affecting the node differently, a basic circuit was implemented in LTSpice. The circuit is shown below in Figure 20. Team 3: Achieving Mobility May 11, 2011 Final Report Page 35 of 160 Figure 20: LTSpice Circuit The impedance of the capacitor is assumed to be negligble, therefore the value of the resistance of the entire circuit was estimated as 43Ω using Ohm’s law. ܸ =ܴ∗ܫ 24ܸ = 560ܴ݉ ∗ ܣ ܴ = 43Ω The voltage was set at 24 Volts because that is the approximate value of the two batteries in series. The current through the entire power regulation circuit was measured to be approximately 560mA. Therefore a 43Ω resistance was added to the circuit above. The value of the capacitor in the simplified circuit was changed in order to see the separate affect of the 0.01uF ceramic capacitor and the 100uF capacitor. The Bode plot of the circuit with a 100uF capacitor is shown in Figure 21. Figure 21: Bode Plot of 100uF Capacitor This Bode plot shows that the capacitor acts like a low pass filter. The corner frequency is at 34Hz, meaning the capacitor is allows frequencies of below 34Hz and filters out frequencies of higher than Team 3: Achieving Mobility May 11, 2011 Final Report Page 36 of 160 34Hz. The plot shows that this capacitor is indeed a good choice of a filter capacitor at low frequencies. The Bode plot of the circuit with a 0.01uF capacitor is shown in Figure 22. Figure 22: Bode Plot of 0.01uF Capacitor This plot looks very similar to the previous one, but the frequencies are very different. The corner frequency is at 340kHz, meaning the capacitor is allowing frequencies of below 340kHz and filters out frequencies of higher than 340kHz. Although it may seem that the 100uF is unnecessary, the small capacitor is more focused on filtering out high frequencies and the large capacitor is better at filtering out low frequencies. 4.1.8.7 Ground As a precaution, the ground was connected to the chassis of the device so that if for some reason the user touches a live wire and ground, the current will travel through the metal chassis of the device instead because it has a lower resistance than the human body. 4.1.8.8 EAGLE Schematic By creating the schematic in EAGLE, it becomes much easier to make the PCB layout since the software shows the creator where all the connections need to be. The schematic in EAGLE is shown below in Figure 23. Team 3: Achieving Mobility May 11, 2011 Final Report Page 37 of 160 Figure 23: EAGLE Schematic 4.1.8.9 EAGLE Board Design The final design of the printed circuit board created in EAGLE is shown in Figure 24. Figure 24: EAGLE Board Layout 4.1.8.10 Revised EAGLE Schematic The revision was made to the original and several changes were made. Diodes were added in order to protect components from someone accidentally mixing up the hot and ground. A switching diode replaced the first LM350 and large heatsink in order to increase efficiency. Over voltage protection was added at the 12 V, 9 V, and 5 V nodes. The mounting holes were increased to an eighth of an inch. The spacing was improved between components, such as capacitors and voltage regulators. The inner diatmer of the pads where the wires connected were increased so that the preferred wires could fit through the pads. The holes to the LED were increased because the LED’s terminals were larger than expected. Finally, the spacing around all pads were increased so that it would make soldering easier. A diagram of the revised schematic is shown below in Figure 25. Team 3: Achieving Mobility May 11, 2011 Final Report Page 38 of 160 Figure 25: Revised EAGLE Schematic 4.1.8.11 Revised EAGLE Board Design The revised EAGLE board design is shown below in Figure 26. Figure 26: Revised EAGLE Board Design 4.1.8.12 PCB Fabrication The printed circuit board was fabricated by Johnson Controls Incorporated in Holland, MI. The picture below shows version 1 printed circuit board. Team 3: Achieving Mobility May 11, 2011 Final Report Page 39 of 160 Figure 27: Version 1 of Power Regulation Circuit Figure 28 shows the final version of the power regulation circuit. Figure 28: Final Version of Power Regulation Circuit 4.1.8.13 Flyback/freewheeling diodes Flyback protection is used to protect the circuitry from Back Electromagnetic Flux (BEMF) voltage that could harm the circuit. The electric motor has an inductive nature, and thus builds up energy. If the power is suddenly stopped (i.e. blown fuse) the energy from the electric motor could travel through the circuit in the opposite direction that it was designed for and possibly damage components. Team 3: Achieving Mobility May 11, 2011 Final Report Page 40 of 160 A diode would normally be placed across the motor so that the current would travel through the diode instead of the circuit. This would release the built up energy without sending the current through the circuit in the opposite direction. The schematic of the motor controllers was analyzed and the motor controllers contain the flyback diodes, therefore flyback diodes were not added into the team’s power regulation circuit. 4.1.9 Connectors and Cables There are several different types of cables and connectors needed throughout the device. 4.1.9.1 USB Updating the ECU with the newest software is done using a Universal Serial Bus (USB) cord. The USB cord also allows for the use of UART through a virtual COM port. UART was used for real-time status updates to a terminal while testing the stroller. This is primarily used to monitor the voltage and current there are applied to each motor. It also allowed the team to measure the temperature of the motor controllers. These measurements allowed the team to adjust the software appropriately. Refer to 4.2.6 for further detail on UART debugging. 4.1.9.2 CAN 6-Pin Connector Cable CAN is a bus standard that allows the MCUs to communicate with each other on a single bus. The product has one motor for each rear wheel, and each motor is controlled separately. The two motor controllers need the ability to communicate with the ECU in order for the device to maintain accurate speeds. The CAN vehicle bus standard provides this capability with a CAN 6-pin connector. A diagram of the CAN connector is shown below in Figure 29. Figure 29: CAN Socket5 Team 3: Achieving Mobility May 11, 2011 Final Report Page 41 of 160 4.1.9.3 Battery The positive and negative terminals of the batteries are connected in series to the rest of the electrical system. Standard “powerpole” connections were used to provide safe yet removable connections. The connection to the batteries is shown below in Figure 30. Figure 30: Battery Connector In order to recharge the batteries, the main power switch should be turned off and the charger connected to the designated charging port. The designated charging port is shown in Figure 31. Figure 31: Battery Charger Connection 4.1.9.4 LCD Monitors and Cameras The LCD and camera are connected via shielded copper wires that transfer the video signal. The video input to the LCD is a shielded signal wire with a standard monaural jack connection. The yellow wire Team 3: Achieving Mobility May 11, 2011 Final Report Page 42 of 160 from the camera connects to the “signal” line of the mono plug and the white wire from the camera connects to ground. 4.1.9.5 Motor Each motor is connected to the battery by large copper wires that are approximately 10 gauge17. A picture of how the wires from the motor are connected to the rest of the circuit is shown in Figure 32. Note that the red ports supply power to the motors and the black ports supply power to the internal brake releases. Figure 32: Motor Power Connection 4.1.10 LCD Screens The camera provides the live video feed to the monitor. A 5.6” LCD screen was donated by the Gentex Corporation in Zeeland, MI. The LCD screen can be seen in Figure 33. Greg Bush, an employee of Gentex, worked closely with the team to make sure the product’s visual system functions properly. The LCD screen is NTSC compatible because that is the format that the camera outputs and the two devices need to be compatible. The LCD provides the user with vision of the front view of the stroller. Each LCD screen needs approximately 12 V; therefore, a voltage regulator was implemented so that the LCD receives the appropriate voltage. Mirrors were not used because a camera and LCD system was preferred by the customer. The customer believed that it would be more convenient and easier to use if a camera and LCD system was used. Team 3: Achieving Mobility May 11, 2011 Final Report Page 43 of 160 Figure 33: Liquid Crystal Display Monitor 4.1.11 Camera An NTSC compatible camera was used for the final design. Gentex donated the camera and LCD system and each device needs to use the same format and since the LCD is NTSC compatible, so is the camera. Since Gentex works with rear view cameras mounted on the back of automobiles, the company has many experts who have had a lot of experience with rear view camera systems. The cameras that Gentex deals with all have flipped images because the cameras are used for rear view video. Therefore, since the camera shows the front view to the user, the camera should not have a flipped image. Gentex has graciously reprogrammed the camera so that the image is not flipped. The camera needs 9V supplied to it. 4.1.12 Motor Control Hardware The motor control hardware is the link between the digital circuitry and the mechanical action of the motors. This hardware is composed of analog circuitry including transistors, heat sinks, capacitors, diodes, and a fuse. The main component of this circuitry is the H-Bridge, a device that allows the rotational direction of an actuator to change. The H-Bridge is composed of four MOSFET transistors – two PNP on top and two NPN on bottom, along with protection diodes to protect the digital circuitry from back EMF current spikes. It should be noted that all of this motor control hardware is included in the RDK-BDC24 development kit; therefore, the team did not design any of the motor control hardware. See section 4.3 for a discussion of the production design or the motor control hardware. Team 3: Achieving Mobility May 11, 2011 Final Report Page 44 of 160 4.2 Software The software must control the speed and direction of the motors as well as provide a means of displaying information to the user. It is absolutely necessary for the software design to be robust and precise, providing safe and reliable transportation for the user. This section is a description of the software design that was used in the device. A general block diagram of the software architecture is shown below in Figure 34. Also, note that each component described in this block diagram was implemented in the ECU; in fact, the software residing on the motor controllers was provided with the development kits. Therefore, the software for the ECU was designed to coordinate with the software already residing on the motor controllers. Figure 34: Software Block Diagram 4.2.1 Cyclic Executive Architecture A cyclic executive is a software architecture that is comprised of an infinite loop, with all the tasks of the system contained in that loop. Since an RTOS was ruled out, this architecture is necessary for this device because the software must always be running and responding to inputs, performing calculations, and producing outputs. This architecture was implemented on the ECU; however a similar cyclic executive was implemented on the motor controllers; however, this will not be discussed because it was not designed by the team. Figure 35 shows a flowchart of the cyclic executive program (bottom) and the system boot procedure (top). Once the device is turned on, the initial configuration is completed. Once complete, the software continues to the cyclic executive, which is shaded in a gray box. This cyclic executive involves continually checking for interrupts, servicing the state machine, and servicing the motor controller. If there are no interrupts to service, the ECU sits idle and does not consume processor time. This is the Team 3: Achieving Mobility May 11, 2011 Final Report Page 45 of 160 highest level software flowchart for the system; the direction controller and velocity controller modules are described in more depth in sections 4.2.2 and 4.2.4 respectively. Initialize global settings Hardware Initialization No Yes Initialization Complete 1 ms SysTick No Poll touch button state Query Motor Controller Status Yes CAN Status Data Ready No Service Velocity Controller Yes 2 second timer Service Directional Controller Figure 35: System Boot and Cyclic Executive Software Flowchart 4.2.2 Directional Control A system of direction control is necessary to provide the user with a means of navigating in a desired direction. This control system must allow the user to turn in any of four possible directions. Since the directional user interface of this device consists of a single button, only a limited number of directions can feasibly be achieved. If the user’s means of control were something more versatile like a joystick, there would be many more possible directions. Allowing any more possible directions would significantly Team 3: Achieving Mobility May 11, 2011 Final Report Page 46 of 160 increase the complexity of the control system from the user’s perspective and would increase the potential latency between direction changes. The directional control system consists of an event driven state machine. Since there are four possible directions available to the user, there are four directional states. The events that drive the current directional state are a timer and the current state of the touch button. Figure 36 shows the state diagram for the directional controller. As shown by the state diagram, as long as the touch button is not being pressed (i.e., Button from Figure 36), the timer controls the current state of the system such that each state is visited for two seconds before transitioning. The transition time of 2 seconds is adjustable by a technician, but this option is not available to the average user for safety reasons. Whenever the touch button is pressed, the current state of direction controller software is held until the button is released. Upon release, the device comes to a complete stop before a new command issued by the user can be registered by the software. Figure 36 : Event-Driven State Machine Software Flow Diagram The directional controller also resides on the ECU because it must respond to user inputs. Also, the method to determine the state of the touch button is polling every 1ms via SysTick interface, as shown in Figure 35. Every 1ms when the SysTick timer expires, the state of the button is polled and debounced with software. Interrupts could be used for the button state changes, but the SysTick is used for CAN heartbeating as well, so it was easier to just poll the button state in the same interrupt handler. A general flowchart of the debouncing process is shown below in Figure 37. Team 3: Achieving Mobility May 11, 2011 Final Report Page 47 of 160 Figure 37: Algorithmic Flowchart of Button Debouncing Process The directional controller also controls the LED user interface, called the directional display. The main function of the directional display is to provide the user with information regarding the current direction of both the directional state machine as well as the physical direction of movement of the device. This information is generated through LEDs positioned around the LCD screen (refer to Figure 5). The LED that is illuminated is a direct output of the current state of the state machine (refer to Figure 36), such that the LEDs represent the current state of the directional state machine. Also, when the touch button is Team 3: Achieving Mobility May 11, 2011 Final Report Page 48 of 160 pressed, the illuminated LED remains illuminated until the user releases the button. After the user releases the button, the LEDs continue circumnavigating the LCD screen. 4.2.3 Diagnostics The diagnostics system tests the electronics for faults and displays the appropriate information to the user regarding the state of the device. This section describes the diagnostics system, including the user interface and the available diagnostic information. 4.2.3.1 Alternatives The other function of the user interface is to provide the user with diagnostic information regarding the status of the device. There are two main options for displaying the diagnostic information. The first option is to use an LED indicator system (separate from the directional display system described previously). Since the ECU is not interfaced with the LCD, this is one of few options to notify the user that there is a problem. With this configuration, a sequence of LEDs would be illuminated and the onchip speaker would beep only if there is a diagnostic problem, and the particular sequence of LEDs and beeping would be mapped to a particular diagnostic message. The team would provide the user with all possible diagnostic errors and the corresponding responses, allowing them to quickly diagnose the problem. The second alternative for displaying diagnostic information is to interface the ECU with a small, character LCD, allowing for real-time diagnostic information available to the user. This option would be much more convenient and helpful for the user because there would be no need to decipher the message. 4.2.3.2 Selected Design The LED and speaker option was selected for diagnostic information because the user will rarely see any diagnostic errors, so the inconvenience of having to decipher the messages is minimal. This method also saved a lot of time (approximately 15 hours) of design work because an external LCD did not need to be selected or interfaced to the ECU. There are three diagnostic errors that are checked for periodically (approximately every 1-2 ms). The user will only be notified when the motors are operating at a dangerous level; therefore, if all components are behaving properly, the user will see no diagnostic information. The first diagnostic error that is periodically tested is too much current. When the motors are running, the ECU constantly checks to make sure that neither motor is providing more than 30 A of current. The maximum amount of continuous current that the motor controllers can safely deliver is 40 A; however, a current of 30 A would only be attained if the stroller was being driven straight into a wall or if the internal brake failed to release. If either motor receives 30 A, both motors will gradually slow to a halt, the LEDs will blink four times and the on-chip speaker will “chirp” loudly four times. After the user releases the touch button, the stroller will be fully functional again. The second diagnostic error is high temperature. The maximum operating temperature of the motor controllers is 50°C. Therefore, in order to protect the motor controllers, the maximum temperature was Team 3: Achieving Mobility May 11, 2011 Final Report Page 49 of 160 set to 45°C. In the case that this temperature is reached, the motors will gradually slow to a halt and the speaker will beep three times. Also, the LEDs will flash constantly until the temperature reaches 40°C. Additionally, the fans inside the motor controllers will continue to run, even though the motors will not be running. The third diagnostic error is high bus voltage on the motor controllers (i.e., the battery voltage being delivered to the motor controllers). The maximum safe voltage that the motor controllers can handle is 35V, so a maximum value of 30 V was set as the threshold. The maximum voltage from the batteries at full charge is about 26 V, which is well under the safe voltage limit; however, if the user starts charging the batteries with the electronics turned on, this could approach 30 V, although testing showed that it only reached 28 V. Regardless, if the batteries were to have a voltage of 30 V or above, the ECU would beep loudly until the voltage dropped back to a normal level (i.e., until the user disconnects the battery charger from the batteries). The ECU cannot control the amount of voltage being delivered to the motor controllers, so this was the best solution. Again, this error will most likely never be encountered because the batteries should never be charged about 28 V, even being connected to the charger. 4.2.4 Velocity Control A mechanism for controlling the speed of the device is necessary for the safety of the user. The speed requirement states that the stroller must not exceed 3.5 mph for an incline ranging from -10° to 10°. This velocity control was accomplished through an closed-loop voltage control system which will be described in the following section. It should be noted that this approach is substantially different than that which was described in the team’s PPFS. This change was made as a result of factors discussed in section 3.2.2. 4.2.4.1 Theory A fundamental theory of DC motor control is that voltage is directly proportional to motor speed and current is directly proportional to motor torque. Therefore, since the goal is to maintain a steady speed, setting the input voltage of the motors to a constant value makes the motors run at a constant speed. The issue arises when an external torque is applied to the motors, such as traversing an incline or decline. When this happens, the voltage stays constant, but the speed of the motors decreases as a function of the amount and direction of external force applied. Also, when an external force is applied, the current flow through the motor windings changes because the force causes torque on the motor shaft. Therefore, voltage control cannot maintain a constant speed, making the current sampling necessary. Since the motor controllers have built-in current sampling capabilities, the ECU can periodically query the current of each motor and make decisions based on these values. For instance, if the motor current is above a certain threshold, it can be assumed that the motor is experiencing an opposing force, and therefore the voltage (and thus the speed) should be increased. Conversely, if the motor current is below a certain threshold, it can be assumed that the motor is experiencing a “helping” force (such as driving down a hill), and therefore the voltage should be decreased to slow down the motors. A simple block diagram of the closed-loop voltage control system is shown below in Figure 38. Note that the correction signal C(s) is actually a voltage that is delivered to the motors, producing a current Y(s). Then the motor current is sampled, Q(s), and read by the ECU. Team 3: Achieving Mobility May 11, 2011 Final Report Page 50 of 160 Figure 38: Block Diagram of Closed-Loop Voltage Control System Also, in order to slowly accelerate and decelerate the motors, Pulse-Width Modulation (PWM) was needed for the motor controllers. Control of DC motors using PWM is a very common method. Controlling the pulse frequency (i.e., the duty cycle) of the PWM voltage signal from the MCU changes the average power to the motors. A higher frequency produces a higher average voltage, producing faster motor rotations. Conversely, lower frequencies produce slower motor rotations. This PWM signal is sent out by the motor controllers at varying frequencies depending on the voltage level commanded by the ECU. 4.2.4.2 Implementation The voltage controller module was implemented within the ECU. Since the ECU is directly interfaced with the external touch button and runs the directional state machine, the ECU is better suited to send voltage commands to the motor controllers, depending on the directional state selected by the user. If the voltage control methods were implemented on the motor controllers, the directional state would have to be queried before any speed adjustments could be made. Thus, the ECU sends the desired voltage signal as a CAN message to the motor controllers, which then computes the appropriate PWM duty cycle and outputs the correct voltage to the motors. This CAN message is a 32-bit 16.16 signed fixed-point number5. The desired output voltage to the motors is a configuration variable that will be set at a level the produces 2.5 mph, but can be changed by a technician if necessary (see Figure 3). For the scope of this project, this technician would need to recompile and load the software onto the ECU; thus, the technician would need to be a member of the team. Alternative methods for speed configuration would be sought if this design were mass produced. Since the voltage should not be set instantaneously to its final value, a “voltage ramping” function was used to increase the motor voltage at a constant acceleration. This acceleration is also fully configurable by a technician with a similar method as the maximum speed. 4.2.4.3 Algorithm The algorithm for controlling the motors using voltage control has been fully developed. This algorithm has the structure of an infinite loop, continuing until the power is turned off. The device must be disabled by cutting the power to the device via manual shut-off. The following flowchart (Figure 39) shows the velocity control function, which resides in the ECU. Team 3: Achieving Mobility May 11, 2011 Final Report Figure 39: Algorithmic Flowchart of Velocity Control Software Page 51 of 160 Team 3: Achieving Mobility May 11, 2011 Final Report Page 52 of 160 The velocity controller first checks the state of the button and then checks status flags to determine if the voltage has already been set to the proper value. If the proper voltage has not already been set, the velocity controller sets the voltage and sends an acceleration command to the motor controllers. If the proper voltage commands have already been sent, then the ECU merely sets the proper synchronization flags and moves on. In order to determine if there are faults or if the speed needs correction, the ECU waits for the motor controller status over CAN. As shown in Figure 35, this data is queried every 1 ms. If the motor controller data is in the ECU’s message queue (i.e., if the data is available), then the fault detection and speed correction can occur. It takes less than 1 ms for a status response from both motor controllers, so a periodic sampling of 1 ms is adequate. Also, servicing the velocity controller on a period of 1 ms allows for immediate response from the motors in case of diagnostic test failure, such as a destructive current spike. The response time of the motors is on the order of 10 - 50 ms, so this rate is considerably fast enough to service the motor voltages in the “Speed Check” function. A flowchart of the “Speed Check” function is shown below in Figure 40. This function takes the current samples from the motor controllers and makes the appropriate voltage adjustments based on these readings. Figure 40: Algorithmic Flowchart of Speed Check Function The upper threshold limit of 20 A and lower threshold limit of 3 A were determined by testing results. The team decided that if any motor draws over 15 A of current for over 1.5 seconds, it must be Team 3: Achieving Mobility May 11, 2011 Final Report Page 53 of 160 experiencing a sizable opposing force, so the voltage should be increased to overcome this. The voltage is increased in small increments every 1.5 seconds to ensure that the stroller does not accelerate too quickly. There is, however, a limit to how high the voltage is allowed to climb; this value is set to 10 V, which is 2 V greater than the typical 8 V in the forward direction. Conversely, the team decided that if any motor draws less than 4 A of current for over 1.5 seconds, it must be experiencing a sizable helping force, so the voltage should be decreased to slow down the stroller. The minimum voltage is set to 6 V, which is 2 V less than the typical 8 V. Finally, if the current returns to a value within the upper and lower thresholds, the ECU sets the voltage back to 8 V. 4.2.5 Device Drivers Device drivers are modules of software that allow higher-level software to interact with a hardware device. They control the data transmission to and from the hardware and must handle any asynchronous interrupts that may occur. The Stellaris Cortex-M3 MCUs that were used in the device utilize a section of ROM that contains an extensive library of drivers for PWM, UART, CAN, USB, GPIO, graphics, and external timers. This library contains all necessary functionality needed for the device. These built-in drivers allow a programmer to focus on high, system-level code development rather than low, component-level driver development. Also, since these libraries are stored in ROM, they do not need to be allocated in the internal flash memory, allowing for more system-level code to be stored in the flash. Moreover, these libraries have been extremely valuable to the software development of the device. Throughout the design of the software, these built-in drivers were used to configure GPIO ports and pins for reading the state of the touch button and for driving the LEDs, configuring the CAN interface and controller, initializing the timer and SysTick and configuring their interrupts, and configuring the UART interface for run-time debugging and testing. 4.2.6 Debugging Several functions were written to allow for easy debugging of the software. These functions mainly use the on-chip LCD and UART to display run-time information. The on-chip LCD can be used to display real-time voltage, current, temperature, and fault statuses for each of the motor controllers. This was helpful for testing the motor controllers to make sure that they were behaving as expected. A drawing of the LCD screen in debug mode is shown below in Figure 41. The top and bottom status section monitor each motor controller individually. Team 3: Achieving Mobility May 11, 2011 Final Report Page 54 of 160 Figure 41: Drawing of LCD Screen Used for Debugging Also, the UART module was used to print out these same real-time measurements to a terminal. Using the terminal, these numbers can be logged, saved, and evaluated after the test. This data was used to correctly design the power regulation system, to determine the proper gauging of wires, and to set the proper current thresholds for the velocity controller. A sample printout of UART measurements is shown below in Figure 42. This is a real sample of the motors accelerating from idle to 2.5 mph. Each column of data represents the status of one of the motor controllers. The number on the far right is a timestamp giving the exact time of the sampled data. This debugging technique allows for constant, real-time monitoring of bus voltage, output voltage, current and temperature. Also, an Excel macro was created as a supplement to this data, allowing the team to quickly produce graphs and analyze the data received in the terminal. Team 3: Achieving Mobility May 11, 2011 Final Report Figure 42: Sample UART Output of Debugging Data Page 55 of 160 Team 3: Achieving Mobility May 11, 2011 Final Report Page 56 of 160 A typical graph showing motor voltage and current for each motor controller is shown in Figure 43. This graph shows ows a visual depiction of the status of the motors throughout the test and the relationship between voltage increases and the corresponding current spike. These graphs were very useful throughout the testing process to make sure that the motors were not ooverloading verloading the motor controllers with too much current draw. Figure 43 43: Example Graph of Motor Status Data 4.2.7 Temperature Control Maintaining the motor controller’s temperature within an operable range (as dictated by the components, specifically the H-Bridge Bridge transistors) is necessary for safe operation of the device. The electronic components most likely to overheat are the transis transistors in the H-Bridge Bridge circuit. This is because there can be large spikes of current flowing through them when the direction of the motor changes, which can greatly impact the heat dissipated by the transistors. Therefore, it will be necessary to measure the t temperature of the electronic components, especially the H H-Bridge. The temperature control system resides in the individual motor controllers, and is therefore not represented in the block diagram shown in Figure 34.. The design of the temperature control system involves a closed loop feedback mechanism. However, since the system does not need to maintain a constant temperature, a simple on--off mechanism chanism with hysteresis was used. The target temperature is Team 3: Achieving Mobility May 11, 2011 Final Report Page 57 of 160 currently set at 24°C with a hysteresis of 8°C. If the motors are running, the fans will turn on regardless of the ambient temperature. Also, if the ambient temperature is above 32°C (i.e., 24°C + 8°C), the fans will turn on regardless of if the motors are running. If the temperature of the device falls below 0°C, the motor controller will shut down due to an error condition. Similarly, if the temperature reaches 50°C and keeps rising regardless of the fan, the device will promptly shut down. This is a simple control system, but it helps keep the motor controllers at a safe operating temperature. 4.3 Future Work: Production Design The idea of a production design has been discussed a few times so far, but this design exceeded the scope of the project. However, this section briefly describes the steps that would go into creating a production design. 4.3.1 Hardware Topology Section 4.1.3 describes the electronic hardware topology used in the delivery design. However, as mentioned, this topology is not necessarily the most cost effective design because it involves three individual MCUs on three individual PCBs. Therefore, the topology of the delivery design will most likely not be used in the production design. The selection of the MCU hardware topology for the production design will be based on cost, size, functionality, simplicity of implementation, and reliability. For this design, reliability and functionality will hold the greatest weight. Most of all, we want the customer to trust the performance of this device, and this is reflected by the weighting of the selection criteria. The first notable difference between the production design and delivery design would be consolidating all the motor control hardware onto a single board. This way, a single MCU could be used to control two motors independently instead of two. Most of the analog components could not be consolidated; for instance, there would still need to be two H-bridges (one per motor) and there would still need to be two voltage and current sensors. Also, a single MCU could most likely handle the directional state machine and the user interface. Testing would be conducted to make sure that controlling the user interface along with both motors did not cause the MCU to become over-utilized (i.e., over 90% utilization). A simple block diagram of the proposed production design topology is shown below in Figure 44. As the figure shows, there is only one board, including a single MCU and all the analog hardware needed to run the motors. Team 3: Achieving Mobility May 11, 2011 Final Report Page 58 of 160 Figure 44: Proposed Production Design Hardware Topology 4.3.2 Motor Control Circuitry The H-bridges are one of the main pieces of analog hardware that would need to be designed in the production model. A schematic of a typical H-bridge circuit is shown below in Figure 45. Figure 45: Schematic Diagram of Simple H-Bridge Circuit Team 3: Achieving Mobility May 11, 2011 Final Report Page 59 of 160 Along with the H-bridge itself, some extra protective equipment is necessary for safe operation. A slowblow fuse would be inserted between the power supply (VCC) and the top node of the circuit to prevent voltage spikes from destroying the motors. Also, a small capacitor would be used before the fuse to filter out high frequency noise disturbances greater than about 20 kHz and a larger capacitor to absorb excess voltage spikes before reaching the fuse. 20 kHz would be the approximate cutoff frequency because the PWM frequency will be a maximum of about 15 kHz. Finally, because of the large amount of current that can flow through the MOSFETs, protection would be needed against excess heat. If the transistors get too hot, they could melt and start a fire. Therefore, heat sinks would be used on all of the transistors to channel the heat from the transistor to the ambient air for convective cooling. The FWD and REV ports in Figure 45 represent outputs from the MCU. PWM signals sent to the FWD port cause the motor to turn in the forward direction and PWM signals to the REV port cause the motor to turn in the reverse direction. The “magic” behind the H-Bridge is that when voltage is applied to the gate of one of the input ports, only that path is opened. Thus, all current is delivered in the desired direction to turn the motor. 4.3.3 MCU Selection The MCU used in the production design would probably be a Luminary Micro Cortex-M3. This MCU worked great for the delivery design and some of the software written for the delivery design could be ported to the production design. Also, the team already has experience writing software and using the drivers for this family of MCU, so the design time would be less for the production design. The selected MCU would need (at least) two PWM generators, 6-8 ADC, at least 10-15 GPIO, a minimum of two timers, and UART. There are several possible MCUs that fit these specifications, and the design would not be constrained to only one or two possibilities. 4.3.4 PCB Design As mentioned earlier, the goal of the production design would be to create a more cost effective solution. This would be done by minimizing the number of redundant components and creating a single PCB that contains all the functionality of the delivery design’s PCBs. The delivery design has four distinct PCBs: two motor controllers, the ECU, and a power regulation PCB. Therefore, the production design would be created on a single board, using one MCU and as few redundant analog components as possible. The power regulation system would also be placed on this PCB. Overall, this would have been the ideal solution for the project, but the design of this PCB would have been too much work and taken too much time to complete with just two electrical engineers. If the team had had another electrical engineer, this production design PCB would have been a possibility. Team 3: Achieving Mobility May 11, 2011 Final Report Page 60 of 160 5. Mechanical Design The mechanical design of the system consists of all major structural components, dynamic parts, mounting, equipment protection, and surface material. Figure 46 shows the breakup of the mechanical design of the project. The larger tasks near the top must be completed before moving on to tasks further down the tree which means following the schedule will be essential to complete the project on time. The following section analyzes each task in detail, explaining the decision criteria, alternatives, financials, final design, and final product. Figure 46: Mechanical Design Breakdown 5.1 Frame The frame consists of the main structure that supports the bed, storage, motors, and mounting components. The frame supports most of the weight of the wheelchair and must be designed with strength in mind. Several different materials and designs were analyzed for the final design of the frame. 5.1.1 Requirements 5.1.1.1 Strength The frame for the delivery design shall be strong enough to support at least 200 pounds on the bed. This specific stroller is designed for individuals less than 60” tall; therefore, a 200 pound weight requirement should be more than sufficient since the average weight of a 60” child is 85-100 pounds18. In addition, the frame shall be able to withstand any direct frontal impact with a wall at the max speed of the motor of 2.5 Team 3: Achieving Mobility May 11, 2011 Final Report Page 61 of 160 mph. Finally, all welds on the frame shall be continuous with a nominal radius equal to the thickness of the tube to ensure maximum strength of the joints. 5.1.1.2 Weight Since most wheelchairs are often pushed up and down wheelchair ramps, the stroller must maintain a weight of less than 250 pounds. The main concern is to make sure most individuals will be able to push the stroller up a 10° ramp and have the brakes strong enough to easily stop it going down a 10° ramp. In addition, the wheelchair must be able to be lifted by a hydraulic lift in a transport van. According to BraunAbility©, a leading dealer in wheelchair lifts for vans, most wheelchair lifts can handle a weight a weight capacity of 600 pounds. Therefore, with the weight of the wheelchair, equipment, and person; the overall weight is much less than 600 pounds and should work with most wheelchair lifts. 5.1.1.3 Aesthetics The overall look of the wheelchair must be pleasing to the eye since it will be the customer’s main means of transportation. Avoiding sharp corners and any sort of “boxy” look will be very important throughout the design. 5.1.2 Material Selection The first decision made regarding the frame was what material to use. The most readily available and common materials are low carbon steel, stainless steel, and aluminum. In order to decide what material to use, a decision matrix was set up to analyze what material would be best for the design. Table 9 shows the decision matrix for the wheelchair material. Selection Criteria Table 9: Frame material decision matrix 304 Stainless 1020 HRS Weight Score Weighted Score Weighted (0-10) (0-10) Score (0-10) Score 6063 Aluminum Score (0-10) Weighted Score Cost Corrosion Resistance Weldability Strength 5 8 5 7 1 5 4 8 5 40 20 56 4 1 9 8 20 8 45 56 9 9 3 5 45 72 15 35 Weight Deflection 10 5 50 5 50 9 90 2 9 18 9 18 5 10 Sum Rank 189 3 197 2 267 1 Team 3: Achieving Mobility May 11, 2011 Final Report Page 62 of 160 5.1.2.1 Cost The cost of each material was calculated based on information from Alro Steel Corporation, located in Grand Rapids, MI. Table 10 shows the cost calculations for each material based on 374.5 inches of 1” OD x 1/8” wall and 191 inches of 3/4” OD x 1/8” wall. The length of tubing needed was based on the current design and is calculated in Table 14. Table 10: Cost analysis for each material Material 304 Stainless 1020 HRS 6063 Aluminum 1" OD cost/in 1" OD length 3/4" OD cost/in 3/4" OD length Total Cost ($) 0.35 0.27 0.09 374.5 374.5 374.5 0.58 0.23 0.33 191 191 191 243.26 143.17 98.61 5.1.2.2 Corrosion Resistance The corrosion resistance of each material is very important because this product will be exposed to rain, snow, and salt. Having a rusty product is not acceptable; therefore, this decision alone makes it very difficult to choose any kind of low carbon steel. The level of corrosion resistance is based on the oxidation of elements as well as corrosion resistance tables found in The Engineering Toolbox19. 5.1.2.3 Weldability Having the ability to weld each material is very important because it determines if the frame can be made at Calvin College or if it must be welded off site. Hot-rolled steel (HRS) can be metal inert gas (MIG) welded using the equipment at Calvin College quite easily. On the other hand, stainless steel must be welded using MIG welding with stainless wire or tungsten inert gas (TIG) welded. This could be done at Calvin College, but not very easily since the welding stations are set up for low carbon steel. Similarly, aluminum would be very difficult to weld at Calvin College because it involves only TIG welding. Phil Jasperse, the head of the Calvin College machine shop, stated that learning how to weld aluminum well enough would be extremely difficult by the end of the year. Aluminum welding would therefore, have to be done off site with the help of another individual or company. 5.1.2.4 Strength The strength of each material is important since the wheelchair is required to support 200 pounds in addition to the weight of all components and material. Pound for pound, steel is the obvious choice when it comes to strength; however, aluminum will provide more than enough strength for the structure based on the calculations shown in Appendix B. Stress Calculations. A finite element analysis (FEA) was also performed to determine if the strength and deflection were sufficient for our design and is also shown in Appendix B. Stress Calculations. Based on the FEA analysis, the max stress in the stroller is far below the Team 3: Achieving Mobility May 11, 2011 Final Report Page 63 of 160 yield stress; therefore, strength will not be a problem. The yield strength of each material analyzed was found in The Engineering Toolbox19 and is shown in Table 11. Table 11: Strength properties for each material Yield Strength (psi) Material 304 Stainless 1020 HRS 6063 Aluminum Young's Modulus (Mpsi) 42100 53700 25000 28 30 10 5.1.2.5 Deflection Deflection is the degree to which a structural element is displaced under a load. The deflection for each material is based on the formula 5ܮݓସ =ݒ 384ܫܧ where w is the load distribution, L is the length to the center of the tube, E is Young’s Modulus, and I is the moment of Inertia. Since w, L, and I are the same for each material, the deflection is inversely proportional to E. Aluminum will therefore have three times the deflection of steel. Based on the current design each material will have the deflections shown in Table 12 based on a distance between supports of 36” and a 5 lb/in weight distribution. Table 12: Maximum deflection for each material Material 304 Stainless 1020 HRS 6063 Aluminum Deflection (in) 0.00073 0.00068 0.00204 As expected, the deflection for each material is very low, which is why deflection was weighted the lowest in the decision matrix. Any of the three materials would be sufficient based on maximum deflection. 5.1.2.6 Weight The overall weight of the frame is very important because one of the major design requirements is keep the overall weight of the final product under 250 pounds. Based on the total weight of the frame shown below in Table 13, aluminum weighs approximately 30 pounds less than steel. Therefore, using aluminum as opposed to steel would reduce the overall weight by approximately 15% since the final product weighs around 200 pounds. Team 3: Achieving Mobility May 11, 2011 Final Report Page 64 of 160 Table 13. Material Weight Comparison Material 304 Stainless 1020 HRS 6063 Aluminum Density (lb/in^3) Total Weight (lbs) 0.285 0.284 0.098 45.4 45.2 15.6 5.1.2.7 Final Material Choice After analyzing the possible options and making a decision matrix, aluminum was the obvious choice for the frame material. Originally, aluminum 6061-T6 was selected due to its high strength, availability, and cost. However, there were two reasons that 6063-T6 was selected instead. First, the team determined that strength was not going to be an issue after performing extensive FEA analyses, so going with a lower strength alloy would not have any adverse affects. Safety was a very large consideration since one of our design norms was trust; therefore, extensive calculations were down to be certain that this lower strength alloy would still provide enough strength. Second, aluminum 6063-T6 machines easier than 6061-T6 making the frame easier to manufacture, ultimately saving money on manufacturing costs. 5.1.3 Material Size The material for the frame is circular structural tubing since the motors and brakes are designed to mount to circular tube. Since most components are designed to mount to 1” OD tube, that is the size that we decided to use. We went with 1/8” wall to provide more than enough strength as stated above. Smaller tube could have been used such as 3/4" OD but this is actually more expensive than 1” OD because it is not a standard size. All quotes of sizes were obtained from Alro Steel Corporation. 5.1.4 Final Design The material of the final design is aluminum 6063-T6. Some of the main factors that influenced this decision were corrosion resistance as well as weight reduction. Once all of the electronic components, mounting components, motors, brakes, and storage racks were selected, the final frame was designed to incorporate all of these components. The design shown in Figure 47 was a preliminary model that shows a rough estimate of his current stroller with two electric DC motors and two 12V batteries added. This design was mainly used to get a rough idea of overall size and weight. Team 3: Achieving Mobility May 11, 2011 Final Report Page 65 of 160 Figure 47: Preliminary design used for base case analysis Since this design had to be made longer as well as taller, a brand new design was developed, as shown in Figure 48. This design was mainly used for overall length and height purposes, but was discarded since it had an undesirable look. Figure 48: Second design used for overall height and length purposes The final frame design is shown in Figure 49. This design simply shows the frame and does not include all of the mounted components. The final design of the frame was dependent on many other factors and was constantly being changed to incorporate new components. Team 3: Achieving Mobility May 11, 2011 Final Report Page 66 of 160 Figure 49: Final design of the stroller frame Some of the major factors that influenced the design of the frame were the overall size requirements. First, the frame had to be taller than his previous stroller per customer request. Therefore, the frame was made 3” taller to incorporate this design request. If the frame was made too high, the risk of tipping over would increase; therefore, a 3” increase in height was chosen. Next, the frame also had to be longer to incorporate a longer bed per customer request. The customer’s original bed was 52” long and the delivery design was made to incorporate a 57.75” bed. The customer also requested that the width of the bed be the same as the customer’s current stroller; therefore, the frame had to incorporate a 13” wide bed. Strength was also an issue that affected the overall design of the frame. After performing some preliminary FEA tests, the team determined that the bed would deflect too much without support bars under it. As a result, two support beams were added under the bed to increase the strength of the bed. Support bars were also placed on the front and rear of the bed to support the weight of the user. These supports were placed at angles that were in 10° increments with the ground for ease of manufacturing as shown in Figure 50. A full size CAD drawing is shown in Figure 50. Team 3: Achieving Mobility May 11, 2011 Final Report Page 67 of 160 Figure 50: CAD Drawing of Frame Weldment On the sides of the stroller a railing system was designed to prevent the user from rolling off the bed. To accomplish this, the bed was placed at a slight incline with two aluminum tubes that ran along side of the bed that were horizontal. On the sides of the railing, brackets were welded on to accommodate a wheelchair accessible canopy. Another factor that affected many parts of the frame was component mounting. Near the front of the frame the front bearing assembly had to be mounted. The bearings are 1.110” OD which meant the ID of the tube had to be slightly larger than this. In addition, the bearing covers were designed to go over 1.25” OD tube. As a result, 1.25” OD X 1.120” ID tube was used. On the sides of the frame the rim brakes needed to be mounted over the rear wheels, so two pieces of round bar were welded on the sides. They were placed so that they would be directly over the wheels for proper braking. There were also holes drilled in four different locations for the tie down brackets. In order for the stroller to be transported, tie down hooks were required in four locations where straps in a wheelchair accessible van could hook onto. These straps needed to make as close to a 45° degree angle as possible with the ground. Figure 51 shows the angles that each tie down strap makes with the ground. Team 3: Achieving Mobility May 11, 2011 Final Report Page 68 of 160 Figure 51: Tie Down Angles The frame was also made with an extendable leg portion to adjust as the user grows in height. This was accomplished by making a foot weldment that could slide into the main weldment and be secured using four bolts. The overall length of the stroller could then be lengthened by up to 4”. Another design factor that influenced the final design of the stroller was aesthetics. Wherever possible, rounded corners were used as opposed to sharp corners to avoid a “boxy” look to the stroller. Even though bending the tube is more expensive and harder to make, it was designed this way to be appealing to the user. 5.1.5 Feasibility Even though the final design was difficult to manufacture due to the welding of the aluminum and the inability of Calvin to bend large tubing, and the manufacturing of the frame alone cost more than Calvin’s budget, it was still feasible with the help of outside organizations and companies. Ivanrest CRC made a large donation towards the project which helped pay for the added cost of aluminum. The current design uses approximately 566 inches of aluminum as shown in Table 14, which cost approximately $100. Since welding the aluminum will be difficult and there is no equipment to bend 1” tube at Calvin College, the team partnered with Ebling and Son Inc. Blacksmiths to weld the frame. This company is located in Grand Rapids, MI and has worked on projects similar to this one for other individuals in the area. Team 3: Achieving Mobility May 11, 2011 Final Report Page 69 of 160 Table 14: Total tube length needed for the frame. Material 1" OD X 1/8" WALL 6063-T6 3/4" OD X 1/8" WALL 6063-T6 5.1.6 Total Qty Needed (in) 374.5 QTY LENGTH 2 1 2 5 2 2 1 2 2 15 15.75 20 24.35 30 37.56 38.88 1 2 1 1 1 15 17.5 17.59 35 88.38 191.0 Financials As stated above, the material cost of the frame was around $100. The only other cost that had to be factored in was the cost of labor to machine the ends of the tubes, bend the tubes, and weld the beams together. Labor time for this project was 40 hours. Ebling and Son, Inc. Blacksmiths agreed to do our project at a reduced rate of $55/hour. Since they did not have the dies to do the tube bending, they had to outsource some parts to another company to make. The final cost for the labor provided by Ebling as well as the outsourced parts and material costs was $3,000. 5.2 Wheels The wheels and tires for the wheelchair could easily be purchased from a wheelchair manufacturer. Since they are inexpensive and readily available, designing our own wheels would be impractical. Some considerations are the size of the wheels as well as the durability. The size of the wheels and tires on the delivery design will be the same to those on Isaac’s old wheelchair; the front tire is 6-3/4” in diameter and the rear tire is 12-1/2” in diameter. These sizes have proven to be adequate and have been very reliable for past designs. For the delivery design, the wheels from Isaac’s old Power Tiger© wheelchair will be used. Re-using these not only saved money, but also guaranteed that the wheels were compatible with the motors since the new motors are nearly identical to the old motors. The rear tires are Power Express tires made by PR1MO© model number 62-203 and they are 12-1/2” in diameter and 2-1/2” wide. The tread is still good Team 3: Achieving Mobility May 11, 2011 Final Report Page 70 of 160 on them and they should easily be able to last the life of the wheelchair. The front tires are also Power Express and are 6” in diameter and 2” wide. The front tires are mounted to a front bearing assembly that is attached to the frame; therefore, this front bearing assembly was designed to accommodate the front wheels. 5.3 Storage The storage compartments are used to store the batteries and all medical equipment. The storage shelves provide enough space and strength to support all equipment. 5.3.1 Requirements 5.3.1.1 Storage Space The main storage requirement is that there is sufficient space for storing batteries, medical equipment, and electronic components. The batteries are enclosed in plastic encasings to keep them separate from all other equipment. The final design uses two lead acid batteries which are stored underneath the stroller. In addition, there needs to be sufficient storage for the customer’s suction device and feeding bag. 5.3.1.2 Strength The second main requirement is that the storage shelves are strong enough to support the weight of all components placed on them. The weight of the lead acid batteries analyzed is approximately 76 pounds, which accounts for the majority of the weight on the stroller14. The weight of the customer’s suction device and feeding bag are 8 pounds and 4 pounds, respectively. Therefore, the storage compartment will need be strong enough to support at least 88 pounds. The final design; however, was made to hold at least double this amount in case different objects of larger weight are ever placed in the storage compartments. 5.3.2 Alternatives Most of the alternatives for storage shelves are very similar to the ones listed above for the frame; therefore, the choices made for the frame will influence the choices made for the storage shelves. 5.3.2.1 Material There are several different materials that can be used for the storage shelves. The most common are 304 stainless steel, 1020 HRS, and 6063 Aluminum. The advantages and disadvantages for these materials are listed above in Table 9. Since aluminum was already chosen for the frame, aluminum will also be used for the storage shelves. The storage shelves will be on the bottom of the stroller; therefore, they are the most susceptible to corrosion making aluminum the best choice. The customer’s current stroller has removable storage shelves that are clamped to the frame; however, after speaking with the customer there does not seem to be any need for removable shelves. Therefore, the delivery design did not have removable shelves. The aluminum sheet metal that is used to make the shelves was welded to the frame since the Team 3: Achieving Mobility May 11, 2011 Final Report Page 71 of 160 material was the same and provided more strength. The upper storage shelf, on the other hand, is removable with fasteners in case the user ever wanted to remove it. 5.3.2.2 Size The size of the storage shelves was most dependent on the final design of the frame. The entire bottom of the frame will be used for storage; therefore, the overall width and length of the frame determined the size of the storage area. With the current design of the frame, there is enough storage for all equipment underneath the stroller since the wheelbase is longer than the customer’s current stroller and the width is about the same. 5.3.2.3 Strength The load capacity of the storage area is largely dependent on the type and thickness of material used. The material is aluminum 6063-T6, which means the thickness will determine the strength of the shelves. The customer’s current stroller uses 14 gauge sheet metal, but Calvin College’s metal shop can only bend up to 16 gauge materials. Since 16 gauge material will cause too large of a deflection in the shelves as shown in Appendix B. Stress Calculations, 3/32” thick sheet metal was used. Consequently, the shelves were fabricated off site at Ebling and Son Blacksmiths. 5.3.3 Financials The current price of aluminum sheet metal 3/32” thick is about $0.04 per square inch based on rates from Alro Steel Corporation. The exact number of square inches needed for the shelves is approximately 834 square inches as shown in Table 15. Therefore, 834 square inches will cost $51.84. Table 15: Storage Shelf Dimensions 5.3.4 Part Overall Dimensions Lower Shelf Upper Shelf 17" x 34.88" 13.38" x 18" Total Area Area (sq in) 592.88 240.75 833.63 Final Design The final design of the storage area is shown in Figure 52. The lower storage area will be used mainly for the batteries and any medical equipment that the user has. The upper storage area will be used for any extra supplies that the customer may have with them. There was an edge ranging from 2-3” tall made on each storage unit to prevent objects from falling off the side. The ends were bent up using a sheet metal press and the sides were welded on. In addition, all corners were rounded to prevent anyone from being injured on any sharp edges. Team 3: Achieving Mobility May 11, 2011 Final Report Page 72 of 160 Figure 52: Final Design of the Storage Area 5.4 Bed 5.4.1 Requirements The bed of the stroller must provide the user with a comfortable location to lie for the majority of the day. In addition, the bed must have removable exterior for cleaning. There shall be enough cushioning in the bed so the user cannot feel any of the metal underneath it. For the delivery design, the upper half of the bed must have an approximate 4 inch rise over the total length per customer request. 5.4.2 Alternatives Several different companies were contacted to make a custom bed to fit our design. Many companies said that they would be capable of making such a product for the team. These four companies were the following: Everything Upholstery, Casey’s Upholstery Services, Perrin’s Upholstery, and Aacaway Bedding Barn. All four of these companies are located in Grand Rapids, MI. After doing further research; however, it was determined that medical professionals would be the best to make the bedding. The bedding needed to be designed to factor in various pressure points from the patient and the safety restraint system attached to the bedding had to be made under certain standards to make transportation safe and legal. As a result, the team partnered with Mary Free Bed Rehabilitation Hospital to make the bedding. 5.4.3 Proposed Design The proposed design of the bed for the production design and delivery design was fabricated by Mary Free Bed Rehabilitation Hospital. The final design of the bed depended largely on the final design of the rest of the stroller. After meeting with several experts at Mary Free Bed, it was decided that the bed would be made out of two layers of 1” thick memory foam wrapped in Rubatex fabric. They highly Team 3: Achieving Mobility May 11, 2011 Final Report Page 73 of 160 recommended this fabric and stated the majority of current wheelchairs use Rubatex. Therefore, it was decided that the final design would use dark gray Rubetex fabric. The proposed design of the bed closely resembled the customer’s current bed since the design was simple enough and the customer was very happy with it. Therefore, the main cushion on the bed was attached with Velcro to a metal board underneath it as shown in Figure 53. In addition, cushions were attached to the side of the bed to prevent the user from rolling off of the bed. These are removable using Velcro as shown in Figure 54. Figure 53: Main Bedding Cushion Figure 54: Side Cushion The metal base board underneath the bed ensures maximum strength of the bed and was made from aluminum to keep the materials consistent and to ensure that it can be welded to the frame. Team 3: Achieving Mobility May 11, 2011 Final Report Page 74 of 160 The restraint system was designed to ensure that the user is completely fastened in during vehicle transportation. There is a main seatbelt attached to the stroller that fastens around the user’s waist with two more straps going over the user’s shoulders and attaching near the seatbelt. This restraint system ensures that the user is completely fastened. This is one area of the design that really shows the design norms of trust and caring. This restraint system will ensure that the user feels safe and comfortable. The restraint system is shown in Figure 55. Figure 55: Restraint System 5.4.4 Feasibility The fabrication of the bed was very feasible with the help of Mary Free Bed Rehabilitation Hospital, more specifically their OrthoSEAT division. They design and fabricate bedding like this on a regular basis and have agreed to do our project. They have also agreed to do our project for a reduced rate. The final cost of the bedding was $286, which accounts for $174 for material and $112 for labor. 5.5 Motors 5.5.1 Research The three main manufacturers of powered rehabilitation wheelchairs are Invacare©, Pride Mobility©, and Permobil©. Based on communication with each company, brushed DC (BDC) motors are the motor of choice for powered wheelchair applications involving rehabilitation. These companies use BDC motors in all of their products except a few models which use brushless DC (BLDC) motors. The major reason these companies choose to go with BDC over BLDC is cost. Jill Kolczynski, Research and Development Lead at Pride Mobility©, states that BLDC motors cost 15 to 20 percent more than BDC motors22. Though this research indicates that BDC motors are the most popular for this type of application, both BDC and BLDC motors were analyzed equally to determine which motor for this application was the most feasible. Team 3: Achieving Mobility May 11, 2011 5.5.2 Final Report Page 75 of 160 Requirements 5.5.2.1 Torque The motors shall be powerful enough to provide the necessary torque to move the wheelchair from rest for the maximum combined weight requirement of 450 pounds. This includes enough torque to travel up a ramp with the maximum incline requirement of 10°. The minimum required motor power based on the necessary torque is 0.295 horsepower (Appendix C. Motor Power, Speed, and Torque Calculations). 5.5.2.2 Speed The motors shall have a fixed speed once the device has accelerated from rest. This fixed speed will be set at 2.5 mph ± 1.0 mph. The motors must therefore be able to provide a minimum angular velocity of 2,259 rpm (Appendix C. Motor Power, Speed, and Torque Calculations). 5.5.2.3 Acceleration The motors shall be capable of accelerating the wheelchair from rest at a rate of 1.5 feet per second squared. This acceleration means it will take the wheelchair roughly 2 seconds to reach the desired top speed of 2.5 mph from rest. 5.5.2.4 Power The motor shall be capable of being powered by DC voltage (battery). 5.5.2.5 Engage/Disengage The motors shall have the capability of being engaged and disengaged easily by an attendant. The motors will need to be engaged in order for the user to control the wheelchair. The motors will need to be disengaged in order for an attendant to manually push the wheelchair. 5.5.3 Alternatives Combustion engines were not considered because they are not feasible for this application for several reasons including noise, safety, usage, and emission concerns. Electric motors, on the other hand, are much more suitable for this type of application. Electric motors can be divided into two categories: alternating current (AC) motors and direct current (DC) motors, however, only DC motors will be considered due to the power requirement of DC voltage (battery). All DC motors consist of a stator and a rotor. The stator includes everything in the motor that is stationary. The rotor includes everything in the motor that rotates. Both of these components produce Team 3: Achieving Mobility May 11, 2011 Final Report Page 76 of 160 magnetic fields that interact and turn the rotor. The configuration of the stator and rotor determine the different types of DC motors. 5.5.3.1 Permanent Magnet Direct Current (PMDC) Motor23, 24 Figure 56: Parts of a PMDC motor25 In PMDC motors, the stator consists of two or more permanent magnets and the rotor consists of several coil windings (Figure 56). The permanent magnets produce a constant magnetic field between themselves because they have opposite polarities. The coil windings also produce a magnetic field around themselves when current is applied. In order to apply current to rotating coils, brushes and a commutator are necessary. Brushes press lightly against the rotating commutator providing current to the commutator. The commutator is then connected to the coil windings and provides current to the coil windings. The commutator also has another crucial function - reversing the direction of current flow. The polarities of the stator and rotor magnetic fields are misaligned and the rotor will rotate until they become aligned. Once they align, the rotor will stop rotating. The commutator reverses the direction of the current flow through the coil windings providing a magnetic field in the opposite direction, continuing to rotate the rotor. 5.5.3.2 Shunt-Wound Direct Current (SWDC) Motor24 Figure 57: Comparison of PMDC and SWDC motors26 Team 3: Achieving Mobility May 11, 2011 Final Report Page 77 of 160 A SWDC motor works the same way as a PMDC motor except instead of permanent magnets in the stator, there are coil windings (Figure 57). When current is applied to these coil windings a magnetic field is produced providing the necessary force to rotate the rotor. 5.5.3.3 Brushless Direct Current (BLDC) Motor27 Figure 58: Parts of a BLDC motor28 A BLDC motor is similar to a PMDC motor except the rotor and stator are switched. BLDC motors have rotating permanent magnets in the rotor and stationary coil windings in the stator (Figure 58). Because the permanent magnets are in the rotor, and not the coil windings, no current is required to the rotor and no brushes are necessary. The magnetic fields produced by the permanent magnets and the coil windings provided a force to rotate the rotor. Because the permanent magnets and the coil windings provide a stationary magnetic field, the rotor will rotate until they are aligned and then stop. To keep the rotor rotating, the current through the stator coil windings must be varied. This variation of current must be regulated by a special controller that alternates the DC in the coil windings. 5.5.3.4 Engage/Disengage Mechanism The motors will be outsourced to a manufacturer because there is not a high enough volume to make it cost effective to build them in-house. Most powered wheelchair motors are manufactured with an engage/disengage mechanism so no further design is necessary. The mechanism consists of a simple lever attached to the gearbox of the motor as shown in Figure 59. The lever is rotated clockwise 90° to engage the motor and counterclockwise 90° to disengage the motor. Team 3: Achieving Mobility May 11, 2011 Final Report Page 78 of 160 Figure 59: Diagram of the motors engaged and disengaged 5.5.4 Selection Criteria A decision matrix comparing the three types of DC motors – PMDC, SWDC, and BLDC - considered for this design are shown in Table 16. Several different motor characteristics were considered and each was weighted based on its importance to the overall design. Each type of motor was then scored in the different categories and then summed up to determine the best motor option. Selection Criteria Table 16: Motor Design Decision Matrix 24, 27, 29, 30 PMDC Motor SWDC Motor Brushless Motor Weight Score Weighted Score Weighted Score Weighted (0-10) (0-10) Score (0-10) Score (0-10) Score Cost Size Service Life Safety Speed Control Power 10 2 8 3 80 6 7 3 70 6 3 4 30 8 5 3 15 3 15 8 40 8 8 64 7 56 9 72 8 8 64 9 72 9 72 9 9 81 4 36 9 81 Control Complexity Sum Rank 6 9 54 8 48 2 12 364 1 303 3 315 2 5.5.4.1 Cost The cost of the motors was the most important selection criteria because the motors make up 50 percent of the project budget. BLDC motors cost 15 to 20 percent more than BDC motors22. BLDC motors require a complex controller to run and that increases the cost substantially. Team 3: Achieving Mobility May 11, 2011 Final Report Page 79 of 160 5.5.4.2 Size The size of the motors is not as crucial because there is room to work with in regards to the structure of the wheelchair. Also, there is not much variation in size for motors for applications with fractional horsepower. However, for the same mechanical work output, BLDC motors will usually be smaller. 5.5.4.3 Service Life 24 The service life of a motor is fairly important because the customer does not want a product that requires servicing often. The actual lifetimes of all three options are negligible but the service life is quite different. The service life of BDC motors is short (2-5 years22) because the brushes and commutator need replacement due to constant mechanical wear. SWDC fair a little better than PMDC because there is no loss of magnetism in the stator. BLDC motors, on the other hand, have a long service life due to no parts rubbing or wearing during use. The only part that might possibly need replacement after some time would be the bearings. 5.5.4.4 Safety Safety is very important in this entire design. All of these electric motors are safe and the only difference between the three is that BDC motors have a slightly higher risk for sparks due to the brushes rubbing against the commutator. 5.5.4.5 Speed Control 24 Speed control is an important selection criterion because the customer needs to be able to effectively control his/her wheelchair safely. All three motors have excellent speed control. The BLDC motors have the most precise speed control out of the three due to the fact that the current is controlled by a complex controller. The next most precise are the SWDC motors because the current in the rotor and the stator are independent from one another. PMDC motors are also precise because the relationship between output speed and voltage is linear so it is extremely easy to control. 5.5.4.6 Power24 Power is important because some motors perform more efficiently in higher power applications while others do better in lower power applications. The application for this design requires roughly 0.295 horsepower as shown in the motor power calculations in Appendix C. Motor Power, Speed, and Torque Calculations. For this reason, SWDC motors do not fare as well because they are best suited for applications involving 5 horsepower or greater. PMDC motors, on the other hand, perform the most efficiently at fractional horsepower. Team 3: Achieving Mobility May 11, 2011 Final Report Page 80 of 160 5.5.4.7 Control Complexity27 The complexity of the control is fairly important because there are time constraints to build this product for the customer. Because of the linear relationship between speed and voltage, the controller for BDC motors is very simple and easy to integrate. BLDC motors on the other hand require a complex controller because the position of the rotor and the timing of alternating the current must be just right for the motor to run smoothly. 5.5.4.8 Other Heat generation and noise were considered but not included in the selection criteria because they are almost negligible in this size of electric motors. Weight and torque were also considered but not included because all three motors score about the same. 5.5.5 Design 5.5.5.1 Production Design PMDC motors were implemented into the final design product. This type of motor was chosen for two main reasons. The decision matrix in Table 16 shows that PMDC motors have the highest score based on the weighing of the selection criteria. All the emphasized categories such as cost, power, speed control, and safety, scored very well under PMDC motors. Also, based on information from Jill Kolczynski, Research and Development Lead at Pride Mobility©22, PMDC motors are the motor of choice for electric wheelchair applications because they are the least expensive to purchase and are very efficient with fractional horsepower applications. The maximum weight the wheels are required to handle is 450 pounds, which includes the wheelchair and the user combined. Table 17 summarizes the required speed, torque, and power for the motor and wheel based on the following assumptions (see Appendix C. Motor Power, Speed, and Torque Calculations for more detailed calculations): • • • • • • The rear wheels carry 80% of total weight (40% each) Friction coefficient of 0.9 (rubber tire of dry asphalt)31 Safety factor of 1.5 Rear wheel diameter of 12.5 in Maximum speed of 3.5 mph (2.5mph ±1.0 mph) Gearbox ratio of 24:1 Team 3: Achieving Mobility May 11, 2011 Final Report Page 81 of 160 Table 17: Required power, speed, and torque for motor and wheel Wheel Motor Measurement Flat Incline Flat Incline Power [hp] 0.261 0.295 0.261 0.295 Speed [rpm] 94.1 94.1 2,260 2,260 Torque [lbf-ft] 82.6 93.4 3.44 3.89 For production design, the motors with the above specifications will be out-sourced to a motor manufacturer. The main wheelchair companies all out-source their motors to manufacturers located in China which is most likely what we would do. Using a manufacturer in China not only saves on money by cutting out mark-up costs but it allows us the ability to obtain motors that fit our specifications. If we purchased motors through the main wheelchair companies such as Invacare we would have to choose motors based on their specifications available, not ours. For example, this application requires a 0.295 horsepower motor but Invacare only sells 0.5 and 0.9 horsepower motors. 5.5.5.2 Delivery Design The customer donated one of their old electric wheelchairs which included two electric motors. These motors were tested for functionality by connecting a 100 watt power supply to the motor terminals and a 25 watt power source to the brake release terminals (Figure 60). The team ran both motors successfully for at least 5 minutes at various speeds. Figure 60: Test setup for donated motor functionality Team 3: Achieving Mobility May 11, 2011 Final Report Page 82 of 160 The two motors are PMDC motors rated for 24 volts and 3.3 amperes. This means the maximum power of these motors is approximately 0.1 horsepower: 24ܸሺ3.3ܣሻ = 79.2ܹ = 0.106 ℎ Based on Table 17, a power of 0.106 horsepower is not enough power for our design (requires at least 0.295 horsepower). Also, the condition of these donated motors is unknown. The customer informed us that the wheelchair had been in use for about 5 years, which is about the service life of BDC motors. The team does not want to give the customer a final product with a motor that they will need to get serviced after less than one year’s use. Therefore the donated motors were used for “benchtop” prototyping and early testing only. Purchasing new motors was necessary in order to meet the 0.295 horsepower requirement. The new motors were selected based on several factors including weight capacity, power, and wheel size. The motors needed to have a weight capacity of at least 450 pounds, at least 0.295 horsepower, and be compatible with 12.5 inch wheels. Table 18 compares the various motors offered by Invacare. Several models are missing values due to unavailable information from Invacare. Table 18: Comparison of Invacare motors32 Model Combined Weight Capacity [lb] FDX 629 Nutron R51LXP Nutron R51 P9000 XDT Pronto M51 Pronto M91 3G Torque SP RWD 3G Ranger X RWD 470 455 392 498 571 566 666 Motor Power [W] [hp] 650 350 350 350 - 0.9 0.5 0.5 0.5 - 2-pole/ 4-pole 2-pole 4-pole 4-pole 2-pole 4-pole 4-pole 4-pole Gearbox Ratio 23:1 18:1 18:1 23:1 Max Speed Wheel Size [mph] [in] 5.0 6.8 6.0 4.0 4.0 4.25 6.5 5.0 14 14 12.5 12.5 12.5 10.5 14 14 14 Motors off the Nutron R51 model wheelchair were selected for our design because they fit our specifications the best. Even though 0.5 horsepower is much more than what we need (0.295 hp), it is the smallest motor that Invacare uses on their wheelchairs. Figure 61 shows one of the new Nutron R51 motors that was in the final product. Team 3: Achieving Mobility May 11, 2011 Final Report Page 83 of 160 Figure 61: Invacare Nutron R51 motors used for delivery design 5.5.6 Financials For the production design, the PMDC motors will be purchased from a motor manufacturer in China, but because their prices were not available, the price of the Nutron R51 motors from Invacare was used as a rough estimate. Table 19 and Table 20 shows the projected costs of the production and the cost of the delivery design, respectively. Item 2 PMDC motors Mounting Table 19: Production Design Costs for the Motor Production Design Cost Cost Source $1,600 Based on Invacare's Nutron R51 Powered Wheelchair: 0.5 hp, 2-pole, PMDC motor and gearbox assembly ($800.00 each) $5.00 Nuts, bolts, washers, etc. $50.00 Mounting motors, connecting to batteries and controller, attaching wheel (1 hr @ $50/hr) 10% Labor Contingency Total $165.50 $1,820.50 Team 3: Achieving Mobility May 11, 2011 Labor Contingency Total Page 84 of 160 Table 20: Delivery Design Costs for the Motor Delivery Design Cost Cost Source $1,600 Based on Invacare's Nutron R51 Powered Wheelchair: 0.5 hp, 2-pole, PMDC motor and gearbox assembly ($800.00 each) Item 2 PMDC motors Mounting Final Report $0.00 $0.00 $160.00 $1,760.00 Nuts, bolts, and washers available in Metal Shop Donated 10% 5.6 Brakes 5.6.1 Research Based on research of power wheelchairs produced by Invacare, Pride Mobility, and Permobil, the trend in the market is using an electronic braking system that slows the motor by decreasing the current to the motor37, 38, 39. The majority of powered wheelchairs do not have a hand brake system for manual drive. To find information on hand brakes, manual strollers had to be researched. Manual stroller applications that employ a hand brake generally utilize a disc type braking mechanism40. The customer’s current manual stroller, produced by Thomashilfen®, has a hand brake that operates using drum brakes41. 5.6.2 Requirements 5.6.2.1 Brake Functions The wheelchair’s braking system shall provide adequate braking for four different functions: usercontrolled touch button braking, attendant-controlled hand braking, parking brake, and emergency brake switch. User-controlled brakes involve the braking needed while the motors are engaged and the user is driving the wheelchair. Attendant-controlled braking involves braking needed while the motors are disengaged and an attendant is pushing the wheelchair manually. The parking brake involves locking the wheelchair in place to prevent any undesired movement. The emergency brake involves allowing an attendant close by the ability to quickly stop the wheelchair in the event of an emergency as well a means to immediately stop the wheelchair if the batteries die. 5.6.2.2 Braking Distance The stroller shall be able to stop in less than two feet on dry pavement during both user-controlled and attendant-controlled braking. Team 3: Achieving Mobility May 11, 2011 5.6.3 Final Report Page 85 of 160 Design 5.6.3.1 User-controlled Braking System One braking system must be designed to give the user driving the wheelchair the ability to slow down or stop. The two options involve a mechanical system and an electrical system. A mechanical system was determined to not feasible due to the physical limitations of the users intended for this device. An electrical system, on the other hand, was considered and would involve decreasing the current into the motor, therefore slowing the wheelchair down to a stop (includes required 10° decline). This method can be implemented through software and would provide smooth, efficient braking. This system is feasible because the user interface works around the user’s physical limitations. An electronic user-controlled braking system was selected for the both delivery and production design because it is regulated by a controller (limiting the user’s work), it provides smooth, effective braking, and it can be implemented with various user interfaces depending on the physical limitation of the user. The speed of the PMDC motors being used for the delivery design is directly proportional to voltage - as voltage decreases, the speed of the motor decreases, and vice versa. This relationship will be used to slow down and stop the wheelchair. When the user de-presses the touch button, the voltage is slowly cut from the motor, and the wheelchair slows down and stops. 5.6.3.2 Attendant-controlled Braking System When the motors are disengaged and an attendant is manually pushing the wheelchair, a brake system controlled by the attendant is required to slow/stop the wheelchair. This system involves two main components: the attendant interface and the braking mechanism. A hand lever and a foot lever were both initially considered for the attendant interface part of the attendant-controlled braking system (Figure 62). A foot lever, however, was determined to not be feasible because it requires an axle across the bottom of the frame to be mounted to in which case the current storage shelf is obstructing it. A hand brake, however, would be mounted to the wheelchair handle bars and a “squeezing” force would be required to operate them. Figure 62: Comparison of foot lever and hand lever for attendant-controlled braking system33, 34 Team 3: Achieving Mobility May 11, 2011 Final Report Page 86 of 160 A separate braking mechanism for the attendant-controlled braking system needs to be implemented during manual drive because when the motors are disengaged the user-controlled braking mechanism, via reducing current to the motor, is not available. The different braking mechanisms considered were a rim brake, a drum brake, and a disk brake. A rim brake presses two pads together against the rim of the rotating wheel. A drum brake presses two pads outward against the inside surface of the wheel hub. A disk brake consists of pressing two pads together against a metal disk attached to the wheel axial. Figure 63 compares the different types of braking mechanisms. Figure 63: Comparison of different braking mechanisms for attendantcontrolled brakes35, 36, 42 Table 21 shows a decision matrix for the braking mechanism alternatives. The scores were based on online research of the different brake types. Table 21: Decision Matrix for Braking Mechanism Alternatives 43, 44, 45 Rim Brake Drum Brake Disk Brake Weight Selection Criteria Weighted Score Weighted Score Weighted (0-10) Score (0-10) Score (0-10) Score (0-10) Score Cost Weight Mounting Maintenance 9 5 8 3 10 9 8 3 90 45 64 9 6 6 3 6 54 30 24 18 6 8 5 8 54 40 40 24 Performance (all weather conditions) Sum Rank 7 6 42 8 56 10 70 250 1 182 3 228 2 For the attendant-controlled braking system, a hand lever with rim brakes was used in both the production and delivery design. A hand lever is inexpensive, easy to mount, and most accessible by the attendant. Team 3: Achieving Mobility May 11, 2011 Final Report Page 87 of 160 The rim brake was chosen because it is inexpensive, easy to mount, and performs well enough for its low amount of usage. Figure 64 shows a picture of the purchased rim brakes and hand levers for the final product. Figure 64: Rim brakes and hand lever used in final product 5.6.3.3 Parking Brake The parking brake is designed to keep the wheelchair in place when the motors are either engaged or disengaged. When the motors are engaged, the automatic braking mechanism described above within the motors acts as a parking brake but when the motors are disengaged there needs to be a braking system that locks the wheels in place. Two different types of parking brakes were considered: wheel locks and axle locks. The advantages and disadvantages of both systems are shown in Table 22. Table 22: Comparison of Parking Brake Alternatives Parking Brake Alternative Wheel Lock Axle Lock Advantages • • • • • • Simple Less expensive Mounts easily Effective lock mechanism Aesthetic Small physically Disadvantages • Possibility of Slip • Wears tires out • Requires axle connecting wheels • Expensive A wheel lock parking brake was selected for the delivery and production design due to its simplicity and ease of mounting. An axle lock is not feasible because it requires an axle which is not included in the frame structure for both the delivery and production design because the motors run independent of each other. For the production design, the parking brake will be outsourced due to the low production volume. For the delivery design, the parking brakes off the donated wheelchair were used because they were Team 3: Achieving Mobility May 11, 2011 Final Report Page 88 of 160 functional and free of cost. Figure 65 shows a picture of the parking brake that was used in the delivery design. Figure 65: Donated parking brake being used in delivery design 5.6.3.4 Emergency Brake It is a real possibility that the user’s finger gets tired and he or she does not have the strength to lift their finger off the touch pad, causing the vehicle to move continuously in a particular direction. Clearly, this is extremely dangerous, especially if in the forward or reverse mode. Therefore an emergency brake will be implemented into the system so that a bystander can immediately stop the device whenever necessary. The motors that will be out-sourced for both the production and delivery design include an automatic braking device that utilizes a powerful magnet. When enough voltage is applied to this device, the current creates a magnetic field that is strong enough to keep the magnets separated. Once this voltage is cut, the magnets are quickly attracted to a metal plate that clamps down on the axle, preventing any further rotation. This device will be used for the emergency braking system in parallel with an on-off toggle switch. Whenever this switch is flipped off or the batteries run out, power to the wheelchair as a whole is cut including the brake release which in effect immediately stops the motors. Figure 66 shows a picture of the switch used in the delivery design. Figure 66: On-off toggle switch for emergency braking Team 3: Achieving Mobility May 11, 2011 5.6.4 Final Report Page 89 of 160 Financials Table 23 and Table 24 shows the costs of the production and delivery design, respectively. Several of the costs were based on pricing from other companies to obtain a rough estimate; however, for the production design, most of these parts will be purchased from manufacturers reducing the price (pre-mark-up). Table 23: Production Design Costs for the Braking Systems Item Rim Brakes Cost $39.98 Production Design Cost Notes Based on actual purchase of Sunlite MX brake set from Kentwood Cycling and Fitness ($19.99 per brake set) Hand lever $0.00 Included in the above cost Parking Brakes $74.86 Based on pricing of an Invacare FDX® parking brake assembly ($37.43 per wheel lock)47 Electronic Brakes Emergency Brakes Emergency Switch Mounting Labor $0.00 Cost included in controller and motor costs $0.00 Cost included in motor costs $13.00 Toggle Switch Chrome, Servalite 34-212U (Modern Hardware) $5.00 $50.00 Contingency Total $18.28 $201.12 Nuts, bolts, washers, etc. Mounting, connecting to motor and controller PCB (1 hrs @ $50/hr) 10% Team 3: Achieving Mobility May 11, 2011 Final Report Page 90 of 160 Table 24: Delivery Design Costs for the Braking Systems Delivery Design Cost Item Rim Brakes Cost $39.98 Hand lever Parking Brakes Electronic Brakes Emergency Brakes Emergency Switch Mounting Labor Contingency Total $0.00 $0.00 $0.00 Notes Based on actual purchase of Sunlite MX brake set from Kentwood Cycling and Fitness ($19.99 per brake set) Included in the above cost Donated Cost included in controller and motor costs $0.00 Cost included in motor costs $13.00 Toggle Switch Chrome, Servalite 34-212U (Modern Hardware) $0.00 $0.00 $5.30 $52.28 Nuts, bolts, washers free at metal shop Donated 10% 5.7 Encasings The encasings provide a protective enclosure to house the critical electronic components of the device – motor controller PCB, ECU PCB, power regulation PCB, and batteries. The motors are being outsourced and therefore its electronic components already include a proper encasing and no further design is required. 5.7.1 Requirements 5.7.1.1 Protection The encasings must be water resistant, meaning the electronic components function properly when they are sprayed or splashed on with water. The encasings must also provide protection from dirt, dust, and other foreign particles. 5.7.1.2 Heat Dissipation The encasings must be designed to provide adequate heat dissipation from the electronic components to prevent overheating. The amount of heat that is required to be removed from each component assuming a worst-case scenario (all input power is converted to heat) is roughly estimated to be: Motor Controller PCB: 10V x 10A = 100W = 341 BTU/hr Power Regulation PCB: 24V x 3.4A = 82W = 280 BTU/hr ECU PCB: 5V x 0.120A = 0.6W = 2 BTU/hr Team 3: Achieving Mobility May 11, 2011 5.7.2 Final Report Page 91 of 160 Alternatives The design choices that need to be determined for the encasings include material, size, and heat dissipation. The alternatives for material are steel, aluminum, and plastic. Table 25 provides a decision matrix comparing the important characteristics of each alternative. Table 25: Decision Matrix for Encasing Material Steel Aluminum Plastic Weight (0-10) Score Weighted Score Weighted Score Weighted (0-10) Score (0-10) Score (0-10) Score Selection Criteria 3 9 8 5 Strength Weight Cost Mountability 10 2 7 7 30 18 56 35 7 5 5 9 139 3 Sum Rank 21 45 40 45 4 10 10 5 151 2 12 90 80 25 207 1 The size of the encasings is mainly dictated by the size and shape of the electronic components it houses. The frame layout and mounting design also put restraints on the size of the encasings. The dimensions of the electronic components along with their proposed encasing dimensions are shown in Table 26. The motor controller and ECU will be placed in the same encasings. Table 26: Electronic Component and Encasing Dimensions Component Motor Controller/ ECU/ Power Regulation Batteries Component Dimension [in] Encasing Dimension [in] 4.5 x 7.5 x 3 5 x 8.25 x 4 8x5x8 9.5 x 5.5 x 10.5 The design alternatives for heat dissipation include natural convection and forced convection. Natural convection will be utilized as much as possible because it is the easiest and least expensive way to dissipate heat because it requires no special fan system. To determine whether or not a component can be sufficiently cooled by natural or forced convection, Newton’s law of cooling is utilized as shown below: ܳ௩ = ℎ௩ ܣ ሺܶ − ܶ ሻ The estimated value for each variable is shown in Table 27. Team 3: Achieving Mobility May 11, 2011 Final Report Page 92 of 160 Table 27: Values used to roughly estimate cooling of PCBs by convection Parameter Variable Value Units W 5-2050 Natural convection coefficient ℎ௩ mଶ K W Forced convection coefficient 10-20050 ℎ௩ mଶ K Surface area 0.25 ܣ mଶ Air temperature 25 °C ܶ The convection coefficient is very difficult to calculate and requires extensive testing therefore for a rough estimate a range was used for each (Appendix F. PCB Heat Dissipation Calculation). Figure 67 and Figure 68 show the resulting temperatures of each PCB for both natural convection and forced convection, respectively. 120 110 Motor Controllers ECU Power Regulation Design Limit PCB Temperature (°C) 100 90 80 70 60 50 40 30 20 10 0 5 7.5 10 12.5 15 Natural Convection Coefficient (W/m^2-K) 17.5 Figure 67: Resulting temperature of PCB due to natural convection 20 Team 3: Achieving Mobility May 11, 2011 Final Report Page 93 of 160 120 110 Motor Controller ECU Power Regulation Design Limit 100 PCB Temperature (°C ) 90 80 70 60 50 40 30 20 10 0 10 30 50 70 90 110 130 150 Forced Convection Coefficient (W/m^2-K) 170 190 Figure 68: Resulting temperature of PCB due to forced convection The limit temperature that each PCB will be designed for is 50°C. Even though the limit temperature for each PCB depends on its components, this temperature was chosen as an upper limit because it provides a safe operating temperature that will not melt components and ensure long life. For the ECU PCB, natural convection will be enough to keep it below the desired 50°C; however the motor controller PCB and the power regulation PCB will both require forced convection. The motor controller PCBs were both donated and already include a built-in fan system so no further design is required. A cooling system is required to be designed for the power regulation PCB. Detailed testing and design for this PCB is described in 4.1.8. 5.7.3 Design 5.7.3.1 Production Design Table 28 shows the final selection for material, sizing, and heat dissipation for each component encasing. Table 28: Design Selection for Electronic Component Encasings Encasing Encasing Heat Dissipation Component Dimensions Material Method [in] Motor Controller/ ECU / Flame 5 x 8.25 x 4 Forced convection Power Regulation Retardant ABS Flame Batteries 9.5 x 5.5 x 10.5 N/A Retardant ABS Team 3: Achieving Mobility May 11, 2011 Final Report Page 94 of 160 Plastic encasings will be purchased rather than manufactured because it is more cost effective for a low volume product. Although the encasing material and dimensions will ultimately be dependent on the manufacture’s product line, specifications close to those in Table 28 will be sought. A gasket will also be purchased and fitted around the main PCB encasing to prevent water from seeping in at the edges. The main PCB will require forced convection using a fan system because both the motor controller and power regulation components require forced convection to keep them below the design limit of 50°C. The plastic encasing for the main PCB will include air-way slits at each end with a fan at the entrance of one side. 5.7.3.2 Delivery Design The motor controllers for the prototype were both donated by Texas Instruments and already include the proper encasing and cooling system design. Battery encasings were donated by the Postma family and were confirmed to properly work with the batteries that were purchased for the prototype. The only electronic component that required proper encasing design was the ECU. The ECU was placed in an aluminum encasing that covers all three of the circuit boards (2 motor controls with plastic encasing and 1 ECU). Aluminum was used for the delivery design encasing instead of plastic because aluminum can be obtained free from the Calvin College metal shop. An open-celled foam gasket was placed around the aluminum encasing to prevent any water from leaking in at the edges. Figure 69 and Figure 70 show the delivery design of the PCB encasing and the battery encasings, respectively. Figure 69: Motor controller, ECU, and power regulation PCB encasing delivery design Team 3: Achieving Mobility May 11, 2011 Final Report Page 95 of 160 Figure 70: Donated battery encasing for final product 5.7.4 Financials Table 29 shows the projected costs of the production design. Table 30 shows the costs of the delivery design. Table 29: Production design costs for the encasing systems Production Design Cost Item Cost Notes Based on pricing of Invacare battery Battery Encasings $41.84 encasing ($20.92 each)20 DC-96F DC Series Heavy Duty Main PCB Encasing $12.64 Electronics Enclosure, 10” x 6” x 3”51 Mounting $5.00 Nuts, bolts, washers, etc. Labor $50.00 Mounting and connections (1 hrs @ $50/hr) Contingency Total $10.95 10% $120.43 Team 3: Achieving Mobility May 11, 2011 Final Report Page 96 of 160 Table 30: Delivery design costs for the encasing systems Delivery Design Cost Item Cost Notes Battery Encasings $0.00 Donated Motor Controller Encasings $0.00 Donated ECU/Motor Controller/ Power Regulation Encasing $0.00 Free aluminum sheet from metal shop Mounting $0.00 Labor Contingency Total $0.00 $0.00 $0.00 Nuts, bolts, washers are free from metal shop Donated 10% 5.8 Mounting Mounting consists of determining how each component will be attached to the frame of the wheelchair. The main components that require mounting are the camera, PCBs, brakes, LCD screen, touch button, and the motors. The mounts for these components can be divided into two categories: fixed and adjustable, as shown in Table 31. Table 31: Component Mounting Type Component Fixed Adjustable Brakes X Camera X PCBs X LCD X Motor X Touch Button X 5.8.1 Brakes In order for rim brakes to function properly they must be centered over each wheel. Based on this requirement, a support arm was built out from the frame structure to mount the rim brakes over the rear wheels. The support arm will extend out 2-3 inches from the frame and consist of a 0.75 inch diameter solid bar for better support during braking. To determine if this design would be able to safely handle the braking load both the maximum bending stress and the maximum torsional stress were calculated (see Appendix G. Brake Mounting Stress Calculations). The stresses in the welded joint were also calculated using the computer program Autodesk Algor (see Appendix G. Brake Mounting Stress Calculations). The stresses calculated were far below the yield strength of the material making the design suitable as shown in Table 32. Team 3: Achieving Mobility May 11, 2011 Final Report Page 97 of 160 Table 32: Calculated bending and torsional stress in the brake support arm Bending Stress Torsional Stress Bending Stress in Weld Calculated 4.0 ksi 1.3 ksi 12.0 ksi 52 52 Yield Strength 40 ksi 26 ksi 40 ksi52 Safety Factor 10.0 19.5 3.3 The designed support bar along with rim brake can be seen in Figure 71. Figure 71: Mounting of rim brake for delivery design The parking brakes are mounted directly to the aluminum tube of the frame just in front of each wheel. The parking brakes are built to fit snug around the tube and bolt into the tube. The clearance hole for the bolt is large enough so the horizontal position of the parking brake can be adjusted if it is too close or too far from the wheel. Figure 72 shows the parking brakes mounted to the frame. Team 3: Achieving Mobility May 11, 2011 Final Report Page 98 of 160 Figure 72: Parking brakes mounted onto frame 5.8.2 Camera A camera needs to be mounted to the front of the frame to provide the user with a view of where he or she is going. The camera also needs to be adjustable to provide the user with the option of altering their view if necessary. The camera will therefore be able to be adjusted in the vertical position a maximum of 30°. The camera will be mounted to the bottom of the bed which has a 7° incline, for this reason, the total 30° will be split 10° upward and 20° downward (net angles from horizon are 17° upward and 13° downward) The initial design of the camera mount is shown in Figure 73. A mounting plate with an arc hole will allow an arm holding the camera to rotate about a fixed pin 30°. When the desired location is found, the pin through the arc will be tightened by the user, fixing the camera arm in place. Figure 73: First design of camera mounting system Team 3: Achieving Mobility May 11, 2011 Final Report Page 99 of 160 After talking with the customer, the customer requested that the camera be removable so they could move the camera around by hand and show the surroundings to the user while he/she is lying down. This made the camera design a little more complicated and a new design had to be created. To incorporate an adjustable camera that can still be fixed during operation, a square tube system was designed as shown in Figure 74. Figure 74: Second design of camera mounting system The smaller tube was dimensioned so the camera would fit snug inside it with epoxy applied. The smaller tube is the one that will be capable of being removed by the user/attendant. The smaller square tube will then fit into the larger square tube and snap in place utilizing a spring button. The same mounting plate design will be used from the initial design to allow for the 30° vertical adjustment. Instead of the making the entire device aluminum, stainless steel will be used for the large tube because steel on aluminum only has a coefficient of friction of 0.6 as opposed to aluminum on aluminum which has a coefficient of friction of 1.35.53 A lower coefficient of friction will allow for lower clearances which in turn will decrease vibration and it will also be easier for the user/attendant to remove and insert the smaller square tube as well as slide the arm up and down. A prototype of the second camera mount design (Figure 75) was built to test the viewing angles and size of the mounting plate. Figure 75: Prototype of second camera design Team 3: Achieving Mobility May 11, 2011 Final Report Page 100 of 160 After hooking up the camera to the prototype and viewing the image on the LCD screen, the team determined that the downward angle was too small and the upward angle was too large. The design was revised to make the upward angle 0° and the downward angle 30° (net angles from horizon are 7° upward and 23° downward) It was also determined that the mounting plate was too large and could be shrunk to better fit underneath the bed and protect the camera from hitting objects upon accidental impact (1 inch was removed from both the length and width of the plate). The third camera mount design with the abovementioned revisions is shown in Figure 76. Figure 76: Second prototype of third camera mounting system After testing the third prototype, the team determined that using a touch button did not allow for a sturdy enough camera mount. As the stroller moved, the camera would vibrate and skew the picture on the LCD screen. For this reason, a set screw was chosen to replace the touch button. A set screw still allowed for the camera to be removed but also stabilized the camera in place, preventing any vibration. Figure 77 shows the final camera mount system for the final product. Figure 77: Final camera mounting system for final product Team 3: Achieving Mobility May 11, 2011 5.8.3 Final Report Page 101 of 160 Printed Circuit Boards For the production design, the ECU, power regulation, and motor controllers will be on the same PCB and then enclosed by a single plastic encasing. This encasing will consist of threaded flanges that can be bolted to the bottom of the bed to provide the most protection. For the delivery design, two motor controller PCB encasings were bolted to the bottom of the bed using the bolt holes already present in the encasing that was included with the donation of the motor controllers. The ECU PCB and power regulation PCB were directly bolted underneath the bed using spacers to provide some space between the bed and PCB for air movement. The large aluminum encasing covering all the above PCBs include threaded flanges that were used to bolt it to the bottom of the bed for the most protection. Figure 78 shows the large aluminum encasings covering all the PCBs mounted to the bottom of the bed. Figure 78: Mounting of PCB encasing 5.8.4 LCD The LCD mount requires the most adjustability for two reasons. One reason is that the user is not going to be in the same position each time so the screen needs to be capable of adjusting to a position that is most suitable for the user’s line of sight. The second reason is that the LCD needs to be capable of being moved out of the way while the system is not in use. For example, when the user is being placed into or being removed from the wheelchair, the LCD needs to be stored away to prevent any damage to the LCD or inconvenience to the user. Two alternatives considered for the LCD include a multi-pivot system and a gooseneck system. The multi-pivot system consists of several linkages with various degrees of freedom to provide all the necessary positions/movements that are required for the LCD screen. A goose-neck system, on the other Team 3: Achieving Mobility May 11, 2011 Final Report Page 102 of 160 hand, consists of a flexible tube that can be bent into any configuration. Figure 79 show an example of a multi-pivot system and a goose-neck system. Figure 79: Comparison of LCD Screen mounting alternatives54, 55 Table 33 compares the advantageous and disadvantageous of each alternative for the LCD screen mounting system. Table 33: Comparison of LCD screen mounting system LCD Screen Mounting Flexible Tubing Multi-pivot Advantages Disadvantages • Unlimited positions • More difficult to store • More expensive • Easier to store • Less expensive • Capable of being produce in-house • Only certain positions A multi-pivot system was chosen for the production design because it has many more advantages over the flexible gooseneck, most importantly the ability to make it in-house and not pay more to have it built and shipped somewhere else. For the delivery design, we did not have the resources to build a multi-pivot system ourselves and we could not find one that worked with our wheelchair layout to purchase; therefore, the flexible gooseneck was chosen. The gooseneck was also a good choice because it was donated and therefore free and we were able to come up with a way of storing it effectively underneath the bed. Figure 80 shows a prototype of the gooseneck system using wood to simulate the dimensions of the frame. Team 3: Achieving Mobility May 11, 2011 Final Report Page 103 of 160 Figure 80: Prototype of LCD mount This prototype helped determine the correct length needed for the final gooseneck. If the length is too short the user will have no viewing angle and if it is too long the LCD will vibrate more and it will be more difficult to store away. Once the gooseneck was designed, the attachment from the gooseneck to the LCD needed to be designed. A coupling was welded to both the LCD plate and the underside of the bed to screw each end of the gooseneck into. Also, the customer requested that the LCD plate include some sort of sun shield that would help prevent glare on the screen. Figure 81 shows the final LCD mounting system. Figure 81: Final LCD mounting system 5.8.5 Motor The motors need to be mounted to the frame in a certain orientation because the wheels are directly connected to the motors. They need to be both parallel to each other and perpendicular to the ground to Team 3: Achieving Mobility May 11, 2011 Final Report Page 104 of 160 provide the smoothest ride and least amount of wear. The motors come standard with several threaded holes in its top housing that can be utilized for bolting to another plate. Initially the motors were going to be mounted using the clamp-style mounts from the old, donated motors but these were found later on to not align correctly with the new, purchased motor’s threaded holes. The two alternative designs for a mounting plate involve one that is permanently welded to the frame and another that is fitted around the frame pipe using bolts. Figure 82 shows the clamp-style mounting system for the motors. Figure 82: Clamp-style mount system The weld-style mount was chosen as a better design because it is much easier to make sure the motors are directly perpendicular to the ground and parallel to each other. Also, the clamp-style mounting system must be re-adjusted every time the motors are removed while the weld-style system is always in the correct orientation. Figure 83 shows the weld-style mounting system with the motors attached. Figure 83: Final motor mounting system Team 3: Achieving Mobility May 11, 2011 5.8.6 Final Report Page 105 of 160 Touch Button The touch button should be adjustable to meet the needs of the user. Not every user is going to want the touch button in the same location so it should not be fixed. The touch button should, however, be configured in such a way that prevents the button from moving, rotating, or sliding away from the user during operation. The difficulty in design is making it adjustable at certain times and fixed at others. Also, the touch button along with its mounting should be capable of being removed and stored away when it is not in use by the user. The two design alternatives for the touch button included a multi-pivot system that folds out from underneath the wheelchair. The other design involves attaching the button to a mount that the user’s arm is strapped into. A comparison of both alternative designs is shown in Table 34. Table 34: Comparison of the two touch button mounting design alternatives Touch Button Advantages Disadvantages Mounting • More adjustable • More difficult to manufacturer • More expensive • More aesthetic, professional looking Multi-pivot • Easier to store Strap-in arm rest • • • • More comfortable Less expensive More stable for finger during operation Easier to build in-house • Only certain positions • Requires more room to store Based on the difference in advantageous and disadvantageous of both options, a strap-in arm rest was chosen as the means of mounting the touch button. Figure 84 shows the design of the strap-in arm rest with the touch button attached. Figure 84: Design of strap-in arm rest with touch button attached Figure 85 shows three prototypes that were built to test on the customer to determine the most comfortable design and dimensions. Team 3: Achieving Mobility May 11, 2011 Final Report Page 106 of 160 Figure 85: Three strap-in arm rest prototypes that were built and used to test on the customer Unlike the multi-pivot system, the strap-in arm rest requires a separate storage design. A shelf, a hook, and a magnetic system were all considered for storing the strap-in arm rest underneath the bed. The magnetic system was the chosen design because it took up the least amount of space underneath the bed (limited space with all the other components underneath the bed) and it provided the most stability while the wheelchair was in motion (do not want the strap-in arm rest vibrating or falling out during operation). Figure 86 shows the design of the strap-in arm rest storage device mounted underneath the bedding. Figure 86: Magnetic strap-in arm rest storage device 5.8.7 Financials Table 29 shows the projected costs of the production design. Table 30 shows the costs of the delivery design. Team 3: Achieving Mobility May 11, 2011 Final Report Page 107 of 160 Table 35: Production design costs for the mounting systems Production Design Cost Item Cost Notes Rim Brake Mounting $0.00 Included in material cost of frame Parking Brake Mounting $0.00 Included in cost of parking brake Camera Mounting $0.00 Included in material cost of frame LCD Screen Mounting $20.00 Encasing Mounting $0.00 Motor Mounting $0.00 Touch Button Mounting 39.32 Miscellaneous $5.00 Labor $50.00 Contingency Total • 0.585” OD, heavy stiffness, 18” length, flexible tube: $20.00 • Aluminum sheet: included in material cost of frame Only requires bolts which is covered under miscellaneous Included in material cost of frame • PVC pipe: $5.00 (Home Depot) • Steel sheet: 14 gauge, $0.4056 • Aluminum sheet: included in material cost of frame • Fabric: included in bedding cost • Velcro: $2.00 (Home Depot) • Straps: included in bedding cost • Magnet: $2.32 (Home Depot) Nuts, bolts, washers, etc. Mounting and connections (1 hrs @ $50/hr) $11.43 10% $125.75 Team 3: Achieving Mobility May 11, 2011 Final Report Page 108 of 160 Table 36: Delivery design costs for the encasing systems Delivery Design Cost Item Cost Notes Rim Brake Mounting $0.00 Included in material cost of frame Parking Brake Mounting $0.00 Included in cost of parking brake Camera Mounting $0.00 Included in material cost of frame • 0.585” OD, heavy stiffness, 18” length, flexible tube: donated LCD Screen Mounting $0.00 • Aluminum sheet: included in material cost of frame Only requires bolts which is covered Encasing Mounting $0.00 under miscellaneous Motor Mounting $0.00 Included in material cost of frame • PVC pipe: $5.00 (Home Depot) • Steel sheet: free from metal shop • Aluminum sheet: free from metal shop Touch Button Mounting $9.32 • Fabric: included in bedding cost • Velcro: $2.00 (Home Depot) • Straps: included in bedding cost • Magnet: $2.32 (Home Depot) Nuts, bolts, washers are free from metal Miscellaneous $0.00 shop Labor Contingency Total $0.00 $0.93 $10.25 Donated 10% 6. Testing Detailed test plans were utilized to ensure that all components were working properly before being integrated into the system. In addition, integration testing was conducted to ensure that the overall product passes certain tests with all of the components working together. Each test plan was designed to test the worst case scenario to ensure maximum reliability of the stroller. 6.1 Component Test Plans This type of testing served to test the individual components of the system. It was important to determine whether each component worked before integrating it into the system. By testing each component separately from the others, it simplified the complexity of the project and increased the chances of the integration tests being successful. Instead of one complex and intricate product, it was broken down into smaller steps for preliminary testing. Team 3: Achieving Mobility May 11, 2011 6.1.1 Final Report Page 109 of 160 Software Testing of software was conducted on each piece of software to make sure that it was functioning properly in all circumstances. The following section describes the component testing that was performed on the ECU and the motor controllers. The ECU software was tested and debugged regularly throughout the development process. The three main aspects of the software design that were tested rigorously are the user interface, velocity control and direction control. The integration of these three systems was then tested to make sure that they work properly together. 6.1.1.1.1 User Interface The LEDs for steering were tested for the time delay between directional states and to confirm that the “select” LED remained illuminated for the duration of the button press. Also, this test made sure that the state transitioned to “forward” after any button press. This test was performed by connecting the touch button and LED lines to the proper external pads of the ECU (thus connecting it to the proper GPIO pins). This was a very simple test to perform, but it was necessary for the user interface to correctly display the current directional state of the device. The time interval between LED transitions was timed to be exactly 2 seconds, as expected. This was timed using a stopwatch. Also, the “select” button was illuminated for the duration of a button press. Finally, it was confirmed that the next state following a button press was “forward.” The user interface was also tested with Isaac Postma himself. This test was conducted on May 7, 2011 at the Projects Night ceremony. He was able to press the touch button within the given 2 second intervals. His reaction time is fairly slow, so this test was to make sure that he would be able to operate the device easily. 6.1.1.1.2 Motor Controls The motor control software was tested using the touch button as an input. This test confirmed that the motors turn in the proper direction when the button is pressed and also provide the desired acceleration. Each of the four possible directions were invoked by the touch button and the response of the motors was observed. Also, when the button is released, the motors were expected to stop. The duration of each directional state was also varied between 0.5 seconds to 20 seconds in order to confirm the total functionality of the system. In order to achieve a constant acceleration of 1.5 ft/s2, the desired time until full speed was approximately 2.5 seconds, using the following equation: 2.5mph 2.5s = 1.47 ft s 2 The inputs and outputs that were tested are summarized in Table 37. Team 3: Achieving Mobility May 11, 2011 Final Report Page 110 of 160 Table 37: Directional Software Test Plan Dire ctional Motor Direction State Le ft Right Forward Clockwise Clockwise Reverse Counter-Clockwise Counter-Clockwise Right Clockwise Counter-Clockwise Left Counter-Clockwise Clockwise The results of the direction test were a suc success. cess. The observed response of each motor matched the expectations. The results of the acceleration test are shown below. This test was conducted on flat ground with a 200 lb load on the stroller. The results are shown in Figure 87. Figure 87: Acceleration Testing Results As seen in this graph, the maximum speed (8 V) was reached after about 2.6 seconds. This is extremely close to the desired 2.5 seconds such that the difference is negligible. Therefore this acceleration was used for the design. 6.1.1.1.3 Velocity Control Softwa Software The velocity control software was tested to ensure that the speed control functions worked properly, such that if the stroller experienced opposing force such as an incline, the voltage would increase to compensate and if the stroller experienced a hel helping ping force such as a decline, the voltage would decrease to compensate. This test was conducted on the bench for functionality, using just one motor and observing the response via UART output, similar to the acceleration test. The threshold limit was set to 4.5 A because that amount of current is easily attainable by adding torque with the tester’s bare hand. The results of this speed control are shown below in Figure 88.. This graph shows that once the current was Team 3: Achieving Mobility May 11, 2011 Final Report Page 111 of 160 above the minimum threshold (in this case, 4.5 A) for about 1.5 seconds, the voltage would increase by 0.5 V. Then, if the current remained above 4.5 A for another 1.5 seconds, it would increase again until unti it reached 10 V. Also, if the current ever dropped below 4.5 V throughout the test, the voltage would be reset to 8 V. All of this functionality was carefully designed to keep the stroller within the required speed window, and the results prove that th the velocity control software is fully functional. Figure 88: Velocity Control Test Results 6.1.2 LCD/Camera System The LCD was tested by powering it the power regulation circuit board. Since the optimum voltage of the monitor is approximately 12 V, a multi multi-meter meter was used to confirm that a constant voltage of approximately 12 V is being outputted form the power regulation circuit board. The voltage from a power source was varied from 18 V to 26 V and the input voltage to the monit monitor or remained constant at approximately 12 V. The camera had similar tests to the LCD monitor because the camera needs a constant voltage of 9 V. This means that the camera will also use a voltage regulator. In order to make sure the camera worked in the final design, the camera was be hooked up to the power regulation and transmitted a signal to the LCD. Team 3: Achieving Mobility May 11, 2011 Final Report Page 112 of 160 Once the LCD and camera are working together, the brightness and clarity of the picture was tested. The LCD screen was taken outside during the early afternoon and the picture was still easily seen with direct sunlight hitting the screen. The LCD screen had excellent quality when used in the dark, although the camera had difficulty capturing the surrounding objects. 6.1.3 Power Regulation Circuit Board The power regulation circuit was tested by inputting a 24 V battery source to the input terminals. Then a multi-meter was used to measure the voltage at the 12 V, 9 V, and 5 V nodes. They read 11.9 V, 8.7, and 4.9 V which were all acceptable. 6.1.4 Temperature of Electrical Components The electrical components of the circuit board may overheat due to the potential of high current traveling through them. The electrical components were closely monitored to make sure they did not overheating during operation. The first voltage regulator that attenuated the voltage from 24 V to 12 V had the highest chance of overheating because it also had the most current traveling through it. A thermocouple was used to measure the temperature of the LM317 voltage regulator. The excel graph below in Figure 89 shows the temperature under various conditions. LM317 Temperature as a Fuction of Time 120 Temperature (°C) 100 80 no heatsink 60 with heatsink 40 heatsink with 12V fan heatsink with 24V fan 20 0 0 50 100 150 200 250 Time (seconds) Figure 89: LM317 Temperature as a Function of Time It was determined that a heat sink and fan should be used for the voltage regulator if the LM317 was used. Team 3: Achieving Mobility May 11, 2011 6.1.5 Final Report Page 113 of 160 Battery/Charger The battery’s voltage was tested using a multi-meter. When the batteries are being fully charged and are directly connected to the charger still, the voltage is at 29.4 V. When the batteries are unhooked from charger, the batteries were at 27 V. Then the batteries were run for a minute in order to remove the surface charge, and the voltage was 25.9 V. The battery charger was used to recharge the final product’s batteries. 6.1.6 Motor The functionality of the motors was tested to determine if they run when a voltage is applied to them. The brake release terminals were connected to a 25 watt power supply while the motor terminals were connected to a 100 watt power supply. The brake was confirmed to disengage from the motor axle because when power was applied, a single “click” noise was heard. When power was applied to the motor terminals, the wheel on the motor began to rotate. The wheel rotating on the motor confirmed that the motors functioned properly when voltage was applied to them. This test determines whether the motors function and not their performance. 6.1.7 Brakes The braking system consists of four subsystems: user-controlled brakes, attendant-controlled brakes, parking brakes, and emergency brakes. Component testing only determined the functionality of these brake systems and not their performance. Braking performance was determined under integration testing. 6.1.7.1 User-controlled Braking System For the user-controlled brakes, the electrical brakes must be able to stop the motor when the touch button is depressed. To determine this, the motor terminals were connected to a 100 watt power supply and the brake release terminals were connected to a 25 watt power supply. Once the wheel had been rotating for approximately 2 minutes, the power to the motor terminals was decreased to 0 watts in about 2 seconds (50W/sec). This simulated the user letting go of the touch button. The wheel on the motor then came to a gradual stop therefore passing this test. This test determines whether the brakes function and not their performance. 6.1.7.2 Attendant-controlled Braking System For the attendant-controlled brakes, the rim brakes must be able to stop the wheels when the hand lever is compressed by the attendant. The motor was setup as described above and a rim caliper was held over the wheel rim connected to a hand lever. Once the wheel on the motor had been running for approximately 2 minutes, the hand lever was compressed. The wheel on the motor then came to a stop while the lever was compressed therefore passing this test. This test determines whether the brakes function and not their performance. Team 3: Achieving Mobility May 11, 2011 Final Report Page 114 of 160 6.1.7.3 Emergency Braking System The emergency brakes provide the attendant with a convenient way to quickly stop the wheelchair for any given situation. To test this functionality, the motors were setup as described above. The power to the brake release terminals was then cut to 0 V by turning off the power supply (this simulates an attendant switching the emergency brake switch to the off position). The wheel on the motor came to an immediate stop almost simultaneously with cutting power to the brake release terminals therefore passing this test. This test determines whether the brakes function and not their performance. 6.1.8 Structure The goal of testing the structure is to ensure that it is strong enough for the maximum user weight requirement of 200 pounds. The structure consists of the frame, bed, and storage and was tested once the frame was welded together. Since the stroller is rated for a 200 pound user and the frame should be the strongest part of the product, it will be tested to 400 pounds. The weight test was accomplished by placing approximately 400 pounds on the bed while the team observed all joints and supports for signs of weakness and fracture. Since the stroller will be susceptible to vibration and fatigue over the course of its life, it was very important to observe any noticeable stress concentration factors and surface cracks at an early point to avoid fatigue failure. Most cracks will be too small to see and will be negligible but any large cracks must be fixed at this time. This test was accomplished by having two people whose combined weight was approximately 400 pounds sit on the stroller. The stroller was then pushed around manually and visually inspected by members of the team for any signs of failure. During the test, there were no noticeable cracks or problems in the structure. Both individuals on the frame were asked if they felt any deflection or weakness in the frame during the test and both answered “No”. 6.2 Integration Test Plans This type of testing confirms that all the components work with each other, meaning that each component still works when the others are integrated into the system. Several components are connected in one way or another. For instance, the ECU and motor controllers may work great as a component, but unless they are correctly integrated together with the entire system, then they are not beneficial to the product. 6.2.1 6.2.1.1 Electrical Testing Speed Testing The vehicle’s speed was tested to ensure that it is operating at a velocity that is safe for the user as well as those located in the same vicinity. A simple speed test was performed by having a user direct the vehicle in the forward direction for 30 feet. Then, the duration it takes to move 30 feet will be measured using a stopwatch. If it takes approximately eight seconds, then the speed of the vehicle is acceptable because this is approximately 2.5 mph, which is the average walking pace. These calculations are shown below in Team 3: Achieving Mobility May 11, 2011 Final Report Page 115 of 160 Figure 90.. The stroller was also tested on a 30 degree hill in order to test the speed difference on an incline and decline. Since the team could not find a 10 degree hill readily available, a 30 degree hill was used instead. If the stroller stays within the required speed window at 30 degrees, it will work even better with a 10 degree slope. Figure 90: Calculations for Speed Testing The results are summarized below in Table 38.. These test results show that the top speed on flat ground is roughly 2.4 mph, which is very close to the desired 2.5 mph. Also, the speed going up and down hill were calculated to be just within the required speed window. However, as mentioned earlier, the terrain was 20 degrees steeper than the requirement, so the speed will stay even more constant with the suggested terrain of 10 degree slopes. Terrain Flat 30 degree incline 30 degree decline 6.2.1.2 Table 38:: Time Trials to Calculate Speed of Stroller Trial 1 [sec] Trial 2 [sec] Trial 3 [sec] Average [sec] 8.1 8.3 8.5 8.3 12.8 13.5 13.3 13.2 5.9 6.6 6.2 6.2 Speed [mph] 2.4 1.6 3.3 Electric Brake Testing Since the requirements state that the stroller should come to a complete stop within 2 feet after the user releases their finger from the touch button, this functionality was thoroughly tested. This was tested by having a user in the device traveling at full speed and then releasing the touch button. Since measuring the stopping distance proved to be inaccurate, the testing was done by performing calculations with the UART T debugging data. Since the stroller has a top speed of 2.5 mph, the amount of time to brake was calculated to be: Team 3: Achieving Mobility May 11, 2011 Final Report Page 116 of 160 ሺ2.5 54 0.545 2 E Thus, the maximum braking time was 0.545 seconds. The following data was measured using a 200 lb occupant on flat ground. Figure 91:: Motor Deceleration from 2.5 mph as a Function of Time The total time taken to stop the device was exactly 0.5 seconds; therefore this test was a success. 6.2.1.3 Emergency Stop Testing It is a real possibility thatt the user’s finger gets tired and he or she does not have the strength to lift their finger off the touch pad, causing the vehicle to move continuously in a particular direction. Clearly, this is extremely dangerous, especially if it is stuck in forward or reverse. Therefore an emergency stop button was implemented into the system so that a bystander ca can n stop the device. The emergency stop scenario was tested by having the stroller move forward at full speed, and then turning off the switch. The vehiclee came to a complete stop in 10 inches. When moving backward at full speed, stroller came to a complete stop 5 inches after hitting the emergency stop switch. When turning either left or right, the stroller stopped after 6 inches. 6.2.1.4 LCD/Camera Testing The camera and LCD were tested by turning on the power to the system and checking to see if LCD and camera are powered on. Then a multi multi-meter was used to check if the proper voltage was supplying them. Team 3: Achieving Mobility May 11, 2011 Final Report Page 117 of 160 The LCD was tested to ensure that there was no distortion in the video while the device was in motion. The screen was tested by driving over grass, bark mulch, and asphalt to confirm that there was no lose in video quality. 6.2.1.5 Battery Testing The battery monitor was installed on the battery so that the customer would be able to check the charge of the battery. By continually operating the vehicle for several hours, it was confirmed that the battery had the appropriate capacity to power the stroller and that battery monitor was working properly. 6.2.1.6 Temperature Testing The vehicle’s temperature was tested at room temperature. A thermocouple was used to make sure the main electronics compartment was not overheating. The ambient temperature was measured at 23°C. After the stroller was used for several hours, a thermocouple was inserted into the main electronics compartment and it measured 23.4°C, which is acceptable. 6.2.2 6.2.2.1 Mechanical Testing Weight Testing The main goal of the weight test is ensure that the final product can hold a 200 pound user as well as all equipment weight. Before the final product was built, a Finite Element Analysis was performed on the stroller; however, the FEA was not able to analyze the strength of several components such as the bed material. Therefore, the weight test is very important and will show the team where any weak areas are on the final product. The customer for the delivery design only weighs 54 pounds and the weight requirement includes all equipment and batteries underneath the stroller; therefore, several different weight tests will be performed to test different distributions of weight. Since the stroller will always have two batteries on it, the batteries will be added to the stroller for each weight test. The batteries weigh approximately 80 pounds as stated in the batteries section. Different weight tests were performed to test different weight distributions. The first weight test consisted of having the batteries underneath with a 200 pound person on the bed. The second test consisted of putting an additional 50 pounds on the storage shelves with a 150 pound person on the bed. The last test put an additional 50 pounds on the storage shelves with 100 pounds on the bed. The tests were conducted for at least ten minutes to ensure there are no effects of creep or fracture growth occurring. If there was indication of failure or lack of confidence in the design, the time would have been increased for that test; however, this was not needed since lack of confidence did not occur. Second, for each test all welded joints were inspected, all seams on the bed were inspected, motor shafts were inspected, and wheels were inspected. There were not any signs of fracture, cracking, and ripping during this test. In addition to testing component failure, the stroller was also be driven to ensure that the motors could move the required weight without burning out the motors. In addition to driving the stroller on flat ground, the stroller was also driven up a 10° incline to ensure that the incline requirement was met while fully loaded. Team 3: Achieving Mobility May 11, 2011 6.2.2.2 Final Report Page 118 of 160 Weather Testing The goal of the weather testing is to make sure that the product will still operate in the rain as well as resist corrosion. The easiest way to test the resistance to rain was to drive the stroller around when it was raining outside. It should be noted that the final product is designed to be rain proof, not water proof. This means that components must be designed to resist penetration from rain. There are attachments on the side of the stroller to attach a custom umbrella provided by the customer, which will keep most of the components dry; however, the motors are still very susceptible to rain being on the bottom of the stroller as water will spray on them from the wheels. The goal of this test was to ensure that all electronic components remained functional when exposed to the rain. Bare wires that become exposed to water can pose a serious safety risk; therefore, this test is very important for functional and safety reasons. After performing this test in the rain, there were a few areas of concern. First, the LCD screen is not sealed on the sides and can easily get water inside of it. Therefore, it is very important that the customer store the screen completely under the stroller when not in use. There was also some concern with water getting in the electronics encasing as it traveled down the gooseneck and followed the wires into the encasing. To prevent this, the hole in the encasing was sealed to prevent water from getting in. Besides the possible problems with the LCD, there were no other issues with components not functioning correctly after being exposed to the rain. 6.2.2.3 Portability Testing The portability test was conducted to make sure that the stroller was compatible with a wheelchair accessible van. The customer’s current stroller is loaded into a van using a standard wheelchair lift and then locked down with four tie-down straps that attach to the stroller. This test verified that the stroller could be loaded into a wheelchair accessible van using a standard wheelchair lift. Even though the wheel base for this stroller is much longer than most wheelchairs, it is still short enough to fit on a hydraulic wheelchair lift. The longest wheelbase that the customer’s wheelchair accessible van can handle is 40” which is much longer than the wheelbase of the final design. This test was performed at Calvin College with the family’s wheelchair accessible van. The first test loaded the stroller into the van using the hydraulic lift. There were not any problems during this test due to excess weight or length of the stroller. Once the stroller was in the van, it was locked in using the four tie down hooks and the parking brakes were engaged. The stroller was rocked back and forth without any movement and the family was very happy with how solid the stroller was secured. Another test was then performed with Isaac in the stroller, completely fastened using the restraint system. After being loaded in the van and locking the stroller in place, there were once again no issues. 6.2.2.4 Motor Testing This test determined the performance of the motors as a part of the entire system. The motors are required to move the maximum rated weight (200 pounds) up the maximum rated incline (10°). For this test the wheelchair was loaded with 230 pounds and driven up a 30° gravel incline using the touch button system. Team 3: Achieving Mobility May 11, 2011 Final Report Page 119 of 160 The wheelchair successfully travelled up the slope with no slippage or stalling but a slight reduction in speed therefore passing this test. 6.2.2.5 Mechanical Brake Testing The mechanical brake test involved two different parts. The first part tested the overall performance of the attendant-controlled brakes as a part of the entire system. These brakes are required to stop the wheelchair in a maximum of 2 feet when traveling at the top speed of 3.5 mph. For this test, the wheelchair was loaded with 230 pounds and manually pushed down a 30° gravel decline. The hand brakes were then applied when the rear wheels reached a line marked on the gravel. When the wheelchair came to a complete stop, a measuring tape was used to determine the distance between the line and the rear wheels. Three separate trials were conducted with an average stopping distance of 1.7 feet therefore passing this test. The second part of mechanical brake test involved testing the overall functionality of the parking brakes as a part of the entire system. These brakes are required to hold the wheelchair in place on the maximum rated incline (10°) with the maximum rated weight (200 pounds) with no slippage or sliding. For this test, the wheelchair was loaded with 230 pounds and manually held on a 30° gravel decline. Each parking brake was then engaged and the wheelchair was let go of. The wheelchair stayed in place with no slippage or sliding therefore passing this test. 7. Business Plan The following chapter discusses the different aspects involved in a business plan for this project and the end product. 7.1 Business Models This section describes the possible business models that could be developed around the product. Two different models will be examined, each with their own advantages and disadvantages. 7.1.1 User This model involves manufacturing the product and selling it directly to the end user. The advantages of this model include the possibility of a higher margin and more customized products better satisfying the needs of the customer. One disadvantage is that it would be difficult to get insurance companies to back the product in this model. Without the help of the insurance companies (usually cover between 50% and 80%)57, most users will not be able to afford the product. Also, hospitals and doctors will be unaware of the product and will not be able to recommend to a patient to buy from us. Setup costs are therefore rather high because salespersons must be paid to go out and convince insurance companies and doctors to insure and recommend the product. This model will only be feasible if there is product diversification because one wheelchair alone is not enough to sustain a company in such a small target market. Invacare for Team 3: Achieving Mobility May 11, 2011 Final Report Page 120 of 160 example is so successful because they have such a varied line of wheelchair products to meet the different needs/wants of the customer. 7.1.2 Wheelchair Supplier This model involves manufacturing the product and selling it to a wheelchair supplier who then turns around and sells the product to the end user. The main advantage of this model is the product is backed by a brand name such as Invacare. Insurance companies will most likely back the product because of the supplier name on it. Hospitals and doctors will also be more likely to recommend the product because of their familiarity of the supplier name. A disadvantage to using this model is a smaller margin because the product must be cheaper for the supplier to buy than to manufacturer themselves. The product must also be marketed to the supplier instead of the end user. The business model that will be proposed for our project is direct to the user. This means manufacturing the product in-house and then selling it directly to the end user. This is the best option for a low-volume, highly-customized, high-cost product. The production design is currently not differentiated enough to sustain a company and have a large enough market. To solve this problem several different options can be designed into our product in the future to expand the target market. This includes various user interfaces (touch button, joystick, sip-and-puff device, tongue device), variable speed, increased top speed, weight capacity, incline capability, adjustable recline and height positions. 7.2 Competition The wheelchair market consists of more than 100 different suppliers of wheelchairs. Of the vast amount of suppliers only the manufacturers of powered wheelchairs with the largest market share will be analyzed and used in a comparison to our product. These suppliers include Invacare, Pride Mobility, and Permobil. For each company, it was determined which model was the most similar to our design as shown in Figure 92. Figure 92: Competitive models in the market58, 59, 60 Team 3: Achieving Mobility May 11, 2011 Final Report Page 121 of 160 These main competing models have different performance specifications as shown in Table 39. Please note that these competing models are being compared to the base production design. To sustain a company, a new production design will need to be developed with differentiated options that would make the product more competitive with the similar models in the market. Table 39: Comparison of Performance of competitive models58, 59, 60 Pride Mobility Achieving Performance Invacare FDX Permobil Corpus Quantum Mobility Speed Type Variable Variable Variable Fixed Drive System Front-wheel Rear-wheel Rear-wheel Rear-wheel Top Speed 5.0 mph 5.0 mph 6.5 mph 2.5 mph Incline Capability 9° 6° 10° 10° User Weight 300 lbs. 300 lbs. 300 lbs. 250 lbs. Capacity Wheelchair 329 lbs. 224 lbs. 313 lbs. 200 lbs Weight The emphasis in our production design will be on special features that do not exist in the market currently. Table 40 compares the competition’s main features with our product’s main features (Invacare FDX, Pride Mobility Quantum, and Permobil Corpus have about the same basic features and are combined here for comparative purposes) Table 40: Comparison of features in competitive models58, 59, 60 Competition Achieving Mobility - Adjustable seating (width, depth, height, tilt) - Lay-down bed (fixed 170°) with adjustable length - Several drive control options: (8 in) Joystick - Simple touch button control Single switch - Fixed speed Wafer Board - Manual drive capabilities Head control - Easy access to batteries Chin control - Attendant-controlled brake Sip-N-Puff - Camera/LCD vision system – drive while lying - Variable speed options down - Manual drive capabilities - Independent wheel suspension - Easy access to batteries As the table shows, the competition has some features that our production design is lacking. The main feature that sets us apart from the competition is the ability for the user to drive the wheelchair while lying down using the camera/LCD vision system. In order to sustain a business, this feature needs to be emphasized and other competitive features need to be designed for such as an adjustable seat, various drive controllers, variable speed, and wheel suspension system. Team 3: Achieving Mobility May 11, 2011 Final Report Page 122 of 160 The cost of the different competitive models needs to be analyzed in order to determine if our production design cost is competitive or if we need to revise something to reduce the cost. To compare the wheelchairs on the same level, options will be selected that are most similar to our production design. Table 41 shows a cost comparison of the various similar wheelchair models with the pricing of the different options (Pride Mobility was not included because detailed price sheets were not readily available). Table 41: Cost comparison of competitive models61, 62 Invacare FDX $ Base Model 5,790.00 Transport Tie-Down Brackets $ 250.00 Proximity Switch and Digital Scanner $ MK6i Digital Interface Box Emergency Stop Switch MK6 Auxiliary Power Source Wheel Locks Total Permobil C350 Corpus $ 6,645.00 Base Model Proximity Switch $ 524.00 3,852.00 Input Module $ 1,012.00 $ 1,500.00 Locking Base $ 1,806.00 $ 1,185.00 $ 200.00 $ 45.00 $ $ $ $ 545.00 475.00 1,103.00 345.00 $ 12,822.00 R-net Controller Controller Mount Attendant Stop Control Attendant Push Handles Total $ 12,455.00 The price of our product is estimated to be about $14,058 (7.5.3) which is fairly competitive in comparison to the models above. It must be taken into consideration though that the additional features that these models offer our product lacks such as wheel suspension system, adjustable seating, etc. 7.3 Market Research 7.3.1 Customer Base The overall customer base for this product is people with conditions that limit them to wheelchair use. Table 42 shows the leading conditions associated with wheelchair usage. Team 3: Achieving Mobility May 11, 2011 Final Report Page 123 of 160 Table 42: Leading conditions associated with wheelchair use63 % of Persons Condition wheelchair [1000s] users Stroke 180 11.1 Arthritis 170 10.4 Multiple sclerosis 82 5.0 Absence or loss of lower extremity 60 3.7 Paraplegia 59 3.6 Orthopedic impairment of lower extremity 59 3.6 Heart Disease 54 3.3 Cerebral palsy 51 3.1 Rheumatoid arthritis 49 3.0 Diabetes 39 2.4 Within this broad customer base of all wheelchair users, a number of people would prefer to lie down in a wheelchair due to the certain condition they have. The more specific customer base for our production design is aimed at children to small adults that are physically limited to lying down. The most likely reason for lying down would be no control over one’s upper torso muscles making sitting-up painful or uncomfortable. Loss of control of the upper torso can be caused by conditions such as: • • • Spinal Muscular Atrophy64 Spina Bifida65 Quadriplegia66 The delivery design has a specific customer, Isaac Potsma. The delivery design is therefore being customized to fit the particular needs of Isaac. The touch button, for example, is utilized due to the fact that Isaac has some movement in one of his fingers. Other customers might not have this capability so the production design needs to be expanded to a larger customer base. The production design will therefore have an independent control system that works with several different user interfaces including a joystick, a sip-and-puff device, or a tongue device. 7.3.2 Market Size There are an estimated 1.6 million Americans using wheelchairs outside of institutions according to data from the National Health Survey on Disability63. Of these, 1.5 million use manual devices while only 155,000 use powered wheelchairs. Wheelchair use increases rapidly with age as shown in Table 43. Team 3: Achieving Mobility May 11, 2011 Final Report Page 124 of 160 Table 43: Wheelchair Use by Age Group in 200263 All Wheelchairs Manual Wheelchairs Powered Wheelchairs Under 18 18-64 65+ Total Number (1000s) 88 614 897 1599 % of population 0.12 0.39 2.87 0.61 Number (1000s) 79 560 864 1503 % of population 0.11 0.35 2.76 0.58 Number (1000s) 18 90 47 155 % of population 0.02 0.06 0.15 0.06 Elderly people are the group with the highest rates of both manual and electric wheelchair use. However, more than two-thirds (69.7%) of powered wheelchair users are not elderly (under 65 years of age). Table 44 shows that wheelchairs cover more than one-third of the home medical equipment market. Table 44: Home Medical Equipment Market Breakdown67 Equipment Type Wheelchairs Home Care Beds Bathroom Safety Supplies Ambulatory Aids Miscellaneous Patient Aids % of market 38 27 15 10 10 Wheelchair usage in terms of the entire population is very small, but because it dominates the home medical equipment market, a low-volume, high-priced approach is feasible. Table 45 shows the estimated annual births per year in the United States for conditions that that would have the highest possible demand for a horizontal powered wheelchair (based on average 4 million annual births in the United States). Table 45: Annual births per year in the United States for conditions most likely requiring horizontal powered wheelchair68, 64, 69 % of births Condition Annual Births per year Spinal Muscular Atrophy 700 0.02 Spina Bifida 400 0.01 Quadriplegia 4,000 0.1 Total 5,100 0.13 A total of 5,100 people each year in the United States could be demanding a horizontal wheelchair. This number is optimistic because it assumes that all these people are capable of controlling a powered wheel and that all these people live long enough to control a wheelchair on their own. Team 3: Achieving Mobility May 11, 2011 Final Report Page 125 of 160 7.4 Target Market The target market for this device is the home medical equipment sector; more specifically, the manual and powered wheelchair market. Figure 93 shows the flow from manufacturing the device to the end user. Figure 93: Product Flow Chart Both insurance companies and doctors have a high influence in which wheelchair supplier and which wheelchair brand the end user usually purchases. The insurance companies usually pay for the product, not the end user and they often have a maximum amount of money that can be spent on any medical item. The device, therefore, must be marketed to the insurance company as a quality product that fits within the price boundaries of their maximum allowable. If the insurance companies approve to fully or partially cover the device, the product looks more appealing to the end user. The end user also decides on a particular wheelchair based on the recommendation of a doctor. Doctors understand best the user’s needs and will recommend a wheelchair with features based on those needs. Doctors, therefore, need to be made aware of this product and its special features and convinced that it better meets the needs of his/her patient than anything else available. Figure 28 shows the breakdown of revenue in 1996 for the wheelchair market by source. Medicare, private insurance, and Medicaid make-up 80 percent while commercial/institutional (doctors/hospitals) make-up 9 percent of the revenue. This mean roughly 11 percent of the wheelchair’s market revenue comes from the actual end user. This further shows that the main market target should be insurance companies and doctors/hospitals. Team 3: Achieving Mobility May 11, 2011 Final Report Page 126 of 160 Figure 94: Breakdown of revenue source for wheelchair market in 199670 7.5 Project Financials The final design of Achieving Mobility is innovative and offers a product to the market that could help many people. As with any new business or product, a financial analysis must be analyzed to see if the product has any potential to yield a profit for a company. The following sections go through a detailed financial analysis of what it would take to make this product profitable. 7.5.1 Delivery Design Budget For this class, the team designed a delivery design for a specific individual, Isaac Postma. The costs for this design differ greatly from the production design due to donations from companies and organizations. In addition, several components were salvaged from old wheelchairs to keep the final cost within our budget. Table 46 shows the delivery design budget of all components that have been discussed in depth in previous sections of this report. All raw materials already have a volume discount factored in because they were purchased through Ebling and Son Inc. Blacksmiths, which already gets a volume discount. Team 3: Achieving Mobility May 11, 2011 Final Report Page 127 of 160 Table 46: Estimated final prototype budget for Achieving Mobility Achieving Mobility Prototype Budget Part Unit Cost Quantity 12V 50Ah lead acid battery $135.00 2 Adjustable Handle knobs $25.00 2 Aluminum Shelf (per sq. in) $0.08 900 Aluminum Tube (per in) $0.29 600 Backpack Hook $0.73 2 Battery Monitor $148.34 1 Black single pole connector $8.19 3 Black two pole connector $4.71 4 Black four pole latched connector $8.18 2 Board Video Camera $0.00 1 Brake Cable $0.00 1 Brake Calipers $43.42 2 Brake Handles $0.00 2 Development Board with LCD $0.00 1 Electronics casing $0.00 2 Encasing Gasket $3.50 1 Fasteners $60.08 1 Flexible goose-neck tube $0.00 1 Heatsinks $10.75 2 Labor (Welding) $55.00 50 LCD Display $0.00 1 Main Motor Controller $0.00 1 Arm Rest Magnets $1.16 2 Motors $800.00 2 Parking Brake $0.00 2 PCB Components Pipe Caps $0.65 4 Powder Coat $58.00 1 Power regulators $4.00 5 Ratchet Strap $15.88 1 Rubber Handle Bar Covers $4.75 2 Seatbelt $25.00 1 Seatbelt mounting bar $0.00 1 Speed Sensor $0.00 1 Thyristor $12.16 1 Tie-down hooks $2.50 4 Total Cost $270.00 $50.00 $100.00 $102.08 $1.46 $148.34 $24.57 $18.83 $16.35 $0.00 $0.00 $86.83 $0.00 $0.00 $0.00 $3.50 $60.08 $0.00 $21.50 $2,787.92 $0.00 $0.00 $2.32 $1,600.00 $0.00 $28.45 $2.60 $58.00 $20.00 $15.88 $9.50 $25.00 $0.00 $0.00 $12.16 $10.00 Team 3: Achieving Mobility May 11, 2011 Final Report Page 128 of 160 Table 46 continued Achieving Mobility Prototype Budget Part Unit Cost Quantity Touch button $77.00 1 Upholstery Seat $293.16 1 Website Template $67.00 1 Wires, cables, connectors $40.00 1 Expected Total Total Cost $77.00 $293.16 $67.00 $40.00 $5,952.53 In order to pay for the delivery design, substantial donations were acquired over the course of the year. Table 47 shows the funding that was acquired over the course of the year. Table 47: Total Donations Ivanrest CRC Donation Other Donations Calvin College Total Donations $5,000.00 $50.00 $1,000.00 $6,050.00 The original budget for the delivery design was approximately $2,000. Some of the main reasons that the final delivery budget was nearly triple this were: buying new motors, higher than expected welding cost, and under budgeting most components. 7.5.2 Production Design Budget The budget for the production design is the one that will be used for the cost analysis of starting a new business. Some of the components on the final design are more expensive since discounts were given on several components and there are no donated components on the final design. There are also some components that will be cheaper due to large volume orders. The final product budget is shown in Table 48. Team 3: Achieving Mobility May 11, 2011 Final Report Page 129 of 160 Table 48: Final product BOM for Achieving Mobility Achieving Mobility Final BOM Part Unit Cost Quantity 12V 50Ah lead acid battery $170.00 2 Adjustable Handle knobs $20.00 2 Aluminum Shelf (per sq. in) $0.08 900 Aluminum Tube (per in) $0.29 600 Backpack Hook $0.73 2 Battery Monitor $100.00 1 Black single pole connector $7.00 3 Black two pole connector $4.00 4 Black four pole latched connector $7.00 2 Board Video Camera $50.00 1 Brake Cable $8.00 1 Brake Calipers $35.00 2 Brake Handles $10.00 2 Development Board with LCD $100.00 1 Electronics casing $10.00 1 Encasing Gasket $2.00 1 Fasteners $30.00 1 Flexible goose-neck tube $15.00 1 Heatsinks $8.00 2 LCD Display $200.00 1 Main Motor Controller $100.00 2 Arm Rest Magnets $1.16 2 Motors $1,000.00 2 Parking Brake $30.00 2 PCB Components Pipe Caps $0.65 4 Powder Coat $58.00 1 Power regulators $4.00 5 Ratchet Strap $10.00 1 Rubber Handle Bar Covers $4.00 2 Seatbelt $20.00 1 Seatbelt mounting bar $5.00 1 Speed Sensor $50.00 1 Thyristor $10.00 1 Tie-down hooks $2.50 4 Touchbutton $70.00 1 Total Cost $340.00 $40.00 $100.00 $102.08 $1.46 $100.00 $21.00 $16.00 $14.00 $50.00 $8.00 $70.00 $20.00 $100.00 $10.00 $2.00 $30.00 $15.00 $16.00 $200.00 $200.00 $2.32 $2,000.00 $60.00 $20.00 $2.60 $58.00 $20.00 $10.00 $8.00 $20.00 $5.00 $50.00 $10.00 $10.00 $70.00 Team 3: Achieving Mobility May 11, 2011 Final Report Page 130 of 160 Table 48 continued Achieving Mobility Final BOM Part Unit Cost Quantity Upholstery Seat $600.00 1 Wires, cables, connectors $30.00 1 Expected Total 7.5.3 Total Cost $600.00 $30.00 $4,431.46 Sell Price The final cost for the end product is based on material and assembly labor costs. Labor hours were estimated and broken down into major categories. The average cost for assembly labor was priced out at $50/hour to include benefits and overhead. Table 49 shows the total labor cost for assembling the stroller. Table 49: Total assembly time and cost Assembly Costs ($50/hr) Component Frame Bed Structure Assembly Electronics Assembly Electronics Installation Packaging Testing Contingency Total Hours Cost Note 55 $2,750 Time to weld and machine the frame 5 $250 Time to sew and assemble the bed 5 $250 Attaching motors, brakes, bed, mounting components, etc. 10 $500 Time to wire all components and attach them 5 $250 Installing all drivers and software 2 $100 2 hours to package the final product for shipping 20 $1,000 Time for all component and product testing $510 10% of total assembly cost 102 $5,610 A profit margin of 40% was used for our product since it is a low volume, high price product. Based on material cost, assembly cost, and a profit margin of 40%, the final product should have a wholesale price of approximately $14,000 as shown in Table 50. The suggested retail price for the product should be set at $21,000 based on a 50% profit margin for the distributor. Table 50: Selling price for the stroller Assembly Costs Material Costs Product Total Wholesale Price $5,610 $4,431 $10,041 $14,058 Assuming 40% profit margin for wholesaler MSRP $21,087 Assuming 50% profit margin for distributor Team 3: Achieving Mobility May 11, 2011 7.5.4 Final Report Page 131 of 160 Fixed and Variable Costs Since this production operation will be a small business, the warehouse and machinery will be rented and there will be an estimated four salaried employees. A certain percent of the company’s time and money will be spent on research and development and advertising each year to further sell and develop the product. The main variable costs are due to labor and material. A full breakdown of the fixed costs is shown in Table 51. Table 51: Fixed costs associated with forming a new business71, 71 Fixed Costs Component Engineering Design Cost Salaries Benefits Warehouse Equipment Rental Utilities R&D Advertising Prototype Cost Intellectual Property Ins. First Year Total Unit Cost Quantity Cost Note $100 1800 $180,000 Estimated engineering hours $60,000 5 $300,000 1 ME, 1 EE, 1 CEO, 1 sales, 1 foreman $18,000 5 $90,000 30% of salary $50,000 1 $50,000 10,000 sq ft, ($5/sq ft) $15,000 1 $15,000 Equipment for machining, welding, and sewing $1,000 12 $12,000 Building Utlities at $1000/month $9,000 1 $9,000 5% of engineering time $700 5 $3,500 Magazine Ad ($700/page/month) $6,000 $10,000 Subsequent Year Total 7.5.5 1 1 $6,000 $10,000 Patent infringement protection $675,500 $489,500 Excludes initial design cost and prototype cost Three year financial outlook A three year financial forecast was used to determine whether or not starting a new business for this product would be feasible. The cost analysis was based on concepts learned in Business 357 and the BizPlan financial template was used to analyze a three year product outlook. Based on information from various sources, there is a market for this product of about 15,000 people73, 74, 75, 76. The number of units sold is based on assuming a small percent of the market will purchase it each year, increasing 50% each year as the product gains popularity. Table 52 shows the projected net income at the end of each year. Based on the assumed number of units sold, the business will break even around the end of year two and turn a large profit at the end of year three. Variable costs of goods sold are based on labor and material to make the product and fixed costs of goods sold are yearly utilities, warehouse and equipment rental, and IP insurance. Variable operating costs are commissions based on sales and fixed operating costs are salaries, R&D, and advertising.77 Depreciation is from the purchased equipment and is based on a 7 year recovery MACRS. Interest expense is calculated based on the amount of debt carried through the current year based on a 6% interest rate. Team 3: Achieving Mobility May 11, 2011 Final Report Page 132 of 160 Table 52: Projected net income for first three years of business operation Since this business will not be able to get started without some capital investment, a bank line of credit of $150,000 will be taken out at an annual interest rate of 6% and yearly invested capital will also be $150,000.77 The bank line of credit will be paid off by year 3 based on projected sales. Based on this initial capital investment and net income at the end of each year, the net cash balance can be calculated and is shown in Table 53. It is also assumed that as the company grows it will purchase more equipment to increase the rate of production and decrease renting costs. Table 53: Estimated cash balance at the end of each year. Beginning Cash Balance Net Income After Tax Depreciation expense Invested Capital (Equity) Increase (decrease) in borrowed funds Equipment Purchases Ending Cash Balance Year 1 Year 2 Year 3 (279,515) 715 150,000 150,000 (5,000) 16,200 16,200 55,289 4,083 150,000 (106,000) (20,000) 99,571 99,571 229,172 12,918 150,000 (56,180) (50,000) 385,480 Team 3: Achieving Mobility May 11, 2011 8. Final Report Page 133 of 160 Project Management Project management is an essential part of this project that must be maintained throughout the year. Clear goals and a structured schedule were very important in completing the project on time as well as staying within the budget. Project management has been divided into three main categories: work division, team organization, and overall schedule. 8.1 Work Division Since this team is split between two concentrations, dividing up the work between all four members of the team was important in order to stay organized and on schedule. At the beginning of each week, certain tasks are laid out for each team member to complete over the course of the week. Then at the end of the week, status reports were utilized to analyze the work completed as well as what needs to done the following week. The three main areas that the work has been divided into are hardware, software, and mechanical. Even though certain people are assigned to specific tasks, there will be some overlap between tasks and tasks that require more than one person to complete. 8.1.1 Hardware The hardware components were split between Dan Evans and Matt Rozema since they were the two electrical engineers on the team. The components were split up based on different skills between the two electrical engineers and their varying abilities. Table 54 shows how the electrical hardware components will be divided between Matt R. and Dan. Table 54: Hardware work division Task Camera Selection Connectors and Cables Development Kits Selection LCD Selection Motor Control Hardware Power Regulation (PCB) Power Supply Selection 8.1.2 Assigned To Dan Dan Matt R. Dan Matt R. Dan Dan Software The majority of the software components were handled by Matt Rozema. Matt has experience working with software design from an internship and feels that he will be able to handle the design of the software components. The main software components are shown in Table 55. Team 3: Achieving Mobility May 11, 2011 Final Report Page 134 of 160 Table 55: Main software components Task Motor Controls Peripheral Interface Self Test System Boot User Interface 8.1.3 Mechanical The mechanical components were divided into major components and were split up between Rob VanderVennen and Matt Last. Each team member was responsible for designing, purchasing, assembling, and testing each component. Rob and Matt both have a different set of skills that will be utilized in the design of each component. Table 56 shows the mechanical task breakdown and the person assigned to each task. Table 56: Mechanical task breakdown Task Bed Brakes Encasings Frame Motor Mounting Storage Wheels Assigned To Rob Matt L. Matt L. Rob Matt L. Matt L. Rob Rob 8.2 Team Organization and Management One of the main goals of the team is maintaining a structure and schedule that is highly organized. Managing the time and resources that are available are a crucial part of this course as well as this project. The team’s advisor, Professor VanderLeest, did a fine job encouraging the team to stay organized throughout the semester. Weekly status reports were submitted each week to show him where the team was currently and where the team expected to go the following week. These proved to be very helpful and gave team members a schedule to follow each week. In addition, a detailed Work Breakdown Structure (WBS) was made to outline the tasks for the entire year (Appendix A. Work Breakdown Structure). The WBS shows each task, the start and end date, estimated hours to completion, actual hours to completion, and the percent complete for the entire project. Management within the team was done through intra-team status reports. At the end of the every week, each team member went over what they accomplished as well as what would be completed the following week. Issues such as team members spending too much time on a task or being behind schedule were brought up and addressed at this time. No consequences were given to any team member for poor quality Team 3: Achieving Mobility May 11, 2011 Final Report Page 135 of 160 or lack of work. Instead, issues were addressed by talking them over and figuring what can be done to overcome them. A daily time card was filled out each day and totaled at the end of the week to make sure all team members were putting in enough time and to avoid one person putting in significantly more time than others. Figure 95 shows the monthly hours the team has logged over the course of this school year. Team 3: Cumulative Monthly Hours 600 516 500 406.5 Hours 400 292.5 300 261.5 200 150.5 107.5 121.5 100 49 33 0 September October November December January February March April May Month Figure 95: Cumulative weekly hours for the team In addition to having the guidance of Professor VanderLeest, several outside mentors and sponsors have volunteered their time and resources to help the team. Ivanrest CRC has graciously donated the funds to complete the project. In addition, Texas Instruments, Gentex, Mary Free Bed Rehabilitation Center, and Ebling and Son Inc. Blacksmiths have donated their products, time, and resources. Without these sponsors and mentors this project would not have been possible; therefore, the team has utilized these resources to manage and organize the project more efficiently. Figure 96 shows the overall structure and organization of the team. Team 3: Achieving Mobility May 11, 2011 Final Report Page 136 of 160 Figure 96: Overall team organization 8.3 Schedule and Milestones 8.3.1 Schedule Figure 97 shows a portion of the WBS showing the start and finish dates and duration of major tasks. A more detailed and complete WBS is shown in Appendix A and outlines all tasks for the entire year. Figure 97: WBS outlying major tasks and completion dates Team 3: Achieving Mobility May 11, 2011 8.3.2 Final Report Page 137 of 160 Milestones The team identified the major milestones that had to be completed for the project by the end of the year. Table 57 shows the completion dates and status of all major milestones. Table 57: Project Milestones Milestone Select Microcontroller Website Posted PPFS Complete Directional Control Software Completed Finite Element Analysis Final Structure Design Final Brake Design Final Component Mounting Design Velocity Control Software Complete Printed Circuit Board Designed Integration of Electronic Components Power Regulation Final Prototype Assembly Final Testing Final Report Completion Date 11/3/2010 11/24/2010 12/6/2010 1/20/2011 2/28/2011 3/2/2011 3/2/2011 3/12/2011 4/1/2011 4/22/2011 4/22/2011 5/5/2011 5/5/2011 5/11/2011 5/11/2011 Status Complete Complete Complete Complete Complete Complete Complete Complete Complete Complete Complete Complete Complete Complete Complete 8.3.2.1 Microcontroller Selected The microcontroller is the part of the system that does all the processing. The design team chose the Micro Cortex-M3 as the microcontroller because it was capable of handling the necessary functions. This selection was done on November 3, 2010. 8.3.2.2 PPFS The PPFS contains a detailed overview of all components of the system. Several aspects that were analyzed are the design, alternatives, feasibility, and financials of each component. This document has proven to be very beneficial in pointing the team in the right direction and figuring out how to manage the project. This milestone was completed December 6, 2010. 8.3.2.3 Website Posted Posting the team’s website was a large milestone since it tracked the progress of the team and is available to anyone to view. This milestone was completed November 24, 2010. Team 3: Achieving Mobility May 11, 2011 Final Report Page 138 of 160 8.3.2.4 Directional Control Software Completed The directional software is the most fundamental part of the product. The product cannot be called a success without a working directional control system. This software determined which direction the stroller would move depending on which LED was illuminated, and thus turn the motors in the correct direction. This milestone was completed January 20, 2011. 8.3.2.5 Finite Element Analysis To make sure the structure would hold up under stresses induced by the weight it carries a finite element analysis was conducted using the computer program Autodesk Algor. This milestone was completed February 28, 2011. 8.3.2.6 Final Structure Design The final design of the structure was one of the largest mechanical milestones and was dependent on several other components. The size and weight of all electronic components as well as mechanical components needed to be determined before the frame could be complete. The design of the frame changed as other components of the system changed. This milestone was completed March 2, 2011. 8.3.2.7 Final Brake Design This milestone includes all three braking systems and was another large mechanical milestone that was achieved. The final brake design occured simultaneously with the structure design since a change in one affected the other. This milestone was completed March 2, 2011. 8.3.2.8 Final Component Mounting Design The final component mounting was one of the later milestones since all components had to be chosen before the mounting could be designed. This milestone was completed March 12, 2011. 8.3.2.9 Velocity Control Software Complete This software controls how fast the user will travel in the product. An open loop control system was used to regulate the speed to make sure that it moves at an appropriate speed. T This milestone was completed April 1, 2011. 8.3.2.10 Printed Circuit Board Designed The printed circuit board was for a more professional look to the final product. The circuit board was designed for proper cooling as well as fitting all of the components in a small space. This milestone was completed April 22, 2011. Team 3: Achieving Mobility May 11, 2011 Final Report Page 139 of 160 8.3.2.11 Integration of Electrical Components The individual electrical components all need to work simultaneously in a system. Therefore once all the components were working independently, they were implemented into the final system to make sure that they all worked collectively. This milestone was completed April 22, 2011. 8.3.2.12 Final Prototype Assembly The final prototype assembly was one of the last mechanical milestones to be completed. All mechanical and electrical components had to be purchased and ready to be assembled in order to complete this milestone. This milestone was completed May 5, 2011. 8.3.2.13 Power Regulation In order for each component to work sufficiently, it needs to be supplied with the proper amount of power. Testing was conducted in order to make sure the components have all the power that they need. This milestone was completed May 5, 2011. 8.3.2.14 Final Testing Final testing was the last milestone that was completed for the final product. Final testing cannot occur until all other milestones are completed. Even though this was the final milestone, there still needed to be time to debug the system after testing. This milestone was completed May 11, 2011. 8.3.2.15 Final Report The final report summarizes all of the work from the entire year. This milestone was completed May 11, 2011. 9. Acknowledgements There are several individuals and organizations that have helped the team out with the project. A special thanks goes out to the following: • • • Calvin College for providing the team with the resources to design the project as well as funding a portion of it. Professor VanderLeest, the team advisor, for pushing the team and offering advice and criticism wherever necessary. His organization and project management techniques proved to be very helpful in organizing the project. Tim Theriault from GE Aviation, for being the team’s industrial consultant and providing us with contacts at Texas Instruments. Team 3: Achieving Mobility May 11, 2011 • • • • • • • • • • 10. Final Report Page 140 of 160 Russel Ramsay from Texas Instruments, for donating the development kits and offering his time to help the team through problems. Ivanrest CRC for providing the necessary funding for this project. A special thanks to Carole Pettijohn, head of outreach ministries at Ivanrest, for setting up the donations and making this project possible. Invacare for providing the team with guidance with wiring up the current motors. Greg Bush, electrical design engineer at Gentex, for providing the team with LCD screens and cameras as well as mentoring the team with the camera and LCD screen design. Jim Nammensma, manager at Ebling and Son, Inc. Blacksmiths, for assisting the team in welding and machining the frame. Professor Ribeiro, the professor of Engineering 315, for allowing the team to use class time and resources to design components of the control system. The Business 396 team which consists of Ji Won Choe, Audrey Petrini, Will Richert, Theo Van Hoek, and Peter Wierenga, for providing the team with help on the business plan and financials. Josh Schroyer for assisting the team in making videos for the RESNA competition. Mary Free Bed Rehabilitation Hospital for designing and fabricating the bedding and restraint system. Johnson Controls Inc. for fabricating the power regulation PCB. Conclusions The final product designed for this project was a success. The team successfully designed and built a working prototype for Isaac Postma that he can operate electronically while lying down. Several difficulties were encountered along the way such as finances, but through the generosity of several organizations, this project has become a reality. The delivery design was specifically designed for Isaac Postma; however, if the product were to hit the market it would be modified to meet the needs of more individuals. The group made substantial progress throughout the year and has completed the final project by the end of the school year. Throughout the course of the year, the team has logged in approximately 1800 hours on this project. This product has proven to be a great example of how we can use God’s gifts to make a difference in someone’s life. Knowing that this product will touch someone’s life and give them the opportunity to see life in a new perspective is what makes this project so special. It is our goal that through this project Isaac Postma will be able to put life into drive and achieve mobility. Team 3: Achieving Mobility May 11, 2011 11. Final Report Page 141 of 160 References 1. Electrical Safety. <http://www.allaboutcircuits.com/vol_1/chpt_3/4.html>. 2. Ermer, Gayle, and Steve VanderLeest. "Using Design Norms to Teach Engineering Ethics." Calvin College. N.p., June 2002. Web. 22 Nov. 2010. <http://www.calvin.edu/academic/engineering/about/faculty/svleest/abstracts/asee02.htm>. 3. "Measuring speed and position with a quadrature encoder." Pager motors and robot gearmotors. Altera Corporation, n.d. Web. 17 Oct. 2010. <http://www.didel.com/mot/RomEnco.pdf>. 4. Motor Control and PFC Developer's Kit. Texas Instruments, n.d. Web. 10 Oct. 2010. <http://focus.ti.com/docs/toolsw/folders/print/tmds1mtrpfckit.html>. 5. "RDK-BDC24 Firmware Development Package User's Guide." Stellaris® Brushed DC Motor Control Reference Design with CAN (24V). Texas Instruments, 3 Aug. 2010. Web. 27 Nov. 2010. <http://www.luminarymicro.com/products/rdk-bdc24.html>. 6. PICDEM Mechatronics Demonstration Kit. Microchip Technology Inc., July 2005. Web. 13 Oct. 2010. <http://ww1.microchip.com/downloads/en/DeviceDoc/51568a.pdf>. 7. DE2 Development and Education Board. Altera Corporation, n.d. Web. 17 Oct. 2010. <http://www.altera.com/education/univ/materials/boards/de2/unv-de2-board.html>. 8. "Stellaris® LM3S2965 Evaluation Board User Manual." LM3S2965 CAN Evaluation Board. Texas Instruments, 6 Jan. 2010. Web. 19 Jan. 2011. <http://www.luminarymicro.com/products/lm3s2965_can_evaluation_kit.html>. 9. "LM3S2616 Microcontroller." Luminary Micro, 2010. Web. 15 Oct. 2010. <http://www.luminarymicro.com/products/LM3S2616.html>. 10. Argus Analyzers. Battery Bug - Deep Cycle Battery Monitor. N.p., 2011. Web. 15 Apr. 2011. <http://www.argusanalyzers.com/battery-monitors/products/bb-dcm12-agm-battery-bug-batterymonitor-argus-analyzers-copy-1.html>. 11. Chaurasia, Neelima. "Serial Buses in Industrial and Automotive Applications." Communication Protocols. N.p., n.d. Web. 12 Nov. 2010. <http://www.scribd.com/doc/33221949/Communication-Protocols>. 12. Controller Area Network (CAN) Overview. National Instruments, 7 Nov. 2009. Web. 7 Nov. 2010. <http://zone.ni.com/devzone/cda/tut/p/id/2732>. 13. 24V 30AH V2.5 LiFePO4 Battery Pack. ProStores, 2010. Web. 23 Oct. 2010. Team 3: Achieving Mobility May 11, 2011 Final Report Page 142 of 160 14. Interstate Batteries. Personal interview. 4 Nov. 2010. 15. Collinson, Andy. "Over Voltage Protection." Circuit Exchange International. N.p., n.d. Web. 9 Mar. 2011. <http://www.zen22142.zen.co.uk/Design/overvoltage.htm>. 16. "Slo-Blow Fuse 313/315 Series." Jameco Electronics, n.d. Web. 2 Apr. 2011. 17. Alternating and Charging Systems. N.p., 2010. Web. 6 Dec. 2010. <http://www.glasswolf.net/papers/charging.html>. 18. "Average Height and Weight for Children." Buzzle: Intelligent Lift on the Web. N.p., 2010. Web. 6 Dec. 2010. <http://www.buzzle.com/articles/average-height-and-weight-for-children.html>. 19. The Engineering Toolbox. N.p., 2010. Web. 22 Nov. 2010. <http://www.engineeringtoolbox.com/>. 20. Invacare Corporation - Parts Catalog. Invacare Corporation, n.d. Web. 5 Dec. 2010. <http://www.invacare.com/cgibin/imhqprd/inv_catalog/partsPHII_home.jsp?s=0&partsHome=partsHome&newSearch=true>. 21. Metals Depot Shopping Cart. Metals Depot, 1999. Web. 5 Dec. 2010. <http://www.metalsdepot.com/Cart3/viewCart1.phtml?LimAcc=&aident=>. 22. Kolczynski, Jill. Pride Mobilty. Phone interview. Oct. 2010. 23. Brushed DC electric motor. Wikipedia, n.d. Web. 28 Nov. 2010. <http://en.wikipedia.org/wiki/Brushed_DC_electric_motor>. 24. Condt, Reston. "Brushed DC Motor Fundamentals." N.p.: Microchip Technology, Inc., 2004. N. pag. Web. 29 Nov. 2010. <http://ww1.microchip.com/downloads/en/AppNotes/00905B.pdf>. 25. Automotive Electronics: DC Motors. Clemson University Vehicular Electronics Laboratory, n.d. Web. 29 Nov. 2010. <http://www.cvel.clemson.edu/auto/actuators/motors-dc.html>. 26. Electronics Tutorial about DC Motors. Ed. Wayne Storr. Basic Electronics Tutorials, n.d. Web. 29 Nov. 2010. <http://www.electronics-tutorials.ws/io/io_7.html>. 27. Brushless DC Electric Motors. Wikipedia, n.d. Web. 28 Nov. 2010. <http://en.wikipedia.org/wiki/Brushless_motors>. 28. How Brushless Motors Work. HPI Europe, n.d. Web. 29 Nov. 2010. <http://www.hpieurope.com/walk.php?lang=en&id=21>. Team 3: Achieving Mobility May 11, 2011 Final Report Page 143 of 160 29. Boley, Brian L. "Overview of Motor Types." N.p., 1996. Web. 12 Nov. 2010. <http://www.oddparts.com/acsi/motortut.htm>. 30. “Brushless vs Brushed Motors." Dynetic Systems. N.p., n.d. Web. 12 Nov. 2010. <http://www.dynetic.com/brushless%20vs%20brushed.htm>. 31. Rolling Resistance. The Engineering Toolbox, n.d. Web. 2 Dec. 2010. <http://www.engineeringtoolbox.com/rolling-friction-resistance-d_1303.html>. 32. Parts Catalog. Invacare, 2011. Web. 27 Apr. 2011. <http://www.invacare.com/cgibin/imhqprd/inv_catalog/partsPHII_home.jsp?s=0&partsHome=partsHome&newSearch=true&ar ea=Main&WT.svl=topNavLink3>. 33. The Every-Part-Of-Your-Bike Blog. Ed. Ryan Jay. Tumbir, n.d. Web. 17 Apr. 2011. <http://beachbikesonline.tumblr.com/post/617679945/the-every-part-of-your-bike-blog>. 34. Mia Moda Cielo Review. Strollers and Prams, n.d. Web. 17 Apr. 2011. <http://strollersandprams.com/strollers/349/Mia-Moda-Cielo/review-1.html>. 35. Sturmey-Archer Dynamo Drum Brake Front Hub 36h. Harris Cyclery, n.d. Web. 30 Nov. 2010. <http://harriscyclery.net/product/sturmey-archer-dynamo-drum-brake-front-hub-36h-2177.htm>. 36. SDM 2.0 Bicycle Disc Brake Products. Alibaba, n.d. Web. 30 Nov. 2010. <http://www.alibaba.com/product-tp/112287745/SDM2_0_Bicycle_Disc_Brake.html>. 37. Power Wheelchairs. Invacare, 2011. Web. 9 May 2011. <http://www.invacare.com/cgibin/imhqprd/inv_catalog/prod_cat.jsp?s=0&catOID=-536885238>. 38. Quantum Rehab. Pride Mobility, 2010. Web. 9 May 2011. <http://www.pridemobility.com/quantum/powerbases/q6series/q6edge.asp>. 39. Rehab Series. Permobil, n.d. Web. 9 May 2011. <http://www.permobil.com/USA/Products/Rehab/>. 40. Single Strollers. JoggingStroller.com, n.d. Web. 9 May 2011. <http://www.joggingstroller.com/Strollers/Single-Strollers/index.cat>. 41. “Easys Rehabilitation Stroller." Thomashilfen, 2010. Web. 12 Nov. 2010. <http://www.thomashilfen.com/th/index.php/en>. 42. Shimano Ultegra Brake Caliper. Carrollwood Bicycle Empoirum, n.d. Web. 30 Nov. 2010. <http://cbebikes.com/product/shimano-ultegra-brake-caliper-43120-1.htm>. Team 3: Achieving Mobility May 11, 2011 Final Report Page 144 of 160 43. "Bicycle brake systems." Wikipedia (2010). Web. 30 Nov. 2010. <http://en.wikipedia.org/wiki/Bicycle_brake_systems#whittbs>. 44. Wilson, David G. Bicycling Science. 2nd ed. Cambridge: The MIT Press, 1982. 237-41. Wikipedia. Web. 30 Nov. 2010. 45. Brandt, Jobst. "Brakes from Skid Pads to V-brakes." Jobst Brandt: Frequently Asked Questions about Bicycles and Bicycling. Harris Cyclery (2005). Wikipedia. Web. 30 Nov. 2010. <http://www.sheldonbrown.com/brandt/brakes.html>. 46. Aivd Code 185mm Dics Brake Galvanized. Tree Fort Bikes, n.d. Web. 30 Nov. 2010. <http://www.treefortbikes.com/product/333222337854/454/Avid-Code-185mm-DiscBrake.html>. 47. Invacare Corporation - Parts Catalog. Invacare, n.d. Web. 30 Nov. 2010. <http://www.invacare.com/cgibin/imhqprd/inv_catalog/partsPHII_home.jsp?s=0&pagePostCount=3&bvModelNbrName=null& bvFormNumber=null&partsHome=searchCategoriesToParts&formNbr=10076&categoryDropDo wn=24898>. 48. Tektro R556 Long Reach Brake Set. Bicycle Warehouse, n.d. Web. 30 Nov. 2010. <http://bicyclewarehouse.com/product/tektro-r556-long-reach-brake-set12028.htm?site=google_base>. 49. Nexus Right Hand Brake Lever. Bike Parts, n.d. Web. 30 Nov. 2010. <http://www.bikeparts.com/search_results.asp?id=BPC345244>. 50. Convection Heat Transfer. The Engineering Toolbox, 2011. Web. 27 Apr. 2011. <http://www.engineeringtoolbox.com/convective-heat-transfer-d_430.html>. 51. DC-96F DC Series Heavy Duty Electronics Enclosure. Polycase, 2011. Web. 18 Apr. 2011. <http://www.polycase.com/dc-96f?seriesqty=1&x=13&y=12>. 52. Riley, William F., Leroy D. Sturges, and Don H. Morris. Mechanics of Materials. 6th ed. Hoboken: John Wiley & Sons, Inc., 2007. 700-01. Print. 53. Friction and Coefficients of Friction. The Engineering Toolbox, n.d. Web. 18 Apr. 2011. <http://www.engineeringtoolbox.com/friction-coefficients-d_778.html>. 54. Dual Swinging Arm Desk Mount. Parity Medical, 2008. Web. 1 Dec. 2010. <http://www.paritymedical.com/mounts-desk-fixed-height-single-monitor-dual-swing-arm.htm>. Team 3: Achieving Mobility May 11, 2011 Final Report Page 145 of 160 55. Arkon IPM525-S 15-Inch Tall Flexible Steel Gooseneck Seat Bolt or Floor Mount for iPhone 4 with Slim-Grip Phone Holder. Bizrate, 2010. Web. 1 Dec. 2010. <http://www.bizrate.com/gpsaccessories/oid2200436801.html>. 56. Central Iron & Steel, Inc. Phone interview. Apr. 2011. 57. Electric Wheelchair - Qualifying for Medicare and Insurance Coverage. Mobility Advisor, 20052010. Web. 3 Dec. 2010. <http://www.mobility-advisor.com/electric-wheelchair-medicare.html>. 58. Invacare Corporation Product Catalog - FDX with Formula CG Powered Seating . Invacare Corporation, 2010. Web. 3 Dec. 2010. <http://www.invacare.com/cgibin/imhqprd/inv_catalog/prod_cat_detail.jsp?s=0&prodID=FDX-CG&catOID=-536891033>. 59. Quantum Rehab - Power Bases - Rear-Wheel Drive Series R-4000. Pride Mobility, 1995-2010. Web. 4 Dec. 2010. <http://www.pridemobility.com/quantum/powerbases/rearwheel/r4000.asp>. 60. USA - Products - Rehab Series - C350 Corpus - Permobil. Permobil, 2010. Web. 4 Dec. 2010. <http://www.permobil.com/USA/Products/Rehab/C350-Corpus/>. 61. "Invacare eForms." Invacare Price Sheet. Invacare Corporation, 2010. Web. 4 Dec. 2010. <http://www.invacare.com/doc_files/09-068%20FDX-CG%20Tilt%20Elevate.pdf>. 62. "C350 Corpus." Permobil Price Sheet. Permobil, 2010. Web. 4 Dec. 2010. <http://www.permobil.com/Global/USA/ORDER%20FORMS/08.09.10%20ORDER%20FORM S/08_C350_Corpus_2010_Rev03.pdf>. 63. Kaye, Stephen, Taewoon Kang, and Mitchell LaPlante. Wheelchair Use in the United States. Disability Statistics Center - University of California, San Francisco, May 2002. Web. 3 Dec. 2010. < http://dsc.ucsf.edu/publication.php?pub_id=1>. 64. Spinal Muscular Atrophy (SMA) Frequently Asked Questions (FAQ). Spinal Muscular Atrophy Foundation, 2010. Web. 4 Dec. 2010. <http://www.smafoundation.org/faq>. 65. Spina Bifda Symptoms. eMedicine Health, n.d. Web. 4 Dec. 2010. <http://www.emedicinehealth.com/spina_bifida/page3_em.htm>. 66. Spinal Cord Injury : Quadriplegic and Paraplegic Injuries. Apparelyzed, 2003-2010. Web. 4 Dec. 2010. <http://www.apparelyzed.com/>. 67. Schworm, Kimberly (1998). The Industry's Facts & Figures. HomeCare Magazine, 20(7), p. 5158. 68. Thorogood, Christine, and Michael Alexander. Cerebral Palsy. eMedicine, 2010. Web. 4 Dec. 2010. <http://emedicine.medscape.com/article/310740-overview>. Team 3: Achieving Mobility May 11, 2011 Final Report Page 146 of 160 69. How often does Spina Bifda occur?. Spina Bifda Association, 2009. Web. 4 Dec. 2010. <http://www.spinabifidaassociation.org/site/c.liKWL7PLLrF/b.2700313/k.28B2/How_Often_Do es_Spina_Bifida_Occur.htm 70. "The Wheeled Mobility Market." WheelchairNet, n.d. Web. 4 Dec. 2010. <http://www.wheelchairnet.org/wcn_wcu/Research/StakeholderDocs/PDFs/wpf_wheelchairsum mary_doc.pdf>. 71. “Warehouses for lease." LoopNet. N.p., 2010. Web. 29 Nov. 2010. <http://www.loopnet.com/Warehouses-For-Lease/>. 72. “Magazine and Tabloid Advertising Rates." Nationwide Advertising. N.p., n.d. Web. 1 Dec. 2010. <http://www.nationwideadvertising.com/newmagadrat.html> 73. “Amyotrophic lateral sclerosis." Google Health. A.D.A.M., 2010. Web. 30 Nov. 2010. <https://health.google.com/health/ref/Amyotrophic+lateral+sclerosis> 74. "Cerebral Palsy." March of Dimes. N.p., Dec. 2007. Web. 30 Nov. 2010. <http://www.marchofdimes.com/Baby/birthdefects_cerebralpalsy.html#types>. 75. “Spinal Cord Injury Facts and Figures at a Glance." The National SCI Statistical Center. N.p., Feb. 2010. Web. 30 Nov. 2010. <https://www.nscisc.uab.edu/public_content/pdf/Facts%20and%20Figures%20at%20a%20Glanc e%202010.pdf>. 76. “Spinal Muscular Atrophy (SMA) Fact Sheet." FightSMA. N.p., 2010. Web. 30 Nov. 2010. <http://www.fightsma.org/index.php?fact_sheet>. 77. Medema, Bob. Personal interview. 1 Dec. 2010 78. Riley, William. Mechanics of Materials. 6th ed. New York: John Wiley & Sons Inc., 2007. Print. 79. Barett, J T. How Wheel Speed Sensors Work. 23 September 2009. <http://www.ehow.com/howdoes_5449960_wheel-speed-sensors-work.html>. 80. “Easys Rehabilitation Stroller." Thomashilfen, 2010. Web. 12 Nov. 2010. <http://www.thomashilfen.com/th/index.php/en>. 81. Microcontroller UART Tutorial. (2010). Retrieved from Society of Robots: http://www.societyofrobots.com/microcontroller_uart.shtml 82. Williamson, J. C. (2009, October 1). Lithium Ion Batteries for Powerchairs and Scooters. Retrieved from Wheelchair Driver. Team 3: Achieving Mobility May 11, 2011 Final Report 12. Appendices 12.1 Appendix A. Work Breakdown Structure Task Name Project Management Presentations Elevator Pitch Presenation Final 339 Presentation 340 Presentation 1 340 Presentation 2 Banquet Night Presentation PPFS Introduction Course Overview Problem Project Statement Project Requirements Functional Requirements Electrical Requirements Mechanical Requirements Safety Requirements Design Norms Major Design Decisions User Interface User Control Mechanism Structure System Design Software User Interface Controls Hardware Microprocessor Sensors Battery LCD Screen Camera Motor Control Frame Wheels Page 147 of 160 Duration (days) Estimated hrs Actual hrs Start Date End Date % Complete 164 154 1 3 3 3 3 15 3 3 3 3 3 3 3 3 3 2 3 3 3 3 13 4 2 4 13 12 3 6 1 1 6 3 1 323 115 15 30 20 20 30 176 6 2 2 2 11 2 2 2 2 3 5 2 1 2 90 12 2 10 27 15 2 3 2 2 3 10 3 352 130 15 25 20 35 35 183 6 2 2 2 15 3 4 3 3 2 5 1 1 3 98 9 2 7 28 12 5 5 2 2 2 16 1 10/7/10 10/20/10 10/20/10 11/29/10 2/16/11 4/27/11 5/18/11 10/25/10 11/3/10 11/3/10 11/3/10 11/3/10 11/4/10 11/4/10 11/4/10 11/4/10 11/4/10 11/4/10 11/5/10 11/5/10 11/5/10 11/5/10 10/25/10 11/5/10 11/5/10 11/5/10 10/25/10 10/25/10 11/8/10 11/1/10 11/8/10 11/8/10 10/25/10 11/5/10 11/8/10 5/20/11 5/20/11 10/20/10 12/1/10 2/18/11 4/29/11 5/20/11 12/6/10 11/5/10 11/5/10 11/5/10 11/5/10 11/8/10 11/8/10 11/8/10 11/8/10 11/8/10 11/5/10 11/9/10 11/9/10 11/9/10 11/9/10 11/10/10 11/10/10 11/8/10 11/10/10 11/10/10 11/9/10 11/10/10 11/8/10 11/8/10 11/8/10 11/1/10 11/9/10 11/8/10 100% 100% 100% 100% 100% 100% 100% 100% 100% 100% 100% 100% 100% 100% 100% 100% 100% 100% 100% 100% 100% 100% 100% 100% 100% 100% 100% 100% 100% 100% 100% 100% 100% 100% 100% Team 3: Achieving Mobility May 11, 2011 Storage Bed Encasings Motor Braking Component Placement Testing Plans Component Test Plan System Test Plan Project Costs Market Feasibility Project Management Budget Work Division Schedule References Appendices Final Report Create Website Budget Set up Donation Options Figure out distribution of funds Preliminary Cost Estimate Final Budget Electrical Create System-Level Block Diagram Create System Topology Diagram Hardware Microcontroller Analyze Alternatives Processor Selection Development Board Selection Integration with Motors Integration with Sensors Sensors Analyze alternatives Measure/Display Battery Charge Power System Battery Analyze Options Determine Type Determine Charging System Obtain Battery Final Report Page 148 of 160 1 2 1 3 3 1 3 3 3 3 3 3 3 3 3 3 3 4 4 4 12 10 4 35 15 20 5 1 11 4 2 5 2 10 3 4 3 18 12 4 30 13 17 4 2 15 5 3 7 2 6 15 60 100 13 48 7 5 5 15 140 1 4 93 45 15 6 10 8 24 70 5 5 56 30 8 2 1 5 20 12 1 1 5 5 554 1 2 192 66 20 1 10 20 15 22 10 12 28 16 8 2 4 1 30 9 1 2 3 3 739 1 3 375 111 18 3 20 50 20 13 5 8 135 15 10 1 1 2 11/8/10 11/8/10 11/10/10 11/3/10 11/5/10 11/8/10 11/9/10 11/9/10 11/9/10 11/8/10 11/8/10 11/10/10 11/10/10 11/10/10 11/10/10 11/8/10 11/8/10 4/1/11 11/8/10 10/7/10 10/7/10 11/1/10 11/8/10 4/1/11 10/4/10 10/4/10 11/1/10 10/18/10 10/18/10 10/18/10 11/8/10 11/16/10 12/1/10 11/26/10 11/8/10 11/8/10 2/7/11 10/25/10 10/25/10 10/25/10 11/4/10 11/8/10 11/29/10 11/8/10 11/9/10 11/10/10 11/5/10 11/9/10 11/8/10 11/11/10 11/11/10 11/11/10 11/10/10 11/10/10 11/12/10 11/12/10 11/12/10 11/12/10 11/10/10 11/10/10 4/24/11 11/24/10 12/10/10 10/15/10 11/5/10 11/12/10 4/15/11 4/14/11 10/4/10 11/4/10 2/23/11 12/29/10 11/5/10 11/15/10 11/29/10 12/10/10 12/29/10 2/11/11 11/12/10 2/11/11 1/10/11 12/3/10 11/3/10 11/5/10 11/9/10 12/3/10 100% 100% 100% 100% 100% 100% 100% 100% 100% 100% 100% 100% 100% 100% 100% 100% 100% 100% 100% 100% 100% 100% 100% 100% 100% 100% 100% 100% 100% 100% 100% 100% 100% 100% 100% 100% 100% 100% 100% 100% 100% 100% 100% Team 3: Achieving Mobility May 11, 2011 Final Report Obtain Charging System Power Regulation LCD Camera Microcontroller Motor LCD Screen/Camera Obtain LCD Screen Obtain Camera Integrate into System Motor Controller Circuit Research Motor Control PCBs Design Motor Control PCB Determine Power Requirements Integration with MCU Software Set Up Development Environment Learn IDE Install Tools Connect to Device User Interface Directional Display Development Battery Voltage Display Detailed Software Requirements Architecture and Design Velocity Control Simulink Simulations Flowcharts Software Development Temperature Regulation Touch Button Drivers UART Drivers CAN Drivers Direction Control Software Speed Control Software Software Integration Debugging Mechanical Structure Frame Select Between Aluminim or Steel Model Current Wheelchair in SW Show height and length reqs. Analyze frame support angles/storage Page 149 of 160 5 26 5 5 6 6 68 5 5 16 92 11 16 6 16 115 11 7 11 11 12 5 4 5 11 5 6 93 6 11 5 8 30 60 20 126 126 114 4 6 7 1 12 3 3 3 3 10 2 2 6 66 12 35 4 15 359 23 16 4 3 58 25 25 8 50 30 20 220 15 15 15 25 50 60 40 521 291 197 8 16 12 1 120 30 30 30 30 11 3 3 5 105 20 60 5 20 360 30 20 5 5 60 30 20 10 35 10 25 225 10 10 35 35 60 40 35 486 224 156 6 10 8 11/29/10 12/6/10 12/6/10 12/6/10 1/3/11 12/6/10 11/22/10 11/22/10 11/22/10 2/2/11 10/18/10 10/18/10 1/31/11 10/25/10 2/1/11 11/5/10 11/22/10 11/22/10 11/22/10 11/22/10 2/1/11 2/1/11 2/11/11 11/8/10 11/5/10 11/15/10 11/5/10 12/7/10 2/28/11 2/21/11 12/7/10 12/14/10 1/10/11 12/24/10 3/18/11 10/7/10 10/7/10 10/7/10 10/11/10 10/7/10 10/14/10 12/3/10 1/10/11 12/10/10 12/10/10 1/10/11 12/13/10 2/23/11 11/26/10 11/26/10 2/23/11 2/22/11 11/1/10 2/21/11 11/1/10 2/22/11 4/14/11 12/6/10 11/30/10 12/6/10 12/6/10 2/16/11 2/7/11 2/16/11 11/12/10 11/19/10 11/19/10 11/12/10 4/14/11 3/7/11 3/7/11 12/13/10 12/23/10 2/18/11 3/17/11 5/5/11 3/30/11 3/30/11 3/14/11 10/14/10 10/14/10 10/21/10 100% 100% 100% 100% 100% 100% 100% 100% 100% 100% 100% 100% 100% 100% 100% 100% 100% 100% 100% 100% 100% 100% 100% 100% 100% 100% 100% 100% 100% 100% 100% 100% 100% 100% 100% 100% 100% 100% 100% 100% 100% 6 16 4 10/22/10 10/29/10 100% Team 3: Achieving Mobility May 11, 2011 Final Report Adjust frame to meet angle reqts Meet with Ebling Blacksmithing Redesign Frame based on Ebling Imput Mounting components attachments Storage Shelf attachment Build Frame Prototype Storage Design in SW Build storage shevles Wheels Test compatibility Analyze similar wheel alternatives Design bearing subassy for front wheels Bed Contact Possible Manufacturers Model Bed in SolidWorks Visit family to see bed Choose mounting material Contact bed manufacturers for estimate Figure out Lead time and delivery FEA analysis Analyze in Simulation Express Analyze Algor options Encasings Battery Material Size Mounting Assembly Circuit Boards Material Size Mounting Assembly Motor Research motors in todays market Determine Alternatives Analyze Alternatives Determine Optimum Choice Power/Torque Calculations Size motor Page 150 of 160 5 5 12 5 8 4 11/15/10 11/22/10 11/19/10 11/26/10 100% 100% 5 5 5 21 83 5 12 37 2 5 12 24 12 80 38 16 22 24 1 8 20 40 6 50 35 25 10 10 1 8 11/29/10 12/6/10 12/6/10 2/14/11 12/13/10 12/13/10 3/15/11 10/7/10 10/7/10 11/22/10 12/3/10 12/10/10 12/10/10 3/14/11 3/30/11 12/17/10 3/30/11 12/9/10 10/8/10 11/26/10 100% 100% 100% 100% 100% 100% 100% 100% 100% 100% 4 44 3 6 3 4 15 32 3 8 6 8 1 23 4 2 6 2 12/6/10 10/7/10 10/7/10 10/18/10 11/15/10 11/18/10 12/9/10 12/6/10 10/11/10 10/25/10 11/17/10 11/23/10 100% 100% 100% 100% 100% 100% 5 4 9 5 5 86 74 1 1 1 1 86 1 1 1 1 102 5 1 3 1 5 5 4 3 40 20 20 64 32 4 8 8 12 32 4 8 8 12 52 16 4 8 2 6 6 6 3 45 5 40 42 4 1 1 1 1 38 1 6 6 25 72 20 6 6 2 5 15 11/24/10 12/1/10 2/18/11 2/18/11 2/25/11 12/1/10 12/1/10 12/1/10 12/6/10 12/13/10 3/14/11 1/3/11 1/3/11 2/22/11 2/23/11 3/14/11 10/25/10 10/25/10 11/1/10 11/2/10 11/5/10 11/22/10 11/29/10 11/30/10 12/6/10 3/3/11 2/24/11 3/3/11 3/14/11 3/14/11 12/1/10 12/6/10 12/13/10 3/14/11 3/14/11 1/4/11 2/22/11 2/23/11 5/5/11 3/15/11 10/29/10 11/1/10 11/4/10 11/12/10 11/26/10 12/3/10 100% 100% 100% 100% 100% 100% 100% 100% 100% 100% 100% 100% 100% 100% 100% 100% 100% 100% 100% 100% 100% 100% 100% Team 3: Achieving Mobility May 11, 2011 Mounting Assembly Braking Hand Brake Alternatives Selection Mounting Assembly Parking Brake Alternatives Selection Mounting Assembly Touch Button Mechanism Mounting LCD Screen Mounting Design Assembly Camera Mounting Design Assembly Testing Hardware Testing Thermal testing on motor controller Camera/LCD Software Testing Speed Control Turning Integration Testing and Debugging Structural Testing Power/Torque Testing Brake Testing Business Plan Marketing Strategy Business Strategy Competitor Analysis Finances Investments Total Final Report Page 151 of 160 3 2 95 73 1 1 1 2 26 1 1 1 1 8 5 3 5 3 2 3 2 1 47 6 4 2 22 3 3 16 9 4 2 7 1 2 1 1 6 4 34 20 8 4 4 4 14 4 2 4 4 11 6 5 18 12 6 11 8 3 63 12 6 6 32 6 6 20 8 8 3 30 6 6 6 6 8 10 42 28 6 4 8 10 14 2 1 3 8 17 5 12 26 6 20 18 12 6 70 13 3 10 35 10 10 25 4 12 6 39 8 8 3 16 12/6/10 3/14/11 11/5/10 11/5/10 11/5/10 11/8/10 3/15/11 3/16/11 11/5/10 11/5/10 11/8/10 3/15/11 3/16/11 1/3/11 1/3/11 3/15/11 1/3/11 1/3/11 3/15/11 11/29/10 11/29/10 3/15/11 2/7/11 3/28/11 3/30/11 3/28/11 3/14/11 3/14/11 3/16/11 3/22/11 2/28/11 2/14/11 2/7/11 11/15/10 11/15/10 11/15/10 11/18/10 11/18/10 12/8/10 5/2/11 3/17/11 3/17/11 11/5/10 11/8/10 3/15/11 4/26/11 3/16/11 11/5/10 11/8/10 3/15/11 4/22/11 3/17/11 1/7/11 4/26/11 3/16/11 1/5/11 5/2/11 3/15/11 11/30/10 4/30/11 4/12/11 4/4/11 4/4/11 3/29/11 4/12/11 3/16/11 3/18/11 5/1/11 4/28/11 5/7/11 5/7/11 11/23/10 11/18/10 11/18/10 11/23/10 11/23/10 100% 100% 100% 100% 100% 100% 100% 100% 100% 100% 100% 100% 100% 100% 100% 100% 100% 100% 100% 100% 100% 100% 100% 100% 100% 100% 100% 100% 100% 100% 100% 100% 100% 100% 100% 100% 100% 100% 1 6 4 11/18/10 11/23/10 100% 1467 1762 Team 3: Achieving Mobility May 11, 2011 12.2 Final Report Appendix B. Stress Calculations Frame Stress Hand Calculation78 Figure 98: Simplified model used for hand calculations Page 152 of 160 Team 3: Achieving Mobility May 11, 2011 Final Report Page 153 of 160 Team 3: Achieving Mobility May 11, 2011 Final Report Page 154 of 160 Team 3: Achieving Mobility May 11, 2011 Final Report Page 155 of 160 ALGOR Stress Calculations Figure 99: Bed stress analysis showing a max stress of approximately 1850psi based on 200lb load Team 3: Achieving Mobility May 11, 2011 Final Report Page 156 of 160 Figure 100: Deflection analysis showing a max deflection located in the bed of approximately 1/64” Figure 101: Max stress in the frame of approximately 510 psi located in the front supports with a 200lb load on the bed and a 100lb load on the storage shelves Team 3: Achieving Mobility May 11, 2011 Final Report Page 157 of 160 Figure 102: Max stress in the storage area is approximately 6000psi with 125lb load Figure 103: Max deflection in the storage area of 0.053” with 125lb load Team 3: Achieving Mobility May 11, 2011 12.3 Final Report Page 158 of 160 Appendix C. Motor Power, Speed, and Torque Calculations Motor Parameters W tot := 450lbf Maximum weight requirement (user + wheelchair) WF := 0.40 Weight Factor (fraction of how much each rear wheel carries of total weight) µ := 0.65 Rubber on Dry Asphalt, Engineering Toolbox θ := 5deg Maximum incline requirement FS := 1.5 Factor of Safety D := 12.5in Diameter of rear wheel Velreq := 3.5mph Maximum speed requirement GearRatio := 24 Motor gearbox ratio Circumference Cir := π ⋅ D Cir = 3.272⋅ ft Required Wheel RPM RPM wheel := Velreq RPM wheel = 94.118⋅ Cir 1 min Required Motor RPM RPM motor := Velreq ⋅ GearRatio Cir 3 RPM motor = 2.259 × 10 ⋅ Force per Rear Wheel due to Friction N wheel := WF W tot N wheel = 180⋅ lbf F f := µ ⋅ N wheel Ff = 117⋅ lbf Force per Rear Wheel due to Friction on Incline F f.incl := µ ⋅ N wheel ⋅ cos ( θ ) Ff.incl = 116.555⋅ lbf 1 min Team 3: Achieving Mobility May 11, 2011 Final Report Force per Rear Wheel due to weight on Incline F w.incl := N wheel ⋅ sin ( θ ) Fw.incl = 15.688⋅ lbf Combined Force per Rear Wheel due to Friction and Weight on Incline F comb.incl := Ff.incl + Fw.incl Fcomb.incl = 132.243⋅ lbf Required Torque on Wheel T wheel := D 2 ⋅ Ff T wheel = 82.62⋅ N ⋅ m Required Torque on Incline on Wheel T incl.wheel := D ⋅ Fcomb.incl 2 T incl.wheel = 93.384⋅ N ⋅ m Required Torque on Motors D T motor := 2 ⋅ Ff T motor = 3.443⋅ N ⋅ m GearRatio Required Torque on Incline on Motor D T incl.motor := 2 ( ⋅ Fcomb.incl ) GearRatio T incl.motor = 3.891⋅ N ⋅ m Required Power P req := FS ⋅ T motor ⋅ RPM motor Preq = 0.261⋅ hp Required Power on Incline P req.incl := FS ⋅ T incl.motor ⋅ RPM motor Preq.incl = 0.295⋅ hp Page 159 of 160 Team 3: Achieving Mobility May 11, 2011 12.4 Final Report Appendix D. LTSpice Power Regulation Circuit Page 160 of 160 Team 3: Achieving Mobility May 11, 2011 12.5 Final Report Appendix E. Voltage Regulator Calculations Page 1 of 8 Team 3: Achieving Mobility May 11, 2011 12.6 Final Report Page 2 of 8 Appendix F. PCB Heat Dissipation Calculation Parameters 2 A := 0.25m Average surface area of PCB Tair := 298K Average temperatureof air flowing over PCB Natural Convection Coefficient Forced Convection Coefficient i := 2 , 3 .. 17 f := 1 j := 2 , 3 .. 192 W W g := 1 2 2 m ⋅K h nat := 4 1 m ⋅K W h for := 9 2 1 m ⋅K h nat := h nat +f i i− 1 h nat = i 5 6 ⋅ W 2 m ⋅K W 2 m ⋅K h for := h for +g j j −1 Average range of convection coefficient for free flowing air (EngineeringToolbox.com) h for = j 10 11 7 12 8 13 9 14 10 15 11 16 12 17 13 18 14 19 15 20 16 21 17 22 18 23 19 24 20 25 26 27 28 29 30 ... ⋅ W 2 m ⋅K Average range of convection coefficient for forced air (EngineeringToolbox.com) Team 3: Achieving Mobility May 11, 2011 Final Report Motor Controller (MC) PCB Power Imc := 10amp Vmc := 10V W mc := Vmc⋅ Imc W mc = 100W Natural Convection Tmc.nat := i W mc h nat ⋅ A + Tair i Forced Convection Tmc.for := j W mc h for ⋅ A + Tair j Electronic Control Unit (ECU) Power Iecu := 3.4amp Vecu := 24V W ecu := Vecu ⋅ Iecu W ecu = 81.6W Natural Convection Tecu.nat := i W ecu h nat ⋅ A + Tair i Forced Convection Tecu.for := j W ecu h for ⋅ A j + Tair Page 3 of 8 Team 3: Achieving Mobility May 11, 2011 Final Report Power Regulation (PR) PCB Power Ipr := 0.12amp Vpr := 5V W pr := Vpr⋅ Ipr W pr = 0.6W Natural Convection Tpr.nat := i W pr h nat ⋅ A + Tair i Forced Convection Tpr.for := j W pr h for ⋅ A j Design PCB Limi t Tlimit:= 50°C + Tair Page 4 of 8 Team 3: Achieving Mobility May 11, 2011 Final Report Page 5 of 8 Natural Convection Component Temperature (C) 120 T mc.nat − 0 °C i 100 1K T ecu.nat −0 °C i 1K 80 T pr.nat − 0 °C i 60 1K T limit− 0 °C 1K 40 20 5 10 15 hnat 20 i Natural Convection Coefficient (W/m^2-K) Forced Convection Component Temperature (C) 70 T mc.for − 0 °C j 60 1K T ecu.for −0 °C j 1K 50 T pr.for − 0 °C j 1K 40 T limit− 0 °C 1K 30 20 50 100 hfor 150 j Forced Convection Coefficient (W/m^2-K) 200 Team 3: Achieving Mobility May 11, 2011 12.7 Final Report Appendix G. Brake Mounting Stress Calculations Stresses on Brake Support Arm Parameters Dist := 2ft Distance to stop after brakes are applied W total := 450lbf Total weight wheelchair is required to handle (user + frame) WF := 0.4 Fraction of weight the rear wheels support Velmax := 3.5mph Maximum speed the wheelchair will be traveling Larm := 2.25in Distance of arm support from frame that is supporting rim brakes Lbrake := 3in Distance of brake caliper from brake pad to arm support Darm := 0.75in Outside diameter of brake arm support σ yield := 40ksi Tension yield strength of Alumimun 6061 T-6 (Mechanics of Materials) τ yield := 26ksi Shear yield strength of Alumimun 6061 T-6 (Mechanics of Materials) Weight & Mass on each rear wheel W wheel := WF ⋅ W total m := W wheel g W wheel = 180⋅ lbf m = 180⋅ lbm Time to stop once brakes applied time := Dist Velmax time = 0.39s Wheel de-acceleration a := Velmax time a = 13.176⋅ ft s 2 Page 6 of 8 Team 3: Achieving Mobility May 11, 2011 Final Report Bending Force & Moment on brake arm F := m⋅ a F = 73.712⋅ lbf M arm := F⋅ Larm M arm = 18.739 J Second moment of area and distance from neutral plane π 4 Iarm := ⋅ Darm 64 Iarm = 0.016⋅ in 4 c := 0.375in Worst-case bending stress on brake support arm σ worst := M arm⋅ c Iarm σ worst = 4.004⋅ ksi Torsion Polar area moment of inertia J arm := π ⋅ Darm 4 32 Torque on brake arm T arm := F⋅ Lbrake 2 Jarm = 0.031⋅ in 4 T arm = 12.492 J Worst-case torsional stress on brake support arm τ worst := T arm⋅ c J arm τ worst = 1.335⋅ ksi Safety Factors SF bending := SF torsion := σ yield σ worst τ yield τ worst SF bending = 9.989 SF torsion = 19.479 Page 7 of 8 Team 3: Achieving Mobility May 11, 2011 Final Report Figure 104: Bending stress in the weld of the brake arm simulated in Autodesk Algor Page 8 of 8