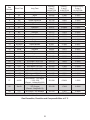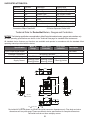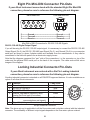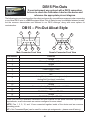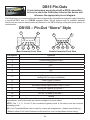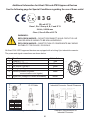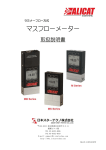
1
16 Series Mass Flow Controllers Precision Gas Flow Controller Operating Manual Table of Contents Installation Plumbing Mounting Application Power and Signal Connections Input Signals Analog Input Signal RS-232 / RS-485 Input Signal Output Signals RS-232 / RS-485 Digital Output Signal Standard Voltage (0-5 Vdc) Output Signal Optional 0-10 Vdc Output Signal Optional Current (4-20 mA) Output Signal Optional 2nd Analog Output Signal MC and MCR Series Mass Flow Controller Operation Main Mode Set-Pt. Gas Absolute Pressure Gas Temperature Volumetric Flow Rate Mass Flow Rate Flashing Error Message Select Menu Mode Control Setup Mode Input Loop Select Gas Select Mode Communication Select Mode Unit ID Baud Data Rate Manufacturer Data Mode Miscellaneous Mode LCD Contrast Display Zero Deadband Pressure Averaging Flow Averaging MCV Controller Operating Notes Information for Alicat TFT (Color Display) Controllers RS-232 or RS-485 Output and Input Configuring HyperTerminal® Changing from Streaming to Polling Mode Sending a Set-Point via RS-232 or RS-485 To adjust the P & D terms via RS-232 or RS-485 Gas Select Collecting Data Data Format Sending a Simple Script File to HyperTerminal® Page 5 5 5 5 6 7 7 7 8 8 8 8 8 8 11 11 11 11 12 12 12 12 12 13 13 14 14 15 16 16 16 16 17 17 18 18 18 18 19 20 22 22 22 23 23 24 26 26 27 Table of Contents Operating Principle Gas Viscosity Other Gases Volume Flow vs. Mass Flow Volumetric Flow and Mass Flow Conversion Compressibility Standard Gas Data Tables Gas Viscosities, Densities and Compressibilities at 25o C Gas Viscosities, Densities and Compressibilities at 0o C Troubleshooting Maintenance and Recalibration MC and MCR Series Technical Specifications MC and MCR Series Dimensional Drawings MCV Technical Specifications MCP Technical Specifications MCS and MCRS Series Technical Information MCS and MCRS Series Dimensional Drawings PROFIBUS Technical Specifications DeviceNet Technical Specifications Option: Totalizing Mode Option: Portable Meters and Gauges Option: Remote Electronics Option: Remote Panel Display Accessory: BB9 Multi-Drop Box Accessory: Flow Vision™ SC Accessories Eight Pin Mini-DIN Pin-Out Locking Industrial Connector Pin-Out PROFIBUS Pin-Out DB15 Pin-Out Diagrams Information for CSA and ATEX Labeled Devices Page 28 28 29 29 30 30 31 32 33 34 35 36 40 43 44 46 47 50 51 53 54 55 55 55 56 57 58 58 59 60 65 Table of Figures Figure 1. 8 Pin Mini-DIN Connector Figure 2. Simple method for providing set-point to controllers Figure 3. Mini-DIN to DB-9 Connection for RS-232 Signals Figure 4. Typical Multiple Device (Addressable) Wiring Configuration 6 7 8 9 Figure 5. Optional Industrial Connector Figure 6. Main Mode Display, MC Series Flow Controller Figure 7. Select Menu Display Figure 8. MC Series Control Setup Display Figure 9. Gas Select Display Figure 10. Communication Select Display Figure 11. Manufacturer Data Displays Figure 12. Miscellaneous Mode Display Figure 13. MCV Controller with Three-Way Solenoid Valve 10 11 12 13 15 16 17 18 19 Thank you for purchasing an MC Series Gas Flow Controller. Please take the time to read the information contained in this manual. This will help to ensure that you get the best possible service from your instrument. This manual covers the following Alicat Scientific instruments: MC Series Mass Gas Flow Controllers MCR Series Mass Gas Flow Controllers This includes MC and MCR Series devices labeled as approved for CSA Class 1 Div 2 and ATEX Class 1 Zone 2 hazardous environments. See pages 65 and 66 for Special Conditions regarding the use of CSA/ATEX labeled devices. MCS Series Mass Gas Flow Controllers MCRS Series Mass Gas Flow Controllers All Alicat MCS and MCRS Series Flow Meters for aggressive gases operate in accordance with the instructions found in this manual. Please see page 46 for technical information specific to MCS and MCRS Series instruments. MCV Series Mass Gas Flow Controllers See page 19 for additional information specific to MCV controllers. MCP Series Mass Gas Flow Controllers See page 44 for additional information specific to MCP controllers. Installation Plumbing All MC Series Gas Flow Controllers are equipped with female inlet and outlet port connections. Because the flow controllers set up a laminar flow condition within the flow body, no straight runs of pipe are required upstream or downstream of the controller. The inlet and outlet ports are equal in size and symmetric (in-line). The port sizes (process connections) and mechanical dimensions for different flow ranges are shown on pages 40-42. Controllers with M5 (10-32) ports have O-ring face seals and require no further sealant or tape. On other controllers, avoid the use of pipe dopes or sealants on the ports as these compounds can cause permanent damage to the controller should they get into the flow stream. Use of thread sealing Teflon tape is recommended to prevent leakage around the threads. When applying the tape, avoid wrapping the first thread or two to minimize the possibility of getting a piece of shredded tape into the flow stream. When changing fittings, always clean any tape or debris from the port threads. It is also recommended that a 20 micron filter be installed upstream of controllers with full scale ranges of 1(S)LPM or less and a 50 micron filter be installed upstream of controllers with full scale ranges above 1(S)LPM. Mounting All MC Series Gas Flow Controllers have mounting holes for convenient mounting to flat panels. The sizes and dimensions for the mounting holes are shown on pages 40-42. Position sensitivity is not generally an issue with small valve controllers. Large valve controllers are somewhat position sensitive because of the fairly massive stem assembly. It is generally recommended that they be mounted so that the valve cylinder is vertical and upright. The primary concern in mounting a large valve controller in a position other than the recommended position is the increased risk of leakage when the controller is given a zero set-point and is being held closed by the spring force. Application Maximum operating line pressure is 145 PSIG (1 MPa). Caution: Exceeding the maximum specified line pressure may cause permanent damage to the solid-state differential pressure transducer. If the line pressure is higher than 145 PSIG (1 MPa), a pressure regulator should be used upstream from the flow controller to reduce the pressure to 145 PSIG (1 MPa) or less if possible. Many of our controllers are built after extensive consultations with the customer regarding the specific application. 5 The result is that two controllers with the same flow range and part number may look and act quite differently depending upon the application the controller was built for. Care should be taken in moving a controller from one application to another to test for suitability in the new application. Power and Signal Connections Power can be supplied to your MC Series controller through either the power jack (power jack not available on CSA/ATEX approved devices) or the 8 pin Mini-DIN connector as shown in Figure 1. AC to DC adapter which converts line AC power to DC voltage and current as specified below is required to use the power jack. The power jack accepts 2.1 mm female power plugs with positive centers. Cables and AC/DC adaptors may be purchased from the manufacturer (see Accessories page 57) and are commonly available at local electronics suppliers. Small Valve: If your controller utilizes a small valve (about the size of your thumb), a 12-30Vdc power supply with a 2.1 mm female positive center plug capable of supplying 250 mA is recommended. Note: 4-20mA output requires at least 15 Vdc. Large Valve: If your controller utilizes a large valve (about the size of your fist), a 24-30 Vdc power supply with a 2.1 mm female positive center plug capable of supplying at least 750mA is required. Alternatively, power can be supplied through the Mini-DIN connector as shown below: AC/DC Adapter Jack 11 3 3 6 6 Pin 2 2 44 77 5 5 8 8 Mini-DIN cable color Black Function 1 Inactive or 4-20mA Primary Output Signal Static 5.12 Vdc or Secondary Analog Output (4-20mA, 5Vdc, 10Vdc) 2 Brown or Basic Alarm 3 RS-232 Input Signal Red 4 Analog Input Signal Orange 5 RS-232 Output Signal Yellow 6 0-5 Vdc (or 0-10 Vdc) Output Signal Green 7 Power In (as described above) Blue 8 Ground (common for power, communications and signals) Purple Note: The above pin-out is applicable to all the flow meters and controllers available with the Mini‑DIN connector. The availability of different output signals depends on the options ordered. Underlined Items in the above table are optional configurations that are noted on the unit’s calibration sheet. Figure 1. 8 Pin Mini-DIN Connector CAUTION: Do not connect power to pins 1 through 6 as permanent damage can occur! Note: Upon initial review of the pin out diagram in Figure 1, it is common to mistake Pin 2 (labeled 5.12 Vdc Output) as the standard 0-5 Vdc analog output signal! In fact Pin 2 is normally a constant 5.12 Vdc that reflects the system bus voltage and can be used as a source for the set-point signal. 6 Input Signals Analog Input Signal Apply analog input to Pin 4 as shown in Figure 1. Standard 0-5 Vdc: Unless ordered otherwise, 0-5 Vdc is the standard analog input signal. Apply the 0-5 Vdc input signal to pin 4, with common ground on pin 8. The 5.12 Vdc output on pin 2 can be wired through a 50K ohm potentiometer and back to the analog input on pin 4 to create an adjustable 0-5 Vdc input signal source as shown below. 6 7 8 0-5 Vdc 3 4 5 2 1 5.12 Vdc 50 KOhm Potentiometer Figure 2. Simple method for providing set-point to controllers Optional 0-10 Vdc: If specified at time of order, a 0-10 Vdc input signal can be applied to pin 4, with common ground on pin 8. Optional 4-20 mA: If specified at time of order, a 4-20 mA input signal can be applied to pin 4, with common ground on pin 8. Note: This is a current sinking device. The receiving circuit is essentially a 250 ohm resistor to ground. Do not attempt to connect it to “loop powered’” systems, as this will destroy portions of the circuitry and void the warranty. If you must interface with existing loop powered systems, always use a signal isolator and a separate power supply. Note: 4-20mA output requires at least 15 Vdc power input. RS-232 / RS‑485 Digital Input Signal If you will be using the RS-232 or RS-485 input signal, it is necessary to connect the RS-232 / RS‑485 Output Signal (Pin 5), the RS-232 / RS‑485 Input Signal (Pin 3), and Ground (Pin 8) to your computer serial port as shown in Figure 3. Adapter cables are available from the manufacturer or they can be constructed in the field with parts from an electronics supply house. In Figure 3, note that the diagrams represent the “port” side of the connections, i.e. the connector on top of the meter and the physical DB-9 serial port on the back of the computer. The cable ends will be mirror images of the diagram shown in Figure 3. (See page 22 for details on accessing RS-232 / RS‑485 input.) 7 Output Signals Note: Upon initial review of the pin out diagram in Figure 1 (page 6), it is common to mistake Pin 2 (labeled 5.12 Vdc Output) as the standard 0-5 Vdc analog output signal! In fact Pin 2 is normally a constant 5.12 Vdc that reflects the system bus voltage and can be used as a source for the input signal. This allows the user in the field to run this output through a 50K ohm potentiometer and back into the analog set-point pin to create a 0-5 Vdc set-point source. RS-232 / RS-485 Digital Output Signal If you will be using the RS-232 or RS-485 output signal, it is necessary to connect the RS-232 / RS‑485 Output Signal (Pin 5), the RS-232 / RS‑485 Input Signal (Pin 3), and Ground (Pin 8) to your computer serial port as shown in Figure 2. Adapter cables are available from the manufacturer or they can be constructed in the field with parts from an electronics supply house. In Figure 2, note that the diagrams represent the “port” side of the connections, i.e. the connector on top of the meter and the physical DB-9 serial port on the back of the computer. The cable ends will be mirror images of the diagram shown in Figure 2. (See page 22 for details on accessing RS-232 / RS‑485 output.) Standard Voltage (0-5 Vdc) Output Signal All MC Series flow controllers have a 0-5 Vdc (optional 0-10 Vdc) output signal available on Pin 6. This is generally available in addition to other optionally ordered outputs. This voltage is usually in the range of 0.010 Vdc for zero flow and 5.0 Vdc for full-scale flow. The output voltage is linear over the entire range. Ground for this signal is common on Pin 8. Optional 0-10 Vdc Output Signal If your controller was ordered with a 0-10 Vdc output signal, it will be available on Pin 6. (See the Calibration Data Sheet that shipped with your controller to determine which output signals were ordered.) This voltage is usually in the range of 0.010 Vdc for zero flow and 10.0 Vdc for full-scale flow. The output voltage is linear over the entire range. Ground for this signal is common on Pin 8. Optional Current (4-20 mA) Output Signal If your controller was ordered with a 4-20 mA current output signal, it will be available on Pin 1. (See the Calibration Data Sheet that shipped with your controller to determine which output signals were ordered.) The current signal is 4 mA at 0 flow and 20 mA at the controller’s full scale flow. The output current is linear over the entire range. Ground for this signal is common on Pin 8. (Current output units require 15-30Vdc power.) Note: This is a current sourcing device. Do not attempt to connect it to “loop powered” systems. If you must interface with existing loop powered systems, always use a signal isolator and a separate power supply. Optional 2nd Analog Output Signal You may specify an optional 2nd analog output on Pin 2 at time of order. (See the Calibration Data Sheet that shipped with your controller to determine which output signals were ordered.) This output may be a 0-5 Vdc, 0-10 Vdc, or 4-20 mA analog signal that can represent any measured parameter. With this optional output, a volumetric flow controller could output the volumetric flow rate with a 0‑5 Vdc signal (on pin 6) and a 4-20 mA signal (on pin 2), or a mass flow controller could output the mass flow rate (0-5 Vdc on pin 6) and the absolute pressure (0-5 Vdc on pin 2). If your device is CSA/ATEX approved or equipped with the optional six pin industrial connector, please contact the factory. Note: This is a current sourcing device. Do not attempt to connect it to “loop powered” systems. If you must interface with existing loop powered systems, always use a signal isolator and a separate power supply. 8 DB-9 Serial Port 8 Pin Mini-DIN Port 2 1 1 2 6 3 7 4 5 8 3 9 5 5 44 66 88 77 5----------Ground--------------------------------------Ground----------8 3----------Transmit------------------------------------Receive---------3 2----------Receive-------------------------------------Transmit--------5 Figure 3. Mini-DIN to DB-9 Connection for RS-232 / RS-485 Signals Purple (Ground) Red Yellow Unit A Purple Red Yellow Unit B Purple Red Yellow Unit C 2 2 3 4 1 5 3 5 9 7 8 6 Female Serial Cable Front Figure 4. Typical Multiple Device (Addressable) Wiring Configuration Note: The easiest way to connect multiple devices is with a Multi-Drop Box (see page 55). 9 An industrial connector is standard on all CSA/ATEX approved devices (see pages 65 & 66). It is also available as an option on all other Alicat instruments. Pin 1 2 3 4 5 6 Function Power In ( + ) RS-232TX / RS-485 + RS-232RX / RS-485 Remote Tare Meters (Ground to Tare) Analog Set-Point Input (Controllers) Ground (common for power, communications and signals) Signal Out (Voltage or Current as ordered) Cable Color Red Blue White Green Black 6 1 5 2 3 4 Brown Figure 4. Optional Industrial Connector Note: The above pin-out is applicable to all the flow meters and controllers ordered with the industrial connector. The availability of different output signals depends on the flow meter options ordered. DB15 Pin-out Diagrams: Pin-out diagrams for devices ordered with a DB15 connector can be found on pages 60 to 64. PROFIBUS Pin-out Diagrams: Pin-out diagrams for PROFIBUS configured devices can be found on page 50 and 59. DeviceNet Information and Pin-out Diagram: Pin-out and operating information for DeviceNet configured devices can be found on page 51. 10 MC and MCR Series Mass Flow Controller Operation The MC (and MCR) Series Mass Flow Controller provides a multitude of useful flow data in one simple, rugged device. The MC Series can have several screen “modes” depending on how the device is ordered. All MC Series controllers have a default Main Mode, Select Menu Mode, Control Set Up Mode, Gas Select Mode (the Gas Select Mode may not be available on controllers calibrated for a custom gas or blend), Communication Select Mode, Manufacturer Data Mode and a Miscellaneous Mode. In addition, your device may have been ordered with the optional Totalizing Mode (page 53). The device defaults to Main Mode as soon as power is applied to the controller. Main Mode The main mode screen defaults on power up with the mass flow on the primary display. The following parameters are displayed in the main mode as shown in Figure 6. #C +21.50 PSIA +13.60 + . +0.000 +0.000 Volume Mass Set Pt. 0.000 Mass SCCM Air Main Figure 6. Main Mode Display, MC Series Flow Controller The “MODE” button in the lower right hand corner toggles the display between modes. Set Pt. – The set-point is shown in the upper right corner of the display. The set-point cannot be adjusted from the main mode screen. For information on changing the set-point, see “Set”, page 14. Gas Absolute Pressure: The MC Series flow controllers utilize an absolute pressure sensor to measure the line pressure of the gas flow being monitored. This sensor references hard vacuum and accurately reads line pressure both above and below local atmospheric pressure. This parameter is located in the upper left corner of the display under the dynamic label “PSIA”. This parameter can be moved to the primary display by pushing the button just above the dynamic label (top left). The engineering unit associated with absolute pressure is pounds per square inch absolute (PSIA). This can be converted to gage pressure (PSIG = the reading obtained by a pressure gauge that reads zero at atmospheric pressure) by simply subtracting local atmospheric pressure from the absolute pressure reading: PSIG = PSIA – (Local Atmospheric Pressure) The flow meters use the absolute pressure of the gas in the calculation of the mass flow rate. If working in metric units, note that 1 PSI = 6.89 kPa. 11 Gas Temperature: The MC Series flow controllers utilize a temperature sensor to measure the line temperature of the gas flow being monitored. The temperature is displayed in engineering units of degrees Celsius (°C). The flow controllers use the temperature of the gas in the calculation of the mass flow rate. This parameter is located in the upper middle portion of the display under “°C”. This parameter can be moved to the primary display by pushing the top center button above “°C”. Volumetric Flow Rate: The volumetric flow rate is determined using the Flow Measurement Operating Principle described on page 28. This parameter is located in the lower left corner of the display over “Volume”. This parameter can be moved to the primary display by pushing the “Volume” button (lower left). In order to get an accurate volumetric flow rate, the gas being measured must be selected (see Gas Select Mode). This is important because the device calculates the flow rate based on the viscosity of the gas at the measured temperature. If the gas being measured is not what is selected, an incorrect value for the viscosity of the gas will be used in the calculation of flow, and the resulting output will be inaccurate in direct proportion to the ratio between the two gases viscosities. Mass Flow Rate: The mass flow rate is the volumetric flow rate corrected to a standard temperature and pressure (typically 14.696 psia and 25°C). This parameter is located in the lower middle portion of the display over “Mass”. This parameter can be moved to the primary display by pushing the button located below “Mass” (bottom center). The controllers uses the measured temperature and the measured absolute pressure to calculate what the flow rate would be if the gas pressure was at 1 atmosphere and the gas temperature was 25°C. This allows a solid reference point for comparing one flow to another. Flashing Error Message: Our flow meters and controllers display an error message (MOV = mass overrange, VOV = volumetric overrange, POV = pressure overrange, TOV = temperature overrange) when a measured parameter exceeds the range of the sensors in the device. When any item flashes on the display, neither the flashing parameter nor the mass flow measurement is accurate. Reducing the value of the flashing parameter to within specified limits will return the unit to normal operation and accuracy. Select Menu Mode Pushing “Mode” once will bring up the “Select Menu” display. Push the button nearest your selection to go to the corresponding screen. Push “Mode” again to return to the Main Mode display. (Note: If your controller was ordered with Totalizing Mode option (page 53), pushing the “Mode” button once will bring up the “Totalizing Mode” display. Pushing “Mode” a second time will bring up the “Select Menu” display.) Gas Control Setup Misc SELECT MENU Comm. RS232F Mfg. Data Menu Figure 7. Select Menu Display 12 Control Setup Mode The Control Setup Mode is accessed by pressing the center button above “Control Setup” on the Select Menu display (Fig.7) This mode allows the user to set up most parameters commonly associated with PID control. Alicat Scientific flow controllers allow the user to select how the set-point is to be conveyed to the controller, what that set-point is if control is local, and what the Proportional and Differential terms of the PID control loop will be. The UP and DOWN buttons for adjusting variables can be held down for higher speed adjustment or pressed repeatedly for fine adjustment. Input – Alicat Scientific Flow Controllers normally ship defaulted to analog control as indicated in Figure 8. To change how the set-point will be conveyed to the controller push the button in the upper right hand corner just above the dynamic label “Input” until the arrow is directly in front of the desired option. The controller will ignore any set-point except that of the selected input and it will remember which input is selected even if the power is disconnected. Analog refers to a remote analog set-point applied to Pin 4 of the Mini-DIN connector as described in the installation section of this manual. To determine what type of analog set-point your controller was ordered with, refer to the Calibration Data Sheet that was included with your controller. 0-5 Vdc is standard unless ordered otherwise. Note that if nothing is connected to Pin 4, and the controller is set for analog control, the set-point will float. CAUTION! Never leave a Controller with any non-zero set‑point if no pressure is available to make flow. The controller will apply full power to the valve in an attempt to reach the set-point. When there is no flow, this can make the valve very HOT! Serial refers to a remote digital RS-232 / RS-485 set-point applied via a serial connection to a computer or PLC as described in the Installation and RS-232 / RS-485 sections of this manual. CAUTION! Never leave a Controller with any non-zero set-point if no pressure is available to make flow. The controller will apply full power to the valve in an attempt to reach the set-point. When there is no flow, this can make the valve very HOT! Local refers to a set-point applied directly at the controller. For more information on changing the set-point locally refer to the heading “Select” below. Local input must be selected prior to attempting to change the set-point locally. CAUTION! Never leave a Controller with any non-zero set-point if no pressure is available to make flow. The controller will apply full power to the valve in an attempt to reach the set-point. When there is no flow, this can make the valve very HOT! Select Loop Input > P 98 >Mass D 5002 Volume AUTOoff Press Set 0.000 UP DOWN Analog >Serial Local Control Setup Figure 8. MC Series Control Setup Display 13 Loop—The selection of what variable to close the loop on is a feature unique to these mass flow controllers. When the mass flow controller is supplied with the control valve upstream of the electronics portion of the system, the unit can be set to control on outlet pressure (absolute pressures only) or volumetric flow rate, instead of mass flow rate. Repeatedly pressing the button adjacent to the word “Loop” on the control setup screen will change what variable is controlled. The change from mass to volume can usually be accomplished without much, if any, change in the P and D settings. When you change from controlling flow to controlling pressure, sometimes fairly radical changes must be made to these variables. Note: Full scale pressure is normally 160PSIA. Consult the factory if you are having difficulties with this procedure. Select – To avoid accidental changing of the PID loop parameters or the set-point, the Control Setup mode defaults with the selector on a null position. To change the set-point or the P and D PID loop parameters, push the button in the upper left corner just above the dynamic label “Select” until the selection arrow is pointing to the parameter you wish to change. When the parameter you wish to change is selected, it may be adjusted up or down with the buttons under the display below the dynamic labels “Up” and “Down”. Press the buttons repeatedly to make slow adjustments or hold them down to make fast adjustments. P refers to the Proportional term of the PID loop. Before changing this parameter, it is good practice to write down the initial value so that it can be returned to the factory settings if necessary. D refers to the Differential term of the PID loop. Before changing this parameter, it is good practice to write down the initial value so that it can be returned to the factory settings if necessary. AUT0on / AUT0off refers to the standard auto-tare or “auto-zero” feature. It is recommended that the controller be left in the default auto-tare ON mode unless your specific application requires that it be turned off. The auto-tare feature automatically tares (takes the detected signal as zero) the unit when it receives a zero set-point for more than two seconds. A zero set-point results in the closing of the valve and a known “no flow” condition. This feature helps to make the device more accurate by periodically removing any cumulative errors associated with drift. Set refers to the Set-Point. This parameter may only be changed if “Local” is selected as the Input. See above for information on selecting the input. Using the UP and DOWN buttons, the set-point may be adjusted between zero and the full-scale range of the controller. CAUTION! Never leave a Controller with any non-zero set-point if no pressure is available to make flow. The controller will apply full power to the valve in an attempt to reach the set-point. When there is no flow, this can make the valve very HOT! 14 Gas Select Mode The gas select mode is accessed by pressing the button above “Gas Select” on the Select Menu display. The screen will appear as shown in Figure 9. PgUP PgDWN Main C2H6 Ethane H2 Hydrogen He Helium >N2 Nitrogen N2O Nitrous Oxide Ne Neon UP DOWN Gas Figure 9. Gas Select Display The selected gas is displayed on the default main mode screen as shown in Figure 6, and is indicated by the arrow in the Gas Select Mode screen in Figure 9. To change the selected gas, use the buttons under “UP” and “DOWN” or above “PgUP” and “PgDWN” to position the arrow in front of the desired gas. When the mode is cycled back to the Main Mode, the selected gas will be displayed on the main screen. (Note: Gas Select Mode may not be available for units ordered for use with a custom gas or blend.) 15 Communication Select Mode The Communication Select mode is accessed by pressing the button below “Comm. RS-232F” or “Comm. RS-485” on the Select Menu display. The screen will appear as shown in Figure 10. Main Select > UnitID ( A ) . . . . . A Baud ( 19200 ) . . . 19200 Data Rate. . . . . . Fast UP DOWN Comm. RS232F Figure 10. Communication Select Display Unit ID – Valid unit identifiers are letters A-Z and @ (see Note below). This identifier allows the user to assign a unique address to each device so that multiple units can be connected to a single RS-232 or RS-485 port on a computer. The Communication Select Mode allows you to view and/or change a unit’s unique address. To change the unit ID address, press the “Select” button in the upper left corner of the display until the cursor arrow is in front of the word “Unit ID”. Then, using the UP and DOWN buttons at the bottom of the display, change the unit ID to the desired letter. Any ID change will take effect when the Communication Select Screen is exited by pushing the MODE button. Note: When the symbol @ is selected as the unit ID, the device will go into streaming mode when the Communication Select Mode is exited by pushing the MODE button. See RS-232 Communications (page 22) for information about the streaming mode. Note: RS‑485 units do not have a streaming mode. Baud – The baud rate (bits per second) determines the rate at which data is passed back and forth between the instrument and the computer. Both devices must send/receive at the same baud rate in order for the devices to communicate via RS-232 or RS-485. The default baud rate for these devices is 19200 baud, sometimes referred to as 19.2K baud. To change the baud rate in the Communication Select Mode, press the “Select” button in the upper left corner of the display until the cursor arrow is in front of the word “Baud”. Then, using the UP and DOWN buttons at the bottom of the display, select the required baud rate to match your computer or PLC. The choices are 38400, 19200, 9600, or 2400 baud. Any baud rate change will not take effect until power to the unit is cycled. Data Rate – Changing the Data Rate affects the rate at which the instrument dumps its data. Slow is ½ the Fast rate. The speed of the Fast rate is determined by the selected baud rate. It is sometimes desirable to reduce the data rate if the communication speed bogs down the computer’s processor (as is not uncommon in older laptops), or to reduce the size of data files collected in the streaming mode. To change the data rate in the Communication Select Mode, press the “Select” button in the upper left corner of the display until the cursor arrow is in front of the word “Data Rate”. Then, using the UP and DOWN buttons at the bottom of the display, select either Fast or Slow. Any data rate change will be effective immediately upon changing the value between Fast and Slow. 16 Manufacturer Data Mode “Manufacturer Data” is accessed by pressing the “Mfg. Data” button on the Select Menu display (Figure 11). The “Mfg 1” display shows the name and telephone number of the manufacturer. The “Mfg 2” display shows important information about your flow meter including the model number, serial number, and date of manufacture. Main Al i cat Scientific Inc. Ph 520-290-6060 Fax 520-290-0109 Mfg1 Main Mdl MC-10SLPM-D Serial No. 47117 Date Mfg. 11/07/2010 Calibrated By DL Software GP07R23 Mfg2 Figure 11. Manufacturer Data Displays Miscellaneous Mode The Miscellaneous mode is accessed by pressing the button above the “Misc” label in the upper right hand corner of the Select Menu display. The screen will appear as shown in Figure 12. Push the button above “Select” to move the cursor even with the item you wish to adjust. Then use the “UP” and “DOWN” buttons to make the adjustment. NOTE: All Miscellaneous changes are recorded when you exit the Miscellaneous display. 17 Main Select > LCD Contrast ( 10 ) . . 10 PVM DBand (0.5% FS) . 0.5 PRESS Avg (001) . . . . 001 FLOW Avg (001) . . . . . 001 UP DOWN Misc Figure 12. Miscellaneous Display LCD Contrast: The Liquid Crystal Display Contrast can be adjusted between 0 and 30 with zero being the lightest contrast and 30 being the darkest contrast. To change the contrast, press the “Select” button in the upper left hand corner of the display until the cursor arrow is in front of the words “LCD Contrast (X)”. Then using the UP and DOWN buttons at the bottom of the display, change the contrast value as desired. The change is immediate and the effect can be monitored as the value is changed. Display Zero Deadband: Zero deadband refers to a value below which the display simply jumps to zero. This deadband is often desired to prevent electrical noise from showing up on the display as minor flows or pressures that do not actually exist, especially in high noise (electrical) environments. This display deadband does not affect the analog or digital signal outputs — there is no zero deadband on the output signals. The display zero deadband can be adjusted between 0 and 3.2% of the Full Scale (FS) of the sensor. PVM refers to Pressure, Volumetric Flow, and Mass Flow, the three parameters to which the deadband applies. To adjust the display zero deadband, press the “Select” button in the upper left hand corner of the display until the cursor arrow is in front of the words “PVM DBand (X %F.S.)”. Then using the UP and DOWN buttons at the bottom of the display, change the display zero deadband value as desired. Pressure Averaging: It is sometimes advantageous to apply an averaging factor to the pressure output (and display) to make it easier to read and interpret rapidly fluctuating pressures. Pressure averaging can be adjusted between 1 (no averaging) and 256 (maximum averaging). This is a geometric running average where the number between 1 and 256 can be considered very roughly equivalent to the response time constant in milliseconds. This can be very effective at “smoothing” high frequency process oscillations such as those caused by diaphragm pumps. To adjust the pressure averaging, press the “Select” button in the upper left hand corner of the display until the cursor arrow is in front of the words “PRESS Avg (XXX)”. Then using the UP and DOWN buttons at the bottom of the display, change the pressure averaging value as desired. Flow Averaging: It is sometimes advantageous to apply an averaging factor to the flow output (and display) to make it easier to read and interpret rapidly fluctuating flows. Flow averaging can be adjusted between 1 (no averaging) and 256 (maximum averaging). This is a geometric running average where the number between 1 and 256 can be considered very roughly equivalent to the response time constant in milliseconds. This can be very effective at “smoothing” high frequency process oscillations such as those caused by diaphragm pumps. To adjust the flow averaging, press the “Select” button in the upper left hand corner of the display until the cursor arrow is in front of the words “FLOW Avg (XXX)”. Then using the UP and DOWN buttons at the bottom of the display, change the flow averaging value as desired. 18 MCV Controller Operating Notes Alicat’s MCV mass flow controller is equipped with an integrated Swagelok® positive shutoff valve. The normally closed valve is air actuated and will remain closed until it is connected to an air source supplying between 60 and 120 psig of air pressure. Once the appropriate amount of air pressure is supplied to the shutoff valve, it will open, allowing flow through the mass controller. Air pressure must be removed from the shutoff valve in order for the valve to close. A common method for actuating the shutoff valve incorporates a three-way solenoid valve (Figure 13). Three-way solenoid valves can be obtained in a variety of configurations to best match your process variables. Air pressure is applied to one side of the solenoid valve while the other side of the solenoid is left open to atmosphere. When the solenoid is energized, air pressure is delivered to the shutoff valve, allowing it to open. When the solenoid is returned to a relaxed state, air pressure is removed from the shutoff valve, allowing it to close. The air pressure is vented to atmosphere. Solenoid valves can be ordered from Alicat Scientific for use with the MCV series mass flow controller. Note: All standard MC Series device features and functions are available on the MCV Series and operate in accordance with the standard MC Series operating instructions. Three-way Solenoid Valve Air Supply Vent MCV Controller Figure 13. MCV controller and three-way solenoid valve. 19 Information for Alicat TFT (Color Display) Instruments Alicat TFT (color display) instruments have a hi-contrast back-lit LCD display. TFT instruments operate in accordance with Alicat standard operating instructions with a few notable differences. Multi-Color Display The color of each parameter is displayed on the Main Mode screen as follows: GREEN = NORMAL CONDITIONS YELLOW = OVER 100% - 128% RED = OVER 128% Each parameter (mass flow, volumetric flow, pressure, temperature) will independently show its operating condition according to the above colors. If the parameter is selected, the main (large) number will display in the same color. Main Mode: Operation equal to Main Mode on the standard monochrome display. Select Sub-Menu Mode: Operation equal to Select Menu Mode on the standard monochrome display. Gas Select Mode: Operation equal to Gas Select Mode on the standard monochrome display. Manufacturer Data Mode: Operation equal to Manufacturer Data Mode on the standard monochrome display. Miscellaneous Mode: Operation equal to Miscellaneous Mode on the standard monochrome display. Control Setup Mode Controllers Only: Operation differs from Control Setup Mode on the standard monochrome display in that two screens are used. Setup 1 allows you to set up most parameters commonly associated with input/se-point control: Input Analog serial or local; Loop - Mass, Pressure or Volume; and Set-point control addition to the parameters explained in the Control Setup Mode section of the manual (page 13). The TFT Control Setup1 display also shows: Set — with the number inside the parenthesis being the set-point that is saved in the unit’s memory. This number is the last set-point given before exiting the control setup screen. The number on its right signifies the current set-point in real time. The set-point will change in real time as adjusted but it will not be saved into memory until you exit the control Setup1 and Setup2 screens. (FS=XX.XX) — The number equaling FS is the full scale flow rate of the unit and 0.0% is the percentage of the set-point from 0-100%. So, for an example using (FS=160)SLPM, if you adjust the set-point to 80.00 on the “Set” line you will simultaneously see the percentage change to 50% as 80 is half of 160. Pressing the button under “Setup1” will switch the display to “Setup2”. Setup 2 displays: Control Algorithm Type (PDF or PD2I) and the values for the Proportional, Differential and Integral terms; and Autotare On or Off. The PDF algorithm is the standard PID algorithm used on most controllers. This is explained on page 13 of this manual. The PD2I algorithm is used primarily for high performance pressure and flow control applications. When this algorithm is selected via control Setup2, the ‘I’ gain value is forced to a numerically ‘odd’ value (ending in 1, 3, 5, 7, or 9). This algorithm exhibits two basic differences from the standard PID algorithm that most controllers utilize. 1. Instead of applying a damping function based upon the rate of change of the process value, it applies a damping function based upon the square of the rate of change of the process value. 2. The damping function is applied directly to the proportional error term before that term is used in the proportional and integral functions of the algorithm. This provides a certain amount of ‘look ahead’ capability in the control loop. 20 Because of these differences, you will note the following: 1. Increasing ‘P’ gain can be used to damp out overshoot and slow oscillations in pressure controllers. You will know that ‘P’ gain is too high, when the controller breaks into fast oscillations on step changes in set-point. On flow controllers, too high a ‘P’ gain results in slower response times. Too low a ‘P’ gain results in overshoot and/or slow oscillation. A good starting value for ‘P’ gain is 200. 2. If the unit was originally shipped with the PD2I algorithm selected, the ‘D’ gain value should be left at or near the factory setting because it relates primarily to the system phase lags. If you are changing from the default algorithm to the PD2I algorithm, you should start with a ‘D’ gain value of 20. 3. The ‘I’ gain is used to control the rate at which the process converges to the set-point, after the initial step change. Too low a value for ‘I’ gain shows up as a process value that jumps to near the set-point and then takes awhile to converge the rest of the way. Too high a value for ‘I’ gain results in oscillation. A good starting value for the ‘I’ gain is 201. Caution: Valve tuning can be very complex. If you would like assistance, please contact Alicat for technical support. AUTO: Autotare is a function that automatically tares the controller when a zero set-point is given. Control Setup2 shows a line marked “AUTO”. In parenthesis you see ON or OFF to signify the current setting. With AUTO set to OFF the controller will not tare when a zero set-point is given and conversely the controller will automatically tare if the function is set to ON. As with the set-point, you must exit the control Setup1 and Setup2 screens to save the setting to the unit’s memory. Control Setup1 and Control Setup2 displays are shown below. Input Analog Serial Local Set ( 0.00) . . (FS= 160.00) Up Down Select Main Loop Main Setup1 Type ( PD2I ) ..... PD2I P r o ( 100 ) ..... 200 Dif ( 65535 ) ..... 20 I n t ( 65535 ) ..... 201 AUT0 ( On ) Off Mass Volume Pressure 0.00 0.0% PD2I Setup1 TFT Control Setup1 PDF Setup2 TFT Control Setup2 Technical Data for TFT (Color Display) Meters, Gauges and Controllers The following specifications are applicable to Alicat TFT (color display) meters, gauges and controllers only. All other operating specifications are shown in the Technical Data page for standard Alicat instruments. All standard device features and functions are available and operate in accordance with the Alicat operating manual provided with the device. Specification Meter or Gauge Small Valve Controller Large Valve Controller Supply Voltage Supply Current 7 to 30 Vdc 80 mA @ 12Vdc 70 mA @ 24Vdc 12 to 30 Vdc 290 mA @ 12Vdc 200 mA @ 24Vdc 24 to 30 Vdc 780 mA @ 24Vdc 21 RS-232 / RS-485 Output and Input Configuring HyperTerminal®: 1. Open your HyperTerminal® RS-232 / RS-485 terminal program (installed under the “Accessories” menu on all Microsoft Windows® operating systems). 2. Select “Properties” from the file menu. 3. Click on the “Configure” button under the “Connect To” tab. Be sure the program is set for: 19,200 baud (or matches the baud rate selected in the RS-232 / RS-485 communications menu on the meter) and an 8-N-1-None (8 Data Bits, No Parity, 1 Stop Bit, and no Flow Control) protocol. 4. Under the “Settings” tab, make sure the Terminal Emulation is set to ANSI or Auto Detect. 5. Click on the “ASCII Setup” button and be sure the “Send Line Ends with Line Feeds” box is not checked and the “Echo Typed Characters Locally” box and the “Append Line Feeds to Incoming Lines” boxes are checked. Those settings not mentioned here are normally okay in the default position. 6. Save the settings, close HyperTerminal® and reopen it. In Polling Mode, the screen should be blank except the blinking cursor. In order to get the data streaming to the screen, hit the “Enter” key several times to clear any extraneous information. Type “*@=@” followed by “Enter” (or using the RS-232 / RS-485 communication select menu, select @ as identifier and exit the screen). If data still does not appear, check all the connections and com port assignments. Changing From Streaming to Polling Mode: When the meter is in the Streaming Mode (RS-485 units do not have a streaming mode), the screen is updated approximately 10-60 times per second (depending on the amount of data on each line) so that the user sees the data essentially in real time. It is sometimes desirable, and necessary when using more than one unit on a single RS-232 line, to be able to poll the unit. In Polling Mode the unit measures the flow normally, but only sends a line of data when it is “polled”. Each unit can be given its own unique identifier or address. Unless otherwise specified each unit is shipped with a default address of capital A. Other valid addresses are B thru Z. Once you have established communication with the unit and have a stream of information filling your screen: 1. Type *@=A followed by “Enter” (or using the RS-232 / RS-485 communication select menu, select A as identifier and exit the screen) to stop the streaming mode of information. Note that the flow of information will not stop while you are typing and you will not be able to read what you have typed. Also, the unit does not accept a backspace or delete in the line so it must be typed correctly. If in doubt, simply hit enter and start again. If the unit does not get exactly what it is expecting, it will ignore it. If the line has been typed correctly, the data will stop. 2. You may now poll the unit by typing A followed by “Enter”. This does an instantaneous poll of unit A and returns the values once. You may type A “Enter” as many times as you like. Alternately you could resume streaming mode by typing *@=@ followed by “Enter”. Repeat step 1 to remove the unit from the streaming mode. 3. To assign the unit a new address, type *@=New Address, e.g. *@=B. Care should be taken not to assign an address to a unit if more than one unit is on the RS-232 / RS-485 line as all of the addresses will be reassigned. Instead, each should be individually attached to the RS-232 / RS-485 line, given an address, and taken off. After each unit has been given a unique address, they can all be put back on the same line and polled individually. 22 Sending a Set-point via RS-232 / RS-485: To send a set-point via RS-232 / RS-485, “Serial” must be selected under the “Input” list in the control set up mode. To give controllers a set-point, or change an existing point, simply type in a number between 0 and 65535 (2% over range), where 64000 denotes full-scale flow rate, and hit “Enter”. The set-point column and flow rates should change accordingly. If they do not, try hitting “Enter” a couple of times and repeating your command. The formula for performing a linear interpolation is as follows: Value = (Desired Set-point X 64000) / Full Scale Flow Range For example, if your device is a 100 SLPM full-scale unit and you wish to apply a set-point of 35 SLPM you would enter the following value: 22400 = (35 SLPM X 64000) / 100 SLPM If the controller is in polling mode as described in Changing from Streaming Mode to Polling Mode, the set-point must be preceded by the address of the controller. For example, if your controller has been given an address of D, the set-point above would be sent by typing: D22400 followed by “Enter” To adjust the Proportional and Differential (P&D) terms via RS-232 / RS-485: Type *@=A followed by “Enter” to stop the streaming mode of information. To adjust the “P” or proportional term of the PID controller, type *R21 followed by “Enter”. 23 Gas Select – The selected gas can be changed via RS-232 / RS-485 input. To change the selected gas, enter the following commands: In Streaming Mode:$$#<Enter> In Polling Mode: Address$$#<Enter> (e.g. B$$#<Enter>) Where # is the number of the gas selected from the table below. Note that this also corresponds to the gas select menu on the flow controller screen: # 0 1 2 3 4 5 6 7 8 9 10 11 12 13 14 15 16 17 18 19 20 21 22 23 24 25 26 27 28 29 GAS Air Argon Methane Carbon Monoxide Carbon Dioxide Ethane Hydrogen Helium Nitrogen Nitrous Oxide Neon Oxygen Propane normal-Butane Acetylene Ethylene iso-Butane Krypton Xenon Sulfur Hexafluoride 75% Argon / 25% CO2 90% Argon / 10% CO2 92% Argon / 8% CO2 98% Argon / 2% CO2 75% CO2 / 25% Argon 75% Argon / 25% Helium 75% Helium / 25% Argon 90% Helium / 7.5% Argon / 2.5% CO2 (Praxair - Helistar® A1025) 90% Argon / 8% CO2 / 2% Oxygen (Praxair - Stargon® CS) 95% Argon / 5% Methane For example, to select Propane, enter: $$12<Enter> 24 Air Ar CH4 CO CO2 C2H6 H2 He N2 N2O Ne O2 C3H8 n-C4H10 C2H2 C2H4 i-C2H10 Kr Xe SF6 C-25 C-10 C-8 C-2 C-75 A-75 A-25 A1025 Star29 P-5 The computer will respond by reading the current value for register 21 between 0-65535. It is good practice to write this value down so you can return to the factory settings if necessary. Enter the value you wish to try by writing the new value to register 21. For example, if you wished to try a “P” term of 220, you would type *W21=220 followed by “Enter” where the bold number denotes the new value. The computer will respond to the new value by confirming that 21=220. To see the effect of the change you may now poll the unit by typing A followed by “Enter”. This does an instantaneous poll and returns the values once. You may type A “Enter” as many times as you like. Alternately you could resume streaming mode by typing *@=@ followed by “Enter”. Repeat step 3 to remove the unit from the streaming mode. To adjust the “D” or proportional term of the PID controller, type *R22 followed by “Enter”. The computer will respond by reading the current value for register 22 between 0-65535. It is good practice to write this value down so you can return to the factory settings if necessary. Enter the value you wish to try by writing the new value to register 22. For example, if you wished to try a “D” term of 25, you would type *W22=25 followed by “Enter” where the bold number denotes the new value. The computer will respond to the new value by confirming that 22=25. To see the effect of the change you may now poll the unit by typing A followed by “Enter”. This does an instantaneous poll and returns the values once. You may type A “Enter” as many times as you like. Alternately you could resume streaming mode by typing *@=@ followed by “Enter”. Repeat. You may test your settings for a step change by changing the set-point. To do this type A32000 (A is the default single unit address, if you have multiple addressed units on your RS-232 / RS-485 line the letter preceding the value would change accordingly.) followed by “Enter” to give the unit a ½ full scale set-point. Monitor the unit’s response to the step change to ensure it is satisfactory for your needs. Recall that the “P” term controls how quickly the unit goes from one set-point to the next, and the “D” term controls how quickly the signal begins to “decelerate” as it approaches the new set-point (controls the overshoot). 25 Collecting Data: The RS-232 / RS-485 output updates to the screen many times per second. Very short-term events can be captured simply by disconnecting (there are two telephone symbol icons at the top of the HyperTerminal® screen for disconnecting and connecting) immediately after the event in question. The scroll bar can be driven up to the event and all of the data associated with the event can be selected, copied, and pasted into Microsoft® Excel® or other spreadsheet program as described below. For longer term data, it is useful to capture the data in a text file. With the desired data streaming to the screen, select “Capture Text” from the Transfer Menu. Type in the path and file name you wish to use. Push the start button. When the data collection period is complete, simply select “Capture Text” from the Transfer Menu and select “Stop” from the sub-menu that appears. Data that is selected and copied, either directly from HyperTerminal® or from a text file can be pasted directly into Excel®. When the data is pasted it will all be in the selected column. Select “Text to Columns...” under the Data menu in Excel® and a Text to Columns Wizard (dialog box) will appear. Make sure that “Fixed Width” is selected under Original Data Type in the first dialog box and click “Next”. In the second dialog box, set the column widths as desired, but the default is usually acceptable. Click on “Next” again. In the third dialog box, make sure the column data format is set to “General”, and click “Finish”. This separates the data into columns for manipulation and removes symbols such as the plus signs from the numbers. Once the data is in this format, it can be graphed or manipulated as desired. For extended term data capture see: “Sending a Simple Script to HyperTerminal®” on page 26. Data Format: The data stream on the screen represents the flow parameters of the main mode in the units shown on the display. For mass flow controllers, there are six columns of data representing pressure, temperature, volumetric flow, mass flow, set-point, and the selected gas The first column is absolute pressure (normally in PSIA), the second column is temperature (normally in °C), the third column is volumetric flow rate (in the units specified at time of order and shown on the display), the fourth column is mass flow (also in the units specified at time of order and shown on the display), the fifth column is the currently selected set-point value, the sixth column designates the currently selected gas. For instance, if the controller was ordered in units of SCFM, the display on the controller would read 2.004 SCFM and the last two columns of the output below would represent volumetric flow and mass flow in CFM and SCFM respectively. +014.70 +025.00 +02.004 +02.004 2.004 Air +014.70 +025.00 +02.004 +02.004 2.004 Air +014.70 +025.00 +02.004 +02.004 2.004 Air +014.70 +025.00 +02.004 +02.004 2.004 Air +014.70 +025.00 +02.004 +02.004 2.004 Air +014.70 +025.00 +02.004 +02.004 2.004 Air MC Series Mass Flow Controller Data Format Note: On units with the totalizer function, the sixth column will be the totalizer value, with gas select moving to a seventh column. 26 Sending a Simple Script File to HyperTerminal® It is sometimes desirable to capture data for an extended period of time. Standard streaming mode information is useful for short term events, however, when capturing data for an extended period of time, the amount of data and thus the file size can become too large very quickly. Without any special programming skills, the user can use HyperTerminal® and a text editing program such as Microsoft® Word® to capture text at user defined intervals. 1. Open your text editing program, MS Word for example. 2. Set the cap lock on so that you are typing in capital letters. 3. Beginning at the top of the page, type A<Enter> repeatedly. If you’re using MS Word, you can tell how many lines you have by the line count at the bottom of the screen. The number of lines will correspond to the total number of times the flow device will be polled, and thus the total number of lines of data it will produce. For example:A A A A A A will get a total of six lines of data from the flow meter, but you can enter as many as you like. The time between each line will be set in HyperTerminal. 4. When you have as many lines as you wish, go to the File menu and select save. In the save dialog box, enter a path and file name as desired and in the “Save as Type” box, select the plain text (.txt) option. It is important that it be saved as a generic text file for HyperTerminal to work with it. 5. Click Save. 6. A file conversion box will appear. In the “End Lines With” drop down box, select CR Only. Everything else can be left as default. 7. Click O.K. 8. You have now created a “script” file to send to HyperTerminal. Close the file and exit the text editing program. 9. Open HyperTerminal and establish communication with your flow device as outlined in the manual. 10. Set the flow device to Polling Mode as described in the manual. Each time you type A<Enter>, the meter should return one line of data to the screen. 11. Go to the File menu in HyperTerminal and select “Properties”. 12. Select the “Settings” tab. 13. Click on the “ASCII Setup” button. 14. The “Line Delay” box is defaulted to 0 milliseconds. This is where you will tell the program how often to read a line from the script file you’ve created. 1000 milliseconds is one second, so if you want a line of data every 30 seconds, you would enter 30000 into the box. If you want a line every 5 minutes, you would enter 300000 into the box. 15. When you have entered the value you want, click on OK and OK in the Properties dialog box. 16. Go the Transfer menu and select “Send Text File…” (NOT Send File…). 17. Browse and select the text “script” file you created. 18. Click Open. 19. The program will begin “executing” your script file, reading one line at a time with the line delay you specified and the flow device will respond by sending one line of data for each poll it receives, when it receives it. You can also capture the data to another file as described in the manual under “Collecting Data”. You will be simultaneously sending it a script file and capturing the output to a separate file for analysis. 27 Operating Principle All M Series Gas Flow Meters (and MC Series Gas Flow Controllers) are based on the accurate measurement of volumetric flow. The volumetric flow rate is determined by creating a pressure drop across a unique internal restriction, known as a Laminar Flow Element (LFE), and measuring differential pressure across it. The restriction is designed so that the gas molecules are forced to move in parallel paths along the entire length of the passage; hence laminar (streamline) flow is established for the entire range of operation of the device. Unlike other flow measuring devices, in laminar flow meters the relationship between pressure drop and flow is linear. The underlying principle of operation of the 16 Series flow meters is known as the Poiseuille Equation: Q = (P1-P2)�r4/8ηL Where: Q P1 P2 r η L = = = = = = (Equation 1) Volumetric Flow Rate Static pressure at the inlet Static pressure at the outlet Radius of the restriction (eta) absolute viscosity of the fluid Length of the restriction Since �, r and L are constant; Equation 1 can be rewritten as: Q = K (∆P/η) (Equation 2) Where K is a constant factor determined by the geometry of the restriction. Equation 2 shows the linear relationship between volumetric flow rate (Q) differential pressure (∆P) and absolute viscosity (η) in a simpler form. Gas Viscosity: In order to get an accurate volumetric flow rate, the gas being measured must be selected (see Gas Select Mode, page 14). This is important because the device calculates the flow rate based on the viscosity of the gas at the measured temperature. If the gas being measured is not what is selected, an incorrect value for the viscosity of the gas will be used in the calculation of flow, and the resulting output will be inaccurate in direct proportion to the difference in the two gases viscosities. Gas viscosity, and thus gas composition, can be very important to the accuracy of the meter. Anything that has an effect on the gas viscosity (e.g. water vapor, odorant additives, etc.) will have a direct proportional effect on the accuracy. Selecting methane and measuring natural gas for instance, will result in a fairly decent reading, but it is not highly accurate (errors are typically < 0.6%) because natural gas contains small and varying amounts of other gases such as butane and propane that result in a viscosity that is somewhat different than pure methane. Absolute viscosity changes very little with pressure (within the operating ranges of these meters) therefore a true volumetric reading does not require a correction for pressure. Changes in gas temperature do affect viscosity. For this reason, the M Series internally compensates for this change. 28 Other Gases: M Series Flow Meters can easily be used to measure the flow rate of gases other than those listed as long as “non-corrosive” gas compatibility is observed. For example, a flow meter that has been set for air can be used to measure the flow of argon. The conversion factor needed for measuring the flow of different gases is linear and is simply determined by the ratio of the absolute viscosity of the gases. This factor can be calculated as follows: Qog = Q1 [η1 / ηog ] Where:Q1 η1 Qog ηog = = = = Flow rate indicated by the flow meter Viscosity of the calibrated gas at the measured temp. Flow rate of the alternate gas Viscosity of the alternate gas at the measured temp. Say we have a meter set for air and we want to flow argon through it. With argon flowing through the meter, the display reads 110 SLPM. For ease of calculation, let us say the gas temperature is 25°C. What is the actual flow of argon? Qog = Actual Argon Flow Rate Q1 = Flow rate indicated by meter (110 SLPM) η1 = Viscosity of gas selected or calibrated for by the meter at the measured temp. ηog = Viscosity of gas flowing through the meter at the measured temp. At 25°C, the absolute viscosity of Air (η1) is 184.918 micropoise. At 25°C, the absolute viscosity of Argon (ηog) is 225.593 micropoise. Qog Qog Qog = = = Q1 (η 1 / ηog) 110 SLPM (184.918 / 225.593) 90.17 SLPM So, the actual flow of Argon through the meter is 90.17 SLPM. As you can see, because the Argon gas is more viscous than the Air the meter is set for, the meter indicates a higher flow than the actual flow. A good rule of thumb is: “At a given flow rate, the higher the viscosity, the higher the indicated flow.” Volume Flow vs. Mass Flow: At room temperature and low pressures the volumetric and mass flow rate will be nearly identical, however, these rates can vary drastically with changes in temperature and/ or pressure because the temperature and pressure of the gas directly affects the volume. For example, assume a volumetric flow reading was used to fill balloons with 250 mL of helium, but the incoming line ran near a furnace that cycled on and off, intermittently heating the incoming helium. Because the volumetric meter simply measures the volume of gas flow, all of the balloons would initially be the same size. However, if all the balloons are placed in a room and allowed to come to an equilibrium temperature, they would generally all come out to be different sizes. If, on the other hand, a mass flow reading were used to fill the balloons with 250 standard mL of helium, the resulting balloons would initially be different sizes, but when allowed to come to an equilibrium temperature, they would all turn out to be the same size. This parameter is called corrected mass flow because the resulting reading has been compensated for temperature and pressure and can therefore be tied to the mass of the gas. Without knowing the temperature and pressure of the gas and thus the density, the mass of the gas cannot be determined. 29 Once the corrected mass flow rate at standard conditions has been determined and the density at standard conditions is known (see the density table at the back of this manual), a true mass flow can be calculated as detailed in the following example: Mass Flow Meter Reading = 250 SCCM (Standard Cubic Centimeters/Minute) Gas: Helium Gas Density at 25C and 14.696 PSIA = .16353 grams/Liter True Mass Flow = (Mass Flow Meter Reading) X (Gas Density) True Mass Flow = (250 CC/min) X (1 Liter / 1000 CC) X (.16353 grams/Liter) True Mass Flow = 0.0409 grams/min of Helium Volumetric and Mass Flow Conversion: In order to convert volume to mass, the density of the gas must be known. The relationship between volume and mass is as follows: Mass = Volume x Density The density of the gas changes with temperature and pressure and therefore the conversion of volumetric flow rate to mass flow rate requires knowledge of density change. Using ideal gas laws, the effect of temperature on density is: ρa / ρs = Ts / Ta Where: ρa Ta ρs Ts ºK = = = = = density @ flow condition absolute temp @ flow condition in °Kelvin density @ standard (reference ) condition absolute temp @ standard (reference) condition in °Kelvin ºC + 273.15 Note: ºK=ºKelvin The change in density with pressure can also be described as: ρa / ρs = Pa / Ps Where: ρa Pa ρs Ps = = = = density @ flow condition flow absolute pressure density @ standard (reference ) condition Absolute pressure @ standard (reference) condition Therefore, in order to determine mass flow rate, two correction factors must be applied to volumetric rate: temperature effect on density and pressure effect on density. Compressibility: Heretofore, we have discussed the gases as if they were “Ideal” in their characteristics. The ideal gas law is formulated as: PV=nRT where: P V n R T = Absolute Pressure = Volume (or Volumetric Flow Rate) = number moles (or Molar Flow Rate) = Gas Constant (related to molecular weight) = Absolute Temperature Most gases behave in a nearly ideal manner when measured within the temperature and pressure limitations of Alicat products. However, some gases (such as propane and butane) can behave in a less than ideal manner within these constraints. The non-ideal gas law is formulated as: PV=ZnRT Where: “Z” is the compressibility factor. This can be seen in an increasingly blatant manner as gases approach conditions where they condense to liquid. As the compressibility factor goes down (Z=1 is the ideal gas condition), the gas takes up less volume than what one would expect from the ideal gas calculation. 30 This reduces to: Pa Va / Za Ta = Ps Vs / Zs Ts , eliminating R and n. Alicat mass flow meters model gas flows based upon the non-ideal gas characteristics of the calibrated gas. The flow corrections are normally made to 25 C and 14.696 PSIA and the compressibility factor of the gas under those conditions. This allows the user to multiply the mass flow rate by the density of the real gas at those standard conditions to get the mass flow rate in grams per minute. Because we incorporate the compressibility factor into our ‘full gas model’; attempts to manually compute mass flows from only the P, V, and T values shown on the display will sometimes result in modest errors. Note: Although the correct units for mass are expressed in grams, kilograms, etc. it has become standard that mass flow rate is specified in SLPM (standard liters / minute), SCCM (standard cubic centimeters / minute) or SmL/M (standard milliliters / minute). This means that mass flow rate is calculated by normalizing the volumetric flow rate to some standard temperature and pressure (STP). By knowing the density at that STP, one can determine the mass flow rate in grams per minute, kilograms per hour, etc. STP is usually specified as the sea level conditions; however, no single standard exists for this convention. Examples of common reference conditions include: 0°C 25°C 0°C 70°F 68°F 20°C and and and and and and 14.696 PSIA 14.696 PSIA 760 torr (mmHG) 14.696 PSIA 29.92 inHG 760 torr (mmHG) MC Series Flow Controllers reference 25ºC and14.696 PSIA (101.32kPa) - unless ordered otherwise and specified in the notes field of the calibration sheet. Standard Gas Data Tables: Those of you who have older Alicat products (manufactured before October 2005) may notice small discrepancies between the gas property tables of your old and new units. Alicat Scientific, Inc. has incorporated the latest data sets from NIST (including their REFPROP 7 data) in our products’ built-in gas property models. Be aware that the calibrators that you may be using may be checking against older data sets such as the widely distributed Air Liquide data. This may generate apparent calibration discrepancies of up to 0.6% of reading on well behaved gases and as much as 3% of reading on some gases such as propane and butane, unless the standard was directly calibrated on the gas in question. As the older standards are phased out of the industry, this difference in readings will cease to be a problem. If you see a difference between the Alicat meter and your in-house standard, in addition to calling Alicat Scientific at (520) 290-6060, call the manufacturer of your standard for clarification as to which data set they used in their calibration. This comparison will in all likelihood resolve the problem. 31 Gas Number Short Form Long Form 0 1 2 3 4 5 6 7 8 9 10 11 12 13 14 15 16 17 18 19 20 21 22 23 24 25 26 Air Ar CH4 CO CO2 C2H6 H2 He N2 N2O Ne O2 C3H8 n-C4H10 C2H2 C2H4 i-C4H10 Kr Xe SF6 C-25 C-10 C-8 C-2 C-75 A-75 A-25 27 A1025 28 Star29 29 P-5 Air Argon Methane Carbon Monoxide Carbon Dioxide Ethane Hydrogen Helium Nitrogen Nitrous Oxide Neon Oxygen Propane normal-Butane Acetylene Ethylene iso-Butane Krypton Xenon Sulfur Hexafluoride 75% Argon / 25% CO2 90% Argon / 10% CO2 92% Argon / 8% CO2 98% Argon / 2% CO2 75% CO2 / 25% Argon 75% Argon / 25% Helium 75% Helium / 25% Argon 90% Helium / 7.5% Argon / 2.5% CO2 (Praxair - Helistar® A1025) 90% Argon / 8% CO2 / 2% Oxygen (Praxair - Stargon® CS) 95% Argon / 5% Methane *in micropoise (1 Poise = gram / (cm) (sec)) Viscosity* 25 deg C 14.696 PSIA 184.918 225.593 111.852 176.473 149.332 93.540 89.153 198.457 178.120 148.456 311.149 204.591 81.458 74.052 104.448 103.177 74.988 251.342 229.785 153.532 205.615 217.529 219.134 223.973 167.451 230.998 234.306 Density** 25 deg C 14.696 PSIA 1.1840 1.6339 0.6569 1.1453 1.8080 1.2385 0.08235 0.16353 1.1453 1.8088 0.8246 1.3088 1.8316 2.4494 1.0720 1.1533 2.4403 3.4274 5.3954 6.0380 1.6766 1.6509 1.6475 1.6373 1.7634 1.2660 0.5306 Compressibility 25 deg C 14.696 PSIA 0.9997 0.9994 0.9982 0.9997 0.9949 0.9924 1.0006 1.0005 0.9998 0.9946 1.0005 0.9994 0.9841 0.9699 0.9928 0.9943 0.9728 0.9994 0.9947 0.9887 0.9987 0.9991 0.9992 0.9993 0.9966 0.9997 1.0002 214.840 0.3146 1.0003 218.817 1.6410 0.9992 223.483 1.5850 0.9993 ** Grams/Liter (NIST REFPROP 7 database) Gas Viscosities, Densities and Compressibilities at 25° C 32 Gas Number Short Form Long Form 0 1 2 3 4 5 6 7 8 9 10 11 12 13 14 15 16 17 18 19 20 21 22 23 24 25 26 Air Ar CH4 CO CO2 C2H6 H2 He N2 N2O Ne O2 C3H8 n-C4H10 C2H2 C2H4 i-C4H10 Kr Xe SF6 C-25 C-10 C-8 C-2 C-75 A-75 A-25 27 A1025 28 Star29 29 P-5 Air Argon Methane Carbon Monoxide Carbon Dioxide Ethane Hydrogen Helium Nitrogen Nitrous Oxide Neon Oxygen Propane normal-Butane Acetylene Ethylene iso-Butane Krypton Xenon Sulfur Hexafluoride 75% Argon / 25% CO2 90% Argon / 10% CO2 92% Argon / 8% CO2 98% Argon / 2% CO2 75% CO2 / 25% Argon 75% Argon / 25% Helium 75% Helium / 25% Argon 90% Helium / 7.5% Argon / 2.5% CO2 (Praxair - Helistar® A1025) 90% Argon / 8% CO2 / 2% Oxygen (Praxair - Stargon® CS) 95% Argon / 5% Methane *in micropoise (1 Poise = gram / (cm) (sec)) Viscosity* 0 deg C 14.696 PSIA 172.588 209.566 103.657 165.130 137.129 86.127 83.970 186.945 166.371 136.350 293.825 190.555 74.687 67.691 97.374 94.690 68.759 232.175 212.085 140.890 190.579 201.897 203.423 208.022 154.328 214.808 218.962 Density** 0 deg C 14.696 PSIA 1.2927 1.7840 0.7175 1.2505 1.9768 1.3551 0.08988 0.17849 1.2504 1.9778 0.8999 1.4290 2.0101 2.7048 1.1728 1.2611 2.6893 3.7422 5.8988 6.6154 1.8309 1.8027 1.7989 1.7877 1.9270 1.3821 0.5794 Compressibility 0 deg C 14.696 PSIA 0.9994 0.9991 0.9976 0.9994 0.9933 0.9900 1.0007 1.0005 0.9995 0.9928 1.0005 0.9990 0.9787 0.9587 0.9905 0.9925 0.9627 0.9991 0.9931 0.9850 0.9982 0.9987 0.9988 0.9990 0.9954 0.9995 1.0002 201.284 0.3434 1.0002 203.139 1.7918 0.9988 207.633 1.7307 0.9990 ** Grams/Liter (NIST REFPROP 7 database) Gas Viscosities, Densities and Compressibilities at 0° C 33 TROUBLESHOOTING Display does not come on or is weak. Check power and ground connections. Flow reading is approximately fixed either near zero or near full scale regardless of actual line flow. Differential pressure sensor may be damaged. Avoid installations that can subject sensor to pressure drops in excess of 10 PSID. A common cause of this problem is instantaneous application of high‑pressure gas as from a snap acting solenoid valve upstream of the meter. Damage due to excessive pressure differential is not covered by warranty. Displayed mass flow, volumetric flow, pressure or temperature is flashing and message MOV, VOV, POV or TOV is displayed: Our flow meters and controllers display an error message (MOV = mass overrange, VOV = volumetric overrange, POV = pressure overrange, TOV = temperature overrange) when a measured parameter exceeds the range of the sensors in the device. When any item flashes on the display, neither the flashing parameter nor the mass flow measurement is accurate. Reducing the value of the flashing parameter to within specified limits will return the unit to normal operation and accuracy. After installation, there is no flow. Alicat Scientific MC controllers incorporate normally closed valves and require a set-point to operate. Check that your set-point signal is present and supplied to the correct pin and that the correct input is selected under the Input list in the control set up mode screen. Also check that the unit is properly grounded. The flow lags below the set-point. Be sure there is enough pressure available to make the desired flow rate. If either the set-point signal line and/or the output signal line is relatively long, it may be necessary to provide heavier wires (especially ground wiring) to negate voltage drops due to line wire length. An inappropriate PID tuning can also cause this symptom if the D term is too large relative to the P term. Meter does not agree with another meter I have in line. Volumetric meters will often not agree with one another when put in series because they are affected by pressure drops. Volumetric flow meters should not be compared to mass flow meters. Mass flow meters can be compared against one another provided there are no leaks between the two meters and they are set to the same standard temperature and pressure. Both meters must also be calibrated (or set) for the gas being measured. M Series mass flow meters are normally set to Standard Temperature and Pressure conditions of 25° C and 14.696 PSIA. Note: it is possible to special order meters with a customer specified set of standard conditions. The calibration sheet provided with each meter lists its standard conditions. Controller is slow to react to a set-point change or imparts an oscillation to the flow. An inappropriate PID tuning can cause these symptoms. Use at conditions considerably different than those at which the device was originally set up can necessitate a re-tuning of the PID loop. The output signal is lower than the reading at the display. This can occur if the output signal is measured some distance from the meter as voltage drops in the wires increase with distance. Using heavier gauge wires, especially in the ground wire, can reduce this effect. 34 RS-232 / RS-485 Serial Communications is not responding. Check that your meter is powered and connected properly. Be sure that the port on the computer to which the meter is connected is active. Confirm that the port settings are correct per the RS-232 instructions in this manual (Check the RS-232 / RS-485 communications select screen for current meter readings). Close Hyperterminal® and reopen it. Reboot your PC. Slower response than specified. MC Series Controllers feature a programmable Geometric Running Average (GRA). Depending on the full scale range of the meter, it may have the GRA set to enhance the stability/readability of the display, which would result in slower perceived response time. Please see “Pressure Averaging” and “Flow Averaging” on page 18. Jumps to zero at low flow. MC Series Controllers feature a programmable zero deadband. The factory setting is usually 0.5% of full scale. This can be adjusted between NONE and 3.2% of full scale. See page 18. Discrepancies between old and new units. Please see “Standard Gas Data Tables” explanation on page 31. Maintenance and Recalibration General: MC Series Flow Controllers require minimal maintenance. They have no moving parts. The single most important thing that affects the life and accuracy of these devices is the quality of the gas being measured. The controller is designed to measure CLEAN, DRY, NON-CORROSIVE gases. A 20 micron filter (50 micron for 50LPM and up) mounted upstream of the controller is highly recommended. Moisture, oil, and other contaminants can affect the laminar flow elements and/or reduce the area that is used to calculate the flow rate. This directly affects the accuracy. Recalibration: The recommended period for recalibration is once every year. Providing that the CLEAN, DRY, and NON-CORROSIVE mantra is observed, this periodic recalibration is sufficient. A label located on the back of the controller lists the most recent calibration date. The controller should be returned to the factory for recalibration within one year from the listed date. Before calling to schedule a recalibration, please note the serial number on the back of the meter. The Serial Number, Model Number, and Date of Manufacture are also available on the Manufacture Data 2 display (page 17). Cleaning: MC Series Flow Controllers require no periodic cleaning. If necessary, the outside of the controller can be cleaned with a soft dry cloth. Avoid excess moisture or solvents. For repairs, recalibrations, or recycling of this product, contact: Alicat Scientific, Inc. 7641 N Business Park Drive Tucson, Arizona 85743 USA Ph. 520-290-6060 Fax 520-290-0109 email: [email protected] Web site: www.alicatscientific.com 35 Technical Data for Micro-Flow and Ultra-Low Flow MC Mass Flow Controllers 0 to 0.5SCCM Full Scale through 0 to 50SCCM Full Scale The following specifications are for the standard configuration of the Alicat product. There are many low-cost customization options available. Specification Mass Controller Description Accuracy High Accuracy Option Repeatability Operating Range Typical Response Time Standard Conditions (STP) Operating Temperature Zero Shift Span Shift Humidity Range Controllable Flow Rate Maximum Pressure At calibration conditions after tare ± (0.8% of Reading + 0.2% of Full Scale) At calibration conditions after tare ± (0.4% of Reading + 0.2% of Full Scale) ± 0.2% Full Scale 1% to 100% Full Scale Measure and Control 100 Milliseconds (Adjustable) 25ºC & 14.696PSIA Mass Reference Conditions −10 to +50 ºCelsius 0.02% Full Scale / ºCelsius / Atm 0.02% Full Scale / ºCelsius / Atm 0 to 100% Non–Condensing 102.4% Full Scale 145 PSIG Mass Flow, Volumetric Flow, RS-232 Serial or RS-485 Serial Input /Output Signal Digital Pressure & Temperature or PROFIBUS or DeviceNet2 Input / Output Signal Analog Mass Flow 0-5Vdc Optional Input / Output Signal Mass Flow, Volumetric Flow, 0-5 Vdc or 0-10Vdc Secondary Analog Pressure or Temperature or 4-20mA Electrical Connections 8 Pin Mini-DIN or DB-15 Supply Voltage 12 to 30 Vdc (15-30Vdc for 4-20mA outputs) Supply Current 0.250Amp Mounting Attitude Sensitivity None Warm-up Time <1 Second 303 & 302 Stainless Steel, Viton®, Silicone RTV (Rubber), Glass Reinforced Wetted Materials2 Nylon, Aluminum, Brass, 410 Stainless Steel, Silicon, Glass. 1. If selecting PROFIBUS or DeviceNet no analog signal is available. PROFIBUS / DeviceNet units do not have the display. See PROFIBUS or DeviceNet specifications for PROFIBUS or DeviceNet supply voltages and currents. 2. If your application demands a different material, please contact Application Assistance for available options. Mechanical Specifications Process Pressure Drop2 1 Connections (PSID) M-5 (10-32) Female 1.0 0.5SCCM to 50SCCM 3.9”H x 3.4”W x 1.1”D Thread* Units ≤50SCCM F.S. are shipped with M-5 (10-32) Male Buna-N O-ring face seal to 1/8” Female NPT fittings. These adaptor fittings were selected for customer convenience in process connection. It should be noted that the 1/8” Female NPT introduces additional dead volume. To minimize dead volume, please see Accessories for the M-5 (10‑32) Male to 1/8”OD compression fitting. 1. Compatible with Beswick®, Swagelok® tube, Parker®, face seal, push connect and compression adapter fittings. 2. Venting to atmosphere. Lower Pressure Drops Available, Please contact Application Assistance. Full Scale Flow Mass Controller Mechanical Dimensions 0.5SCCM to 50SCCM approximate shipping weight: 1.1 lb. Dimensional Drawings: page 40 36 Technical Data for Low Flow MC Mass Flow Controllers 0 to 100SCCM Full Scale through 0 to 20SLPM Full Scale The following specifications are for the standard configuration of the Alicat product. There are many low-cost customization options available. Specification Mass Controller Description Accuracy High Accuracy Option Repeatability Operating Range Typical Response Time Standard Conditions (STP) Operating Temperature Zero Shift Span Shift Humidity Range Controllable Flow Rate Maximum Pressure ± (0.8% of Reading + 0.2% of Full Scale) ± (0.4% of Reading + 0.2% of Full Scale) ± 0.2% 1% to 100% Full Scale 100 25ºC & 14.696PSIA −10 to +50 0.02% 0.02% 0 to 100% 102.4% 145 Input /Output Signal Digital Mass Flow, Volumetric Flow, Pressure & Temperature At calibration conditions after tare At calibration conditions after tare Full Scale Measure and Control Milliseconds (Adjustable) Mass Reference Conditions ºCelsius Full Scale / ºCelsius / Atm Full Scale / ºCelsius / Atm Non–Condensing Full Scale PSIG RS-232 Serial or RS-485 Serial or PROFIBUS or DeviceNet2 Input / Output Signal Analog Optional Input / Output Signal Secondary Analog Electrical Connections Supply Voltage Mass Flow 0-5Vdc Mass Flow, Volumetric Flow, 0-5 Vdc or 0-10Vdc Pressure or Temperature or 4-20mA 8 Pin Mini-DIN or DB-15 12 to 30 Vdc (15-30Vdc for 4-20mA outputs) 0.250Amp Supply Current (at 12 Vdc, declining with increased supply voltage) Mounting Attitude Sensitivity None Warm-up Time <1 Second 303 & 302 Stainless Steel, Viton®, Silicone RTV (Rubber), Glass Reinforced Nylon, Wetted Materials2 Aluminum, Brass, 410 Stainless Steel, Silicon, Glass. 1. If selecting PROFIBUS or DeviceNet no analog signal is available. PROFIBUS / DeviceNet units do not have the display. See PROFIBUS or DeviceNet specifications for PROFIBUS or DeviceNet supply voltages and currents. 2. If your application demands a different material, please contact Application Assistance for available options. Mechanical Specifications Full Scale Flow Mass Controller 100SCCM to 500SCCM 1SLPM 2SLPM 5SLPM 10SLPM 20SLPM Mechanical Dimensions Process Connections1 4.1”H x 3.6”W x 1.1”D 1/8” NPT Female Pressure Drop2 (PSID) 1.0 1.5 3.0 2.0 5.5 20.0 1. Compatible with Beswick®, Swagelok® tube, Parker®, face seal, push connect and compression adapter fittings. 2. Lower Pressure Drops Available, Please contact Application Assistance. 100SCCM to 20SLPM approximate weight: 1.2lb Dimensional Drawings: page 40 37 Technical Data for Moderate Flow MC Mass Flow Controllers 0 to 50SLPM Full Scale through 0 to 100SLPM Full Scale The following specifications are for the standard configuration of the Alicat product. There are many low-cost customization options available. Specification Mass Controller Description Accuracy High Accuracy Option Repeatability Operating Range Typical Response Time Standard Conditions (STP) Operating Temperature Zero Shift Span Shift Humidity Range Controllable Flow Rate Maximum Pressure ± (0.8% of Reading + 0.2% of Full Scale) ± (0.4% of Reading + 0.2% of Full Scale) ± 0.2% 1% to 100% Full Scale 100 25ºC & 14.696PSIA −10 to +50 0.02% 0.02% 0 to 100% 102.4% 145 Input /Output Signal Digital Mass Flow, Volumetric Flow, Pressure & Temperature Input / Output Signal Analog Optional Input / Output Signal Secondary Analog Electrical Connections Supply Voltage Supply Current At calibration conditions after tare At calibration conditions after tare Full Scale Measure and Control Milliseconds (Adjustable) Mass Reference Conditions ºCelsius Full Scale / ºCelsius / Atm Full Scale / ºCelsius / Atm Non–Condensing Full Scale PSIG RS-232 Serial or RS-485 Serial or PROFIBUS or DeviceNet2 Mass Flow 0-5Vdc Mass Flow, Volumetric Flow, 0-5 Vdc or 0-10Vdc Pressure or Temperature or 4-20mA 8 Pin Mini-DIN or DB-15 24 to 30 Vdc 0.750Amp Control response somewhat sensitive to inverted operation. <1 Second 303 & 302 Stainless Steel, Viton®, Silicone RTV (Rubber), Glass Reinforced Nylon, Aluminum, 410 &416 Stainless Steel, Nickel, Silicon, Glass. Mounting Attitude Sensitivity Warm-up Time Wetted Materials2 1. If selecting PROFIBUS or DeviceNet no analog signal is available. PROFIBUS / DeviceNet units do not have the display. See PROFIBUS or DeviceNet specifications for PROFIBUS or DeviceNet supply voltages and currents. 2. If your application demands a different material, please contact Application Assistance for available options. Mechanical Specifications Pressure Drop2 (PSID) 50SLPM 9.0 4.7”H x 7.3”W x 2.3”D 1/4” NPT Female 100SLPM 11.7 1. Compatible with Beswick®, Swagelok® tube, Parker®, face seal, push connect and compression adapter fittings. 2. Lower Pressure Drops Available, Please contact Application Assistance. Full Scale Flow Mass Controller Mechanical Dimensions Process Connections1 50SLPM to 100SLPM approximate weight: 6.4 lb. Dimensional Drawings: page 41 38 Technical Data for High Flow MCR Mass Flow Controllers 0 to 250SLPM Full Scale through 0 to 2000SLPM Full Scale The following specifications are for the standard configuration of the Alicat product. There are many low-cost customization options available. Specification Mass Controller Description Accuracy ± (0.8% of Reading + 0.2% of Full Scale) At calibration conditions after tare 1 ± (0.4% of Reading + 0.2% of Full Scale) At calibration conditions after tare High Accuracy Option Repeatability Operating Range Typical Response Time Standard Conditions (STP) Operating Temperature Zero Shift Span Shift Humidity Range Controllable Flow Rate Maximum Pressure ± 0.2% 1% to 100% Full Scale 100 25ºC & 14.696PSIA −10 to +50 0.02% 0.02% 0 to 100% 102.4% 145 Mass Flow, Volumetric Flow, Pressure & Temperature Input /Output Signal Digital Full Scale Measure and Control Milliseconds (Adjustable) Mass Reference Conditions ºCelsius Full Scale / ºCelsius / Atm Full Scale / ºCelsius / Atm Non–Condensing Full Scale PSIG RS-232 Serial or RS-485 Serial or PROFIBUS or DeviceNet2 Input / Output Signal Analog Optional Input / Output Signal Secondary Analog Electrical Connections Supply Voltage Supply Current Mass Flow 0-5Vdc Mass Flow, Volumetric Flow, 0-5 Vdc or 0-10Vdc Pressure or Temperature or 4-20mA 8 Pin Mini-DIN or DB-15 24 to 30 Vdc 0.750Amp Control response somewhat sensitive to inverted Mounting Attitude Sensitivity operation. Warm-up Time <1 Second 303 & 302 Stainless Steel, Viton®, Silicone RTV (Rubber), Glass Reinforced Nylon, Wetted Materials3 Aluminum, 410 & 416 Stainless Steel, Nickel, Silicon, Glass. 1. High Accuracy option not available for units ranged over 500SLPM. 2. If selecting PROFIBUS or DeviceNet no analog signal is available. PROFIBUS / DeviceNet units do not have the display. See PROFIBUS or DeviceNet specifications for PROFIBUS or DeviceNet supply voltages and currents. 3. If your application demands a different material, please contact Application Assistance for available options. Mechanical Specifications Pressure Drop2 (PSID) 250SLPM 4.6 500SLPM 6.5 1000SLPM 5.5”H x 7.4”W x 2.3”D 14.0 3/4” NPT Female 1500SLPM 17.0 2000SLPM 5.5”H x 8.1” W x 2.9” D 30.0 1. Compatible with Beswick®, Swagelok® tube, Parker®, face seal, push connect and compression adapter fittings. 2. Venting to atmosphere. Lower Pressure Drops Available, Please contact Application Assistance. Full Scale Flow Mass Controller Mechanical Dimensions 5.5”H x 7.9”W x 2.3”D Process Connections1 1/2” NPT Female MCR-250SLPM to 1500SLPM approximate weight: 9.0 lb. MCR-2000SLPM approximate weight: 12.0 lb. Dimensional Drawings: page 42 39 MC Series: 0 - 0.5SCCM 0 - 1SCCM 0 - 2SCCM 0 - 5SCCM 0 - 10SCCM 0 - 20SCCM 0 - 50SCCM MC Series: 0 - 100SCCM 0 - 200SCCM 0 - 500SCCM 0 - 1SLPM 0 - 2SLPM 0 - 3SLPM 0 - 5SLPM 0 - 10SLPM 0 - 20SLPM 40 MCR Series: 0 - 50SLPM 0 - 100SLPM MCR Series: 0 - 250SLPM 41 MCR Series: 0 - 500SLPM 0 - 1000SLPM 0 - 1500SLPM MCR Series: 0 - 2000SLPM 42 Technical Data for MCV Mass Flow Controller for Vacuum Applications 0 to 0.5SCCM Full Scale through 0 to 20SLPM Full Scale Specification MCV Mass Controller Description Accuracy ± (0.8% of Reading + 0.2% of Full Scale) At calibration conditions after tare High Accuracy Option1 ± (0.4% of Reading + 0.2% of Full Scale) At calibration conditions after tare Repeatability ± 0.2% Operating Range Full Scale 1% to 100% Full Scale Typical Response Time Measure and Control 100 Standard Conditions (STP) Milliseconds (Adjustable) 25ºC & 14.696PSIA Operating Temperature Mass Reference Conditions −10 to +50 ºCelsius Zero Shift 0.02% Full Scale / ºCelsius / Atm Span Shift 0.02% Full Scale / ºCelsius / Atm Humidity Range 0 to 100% Controllable Flow Rate Non–Condensing 102.4% Maximum Pressure Full Scale 145 Input /Output Signal Digital Mass Flow, Volumetric Flow, Pressure & Temperature Input / Output Signal Analog Mass Flow Optional Input / Output Signal Secondary Analog PSIG RS-232 Serial or PROFIBUS2 0-5Vdc Mass Flow, Volumetric Flow, Pressure or Temperature Electrical Connections 0-5 Vdc or 0-10Vdc or 4-20mA 8 Pin Mini-DIN or DB-15 Supply Voltage 12 to 30 Vdc (15-30Vdc for 4-20mA outputs) Supply Current 0.300Amp Mounting Attitude Sensitivity None Warm-up Time Integrated Valve Leak Integrity Wetted Materials3 <1 Second 1 x 10⁻⁹ atm sccm/sec Helium max 316L,303 & 302 Stainless Steel, Viton®, Silicone RTV (Rubber), Glass Reinforced Nylon, Aluminum, Brass, 410 Stainless Steel, Silicon, Glass, PCTFE. 1. High Accuracy Option not available for ranges below 5SCCM. 2. If selecting PROFIBUS no analog signal is available. PROFIBUS units do not have the display. See page 50 for PROFIBUS specifications for PROFIBUS supply voltages and currents. 3. If your application demands a different material, please contact Application Assistance for available options. Full Scale Flow MCV Controller Mechanical Dimensions Process Connections 0.5SCCM to 20SLPM 4.992”H x 6.710”W x 1.50”D 1/4” VCR® Male Welded VCR® fittings (process connections) are recommended for MCV applications. Please contact Application Assistance. MCV Series All ranges MCV approximate weight: 3.0 lb. 43 Technical Data for MCP Moderate Flow Mass Flow Controllers 0 to 50SLPM Full Scale through 0 to 250SLPM Full Scale NOTICE: The following specifications are applicable to Alicat MCP Series Mass Flow Controllers only. Please note maximum pressure of 60 PSIG. MCP units are fitted with a high performance valve that provides increased speed of response and control stability for low pressure applications. Specification Accuracy High Accuracy Option Repeatability Operating Range Typical Response Time Standard Conditions (STP) Operating Temperature Zero Shift Span Shift Humidity Range Controllable Flow Rate Maximum Pressure Input /Output Signal Digital Input / Output Signal Analog Optional Input / Output Signal Secondary Analog Electrical Connections Supply Voltage Supply Current Mounting Attitude Sensitivity Warm-up Time Wetted Materials2 Mass Description Controller At calibration conditions after tare ± (0.8% of Reading + 0.2% of Full Scale) At calibration conditions after tare ± (0.4% of Reading + 0.2% of Full Scale) ± 0.2% Full Scale 1% to 100% Full Scale Measure and Control 100 Milliseconds (Adjustable) 25ºC & 14.696PSIA Mass Reference Conditions −10 to +50 ºCelsius 0.02% Full Scale / ºCelsius / Atm 0.02% Full Scale / ºCelsius / Atm 0 to 100% Non–Condensing 102.4% Full Scale 60 PSIG Mass, Volumetric, RS-232 Serial or RS-485 Serial Pressure & Temperature Mass Flow 0-5Vdc Mass, Volumetric, 0-5 Vdc or 0-10Vdc Pressure or Temperature or 4-20mA 8 Pin Mini-DIN 12 to 30 Vdc 0.250Amp None <1 Second 303 & 302 Stainless Steel, Viton®, Silicone RTV (Rubber), Glass Reinforced Nylon, Aluminum, Brass, 410 &416 Stainless Steel. 1. If your application demands a different material, please contact Application Assistance for available options. Mechanical Specifications Full Scale Flow Mass Controller 50SLPM 100SLPM Mechanical Dimensions 4.4”H x 5.4”W x 1.6”D Process Connections1 Pressure Drop2 (PSID) 1/4” NPT Female 6.0 14.0 1/4” and 1/2” NPT Female 1. Compatible with Beswick®, Swagelok® tube, Parker®, face seal, push connect and compression adapter fittings. 2. Lower Pressure Drops Available, Please contact Application Assistance. 250SLPM 5.0”H x 6.0”W x 1.6”D Dimensional Drawings: page 45 44 MCP Series: 50SLPM 100SLPM MCP Series: 250SLPM 45 Technical Data for MCS and MCRS Mass Flow Controllers Alicat MCS and MCRS instruments are built for use with aggressive gases. For the most part, these instruments maintain the specifications of equivalently ranged MC and MCR Series devices. In addition to Alicat’s standard 30 gas select programming, MCS and MCRS controllers are configured to operate with the following aggressive gases. MCS and MCRS controller gas compatibility list: NO Nitric Oxide to 100% NF3 Nitrogen Triflouride to 100% NH3 Ammonia to 100% H2S Hydrogen Sulfide to 100% (22°C and under) Propylene to 100% In addition, the following gases are available upon request: NO2 Nitrogen Dioxide to 0.5% in an inert carrier Refrigerant gases to 100% Other gases to 1000 ppm in an inert carrier If your application requires another gas or gas mixture, please contact Alicat. We will do our best to accommodate your request. Please refer to the Technical Data for the equivalently ranged MC and MCR Series instrument for all operating specifications except “Wetted Materials”. The dimensions of MCS and MCRS instruments vary slightly from their standard MC and MCR Series counterparts. Dimensional drawings for MCS and MCRS instruments are shown on pages 47 - 49. MCS Wetted Materials 316LSS, 303SS, 430FRSS, FFKM (Kalrez) standard; Viton, EPDM, Buna, Neoprene as needed for some gases. 46 MCS Series: 0 – 0.5SCCM 0 – 1SCCM 0 – 2SCCM 0 – 5SCCM 0 – 10SCCM 0 – 20SCCM 0 – 50SCCM MCS Series: 0 – 100SCCM 0 – 200SCCM 0 – 500SCCM 0 – 1SLPM 0 – 2SLPM 0 – 5SLPM 0 – 10SLPM 0 – 20SLPM 47 MCRS Series: 0 – 50SLPM 0 – 100SLPM MCRS Series: 0 – 250SLPM 48 MCRS Series: 0 – 500SLPM 0 – 1000SLPM 0 – 1500SLPM MCRS Series: 0 – 2000SLPM 49 Technical Data for PROFIBUS Meters, Gauges and Controllers NOTICE: The following specifications are applicable to Alicat PROFIBUS enabled meters, gauges and controllers only. All other operating specifications are shown in the Technical Data page for standard Alicat instruments. All standard device features and functions are available and operate in accordance with the standard Alicat Scientific device operating manual provided with the device. Specification Meter or Gauge Small Valve Controller Large Valve Controller Description Input /Output Signal Digital PROFIBUS DP Electrical Connections DB9 Supply Voltage: 7 to 30 Vdc 12 to 30 Vdc 24 to 30 Vdc Supply Current 80mA @ 12Vdc 65mA @ 24Vdc 295mA @ 12Vdc 280mA @ 24Vdc 780mA @ 24Vdc Power and Signal Connections: Connect to the device using two DB9 connectors. The female top connection is PROFIBUS. The male connection on the side is power and RS-232 or RS-485. Pin out diagrams for all PROFIBUS enabled Alicat devices are shown: TOP 5 9 1 6 1. NC 2. OPT GND 3. DP 4. RTS 5. DGD 6. VP 7. OPT 7 to 30VDC 8. DN 9. NC 4.08 1/8 NPT Both Sides SIDE 1 6 5 9 1. NC 2. RS232RX 3. RS232TX 4. NC 5. GND 6. NC 7. 7 to 30VDC 8. GND 9. NC 4.26 .35 .35 3.59 .525 .525 3.76 1.05 .150 2.225 2 x 8-32 UNC ┬ v .350 .125 .925 MC-1SLPM-PROFIBUS PROFIBUS MC1SLPM shown to provide PROFIBUS connector dimensions only. Flow body and valve dimensions will vary with range. Please see Alicat’s device specifications for complete dimensions. PROFIBUS units do not have a display screen. 50 Information for Alicat DeviceNet Compatible Instruments DeviceNet OVERVIEW Alicat DeviceNet compatible instruments support the Predefined Master/Slave Connection Set. There are three connectors on the Alicat meter/controller. Only one of the connections is required for DeviceNet operations. This is a DeviceNet standard M12 Micro Connector. The other two connectors are provided for convenience and are not necessary for operation of the DeviceNet compatible Alicat meter/controller. One of the convenience connectors is a standard DC power jack which can provide power to the unit. The other is a DB9 which can be used for RS-232 communication. DeviceNet CONNECTION Utilizing the standard DeviceNet M12 micro connector allows the Alicat meter/controller to be easily attached to a DeviceNet network. The pin out as defined in Volume Three of the DeviceNet Standard applies and is repeated here. PIN 1 2 3 4 5 Description Drain V+ (24VDC) V- (GND) CAN-H CAN-L Wire Color Bare RED BLACK WHITE BLUE MAC ID All devices on a DeviceNet must have unique MAC ID. Alicat units can either be programmed with a customer requested ID or they will be defaulted to 63. In either case when an Alicat unit is attached to a DeviceNet and powered up it will send out a duplicate MAC request. If there already is a device on the network with the same address, the Alicat device will decrement its address and try again until it finds an unoccupied address. Once it finds a unique address, it stores that address into its nonvolatile memory, enabling it to come back on at the same address. BAUD RATE The following baud rates are available: 125K 250K 500K The default baud rate is 125K Baud. You may specify the baud rate at the time of order. The baud rate can be changed by using a set attribute single DeviceNet service request to the DeviceNet Object Class 03 Instance 01 Attribute ID 02. A setting of 0 is 125K baud, 1 is 250K baud, and 2 is 500K baud. In order for a change of baud rate to take affect the unit will have to be power cycled. SUPPORTED DEVICE TYPE: Mass Flow Controller Device Type 0x1A SUPPORTED CLASSES: Identity Object Class 0x01 51 SUPPORTED ATTRIBUTES: Attribute 1 2 3 4 5 6 7 Services Get Get Get Get Get Get Get Description Vendor ID Device Type Product Code Revision (Maj, Min) Status Serial Number Product Name DeviceNet Object Class 0x03 Connection Object Class 0x05 Default Value 1174 (0x0496) 0x1A (Mass Flow) See Product Codes 0x01,0x01 0x00 0x######## Alicat Scientific Inc MFC DeviceNet Assembly Object Class 0x04 S-Device Supervisor Class 0x30 Technical Data for DeviceNet Meters, Gauges and Controllers NOTICE: The following specifications are applicable to Alicat DeviceNet enabled meters, gauges and controllers only. All other operating specifications are shown in the Technical Data page for standard Alicat instruments. All standard device features and functions are available and operate in accordance with the standard Alicat operating manual provided with the device. Specification Meter or Gauge Small Valve Controller Large Valve Controller Description Input /Output Signal Digital Electrical Connections Supply Voltage: Supply Current DeviceNet M12 Micro Connector 7 to 30 Vdc 12 to 30 Vdc 24 to 30 Vdc 80mA @ 12Vdc 295mA @ 12Vdc 780mA @ 24Vdc 65mA @ 24Vdc 280mA @ 24Vdc DeviceNet MC10SLPM shown to provide DeviceNet connector dimensions only. Flow body and valve Alicat Scientific, Inc. dimensions will vary with range. Please see Alicat’s device specifications for complete dimensions. DeviceNet units do not have a display screen. Rev. No. Description Date 52 2045 N. Forbes Blvd. Suite 103 Tucson, AZ 85745 520-290-6060 Ph. 520-290-0109 Fax Option: Totalizing Mode MC Series Flow Controllers can be purchased with the Totalizing Mode option. This option adds an additional mode screen that displays the total flow (normally in the units of the main flow screen) that has passed through the meter or controller since the last time the totalizer was cleared. The Totalizing Mode screen shown below is accessed by pushing the “MODE” button until the label over it reads “Total”. If your meter or controller is ordered with Totalizing Mode option, pushing the “Mode” button once will bring up the “Totalizing Mode” display. Pushing “Mode” a second time will bring up the “Select Menu” display. Pushing it a third time will return you to the Main Mode Screen. Hours 0.3 Mass 0.00 Clear Mass SCCM Air +0.4 SCCM Total Counter – The counter can have as many as six digits. At the time of order, the customer must specify the resolution of the count. This directly affects the maximum count. For instance, if a resolution of 1/100ths of a liter is specified on a meter which is totalizing in liters, the maximum count would be 9999.99 liters. If the same unit were specified with a 1 liter resolution, the maximum count would be 999999 liters. Rollover – The customer can also specify at the time of order what the totalizer is to do when the maximum count is reached. The following options may be specified: No Rollover – When the counter reaches the maximum count it stops counting until the counter is cleared. Rollover – When the counter reaches the maximum count it automatically rolls over to zero and continues counting until the counter is cleared. Rollover with Notification – When the counter reaches the maximum count it automatically rolls over to zero, displays an overflow error, and continues counting until the counter is cleared. Hours.–.The display will show elapsed time since the last reset in 0.1 hour increments. The maximum measurable elapsed time is 6553.5 hours (about nine months). The hours count resets when the “clear” button is pushed, an RS-232or RS-485 clear is executed or on loss of power Clear – The counter can be reset to zero at any time by pushing the dynamically labeled “Clear” button located above the upper right corner of the display. To clear the counter via RS-232 or RS-485, establish serial communication with the meter or controller as described in the RS-232 or RS-485 section of the manual. To reset the counter, enter the following commands: In Streaming Mode: $$T <Enter> In Polling (addressable) Mode: Address$$T <Enter> 53 (e.g. B$$T <Enter>) Alicat Portable Meters and Gauges Alicat Portable Flow Meters and Gauges use a common 9 Volt battery located in the top section of your meter. Output signals from the flow meter are passed through the female connector on top of the flow meter. Turn the switch on top of the flow meter “off” when the meter is not in use. Normal (9V alkaline) battery life is approximately 8 hours (30-40 hours with a 9V-lithium battery), however many factors can affect this. Note: Alicat recommends the use of non-rechargeable 9V-lithium batteries in all MB TFT (color display portable) meters and gauges. Replace the battery as often as required. A yellow LED indicates low voltage and that the battery should be replaced. A false signal can result when the voltage drops below its normally regulated level. Alicat Portable Flow Meters and Gauges can also be powered by an optional AC/DC plug-in wall adaptor. With the adaptor plugged into the flow meter, the battery is bypassed and the meter will operate solely off the adaptor power supply. Replacing the Battery: 1. Remove the four Phillips head screws from the front cover and gently remove it as shown below. 2. Remove the 9V battery, pulling the top of the battery out first. 3. Disconnect the old battery from the harness and replace it with a new battery. 4. Install the new battery bottom end first and replace the back cover so that the cushioning pad presses directly down on the battery. 5. Replace the four Phillips head screws. AC/DC Adaptor Port Battery cover removal Rev. No. Description Date 54 Alicat S Option: Remote Electronics for High Line or Gas Temperatures Some applications involve operating temperatures outside the standard Alicat device specifications. A solution using remote electronics is available. (This option is not applicable for liquid devices.) The flow body’s components are minimized to only the required sensors. The flow data is sent to the microprocessor electronics up to 6 feet away from the sensor package. Relocating the sensitive electronics, including the LCD, allows for installation of the flow body in ambient temperatures as high as 85° Celsius with gas temperatures under 100°Celsius. In these applications we recommend our custom gauge calibration at a gas temperature of up to 70°Celsius. This will reduce zero shift errors that occur when actual gas flow temperatures deviate substantially from the gas calibration temperature. This configuration is also used in integrations that require a compact flow package at the installation point. Option: Remote Panel Display Our Remote Display option offers the flexibility of using Alicat’s display with units that are embedded inside processes or instrument enclosures. The Remote Display retains all of the same features as our standard display. The Remote Display is ideal for: ► OEMs Remote Panel Mounting ► Embedded Systems ► Gas Panels ► Fuel Cell Test Stations ► Leak Detection Systems ► Artificial Environments Accessory: BB9 Multi-Drop Box The BB9 Multi-Drop Box makes it convenient to wire multiple flow and/or pressure devices to a single RS-232 or RS-485 port. The Multi-Drop Box has nine 8 pin mini-DIN ports available. The ports are to be used with a standard double ended 8 pin mini-DIN (DC-62) style cable going from the box to each flow or pressure device. A single DB9 D-SUB type connector (COM PORT) connects, using the included cable, to the serial connector on a PC or laptop. All of the flow and/or pressure devices are powered via a terminal block on the front of the box. If more than nine devices will be required, additional Multi-Drop Boxes can be daisy chained together with a double ended 8 pin mini-DIN cable plugged into any receptacle on both boxes. BB9 Power Supply for Large Valve Controllers: The PS24VHC (Power Supply 24Vdc High Current) is a 6.5Amp 24Vdc power supply designed for running multiple large controllers on a BB9. The 6.5Amp power supply can run as many as 8 large valve controllers, which makes it ideal for the BB9 and multiple large valve (or small valve / large valve combination) controllers on a BB9. 55 Accessory: Flow Vision™ SC Software Flow Vision™ SC is an intuitive software interface to help Devices Scripts Data Logs Charts Terminals your test cycles run smoother and shorten your engineering time! Flow Vision™ SC lets you connect to and communicate with multiple Alicat units simultaneously. Now you can view virtual displays, control tabs, charts and data lines from every connected Alicat device on the same screen. Flow Vision™ SC supports all RS-232 and RS-485 Serial communication functions, including: gas selection, tareing, set‑point control, valve tuning and flow averaging. Session Saving: Save and reload your configuration data with confidence. Script Building: Create scripts to adjust a controller’s set-point value at variable specified time intervals. Charting: Chart as many parameters as you want off as many devices as you want, with color coding, zooming, and printing functionality. Alarms: Create software alarms that will notify you of given parameter conditions. Data Capture & Logging: Capture and log data to either a .csv file or a .txt file. Improved Data Logging and Data Log File Splitting for easy to manage data. Flow Vision™ SC supports multiple devices connected to the same RS-232 or RS-485 port. Now you can easily monitor and control multiple Alicat instruments from your computer. Simply connect each device to a BB9 Multi‑Drop Box, then using device addressability, assign an identifier to each instrument. 56 Part Number FLOWVISIONSC BB9 BB9-I PVPS24U PS24VHC PCASE DC-61 DC-251 DC-301 DC-501 DC-751 DC-6RT DC-62 DC-252 DC-502 DC-602 MD8DB9 DBC-251 510199 IC10 IC10-18G IC20 IC24-18G IC50 IC-102 USB-RS232 REMOTE RD Accessories Description Flow Vision™ SC software for interface with all Alicat instruments 9 position Multi-Drop Box 9 position Multi-Drop Box, Industrial connectors Universal 100-240 VAC to 24 Volt DC Power Supply Adapter High current power supply for BB9 use with Large Valve Controllers Industrial carry and storage case for portable meters/gauges 8 Pin Male Mini-DIN connector cable, single ended, 6 foot length 8 Pin Male Mini-DIN connector cable, single ended, 25 foot length 8 Pin Male Mini-DIN connector cable, single ended, 30 foot length 8 Pin Male Mini-DIN connector cable, single ended, 50 foot length 8 Pin Male Mini-DIN connector cable, single ended, 75 foot length 8 Pin Male Right Angle Mini-Din Cable, single ended, 6 foot length 8 Pin Male Mini-DIN connector cable, double ended, 6 foot length 8 Pin Male Mini-DIN connector cable, double ended, 25 foot length 8 Pin Male Mini-DIN connector cable, double ended, 50 foot length 8 Pin Male Mini-DIN connector cable, double ended, 60 foot length 8 Pin Male Mini-DIN to DB9 Female Adapter, 6 foot length DB15 cable, single ended, 25 foot length DB9 cable, double-ended female, 3 meter length Industrial cable, 6 Pin, single ended, 10 foot length 18 gauge industrial cable, 6 Pin, single ended, 10 foot length Industrial cable, 6 Pin, single ended, 20 foot length 18 gauge industrial cable, 6 Pin, single ended, 24 foot length Industrial cable, 6 Pin, single ended, 50 foot length Industrial cable, 6 pin double ended, 10 foot length RS-232 to USB Converter Remote Electronics with Display Remote Panel Mount Display MNPT to Compression Fittings 10-32 - 1/8” SS-200-1-0157 10-32 - 1/4” SS-400-1-0256 1/8” - 1/8” SS-200-1-2 1/8” - 1/4” SS-400-1-2 1/8” - 3/8” SS-600-1-2 1/8” - 1/2” SS-810-1-2 1/8” - 3mm SS-3M0-1-2 1/8” - 4mm SS-4M0-1-2 1/8” - 6mm SS-6M0-1-2 1/8” - 8mm SS-8M0-1-2 1/8” - 12mm SS-12M0-1-2 1/4” - 1/8” SS-200-1-4 1/4” - 1/4” SS-400-1-4 1/4” - 3/8” SS-600-1-4 1/4” - 1/2” SS-810-1-4 1/4” - 3mm SS-3M0-1-4 1/4” - 4mm SS-4M0-1-4 1/4” - 6mm SS-6M0-1-4 1/4” - 8mm SS-8M0-1-4 1/4” - 12mm SS-12M0-1-4 MNPT to Compression Fittings 1/2” - 1/8” SS-200-1-8 1/2” - 1/4” SS-400-1-8 1/2” - 3/8” SS-600-1-8 1/2” - 1/2” SS-810-1-8 1/2” - 3/4” SS-1210-1-8 1/2” - 6mm SS-6M0-1-8 1/2” - 8mm SS-8M0-1-8 1/2” - 12mm SS-12M0-1-8 1/2” - 16mm SS-16M0-1-8 3/4” - 1/4” SS-400-1-12 3/4” - 1/2” SS-810-1-12 3/4” - 3/4” SS-1210-1-12 3/4” - 12mm SS-12M0-1-12 3/4” - 16mm SS-16M0-1-12 Filters & Elements FNPT-MNPT 10-32 5μ 510053 10-32 20μ 510054 1/8” 20μ ILF-1/8-20 1/4” 40μ ILF-1/4-40 1/2” 40μ ILF-1/2-40* 3/4” 40μ ILF-3/4-40* 20μ element ILFE20 40μ element ILFE40 40μ element ILFE40L* Filters & Elements FNPT-FNPT* 10-32 5μ CF-303-20-316 *requires MNPT to MNPT coupler to interface with Alicat flow bodies 10-32 Male UNF to 1/8 FNPT Adapter 410133 Male M5 (10-32) Buna-N O-ring face seal to 1/8”Female NPT 57 Eight Pin Mini-DIN Connector Pin-Outs If your Alicat Instrument was ordered with the standard Eight Pin Mini-DIN connection, please be sure to reference the following pin-out diagram. 8 Pin Mini-DIN Port DB-9 Serial Port 11 2 1 6 3 7 4 8 5 33 9 6 6 2 4 4 77 55 88 5----------Ground--------------------------------------Ground----------8 5----------Ground--------------------------------------Ground----------8 3----------Transmit------------------------------------Receive---------3 3----------Transmit-------------------------------------Receive---------3 2----------Receive-------------------------------------Transmit--------5 2----------Receive--------------------------------------Transmit--------5 Mini-DIN to DB-9 Connection for RS-232 / RS-485 Signals RS-232 / RS-485 Digital Output Signal If you will be using the RS-232 / RS-485 output signal, it is necessary to connect the RS-232 / RS-485 Output Signal (Pin 5), the RS-232 / RS-485 Input Signal (Pin 3), and Ground (Pin 8) to your computer serial port as shown in above. Adapter cables are available from the manufacturer or they can be constructed in the field with parts from an electronics supply house. Note that the diagrams represent the “port” side of the connections, i.e. the connector on top of the meter and the physical DB-9 serial port on the back of the computer. The cable ends will be mirror images of the diagram. Locking Industrial Connector Pin-Outs If your Alicat Instrument was ordered with a Six Pin Locking Industrial connection, please be sure to reference the following pin-out diagram. A locking industrial connector is standard on all CSA/ATEX approved devices. It is also available as an option on all other Alicat instruments. Pin 1 2 3 4 5 6 Function Power In ( + ) RS-232TX / RS-485 + RS-232RX / RS-485 Remote Tare Meters (Ground to Tare) Analog Set-Point Input (Controllers) Ground (common for power, communications and signals) Signal Out (Voltage or Current as ordered) Cable Color Red Blue White Green Black 6 1 5 2 3 4 Brown Six-pin Industrial Connector Note: The above pin-out is applicable to all the flow meters and controllers ordered with the industrial connector. The availability of different output signals depends on the flow meter options ordered. 58 PROFIBUS Pin-Outs If your Alicat Instrument was ordered with a PROFIBUS connection, please be sure to reference the following pin-out diagram. Power and Signal Connections: Connect to the device using two DB9 connectors. The female top connection is PROFIBUS. The male connection on the side is power and RS-232 or RS-485. Pin out diagrams for all PROFIBUS enabled Alicat devices are shown below. TOP 5 9 SIDE 1 6 1 6 1. NC 2. OPT GND 3. DP 4. RTS 5. DGD 6. VP 7. OPT 7 to 30VDC 8. DN 9. NC 5 9 1. NC 2. RS232RX 3. RS232TX 4. NC 5. GND 6. NC 7. 7 to 30VDC 8. GND 9. NC 59 DB15 Pin-Outs If your instrument was ordered with a DB15 connection, be sure to check the Calibration Label on the device and reference the appropriate pin-out diagram. The following pin-out chart describes the safest and generally compatible arrangement when connecting a non-Alicat DB15 wire to a DB15 equipped Alicat. Not all features may be available between brands, but the common denominators are featured in our DB15 offerings, along with some options for customization. DB15 – Pin-Out Alicat Style 5 2 9 11 8 13 15 15 Male Connector Front View 2 5 8 13 11 9 Female Connector Front View Pin Number 1 2 3 4 5 6 7 Function Ground Primary Analog Signal Output Ground N/C Power Supply (+Vdc) N/C N/C Analog Tare (meters — when grounded) 8 Analog Set-Point Input (controllers) 9 Power Supply Common 10 Ground 11 Secondary Analog Signal Output / fixed 5.12Vdc 12 N/C 13 RS-232 RX (receive) or RS-485 – 14 Ground 15 RS-232 TX (send) or RS-485 + Check your device’s calibration certificate and user manual for the actual electrical input/output requirements, as all instruments are custom configured to some extent. NOTE: Pins 1, 3, 9, 10, and 14 are connected together inside of the device and are common grounding points. N/C = Not Connected/Open (can be used for custom pin assignments – please consult factory). 60 DB15 Pin-Outs If your instrument was ordered with a DB15 connection, be sure to check the Calibration Label on the device and reference the appropriate pin-out diagram. The following pin-out chart describes the safest and generally compatible arrangement when connecting a non-Alicat DB15 wire to a DB15B equipped Alicat. Not all features may be available between brands, but the common denominators are featured in our DB15 offerings, along with some options for customization. DB15B – Pin-Out “Brooks” Style 2 9 8 5 11 14 5 8 15 15 Male Connector Front View 14 2 11 9 Female Connector Front View Pin Number 1 2 3 4 5 6 7 Function Ground Primary Analog Signal Output N/C N/C Power Supply (+Vdc) N/C N/C Analog Tare (meters — when grounded) 8 Analog Set-Point Input (controllers) 9 Power Supply Common 10 Ground 11 Secondary Analog Signal Output / fixed 5.12Vdc 12 N/C 13 N/C 14 RS-232 RX (receive) or RS-485 – 15 RS-232 TX (send) or RS-485 + Check your device’s calibration certificate and user manual for the actual electrical input/output requirements, as all instruments are custom configured to some extent. NOTE: Pins 1, 9, and 10 are connected together inside of the device and are common grounding points. N/C = Not Connected/Open (can be used for custom pin assignments – please consult factory). 61 DB15 Pin-Outs If your instrument was ordered with a DB15 connection, be sure to check the Calibration Label on the device and reference the appropriate pin-out diagram. The following pin-out chart describes the safest and generally compatible arrangement when connecting a non-Alicat DB15 wire to a DB15K equipped Alicat. Not all features may be available between brands, but the common denominators are featured in our DB15 offerings, along with some options for customization. DB15K – Pin-Out “MKS” Style 2 9 5 13 7 8 8 14 Male Connector Front View Pin Number 1 2 3 4 5 6 7 8 9 10 11 12 13 7 5 2 14 13 9 Female Connector Front View Function N/C Primary Analog Signal Output N/C N/C Power Supply Common N/C Power Supply (+Vdc) Analog Tare (meters — when grounded) Analog Set-Point Input (controllers) Secondary Analog Signal Output / fixed 5.12Vdc * N/C Ground Ground RS-232 RX (receive) or RS-485 – * 14 RS-232 TX (send) or RS-485 + * 15 Ground Check your device’s calibration certificate and user manual for the actual electrical input/output requirements, as all instruments are custom configured to some extent. NOTE: Pins 5, 11, 12 and 15 are connected together inside of the device and are common grounding points. N/C = Not Connected/Open (can be used for custom pin assignments – please consult factory). * Added to allow for full use of features on Alicat devices, may not be present on host wiring. 62 DB15 Pin-Outs If your instrument was ordered with a DB15 connection, be sure to check the Calibration Label on the device and reference the appropriate pin-out diagram. The following pin-out chart describes the safest and generally compatible arrangement when connecting a non-Alicat DB15 wire to a DB15H equipped Alicat. Not all features may be available between brands, but the common denominators are featured in our DB15 offerings, along with some options for customization. DB15H – Pin-Out “Hastings H” Style 2 10 6 11 7 14 7 15 15 Male Connector Front View Pin Number 1 2 3 4 5 6 7 8 9 10 11 12 13 14 2 6 14 11 10 Female Connector Front View Function N/C RS-232 RX (receive) or RS-485 – * N/C N/C Ground Primary Analog Signal Output Power Supply Common N/C N/C Secondary Analog Signal Output / fixed 5.12Vdc * Power Supply (+Vdc) Ground N/C Analog Tare (meters — when grounded) Analog Set-Point Input (controllers) 15 RS-232 TX (send) or RS-485 + * Check your device’s calibration certificate and user manual for the actual electrical input/output requirements, as all instruments are custom configured to some extent. NOTE: Pins 5, 11, 12 and 15 are connected together inside of the device and are common grounding points. N/C = Not Connected/Open (can be used for custom pin assignments – please consult factory). * Added to allow for full use of features on Alicat devices, may not be present on host wiring. 63 DB15 Pin-Outs If your instrument was ordered with a DB15 connection, be sure to check the Calibration Label on the device and reference the appropriate pin-out diagram. The following pin-out chart describes the safest and generally compatible arrangement when connecting a non-Alicat DB15 wire to a DB15S equipped Alicat. Not all features may be available between brands, but the common denominators are featured in our DB15 offerings, along with some options for customization. DB15S – Pin-Out “Sierra” Style 2 9 8 11 12 13 14 14 Male Connector Front View Pin Number 1 2 3 4 5 6 7 8 9 10 11 2 8 13 12 11 9 Female Connector Front View Function Ground Primary Analog Signal Output N/C N/C Ground N/C N/C Analog Tare (meters — when grounded) Analog Set-Point Input (controllers) Power Supply Common Ground Secondary Analog Signal Output / fixed 5.12Vdc * 12 RS-232 RX (receive) or RS-485 – * 13 Power Supply (+Vdc) 14 RS-232 TX (send) or RS-485 + * 15 Ground Check your device’s calibration certificate and user manual for the actual electrical input/output requirements, as all instruments are custom configured to some extent. NOTE: Pins 1, 5, 9, 10 and 15 are connected together inside of the device and are common grounding points. N/C = Not Connected/Open (can be used for custom pin assignments – please consult factory). * Added to allow for full use of features on Alicat devices, may not be present on host wiring. 64 Additional Information for Alicat CSA and ATEX Approved Devices See the following page for Special Conditions regarding the use of these units! II 3 G EEx nA IIC T4 Class I, Div. 2 Group A, B, C and D T4 24 Vdc, 0.800A max Class I, Zone 2 AEx nA IIC T4 WARNINGS: EXPLOSION HAZARD – DO NOT DISCONNECT WHILE CIRCUIT IS LIVE UNLESS AREA IS KNOWN TO BE NON-HAZARDOUS. EXPLOSION HAZARD – SUBSTITUTION OF COMPONENTS MAY IMPAIR SUITABILITY FOR CLASS I, DIVISION 2. All Alicat CSA / ATEX approved devices are equipped with a locking 6 pin industrial connector. The power and signal connections are shown below. Ø .710 Wire color Red Blue White Green Black Brown 6 1 5 2 4 3 Brown Industrial Connector Overall Clearance IC-10 Cable Pin# 1 2 3 4 5 6 Cable Color Red Blue White Green Black 2.537 Min. Clearance w/ Cable Bend 6 Function Power In ( + ) RS-232TX / RS-485 + RS-232RX / RS-485 – Analog Input Signal Ground (common for power, communications and signals) Signal Out (Voltage or Current as ordered) Minimum Removal Clearance Pin 1 2 3 4 5 1.817 .425 Clearance Requirements for Industrial Connector IC-10 Locking Industrial Cable 65 1.602 USE of Alicat instruments (M, MS, MC, MCS, MCR, MCRS, P, PS, PC, PCS, PCR and PCRS product families only) in Class 1 Division 2 applications. CSA certifies the use of this product for general use as well as use in hazardous locations as defined by Class 1 Division 2 Group A, B, C and D T4. CSA certification is indicated by the product label as shown below and not by the statements in this, or any accompanying documentation. Special Conditions: To comply with CSA certification the following information is included in the product literature: • When equipment is properly labeled, it is suitable in Class I, Division 2, Group A, B, C and D, T4 o Tamb. -40°C to +50°C • Electrical Rating 24Vdc, 0.800A max • Instruments shall be powered by a CSA certified, UL listed, Class II external power supply suitable for the application • Instruments shall be housed in an enclosure with a minimum IP54 rating or location providing equivalent protection • Instrument’s final approval shall be provided by the local authority having jurisdiction II 3 G EEx nA IIC T4 Class I, Div. 2 Group A, B, C and D T4 24 Vdc, 0.800A max Class I, Zone 2 AEx nA IIC T4 X – See manual for special conditions WARNINGS: EXPLOSION HAZARD – DO NOT DISCONNECT WHILE CIRCUIT IS LIVE UNLESS AREA IS KNOWN TO BE NONHAZARDOUS. EXPLOSION HAZARD – SUBSTITUTION OF COMPONENTS MAY IMPAIR SUITABILITY FOR CLASS I, DIVISION 2. Alicat Scientific, Inc. Tucson, AZ USA Tel: 520-290-6060 www.AlicatScientific.com USE of Alicat instruments (M, MS, MC, MCS, MCR, MCRS, P, PS, PC, PCS, PCR and PCRS product families only) in applications requiring ATEX Certification. Properly labeled Alicat instruments comply to the following ATEX standard: II 3 G EEx nA IIC T4 (-40°C ≤ Ta ≤ +50°C) The examination certificate was issued by the CSA in accordance with accepted practices and procedures. This confirms compliance with the European ATEX Directive or Group II Category 3G equipment. ATEX certification is indicated by the product label as shown above and not by the statements in this, or any accompanying documentation. Special Conditions: • Properly labeled equipment is only certified for use in ambient temperatures in the range of -40°C to +50°C only • Electrical Rating 24Vdc, 0.800A max • Instruments shall be powered by a CSA certified, UL listed, Class II external power supply suitable for the application • Instruments shall be housed in an enclosure with a minimum IP54 rating or location providing equivalent protection • Instrument’s final approval shall be provided by the local authority having jurisdiction 66