1
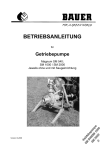
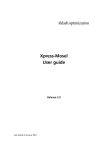
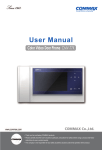
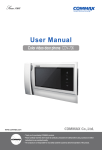
www.safemag.ru User Manual Home Automation CAV-705U • • Thank Thank you you for for purchasing purchasing COMMAX COMMAX products. products. • • Please Please carefully carefully read read this this User’s User’s Guide Guide (in (in particular, particular, precautions precautions for for safety) safety) before before using usingaaproduct productand andfollow follow instructions instructions to to use use aa product product exactly. exactly. • • The The company company isis not not responsible responsible for for any any safety safety accidents accidents caused caused by by abnormal abnormal operation operation of of the the product. product. www.safemag.ru www.safemag.ru Table of Contents 1. Greeting..............................................................................................................1 2. Warnings and caution.........................................................................................2 3. Parts and functions ............................................................................................4 4. Compositions .....................................................................................................5 5. Main menu..........................................................................................................6 6. Household setting (household No./ PIN / extension)..........................................7 7. Away mode setting ............................................................................................8 8. Individual door talk ...........................................................................................9 9. Guard station talk .............................................................................................11 10. Emergency function........................................................................................12 11. Telephone function(Telephone/Extension/Neighbor talk) ..............................13 12. Volume control(Receiving / calling / button tone) ...........................................14 13. EMS function (Device control) ......................................................................15 14. Detoured call ..................................................................................................19 15. Delivery notice ................................................................................................19 16. Guard security function .................................................................................19 17. Wiring ............................................................................................................21 18. Operation tips ................................................................................................23 19. Attention when in use .....................................................................................24 20. Miscellaneous.................................................................................................24 21. Specifications .................................................................................................25 1. Greeting ● Thank you for purchasing a COMMAX product Please, use the product after carefully reading this Manual ● This type of videophone can be used in apartments, villas and other buildings as a multifunctional device with door opening, telephone conversation and guard station control function ● 1 www.safemag.ru www.safemag.ru 2. Warnings and caution Please follow the things described below in order to prevent any danger or property damage. Warning Prohibition. No disassembly It may cause a serious damage or injury if violated. No touch Caution Must follow strictly. Shows plugging out the power cord without an exception It may cause a minor damage or injury if violated. Shows the warning and caution for an electric shock. Shows the warning and caution for a fire. Power & Installation Warning Please don’t use several products at the same time on one power socket. ·It may cause a fire due to an abnormal overheating. Please don’t bend the power cable excessively or it may cause an electric shock. ·fire when using a damaged power cable. Please don’t handle the power cable with a wet hand. ·It may cause an electric shock. Please plug out the power cable from the socket when not using it for a long period of time. ·It may shorten the product lifespan or cause a fire. Please don’t install the product in the place where there is much oil, smoke or humidity. ·It may cause an electric shock or fire. Please don’t install the product with the lightening and thunder. ·It may cause an electric shock or fire. Please don’t use and connect this product with other products with different rated voltage ·It may cause a disorder or fire. When installing the product that generates heat, please install the product away from the wall (10cm) for the ventilation. ·It may cause a fire due to the increased internal temperature. 2 www.safemag.ru www.safemag.ru Cleaning & Use Warning Please don’t disassemble, repair or rebuild this product arbitrarily (please contact the service center if a repair is needed. ·It may cause an electric shock or fire. If an abnormal sound, burning smell or smoke is coming out of the product, please plug out the power cable and contact a service center. ·It may cause an electric shock or fire. Please don’t insert any metallic or burnable materials into the ventilation hole. ·It may cause an electric shock or fire. Please use only the designated batteries for the products of using DC power. ·It may cause an electric shock or fire. Cleaning & Use Power & Installation Caution Please plug the power cable firmly into the inner end ·It may cause a fire. Please hold the plug tightly when unplugging the power cable (a part of the copper wire may be disconnected if the grabbing is only made on the cord when pulling out the cable). ·It may cause an electric shock or fire When connecting the power cables after cutting the cable, please install the product with power off ·It may cause an electric shock or fire Please be careful when using an AC circuit breaker since there is a possibility of an electric shock. Please check the use voltage and current for the DC-only products and use the appropriate rectifier. ·It may cause a fire. Please avoid direct rays of the sun or heating devices at a time of installation. ·It may cause a fire. When cleaning the product, please rub it with a soft and dry cloth after plugging out the power cable. (Please don’t use any chemical products such as wax, benzene, alcohol or cleanser.) Please don’t drop the product on the ground and don’t apply a shock . ·It may cause a failure. Please use the designated connection cable within the maximum calling distance designated for the product ·It may reduce the product performance. When installing the product, please fix it firmly while using the wall-mounting unit and screws. ·It may cause an injury from the falling object. Please don’t install the product on an unstable place or small support board. ·It may cause an injury if it falls down while in use. 3 www.safemag.ru www.safemag.ru 3. Parts and functions CAV-705U ① ⑤ ⑥ ⑦ ⑧ ⑨ ② ③ 1 ⑩ ④ Part No. ⑪ Part No. LCD & TOUCH SCREEN 7 Guard button Door release button Speaker 8 3 Power LED 9 Talk button 4 MIC 10 Power switch 5 Emergency button 11 Wiring connector 6 Monitoring button 2 The product has hands-free conversation function : Please, press conversation button to initiate or end a call (Remark : When in stand by mode, only power button is on.) ▶ The product is designated as Master and can be connected to multiple Slave units. (Cannot be used as Slave terminal) ▶ In case if multiple video-phone terminals are installed and the line of one terminal is busy, other terminal can overtake the call. ▶ In case if the line is busy and the call comes to the busy line, call notification only comes to the terminal where call is directed ▶ In case of emergency, notification is directed to all installed devices. Setting and resetting the emergency situation are only available on terminals where 'Setting and resetting' button is installed In case if alarm is emitted, conversation through video phone terminal will be forcibly terminated. (Alarm : emergency, Notification 1(Fire), Notification 2(Gas), Burglar 1, Burglar 2) 4 www.safemag.ru www.safemag.ru 4. Compositions MANUAL Monitor ▲ 본체( CAV-705U) GH1T GH1T4X18 4 XZNW 50 ZnY Screws mounting 벽걸이 for 설치 스크류 PHM 3 X 6 ZnY Screws for main body 본체 설치 스크류 bracket ▲ Wall 벽걸이 브라켓 2P(3EA) Connectors 연결 컨넥터 manual ▲ User 사용설명서 3P(1EA) Connectors 연결 컨넥터 4P(1EA) Connectors 연결 컨넥터 POWER CORD 480 장원 원형 단짹 6P(2EA) Connectors 연결 컨넥터 8P(1EA) Connectors 연결 컨넥터 12P(1EA) Connectors 연결 컨넥터 5 www.safemag.ru 5. Main menu www.safemag.ru ① Door : Door camera monitoring and talk ② Guard : Guard station call and talk ③ Telephone : Telephone and extension/neighbor talk ④ EMS(Energy Management System) : Remote control(Secumax - remote metering and control) Device control(Lighting / Gas valve / Boiler) ⑤ Security1(Burglar1) : For setting Security1(Magnetic sensor) ⑥ Security2(Burglar2) : For setting Security2(PIR sensor) ⑦ Delivery : For checking delivery notice ⑧ Away : For setting or releasing away mode ⑨ Setting : For setting household Info, volume control, away mode details 6 www.safemag.ru www.safemag.ru 6. Household setting (household No./ PIN / extension) ※ It shows the following screen after pressing「 Setting 」 icon and 「Household」 」in order. 1. Household No. setting It shows setting menu of building and room No. after pressing「House Num」icon ① Enter your preferable number and press 'Bldg' then number and press 'Rm' for room number. Press for confirmation (You can cancel the numbers you entered by pressing icon) 2. Household PIN setting ① It shows setting menu of PIN after pressing「House PIN」icon for confirmation ② Enter your preferable 4 digits and press 3. Extension No. setting ① It shows setting menu of extension No. after pressing「extension」icon ② Call guard station through sub phones. You can hear melody sound if installation is fine. for confirmation ③ Enter ID from 2 ~ 9 through 10-key button and press 7 www.safemag.ru www.safemag.ru 7. Away mode setting 」 icon and「Setting ※ It shows the following screen after pressing「Setting」 」in order. away mode」 ① You can activate each icon to be operating in away mode. (Devices and sensors should be installed before activating) - Security1(Burglar1) : Activating security 1 sensor in away mode - Security2(Burglar2): Activating security 2 sensor in away mode - All lights off : Activating all lights Off in away mode - Gas valve closed : Activating gas valve closed in away mode - Standby power block : Activating standby power block device in away mode ● Time setting for security sensor in away mode (Value : 0 ~ 90 sec available) ① Setting delay time(Sec) - You can choose delay time after activating away mode. (Security sensors get activated after delay time ends. - Default 60 sec ② Releasing delay time(Sec) - You can choose releasing time of reactivating sensors when you come back home. (It generates alarm signal after time set [Default 0 sec] ※ Factory default is 0 sec, so you should set the releasing time from 0 to 90 sec 8 www.safemag.ru www.safemag.ru 8. Individual door talk ● How to use door monitoring/talk and basic function 1. Individual door monitoring and talk ① When you press「Door」icon, it shows door monitoring ② When you press「Talk」icon, it enables to talk ③ When you press「Door Release」icon, it makes door open 2. When you get a call from entrance(Individual/Lobby) ① It shows visitor image when you get call sound(Call indication appears on the upper left of screen) ② Press「Talk」icon(or button) to communicate. ③ Press「Talk end」icon to end communication 」button while talking with visitor ※ You can make door open by pressing「Door Release」 ● Volume control function ① You can control receiving sound volume through +, - of volume control while talking ② You can control call sound volume through +, - of volume control while monitoring (You can make factory default by pressing「Initial」) 9 www.safemag.ru www.safemag.ru ● Display setting It shows Color, Contrast and Brightness after pressing「Display 」icon while talking/monitoring. (You can make factory default(medium value) by pressing「Initial」) ● Screen scrolling and zoom in & out 1. You can make screen zoom in & out by pressing 2. You can drag its screen view as PTZ function) and while talking and monitoring ※ Caution : PTZ function is available when you connect door camera having PTZ function only. You should make power off and on when you change with PTZ based door camera. 10 www.safemag.ru www.safemag.ru 9. Guard station talk ● How to use guard call and talk 1. Guard call ① When you press「Guard」icon, it executes calling and talking ② When you press「Talk end」icon, it ends talking 2. Receiving a call from Guard ① It converts with Guard talk after calling sound ② You can press「Talk」icon and talk ③ When you press「Talk end」icon, it ends talking ● Volume control function ① You can control receiving sound volume through +, - of volume control while talking ② (You can make factory default by pressing「Initial」) 11 www.safemag.ru www.safemag.ru 10. Emergency function ● How to activate emergency function It generates emergency when you press 'Emergency button more than 1 sec on the right upper side. (With emergency sound generating, guard station gets emergency signal from household ● How to release emergency function You should check all the circumstances in your house after emergency happened and press 「Release」icon to stop signal going to guard station. ● How to return emergency function You can return to standby status after pressing「Return」icon in emergency released. 12 www.safemag.ru www.safemag.ru 11. Telephone function (Telephone/Extension/Neighbor talk) ※ It shows the following screen once you press「Telephone 」icon ● How to register numbers and make a telephone call conafter entering the numbers you want to call Press ① Calling : Press「Telephone」icon and 「Talk end」icon after you finish calling ② Receving a call : It shows「Talk」icon when you have receiving bell sound Press「Talk」icon to communicate and press「Talk end」icon after you finish talking ● How to register numbers and call extension ① Calling : Press「 Extension 」icon and it shows registered ID and name on screen. You can talk with extension after entering the number(No. 2~9) you want to call ② Receiving a call : It appears [Extension] mark on screen when a call comes from extension and you can talk by pressing talk button ● How to register neighbor numbers and call ① Calling : Press「 Neighbor 」icon and it shows registered ID and name on screen. You can call to neighbor by entering building number → press 'Bldg' and house number → press 'Rm'. ② Receiving a call : It appears [Neighbor] mark on screen when a call comes from neighborhood and you can talk by pressing talk button ● How to control calling and receiving sound volume You can control receiving sound volume through +, - of volume control while talking ☞ It appears dial pad when you press「Key Pad」icon while talking (It requires when you need to use ARS service) ☞ Recent call history up to 5 calls is shown on left upper side You can recall one of restored calls by pressing each tab. ☞When you get a call from outside ① It appears one of the following marks with call sound while talking (ex : Individual door, Lobby, Guard, Neibor, Extension, Telephone etc) ② You can switch the call by pressing「Talk」icon two times ③ You should end the call by pressing「Talk」icon after finishing talking www.safemag.ru 13 www.safemag.ru 12. Volume control(Receiving / calling / button tone) ※ It shows the following screen once you press「Volume 」icon ● How to control volume 1 It shows control pad after pressing「Volume」icon 2 You can control volume through +, - of volume control from assigned icon ※ Caution : It gives you no sound if you make minimum level for calling and beep sound - Lobby : It controls receiving sound from lobby panel - Telephone : It controls receiving sound from Telephone - Guard : It controls receiving sound from Guard phone - Individual door : It controls receiving sound from individual door - Neighbor : It controls receiving sound from Neighbor - Call sound : It controls calling sound - Extension : It controls receiving sound from extension - Touch/Ring tone : It controls the volume level of Touch/Ring tone ※ It enables to change the volume level while talking with each item 14 www.safemag.ru www.safemag.ru 13. EMS function (Device control) ※ Each device tab is shown automatically after product booting In case a device is not properly connected, it does not appear. (In order to make sure device checking, please make power on again. ※ If the device is set to "Away"mode, the integrated devices for all lights off, gas valve control and standby power control are activated. ※ The all lights switch is not integrated with normal light switches and thus, it is not displayed in the light switch menu. 」→「Lighting」 」in order to move to control screen. 1) Lighting control : Press「EMS」 ● Lighting status screen On / Off : It shows the status of the assigned room It shows basic 8 lights on screen, you can check and control additional lights by scrolling right and left sides ● Individual lighting control You can control each lights(On / Off) individually. ● All lights control Press 'All on' icon to make all lights on Press 'All off' icon to make all lights off 15 www.safemag.ru www.safemag.ru 2) Gas control : Press「EMS」 」→「Gas」 」in order to move to control screen. ● Gas valve status screen Open / Close : It shows the status of the assigned valve ● Individual valve close You can make the available valve close by pressing the switch located below ● All Gas valve close Press 'All Close' icon to make all valves close 16 www.safemag.ru www.safemag.ru 3) Boiler control : Press「EMS」 」→「Boiler」 」in order to move to control screen. ● Temp control status screen ① Operating condition : The display highlighted in green means ON and grey means OFF. ② The upper temperature display : It shows the current temperature of the room ③ The lower temperature display : It shows the desired temperature of the room (It has 2 controllers basically, you can check and control additional controllers by scrolling right and left sides ● Temperature control ① You make the display ON by clicking(Green) ② You can set the desired temperature by pressing Up & down button on the lower temperature display. 17 www.safemag.ru www.safemag.ru 4) Remote control : Press「EMS」 」→「Remote control」 」in order to move to control screen. ● Remote metering You can check the real time based following date by pressing [Requesting remote metering data] ① Water : It shows Water usage ② Gas : It shows Gas usage ③ Electricity : It shows Electricity usage ④ Hot water : It shows Hot water usage ⑤ Heat : It shows Heat usage 18 www.safemag.ru www.safemag.ru 14. Detoured call ● In case away mode is activated, all the calls from lobby and individual door detour and talk with guard station ※ receiving sound might be lower as the call routs through many paths 15. Delivery notice When guard station makes delivery call to household,「Delivery」icon blinks ● Press「Delivery」icon to call the relevant guard station You can confirm your delivered goods and take from guard station ● When you complete the call with guard station,「Delivery」icon stops blinking ※ Remark :「Delivery」icon remains in blinking if you do not make a call with guard station 16. Guard security function Emergency signal only keeps on after sound ringing for 3 minutes. When there is a call from other devices, the emergency sound rings again and delivery sounds to the caller. 1) Alarm 1 function (Fire) When burglar 1 is activated, alarm signal(Fire truck) generated delivers to guard station. After checking properly the status of inhouse, you may press「Release」button to deactivate the alarm and it makes alarm sound stopped from guard station. You can make it initial stage once you press「Return」button 2) Alarm 2 function (Gas) When burglar 2 is activated, alarm signal(Ambulance) generated delivers to guard station. After checking properly the status of inhouse, you may press「Release」button to deactivate the alarm and it makes alarm sound stopped from guard station. You can make it initial stage once you press「Return」button 3) Fire ladder alarm function You will have alarm sound when Fire ladder is using After checking properly the status of inhouse, you may press「Release」button to deactivate the alarm and it makes alarm sound stopped from guard station. You can make it initial stage once you press「Return」button 4) Security function (Burglar sensor) Security1 function (Security1 activates after setting up) After pressing「Security1」icon while standby status, it makes「Security1」icon and its function are activated. Burglar alarm rings(Police car sound) and signal delivers to guard station when it gets movement. 19 www.safemag.ru www.safemag.ru Security2 function After pressing「Security2」icon while standby status, it makes「Security2」icon and its function are activated. Burglar alarm rings(Police car sound) and signal delivers to guard station when it gets movement. How to release security function Press「Security 1,2」again to make both setting deactivated How to return security function after alarm generates Press「Release/Return」icon to return security function after checking household. The way of Release/Return emergency and security Press「Release」icon → Return」icon [Caution] Burglar sensor will be returned to normal mode as long as it is working properly. Be sure to check the door closed or nobody is in IR sensor area You can make security and away mode released when it is in stop mode. 5) Away mode setting After setting away mode, you should be out of house within 60 sec (Time counts from screen) ☞ You can change delay time from「Away mode」→「Delay time(Sec)」 Press「Away」icon to activate icon and away mode together. For integrating device, you can choose from「Away mode」 6) Away mode releasing Press「Away」icon again when you come back home to release away mode Away mode releasing signal delivers to guard station ot inform its deactivation 20 www.safemag.ru www.safemag.ru 17. Wiring Diagram 2 1 4 3 2 1 2 1 6 5 4 3 2 1 8 7 6 5 4 3 2 1 6 5 4 3 2 1 12 11 10 9 8 7 6 5 4 3 2 1 TEL VIDEO B+ GND INT CAMERA FIRE_LADDER LOBBY LB_VD_CONT VIDEO OUT VIDEO IN GND LB_CONV GND DATA GD_CONV 3 GUARD GD_CONV 2 GD_CONV 1 VIDEO OUT GND SLAVE PHONE EMERGENCY_ ALARM BUTTON BURG2 (PIR) CONV 485+A 485-B SENSOR GND DC12V(+) BURG1 ALARM2 (GAS) ALARM1 (FIRE) SENSOR GND DC12V(+) CAV-705U 2 1 3 2 1 4 3 2 1 GND DC14V(+) DC_OUT (300mA) GND 485+A 485-B 485 DEVICE (LIGHTING, GAS,BOILER) SCL VCC SDA GND PROGRAM Wiring method ☞ Be sure to check wire polarity. Monitor might be not working properly due to wrong wiring. ☞ ID of every product must be registered or it won't work properly. Installing SLAVE phones ① Enter the ID which is an assigned number of each Slave phone for classifying ID in circumstance of installing more than 2 units. Duplicate number is not acceptable ② The ID of Master monitor is '1' and you can assign '2' from following devices Assigned ID is also used as ID for inter - communication 21 www.safemag.ru www.safemag.ru ▣ Emergency Button Connect the emergency switch referring to wiring diagram. Please press it more than 1 sec to avoid malfunctioning. ▣ Fire ladder It generates alarm in case of using fire ladder. Please connect two wires from lead switch when you do not use emergency ladder to avoid malfunctioning ▣ Alarm sensor 1 (Fire) Be sure to check the wire polarity before connecting the wires ▣ Alarm sensor 2 (Gas) Operating voltage is DC 12V. Be sure to check the wire polarity before connecting the wires ▣ Security 1 (Burglar 1) It should be connected with lead switch. If you don't want to use this function, connect 2 wires each other or security sensor 1 & away mode will be deactivated. ▣ Security 2 (Burglar 2) Operating voltage is DC 12V. Be sure to check the wire polarity before connecting wires. When it is used with security switch (lead switch) it use '+' and sensor line. If you do not want to use security 2, please connect '+' & sensor line each other or security sensor 2 & away mode will be deactivated. ▣ Guard Guard station unit is connected with 8 wires. Be sure to check the wire polarity before connecting wires. ▣ Individual door (Camera) Individual door camera is connected with 8 wires. Be sure to check the wire polarity before connecting wires ▣ Lobby Lobby camera is connected with 4 wires in polarity. In case of connecting between lobby panel & monitor, please connect them VD/IN(DN), VD/OUT(UP) in order. Wire for transferring video signal between lobby & monitor should be connected with coaxial cable except star configuration using CCU-481F. extension (Slave phone) Be sure to check wire polarity before connecting wires. Please connect wire for video signal VD/IN, VD/OUT order. Be sure the polarity of power input to SLAVE (SLAVE requires power independently) 22 www.safemag.ru www.safemag.ru 18. Operation tips ● ● ● ● Troubles Cause Remedy Blackened visitor’ image in clear background Due to backlight, aperture is respond too brightly Replace camera to the place where there is no backlight Blurry screen Due to foreign substance on the lens Remove foreign substance with rug No call to guard station/common lobby Appears “DATA LINE out -of - order(2) on the screen Problem in communication line. Call A/S center of a agent hung up automaticallywhile talking Preset communication time individual entrance : 1min Common entrance : 1min End talk within preset time ※ Appears “DATA LINE out-of-order(1) on the screen, call A/S center in your region 23 www.safemag.ru www.safemag.ru 19. Attention when in use ※ Don’t install this product at different place when it need to be moved to other places as it is installed with common wiring type ※ Please make the device switch up ※ Please never make this product disjointed and remodeled. Please consults checking and repair of this product with dealership or customer consultation counter. ※ Please do not raise metal object, pot and bottle on the product ※ use a proper disconnection device at interior wiring in a building. When the fire emergency alarm is happened, promptly shut down the disconnection device of building ※ When to install and repair the device, please make the device power off 20. Miscellaneous •Please carefully read this User’s Guide before calling service man •After checking the entire check list, please contact customer service center. We will do our best to make you satisfy with our services. ▣ Before You Call Try the Troubleshooting Guide on the following pages. If you still can’t solve your problem, try one more thing before you call. 1. Pull the Power Plug from the AC receptacle. 2. Wait 10 minutes. 3. Plug the unit back in and try your procedure again. ▣ Getting Help If you still can’t correct an operating problem, contact your dealer. If your dealer is unable to solve your problem, contact Commax Customer Service. Please don’t open the cabinet and attempt to repair the unit, as this will void your warranty. Unplug the unit and refer servicing to qualified service personnel when: The power supply or plug is damaged. The unit has been exposed to rain or water. A solid object or liquid ahs fallen into the unit. The unit exhibits a distinct change in performance or will not operate normally. The unit has been dropped or the cabinet has been damaged. ▣ Maintaining Your Unit The only maintenance that your unit should requires is an occasional dusting DO NOT spray any liquids on the unit. ▣ To Service The Unit Customer Service may be reached at 1-080-902-2222 ▣ Replacement Parts When replacement parts are required, be sure the service technician has used replacement parts specified by the manufacturer or those which have the same characteristics as the original part. Unauthorized substitutions may result in fire, electrical shock or other hazards. 24 www.safemag.ru www.safemag.ru 21. Specifications Content Item Telephone: 2 wires, Door camera: 4 wires, Fire ladder : 2 wires, Wiring Lobby: 4 wires in common, Guard station : 8 wires in common, SLAVE : 6 wires, Power 100~240V, 50~60Hz(FREE VOLTAGE) , 0.3A Emergency switch : 2 wires, Sensor: 12 wires Power consumption Communication Display Standby : 6W , Max : 16W HANDS FREE 17.78Cm(7") COLOR TFT-LCD (DIGITAL) Telephone : Ringer Call sound Door camera : Chime 3 melody 2 times Guard station : Melody Door camera : 28m(Ø0.5) Distance Guard station : 1Km(Ø0.5) Lobby panel : 300m(Coaxial cable) Channel Guard station: 3 channel, Lobby panel: 1 channel Remark : Function and design can be changeable to improve product quality. 25 www.safemag.ru www.safemag.ru 513-11, Sangdaewon-dong, Jungwon-gu, Seongnam-si, Gyeonggi-do, Korea Int’l Business Dept. Tel. : +82-31-7393-540~550 Fax. : +82-31-745-2133 Web site : www.commax.com PM02705U0010 Printed In Korea / 2014.05.104 www.safemag.ru