1
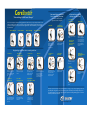
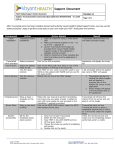
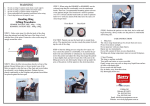
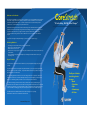
Welcome to CoreStretch
CoreStretch
TM
Each year we lose flexibility in our muscles, tendons and ligaments. This loss in flexibility directly correlates to
increase risk of injury and a decrease in athletic performance. Because the back is the core of our skeletal
and muscular system its health is vital to our bodies overall performance. Yet, this is also why the back
continues to be one of the leading causes of pain and discomfort.
“Stretching BACK I n t o S h a p e ”
CoreStretch was designed to stretch the back, shoulders and legs better than traditional and conventional
methods. Corestretch’s unique design elongates the back, stretching the muscles, tendons and ligaments not
only in the back, but also those in your legs that work in conjunction with the back. Traditional and
conventional back stretching methods are either to difficult to use or force the back to curve instead of
elongate.
CoreStretch is also light and collapsible making it easy to transport for use anywhere you go.
Stretching Guidelines
•
•
•
•
Stretching is more effective after warming up and also after exercise.
Never bounce or jerk when stretching
Hold each stretch 10-30 seconds
Never stretch to the point of pain. Stretch to the point of mild tension in the muscles and then relax as you
hold the stretch.
• Focus on breathing slowly, deeply and naturally. Proper breathing aids relaxation which enhances your
stretching success.
Proper Technique
For best results, it is important that the CoreStretch be properly sized (adjusted in length) and positioned
correctly.
To position the CoreStretch correctly, first set the padded foam bar on you lap at your waist, approximately
the same position as your waist or belt line. It is preferable that the numbers face you, with the number 1 on
top and the number 10 on the bottom
For proper sizing, adjust the CoreStretch on one of the settings, numbered 1-10. Depress the button and
lengthen the CoreStretch to the number which fully extends your arms and straightens your back but still
allows for a comfortable grip with your hands. You are now ready to use the CoreStretch.
The attached stretching poster demonstrates a variety of stretches that may be performed using the
CoreStretch. Please note that there are three levels of stretching and that not all stretches are recommended
at each level. For beginners it is recommended that you start in a seated/chair position, working your way up
to the intermediate or standing/supported position and if possible the advanced or seated/floor position.
For additional instruction, a DVD is available on-line at www.medi-dyne.com or by calling
817-251-8660 or toll free in the United States at 800-810-1740.
www.medi-dyne.com
Finally, an effective
stretching device
for your
• Back
• Shoulders
• Hips
• Hamstrings
• & Shins
CoreStretch
TM
Intermediate stretches
in a standing position
“ S t r e tching BACK Into Shape”
(can also be done leaning
against a wall for support)
For best results, please read the stretching guidelines and directions for proper technique included on the
reverse side of this poster. Also, be sure that your arms are fully extended (not bent at the elbow) and
your back is straight (not curved) as shown in the diagram below. This will maximize your back elongation and stretch.
Correct Height
Correct Posture
Incorrect Height
Lower Back
A d v a n c e d s t r e t c h in g
s it t i n g o n t h e f l o o r
Lower Back
& Hamstrings
Advanced Lat
Lower & Upper
Back & Shoulders
Incorrect Posture
With legs straight, slowly lean
forward.
Slightly bend the knees and
slowly lean forward. You
may also lean side to side
emphasizing a side or
specific target area.
Slightly bend the knees, cross
your arms (see inset) and
slowly lean forward.
Peroneal (Outer
Calf & Ankle)
Lateral (outside)
Hamstrings
With legs straight and
slightly separated, grip the
handle with one hand and
support yourself on the
floor with the other. Lean
toward the supporting
hand. Reverse hands for
other side.
B e g in ning stretches in a seated position
Lower Back
Lower & Upper
Back & Shoulders
Lats & Lateral
Scapula
Advanced
Lateral
Lats & Lateral
Scapula
Medial (inner)
Calf & Medial (inner)
Hamstrings
Lower Back &
Hamstrings
With legs spread, invert toes
(point inward) and slowly
lean forward.
Groin &
Hamstrings
Keep legs bent and slowly
lean forward. You may also
lean side to side emphasizing
a side or specific target
area.
Lower Back
& Hamstrings
Legs bent, cross your arms
(see inset) and slowly lean
forward.
Lower Back,
Hamstrings & Shins
Reverse your hands so that
your palms are facing
upwards (see inset) and
slowly lean forward
Grip the handle with one
hand and support yourself on
the chair with the other
hand. Lean toward the
supporting hand. Reverse
hands for other side.
Slightly bend the knees.
Reverse your hands so that
your palms are facing
upwards (see inset) and
slowly lean forward
Straighten your legs and
slowly lean forward.
With legs spread, evert toes
(point outward) and slowly
lean forward.
Hip (Piriformis)
Upper Glute & I.T. Band
With legs spread, slowly lean
forward.
As always, if you have had any recent physical problems or surgery, or if you are just beginning to exercise,
especially after a long absence, please consult your physician. As with any new stretching technique, it is
recommended that you start slowly using the beginner positions and then gradually progress to the more
advanced positions and techniques.
Position yourself on the edge
of your seat. Straighten your
legs and slowly lean forward.
This can also be done one
leg at a time.
Sitting on the edge of your
chair, straighten your legs
and point your toes. Slowly
lean forward.
Sitting comfortably in
your chair, cross the leg
of the hip you want to
stretch and slowly lean
forward.
www.medi-dyne.com