1
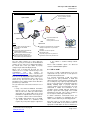
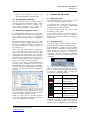
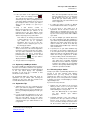
Yebo Sync Station User Manual
YT-SS-UM-1.1
Author:
YeboTech (Pty) Ltd
2.
DOCUMENTATION
2.1. Product Information Leaflets
1.
INTRODUCTION
1.1. Overview
The Yebo Sync Station is used to connect Yebo Keys
to the Yebo Management System web site, enabling
the user to capture locks and keys, manage key
authorizations, collect audit trails, and enable timebased functions such as time windowing and multikeying.
The information leaflets describe the basic usage of
the products in day-to-day use. The information
leaflets for sync station models and related utilities
may be found in:
Product
Reference
USB Sync Station
YT-SS_USB-IL-1.0
GSM Sync Station
YT-SS_GSM-IL-1.0
There are currently two variants of sync station: a
‘USB’ variant, which requires an Internet connected
Microsoft Windows™ workstation with an available
USB port and installation of YSSController software;
and a “GSM’ variant, which is stand-alone but
requires the presence of a supported GSM cellular
network.
YSSController software
YT-SS_CTLR-IL-1.0
1.3. Scope
Product
Reference
This manual describes the installation, configuration,
use and trouble-shooting of all variants of the Sync
Station products and controller software.
USB Sync Station
YT-SS_USB_001-DS-1.0
GSM Sync Station
YT-SS_GSM_001-DS-1.0
1.2. Context
The information contained herein is intended for those
who need to install, support and maintain sync station
services, or advanced users wishing to obtain a
deeper understanding of the product than that
provided by the information leaflets.
1.4. Table of Contents
2.2. Product Data Sheets
The product data sheets contain summary information
about each product. The products applicable to this
manual are:
2.3. Software
The latest YSSController software required to support
the USB sync station may be downloaded from the
sync
station
product
support
page
on
www.yebotech.com.
1.
Introduction ....................................................... 1
2.
Documentation ................................................. 1
2.4. Price Lists
3.
Basic Concepts ................................................. 1
4.
Installing a USB Sync Station ........................... 3
The latest product price lists are available in YT-ccyyPL-1.n, where ‘ccyy’ is the applicable year.
5.
Running the USB Controller ............................. 6
6.
Running the USB Client .................................... 7
7.
Installing a GSM Sync Station .......................... 8
8.
Registering a Sync Station ............................. 11
9.
Trouble-Shooting ............................................ 13
10.
Appendix: Command Switches ....................... 14
(c) 2012-2013 YeboTech (Pty) Ltd
www.yebotech.com
3.
BASIC CONCEPTS
3.1. Product Overview
The location of the sync station within the larger
system is summarized in the image below.
Page 1 of 15
Yebo Sync Station User Manual
YT-SS-UM-1.1
Overview of Yebo Sync Station Solutions
Secure HTTPS connection
from sync station controller
to Yebo servers
Option 2: GSM
GSM network
Internet
Firewall
Sync Station
Option 1: USB
Notes:
A sync station typically generates 4
kbyte traffic per 100 audited
transaction;
A large store typically generates 5001000 transactions per day;
GSM is simpler to install and manage
but attracts GSM network charges;
Sites requiring high reliability can use
both solutions to provide redundancy.
USB
requirements
A Windows™ workstation with an available
USB port is required to run sync station
controller;
Installation as a service requires
administrator rights;
Corporate proxy server may need to be
bypassed to reach secure.yebotech.com.
The sync station contains one or more plugs into
which a key may be inserted; the model illustrated
contains just one. It also has a display that indicates
the current state of the sync station. A properly
configured sync station will display ‘Ready’.
When a key is inserted into the plug, the sync
station’s job is to securely connect the key to the
YeboManager
web
site
located
at
https://secure.yebotech.com. Once connected the
web site performs the necessary transactions and
then closes off by displaying the status of the key; this
usually involves displaying the name of the user to
whom the key has been issued, plus any useful
information such as which location and for what time
period the key is authorized.
The sync station can connect to the web site in one of
two ways:
1. Using a host Microsoft Windows workstation
that has access to the secure.yebotech.com
web site. This is the ‘USB’ sync station variant
and it plugs into a regular USB port. No special
USB driver is required, but it is necessary to run
the ‘controller’ software on the host workstation.
2. Via a GSM cellular network. This is the ‘GSM’
sync station variant. It is stand-alone and
requires only a 12V power supply to support, but
(c) 2012-2013 YeboTech (Pty) Ltd
www.yebotech.com
Corporate firewalls must
permit access to
secure.yebotech.com:443
https://
secure.yebotech.com
it also attracts a nominal monthly network
charge.
Various USB installation options are discussed
section 4.2 USB Installation Options.
3.2. USB vs. GSM
The choice of USB or GSM depends on the site
requirements. The pros and cons of each option are
summarized in the table below.
In a corporate environment a USB sync station
solution can be quite problematic to install and
support. Corporate security policies frequently restrict
use of USB ports, may require opening of firewalls to
access secure.yebotech.com, and installers may have
difficulty obtaining rights to properly install the
controller software on the host workstation. In a work
environment a reliable host workstation is also
sometimes hard to identify and their maintenance
depends a great deal on the quality of the resident
management and staff. These factors should be
assessed prior to advancing a USB solution.
In smaller stand-alone environments where one
individual is responsible for maintaining the sync
station, a USB solution may be eminently practical.
Sites that require a very high degree of reliability
should consider GSM as the preferred solution. If
appropriate a USB station can also be installed as a
Page 2 of 15
Yebo Sync Station User Manual
YT-SS-UM-1.1
Installation
USB
GSM
Requires:
Requires:
•
MS Windows host computer
•
Supported GSM network
•
Available USB port
•
12V power supply
•
Network access to secure.yebotech.com
•
Run YSSController software
•
Administrator rights to install as service
Support
Less robust; people fiddle, un-plug devices,
turn off computers, loose network connectivity,
experience power outages.
Very robust. Device contains battery backup
good for at least 24 hours power outage.
Cost
Cheapest.
Attracts monthly cellular network charge.
Security
Less secure. The secure link to the web server
is decrypted by the YSSController software
and is potentially vulnerable to interception by
malicious applications on the host workstation.
Most secure.
Speed
About the same
redundant network backup. Note that for sites making
use of daily time-windowing, reliability is essential as
expired keys must be synced in order to be
authorized for the day.
number of sync stations installed at the site, so the
major cost impact of redundant sync stations is
typically the cost of the hardware.
4.
3.3. Network load
A sync station typically generates less than 4kb of
traffic per 100 audited transactions. A site with 100
locks and 20 keys typically generates less than 1,000
transactions a day, so the monthly sync station
network traffic is usually well under 2MB per month.
This is usually inconsequential in a corporate or GSM
network. Note that the quality and congestion on a
corporate network can vary significantly, and if
possible corporate IT should prioritize traffic to and
from sync stations.
INSTALLING A USB SYNC STATION
4.1. Requirements
The following checklist should be cleared prior to
installing a USB sync station:
Requirement
Description
Host
computer
A Microsoft Windows
workstation Windows
2000/XP or later.
Check: Start / Right click
‘Computer’, check Windows
edition. Windows 2000, XP,
Vista or 7 are all acceptable.
3.4. Cost
There is a nominal price difference between the USB
and GSM sync station hardware; typically this will not
be a factor for larger sites.
The GSM sync station attracts a nominal monthly
network connection charge, plus a data charge. This
will vary from network to network but will typically be
significantly less than a standard cell phone contract.
A busy sync station is unlikely to use more than 2MB
of data per month, which is usually an inconsequential
cost.
Note that YeboTech charges a site service fee for
sync stations, not per sync station. The site attracts
the same sync station service fee regardless of the
(c) 2012-2013 YeboTech (Pty) Ltd
www.yebotech.com
Ok?
Internet
access
Access to
secure.yebotech.com.
Check: Open a web browser
and type
‘secure.yebotech.com’ into
the address line. The web site
home page should display.
Troubleshooting: see section
9.1, Configuring the Network.
Page 3 of 15
Yebo Sync Station User Manual
YT-SS-UM-1.1
USB port
An available and powered
USB port.
Check: Plug in the USB sync
station. It should display
‘Please run sync station
service’.
Administrator
access
Access to an account with
administrator access.
Note: this is only required for
install option 3. See section
4.2, USB Installation Options.
Check: Start / Control Panel /
User Accounts / Change Your
Account Type. If
‘Administrator’ is not selected
then it is not an administrator
account.
Install
software
The install file. See section
4.3, Obtaining YSSController
Software.
4.3. Obtaining YSSController Software
The latest YSSController install can be obtained from
www.yebotech.com/support/ss/downloads.htm, or go
to https://secure.yebotech.com/ and click ‘Help’.
4.4. Option 1: Copy Executable
Use this option if you are unable to obtain
administrator rights to the host workstation, but for
which a user has been nominated to be logged in for
the sync station to function.
Note: Copying an executable file to a corporate
computer may be contrary to security policies. This
should be cleared with local management first.
To obtain the YSSController.exe application you
must first run the downloaded install on a workstation
on which you have install rights (see Option 2: Install
as a user application). YSSController.exe can then be
copied
from
the
path
“C:\Program
Files\YeboTech\YSSController” (or “C:\Program
Files (x86)\YeboTech\YSSController” on a 64bit operating system).
The installation procedure is then as follows:
4.2. USB Installation Options
1. Log into the host workstation
nominated user account.
The USB sync station requires the ‘controller’
software to be run on the host computer. No special
USB driver is required.
2. Copy YSSController.exe to a suitable location.
A
suggested
location
is
“<User
Folder>\Software\YeboTech”.
There are three install options:
3. Click Windows Start menu, All Programs, rightclick ‘Startup’ and ‘Open’. Then right-click on the
YSSController.exe in its copied location and
drag into the Startup folder, and select “Create
shortcuts here”. This will cause YSSController to
be run whenever the user logs in.
1. Don’t install. Copy YSSController.exe to the
computer and run in a regular user account.
This does not require administrator rights and
no installation is required. See section 4.4,
Option 1: Copy Executable.
2. Install YSSController as a regular user
application. This may require administrator
access depending on corporate policies.
YSSController will only run when the nominated
user is logged in. This may be preferred if the
site does not wish the sync station to be
operable unless a nominated user is
authenticated. See section 4.5, Option 2: Install
as a user application.
3. Install YSSController as a system service. This
requires administrator rights to install.
YSSController will start running as soon as the
workstation is booted and does not require
anyone to log in. This is the most robust solution.
See section 4.6, Option 3: Install as a service.
From a support perspective the last option is
preferred.
using
the
4. Repeat the process above to create a link on
the user’s desktop. This will enable the user to
manually start the application if necessary.
4.5. Option 2: Install as a user application
Use this option if the site requires a designated user
to be logged in for the sync station to be operable. In
order to run the install you may require administrator
rights, depending on corporate IT policies.
1. Log into the designated user’s account.
2. Download the latest .msi file from YeboTech
(see section 4.3, Obtaining YSSController
Software).
3. Double-click on the downloaded .msi file to
start the install.
4. When presented with the ‘Install Options’ dialog,
un-check the ‘Install as a service’ option. See
section 4.7, Install Options for a full description
of other available install options.
(c) 2012-2013 YeboTech (Pty) Ltd
www.yebotech.com
Page 4 of 15
Yebo Sync Station User Manual
YT-SS-UM-1.1
5. If requested “Do you want to allow the following
program to make changes to your computer?”
click ‘Yes’. You may be required to enter an
administrator password.
6. Click ‘Finish’ to complete the installation. The
controller should now be running. See section
4.8, Verifying the Installation.
4.6. Option 3: Install as a service
Use this option if you wish the sync station to be
operable as soon as the host computer has booted,
regardless of whether or not someone is logged in.
This is the preferred option from a support
perspective. You will require access to an account
with administrator rights.
1. Log into the Administrator account.
2. Download the latest .msi file from YeboTech
(see section 4.3, Obtaining YSSController
Software).
3. Double-click on the downloaded .msi file to
start the install.
Note: If you wish to perform the install in a
non-administrator account, go to Start / All
Programs
/
Accessories,
right-click
Command Prompt, and select ‘Run as
administrator’. Then use ‘cd’ to change to
the folder in which the .msi file is located,
and type <filename>.msi. The install will
then run with administrator rights.
4. When presented with the ‘Install Options’ dialog,
check the ‘Install as a service’ option. See
section 4.7, Install Options for a description of
other available install options.
Note: If the install has not been run with
administrator rights the install will end with
an error.
5. Click ‘Finish’ to complete the installation. The
YSSService should now be running. See section
4.8, Verifying the Installation.
4.7. Install Options
There are various install options that may be used to
customize the install, presented in the ‘Install Options’
dialog during installation.
The options are as follows:
1. Install as a service. If checked, a service
named YSSService is installed. The service is
configured to run on start-up. Following
installation the service should be running. The
sync station will be accessible even if no one is
logged into the computer.
If not checked, the application is installed as a
regular user application. A user must be logged
in for the sync station to be useable.
Note: If this option is checked, the install must
be run with administrator rights.
2. Allow users to start and stop service. This is
only applicable if ‘Install as a service’ is checked.
If checked, this will allow ordinary users to start
and stop the controller service via the GUI. If not
checked, only an administrator will be allowed to
start and stop the service.
3. Start when user logs in. This will cause either
the controller or a client to start up when a user
logs in by means of a link in the user’s “Startup”
folder. This will appear as a small icon in the
system tray, and allow the user to monitor the
state of the sync station controller.
If not checked, a user will have to manually start
the application via the applications menu or a
desktop icon.
Note: If installing as a service, this option
only applies to the GUI. The service will still
run even if this option is un-checked.
4. Add a desktop icon. If checked, a desktop icon
will be added to the user’s desktop.
(c) 2012-2013 YeboTech (Pty) Ltd
www.yebotech.com
Page 5 of 15
Yebo Sync Station User Manual
YT-SS-UM-1.1
5. If the the application was installed as a system
service, a service named ‘YSSController’ should
have been installed and started.
6. If a sync station is plugged in and the host can
contact secure.yebotech.com, the sync station
should display ‘Pass Key:’ followed by a 6character code.
See section 5, Running the USB Controller and
section 6, Running the USB Client for details on how
to use the application, and section 8 for details on
how to register the sync station.
5.
RUNNING THE USB CONTROLLER
5.1. Understanding execution modes
5. Folder. Specify the installation folder for the
application. Usually the default folder should be
used.
6. Everyone or Just me. If you select ‘Everyone’,
then the ‘Start when user logs in’ and ‘Add
desktop icon’ will be applied to every user on
the workstation. If you select ‘Just me’, then only
the account in which the installation is being
performed will be affected.
Note: When not installing as a service, if
multiple users are logged into the computer
then only the first user who logs in will run
the controller. Subsequent users who log in
will only run the client. When the first user
logs out the controller will no longer be
running. See section 5.1, Understanding
execution modes for a full explanation.
4.8. Verifying the Installation
The application consists of two programs:
YSSService.exe, and YSSController.exe.
YSSService.exe is a ‘controller’ application that
manages any sync stations plugged into the host
computer. It is usually run as a system service. It may
also be used by an administrator to configure the
service installation, or it may be run as a consolemode application. See section 10.2, YSSService.exe
switches for a description of YSSService.exe
command-line options.
YSSController.exe is actually two applications in
one: the ‘controller’, which does exactly the same job
as YSSService.exe, and a ’client’, which provides a
graphical interface reporting the status of the
controller. It is always run as a regular user
application, and supports command-line options
similar to YSSService.exe. See section 10.3,
YSSController.exe switches for a description.
Following execution of the installation programme
(options 2 and 3 above), the controller should be
running. The following may be checked to verify an
installation:
The ‘controller’ component does the actual job of
controlling sync stations, and only one copy may run
at a time. The controller may be run either as a
Windows service (as YSSService.exe), or as a user
application (in YSSController.exe).
1. A new menu item will have appeared under
Start / All Programs / Yebo Tech / Sync Station
Controller. This menu contains links to
YSSController and various support pages.
The ‘client’ component simply connects to the
controller version and provides the user with a means
of seeing what is going on. The client is visible as an
icon in the Windows system tray.
2. If ‘Start when user logs in’ was checked, Start /
All Programs / Startup will contain a link to
YSSController.
Because YSSController.exe contains both the
controller and the client, exactly how it behaves when
started depends on the installation options and the
context in which it is launched:
3. If ‘Add a desktop icon’ was checked, there
should be an icon on the user’s desktop that
looks like this:
.
4. An icon should have appeared in the system
task tray that looks like this:
. See section
6.2, Client Status Icon if you have difficulty
finding the icon.
(c) 2012-2013 YeboTech (Pty) Ltd
www.yebotech.com
1. If the application was installed as a service,
YSSController.exe will always run as a client,
even if the service is not running.
2. Otherwise, if there is no other controller running
the YSSController.exe will run as both a
controller and as a client.
3. If however there is already a controller running,
then YSSController.exe runs only the client
Page 6 of 15
Yebo Sync Station User Manual
YT-SS-UM-1.1
portion. It will attempt to connect to the
controller and display the controller status.
5.2. Overriding default behaviour
6.
RUNNING THE USB CLIENT
6.1. Starting the Client
The USB client allows a user to view the current
controller state and to manage the controller.
The above behaviour may be overridden using the
/controller and /client command-line switches, which
force YSSController.exe to run as a controller or only
as a client, respectively. See section 10.3,
YSSController.exe switches for a full description.
To start the client is is usually only necessary to run
YSSController.exe. See section 5.1, Understanding
execution modes for further information.
5.3. Starting and stopping the service
You can force YSSController.exe to run as a client
by using the /client switch.
If the application was installed as a service, a service
named ‘YSSController’ will have been created in the
list of system services. This is a background
application that runs independently of any logged in
user.
A user should run just one copy of the client. It is
possible for more than one copy to be running, in
which case an identical set of status icons will appear
in the task tray.
By default the installer configures the service to start
whenever the computer is booted, and it is started as
part of the installation. Normally it should not be
necessary to manually start or stop the service, but it
is possible to do so.
6.2. Client Status Icon
If the service was installed with the option ‘Allow
users to start and stop the service’, then the control
menu in the client interface will contain the ‘Start
Service’ and ‘Stop Service’ items (see section 6.3,
Control Menu). The appropriate item will be un-greyed
depending on the current state of the service. If the
service is currently started, select ‘Stop Service’ to
stop the service, and ‘Start Service’ to start it.
The service may also be controlled through the
operating system’s management console. To open
click Start, right-click ‘Computer’, and select ‘Manage’.
Then open up ‘Services and Applications’, and select
‘Services’. You may need to type in an administrator
password.
The client is visible as a small icon in the service tray,
located in the bottom right of the Windows desktop.
Note: On Windows 7 / Vista the icon may be hidden.
Click the arrow as indicated in the figure below to
display all of the service tray icons. The icon may be
made permanently visible by selecting the
‘Customize…’ link in the service tray, locating the
sync station icon, and then selecting ‘Show icon and
notifications’.
As a rule, one icon per plugged in sync station is
visible to indicate the status of that sync station. If
there are no sync stations plugged in then only one
icon with the ‘Unplugged’ status is visible. The
possible status icons are listed below.
Icon
The YSSController should appear in the list of
services under the name ‘YSSController’. It should
have a Startup Type of ‘Automatic’, meaning it will run
on reboot, and status ‘Started’ if running.
Finally, the service may be controlled using the
/start and /stop switches of YSSService.exe. See
section 10.2, YSSService.exe switches.
(c) 2012-2013 YeboTech (Pty) Ltd
www.yebotech.com
Status
Description
No controller
The client was unable
to connect to the sync
station controller.
Unplugged
There are no sync
stations plugged in.
Ready
Sync station is idle and
ready for key insertion.
Key present
A key is present and
active.
Failed
A sync station has
experienced an error.
In a new installation with just a single sync station
plugged in you should see a single ‘Failed’ status icon,
as the sync station will still have to be registered.
Follow the web site registration procedure described
Page 7 of 15
Yebo Sync Station User Manual
YT-SS-UM-1.1
in section 8, Registering a Sync Station to register the
sync station on the web site.
Reset all stations
This causes the sync station
controller to perform a hardware
reset on all connected sync
stations. This should have the
same effect as unplugging the
sync station and re-inserting.
Open log…
Open the sync station controller
log.
Further information can be obtained about the state of
a sync station by hovering the mouse over the status
icon. The sync station controller menu can be
accessed by right-clicking a status icon.
6.3. Control Menu
The control menu for a sync station / controller may
be accessed by right-clicking a sync station status
icon. An example of the control menu appears below.
Note: Depending on the log
configuration, this may only
contain events from the time the
sync station controller was last
started.
Start Service
Start the sync station controller.
Note: This item is only visible if
the application is installed as a
service.
Note: This will be greyed out if
the service is already running, or
if the user does not have
permission to start the controller
service.
At the top of the menu appears the location of the
sync station. This is the location entered into the
‘Location’ field on the management web site when a
sync station is registered, and is only configurable on
the web site. If the sync station is not registered this
will display ‘(unregistered)’.
Stop Service
Note: This item is only visible if
the application is installed as a
service.
Note: This will be greyed out if
the service is not running, or if
the user does not have
permission to stop the controller
service.
The remaining menu items are described below.
Item
Description
About
YSSController
Displays the ‘About’ box for the
sync station controller. This may
be used to obtain the software
version of the currently running
sync station software.
Check
Registration
Force a check the registration
status of all connected sync
stations. This will cause the sync
station to contact the server and
verify it is correctly registered.
This may be used to update the
registration status after entering
a new registration key.
Note: An unregistered sync
station will check its registration
status every five minutes in any
event.
Stop sync station controller.
Exit
Exit the client application.
Note: If the application is only
running as a client, this will not
stop the service.
Note: If the application is being
run as a controller as well, then
this will stop the controller and
the sync stations will no longer
run.
7.
INSTALLING A GSM SYNC STATION
7.1. Requirements
To install a GSM sync station the following is
required:
Note: An unregistered sync
station may be forced to check
its registration by inserting a key.
(c) 2012-2013 YeboTech (Pty) Ltd
www.yebotech.com
Page 8 of 15
Yebo Sync Station User Manual
YT-SS-UM-1.1
Requirement
Description
Mains power
Access to mains power.
Ok?
Note: Any 12W power source
from +6V (2A) to +24V (0.5A)
is an acceptable input.
GSM
coverage
7.3. Power connector
Note: the GSM sync station is designed to be a nonportable fixture with a permanently wired power
supply using an RJ 6P6C connector that is easy to
customize on site. Incorrect wiring can result in
destruction of the sync station. On-site power
cable assembly should be done by trained personnel
only, or use a provided standard length cable.
Acceptable GSM coverage
signal strength.
0V
Check: A typical cell phone
should indicate at least 2 bars
strength at the proposed site
of installation. A portable
GSM station should show
more than -91 dBm. See
Figure 6.
7.2. Power precautions
A sync station draws a peak power of about 8W
during transmission. If the voltage input to the sync
station drops below +5V the station will lose
regulation and affect reliability. Low voltage supplies
with poor regulation or long cable runs to sync
stations without battery backup can result in
unacceptable power dips during activity. For these
applications higher voltages (16 - 24V) are preferred.
For reliable performance it is advisable to use a PSU
with a three-prong power connector. Two-prong
connectors can fail if bumped or joggled, and twoprong adapters get ‘borrowed’.
+12V
GSM sync station power
connector
6P6C connector
Pin-out
Pin 1
Pin 6
The required wiring for the power plug connecting to
the GSM sync station is indicated in the figure above.
Only two pins are connected.
7.4. Standard cables and PSU
For permanent fitted and wall-mounted installations
YeboTech supplies recommended PSU’s with skirting
adapter and cables of standard lengths. When making
use of these ensure that the cable end marked ‘PSU’
is plugged into the PSU adapter box, and the end
marked ‘GSM’ is plugged into the top left socket of the
GSM sync station as viewed from the front.
The sync station will not be harmed if a standard
cable is accidentally plugged in the wrong way around.
If the sync station does not power up, check the cable
is plugged in correctly.
Figure 2: Standard PSU and skirting adapter
Figure 1: A suitable 24V/0.8A GSM station PSU
(c) 2012-2013 YeboTech (Pty) Ltd
www.yebotech.com
Page 9 of 15
Yebo Sync Station User Manual
YT-SS-UM-1.1
Thread and
attach antenna
Insert power
cable
7.5. Tamper-proof battery installations
If the sync station is to be used with a battery backup
and is not fitted with an on/off switch, the device will
have been shipped with the battery disconnected.
Prior to installation open the unit and connect the
battery. Prior to closing ensure the connectors
between the two boards are aligned. The unit will
become live once the unit is closed.
Note: Do not permit the battery to remain in a fully
discharged condition for extended periods of time, as
this may affect battery capacity. After connecting the
battery the unit should be connected to a PSU.
7.6. Installation Procedure
The installation procedure is as follows:
Thread PSU cable
behind bracket and
locate under preferred
groove
Figure 4: Cables prior to securing to bracket
5. If a battery is installed then prior to securing in
the bracket verify the power status icon has
gone out. See section 7.7, GSM Power Status
Indicator.
1. Prepare the chosen table or wall mounting as
per instructions included in the package.
6. Secure the unit with the provided fixing screws
and/or double-sided tape, as appropriate.
2. Prepare the power supply cabling and fit to
length. If not using a standard supplied
connector, see section 7.3, Power connector for
plug wiring.
7. If using an external patch antenna, adjust the
location to obtain the optimal reception using the
signal strength indicator. See section 7.8, GSM
Signal Strength Indicator.
3. If the device is not fitted with an on/off switch
and is to have a battery backup, connect the
battery. See section 7.5, Tamper-proof battery
installations.
8. Once the sync station is able to connect to the
GSM network it will attempt to register with the
server. Registration will usually take just a few
seconds. Upon successful completion the
station will display the user-assigned sync
station name and the legend ‘Ready’.
4. Thread the PSU and antenna cables into the
mounting bracket as indicated in Figure 3 and
Figure 4.
9. If the sync station is not registered the displayed
pass key must be entered into the user account.
See section 8.3, Registering a GSM Sync
Station. The sync station will attempt to register
once per minute until the correct pass key has
been entered on the web site.
7.7. GSM Power Status Indicator
Figure 3: GSM station socket locations, top view
(c) 2012-2013 YeboTech (Pty) Ltd
www.yebotech.com
When the GSM station is operating on battery power
the ‘connect power’ icon is lit. When installing a sync
station with a battery backup ensure this icon turns off
when the PSU is plugged in.
Page 10 of 15
Yebo Sync Station User Manual
YT-SS-UM-1.1
Figure 5: Power status indicator
7.8. GSM Signal Strength Indicator
The GSM signal is displayed as a lob-sided pyramid
icon on the bottom right of the display.
Icon
Strength
Description
Figure 7: Signal strength indicator
The signal strength is update once per second for 30
seconds following start-up. Thereafter the strength
may be checked only every 30 seconds or upon key
insertion. If the signal strength appears to be
acceptable and stable the icon may be removed. The
icon will re-appear if the strength starts to change
significantly.
<-113 dBm
No signal or unable to
connect
During installation the signal strength display can be
forced by re-starting the unit. Changing the location of
the external antenna in a manner that significantly
changes the signal strength will also cause the icon to
re-appear.
< -91 dBm
Terrible, probably
unreliable
Signal strength may vary depending on climactic
conditions. Stations using internal antennas may
indicate varying signal strength as users move about.
8.
< -79 dBm
Bad, usable but speed
may be compromised
REGISTERING A SYNC STATION
8.1. About Registration
A sync station cannot be used until it is registered
with an account on the management system at
https://secure.yebotech.com.
< -65 dBm
Ok
< -53 dBm
Good
In order to register the sync station you need access
to a management account. Usually a sync station is
permanently attached to a single account, and may
only be used for locks and keys managed by that
account.
Note: You need to have ‘Manage Sync Stations’
permission on the account. This is available to
‘Installer’ and ‘Account Superuser’ roles.
8.2. Registering a USB Sync Station
> -53 dBm
Excellent
If you have a sync station controller running and you
plug a new sync station into a USB port, the following
happens:
1. The sync station controller recognizes the
presence of the sync station. A new sync station
status icon appears in the service tray.
Figure 6: Signal strength icons
(c) 2012-2013 YeboTech (Pty) Ltd
www.yebotech.com
2. The Yebo server is contacted to check the sync
station’s registration status.
Page 11 of 15
Yebo Sync Station User Manual
YT-SS-UM-1.1
3. If the sync station is not registered, the sync
Note: The new registration only takes effect
when the temporary pass key is entered. If
the designated user runs the controller
without the sync station having been reregistered then the sync station will not need
to be re-registered.
station’s status icon displays ‘Failed’:
.
The controller then generates a temporary 6character pass key. This key is displayed on the
sync station display, and may also be accessed
by hovering the mouse over the sync station’s
status icon. An example of a pass key is
‘SJ2GKL’.
3. If a USB sync station is moved to a different
host workstation then it must be re-registered.
4. Using
a
web
browser,
connect
to
https://secure.yebotech.com and log into the
account on which the sync station is to be
registered. Access the ‘Sync Stations’ menu
item and use the ‘Add’ button to enter the sync
station’s temporary pass key and location.
4. If for any reason a sync station loses its
registration, but the account to which it is
attached has not changed, then use the ‘Reregister’ button to enter the new temporary pass
key. It is not necessary to delete and re-add the
sync station.
Note: If there is an existing sync station that
is being replaced or for some reason the
sync station has lost its registration
information, then you can use the ‘Reregister’ to enter a temporary pass key for
the existing sync station.
5. If a site has multiple sync stations attached to
the same workstation, then after registration a
sync station may be identified by right-clicking to
obtain the sync station control menu. The sync
station’s location (as entered on the web site)
will be displayed in the bubble help or at the top
of the control menu.
5. Wait for a few minutes, or right click on the
status icon and access the ‘Check Registration’
menu item, or insert a key into the sync station.
The sync station contacts the server using the
temporary pass key, and is issued with a
permanent pass key. The status icon should
now show ‘Ready’:
. The sync station’s
display should also show ‘Ready’.
6. The sync station is now registered.
8.3. Registering a GSM Sync Station
If you have a GSM sync station that has been able to
reach the server and has verified it is not registered,
the temporary 6-character pass key will be displayed
on the sync station display. The registration
procedure on the web site is identical to that
described in section 8.2 above.
An unregistered GSM sync station will check its
registration once per minute. After entering the
required pass key on the web site, just wait a few
seconds until the station checks again.
8.4. Registration Tips
1. Temporary pass keys are re-generated every
time a sync station is plugged in or initialized.
Ensure that the pass key you are entering is the
pass key currently being displayed on the sync
station.
2. If a sync station was installed to be run as an
application and a designated user account, then
that user must always run the sync station
controller. If another user attempts to run the
controller then the sync station will have to be
re-registered.
(c) 2012-2013 YeboTech (Pty) Ltd
www.yebotech.com
6. A specific piece of sync station hardware may
be locked to an account by selecting the ‘Lock
to account’ option in the sync station properties
dialog on the web site. This will prevent the sync
station from being re-registered on another
account, providing a means of theft deterrence.
Note: For security reasons an unregistered
sync station does not display information
about the account on which it is registered.
Locking a sync station to an account which
cannot be subsequently identified may thus
render the sync station unusable.
8.5. Relocating a Sync Station
Usually a sync station is permanently attached to one
account. If you have ‘Relocate Sync Stations’
permission then you may relocate an already
registered sync station you own to any account to
which you have access. This permission is available
to ‘Installer’ roles and is a useful facility if you need to
support multiple sites.
If you have relocate permission:
1. Register your sync station on any account to
which you have access. In the sync station
properties dialog, select the ‘Ownership’ tab,
and in ‘Owning user’ select yourself.
Note: The ‘Ownership’ tab is only visible if
you
have ‘Relocate Sync Stations’
permission.
2. Assigning ownership of the sync station to
yourself causes the sync station to be always
listed in every account to which you have
access, even if the currently selected account is
not the account to which the sync station is
Page 12 of 15
Yebo Sync Station User Manual
YT-SS-UM-1.1
attached; and it will only be visible to yourself. If
ownership is ‘none’ (the only other available
option), then the sync station only appears on
the account to which it is attached, for all users.
“secure.yebotech.com”. If there are already
addresses specified, use a semicolon to
seperate
them;
for
example
“192.168.0;secure.yebotech.com”.
3. To relocate a sync station, access the ‘Sync
Stations’ menu item on any account, access the
‘Ownership’ tab for the relocateable sync station,
and select the account to which the sync station
is to be relocated.
Note: On older operating systems such as
Windows XP there is a character limit of 255
characters. If this limit is exceeded, do not
remove any addresses from the bypass list
without consulting the corporate’s IT
department as it may affect other
applications on the workstation.
Note: Sync station relocations appear on
your audit trail and on the affected account’s
security exceptions advisory.
9.
TROUBLE-SHOOTING
9.1. Configuring the Network
In order to function the USB sync station host must
have access to https://secure.yebotech.com. The
quickest way to verify this is to type this address into
a web browser on the host workstation. This should
return the login prompt from the management web
site.
For home and small business installations it is very
unlikely there will issues reaching the server.
Some corporate networks restrict access to all but a
restricted list of hosts. In such cases the corporate’s
IT department must be contacted and requested the
following:
•
Enable HTTPS protocol packets
secure.yebotech.com, port 443.
to
host
•
As a convenience, also open port 7 (ECHO,
used by ‘ping’).
Even if the corporate firewall is opened to
secure.yebotech.com (which may be verified by
typing ‘ping secure.yebotech.com’ on a command
prompt), it is possible that the host workstation is
configured to use a proxy server that is not forwarding
to secure.yebotech.com. It is then necessary to
bypass the proxy server for this address. In order to
do so:
7. Click 'Ok' until you reach the main browser
window, and then enter “secure.yebotech.com”
into the URL box. You should be presented with
the YeboManager login page.
9.2. Managing Hibernation
If a USB host computer goes into hibernation it will
usually turn off the USB ports. The sync station will
not be functional until the computer is woken up.
Usually a computer in hibernation may be woken by
hitting a key, and up to a minute will be required
before the sync station may be used. In such
circumstances the user(s) must be trained to
understand the required process.
The brute-force method is to turn off hibernation. This
may be appropriate if the sync station is used through
a 24-hour period. Consult the operating system
documentation for the appropriate way to turn off
hibernation.
9.3. Managing Service Configuration
YSSService.exe may be run on the command line to
manage its installation configuration. Depending on
the initial installation options you may need to have
administrative rights.
To start a command prompt as administrator, got to
Start / All Programs / Accessories, right-click
Command Prompt, and select ‘Run as Administrator’.
To change to the folder containing YSSController.exe:
1. Run Internet explorer.
cd C:\Program Files (x86)\YeboTech\YSSController
2. Access Tools / Internet Options.
To display all available command-line switches:
3. On the “Connections” tab, access the “LAN
Settings” button.
4. If the “Use a proxy server for your LAN”
checkbox is not checked, then you do not have
to configure any proxy bypass. Only if it is
checked, continue to the next step.
5. Click the “Advanced” button under the Proxy
server settings.
6. In the “Exceptions” box under “Do not use proxy
server for addresses beginning with:”, enter
(c) 2012-2013 YeboTech (Pty) Ltd
www.yebotech.com
YSSController /help
To re-install the service:
YSSController /reinstall
To restart the service:
YSSController /restart
To grant ordinary users the ability to start and stop the
service:
YSSController /grantall
Page 13 of 15
Yebo Sync Station User Manual
YT-SS-UM-1.1
To specify a fixed location for a log file and enable
event logging, and have these used every time the
controller is started:
YSSController /log c:\yssc.log
Note: this does not un-install the
application, just the service.
/install
Install this application as a system
service. This will fail if the service is
already installed.
/reinstall
Re-install this application as a system
service. If the service is already
installed it will be first un-installed.
This will not affect existing registry
settings.
/stop
Stop the YSSController service.
/start
Start the YSSController service. This
will fail if the service is already
running.
/restart
Re-start the YSSController service. If
the service is currently running it will
first shut it down before re-starting.
/grantstart
Grant ‘Everyone’ the right to start the
service.
/grantstop
Grant ‘Everyone’ the right to stop the
service.
/grantall
Grant both start and stop access to
‘Everyone’.
/console
Run the service as a regular consolemode application. All output to the
error log is echoed to the display. Hit
<Enter> to exit the application.
/log
[<file>]
Specify the name of the log file to log
to. If <file> is not specified the
default temporary file is used.
/diag [<n>]
Set the diagnostic level: 0 = errors
only (default), 1 = activity, 2 =
messages, 3 = both.
/diag 1 /persist /exit
See section 10, Appendix: Command Switches for a
full description of available switches.
10. APPENDIX: COMMAND SWITCHES
10.1. General remarks about switches
Both YSSService.exe and YSSController.exe can
be executed with command-line switches to control
their behaviour and installation.
Generally:
1. All switches are preceded by a ‘/’.
2. Switches are case-insensitive.
3. Multiple switches may be specified.
4. With the exception of /fork, the order of
switches doesn’t matter. When multiple switches
are specified they are executed in the ‘logical’
order.
5. The arguments for switches that take arguments
must follow the switch separated by white space.
Example: /diag 1
6. Arguments that contain white space must be
enclosed in double-quotes.
Example: /log "My log file.log"
7. The application will return an error code of zero
if no error occurred processing switches,
otherwise it will return the Windows error code
of the failing operation. This code is accessible
in the command shell via the %ErrorLevel%.
10.2. YSSService.exe switches
The YSSService.exe application is normally run by
the system as a service. This is its default behaviour
when run without any command-line switches. It may
also be run from a command prompt to configure the
service installation.
Note: Message logging will fail unless
run as an administrator.
Note: If <n> is not specified, the
default is 0 = errors only.
The following switches are supported:
Switch
Description
/help
List application information and all
available switches.
/uninstall
Uninstall the YSSController service.
This will first stop the service if it is
currently running.
(c) 2012-2013 YeboTech (Pty) Ltd
www.yebotech.com
Note: Activation of message logging
is recorded in the sync station’s audit
trail and raised on the security
exception report.
/persist
Write the /log and /diag settings to
the registry.
Page 14 of 15
Yebo Sync Station User Manual
YT-SS-UM-1.1
/exit
Exit the application after processing
the switches. This is implied by
/help,
/uninstall, /install,
/reinstall,
/stop,
/start,
/restart,
/grantstart,
/grantstop, /grantall.
application is running as a controller.
/log
[<file>]
Specify the name of the log file to log
to. If <file> is not specified the
default temporary file is used.
Note: this switch is only applicable if
application is running as a controller.
Examples:
To force a re-install, grant start and stop access to all
users, and start:
/client
Note: If YSSController is installed as
a service then this is implied, even if
no controller is running. This
behaviour may be overridden by
specifying the /controller switch.
YSSService /reinstall/grantall/start
To run as a console-mode application and log activity
to the console:
YSSService /console/diag 1
/controller
10.3. YSSController.exe switches
YSSController.exe is normally run as a user
application. The following switches are supported:
Switch
Description
/help
Display a dialog listing all available
switches.
Display
dialog.
/stop
Stop all running instances
YSSController and exit.
the
application’s
/fork
of
Fork a new copy of this process and
then immediately exit. All switches
following ‘/fork’ are passed to the
new application.
Note: switches prior to /fork are
processed before forking.
/diag [<n>]
Do not enable the client graphical
interface when running as a
controller. This implies /controller.
Note: When run with this option there
will be no visible interface. The only
way to stop the application is for the
user to log out, or to locate
YSSController in the task manager
and shut it down.
‘About’
Note: This may fail if the account
executing this command lacks
sufficient privileges.
Force the application to run as a
controller.
Note: This will fail if there is already a
controller running.
/nogui
/about
Force the application to run as a
client and not as a controller.
Note: When started as a service,
/noclient is implied.
/noclients
Prevent clients from connecting to the
controller. This implies /controller.
/persist
Write the /log and /diag settings to
the registry.
/exit
Exit the application after processing
the switches. This is implied by
/help, /about, /stop, /fork.
Set the diagnostic level: 0 = errors
only (default), 1 = activity, 2 =
messages, 3 = both.
Note: Message logging will fail unless
run as an administrator.
Note: If <n> is not specified, the
default is 0 = errors only.
Note: Activation of message logging
is recorded in the sync station’s audit
trail and raised on the security
exception report.
Note: this switch is only applicable if
(c) 2012-2013 YeboTech (Pty) Ltd
www.yebotech.com
Page 15 of 15