1
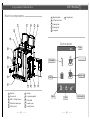
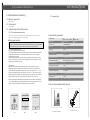
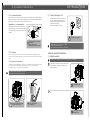
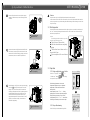
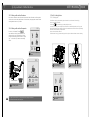
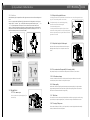
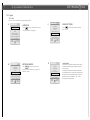
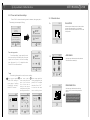
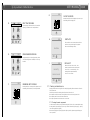
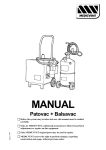
 KK&yyhd
USER MANUAL USER MANUAL
Fully-automatic Coffee Machine
IMPORTANT SAFEGUARDS
When using electrical appliances, basic safety precautions
should always be followed, including the following:
1. Read all Instructions.
2. Do not touch hot surfaces. Use handles or knobs.
3. To protect against fire, electric shock and injury to persons do
not immerse cord, plugs, in water or other liquid.
15. Close supervision is necessary when any appliance is used by or
near children.
16.Supply cord
a) A short power-supply cord is to be provided to reduce risks resulting
from becoming entangled in or tripping over a longer cord.
b) Longer detachable power-supply cords or extension cords are
available and may be used if care is exercised in their use.
c) If a long detachable power-supply cord or extension cord is used:
4. Unplug from outlet when not in use and before cleaning. Allow
to cool before putting on or taking off parts, and before cleaning
the appliance.
5. Do not operate any appliance with a damaged cord or plug or
after the appliance malfunctions, or has been damaged in any
manner. Return appliance to the nearest authorized service
facility for examination, repair or adjustment.
6. The use of accessory attachments not recommended or sold
by the appliance manufacturer may result in fire, electric shock or
injury to persons.
7. Do not use outdoors.
8. Do not let cord hang over edge of table or counter, or touch hot
surfaces.
9. Do not place on or near a hot gas or electric burner, or in a
heated oven.
10. To disconnect, turn any control to "off", Then remove plug
from wall outlet.
11. Do not use appliance for other than intended use.
12. Avoid contacting moving parts.
SAVE THESE INSTRUCTIONS
I f an extension cord is used :
(1) the marked electrical rating of the (detachable power supply cord or)
extension cord should be at least as great as the electrical rating of the
appliance;
(2) the appliance is of the grounded type, the extension cord should
be a grounding type 3-wire cord;
(3) the longer cord should be arranged so that it will not drape over the
countertop or tabletop where it can be pulled on by children or tripped
over.
This appliance is intended to be used in household and similar
applications such as:
– staff kitchen areas in shops, offices and other working environments;
13. Don’t move the covering lid away when the appliance is in
working.
– farm houses;
14.Scalding may occur if the brewing unit is removed during the
brewing cycles.
– bed and breakfast type environments.
– by clients in hotels, motels and other residential type environments;
USER MANUAL
Fully-automatic Coffee Machine
Machine components
9
8
10
11
12
7
11
Adjusting knob
12
Coffee bean tank
13
Brewing door
14
Brewing unit
15
Dreg plate
16
Dreg drawer
6
Control panel
00:25
5
Time
4
Hot water
3
Single cup
Steam
2
1
16
15
14
1
Drip tray
6
Display
2
Power cord
7
Cup warming plate
3
Milk-Frothing Device
8
Water tank
4
Steam/hot water pipe
9
Powder cover
5
Coffee spout
10
Powder funnel
图1
.
13
Menu
.
Power
图2
Add powder
ME-711
USER MANUAL
Fully-automatic Coffee Machine
T a b l e o f C o n t e n ts
1.Coffee machine introduction
01
3.3.5 Milk-Frothing device
10
1.1 Machine components
01
3.3.5.1 Frothing milk
10
1.2 Control panel
01
3.3.5.2 Hot water
11
1.3 Safety features of the coffee machine
01
1.3.1 Excessive powder protection
01
3.4.1 Pre-warm cups
11
1.3.2 Impurity filter
02
3.4.2 Adjust coffee grind thickness
12
1.4 Specification parameters
02
3.4.3 Adjust the height of coffee spout
12
1.5 Accessories of the machine
02
3.4.4 Pre-marinate coffee powder (Pre-brewing coffee)
12
2.Read before starting the coffee machine
03
3.4.5 Coffee bean storage
12
2.1 Safety
3.4 Suggestions
11
03
3.4.6 Water quality
12
2.1.1 Power line
03
3.4.7 Working time
12
2.1.2 Keep children away from the machine
04
3.4.8 Turning off the power
12
2.1.3 Placement of the machine
05
2.1.4 Cleaning
05
3.5.1 Menu
13
2.1.5 Repair and maintain
05
3.5.2 Timer switch and time settings
17
3.5 Program
12
2.2 Connect the power
06
3.6 Other indications
18
3. How to use the machine
06
3.7 Cleaning and maintenance
21
3.1 Install the machine
06
3.7.1 Cleaning the main components
21
3.2 Discharge water
08
3.7.2 Cleaning the water tank filter
23
3.3 Operation
08
3.7.3 Storage
23
3.3.1 Single cup/Double cups of coffee
08
3.3.2 Stop coffee brewing
08
3.3.3 Making coffee with coffee beans
09
3.3.4 Making coffee with coffee powder
09
4. Malfunction
23
ME-711
USER MANUAL 01/02
Fully-automatic Coffee Machine
1. Coffee machine introducton
1.3.2 Impurity filter
1.1 Machine components
See fig.1 above
1.2 Control panel
See fig.2 above
1.3 Safety features of the coffee machine
1.3.1 Excessive powder protection
If the user add excessive powder,the machine will stop brewing in 2 seconds.Unnecessary
powder should be discharged,then machine start to work
1.4 Specification parameters
Rated voltage
220 - 240VAC 50/60Hz
120V 60Hz
R ated power
1250-1450W
1250W
Size(L*W*H)
415 * 320*365mm
Net weight
12 . 0Kg
Check the machine before adjust:
First, choose the coffee grind thickness level;
Check if there is coffee powder overflow from brewing unit, or there is much coffee powder in
dreg plate (15) after several cup of coffee made, for those situation, the coffee powder
quantity need to be reduced;
Adjust powder quantity to the maximum, if there is still too little coffee powder in brewing
unit, or the coffee waste is not like a cake in dreg drawer(16), for those situation, the coffee
powder quantity need to be increased.
Dreg cake
8PCS
Exterior power cord
0 . 9m
Temperature control
Digital control
Coffee powder quantity
p ro gra m a dju st( five file s)
Coffee powder thickness
Manually adjusted , 3 settings
Water tank capacity
1 . 6L
Adjust method:
When the machine stop brewing, the brewing unit (14) return original position! press
'MENU' key (see FIG 3) and hold it until LCD shows FIG 4, then press 'ok' key move the
coffee powder quantity adjustment into option(see FIG 5), at this moment, press”-“ key
to reduce coffee powder quantity, The minimum is -50, press “+'”key to increase coffee
powder quantity, The maximum is +200;after adjustment, press 'OK' key to save and back to
normal working condition, if you do not want to adjust, then press 'ESC' key to exit.
Coffee bean tank capacity
200g
Steam/hot water exhaust ra nge
60°
Coffee spout height range
80 - 110mm
Adjust powder quantity
Instruction: you can adjust powder quantity not only in menu, sometimes because of the coffee
bean you use, menu adjustment may still cause machine produce too much or too little coffee
powder quantity, then you can adjust coffee powder quantity as following method.
Notes: The adjustment of the method of flow quantity is the same as above, the minimum is
-25. The above adjustment, when the digital become red, marking the adjusted value is too
small or too large, may affect the actual brewing results, Please caution!
00:25
00:25
Flow Calibration
Powder Quantity Cal.
Overheat protection
Dual protection:temperature fuse and temperature sensor
Pump pressure
20 b ar
Compliance with EN bylaw
EN 60335-1; EN 60335-2-14 ;EN 60335-2-15; EN 62233
1.5 Accessories included with the machine
00:25
Powder Quantity Cal.
-
0
+
8g
ESC
图.3
ESC
OK
图.4
OK
ESC
图.5
1. Instruction manual 1pc
2. Coffee spoon 1pc
ME-711
USER MANUAL 03/04
Fully-automatic Coffee Machine
2. Read before starting the coffee machine
2.1.2 Keep children away from the machine
Children are unaware of the danger that
electrical machines represent, therefore.
Children should never be left unsupervised with
the machine.
2.1 Safety
Danger
The machine is an electrical appliance;there is risk
of short circuit and electric shock if it comes in
contact with water. Steam and hot water can scald
users; never aim hot water or steam at yourself or
others. Avoid touching steam and hot water
exhaust directly with your hands.
Do not make any technical change of the machine.
Unplug from outlet when not in use and before
cleaning. Allow to cool before putting on or taking
off parts, and before cleaning the machine. Don't
use the machine for any other purpose.
Please operate only as shown in the manual.
Never allow child to
play with the machine
Do not touch the hot
water and steam exhaust
Warning
This machine should only be operated by adults who have read and understood the
manual.Nerver touch the machine with the electrical objects as they can cause injury or
death.Plug the machine into a suitable electrical socket.The voltage must correspond to the
voltage on the rating plate.
Do not use the machine outdoor.
Avoid contacting moving parts. (Lids of containers, brewing unit)
Don’t shake the machine when it is in working.
Scalding may occur if the protective parts of the machine (such as covering lids, funnel cover,
brewing door) is removed during the brewing cycles.
Never use a damaged
power cord
Keep the cable away from
fire and hot surfaces
Never squeeze the
power cord
Keep the machine away from
fire and high temperatures
2.1.1 Power cord
Never use the coffee machine if the cord is damaged. If the power cord is Damaged, it must be
replaced by the manufacturer, its service agent or similarly qualified persons in order to avoid a
hazard.Do not pass the cable around corners, over sharp edges or over hot surfaces and keep it
away from oil. Do not use the cable to carry or pull the machine.Do not remove the plug by
tugging on the cable and do not touch it with wet hands.Make sure the cable cannot drop freely
from tables or shelves.
ME-711
USER MANUAL 05/06
Fully-automatic Coffee Machine
2.2 Connect the supply cord
2.1.3 Placement of machine
Place the machine on a flat and horizontal surface, and make sure it is inaccessible for children
or pets to avoid harm. The most appropriate temperature for operating the machine is between
10℃ to 35℃. Do not place the machine nearby hot surfaces or fire.
Manufacturer’s recommendations
Operating the machine in a clean environment,
place the machine on a flat and horizontal surface.
Leave at least 100mm space between the wall and
machine.
The coffee machine must be connected to an
AC out let. Make sure the actual voltage is
match to the rating voltage label which sticks
on bottom of the machine.
Never use a damaged cord or plug.
Plug into an AC outlet
Place the machine on a level and
clean surface
Leave at least 100 mm
between the wall and the machine
2.1.4 Cleaning
Before cleaning, make sure that all switches have been turned off and unplug the coffee
machine. Then wait until the machine is cool before cleaning it. Never put the machine under
water.
Warning:Electric current can cause death!
Handle with care at all times.
Do not immerse plugs in water or other liquid.
3.How to operate the machine
3.1 Install the machine
Never start the machine if it does not contain water or coffee beans.
2.1.5 Repair and maintenance
Unplug the machine immediately if it falls down. Do not operate the machine with a damaged
cord or plug or has been damaged in any manner. Manufacture will not assume the
responsibility which causing by any unauthorized repair.
Put drip tray [1] into the groove which located in lower
part of the machine make sure the drip tray cover is
correctly positioned.
Use carbon diocide extinguisher in case of fire.
Never use water or dry powder extinguisher.
Install the drip tray
Take accessories of the machine out from the water tank
[8]
Do not immerse the machine
in water or other liquid.
Use carbon dioxide
extinguisher
Take out spoon from
the water tank
ME-711
USER MANUAL 07/08
Fully-automatic Coffee Machine
Caution:
Remove coffee bean tank cover and put the proper
quantity of coffee beans (no more than 200g) into the
container.
Use pure water only. Do not fill liquid other than water into the water tank.
In order to extend service life of the coffee machine, do not mix coffee bean with other material
(such as sugar and so on), otherwise the grinder will be damaged. These damages are not in the
scope of warranty.
3.2 Discharge water
Put coffee bean
into bean tank
Turn the steam/hot water exhaust towards to the drip tray, place a cup under it, and then touch
the “OK” button by following the instructions which shows on the screen. The machine will
then start to pump water out.
Caution:
The drainage procedure should be carry out by
machine in the following four cases.
The initial use of the machine
After the water tank was completely
emptying
The machine has not been use for a
long period of time.
Upon completion of the use of steam.
Remove the water tank [8] from the machine,fill it with
fresh water to 3/4 capacity.The valve in bottom of the
water tank is for water discharging. Gently press down
the water tank, then cover the lid to replacement.
Discharge water
Take off water tank
and infuse fresh water
to 3/4 capacity
3.3 Operation
3.3.1 Single cup/Double cups of coffee
Touch the “single cup” button
“double cups” button
00:25
or
to start making
one cup or two cups of coffee.
Untie the power cord [2], then connect to power supply,
touch the "
"symbol press the power icon on the
Display. The screen shows self test first and then
warming up Disappearance of the tiny dots represents
the boiler temperature reaches a higher level. The
machine will start rinsing after the boiler reaches
appropriate temperature. Please wait until a “beep”
and the screen shows standby , the machine has
finished the preparatory.
The following adjustments can be made:
Temperature adjustment: you can adjust the
temperature of coffee when the machine is
brewing coffee;
Powder quantity: Press “+” or “-“during
grinding process in order to adjust the quantity of
coffee powder going to brew a cup of coffee;
Coffee quantity: Press “+” or “-“when coffee
is following out from the spout in order to adjust
00:25
Open power
flow out some water
Put in coffee bean
3.3.2 Stop coffee brewing
Touch ESC key to terminate the making coffee.
8g
ESC
ME-711
USER MANUAL 09/10
Fully-automatic Coffee Machine
3.3.3 Making coffee with coffee beans
3.3.5 Milk-Frothing Device
There are two methods to make coffee with the machine. Either coffee bean or coffee powder
can be used. In order to keep the freshness of the rest beans, the appropriate amount of beans
will be grinded to brew a cup of coffee.
3.3.5 .1 Frothing milk
3.3.4 Making coffee with coffee powder
00:25
Touch the “add powder” button
,
Open the funnel cover [9] when fill powder icon
appears on the screen, fill a flat spoon of coffee
powder into the funnel, then touch either “Single
cup” or “Double cup” button to start making
coffee.
1
Fill milk into a milk jug, then pull the pipe out from the slot, and immerse it into the jug.
Place a mug under the device.
Touch the
to start heating up, at this point please wait.
Once the steam ready, turn the tiny knob on the device to milk frothing mode (See Fig.2), and
then the device will start to frothing milk. Press the steam button on the machine to stop frothing
when the milk foam meets your expectation.
Please clean the device after use.
Fill fresh water into a jug, immerse the pipe into it, and press the steam button to start cleaning.
Touch the " add powder "
button
00:25
Press steam button to
start heating up
00:25
8g
ESC
One flat spoon
2
Add appropriate amount
of coffee powder
3
Choose single cup
or double cup
The appropriate amount of coffee powder which going to the funnel
should be no more than one flat spoon.
Press the steam button
for steam
Turn the knob to the place
as showed to froth milk
ME-711
USER MANUAL 11/12
Fully-automatic Coffee Machine
3.3.5.2 Hot Water
3.4.2 Adjust coffee grind thickness
Steam/Hot water pipe is separated from coffee pipe. Hot water can be used for making tea and
so on.
Place a cup under outlet of Milk frothing [3], adjust the knob of frothing device to the Figure 1
and then press” hot water” key , and then enter hot water operation interface ,press “-“ or
“+” to set the temperature of hot water! There are 6 levels for hot water! These are 70
degrees, 75 degrees, 80 degrees, 85 degrees, 90 degrees and 95 degrees. And then the hot
water comes from the outlet of milk frothing till meet your demand, and then press “ESC” to
exit! The maximum production of hot water is 250ML.
Grinding grade need to be adjusted either the coffee flows out too fast (coffee granules are too
big) or too slow (coffee granules are too small).
The adjustment only can be made during grinding,
otherwise the machine will be damaged.
The recommended grade is 2.
Turn the powder thickness adjust knob [11] to a lower
number if the coffee granules are too big, turn the powder
thickness adjust knob [11] to a higher number if the coffee
granules are too small.
2
2
The recommended
grade is "2"
3.4.3 Adjust the height of coffee spout
Move the coffee spout up and down to make the spout a
little higher than the cup so as to keep the aroma of the
coffee.
Place a cup under the
steam/hot water pipe [4]
2
00:25
Turn the knob to hot
water position
Adjust height of
coffee spout
00:25
3.4.4 Pre-marinate coffee powder(Pre-brewing coffee)
The pump will stop for 2 second after the coffee powder has been wet , then continue.
3.4.5 Coffee bean storage
ESC
3
Press the hot water button
4
Press " - " OR " + " button
To make sure that the coffee bean or coffee powder is fresh,put coffee bean into a sealed
container,then put the container in a shady and cool place.
3.4.6 Water quality
Besides the coffee beans,grinding and water temperature,water quality is also important.We
suggest treating the water with a water filter or purifier before putting it in the coffee machine.
The water in the water tank must be changed daily.
3.4 Suggestions
3.4.1 Pre-warm cups
3.4.7 Work time
Place cups above the cup warming plate [7] to
warm them up.
The machine can work continuously all day.But if the machine is not going to be used for a long
period of time,once put through the power , it will reach to ready condition within 2 seconds.
3.4.8 Turning off the power
Suggest to pre-warm cup
Please wait until the end of coffee, cycle of operation, the screen displayed when the standby
mode, and then turn off the machine power.
ME-710
USER MANUAL 13/14
Fully-automatic Coffee Machine
3.5 Program
3.5.1 Menu
Press the " menu " button,then choose from the following options
A.
00:25
English
Descaling
Time
Water Hardness
Sonnd Settings
Product Information
Factory Settings
OK
B.
English
Descaling
Time
Water Hardness
Sonnd Settings
Product Information
Factory Settings
ESC
00:25
C.
English
Descaling
Time
Water Hardness
Sonnd Settings
Product Information
Factory Settings
Press
to access language menu,then
choose your preferred language.
OK
ESC
00:25
OK
LANGUAGE
WATER HARDNESS
Press MENU to choose water hardness
setting, Choose hardness value, press OK
button to confirm.
English
Descaling
Time
Water Hardness
Sonnd Settings
Product Information
Factory Settings
OK
Press
to switch button keypad/warning
tone on or off.
ESC
00:25
D.
SOUND SETTINGS
ESC
Decalcification
Decalcification is significant to ensure the valves, heating
controller and other important components stay in good
working condition.
According to water hardness coefficient, decalcification
should be taken every 3 or 4 months. Decalcification has to
be taken as soon as the reminding message “decalcify”
appears on the screen. Please press “OK” to start
decaling. Refer to following steps.
ME-711
USER MANUAL 15/16
Fully-automatic Coffee Machine
Never descaling with vinegar.
Choose the DESCALING program,display will
show FILL SOLUTION IN TO TANK
PRESS OK BUTTON
00:25
Fresh water
Take out the water tank [8] and clean
it,then fill more than 1 liter fresh water
into the water tank.Press "OK" button.
LCD shows RINSING MACHINE the
machine will be back to standby mode
Fill Solution to Tank
OK
Fill fresh water to clean
the machine.Press "
OK " .
Choose " DESCALING "
If the descaling is interrupted by switching off the machine,it will automatically resume when the
machine is switch back on.
Fill water into water tank [8] and add the
decalcify substance into the water tank.
Press " OK " to start descaling. The LCD
shows DESALING...
Decalcify substance
Importance of decalcification:Seasonal decalcification can save expensive
maintenance costs.If the decalcification is not complete or done correctly,
the manufacturer will not be responsible for any damage caused.
E.
00:25
00:25
English
Descaling
Time
Water Hardness
Sonnd Settings
Product Information
Factory Settings
Fill the water tank with water
and some decalcify
substance.
Press " OK " button.
OK
ME11050 1001
D ATE 20110501
TOTAL COF. 350 00
VERSION 7S. 001.001
ESC
ESC
PRODUCT INFORMATION
After about 60 minutes, the water tank
will be empty and the LCD will show
FILL FRESH WATER
PRESS OK BUTTON
Press
00:25
Fill FreshWater
OK
Descaling finished
key to view the product information.
00:25
F.
English
Descaling
Time
Water Hardness
Sonnd Settings
Product Information
Factory Settings
OK
ESC
FACTORY SETTINGS
Press
to restore the factory settings.
ME-711
USER MANUAL 17/18
Fully-automatic Coffee Machine
3.5.2 Timer switch and time settings
Touch “OK” to choose the setting term. As showed, the upper part is
Time seting, the lower part is Timing.
3.6 Other indications
A.
English
Descaling
Time
Water Hardness
Sonnd Settings
Product Information
Factory Settings
FILL WATER
If this message is indicated on the LCD, there is either
no water in the water tank [8] or it is not installed
properly. Add fresh water and make sure it is set in the
correct position.
00:25
00:25
day.sunday
time.3:09
date.01-05-2011
Turn Off
ESC
ESC
OK
00:25
00:25
Time setting operation
Press time setting ( upper part of screen)
to access setting. As showed, press the arrow
symbol on the screen to choose the setting
term, then press "+" or"-" to adjust the value.
Press "OK" to confirm and back.
day.sunday
time.3:09
date.01-05-2011
OK
B.
00:25
Add Beans
ADD BEANS
If this message is indicated on the LCD,add beans
in the coffee bean container [12] .
ESC
Timing
Press timing (lower part of screen) to access setting.
Press arrow symbol.
Select "ON" moving to
n e x t s t a g e o f s e t ti n g
(Day/Week setting),
select "O FF" to back.
P re ss a r r o w sy m b o l t o
ch oose sett ing te rm, th en
press "十 "or"一 "to choose
on or off. Press "OK" to
moving to ne xt sta ge of
se ttin g (time set ting) wh en
the setting h as b een do ne.
00:25
Turn On
Turn Off
OK
ESC
Press arrow symbol to
choose setting term, the
press"十"or"一" to adjust
the value. Press “O K”
to back to the main
menu setting been
00:25
00:25
SUN MON
TUE WED
THU FRI SAT
Turn On
Turn Off
07 :30
18:45
OK
OK
ESC
ESC
C.
00:25
DREG DRAW FULL
If this message is indicated on the LCD dreg
drawer [16] is full, remove the dreg drawer and
empty it.
Note:The dreg drawer may be em ptied
only when the machine is power on.
The dreg drawer must be remove d for
more than 5 seconds, otherwise the
warning tone will be repeated.
ME-711
USER MANUAL 19/20
Fully-automatic Coffee Machine
00:25
G.
D.
00:25
Drip Tray Missing
CLOSE THE DOOR
Brewing door[13]is not in the right place, Be sure to put
the brewing door in the right place.
DRIP TRAY MISSING
If this message is indicated on the LCD, install the
drip tray [1] or make sure it is well positioned
00:25
H.
Ventilate
E.
00:25
Dregdrawer Missing
DREG DRAWER MISSING
00:25
D ecalcify
P ress
OK
F.
BREWING UNIT MISSING
Brewing unit [14] is not in the position, please check if
the brewing unit is installed, or if correctly installed.
The machine in a vacuum state, the need for the
machine to carry out drainage action (please
refer to earlier drainage section).
OK
Dreg drawer [16] is not in the right position, please
check if the dreg drawer is installed, or if correctly
installed.
I.
00:25
VENTILATE
ok or esc
DECALCIFY
When LCD shows " DECALCIFY " , that
means the machine needs to be descaled.
Press " ESC " to cancel decalcify, ( The
warning will be repeated next time )
Press " OK " to continue.
ESC
3.7 Cleaning and maintenance
Keeping the machine clear is significant for making high quality coffee and extension of service
life of the machine.
Shut off the power before cleaning and wait for the machine to be cool.
Never put the machine into water or other liquids.In order to avoid causing short circuit.
Never put the parts of the machine into a dishwasher.
Never put components into microwave oven or over dries.
3.7.1 Cleaning the main components
In order to keep the coffee spout [5] and the brewing unit [14] clean, it is recommended to empty
the dreg drawer [16] and drip tray [1] once a day.Clean the water tank [8] , drip tray [1] , drip tray
cover and dreg plate [15] regularly.
When the red buoyage in drip tray is higer than drip tray surface, please empty the drip tray as
soon as possible.
ME-711
USER MANUAL 21/22
Fully-automatic Coffee Machine
Turn off the power, pull out the plug, then open
the brewing door [13].
Clean the area around brewing unit
competely. And then, install dreg drawer
again.
Take out brewing original unit with handle.
Slide into the initial position. Be sure the
brewing unit is well positioned after hearing
"clip", then install the dreg drawer. Close the
brewing door finally.
D on 't press h ere
Turn off the power and
open brewing door
Lift the handle on the brewing unit, and
press the flake which there is a written
word "press" on top of it. Take out the
brewing unit. Clean the main equipment
with hot water without impregnant. Be
sure there is no coffee dreg on the two
filters, then dry it.
Clean the area
around brewing unit
Press here
Put back brewing unit
Note: When put back the brewing unit,never push the flake where
there is a word"press",or it will cause damage to the machine.
Warning : If the brewing unit is not in the correct place,display show
BREWING UNIT MISSING,and machine can not work properly.
Usually, the bean tank is not required to be clean. Clean it with cotton if needed.
Note:Never add water into bean tank, otherwise it will cause damage to machine.
Take out of brewing unit
correctly and clean it
Take out dreg plate and dreg drawer ,clean
them with unrough impregnant
Clean the milk-frothing device
Take off the metal tube, Spout can be taken off
with the spanner on the spoon.Clean the metal
tube and nozzle with water. If the nozzle was
blocked, clean it with pin, wash it with water.
Re-assembly after cleaning.
Nozzle
Milk-Frothing
Metal tube
Clean metal tube and nozzle
to keep the spout expedite
Take off the dreg drawer
and the dreg plate
Warning :Make sure the machine is power off and the steam/hot water pipe is
cooling down completely
ME-711
USER MANUAL 23/24
Fully-automatic Coffee Machine
3.7.2 Cleaning the water tank filter
Importance :
Remove the water tank.There is an inlet which connects with water tank. Turn the cover
anticlockwise, take out thefilter in it and clean the filter. Re-assembly after cleaning.
Filter
The water inlet is located
under the water tank
Turn the cover anticlockwise
take off the filter and clean it
3.7.3 Storage
If you do not plan to use the machine for a long period,turn it off and pull out the plug.Store the
machine in a dry place and keep away from children. Keep the machine clean.Check the
machine regularly;clean it according to the instruction manual.
4.Malfunction
Switch power off, then pull plug out immediately when the machine has been damaged in any
manner.
When malfunction occurred, try to find solutions for the manner by referring to the table below.
Do not try to fix the machine by yourself in order to avoid getting injury, return machine to the
nearest authorized service facility for examination, repair or adjustment if needed. Otherwise the
manufacturer will not assume the responsibility for any injury.
Problem
Possible Reason
or indication
Possible Fix
Grinder sounds
unusual
There are some impurity in the
grinder
Coffee can not be
flowed out
Grinding coefficient is excessively high Adjust grinder.use a little thick
Adjust the grinding coefficien t
coffee powder
Brewing unit can
not be moved
Brewing unit is not in original
position
Contact factory or authorized dealer
Close the brewing door,restart the
machine,brewing unit will return in
original position
The st ea m/h ot w ate r no zzle is b lo cke d Dredge the nozzle with needle.
No water or steam
To avoid scalding, make sure the machine has been power off.
Meaning of crossed out wheeled dustbin:
Do not dispose of electrical appliances as unsorted municipal waste, use separate collection
facilities.
Contact you local government for information regarding the collection systems available.
If electrical appliances are disposed of in landfills or dumps, hazardous substances can leak into
the groundwater and get into the food chain, damaging your health and well-being.
When replacing old appliances with new ones, the retailer is legally obligated to take back your
old appliance for disposals at least free of charge.
This appliance is not intended for use by persons (including children) with reduced physical,
sensory or mental capabilities, or lack of experience and knowledge, unless they have been
given supervision or instruction concerning use of the appliance by a person responsible for
their safety.
Children should be supervised to ensure that they do not play with the appliance.