1
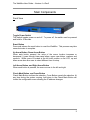
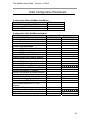
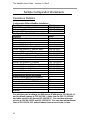
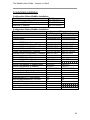
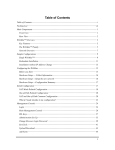
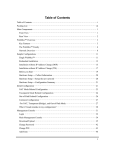
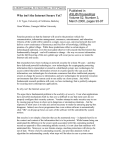
TM
WebMux
User Guide
Version 4.x
Copyright 2000 - 2003 CAI Networks, Inc.
Copyright 1998 – 2000 Red Hill Networks, Inc.
Legal Notices
The information in this document is subject to change without notice.
CAI Networks makes no warranty of any kind with regard to this manual, including, but not limited
to, the implied warranties of merchantability and fitness for a particular purpose. CAI and CAI
Networks shall not be held liable for errors contained herein or direct, indirect, special, incidental
or consequential damages in connection with the furnishing, performance, or use of this material.
Warranty. A copy of the specific warranty terms applicable to your CAI Networks product and
replacement parts can be obtained from your local Sales and Service Office.
Restricted Rights Legend. Use, duplication or disclosure by the U.S. Government is subject to
restrictions as set forth in sub-paragraph (c) (1) (ii) of the Rights in Technical Data and Computer
Software clause at DFARS 252.227-7013. Rights for non-DOD U.S. Government Departments
and Agencies are as set forth in FAR 52.227-19(c)(1,2).
CAI Networks, 1715 East Wilshire Avenue, Suite 707, Santa Ana, CA 92705 U.S.A.
Copyright © 2000-2003 CAI Networks, all rights reserved.
Copyright © 1998-2000 Red Hill Networks, all rights reserved.
Reproduction, adaptation, or translation of this document without prior written permission is
prohibited, except as allowed under the copyright laws.
Revision History: Jan 2003 Edition 4
Nov 2002 Edition 3
May 2002 Edition 2
This edition describes installing WebMux and Operating WebMux models.
This guide's printing date and part number indicate its current edition. The printing date changes
when a new edition is printed. (Minor corrections and updates which are incorporated at reprint
do not cause the date to change.) The part number changes when extensive technical changes
are incorporated.
New editions of this manual will incorporate all material updated since the previous edition. For
the latest version, see the WebMux Documentation section on the Web at:
http://www.cainetworks.com
Please direct comments regarding this guide to:
CAI Networks, Inc.
CAI Networks Learning Products, MS 17725
P.O.Box 17725
Irvine, CA 92623-7725
i
Table Of Contents
Packing List ..................................................................................................................................... 1
Main Components ........................................................................................................................... 2
Front View...................................................................................................................... 2
Rear View ......................................................................................................................3
WebMux Overview........................................................................................................................... 4
Key Features ................................................................................................................. 4
The WebMux Family ...................................................................................................... 6
Network Overview.......................................................................................................... 8
Sample Configurations .................................................................................................................. 10
Single WebMux............................................................................................................ 10
Redundant Installation ................................................................................................. 12
Installation Without IP Address Change ...................................................................... 14
Configuring the WebMux ............................................................................................................... 16
Before you Start........................................................................................................... 16
Network Terminology ................................................................................................... 16
Hardware Setup........................................................................................................... 17
Collect Information......................................................................................................................... 17
Setup the new network .................................................................................................................. 17
Configuration Summary ............................................................................................... 17
Initial Configuration ...................................................................................................... 18
Router LAN Information................................................................................................................. 19
Server LAN Information ................................................................................................................. 19
Administration Setup Information .................................................................................................. 20
WebMux Information ..................................................................................................................... 21
Management Browser ................................................................................................................... 24
Login ............................................................................................................................ 24
Administration Set Up .................................................................................................. 26
Status........................................................................................................................... 33
Add Farm ..................................................................................................................... 36
Modify Farm................................................................................................................. 38
Modify Server............................................................................................................... 41
Phone Paging Codes..................................................................................................................... 42
Contact Information ....................................................................................................................... 44
Initial Configuration Worksheets.................................................................................................... 46
Sample Configuration Worksheets ................................................................................................ 47
Contact Information ....................................................................................................................... 50
FAQs.............................................................................................................................................. 51
Regulation…………………………………………………………………..……………………….…….54
ii
The WebMux User Guide – Version 4..x Rev2
Packing List
1
•
One (1) WebMux unit
•
One (1) Power cord
•
One (1) Phone cord
•
One (1) User Manual
•
One (1) Warranty registration card
•
One (1) WebMux serial connection cable (to connect primary and secondary
WebMuxes, provided with 2nd WebMux)
The WebMux User Guide – Version 4..x Rev2
Main Components
Front View
Toggle Power Switch
This switch toggles power on and off. To power off, the switch must be pressed
and held for 5 seconds.
Reset Button
Press and release the reset button to reset the WebMux. This process may take
several minutes to complete.
Up Arrow Button, Down Arrow Button
When each button pressed, the value of the cursor location increases or
decreased. It goes through lower case letters, upper case letters, numbers and
symbols. When cursor is located at the left most position on the LCD, up and
down arrow also allow user to select different item to setup.
Left Arrow Button, and Right Arrow Button
When each button is pressed, the cursor moves to the left and right.
Check Mark Button, and Cross Button
Check Mark Button confirms the selection, Cross Button cancels the selection. At
any time during the system running, hold down to the Check Mark Button will
invoke the configuration menu allowing the IP address changes.
2
The WebMux User Guide – Version 4..x Rev2
Rear View
Router LAN Port
Connect this port to the Router LAN switch or hub.
Server LAN Port
Connect this port to the Server LAN switch or hub.
Please note: The Router LAN and Server LAN port are not interchangeable.
WALL - Phone Line Port
This port is used by webMux sending the paging notice to the operator through a
numerical phone pager. It should be connected to a PSTN (Public Switched
Telephone Network) compatible analog phone line.
Warning: Connecting digital phone line to this port will cause permanent damage to the
WebMux™ and void the warranty.
Phone Set Port
Optionally, you may connect a regular PSTN analog phone set to this port.
Please note: The phone line port and phone set port are not interchangeable. The system
will not function properly if the phone line is connected to this port instead.
Primary/Secondary Connect Port
Connect this port to another WebMux in a WebMux Pro installation. Connect the
WebMuxes™ with the supplied cable. Do not connect anything to this port, if
only one WebMux™ is being used.
Power Switch
This switch powers the WebMux on and off. When in the "off" position, the front
panel power switch is disabled.
Power Cord
Please use the supplied power cord to connect the WebMux™ to power source.
1U WebMux has 115V/230V AC universal power supply.
3
The WebMux User Guide – Version 4..x Rev2
Overview
Key Features
The WebMux is a standalone device designed primarily to load balance IP traffic
to multiple servers. The WebMux includes the following key features.
•
Improves performance by distributing the traffic for a site or domain
among multiple servers. No one server will be bogged down trying to
service a particular site.
•
Provides Persistent Connections by memorizing the user browser
session and the server session and sending the same user to the same
server. This is important for site using shopping cart and dynamically
generated pages, like BroadVision, ASP site and JSP site.
•
Provides high availability by tracking which servers are functioning
properly and which servers are out of service.
If a web server
unexpectedly goes down, the WebMux will direct the traffic to other
servers, or will bring a standby, or backup, server online to service the
traffic.
•
Provides fault tolerance. This installation requires two WebMuxes, a
primary and a secondary. Two WebMux will automatically sync the
configuration datum.
•
Easy management. It can be managed via a secured web browser
session from anywhere in the world. By setting up Telnet or PC-Anywhere
farm, remote management of web servers is truly possible.
•
Operating System independent. No software, or agent, to load on the
web servers. Non-intrusive load/failure detection and management.
•
Provides Proxy function. When communication is initiated from behind
the WebMux, the WebMux will substitute its own address for the internal
address. This allows the web servers to initiate communication for
services such as credit card validation and mapping services.
•
Built-in Firewall functions. Stop possible hacker intrusion into your
network from Internet. Built-in functions will detect any possible denial of
service attack and make your services always available.
•
Inform you of the status of your network. It provides phone pager and
email notification so that the network administrator can be paged or
4
The WebMux User Guide – Version 4..x Rev2
emailed whenever a server or WebMux goes down, and when they return
online.
5
The WebMux User Guide – Version 4..x Rev2
The WebMux Family
The 1U WebMux family consists of two models. They are:
•
•
The WebMux
The WebMux Pro
The table below compares the features of the models.
WebMux
WebMux Pro
Ethernet/Fast Ethernet
Yes
N/A
GB Ethernet (1000Base-TX)
N/A
Yes
Round-Robin
Yes
Yes
Persistent Round-Robin
Yes
Yes
Weighted Round-robin
Yes
Yes
Persistent Weighted Roundrobin
Yes
Yes
Least Connections
Yes
Yes
Persistent Least Connections
Yes
Yes
Weighted Least Connections
Yes
Yes
Persistent Weighted Least
Connections
Yes
Yes
Diskless Design
Yes
Yes
Port aggregation
Yes
Yes
Failover via serial link
Yes
Yes
Service aware
Yes
Yes
Server aware
Yes
Yes
Backup server
Yes
Yes
1,440,000
5,760,000
7,000
40,000
200 MBit/s
1 GBit/s
2 X T3
1.5 X OC-12
Secure web browser access
Yes
Yes
In service/Not in service
Yes
Yes
Topologies:
Balancing Method:
Fault Tolerance:
Performance:
Maximum concurrent
connections
Maximum new connections per
second
Maximum throughput per second
Maximum Internet Link Speed
Management:
6
The WebMux User Guide – Version 4..x Rev2
Page alarms
Yes
Yes
Email Notification
Yes
Yes
Configuration access
Yes
Yes
Remote telnet access
Yes
Yes
Persistent connections
Yes
Yes
Port mapping
Yes
Yes
Port-specific services
Yes
Yes
Year 2000 compliant
Yes
Yes
Network Address Translation
Yes
Yes
TCP SYN protection
Yes
Yes
TCP DoS protection
Yes
Yes
SSL support
Yes
Yes
Unlimited
Unlimited
65,532
65,532
Device's role in the network
IP router
IP router
UDP-based service support
Yes
Yes
Service Contract
Service Contract
Free Email Support
Yes
Yes
Free Phone Support
Yes
Yes
Security Features
Device Support:
Maximum virtual servers
Maximum real servers
Misc.
Overnight Exchange Unit
Power and Cooling Requirement
90 – 130VAC 2.5A or 190-235VAC 1.5A at 50-60Hz input power required.
Absolutely operating temperature range is 0-40C. Recommended ambient
temperature do not exceeding 30C. Max heat producing factor is 405 BTU/hr.
7
The WebMux User Guide – Version 4..x Rev2
Network Overview
The main purpose of the WebMux is to balance the traffic among multiple web or
other servers. The diagram above shows an installation with two WebMuxes. In
this configuration, one WebMux serving as the primary, and the other serving as
the secondary, or backup, provides a fault tolerant solution.
In order that the web servers can share the incoming traffic, the WebMux must
be connected to the network. There are two interfaces on the WebMux. One
interface connects to the Router LAN. This is the network to which the Internet
router is connected. The other interface is connected to the Server LAN. This
network connects all the web servers.
Next, a Virtual Farm or multiple farms must be configured on the WebMux. The
farm then consist of the group of servers that service the same domain or
website.
For example, to configure a farm (or virtual farm) to serve
www.cainetworks.com:
8
The WebMux User Guide – Version 4..x Rev2
9
•
First,
•
Second, a farm on the WebMux would be defined with Server 1 and
Server 2 in it. The servers would be setup to either share the traffic, or
setup as a primary server and standby server. In either case, if Server 1
goes down, then all traffic is directed to Server 2.
Server
1
and Server 2 would each need the website
www.cainetworks.com to be configured on Server 1 and Server 2, and
The WebMux User Guide – Version 4..x Rev2
Sample Configurations
Single WebMux
•
This installation requires one WebMux.
•
One WebMux interface connects to the Router LAN. The other interface
connects to the Server LAN.
•
The WebMux translates the Internet addresses to an Internet non-routable
C address. In this example, the subnet mask is 255.555.255.0. The IP
10
The WebMux User Guide – Version 4..x Rev2
address of the WebMux interface attached to the Server LAN is
192.168.199.251.
•
The Default Gateway for all the servers is 192.168.199.1.
•
Farm 1 IP address is 205.133.156.200. Servers 1 and 2 serve Farm 1.
•
Farm 2 IP address is 205.133.156.210. Servers 2 and 3 serve Farm 2.
Note: All server IP addresses must be Internet non-routable address so that the source
address from the Internet does not conflict with the IP addresses on the Server LAN.
Note: If there is a firewall between the WebMux and the Internet Router, a rule must be
defined in the firewall to allow the IP address of the WebMux interface on the Router LAN
along with the farm IP address to communicate out to the Internet on all ports. If you are
doing Network Address Translation of the farm address to a non-routable address, then
both the farm address and WebMux interface address must be translated to communicate
outbound on all ports.
11
The WebMux User Guide – Version 4..x Rev2
Redundant Installation
•
The installation requires two WebMuxes. One will be the primary, and the
other the secondary. They connect together with the special cable that is
shipped with the WebMux.
•
Both WebMuxes connect to the Router LAN, and to the Server LAN. Each
WebMux interface has a unique IP address.
•
The registered IP address is a class C address. The IP address of the
WebMuxes’ Virtual Farms must be in the same network as the Internet
router.
12
The WebMux User Guide – Version 4..x Rev2
•
The WebMux translates the Internet addresses to an Internet non-routable
class A address. In this example, the subnet mask 255.0.0.0. The IP
address of the WebMux interfaces attached to the Server LAN are
10.1.1.10 and 10.1.1.20.
•
The Default Gateway for all the servers is 10.1.1.1.
•
Farm 1 IP address is 205.133.156.200.
•
Servers 1 and 2 serve Farm 1.
•
Farm 2 IP address is 205.133.156.210.
•
Servers 2 and 3 serve Farm 2.
NOTE: All server IP addresses must be Internet non-routable address so that the source
address from the Internet does not conflict with the IP addresses on the Server LAN.
Note: If there is a firewall between the WebMux and the Internet Router, a rule must be
defined in the firewall to allow the IP address of the WebMux interfaces on the Router LAN in
addition to the farm IP address (could be same as the WebMux Router LAN IP address) to
communicate out to the Internet on all ports. Since WebMux doing Network Address
Translation of the farm address to a non-routable address, the farm addresses on the
WebMux interface must communicate outbound on all ports defined in the farms.
13
The WebMux User Guide – Version 4..x Rev2
Installation Without IP Address Change
The above diagram is an example about how to install the WebMux without
changing the IP addresses of the web servers and other servers that already
exist on the network. This is particularly helpful when changing existing network
14
The WebMux User Guide – Version 4..x Rev2
of servers cause problems. However, there are restrictions for the IP addresses
the servers taken, due to WebMux using subnet netmask to allow the IP routing
possible.
In this configuration, all the servers still remain on the same IP network, and can
communicate. From the servers “view”, the WebMux is on the same network as
the servers. However, since the WebMux uses a different network mask, it
“sees” each of its interfaces on a different network.
A WebMux can be installed in the above network according to the following
procedure.
1. The Network BEFORE the WebMux:
o This network is a class “A” network.
o All servers and the firewall use a network mask of 255.255.0.0.
o The network address is 10.1.0.0.
2. To install the WebMux:
o Connect both WebMux interfaces, the interface to the router LAN and
the interface to the server LAN to the network switch or hub.
o The IP addresses for the WebMux are assigned addresses in the high
range assuming they would be available.
o Assign the IP address of 10.1.2.254 with a subnet network mask of
255.255.255.0 to the WebMux server LAN interface.
o Assign the Gateway address, the one that will be the Default Gateway
for the web servers, as 10.1.2.253. The subnet network mask will be
255.255.255.0.
3. An example of a farm address is 10.1.1.200
4. In each web server, assign the default gateway of 10.1.2.253.
5. In each web server, add the route statement route add 10.1.1.1 10.1.2.253.
6. Computers and other routers still use their original netmask. Only WebMux
uses subnet netmask to make the routing possible. Since WebMux always
do NAT (Network Address Translation), it must have a way to route the IP
packets between the front and back interfaces. Subnetting the network
address on the router device is a common practice in the network setup.
Although this method works for situation that system administrator does not
want to change the network topology, we strongly recommend using first two
methods, since they do provide better security and performance.
15
The WebMux User Guide – Version 4..x Rev2
Configuring the WebMux
Before you Start
Please collect information about the names and IP addresses pointed by the
arrows in the network topology below.
Network Terminology
A Virtual Farm includes the WebMux setup and the servers under it.
Functionally, it acts as a single unit on a network.
For example,
http://www.cainetworks.com is one virtual server farm; https://www.cainetworks.com is
another farm, and ftp://ftp.cainetworks.com is the third farm. The first farm works
on a set of servers on port 80, the second farm consists of another set of servers
on port 443, and the third farm works on a set of servers on port 21.
To serve the Internet, there must be at least one Internet Router. This local
area network that connects the router and the WebMux is called the Router
LAN. In this LAN, the WebMux takes the Internet traffic and distributes it to the
web servers behind it. The LAN connecting WebMux and web servers together
is called Server LAN.
16
The WebMux User Guide – Version 4..x Rev2
Only WebMux boxes are connected to both Router LAN and Server LAN. At
least one WebMux is needed to define the Router LAN and the Server LAN.
The side of the WebMux that connects to the Router LAN is to send and receive
all the IP packets from the router to the Internet. The side of the WebMux that
connects to the Server LAN is to send and receive IP packets to and from the
servers in the farms. By properly configuring WebMux, one can create one or
more Virtual Farms on top of physical hardware.
Hardware Setup --- Collect Information
•
Make a drawing of the existing network and note all the configuration
settings. This will help you to fall back to the existing configurations if
needed.
•
Make a new drawing for the new setup with the WebMux™ and the web
farm in place. This will be used as a guide for setup and preparation of all
the necessary material and equipment.
•
Collect all the IP addresses, their network masks, network addresses, and
broadcast addresses for the Server LAN and Router LAN WebMux
interfaces. The IP address of the Internet router is also needed.
•
Label all the cables. Prepare additional cables if needed.
•
Make sure there are enough electrical or UPS outlets for all the new
equipment.
Hardware Setup --- Setup the new network
•
Power down all the devices on the network.
•
If you have a secondary WebMux, connect the WebMuxes with the special
serial cable.
•
Connect the servers to the Server LAN
•
Connect the WebMux(es) to the Server LAN
•
Connect the WebMux(es) to the Router LAN.
•
Power up all devices network.
•
Verify that all the devices are up and running.
•
You are now ready to configure WebMux.
Hardware Setup --- Configuration Summary
CAUTION: Do not proceed without collecting the necessary information.
17
The WebMux User Guide – Version 4..x Rev2
•
Turn on the WebMux.
You will see the version number like this:
.
•
After self-test, hold down the Check-Mark button on the WebMux will
display the first question – “Enter WebMux host name”.
•
During the initial configuration, you will be asked to provide names and IP
addresses. (See next section.) Each item is explained in the order it is
asked.
•
Answer the questions. Reboot. Note: When reboot is complete, the first
question will re-appear.
•
The monitor and keyboard are now no longer needed.
disconnect the monitor and keyboard.
•
Run the Management Browser.
If you prefer,
Initial Configuration
Enter WebMux Host Name:
This is the host name of the WebMux. It is used for identification purposes. You
may call it webmux1, webmux2, etc. (trick to enter name quickly: If you hold
down the up/down button for more than a second, the letter will start changing
quickly.) Note the left most down arrow on the LCD allowing user to skip certain
entries.
Enter WebMux Domain Name:
18
The WebMux User Guide – Version 4..x Rev2
It is for identification only. Although it can be any name, we suggest using the
primary domain name of the Router LAN network. If you have only one domain,
use that domain name. Note that left most position on the LCD has changed to
up and down arrow, allowing user to go back and forth for questions and
answers.
Router LAN Information
Enter Router LAN WebMux Proxy IP Address:
This is the IP address that the WebMux uses as the external IP address when it
functions as a proxy. This IP address will be referred to as the “first farm”. When
any server behind the WebMux (on the Server LAN) initiates communication with
another host, the WebMux substitutes the servers’ IP address with this address.
Enter Router LAN Network IP Address Mask:
This is the network mask of the Router LAN network. It is usually 255.255.255.0
for class C networks.
Enter Router LAN gateway Address:
This address is normally the gateway address of your existing server(s) before
adding the WebMux. This would be the IP address of the Internet router’s
Ethernet port that connects to the Router LAN. An example of a router LAN
gateway IP address is 205.180.168.1. However, if there is a firewall, then this is
the IP address of the firewall interface that connects to the same LAN as the
Router LAN interface of the WebMux.
Server LAN Information
Enter Server LAN WebMux IP Address:
19
The WebMux User Guide – Version 4..x Rev2
This is the IP address of the WebMux interface that connects to the Server LAN.
This IP address must also be unique for each WebMux. This address must be
different from the server LAN gateway address. The purpose of this IP address
is to allow WebMux to check the network and server healthy situation, even the
WebMux is the backup one. It is highly recommended to add this IP address to
your servers /etc/hosts file, along with the gateway IP address.
In an installation with a primary and secondary WebMux, each must have a
unique address. Therefore two IP addresses are required for each WebMux
interface that connects to the Server LAN. Those two IP addresses are in
addition to the gateway IP address that is floating between the primary and
secondary WebMux.
These IP addresses cannot be your Internet registered addresses. They must be
Internet non-routable. For example, you can assign addresses in a 10.0.0.0
network, or a 192.168.199.0, etc.
Enter Server LAN Network IP Address Mask:
This is the network mask of the Server LAN. For a class A network, it may be
255.0.0.0. For a class C network, it may be 255.255.255.0.
Enter Server LAN Gateway IP address:
This IP address will be the Default Gateway entry for all the web servers on the
Server LAN. In an installation with two WebMuxes, if a gateway IP address of
10.1.1.1 is used, this address will ‘float’ between the primary and secondary
WebMux. When the Primary is down, the Secondary becomes 10.1.1.1.
In the single WebMux setup, this address CANNOT be the same as the WebMux
IP interface address on the Server LAN.
Administration Setup Information
Is this a Primary WebMux?
If this is the Primary, answer Yes. If this is the Secondary WebMux, answer No.
Secondary WebMux automatically gets configuration information from Primay
once it sets up. If this is the only WebMux, answer Yes.
20
The WebMux User Guide – Version 4..x Rev2
Primary WebMux Information
This question is not asked for the Secondary WebMux.
Is this WebMux running solo without a backup WebMux?
If the Primary WebMux is running in a standalone configuration (see sample
configuration – Standalone WebMux.), answer Yes. If you plan to add 2nd
WebMux later, you may answer no.
Clear Allowed Host File?
Allowed host file prevent any unauthorized access to the WebMux browser
control panel. If the IP address is not in the allowed host file, that browser will
not be able to reach to WebMux management console through browser.
However, sometimes the IP address change made no browser can access the
browser management console. At that point, clear the allowed host file will allow
any browser to access it. By default, the allowed host list is empty so that any IP
address can access WebMux. It is advised once the browser management
console started, add only host IP addresses that you allow to manage WebMux
into the list.
Remake /home/webmux/conf/passwd?
This function is provided in case you have forgotten the passwords to access the
Management Browser. Use Management Browser for normal password
changes. Factory default password is the same as login ID on the screen.
Answer Y to reset the Passwords to factory default. Answer N to leave them
unchanged.
Enter Admin http Port Number:
This is http port number for the Management Browser in non-secure mode. Any
unused port number can be used. Factory default port number is 24, one could
choose to use port number above 1024 for this. Using port number above 1024
will need to have a admin farm setup. This farm is for protecting the http
21
The WebMux User Guide – Version 4..x Rev2
management console access in case passive FTP is one of your server farm.
Using port number below 1024 will not need to have this farm.
Enter Admin https Port Number:
This is the https port number for Management Browser in secure mode. Factory
default port number is 35, one could choose to use port number above 1024 for
this. Using port number above 1024 will need to have a admin farm setup. This
farm is for protecting the https management console access in case passive FTP
is one of your server farm. Using port number below 1024 will not need to have
this farm.
Discard Changes Made?
User can select Yes at this point, all the changes made will not be saved to the
internal flash storage device. By default is NO, so that the change will take effect
after next reboot.
Another way to discard all the changes is to move up-arrow button all the way till
it reach to the top, the following display will show up:
Hold down to the center check-mark button will discard all the changes.
(Re)initialize your config file with Admin farm?
This selection is typically for a primary and secondary installation, or if you are
running passive FTP. Answer Y to add a secured and unsecured Administrative
farm to the WebMux configuration. If you choose port number below 1024 for
administrative web console, you do not to have this Admin farm, answer N. By
creating an Admin farm, the WebMux will not let passive FTP use the admin port.
Also, this allows status page to be reached if one of the WebMuxes is not
available.
The next question will be Reboot Now?
Reboot now?
22
The WebMux User Guide – Version 4..x Rev2
This is the end of initial configuration. Most of the setup or changes require a
reboot to take effect. Press the center Check-Mark Button to make the WebMux
reboot
After the WebMux rebooted, the statistic of the incoming package, outgoing
package, etc will be displayed on LCD periodically.
What if I made mistake in my configuration later one?
One can always make changes to the hardware settings by press the CheckMark button for three seconds. It will start prompt the questions and it will allow
user to navigate from one prompt to another by using the up/down button on the
left most LCD position. For example, if you configured the Allowed Hosts wrong
and lock yourselves out, you can go to the push buttons and select “Clr Allowed
Hosts” option, save changes and reboot, which will allow all the IP address to
login. You can clear the allowed hosts but not reset the password, or change
one option and not change other parts.
23
The WebMux User Guide – Version 4..x Rev2
Management Browser
After the Initial Configuration, user should be able to connect a web browser to
the WebMux. The web browser does all of the WebMux management. The
following explains each of the easy to use management browser screens.
•
•
•
•
•
•
•
Login
Administration Setup Page
o Change Password
o Set Clock
Status
Add Farm
Modify Farm
Add Server
Modify Server
Login
Start Login Page:
• Start web browser.
• Set URL to http://webmuxip:webmuxport/cgi-bin/login
o webmuxip is the IP address of the WebMux.
o webmuxport is the management port address of the WebMux. The
default ports are 24 for an unsecured connection, and 35 for the
secured connection. Use https instead on the command line if you
decide to use port 35.
• The following login page will appear.
Note: In order for the browser to manage the WebMux, the browser must be set to accept
all cookies.
24
The WebMux User Guide – Version 4..x Rev2
User ID:
There are two preset user IDs
• Super User - Allows access to all screens and functions provided by the
WebMux.
• WebMux - Does not allow the user to access or change any settings
within the setup screen.
Password:
Fill in the correct password for the selected User ID. The password is case
sensitive.
The default passwords are:
ID
Password
Super User Superuser
WebMux Webmux
It is recommended to change the passwords periodically.
Login:
After entering the correct password, click Login.
Note: For first time setup, please login as Super user and go to the Administration Setup by
clicking the Setup button. It is important to set up the Server Farm Gateway IP address and
network mask first.
25
The WebMux User Guide – Version 4..x Rev2
Administration Set Up
Allowed remote host IPs:
The WebMux management software only allows logins from these IP addresses
to establish a management session. You can access from more than one IP
address by specifying all the allowed IP addresses separated by a ":". If this field
26
The WebMux User Guide – Version 4..x Rev2
is left blank, you can access the management software from any IP address. If
you have more than one computer needs to access the web management
console, you can specify a netmask. When IP addresses are entered, you can
only access it from the IP addresses in the field. This field is blank by default.
Paging Algorithm:
• Standard: This selection is for the standard paging services. The
WebMux waits 5 seconds after the paging number is answered before
sending the page message.
• Alternate: This selection is for the paging services that require a longer
delay. The WebMux will wait 10 seconds after the paging number is
answered before sending the page message.
Dialout prefix:
Some phone systems require a prefix for outside phone numbers. If a prefix is
required, enter it here. Leave it blank if a prefix is not required. For most Analog
PBX, this will be “9”.
Pager phone numbers:
This is the pager phone number to be dialed when an abnormal condition occurs.
Enter the number without any of the special characters or spaces. It should be in
the format of a single long integer. Add 1 and the area code if needed. Do not
use "()" or "-" or blank spaces.
Server for email notification:
In addition to paging, the WebMux can send email notifications. Enter the IP
address of the SMTP server that will forward the notifications. Please note:
Because the WebMux does not resolve names, this entry must be an IP address.
Addresses for email notification:
Enter the email addresses to be notified. Separate multiple addresses with a
colon. For example: [email protected]:[email protected]
Server gateway IP address:
The WebMux appears to all the servers under it as a gateway or router. This is
the IP address for the WebMux to assume the router role for the servers. This
address should be the gateway IP address in the web (or other) servers. It is
highly recommend to add it to the /etc/hosts file on your servers.
Please note: For first time setup, it is very important to set up this address and the Server Farm
network mask (below) first. Also when setting up the servers, you may be asked to fill in the
default gateway IP address for the server. Use this IP address to setup all the servers under it.
The WebMux will not function properly if this IP address is not set correctly for both WebMux and
the servers.
27
The WebMux User Guide – Version 4..x Rev2
WebMux http control port:
Since WebMux does the address translation for the incoming traffic, the HTTP
port for the management console must be set to a different port. By default, the
port is 24. You can change the port, if so desired.
WebMux https control port:
Since WebMux does the address translation for the incoming traffic, the HTTPS
port for the management console must be set to a different port. By default, the
port is 35. You can change the port, if so desired.
WebMux diagnostic ports:
The WebMux allows diagnostic sessions for remote console access for factory
technical support. Enter the port number(s) to allow our support engineer to
access your WebMux. When this entry is blank, any support access is denied.
This entry should remain blank under normal operations. Default port numbers
are 77/87. You will need to notify us the change of these numbers before obtain
support from us.
Connection warning threshold:
The WebMux monitors the number of connections established. When the
number of connections is greater than the value entered, the WebMux will page
the designated numbers. For example, if a DoS attack is occurring, the number
of connections to the site would be extremely high. Assuming they exceeded the
value set for the “connection warning” threshold, the designated numbers would
be paged.
Least significant bits in client IP address to ignore for persistent
connections:
This feature allows persistent connections to be handled properly when
communicating with America Online’s bank of cache servers. With AOL’s cache
servers, the IP address of the cache server becomes the source address. Since,
an end user can be using multiple cache servers, it is possible for the end user to
communicate to different web servers in the same session.
Therefore,
applications, such as shopping carts, that require persistent and secure
connections will not work properly. From customers’ feedback, three(3) is good
enough for most AOL requests.
When multiple cache servers whose IP addresses are fairly sequential, the
WebMux will apply a mask, determined by the number of bits chosen in this
entry, to the source IP address. The WebMux will use the result to determine
how to load-balance the traffic. When too large a mask applied, it will defeat the
load balancing function of WebMux.
28
The WebMux User Guide – Version 4..x Rev2
ICMP Packet input policy:
• Accept: The WebMux will allow all ICMP packets to travel through the
WebMux.
• Deny: The WebMux will NOT allow any ICMP packets to travel through
the WebMux.
Note: During installation, having the ability to PING the other hosts on the networks is typically
useful. When the installation is complete, setting the “ICMP packet policy” to DENY, is
recommended as a security precaution.
Front Router Connection Verification:
It can be “none”, “ARP”, “TCP Connection”, or “ping”. Depending on the front
end router, this can be changed. For example, most Cisco routers will talk to
WebMux through ARP and TCP Connection; however, most Cisco DSL modems
will only talk to WebMux through Ping. The change to this verification method
will take effect after WebMux being rebooted.
Front Router Connection Verification IP Address:
It can be the router in front of the WebMux, or a router before your own route in
your ISP’s WAN. It is recommended to have the router IP address as the
verification IP address. However, it can be any address that is reachable on your
Internet side.
Front Router Connection Verification Bin Port:
It can be any port number for the verification process to “connect”. Some device
does not allow TCP connection. However, WebMux is smart enough to figure
out the error message means the device is talking back, thus the network
connection is okay.
Persistence Timeout:
WebMux will keep track the browser connections if the persistent farm is defined
and accessed. Within the timeout time period, WebMux will send any request
from the browser IP address to the same server. Our survey shows 5-6 minutes
is the best value for most cases. The larger the persistence timeout value, the
less chance user connection get lost. However, by keeping a lot of connections
in the WebMux memory, the maximum number of concurrent connections will
drop.
Outbound Connection Timeout:
WebMux keeps track the outbound connections. This outbound proxy function
provides communication tunnels for servers behind it to talk to other computers
on the Internet side. This type of connection is different from the connections
from outside through server farms to the servers. After the connection closed
from the servers to the outside computer, it will wait this timeout minutes before it
removes that from the tracking table. Setting this too long will cause WebMux
allocating too much memory, thus reduce the memory for other functions. The
default value is 15 minutes.
29
The WebMux User Guide – Version 4..x Rev2
Server Scan Mode:
WebMux talks to the real servers in the farm through the layer 4-7 protocols
every few seconds. This is important process for monitoring servers’ health
situation. If there are a lot of farms and a lot of servers, WebMux may not be able
to get around to check all the servers in few seconds. If that is the case, user
can enable the scan mode from sequential to concurrent. WebMux will have
multiple protocol scanner to chat with servers in concurrent mode. For most
setups, sequential scan is good enough.
Reboot:
Changes to "server gateway address", "server farm network mask" and
"WebMux http control port", and WebMux https control port” require a reboot of
the WebMux to take effect. You can use the Reboot button to reboot the
WebMux remotely.
Change Password:
Name:
Select the login name for which the password is to be changed.
New Password:
Enter the new password. This is the password to which the login will be
changed.
New Password Again:
Enter the same password as in the previous box.
30
The WebMux User Guide – Version 4..x Rev2
Confirm/Cancel:
Click Confirm to execute the change. Click Cancel to return to the
previous screen WITHOUT changing the password.
Set Clock:
Click this button to go to the “Set the Clock” page. The time and date of the
WebMux then can be set. Please note that WebMux internally uses GMT time
zone, not your local time zone, per W3C/HTTP protocol. If the timezone did not
set correctly, the browser access could time out. This clock setting will change
the hardware clock setting, so user do not need to change the BIOS clock from
console.
Month:
Enter the number of the month, 1 through 12. Leading zeroes are not necessary.
Day of the Month:
Enter the day of the month, 1 through 31.
Year:
Enter the year. Enter all 4 digits.
31
The WebMux User Guide – Version 4..x Rev2
Hour:
Enter the hour of the day. Use the 24 hour clock, or military time.
Minute:
Enter the minute of the hour.
Note: The recommendation is to set the WebMux clock to UTC (GMT) time.
Time Zone:
Select the time or hour offset to the UTC (GMT) time.
Confirm/Cancel:
Click Confirm to execute the date and time change. Click Cancel to return to
the previous screen WITHOUT making any date or time changes.
32
The WebMux User Guide – Version 4..x Rev2
Status
Add Farm
Click Add Farm to add a virtual web or FTP site. The “ADD FARM” screen will
appear.
Save
Changes made to the "Farm" and "Server" will take effect immediately. The
changes however are not saved permanently to the flash memory until the
"Save" button is clicked. Unsaved settings may be lost during power outage or
WebMux reboot.
33
The WebMux User Guide – Version 4..x Rev2
Upload/Download
Download:
This feature allows the SAVED (not necessarily the active) configuration to
be saved at the Administrative Browser workstation. Click on the Click
Here to display the configuration. Choose ‘File->Save As’ from the
browser menu to save it as a text file. Changes can be made to this file
and uploaded to the WebMux.
Upload:
Upload allows a configuration file that has been saved at the browser
workstation to be uploaded to the WebMux. Enter the full path of the
configuration file, or click on Browse to search for the file. Click Upload to
upload the file to the WebMux. This file will IMMEDIATELY become the
saved and active configuration.
Setup
This button brings up the “Administration Setup” page. "Super User" login is
required to access this page.
Logout
It is not recommended to leave the management browser login unattended. Click
the Logout button to close the session. The “Login” screen will re-appear.
Pause
34
The WebMux User Guide – Version 4..x Rev2
The status screen auto refreshes frequently to provide most up to date status.
You can use the Pause button to freeze the auto refresh.
Resume
After the Pause button been pushed, it will change to Resume and the auto
refresh stopped. Click the Resume button to restart the auto refresh.
Adjusting Timeout for Each Service
Click on the service type of each farm will allow you to change the timeout value
for each different service. Please note this change is global that will affect all the
farms using the same type of service. For example, the default timeout for HTTP
service is 5 seconds. If web server does not respond to the WebMux protocol
chat within 5 seconds, WebMux will declare the server is dead and switch the
server out from service and notify the operator through email or pager. However,
if your web server did not really dead but for some reason not responding to the
WebMux’s request, WebMux will false alarm. To avoid this, user can change the
timeout value to a larger number. Many times, the server can not resolve the IP
addresses for the back end of the WebMux could cause server not responding to
WebMux’s protocol chat. Please read the Q&A section for more information.
35
The WebMux User Guide – Version 4..x Rev2
Add Farm
Farm IP address:
This is the IP address of the new farm.
The farm address is the Internet known address. For example, if you want to
create an http farm for www.yourdomain.com, the farm IP address will be the IP
address for www.yourdomain.com from your DNS record. If the IP address of
www.yourdomain.com is 205.188.166.10, then the Farm IP address is also
205.188.166.10. The WebMux will then translate the farm address to the web
server address in your DMZ or internal network.
From version 4.0.3, we also introduced “label” for the farms and servers. Once
the label being specified, WebMux will display in the Show-Status screen the
label for the farm and server, instead of the IP addresses. Although labels can
be anything, it is better to have meaningful and unique label for each farm or
server.
If you use WebMux for your intranet, then the farm IP address will be the IP
address of the original web or application server. The IP addresses of the
36
The WebMux User Guide – Version 4..x Rev2
original web or application servers must be changed so that the WebMux can
translate farm IP address to the server IP address.
Caution: Once a new farm is added, the IP address cannot be changed. To correct the IP
address, the old one has to be deleted and a new one to be created.
Service:
This is the service of the new farm. Select a service to create a farm using its
well-known port. If a port other than a well-known port for TCP or UDP service is
to be used, then choose one of the “Generic” selections, and enter the port
number in the PORT NUMBER box. No port number needed to be specified, if
the service protocol is on the list.
Caution: Once the new farm is created, the port number cannot be changed. Like the IP
address, the old farm must be deleted and a new one created.
Service
Well-Known
Port#
DNS – Domain Name Service (TCP)
53
FTP – File Transfer Protocol (TCP)
21
HTTP – Hypertext Transfer Protocol (TCP) 80
HTTPS – Secure Hypertext Transfer 443
Protocol (TCP)
NTP – Network Time Protocol
123
POP3 – Post Office Protocol
110
SMTP – Simple Mail Transfer Protocol 25
(TCP)
Generic TCP
User Specify
Generic UDP
User Specify
Generic TCP/UDP
User Specify
Generic no port scan (TCP)
User Specify
Generic no port scan (UDP)
User Specify
Generic no port scan (TCP/UDP)
User Specify
Alkaline Search Engine
Multiple ports
Scheduling method:
The scheduling method is the way in which traffic is distributed among the
servers in the farm. Eight different methods are supported. If you are using a
shopping cart service, a persistent scheduling method is recommended.
• Least connections
• Least connections - persistent
• Round robin
• Round robin - persistent
• Weighted least connections
• Weighted least connections - persistent
• Weighted round robin
• Weighted round robin – persistent
37
The WebMux User Guide – Version 4..x Rev2
Modify Farm
Modify farm can be invoked from the Status screen by clicking on the farm IP
addresses.
Farm IP address and port number:
These numbers are displayed here for reference purposes. These fields are set
in the "Add Farm" screen. Once set, they are not changeable. If they must be
changed, delete the farm and then add a new one.
Farm scheduling method:
Eight different methods are supported:
• Least connections
• Least connections - persistent
• Round robin
• Round robin - persistent
• Weighted least connections
• Weighted least connections - persistent
• Weighted round robin
• Weighted round robin – persistent
Delete:
Click this button to delete the entire farm.
38
The WebMux User Guide – Version 4..x Rev2
CAUTION: This function also deletes ALL the servers under this farm.
Add Server:
Click this button to add a new server to this farm.
Server IP Address:
This is the IP address of the server to be added.
From version 4.0.3, WebMux allows adding label next to each server’s IP
address. The purpose of labeling a server is only for helping name the server in
the farm. It has nothing to do with the name resolution of the server. Although
label can be anything, it is always better to have meaningful and unique label for
each server.
CAUTION: Once the server is added, the IP address cannot be changed. To correct the IP
address, the server must be deleted and a new one be created.
Server Port Number:
Enter the port number of the server to be added.
39
The WebMux User Guide – Version 4..x Rev2
CAUTION: Like the IP address, once created, the port number cannot be changed. To correct
the port number, the old server needs to be deleted and a new one to be created.
Weight:
Scheduling priority weight. Valid integer numbers are between 1 and 100. A
server that has a weight of 2 will be directed twice as much traffic as a server
with a weight of 1.
A special zero weight setting is provided for a graceful shut down of a server.
When the weight is changed to zero, the WebMux will not accept new
connections, but will maintain all current connections to the server. The
connections will gradually reduce to zero as current clients’ sessions terminate.
When there are no connections, the server is functionally “dead” or off line until
the weight is changed back to a valid number. Then the server can then be
shutdown or taken out of service without affecting any users.
Caution: Unlike a server that can go down unexpectedly, the WebMux will not move a STANDBY
server to ACTIVE when one or more server's weight is set to zero. If the weight of all the servers
in a farm were set to zero, then the farm would be “down” because none of the servers are
accepting new connections.
Run State
• Active - The server will be put into service immediately after it is added.
However, once it is failed, it will stay Standby mode, until manually set its
run state to Active again through the browser interface. This will give
system administrator time to fix the system or reboot the server once
some software/hardware update is going on.
• Favorite Active – The server will be put into services immediately after it
is added. If a Favorite Active server failed, once it is operational, WebMux
will automatically put it back to the Active state.
• Standby - The server will be put into STANDBY, or backup, mode after it
is added. The WebMux will change a STANDBY server to ACTIVE when
one or more ACTIVE servers fail.
40
The WebMux User Guide – Version 4..x Rev2
Modify Server
Modify Server can be invoked by clicking on the server IP address on the Status
screen.
Destination server IP address and port number:
These parameters are set in the “Add Server” screen. Once set, these fields
cannot be modified. To correct this setting, delete the server and add a new one.
Weight:
Scheduling priority weight. Valid integer numbers are between 1 and 100.
Running state:
• Active
• Favorite Active
• Standby
41
The WebMux User Guide – Version 4..x Rev2
Phone Paging Codes
When an error occurs, the WebMux will send an error code to the regular
numerical pager assigned in the Administration Setup page. Please refer to the
Management Browser - Administration Setup section on setting up phone pager
numbers.
To be as compatible as possible to different types of pagers, only numeric error
codes are used. The minimum requirement is the pager should be able to
display up to 18 digits. If the pager cannot display 18 digits, some codes may get
truncated.
For WebMux (Single and with Secondary)
•
99IIIIIIIIIIIIPPPP - A server went down. This 18-digit code (no spaces)
starts with 99 followed by 12 digits of the IP address (without the periods)
of the server. The last four digits represent the port number of the server.
•
00IIIIIIIIIIIIPPPP - A downed server went back up. This 18-digit code (no
spaces) starts with 00 followed by 12 digits of the IP address (without the
periods) of the server. The last four digits represent the port number of
the server.
•
98////////////[PPPP] – Gateway (router LAN) does not respond. 12 digits
number after the 98 is the IP address of the gateway. Port number is
optional.
•
01////////////[PPPP] – Gateway comes back in service. 12 digits number
after the 01 is the IP address of the gateway. Port number is optional.
•
88////////////PPPP – WebMux has detected more connections than the
threshold defined in the setup screen.
•
73 - WebMux cannot reach to the back LAN.
•
74 - WebMux cannot reach the front LAN.
•
75 - Primary or Secondary cannot reach the other WebMux through the
serial cable.
•
76 - Serial cable communication restored.
•
55 - User configuration cannot be parsed by WebMux (after the
configuration restored through browser).
For WebMux Primary Only
•
66 - Secondary is not responding.
42
The WebMux User Guide – Version 4..x Rev2
For WebMux Secondary Only
43
•
71 - Primary failed. Secondary took over from Primary.
•
72 - Primary went back up. Control returns to the Primary.
The WebMux User Guide – Version 4..x Rev2
Initial Configuration Through Browser
Sometimes users like to change the basic settings for the WebMux through
browser interface, for example, when WebMux located in a hosting center across
the country. If one have information about the WebMux current basic settings,
one could change those parameters through browser. On the browser, enter the
following URL:
https://webmux_ip:webmux_manage_port/cgi-bin/rec
For example, if your webmux IP is 192.168.12.1, and your
webmux_manage_port is 24, your URL will be
http://192.168.12.1:24/cgi-bin/rec
The first screen in “rec” – reconfiguration, asks for the supervisor’s password.
The default supervisor’s password is “supervisor”, however, the actual
supervisor’s password may had been changed by the system administrator. If
you could not remember the supervisor’s password, someone has to go to the
keypad to reset the password. See page 21 for more details.
44
The WebMux User Guide – Version 4..x Rev2
The next question on the screen asks to set the time in the WebMux. WebMux
uses its clock to set cookie for the management browser. When a WebMux
manager login more than 8 hours without activity, WebMux will log out the user
based on the cookie. However, if the clock is off by more than 8 hours, the
manager will not be able to login into WebMux. The second section on the “rec”
screen will allow the manager to correct the clock, if it is off.
After enter proper password and set clock information, then “continue” button will
bring up this screen:
When the mouse moving into each field, the current value will automatically fill up
the field. One may change it based on the new information obtained from ISP or
network engineers. Once you press on the submit button, WebMux will save all
the changes to its internal flash storage and reboot itself with the new value.
45
The WebMux User Guide – Version 4..x Rev2
Initial Configuration Worksheets
Configuration Before WebMux Installation
Equipment
IP Address
Internet Router (or Firewall) Address
Webserver(s) Default Gateway
Web Site IP Addresses
Configuration After WebMux Installation
Question
Entry
Primary
Secondary
Host Name
Domain Name
Router LAN Information
Router LAN WebMux Proxy IP Address
Router LAN Network IP Address Mask
Router LAN Network IP Address
Router LAN Broadcast IP Address
Internet Router LAN Gateway Address
Server LAN Information
Server LAN WebMux IP Address
Server LAN Gateway IP Address
Server LAN Network IP Address Mask
Server LAN Network IP Address
Server LAN Network Broadcast Address
Administration Setup Information
Remake /home/webmux/conf/passwd
Administration HTTP Port Number
Secure Administration HTTP Port
Number
Is this WebMux primary
WebMux running solo without backup
Reboot?
Y/N
Y/N
Y
Y/N
N
Y/N
46
The WebMux User Guide – Version 4..x Rev2
Sample Configuration Worksheets
Standalone WebMux
Configuration Before WebMux Installation
Equipment
Internet Router (or Firewall) Address
Webserver(s) Default Gateway
Web Site IP Address
Configuration After WebMux Installation
Question
IP Address
205.133.156.1
205.133.156.1
205.133.156.200
Domain Name
Entry
webmux
Cainetworks.com
Router LAN Information
Router LAN WebMux Proxy IP Address
Router LAN Network IP Address Mask
Router LAN Network IP Address
Router LAN Broadcast IP Address
Internet Router LAN Gateway IP address
205.133.156.200
255.255.255.0
205.133.156.0
205.133.156.255
205.133.156.1
Server LAN Information
Server LAN WebMux IP Address
Server LAN Gateway IP Address
Server LAN Network IP Address Mask
Server LAN Network IP Address
Server LAN Network Broadcast Address
192.168.199.251
192.168.199.1
255.255.255.0
192.168.199.0
192.168.199.255
Administration Setup Information
Remake /home/webmux/conf/passwd
Administration HTTP Port Number
Secure Administration HTTPS Port Number
Is this WebMux primary
WebMux running solo without backup
Y
24
35
Y
Y
Reboot?
Y
Host Name
You will also need to change the Web server IP address to 192.168.199.10,
and its default gateway to 192.168.199.1. Add a farm for 205.133.156.200
and add a server to the farm at 192.168.199.10. You can then add more
servers at 192.168.199.20 and 192.168.199.30. You can also add additional
farm at 205.133.156.210, and add above three servers to the 2nd farm.
47
The WebMux User Guide – Version 4..x Rev2
A redundant installation
Configuration Before WebMux Installation
Equipment
IP Address
Internet Router (or Firewall) Address
205.133.156.1
Webserver(s) Default Gateway
205.133.156.1
Web Site IP Address
205.133.156.200
Configuration Before WebMux Installation
Question
Entry
Domain Name
Primary
Secondary
webmux1
webmux2
Cainetworks.com Cainetworks.com
Router LAN Information
Router LAN WebMux Proxy IP Address
Router LAN Network IP Address Mask
Router LAN Network IP Address
Router LAN Broadcast IP Address
Internet Router LAN gateway IP address
205.133.156.200
255.255.255.0
205.133.156.0
205.133.156.255
205.133.156.1
205.133.156.200
255.255.255.0
205.133.156.0
205.133.156.255
205.133.156.1
Server LAN Information
Server LAN WebMux IP Address
Server LAN Gateway IP Address
Server LAN Network IP Address Mask
Server LAN Network IP Address
Server LAN Network Broadcast Address
10.1.1.10
10.1.1.1.1
255.0.0.0
10.0.0.0
10.255.255.255
10.1.1.20
Administration Setup Information
Remake /home/webmux/conf/passwd
Administration HTTP Port Number
Secure Administration HTTPS Port
Is this WebMux primary
WebMux running solo without backup
Y
24
35
Y
N
Y
24
35
N
Reboot?
Y
Y
Host Name
255.0.0.0
10.0.0.0
10.255.255.255
48
The WebMux User Guide – Version 4..x Rev2
Without IP Change Installation of WebMux
Configuration Before WebMux Installation
Equipment
Internet Router (or Firewall) Address
Webserver(s) Default Gateway
Web Site IP Address
Configuration After WebMux Installation
Question
IP Address
10.1.1.1
10.1.1.1
10.1.1.200/255.255.0.0
Domain Name
Entry
webmux
Cainetworks.com
Router LAN Information
Router LAN WebMux Proxy IP Address
Router LAN Servers’ IP Address Mask
Router LAN WebMux IP Address Mask
Router LAN WebMux Network IP Address
Router LAN WebMux Broadcast IP Address
Internet Router LAN Gateway IP address
10.1.1.200
255.255.0.0
255.255.255.0
10.1.1.0
10.1.1.255
10.1.1.1
Server LAN Information
Server LAN WebMux IP Address
Server LAN Gateway IP Address
Server LAN Servers’ IP Address Mask
Server LAN WebMux IP Address Mask
Server LAN WebMux Network IP Address
Server LAN WebMux Broadcast Address
10.1.2.254
10.1.2.253
255.255.0.0
255.255.255.0
10.1.2.0
10.1.2.255
Administration Setup Information
Remake /home/webmux/conf/passwd
Administration HTTP Port Number
Secure Administration HTTPS Port Number
Is this WebMux primary
WebMux running solo without backup
Y
24
35
Y
Y
Reboot?
Y
Host Name
You will also need to change the Web server IP address to 10.1.2.100, and its
default gateway to 10.1.2.253. Make sure each web server in the farm “route add
–p 10.1.1.1 10.1.2.253” so that the route will be there after reboot. Add a farm for
10.1.1.200 and add a server to the farm at 10.1.2.100. You can then add more
servers but make sure the default gateway change and add proper route. The
web servers can communicate with WebMux as well as other servers like
10.1.2.20 or any computer other than 10.1.1.1.
49
The WebMux User Guide – Version 4..x Rev2
Contact Information
For latest product and support information, please visit our web site at:
http://www.cainetworks.com
To reach us by e-mail:
Support: [email protected]
Sales: [email protected]
To reach us by phone:
Support: 714-550-0901 X2
50
The WebMux User Guide – Version 4..x Rev2
WebMux
Q.
R.
FAQs
If I have multiple servers assigned as STANDBY, how does the
WebMux choose which server to use if an ACTIVE server goes down?
The WebMux checks the standby servers in orders and activates each
one until their total weight meet or exceeds the server that is
unavailable
Q.
R.
Will a server with weight 0 act as a STANDBY?
No. A weight of 0 indicates that the server will not accept any new
connections. The state is considered neither ACTIVE nor STANDBY.
Q.
Is the Server LAN and the Router or Front LAN required to be on
separate IP subnets?
It is required that the server LAN and the router LAN be separate IP
subnets.
R.
Q.
R.
What notification services are compatible with the WebMux?
Airtouch and PageMart are the services that are currently supported.
Any SMTP server can be used for sending email notifications.
Q.
If I’m running a Unix-based FTP, such as wuftp, how can I get the ftp
server in the farm to resolve the WebMux IP addresses?
The IP addresses typically will not be able to be resolved since the
servers in the farm are typically using non-routable or private network
addresses. In order for wuftp to resolve the IP addresses and stop
complaining, place the non-routable IP address entries in the /etc/hosts
file.
R.
Q.
R.
Q.
51
TM
How come my servers in the farm showing in red color from time to
time, even the servers are okay?
Your servers are trying to resolve WebMux’s IP address to name so it
could log them into log file. To avoid this problem, set the servers not
resolve the IP addresses, also adding all the IP address to the
/etc/hosts file on your servers. For example,
www.mydomain.com 1.2.3.4
// use your real IP address
webmuxgw
192.168.199.1
// server lan gateway
webmuxip
192.168.199.254 // server lan WebMux
R.
How many browsers can simultaneously access the WebMux
management console?
The limit is 4.
Q.
I can’t login with my browser.
The WebMux User Guide – Version 4..x Rev2
R.
To use your browser to manage the WebMux, it must be set to accept
all cookies. Because the cookie sets expired in 8 hours, you also need
to make sure your hardware clock set correctly using GMT.
Q.
I have added a new farm/server, but the changes are not showing up
on the STATUS screen.
The web browser caching pages may cause this. If the new
configuration does not appear after clicking on Reload or Refresh, then
clear the cache or temporary files on the browser.
R.
Q.
R.
Q.
R.
Will my web server be able to communicate to a credit card validation
service, like Cybercash?
Yes. Any communication initiated from the internal or private network,
the WebMux will substitute the IP address of its router LAN interface
for the IP address of the host initiating the conversation. Any service
that requires a specific IP address to allow communication into their
network, the IP address of the router LAN interface must be the one
provided. We have CyberCash engineers worked with us to test this is
working fine.
Can I use the WebMux as a proxy server for other hosts in my internal
network?
Yes. The function that allows the web servers to talk to services such
as the credit card validation, allows the WebMux to function as a proxy
server for any host in the internal network. The WebMux will translate
all internal addresses to the IP address of the “first farm” defined. This
is the farm that is created when answering the question: Enter Router
LAN WebMux proxy IP address:.
Configuring other computers using WebMux’s proxy function is easy –
just point the gateway IP address to the WebMux backend IP address.
Q.
R.
Do I need to have a firewall in front of WebMux?
In most cases, no. WebMux blocks all the incoming traffic from router
LAN to your internal network. Unless there is a farm defined for a port
number, the outside traffic will not be able to reach to any server or
computers behind WebMux. WebMux does not have the management
functionality for restricting which IP address or services an internal
host can reach to the outside. If such restriction is desirable, then
additional firewall is needed.
Q.
R.
What can I do if the service that I want to load balance is not in the list?
WebMux as is already supports many different services. In the case if
your service is not in the list, you could use generic TCP and/or UDP to
set your farm. If that is still not good enough, you may contact us for
developing a special service aware module for you. In most cases,
there is a very reasonable fee to be charged.
52
The WebMux User Guide – Version 4..x Rev2
Q
R
Q
R
53
Why secondary WebMux did not take over when I powered down
Primary WebMux?
Secondary WebMux monitors primary WebMux as well as few other
things. Before it takes over, it makes sure it can reach to the router
LAN gateway, as well as at least one server defined in any farm. If
secondary WebMux cannot reach to the front router LAN gateway, or
it cannot see any server in any farm, then it will consider the primary
disconnect or power down was done purposely by operator.
Why my FastIron Switch set to 100MB fix speed does not work with
WebMux?
WebMux uses Intel network chipsets internally. Intel chipsets follows
all industrial standards and have good performance and reliability.
However, we did discovered some of the Foundry Networks switches
does not negotiate with Intel chipsets well. To make them work
together, one will need to set the switch to “auto negotiation” on speed,
instead of fixed 100. They will communicate each other at 100BT or
1000BT (Pro version only).
The WebMux User Guide – Version 4..x Rev2
Notice to the USA
Compliance Information Statement (Declaration of Conformity
Procedure) DoC FCC Part 15: This device complies with part 15
of the FCC Rules.
Operation is subject to the following conditions:
1) This device may not cause harmful interference, and
2) This device must accept any interference received including
interference that may cause undesired operation. If this equipment
does cause harmful interference to radio or television reception,
which can be determined by turning the equipement off and on, the
user is encouraged to try one or more of the following measures:
Reorient or relocate the receiving antenna.
Increase the separation between the equipement and the
receiver.
Plug the equipment into an outlet on a circuit different from
that of the receiver.
Consult the dealer or an experienced radio/television
technician for help.
Notice for Canada
This apparatus complies with the Class B limits for radio interference as specified
in the Canadian Department of Communications Radio
Interference Regulations. (Cet appareil est conforme aux
norms de Classe B d’interference radio tel que specifie par
le Ministere Canadien des Communications dans les
reglements d’ineteference radio.)
Notice for Europe (CE Mark)
This product is in conformity with the Council Directive
89/336/EEC, 92/31/EEC (EMC).
Caution: Lithium battery included with this device. Do not puncture, mutilate, or
dispose of batter in fire. Danger of explosion if battery is incorrectly replaced.
Replace only with the same or equivalent type recommended by manufacture.
Dispose of used Battery according to manufacture instruction and in accordance
with your local regulations.
54