1
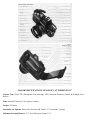
Konica Autoreflex TC
posted 10-12-'03
This camera manual library is for reference and historical purposes, all rights reserved.
This page is copyright© by
, M. Butkus, NJ.
This page may not be sold or distributed without the expressed permission of the producer
I have no connection with any camera company
On-line camera manual library
This is the full text and images from the manual. This may take 3 full minutes for all images to appear.
If they do not all appear. Try clicking the browser "refresh" or "reload button" or right click on the image, choose "view image" then go back. It should now appear.
To print, try printing only 3 or 4 pages at a time.
If you find this manual useful, how about a donation of $3 to: M. Butkus, 29 Lake Ave., High Bridge, NJ 08829-1701
and send your e-mail address so I can thank you.
Most other places would charge you $7.50 for a electronic copy or $18.00 for a hard to read Xerox copy.
This will allow me to continue to buy new manuals and pay their shipping costs. It'll make you feel better, won't it?
If you use Pay Pal, use the link below. Use the above address for a check, M.O. or cash.
Back to main camera manual page
FOR SAFETY'S SAKE
Your new Konica camera reflects the advances in photographic engineering and is designed to give you dependable,
trouble-free use. Operation is probably somewhat different from cameras which you have previously owned For this
reason, it is strongly recommended that you shoot a "test" roll of film, have this roll processed, and examine the
pictures before exposing additional rolls. The processed "test" roll will verify that you are using your new equipment
correctly, and allow you to make any necessary changes in operating patterns; additionally, it will confirm that all
camera functions are operating perfectly. In the event you are leaving on a trip (or some equally important event)
shortly, your Konica dealer can recommend the fastest way of having your first roll processed ... so that you can be
certain that all subsequent rolls will be as good - or better!
CONTENTS
Hints for Unusual Exposure Situations . . . . . 21
Using your Konica Autoreflex TC Seven Basic Steps . . . 3
Shutter Speeds and Lens Openings . . . . 22
Operating Controls . . . . . . . 4
Major Specifications . . . . . . 6
Manual Exposure Operation . . . . . 23
Inserting Batteries . . . . . . 8
Operation with Uncoupled Lenses/Accessories . . . .24
Changing Lenses . . . . . 9
Depth-of-Field Control . . . . .26
Film Loading . . . . 10
Depth-of-Field Tables ............. .. . 27
Meter/Shutter "On/Of" Control . . . . . 13
Film Rewind and Unloading . . . . . 28
Holding Your Camera . . . . . . 14
Flash Photography . . . . . . . 29
Focusing . . . . . 15
Self Timer/Time Exposures . . . . . . 30
"Control Center" Viewfinder . · 16
Caring for Your Camera and Lenses . . . . . . 31
Using Automatic Exposure Control (AEC) . 18
Konica Accessories . . . . . . 32
Under/Over-Exposure Safeguards .. 20
Konica Interchangeable Lenses . . . . . . . 38
USING YOUR KONICA AUTOREFLEX TC- SEVEN BASIC STEPS
1. Insert the two 1.35 volt mercury photographic batteries supplied with
your camera into the compartment at the bottom of the camera. (This
supplies power to the CdS meter.)
2. Load camera. Konica's "Fast Load" take-up spool assures trouble-free
operation.
3. Set ASA rating required for your film speed.
4.butkus.org
4. Move Aperture Control Ring to "AK" position ("EE" on same
Lenses).
5. Select desired shutter speed. (For most shots, 1/125th is recommended.)
6. Focus and compose picture in viewfinder.
7. Shoot ... as long as the needle in the finder is in the "white" area, your pictures will be perfectly exposed
automatically!
MAJOR SPECIFICATIONS OF KONICA AUTOREFLEX TC
Camera Type: 35mm TTL (Through-the-Lens metering) AEC (Automatic Exposure Control) SLR (Single-LensReflex)
Film: Standard 35mm 20 or 36-exposure cassettes
Format: 24x36mm
Standard Lens Options: Konica New Hexanon AR 50mm f/1.7 (6 elements, 5 groups)
Minimum Focusing Distance: 21.7" from film plane (50mm f/1.7)
Lens Mount: Konica Bayonet (47mm diameter)
Flange/Film Distance: 40.5mm
Aperture Control System: Automatically sets correct f/stop (or fractional f/stop) with all Konica Automatic
Hexanon and Hexar lenses.
Shutter: Metallic, vertical-scanning Copal Square
Shutter Speeds: Convenient top-mounted selector for all speeds 1/8th second to 1/1000th second plus "B" (for time
exposures)
Flash Synchronization: Electronic flash synchronization at all speeds to and including 1/125th second. Built-In Hot
Shoe for use with cordless (direct contact) electronic flash units. Also features standard PC Outlet, conveniently sidemounted.
Self-Timer: Built-In Variable delay, range approximately 4 to 10 seconds.
Viewing System: Parallax-Free Single Lens Reflex System. Coated, eye-level pentaprism shows upright, unreversed
image; apparent magnification O.91X with 50mm lens.
Focusing Screen: Konica 3-way focusing system has split image rangefinder plus microdiaprism and fine ground
glass focusing.
4.butkus.org
In-Finder Readouts: "Control-Center" viewfinder shows vital data at a glance: exact lens aperture being set
automatically; under/over-exposure ranges; match-needle indicator for semiautomatic operation. Automatically
signals when in manual exposure mode.
Reflex Mirror: Oversize, coated mirror prevents image cutoff in finder even with bellows extensions at 1:1
magnification. Mirror design permits automatic operation even with extreme wide-angle lenses. Instant-return mirror
action prevents image blackout after exposure.
Exposure Control System: Fully Automatic Exposure Control (AEC) system selects and sets correct lens aperture
(or fractional aperture) automatically, based on information obtained from dual through-the-lens CdS cells located in
pentaprism.
Film Speed Range: ASA 25-1600
Meter Power Source: Two 1.35 Volt mercury photographic batteries, photographic type (Mallory PX-13, PX-625,
Eveready EPX-625, or equivalent).
4www.butkus.org
Exposure "Memory" Lock: Memorizes and holds exposure reading to allow precise meter operation in backlit or
spotlight situations; operates via shutter release.
Meter Coupling (Sensitivity) Range: With ASA 100 film and f/1.7 lens EV 4.5 (1/8th see, at f/1.7) to EV 18
(1/l000th sec. at f/16). With f/1.2 lens, EV 3.5 (1/8th sec. at f/1.2) to EV 18. Meter automatically turns off if shutter
speed selected is beyond meter EV Range.
Loading: Konica Fast Loading system uses multi-slotted take-up spool to grip film securely.
Film Transport: Single-stroke lever automatically advances film, winds shutter, counts exposures, and prevents
unwanted double exposures. Lever returns to "ready" position away from camera body to permit continuous operation
at eye-level. Unique spring-loaded lever action keeps lever in "ready" position until "Off" switch is pressed.
Unloading: Oversize rapid-rewind crank permits rewinding within seconds; cutaway film cassette chamber allows
dropout cassette removal.
Other Features: Meter/Shutter "Off' Switch locks shutter, turns meter off; unlocked by engaging Transport Lever.
Standard 1/4" X 20 Tripod Socket. Hot Shoe has automatic "off" control to prevent electrical shock when PC outlet is
"live".
Dimensions: Body Only 5.4" x 3.5" x 1.8" (136mm x 90mm x 45mm) With 50mm f/1.7 Lens 5.4" x 3.5" x 3,3" (I
36mm x 90mm x 85mm)
Weights: Body Only 18.0 oz. (510g) With 50mm f/1.7 Lens 25.4 oz. (720g)
INSERTING BATTERIES - (Webmaster: see my main camera page on replacement mercury batteries)
Open Battery Compartment (41) by turning the cover counter-clockwise
as shown. Remove batteries from protective packing (handle them by the
edges to keep the surfaces clean). If the batteries appear to have a thin
deposit of dust on them, wipe clean with a dry cloth.
Insert the two batteries into the compartment, with "+" sides facing up.
(For your convenience, + and - indicators are marked in the
compartment.)
After the batteries are in the chamber, replace cover.
To obtain longest service from your batteries, always press the Meter/Shutter "Off" Switch (34) when you have
completed picture taking. This turns the meter off, preventing battery depletion.
4.butkus.org
When needle movement becomes extremely sluggish or stops altogether, replace your batteries with a fresh set.
Normal life of PX-13 mercury batteries is approximately one year under normal operating conditions.
Prolonged heat and moisture may reduce battery life. Always keep your camera (and any spare batteries) in a cool,
dry place. And, when obtaining new batteries, make certain they are photographic type 1.35 volt PX-13 (Mallory PX13, PX-625. Eveready EPX-625,or exact equivalent). Many other batteries are similar in appearance, but the
difference in voltage and construction may cause incorrect exposures.
CHANGING LENSES
To Mount the Lens on your Camera:
Line up the Red dot on the lens with the matching dot on the camera body; the lens will "seat" into the body easily.
Now, grip the lens and turn it clockwise gently until it "clicks" into place. No further adjustments are required!
To Remove the Lens from your Camera:
Grip lens securely in one hand. With the other hand, hold the camera body and press the Lens Lock Release Button
(25). Holding this in, turn the lens counterclockwise until the two Red dots (one on the camera body, and one on the
lens) line up. The lens may now be removed.
Note: Always protect your camera's interior by replacing the lens as quickly as possible, or by attaching the Konica
Body Cap (supplied with your camera). Never touch any of the internal parts, or permit dust or dirt to enter the
camera body, when the lens has been removed.
FILM LOADING
Loading your Konica Autoreflex TC is exceptionally fast, accurate, and
foolproof, because of Konica's Fast Loading take-up spool .. . Here's
how:
1. Press down Camera Back Release (27), and swing the back open.
2. Slide the film cassette into the Cassette Chamber (29) as shown
above.
4.butkus.org
3. Pull out enough film to reach the Take-Up Spool (36). Insert film end into any slot in the spool. The film will be
gripped instantly ...
4. Advance the Film Transport Lever (14) one full stroke. Make sure that the sprocket holes in the film engage the
Upper and Lower Sprockets (35) in your camera.
5. Close the camera back. Gently, turn the Film Rewind Crank (21) until resistance is felt (this takes up the slack of
the film within the cassette).
6. Press the Shutter Release Button (1) and operate the transport lever until the Number 1 appears in the center of the
Film Counter (2).
To Check Film Advance
It's easy to make sure your camera is loaded correctly. While operating the transport lever, watch the Film Rewind
Crank (21) to see if it rotates. If it does, you know that film is going through properly; if it doesn't, it's not.
METER/SHUTTER "ON-OFF" CONTROL
When the Film Transport Lever (14) is at "ready" position (away from camera body), the exposure meter is turned on
and the Shutter Release Button (1) may be operated.
After you have completed picture-taking, press the Meter/ Shutter "Off" Switch (34). This will cause the Transport
Lever to move flush with the camera body, while simultaneously turning the meter "Off" and preventing operation of
the Shutter Release Button.
Next time you're ready to use your camera, simply move the Transport Lever to "Ready" position.
4.butkus.org
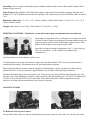
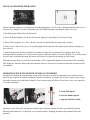
HOLDING YOUR CAMERA
· Hold the Camera securely - comfortably for your hand
One secret for getting ultra-sharp pictures is to prevent accidental camera movement. To do this it is suggested that
you hold the camera firmly, as shown in the picture above, cradling the body of the Autoreflex TC against the face.
Gently squeeze the shutter release button to avoid camera motion during exposure.
Vertical shots add variety to a series of pictures. They are especially desirable when making head and shoulder
portraits and architectural shots. Hold the camera as shown above.
FOCUSING
Turn the Focusing Ring (11) of the lens until a sharp, clear image is seen in the viewfinder. The split-image "spot" in
the center of the viewfinder shows your subject split into two parts when it is out of focus, then as a single, solid
image when it is in focus.
The Microdiaprism Circle (43) will prove helpful when the subject lacks clear vertical lines - for example, as in a
picture of a field covered with leaves.
The Fine Ground-Glass Ring (44) is most useful with ultra telephoto lenses and in close-up photography with bellows
unit, macro lenses, or extension rings; under these conditions the other focusing aids may darken appreciably.
Your camera's viewing system is designed for clear, comfortable viewing and focusing for persons with normal
vision. If you normally wear glasses for distant viewing, do so when picture taking also. Should you prefer to operate
your camera without glasses, use of a Konica diopter Correction Lens (available from your dealer) will provide a
correction similar to that of your eyeglasses, and simplify operation for farsighted or nearsighted photographers.
"CONTROL CENTER" VIEWFINDER
Your Konica Autoreflex TC has. a "Control Center" viewfinder which shows important picture-taking information at
a glance! Without removing the camera from your eye, you see:
* Match-Needle Index Mark for use with uncoupled lenses or accessories (46);
* Under-Exposure Indicator (47);
* Meter Needle (48);
* Aperture Scale (49);
* Over-Exposure Indicator (50);
* Manual Operation Signal (45).
THE UNDER-EXPOSURE INDICATOR
The upper Red Band (47) is automatically positioned to show the under-exposure range for the lens in use. (For
example, the Band will move to a higher position with an f/1.7 lens, and a lower position with an f/2.8 lens.) For
optimal exposure accuracy, the position of this band is calculated individually for each Konica lens according to its
focal length and optical characteristics as well as the theoretical maximum f/stop. Thus, the lower edge of the Band
(47) will not necessarily intersect the maximum aperture number of the lens shown in the viewfinder Aperture Scale
(49).
4.butkus.org
So long as the exposure Meter Needle (48) is in the white area between the upper and lower Red Bands shoot! Your
photograph will be correctly exposed, automatically.
USING AUTOMATIC EXPOSURE CONTROL (AEC)
1. Set the Film Speed.
Lift the outer collar surrounding the Shutter
Speed Dial (20) and turn it until the correct ASA
number appears in the Indicator Window (16).
2. Select the Shutter Speed.
For most situations, 1/125th is an excellent
choice; it's fast enough to freeze most action and
stop camera movement, and lets you shoot in
most situations with today's film types.
Generally, slower shutter speeds should be used only when there's not enough light to work at 1/125th; faster speeds
are required usually only for extremely fast-moving subjects (racing cars, sports) or when shooting with telephoto
lenses which naturally magnify possible camera movement just as they magnify the subject. (See page 20 for other
situations in which faster or slower speeds may be desired)
4.butkus.org
3. Check Aperture Ring.
Make certain the Aperture Control Ring
(12) is at the AE (EE) position as shown. If
lens is not on AE (EE) position, your
picture will be exposed at the opening
shown on the aperture ring irrespective of
the f/stop indicated in the viewfinder.
Should the Aperture Ring inadvertently be moved off "AE" position, a red Manual signal will appear at the left side of
the viewfinder (see p.17).
4. Take the Picture!
Aim camera at subject, focus ... and shoot. As long as the Meter Indicator Needle (48) is in the white area, you'll get a
perfectly exposed picture ... automatically!
UNDER/OVER-EXPOSURE SAFEGUARDS
If the meter needle goes to the upper red band (shown above for the three
standard Lenses), choose a slower shutter speed. If, at the slowest shutter speed,
the needle's still in the red zone, there's not enough light to get a perfectly
exposed picture. (Naturally, when using speeds of 1/30 second or slower, use a
tripod or brace the camera on a firm support if at all possible, and trip the
shutter with a cable release.)
If the needle goes down to the lower red band (as shown in the fourth example
above), there's too much light; choose a faster shutter speed.
METER RANGE
All exposure meters are designed to operate over a certain range of film and shutter speeds. Your Konica Autoreflex
TC's meter is actually sensitive enough to allow operation both in dimly-lit interiors and in outdoor situations where
brightness is more than 12,000 times greater from 1/8 sec. at f/1.7 to 1/l000th sec. at f/16, using ASA 100 film.
With films faster than ASA 200, the slower shutter speeds are not usable in automatic exposure photography. Here,
your camera prevents exposure errors by automatically turning the exposure meter off if the shutter speed selected is
too slow for AE operation. When this occurs, the Meter Needle (48) moves into the red Under-exposure band (47), to
show that the shutter speed is beyond the meter's EV range. Solution: turn the Shutter Speed Dial (20) to a faster
speed, until the Meter Needle moves into the white area in the viewfinder. (If Needle will not move into the White
area at any speed, flash photography must be used-see p. 29-30.)
Exposure Meter Range of Konica TC:
ASA 25 - 200 -1/8 sec. to 1/1000
ASA 250 - 400 - 1/5 sec. to 1/1000
ASA 500 - 800 - 1/30 sec. to 1/1000
ASA 1000 - 1600 - 1/60 to 1/1000
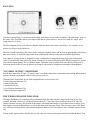
HINTS FOR UNUSUAL EXPOSURE SITUATIONS
A unique and most valuable feature of your Konica Autoreflex TC camera is the built-in exposure "Memory" lock...
an easy-to-use control that "holds" a meter reading (and exposure setting) to insure correct exposure even in unusual
lighting conditions.
4.butkus.org
Backlit Subjects:
See how the sun is shining towards the camera in the illustration at the right? Chances are,
the subject will have a much more natural expression than she would if she had to stare into
the sun...but as a result, her face is much darker than the rest of the scene as seen by the
camera. Solution: walk up to the subject hold the camera dose to the most important part
(her face), press the shutter release halfway down...and you've 'frozen" the meter needle at
the correct position. Holding the release button in place, step back, focus, and shoot: the
exposure is actually taken at the aperture indicated when you first depressed the release, as
shown within your Konica's viewfinder.
Extremely Dark Backgrounds:
In the illustration at left, a relatively light subject is being photographed against a very dark
background. Here again, taking a "close-up" reading, holding or locking that reading, then
going back to the desired position and taking the picture, will automatically provide a
professional close-up exposure reading and a perfectly-exposed picture. As soon as you
release the shutter button, the meter resumes continuous operation...so there's nothing to set
or re-set.
Sometimes, of course, it's not possible to approach your subject for a close-up reading as outlined above. A very
practical alternative is to memorize' the exposure setting by aiming the camera at your hand, then raising the camera
to your eye and taking the picture. As your hand almost certainly reflects a similar amount of right to the subject's
face, your exposure will in almost all instances be excellent! Try this "professional" technique when it's impossible to
come close to your subject for an exposure reading, and the subject is much brighter - or darker - than the rest of the
scene.
SHUTTER SPEEDS AND LENS OPENINGS
* In most cases, it is of more importance to take the picture at a
specific shutter speed than at a particular lens opening. Almost all
subjects are likely to move to some extent during the exposure, and
all photographers tend to move the camera slightly when taking a
photograph. By selecting a shutter speed fast enough to overcome
subject and camera motion, you are assured of obtaining a sharp,
clear picture.
* Should you prefer to take the picture at a specific lens opening to obtain more or less depth-of-field (see p. 26), this
may easily be done while in "Automatic" (AK) mode. Just look through the viewfinder and rotate the Shutter Speed
Dial (20) until the desired lens aperture is indicated by the Meter Needle (48) ... and take the picture! Your
photograph will be correctly exposed, automatically, at the lens aperture indicated in the viewfinder.
Alternatively, it is possible to note the lens opening indicated by the Meter Needle, then manually set the Aperture
Ring of the Lens to this position. However, there is no practical advantage in doing this: operation is faster and
exposure accuracy is greater when the aperture is set by the automatic exposure mechanism.
Like your eye, your camera lens has an iris, generally called the diaphragm. Open it up, and it admits more light;
close it down, it admits less. The amount of light is indicated by f/stops (also known as "apertures"): f/2.8 admits half
as much light as f/2; f/4 admits one-quarter as much as f/2, and so on.
MANUAL EXPOSURE OPERATION
Manual exposure settings are used primarily in flash photography (p. 29 30), and to obtain intentional under or overexposure--for example, to create a 'silhouette' effect by deliberately under-exposing the subject. It's easy:
1) Set Shutter Speed Dial (20) to desired speed.
2) Press AE Release Button (13) on lens and set lens Aperture Control Ring (12) to desired f/stop.
4.butkus.org
3) Move Film Transport Lever (14) to "Ready" position (so that Red Dot on camera top is visible).
4) Frame, focus...and take the picture. Your photograph will be exposed at the shutter speed and lens opening you
have selected.
* In Manual operation, the Meter Needle (48) continues to show the recommended lens opening. Thus, if the
recommended lens opening is f/8 and you wish to obtain a silhouette effect, set Aperture Ring to f/16 to under-expose
by two f/stops. In manual operation, the picture will always be exposed at the settings you hay" made.
When the Aperture Ring of your lens is set manually, a Red - Signal Mark appears at the left side of the viewfinder.
This Signal also functions when using non-automatic lenses or accessories, to remind you that the exposure must be
set manually. .
OPERATION WITH UNCOUPLED LENSES/ACCESSORIES
Your Konica's through-the-lens metering system works perfectly even with non-automatic lenses and accessories,
which do not couple to the camera's automatic exposure mechanism. (Example: Pre-set lenses, mirror lenses, lenses
from other cameras used with Konica adapters, even extension rings or bellows.) Here's how to use your Autoreflex
TC m these situations:
1. Set the Film Speed.
2. Select the Shutter Speed.
3. Align the Indicator Needle.
Open up (or close down) the lens aperture until the Meter Indicator Needle (48) limes up with the Stop-down
Metering Index Mark (46). (If preferred, you can also do this by changing the shutter speed instead of the lens
aperture.)
4. Take the Picture!
Remember...this stop-down metering procedure is not needed (and in fact is not possible) with Konica Automatic
lenses mounted on the camera body. Stop down metering is used only for uncoupled lenses or accessories.
OPERATION WITH UNCOUPLED LENSES/ACCESSORIES: REMINDERS
When using the stop-down metering system with uncoupled lenses or accessories,
keep in mind that the f/stop scale in the viewfinder no longer applies; neither do the
under or over-exposure warning bands. If the needle's above the Index Mark (46) as
shown (above, left) there's not enough light; if it's below this mark (above, right)
there's too much light. Solution: change lens aperture and/or shutter speed until the
needle lines up with the Index Mark.
In full-aperture metering with Konica Automatic lenses stray light which may enter the eyepiece and reach the meter
cells has virtually no effect on exposures. In stop-down metering with uncoupled lenses or accessories, however, such
light can have the effect of incorrectly influencing the meter's reading. Whenever you're using the stop-down metering
system, be sure to place your eye as close as possible to the eyepiece, to prevent stray light from entering. (A Konica
Rubber Eyecup, available from your dealer, helps here.)
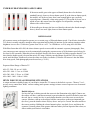
Using Preset Lenses.....
Lenses of this type do not automatically close down to the desired
aperture; you turn the aperture control ring by hand to select the desired
f/stop. Still, you can speed up operation considerably by setting both
control rings of these lenses to the smallest f/stop (f/22 in the example
shown above), then turning them together until the meter needle lines
up with the Index Mark in the viewfinder. As soon as it lines up, you're
ready to shoot...
DEPTH-OF-FIELD CONTROL
Depth-of-Field is the distance between the nearest and farthest
objects in the scene that will be sharp in the finished picture. In
practical terms this means that when you bring an object into sharp
focus, objects behind and in front of this will be rendered more or
less sharply as well. For more Depth-of-Field, use a smaller f/stop
(for example, f/ I 1 instead of f/5.6). For less Depth-of-Field, use a
larger f/stop (for example, f/4.0 instead of f/8).
4.butkus.org
Using Depth-of-Field Scale on Lens:
On the Depth-of-Field Scale, f/stop markings identical to those
on the Manual Aperture Scale (9), are repeated to the right and
left of the Distance/Aperture Scale Index Mark (7). The Depthof-Field for any focused distance will be found between any two
identical f/stop markings on the Depth-of-Field Scale. Thus, if the
lens is focused at 15 feet and the picture is to be made at f/16,
referring to f/16 on both sides of the scale tells us that the Depthof-Field extends from Infinity to about 8 feet. For maximum
Depth-of-Field, including Infinity, set the Infinity mark to the
f/stop in use, on the right hand side of the scale.
Infrared Film Index Mark: Infrared rays come to a different focus than visible light rays. When shooting infrared
film with the appropriate filter, focus as usual. Then bring the distance figure opposite the Distance Scale Index Mark
(7) into line with the Infrared Film Index Mark (51).
FILM REWIND AND UNLOADING
After all the pictures on the roll have been taken, the film is rewound into the cassette prior to removal for processing.
An occasional look at the Film Counter (2) will help you keep posted as to when you are coming to the end of the roll
and prevent your accidentally tearing the film out of the cassette If you should come to the end of the film while
moving the Transport Lever, the Transport Lever (14) will tighten and refuse to advance even if the shutter has been
released. If this happens do not force it! Instead, depress the Film Rewind Button (39) and at the same time move the
Film Transport Lever as far as it will go. It will then snap back into its normal position. Then, just ....
1. Depress the Film Rewind Button (39). Once it is depressed, the button remains in place.
2. Lift up the Film Rewind Crank (21) and turn it clockwise at moderate speed in a continuous motion. An arrow on
the Rewind Crank indicates correct direction.
3. When tension on the Film Rewind Crank eases, the film has been fully rewound. You can now open the camera
back and remove the cassette by tipping it towards yourself and letting it drop out of the bottom opening.
The Film Rewind Button returns to its original position once the Film Transport Lever is again actuated. In addition,
the Film Counter automatically resets itself to "S" (Start) as soon as the back was opened ... so you're ready to load
your next roll right away!
4.butkus.org
FLASH PHOTOGRAPHY
Your Konica Autoreflex TC camera has several features which make flash
photography easy.
* With electronic flash, set Shutter Speed Dial (20) to 1/125th second. This
shutter speed prevents annoying 'ghost' images (and possible color shifts) which
may be encountered at slower shutter speeds.
* For maximum convenience, a "Hot" accessory shoe is built-in to your TC.
Simply slide in any "Hot Shoe" flash...no cords to connect.
* If your flash unit does not have a "Hot Shoe", or if you prefer to use a separate
flash bracket, plug the flash cord into the Flash Cord Terminal (23).
* In flash photography, the built-in exposure meter is not used.
With KONICA X-20 or Other Manual Flash
Unit, Set calculator dial of Flash to correct ASA film speed. Your flash dial will
now indicate the correct lens openings for various distances. Focus, and set lens
Aperture Control Ring (12) to the aperture indicated by your flash for the actual
camera-to-subject distance, as shown by your lens' Distance Scale (8). All
photographs taken at this flash-to-subject distance will be properly exposed.
With KONICAX-28 or Other Automatic Flash
Units, Set calculator dial of flash to correct ASA film speed. Your flash dial will now indicate the correct lens
opening for photography at a wide range of distances.
Set lens Aperture Control Ring (12) to the aperture indicated by your flash dial. You can now take pictures at any
distance within the range indicated by your flash without further exposure adjustments.
SE LF Tl ME R
This trips the shutter for you, after a delay ranging from 4 to 10 seconds; thus, you can
walk around and appear in the photograph yourself: The Self Timer is also valuable in
close-up and technical photography, as it trips the shutter internally-reducing the
possibility of blur due to camera movement at the moment of exposure.
4.butkus.org
To use the Self-Timer (4) simply move the Timer counterclockwise, then depress the Shutter Release Button (1).
According to the degree you have moved the Timer down, the shutter will fire within about 4 seconds to a maximum
of 10 seconds.
When the Self Timer is not in use, push the lever to its maximum vertical position - Engaging the Lock Pin (3). This
prevents accidental activation of the Self Timer.
TIME EXPOSURES
When the shutter speed dial is set at "B", the shutter will remain open as long as the shutter release is held down. As a
result, exposures longer than one second - as long, in fact, as several hours may be taken at night, or in dimly- lit
places where there is no moving subject. If an exposure of more than several seconds is desired, attach a Konica
Cable Release (available from your dealer) to the Shutter Release Button (1). Set the shutter speed dial to "B". Press
down the cable release "plunger", and hold it down for as long an exposure time as is desired. When the cable release
plunger is released, the shutter closes. (Webmaster: This is a manual camera shutter. The batteries DO NOT control
the shutter so the shutter can be open as long as desired without any drain on the batteries)
In Time exposures, move the Aperture Control Ring to the desired f/stop and expose manually. Automatic exposure
operation is not possible with time exposures.
It is necessary that you use a tripod or other support for "B" time exposures and all other exposures longer than 1/30th
second. Use of a cable release will minimize jarring the camera.
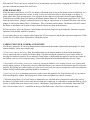
CARING FOR YOUR CAMERA AND LENSES
Your Konica Autoreflex TC has been designed and constructed for thousands of pleasurable photographs. To insure
utmost reliability, follow these simple steps:
* Protect your camera and lenses. Dust, dirt, and moisture are the natural enemies of all precision instruments.
Always replace the lens (or attach your Konica Body Cap) when storing the camera Keep your camera within its'
carrying case whenever possible. Never attempt to clean, adjust, or disassemble the camera or lens for any reason. In
the unlikely event service becomes necessary, forward the equipment to an authorized Konica Service Center.
* In extremely cold weather, protect your camera by carrying it within its' case, keeping it inside your clothing until
actually taking a picture. If exposed to extremely cold temperatures, your camera's meter batteries may fail to operate
properly. By keeping your camera inside your coat, next to your body, the camera's temperature will in most instances
remain virtually normal and no problems should be encountered.
* Avoid excessive force in attaching accessories (such as cases and tripods) to the Tripod Socket (40) of your camera.
When attaching these, tighten. the locking screw firmly but do not tighten more than is necessary.
* The Built-in Hot Shoe (19) of your camera is intended for use with flash units of normal size and weight, such as
the Konica X-20 flash. In the event a much heavier flash unit is employed, it is advisable to mount the flash on a flash
bracket, available from your dealer as an accessory. (Webmaster: Large flash units will eventually loosen the flash
shoe. Plus it becomes a lever. A small hit on the top of the flash creates a lot of force at the hot shoe area)