1
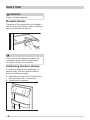
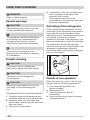
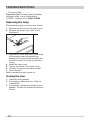
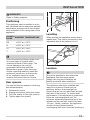
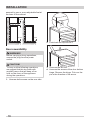
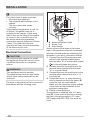
User Manual
FRLF55W
CONTENTS
Safety information.......................................2
Safety instructions...................................... 4
Operation....................................................6
First use......................................................7
Daily use.....................................................8
Hints and tips..............................................9
Care and cleaning.................................... 10
Troubleshooting........................................12
Installation................................................ 15
Technical information............................... 20
SAFETY INFORMATION
Before the installation and use of the appliance, carefully read
the supplied instructions. The manufacturer is not responsible
if an incorrect installation and use causes injuries and
damages. Always keep the instructions with the appliance for
future reference.
Children and vulnerable people safety
•
•
•
•
This appliance can be used by children aged from 8 years
and above and persons with reduced physical, sensory or
mental capabilities or lack of experience and knowledge if
they have been given supervision or instruction concerning
use of the appliance in a safe way and understand the
hazards involved.
Do not let children play with the appliance.
Cleaning and user maintenance shall not be made by
children without supervision.
Keep all packaging away from children.
General Safety
•
•
•
•
•
•
This appliance is intended to be used in household and
similar applications such as:
– Farm houses; staff kitchen areas in shops, offices and
other working environments
– By clients in hotels, motels, bed and breakfast and other
residential type environments
Keep ventilation openings, in the appliance enclosure or in
the built-in structure, clear of obstruction.
Do not use mechanical devices or other means to accelerate
the defrosting process, other than those recommended by
the manufacturer.
Do not damage the refrigerant circuit.
Do not use electrical appliances inside the food storage
compartments of the appliance, unless they are of the type
recommended by the manufacturer.
Do not use water spray and steam to clean the appliance.
2
SAFETY INFORMATION
•
•
•
Clean the appliance with a moist soft cloth. Only use neutral
detergents. Do not use abrasive products, abrasive cleaning
pads, solvents or metal objects.
Do not store explosive substances such as aerosol cans with
a flammable propellant in this appliance.
If the supply cord is damaged, it must be replaced by the
manufacturer, its Authorised Service Centre or similarly
qualified persons in order to avoid a hazard.
3
SAFETY INSTRUCTIONS
Installation
WARNING!
Only a qualified person must install
this appliance.
• Remove all the packaging.
• Do not install or use a damaged
appliance.
• Obey the installation instruction supplied
with the appliance.
• Always be careful when you move the
appliance because it is heavy. Always
wear safety gloves.
• Make sure the air can circulate around
the appliance.
• Wait at least 4 hours before connecting
the appliance to the power supply. This
is to allow the oil to flow back in the
compressor.
• Do not install the appliance close to
radiators or cookers, oven or hobs.
• The rear of the appliance must stand
against the wall.
• Do not install the appliance where there
is direct sunlight.
• Do not install this appliance in areas that
are too humid or too colds, such as the
construction appendices, garages or
wine cellars.
• When you move the appliance, lift it by
the front edge to avoid scratching the
floor.
Electrical connection
WARNING!
Risk of fire and electrical shock.
• The appliance must be earthed.
• Make sure that the electrical information
on the rating plate agrees with the power
supply. If not, contact an electrician.
• Always use a correctly installed
shockproof socket.
• Do not use multi-plug adapters and
extension cables.
4
• Make sure not to cause damage to the
electrical components (e.g. mains plug,
mains cable, compressor). Contact the
Authorised Service Centre or an
electrician to change the electrical
components.
• The mains cable must stay below the
level of the mains plug.
• Connect the mains plug to the mains
socket only at the end of the installation.
Make sure that there is access to the
mains plug after the installation.
• Do not pull the mains cable to
disconnect the appliance. Always pull
the mains plug.
Use
WARNING!
Risk of injury, burns, electrical shock
or fire.
• Do not change the specification of this
appliance.
• Do not put electrical appliances (e.g. ice
cream makers) in the appliance unless
they are stated applicable by the
manufacturer.
• Be careful not to cause damage to the
refrigerant circuit. It contains isobutane
(R600a), a natural gas with a high level
of environmental compatibility. This gas
is flammable.
• If damage occurs to the refrigerant
circuit, make sure that there are no
flames and sources of ignition in the
room. Ventilate the room.
• Do not let hot items to touch the plastic
parts of the appliance.
• Do not store flammable gas and liquid in
the appliance.
• Do not put flammable products or items
that are wet with flammable products in,
near or on the appliance.
• Do not touch the compressor or the
condenser. They are hot.
SAFETY INSTRUCTIONS
Internal light
• The type of lamp used for this appliance
is not suitable for household room
illumination
Care and cleaning
WARNING!
Risk of injury or damage to the
appliance.
• Before maintenance, deactivate the
appliance and disconnect the mains plug
from the mains socket.
• This appliance contains hydrocarbons in
the cooling unit. Only a qualified person
must do the maintenance and the
recharging of the unit.
• Regularly examine the drain of the
appliance and if necessary, clean it. If
the drain is blocked, defrosted water
collects in the bottom of the appliance.
Disposal
WARNING!
Risk of injury or suffocation.
• Disconnect the appliance from the mains
supply.
• Cut off the mains cable and discard it.
• Remove the door to prevent children and
pets to be closed inside of the appliance.
• The refrigerant circuit and the insulation
materials of this appliance are ozonefriendly.
• The insulation foam contains flammable
gas. Contact your municipal authority for
information on how to discard the
appliance correctly.
• Do not cause damage to the part of the
cooling unit that is near the heat
exchanger.
5
OPERATION
Switching on
Insert the electrical plug into a wall socket.
Turn the temperature regulator clockwise to
a medium setting.
Switching off
To turn off the appliance, turn the
temperature regulator to the "O" position.
Temperature regulation
The temperature is automatically regulated.
To operate the appliance, proceed as
follows:
• turn the Temperature regulator towards
lower settings to obtain the minimum
coldness.
• turn the Temperature regulator towards
higher settings to obtain the maximum
coldness.
A medium setting is generally the most
suitable.
However, the exact setting should be
chosen keeping in mind that the
temperature inside the appliance depends
on:
• room temperature
• how often the door is opened
• the quantity of food stored
• the location of the appliance.
If the ambient temperature is high or
the appliance is fully loaded, and the
appliance is set to the lowest
temperature, it may run continuously
causing frost to form on the rear wall.
In this case the dial must be set to a
higher temperature to allow automatic
defrosting and therefore reduced
energy consumption.
6
FIRST USE
Cleaning the interior
Before using the appliance for the first time,
the interior and all internal accessories
should be washed with lukewarm water and
some neutral soap to remove the typical
smell of a brand-new product, then dried
thoroughly.
CAUTION!
Do not use detergents or abrasive
powders, as these will damage the
finish.
7
DAILY USE
WARNING!
Refer to Safety chapters.
Movable shelves
The walls of the refrigerator are equipped
with a series of runners so that the shelves
can be positioned as desired.
Do not move the glass shelf above the
vegetable drawer and the bottle shelf
to ensure correct air circulation.
Positioning the door shelves
To permit storage of food packages of
various sizes, the door shelves can be
placed at different heights.
1. Gradually pull the shelf in the direction
of the arrows until it comes free.
2. Reposition as required.
8
HINTS AND TIPS
Normal operating sounds
The following sounds are normal during
operation:
• A faint gurgling and bubbling sound from
coils sound when refrigerant is pumped.
• A whirring and pulsating sound from the
compressor when refrigerant is pumped.
• A sudden cracking noise from inside
appliance caused by thermic dilatation (a
natural and not dangerous physical
phenomenon).
• A faint click noise from the temperature
regulator when the compressor switches
on or off.
Hints for energy saving
• Do not open the door frequently or leave
it open longer than absolutely
necessary.
• If the ambient temperature is high and
the Temperature Regulator is set to low
temperature and the appliance is fully
loaded, the compressor may run
continuously, causing frost or ice on the
evaporator. If this happens, set the
Temperature Regulator toward warmer
settings to allow automatic defrosting
and so a saving in electricity
consumption.
• For safety, store in this way only one or
two days at the most.
• Cooked foods, cold dishes, etc..: these
should be covered and may be placed
on any shelf.
• Fruit and vegetables: these should be
thoroughly cleaned and placed in the
special drawer(s) provided.
• Butter and cheese: these should be
placed in special airtight containers or
wrapped in aluminium foil or polythene
bags to exclude as much air as possible.
• Bottles: these need a cap and should be
stored on the door bottle shelf, or (if
equipped) on the bottle rack.
• Bananas, potatoes, onions and garlic, if
not packed, must not be kept in the
refrigerator.
Hints for fresh food
refrigeration
To obtain the best performance:
• do not store warm food or evaporating
liquids in the refrigerator
• do cover or wrap the food, particularly if
it has a strong flavour
• position food so that air can circulate
freely around it
Hints for refrigeration
Useful hints:
• Meat (all types) : wrap in polythene bags
and place on the glass shelf above the
vegetable drawer.
9
CARE AND CLEANING
WARNING!
Refer to Safety chapters.
General warnings
CAUTION!
Unplug the appliance before carrying
out any maintenance operation.
This appliance contains hydrocarbons
in its cooling unit; maintenance and
recharging must therefore only be
carried out by authorized technicians.
The accessories and parts of the
appliance are not suitable for washing
in a dishwasher.
4. If accessible, clean the condenser and
the compressor at the back of the
appliance with a brush.
This operation will improve the
performance of the appliance and save
electricity consumption.
Defrosting of the refrigerator
Frost is automatically eliminated from the
evaporator of the refrigerator compartment
every time the motor compressor stops,
during normal use. The defrost water drains
out through a trough into a special
container at the back of the appliance, over
the motor compressor, where it evaporates.
It is important to periodically clean the
defrost water drain hole in the middle of the
refrigerator compartment channel to
prevent the water overflowing and dripping
onto the food inside.
Periodic cleaning
CAUTION!
Do not pull, move or damage any
pipes and/or cables inside the cabinet.
CAUTION!
Take care of not to damage the
cooling system.
CAUTION!
When moving the cabinet, lift it by the
front edge to avoid scratching the
floor.
The equipment has to be cleaned regularly:
1. Clean the inside and accessories with
lukewarm water and some neutral soap.
2. Regularly check the door seals and
wipe clean to ensure they are clean and
free from debris.
3. Rinse and dry thoroughly.
10
Periods of non-operation
When the appliance is not in use for long
periods, take the following precautions:
1. Disconnect the appliance from
electricity supply.
2. Remove all food.
3. Clean the appliance and all
accessories.
4. Leave the door/doors open to prevent
unpleasant smells.
CARE AND CLEANING
WARNING!
If the cabinet will be kept on, ask
somebody to check it once in a while
to prevent the food inside from spoiling
in case of a power failure.
11
TROUBLESHOOTING
WARNING!
Refer to Safety chapters.
What to do if...
PROBLEM
The appliance does not operate.
POSSIBLE CAUSE
SOLUTION
The appliance is switched
off.
Switch on the appliance.
The mains plug is not connected to the mains socket
correctly.
Connect the mains plug to
the mains socket correctly.
There is no voltage in the
mains socket.
Connect a different electrical
appliance to the mains socket. Contact a qualified electrician.
The appliance is noisy.
The appliance is not suppor- Check if the appliance
ted properly.
stands stable.
The lamp does not work.
The lamp is in stand-by.
Close and open the door.
The lamp is defective.
Refer to "Replacing the
lamp".
Temperature is set incorrectly.
Refer to "Operation" chapter.
Many food products to be
frozen were put in at the
same time.
Wait some hours and then
check the temperature
again.
The compressor operates
continually.
The room temperature is too Refer to climate class chart
high.
on the rating plate.
Food products placed in the
appliance were too warm.
Allow food products to cool
to room temperature before
storing.
The door is not closed correctly.
Refer to "Closing the door".
Water flows on the rear
plate of the refrigerator.
During the automatic defrosting process, frost melts
on the rear plate.
This is correct.
Water flows into the refrigerator.
The water outlet is clogged.
Clean the water outlet.
12
TROUBLESHOOTING
PROBLEM
POSSIBLE CAUSE
Food products prevent that
water flows into the water
collector.
SOLUTION
Make sure that food products do not touch the rear
plate.
Water flows on the floor.
The melting water outlet is
Attach the melting water
not connected to the evapo- outlet to the evaporative
rative tray above the comtray.
pressor.
Door is misaligned or interferes with ventilation grill.
The appliance is not levelled. Refer to "Levelling".
The temperature in the appliance is too low/too high.
The temperature regulator is Set a higher/lower temperanot set correctly.
ture.
The door is not closed correctly.
Refer to "Closing the door".
The food products' tempera- Let the food products temture is too high.
perature decrease to room
temperature before storage.
Many food products are
stored at the same time.
Store less food products at
the same time.
The door has been opened
often.
Open the door only if necessary.
There is no cold air circulation in the appliance.
Make sure that there is cold
air circulation in the appliance.
Service and spare parts.
Please ensure you read the information
under "What to do if" in your instruction
booklet before contacting us for service.
Servicing and/or installation of your
product, including electrical connections
should be carried out by a suitably qualified
engineer. in the user manual you will find
some useful information on how to deal
with minor faults and how to take care of
your product.
Please contact your Authorised Service
Force Centre on: 03445 616616 (Your call
will automatically be routed to your local
centre). For the address of your local
centre please visit
www.serviceforce.co.uk
• Model No.............................
• Serial No..............................
• Product No..........................
If the advice does not lead to the
desired result, call the nearest
Authorized Service Centre.
FRIGIDAIRE-Customer Care
and Service
When contacting us for Service please
ensure that you have your purchase receipt
and the following information available:
13
TROUBLESHOOTING
• Purchase Date....................
Customer Care. Please contact Frigidaire,
Addington Way, Luton, Bedfordshire,
LU49QQ. Telephone No. 03445 610528
Replacing the lamp
Disconnect the plug from the mains socket.
1. Remove the screw from the lamp cover.
2. Remove the lamp cover (refer to the
illustration).
3. Replace the used lamp with a new lamp
of the same power and specifically
designed for household appliances (the
maximum power is shown on the lamp
cover).
4. Install the lamp cover.
5. Tighten the screw to the lamp cover.
6. Connect the plug to the mains socket.
7. Open the door.
Make sure that the light comes on.
Closing the door
1. Clean the door gaskets.
2. If necessary, adjust the door. Refer to
"Installation".
3. If necessary, replace the defective door
gaskets. Contact the Authorised Service
Centre.
14
INSTALLATION
WARNING!
2
Refer to Safety chapters.
Positioning
This appliance can be installed in a dry,
well ventilated indoor where the ambient
temperature corresponds to the climate
class indicated on the rating plate of the
appliance:
CLIMATE
AMBIENT TEMPERATURE
CLASS
SN
+10°C to + 32°C
N
+16°C to + 32°C
ST
+16°C to + 38°C
T
+16°C to + 43°C
Some functional problems might occur
for some types of models when
operating outside of that range. The
correct operation can only be
guaranteed within the specified
temperature range. If you have any
doubts regarding where to install the
appliance, please turn to the vendor,
to our customer service or to the
nearest Authorised Service Centre.
Rear spacers
You can find the two spacers in the bag
with documentation.
1.
2.
3.
4.
Release the screw.
Engage the spacer below the screw.
Turn the spacer to the right position.
Tighten again the screws.
1
4
3
Levelling
When placing the appliance ensure that it
stands level. This can be achieved by two
adjustable feet at the bottom in front.
Location
It must be possible to disconnect the
appliance from the mains power
supply; the plug must therefore be
easily accessible after installation.
The appliance should be installed well
away from sources of heat such as
radiators, boilers, direct sunlight etc.
Ensure that air can circulate freely around
the back of the cabinet. To ensure best
performance, if the appliance is positioned
below an overhanging wall unit, the
minimum distance between the top of the
cabinet and the wall unit must be at least
100 mm . Ideally, however, the appliance
should not be positioned below
overhanging wall units. Accurate levelling is
15
INSTALLATION
ensured by one or more adjustable feet at
the base of the cabinet.
100 mm
15 mm
15 mm
2. Push back the top and lift it.
Door reversibility
WARNING!
Before carrying out any operations,
remove the plug from the power
socket.
CAUTION!
To carry out the following operations,
we suggest that this be made with
another person that will keep a firm
hold on the doors of the appliance
during the operations.
1. Unscrew both screws on the rear side.
16
3. Unscrew the left foot.
4. Unscrew the screws of the door bottom
hinge. Remove the hinge. Put over the
pin in the direction of the arrow.
INSTALLATION
5. Unscrew and install the screw on the
opposite side.
6. Install the hinge on the opposite side.
7. Screw the right foot.
8. Unscrew the screws of the door top
hinge.
1
2
10. Tighten the hinge.
11. Put the top in position.
12. Push front the top.
13. Screw both screws on the rear side.
14. Remove and install the handle on the
opposite side.
3
1
2
3
9. Remove the hinge. Put over the pin in
the direction of the arrow. Install the
hinge on the opposite side.
CAUTION!
Reposition, level the appliance, wait
for at least four hours and then
connect it to the power socket.
17
INSTALLATION
A
Do a final check to make sure that:
• All screws are tightened.
• The magnetic seal adheres to the
cabinet.
• The door opens and closes
correctly.
If the ambient temperature is cold (i.e.
in Winter), the gasket may not fit
perfectly to the cabinet. In that case,
wait for the natural fitting of the gasket.
In case you do not want to carry out
the above mentioned operations,
contact the nearest Authorised Service
Centre. The Authorised Service
specialist will carry out the reversibility
of the doors at your cost.
Electrical Connection
CAUTION!
Any electrical work required to install
this appliance should be carried out by
a qualified electrician or competent
person.
WARNING!
This appliance must be earthed.
The manufacturer declines any liability
should these safety measures not be
observed.
The wires in the mains lead are coloured in
accordance with the following code:
18
B
C
D
E
• A - green and yellow: Earth
• C - brown: Live
• D - blue: Neutral
As the colours of the wires in the mains
lead of this appliance may not correspond
with the coloured markings identifying the
terminals in your plug, proceed as follows:
1. Connect the wire coloured green and
yellow to the terminal marked either
with the letter “E“ or by the earth symbol
or coloured green and yellow.
2. Connect the wire coloured blue to the
terminal either marked with the letter
“N“ or coloured black.
3. Connect the wire coloured brown to the
terminal either marked with the “L“ or
coloured red.
4. Check that no cut, or stray strands of
wire is present and the cord clamp (E)
is secure over the outer sheath.
Make sure the electricity supply voltage
is the same as that indicated on the
appliance rating plate.
5. Switch on the appliance.
The appliance is supplied with a 13 amp
fuse (B). In the event of having to change
the fuse in the plug supplied, a 13 amp
ASTA approved (BS 1362) fuse must be
used.
INSTALLATION
WARNING!
A cut off plug inserted into a 13 amp
socket is a serious safety (shock)
hazard. Ensure that it is disposed of
safely.
19
TECHNICAL INFORMATION
Technical data
Height
mm
850
Width
mm
550
Depth
mm
612
Voltage
Volts
230 - 240
Frequency
Hz
50
The technical information are situated in
the rating plate, on the external or internal
side of the appliance and in the energy
label.
20
ENVIRONMENT CONCERNS
dispose appliances marked with the symbol
with the household waste. Return the
product to your local recycling facility or
contact your municipal office.
Recycle the materials with the symbol .
Put the packaging in applicable containers
to recycle it. Help protect the environment
and human health and to recycle waste of
electrical and electronic appliances. Do not
21
*
22
23
212001052-A-072015