1
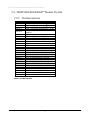
Revision 1.0.0 WI.DP1203WI.DP1203-XXXXXX-EVMEVM-R™ and RKRK-WI.DP1203 WI.DP1203DP1203-XXXXXX-R™ USER’S MANUAL WI.DP1203-XXX-EVM-R/ RK-WI.DP1203-XXX-R USER’S MANUAL RADIOTRONIX, INC. WI.DP1203-XXX-EVM-R/ RK-WI.DP1203-XXX-R USER’S MANUAL Radiotronix 905 Messenger Lane Moore, Oklahoma 73160 Phone 405.794.7730 • Fax 405.794.7477 www.radiotronix.com 1 WI.DP1203-XXX-EVM-R/ RK-WI.DP1203-XXX-R USER’S MANUAL Document Control SIGNED DATE CREATED BY TJE 4/7/2008 ENGINEERING REVIEW TRM 4/11/2008 MARKETING REVIEW TJE 4/8/2008 APPROVED- ENG. TRM 4/11/2008 APPROVED- MAR. T 4/8/2008 Revised History REVISION SIGNED DATE DESCRIPTION 1.0.0 TJE/TRM 4/7/2008 Document created 2 WI.DP1203-XXX-EVM-R/ RK-WI.DP1203-XXX-R USER’S MANUAL Table of Contents 1. DESCRIPTION ............................................................................................................................................. 5 2. SUPPLEMENTAL DOCUMENTATION ....................................................................................................... 6 3. DEVELOPMENT KIT SETUP....................................................................................................................... 7 4. USING THE RK-WI.DP1203-XXX-EVM-R 4.1. 4.2. 4.3. 4.4. 5. TM EVALUATION SOFTWARE ................................................. 8 COM PORT SETUP AND SELECTION ........................................................................................................... 8 W IRELESS CHAT PAGE .............................................................................................................................. 8 NON-VOLATILE REGISTER PAGE ................................................................................................................ 9 VOLATILE REGISTER PAGE ...................................................................................................................... 10 USING THE EVALUATION SOFTWARE .................................................................................................. 11 5.1. SETTING REGISTER VALUES .................................................................................................................... 11 5.1.1. Transceiver Mode ........................................................................................................................... 11 5.1.2. Transmit Diagnostic ........................................................................................................................ 11 5.1.3. Receive Diagnostic ......................................................................................................................... 11 6. NOTES........................................................................................................................................................ 13 6.1. 6.2. 7. MICROSOFT/ HILGRAEVE HYPERTERMINAL ............................................................................................... 13 LOOPBACK MODE .................................................................................................................................... 13 PCB LAYOUT DIAGRAMS........................................................................................................................ 14 TM 7.1. RK-WI.DP1203-XXX-R EVALUATION BOARD LAYOUT .......................................................................... 14 TM 7.2. WI.DP1203-XXX-EVM-R EVALUATION MODULE LAYOUT ..................................................................... 15 TM 7.3. WI.DP1203-XXX-EVM-R MODULE PIN OUT........................................................................................ 16 7.3.1. Pin Descriptions .............................................................................................................................. 16 8. SCHEMATIC DIAGRAMS.......................................................................................................................... 17 TM 8.1. 8.2. 9. WI.DP1203-XXX-EVM-R SCHEMATIC DIAGRAM .................................................................................. 17 TM RK-WI.DP1203-XXX-R EVALUATION BOARD SCHEMATIC .................................................................... 18 CUSTOM APPLICATIONS ........................................................................................................................ 19 10. ORDERING INFORMATION ................................................................................................................... 20 11. CONTACT INFORMATION ..................................................................................................................... 21 11.1. 11.2. Technical Support ........................................................................................................................... 21 Sales Support.................................................................................................................................. 21 3 WI.DP1203-XXX-EVM-R/ RK-WI.DP1203-XXX-R USER’S MANUAL Index of Tables Table 1, Pin Descriptions..................................................................................................................................... 16 Table of Figures Figure 1: COM Port Setup ..................................................................................................................................... 8 Figure 2: Wireless Chat ......................................................................................................................................... 9 Figure 3: Non-Volatile Register Page.................................................................................................................... 9 Figure 4: Volatile Register Page.......................................................................................................................... 10 Figure 5: RS-232 Jumpers .................................................................................................................................. 13 Figure 6: Evaluation Board Layout ...................................................................................................................... 14 Figure 7: Evaluation Module Layout.................................................................................................................... 15 Figure 8: WI.DP1203-XXX-EVM-R Figure 9: RK-WI.DP1203-XXX-R TM TM Schematic Diagram.................................................................................. 17 Evaluation Board Schematic Diagram........................................................ 18 4 WI.DP1203-XXX-EVM-R/ RK-WI.DP1203-XXX-R USER’S MANUAL Chapter 1 1. Description TM The RK-Wi.DP1203-XXX-R TM is a rapid-development/evaluation kit for the Wi.DP1203-XXX-R Included in the kit is: • 1 – Development Case • 1 – Development Utility and Documentation CD • 2 – Development Boards • 2 – Wi.DP1203-XXX-EVM-R • 2 – Antennas • 2 – RS-232 Cables • 2 – USB Cables • 6 – AAA Batteries • Quick Start Guide TM modules (pinned) 5 module. Chapter WI.DP1203-XXX-EVM-R/ RK-WI.DP1203-XXX-R USER’S MANUAL 2 2. Supplemental Documentation This user’s manual is intended to cover to RK-Wi.DP1203-xxx-EVM-R™ platform at an operational level. For detailed information, please refer to these documents (available on our website, except where noted). • Wi.232DTS™ User’s Manual (915 version) – This document details the use of the Wi.232DTS™ module. Since the Wi.DP1203-915-EVM-R™ module firmware is a port of this package, this document may be used for reference on the available registers and theory of operation. • Wi.232EUR™ User’s Manual (868 and 433 versions) – This document is the Wi.232EUR™ module reference. The Wi.DP1203-868-EVM-R™ implements the Wi.232EUR™ exactly, however the 433MHz version has one wide-band and one narrow-band channel (both centered at 434MHz). • Wi.DP1203-xxx-R™ / Wi.MxxxX-R™ User’s Manual – This document details the surface-mount module used on the supplied EVMs, the Wi.DP1203-xxx-R. • Semtech XE1203F Datasheet – This Semtech-supplied document details the transceiver IC used in the surface-mount module. This document is available on Semtech’s website. 6 WI.DP1203-XXX-EVM-R/ RK-WI.DP1203-XXX-R USER’S MANUAL Chapter 3 3. Development Kit Setup • Insert the AAA batteries into the evaluation PCB, observing the correct polarity. • Insert a Wi.DP1203-XXX-EVM-R module into one of the evaluation boards, observing the correct orientation (see later in this document). The correct orientation of the module is with the antenna connector closest to the edge of the evaluation board. Make sure it is seated fully and correctly. • Insert the other Wi.DP1203-XXX-EVM-R the correct polarity. • Connect antennas to Wi.DP1203-XXX-EVM-R • Connect evaluation boards to computers. If using USB connection, populate USB jumpers and remove RS-232 jumpers. If using RS-232 connection, populate RS-232 jumpers and remove USB jumpers. • Install the RK- Wi.DP1203-XXX-EVM-R • Run the RK- Wi.DP1203-XXX-EVM-R “Wireless Chat” tab. • Power-On both evaluation boards, verifying that the version/copyright information is echoed to the screen from both modules. • Chat back and forth between evaluation boards, verifying that serial and RF communications are successful. IMPORTANT NOTE FOR HYPERTERMINAL USERS: See section 6.1 TM TM module into the other evaluation board, also observing TM TM TM modules. Windows software. If already installed, skip this step. software, select 2400 baud operation and navigate to the 7 WI.DP1203-XXX-EVM-R/ RK-WI.DP1203-XXX-R USER’S MANUAL Chapter 4 4. Using the RK-WI.DP1203-XXX-EVM-RTM Evaluation Software TM The software supplied with the RK- Wi.DP1203-XXX-R Development Kit is used to read and set the volatile TM TM and non-volatile registers with the Wi.DP1203-XXX-R module. Refer to the Wi.DP1203-XXX-R Users Manual for more information on the register settings. 4.1. COM Port Setup and Selection TM Upon starting the RK- Wi.DP1203-XXX-R evaluation software, you will be presented with a COM port selection dialog box. If you are using the USB interface, make sure that the evaluation board is already connected to the computer via the USB cable before you start the software. This will ensure that the virtual COM port which is assigned to the USB to UART bridge controller by Windows is visible in the COM port selection list. TM The first time you start the RK- Wi.DP1203-XXX-R evaluation software, the Baud Rate should be left at 2400 baud, since this is the factory default baud rate setting for the module. TM Tip: The RK- Wi.DP1203-XXX-R evaluation software does not auto detect the baud rate of the module. If you have changed the Non-Volatile Data Rate register, you will have to select the baud rate you set this register to when TM you start the RK- Wi.DP1203-XXX-R evaluation software. Figure 1: COM Port Setup 4.2. Wireless Chat Page TM The Wireless Chat page in the RK- Wi.DP1203-XXX-R evaluation software demonstrates the capability of the TM Wi.DP1203-xxx-R to be used as a wireless communications link. The Rapid Development kit works as a wireless chat link with no register changes required, out of the box. To Use Wireless Chat: Type a message in the lower text field and press Enter. The text you typed will be displayed on the remote system, prefixed with a Node Identifier if you specified one. 8 WI.DP1203-XXX-EVM-R/ RK-WI.DP1203-XXX-R USER’S MANUAL Figure 2: Wireless Chat 4.3. Non-Volatile Register Page The Non-Volatile Register page in the evaluation software allows you to change the default settings which will be loaded when the module is powered on. It is important to note that data rates in excess of 19.2kbps cannot be achieved in LP mode due to bandwidth limitations. Tip: If you change the NonVolatile Data Rate setting, you will have to select the baud rate you set this register to when you start the RK- Wi.DP1203-XXXTM R evaluation software. Figure 3: Non-Volatile Register Page 9 WI.DP1203-XXX-EVM-R/ RK-WI.DP1203-XXX-R USER’S MANUAL 4.4. Volatile Register Page In this page, you can change the Volatile settings of the module. Values programmed into these registers are lost of power-down. The page also provides a means of switching the receiver and transmitter on and off, setting receive and transmit channels, transceiver mode and modulation settings. Tip: It is important to note that data rates in excess of 19.2kbps cannot be achieved in LP mode due to bandwidth limitations. Figure 4: Volatile Register Page 10 WI.DP1203-XXX-EVM-R/ RK-WI.DP1203-XXX-R USER’S MANUAL Chapter 5 5. Using the Evaluation Software The firmware packages in the Wi.DP1203-xxx-EVM-R™ modules are ports of the Wi.232DTS™ (915MHz) and Wi.232EUR™ (868MHz) applications. The Wi.DP1203-915-EVM-R™ modules support 32 wide-band and 84 narrow-band channels; Wi.DP1203-868-EVM-R™ modules support 2 wideband and 6 narrow-band channels, while the Wi.DP1203-433-EVM-R™ supports 1 wide-band and 1 narrow-band channel. For more information on the register settings available, please refer to the Wi.232DTS-R™ User’s Manual. 5.1. Setting Register Values On both the Volatile and Non-Volatile pages, the registers are labeled by function. To set a register value, select the value from the options available for that register and click the “Write” button. To perform a read of that register, simply click the “Read” button. Descriptions of the register functions can be found in the Wi.DP1203™ / TM Wi.M xxxX-R Users Manual. 5.1.1. Transceiver Mode This selects the modulation mode and power output of both the transmitter and receiver. The mode is not set until “Set TX Diag” or “Set RX Diag” is pressed. If “Set RX Diag” is pressed, the power output value is ignored. 5.1.2. Transmit Diagnostic Transmit Diagnostic consists of four radio buttons which select the transmit channel. Low, Mid and High are quick reference buttons which can be used to select the lowest, the middle, or the highest channel. Any specific channel can be selected by using the controls below the “Set TX Diag” button. The “Set TX Diag” button switches the transmitter on using the channel and mode selected in the channel selector and transceiver mode controls. A “…1010101010101…” bit pattern is transmitted for bit error testing with another system or RF carrier analysis. 5.1.3. Receive Diagnostic Receive Diagnostic consists of four radio buttons which select the transmit channel. Low, Mid and High are quick reference buttons which can be used to select the lowest, the middle, or the highest channel. Any specific channel can be selected by using the controls above the “Set RX Diag” button. The “Set RX Diag” button switches on the receiver using the channel and mode selected in the channel selector and transceiver mode controls. Additionally, the module enters the diagnostic bit error test. 11 WI.DP1203-XXX-EVM-R/ RK-WI.DP1203-XXX-R USER’S MANUAL If a “…1010101010101…” bit pattern is received at the frequency and baud rate set up in the relevant registers, the BER test will return the number and percent of bit errors. This information is displayed in the panel below the “Set RX Diag” button. If no transmission is present, or the transmission is at the wrong frequency or data rate, the module may enter an infinite loop waiting for the beginning of the data. In this case, the module should be powered down and back up to return the module to its normal operating mode. 12 WI.DP1203-XXX-EVM-R/ RK-WI.DP1203-XXX-R USER’S MANUAL Chapter 6 6. Notes 6.1. Microsoft/ Hilgraeve HyperTerminal TM The RK- Wi.DP1203-XXX-R Evaluation Kit can be used with HyperTerminal to receive and transmit RS232 data and send files using file transfer protocols such as ZMODEM. HyperTerminal and many other terminal programs assert RTS by default. On the evaluation board, the RTS line is tied to the CMD pin on the module. When the CMD pin is held low, which is the case when the RTS line is asserted; the module will be placed in command mode. In command mode, all UART data sent to the module will be interpreted as commands and will NOT be sent to the RF engine for transmission. Additionally, if an evaluation board is switched on in the presence of an asserted RTS line, it will perform a full hardware and flash reset to the factory defaults. To use the evaluation board with HyperTerminal or other terminal program, you must first remove the jumpers from pins 7+8 of JP2, if you are using an RS-232 connection to your PC, or JP3, if you are using a USB connection to your PC. Removing this jumper will disconnect the RTS line from the CMD pin on the module, allowing normal operation. 6.2. Loopback Mode TM The RK- Wi.DP1203-XXX-R kit can be operated in a loopback mode by configuring the COM jumpers in such a way as to link together the TXD and RXD lines to and from the module in the remote evaluation board. Using this mode, the user can send data from their local evaluation board and have it re-transmitted back to them by the remote evaluation board. The maximum baud rate allowed in loopback mode is 38400 baud for point to point communications only. Since the built-in flow control is bypassed by this jumper setting, streaming data is not supported. Loopback mode using the RS232 jumpers: Figure 5: RS-232 Jumpers 13 WI.DP1203-XXX-EVM-R/ RK-WI.DP1203-XXX-R USER’S MANUAL Chapter 7 7. PCB Layout Diagrams 7.1. RK-WI.DP1203-XXX-RTM Evaluation Board Layout Figure 6: Evaluation Board Layout 14 WI.DP1203-XXX-EVM-R/ RK-WI.DP1203-XXX-R USER’S MANUAL 7.2. WI.DP1203-XXX-EVM-RTM Evaluation Module Layout JP1 Pin 1 JP2 Pin 1 Figure 7: Evaluation Module Layout NOTE: Pin 1 of the Wi.DP1203-XXX-R™ module’s JP2 aligns with Pin 1 of JP6 on the evaluation board. The following table lists the pin numbers and their assignments. 15 WI.DP1203-XXX-EVM-R/ RK-WI.DP1203-XXX-R USER’S MANUAL 7.3. WI.DP1203-XXX-EVM-RTM Module Pin Out 7.3.1. Pin Descriptions Pin Name JP2 Pin 1 JP2 Pin 2 JP2 Pin 3 JP2 Pin 4 JP2 Pin 5 JP2 Pin 6 JP2 Pin 7 JP2 Pin 8 JP2 Pin 9 JP2 Pin 10 JP2 Pin 11 JP2 Pin 12 JP1 Pin 1 JP1 Pin 2 JP1 Pin 3 JP1 Pin 4 JP1 Pin 5 JP1 Pin 6 JP1 Pin 7 JP1 Pin 8 JP1 Pin 9 JP1 Pin 10 JP1 Pin 11 JP1 Pin 12 JP3 Pin 1 JP3 Pin 2 JP3 Pin 3 JP3 Pin 4 Pin Description 4V to 12V Vdd TM RxD0, Wi.DP1203-xxx-EVM-R RxD pin TM TxD0, Wi.DP1203-xxx-EVM-R TxD pin TM CTS0, WI.DP1203-XXX-EVM-R CTS pin CMD (Active Low), WI.DP1203-XXX-EVM-R CMD pin RxD1 – Reserved for Future – No Connect TxD1 – Wi.DP1203-xxx-R™ TXSW pin* RTS1 – Wi.DP1203-xxx-R™ RXSW pin* DTR1 – Wi.DP1203-xxx-R™ PAT pin* DTR1* - Wi.DP1203-xxx-R™ DIN pin GND GND GND GND AD1 – Wi.DP1203-xxx-R™ SWITCH pin* AD0 – Wi.DP1203-xxx-R™ EN pin* RSSI – Wi.DP1203-xxx-R™ SO pin* PD5 – Wi.DP1203-xxx-R™ SI pin* PD4 – Wi.DP1203-xxx-R™ SCK pin* PD3 – Wi.DP1203-xxx-R™ CLKOUT pin PD2 – Wi.DP1203-xxx-R™ DCLK pin* PD1 – Wi.DP1203-xxx-R™ DIO pin* GND GND Regulated Vdd EVM microcontroller C2CK/RST pin EVM microcontroller C2D pin Ground * These pins are also connected to and are driven by the EVM microcontroller. Table 1, Pin Descriptions 16 WI.DP1203-XXX-EVM-R/ RK-WI.DP1203-XXX-R USER’S MANUAL Chapter 8 8. Schematic Diagrams 8.1. WI.DP1203-XXX-EVM-RTM Schematic Diagram Figure 8: WI.DP1203-XXX-EVM-RTM Schematic Diagram 17 WI.DP1203-XXX-EVM-R/ RK-WI.DP1203-XXX-R USER’S MANUAL 8.2. RK-WI.DP1203-XXX-RTM Evaluation Board Schematic Figure 9: RK-WI.DP1203-XXX-RTM Evaluation Board Schematic Diagram 18 WI.DP1203-XXX-EVM-R/ RK-WI.DP1203-XXX-R USER’S MANUAL Chapter 9 9. Custom Applications For cost-sensitive applications, such as wireless sensors and AMR, Radiotronix can embed the application software directly into the microcontroller built into the module. For more information on this service, please contact Radiotronix. 19 WI.DP1203-XXX-EVM-R/ RK-WI.DP1203-XXX-R USER’S MANUAL Chapter 10 10. Ordering Information Product Part Number RK-Wi.DP1203-433-R™ RK-Wi.DP1203-868-R™ RK-Wi.DP1203-915-R™ Wi.DP1203-433-EVM-R™ Wi.DP1203-868-EVM-R™ Wi.DP1203-915-EVM-R™ Wi.DP1203-433-R™ Wi.DP1203-868-R™ Wi.DP1203-915-R™ Description Development Kit (433MHz) Development Kit (868MHz) Development Kit (915MHz) Evaluation Module (433MHz) Evaluation Module (868MHz) Evaluation Module (915MHz) Surface-Mount Module (433MHz) Surface-Mount Module (868MHz) Surface-Mount Module (915MHz) 20 Chapter WI.DP1203-XXX-EVM-R/ RK-WI.DP1203-XXX-R USER’S MANUAL 11 11. Contact Information Corporate Headquarters: 905 Messenger Lane Moore, Oklahoma 73160 405-794-7730 www.radiotronix.com website: support: [email protected] 11.1. Technical Support Radiotronix has built a solid technical support infrastructure so that you can get answers to your questions when you need them. Our primary technical support tools are the support forum and knowledge base found on our website. We are continuously updating these tools. To find the latest information about these technical support tools, please visit http://www.radiotronix.com/support. Our technical support engineers are available Mon-Fri between 9:00 am and 5:00 pm central standard time. The best way to reach a technical support engineer is to submit a Webcase. Webcase submissions can be made at http://www.radiotronix.com/support/webcase.asp. For customers that would prefer to talk directly to a support engineer, we do offer phone support free of charge. 11.2. Sales Support Our sales department can be reached via e-mail at [email protected] or by phone at 405-794-7730. Our sales department is available Mon-Fri between 8:30 am and 5:00 pm central standard time. Visit our web site at http://www.radiotronix.com/corpsales.asp for information on where to buy our products. 21