1
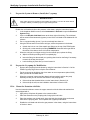
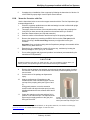
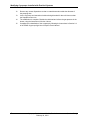
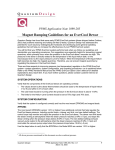
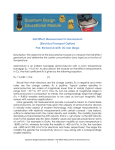
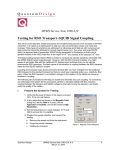
Service Note 1083-201
Modifying Cryopumps Installed with EverCool Systems
Quantum Design has developed a copper extension (PN 4083-234) to increase the efficiency of
cryopumps that are installed in systems that also have the EverCool option. The special
temperature profile in the EverCool dewar prevents optimal cryopump operations. After the
extension has been attached to the cryopump pumping tube, the cryopump will be more effective
at producing high vacuum in the sample space.
The procedures for mounting the extension for the cryopump are described below. Please review
the procedures before you begin them. Also, verify that you have received all the listed items.
Modification Kit
• extension (solid or with threaded holes)
Figure 1. Extensions for pumping tube
• bolts and washers (extension with threaded holes)
• Tra-Con Supertherm glue (solid extension)
• sandpaper
Materials
It will also be helpful to have the following items on
hand:
• rags or similar materials (to wipe up liquids)
• tape (plastic package tape or similar)
Figure 2. Modifying the cryopump pumping tube with
an extension
WARNING!
Always wear protective clothing, including thermal gloves, eye protection, and covered
shoes, when you install the cryopump in the dewar, when you remove it, and when you
work with any cryogen. See the PPPMS Hardware Manual for more about safety.
Quantum Design
Cryopump Service Note 1083-201, Rev. A-0
February 24, 2003
1
Modifying Cryopumps Installed with EverCool Systems
I.
Prepare the System to Remove (Install) the Cryopump
WARNING!
Wear safety gloves and goggles for the following procedures. Your skin will freeze almost
instantly if it directly contacts cryogens in high boil-off gas flows.
Disable the cold head and relieve the pressure in the dewar, using the instructions below.
1.
In the dropdown MultiVu menus, select Instrument >> Evercool to open the EverCool
System dialog.
2.
Click on the Disable Cold Head button at the lower right of the dialog. The cold head
will be turned off and automatic (system) control of the cold head will be disabled for 20
minutes.
3.
Put on cryogenic safety gloves, if you do not already have them on.
4.
Using the utmost caution to avoid the cold gas, relieve the pressure in the dewar:
a. Unlatch the lock on one of the transfer port fittings on the top of the PPMS probe.
b. Quickly pull out that transfer port fitting. WARNING: Ultra-cold helium gas will be
forced out of the dewar, where it is held at overpressure.
5.
When the cold gas is no longer coming from the transfer port, replace the fitting.
a. Wipe the transfer port fitting until it is completely dry.
b. Insert the fitting into the transfer port, pushing down hard on the fitting if necessary
to seat it all the way into the port.
c.
II.
Latch the fitting in place after you have inserted it.
Prepare the Cryopump for Modification
1.
Remove the cryopump from the dewar by using the instructions in Section 2.3 of the
PPMS Cryopump High Vacuum Option User's Manual.
2.
Put the cryopump to the side so that it can warm to room temperature (about 300 K)
while you seal off the PPMS dewar.
3.
When the cryopump is warm and the dewar has been sealed, position the pump
assembly so that you can examine the bottom of the pumping tube.
a. If the end cap has threaded holes, use the instructions in Section III.A.
b. If the end cap is solid, use the installation instructions in Section III.B.
III.A. Mount the Extension with Bolts
Use the instructions below to mount the copper extension with the bolts and washers that
were shipped with it.
2
1.
Apply a drop of Apiezon M grease to the contact surface.
2.
Place the extension on the pumping tube, lining up the bolt holes.
3.
Place the washers over the bolt ends, insert the bolts into the bolt holes, and screw
them into the pumping tube. This completes the cryopump modification.
4.
Disable the cold head and relieve the gas pressure in the dewar, using the instructions
in Section I above.
Cryopump Service Note 1083-201, Rev. A-0
February 24, 2003
Quantum Design
Modifying Cryopumps Installed with EverCool Systems
5.
III.B
Complete the re-installation of the cryopump by following the instructions in Section 2.4
of the PPMS Cryopump High Vacuum Option User's Manual.
Mount the Extension with Glue
Use the instructions below to mount the copper extension with the Tra-Con Supertherm glue
that was shipped with it.
1.
Place the cryopump upside down on a table and wedge it so that it will be held upright
and steady for the next 24 hours.
2.
Thoroughly clean the surface of the extension and the end cap of the pumping tube.
Verify that you have removed all grease from the surface before you continue.
3.
Sand the contact surfaces (end cap and extension).
4.
Clean the surface of the extension and the end cap of the pumping tube again.
5.
Remove the opaque bag containing the BIPAX kit from its box. Tear open the foil
sleeve of the bag—do not cut the bag, because you might slice into the glue
container.
Important: Once you begin working with the Supertherm package, the materials will be
usable for only about one hour.
6.
Examine the glue materials for crystals. If there are any, melt them by heating the
BIPAX package to 125°F (52°C) for 15 minutes.
7.
Put on safety goggles and gloves and provide a local exhaust (recommended by the
manufacturer of Supertherm).1
CAUTION!
Supertherm hardener and resin can irritate the skin, eyes, and respiratory system. When you
use the product, wear protective gear and ensure that the area has good ventilation.
8.
Remove the bar between the hardener and resin and knead them together for about
five minutes. If the color is not uniform after five minutes, knead the package for two
more minutes.
9.
Cut the corner of the package to dispense the
epoxy.
10.
Apply a small amount of Supertherm to the
contact surface of the extension and put it on the
end cap of the pumping tube (see Figures 2 and
3).
Using gentle pressure, move the extension
around on the end cap so that the epoxy is evenly
distributed between the two surfaces and it has no
bubbles.
11.
Center the extension on the cap and then fix it in
position on the tube with tape. The tape should be
tight enough to apply pressure to the glue joint
during the cure time.
Figure 3. Copper extension glued to the
end cap of the cryopump pumping tube,
held in place with tape during the cure
1
For further information about Supertherm BIPAX, see the product materials, visit theTra-Con Web page
(www.tra-con.com), or call their technical support at 1-800-872-2661.
Quantum Design
Cryopump Service Note 1083-201, Rev. A-0
February 24, 2003
3
Modifying Cryopumps Installed with EverCool Systems
4
12.
Remove any excess Supertherm so that no material extends outside the diameter of
the pumping tube.
13.
Let the cryopump and extension sit without being disturbed for about 24 hours so that
the Supertherm can cure.
14.
The modification is complete. Disable the cold head and relieve the gas pressure in the
dewar, using the instructions in Section I above.
15.
Complete the re-installation of the cryopump by following the instructions in Section 2.4
of the PPMS Cryopump High Vacuum Option User's Manual.
Cryopump Service Note 1083-201, Rev. A-0
February 24, 2003
Quantum Design