1
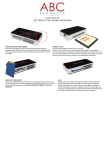
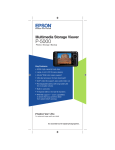
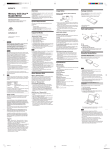
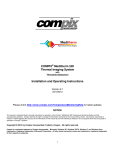
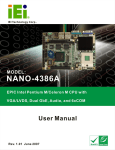
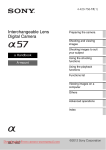
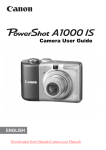
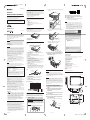
MRW620-U1/3-295-886-13(1)
3-295-886-13 (1)
a) Push front panel first hook gently to release it from
the hole.
Overview
Internal
Multi-Card Reader/Writer
Operating Instructions
Before operating the unit, please read this document
thoroughly, and retain it for future reference.
This product and manual are intended for persons who have expert
knowledge of personal computers (PCs). Read your PC and
motherboard manuals carefully before connecting the product to your
PC. If you have any questions, contact your Sony representative.
MRW620-U1
The MRW620-U1 (hereafter referred to as the “reader/writer”)
has the following features:
s Quick and simple data transfer - easily transfer images from camera to PC
s Compatible with “Memory Stick,” “Memory Stick PRO,” “Memory
Stick Duo,” CompactFlash, Microdrive, xD-Picture Card,
SmartMedia, MultiMediaCard, SD Memory Card
s Changeable front panel: Customize your own PC
s Quick and easy installation
Printed in China
1
1
2
4
3
3
4
6
5
5
6
8
7
7
8
10
0
Connector
6
7
8
System Requirements
USB Header
Reinstall the cover on your computer.
Plug your computer to the AC power outlet.
Start your computer.
The reader/writer is automatically detected. You do
not need to install any device drivers.
The reader/writer requires the following minimum system
configuration:
• OS
– Windows® 7
– Windows Vista®
– Windows® XP Home or Professional
– Windows® 2000 Professional (Service Pack 4 or later)
– Windows® Me
• Motherboard Interface
– USB header
Notes
First hook is off
from the hole.
Package Contents
© 2008 Sony Corporation
2
When you unpack the box, make sure that it contains all the
accessories listed below.
If anything is missing or damaged, contact your retailer.
b) Push front panel second hook gently to release it
from the hole.
• On some computers, a message may appear asking you to
insert the operating system disc. When this happens, follow
the computer’s instructions.
• On some computers, the “HI-SPEED USB Device Plugged into
non-HI-SPEED USB Hub” message may appear, indicating
that a hi-speed USB device has been connected to a USB port
which does not support hi-speed USB. If your computer has
multiple USB headers, try connecting to a different header.
Otherwise, close the message and continue using the reader/
writer with the current header.
• MRW620-U1 Internal Multi-Card Reader/Writer
Owner’s Record
The model and serial numbers are located on the bottom of the
reader/writer. Record the serial number in the space provided
below. Refer to these numbers whenever you call upon your
Sony representative regarding this product.
•
•
•
•
Model No. MRW620-U1
Serial No.
Front Panel (lvory)
Operating Instructions
Mount Screw (M 3 x 5) x 4
Warranty Card
Second hook is off
from the hole.
WARNING
You are cautioned that any changes or modifications not expressly approved
in this manual could void your authority to operate this equipment.
To reduce the risk of fire or electric shock, do not expose this apparatus to
rain or moisture.
To avoid electrical shock, do not open the cabinet. Refer servicing to
qualified personnel only.
c) Pull out the right side of the front panel as
illustrated, then remove the panel.
Parts and Functions
Front
1
5
2
Caution
3
This equipment has been tested and found to comply with the limits for
a Class B digital device, pursuant to Part 15 of the FCC Rules. These
limits are designed to provide reasonable protection against harmful
interference in a residential installation. This equipment generates, uses,
and can radiate radio frequency energy and, if not installed and used in
accordance with the instructions, may cause harmful interference to
radio communications. However, there is no guarantee that interference
will not occur in a particular installation. If this equipment does cause
harmful interference to radio or television reception, which can be
determined by turning the equipment off and on, the user is
encouraged to try to correct the interference by one or more of the
following measures:
• Reorient or relocate the receiving antenna.
• Increase the separation between the equipment and receiver.
• Connect the equipment into an outlet on a circuit different from that
to which the receiver is connected.
• Consult the dealer or an experienced radio/TV technician for help.
You are cautioned that any changes or modifications not
expressly approved in this manual could void your authority to
operate this equipment.
4
6
1 Access Indicator
The indicator blinks when the reader/writer accesses data
on a memory card.
Declaration of Conformity
Trade Name:
SONY
Model No.:
MRW620
Responsible Party: Sony Electronics Inc.
Address:
16530 Via Esprillo, San Diego, CA 92127
U.S.A.
Telephone No.:
858-942-2230
This device complies with Part 15 of the FCC Rules. Operation
is subject to the following two conditions:
(1) This device may not cause harmful interference, and (2)
this device must accept any interference received, including
interference that may cause undesired operation.
NOTICE TO USERS
Insert either a SmartMedia memory card or xD-Picture Card
here.
Install the new front panel (left side first, as
illustrated), and then push the right side
until you hear a click.
Specifications
USB transfer rate
Full-speed (12 Mbps)
Hi-speed (480 Mbps)
This hi-speed transfer rate is theoretical value for the USB standard.
Actual performance is dependent on the device.
3 USB Port
Insert a USB device here.
4 CompactFlash / Microdrive Slot
Power requirements
Insert either a CompactFlash or Microdrive memory card here.
Remove all other memory cards before using a Microdrive,
because of its large power consumption.
4.75 V to 5.25 V DC
Current consumption
Max. 500 mA *1
5 MultiMediaCard / SD Memory Card Slot
Access indicator
Insert either a MultiMediaCard or an SD Memory Card here.
When inserting a miniSD Card, use an adaptor (not
supplied).
Blinks on access
Operating environment
6 “Memory Stick” Slot
Temperature: 5 °C to 40 °C (41 °F to 104 °F)
Humidity: 30% to 80% RH
Insert a “Memory Stick” media here.
When inserting a “Memory Stick Duo” (without MagicGate),
“MagicGate Memory Stick Duo,” “Memory Stick Duo” (with
MagicGate), “Memory Stick PRO Duo,” “Memory Stick PROHG Duo,” or “Memory Stick Micro” (“M2”), use an adaptor
(not supplied).
Storage environment
Temperature: -30 °C to + 60 °C (-22 °F to +140 °F)
Humidity: No condensation
Mass
Approx. 200 g (7.1 oz.)
Rear
7
Installing the Reader/Writer
USB Cable: Black
(for USB devices)
*1 Except when using Microdrive
CAUTION
8
• Read your PC and motherboard manuals thoroughly.
• Before installing the reader/writer in your computer, be sure
to turn off the power and remove the AC power cord from the
outlet. (Recent computers remain internally live even after
Windows is shut down.)
USB Cable: Beige
(for memory cards)
Dimensions
(Units : mm)
125.6
7 USB Cable (Black)
Connected to the USB header on your motherboard.
For the detail, see “Installing the Reader/Writer.”
WARNING
8 USB Cable (Beige)
Connected to the USB header on your motherboard.
For the detail, see “Installing the Reader/Writer.”
Pin Assignments
Signal
VCC
–DATA
+DATA
Ground
Shield
(Non Connection)
PIN No.
2
1
4
3
6
5
8
10
3
5
7
2
Follow your computer and motherboard
manual to prepare a drive bay for this
reader/writer.
Connector
•
About this Document
1
Front panel in alternate colors (ivory) is included for use with
different computer case color. If you want, replace the standard
black front panel with one of the replacements, as follows.
1
Hold the reader/writer face front and gently
remove the panel.
How to release Front Panel hook from the
hooking hole
Insert the reader/writer into the drive bay of
your computer.
4
5
Secure the reader/writer with four screws.
90
USB Cable: Beige
(for memory cards)
Connect the USB cable to the USB header
on the motherboard.
Make sure it is connected in the correct directions.
Insert sharp object such as tweezer into the
gap and push gently on the hook to release
the front panel
32.5
USB Cable
CAUTION
Apply too much force may break front panel hook.
70
No tapping
(4 portions)
This document is intended for customers who specialize in the
assembly of build-to-order and other PCs. End users should observe the
following items when using this product and manual.
• Read your PC and motherboard manuals thoroughly.
• When connecting this Reader/Writer’s USB cable to your
motherboard, first read the motherboard manual to learn the
position and pin assignment of the USB header.
Inserting the USB cable of this Reader/Writer into other
terminals, into a USB header with a different pin assignment
on the motherboard, or inserting it incorrectly may cause
serious damage not only to the Reader/Writer but also to the
PC and other connected devices.
Replacing the Front Panel
3
60
94
, “Memory Stick,” “Memory Stick Duo,” “MagicGate
Memory Stick,” “Memory Stick PRO,” “Memory Stick PRO
Duo,” “Memory Stick PRO-HG Duo,” “Memory Stick Micro,”
and “M2” are registered trademarks or trademarks of Sony.
• Microsoft®, Windows®, and the Windows logo are trademarks
or registered trademarks of Microsoft Corporation in the
United States of America and/or other countries.
• Other system names, product names, and company names
appearing in this manual are trademarks or registered
trademarks of their respective holders, even though not
indicated by the ® or ™ marks.
22.5
3-M3
1
4
6
8
10
Unplug your computer from the AC power
outlet.
5
2
1
USB Cable: Black
(for USB devices)
25.4
Copyright law prohibits unauthorized use of any recorded audio/video
for any other purpose than personal enjoyment. Please be warned that
the “Memory Stick” containing images and data protected by copyright
shall be strictly used within copyright law.
Trademarks
To Install the Reader/Writer
7
101.6
When connecting the reader/writer’s USB cable to your motherboard,
first read the motherboard manual to learn the position and pin
assignment of USB header. Installing the USB cable to this reader/
writer into other terminals such as IEEE1394 header, into a USB
header with a different pin assignment on the motherboard, or inserting
it incorrectly may cause serious damage not only to the reader/writer
but also to the computer and other connected devices, in the worst case
it makes fire or smoke.
Fornt panel
All rights reserved. This manual described herein, in whole or in
part, may not be reproduced or translated to any machinereadable form without prior written approval from Sony
Corporation.
IN NO EVENT SHALL SONY CORPORATION BE LIABLE FOR ANY
INCIDENTAL, CONSEQUENTIAL OR SPECIAL DAMAGES,
WHETHER BASED ON TORT, CONTRACT, OR OTHERWISE,
ARISING OUT OF OR IN CONNECTION WITH THIS MANUAL, THE
DEVICE DRIVERS OR OTHER INFORMATION CONTAINED
HEREIN OR THE USE THEREOF.
Sony Corporation reserves the right to make any modification to this
manual or the information contained herein at any time without notice.
SONY CORPORATION IS NOT RESPONSIBLE FOR ANY DAMAGE
TO OR LOSS OF ANY PROGRAMS, DATA, OR OTHER
INFORMATION STORED ON ANY MEDIA.
3295886131.p65
2
2 SmartMedia / xD-Picture Card Slot
Note
If you have any questions about this product, you may call the
telephone number listed in “Technical Support.” The telephone number
below is not for customer service but only for official purposes.
Then remove
Front Panel
(Remove slowly in this
direction with light force)
Connector
4/3/10, 2:16 PM
MRW620-U1/3-295-886-13(1)
MRW620-U1/3-295-886-13(1)
Supported Media
Usage Notes
The reader/writer supports the following media:
“Memory Stick” Media
“Memory Stick” media
Notes on using “Memory Stick” media
•
•
•
•
•
•
•
•
•
•
“Memory Stick” (without MagicGate) *1
“MagicGate Memory Stick” *1*2
“Memory Stick” (with MagicGate) *1*2*3
“Memory Stick Duo” (without MagicGate) *1*5
“MagicGate Memory Stick Duo” *1*2*5
“Memory Stick Duo” (with MagicGate) *1*2*3*5
“Memory Stick PRO” *2*3
“Memory Stick PRO Duo” *2*3*5
“Memory Stick PRO-HG Duo” *2*3*5
“Memory Stick Micro” (“M2”) *2*3*4*5
*1
“MagicGate” is the general name of a copyright protection technology
developed by Sony.
Recording or playback of MagicGate data that uses MagicGate
technology is not supported.
4-bit parallel data transfer is supported. It, however, varies depending
on each medium how long it takes to read/write data.
“M2” is an abbreviation of “Memory Stick Micro.” in this document,
hereinafter, the abbreviation “M2,” is used.
With adaptor (not supplied) only.
*2
*3
*4
*5
SD memory cards
• SD/SDHC Memory Card *6
• miniSD™ card *6*7
*6
*7
Recording or playback of data that uses SD technology is not
supported.
With adaptor (not supplied) only.
Other memory cards
•
•
•
•
•
•
MultiMediaCard *8
RS-MMC *8
CompactFlash®
Microdrive® *9
SmartMedia™
xD-Picture Card™
*8
MMCplus and MMCmobile are supported, but parallel data transfer is
not supported.
The Microdrive requires more power than other memory cards. When
using a Microdrive, remove other memory cards; otherwise an error
may occur due to a shortage of power.
*9
Notes
• Not all memory cards are guaranteed to work. Operation is
not assured if non-supported memory cards are used.
• The capacity of a file to be recorded/played back is smaller
than 4 GB per file according to the specifications of the file
system incorporated in “Memory Stick.”
• Although operation check of this product has been performed
with up to 8 GB “Memory Stick,” please note that the
operation is not guaranteed for every type of “Memory Stick.”
• In this manual, all types of media listed in “Supported Media”
are generically called memory cards.
• I/O cards that are not memory cards, such as GPS cards, are
not supported.
• MultiMediaCards and SD Memory Cards use the same slot, so
you cannot use them at the same time.
• The “Memory Stick” media all use the same slot, so you
cannot use them at the same time.
• Only DOS format is supported. Memory cards in other
formats are not supported.
About Memory Stick
What is “Memory Stick”?
“Memory Stick” is a compact-size IC recording medium with a
large capacity. It has been designed not only for exchanging/
sharing digital data among “Memory Stick” compliant products,
but also for serving as an insertable/removable external storage
medium that can save data.
Using the Reader/Writer
CAUTION
Terminal
Inserting a Memory Card
Insert a memory card into the corresponding slot on the reader/
writer.
When inserting a card, push it in as far as it can go.
Write-Protected
switch
Label area
• Do not remove “Memory Stick” while data is being read or
written.
• Data may be damaged if:
– You remove “Memory Stick” or disconnect the USB cable
while data is being read or written.
– You use “Memory Stick” in a place where it is susceptible
to static electricity or electric noise.
• You can keep backup copies of important data on a “Memory
Stick.”
• Avoid touching the metal terminals on the “Memory Stick” to
prevent damage from static discharge.
• Do not subject the “Memory Stick” to excessive stress or
shock.
• Do not disassemble or modify “Memory Stick.”
• Keep “Memory Stick” and other media away from water,
excessive heat and humidity, and from corrosive elements.
• Do not use or keep “Memory Stick” under an unfavorable
condition as below:
– Extremely hot place (such as in a parked car with windows
closed in summer, a spot under direct sunlight, or near an
electrical appliance that radiates heat).
– Humid place.
– Place near corrosive substances.
• If you set Write-Protected switch “LOCK,” data cannot be
recorded, edited, or erased.
• Do not stick anything other than the supplied labels on the
label area of “Memory Stick.”
• Stick a label precisely within the label area. Make sure that the
label does not go beyond the area.
• Carry and keep “Memory Stick” in the supplied case.
Insert one of the following
cards in this slot:
Insert one of the following
cards in this slot:
• MultiMediaCard
• RS-MMC
• SD/SDHC Memory Card
• miniSD Card*
• SmartMedia
Notes
• Use the removable disk icon for the memory card you are
using.
• It may take a while for the removable disk icons to appear.
• If the removable disk icons do not appear, uninstall the
reader/writer from your computer, and then install again.
• Depending on your operating system and the type of memory
card you are using, the reader/writer drives may be
recognized as “Local Disks” instead of “Removable Disks,”
but this will not affect their operation.
Removing a Memory Card
Note
• xD-Picture Card*
Be sure to follow the steps described below.
Do not remove a memory card without following this
procedure, as it may cause damage to the data stored on the
memory card.
* Use an appropriate adaptor
(not supplied).
* Push at the right side.
1
2
3
4
Make sure the access indicator is not blinking.
Open [My Computer].
Right-click the removable disk icon, and select
[Eject].
Pull the memory card straight out.
Troubleshooting
Insert one of the following
cards in this slot:
• CompactFlash
• Microdrive
Before consulting your Sony representative, verify the following.
If the problem still persists, consult your local Sony dealer.
Notes on using “Memory Stick Duo/Memory
Stick PRO Duo”
Problem
Solution
The computer does not
detect the reader/writer.
, Your computer and the reader/
writer may not be properly
connected. Disconnect the reader/
writer from the computer and
reconnect it.
The removable disk icon
does not appear.
, Your computer and the reader/
writer may not be properly
connected. See “Installing the
Reader/Writer” and make sure the
connection is correct.
, A USB device other than the reader/
writer is connected to the USB port
on the computer.
The memory card cannot be
accessed with Windows
Explorer or My Computer.
, No memory card is inserted. Insert a
memory card into the proper slot.
The computer does not
recognize the memory card.
, The memory card is not fully
inserted. Insert the card completely.
, The memory card is not inserted
straight. Remove the card and insert
it again.
The computer cannot read /
write the memory card
, The memory card is not fully
inserted. Insert the card completely.
, The memory card is not inserted
straight. Remove the card and insert
it again.
The read/write speed is
slow.
, The speed may vary depending on
the environment or the memory
card being used. This is not a
malfunction.
With Windows 2000 or
Windows Me, the drive icon
of the unit does not appear
in the “My Computer”
window.
, Make sure that the “USB Mass
Storage Device” is not displayed as
in the “Device Manager.” If it is,
delete it, disconnect the USB cable
from your computer, and then
reconnect it.
Terminal
Insert one of the following “Memory Stick” media in this slot:
• “Memory Stick”
(without MagicGate)
• “MagicGate Memory Stick”
• “Memory Stick”
(with MagicGate)
• “Memory Stick Duo”
(without MagicGate)*
Write-Protected
switch
Memo area
• When you use “Memory Stick Duo/Memory Stick PRO Duo”
without Write-Protected switch, be careful not to edit or erase
important data by mistake.
• When you use “Memory Stick Duo/Memory Stick PRO Duo”
with Write-Protected switch, data cannot be recorded, edited,
or erased by “LOCK” the switch.
• Use an object with a sharp tip to move the Write-Protected
switch.
• Do not press on the memo area strongly when writing.
• Carry and keep “Memory Stick” in the supplied case.
SmartMedia Cards
Supported SmartMedia cards
The reader/writer supports 3.3-volt and 3-volt SmartMedia
cards, but not the older 5-volt type.
Notch
Notes on “Memory Stick”
On formatting (initialization)
• If you format a medium in which data has been already
written, all the data and software will be erased. Please be
cautious not to mistakenly erase any important data.
• Please make sure to format (initialize) a medium with the
formatter of a “Memory Stick” compliant product. If it is
initialized with Windows Explorer, a FORMAT ERROR
occurs, and data on the medium can no longer be used by this
product.
Do not touch and remove a memory card from the reader/
writer while the access indicator is blinking. The data stored on
the memory card may be damaged.
3.3 V and 3 V type
5 V type
Note
Do not insert a 5-volt SmartMedia card into the reader/writer
forcibly.
About the size of “Memory Stick”
SmartMedia card handling
• When you use “Memory Stick Duo” on the product, please
make sure to attach the media to a Memory Stick Duo
Adaptor before inserting into the product.
If you attempt to insert “Memory Stick Duo” into this product
without attaching it to an adaptor, there is a possibility that
the “Memory Stick Duo” cannot be pulled out of the product.
• Do not insert multiple “Memory Sticks” at the same time. It
might cause damage to the product.
• When you use “Memory Stick Duo” attached to a Memory
Stick Duo Adaptor, please make sure to attach it in the right
direction.
• “Memory Stick Duo” and “Memory Stick Micro” should be
kept away from small children to prevent them from
accidentally swallowing it.
• When you use “Memory Stick Micro” on this product, please
make sure to attach the media into M2 adaptor of standard
size.
If you attempt to insert “Memory Stick Micro” without
attaching to M2 adaptor, there is a possibility that it cannot be
pulled out.
“Memory Stick Micro” may not operate properly when the
media is put into Duo-size M2 Adaptor and inserted all
together into Memory Stick Duo adaptor. Please use an M2
adaptor of standard size for proper operations.
If the gold contact area of a SmartMedia card is dirty, a read
error may occur. Keep the contact area clean. Otherwise do not
touch the gold contact area. Do not twist or warp the card.
Protect the card from static electricity.
• “MagicGate Memory Stick Duo”*
• “Memory Stick Duo”
(with MagicGate)*
• “Memory Stick PRO”
• “Memory Stick PRO Duo”*
• “Memory Stick PRO-HG Duo”*
• “Memory Stick Micro” (“M2”)*
* Use an appropriate adaptor (not supplied).
Notes
• Each card slot is designed so a card can only be inserted in the
correct direction.
• Insert only one memory card into the corresponding slot. Do
not insert multiple cards at the same time.
• When inserting a “Memory Stick Duo” (without MagicGate),
“MagicGate Memory Stick Duo,” “Memory Stick Duo” (with
MagicGate), “Memory Stick PRO Duo,” “Memory Stick PROHG Duo,” “Memory Stick Micro” (“M2”) or miniSD Card, use
an appropriate adaptor (not supplied).
• Do not insert a card upside down.
• Forcibly inserting the card may damage the card or the slot.
• If a memory card is inserted incorrectly, you may not be able
to remove it. In the unlikely event that a memory card
becomes stuck in the reader/writer, consult your local Sony
dealer.
Reading and Writing Data on a Memory Card
The following explanation is illustrated with screens from
Windows XP.
The screens may differ for other versions of Windows.
1
Open [My Computer].
Local technical support service is only available in the
following sales regions.
s For customers in the USA (Sony Electronics Inc.)
Monday to Saturday,
8:00 a.m. - 8:00 p.m. CT
• Toll free: 1-800-588-3847
• Free telephone support is offered for 90 days after your first
call.
USA technical support only: Web- based technical support
is free and available 24 hours a day, 7 days a week.
• Web site:
http://sony.storagesupport.com/
SmartMedia card with ID
The reader/writer does not support the ID information on
SmartMedia cards, but allows any SmartMedia card with an ID
to be used as regular media.
Other Points to Note
Media formatting
Technical Support
2
Do not format (initialize) memory cards with a computer. If you
format a memory card with a computer, devices such as digital
cameras may not be able to use it due to differences in format
type (FAT size, cluster size, hard disk type, or super floppy disk
type). If you use a digital camera, format memory cards with
your camera, instead.
Make sure the removable disk icons appear in
[My Computer].
Restrictions on DOS mode
Warranty Card
• A warranty card should be provided with this product at the
place of purchase.
• Please read the warranty card, fill in the specified information,
and retain it for future reference.
• The warranty period is one year from the date of purchase.
Caution
In Windows, the reader/ writer does not operate in DOS mode.
To use the reader/writer, start up Windows.
The warranty and technical support service are valid only in the
countries or sales regions specified on the warranty card.
Standby
The reader/writer supports standby functions based on the
PC2000 standard, which may not cover the standby function of
all computers. Disable the standby function of your computer if
it causes any problems. While the computer is in standby, do not
insert or remove any media.
Drive letters for the removable disk icons are assigned in
alphabetical order to the CompactFlash / Microdrive Slot,
SmartMedia / xD-Picture Card Slot, MultiMediaCard / SD
Memory Card Slot and “Memory Stick” Slot.
For example, if the computer has an A:, C:, and D: drive
before connecting the reader/writer, the drive letters will be
assigned as follows when the reader/writer is connected:
Antivirus software
If you have memory-resident antivirus software on your
computer, the computer may hang or become unusually slow. In
this case, set your antivirus software so it does not scan the
media in the reader/writer.
Do not attempt to dismantle, repair, or alter the
reader/writer yourself
Do not, under any circumstances, attempt to dismantle, repair,
or alter the reader/writer yourself. You may not only
permanently damage the reader/writer and/or your computer,
but may also cause fire or personal injury through electrical
shock.
Operating and storage environments
• Do not place the reader/writer close to heat sources or in
direct sunlight; in dusty, dirty, or humid locations; under
precipitation such as rain; or leave it in a vehicle with the
windows closed.
• If the reader/writer interferes with the reception of radio or
television signals, move the reader/writer away from the
radio or television.
• When using the reader/writer, do not wrap it in cloth, sheets,
or covers as this may cause a malfunction or fire.
3
Computer drive name
Corresponding memory card
Removable Disk (E:)
CompactFlash
MicroDrive
Removable Disk (F:)
SmartMedia
xD-Picture Card
Removable Disk (G:)
MultiMediaCard
SD Memory Card
Removable Disk (H:)
“Memory Stick” media
Insert a memory card into the corresponding slot.
When a volume label has been assigned to the memory card,
the volume label will be displayed together with the
removable disk icon.
4
Use the removable disk icon to read or write data
on the memory card.
If the following message appears, the memory card has not
been recognized correctly, even though the access indicator
lights up. Remove the card and insert it again.
3295886131.p65
2
4/3/10, 2:16 PM
MRW620-U1/3-295-886-13(1)