1
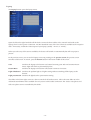
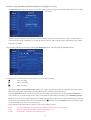
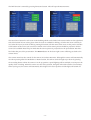
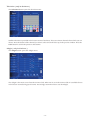
User Manual Lecture Room version 3.0 - September 2010 Faculty of Science Leiden University Inhoud Introduction 4 Available facilities Design philosophy Assistance Important 4 4 4 5 Start the system 6 Menu Sound: Light: Computer Laptop Blu Ray Document camera Camera ( only available in Gorlaeus Room 4/5 and Sylvius 1.5.35) 8 8 8 9 10 11 12 14 The upper left corner has three control buttons to control the recording. 14 Television ( only in Gorlaeus ) Adagio ( only in Gorlaeus ) Logitech Presenter 16 16 17 Introduction This guide provides information on how to use the installation in lecture rooms 1 to 4/5 in the Gorlaeus and the lecture rooms 1.4.31, 1.4.35 and 1.5.31 in the Sylvius. Please take some time to read this manual and familiarize yourself with the system. Available facilities Touch screen for room control Annotation Wireless microphone Fixed table microphone Fixed computer Connection for laptop (vga, sound and network Blu-Ray player Documentcamera HD camera Mediasite Picture in Picture view other room Television Adagio music server Logitech Presenter 1 X X X X X X X X 2 X X X X X X X 3 X X X X X X X X X X X X X X X X X X X 4/5 X X X X X X X X X X X X X 1.4.31 X X 1.4.35 X X 1.5.31 X X X X X X X X X X X X X X X X X X X X X X X X Design philosophy Both the systems in Gorlaeus and Sylvius are designed as intergraded systems. All functions are available through one touch screen for user comfort. The interface and setup is the same in all lecture rooms depending on the available facilities. Important design criteria were: • Good visibility of presentations • Not only hearable sound but more importantly, understandable speech for a wide variety of user • Wide range of sources, eq. computer, laptop, document camera, etc. • User friendly and easy to learn interface for complete control • Ready for the future • Reduction of energy use • High availability rate Assistance For assistance you can phone the following numbers. Gorlaeus: 4400 Reception 4582 Joske Lamme Sylvius: 5000 4747 Reception Gerard Weijers -4- Important The touch screen can be controlled by touching it with your finger or with the pen attached to the screen. DO NOT USE SHARP OBJECTS ON THE SCREEN. When you pick the pen from the screen, a blue light will light up in the pen. When you pick up the pen, it becomes the only way to control the screen, touching it with your finger will not result in the desired effect. After you are done, place the pen in front of the screen where a magnet will hold the pen to the screen. A USB-stick or any other USB device can be inserted in the USB hub in the tray where the keyboard and mouse are. The USB entrance on the touch screen is not available. It is recommended that you copy your presentation to de DATA disk on de computer. This will ensure a smoother operation of your presentation because the data transfer rate is higher from a harddisk than a USB device. The DVD/CD Rom device in the fixed computer is not available. Please you a laptop when you need a CD Rom device. All controls are done through the touch screen. You do not have to press any buttons on the document camera. The computer and Blu Ray are behind a closed door. The touch screen will enter sleep mode when not touched for 120 minutes. The screen will wake up by touching the screen, either by hand or with the pen. The keyboard and mouse are in the tray under the touch screen. After use, please put them back and close the tray. The desk is made from a high reflective material. The laser mouse will not operate when used on the desk. Please use the mouse mat. If necessary, help can be provided by the reception desk. Please check your USB device for viruses and other malware prior to inserting it in the USB hub. A Logitech Presenter is available for each room at the reception -5- Start the system Step 1: On entering the lecture hall, you switch on the lights by pressing the switch next to any of the doors. The orientation lights on the stairs will switch on together with the main lights which will illuminate to 100%. Step 2: On the desk in a central position you find the touch screen. If the green light in the right upper corner is not on, press the on/off switch. If the green light is on but the screen is black, touch the screen. Enter the login code which was provided at the reception desk and press enter. The system will start up while you see a status bar. Once you are logged in, the light switches at the doors will be disabled and control of the lights is done via the Light button on the touch screen. Step 3: Select the sound setting Empty Room, Half Room or Full Room for the room according to the number of people in the room. -6- Step 4: Select the source you want to use in the Menu. Step 5: When your lecture is done, press the logout button in the lower left corner of the screen. This will switch on all the light to 100% and enable the light switches at the door. After 5 minutes the system will switch off the beamer and other parts of the system. Step 6: On leaving the room, press the light switch once. The lights will not immediately switch off. After 5 minutes the lights will switch off. Note: When the system is logged in, the ventilation will start and in the ‘advanced light menu’ you will find the statusbar at 100%. You can not manipulate the setting of the ventilation, it is automaticly swithed on when logged in. -7- Menu Sound: The Sound button opens the standard sound menu. You can select the sound setting according the number of people in the room. The three options are Empty Room, Half Full Room and Full Room. The Advanced button in the lower right corner opens the advanced settings where you can control the levels of the wireless microphone, wired table microphone and audio. The microphones both have a mute button. The wired table microphone is muted in the standard setting, the mute button is red. Do not simultaneous use the wireless and wired table microphone. Press the Return button to return to the previous menu. By touching the slider on the level you want, the system will change the setting of the source to that level. Do not continuously touch the slider. Light: The Light button opens the standard light menu. There are multiple presets for the light to control the different light groups. All on – All off switches both groups on or off Podium on – Podium off switches the podium rows on or off Middle rows on – Middle rows off switches the middle rows on or off in room 4/5 Back rows on – Back rows off switches the back rows of or off Presentation switches the podium lights to 10% and back row lights to 50% Advanced opens the advanced light menu In the advances light menu you can control the two groups individually in the same way you can control the sound settings. Press the Return button to return to the previous menu. -8- Computer The Computer button opens the computer menu. When you are the first user of the day or if there was no lecture before yours, the computer can be switched off. When you login to the system, the computer will automatically boot. Please realize this process can take a few minutes to complete. When you select any of the available sources, the beamer will switch on automatically but will not project a picture. In the preview screen, you can see the computer screen. By pressing on the preview screen, the preview screen switches to full screen. To return, press the Return button in the lower middle of the screen. View Switches the computer to the beamer on, button becomes green and text becomes Picture Mute. Light will switch to presentation preset. Picture Mute Switches the computer to the beamer off, button returns to View state. Light whiteboard Switches the podium light to a higher setting without switching off the computer to the beamer. Light presentation Switches the lights back to presentation setting. Return Available in full screen mode. Returns to the preview and control mode. Annotation on Switches the annotation function on and the button becoumes red and text becomes Annotation off. Standard, this function is switched off The slider in the lower right corner is a direct controle for all audio sources. This is the same slider as in the Advanced Sound Menu and is available for every source with a audio connection. The wireless microphone and table microphone are not controlled by this slider. -9- Laptop The Laptop button opens the laptop menu. Open the lid on the right hand side off the desk. Connect the three cables: video, network and audio to the laptop. There is also a power connection. For Mac Notebook users, there are convertors available at the reception desk. If necessary, enable the video output of your laptop (usually -Fn F5- or –Fn F8-). When you select any of the sources available, the beamer will switch on automatically but will not project a picture. In the preview screen, you can see the laptop screen. By pressing on the preview screen, the preview screen switches to full screen. To return, press the Return button in the lower middle of the screen. View Switches the laptop to the beamer on, button becomes green and text becomes Picture Mute. Light will switch to presentation preset. Picture Mute Switches the laptop to the beamer off, button returns to View state. Light whiteboard Switches the podium light to a higher setting without switching off the laptop to the beamer. Light presentation Switches the lights back to presentation setting. The slider in the lower right corner is a direct controle for all audio sources. This is the same slider as in the Advanced Sound Menu and is available for every source with a audio connection. The wireless microphone and table microphone are not controlled by this slider. - 10 - Blu Ray The Blu Ray button opens the Blu Ray menu. The Blu Ray is located in the left side cabinet of the desk. The tray is accessible through the slot in the door. The Blu Ray plays audio CD’s, DVD’s and Blu Ray disks. When you select any of the sources available, the beamer will switch on automatically but will not project a picture. In the preview screen, you can see the Blu Ray screen. By pressing on the preview screen, the preview screen switches to full screen. To return, press the Return button in the lower middle of the screen. Switches the Blu Ray on or off View Switches the laptop to the beamer on, button becomes green and text becomes Picture Mute. Light will switch to presentation preset. Picture Mute Switches the Blu Ray to the beamer off, button returns to View state. Light whiteboard Switches the podium light to a higher setting without switching off the Blu Ray to the beamer. Light presentation Switches the lights back to presentation setting. a Stop h Play b Pause f Previous chapter e Next chapter d Fast backward n Open or close tray c Fast forward Options Opens the options menu of the DVD or Blu Ray Menu Opens the menu of the DVD or Blu Ray Enter Selects the option in the menu of the DVD or Blu Ray Arrows Use to navigate through the menu of the DVD or Blu Ray - 11 - Document camera The Document camera button opens the document camera menu. The Document camera is located on the left side of the desk. The document camera may be covered by its protective cover. Remove the cover, and setup as shown below. When you select any of the sources available, the beamer will switch on automatically but will not project a picture. In the preview screen, you can see the document camera screen. By pressing on the preview screen, the preview screen switches to full screen. To return, press the Return button in the lower middle of the screen. View Picture Mute Light whiteboard Switches the document camera on or off Switches the document camera to the beamer on, button becomes green and text becomes Picture Mute. Light will switch to presentation preset. Switches the document camera to the beamer off, button returns to View state. Switches the podium light to a higher setting without switching off the document camera to the beamer. - 12 - Light presentation Lamp Zoom Auto Focus Auto Color Brightness Rotate Switches the lights back to presentation setting. Upper switches on the upper lamps. Use this setting for objects. Lower switches on the lower lamp. Use this setting for sheets. Zoom in or out on the plate If necessary, press this button to focus on the object or sheet. If necessary, press this button to adjust the color on the screen. Makes the picture brighter or darker. Rotates the picture to 0, 90, 180 or 270 degrees. - 13 - Camera ( only available in Gorlaeus Room 4/5 and Sylvius 1.5.35) The Camera button opens the camera menu after a short system startup screen which enables the system to boot the camera. After the system is booted, you will enter a selection menu for the use of the camera. It can be used for either recording a lecture using ‘MediaSite’ or to link the lecture room to other lecture rooms. Simultanious use of both functions is possible. The recording function is entered by pressing the MediaSite button. This will open the MediaSite menu. The upper left corner has three control buttons to control the recording. g Start recording b Pauze recording a Stop recording The button Today’s presentations only enables you to show only the presentations scheduled for today. Using this button will reduce the number of presentations in the ‘Available presentations’ bar. Press the Refresh button to refresh or populate the ‘Available presentations’ bar. Using the Up and Down buttons enables you to scroll trough the list. Ones you located the intended presentation, press Available presentations, the same as the bar. This will move the selected presentation to the ‘Current selected presentation’ bar and becomes the presentation which will be recorded ones the g button is hit. The Return button in the lower right corner will bring you back to the camera menu. The preparation of presentations is done by your own faculty of school. FSW: www.fsw.leidenuniv.nl/organisatie/ictoatelier/info/over-het-icto-atelier.html FRG: http://law.leidenuniv.nl/medewerkers/onderwijs-en-ict/ FWN: Kees Hofker, [email protected] - 14 - The link function is entered by pressing the Rooms button. This will open the Rooms menu. The menu has a button for each room in the building which can be linked. The status window on the right hand side of the button has two states, green when the room is available for linking, red when the room is already in use. Select the room you want to link by pressing the button with the name of the room. In the preview window at the bottom of the screen you can select in which corner of the camera picture should be projected. All four corners are available. Please keep in mind that the camera picture is projected over the presentation and therefore hides that part of the presentation. The Return button in the lower right corner will bring you back to the camera menu. The camera menu has also control for the camera in Gorlaeus Room4/5. Although the camera will automatically rise when pressing either the MediaSite or Rooms button, the camera can be brought up or down by pressing the according button. When the camera is in the up position, special lighting will be switched on to improve the quality of the recording. When the camera is in the down position, the lights will switch off after a few minutes. When you log out, the camera will automaticly be brought to the down position and the lights will switch off. - 15 - Television ( only in Gorlaeus ) The Television button opens the television menu. Satellite television is provided in the lecture rooms of Gorlaeus. There are sixteen channels from which you can choose. Press the button of the channel you want to select and it will show up in the preview window. Press the View button to switch the picture to the beamer. Adagio ( only in Gorlaeus ) The Adagio button opens the Adagio menu. The Adagio is the music server from the Science Club. When not in use in the Science Club it is available for use in the lecture rooms during special events. We strongly recommend not to use the Adagio. - 16 - Logitech Presenter A Logitech Presenter is available for use with the computer in all rooms. When switched on at the left side, the presenter will vibrate shortly. The presenter has a forward and backward button, a timer with 5 minutes intervals and a laser pointer although the annotation function on the touch screen provides with a better result. Please switch off the presenter after use. The presenter operates in the 2,4GHz band. These signals are easily absorbed by the human body and are in the same bandwidth as Blutooth devices like cell and smartphone. These devices can interfere with the presenter and cause a malfunction. When the presentation is not longer controllable with the presenter you can still use the mouse and keyboard although a small delay can occur Make sure to aim the presenter towards the desk when using. - 17 -