1
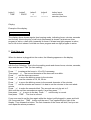
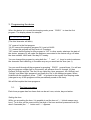
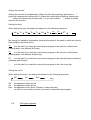
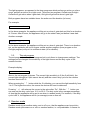
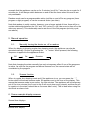
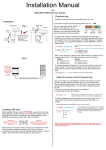
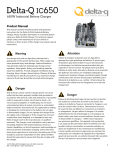
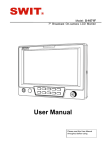
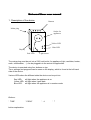
Universal timer user manual
1. Description of the device
Buttons
Mains plug
Socket for
appliances
Yellow LED
Blue LED
Display
Red LED
Light sensor
The mains plug must be put into a 230V wall outlet. An appliance (light, ventilator, heater,
radio, coffeemaker, …) can be plugged into the socket for appliances.
The device is operated using four buttons on top.
Time, settings and programs can be seen on the display, which is found at the left hand
side of the device.
Various LEDs show the different state the device can be put into:
Red LED:
will light when the appliance is on
Yellow LED: will light when it gets dark
Blue LED: will light when the appliance is in random mode
Buttons:
‘TIME’
button explanation:
‘PROG’
‘->’
‘^’
button1
‘TIME’
button2
‘PROG’
button3
‘->’
Manual
button4
‘^’
Snooze
button layout
main functions
secondary functions
Display
Example of the display:
12:34:05 We
The display above shows regular time keeping mode, indicating hours, minutes, seconds
and the day. Next to the day, a half circle (downward) is shown if at least one timer
program is active, a half circle (upwards) is shown if at least one light program is active,
and a full circle is shown if at least one timer program and one light program is active.
2. First time use
When the device is plugged into the mains, the following appears on the display:
00:00:00 Mo Tset
with the first 0 blinking. This is the time setting mode and shows hours, minutes, seconds,
days and the word “Tset’ (for time setting).
Press ‘^’ to advance the hours to 10 or 20 if necessary.
Then press ‘->’. The second character of the hours will now blink.
Press ‘^’ until the hours are correct.
Press ‘->’ to move the blinking cursor to the minutes.
Press ‘^’ to set the minutes to 10, 20, 30 etc.
Press ‘->’ to move the blinking cursor to the second character of the minutes.
Press ‘^’ until the minutes are correct. It is best to set the minutes to the next whole
minute.
Press ‘->’ to make the seconds blink. The seconds can only be set to 0.
Wait until the real time seconds are exactly 0 and then press ‘^’.
Now press ‘->’ to move to the day. Press ‘^’ until the day is correct.
Now press ‘TIME’. The time is now set.
If you ever need to set the time again while the device is still plugged in, press and hold
(for 2 seconds) the ‘TIME’ button until the word “Tset” appears at the right of the
display. Then release the button. The first character of the hours will blink, and you can
now repeat the above procedure.
3. Programming the device
When the device is in normal time keeping mode, press ‘PROG’ to view the first
program. The display shows for example:
01 14:56 Tu Off
(The third character will blink).
“01” means it is the first program
“14:56” means this program (program 01) is set at 14h56
“Tu” means this program will only work on Tuesdays.
“Off” means that the action for this program is “Off”. In other words, whatever the state of
the device, program 01 will make the appliance connected to the device will go off when
the time reaches 14h56 and if the day is Tuesday.
You can change this program by using both the ‘^’ and ‘->’ keys in order to advance
the character that is blinking, in the same way as you would set the time (see 1).
You can scroll through all the programs by pressing ‘PROG’ several times. You will see
that the program number (left on the screen) will advance from 01 through 14, then
OnDark, OnLight and Set. The first 14 are called the ‘timer programs’, the ‘OnDark’ and
‘OnLight’ are called ‘light programs’ and finally the ‘Set’ is the settings program. When
finished with the programs, press ‘TIME’ to go back to the regular time keeping mode
(changes to any of the programs will be permanently saved at this time).
We will first explain the timer programs.
3.1.
The timer programs
Each timer program has four items that can be set: hour, minute, day and action.
Setting the hour
While you are setting the hour, it is possible to set the hour at “—“ (which means every
hour). To do this, set the cursor at the first digit of the hour and then press and hold (for
about 2 seconds) the ‘^’ button until “—“ appears.
Setting the minutes
Setting the minutes is straightforward. When the first digit is blinking, pressing the ‘^’
button will advance the minutes with 10. When the second digit is blinking, pressing the
‘^’ button will advance the minutes with 1, or you can hold the ‘^’ button to quickly
advance the minutes.
Setting the days
When setting the day, the display will advance in the following sequence:
Mo
Tu
We
Th
Fr
Sa
Su
WE
WE
Sau
--
Mo through Su speak for themselves, these are the days of the week on which the current
timer program should be active.
WE
is to be used if you want the current timer program to be valid for a whole week
(working days, from Monday till Friday)
WE
is to be used if you want the current timer program to be valid for a whole week
(working days, from Monday till Saturday)
Sau
is to be used if you want the current timer program to be valid during the weekends
(Saturday and Sunday)
--
is to be used if you want the current timer program to be valid every day
Setting the action
When setting the action, the display will advance in the following sequence:
Off
Off
On
Ran
---
On
Ran
--
the appliance will be put off
the appliance will be put on
the appliance will be put in “Random” mode (see later)
no action is to be taken (use this if you want to deactivate the program)
3.2.
The light programs
The light programs, as opposed to the timer programs which perform an action on a time
event, perform an action on a light event. There are two program: OnDark and OnLight.
OnDark will get active when it gets dark, OnLight will get active when it gets light.
Both programs have two settable items: the action and the duration (in hours).
For example:
OnDark
On
5
In the above example, the appliance will be put on when it gets dark and this for a duration
of 5 hours. After 5 hours, the appliance will go to the state it was just before it was dark.
Another example:
OnDark
On
-
In the above example, the appliance will be put on when it gets dark. There is no duration
set, so the appliance will be on forever unless another program (timer program or the
OnLight program) will put it to a different state (off or random).
3.3.
The set program
The set program is not an actual program but is only there to change some settings. Two
settings can be changed: the sensitivity of the light sensor and the duty cycle of the
random function.
Example display:
Set Se5 Cu6 Du40
Above, the set program is shown. The current light sensitivity is 5 (the 5 will blink), the
current light strength is 6 (this cannot be set) and the current duty cycle for the random
function is set to 40 %.
When pressing the ‘^’ button while the 5 is blinking, you can set the light sensitivity from
1 to 9. The higher the value, the sooner the device will react to darkness.
Pressing ‘->’ will advance the cursor to the value after “Du”. With the ‘^’ button you
can now set the duty cycle from 10 % to 90 %. The duty cycle is the average percentage
of time that the appliance will be put to on when in random mode. For instance, if the duty
cycle is 90 %, the appliance will be (on average) more on than off.
4. Random mode
Random mode is just another state, next to off or on, that the appliance can be put into.
Random mode just means on or off in a random fashion, i.e. not predictable. It means for
example that the appliance can be on for 5 minutes, be off for 7 minutes, be on again for 3
minutes etc. It will always switch between on and off but the times when this occurs are
not predictable.
Random mode can be a programmable action just like on and off for any program (timer
program or light program) or can be a manual action (see later).
Note that random is really random, however, over a longer period of time, there will be a
certain relationship between the “On” and “Off” cycles (i.e. will it be more on than off or the
other way around). This relationship can be set once in the Set program (set duty cycle,
see above).
5. Manual operation
5.1.
Manually turning the device on, off or random
When the display is showing regular time keeping mode, the appliance can also be
operated manually. Do this by pressing the ‘->’ button. When pressed, the following
sequence is applied to the appliance socket:
Off
On
Random
Note that changing the state manually has only a temporary effect if one of the programs
is active. As soon as the program conditions become true, the manual state will be
overridden by the program.
5.2.
Snooze function
When in regular time keeping mode and if the appliance is on, you can press the ‘^’
button which will activate snooze mode. S9 appears next to the time on the display. This
means that snooze mode is now active, for nine minutes. The appliance will be temporary
put off for nine minutes (the 9 next to the S will count down every minute) and then be put
on again(or in the state it should be as if snooze didn’t exist). This is ideal when using the
device as an alarm clock.
6. Some example display screens
Normal time displays
13:34:09 Su
Normal time display
16:33:12 Sa
S8
Normal time display (S means snooze function is activated, followed by minutes left to
snooze)
Time set display
13:34:09 Tu Tset
Use cursor button (‘->’) and up button (‘^’) to set the time and day
Prog displays
Some example programs:
01 14:56 Tu Off
Program 1: relay off all Tuesdays at 14h56
02 15:36 Fr On
Program 2: relay on all Fridays at 15:36
03 14:56 Tu --Program 3: no action
04 07:21 Th Ran
Program 4: every Thursday at 7:21 go to random mode
05 --:00 We On
Program 5: every hour, on the hour, but only on Wednesdays, put relay on
06 --:04 -- Off
Program 6: every hour, on the 4th minute, put relay off
07 15:34 -- --Program 7: no action
08 15:34 -- --Program 8: no action
09 15:34 -- --Program 9: no action
10 15:34 -- --Program 10: no action
11 15:34 -- --Program 11: no action
12 15:34 -- --Program 12: no action
13 15:34 -- --Program 13: no action
14 23:34 -- Off
Program 14: Relay off all days at 23h34
Light prog displays
OnDark On 6
OnDark program: relay on as soon as it gets dark, for six hours (after six hours go back to
the state just before it was dark)
OnDark Off 7
OnDark program: relay off as soon as it gets dark, for seven hours
OnDark Off OnDark program: relay off as soon as it gets dark remark: this is a one-time event, i.e. it
will not go back on when it gets light again unless the OnLight event has such an action
set
OnDark Ran 4
OnDark program: device in random mode when it gets dark, for 4 hours
OnDark Ran OnDark program: device in random mode when it gets dark
OnDark --- OnDark program: no action when it gets dark
OnLight On OnLight program: relay on as soon as it gets light
OnLight Ran OnLight program: device in random mode when it gets light
OnLight --- OnLight program: no action when it gets light
Setting display
Set Se4 Cu7 Du70
Set mode program: Se followed by current light sensitivity setting, Cu followed by current
light measurement, Du followed by current random duty cycle setting