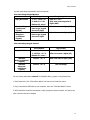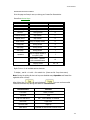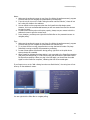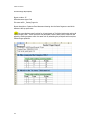
1
PowerCom for Reply Worldwide User Manual - Welcome To PowerCom Help Select a topic in the left window. - For Technical Support and Product Information Dynamic Services International, Inc., 57 West 38th Street 12 Floor New York, NY 10018 Phone: (212) 997-2000 Fax: (212) 997-4297 Toll Free in the US and Canada: 877-DSINFO7 http://www.PowerComARS.com Email: [email protected] Version 2.32.2 01/16/2009 1 Table of Contents Introduction ............................................................................................................................................................................ 5 What is PowerCom............................................................................................................................................................. 5 What you can do with PowerCom ...................................................................................................................................... 6 System Requirements ........................................................................................................................................................ 7 PowerCom Keypad Communication Methodology............................................................................................................. 8 PowerCom Installation Prerequisites ............................................................................................................................... 10 Installing and Uninstalling PowerCom.............................................................................................................................. 11 Files Created by PowerCom Setup .................................................................................................................................. 15 USB Driver Installation ..................................................................................................................................................... 17 How to Activate PowerCom.............................................................................................................................................. 21 Switching between PowerCom for Reply Worldwide and PowerCom for Reply Plus ...................................................... 23 Quick Start........................................................................................................................................................................ 27 Reply Hardware ................................................................................................................................................................... 29 Keypads Compatible with PowerCom Reply Worldwide .................................................................................................. 29 Reply Worldwide hardware overview ............................................................................................................................... 30 Reply Mini keypad CRS5000 Hardware........................................................................................................................... 34 CRS941 USB stick Base station ...................................................................................................................................... 36 Standard Reply hardware overview ................................................................................................................................. 37 Reply EU Export hardware overview ............................................................................................................................... 39 Reply EZ hardware overview ........................................................................................................................................... 41 Reply hardware specifications.......................................................................................................................................... 43 Components ..................................................................................................................................................................... 45 Using Multiple Com Ports................................................................................................................................................. 47 Configuring Com Ports ..................................................................................................................................................... 48 Reply Worldwide Keypad Settings ................................................................................................................................... 49 Reply Worldwide Keypad User Guide .............................................................................................................................. 51 How to use Reply Mini with PowerCom Reply Worldwide ............................................................................................... 52 View and Change Reply Keypad Number and Channel Number .................................................................................... 55 Reply Wireless Response System Meeting Room Setup ................................................................................................ 56 System Setup and Configuration ......................................................................................................................................... 59 Introduction to System Configuration ............................................................................................................................... 59 General Tab ..................................................................................................................................................................... 59 System wide configuration settings .............................................................................................................................. 59 Running in Demo Mode ................................................................................................................................................ 61 Writing to log file ........................................................................................................................................................... 62 Related Topic:............................................................................................................................................................... 62 Displaying Confirmation Form in Slide View................................................................................................................. 63 Related Topic:............................................................................................................................................................... 63 Displaying Results Instantly After Polling ..................................................................................................................... 64 Polling Results Data Path ............................................................................................................................................. 65 Real time replication of voting result file to a back up computer .................................................................................. 66 Hardware Tab................................................................................................................................................................... 68 Connecting the Base Station ........................................................................................................................................ 69 Operating Multiple Base Stations ................................................................................................................................. 71 Finding the COM Port Number ..................................................................................................................................... 73 Defining Keypad Range and Testing Keypads ............................................................................................................. 74 Setting Reply Worldwide Keypad Settings ................................................................................................................... 76 i Table of Contents Combine Data Files Tab................................................................................................................................................... 77 Combine and merge voting data files ........................................................................................................................... 77 Roster and Team ................................................................................................................................................................. 79 Roster............................................................................................................................................................................... 79 Roster Overview ........................................................................................................................................................... 79 Purpose of using a Roster ............................................................................................................................................ 80 Getting started with Roster Setup................................................................................................................................. 81 Roster Setup Procedure ............................................................................................................................................... 82 Assigning Points ........................................................................................................................................................... 83 Creating and Maintaining a Roster Template ............................................................................................................... 84 Copying Roster Template ............................................................................................................................................. 85 Deleting Roster Template ............................................................................................................................................. 86 Exporting Roster Template ........................................................................................................................................... 87 Populating and Maintaining Roster List Files ............................................................................................................... 88 Creating a Roster List ................................................................................................................................................... 89 Editing a Roster List...................................................................................................................................................... 90 Assigning a Roster File to a PowerPoint Slide ............................................................................................................. 91 Managing the Roster File.............................................................................................................................................. 92 Team ................................................................................................................................................................................ 92 Team Overview............................................................................................................................................................. 92 Team Setup Procedure ................................................................................................................................................ 93 Create team by question slide during slide show ......................................................................................................... 94 Quickstart Roster and Team ............................................................................................................................................ 96 Quickstart Roster and Team......................................................................................................................................... 96 Step 1: Setting Up a New Roster Template and Create a Team.................................................................................. 98 Step 2: Populating the Roster File................................................................................................................................ 99 Step 3: Using the Roster File with a PowerPoint Presentation................................................................................... 100 Roster and Team Reports .............................................................................................................................................. 100 Reports Related to Roster & Team ............................................................................................................................ 100 Inserting PowerCom Poller on Slide .................................................................................................................................. 101 Overview......................................................................................................................................................................... 101 Inserting a PowerCom Poller.......................................................................................................................................... 102 PowerCom Poller ........................................................................................................................................................... 102 The PowerCom Poller Wizard .................................................................................................................................... 102 Maintaining Poller Properties...................................................................................................................................... 109 Timer Countdown Clock..................................................................................................................................................... 111 Timer Countdown Clock Overview ................................................................................................................................. 111 Purpose of Timer Countdown Clock .............................................................................................................................. 112 Designing the Timer ....................................................................................................................................................... 113 Timer Operation Procedure............................................................................................................................................ 114 Custom Animation.............................................................................................................................................................. 115 Animation Overview ....................................................................................................................................................... 115 Applying Custom Animations to a Question Slide .......................................................................................................... 116 Good Animation Effect Schemes ................................................................................................................................... 118 The Presentation................................................................................................................................................................ 121 Running Your Presentation ............................................................................................................................................ 121 The Slideshow PowerCom Confirmation Screen ........................................................................................................... 122 Impromptu Questions ..................................................................................................................................................... 124 Replicate a question slide during slide show as an advanced Impromptu feature......................................................... 125 ii Table of Contents Question slide comparison during slide show ................................................................................................................ 126 PowerCom Shortcut Keys During a Slideshow .............................................................................................................. 129 Available Polling Functions at Each Polling Stage ......................................................................................................... 132 Presentation Functions at a Glance ............................................................................................................................... 135 Winners .......................................................................................................................................................................... 136 Winners Overview....................................................................................................................................................... 136 Fastest Finger............................................................................................................................................................. 137 Team Scores .............................................................................................................................................................. 138 Individual Cumulative ................................................................................................................................................. 139 Team Cumulative........................................................................................................................................................ 140 Demographic Analysis.................................................................................................................................................... 140 Demographic Analysis Overview ................................................................................................................................ 140 Demographic Cut Function Step-by-Step Illustration ................................................................................................. 142 Demographic Analysis by Demographic Slide............................................................................................................ 147 Demographic Analysis Display: Fixed / Flexible Fonts and Sizing ............................................................................. 149 Dual Monitor Display.......................................................................................................................................................... 151 Dual Monitor Overview ................................................................................................................................................... 151 Dual Monitor Hardware .................................................................................................................................................. 154 Dual Monitor Support (aka Multiple Monitor Support) .................................................................................................... 156 Hardware Requirement: ................................................................................................................................................. 156 Your computer must be equipped with a dual monitor video card. You can check if your computer has dual monitor video card by right clicking on the Desktop, selecting Properties, and clicking the Settings tab. The details of your display can be found under this tab. .............................................................................................................................. 156 Please review the following PowerPoint online help topics:........................................................................................... 156 Turn on dual monitor support ......................................................................................................................................... 156 Run a presentation on two monitors............................................................................................................................... 156 About running a presentation on two monitors............................................................................................................... 156 Set up a presentation to run on a second monitor ......................................................................................................... 156 Troubleshoot running a presentation on more than one monitor ................................................................................... 156 Preparing Dual Monitor Display...................................................................................................................................... 157 Slideshow and Polling Navigation .................................................................................................................................. 162 Report ................................................................................................................................................................................ 167 Basic Data ReviewRhGlossDef_Basic20Data20Review ............................................................................................... 167 OLAP Data Analysis Report Tool ................................................................................................................................... 170 Create Office Documents ............................................................................................................................................... 171 Choosing an Office Document Report ........................................................................................................................... 173 Office Document Report Format Standard..................................................................................................................... 174 Slide Sorter..................................................................................................................................................................... 175 Results Sorter................................................................................................................................................................. 177 Office Document Reports ............................................................................................................................................... 177 01 PowerPoint All Slides ............................................................................................................................................ 177 02 PowerPoint Polling Slides Only ............................................................................................................................. 179 03 Excel Summary Report.......................................................................................................................................... 180 04 Excel Summary Report with Charts....................................................................................................................... 182 05 Word Summary Report with Charts ....................................................................................................................... 183 06 Word Summary Report .......................................................................................................................................... 184 07 Word Detailed Report with Charts ......................................................................................................................... 185 08 HTML Report ......................................................................................................................................................... 186 09 Excel Detail Report ................................................................................................................................................ 187 10 Team Comparison Report ..................................................................................................................................... 189 iii Table of Contents 11 Excel Team Comparison with Graphs ................................................................................................................... 190 12 Individual Scoring Summary Report ...................................................................................................................... 191 13 Class Report Summary Report.............................................................................................................................. 192 14 Class Report Detailed Report ................................................................................................................................ 193 15 Fastest Finger Report (Excel)................................................................................................................................ 194 16 Demographic Analysis (Excel)............................................................................................................................... 196 17 Demographic Analysis with Charts (Excel)............................................................................................................ 197 OLAP Data Analysis .......................................................................................................................................................... 199 Wizard to Launch the OLAP report ................................................................................................................................ 199 PivotTable Reports......................................................................................................................................................... 200 Elements of a PivotTable Report ................................................................................................................................... 201 Adding and Removing Fields ......................................................................................................................................... 202 Manage PowerCom like a Pro ........................................................................................................................................... 205 Conducting a meeting with multiple speakers and multiple presentation slides ............................................................ 205 Preparing a Meeting ....................................................................................................................................................... 206 Pre-slide show check list ................................................................................................................................................ 207 To Do List after the meeting ........................................................................................................................................... 208 PowerCom Vista and Office 2007 Compatibility ................................................................................................................ 209 Overview and Compatibility Summary ........................................................................................................................... 209 Vista Compatibility.......................................................................................................................................................... 211 Enable ActiveX in Office 2007........................................................................................................................................ 218 How to set Windows System32 permission in Vista ...................................................................................................... 221 How To use Dongle in PowerCom..................................................................................................................................... 233 PowerCom dongle licensing overview ........................................................................................................................... 233 Installing dongle USB driver ........................................................................................................................................... 235 How to upgrade the Dongle for an upgraded PowerCom .............................................................................................. 239 How to upgrade the keypad capability when using the PowerCom Dongle................................................................... 242 Troubleshooting ................................................................................................................................................................. 243 Troubleshooting Installation ........................................................................................................................................... 243 Reply Worldwide Troubleshooting Procedures .............................................................................................................. 244 Software Troubleshooting .............................................................................................................................................. 246 Software Troubleshooting .............................................................................................................................................. 246 Hardware Troubleshooting ............................................................................................................................................. 247 PowerCom Support and Resources .................................................................................................................................. 249 Contact the PowerCom Team............................................................................................................................................. 251 Appendix and Glossary...................................................................................................................................................... 253 Glossary For Terms........................................................................................................................................................ 253 Glossary............................................................................................................................................................................. 257 Index .................................................................................................................................................................................. 263 iv Introduction What is PowerCom PowerCom® is an ARS () or GRS () software used as a Microsoft Office PowerPoint® add-in. It cannot be used as a stand-alone ARS software. When conducting meetings, trainings and presentations, PowerCom allows you to conduct polls and gather results from the audience. PowerCom is designed for use with the Fleetwood . By using PowerCom along with the wireless keypads, you can record data and display the resulting data in a graph. PowerCom® is a registered trademark of Dynamic Services International, Inc. PowerPoint® is a registered trademark of Microsoft. Reply® is a registered trademark of Fleetwood. 5 Table of Contents What you can do with PowerCom PowerCom establishes a data communication link between PowerPoint and the wireless keypads via the . Note: Even without the Keypads and the station you can run PowerCom using the . Once a connection is established you can: 1. Design a four-step for a Question slide and define how the answer from each keypad will be organized and presented as a graph at the end of voting. Alternatively, you can also choose not to display poll results. Please see the topic for more details. 2. Configure Com Port, number, set voting parameters, set and test keypad. 3. with or without the physical keypad. In demo mode keypad is not used. Display result summary for each question slide at the end of voting. Conduct by . 4. Generate after a slide presentation is completed. Export voting results and display voting results in a graph presentation. 6 Introduction System Requirements PowerCom is a Microsoft Office add-in and therefore the hardware and software should comply with Microsoft Office requirements. Currently, PowerCom supports Office 2000 or later and has been tested on Windows 2000 and later versions of the Windows operating system. Hardware: Pentium PC with 800 MHz CPU, 64MB Free Memory, 128 MB preferred. USB Driver port is necessary to connect the . USB driver software is located in the PowerCom folder. This can be found once PowerCom is installed. Note: For a larger-sized meeting, a more powerful computer is needed. Software: Operating System Software Internet Browser Windows 2000 or above. Windows Vista requires additional memory. Microsoft PowerPoint, Excel, Word from Microsoft Office 2000 or above must also be installed in order to use PowerCom successfully. PowerPoint must be running too. Ensure PowerPoint is not the viewer version. It needs to be the regular version. Internet Explorer 6 or above Tip: 1. Use Ctrl + Alt + Del to open Task Manager, then click Performance tab to check free memory before and after opening PowerPoint and during slide show. The more questions you have, the more free memory is needed. 2. A laptop is more suitable than a desktop because of mobililty. Note: Even without the Keypads and the station you can run PowerCom. This can be done using the . 7 Table of Contents PowerCom Keypad Communication Methodology The Reply Worldwide Keypads communicate with the using 2.4 GHz wireless Radio Frequency (RF) technology. The (North America Version) incorporates a 216-220 MHz transmitter Model TX216SYN. Backward / Reverse Compatibility The Reply® WW system uses the same protocol as the previous Fleetwood Standard Reply® products (i.e. CRS920 and CRS930). This allows older software packages to run with newer systems without the need of any software upgrades. However, Reply® WW keypads and Stations are not compatible with the older Reply® hardware. Reply® WW system is one of several electronics products available from Fleetwood Group, Inc. Other products include: Reply® IQ: This product is the advanced for interactive meetings, educational settings, and research professionals. A large graphics LCD shows question and answer options. Multiple digit entry, user ID and vote verification, speed scoring, moment-to-moment , and text messaging are standard. Expansion port allows capabilities to be added with plug-in modules. Standard Reply®: This product is the industry’s trusted workhorse with over 400,000 units in service worldwide. This keypad has a unique RF ID for tracking entries by individual. A proprietary acknowledgement function positively confirms the system’s acceptance of all user inputs. Intuitive keyboard and display are ideal for voting, answering multiple choice or continuum questions, and rank ordering options. Reply® EZ: This is an entry-level product that’s ideal for most classroom and boardroom applications. It is simple to setup, easy to operate, and delivers all the advantages of radio – speed, barrier-free operation, reliability – with a price comparable with less functional and less reliable products. Reply Worldwide hardware model numbers Keypad, Model CRS5200 Base Station, Model CRS940 Frequency, a license free 2.4 GHz and patented Frequency Hopping Spread Spectrum (FHSS) Radio Frequency. Capacity: CRS940 processes responses of up to 250 keypads on a single radio . There are 15 radio channels available to support a maximum of 3,750 keypads per room if 15 systems are used together. Standard Reply hardware model numbers Keypad, Model CRS1200 Base Station, Model CRS930 Frequency, a 216-220 MHz transmitter Model TX216SYN Capacity: 250 keypads per channel. 8 RF channels available for up to 2000 keypads per site. Adding keypads to an existing channel requires them to be set to new, unused addresses. No change is required on the Reply Base Station when keypads of the same channel are added. Related Topic: 8 Introduction Reply® is a registered trademark of Fleetwood Group, Inc. ©Copyright 2005 Fleetwood Group, Inc., 9 Table of Contents PowerCom Installation Prerequisites Before installing PowerCom on your computer, ensure that your operating system has the latest Service Pack, security fixes, hardware drivers and other patches. You can get these from Microsoft via the regular Windows Update option and the updates via the Software Update option. You can also check for regular updates for the Operating System and Microsoft Office from Microsoft’s website. The Internet Explorer update improves the PowerCom XML engine. Note: 1. You must have Internet Explorer 6.0 or above installed on your computer. 2. You must also have Office 2000 or above and Windows 2000 or above installed on your computer. 3. Ensure that you have the complete PowerPoint version and not the PowerPoint viewer version. 10 Introduction Installing and Uninstalling PowerCom Installation: This topic describes how to install PowerCom on your PC. 1. Locate the setup folder and double click the "Setup.exe" file on the folder on your CD or folder on your computer to start the PowerCom installation program. Note: If there is an existing version of PowerCom on your computer you have to uninstall it before installing a newer version. Powercom will not delete any system configuration settings, nor will it delete any PowerPoint files you have created. However, the sample.ppt file in the My Documents\PowerCom folder will be replaced. This dialog displays the PowerCom software license agreement. 2. Click Yes to accept the PowerCom license agreement. The next page of the wizard is displayed. 11 Table of Contents This page displays a "Check Required Component" window to display the PowerCom installation pre-requisites. 3. Click Next if all 3 statuses are all indicated as "Pass". If the status is "Warming or Failed", then click More Information to display information about the current version of PowerCom and the components required such as a specific operating system, version of Microsoft Office, and Internet Explorer. 12 Introduction This page is Select the PowerCom Version that best suits your needs. 4. Check the to verify the installation pre-requisites and apply Microsoft service packs, updates and patches. Note: Click Go to at the "Internet Explorer" section to locate the link to: http://www.microsoft.com/windows/ie, which provides an upgrade to the latest version of Internet Explorer. 5. For "Choose Destination Location", it is suggested that you use default folder. The Wizard then proceeds to complete installation of PowerCom. Tip: 1. Install PowerCom on a folder other than C:\Program Files\PowerCom because this may introduce maintenance overheads for you if you create a question slide on one computer and then move the PPT file onto another computer. For example, if you use music file provided by PowerCom from C:\Program Files\PowerCom\Music folder you have to re-set the music file location after copying the PPT file to another computer. 2. Do not install PowerCom on your desktop. Too many files will be created by the software that will overcrowd and eventually fill your desktop. 6. View the Read Me file and/or Open the sample PowerPoint file to start using PowerCom. Note: After installation, there will be a new PowerCom dropdown menu the next time you open Microsoft PowerPoint. Note: 1. To the complete version and convert from the trial version insert the "Registration key". You can find the registration code from the product CD or if you received the same via email. 2. Upgrading Powercom to newer version will not affect the license status. Uninstallation: Follow the procedure below to uninstall PowerCom from your computer and to remove the custom menu from Microsoft PowerPoint. 1. Click "Start" -> "Program" -> "PowerCom" -> "Uninstall PowerCom" to remove the files from your system. 2. Launch Microsoft PowerPoint. 3. Click "Tools" -> "Customize" -> "PowerCom Bar" and click "Delete". 4. Right click the "PowerCom" menu and select "Delete" to remove the custom menu. 13 Table of Contents 14 Introduction Files Created by PowerCom Setup 1. addIn.reg is a Windows registry file that controls the PowerCom PowerPoint Add-in DLL Windows registration. The content is as follows: Windows Registry Editor Version 5.00 [HKEY_CURRENT_USER\Software\Microsoft\Office\PowerPoint\Addins\PowerCom.AddIn] "FriendlyName"="PowerCom Add-In" "Description"="PowerCom Add-In For PowerPoint" "SatelliteDllName"="PowerCom Add-In" "LoadBehavior"=dword:00000003 "CommandLineSafe"=dword:00000000 Make sure the registry has "LoadBehavior"=dword:00000003 and not dword:00000002 2. Default.dat is a PowerCom system file that stores Poller default settings. 3. PowerComLog.txt is a runtime trace log file that is turned on in the PowerCom menu. Open the menu, go to System Configuration, then General Tab, and then check "Write To Log". This file allows the PowerCom development team to debug any runtime error. Here is the list of the System files created by PowerCom Default.dat: Saves some configuration information when users click the "Save as default" button in Poller Wizard step 3 (Graph type and Format) and step 4 (Music file) [Your PowerPoint file Name].xml: Saves some poller result information (Example: user keypad, total poller count etc). The XML file is the voting results file generated by Powercom during the slide show. One for each session with polling slide with voting results. The XML file has exact same filename as your PowerPoint file name with a different filetype "xml". Notes: If there are several incomplete session result XML data files you have to review. Please use "Combine Data Files" function under System menu to combine result XML files. [[Your PowerPoint file Name]_Pictures Folder: Contains all Poller result's PowerPoint slides images file. [Your PowerPoint file Name].csv: Analysis Poller result's OLAP file. PowerComLog.txt: Log file when PowerCom runs. For debugging PowerCom slideshow. ReportTemplate.xls: Report template file when user generates some Poller report Excel file. Roster Template files: PowerCom creates Roster Template files with PRTfile type and stores them in the Roster folder. 15 Table of Contents Roster List files: Powercom creates Roster List files with PRL filetype and stores them in the Roster folder. After PowerCom installation, PowerCom will create several files in 2 folders: A. \Program Files\PowerCom 1. addIn.reg 2. Default.dat Note: this file is created the first time you use Save as Default in Poller wizard. 3. PowerComLog.txt B. My Documents\PowerCom Roster folder and a sample PowerCom Roster Template (PRT file) .XML file .CSV file Note: PowerCom will create these 2 files in the same folder as your PowerPoint PPT file when you run the first question slide polling during your slideshow. Tip: For better file maintenance, it is recommended that you create a new folder for the PPT file when conducting an ARS live meeting because PowerCom will generate result files (XML & CSV files) for each new session and create backup files during the meeting. PowerCom will also generate report files when you run Office Document Report after the meeting. 16 Introduction USB Driver Installation After installing PowerCom on your PC or notebook, a "USB Driver" folder will be copied to the PowerCom program folder. This topic details the USB driver installation for the Reply CRS940. If a previous USB driver is installed on your PC it must be removed before installing the new one. To delete the old USB drivers go to Start -> Control Panel >Add/Remove Programs. Remove the "USB Serial Converter Drivers" program. Fleetwood uses FTDI USB controller. Read related information under the Powercom/USB Driver folder after the installation. For more FTDI product information visit the FTDI web site at http://www.ftdichip.com. Fleetwood comes with the RS232 connector. If you are using the RS232 with the USB connector, please install the correct USB to Serial Comm Port Driver provided by the manufacturer of the connector. Note: Please visit Powercom Forums at http://forum.powercomars.com/forums/ for more information and for driver downloads. To install the USB driver 1. Connect the device to a USB port on your PC or notebook. Windows will popup a message "Found New Hardware Fleetwood Reply CRS940 Base" in the Notification area (bottom right corner). This will launch the Windows Found New Hardware Wizard. 17 Table of Contents Select "Install from a list or specific location (Advanced) 2. Click Next to proceed with the installation. The next page of the wizard is displayed. 18 Introduction 3. Select Search for the best driver in these locations then check Include this location in the search and then click Browse to locate the USB driver from Program files\PowerCom\USB driver. This USB driver is provided by Fleetwood for station. 19 Table of Contents 4. Click OK, then Next to proceed to driver installation. 5. Windows will display a message indicating that the installation was successful. Click Finish to complete the installation. The serial converter is now installed. Windows will popup a second message "Found New Hardware USB Serial Port" The COM port emulation driver must be installed after this has completed. 6. Follow this same procedure to install the serial converter driver. 7. After installing the serial converter driver, you should see Windows popup the "Your new hardware is installed and ready to use." Note: 1. PowerCom provides FTDI USB driver V2.0 in the PowerCom setup software and also creates USB driver files in the Program files\PowerCom\USB driver folder. 2. PowerCom uses DPInst.exe to ensure Base station driver installation will give warning message when USB driver setup program detects USB installation may override a newer USB driver with an older version. Please review FTDI USB driver installation guide in the Program files\PowerCom\DPInst folder. 20 Introduction How to Activate PowerCom The serial number given to you by PowerCom can only be used on one computer. Activating PowerCom by using the same serial number on different computers is a violation of the PowerCom license agreement. Each serial number is associated with a maximum-keypad-allowed number that allows only a certain number of keypads to vote during the slideshow. Your computer must connect to Internet to activate Powercom. Open PowerPoint after installing PowerCom. Go to the menu PowerCom > Help > Activate. Enter the PowerCom serial number, your email address and then click the "Activate" button. PowerCom will connect to PowerCom registration servers and activate PowerCom. You are now registered. If it pops up this Message "Your PowerCom will not be activated till you restart", It shows you already active PowerCom successfully!, You need close PowerPoint, then open PowerPoint, Click PowerCom menu -> Help -> About PowerCom view PowerCom license number. If you have difficulty activating PowerCom, contact your PowerCom dealer for assistance. 21 Table of Contents Or email us at [email protected] with a screen print or error message. You can also call us at 212-997-2000, Monday thru Friday 9 to 5 for assistance. Add permission prompt message when user activates on Vista machine! Tips: Activate your license carefully. We allow three activations for each license; however, only one ARS meeting at a given time can use PowerCom. Note: Read PowerCom agreement for more information 22 Introduction Switching between PowerCom for Reply Worldwide and PowerCom for Reply Plus Due to the protocol difference, the PowerCom team has created two separate PowerPoint add-in applications for the Reply Worldwide and Reply Plus keypad models. Only one copy of PowerCom can run on a computer at any given time. For users who want to use both Reply Worldwide and Reply Plus on the same computer, PowerCom has to be uninstalled and then re-installed. The new combined PowerCom for Reply PowerPoint add-in application loads both versions of PowerCom on the computer and allows the user to switch between the different keypad models: Reply Worldwide and Reply Plus. Therefore, uninstalling and re-installing PowerCom to switch Reply keypad models is no longer necessary. However, you cannot combine the use of Reply Worldwide and Reply Plus keypads within PowerCom because Reply Worldwide and Reply Plus have different communication protocols. Highlights of the new version switch features: 1. One PowerCom setup will install two versions of PowerCom software, one for Reply Worldwide and one for Reply Plus. 2. PowerCom will allow the user to set an initial version upon installation. 3. PowerCom provides two program entries and a new version switch program. To switch between versions of PowerCom, go to StartÆAll ProgramsÆPowerComÆSwitch PowerCom Version. 5. PowerCom will now maintain one version control for both Reply Worldwide and Reply Plus. 6. PowerCom will detect and show a warning message when the user opens the wrong version of PowerPoint and explain how to change the version. 7. User uses a different activation key or dongle to control the licensing. How to switch the PowerCom version 1. Close all PowerrPoint files 2. You can choose the PowerCom version within installation. 23 Table of Contents 3. Click start->Programs->PowerCom ->Switch PowerCom Version Note to Windows Vista user: You must run "Switch PowerCom Version" as Administrator. Procedure: Start->Programs->PowerCom->Switch PowerCom Version,right mouse click "Run as administrator". 24 Introduction 4. Pop up. 5. Choose to Switch the software,Reply Worldwinde or Reply Plus. Click Switch. 25 Table of Contents 6. 26 PowerCom will automatically determine the proper version to install when you plug in the base station. Introduction Quick Start The best way to explore PowerCom’s functionality is to review the PowerCom sample.ppt demo file. Then follow the step by step demo of inserting a to sample questions and run slide show in the to experience the benefits of PowerCom. If you are an experienced PowerCom user, you may want to discover its newest features on your own. If not, you can still get a good feel for PowerCom's software by running the included sample PowerPoint presentation (Strategic Planning – Annual Off-Site Workshop). You can also download the sample Power Point presentation from the Documents menu online at: http://www.PowerComARS.com. The sample Power Point presentation "Survey the best price for a new product" contains surveys relevant to price setting for a product. The example slides contain an analysis of age, gender, education, marriage status, and income. Tip: Please review PowerCom Tutorial at http://www.powercomars.com/support/tutorial.html for a step-by-step tutorial. Follow these 4 key steps to experience PowerCom capabilities: 1. Design and create PowerPoint presentation slides and question slides (with or without PowerCom installed) bar. 2. Insert a Poller using the PowerCom 4 step or edit an existing using the Poller object tool 3. Present the PowerPoint slide using PowerPoint slide show and conduct for the question slides. 4. Analyze the voting results by creating reports and optionally conduct . Each of the 4 steps can be repeated. The following steps will show you a quick and easy way to create a question slide using PowerCom, and how to run the presentation and slides: 1. Open the PowerPoint slide and go to the first question slide. 2. Click the "Insert Poller" button in the "PowerCom Bar" toolbar. It will show a wizard that will allow you to insert a PowerCom Poller in the slide. 3. In the first step of the wizard, there are several checkboxes that you can choose. Check the boxes according to what you want the Poller to do. You must provide a one or two word summary description of your question before you move onto the next step. 27 Table of Contents 4. In the second step of wizard, you can input custom labels in the text box and you can select the correct item. If you select a correct answer, it will flash in the results graph after polling. 5. In the third step of wizard, you can change the way your graph looks using the various tabs and drop-down menus. There is a "Save as default" button that will allow you to save the settings for use with future pollers. 6. In the last (optional) step of wizard, you can choose the to use while polling. After you complete the setting, save your music selection using "Save as the default". Then click "Finish" button to insert it into the current slide. Repeat several slides with Poller insertion. 7. Repeat step 2 to step 6 for each question slide. 8. Save the file and press "F5" to run this presentation. In the first slide a window will popup. Check the "" box (if there is no attached to the computer, PowerCom will automatically default to Demo Mode) and then the "OK" button to run the presentation as a demo. 9. Simply use space bar to advance from slide to slide, to start and stop the Polling and to display results graph. Alternatively, you can right-click the PowerCom Poler icon in rightbottom corner for more menu actions. Using is another good way to navigate the slideshow. Have fun. . . Related Topics: 28 Reply Hardware Keypads Compatible with PowerCom Reply Worldwide Thanks to backward compatibility design of Reply Worldwide API (the CRS940.OCX), PowerCom for Reply Worldwide is capable of interfacing with 5 Reply keypad models. These are: 1. Reply Worldwide 2. Reply Mini 3. Standard Reply 4. Reply EU (Reply Export), and 5. Reply EZ Reply Worldwide and Reply Mini share the same base station model, i.e. the CRS940. Stand Reply has several base station and keypad models primarily differentiated by synthesized and non-synthesized keypad models. You cannot change the keypad channel number for the non-Synthesized keypad. Channel number of the synthesized keypad is configurable by keypad command (the 973 command). You can connect all 5 keypad models (via base station) or mix any or all of them in any combination and connect them to the computer running PowerCom for Reply Worldwide, because the CRS940.OCX API can communicate with all the 5 Reply keypad models. The maximum capacity is 4550 keypads and that will consist of 2 base stations of Reply EU each of which has a capacity of 650 keypads per base station. The other base station, the 13 Reply Worldwide has a capacity of 250 keypads per base station. When you use all 15 Reply Worldwide base stations, the total capacity will be 3750. Please review the 5 Reply model comparisons at: http://www.powercomars.com/hardware/reply-worldwide-reply-mini-standard-reply-reply-euand-reply-ez-keypad-comparison.html At the PowerCom Find Base station screen (or System Configuration screen, Hardware tab), select the Reply model and assign a unique base alpha (A to O) before you connect to the base station. You then enter the keypad range for each keypad model according to the physical keypad you have prepared for the meeting. Please review these 5 Reply model topics within the Reply Hardware chapter. Reply Worldwide Reply Mini Standard Reply Reply EU (Reply Export) Reply EZ 29 Table of Contents Reply Worldwide hardware overview The Reply Worldwide Wireless Response System consists of the following items: 1. Wireless Keypads: Model CRS5200 is a calculator-style radio frequency device with a numeric button panel on the top surface. Keypads are given to each participant in the group. They are used to respond to questions presented during the meeting. Each Keypad is powered 2 x "AA" batteries and requires no external wires or electrical connections. 2. Base Station: Model CRS940 processes responses of up to 250 keypads on a single radio channel. There are 15 radio channels available to support a maximum of 3,750 keypads per room if 15 systems are used together. Keypad Use After the Base Station is turned on, pass out the keypads to the meeting participants and demonstrate how the keypad works. Ask each person to press a numeric key on his or her keypad and observe what happens. When a key on the keypad is pressed, a single digit display will indicate which key was activated. The digit keys (1 through 10) are used to enter numeric responses, including multiple choice questions (A through E) or yes/no answers, into keypad memory. The key must be released to allow the next keypress to occur. Entries are transmitted to the Reply CRS940 Base Station, which is then transmitted to the computer via the provided serial cabling. As keys are pressed, the digits are echoed on the seven-segment display (SSD). During normal operation, the displayed digit will go out within 3 seconds. This indicates to the user that the Base Station has accepted the entry and the hardware is operational. If the light blinks and comes back on, this means that the Base Station addressed the keypad but was not able to accept the entry. This could mean one of a few things: An invalid choice was made. (Some software packages use a key masking function that rejects entries from certain keys. For example, keys #3 – 9 and 0 may be marked as invalid answers and keys #1 - 2 as valid answers to a Yes/No question.) The participant should press the "Clear" key and enter a new valid answer. To clear a response, the CLEAR key must be pressed and released before the Reply CRS940 Base Station receives the keypad transmission. Depending on the number of keypads being scanned, this may take 0.5 second (< 50 keypads) to 2.5 seconds (> 200 keypads). While the "Clear" key is depressed, the keypad will display the letter C on the SSD. The keypad is out of range of the Base Station. Try moving the keypad closer to the base. An out of range keypad's LED indicator will wink approximately every 2.5 seconds (with 250 keypads polling). If the LED indicator on one keypad stays on and never blinks while other keypads are working, check the address and channel of the keypad. If everything appears to be set correctly, then the pad might need factory repair. There is also a low battery detect circuit built into the keypad to notify the user when the battery is getting low and needs replacement. This causes the LED indicator to flash at a high rate (several times per second) when the battery is getting low and should be replaced. There 30 Reply Hardware will, however, still be several hours of usage left in the battery, allowing use of the keypad until the meeting is completed. Softkeys A new feature for the CRS5200 keypad is the addition of 3 "Softkeys". If enabled, these keys can be used as 3 extra general purpose response buttons for non-numeric responses. Change/Check Keypad Address Model CRS5200 keypads have a mode that allows the user to change or recall the current keypad address. There are two methods for accessing this mode: Enter code 951: This feature may be disabled from a previous base command. If it is disabled, use the 951 code listed above. Once one of the above actions has been performed, the two lower horizontal segments will light on the keypad. At this point, you have 5 seconds to do one of the following actions: To recall the current address, press the "*" key. The address will blink out on the display (001 - 250). To set a new address, simply type in the new 3-digit address (i.e. "0"-"0"-"1" = address 1, and "2"-"5"- "0" = address 250). If the address was changed, the keypad will use this new address on the next keypress. Change/Check Keypad Channel Number The CRS5200 keypads contain a mode that allows the user to recall or change the current channel. There are two different methods of accessing this mode: Enter code 973: Press and hold "Clr" and press "2". Then release both keys. This feature may be disabled from a previous base command. If it is disabled, use the 973 code listed above. Once one of the above actions has been performed, the two lower horizontal segments will light on the keypad. At this point, you have 5 seconds to do one of the following actions: To recall the current channel, press the "*" key. The channel will blink out on the display (01 - 15). To set a new channel, simply type in the new 2-digit address (i.e. "0"-"1" = channel 1, and "1"-"5" = channel 15). If the channel was changed, the keypad will use this new channel on the next keypress. Keypad Option Commands Entering option commands is identical to entering a new Channel Number. All option commands start with the digit "9". Code Description 910 Display the key that was pressed.* 911 Display a secure character ("-") instead of the key that was pressed. The actual key pressed will still be sent. 920 Disable post acknowledge* 31 Table of Contents 921-929 Enable post acknowledge for 1-9 seconds 930 Disable the "*" key. 931 Enable the "*" key.* 940 Disable sending low battery message. 941 Enable sending low battery message (A "?" is sent after each response if the battery is low)* 951 Setup the keypad's address. 952 Disable the C-1 and C-2 shortcut keys. 953 Enable the C-1 and C-2 shortcut keys.* 960 Display the keypad's 6 digit serial number (in Hex) 970 Display the keypad's firmware revision 973 Setup the keypad's channel. 980 Reset EEPROM to default settings. 983 Disable key lockout (Any key can be pressed at any time).* 984 Enable key lockout (Only the first key is accepted until an acknowledgement is received). Option Commands (* = default) Most of the keypad settings are controlled by a series of "9XX codes, where "XX" represents a two digit number. To enter a 9XX code, press and hold down the "C" key, type in the 3 digit 9XX code, and release the "C" key. For example, to enter the code "970", press and hold the "C" key, type "9"- "7"-"0" and then release all keys. In this example, the keypad will blink back the firmware revision. Base Station Overview The Base Station contains a 2.4 GHz RF transceiver and the hardware necessary to send keypad votes to a PC via USB connection. The CRS940 can change channels so systems in close proximity can be set to different channels to prevent interference. The CRS940 uses an integrated RF antenna combined with a proprietary frequency hopping algorithm to ensure reliable RF performance when there is a lot of RF interference being generated from other 2.4 GHz devices such as wireless internet, cordless phones, etc. Change CRS940 Channel Number The CRS940 base station can be set to any of the 15 available channels through the Reply Configuration and Diagnostic Utility. Extract from Reply manuals Reply® is a registered trademark of Fleetwood Group, Inc. ©Copyright 2005 Fleetwood Group, Inc., 32 Reply Hardware 33 Table of Contents Reply Mini keypad CRS5000 Hardware Reply® Mini Model CRS5000 is a miniaturized version of the popular Reply® (Worldwide) keypad that is being used extensively in ‘audience response’, ‘group response’, or ‘interactive voting’ sessions and presentations. The CRS5000 wireless audience response keypads and a CRS940 base station comprise of a versatile two-way interactive voting system that includes these features: • • • • • • • • • • • Slim case with soft touch elastomeric keyboard and LED indicators. Smaller than a credit card and weighs less than an ounce. Fits easily in the palm and may be comfortably worn with an optional lanyard. Two-way spread spectrum radio employing an advanced communications protocol. Frequency hopping delivers high immunity to interference plus signal security to allow the system to operate in the presence of other wireless devices. Works with Reply® (Worldwide) Model CRS940 base stations. Allows drop-in use with scores of Reply®-compliant software applications. Ultra lightweight: Less than 1 oz. (with battery). Footprint smaller than a credit card. Is compatible with Reply Worldwide keypad. (same RF protocol, same firmware, and is exchangeable) Can interface with Reply Worldwide base station CRS940 or Reply Solo base station WRS960X. Can be combined use with Reply Worldwide keypad using PowerCom for Reply Worldwide software. Ideal for attending multi-event conference. The Mini’s functions are exactly the same as Reply Worldwide with the exception of only having 5 choices. More Detailed Information… User Identification • Each keypad has an RF device identity ("address") between 1-250 and a channel identity between either, 1-15 (standard version; stocked item) or 1-72 (custom arena version; by special order; special terms and pricing applies). • Addresses may be changed by using an optional WRS960X-T portable programmer • Each keypad also has a unique device serial number. • Serial numbers are permanent and set during manufacturing. • Both the address and serial number are transmitted with each keypad’s response. User Input • 5 elastomeric buttons for entering multiple choice responses. Buttons labeled: 1-5, A-E. • Entries can be "speed scored" to 0.05 seconds (50 milliseconds) resolution to identify group response sequence (PowerCom ‘Fastest Finger’ function) during competitive events. Display • Green and Red LEDs confirm user keypresses and indicate when the base station accepts the keypad’s inputs. RF Technology • Two-way RF keypad uses eligible license-free/license exempt frequencies to communicate keypresses to the base station and receive from the base station, control information and acknowledgments of successful entries. • Employs Fleetwood-engineered 2.4 GHz frequency hopping spread spectrum (FHSS) transceivers. • FHSS offers excellent range, immunity to interference, and signal security. • Patented and proprietary radio protocol. 34 Reply Hardware • • • • • • Creates a secure communications network between keypads and their associated base station. User entries are acknowledged when received by the base station. This message acknowledgment method is just one of the many patented features of Reply® systems. Permits Reply® systems to operate in the presence of other RF devices (WLANs, PDAs, phones, etc.). Integrated error checking discriminates system signals from all other RF traffic to ensure data accuracy and enhanced security. Depending on the version, 15-72 channel identities are available to provide installation flexibility and support up to 3,750-18,000 keypads per room. Internal antenna is protected by the keypad enclosure. Range • Reply® Mini is designed to operate in an indoor area 300 x 300 feet. • Elevating the base station often results in a performance advantage. Capacity • 250 keypads per base station channel identity. • Stock configuration: Default, 15 identities available for 3,750 keypads per room/site. • Arena configuration: Non-stock, special terms and pricing apply. Up to 72 identities for 18,000 users per venue. Speed • Determined by base station. See Reply Worldwide Base Station Model CRS940 specifications. • Time stamping is available to identify each keypad’s input sequence in group’s response. 35 Table of Contents CRS941 USB stick Base station Reply(Worldwide) Base Station Model CRS941 Base Station in compact USB Stick styling that communicates with Reply (Worldwide)and Reply Mini (Worldwide) keypads. Like CRS940, controlled by value-added software* (purchased separately). Reply (Worldwide) Base Station Model CRS941 z USB Stick version of CRS940. z Dimensions: 3.1"L x 0.9"W x 0.57"H. z Same performance characteristics as CRS940. Base stations do not include accessories such as software** and carry cases. These additional items are priced separately. 36 Reply Hardware Standard Reply hardware overview Note: Standard Reply is a discontinued model The standard Reply Wireless Response System consists of the following items: 1. Wireless Keypads: Model CRS1200 is a calculator-style radio frequency device with a numeric button panel on the top surface. Keypads are given to each participant in the group. They are used to respond to questions presented during the meeting. Each Keypad is powered by an internal 9-volt battery and has no external wires or electrical connections. 2. Base Station: Model CRS930 processes responses of up to 250 keypads on a single radio channel. There are 8 radio channels available to support a maximum of 2,000 keypads per room. Base Station Carrycase, Model CRS899B-32 - High impact ABS shell, die cut foam insert, and locking clasps. Holds Base Station, 32 keypads, antennas, serial cable, and power supply. Lockable Keypad Carrycase, Model CRS899K - High impact ABS shell, die cut foam insert, and locking clasps. Holds 50 keypads for security and shipping protection. Auditorium/Hall Antenna Kit, Model CRSXANT20 - Consists of a pair of special dipole antennas with mounting slots. Replaces standard whip antennas to increase Base Station reception. Includes coaxial cable and connectors to attach antennas to the Base Station. This type of antenna system is recommended for large audiences in large areas. The user of the system provides a personal computer or notebook and any desired projection device. Any personal computer with an available serial connection can potentially be used with the Reply System. The Standard Reply uses the latest in wireless technology to turn any meeting into a dynamic interactive experience for each participant without having to deal with a nightmare of cables and connectors. Fleetwood is unique in the marketplace with its patented system utilizing two separate radio frequencies to provide a two-way link with the keypads. This design ensures that no responses are missed by requiring a keypad to retransmit the user’s response until it is properly received by the Base Station. The design also allows the system to refuse to acknowledge any invalid entries. This is clearly superior to other technologies using one-way radio or infrared, which do not provide acknowledgment to the keypad when its entry is received and do not have any way of rejecting invalid entries. The Base Station is the control center for the system and operates according to commands issued by the application software. Each Base Station can process responses from up to 250 keypads. A radio frequency with an assigned channel number is used by the Base Station to address each individual keypad. This frequency is modulated by the Base Station microprocessor with a serial digital address signal that transmits continuously whenever the Base Station is turned on. A different radio frequency, but with the same channel number, is used by the keypad to send response information to the Base Station. When a key is pressed on the keypad, this transmitter is automatically activated when addressed by the base transmitter. Channel numbers are used only to denote the pair of operational frequencies as used by the Base Station and keypad unit. 37 Table of Contents How it works The keypads are rapidly and continually interrogated by the Base Station 'in sequence' to securely process responses. System timing -- the interrogation cycle -- is adjustable from 0.5-2.5 seconds depending on group size. Keypads transmit their response information for a duration of 10 milliseconds (1/100th of a second) after receiving their address. Once the Base Station acknowledges a keypad's response information, the keypad turns off to conserve battery life. Change/Check Keypad Channel Number To change the Channel Number, simultaneously hold the "Clear" key and press key's "9" "7" "3". Then release the "Clear" key. The current Channel Number will flash on the LED. The user can now enter any valid 3 digit Channel Number (002, 003, 004, 006, 007, 008) or press the "Clear" key to exit the Channel Change Mode. While in the Channel Change Mode, use the "0/10" key when you want to enter a "0". Up to four seconds is allowed to enter each digit. After this interval, the keypad will also shut down. The keypad will shut down after the third digit is entered. To check Channel Number, follow the same procedure as to change Channel Number, then press "Clear" key when complete. Keypad Option Commands Entering option commands is identical to entering a new Channel Number. All option commands start with the digit "9". See Table 1 for the list of available options. Option Description 910 Display will display key number (0 - 9) 911 Display will show bar instead of number 92x Post acknowledge time-out (x = 0 - 9) (* = 0) 930 Asterisk "*" key disabled in standard mode 931 Asterisk "*" key enabled in standard mode 940 Suppress low battery transmission in standard mode 941 Allow low battery transmission 970 Display current firmware version number 973 Display/Change Data Channel Option Commands (* = default) Extract from Reply manuals Reply® is a registered trademark of Fleetwood Group, Inc. ©Copyright 2005 Fleetwood Group, Inc., 38 Reply Hardware Reply EU Export hardware overview Technical Specifications for Wireless Keypad Model CRS4200: Note: Reply EU is a discontinued model Enclosure • Each wireless keypad is housed in a lightweight, compact, and rugged A.B.S. plastic molded enclosure. • Dimensions: 17 cm L x 7.9 cm W x 3.8 cm H. • Weight: 215 grams. User Input • Soft-touch sealed membrane switch panel with 12 tactile keys. • Ten keys are numbered 1-10. Additional key markings include A-E on keys 1-5, and "Yes" and "No" on keys 1-2. "Clear" and user-defined "asterisk" keys provide additional functions. Display • Seven-segment LED displays user input and is extremely visible, even in reduced lighting conditions. • A proprietary acknowledgement feature is integrated with the display to show the status of data delivery as well as verify the acceptance of each keypad entry by the Base Station. Power and Power Management • Powered by a 9-volt battery and internally regulated to 5 volts for consistent performance throughout the life of the battery. • Keypad is using power only when transmitting and acknowledging an entered response. • Low battery is indicated by the rapidly flashing seven-segment LED display when about 100 responses are remaining. Also, keypad transmits a warning to the Base Station. • Battery provides sufficient power for 10,000+ responses before requiring replacement. User Identification • Each keypad has a unique radio frequency (RF) address between 1 and 650. Combining this "address" feature with a patented response verification method provides additional security. • Keypads operate independently of each other, and keypad addresses are programmable. Additionally, keypads may be password-enabled to protect configuration. RF Technology • Proprietary radio communication system provides secure, barrier free operation between keypads and their associated base station. • User entries are acknowledged when received by the base station. • Integrated error checking ensures accurate communication of responses and control functions. 39 Table of Contents • Compact radio transceiver (transmitter/receiver combination) processes address/control signals from the Base Station and sends keypress information to the Base Station on 433.92 MHz. • Communications to/from the Base Station are crystal referenced. • Receiver is SAW referenced superheterodyne design with phase lock detection for superior sensitivity, stability, and selectivity. • Internal antenna is protected by the keypad enclosure. Range • The system is designed to provide reliable operation in an area 100 meters by 100 meters. • Range can vary due to a room’s geometry and RF propagation characteristics. Performance may be improved by elevating the base station and/or positioning it in the center of the group. Speed • The Base Station scans each keypad in ‘rapid fire’ sequence. Scan duration is 1/100th of a second. Within each brief time slice, the Base Station simultaneously determines a keypad’s identification and processes/acknowledges its response information. • This "look, listen, verify" routine is both intelligent and fast. Polling cycles are adjustable to optimize speed to group size. For example, a group of 50 keypads can be sampled every one half second, whereas an audience of 650 per room/site can be sampled every 6 seconds. Control • Utilizes a high performance microprocessor and external permanent memory for storage of setup parameters and keypad addresses. • Firmware is resident in the microprocessor chip, which can be replaced to facilitate easy upgrade during the life of the product. Capacity • 650 keypads per radio channel. • Adding keypads to an existing Base Station requires them to be set to new, unused addresses. No change is required on the Base Station when keypads of the same radio channel are added. Extract from Reply manuals Reply® is a registered trademark of Fleetwood Group, Inc. ©Copyright 2005 Fleetwood Group, Inc., 40 Reply Hardware Reply EZ hardware overview Technical Specifications for Wireless Keypad Model CRS1200-EZ: Note: Reply EZ is a discontinued model Enclosure • Lightweight, compact, gray A.B.S. plastic molded enclosure. • Dimensions: 6.7" L x 3.1" W x 1.5" H. • Weight: 6.5 ounces. User Input • Soft-touch sealed membrane switch panel with 12 tactile keys. Seven keys are lettered a – g. Three are marked Y(es)/+, A(bstain)/., and N(o)/-. The ! (Alert/raised hand) and (reset) keys provide additional functions. Display • Seven-segment LED provides response entry confirmation and is visible in reduced lighting conditions. Power and Power Management • Powered by a commonly available 9-volt alkaline battery and internally regulated to 5 volts for consistent performance throughout the life of the battery. • Keypad is using power only when transmitting an entered response. • Battery provides sufficient power for 10,000+ responses before requiring replacement. User Identification • Each keypad has a unique address between 1 and 50 and a radio frequency (RF) channel number. Combining this "address" feature with a special response verification routine provides additional security. • Keypads operate independently of each other, and keypad addresses are programmable. • Individual pads can be password protected to preserve configurations. RF Technology • Proprietary radio communication system provides reliable, barrier-free operation between keypads and their associated base station. • Integrated error checking ensures accurate communication of responses. • The keypad design uses license-free frequencies for communicating key presses to the base station. A 345 MHz RF keypad transmitter sends key press information to the base station’s receiver. 41 Table of Contents This transmitter is frequency synthesized and frequency modulated. Multiple channels provide installation flexibility. • Internal antenna is enclosed and protected by the keypad housing. Extract from Reply manuals Reply® is a registered trademark of Fleetwood Group, Inc. ©Copyright 2005 Fleetwood Group, Inc., 42 Reply Hardware Reply hardware specifications Reply Worldwide Employs 2.4 GHz frequency hopping spread spectrum (FHSS) transceivers. FHSS offers excellent range, immunity to interference, and security. Range: z z Spread spectrum technology is designed to operate in an indoor area 450 x 450 feet (150 x 150 meters). A rooms geometry and RF propagation characteristics will influence actual range experienced. Elevating the base station often results in a performance advantage. Reply Standard employs radio frequency (RF) technology to communicate between keypads and their associated Base Station. Reply Standard has 2 Separate frequencies are used to address/control the keypad and communicate keypresses to the Base Station. A 216 - 220 MHz RF keypad receiver processes address/ control signals from the Base Station’s transmitter. This receiver is dual conversion crystal referenced frequency modulated. A 345 - 369 MHz RF keypad transmitter sends keypress information to the Base Station’s receiver. This transmitter is frequency synthesized and frequency modulated. z z Range z z The system is designed to provide reliable operation in an area 200 feet by 200 feet with standard omnidirectional, quarter-wave whip antennas. Note: Range can vary due to a room's geometry and its RF propagation characteristics. Performance may be improved by using the optional auditorium/hall antenna kit. This kit includes high-gain dipole antennas that replace the standard antennas. Reply EZ Each keypad has a unique address between 1 and 50 and a radio frequency (RF) channel number. z z z A 345 MHz RF keypad transmitter sends keypress information to the Base Station's receiver. This transmitter is frequency synthesized and frequency modulated. Multiple channels provide installation flexibility. Range z z The system is designed to provide reliable operation in an area 150 feet by 150 feet using the Base Station's internal antenna. Greater range may be achieved by elevating the base station to reduce barriers to transmission. Reply EU (Export) is a 433.92 MHz. radio frequency (RF) keypad for Europe. Each keypad has a unique radio frequency (RF) address between 1 and 650. Range 43 Table of Contents z z 44 The system is designed to provide reliable operation in an area 100 meters by 100 meters. Note: Range can vary due to a room’s geometry and its RF propagation characteristics. Performance may be improved by elevating the base station and/or positioning it in the center of the group. Reply Hardware Components Your group response system is a peripheral device that attaches to a PC or notebook. The interface (also called a base station or controller) communicates with each keypad and your computer. The Interface The Interface includes transmit and receive modules along with a serial cable that connects to the computer. The Interface communicates with up to 250 keypads on a specific radio frequency (channel) and sends data to one of the computer's serial communications ports for processing. There are eight different radio channels available within the Fleetwood Standard Reply hardware platform. A Channel 1 interface can only communicate with Channel 1 keypads. A Channel 2 interface can only communicate with Channel 2 keypads. The same holds true for all other channels. PowerCom supports up to 2000 keypads, with eight serial ports. To Set Up A Four Interface System: Be certain you have 4 different channel Reply systems. Be certain you have 4 available Com Ports numbered from 1-10. Set the 4 interfaces on a table near your computer. With the computer and interfaces off, connect the 1st interface cable to your first serial port. Connect the others cables to the ports in the same way. Turn on the Interfaces and computer. If an interface's power lamp fails to light, be sure that the AC outlet is operational. If it is, but there is still no power, replace the Interface (you should always have a back-up unit.) The wireless keypads function as individual terminals, sending user entered digits to the Interface via wireless Radio Frequency transmission. Each keypad has an electronically stored "address," or ID, which is also written on its bottom cover. This address is a number from 1 to 250. Please see the Fleetwood manual for information on re-addressing keypads and for re-assigning channels on the synthesized keypads. In a multi-system environment, it is critical that keypads are placed within the maximum radio range (about 75') of the interface's receiving antennas. This is typically accomplished by using an external antenna system. 45 Table of Contents 46 Reply Hardware Using Multiple Com Ports To use multiple Reply systems simultaneously, each system must use a different channel. Also, you need multiple Com Ports, one for each Reply system. Virtual Numbering Since each interface can address up to 250 keypads and all keypads use individual addresses between 1 and 250, PowerCom will convert physical keypad addresses to virtual addresses for all Com Ports after the first. Keypads associated with your lowest number port remain numbered 1-250. Any keypads on your next port are assigned virtual addresses of 251-500. The next port will be assigned 501750, etc. So for example, if you are using two interfaces (Channel 1 and 2) with 125 pads for each interface numbered 1-125, PowerCom will report your keypad numbers as 1 to 125 for interface 1 and 251 to 375 for interface 2. Note that there are no keypads numbered 126-250. If you do not understand this and you are using more that one system, stop and re-read it carefully. It is important to understand this concept because you will need to physically re-label your keypads according to PowerCom's Virtual Numbering Plan. 47 Table of Contents Configuring Com Ports If you are unable to read interface data you should first launch HyperTerminal. Create a new connection and select "Direct to Com Port 1". Set the baud for 9600 and leave other port settings as they are. When you click OK, a new window should show. With the interface on, you should see data in the window. It will use a format of "A" then 50 underscores then "YZZ" followed by "B" etc. If you do not see this data, Windows is not reading the port correctly. On Win9x, Win2000 and Windows XP machines use the Device Manager to manually configure your ports. Your settings should be: - Com 1 IRQ 4 address 3F8 - Com 2 IRQ 3 address 2F8 - Com 3 IRQ 4 address 3E8 - Com 4 IRQ 3 address 2E8 In Win NT use Control Panel, Ports, Advanced. Your settings should be: - Com 1 IRQ 4 address 3F8 - Com 2 IRQ 3 address 2F8 - Com 3 IRQ (any available but not 3 or 4) address 3E8 - Com 4 IRQ (any available but not 3 or 4) address 2E8 Once you have confirmed port configurations, try reading data with HyperTerminal again. If you now see data, PowerCom will see it as well. If you don't see data, you should enter your machine's BIOS setup. (If you don't know how to access your BIOS, don't try it. Contact your company's support group or call us.) Manually configure your ports in BIOS as stated above. This will allow HyperTerminal and all other applications to establish the correct communications. 48 Reply Hardware Reply Worldwide Keypad Settings Configure Via Section: When set to Keypad, all keypad changes must be made manually using the keypad membrane. When set to Base, all keypads that are within range and powered up will be automatically reconfigured based on the following Keypad Settings. Digit Echo When checked, a key that is pressed will display the value of the key on the keypad display. For example, with digit echo on, pressing key 2 displays "2" on the keypad display. Enable Star Key When checked, the * keypad key will be enabled, by default the * key is disabled. Low Battery Notification When checked, a low battery warning with keypad LED blinking will be given when a keypad experiences low battery power. Post Acknowledgement When checked, a key that is pressed will display horizontal bars on the keypad display after the base has acknowledged receipt of the keypress. Acknowledgement will display for three seconds. Shortcut When checked, the keypad shortcuts for changing the keypad address and channel are enabled. Soft Keys When checked, the Soft Keys at the top of the keypad membrane will be responsive to user actions. The default base behavior sets these Soft Keys to inactive. Accept Only Initial Response When checked, only the initial keypress will be sent to the base. This property is easy to misunderstand. To clarify, if this property is enabled a keypad user presses 4 can press clear and change their response before the base reads the keypress value. The user cannot press 4, then press 2 before the base has read the keypress value. The 2 will be rejected by the keypad. Once the 4 has been read, the user can then press 2 and it will be accepted by the keypad. Lock Keypads When checked, keypad manual configuration will be locked. No shortcuts will work on the keypad. This setting is intended to prevent keypad users from inadvertently or intentionally changing keypad settings. Transmit Power Normally full power is appropriate and results in the longest range of RF communication. Occasionally when interference is a problem, Experimenting with lower power levels will yield less RF interference at the expense of keypad range. 49 Table of Contents Extract from Reply manuals Reply® is a registered trademark of Fleetwood Group, Inc. ©Copyright 2005 Fleetwood Group, Inc., 50 Reply Hardware Reply Worldwide Keypad User Guide Keypads do not need to be turned on or off. To vote, simply press the number of your answer choice. The number of your choice should appear in the LED display. When your vote has been accepted, the LED display will show three horizontal lines to acknowledge that your vote has been accepted. The display will then return to blank. To switch your vote, press the number for your new answer choice. The receiver will accept your most recent answer as your response. For example, if you have already voted choice ‘1’, but later during the poll decide that choice ‘2’ is better, you can press ‘2’ on the keypad and the program will automatically change your vote from ‘1’ to ‘2’. If you vote for a choice that is not one of the answer choices, your vote will not be accepted. If a poll has a choice ‘10’, pressing just the ‘0’ key will accept as choice ‘10’ for you. For polls that have letter answer choices, keys 1-5 correspond to A-E. For polls that have True or False answers, pressing 1 on the keypad means a response of ‘True’, and 2 on the keypad means a response of ‘False’. The ‘Clr’ key, if pressed after a vote has been accepted, will not recall your vote. If the Clr key has been pressed before the vote has been accepted, it will recall your vote. Notes: PowerCom does not employ the use of the top three keys and the ’*’ key. Pressing these keys will not alter the outcome of voting. 51 Table of Contents How to use Reply Mini with PowerCom Reply Worldwide The Reply Mini is similar to the Reply Worldwide except for the following features: From the audience point of view: 1. Only 5 choices (1 – 5, A-E) are permitted 2. No 7 segment LED to display your answer choice. 3. When you press any key, the green LED will light to indicate keypad power on. 4. When the vote is received by the base station, the green LED light goes off. 5. If the keypad is unable to send the vote after a period of 9 seconds, the red LED will light for 3 seconds and then power off keypad. 6. Red LED will blink quickly 4 times when the battery power is low. From the Presenter and ARS technician point of view: 7. Can be set up to answer 5 choices for a given question. 8. Reply worldwide keypad settings are not applicable to Reply Mini. 9. You need the special equipment WRS960X-T Programmer Model to change the channel number and keypad ID. This equipment is mandatory for breakout events. 10. You can view the keypad channel ID and keypad address by pressing the 1 and 5 key simultaneously for 3 seconds. Either the red or the green led will light to start a sequence of blinks representing the Base ID (from 01 to 15) and the keypad address (from 1 to 250). A green LED flash represents the numerical values separated by the red LED indicator. The format is as follows: 52 Reply Hardware Note: If the Base ID is below 10, the sequence will begin with a red flash. For any 0 digits, there will be no green flashes. For example, representing Base ID 02, Keypad Address 103. Additional information for the presenter and the ARS technician The serial numbers of the CRS5200 (Reply Worldwide) and CRS5000 (Reply Mini) do not overlap and therefore the keypads can be mixed on a single system. In other words, no CRS5200 will have the same serial number as a CRS5000 or vise-versa. The Reply Mini has Timestamp capacity and speed, so can be used in the Fastest Finger competition on the Winners screen. Reply Worldwide Keypad’s settings are not applicable to the Reply Mini, such as "Accept Only Initial Response" and echo. 53 Table of Contents For hardware specification comparison between Reply Mini and Reply worldwide, please review "Reply Worldwide and Reply Mini Keypad Comparison". 54 Reply Hardware View and Change Reply Keypad Number and Channel Number View and Change Keypad Number View Keypad # Reply Worldwide Change Keypad # 1. Clr + 1 then * or Hold Clr + 9 5 1 2. Hold Clr + 9 5 1 After view enter keypad as 3 digits (002) Release Clr, enter * Standard Reply (synthesized keypad) Hold Clr till it blink then let go, keypad show as 3 digits After view enter 3 digits (002) Standard Reply(nonsynthesized keypad) Hold Clr till it blink then let go, keypad show as 3 digits After view enter 3 digits (002) View and change keypad channel: Reply Worldwide View Channel Chg Channel 1. Clr + 2 then * or Hold Clr + 9 7 3 2. Hold Clr + 9 7 3 After view enter 2 digits (02) Release Clr, enter * Standard Reply(synthesized keypad) Hold Clr + 9 7 3 After view enter 3 digits (002) Standard Reply(nonsynthesized keypad) Hold Clr + 9 7 3 Can not change You can change base station channel via ReplyWW Utility program or using PowerCom: 1. Start PowerPoint, Click "Start a Base station" sub menu from PowerCom menu. 2. Plug in base station USB cable to your computer, then click "Find Base Station" button. 3. After PowerCom locate the base station, simply change the channel number, and then press enter. Now the channel is changed. 55 Table of Contents Reply Wireless Response System Meeting Room Setup Reply Worldwide The Base Station can be located anywhere in the area where the keypads are to be used. CRS5200 keypads can operate in a room up to 450’ x 450’ in size. Despite a robust communication system, walls and some other 2.4 GHz devices can moderately to severely limit the CRS940 system’s performance. If coverage of a larger area is necessary, elevation of the Base Station can usually improve the reception of the keypad signals. NOTE: Due to the properties of signals operating at 2.4 GHz, Fleetwood does not recommend placing any walls between the base station and the keypads. The material in a wall tends to absorb the RF signal and slightly reduced performance might be observed. Standard Reply Recommended Installation: Central Position The Base Station case should be located centrally in the area where the keypads are to be used. This placement ensures that the outermost keypads are nearly equidistant from the Base Station. Optimally, the Base Station should be elevated at or above keypad height. Elevation above that height can usually improve reception and expand the coverage zone. The Base Station uses omni directional antennas, and their coverage pattern is circular, that is, evenly distributed around the plane of each antenna. Central placement optimizes coverage with this type antenna configuration, and it helps you to quickly get down to business by basically setting up the Base Station, passing out keypads, and testing operation. Central position has other advantages including: displacing the Base Station from sources of RF interference which could possibly reduce reception range (e.g., computers, projectors); helping ensure keypads -- as they freely move about the room -- will remain within the Base Station's coverage pattern; and following recommended manufacturer's guidelines. If central placement provides solid and consistent coverage to all keypads, then you may have the latitude to reposition the Base Station to the front, rear, or one side of the room. When a Central Position Is Not Feasible If central position is not desirable, then you may want to reposition the Base Station to the perimeter of the room (front, back, or side). After repositioning the Base Station, you should elevate it above keypad height and again test keypads to verify coverage. Test by placing the keypads farthest from the Base Station on the floor. If their responses are collected on their first transmissions, no further action on your part should be necessary. If responses are not quickly collected, then you need to decide on EITHER moving the Base Station back to the central position OR performing a coverage zone expansion strategy to increase the Base Station’s reception area and/or strength. There are two commonly used coverage zone expansion strategies: one uses your existing whip antennae and one replaces your whip antenna with high-performance dipole antennas. Multiple Base Station Coverage For Large Audiences/Rooms When using multiple Base Stations to service more than 250 keypads in a single room, create zones of coverage. In each zone, place keypads and a Base Station of the same radio channel. 56 Reply Hardware Central position of Base Stations in each zone will provide all of the advantages discussed in Diagram 1. The Base Stations MUST BE ON DIFFERENT CHANNELS. For best results, maintain a minimum separation of 15' between Base Stations of a different channel. Alternate positions of the Base Stations are possible (i.e., all against a single wall); however, the use of high-performance dipole antennas is strongly recommended to provide proper coverage of very large areas. Extract from Reply manuals Reply® is a registered trademark of Fleetwood Group, Inc. ©Copyright 2005 Fleetwood Group, Inc., 57 System Setup and Configuration Introduction to System Configuration Configuring the PowerCom system is your starting point. To do this, select "System" on the PowerCom menu. The System Configuration box opens with three tabs. General Tab Hardware Tab Combine Data Files General Tab System wide configuration settings General Tab allow user to configure System wide settings under PowerCom menu System sub menu. Demo Mode PowerCom recommendation: Off, 59 Table of Contents PowerCom will set on and off depends on the base station connection. Write to log PowerCom recommendation: Off, turn on when need to debug the program. Slide Show Confirmation screen PowerCom recommendation: On Demographic Analysis Flexible Font Select this option when you like PowerCom to dynamically adjust the Result Graphic Font when displaying Demographic cut. PowerCom recommendation: On Add a Voting Box when use Dual Monitor PowerCom will display a vote count box on question slide during slide show when dual monitor display is used. PowerCom recommendation: On Reset Poller after slide show After the slide show set to resume poller for the default. PowerCom recommendation: On Hot Backup Location Real time replication of voting result file to a back up computer PowerCom recommendation: On 60 System Setup and Configuration Running in Demo Mode You can run the PowerCom slideshow without connecting to a physical base station and keypads using demo mode. Demo mode is for meeting presentation simulations. We encourage presentation authors to utilize the demo mode during the PowerPoint presentation’s design and construction stage to get a sense and feel for how the slideshow will look. Demo mode will allow you to figure out the best screen layouts for the results graph. Running demo mode is the best practice method to perfect your presentation. You can use demo mode to conduct pre-meeting rehearsal and sneak previews of your presentation and polling result graph displays. When PowerCom cannot detect a base station connection, PowerCom will automatically set itself to demo mode. If you have the base station connected to your PC or laptop, please end the slide show and go to the System menu Keypad section to check the connection. You can set demo mode at slideshow confirmation screen when you start the slide show. Related topic: Slideshow PowerCom Confirmation Screen 61 Table of Contents Writing to log file Use diagnostic mode writing any errors to a log file. System default off When turned on, PowerCom will record system-debugging traces in the file. Related Topic: PowerCom System Files 62 System Setup and Configuration Displaying Confirmation Form in Slide View Prompt for action when data already exists for this presentation. System default on. Leaving the system default on is recommended if you are reviewing and changing settings (Confirmation Screen) before the start of the slideshow when the presentation has at least one poller inserted. Related Topic: Slide Show PowerCom Confirmation Screen 63 Table of Contents Displaying Results Instantly After Polling System default off This feature is disabled from the System menu to prevent the presentation from going to the next slide when you set "Do not display result graphic for this slide" on. However, you can get this option through Windows Registry Editor. See PowerCom Windows Registry for more information. 64 System Setup and Configuration Polling Results Data Path Location of data file for this presentation. Used to identify the folder where all the polling results data and screen will be stored. PowerCom will default the data path to directory where the current PowerPoint presentation is located. PowerCom will automatically rename the previous results data files by appending the date and time to the end of the file. To prevent complications and confusion, you should rename the files to a meaningful name related to the slide show session immediately after you have completed the slideshow and before you start another slideshow. Search for the same name as your PowerPoint file (file types are XML, CSV, DOC) and a folder with same PowerPoint filename plus suffix "_Pictures". Make sure that the names match. PowerCom will only recognize matching names in the Picture folder for PowerPoint presentations. 65 Table of Contents Real time replication of voting result file to a back up computer When should we use this feature? During the ARS meeting, especially when it is a critical one, you do all the necessary preparation to prevent any kind of interruption during the meeting. You can have a stand-by computer load with same PowerPoint slides and have a spare base station placed next to the stand-by computer to deal with any computer melt-function or PowerPoint crash. However, when you switch the slide show presentation to the stand-by computer when the primary computer encounters an error and you cannot fix it quickly, your stand-by computer has the same PowerPoint file but has no previous voting results. You have to copy the file over or run the slide show with a new result file. This may not be an issue if you do not have demographic slides in your break down computer or you never have to re-visit the question slides on the break down computer. To be able to port the complete slide and voting result data from primary computer to the backup computer, Powercom provides a new feature of real time voting result replication in Version 2.32. How it works? PowerCom copies the following PowerCom files in real time mode from the primary computer to the backup computer: 1 The voting result XML 2. The OLAP data analysis CSV file. 3. The slide Poller Result Picture File. As you run your Presentation, these PowerCom files are updated on both the main and backup machines simultaneously. So if your primary computer experiences any technical difficulty during the PowerPoint slide show, you can start the Presentation from the backup with all the data ported over from the primary computer. Requirements & preparations: 1. 1. You should first establish a computer to computer connection using Ethernet LAN connection via a hub or switch and RJ45 LAN cables. Other computer to computer connections such as Infra-rate, blue tooth, or computer to computer connection using a category 5e crossover patch cable., because the connection may not be stable. Note: What is a Category 5e crossover patch cable? Actually, it's a cable that directly links one computer to another on a Local Area Network (LAN). The RJ45 CAT 5e UTP crossover cable with molded strain relief is designed to provide Hub-to-Hub, PC-to-PC connection. The computer environment on both the computers should be identical. Windows version, Office version and PowerCom version should be totally identical. 2. First locate the folder on the backup computer that you would like to share or make a new folder. 3. Right click on that folder and click on the option "Sharing and security". 66 System Setup and Configuration 4. A small dialog box will appear with the title "data properties". Under the "Sharing" tab, select the check box "Share this folder on the network" under the "Network sharing and security". 5. Set the permission level on this folder to be writable to the primary computer login account. 6. The path and name of PowerPoint file, music file and other PowerCom system files must be identical on both primary and backup computers. If you use roster files, you must set up roster files on the same shared folder(PowerCom menu -> Roster/Team -> Roster path). You must establish a File Sharing network between your two computers, and ensure that the File Sharing folder on the back-up computer has write, read permission for primary computer’s login account. And this folder has the same ppt files (and same file name too) as the primary computer. If there is roster file configuration in primary computer, You must set the roster file in back-up computer. Run ppt file in Demo Mode on both computers simultaneously to ensure that all necessary files exist on both computers. Set up Procedure 1. Open PowerPoint, Click PowerCom menu, then System sub-menu, General Tab, check "Hot backup location". 67 Table of Contents 2. Enter the backup computer PowerCom result XML file folder location by \\computer name\folder name or by \\IP address\ folder name. Note: The voting result file should reside in the same folder as the PowerPoint file. (.PPT or .PPTX) 3. Click "Replication Test" to replicate all files including the voting result files from primary computer to backup computer. You should create result files by running slide show in demo mode or live mode. Replication Test File List:Current PowerPoint File, Poller result.xml, OLAP csv File, Current Roster File, Slide Poller Result Picture Folder and all files. PowerCom copy question slide voting result files to backup computer after voting is stopped and copy one more time after voting result is displayed. Related topics: 1. Files Created by PowerCom Setup 2. Preparing a Meeting Hardware Tab 68 System Setup and Configuration Connecting the Base Station Here you select the right Com port for the base station and make base station connections before you can connect the base station and test the keypads. It is highly recommended that you Install PowerCom before trying to connect the base station. The Base Station USB driver will be installed after complete the PowerCom installation. The very first time you connect the base station, the system will prompt you to install the USB driver. You can locate the USB driver under PowerCom folder. After installing the base station USB driver, if you go to Hardware tab, PowerCom will list all the available com ports in the Port drop down list box for you to make a selection. See "How to find the COM Port Number " for how to determine the USB com port number. PowerCom for Reply WorldWide software supports four Reply keypad types: Standard Reply, Reply WorldWide, Reply EU, and Reply EZ. With your interface(s) connected, Power on (Reply WorldWide auto power on when you connect to USB port), click the Connect button to connect the base station. After the base station is connected, PowerCom will display the product name, version number, channel number and the number of keypad used for this computer according to the keypad range setting in the test keypad screen. After the base station is connected, you can test keypad by clicking Test Keypad button. Reply keypads capacities and limitations: Standard Reply: Supports up to 8 channels, 250 keypads each channel. 69 Table of Contents Reply Worldwide: Supports up to 15 channels, 250 keypads each channel. For the Reply Worldwide keypad, you can configure Keypad settings. Please see "Reply Worldwide Keypad Settings" for detail. Reply EU: Supports up to 2 channels, 650 keypads each channel. Reply EZ Supports 1 channel only and up to 50 keypads. Note: You can connect different types of base stations to the same computer to conduct the poll. See multiple base stations for more detail. Related topics: Reply Worldwide hardware overview Standard Reply hardware overview Reply EU hardware overview Reply EZ hardware overview 70 System Setup and Configuration Operating Multiple Base Stations Starting in Version 2, PowerCom allows the connection of multiple ports. Before adding multiple base stations, make sure the drivers for the base stations are all installed. A driver for Standard Reply may not necessarily work for Reply Worldwide. In order to add a base station, go to the "Start a Base Station" option in the PowerCom menu and add a base station. In the base station adder, there will be two dropdown menus. The first menu, called Base, allows PowerCom to differentiate between the different bases. The default base is ‘A’. If you want to add multiple ports, you must choose a different base name for each base added. The second dropdown menu allows you to choose which kind of base station you are adding. Click "Find Base Station button to start the base station search. Please select the right type of base and do not use the same base alpha (A – Z). When the base station is located, Powercom will display the base station with Comm Port #, base model type, assigned base alpha, channel (for Reply WorldWide only), total keypads selected, and keypad range setting. The check box at left-most side is a base station selection indicator. In most cases, it should be checked. One exception is when you want to disconnect a base station but not all base stations, then you uncheck all other base stations except the one you want to disconnect, then click Disconnect button. The checked base station line will disappear. Make sure you check all the remaining base stations, otherwise Powercom will not use the bases not checked. The different bases must be set to different channels. You cannot have two base stations set to the same channel. PowerCom suggests plugging in and adding base stations one-by-one, which means plugging in one base station at a time into your computer and adding it using PowerCom’s base station adder. Then plugging in another base into your computer and adding that. If you want to test the base stations to make sure they are fully functional, you can check the tab (e.g. A Port: 14 CHNL:3) that contains the base station you want to test and press the `Test Keypad' button. This will bring up a new screen that will display keypad responses highlighted in green. 71 Table of Contents PowerCom recommends that you do this to make sure you have connected the ports correctly. Keypads will be listed from A001-A250 for channel A, B001-B250 for channel B, and so forth. For Reply EU, which can take up to 650 keypad responses, keypads will be listed as A001-A650, B001-B650, etc. For Reply EZ, which can take up to 50 keypad responses, keypads will be listed as A001-A050, B001-B050, etc. PowerCom allows a total of 15 channels to be used. The max number of keypads allowed therefore, is 4550. This configuration includes 13 Reply WorldWide bases (250 keypads each) and 2 Reply EU bases (650 keypads each). Related Topic: Using Multiple Com Ports Reply WorldWide keypad Reply EU keypad Test Keypad View and change Reply keypad no. and channel no. 72 System Setup and Configuration Finding the COM Port Number From DeviceManager, select "View devices by type". Then open "Ports (COM & LPT)" to find out the Com Port number. Changing the COM Port Number From DeviceManager, select "View devices by type" Æ "Ports (COM & LPT)". Select the USB serial port and click Properties. Select the "Port Settings" tab. Then click Advanced. Choose the required COM port number from the list and click OK. Notes If a modem is attached to the USB serial port when the port number is changed, it will continue to work under the new port number. If a modem had been attached to the USB serial port but was not attached when the port number was changed, it will not work when re-attached under the new port number. In this case, the modem must be removed from the system and re-installed. In general, if there are devices which have been attached previously to the USB serial port, they may not work after the port number has been changed. If this is true, remove the device from the system and re-install it. 73 Table of Contents Defining Keypad Range and Testing Keypads Test keypad screen display Base Alpha (A – Z), Com Port number and Channel (CHNL) as tab title. Click the tab to test base station. The selected tab will have broken dot line as border. Keypads Enter the range of keypad numbers that you wish to use for the polling, the default is the maximum number of keypads. This box is used to define the keypad number range and to allow the defined group to participate in voting during the slide show. It accepts a string of the following format: "1,3,610,21-29,38". Keypad numbers separated by commas are treated as individual keypads while keypads separated by a dash are interpreted as an inclusive range. Set Button Click "Set" button to save the definition of the keypad number range and allow the defined group to participate voting during the slide show. Non-responding keypad numbers will be displayed as Absent Keypads list during the slide show by right-clicking the Poller box or by pressing the A key. Test keypads Click the "Start Polling" button to start test keypad. Press the keypad number and see the visual display of number entered. Color codes in keypad list area: 74 System Setup and Configuration Clear Grid Clears the keypad voting display and color codes. _ Keypads of _ Displays the number of keypads used for this computer according to the keypad range setting on this screen. There is no need to click the "Stop Polling" button, just close the Test Keypad Window and return to System Configuration Window Keypad Tab and click OK button to save the settings. Also See Reply Worldwide Keypad Settings Connect Base Station Operating Multiple Base Stations 75 Table of Contents Setting Reply Worldwide Keypad Settings Configure Via Section: When set to Keypad, all keypad changes must be made manually using the keypad membrane. When set to Base, all keypads that are within range and powered up will be automatically reconfigured based on the following Keypad Settings. Digit Echo When checked, a key that is pressed will display the value of the key on the keypad display. For example, with digit echo on, pressing key 2 displays "2" on the keypad display. Enable Star Key When checked, the * keypad key will be enabled. By default, the * key is disabled. Low Battery Notification When checked, a low battery warning will be given when a keypad experiences low battery power. Post Acknowledgement When checked, a key that is pressed will display horizontal bars on the keypad display after the base has acknowledged receipt of the key press. This will be displayed for three seconds. Shortcut When checked, the keypad shortcuts for changing the keypad address and channel are enabled. Soft Keys 76 System Setup and Configuration When checked, the Soft Keys at the top of the keypad membrane will be responsive to user actions. The default base behavior sets these soft keys to inactive. Accept Only Initial Response When checked, only the initial keypress will be sent to the base. This property is easy to misunderstand. To clarify, if this property is enabled, a keypad user who presses 4 can press clear and change their response before the base reads the keypress value. The user cannot press 4, then press 2 before the base has read the keypress value. The 2 will be rejected by the keypad. Once the 4 has been read, the user can then press 2 and it will be accepted by the keypad. Lock KeyPads When checked, keypad manual configuration will be locked. No shortcuts will work on the keypad. This setting is intended to prevent keypad users from inadvertently or intentionally changing keypad settings. Transmit Power Normally full power is appropriate and results in the longest range of RF communication. Occasionally when interference is a problem, Experimenting with lower power levels will yield less RF interference at the expense of keypad range. Note: PowerCom defaults to Base and doesn’t allow changes to keypad. For keypad configuration see "Reply Worldwide hardware overview " or "Standard Reply hardware overview ". Combine Data Files Tab Combine and merge voting data files This feature allows you to combine or merge up to ten PowerCom result Data Files at any instance, and is typically used for "rolling up" data from multiple meetings voting result. What is the different between Combine file and merge file? Combine: Same audience using the same keypad and generating different voting result files that you like to combine into one result file. Combine file is used when multiple voting result files are generated by PowerCom that are voted by same audience that holds the same keypad for the duration of the meeting. Merge: Same set of question voted by different audience group in different meetings. You like to merge the voting result files. Merge file is used when multiple voting result files for a given set of identical question are generated by PowerCom that are voted by different group of audience that uses the same keypad address from different ARS meetings. There are three situations when you may want to combine or merge result XML files. 1. When the same audience (holding the same keypad) attending different meeting sessions does voting for different sets of questions. 77 Table of Contents 2. When the same audience attends the same meeting but creates multiple result XML files. To combine different question result XML files Use "Combine file". 3. When the same question set is used at different meetings and voted by different audiences. In this case use "Merge". You may want to add one or two meeting attributes as artificial demographic questions, such as Meeting location, meeting date etc. Situation 1 & 2: You may want to combine different question sets voted by the same audience in a meeting. Multiple ARS meeting result files for a given meeting (Instead of continue the session, but create new session accidentally) Same audience using the same keypad in a ARS meeting, accidentally create a new ARS session instead of continue the ARS session, presenter then skip those question slides have been voted to the new question slide. Assume no question has been voted twice. Situation 3: Go to System Configuration menu, "Combine data files" tab and use "Merge" function to merge same question voted by different audiences in different sessions. To Combine or Merge Data Files If you know that you will ultimately combine (or merge) the data from multiple identical presentations, it will help if you give each presentation a meaningful name such as: Focus01, Focus02, Focus03 and so on. Select the "Combine Data Files " tab from PowerCom's System menu. Name the source files in each of the boxes provided or use the Browse button to locate them. You must also specify a destination file which will be assigned a filename extension of *.xml Once the files have been specified, click on 'Combine' or "Merge". PowerCom will then join the files. If you need to combine or merge more than 10 files, combine or merge the first 10. Then, combine or merge the next 10 (or fewer) naming the same destination file as the first. The second group of files will be added to the destination. Note: When different question sets voted by different audiences where the same keypad used in different meeting is used by different audiences. In this case you should NOT use combine or merge file features. 78 Roster and Team Roster Roster Overview Roster is an optional feature in PowerCom. Roster is useful in educational and training institutions for teachers and trainers to identify the holder of the keypads by meaningful names instead of keypad numbers. Roster files establish the link between the participants and their keypad numbers. For example, presenters can use roster to track each participant’s class position, percentage correct, and points scored. However, PowerCom is not capable of systematically determining and validating the match between keypad numbers and participants’ information including names and contacts because login is not required for most of the wireless keypads in the current market. (see Notes) Therefore, PowerCom can not validate the keypad numbers and their holder by login authentication. Teachers and meeting organizers need to develop a procedure to make sure the accuracy of the participant names on the roster list match their keypad numbers. Anonymity is the key ARS feature by default. Roster changes the nature of ARS anonymity by providing the association between the keypad with the participant who is holding the keypad with personal indicative data such as name, ID, and contacts. When the teacher is capable of identifying keypad number by student ID or name, then the teacher can then use the student ID or name with class position and publish more meaningful information in the reports than with just the keypad number. PowerCom uses Roster Template file (PRT file type) and Roster List file (PRL file type) to store Roster data and Select and Deselect functions to associate Roster data with a PowerPoint file. Set up Roster Template file and Roster List file and associate a Roster List file with the PowerPoint file you are using to enable the roster feature. If you decide not to use roster feature after the roster files are set up, simply deselect the roster list file from your PowerPoint file to keep the participants’ identities anonymous. Note: ReplyIQ provides login feature. 79 Table of Contents Purpose of using a Roster 1. Take attendance in PowerCom. 2. Identifying the keypad user by more than just a keypad number. Examples of useful roster applications: 1. Fastest Finger: Identifying the person who has the 1st correct answer to a question. 2. Class position rankings: The highest point earned at any point during the session. The highest point earned at the end of the session. 3. Identifying keypad user by name instead of keypad number in the reports. 80 Roster and Team Getting started with Roster Setup When deciding which fields should be populated in the Roster Template, the following questions should be asked: 1. What kind of information would you like to associate with the person holding the keypad? 2. How would you like to announce the participants? i.e. nickname, first name, first and last name, ID#. List all the possible information you would like to use. Assign a brief field name to each piece of information. Then add some additional fields like student ID, telephone #, and email address. Each piece of information becomes a field, collected in the Roster Template. Publish the Roster Template to create Roster fields and then populate the Roster List to create the Roster data that matches the keypad numbers. 3. Do you want to export the polling result data to an external system/file? i.e. a course management system such as WebCT or BlackBoard If the answer is yes, please check the external system you want to interface with. Does it have a standard import template? What are the minimum mandatory fields you have to populate? What is/are the unique key field(s)? Do your homework before you start setting up the Roster. 81 Table of Contents Roster Setup Procedure 1. Go to the PowerCom menu and click submenu Roster/Team to open. 2. Publish a roster template by creating or editing a roster template in the Roster Template tab screen. The Roster Template defines the roster field layout. 3. Select a roster list for the PowerPoint slide you are currently using after creating and/or editing a roster list file in the Roster List Tab screen. Publish the roster data and link the roster data with the PowerPoint slide. 4. After completing the roster setup, you can now use the roster feature of PowerCom. 5. You can de-select the Roster List file to disable the roster feature. 82 Roster and Team Assigning Points When using Roster and Team, you should assign points to each question slide for the answer choices in Step 2 of the Poller Wizard "Customer label and correct answer". You don’t have to check the correct answer for the choice to assign points and you can assign points to none, one, more or all choices. PowerCom accepts points for each answer choice from 0 to 999 as whole number; no fractional points allowed. 83 Table of Contents Creating and Maintaining a Roster Template Choose the relevant Roster List and add or delete data accordingly. Open the Roster/Team menu under the PowerCom main menu, and then click the Roster List Tab. You can Add, Edit, Copy, Delete, and Select/De-Select a Roster List. The Roster List screen is used to store the Roster data and associate the Roster List with the PowerPoint slide you are currently using. To populate Roster List data, you can either enter the Roster List data line by line or perform an import from an Excel file. You also can export the Roster List to an Excel file by clicking ‘Export to Excel’ button. Use Add or Edit to perform the Roster List data entry. There are 3 steps required to complete the creation of a Roster Template: 1. Define Roster Template fields 2. Create team names (optional) 3. Save the Roster Template by giving it a name. PowerCom will assign PRT as the filetype. 1. Define Roster Template fields a. Click the available fields pre-defined by PowerCom and then click the right arrow to select fields. Click the double arrow (no need to select any field) to select all available fields. b. Click the up or down arrows to arrange the sequence of the fields. c. Use the "green + " to create a new field name that doesn’t exists in the current available fields pre-defined by PowerCom. d. Use Red X check icon to remove the field. 2. Create Team names a. Enter a team name and click "green + " to publish a team name. b. Use Red X check icon to remove a team name. 3. Save the Roster Template by giving it a name. PowerCom will assign PRT as the filetype. Note: If you create a Roster List file based on a Roster Template, and then alter the Roster Template field layout, it has no impact to the Roster List file that has been created previously. In other words, altering Roster Template has no retrospective effect. 84 Roster and Team Copying Roster Template Click "Copy" to copy a selected (checked) Roster Template to a new filename. Copy function is similar to "Save As" of a file by a different filename. It preserves the original Roster List file contents and modifies the new Save-As file instead of overriding an existing template. For example, a math teacher may want to save an existing Math I class roster and copy over the Math I roster to a Math II class roster and then edit the roster list, because the majority of Math II class students has taken Math I class. 85 Table of Contents Deleting Roster Template Click Delete button to remove a Roster Template file. Alternatively, you can delete roster files from Windows file system via Windows Explorer. Note: You can delete a Roster Template file that has been associated with a Roster List. The only impact is that you cannot use this deleted roster template anymore. Delete Roster Template has no retrospective effect on Roster List. 86 Roster and Team Exporting Roster Template Click Export button to export a Roster Template to an Excel book to view the field listing and to perform data entry outside of PowerCom Roster List data entry. 87 Table of Contents Populating and Maintaining Roster List Files Open Roster/Team menu under PowerCom main menu, then click Roster List Tab. You can Add, Edit, Copy, Delete, and Select/De-Select a Roster List. The Roster List screen is used to store the Roster data and associate the Roster List with the PowerPoint slide you currently have open. To populate Roster List data, you can either enter the Roster List data line-by-line or import from an Excel file. You also can export the Roster List to an Excel file by clicking ‘Export to Excel’ button. Use Add or Edit to perform the Roster List data entry. 88 Roster and Team Creating a Roster List Click Add button, PowerCom will prompt you a list of existing Roster Templates (PRT file created at Roster Template Tab) for you to select as the Roster Template. Click the Roster Template file desired to populate the roster data and then click OK. At end of the data entry, PowerCom will prompt for you to enter a Roster List filename. The rest of the adding roster list procedures are the same as Editing a Roster List. 89 Table of Contents Editing a Roster List Select a Roster List by checking the Roster List and then click ‘Edit’. The Roster List data entry screen allows you to enter new roster list data row by row from the top 1st row. Press Enter when you complete the data entry for the row. If you want to delete a row, highlight the existing row and click ‘Delete’. Click ‘Save’ to save the Roster File after editing. Click ‘Save As’ to save the roster list under a new filename. Use the ‘Import Excel’ button to import Roster List from an Excel file. If there is existing data in the Roster List file, PowerCom will append the data to the end of the file. Use the ‘Export Excel’ button to export Roster List data to Excel. 90 Roster and Team Assigning a Roster File to a PowerPoint Slide Choose the PowerPoint presentation that you are going to use. Select the relevant Roster List; and run your presentation. Select a Roster List by checking a Roster List then click ‘Select’. PowerCom will publish the Roster List name with the path of the current Roster File list. You can optionally change the name and path of the file by typing the path and filename. However, this is not recommended. De-select the Roster List file to disable the roster feature. 91 Table of Contents Managing the Roster File 1. Naming convention to closely associate Roster List name to their respective Roster Template name is important. Please name by using the Roster List file with Roster template name as a prefix. For example, name a math class Roster Template "math.PRT" and name the 2006 Fall Semester roster list as "math2006Fall.PRL" and the Spring Semester roster list as "math2007Spring.PRL" 2. Try to enter a brief and short name for the field name or use abbreviations. 3. It is a good practice to store the Roster Files at a single place under a folder designated for storing roster and team related files. A good place to store roster files is "…\My Documents\PowerCom\Roster". Do not store in the same folder as your PowerPoint files. 4. You can perform some Windows system functions such as ‘Delete’ file, ‘Rename’ file, ‘Save as’ file for Roster Template file and Roster List file. However, you must use the PRT and PRL filetypes. 5. Both PRT and PRL files are XML files. In case you can not open these files from PowerCom, you can use any XML editor to examine the contents of the files. Team Team Overview During setup of the roster template, you can add team name list to the template. You can assign each participant to a team when you populate the roster list. Purpose of Team 1. Fun 2. Group Competition 92 Roster and Team Team Setup Procedure 1. Enter the team name at Roster Template Maintenance screen 2. Assign a team to each participant by checking the checkbox under the team you want to assign at Roster List maintenance screen. 3. You can use team feature after selecting the roster list for the PowerPoint file you are currently using. Tips: To populate the team checkbox, click the team checkbox of the first row, then use space bar to set the check box on or off, then use down/up arrow key to move to next row. Team Maintenance: To add, delete, and change team structure 1. Edit the Roster Template 2. Go to Roster List Maintenance, export data to Excel 3. Create a New Roster List. 4. Import the step 2 data. 5. Change the team assignment by un/checking the team checkboxes. 93 Table of Contents Create team by question slide during slide show This feature enables the presenter to assign each audience to a team during the presentation. The major advantage of this feature is that it avoids manually entering team assignment by roster. The best practice is to vote the team question slide before voting other question slides. This will help you can obtain the team related display for the question using Winners screen. However, even if you vote the team question slide after other normal question that cannot display team score at that moment. You still can display Winners team scoring after voting the team assignment slide and going back to the previously voted slide. When should we use this feature? 1. When the team member is not pre-arranged. 2. When the audience will be grouped in teams by a demographic slide at the beginning of the presentation. For example, Team by gender, by age group, by geography location which can be easily obtained by a demographic question slide. 3. You are not sure at all regarding who will not attend the meeting so you have no time to maintain the team assignment in roster file. Good question slide candidates for team assignment are: Gender, age, region. How it works? Depending on whether you have assigned a roster file for this presentation or not, PowerCom will handle the team assignment differently. I. When there is a roster file associated with the presentation: PowerCom will append new columns at the end of the Roster file and place an indicator for the team participant vote on. II. When there is no roster file associated with the presentation: PowerCom will create a new roster file with standard column settings and populate First name as Base ID (A, B, C. etc.); last name as keypad address (001 to 250) and also populate new columns for team listing and place an indicator for the team participant vote on. The roster file name is constructed as a combination of PowerPoint file name plus the team name. PowerCom will automatically back up roster file, if the file name already exists. How to assign Team by question slide? 1. When inserting a Poller, in the Polling Wizard step 2 select Assign Team by checking the "Assign Team" box. 94 Roster and Team 2. Or open the Bar Labels Custom Labels option to check the "Assign Team" check box. 95 Table of Contents Tip: The customer label answer choices should be meaningful names, do not use 1, 2, 3 or blanks. Blank label will be rejected. Note: There can be only one question slide that can be assigned as a team. If you assign a second team in the same PowerPoint file, PowerCom will automatically remove the first team assignment slide. Quickstart Roster and Team Quickstart Roster and Team The Roster File capability allows you to assign keypads to named individuals. It is a useful feature in training and education as it allows responses to be traced by name rather than by keypad and base station number assuming keypad numbers and names are correctly allocated. Teachers and meeting organizers need to develop a procedure to ensure high corresponding accuracy between the participant names on the roster list and their keypad numbers. In common with other parts of PowerCom; the roster file is an XML based routine and can be viewed directly in an XML reader. There are two parts to the Roster feature. The first part is the Roster Template File (.PRT) which is used to prepare and format the roster file before it is populated by the participants. 96 Roster and Team The roster list file (.PRL) is the file populated by the names of the participants, and this is the file that is linked to the presentations. There are 3 steps in using the Roster File. Step 1. Prepare the Roster Template to your own specifications. Step 2. Populate the Roster File and give it a name Step 3. Use the Roster File with an interactive PowerPoint presentation. 97 Table of Contents Step 1: Setting Up a New Roster Template and Create a Team 1. Click submenu Roster/Team to open the following: 2. Click on ‘Add’ to form a new template: 3. Choose the fields that you want to go into the Roster Template and click the insert arrow >, or choose all of them by clicking >>. Remove fields by clicking < or <<. 4. To add an additional field of your own, type the name of the field into the field by the side of the green cross under "Select Fields" and click > or click the green cross at the side of the field. 5. If using the Team function then type in the team name and click the cross at the side of the field. Hint: To help in populating the Team field, click one of the team names. 6. Give the file a name and save. The file will be saved to the Roster subfolder that is situated in ..\My Documents\PowerCom. Ensure that you give the Roster Template a relevant name. 98 Roster and Team Step 2: Populating the Roster File 1. Go to Roster List and click on Add; this will open a list of the Roster Templates. Choose the Roster Template that is required. 2. Enter the relevant data for the Roster List by pressing the Enter button after the details of each participant entered. Hint: Enter 1 line of text for the first participant remembering to press the Enter once the first line of data is in. Export the file to Excel and a spreadsheet file will be formed. You can enter the data into all the participant data into the spreadsheet file and then save the file. The advantage of doing this is that the correct headers will be on the spreadsheet. You could also transfer data directly from a database into the spreadsheet making the process simpler. Warning: ensure that you have no duplicates in the Roster List after importing the spreadsheet. 99 Table of Contents Step 3: Using the Roster File with a PowerPoint Presentation Select a Roster List for the PowerPoint slide you are currently using after creating and/or editing a roster list file in the Roster List Tab screen. The Roster List screen publishes the roster data and links the roster data with the PowerPoint slide. After completing the roster setup, the roster / team feature of PowerCom may be used. Roster and Team Reports Reports Related to Roster & Team 10 Team Comparison (Excel) 11 Team Comparison with graphs (Excel) 12 Individual Scoring Summary (Excel) 13 Class Report Summary (Excel) 14 Class Report Detailed (Excel) 15 Fastest finger (Excel) 100 Inserting PowerCom Poller on Slide Overview Suggested Method: The suggested method to having poller objects in your presentation is to maintain a separate presentation file for questions slides only. This practice boosts PowerPoint performance during the slideshow, resulting in better coordination for presentation projects. The main purpose is to maintain a smaller PowerPoint file that uses PowerCom poller objects. The disadvantage of this practice is presentation navigation. The presenter has to switch between two different PowerPoint slideshows with one being the main presentation show and the other being the questions slideshow. By using the Windows command—“Alt + Tab”, the presenter should be able to navigate between the two slideshows fairly easily. Working with PowerCom question slides: There are only two things you should be aware of when you are working with PowerCom question slides: Insert a Poller and Maintain an Existing Poller Object Property. 101 Table of Contents Inserting a PowerCom Poller You should first create your question in PowerPoint using standard conventions except that when listing the choices for your question, you must label each choice with either a number or a letter. Rapid question creation rule: In a question slide, you should have only two text objects: a title text for question and a text for answer choices. If you follow this rule, PowerCom will automatically capture the number of answer choices to the question and text of all the answer choices. Notes: 1. No animation is allowed for question slides. Save them for the main presentation slideshow. With animation in questions, PowerCom Polling will not work. 2. The Reply system allows up to 10 choices when using numbers (1 through 9, and 0 for 10) and up to 5 choices when using letters (A through E). For example your PowerPoint slide could look like: From the PowerCom menu or toolbar, select "Insert Poller”. This will launch the 4 step Polling Wizard. in the PowerCom toolbar "PowerCom Alternatively, you can click the "Insert Poller" button Bar". It will show a Poller wizard that will allow you to insert a PowerCom Poller in the slide. PowerCom Poller The PowerCom Poller Wizard 102 Inserting PowerCom Poller on Slide From the PowerCom menu or toolbar, select "Insert Poller ”. This will launch the 4 step Polling Wizard. Please click the Next button when you complete the entering of data at each step, and at the last step, click “Finish”. PowerCom will then insert a Poller object on the PowerPoint slide. Step 1: Choices and Labels - On the Choices and Labels screen, enter the total number of choices for the current question. (For the above example you would enter 6). Normally, if you follow the question slide creation rule, PowerCom will detect the presence of 6 choices and correspondingly insert 6 for you. - Please enter one or two words to describe the question. The word(s) entered will become the column heading or label title for data analysis and reporting purposes. We recommend you keep the description as short as possible and perhaps to use short one-word synonyms to describe the question. The maximum length for the column heading / label is 30 characters. Naming rules is as follows: 1. The first character must be one of the following: • A letter as defined by the Unicode Standard 2.0. The Unicode definition of letters includes Latin characters from a through z and from A through Z, in addition to letter characters from other languages. • The underscore (_), "at" sign (@), or number sign (#). 2. Subsequent characters can be: • Letters as defined in the Unicode Standard 2.0. • Decimal numbers from either Basic Latin or other national scripts. • The @, $, #, or _ signs. 3. Embedded spaces or special characters are not allowed. 103 Table of Contents Tips: You can navigate your mouse out of the Poller Wizard and click and hold the right mouse on the question word(s) on the slide to highlight the word(s) then copy (right mouse or Ctrl + C) the word(s) to paste (Ctrl + V) to Wizard. 2. Check "Demographic question" box if this question is a demographic question. By identifying this question as a demographic question, you can perform data analysis on a later question, based on the demographic questions. All demographic questions should be placed near the beginning as the first group of questions. 3. "Start polling right after slide shown" - PowerCom defaults this setting to ON. The audience can start voting right after the slide shown. We recommend you do not change this setting, since this is the most common practice. It is highly recommended not to put anything other than question and answer choices on a slide with a poller object to avoid cramming the slide. 4. "Do not display result graphic for this slide" - You can use this option to skip the results graph display. For example, for questions like "Please rate today’s presentation." 5. You then need to specify whether you want you use the Numerical (1-10) (the default setting) or Alphabetical (A-E) buttons on the keypad. Step 2: Custom Labels and Correct Answer Here, you can specify custom bar labels. The default setting is either the numbers or letters you specified in Step 1. Tips: 104 Inserting PowerCom Poller on Slide You can navigate your mouse out of the Poller Wizard and click and hold the right mouse on the answer choice word(s) on the slide to high light the word(s) then copy (right mouse or Ctrl + C) the word(s) to paste (Ctrl + V) to Wizard. You also have the option of specifying a correct answer (or best answer). You can select one or more correct answer. You can assign point(s) to any answer choice regardless if it is correct or not. You even can assign negative point(s) as point deduction of wrong answer. PowerCom Winners screen will track scoring if you enter points for the answer choices, it will flash any bars that you have checked as being correct. There is also an option to specify that the majority vote will be considered the correct answer. Step 3: Graph Type and Format Here you can set the Graph Type, whether to have percent labels or not, and the font style and size. Try using one of the horizontal graph types. This will give you more room for the labels. This screen contains three tabs: "General”, "Bar Colors", and “Background” General tab: PowerCom provides 6 chart types: 3D Vertical Bar 2D Vertical Bar 3D Horizontal Bar 2D Horizontal Bar 105 Table of Contents Vertical Cylinder Horizontal Cylinder The best choice for horizontal display is Horizontal Cylinder which has a gradient effect. The best choice for vertical display is Vertical Cylinder which has a gradient effect. Click the 1st graph type and scroll down to decide the best graph type for your polling results display. For the results graph, you can choose either Show Percent or Show Number or both. You can shadow the text by checking the "Text Shadow" checkbox. You can change the shadow color by clicking the color box. You can change the background color by checking the checkbox and clicking the colorbox. For transparency, uncheck the box. Check "Show Mean" to display the average (approximating the statistical norm). Click ‘Font’ to set your font. Bar Colors tab: You can customize the color for results graph bar 1 to 10 by clicking the color box next to the bar #. Choose your graph type and click "Save as default". The font and graph style default will apply to all your new graph displays from now on. However, you always can override the type and format later on or save a new default. Step 4: Polling Music and Timer Music 106 Inserting PowerCom Poller on Slide If you would like PowerCom to play Music while people are voting, browse for and select a music file here. The type of music files that you can play is totally dependent upon the version of Windows Media Player that you have installed. If you would like to use this music file for all of your voting music, click the 'Save as Default' button. If you would like to use formats such mp3s or streaming audio files, and they do not play when you test them, you should get the latest Media Player from www.microsoft.com. When you check the “Play Music While Polling” and select a music file, the music will start when polling starts. However, if the presenter may want to explain the question when the question slide is presented and if you would not want to disturb the presenter’s comments, you can un-check the “Play Music While Polling” box. This setting allows you to control music playback with shortcut key “M” to start playback and “M” again to mute the music. Timer Clock Countdown Using a countdown clock Check this box to turn on Timer Clock option Time on clock Set Timer clock countdown in seconds (from 1 to 999). Zero seconds means no timer clock. at left bottom screen When you enter a non-zero time, PowerCom will insert a clock icon by default. You can move the Timer Clock to your preferred location by dragging the icon to that location. You can change the Clock and Font size just as if you are changing a PowerPoint object. Start automatically when slide is presented Select this Check Box means that you want to start the Timer Clock countdown immediately after a slide is shown. It is best used for a time-limit test question. During the slideshow, the presenter may use shortcut key “T” to start and stop the Timer Clock countdown. Tip: Checking the “Start Count Down right after slide shown” and setting 0 seconds as Timer Clock would have no timer effect. Notes: Poller Wizard Step 4 is optional. You can save the Music and Timer clock as default and all the pollers you create will have the same effects regardless of whether you click Step 4 or not. Once Finished Once you have finished with the wizard, PowerCom will place an example graph on your slide. You can move or resize the graph to arrange the results graph display in the slide. During the presentation and voting, the graph will pop-up as a transparent graph and will be located in the same position and size as the example graph on the slide. 107 Table of Contents For a long list of answer choices (more than 3), we recommend you use horizontal graph type such as Horizontal Cylinder, 3D Horizontal Bar, or 2D Horizontal Bar. You can line up the results graph next to the answer list. Run slideshow in demo mode to position the best fit. For short list answer, we recommend you use vertical graph types such as Vertical Cylinder, 3D Vertical Bar, or 2D Vertical Bar. We recommend you place the result graph box at bottom right corner. Now you can create your next slide and repeat the process as needed. Important Notes: 108 • You can use the PowerCom toolbar to change the Poller properties. • If your question has identical choices, you can copy and paste the Poller in another slide rather than run the Wizard each time. However, please remember to change the question label to avoid duplicated label error. • You can either right-click the small box located on the lower-right-hand side of the slideshow screen, or use hot keys to play Music (M), start / stop Timer clock (T), stop polls (S), continue polling (C), clear data (R), display data (D), and show absent clickers (A). Inserting PowerCom Poller on Slide Maintaining Poller Properties To modify the Poller property, you can either delete and recreate the poller or right-click the Poller to modify the Poller properties. There are three ways to modify the poller properties: a. Click "Poller". The Poller toolbar will show up. You can modify the poller property attributes via tool bar. b. Right-click the Poller and click DSIGraphic Control Object, then click Properties. c. Right-click the Poller, then click Properties. a. Poller property tool bar: Icon descriptions from left to right: 1. Question title (Poller wizard step 1) 2. Graph type dropdown selection (Poller wizard step 3) 3. Show percent and/or number of votes (Poller wizard step 3) 4. Update and synchronize the answer choices and bar labels contents by clicking this icon. 5. Music dropdown (Poller wizard step 4) Click “Play music while polling” to select / un-select this setting. Click “Open File” to select music file. 6. Bar Labels (Poller wizard step 1 and 2) 7. Timer Clock dropdown (Poller wizard step 4) Click the “Start Countdown right after slide shown” to select / un-select this setting. Click Timer Clock to set the timer clock in seconds. 8. Roster and Team 9. Launch Poller Wizard. 10. PowerCom Online Help b. DSIGraphic Control Object Properties This poller property dialog box displays the completed Poller attributes by 4 category tabs. c. Native Poller Properties Right-click a Poller and click Properties to display all attributes of the poller property. 109 Table of Contents You can alter the value of the poller property attributes. However, we recommend you do not change the values here except the attributes with drop down selection, such as background color (BackColor), Bar Color (BarColor1 to BarColor10). Related topics: PowerCom Poller Wizard Poller property attributes Available Polling Functions at each polling stage Presentation Functions At A Glance 110 Timer Countdown Clock Timer Countdown Clock Overview A can be planted into a slide to control the timing, speed, and overall flow of the presentation. The timer can be made so that: 1) The timer starts when the polling slide opens. 2) The timer starts when the presenter presses ‘T’. The timer can be set starting from 1 second to 999 seconds (16 minutes, 39 seconds). Setting the timer to 0 seconds will disable the timer. Timers are suggested to be more than 10 seconds long to ensure that votes have been recognized by the receiving device. A manual start of the timer by the presenter is suggested. Related topics: 111 Table of Contents Purpose of Timer Countdown Clock The overall purpose for having a is so that you can control the timing of your presentation so that the presentation does not run over time. The timer can also be used to prompt voters who have not voted yet to vote. For example, if a poll is taking too long, the presenter can start a 10 second timer to tell people to finish voting so that he can continue with the presentation. 112 Timer Countdown Clock Designing the Timer The can be added in the fourth step of the Insert . If you choose to use a timer that starts automatically when the slide opens, make sure that it allows enough time for explanation of the question and answer choices. appears, you can drag it around or change its size to whatever you Once the timer icon prefer. Do not however, delete the icon. If you do, the presentation may not run correctly. If you want to delete the timer, first use the PowerCom and uncheck the "Use a " and then delete the timer icon . Tip: 1. Do not place the icon over text. 2. Try to place icons consistently in the same place. 3. Make sure not to place the icon in the bottom right corner. It will cover the box display during the slideshow. 113 Table of Contents Timer Operation Procedure When to start timer 1. Timer automatically starts when the slide opens 2. Start the after the presenter explains the question and answer choices. 3. Start the timer when the presenter wants to move along. If the timer does not start automatically when the polling slide opens, then press ‘T’ to start the timer. Pausing the Timer If the voters need more time to vote, you can pause the timer by pressing ‘T’. Voters can still vote when the timer is paused. To resume the countdown, press ‘T’ again. Stopping the Timer If enough people have voted and the timer has not yet run out, you can stop the timer and end voting by pressing ‘S’ or spacebar. Timers do not have to be used during the slideshow. If enough people have voted, you can press ‘S’ or spacebar and end voting without using a timer even if you have put a timer on the page. Resetting the Timer after Voting Has Stopped To restart a timer after voting has stopped without resetting the votes, press ‘C’ to continue voting. If the timer does not appear, press ‘T’. The time on the timer will be the same as what you have set it to be. Related Topics: 114 Custom Animation Animation Overview PowerPoint animation is one of the most complex PowerPoint functions. PowerPoint animation adds special visual or sound effects to a text or an object. According to the Microsoft Office document, the main objectives of PowerPoint animation are: 1. Captivate audiences’ attention 2. Focus on important points RhGlossDef_Points 3. Control the flow of information 4. Add interest to your presentation For a non-question slide, you can apply an animation with any effect without affecting the PowerCom polling. However, when you are entering a question slide, you should consider that the fewer animations there are, the better and safer the polling. First of all, a question slide should be as simple as possible. Excess animation will only confuse and distract the audience during the polling. We strongly recommend that you do not use animations on a question slide unless it is necessary. Another reason not to use excess animation is, during the slide show, we use SpaceBar to control the flow of information. If you apply animations on answer choices using “on click” as the animation start option, then you have to be careful not to press spacebar after all answer choices are displayed. Otherwise, the polling will be stopped and may be accidentally display the result before the audience has the time and opportunity to vote. 115 Table of Contents Applying Custom Animations to a Question Slide Applying a custom animation to a question slide Let’s examine the PowerPoint animation mechanism and the impact of the PowerCom polling procedure. You can apply animations to all slides using the slide-master or by editing the slide template (in case of a multiple slide-master in a slide file). Animation scheme and animation timing sequence are two of the most important slide animation tools available to PowerCom question slide design and operation. I. Preset and Custom Animation A preset animation scheme ties together several types of animation effects that complement each other. Instead of applying each individual effect, you may just apply one whole scheme. The general types of effects used, in different variations, are: 1. Transitions: The slide is revealed using an effect like a wipe or a checkerboard pattern. 2. Entrances: The text or object enters the slideshow presentation with an effect, such as text fading in or flying in. 3. Emphasis or Dimming: Adds an effect to text or an object that is on the slide. Emphasis calls attention to a bullet point by making the text stand out; dimming de-emphasizes a bullet point once you've moved on. 4. Exits: Adds an effect for when text or an object leaves the slide, such as a fly out, fade out, bounce out, and the like. 5. Motion Path: Adds an effect that makes an object move in a specified pattern, which traces a pattern for an object to follow. ‘Ellipse’ and ‘Neutron’ are two schemes that use motion paths. II. Timing Animation Sequences in PowerPoint There are 3 “Start Setting” choices for the timing of the animation event in relation to the other events on the slide. The three Start Settings are: 1. Start on Click: Animation event begins on a mouse click on the slide. 2. Start with Previous: Animation sequence begins at the same time as the previous item in the list (that is, one click executes 2 animation effects). When using this setting, all text or objects appear at the same time. 3. Start after Previous: Animation sequence begins immediately after the previous item in the list has finished playing (that is, no additional click is required to make the next sequence start). When using this setting, all text or objects appear one after the other. Keep the number of your text or objects at a minimum when you create a question slide. Try to avoid applying more than one set of animations on the text or object. When you design a question slide, you should focus on custom animation effects of the Entrance. The Exit and Emphasis effects may be less applicable to the question slide. Apply motion paths only when you truly need this effect. 116 Custom Animation Animation timing sequence is the most important issue when you design a question slide. We recommend avoiding the use of the ‘Start on click’ function unless you need to pause in between displaying answer choices. Use ‘Start with previous’ or ‘Start after previous’ to allow the text or object to appear at the same time (with previous) or one after the other (after previous). 117 Table of Contents Good Animation Effect Schemes PowerPoint provides many animation effect schemes, the following schemes are considered good animation schemes for the question slide applications. 1. Entrance effect: A. Basic scheme: Wheel Diamond Plus Wedge Random Effects Fly In B. Subtle scheme: Faded Swivel (great animation scheme) Expand C. Moderate scheme: Grow &Turn Color Typewriter Unfold Ascend D. Exciting scheme: Pinwheel Flip (great animation scheme) Whip Swish (great animation scheme) 2. Emphasis Basic Change Font Change Font Color Change Font Style Change Font Size Subtle Color Ware Vertical Highlight Bold Flash Brash On Underline Moderate Shimmer Teeter Exciting Bold Reveal Style Emphasis 118 Custom Animation Ware 3. Exit Basic Wheel Diamond Plus Wedge Random Effects Subtle Faded Swivel Moderate Grow &Turn Color Typewriter Unfold Exciting Pinwheel Flip Whip Swish 4. Motion Paths Basic Equal Triangle Crescent Moon Lines & Curves Wave Zigzag Special Curvy Star Neutron Please download the “PowerCom Custom Animation Samples for Question Slides PPT ” and run the slideshow to experience the animation effects of good schemes. The scheme selection is based on PowerPoint 2003. Please be careful to control the flow of the slideshow presentation when you enter the question slide with animation effects during the slideshow. We strongly recommend using the default setting of “Start polling automatically when slide is presented”. This setting allows the audience to start voting without any action on your part (SpaceBar). We also recommend you use the “Start with previous” or “Start after previous” 119 Table of Contents Start Settings. These two settings allow the slideshow presentation text or object to automatically appear without your intervention. When you need to control the flow and appearance of each individual text or object then you may use the “Start on click” setting, for example: if you need to explain or illustrate each answer choice after the text or object is presented. In this case, you should keep in mind how many clicks will reach the end of the last item because after the last item is displayed, the next click will stop the polling. If you want to break the “Start on click” animation effect before completing all the animation items, first use the PowerCom shortcut key "S" to stop the polling, then use the PowerCom shortcut key “D” (or spacebar) to display the result or ‘Page Down’ to advance to the next slide. The shortcut key “S” has no effect on ‘Start with previous’ and ‘Start after previous’. 120 The Presentation Running Your Presentation PowerCom is an ARS software as a Microsoft PowerPoint® add-in. There is only one way to deliver your presentation with PowerPoint®—presentation with a live speaker. You can run PowerCom slideshow in either or real mode. simulates 250 keypads without a connection to . Real mode requires a connection. During the slideshow, you use on the keyboard to advance the slideshow. Start polling automatically when the slide is presented (this is the system default setting). Audiences can vote when the question slide appears. You can optionally play and/or display a during the polling. When the timer expires PowerCom will automatically stop the polling. You can freeze the timer before it expires by press "". If you are not using the timer but want to stop polling, you can press Spacebar to stop polling. You can continue polling by pressing shortcut key " ". If you do not want to show results, you can press "Page Down" key to advance to next slide. (You can come back later onto this slide to show results) Pressing SpaceBar after stopping the poll will display results; it is too late to continue polling. At Stop and Display stages, you can clear the polling results and by pressing shortcut key "". To deliver a real, non-demo mode ARS meeting in a large room, monitors and projectors are usually the most common way of delivering presentations. The speaker will have complete control of the presentation and will run the show manually. PowerCom is not a self-running presentation and must have a speaker to manually start and stop polling. PowerCom color codes the to show the station connection status. A green box background indicates the base is connected and the polling processing is normal. A red poller box background signals that the base is not connected and the polling processing is interrupted. Presenter should examine the base station connection and try to restart the poll. If the connection can not be re-established, you may have to re-vote by clearing the poll. and Display stage, poller box background displays yellow At Stop background which indicates the base is connected; however, the vote will not be registered. For a large meeting, it is common practice to have a technician provide onsite assistance for operating the presentation and for help with keypad polling. Tip: , and has the same effect as SpaceBar. 121 Table of Contents The Slideshow PowerCom Confirmation Screen " New session or Continue from previous session 1. Create a new session starting from the 1st slide: Run the slideshow as a brand new session. The previous session result will be saved. 2. Continue the session from current slide: Slideshow from current side, equivalent to Shift + F5. The previous session results will be saved as part of the current session results file. 3. Continue the session from previous completed slide: PowerCom will determine which slide to start from based on the following rules: a. When previous slide has and is completed, PowerCom will start from next slide. b. When previous slide has poller and polling is not completed (before Stop), PowerCom will start from this polling slide and repoll. c. When previous slide has no poller, PowerCom will start from this slide. The 1st "Create a new session start from 1st slide" treats the slideshow as a new session. If you are running the same PowerPoint file from the same folder and there is any previous created (.XML and .CSV), PowerCom will assume that you want to create a new session, and will back up the results files with a timestamp suffix. Tip: Save the PowerPoint file as a new file with location and/or date/time suffix before running the slideshow will make the results file management easier. The settings for 2nd and 3rd choice are for continuing from a previous slideshow. When you want PowerCom to continue saving the polling result on the results files, you use one of these options. Keypad List (view only) See Topic "" for detail. 122 The Presentation Demo mode Users may run the simulation polling without using and keypads. When PowerCom detects no station plugged in, PowerCom will force to and cannot reset by user. See topic: "" for details. Write to log For debugging PowerCom slideshow. See Topic "" for detail. Location of data file for this presentation This is the name of the file (including the full path) where your data will be stored. After the presentation you can view the data from the Display Polling Data tab. See Topic "" for details. Related topics: 123 Table of Contents Impromptu Questions The questions feature allows the user to insert a new question slide during the slideshow (by pressing the "I") Condition: This can not be done during voting and can only be completed in any other stage including the non-question slide. When a presenter requests an Impromptu question during the slideshow, PowerCom will display a popup window at bottom of the screen prompting the presenter to enter the following parameters: 1. Summary: Question summary description. This is a mandatory field. 2. Scale of answer choices: Yes/No, True/False, and any number of choices from 2 to 10. 3. Graph: Show percent of votes, number of votes or both. Click ‘OK’. PowerCom will then create a new slide with the question title that the presenter entered with the allowing participants to start voting. The rest of the presentation is exactly the same as a normal question slide with . PowerCom will insert this new slide after the current slide and the presenter should save the PowerPoint file after the slideshow to preserve the Impromptu question slide. Since there is no , the presenter may want to enter the answer after the slideshow. If there are default and settings, then the presenter can click T or M to start and stop and . The beauty of the Impromptu question feature is that the presenter can create a new question slide without exiting the slideshow. However, the limitations are: 1. The presenter can not type in all answer choices. 2. The presenter may not have time to type in the whole question. 3. The presenter must be quick so the lecture can be continued without delay. When to use the Impromptu question feature? A good usage of impromptu question is when the presenter wants to alter the current question slide answer choice but does not want to exit and resume slide show. 124 The Presentation Replicate a question slide during slide show as an advanced Impromptu feature. Overview There may be times when you want the audience to vote on the same question slide more than once during a slide show but do not wish to override the voting result. Impromptu allows you to create a new question slide on the fly without exiting the slide show. This is considered as an out-of-script on-demand question. However, if you already know the question and answer choice but like to have the freedom to vote the same question during the slide show anywhere you wish to display the question. For this PowerCom has "Copy Question Slide" as an advanced impromptu feature. Copy question slide procedure: 1. When you want to replicate a question slide during the slide show, Please Press "I" or Click "Impromptu" from poller box. 2. You can optionally enter a new question title in the summary field. This will override the question slide title after you select the question slide to be copied. 3. Click "Copy Question Slide" in Impromptu Windows, PowerCom will popup a menu including all question slide titles displayed as the SlideIndex (a numeric slide number) plus the Slide Title. 4. Click a question slide that you want to replicate, Copying a slide also copies the original slide's background and music options. 5. "Copy question slide" will create a new PowerPoint slide after the current slide and display this new slide immediately after you select the question slide you wish to copy. 6. If you want to modify the title of " a new question slide" please input the title in the "Summary" column! Note: Answer type, choices numbers, graph options are not applicable when you use "copy Question Slide" option. Related topic: 125 Table of Contents Question slide comparison during slide show Overview Many a times you may just want to view the outcome of votes of one slide and compare it with the votes of another slide on the same screen. You can use the "Question slide comparison" feature to let the audience see the difference and compare 2 screens simultaneously. You can select the Location, Chart and Graph without exiting the slide show. Prerequisite : 1. You must have an existing similar question slide result. 2. Compared question slide should have the same answer choices listing Tips: This feature can be used when the audience has voted on the same question more than once. Especially when you use Impromptu Copy question slide to vote more than once. Comparison during slide show procedure: 1. Let the audience cast their votes into the state display 2. Right-click Poller box>Compare List of choices for Comparative poller name will be displayed. 3. 126 - Related data can be compared. The Presentation 127 Table of Contents 4. You can modify poller property-related settings. a. "Compare with" allows you to choose the other slide for comparison b. "Location" can be set as Left - Right or Top-Bottom c. "Chart" allows the user to select one chart out of the PowerCom six charts:3D Vertical Bar, 2D Vertical Bar, 3D Horizontal Bar, 2D Horizontal Bar, Vertical Cylinder, Horizontal Cylinder. d. "Graph" allows the user to select one of the three Graph types PowerCom uses: Percent Of Votes, Number Of Votes and Show Percent & Number e. Show Mean Tips: 1. PowerCom displays the question slide comparison screen as a popup screen. The best practice is to use PowerPoint Dual monitor display feature, and display the question slide comparison screen on the monitor you prefer to display. 2. Comparison slide is a popup windows, PowerCom recommends the use of Dual Monitor display with presenter’s view. In this way you can decide where to display the comparison first. 128 The Presentation PowerCom Shortcut Keys During a Slideshow You can use the following shortcut keys while running your slide show presentation in fullscreen mode. (: A function key or key combination, such as F5 or CTRL+A that you can use to carry out a menu command. In contrast, an access key is a key combination, such as ALT+F, that moves the focus to a menu, command, or control.) PowerCom is adopting PowerPoint shortcut keys for slides that have no . Exception notes are written under each shortcut key. N, ENTER, PAGE DOWN, RIGHT ARROW, DOWN ARROW, or the SPACEBAR Perform the next or advance to the next slide Note: Question slide containing the question cannot use animations. P, PAGE UP, LEFT ARROW, UP ARROW, or BACKSPACE Perform the previous animation or return to the previous slide Note: Question slide with question cannot use animation feature. number+ENTER Go to slide number B or PERIOD Display a black screen, or return to the slideshow from a black screen W or COMMA Display a white screen, or return to the slideshow from a white screen S or PLUS SIGN Stop or restart an automatic slideshow ESC, CTRL+BREAK, or HYPHEN End a slideshow E Erase on-screen annotations H Go to the next hidden slide 129 Table of Contents T Set new timings while rehearsing O Use original timings while rehearsing M Use mouse-click to advance while rehearsing 1+ENTER (or press both mouse buttons for 2 seconds) Return to the first slide CTRL+P Redisplay hidden pointer and/or change the pointer to a pen CTRL+A Redisplay hidden pointer and/or change the pointer to an arrow CTRL+H Hide the pointer and navigation button immediately CTRL+U Hide the pointer and navigation button in 15 seconds SHIFT+F10 (or right-click) Display the Shortcut Menu Note: PowerCom disables the right-click shortcut key TAB Go to the first or next hyperlink on a slide SHIFT+TAB Go to the last or previous hyperlink on a slide ENTER while a hyperlink is selected Perform the "mouse click" behavior of the selected hyperlink 130 The Presentation SHIFT+ENTER while a hyperlink is selected Perform the "mouse over" behavior of the selected hyperlink Tip You can press F1 during a slide show to see a list of controls. 131 Table of Contents Available Polling Functions at Each Polling Stage For the slides with objects, PowerCom disables most of the PowerPoint shortcut keys except special shortcut keys designed for PowerCom navigation. We encourage you to use SpaceBar to navigate the normal polling. A normal polling procedure: Assumptions: 1. . 2. System parameter " " is OFF. (System default, can be changed via Windows Registry Editor) Normal Procedure: Use Spacebar to navigate from one stage to next stage, and use (A, M, T, W) during the polling. 1. 2. 3. 4. When the question slide is shown, the displays "0" keypads voted. starts. Tell the participants to begin voting. Press W key to display screen. When most of the participants have voted, you can click to check who has not voted yet. . This option can be set at 5. You can optionally use " T " to start clock countdown step 4. Press T again to stop clock. Participants can still poll after you stop the clock. . When the Timer is down to 0 seconds, the polling will be stopped " 6. If you are not using Timer but you consider that time is up, you can press Stop or Spacebar. The Poller Box will display "Stop" . 7. At the Stop stage, you can press C to continue or R to clear and re-poll. 8. From here you can press Spacebar again to display the results graph or press Page Down to skip the results and advance to next slide. 9. For re-votes, press R to clear results and start the voting again. What actions can you take at each stage? 1. Polling: The Poller Box a. Show Winners screen (W) b. Check/Hide (A). c. Start / Stop music (M). 132 displays from 0 to n (n is the total keypad set in the ) The Presentation d. Start / Stop Timer Clock countdown (T). e. Stop the polling (S or SpaceBar). f. Exit slide show (Esc). Note: During the polling, you cannot go to another slide or switch to other program until polling stops. 2. Base station connection lost during polling: The visual indication is when the background color of poller box changes to red. If PowerCom displays a station lost connection warning message, click OK to close the popup windows. Immediately press shortcut key "B" to re-connect base station. The when the background color of poller box should change to green connection is re-established. You can continue polling without losing existing votes. There is no need to exit slideshow to go to Find menu. 3. Stop: " a. Show winners screen (W) b. Continue voting (C) d. Clear the Poll, prepare for . (R) System will display a confirmed message. e. Display Graph (D) or SpaceBar. f. Right-click Poller Box for all available navigation options. g. Go to next slide: SpaceBar or Page Up/Down. Note: Pressing PageUp or PageDown keys after polling skips the display of the Result graph. 4. Display: " a. Show winners screen (W). b. Clear the poll, prepare for re-vote (R). c. Right-click Poller Box for all available navigation options. d. Advance to next slide: SpaceBar or Page Up/Down. 133 Table of Contents Note: If you experience a loss in base station connection during Polling Stop or Poll Display stages, no action needs to be taken. When you advance to next question slide, PowerCom will try to connect the base station again. If you see red background in the Poller Box, then you should fellow Step 2 of "Lost Base Station connection during Polling" procedure to re-connect base. 134 The Presentation Presentation Functions at a Glance Print this page and keep it near you during your PowerCom Presentation. PowerCom shortcut keys: Function Name Available From Shortcut Next Action Screen SpaceBar Stop Polling Polling Screen SpaceBar or S Connect Polling Screen B Continue Polling Stop Screen C Display Chart Stop Screen D Clear Data & Stop or Display Screen R Show/Hide Polling Screen A Start/Stop Polling Screen M Start/Stop Polling Screen T Stop or Display Screen of non polling slide I questions Start from 1st question W with corrected answer Display Screen Alt + N Right-Click on for all available action shortcuts. To display , use Alt + 1 to Alt + 9 to switch the . (Same as click Drop down menu) Note: During the polling all short cut keys are disabled except SpaceBar and PowerCom applicable short cut keys. or result displayed" , you can use these useful After Polling Stop " PowerPoint shortcut keys during slide show for slides with Poller: Function Name Shortcut First Slide Home, 1+Enter Last Slide End End The Slide Show ESC , CTRL+BREAK, or HYPHEN Next Slide Page Down Previous Slide Page Up Next Action SpaceBar or Next Arrow or Down Arrow 135 Table of Contents Display/close a black screen B or PERIOD Display/close a white screen W or COMMA Note: A PDF format of "Presentation Functions at a Glance" is posted at PowerCom website documents section. Winners Winners Overview Winners function is used during the slideshow to display the Winners and their performance ranking. Winners screen displays top performers of individual and team winners for current slide and cumulative total. Winners screen has 4 functions: For current slide: 1. Fastest Finger 2. Team Scores For cumulative total: 3. Individual Cumulative 4. Team Cumulative By definition, you have to setup teams to enable Team winners. (function 2 & 4) Roster is not a mandatory requirement for Fastest Finger and Individual Cumulative functions. If there is no roster list for this slide, or the participant has no name associated with the participant, Winners will display base + keypad number. You can display winners screen during the slideshow by press shortcut key “W”. Press “W” again to refresh the status of Winners. Note: You can set the number of participants to be displayed at General tab of System Configuration screen. Related Topics: Roster and Team Points Office Document Report #15 136 The Presentation Fastest Finger " Fastest Finger displays the top performers of the current slide question. The current slide question should have correct answer(s). Although it’s optional, we recommend you enter points for the correct answer so PowerCom can track cumulative scoring for individual and team. PowerCom displays the quickest participants who select the correct answer(s); their ranking and participant names (if roster list is used and names are available). You can run the question slides in any sequence or re-poll any question slide. The Winners screen will always track and display the current winners. Revisiting the previous question slide and pressing shortcut key “W” will display the current winners too. Notes: 1. The Fastest Finger function only applies to those participants using the Reply WorldWide keypad; Fastest Finger is not applicable to those using Standard, EU, and EZ Reply keypads. 2. Please refresh the screen by pressing W shortcut key to update the Winners’ status. 3. PowerCom determines each participant’s last keypress as the final choice. With participants who select the correct answer multiple times, PowerCom will count the latest keypress as the final choice. Related Topics: Presentation Functions At a Glance 137 Table of Contents Team Scores " Team Scores displays the current slide’s total team points and rankings. You have to setup teams and assign participant(s) to teams and points to answer choices. Related Topics: Office Document Report #15 138 The Presentation Individual Cumulative " Individual Cumulative displays cumulative total points for top ranking individuals and their cumulative point scores. Notes: 1. Please refresh the screen by pressing “W” shortcut key to update the Winners status. 2. PowerCom determines each participant’s last keypress as the final choice. For a participant who selects the correct answer but then selects another answer, PowerCom will void the correct answer point value and replace with the new answer’s point value. Related Topics: Office Document Report #15 139 Table of Contents Team Cumulative " Team Cumulative displays cumulative total points for top ranking teams and their cumulative point scores. Related Topics: Office Document Report #15 Demographic Analysis Demographic Analysis Overview Demographic Analysis also called “Demographic Cut” or “Demographic Filter”. After displaying the voting results of a question slide, you may want to analyze the voting results data by participant profile such as gender, age group, geographic region, educational attainment, marital status. PowerCom’s Demographic analysis function slices the voting results data by demographic question. In PowerCom, you need to create at least one demographic question to enable you to perform demographic analysis. Designing demographic questions is a profiling process. A demographic profile refers to a demographic group or segment. In PowerCom, designating a participant profiling question can be done by checking the “Designate as a demographic question (allows data comparison)” in Poller wizard Step 1 140 The Presentation “Choices and Labels”. Demographic questions form demographic profiles that usually should be inserted at the beginning of presentations. After completing the demographic profiles, you can use the profiles to perform demographic analysis on any question slides including other demographic question slides. Theoretically, every question slide may be a candidate of a demographic question slide. Assigning appropriate question slides as demographic question slides is based on your own judgment. In general, you should design demographic questions with brief and simple answer choices. Demographic analysis utilizes demographic profiles to explore the voting results. Demographic Cut graphs display voting answers by participant profile to illustrate the answer percentage with a demographic question selected by presenter. Please download the sample demographic analysis demo presentation, “Demographic analysis Demo.ppt” from PowerCom Forum Files menu Samples folder (http://forum.powercomars.com/forums/files/23/default.aspx) and follow the “Demographic Cut Step by Step Illustration” to get a better grasp of demographic analysis. Related Topics: Demographic Cut Step by Step Illustration Demographic Analysis by Demographic Slide 141 Table of Contents Demographic Cut Function Step-by-Step Illustration This demo presentation contains two demographic slides and one normal question slide. The presenter first gathers demographic data from participants to form a participant profile: 1. What is your gender? Polling Result: Female: 60 Male: 190 2. What is your region? Polling Result: 1. North East: 27 2. South: 36 3. Central: 57 4. West: 55 5. Others: 75 After creating the participant profile, the presenter then uses these voting results of the demographic slides to perform a demographic analysis. If you would like to break the participant region down by gender, you can use the demographic cut function. To display the demographic cut by gender: Right-click on the Poller Box, then Æ “Demographic Question List” menu, then Æ Gender. 142 The Presentation Display results by vote counts and percentages: (see Report 16 Demographic analysis) 1. North East Count % 2. South Count 3. Central % Count % 4. West Count 5. Others % Count % 1. Female 6 11% 10 18% 8 14% 15 27% 17 30% 2. Male 22 11% 39 20% 34 18% 44 23% 55 28% Total 28 49 42 59 72 Slide 3: 143 Table of Contents If you would like to see who answered ‘Yes’ or ‘No’ by gender, you can use the demographic cut function. To display the demographic cut by Gender: Right click on the Poller Box, Æ “Demographic Question List” Æ Gender. Display results by vote counts and percentages: (see Report 16 Demographic Analysis) 1. No 1. Female 2. Male 144 2. Yes Count Percentage Count Percentage Total 9 16% 47 84% 56 51 26% 143 74% 194 The Presentation Total 60 190 250 To display a demographic cut by Region: Right-click on the Poller Box, then Æ “Demographic Question List”, Æ Region. Display results by vote counts and percentages: (see Report 16 Demographic Analysis) 1. No 2. Yes Count Percentage Count Percentage Total 7 25% 21 75% 28 10 20% 39 80% 49 8 19% 34 81% 42 4. West 13 22% 46 78% 59 5. Others 22 31% 50 69% 72 Total 60 1. North East 2. South 3. Central 190 250 145 Table of Contents Display results by vote counts and percentages: (see Report 16 Demographic Analysis) 1. Female 2. Male Count Percentage Count Percentage Total 6 21% 22 79% 28 10 20% 39 80% 49 8 19% 34 81% 42 4. West 15 25% 44 75% 59 5. Others 17 24% 55 76% Total 56 1. North East 2. South 3. Central 146 194 72 250 The Presentation Demographic Analysis by Demographic Slide You can perform demographic analysis by using previously polled demographic slides during the slideshow. You must run a demographic slide before you can perform any demographic analysis. For example, say you have voting results on a demographic slide called “Gender” with 185 male participants and 65 female participants. When you complete an opinion poll called, “Do you agree maternity leave is a Short-term disability?”, the polling result is: 198 ‘Yes’, 52 ‘No’. Using the information gathered from the previous demographic slide you can discover the correlation between gender and the opinion to the question by using demographic analysis. Another example, in which demographic cut can be used is in the correlation between age and retirement planning. The presenter would first collect the age groups data to create a demographic slide, and then ask, “How important is retirement planning to you?” After the poll is completed, the presenter will use the age group data to analyze the correlation between the importance of retirement and age. After displaying the polling results, you can perform demographic analysis according to gender by right-clicking the Poller box to display the navigation menu, Æ “Demographic Question List” Æ “Gender”. At the Demographic Analysis display, you can use shortcut keys Alt + 1 to Alt + 9 to switch Demographic questions. st For example, you can use Alt + 1 to switch to the 1 demographic question to perform st Demographic Analysis by the 1 question slide. You can use shortcut keys to switch up to 9 demographic slides without right-clicking on Poller box. After displaying the Demographic cut, press the "D"(Display) shortcut key to switch back to the polling results. Please run the Demographic Cut demo PowerPoint sample slide to see an example of the Demographic Analysis function. Reference to the Demographic Cut Step by Step Illustration for Demographic Analysis is a simplified version of OLAP with only one demographic slide allowed. The graph produced by Demographic analysis is easier to understand than OLAP and requires less space on the screen. Tips and guidelines: You can display Demographic Cut on a demographic slide. You can display Demographic Cut using only one demographic slide; no nesting a Demographic Cut. Use OLAP for nesting a Demographic Cut. You must complete Demographic Slide polling with non-zero results before using the slide as Demographic Cut. Demographic Cut results graph displays in “Horizontal Cylinder” format only. Demographic Cut results graph displays percentages only. 147 Table of Contents Demographic Cut results graph’s labels display only the first 10 characters for aesthetic purposes. You cannot change the color of the bars in the Demographic Cut graph. Demographic Cut displays the percentage of votes only; not by number of votes. You cannot move or resize the Demographic Cut results graph. Demographic Analysis Reports: Report 16 Demographic Analysis Report 17 Demographic Analysis with Charts 148 The Presentation Demographic Analysis Display: Fixed / Flexible Fonts and Sizing PowerCom provides two options to display font in Demographic Analysis: Fixed Font and Flexible Font. You can set this option at System menu’s General Tab. Flexible font will try to display all bar percentage labels to the extreme. However, a mix of many different fonts may overcrowd and confuse the demographic bar display. Fixed font will display at least one label for each bar unless the bar label is less than 5 characters. To arrange for the best sizing of the demographic display, run your slideshow in demo mode. After completing all polling simulations, exit the slideshow, right-click the Poller, and click DSIGraphic Control Object Properties to open Poller dialog box. Manipulate the values of the demographic data in the Demographic tab to experience different variations of data distributions by question slide. 149 Dual Monitor Display Dual Monitor Overview The PowerPoint Dual Monitor Display feature enables the presenter to run PowerPoint presentation from one monitor (at a podium, for example) while your audience views it on a second monitor (a projector screen). PowerPoint Dual Monitor with Presenter’s view feature offers slide design view and several tools on presenter’s monitor that greatly enhance the presenter’s slide show navigation ability. By using two monitors, you can run other programs that your audience will not see, and you can access the Presenter’s view. The Presenter view offers the following features to make it easier for you to present information: 1. You can use thumbnails to select slides out of sequence and create a customized presentation for your audience. 2. Preview text shows you what your next click will add to the screen, such as a new slide or the next bullet in a list. 3. Speaker's notes are shown in large, clear type so that you can use them as a script for your presentation. 4. You can black out the screen during your presentation and then resume where you left off. Thumbnails of slides that you can click to skip a slide or to return to a slide that you already presented. The slide that you are currently showing to the audience. The End Show button, which you can click at any time to end your presentation. 151 Table of Contents The Black-out button, which you can click to temporarily darken the audience screen and then click again to show the current slide. Up Next, which indicates the slide that your audience will see next. Buttons that you can click to move forward or backward through your presentation. The slide number (for example, Slide 7 of 12). The elapsed time, in hours and minutes, since the start of your presentation. The speaker's notes, which you can use as a script for your presentation. When you enable the PowerPoint dual monitor display with presenter’s view in the PowerCom question slide, the presenter inherits all the benefits of PowerPoint dual monitor features plus the PowerCom slideshow feature on the presenter’s monitor display. During the question slide voting stage, the audience will be able to see a vote count box similar to the poller box but will not get any right-click functionality or any Timer display. Once the voting is complete, the voting box will disappear. When the presenter decides to show the voting results, the results graphic will be displayed on the audience’s secondary monitor. Further benefits for PowerCom polling manipulation are when the presenter decides to display Absentee lists, Winners screens, Base and Keypad Settings screens. These screens will be displayed on the presenter’s monitor first. Presenter can then drag the screen to the audience’s monitor at the appropriate moment or may decide not to display them to the audience at all. When inserting a new question slide during slideshow as Impromptu, the question slide construction screen will be displayed on the presenter’s monitor but not on the audience’s monitor. When right-clicking the poller box to navigate polling, the audience will not see the poller box at all. These operations should be done behind the scenes and must not be visible to the audience. This is particularly the case when the base station gets disconnected from the PowerCom computer and you definitely don’t want to distract the audience with the red Poller box. PowerCom with Dual Monitor Display contains most of the PowerCom add-on objects/screens on the presenter’s monitor while containing the voting boxes, Timer, and results graph on the audience’s monitor: 152 Dual Monitor Display 1. Right-click Poller Box to display PowerCom slideshow navigation menu, and initiate polling actions. 2. Display Absentee List (shortcut key A). 3. Display Winners screen and see current standings of winners. 4. Create and construct an Impromptu question. 5. Observe base station connectivity status, and reconnect base station in the case of a lost connection, without disturbing the audience. 6. Voting counter box 7. Timer Alternatively, the presenter can drag the Absentee List and the Winners screen to the audience’s monitor for display. For dual monitor usage, ensure that the computer you are using for the presentation has multiple monitor capability. Most desktop computers require two video cards for multiple monitor capability, and many laptop computers have multiple monitor capabilities built-in. 153 Table of Contents Dual Monitor Hardware Check display settings to determine if your computer has dual monitor capability. Right-click your Desktop Æ Properties Æ Settings tab 1. Windows XP: a. Display property settings indicate that no dual monitor video card is installed or configured. b. Dual monitor available 154 Dual Monitor Display 2. Vista Display Settings: a. Only one monitor available: b. Dual monitor available: 155 Table of Contents Tips: 1. Dual monitor capability has become a standard built-in feature on laptops. Most of today’s modern laptops have a built-in video card. 2. Dual monitor video card usually is an add-on interface card in desktop computers and is not a standard feature. You can search the Internet for "dual monitor video card" to find a compatible video card for your desktop computer. Dual Monitor Support (aka Multiple Monitor Support) Hardware Requirement: Your computer must be equipped with a dual monitor video card. You can check if your computer has dual monitor video card by right clicking on the Desktop, selecting Properties, and clicking the Settings tab. The details of your display can be found under this tab. Please review the following PowerPoint online help topics: Turn on dual monitor support Run a presentation on two monitors About running a presentation on two monitors Set up a presentation to run on a second monitor Troubleshoot running a presentation on more than one monitor 156 Dual Monitor Display Preparing Dual Monitor Display 1. Check display settings to determine if your computer has dual monitor capability. See Dual Monitor Hardware for details 2. Turn on Dual Monitor features by right-clicking on the Desktop, Choose Properties. Click Settings tab: 3. Turn on Dual monitor by selecting the ‘Setup Show’ sub-menu in the PowerPoint Slideshow menu. In the Multiple Monitors section, select Display slideshow on: "Monitor 2". Use PowerPoint Presenter’s view by checking Show Presenter view and select Display slideshow on "Monitor 2 default Monitor". 157 Table of Contents Note: Please use Dual Monitor with Presenter View by checking "Show Presenter View" 4. In the PowerCom System Configuration screen General tab, turn on the "Add a Voting box when using Dual Monitor" 158 Dual Monitor Display 5. Taskbar Preparation. The taskbar contains the Start button and appears by default at the bottom of the desktop. You click the taskbar buttons to switch between programs. You can also hide the taskbar, move it to the sides or top of your screen, and customize it in other ways. PowerCom displays Poller Box at the bottom right corner of the screen. During the slideshow with a single monitor, the taskbar will not show up and the Poller box will be displayed at the bottom right corner. However, when you use dual monitor display, the presenter’s screen will show the taskbar and may overlap the Poller Box display. It is important to keep the Poller Box in display at all times so it is recommended that you Autohide your taskbar. Do not select "keep the taskbar on top of other windows". To prevent the overlay of the taskbar with the Poller Box (preferred), lock the taskbar at the top of your screen and "keep the taskbar on top of other windows". To move the taskbar to the top of window, simply drag the taskbar from the bottom of the screen to the top of the screen, then right-click the taskbar area and check "Lock the Taskbar". 159 Table of Contents Tip: You have to unlock the taskbar before you can move the taskbar. To change the taskbar settings, right-click the taskbar. Then click Properties 160 Dual Monitor Display Auto-hide the taskbar Check "Auto-hide the taskbar" Turn on / off "Keep the taskbar on top of other windows" Check or uncheck "Keep the taskbar on top of other windows" Note: Turning on this option will force the Windows taskbar to always be the topmost item and it may force the Poller Box to hide under this taskbar. Please set this option off when your taskbar is at bottom of the screen. To display taskbar, point to where you last saw it to show it again. If you can't remember where you last saw it, try pointing to the bottom of the screen first, and then to the side or the top of the screen, if necessary. You might need to move the pointer almost off the screen to show the taskbar. For example: if the taskbar was last seen at the bottom of the screen, move your mouse down to the bottom of the Desktop screen so the taskbar will show up again. Tip: When you are in the PowerPoint slideshow program and you want to see the taskbar from the presenter screen, click Ctrl + Esc to bring back taskbar. 161 Table of Contents Slideshow and Polling Navigation Dual Monitor with Presenter’s View Navigation Procedure 1. Start slideshow and PowerCom confirmation screen. Note: PowerPoint Dual Monitor behaves differently between PowerPoint 2007 and older Office versions (e.g. PowerPoint 2003). Office 2007: When you start the slideshow, the PowerCom confirmation screen will display on the presenter’s monitor. This is the right place to display the confirmation screen because the audience has no need to view this screen. Office 2003 and earlier versions: When you start the slideshow, the PowerCom confirmation screen will display on audience’s monitor. You can drag this to the Presenter’s screen. PowerPoint 2007: PowerPoint 2003: 2. Non-question Slide When displaying a non-question slide, you can use SpaceBar to advance the presentation or use PowerPoint’s Slide Design View screen (left panel on presenter’s computer) to navigate slide presentation. 3. Question Slide Polling Mode 162 Dual Monitor Display When you enter a question slide, you will see a Poller box displayed on the bottom right PowerCom will display a voting box object on corner of presenter’s screen. audience’s screen (secondary screen) at the bottom right corner (the same location as in the non dual monitor mode) to show vote count. From here on, you can use the PowerCom shortcut keys or right-click the Poller box to conduct your poll. You can decide to display the following screens on the audience’s or presenter’s screen. 1. The absentee list (shortcut key A) will initially be displayed on presenter’s screen. You can decide to drag this to the audience’s screen or keep it at the presenter’s screen. 2. The Winner’s screen (shortcut key W) will initially be displayed on the presenter’s screen. You can decide to drag to audience’s screen or keep it at presenter’s screen. 3. Polling Box with color coded background will be displayed at the bottom corner of the presenter’s screen. PowerCom will display a voting box with the vote count on audience’s screen. This is the same position (at the bottom right corner) as when you turn on the "Add a Voting box when use Dual Monitor" at System Configuration screen General Tab. 163 Table of Contents Timer (shortcut key T) will show on both the presenter’s & audience’s screen. 4. Question slide stop and display modes At Stop and Display polling result stages, you can click different slides to navigate out of the question slide. 5. Insert an Impromptu Question When you insert an impromptu question, the question screen will show up on the presenter’s screen; the audience will not see the screen. Presenter will be free to enter more detailed information. 164 Dual Monitor Display Notes: 1. Make sure the audience’s screen is your focus (by clicking the audience screen) program to ensure that you can navigate the presentation by shortcut keys. 2. If you do not you turn on the "Add a Voting box when use Dual Monitor", there will not be a voting box visible to the audience. 3. You can switch to other programs other than the PowerPoint slide design screen. However, this is not recommended because you will lose screen focus and the shortcut key may not work. 4. In case the shortcut keys do not function properly, always use your mouse to click the audience’s screen to gain the screen focus. 5. In any situation, you always can right-click the Poller Box on the presenter’s screen to navigate polling. Tips: 1. Make sure the audience’s screen is your focus (by clicking the audience screen) program to ensure that you can navigate the presentation with shortcut keys. 2. Try to close all other running programs when running dual monitor mode. Only keep PowerPoint running to simplify the presentation processing. 3. In case of base station disconnection during polling, right-click on the poller box to ensure shortcut B is enabled. 4. When PowerCom indicates that base station is not connected to the PowerCom computer (red poller Box background), it is OK to disconnect and reconnect the USB cable back to the PowerCom computer. When you plug in the USB cable, you should hear the audio signal from the PowerCom computer, indicating that USB is connected again. If you forget to turn on the "Add a Voting box when use Dual Monitor", the voting box will not show up on the audience’s screen. You can right-click the Poller Box to navigate polling. 165 Table of Contents Dual Monitor with Presenter’s View Navigation: DO's and DON'T's DO's 1. Try to use the mouse to navigate instead of SpaceBar. 2. Removing the navigation device is supported in PowerCom assuming you are not switching to another program during the slideshow. 3. When you return to the slideshow after switching programs, please make sure you click the Poller box to gain focus. DON'T's 1. Do not click other slides during polling. You should finish the voting before changing slides. 2. Please try not to switch programs during the entire slideshow (especially during voting) because PowerPoint will lose focus and the shortcut keys may not work when you return to the slideshow. Your PowerCom navigation may also be out of sequence. 3. When you return to the slideshow after switching programs, do not use SpaceBar to navigate. Click the poller box first to gain screen focus. 166 Report Basic Data ReviewRhGlossDef_Basic20Data20Review Display Polling Data Tab Click on the Display Polling Data tab to display the basic Polling data. This allows you to view the data that you collected in a previously conducted presentation. Use the Browse button to locate the data file that you want to view. Once selected, use the First, Next, Previous, and Last buttons to navigate the file and display each graph. Display Demographic Data 167 Table of Contents When you have a demographic question slide in your presentation, you can display demographic cut data by clicking on the “Display Demographic Data” tab. You can review the demographic cut data series by selecting one demographic question slide at a time and then browse all question slides as demographic cut graphics. All question slides results data will be sliced by that demographic question slide you selected. When the demographic cut graphic results in 100%, it means that you are comparing the demographic question by itself; you may ignore this. If you want to export the results data file to HTML or Word, go to the "Create Office Documents" under Reports menu. Related Topics: 168 Report Demographic Analysis Overview Demographic Cut Step by Step Illustration Demographic Analysis by Demographic Slide Report 16 Demographic Analysis Report 17 Demographic Analysis with Charts 169 Table of Contents OLAP Data Analysis Report Tool PowerCom incorporates a powerful data analysis reporting tool called OLAP. OLAP is an acronym for On Line Analytical Processing. It is an approach to quickly provide the answer to analytical queries that are dimensional in nature. It is part of the broader category of business intelligence. The typical applications of OLAP are in business reporting for sales, marketing, management reporting, business performance management (BPM), budgeting and forecasting, financial reporting and similar areas. You can run the OLAP report tool only after the slideshow. You can use demographic analysis to perform data analysis during the slideshow. Demographic analysis always displays demographic cut data by one demographic question slide. In OLAP, every question slide is a candidate of demographic slide; there is no need to create any demographic slides to enable OLAP reporting at slideshow’s end. You can identify question slide for row and column dimensions during the 4 step OLAP wizard and during the OLAP reporting, you can dynamically change the row and column dimension as you wish. 170 Report Create Office Documents Generate Office Report main screen Please run the report and save the report file right after the slideshow session ends. In the Select files section, PowerCom automatically selects the current PowerPoint file at PowerPoint file list box and the Result XML file. These are the most current session files of the PowerPoint presentation voted on. If you want to generate a report for the same PowerPoint slide but use the previous session’s result XML file, click the Browse button to select the XML file which adds "backup" and date time suffix. You can generate the following reports by going to the PowerCom dropdown menu and selecting ‘Create Office Documents’ submenu in the Report section. There are 15 different reports that can be generated: 1) 2) 3) 4) 5) 6) 7) 8) 9) PowerPoint all slides (PowerPoint) PowerPoint Polling slides only (PowerPoint) Excel Summary Report (Excel) Excel Summary Report with Charts (Excel) Word Summary Report with Charts (Word) Word Summary Report (Word) Word Detail Report with Charts (Word) HTML Report (HTML) Excel Detail Report (Excel) The following reports are related to Roster and Team; you must setup a Roster file and Team file before you can run these reports. 10) Team Comparison (Excel) 11) Excel Team Comparison with Graphs (Excel) 12) Individual Scoring Summary(Excel) The following reports can be executed without setup of Roster and Team files. 13) Class Report Summary (Excel) 14) Class Report Detailed (Excel) 15) Fastest finger (Excel) Demographic analysis reports: 16) Demographic analysis (Excel) 17) Demographic analysis with Charts (Excel) Double-click a report to generate and open the report. Alternatively, you can select more than one report by checking the checkbox in front of the report name. Click ‘Generate’ to create all reports selected and save the reports in the same folder as the PowerPoint file. To select all reports, check "Select all reports" box at bottom-right corner. 171 Table of Contents 172 Report Choosing an Office Document Report Office document reports are saved in Microsoft Office format (Word, Excel, HTML, and PowerPoint files). The reports display voting results in graphic or descriptive numbers and words format. The reports are generally broken down by 4 categories: 1. Summary: Voting summary by question (no keypad info) 2. Detail: Who votes what by each question? (lists keypad info) 3. Roster: Lists participant information in detailed voting results. 4. Team: Team comparison reports. If you are not sure which Office Document report to choose from, check from the listing below: Summary PowerPoint Excel Word HTML All slides 01 Question slides only 02 No Graph 03 Graph 04 No Graph 05 Graph 06 Detail Roster Team 09 12, 13, 14, 15 10 11 07 08 When you create a roster in PowerCom and would like to see the participant’s information instead of just the keypad number, you should use Roster and Team reports. Report #12 has the same layout as Report #09 and adds roster information if Roster list is chosen. Report #13 is the Class Report Summary Report (Master Grade Sheet Sort Form). Report #14 is the Class Report Detailed Report (Master Grade Sheet Long Form). Report #15 is the Fastest Finger Report plus overall rankings at the end of the report. 173 Table of Contents Office Document Report Format Standard 1. Report Header for Excel and Word (at upper-left corner) PowerCom Office document report #nn 2. Filename The physical PowerPoint file location 3. Creation date and time 4. Total keypads and total roster participants ‘Total keypads’ indicates the keypad range setting and ‘total roster participants’ indicates the roster list entry number. 5. Report Label headers stay as non scrollable heading. 6. Highlight the correct answers Correct answers will be highlighted in green for all reports; incorrect answers in red for detailed reports only. Report filename naming convention a. Using report number as prefix PowerCom creates report filenames using the report number as filename prefix, such as 01_ making it easy to identify the report filename. b. Using report name as suffix: Same as report name Tips: 1. Use ‘Print Preview’ to see the header and footer. 2. Adjust the layout, size the column width, and page setup to fit your print page before printing the reports. 174 Report Slide Sorter Click "Slide Sorter" listed under the PowerComÆ Reports menu, and open "Slide Sorter" option to choose "View Sorter" item. You will find that all PPT micro-slides are displayed in a form (Chart 1). The polling results will also be revealed on the slides which have pollers that have been voted on during the presentation. Chart 1 You can view the original sized slides by double-clicking any of the miniatures as well (as Chart 2 showed). Close or double-click the extended form to see micro-slides in the previous status. 175 Table of Contents Chart 2 176 Report Results Sorter You may use this function to see the results of polling. You first need to choose which XML file you want to see. After choosing the file, you should click "View Sorter". A new window will show all polling slides and results of the polling. Office Document Reports 01 PowerPoint All Slides Report number: 01 Office document type: PowerPoint File name suffix: _PowerPoint_All_Slides.ppt Report description: Creates a copy of your PowerPoint file that includes Microsoft graphs instead of PowerCom graphs so you can send it to someone who does not have PowerCom. This option will display a PowerPoint presentation with the pollers already answered according to how people voted. It will appear exactly as in the presentation when voters have already voted. 177 Table of Contents 178 Report 02 PowerPoint Polling Slides Only Report number: 02 Office document type: PowerPoint File name suffix: _PowerPoint_Polling_slides_Only.ppt Report description: Creates a copy of your PowerPoint file like Report #01 except that only polling slides are included. 179 Table of Contents 03 Excel Summary Report Report number: 03 Office document type: Excel File name suffix: _Excel_Summary.xls Report description: Creates an Excel document that shows the slide text, choices, number of votes for each choice and the percent of votes for each choice. This choice will generate a Microsoft Excel spreadsheet that displays the question title with answer choices and the number of responses for each choice with percentages. Print Preview 180 Report 181 Table of Contents 04 Excel Summary Report with Charts Report number: 04 Office document type: Excel File name suffix: _Excel_Summary_with_Charts.xls Report description: Creates an Excel document that shows the slide text, choices, number of votes for each choice and the percent of votes for each choice. The report includes a Microsoft graph for each question. This report generates a Microsoft Excel file with MS Graphs next to the question. 182 Report 05 Word Summary Report with Charts Report number: 05 Office document type: Word File name suffix: _Word_Summary_with_Charts.doc Report description: Creates a Word document using a standard table that shows the slide details and a thumbnail view of each slide. Includes text, choices, number of votes for each choice with percentages for each choice. This option generates a Microsoft Word document that shows the resulting poll thumbnail with number and percentages of votes for each choice. 183 Table of Contents 06 Word Summary Report Report number: 06 Office document type: Word File name suffix: _Word_Summary.doc Report description: Creates a Word document using a standard table that shows the slide text, choices, number of votes and percentages for each choice. This option generates a Microsoft Word document that shows summary response information by question including each question’s name, answer choices, number of votes and percentages in a table. 184 Report 07 Word Detailed Report with Charts Report number: 07 Office document type: Word File name suffix: _Word_Detail_with_Charts.doc Report description: Create a report like Report #05, but includes the keypad numbers that voted for each choice, for each slide. Report 07 is a Microsoft Word document that displays each PowerPoint slide with a poll on it, question title and answer choices, and the ID number of each clicker that voted for each question. This Word report shows a detailed ‘Results by Question with Charts’ snapshot. It displays detailed results response information with PowerPoint results thumbnails. 185 Table of Contents 08 HTML Report Report number: 08 Office document type: HTML File name suffix: _HTML_Report.htm Report description: Creates a standard HTML document like the Word document Report #06. This option generates a webpage that lays out each question with the number of votes and percentages for each answer choice. 186 Report 09 Excel Detail Report Report number: 09 Office document type: Excel File name suffix: _Excel_Detail_Report.xls Report description: Create an Excel document showing how every person answered every question. This option will generate a Microsoft Excel spreadsheet that displays each participant and their votes. Each participant will be listed vertically and their answers will be shown horizontally; Base in Column 1, List participants in Column 2 and Questions start in Column 3. A “Total Scoring Points” column is added to the end of each row. To see the class ranking with Fastest Finger consideration, please see the ranking display at the end of Report 15 “Fastest Finger Report”. The report serves as a detailed voting result by question and participant. It is very useful to import the data to other applications for data analysis. This option is particularly useful when you want to find out how specific participants voted. 187 Table of Contents 188 Report 10 Team Comparison Report Report number: 10 Office document type: Excel File name suffix: _Excel_Team_Comparison.xls Report description: Creates an Excel document showing how each team answered each question. This Excel report displays a breakdown of question response information by Team. Corrected answers shown in green highlights. 189 Table of Contents 11 Excel Team Comparison with Graphs Report number: 11 Office document type: Excel File name suffix: _Excel_Team_Comparison_with_Chart.xls Report description: Creates an Excel document like Report #10 (Team Comparison), but adds a graph for each question. This Excel report displays question response information by Team; includes a Microsoft graph for each team. Correct answers shown in green highlights. 190 Report 12 Individual Scoring Summary Report Report number: 12 Office document type: Excel File name suffix: _Excel_Detail_Roster.xls Report description: Creates an Excel document that lists every individual along with team assignments, responses to each question, their percentage correct, and points scored. This Excel report displays question responses by Roster; it carries the same report layout as Report #09 with additional roster field information. 191 Table of Contents 13 Class Report Summary Report Report number: 13 Office document type: Excel File name suffix: _Master_Grade_sheet_short_form.xls Report description: Creates an Excel document for the instructor which provides a summary view of each student’s performance. This Excel report, aka "Master Grade Sheet Short Form", lists question by question summary grade sheet by student with points earned for each question. 192 Report 14 Class Report Detailed Report Report number: 14 Office document type: Excel File name suffix: _Master_Grade_sheet_long_form.xls Report description: Creates an Excel document for the instructor which provides a detailed view of each student’s performance. This Excel report also known as "Master Grade Sheet Long Form", lists question by question detail grade sheet by student with points earned for each question. 193 Table of Contents 15 Fastest Finger Report (Excel) Report number: 15 Office document type: Excel File name suffix: _Fastest_Finger.xls Report description: Creates an Excel document showing who the faster fingers are and which teams are the top performers. This report displays overall ranking for all participants as “Individual total points ranking & Fastest Finger Count”. When more than one participant have the same points, PowerCom will adjust the ranking sequence within the same rank by calculating the participant with more/less Fastest Finger questions. 194 Report Notes: 1. You can configure the number of top performers at System configuration’s General tab. 2. Press shortcut key "W" to display Winners screen in slideshow during polling or after completion of the voting. 195 Table of Contents 16 Demographic Analysis (Excel) Report number: 16 Office document type: Excel File name suffix: _ Demographic_Analysis.xls Report description: Creates an Excel document showing demographic analysis by counts and percentages. This is a Demographic analysis report by demographic slides. PowerCom creates one data sheet for each demographic slide and names the tab by the Question summary. Excel displays polling data in a 2D table showing demographic question choices as row data and the polling question choices as column data with counts, percentages and total. 196 Report 17 Demographic Analysis with Charts (Excel) Report number: 17 Office document type: Excel File name suffix: _ Demographic_Analysis_with_Charts.xls Report description: Creates an Excel document showing demographic analysis by counts and percentages with demographic cut graph. This is a Demographic analysis report by demographic slides. Same report layout with snapshot of Demographic cut graphic. 197 Table of Contents 198 OLAP Data Analysis Wizard to Launch the OLAP report To analyze the data dynamically using OLAP PivotTable, you can choose OLAP Data Analysis from PowerCom in the Menu bar. By following the steps below, you can analyze the data using The Pivot Table tool in Excel form: Step 1. Click ‘Browse’ to allocate the Analysis File you want to export the data into (the file must be .csv), and click the "Next". Step 2. Available dimensions will be displayed in the left list box; choose the row dimensions you want to view and click the arrow button; the dimensions you select will be in the right list box. Click "Next". Step 3. From this window select the column dimensions you want to view and click the "Next". Step 4. "Finish". 199 Table of Contents PivotTable Reports A PivotTable report is an interactive table that you can use to quickly summarize large amounts of data. You can rotate its rows and columns to see different summaries of the source data, filter the data by displaying different pages, or display the details for areas of interest. PivotTable Reports Data Organization Fields and Items A PivotTable report contains fields, each of which corresponds to a column (or OLAP dimension) in the source data and summarizes multiple rows of information from the source data. Fields in a PivotTable report list items of data across rows or down columns. The cells where the rows and columns intersect show summarized data for the items at the top of the column and the left side of the row. For example: "Gender", "Age", and "Marriage status", can be a column dimension, and "Price" can be a row dimension. Data Fields and Cells A data field provides the values that are summarized in the PivotTable report. For example: the "Vote Count" as the data field. Summary Functions To summarize the data field values, PivotTable reports use summary functions, such as Sum, Count, or Average. These functions automatically provide subtotals and grand totals, wherever you choose to show them. Viewing Details In most PivotTable reports, you can view the detail rows from the source data that make up the summary value in a particular data cell. Changing the Layout By dragging a field button to another part of the PivotTable report, you can view your data in various ways and calculate different summarized values. Graphical Views of PivotTable Data A PivotChart report is an interactive chart that you can use to view and rearrange data graphically in a similar manner to a PivotTable report. A PivotChart report always has an associated PivotTable report in the same workbook, and includes all of the source data from the associated report. Also, like a PivotTable report, a PivotChart report has field buttons that you can use to display different data and to change the layout. 200 OLAP Data Analysis Elements of a PivotTable Report Row Fields Fields from the underlying source data that are assigned a row orientation in a PivotTable report. A PivotTable report that has more than one row field has one inner row field, the one closest to the data area. Any other row fields are referred to as outer row fields. For example: "Gender", "Age", and "Mstatus". Column Field A field that's assigned a column orientation in a PivotTable report. A PivotTable report can have multiple column fields just as it can have multiple row fields. Most indented format PivotTable reports do not have column fields, For example: "Mprice" Page Field A field that's assigned to a page, filter, orientation. When you click a different item in a page field, the entire PivotTable report changes to display only the summarized data associated with that item. Page Field Item Each unique entry or value from the field, or column, in the source list or table becomes an item in the page field list. Data Field A field from a source list or database that contains data to be summarized, For example: "Vote count" Data Area The part of a PivotTable report that contains summary data. The cells of the data area show summarized data for the items in the row and column fields. Each value in the data area represents a summary of data from the source records, or rows. 201 Table of Contents Adding and Removing Fields Depending on how the creator of the PivotTable list has setup the data, you might be able to display additional data or remove data that you don’t want to view or summarize. Viewing the fields available to the PivotTable list Use the field list to view the list of field sets and fields that are available from the source data, and to add fields to the row, column, filter, data, and detail areas of the PivotTable list. In the field list, the fields that are not bold are available but not yet displayed in the PivotTable list. The bold fields are already displayed. You can scroll and click the expand indicators next to the field sets to show or hide fields in the field list. Adding fields to the detail area Use detail fields to display all of the available detail data and see what data is available to be summarized. When you add fields to the detail area, you display all of the detail records from the source data for the fields. Field names become column labels, and the detail records are displayed in rows below the column labels. Adding fields to the row or column area Use row and column fields to summarize and compare data. These fields display the unique items of data within a field down rows or across columns. The cell at each row and column intersection summarizes the data for an item. Adding fields to the data area Data fields provide the values to be summarized in the PivotTable list. When you add a field to the data area, the values from the field are summarized for the row and column field items. Adding fields to the filter area A filter field is similar to a page field in a Microsoft Excel PivotTable report. Use filter fields to confine the view to a particular part of the available data. When you select an item in a filter field, data is displayed and calculated only for that item, for example: if you add a Region filter field, you can have the PivotTable list display and calculate data for the regions you select. Removing fields To eliminate data that you don't want to see or summarize, you can remove fields from the PivotTable list layout. Removing a field does not remove it from the available source data. A field that you remove is no longer displayed in the PivotTable list, but it remains available in the field list for viewing Moving fields 202 OLAP Data Analysis After you add a field to a PivotTable list, you can move it to other areas. When you move a field, you change the layout of the PivotTable list, and you change the data that's displayed and the summaries that are calculated. Viewing information about fields You can view information about fields in a PivotTable list, including information about the field in the source database from which the data is taken and the type of data that the source database supplies for the field. 203 Manage PowerCom like a Pro Conducting a meeting with multiple speakers and multiple presentation slides 1. It is good practice to create a separate PowerPoint (PPT) file for the questions slide, especially if you have multiple speakers presenting in a meeting. This isolates and protects the final version of the question slides from being overridden by the earlier versions. Each speaker will have their own presentation slide and you, as an ARS professional, maintain a question slide file for all speakers. 2. A frequently asked question is: Should I combine all question slides into one PPT file or should I keep separate PPT files for each speaker? You should determine this by asking yourself the following questions: A. Will the same audience attend the session from beginning to the end for every speaker? B. Do you have the same set of demographic slides for all speakers? If the answers to both questions are yes, then you should create a combined question slide file. PowerCom recommends creating separated slide files under the circumstances of: 1. Same audience in multiple ARS sessions and you have demographic slide, creating a combined PPT to share the same demographic slide result for all the question slides. 2. Multiple speakers in an ARS event that share the same presentation computer. Last minute change to content is common, but not to questions. So we recommend combined question slides from all speakers and keep separated PPT files for each speaker. The speakers may not have the final question slide with poller. Either the speaker has not installed PowerCom or the event master is in control of the question slide design. Any replacement of the speaker's PPT file may not contain the latest question slide and may not be well tested. This is the best way to minimize ARS error in a formal meeting. 205 Table of Contents Preparing a Meeting A. Powercom: 1. Make the PPT file name as short as possible. Powercom uses the PPT file name as a base and adds a pre-fix and suffix to the name to generate result data files and report files. 2. When conducting a meeting, put the final version of the PPT file in a new folder. During the testing period, your testing folder may contain multiple versions of files generated by Powercom. You want to have a clear start that is easy to manage. 3. Print a copy of "Presentation Functions At a Glance " (PDF file) from the Powercom web site as the slide show short cut key reference and keypad and channel settings reference. 4. Set up and test the roster and team tool, if applicable. 5. Run the slide show in Powercom demo mode to adjust the poller size and position for each question slide. 6. Generate all reports and review the reports to vilify the setting of the pollers. Report #09, #14 are very useful to validate the poller settings. B. Computer: 1. Always prepare a spare laptop just in case. Contact the dealer you purchased Powercom from or a Powercom team member to obtain an emergency Powercom license. 2. Make sure you have all the accessories and drivers (USB, adapter) handy. 3. Test the compatibility of your laptop with the LCD projector and determine whether or not the resolution is acceptable. 4. Check to see if you need an extension cord and/or a power plug adapter. 5. Check your laptop to see if you have enough USB ports for connection to the base station(s) and the mouse. Bring a multiple port USB Hub / USB Splitter to gain additional USB ports. 6. Bring a flash memory drive in case you need to copy files between computers. C. Base station and Keypads: 1. For an important meeting, always bring a back up base station and some spare keypads. 2. For multiple base station usage, label keypads to their base station using letters A to Z, and properly test the channel number for each set of keypads. 3. For single base station usage, check that all keypads are set to the same channel number for the base station. 4. Test keypads to make sure all keypads work using the Powercom test keypad function after connecting to the base station in the "Find a Base station " menu. 5. Check and configure ReplyWorldWide keypad settings as desired, such as Digit Echo and Post Acknowledgement. A. 206 Meeting room set up. Refer to the "Reply Wireless Response System meeting room set up " topic in the "Reply hardware" section. Manage PowerCom like a Pro Pre-slide show check list 1. Turn off the screen saver. 2. Check the laptop power management power scheme settings. Never turn off hard disks and never turn on system standby. 3. Disable antivirus auto-protect. 4. Disable all programs that may have pop-up ads. 5. Disable Windows Automatic updates. (XP may notify you with a pop-up) 6. Do not connect to the internet. 7. Do not run Instant Messenger programs. You may receive instant messenger alerts during the slide show. 8. Minimize back-ground running programs such as Microsoft SQL Server. Move your mouse over to the System Tray at the right bottom corner of your desk top and right mouse click to stop or disable unnecessary background programs. 9. Reboot the laptop before running the slide show to clear up unused memory. 10. Disable the wireless LAN to prevent popup when a wireless connection is detected. 11. Print a final version of PowerPoint slide using Handouts style. Go to PowerPoint menu File, Print, Print What: Choose "Handouts" 3, 6, or 9 slides per page. 207 Table of Contents To Do List after the meeting 1. Backup 3 important files right after the meeting is completed: the PowerPoint file, the CSV file, and the XML file. If you have multiple versions of CSV & XML files, back them up together. Do not open the PPT file and run the slide show again. Copy the PPT file to another folder and run the slide show from there. You don’t want to create different result files after the official meting has ended. 2. Your guest speakers do not have to download Powercom to view the result slides. You can email Office Document report #1 and #2 after the meeting. These 2 reports take snapshots of the voting result graph and convert them to a Microsoft graph, which can be view in any regular PPT viewer. 3. Generate Office Document reports as needed. Save the report files for future reference. 4. Run the OLAP Data Analysis reporting tool under the Reports menu to analyze the poll results. 208 PowerCom Vista and Office 2007 Compatibility Overview and Compatibility Summary PowerCom is compatible with Vista for all versions of Microsoft Office supported by Vista. However, since Vista has enforced a more secure Desktop called User Account Control (UAC), you should grant proper access rights to PowerCom. You should also use the same access rights group as the user installing PowerCom. Please reference the Vista compatibility topic for more information. The 2007 Microsoft Office system introduces a new file format that is based on XML. It is called Microsoft Office Open XML Formats and it applies to Microsoft Office Word 2007, Microsoft Office Excel 2007, and Microsoft Office PowerPoint 2007. For more information see Office 2007 Help Topic: Introduction to new file name extensions and Office XML Formats. PPTX is PowerPoint 2007’s new filetype. PowerCom supports this new file format and you can create question slides and inset poller objects in your presentation and save in PPTX format. You may sometimes need to save your PowerPoint files in earlier versions of PowerPoint (the PPT file format. You may copy PowerPoint 2003 or earlier version PPT files to the PowerPoint 2007 environment. For this reason, the 2007 Office release still allows you to save files in PPT format and run the PPT file as Compatibility Mode. PowerCom supports running both PPT and PPTX file formats in the Office 2007 environment. You can open and work on a file that was created in an earlier version of Office, and then save it in its existing format. For example, you can copy a PPT file from Office 2003 to the PowerPoint 2007 environment and continue using the PPT format in Compatibility Mode. You also can create a new PPTX file in PowerPoint 2007 or save the PowerPoint file as a PPTX file. When you install Office 2007, the PowerPoint 2007 ActiveX default setting is disabled, which will prevent PowerCom’s Poller from working properly. When working on an existing PPT file with a poller object, the following error may occur. When you go to the question slide, you can see the Poller Graph but when you click the poller object, the PowerCom poller object has no PowerCom behavior. You will also see that PowerPoint has a Security warning displayed under the PowerPoint toolbar “Macros have been disabled”. When you work on PowerCom Poller in the PowerPoint 2007 environment, you must enable ActiveX control first. Please reference the enable ActiveX in Office 2007 topic for more information. 209 Table of Contents Please be aware of the following conditions when running PowerCom in the Office 2007 environment: 1. The PowerCom menu will be installed under the Add-Ins Tab. To use the PowerCom menu, you first must click the Add-ins Tab. Note: The new PowerCom 2007 for Reply Worldwide will install a new PowerPoint tab “PowerCom” and a complete new set of Office 2007 Ribbons. 2. The PowerCom menu will be in a Ribbon group called “Menu Commands” under the Add-ins Tab. When you click a poller, the Poller toolbar is in the “Custom toolbars” Ribbon Group. Opening the Office 2007 release files in earlier versions of Office is supported by Microsoft. You can open and edit a 2007 PowerPoint PPTX file in an earlier version of PowerPoint by downloading the necessary file converters. On computers with an earlier version of Office, go to the Download Center and download the Microsoft Office Compatibility Pack for 2007 Office Word, Excel and PowerPoint File Formats. http://www.microsoft.com/downloads/details.aspx?FamilyId=941b3470-3ae9-4aee-8f43c6bb74cd1466&displaylang=en However, running PPTX in Office 2003 or an earlier version is NOT supported by PowerCom. You must use the PPT file format in PowerPoint 2003 or an earlier version. 210 PowerCom Vista and Office 2007 Compatibility Vista Compatibility PowerCom is compatible with Vista running Office 2003 and Office 2007. PowerCom will not provide support for versions of Microsoft Office prior to Office 2003 running on Vista. Windows Vista is the most secure version of Windows that Microsoft has ever developed. Security threat is the most challenging issue to the Microsoft Windows environment and how to balance computer security, while enabling user productivity is a hot topic on Vista. A significant focus of Windows Vista and a fundamental piece of Microsoft's overall vision is security. Windows Vista provides a simple and secure mechanism for running end-user accounts with standard user privileges, while eliminating the need for administrator privileges when performing many common tasks, such as installing a printer driver or connecting to a secure wireless network. This fundamental shift provides security at the OS level by preventing malware and root kits from damaging company-wide files and settings. Vista deploys “User Account Control” (UAC) to deliver a more secure desktop. The main goal of User Account Control is to reduce the exposure and attack surface of the operating system by requiring that all users run in standard user mode. This limitation minimizes the ability for users to make changes that could destabilize their computers or inadvertently expose the network to viruses through undetected malware that has infected their computer. With User Account Control, IT administrators can run most applications, components and processes with a limited privilege, but have "elevation potential" for specific administrative tasks and application functions. Conversely, when users encounter a system task that requires administrator privileges, such as attempting to install an application, Windows Vista will notify the user and require administrator authorization. This type of prompting helps ensure that users do not accidentally make modifications to their desktops. It also helps eliminate the ability for malware to invoke administrator privileges without a user's knowledge. As a defense-in-depth measure, User Account Control also provides additional protection for administrators through its Administrator Approval Mode. With Administrator Approval Mode, Windows Vista will run most applications with standard user permissions even if the user is an administrator. If a user wishes to run a program that requires administrator permissions, they must give consent through a User Account Control prompt. This helps limit malware's ability to make system-wide changes without the administrator's knowledge. However, Administrator Approval Mode does not provide the same level of security or control as a true standard user account. When you install PowerCom, please run setup.exe and use the login that has the Administrator rights. When the current login has no administrator rights, you can right mouse click the setup.exe and select “run as Administrator”. In this case, you must have an administrator login and password to be able to run as administrator. When working on a question slide and running a slideshow, it is strongly suggested that you login as the same level or group used in the PowerCom installation. The following procedure demonstrates how to assign the right permission for the current user to write to the PowerCom system files (such as a log file) and when you perform “Save as default” in Poller wizard step 3 and step 4. 1. Click Start, then All Programs, locate the PowerCom program, then right-click PowerCom to enter PowerCom Properties. 211 Table of Contents 2. Select Security Tab 212 PowerCom Vista and Office 2007 Compatibility 3. Click Edit button 4. Click Add… button to add a new group or user name. 5. Click “Advanced…” button 213 Table of Contents 6. Click “Find Now” to locate the current login user. 214 PowerCom Vista and Office 2007 Compatibility 7. Choose the current login user (for example, DSI is the current login) by double-clicking the user (DSI) or clicking the current user (DSI) then click ‘OK’. 8. Click OK to select the current user (e.g. user DSI on DSI-Vista computer) 215 Table of Contents 9. Add permissions for the current user (DSI) by selecting the box in the “Allow” column next to the “Full control” and “Modify” rows, then click OK. 216 PowerCom Vista and Office 2007 Compatibility 10. Now you have the Full Control and Modify permissions for the PowerCom program folder. Tips: This action enables you to have full control of: 1. Writing PowerCom system file “default.dat” when you “Save as default” in the Poller Wizard. 2. Writing to PowerComLog.txt at the slideshow confirmation screen for debugging purposes. 217 Table of Contents Enable ActiveX in Office 2007 When you open an existing PPT file with a poller object, you must enable ActiveX before you can work on a Poller object in a question slide. Without enabling ActiveX, a Security warming will display under PowerPoint toolbar/Ribbon “Macros have been disabled” when you open the PowerPoint file with a Poller. When you run the PowerPoint presentation file with a Poller on it, PowerPoint will prompt you with a popup message asking you to enable the content. When you work on PowerCom Poller in PowerPoint 2007 environment, you must enable ActiveX control first. The following procedure shows you how to enable ActiveX: 1. Click the Office 2007 button then click “PowerPoint options” PowerPoint 2007 Options setting: 218 PowerCom Vista and Office 2007 Compatibility 2. Click Trust Center and select “Enable all Macros”. Now your ActiveX is enabled. If you Click Add-ins, you will see if the PowerCom add-in is installed and where it is installed. 219 Table of Contents Click Go… to see COM add-ins detail, you can also uninstall PowerCom by deleting this add-in from here. 220 PowerCom Vista and Office 2007 Compatibility How to set Windows System32 permission in Vista 1. Rigth mouse click System32 folder, then click Properties. 221 Table of Contents 2. Click Security tab 3. Click Advanced button 222 PowerCom Vista and Office 2007 Compatibility 4. Click the Owner Tab£¬Then click Edit button. 5. Select Administrators then click OK 223 Table of Contents 6. Vista popup a message box: 7. Click OK Current owner will be changed to Administrator 224 PowerCom Vista and Office 2007 Compatibility 8. Click Permissions Tab, then click Edit button. 225 Table of Contents 9. Then click Add… button 226 PowerCom Vista and Office 2007 Compatibility 10. Click Advanced… button 11. Click “Find Now” button 227 Table of Contents 12. Locate the current login to this computer, then click ‘OK’ 228 PowerCom Vista and Office 2007 Compatibility 13. Click ‘OK’ again 14. Check ‘Full control Allow’ checkbox ON, then click ‘OK’ 229 Table of Contents 15. Click ‘Yes’ Click ‘OK’ again 230 PowerCom Vista and Office 2007 Compatibility 16. Click ‘OK‘ again, Vista will popup a message: 17. Click ‘OK’ 231 Table of Contents 18. At completion, you should see that the current user has full control of the system32 folder. 232 How To use Dongle in PowerCom PowerCom dongle licensing overview The Dongle stores the PowerCom keypad counts and the PowerCom version that allows your computer to interact with a limited number of keypads with that particular version of PowerCom. When you plug the dongle into your computer, you upgrade the 5 keypad trial version of Powercom to work with the number of keypads allowed by the dongle. When you remove the dongle, your Powercom reverts to the 5 keypad trial version. You install Popwercom on every computer that you want to use for voting and then you install the dongle on each computer. When you upgrade your PowerCom (say from V2.28 to V2.31), you have to upgrade the dongle as well. See how to upgrade dongle PowerCom version for upgrade procedure. You can also increase the keypad capability of the dongle, or the license key as well. Please refer to how to upgrade dongle PowerCom key count. After Installing PowerCom, Check PowerCom license version: click PowerCom > Help > About PowerCom 5 keypads is for trial version 233 Table of Contents 234 How To use Dongle in PowerCom Installing dongle USB driver The first time that you install the dongle into the computer Windows will prompt "Found New Hardware Wizard" Cancel it. With the Dongle plugged into the computer go to the folder named "HASP_Runtime_setup" And then run (by double clicking) the HASPUserSetup.exe from the "HASP_Runtime_setup" folder: 235 Table of Contents Just click Next and then Finish. 236 How To use Dongle in PowerCom Now Close PowerPoint and re-open it again, check PowerCom > Help > About PowerCom, You will see the PowerCom license has been upgraded: You have now installed the USB Hasp onto that specific computer. Do this with any other computer with Powercom installed on it. 237 Table of Contents 238 How To use Dongle in PowerCom How to upgrade the Dongle for an upgraded PowerCom As well as downloading and installing a new version (upgrade) of Powercom you need to upgrade both your Dongle and Powercom - the Dongle version must be the same version as Powercom. You need to extract what is called the c2v file from the USB Dongle, send it to Powercom for changing, then when the new c2v has been received back install the new c2v file onto the Dongle. If you are upgrading multiple dongles then make sure that each dongle is clearly identified with a physical label or key fob type tag (Dongle 1, Dongle 2, Dongle 3 etc) and that the c2v file is similarly named when saved so that the correct c2v file can be re-installed onto the correct Dongle, you cannot mix and match the c2v files with the wrong Dongle 1. Plug in your Dongle to the PowerCom computer. Run PowerCom_Dongle_License_Update.exe under Program files\PowerCom\HASP_SRM_Runtime_setup folder to collect key status information by pressing "Collect information" button in the Collect Key Status Information Tab. 239 Table of Contents 2. PowerCom will prompt you to save the key status as a c2v file and give it a name of your choice (WW Dongle 1, Plus Dongle 3 etc.). Make sure that you can identify from which Dongle the relevant c2v file came. 3. Save the file and then email to [email protected] and indicate your request to upgrade dongle version. 4. PowerCom technical support team will update the c2v file and email it back to you as a v2c file. 5. When you receive the v2c file, run PowerCom_Dongle_License_Update.exe again. Apply the new v2c file as update file to upgrade the PowerCom version by clicking "Apply License Update" and browse to the relevant file. 6. When you receive the v2c file, run PowerCom_Dongle_License_Update.exe again. Apply the new v2c file as update file to upgrade the PowerCom version by clicking "Apply License Update" and browse to the relevant file. 240 How To use Dongle in PowerCom 7. Then press "Update" to install the new file. The picture above shows what happens if you make a mistake, such as upgrade the wrong dongle when upgrading multiple Dongles. The picture below gives an example of the correct installation of a new v2c file. 241 Table of Contents How to upgrade the keypad capability when using the PowerCom Dongle After completing the PowerCom key count upgrade purchase, follow the same procedure as Upgrading dongle PowerCom version to save the current key status to a c2v file. Send email to [email protected] with prove of purchase. Please indicate: Your current keypad count and the keypad count you are upgrading to. Your current version of PowerCom that you are using, and if you wish to upgrade to the most current version. PowerCom team will perform upgrade and send you back a new C2V file that will enable you to upgrade your PowerCom license. 242 Troubleshooting Troubleshooting Installation Symptom: No PowerCom menu or no PowerCom submenu in PowerPoint after installing PowerCom software. Cause: During PowerCom un-installation, the system will set the registry entry to "LoadBehavior"=dword:00000002 to remove the PowerCom submenus. Somehow during reinstallation, the entry never resets to "LoadBehavior"=dword:00000003 The registry’s not-reset is the cause of PowerPoint not showing the PowerCom menus. Solution: 1. Go to the PowerCom Folder and right-click the AddIn.reg file and click Property. Uncheck ‘Read Only’ to allow editing of this file. 2. Right-click the AddIn.reg file again. Edit this file using notepad, then Edit the file registry and change the entry from "LoadBehavior"=dword:00000002 to "LoadBehavior"=dword:00000003 3. Save and close the file. Double-click the AddIn.reg file and the system will pop up a message: Click ‘yes’. 4. Run PowerPoint and the PowerCom menu should contain the right submenus. 243 Table of Contents Reply Worldwide Troubleshooting Procedures DOs Position the Base Station in a clear, open location such as the top of a desk. This will provide optimal performance. Elevate the Base Station to at least keypad height, or higher if possible for best reception. Check out the keypads before use. Use a data stream test utility to assure that data is properly flowing to the PC. Verify the channel number of each keypad. Make sure it matches the Base Station channel (i.e. Channel #1 pads can only “talk” to a Base Station when it is set to Channel #1). DON'Ts Avoid placing the Base Station on large, metal areas such as a TV cart. The metal could cause some RF performance deterioration. Never position the Base Station inside or near a metal enclosure. Avoid positioning the keypad on a metal surface during operation as this may cause the RF performance to deteriorate. Never have two Base Stations with the same channel turned "on" at the same time. Never have two keypads with the same ID number assigned to avoid overwriting keypad responses. Never use a keypad that has a rapidly flashing display. This indicates a low battery that must be replaced. Caution: Use of the system in an outdoor location or different indoor environments can significantly alter the range of the keypads. TROUBLESHOOTING GUIDELINES Problem: Keypad LED remains illuminated Keypad does not “hear” the Base Station transmitter. This is usually because the Base Station corresponding to the same channel as the keypad is not turned "on". In some circumstances, the Base Station could be simply out of range of the keypad. 1. Verify keypad channel is same as Base Station 2. Make sure the application software is polling the keypads. Problem: Keypad LED flashes approximately once every 2 seconds Keypad “hears” the Base Station transmitter, but the Base Station receivers cannot collect keypad data. This happens when the Base Station receivers are out of range of the keypad. Try moving the keypad closer to the Base Station. Problem: Keypad LED flashes at a fast rate, approximately 5 times per second There is a low battery detect circuit built into the keypad to notify the user when the battery is getting low and needs replacement. This causes the LED indicator to flash at a high rate (several times per second) when the battery is getting low and should be replaced. See Section 7.3 for information on how to change the battery. 244 Troubleshooting Problem: Number of recorded responses is less than total number of keypads Software is not processing keypad responses. This is frequently because the user is not responding properly (e.g., fails to enter answer in polling time granted, enter one of the available responses, or engage the keyboard tactile to illuminate LED) or is using a keypad of a different channel. Also, the operator's PC may not be properly configured to process data from the COM port to which the Base Station is connected. 1. Verify data stream present (use Reply-compliant software data stream utility) 2. Verify keypad channel is same as Base Station 3. Verify software preferences/rosters authorize response from all keypads 4. (Selected applications only) Verify software license equals or exceeds total number of keypads being used 5. Use software to compare keypad responses to keypad addresses. 6. Verify keypad address 7. Check COM port (run OS hardware test, try a different serial component) Problem: No Data Stream There is no serial data present. This is usually because the Base Station is "off", the wrong COM port is assigned in the software, or the operator's PC has a COM port conflict. 1. Insure proper COM Port is assigned in software 2. Inspect Base Station connections; make sure they are secure 3. Check to make sure the Base Station power is on 4. Verify serviceability of COM Port (run OS hardware test, try another serial device) Extract from Reply manuals Reply® is a registered trademark of Fleetwood Group, Inc. ©Copyright 2005 Fleetwood Group, Inc., 245 Table of Contents Software Troubleshooting Software Troubleshooting 1. When users run the PowerCom View Slide, instead of starting from 1st slide, it jumps to another slide. Solution: Check the PowerCom System Panel. Select "Keep the data and start from slide #". 2. When users get the error message "Path not found" after opening the slide. Solution: Check PowerCom menu, and reselect "Results Polling data path". 3. Error message "Can not find (any) COM port in settings" after opening the slide. Solution: Check PowerCom menu, and reselect "COM port". 4. When the PPT file is a big one, users will see some delay after starting the slideshow. 5. PowerCom Poller Object Backward Compatibility Issues. When opening a PowerPoint file, a message popup appears: Cause: The PowerPoint file contains an older version of the PowerCom Poller object. Solution: Delete and recreate the Pollers. 6. Runtime error message during PowerPoint slideshow. Cause: PowerCom runtime error due to program conflicts. Solution: 1. Please capture the error message screen; (Hold Alt key and press Print Screen key, then paste to Word document). 2. Try to replicate the error and write down how the error occurs. 3. Email this screenshot and steps to error replication, to [email protected] . Please include the System Information by screen capture (alt+PrintScreen) from the PowerCom Menu Help in ‘About PowerCom’. PowerCom will get back to you and try to solve your problem as soon as possible. 246 Troubleshooting Hardware Troubleshooting From time to time, you may experience operational difficulties with your Reply system. At those rare times, it is important to understand how the system works and how to remedy these problems quickly. In this guide, it is assumed that you know how to connect and test your hardware. System Operation The Reply interface contains one transmitter (with an antenna) and two receivers (with antennas.) For the CRS-920 and CRS930, the long antenna is for the transmitter and is mounted on the front. For the CS-910, the long antenna is mounted on the center post. The transmitter interrogates each pad sequentially on a given frequency (e.g. 216.01 MHZ for channel 1.) When the pad "sees" its address, it transmits the digit entered on a separate frequency (e.g. 345 MHZ for channel 1.) The number in the pad's window will disappear and the interface will send an acknowledgement of receipt. If the Number Flashes in the Pad Window When a user presses a key on the pad, the number appears in the window. Once the transmitter signals that pad, the digit is sent and the display disappears. If it is not received error free, the number will reappear in what appears to be a slow flash (every 2-3 seconds.) There are three possible reasons for this. One, the pad is in a drop-out zone. Two, the pad is too far from the interface (or receiving antenna). Or three, there is Radio Frequency Interference. In any case, the solution is the same, get the pad closer to the interface. Either move the interface so that is centrally located, move keypads, or use an antenna extension kit. If the Number Stays Solid and Does Not Disappear When a key is pressed on the pad, it should appear in the window and then extinguish after 1 or 2 seconds. If it does not, the pad does not "see" the transmitter at all. There are four possible reasons for this. One, the pad is too far from the interface (125' or more.) Two, power to the interface is off. Three, the keypad is set to a different channel than the interface. Or four, the transmitter portion of the interface has malfunctioned. First, be sure the pad is within 75' of the interface. Then check that the power is on. Also, check that the antennas are connected and that the keypads are set to the same channel as the interface. If the problem still exists on all (or most) of the keypads, the transmitter has malfunctioned and must be repaired. If this happens to only a few keypads, the keypads need maintenance. Preventive Measures In small rooms, the above keypad problems will most likely never appear. However, in larger rooms that are setup for 100 or more people, you must be more careful of equipment placement. 247 Table of Contents Do not place the Reply Interface next to projectors, metal objects, or any device that may generate radio noise. It is strongly suggested that you use a frequency counter to scan for interference and when necessary, place extended antennas strategically. This equipment is available from your hardware dealer. You should also leave ample setup time, so that you can test the entire system well before its use. For large rooms, you should obtain floor plans, and decide on equipment placement ahead of time. Also be sure to have your hardware dealer’s phone number with you, for further technical assistance. 248 PowerCom Support and Resources PowerCom Software Support 1. Contact the dealer you purchased the software from. 2. Visit the PowerCom web site at http://www.PowerComARS.com 3. Visit the PowerCom discussion forum (forum.powercomars.com) on the PowerCom website. a. Browse the forum by topic or perform a search to see if you can find an answer to your problem. b. Post your own question on the PowerCom Forum. A PowerCom support technician will try to answer your question within a reasonable time frame or other forum users may help to answer your question. c. Email [email protected] if you have a subscription to the PowerCom support contract. d. For Windows and Office related issues, visit the Microsoft websites: www.microsoft.com www.msdn.com 249 Table of Contents Reply Hardware Support Contact the dealer you purchased the keypads from. If you cannot locate the dealer, contact: Fleetwood Web site: http://www.replysystems.com Company address and phone: Fleetwood Group, Inc. 11832 James Street Holland Michigan, 49424 1-800-257-6390 PowerCom web site: http://www.PowerComARS.com provides some hardware support references. PowerCom Forum (forum.powercomars.com) ARS Hardware Group provides some hardware support references. 250 PowerCom Support and Resources Contact the PowerCom Team PowerCom is developed by Dynamic Services International, Inc. DSII: www.dsii.net PowerCom: http://www.PowerComARS.com PowerCom Online Chat Support: http://www.powercomars.com/support/chat-online.html Corporate Address: 57 West 38 Street 12 FL New York, NY 10018 USA Tel: 1-212-997-2000 Fax: 1-212-997-4297 Email: [email protected] 251 Appendix and Glossary Glossary For Terms A Absent List Absentee Accept Only Initial Response Activation Animation Answer Choice Audience Response System B Background Bar Colors Bar Labels Base Base station Basic Data Review C Channel Choice Classroom Performance System Clr key Combine Data Files Confirmation Screen Countdown clock CRT Custom label D Demo mode Demographic Analysis Demographic Cut Demographic Filter Demographic question Digit Echo Dual Monitor E 253 Table of Contents F Fastest Finger G Graph format Graph Type Group Response System H Hot key I Impromptu Individual Cumulative infrared IR J K Keypad Address Keypad number Keypad Range Keypad Settings L Label Label Format LCD Low Battery Notification M Mean multiple monitor Music N O Office document Report On Line Analytical Processing 254 Appendix and Glossary P Points Poller Poller Box Poller Wizard Polling Post Acknowledgement Presenter view Q Question label R Radio Frequency Re-vote Reply EU Reply EZ Reply IQ Roster List Roster Template S Save as default Shortcut key Soft Keys Standard Reply T Team Cumulative Team Scores Template Test Keypads Timer U V Video Card Voting box W Winners Write to log 255 Table of Contents X Y Z 256 Glossary A Absent List: (Also called an absentee, or a non-voting keypad.) PowerCom has the ability to track any keypads that don't place a vote. During the slide show a presenter can display a listing with Base +3 digit keypad addresses to remind participants that they haven't responded yet. Once a response is given the keypad number will disappear. Absentee: (Also called an absent list, or a non-voting keypad.) PowerCom has the ability to track any keypads that don't place a vote. During the slide show a presenter can display a listing with Base +3 digit keypad addresses to remind participants that they haven't responded yet. Once a response is given the keypad number will disappear. Accept Only Initial Response: This is a ReplyWorldwide keypad setting option. When this option is set to true, a keypad user can change their response before the base reads the keypress value. Only the first response (keypress) will be sent to the base. When this option is not checked, a keypad user is able to change their responses and the last response before the time expires will be sent to the base. When set to true, a key that is pressed will display horizontal bars on the keypad display. When the base has acknowledged receipt of the key press, the bars will disappear. Activation: This term defines the process of applying a PowerCom license key to enable a full version license. Animation: Animation is a PowerPoint options that allows a presenter to customize the way the information appears on the screen. Animation effects are builds, movement, and other special effects that can be applied to objects and text. They add interest and variety to a presentation. For example, one effect would allow bullet points to be revealed one at a time. Answer Choice: (Also called choice.) This is a list of possible answers that an audience can select from. For example, an answer choice for the question: "What is your gender?" would have two answer choices - male or female. Audience Response System: (ARS) Also known as Group Response System (GRS). An Audience Response system is a system of keypads that are held by audience members during a presentation or meeting. This system allows presenters to give their real-time feedback to opinion polling questions, training questions, evaluations, and even interactive audience games. B Background: This refers to the background of a Poller slide. With PowerCom the Poller background can be customized, however it's recommend that presenters use a transparent background as the result graphic background, instead of using a background color that has been selected in edit mode. Bar Colors: PowerCom allows presenters to customize the colors of a Poller graphic bar. With up to 10 answer choices, you could have 10 bars, each with a unique color. By clicking the color box you can control the color of each bar. Bar Labels: This label represents the description given to the Poller graphic bar. With PowerCom you can customize the graph labels, or skip the short description and show only the 1 to 10 numbers or the alpha characters. Base: (Also called base station) The base is the receiver or transceiver of used to communicate with participant's keypad and transmit the voting to PowerCom software via a USB cable. Reply systems are able to provide true two-way communication between keypad and base station. Base station: (Also called base) The base station is the receiver or transceiver of used to communicate with participant's keypad and transmit the voting to PowerCom software via a USB cable. Reply systems are able to provide true two-way communication between keypad and base station. Basic Data Review: This term describes one of the PowerCom reporting functions that displays Polling Data and Demographic Data, slide by slide. C Channel: The base station uses a specific channel to communicate with keypads called the "Radio Channel". A unique number is assigned to each base station. The Reply system uses an integrated RF antenna combined with a proprietary frequency-hopping algorithm to ensure reliable RF performance. When there is a lot of RF interference being generated from other RF devices (such as wireless Internet, cordless phones, etc.) RF base stations use different radio frequency to communicate with keypads. Most of the Reply base station channel numbers are programmable (except some older Standard Reply models). Each base station model has limited keypad capacity; ReplyWorldwide is 250 keypads per base and up to 15 channels. Standard reply also provides 250 keypads capacity per base. Reply EZ base only capable to communicate with 50 keypads. Reply EU base has 650 keypads capacity. 257 Table of Contents Choice: (Also known as Answer Choice.) This is a list of possible answers that an audience can select from. For example, an answer choice for the question: "What is your gender?" would have two answer choices - male or female. Classroom Performance Sysetm: (Also known as CPS.) A classroom performance system is a term used to classify an audience response system (ARS) used for the education and training industries. Classroom Performance System: (Also known as CPS.) A classroom performance system is a term used to classify an audience response system (ARS) used for the education and training industries. Clr key: This key is found on the ReplyWorldwide keypad. Clr is the abbreviation of Clear and is used by a keypad holder to clear the pending signal. Combine Data Files: This feature allows you to combine up to ten PowerCom result Data Files at a time, and is typically used for "rolling up" data from multiple meetings with same question set. Confirmation Screen: PowerCom re-start or re-run slide show option choice confirmation screen at beginning of slide show. Countdown clock: (Also called timer countdown clock.) A countdown clock is used to set the voting time limit for a given question. CRT: Cathode Ray Tube, the original display units now being largely replaced by LCD monitors. Custom label: Custom labels allow presenters to customize the graph chart so the answers are more meaningful. Instead of Numerical (1 to 10) or Alphabetical (A to E) labels, short summary descriptions of the answer choice can be used. D Demo mode: Without connecting to a physical base station and keypads presenters can run a PowerCom slide show using demo mode Demo mode is a great way to simulate ARS meetings and do a presentation rehearsal. When you start the slide show (press F5) your computer won't connect to a base station, but instead PowerCom will automatically launch in demo mode. Demographic Analysis: (Also known as Demographic Cut and Demographic Filter.) This feature allows presenters to analyze responses based on the demographic makeup of the audience. Presenters can display a demographic cut graph that shows the demographic profiles of the participants and the answer percentage by a demographic question selected by the presenter. Demographic Cut: (Also known as Demographic Analysis and Demographic Filter.) This feature allows presenters to analyze responses based on the demographic makeup of the audience. Presenters can display a demographic cut graph that shows the demographic profiles of the participants and the answer percentage by a demographic question selected by the presenter. Demographic Filter: (Also known as Demographic Cut and Demographic Analysis.) This feature allows presenters to analyze responses based on the demographic makeup of the audience. Presenters can display a demographic cut graph that shows the demographic profiles of the participants and the answer percentage by a demographic question selected by the presenter. Demographic question: A demographic question is a slide designated for the purpose of demographic analysis. These questions are used as part of the demographic profile building process and used to describe a demographic grouping or segment. Digit Echo: When checked, this feature allows the user to display the value of the key pressed on the keypad display. For example, with digit echo on, pressing key 2 displays "2" on the keypad display. Dual Monitor: Dual Monitor support in Powerpoint allows you to display your presentation on a projector and display your slides and notes on the computer This is a PowerPoint feature that allows a presenter to run a slide show on the full screen of a secondary monitor, while viewing the presentation in normal view on the primary monitor. This lets the presenter see his or her outline and notes with the slides, while an audience sees only the slides. F Fastest Finger: Fastest Finger is a PowerCom feature that identifies and displays the audience member who answered a specific question first. It also displays their ranking and participant names (if roster list is used and names are available), as well as the points assigned, if points were being awarded for that question. G Graph format: This is the format of the polling results graph. It includes setting bar colors and the background, Graph chart format attributes are: result data display: show percent or show number or both, use text shadow, show mean, use custom label, and Font settings. 258 Glossary Graph Type: This is the type of chart chosen for the polling result graph. PowerCom provides 6 chart types: 3D Vertical Bar, 2D Vertical Bar, 3D Horizontal Bar, 2D Horizontal Bar, Vertical Cylinder, Horizontal Cylinder. Horizontal Cylinder and Vertical Cylinder are the two best choices. Group Response System: (Also known as Audience Response System, ARS and GRS.) An Audience Response system is a system of wireless keypads that are held by audience members during a presentation or meeting. This system allows presenters to give their real-time feedback to opinion polling questions, training questions, evaluations, and even interactive audience games. H Hot key: (Also called accelerator keys or shortcut keys.) This is a term given to a set of keys that perform a predefined function. These functions can often be done through menus or other indirect mechanism, but with a shortcut key users only need to press on key on their keyboard to accomplish the same task. I Impromptu: The Impromptu questions feature allows the user to insert a new question slide during the slide show (by pressing the shortcut key "I") In other words, PowerCom allows a presenter to insert a question slide on the fly, without existing the slide show. Individual Cumulative: When points are assigned to questions. This feature accumulates the total points and displays the top ranking individuals and their point scores. infrared: (Also known as IR) Infrared radiation (IR) is electromagnetic radiation, it means "below red", red being the color of visible light of longest wavelength. IR does not penetrate walls and does not interfere with other devices in adjoining rooms. TV remote control is the most popular Infrared appliances. IR communication requires straight point-to-point aiming with limited angle. Its range and keypad capacity are limited, so it works best in small size meetings. RF has better speed and quality than IR in ARS meetings. See RF for more related information. IR: (Also known as Infrared radiation (IR) is electromagnetic radiation, it means "below red", red being the color of visible light of longest wavelength. IR does not penetrate walls and does not interfere with other devices in adjoining rooms. TV remote control is the most popular Infrared appliances. IR communication requires straight point-to-point aiming with limited angle. Its range and keypad capacity are limited, so it works best in small size meetings. RF has better speed and quality than IR in ARS meetings. See RF for more related information. K Keypad Address: (Also known as keypad number.) Each keypad has a unique address per base station. This is called the keypad address or the keypad number. The keypad address uses an artificial base letter (A,B,C,D) plus a keypad address so presenters can differentiate the keypad number, as well as the different base station channel. Keypad number: (Also known as keypad addresses.) Each keypad has a unique address per base station. This is called the keypad address or the keypad number. The keypad address uses an artificial base letter (A,B,C,D) plus a keypad address so presenters can differentiate the keypad number, as well as the different base station channel. Keypad Range: The range of keypad numbers that will be used for polling, the default is always the maximum number of keypads from 1 to 250, but you can also input a string of keypad numbers. Here's a sample of a string: "1,3,6-10,21-29,38". Keypad numbers separated by commas are treated as individual keypads, whereas the keypads separated by a hyphen will be interpreted as an inclusive range. Keypad Settings: Keypad configuration either via base station or manually set on keypad using the keypad membrane. When set to Base, all keypads that are within range and powered up will be automatically reconfigured Keypad Settings such as Digit Echo, Post Acknowledgement, Low Battery Notification. L Label: See Question label as question summary and Custom label for answer choice label. Label Format: The label format is the format given to the answer choices. Options include, Numerical (1 to 10), Alphabetical (A to E) Yes/No or True/False. LCD: Liquid crystal display. A form of display commonly used in Laptop computer displays and now used for desktop displays as well. Low Battery Notification: This is a ReplyWorldwide keypad feature. When set on this feature, a low battery warning will be given when a keypad experiences low battery power. 259 Table of Contents M Mean: The mean is a display of the average (approximating the statistical norm). multiple monitor: Usage of two or more monitors. Computers are able to provide inputs for two or more displays (LCD’s, CRT’s or both). In some cases the output can also be fed to projection systems. Music: With PowerCom presenters have the ability to play music. Presenters can turn on / or off the music during a polling question. O Office document Report: PowerCom generates many reports. The Office Document Report saves data in a Microsoft Office format (Word, Excel, HTML, and PowerPoint files). The reports display voting results in graphic format or descriptive numbers and words. On Line Analytical Processing: OLAP is an acronym for On Line Analytical Processing. This approach is part of the broader category of business intelligence and quickly provides the answer to analytical queries that are dimensional in nature. P Points: PowerCom allows presenters to assign a point value to questions. Participants who answer correctly receive the value of the points. The winning individuals or teams can be calculated. Poller: The Poller is a special object PowerCom uses to control the voting in a PowerPoint slide. During slide design, by inserting the PowerCom Poller object you can size and position the result graphic to be displayed at end of the polling question. See Poller Wizard and Poller Box for more information. Poller Box: The Poller Box is a small box on a question slide that is found at the bottom of the PowerPoint screen during the slide show. The Poller Box background color give base station connection status, green means base is connected, and vote will be received, red means base is not detected, so no vote will be registered. This Poller Box also indicates voting stages and will show vote count during the Polling stage, then Stop, then Display. Poller Wizard: The Poller Wizard is used to create a PowerCom Poller. It's a 4 steps processing procedure that creates a Poller object and sets the Polling characteristics. Characteristics include: playing music, setting a Timer, Graphic type and corrected answer and points. Polling: A term used for voting, participant that express an opinion or preference when the keypads are pressed. Post Acknowledgement: This is a ReplyWorldwide keypad setting. When this key is pressed, the Reply keypad will display horizontal bars on the keypad for three seconds. This confirms that the base has acknowledged receipt of the key pressed. Presenter view: A monitor that is exclusively used for the presenter. It is also called the Primary monitor. Presenter’s view: A monitor that is exclusively used for the presenter. It is also called the Primary monitor. Q Question label: When PowerCom performs a Demographic Analysis or OLAP, instead of displaying the whole sentence of the question as a label, PowerCom lets presenters create a one or two word summary description of the question as a question label. It is also called question summary. R Radio Frequency: Keypads communicate with the Base Station using what is called a radio frequency. (2.4 GHz wireless Radio Frequency (RF) technology.) The Base Station is the control center for the system and operates according to commands issued by the application software. When a key is pressed on the keypad, it's transmitted using radio frequency. The base station continuously sends out a radio frequency packet when the unit is powered on. Re-vote: This function clears the Poll, resets the Poller counter to 0 and allows participants to re-vote. The PowerCom short cut key R but beware as no warning message or confirmation is given and the reset cannot be undone. Reply EU: A Reply EU is a Reply radio frequency keypad model designed for the European region. The ReplyExport system is a variant of the Standard Reply system and was modified to meet the radio regulatory rules of the European Union and other foreign countries. Reply EZ: most classroom and boardroom applications. It is simple to setup, easy to operate, and delivers all the advantages of radio - speed, barrier-free operation, reliability - near the price of less functional/reliable 260 Glossary infrared products. Reply EZ support 50 keypad address per channel and 2 user-selectable channels. Maximum capacity is 100 participants. Although still used, the EZ model was discontinued by Reply in 2005. Reply IQ: The Reply IQ is the advanced keypad used mainly for interactive meetings by education and research professionals. Standard features include: large graphics, LCD shows, question and answer options and has multiple digit entry, user ID, vote verification, speed scoring, moment-to-moment polling, and text messaging. Expansion port allows capabilities to be added with plug-in modules. Roster List: With PowerCom, presenters can create a Roster List that stores the participant information. Roster List is the actual data in tabular format with the column label being the first row of data. The Roster List uses a PRL file type acronym. Roster Template: PowerCom uses a Roster template to define the participant information. The Roster Template is the data definition of the Roster file, and does not contain actual data. The Roster Template has a PRT file type acronym. S Save as default: This function is used to set the defaults for PowerCom Poller properties. Defaults can be saved for Graphics, Music, or the Timer counter clock. Shortcut key: (Also called accelerator keys or hot keys.) This is a term given to a set of keys that perform a predefined function. These functions can often be done through menus or other indirect mechanism, but with a shortcut key users only need to press on key on their keyboard to accomplish the same task. Soft Keys: Reply has 3 soft keys at the top of the keypad membrane. If enabled, these keys can be used as 3 extra general-purpose response buttons for non-numeric responses. PowerCom does not currently use these soft keys. Standard Reply: With over 400,000 units in service worldwide, Standard Reply is considered the industry workhorse. This trusted keypad has a unique RF Id for tracking entries by individuals and a proprietary acknowledgement function that positively confirms the system's acceptance of all user inputs. Its intuitive keyboard and display are ideal for voting, answering multiple choice or continuum questions, and rank ordering options. This keypad supports 250 keypad addresses per channel, with a maximum capacity of 8 channels. T Team Cumulative: Team Cumulative displays cumulative total points for top ranking teams and their cumulative point scores. Team Scores: Team Scores display a slide of teams' total points and their ranking. Template: A template is a slide or presentation that provides a predefined format and color scheme that can be applied to another presentation. You can use an existing presentation as a template. Test Keypads: This function tests the keypad to make sure they are interacting properly with the base station. Users press the keypad number and a visual display of the number entered appears on Reply Utility or PowerCom Test Keypad Screen. Timer: (Also called clock, or timer countdown clock.) A Timer is used to set the voting time limit for a given question. V Video Card: The card that is responsible for the display on your LCD or CRT monitor. In several systems the Video Card is integrated into the motherboard, such as in laptops. However the more capable cards that support dual monitor can also be purchased separately as in the case of Desktops. Voting box: A display that PowerCom adds to the audience’s screen when dual monitor is used for all question slides during a slide show. W Winners: PowerCom has game capabilities. Its winner function is used during the slide show to display the Winners and their performance ranking. A winners screen displays top performers of individual and team, as well as winners for current slide and cumulative total. Write to log: This function allows PowerCom users to use diagnostic mode writing for any errors received. Errors are entered into a log file during the slide show. 261 Index diagnostic mode 0 Display Polling Data 60 165 04 Graphical Result Summary By Question Excel 180 07 Detailed Results By Question with snapshoot Word 183 Driver Installation Guide for Reply CRS940 08 Result Summary By Question HTML 184 Dual Monitor Overview 149 Dual MonitorHardware 152 Display Result right after Stop Polling 09 Result Question By Question By Participants Excel185 1 62 15 E 10 Team Comparison Excel 187 Edit a Roster List 11 Team Comparison with graphs Excel 188 Elements of a PivotTable report 199 12 Roster Results Question By Question By Participants Excel 189 enable ActiveX In Office 2007 216 13 Master Grade sheet short form Excel 190 14 Master Grade sheet long form Excel 191 15 Fastest Finger Report Excel 192 16 Demographic analysis Excel 194 17 Demographic analysis with Charts Excel 195 A A 130 About adding and removing fields 200 About PivotTable reports 198 Absent list 130 Add a Roster List Animation overview 87 113 Apply Custom animation to question slide 114 Assign a roster file to a PowerPoint slide 89 Available Polling Functions at each polling stage 130 C C 130 Choosing an Office document report 171 Combine Data Files 75 Components 43 Conducting a meeting with multiple speakers and multiple presentation slides Configuring Com Ports Connect Base Station Contact the Powercom team Export Roster Template Fastest Finger 79 Glossary For Terms 251 Good animation effect Schemes 116 Graphical Result Summary By Question 180 H Hardware Troubleshooting Help for Reply World Wide Keypad Settings How to Activate PowerCom How to Design Timer 245 47 19 111 How to find the COM Port Number 71 How to maintain Poller Properties 107 How to set Windows System32 permission in placeVista 219 How to upgrade the keypad capability when using the PowerCom Dongle 240 How to use Reply Mini with PowerCom Reply Worldwide 50 I 46 III. How to upgrade the Dongle for an upgraded PowerCom 237 67 Impromptu questions 122 249 Individual Cumulative 137 203 83 Create team by question slide during slide show 92 Insert a PowerCom Poller 82 34 Inserting PowerCom Poller Overview Define keypad Range and Test Keypads 72 Delete Roster Template 84 Demo Mode 59 145 13 100 99 Installation and Uninstallation Installing dongle USB driver D Demographic Analysis by Demographic slide 135 G Getting started with Roster set up Copy Roster Template CRS941 USB stick Base station 85 F Informational Files Created by PowerCom Setup Creating and maintaining a roster template 88 9 233 K Keypads compatible with PowerCom Reply Worldwide 27 M M 130 Demographic Analysis display fixed / flexible font and sizing 147 Manage Roster file Demographic analysis overview Meeting Preparation 204 music 130 138 Demographic Cut Function Step by Step illustration 140 90 263 Table of Contents Result Summary By Question Word O Office Document Report format standard 172 Roster overview OLAP Data Analysis Report tool 168 Roster set-up Procedure Operating Multiple Base Stations 69 Overview and compatibility summary 207 181, 182 Running Your Presentation 77 80 119 S S 130 P Pausing the Timer 112 Show Confirm form When view Slide placeVista compatibility 209 Slide show and polling navigation 160 61 Points 81 Slide Show PowerCom Confirmation Screen 120 Populate and maintain roster list file 86 Slide Sorter 173 Software Troubleshooting 244 PowerCom dongle licensing overview 231 PowerCom Installation and Pre-requisities 8 Standard Reply hardware overview 35 PowerCom keypad communication methodology 6 Step 1 Set-up new a new Roster Template and create Team 96 Step 2 Populating the Roster File 97 PowerCom Poller Wizard 100 PowerCom Shortcut keys during slide show 127 Powercom software support 247 Preparing dual monitor display 155 Presentation Functions At A Glance 133 Pre-slide show check list 205 Purpose of Timer countdown clock 110 Purpose of using a Roster 78 Q Question slide comparison during slide show 124 25 Quick Start Roster and Team 94 R Replicate voting result file to a back up computer 64 Reply EU Export hardware overview 37 Reply EZ hardware overview 39 Reply hardware specifications 41 Reply mini keypad CRS5000 hardware 248 32 Reply Wireless Response System meeting room set up 54 Reply Worldwide hardware overview Reply Worldwide Troubleshooting Procedures Reply WorldwideKeypad Settings ReplyWorldWide keypad user guide Reports Reports related to Roster & team Resetting the Timer restart a timer Result polling data path Result snapshoot all slides 28 242 74 49 169 98 112 112 63 175 Result snapshoot Polling slides only 177 Result Sorter 175 Result Summary By Question 178 264 130 Stopping the Timer 112 Switching between PowerCom for Reply Worldwide and PowerCom for Reply Plus 21 System Configuration System wide configuration settings 57 5 57 T T 130 Team Replicate a question slide during slide show as an advanced Impromptu feature. 123 98 Stop the Polling System Requirements Quick Start Reply Hardware support Step 3 Use the Roster File with a Power Point presentation 90 Team Cumulative 138 Team Scores 136 Team set up procedure 91 Timer Clock count down 130 Timer countdown clock overview 109 Timer Operation Procedure 112 To Do List after the meeting 206 Troubleshooting Installation 241 U upgrade Powercom Using Multiple Com Ports 9 45 V View and change Reply keypad no. and channel no. 53 W W 130 Welcome to PowerCom 3 What you can do in PowerCom 4 When to start timer 112 Winners Overview 134 Winners screen 130 Wizard to launch the OLAP report 197 Write to log 60