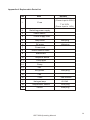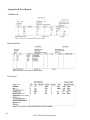
1
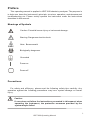
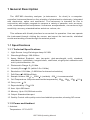
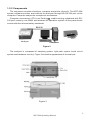
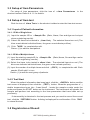
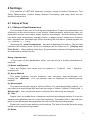
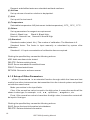
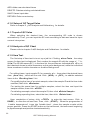
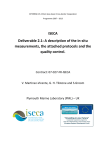
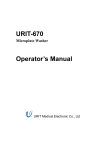
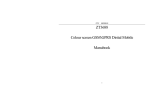
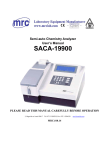
URIT-800
Chemistry Analyzer
URIT Medical Electronic Co.,LTD
Contents
Copyright and declaration............................................................... 1
Preface ........................................................................................ 3
1 General Description ..................................................................
7
1.1 Specifications ......................................................................... 7
1.2 Principle and Component ......................................................... 8
1.3 Functions ............................................................................... 10
2 Installation ................................................................................ 11
2.1 Unpacking .............................................................................. 11
2.2 Instrument Installation ............................................................ 11
2.3 Software Installation and Registration ....................................... 12
2.4 Software Online ...................................................................... 13
2.5 Software Initialization ............................................................. 13
3 Operation .................................................................................. 14
3.1 Start-up .................................................................................. 14
3.2 Preparation ............................................................................
14
3.3 Setup of Item Parameters ........................................................
15
3.4 Setup of Item test ....................................................................
15
3.5 Registration of Result ..............................................................
15
3.6 Modification of Result .............................................................. 16
3.7 Recall of Sample ..................................................................... 16
3.8 Help ....................................................................................... 16
3.9 Logout ................................................................................... 16
3.10 Ending ................................................................................. 16
4 Settings .................................................................................... 17
4.1 Setup of Test ........................................................................... 17
4.2 Maintenance ........................................................................... 21
4.3 Setup of System ......................................................................
23
4.4 Processing of Result ............................................................... 24
4.5 Help ...................................................................................... 24
5 QC Analysis and Calibration ........................................................ 26
5.1 General .................................................................................. 26
5.2 QC and QC Procedure ............................................................. 26
5.3 Analysis of QC Result .............................................................. 27
5.4 Treatments for Abnormality ...................................................... 28
5.5 Calibration and Procedure ....................................................... 29
6 Reagent, Sample and Waste ....................................................... 30
6.1 Reagent ................................................................................. 30
6.2 Detergent ............................................................................... 30
6.3 Precautions ............................................................................. 30
7 Maintenance .............................................................................. 31
7.1 Cell ......................................................................................... 31
7.2 Peristaltic pump ....................................................................... 32
7.3 Cleanliness ............................................................................. 33
7.4 Precautions for Usage .............................................................. 34
8 Troubleshooting ......................................................................... 35
8.1 Troubleshooting Direction ........................................................ 35
8.2 Obtaining Technical Help .......................................................... 36
9 Transportation and Storage ......................................................... 38
9.1 Transportation ......................................................................... 38
9.2 Storage .................................................................................. 38
Appendix A .................................................................................... 39
Appendix B ................................................................................... 40
Copyright and Declaration
Copyright : URIT MEDICAL ELECTRONIC CO., LTD (URIT)
Thank you very much for your purchase of the model URIT-800 chemistry
analyzer.
All contents in this manual were strictly compiled according to the related laws
and regulations in china, as well as the specific condition of URIT-800 chemistry
analyzer, covering all the updated information before printing. The URIT is fully
responsible for the revision and explanation of the manual, and reserves the right to
renovate the relevant contents without separate notice. Some of the demonstration
pictures in this manual are for reference and subject to real object if any differences.
All the information included is protected by copyright. No any part of this
document may be reproduced, stored or transmitted in any form, or by any means
unless written authorization by URIT.
All instructions must be followed strictly in operation. In no event should URIT be
responsible for failures, errors and other liabilities resulting from user's
noncompliance with the procedures and precautions outlined herein.
Limitation of Liability
URIT warrants to the original purchaser that this instrument will be free from
defects in materials and workmanship for a period of one year from the later of the
date of original purchase or installation.
URIT assumes no liability in the following situations even during the period of
warranty.
1.
Failure due to abuse the instrument or neglect the maintenance.
Use reagents and accessories other than manufactured or recommended by
URIT.
2.
3.
Failure due to operate not under the instructions described in the manual.
Replace accessories not specified by URIT, or after maintenance or repair by a
service agent not approved or authorized by URIT.
4.
Caution:
URIT makes no warranties, either express or implied, as to product quality,
performance, and value as a commodity or applicability for any particular
purpose.
1
URIT-800 Operating Manual
Technical service and troubleshooting are provided by URIT.
If the instrument has malfunction, please contact the agency authorized by URIT .
If the problem cannot be solved through telephone directions, professional
technician and sale representative will be sent to offer you timely service.
n
Manufacturer: URIT Medical Electronic Co., Ltd.
n
Add: 4 East Alley, Jiuhua Road, Guilin, Guangxi541001, P.R. China
n
Tel: +86-773-2832799/2883225
n
Fax: +86-773-2804668
n
Website: www.uritest.com
n
E-mail: [email protected]
Version: 2/2008
2
URIT-800 Operating Manual
Preface
This operating manual is applied to URIT-800 chemistry analyzer. The purpose is
to help user know the instrument's principle, structure, operation, maintenance and
troubleshooting etc. Please strictly operate the instrument under the instructions
described in this manual.
Meanings of Symbols
Caution: Potential human injury or instrument damage.
Warning: Dangerous electric shock
Note: Beware scald
Biologically dangerous
Grounded
Power on
Power off
Precautions:
For safety and efficiency, please read the following safety tips carefully. Any
operation against the following precautions may incur system damage or human
injury.
Caution:
If user dose not follow the instructions presented in this manual when
operating the instrument, the protective measures provided by the
system may be failed.
3
URIT-800 Operating Manual
Electric shock due to high voltage
Warning:
When the power supply is on, do not open the cover other than the
authorized maintenance man.
If liquid leaks into the instrument, cut off power supply immediately.
Improper operation may cause electric shock and system damage.
Eye damage due to light beam
Caution:
When the instrument is active, do not directly look at the light beam
emitting from the lamp source, which may cause injury to your eyes.
Skin damage due to chemicals
Biologically dangerous
If chemical adheres to the human body, infection may occur. Do not
directly touch the sample, mixed solution and waste solution. Be sure to
put on protective gloves, clothes, or even goggles when necessary.
If chemical sticks to the human body, handle it according to the working
standard procedure and consult a physician.
Some reagents are strong acid or basic. Please use them carefully and
avoid direct contact. If the reagent sticks to hands or clothes,
immediately wash it off with water and soap. If the reagent goes into the
eyes, wash it off with a lot of water and consult an oculist.
Disposal of waster solution
Biologically dangerous
The discharge and disposal of reagent, control solution, calibration
4
URIT-800 Operating Manual
solution, detergent, and waste solution are regulated by certain
standard provisions. Please observe the local discharge standards and
consult the reagent supplier or distributor.
Intended use
Caution:
The instrument is mainly employed to quantificationally analyze the
serum, plasma, urine and cerebrospinal fluid etc. If the instrument is to
be used beyond the intended use, consult URIT first.
When doing clinical diagnosis based on the test result, clinical
symptom and other test results should also be considered.
Ambient
Caution:
The instrument should be installed in the ambient specified in the
manual; otherwise, inaccurate results or even system damage may
occur.
I f r e l o c a t i o n i s n e c e s s a r y, p l e a s e c o n t a c t U R I T o r l o c a l
representatives.
Usage
Caution:
(1) Operate the instrument as the operating manual. Improper operation
may incur error results or even system damage and human injury.
(2) For the first use of the instrument, please perform calibration and
quality control to confirm the instrument's working order.
(3) Perform quality control before using the instrument. Otherwise, the
results may be inaccurate.
(4) The instrument's RS-232 port is required to be connected with the
computer's RS-232 port, rather than any other cables. Please use the
special cable provided by URIT or representatives.
(5) As a special monitor for the software, the computer installed with
any software and hardware other than specified by URIT may cause
bad influence on the instrument. Do not run any other software
5
URIT-800 Operating Manual
when the instrument is active, otherwise, computer virus infection
may incur.
(6) Do no touch the display, mouse and keyboard when your hands are
wet or stuck with chemicals.
6
URIT-800 Operating Manual
1 General Description
The URIT-800 chemistry analyzer ( instrument
for short) is a computercontrolled instrument based on the principle of photoelectric colorimetry, integrated
with electronics, optics and mechanics. The instrument is intended for use in
conjunction with certain reagents to measure a variety of samples, such as serum,
urine, cerebrospinal fluid and plasma. Its features are speediness, convenience, high
sensitivity, accuracy, standardization and micro-volume, etc.
This software with friendly interface is convenient for operation. User can operate
the instrument through clicking the mouse, and export the test results, statistical
results and working curves through the external printer.
1.1 Specifications
1.1.1 Technical Specifications
1. Light Source: Long-life halogen lamp 6V/10W
2. Wavelength Range: 300~800nm
3. Assay Method: Endpoint, rate, two-point, dual-wavelength, multi- standard,
absorbance, turbidimetry, reagent blank, coefficient, single-point calibration and
multi- point calibration, etc.
4. Photometric Range: 0 3.0 Abs
5. Linearity Error: 0.5% (within 0.5 1.8Abs)
6. Resolution: 0.001Abs; (0.0001Abs for Internal calculation)
7. Drift Rate:
0.002Abs/20min
8. Sample Volume: 200 L
3000 L (variable) , 500 L is recommended
9. Cell Temperature: NO(instrument inside temperature), 25
10. Carry-over:
30
37
.
0.1
1%
11. Reproducibility: CV 1.0%
12. Item: Up to 200 items
13. Memory: Up to 100,000 test results
14. Output: Standard data port
15. Quality Control: with quality control and statistic procedure, showing QC curves
1.1.2 Power and Ambient
1. Ambient:
o
Temperature: 10 C
o
30 C
7
URIT-800 Operating Manual
Relative Humidity:
80%
Extremity: 5
40
RH
85%
Storage :-20
55
RH
95%
2. Power Supply: (110~240) V
3. Power:
50~60 Hz
100W
4. Atmospheric Pressure: 75kPa~106kPa
5. Dimension: 330 mm by 310mm by 175mm (length by width by height)
6. Weight: About 5.5Kg
1.2 Principle and Components
1.2.1 Principle
Beer's law:
When a parallel monochrome light beam goes through an absorbent object (gas,
liquid or solid), some photons are absorbed and the light intensity decreases from I to
Io. The formula is:
- lg
I
I0
KLC
K: Absorbance coefficient
L: Thickness of object
C: Concentration of object
I: Intensity of shoot-in light
Io: Intensity of shoot-out light
Measure I, Io and L, and then calculate C according to the formula above. The
result will be obtained through data conversion. (Figure1)
Receiver
Selective Filter and
Conversion system
Amplifier
Focus System
Digit Area
Figure 1
8
URIT-800 Operating Manual
1.2.2 Components
The instrument consists of analyzer, computer and printer (figure 2). The URTI-800
system software monitors and controls the analyzer through the RS-232 port on the
computer. Computer and printer are optional accessories.
Computer requirement: CPU over Pentium , stable running mainboard with RS232 port, memory over 256M, and windows XP operation system. All the parts should
consist with the relevant safety standards.
RS-232
Analyzer
Computer
Figure 2
The analyzer is composed of sampling system, light path system, liquid circuit
system and hardware circuitry. Figure 3 shows the appearance of the analyzer.
Figure 3
9
URIT-800 Operating Manual
1.3 Functions
(1) Integrated assay methods: Endpoint, rate, two-point, dual-wavelength,
absorbance, etc.
(2) Proper parameter setup: Reagent blank and distilled water blank are applied to
test to ensure the accuracy of test results.
(3) Credible calculating method: Coefficient, single-point calibration and multi-point
calibration, etc.
(4) Large capacity storage: Up to 200 items and 100,000 test results. Test results,
QC data, item standard and item setup are saved in the system database for
analysis and statistic.
(5) Quality control: Perfect QC function for QC data statistic, storage and QC chart
drawing.
(6) Various print formats: Three print formats are selectable: traditional, economical
and common .
(7) Strong search function: Search indexes include: test date, patient's name,
doctor, number of outpatient, operator, display all, etc.
(8) Open reagent: Reagent is optional; user can set up items to be tested as
required.
(9) Data share: External date can be transmitted into the system.
(10) Modifying results: Patients' information and test results can be modified in
flexibility and convenience.
(11) User-friendly interface: Allows multi-user management. The test results can be
summed up and analyzed according to different users' requirement.
(12) Visually dynamic display: Displays the whole test process and detects the
abnormality, such as air bubble disturbance.
10
URIT-800 Operating Manual
2 Installation
Caution:
User shall not attempt installation of this instrument after its delivery.
URIT's service representative will install the instrument for its safe and
exact operation.
Before installation, User shall make preparations for satisfying the
installation requirements in accordance with this manual.
2.1 Unpacking
Please check the carton according to following procedures:
1) Carefully unpack the package and take out the URIT-800 chemistry analyzer and
accessories.
2) Inspect the instrument and accessories for quantity and visible signs of damage
according to the standard list.
3) If any loss or damage exists, contact the distributor or manufacturer immediately.
2.2 Instrument Installation
2.2.1 Requirement of Installation
!
!
!
!
!
!
!
!
!
!
!
!
Just for room installation and use.
Table-board(or ground) must be level (Gradient
1/200).
Good ventilation.
Free from direct sunshine.
Free from hot source and wind source.
Free from corrosive and flammable gas.
No shake with the table-board (or ground).
Free from noise source and electricity source interference.
Do not be close to the brush-motor and the electric equipment which are often
turned on or off.
Height above seal level of the working place should below 3500 meters.
Power supply: 110~240V
50~60 Hz , three cores cable, well grounded.
A well-grounded power jack is required. The maximum power consumption is
1KVA. The instrument should be connected with exclusive cable, if possible.
11
URIT-800 Operating Manual
!
!
!
The distance between jack and instrument should be less 5 meters.
Temperature range is 10
30
with the variation < 2
Relevant humility range is 35%RH
/H.
80%RH, no coagulation .
2.2.2 Procedure of Installation
(1) Take out the instrument and place it on a level stable worktable. For heat
dispersion, the rear of the instrument should keep away from wall or obstacles at
least 20 cm. The bottom of the instrument should keep good air circulation.
(2) Take out the onboard online control cable; connect one of the end to the RS-232
port on the computer, and the other one to the RS-232 port on the instrument. Fix
them with screws to avoid looseness and online failure.
(3) Connect the power cord to the power export port on the rear of the instrument.
(4) Connect the joint end of the waste tube to the waste outlet, and the other end to
the waste flask.
(5) Before initial running, check the liquid tubes to make sure that they are not bent
and the waste solution can be discharged to the proper flask.
(6) Install the printer as the instructions provided by the printer supplier.
(7) Before operation, warm up the instrument for 20~30 minutes until the heat and
light source are stable.
2.3 Software Installation and Registration
2.3.1 Software Installation
Run the SETUP.EXE on the onboard CD, and execute the operation step by step
according to the prompts provided by the system. When the installation has been
completed, the shortcut icon of URIT-800 is set up automatically on the desktop by
the installer program. then, you can run the URIT-800 through double click.
2.3.2 Software Registration
Run the URIT-800 software and select Registration
in
Help
menu. The
logon screen is displayed. Make your entry for User Name , which will be showed
on the test report as the title. Click the Device ID to get the device ID and feed it
back to URIT to get the registration ID in return, and then input it in the
Registration ID . That done, click the
Registration
button. Alternatively, our
engineer can finish the registration for you.
Note:
The methods of the software installation and registration are subject to
12
URIT-800 Operating Manual
change without prior notice. Please refer to the installation instructions
accompanied with the onboard CD.
2.4 Software Online
Turn on the power switch on the instrument. Click twice the URIT-800 icon on the
desktop to run the registered software. The initial logon account is: Operator: user,
Password: user. Input the password and click
OK . If the input password is
correct, the
OK
button disappears; otherwise, the
OK
button does not
disappear and checkup of operator and password is necessary.
Selecting COM Setup in Maintenance , all the COM ports on the computer
will be checked by the system automatically. After checkup, a dialog is displayed.
Select proper COM and click the TEST button. If the buzzer rings, communication
is successful. If the buzzer has no response, please select other COM until the
communication is successful. After confirmation, click the SAVE button.
2.5 Software Initialization
After installation and registration, the software should perform initializing and read
the internal instrument data before its normal running.
Selecting System Initialization in Maintenance , the initialization screen
is displayed. Select
Temperature parameter initialization
and
Pump
parameter initialization (by placing
mark) , and click the INIT button.
(For initial installation, both should be selected). Then, Reenter the software to
achieve initialization for the software.
13
URIT-800 Operating Manual
3 Operation
Caution:
For convenient operation, please refer to the online help when operating
the instrument.
Biologically dangerous:
To avoid infection, please put on protective gloves, clothes, and even
goggles when necessary.
To avoid unnecessary damage to the instrument resulting from improper
operation, please read the operating manual with care prior to operation.
The system offers the convenient shortcuts toolbar that are indicated with icons
under the menu bar. The routine work can be performed by clicking the icons in turn
from left to right .
3.1 Start-up
(1) Open the display and host computer.
(2) Open the analyzer.
(3) Run URIT-800 chemisty analyzer software and log in the main screen.
3.2 Preparations
(1) Inspect the waste flask to see whether it is full. If so, dispose the waste solution
according to relevant regulations.
(2) Click the icon of Rinse Tube in the shortcut toolbar. The instrument is rinsed
one time with distilled water then goes to standby status.
(3) Click Instrument Checkup in Maintenance and set proper temperature
o
o
o
for the cell (NO [instrument inside temperature], 25 C 30 C 37 C). Default
o
temperature for the cell is 37 C.
(4) Half an hour later for standby, the light source lamp is expected to be stable and
the temperature reaches the expected level.
(5) Rinse the instrument five times with distilled water.
(6) Click the icon of Adjust A/D in the shortcut toolbar to adjust the instrument
automatically. If problem appears, refer to the seventh item in
Troubleshooting .
(7) Confirm whether the instrument needs to be calibrated. Refer to chapter 5
Analysis and Calibration for details.
14
URIT-800 Operating Manual
QC
3.3 Setup of Item Parameters
For setup of item parameters, click the icon of
shortcut toolbar. Refer to 4.1.1 for details.
Item Parameters
in the
3.4 Setup of Item test
Click the icon of
Item Test
in the shortcut toolbar to enter the item test screen.
3.4.1 Input of Patient Information
3.4.1.1 Edit of Single Item
(1) Input the sample ID for
Sample ID
when registering results).
(Date, Name, Sex and Age can be input
(2) Select the items to be tested in Item List . The selected items turn red. (The
blue ones indicate individual items, the green ones indicate profiles).
(3) Click
ADD
to complete the edit.
Return (1) to edit the next patient.
3.4.1.2 Edit of Multiple Items
(1) Input the starting sample ID for
input when registering results).
Sample ID . (Date, Name, Sex and Age can be
(2) Select the items to be tested in Item List . The selected items turn red. (The
blue ones indicate individual items, the green ones indicate profiles).
(3) Input the number of multiple items and click
sample ID will add 1 in turn.
COPY
to complete the edit. Each
Return (1) to edit the next group of patients.
3.4.2 Test Start
When the patient information has been input, click the CHECK button and the
test screen is displayed, then click the TEST button. When the progress bar of
stable temperature turns into
read time , locate the sample cuvette under the
probe and press the START button on the instrument. The instrument will pipette the
sample and perform test according to the item parameters that have been set up
previously.
If abnormality is detected in the test process and you need to cancel the current
test, click the RETURN button. A dialog is displayed for confirmation. Click OK
to cancel the test.
3.5 Registration of Result
15
URIT-800 Operating Manual
After a test has been completed, click the RETURN button. Then, click the
icon of Register Results in the shortcut toolbar. Input the sample ID according to
the test report, of which all the test results are displayed. Clicking
Calculated
Item , all the items to be calculated are displayed. When a piece of sample
information has been registered, click the SAVE button then register the next one
until all the sample information is input.
3.6 Modification of Result
If the test results show abnormality, click the icon of Modify Results
in the
shortcut toolbar to enter the modification screen. Select the item to be modified and
enter the Modified Factor calculated by the formula : Factor=QC target value
QC measured value . Click MODIFY followed by clicking SAVE to complete the
modification. To avoid blind modification, some objective factors, e.g., the condition
of patient's sample, as well as the QC values tested several days ago should be
taken into consideration.
3.7 Recall of Sample
Click the icon of Recall Samples
results. Refer to 4.4.3 for details.
in the shortcut toolbar to review desired
3.8 Help
For any problems and questions in operation, click
and detailed help.
Help
to get convenient
3.9 Logout
When you have completed your test, click the icon of Logout in the shortcut
menu. The login screen is displayed again for other users to enter system to manage
their own test information conveniently.
3.10 Ending
Please carry out following operation when your work ends.
(1) Put reagents into icebox.
(2) Dispose the useless serum cuvette according to relevant regulations.
(3) Rinse the instrument at least 10 times.
(4) Click Exit in shortcut menu and turn off the instrument.
(5) Turn off the host computer, display and power supply.
(6) Wipe the worktable with clean soft cloth.
16
URIT-800 Operating Manual
4 Settings
The software of URIT-800 chemistry analyzer mainly includes five menus: Test
Setup, Maintenance, System Setup, Results Processing, and Help. Next are the
detailed instructions.
4.1 Setup of Test
4.1.1 Setup of Item Parameters
The first step of item test is to set up item parameters. Proper item parameters can
effectively ensure the accuracy of test results. Whatever assay method you take, the
essentials include: item name, assay method, wavelength, unit and decimal, blank
low, blank high, temperature, sample volume, reagent volume, stable time, measure
time, standard low, standard high. When inputting the item name, please replace the
- with the _ , if any.
Selecting the Item Parameters , a screen is displayed for setting. The left field
indicates the existing items, which are displayed as the order set in Display and
Print Order . When adding a new item, the parameters relating to Endpoint method
are indicated as default values.
Setup of parameters
In the screen of item parameters setup, you can set up or modify parameters as
required.
(1) Name and Byname
Input the English item name and its byname in
respectively.
name
and
byname”
(2) Assay Method
The assay methods include: endpoint, rate, two-point, dual-wavelength, etc.
clicking the
Method
icon, an optional menu is displayed for selecting assay
method.
(3) Wavelength
The main wavelength range is 340nm~800nm. For dual-wavelength method, you
can select sub wavelength that also has the range of 340nm ~800nm. Clicking the
Wavelength icon, an optional menu is displayed for selecting wavelength.
(4) Time
Stable time: the stable time of endpoint and dual-wavelength method is from the
sample being pipetted into cell to the test beginning. The stable time of rate and twopoint is from the sample being pipetted into cell to the fist point being tested.
Read time: used for rate and two-point method. The time is from the fist point being
tested to the last point being tested.
(5) Blank
17
URIT-800 Operating Manual
Reagent and distilled water are selectable as blank mediums.
(6) Volume
Set up volume of reaction solution to be pipetted.
(7) Unit
Set up unit for test result.
(8) Temperature
o
Selectable temperature: NO(instrument inside temperature), 25 C
o
30 C
o
37 C .
(9) Others
Set up parameters for reagent as requirement.
Blank L: Blank Low;
Normal L: Normal Low;
Blank H: Blank High;
Normal H: Normal High
(10) Standard
Standard number (stand. No.): The number of calibration. The Maximum is 6.
Standard factor: The factor is input manually or calculated by system after
calibration.
Standard 1~6: Input concentration of calibration item as required.
Clicking the specified key causes the following actions:
ADD: Adds new items to be tested
DELETE: Deletes existing items
SAVE: Saves new added or modified items
PRINT: Prints selected items
RETURN: Returns to welcome screen
4.1.2 Setup of Other Parameters
Other Parameters is an extended function through which the items and test
results from other instrument can be transmitted into the internal system and printed
out with the same format.
Make your entries in the input fields.
Char: If the normal low value is equal to the high value, it means the results will be
shown in char type, for example: + , - , positive , negative , etc.
Float: If the normal low value is lower than the high value, it means the content will
be input in float type.
Clicking the specified key causes the following actions:
SAVE: Saves the input information into database
DELETE: Deletes selected information
18
URIT-800 Operating Manual
RETURN: Exits current setup
4.1.3 Setup of Profile
Profile means an independent test name which is shared by some collected items.
All the items for option in database are showed in the middle filed; the input profile
names are showed in the left field, and the items that belong to a certain profile are
showed in the right field.
Input the profile name and click Add Profile . Then, add desired items to the
profile through the function of ADD and DELETE .
Clicking the specified key causes the following actions:
ADD: Adds items to profile
DELETE: Deletes items from profile
Add Profile: Adds profiles
Delete Profile: Deletes profiles
RETURN: Exits current setup
4.1.4 Setup of Display and Print Order
For the order of display and print, sequence the targets to be tested, including
biochemical items, external items and calculated items.
Clicking the specified key causes the following actions:
ADD: Adds selected items in the left item list to the right order list
INSERT: Inserts selected items in the left item list at the desired position in the right
order list
SAVE: Saves sequenced items into system
RETURN: Exits current setup
4.1.5 Setup of Calculated Items
Some items are calculated and the corresponding results are named calculated
results, which are of great help for doctors' diagnosis. The calculating aggregation
composed of arithmetic function is called calculated item. For example: the formula
of calculated item SIDF is: TG+UA+EXP (GLU).
For standardization of formula, some arithmetic function are offered by system.
For error avoidance in calculation, please replace the
inputting the item name, if any.
-
with the
_
when
Clicking the specified key causes the following actions:
19
URIT-800 Operating Manual
ADD: Adds new calculated items
DELETE: Deletes existing calculated items
SAVE: Saves input data
RETURN: Exits current setup
4.1.6 Setup of QC Target Value
Refer to chapter 5
QC Analysis and Calibration
for details.
4.1.7 Input of QC Value
When selecting the desired item, the corresponding QC code is shown
automatically. Then, you can input the QC code according to date and save the input
content into system.
4.1.8 Analysis of QC Chart
Please refer to chapter 5
QC Analysis and Calibration
for details.
4.1.9 Item Test
The first step of item test is to set up a job list. Clicking Item Test , the setup
screen for item test is displayed. First number the sample ID with the range of
1
999 (The ID 999 means QC) . In the item list, the profiles are indicated with P: at
the head and shown in white characters on the green background, while the individual
items are shown in white character on the blue background.
For editing items, input sample ID, for example: 1 , then select the desired items
from Item List , which will turn red. Click ADD or OPY to add the selected
items to the Pending Item list.
l
For modifying the item of a certain sample, select the sample ID and the item to be
modified, then click Evaluate .
l
For testing the same item for multiple samples, select the item and input the
sample number, then click COPY .
l
For deleting a sample, select the sample ID, then click
Delete Sample .
l
For deleting a pending item, select the item, then click
Delete Item .
Upon completion of setup, click
TEST
to enter the test screen. Click
RINSE to rinse the cell one time. Then, click START . When the progress bar of
stable temperature
turns into stable time , place the sample cuvette at the
proper position. Press the START button on the instrument, the instrument beginning
to pipette sample and perform test automatically.
20
URIT-800 Operating Manual
4.2 Maintenance
The maintenance menu includes following options: COM Setup, Instrument
Checkup, Adjust A/D, Rinse Tube, ABS Checkup, Adjust Temperature, Adjust Pump
and System Initialization.
4.2.1 COM Setup
Selecting COM Setup in Maintenance , all the COM ports on the computer
will be checked by system. After checkup, a dialog is displayed for user to select a
COM. Select one and click
TEST , if the buzzer rings, communication is
successful. If the buzzer has no response, select another COM until communication
is successful. After confirmation, click the SAVE button.
4.2.2 Checkup of Instrument
This function aims at the instrument maintenance and debugging. Input the
parameters according to prompts in the operation process, and select TEST
to
validate.
l The current temperature of the cell is displayed by system, with the selectable
temperature: NO(instrument inside temperature), 25
30
37
.
l The A/D value of current filter can be obtained by setting up the gain.
l The peristaltic pump's move step and rate is settable to adjust the pipetted volume
each time. The factory parameter is 500
at a time. If volume adjustment is
necessary, make sure the liquid fills the cell fully and overflows the cell exit about
10cm without air bubble between.
l
The number of filter and the diameter of cell are settable.
l
The status of START button can be checked.
When done, click the
SAVE
button .
4.2.3 Adjustment of Initial A/D
The A/D value of each instrument has been adjusted in factory testing. The gain,
A/D and offset value vary with different filters. Generally, when the gain is 3 or 4, the
initial A/D value is about 34000, the offset value is within 70~130 (never 0), which are
the optimum initial values for checking system.
Click Adjust A/D to enter the screen of initial A/D value. Click
fill the cell with distilled water prior to adjustment.
SAMPLE
to
Clicking ADJUST , the gain and offset of different wavelengths are adjusted by
system. After adjustment, the buzzer rings and the adjusted results are saved
automatically as reference values for the sequent tests.
21
URIT-800 Operating Manual
It is recommended to adjust the initial A/D value under following conditions:
l When installing instrument or replacing computer.
l
When operating the instrument after a long-distance shipping.
l
When replacing a halogen lamp.
l
When replacing a cell.
l
When filter has deteriorated.
l
Whenever test results show abnormal fluctuation.
4.2.4 Rinse Tube
Carrying out tube rinse can clean the tubes and cell, and keep the cell humid. Click
tube rinse to enter the screen of tube rinse.
Input the rinse times and click the
RINSE
button to start rinsing automatically.
It is recommended to rinse tubes under following conditions:
l
At the start of the day's run.
l
At the end of the day's run.
l
After testing high concentration solution.
l
A long time for disuse.
l
The initial A/D value is abnormal.
Caution:
For the air bubble or foreign body that is difficult to wash off in the cell,
try to rinse it with absolute alcohol or detergent recommended by
URIT.
4.2.5 Checkup of ABS
In the Abs checkup dialog, you can check any filters in the left wavelength list, and
quickly analyze the liquid of different absorbance.
Clicking the specified key causes following actions:
SAMPLE: Pipettes solution to be tested in the cell
ZERO: Zeros the ABS of current solution
RETURN: Exits current screen
22
URIT-800 Operating Manual
4.2.6 Temperature Adjustment
This function is just for factory testing, only open to URIT technicians or
technicians authorized by URIT.
4.2.7 Pump Adjustment
This function is just for factory testing, only open to URIT technicians or
technicians authorized by URIT.
4.2.8 System Initialization
After installation and registration, the software must perform initializing and read
internal data prior to normal running.
For initialization, select
Temperature parameter initialization
and
Pump
parameter initialization to initialize. That done, that is, the software has read out
the default parameters, reenter the software as requirement to complete the
initialization.
Note:
For initial installation, both two items should be selected for initialization.
4.3 Setup of System
The menu of system setup includes following items: Operator Password, Doctor,
Department, Operator and Chart Color.
4.3.1 Setup of Operator Password
Click
password.
Operator Password
in
System Setup
to set up or modify the
When initially inputting the user name, you can set up the corresponding
password through this function. If the password has existed, it will be shown in the
old password . After modification, the new password will be saved as the operator
password for the sequent login.
4.3.2 Setup of Doctor
The doctors can be denoted with codes or names, depending on the requirement
of lab.
23
URIT-800 Operating Manual
4.3.3 Setup of Department
The departments can be denoted with codes or names, depending on the
requirement of lab.
4.3.4 Setup of Operator
The operators can be denoted with codes or names, depending on the
requirement of lab.
4.3.5 Setup of Chart Color
You can set up your favorite colors for charts.
Default chart colors provided by system can also be customized as required. The
changed colors are valid only after saved.
4.4 Processing of Results
The menu of result processing includes following items: Modify Results,
Register Results and Recall Results.
4.4.1 Modify Results
Refer to 3.6 for details.
4.4.2 Register Results
Refer to 3.5 for details.
4.4.3 Recall Results
Click
Recall Results
to review the tested sample information. Select one
search method: date ,
item , doctor , outpatient no , operator or
all , and click
SEARCH . The desired records will be shown in the patient
information list.
Print: Prints the records selected from the Patient Information List .
4.5 Help
The help menu includes three submenus:
Software .
Help
,
24
URIT-800 Operating Manual
Registration
and
About
4.5.1 Help
If you have any problems in operation, click
help
to obtain details.
4.5.2 Registration
Input user's name and registration ID to complete registration for the software.
4.5.3 About Software
You can find the copyright number and registration information about this
software here.
25
URIT-800 Operating Manual
5 QC Analysis and Calibration
5.1 General
The meanings of reliability about test results have two aspects: one is high
precision, i.e. the good repeatability of test results, which mainly aims at eliminating
or minimizing the influence caused by random error and depends on the perfect room
QC system to guarantee. The other one is accuracy, i.e. the test results are correct
and close to the true values, which mainly aims at eliminating or minimizing the
influence caused by system error and depends on the proper assay method and
correct calibration to guarantee. Therefore, it is necessary to strictly select certified
control sample and calibration solution, and use them according to their instructions.
5.2 QC and QC Procedure
The control sample is just used together with the sample to be tested. To minimize
the test error, it is required to keep the control sample stable in storage.
5.2.1 Class of Control Sample
l
Mixed serum, freeze-dried and liquid control sample, classified by the different
physical properties of control samples.
l
Fixed value and non-fixed value control sample, classified by the presence /
absence of measurement value.
You can select one kind of control sample above as the room control sample as
required.
5.2.2 Usage and Storage
l Strictly use control sample according to the instructions provided by the supplier.
l Make sure the high quality of the solution redissolved from freeze-dried control
sample.
l Make sure the added volume is accurate and consistent each time redissolving the
freeze-dried control sample.
l Fierce shake is avoided by all means when redissolving the freeze-dried control
sample.
l Store the control sample according to requirement; do not use the expired
products.
l Test the control sample at the same condition as that of the patient sample.
26
URIT-800 Operating Manual
5.2.3 Setup of QC Target and Control Limit
The QC target and control limit value can be obtained from the control sample
manufacturer or from following methods:
l Setup of temporary target value: Test a new set of control sample. Obtain the
results of at lest 20 control tests, and calculate their mean value and standard
deviation (SD) as the temporary target value and temporary SD respectively.
l Setup of regular target value: Obtain the accumulative mean values of the original
20 data and all the tested data collected for 3~5 months as the regular value and
SD respectively.
l Setup of control limit: The new set of control sample is required to fix the control
limit that is usually denoted with some SD, i.e. denoted with the multiple of SD. The
control limit of different items (quantitative test) depends on their QC regulations.
5.2.4 QC Procedure
In Item Test , if you input 999 for Sample ID , the code of the current
control sample is required and the relevant QC results will be saved to database for
control analysis.
5.3 Analysis of QC Results
5.3.1 Input of QC Target and Standard Deviation
Select QC Target Setup in Test Setup
the target and SD that obtained before.
, and input the QC code as well as
5.3.2 Analysis of QC Chart
Select
QC Chart Analysis .
In the QC chart dialog, the red line marks the target value, while the blue lines
mark +1SD +2SD +3SD +4SD. Select the items from
item List , and make
your entries in
QC Code and Test Date respectively. The system will draw
the QC curves in this period automatically. If you select the
Standard Qc
(by
placing
mark ), the target value and SD are just those set in 5.3.1 ; Otherwise,
the system will recalculate the target value and SD of this period and draw the QC
curves.
5.3.3 Normal Distribution
l About 95% data are within
.
l
5 continuous data in the same side are not allowed.
l
5 continuous data step-up or step-down are not allowed.
l
2 continuous points outside X 2S are not allowed.
27
URIT-800 Operating Manual
l
Points outside X 2S are not allowed.
5.3.4 Abnormality
Drift: System error is prompted.
Tendency change: The capability of reagent or instrument has been changed.
Precision change: Accidental error is large, e.g. the instrument or reagent shows
instability.
5.4 Treatments for Abnormality
For abnormality, carry out following procedures to deal with.
Fill in abnormality report and report it to your lab manager.
Simply and quickly review the operation process to find out the possible cause.
If no evident error is found, follow the steps below to find out the cause.
(1) Retest the same control sample. This step is mainly for checking whether
operator caused the error. Additionally, this step can also check out whether the
random error existed. If so, the retested results should be within the allowable
rang (control limit). If not, proceed to the next step.
(2) Obtain a new bottle of control sample to retest the abnormal items. If the retested
results are within the allowable range, it means the previous bottle of control
sample has expired or deteriorated as being laid aside for a long time. If not,
proceed to the next step.
(3) Obtain a new set of control sample to retest the abnormal items. If the retested
results are within the allowable range, it means the previous set of control sample
has problem. Then, Inspect the expiration date and storage ambient to find out
the cause. If not, proceed to the next step.
(4) Maintain the instrument and retest the abnormal items. Inspect the instrument for
replacement of filter and cleanness of cell. If the retested results are not within
the allowable range, proceed to the next step.
(5) Recalibrate the instrument and retest the abnormal items. Perform calibration
with the new calibration solution. If the retested results are not within the
allowable range yet, proceed to the next step.
(6) Obtain help from technician. If the test results are not within the allowable range
yet after completing the five steps above, the instrument or reagent may be to
blame. Contact URIT or reagent supplier to get more technical help.
28
URIT-800 Operating Manual
5.5 Calibration and Procedure
Calibration sample is used to calibrate the numerical value of the assay method.
The function is to eliminate or minimize the system error caused by instrument or
reagent. It is recommended that human serum matrix be employed to minimize the
error caused from matrix effect.
5.5.1 When to Calibrate
It is suggested to perform calibration every six months or under the below
situations:
l When installing and running the instrument initially.
l When changing the reagent class or the batch number , unless otherwise specified.
l When carrying out a protective maintenance or replace a essential component,
which may influence the capability of the instrument.
l When the QC results reflect abnormality, which cannot be rectified through general
corrective measures.
5.5.2 Procedure of Calibration
Select the items to be calibrated in Item Parameter , and input the numerical
value offered by the supplier, then click the SAVE button. The system will perform
calibration for this item prior to test, process the calibration result and save it as
standard reference for the item to be tested next time.
All the calibration and validation work are required to be recorded and compiled
into document. It is must be emphasized that the fixed-value serum should not be
used as calibration sample because of the huge difference between.
29
URIT-800 Operating Manual
6 Reagent, Sample and Waste
6.1 Reagent
!
!
!
The reagent parameters are settable for the URIT-800 chemistry analyzer.
Only the certified reagents can be used to test.
Carefully read the instructions provided by reagent supplier before using it.
6.2 Detergent
The detergent that the instrument employs is open for choosing.
6.3 Precautions
!
!
!
!
When carrying out test and daily maintenance, be sure to obey the operation
regulations, put on protective gloves, clothes and goggles, and avoid contacting
the sample.
All the clinic samples should be handled according to the operation regulations,
as they may carry potential infectious disease. Put on protective clothes, gloves
and eyeglasses. No smoking and eating in working area. Do not blow or suck the
tubes.
Carefully dispose the wastes as they may carry potential contaminations and
cause biologic and chemical hazard. Obey the relevant regulations constituted by
local Medical and Health Administration to dispose and drain the waste solution.
Store reagents according to the instructions offered by reagent supplier. User has
the obligation to establish measures for reagent keeping and use, thus avoiding
using expired reagents. Storage should keep away from excessive hot or cold
environment.
30
URIT-800 Operating Manual
7 Maintenance
To ensure reliable capability and prolong the instrument's life, perform periodical
maintenance for the instrument according to the operating manual.
For the problems cannot be solved or not be involved in this chapter, please
contact URIT or the local representatives.
Caution:
l Do not perform any maintenance other than specified in this chapter;
otherwise, human injury and instrument damage may occur.
l The unauthorized maintenance for instrument may cause system
damage and human injury, and invalidate the terms of maintenance
service stated in contract.
l After maintenance, make sure the system is working in order.
l Most maintenance is carried out with the instrument power off. For
your safety, the main power supply sometimes is required to be cut off
prior to maintenance.
l Free of spills of water, reagent, etc. on the instrument and electric
units.
Biological dangerous:
Be sure to put on protective clothes, gloves, and even goggles when
necessary before maintenance.
7.1 Cell
The precisely designed flow cell with a stainless steel quartz window, can keep an
accurate heat balance inside. The temperature in the cell is controlled by Peltier
element. The inlet is narrow and close to light source while the outlet is a little wider
(figure 4).
For replacement of the cell, first drain off the liquid in the cell and flow path. Then,
press the cell with one hand, and take out the tubes of inlet and outlet with the other
hand. Finally loosen the fixed clip on the cell and take out the cell from the cell hole.
For installation of the cell, properly embed the cell in the hole, and fix it with the
fixed clip. Then, connect the tubes back to the corresponding inlet and outlet
respectively.
31
URIT-800 Operating Manual
Cell
Fixed clip
Figure 4
Caution:
For cleanliness of the cell, do not touch the quartz window on the cell.
After each testing, rinse the flow cell and fill it with water before turning
off the instrument.
Rinse the cell with detergent once a week. Aspirate detergent 2
milliliters, and keep it in the cell for 5 minutes, then aspirate distilled
water 20 milliliters to wash off.
Biological Dangerous
To avoid infections, be sure to put on protective clothes, gloves and
even goggles when necessary.
7.2 Peristaltic Pump
The peristaltic pump is an essential part for liquid entering and draining. The
pump pipe is made of special silica gel. When the error of pipetted volume is large or
the pipetting fails, replace the silica gel pipe with a new one in the same model
(figure 5). The steps for replacement are as follows:
(1) Drain off the liquid in the flow path, open the maintenance window on the left side
of the instrument, and take out the tubes connected with the pump.
(2) Forcibly nip the two clamps on the pump base with your thumb and index finger,
and then take out the pump from the base.
(3) Forcibly nip the two clamps on the upper cover of the pump with your thumb and
index finger, and then take out the lower cover.
(4) Take down the wore pump pipe from the upper cover, then take down the two
closing rings from the wore pipe and clip them in the new pipe.
32
URIT-800 Operating Manual
(5)
Push the new pipe into the interspace between the rotating wheel and the inner
wall of the upper cover. Hold down the two closing rings to clip the outlet of the
upper cover, with the opening upward.
(6)
Join the upper cover with the lower cover. Forcibly press until the covers join
with each other totally.
(7)
Aim the center of the pump at the motor shaft, and press the pump until it is set
on the base.
(8)
Connect the tubes back to the pump.
Figure 5
7.3 Cleanliness
7.3.1 Daily Maintenance
l Perform rinse 10~15 times after turning on the instrument and 10~20 times before
turning off the instrument.
l Wash the waste flask.
Biological dangerous
To avoid infection, be sure to put on protective clothes, gloves and even
goggles when necessary.
7.3.2 Weekly Maintenance
l
Using detergent contains active enzyme, soak the cell for certain time. (Note: do
not soak a long time if the detergent is strong caustic.) Then, rinse the cell with
33
URIT-800 Operating Manual
distilled water several times. The detergent that soaks the cell can be pipetted
through the setting of pipette in Abs checkup .
l
Perform rinse 10~15 times with absolute alcohol.
l
Shut off the power supply, and then wipe the appearance of the instrument with
clean gauze, or gauze moistened with water or disinfector when necessary.
Caution:
Be sure to operate the instrument with care, avoiding being lacerated by
the instrument shell.
Biological dangerous
To avoid infection, be sure to put on protective clothes, gloves and even
goggles when necessary.
Do not discard the used gauze at will after wiping the instrument.
Dispose it as per the relevant regulations.
7.3.3 Monthly Maintenance
l The operation is as weekly maintenance.
l Inspect the cell for air bubble and foreign bodies.
7.4 Precautions for Usage
(1) Free from dust and moist. Air conditioner is recommended. The optimum ambient
temperature is 15~25 .
(2) Free from electric leakage and static electricity. Make sure the instrument is well
grounded. For the absence of earth wire on the power socket, the ground pole
outside the instrument should be grounded to ensure safety and stability.
(3) It is suggested that the power socket be for instrument exclusive use.
(4) Be sure to use certified reagents.
(5) Reagents taken out from icebox should not be used immediately until they reach
the room temperature.
(6) To avoid confusion, different samples should be registered with different codes,
(7) After turning on the instrument and computer, execute
for half an hour prior to routine test.
(8) After work, execute
Rinse Tube
Tube Rinse
and wait
several times.
(9) Do not perform any other irrelevant operation with the computer lest virus intrude
and cause damage to the system.
34
URIT-800 Operating Manual
8 Troubleshooting
Caution:
Be careful to handle with malfunctions, be sure to shut off the power
supply before operation.
Biological dangerous
Be sure to put on protective clothes, gloves, and even goggles when
necessary before operation.
Troubleshooting is presented in this chapter. If the malfunctions cannot be
eliminated as per the instructions specified in this chapter, or if you need more and
detailed materials, please contact URIT.
8.1 Troubleshooting Directions
Troubleshooting directions are designed to help user search and eliminate the
malfunctions in the operation, and also offer the ways to obtain timely and
convenient technical help from URIT.
For correct and quick troubleshooting, read through the operating manual
carefully and be familiar with the operation and maintenance measures.
In general, troubleshooting can be followed as three steps below:
l Confirming malfunction
l Classing malfunction
l Eliminating malfunction
The first step: confirming malfunction
You should find out what cause the malfunction, and know what the instrument
should be when in order. This step is essential to eliminate malfunction.
The second step: classing malfunction
The instrument malfunction can be classed into three categories:
l Malfunction relating to hardware
l Malfunction relating to software
l Malfunction relating to sample analysis
35
URIT-800 Operating Manual
The malfunction relating to hardware and software only can be solved by URIT or
the qualified engineer authorized by URIT. The malfunction relating to sample
analysis can be eliminated by operator himself under the instructions from URIT.
The third step: eliminating malfunction
The maintenance engineer takes proper methods and procedures to get rid of
malfunction. If the operator can eliminate it with the help of engineer, the delay is
shortened much more.
8.2 Obtaining Technical Help
The common malfunction and troubleshooting are listed below. If the problem
cannot be solved with the methods described in the list, or if you need more technical
help, contact URIT.
NO
1
2
3
Symptom
Possible Cause
A.The COM cable is
loose.
B.Improper COM.
Failed online.
Turning on the
power supply, the
fan and lamp don't
work.
.
Turning on the
power supply, the
fan works while the
lamp doesn't.
Defective fuse.
Broken lamp.
Pressing the START A.The pump is not
installed well.
button, no liquid is
aspirated.
B.The pump has
deteriorated or
4
cracked.
C.Improper parameter
set for the pump .
D.Failed online.
36
URIT-800 Operating Manual
Remedy
A.Fasten the cable.
B.Select a proper COM.
C.If the problem recurs,
please contact URIT.
A.Replace the fuse
(T 0.8A delay fuse).
B.If the problem recurs,
please contact URIT.
Please contact URIT.
A.Reinstall the pump.
B.Replace the pump.
C.Reset up parameter
for the pump.
D.Press 1 to check up.
E.If the problem recurs,
please contact URIT.
5
No water runs out
when performing
rinse.
A.Check up the leakage
A.Leakage with tubes.
and reconnect the
B.The pump has.
deteriorated or cracked. tubes.
B.Replace the pump.
C.If the problem recurs,
please contact URIT.
The analyzer has no
A.The COM cable is too
response to the
long.
directive from
B.The COM cable is not
6
computer. The working
connected well.
indicator lamp is
C.Strong electromagnetic
unlighted.
interference nearby.
A.Use the onboard cable.
B.Fasten the cable.
C.Remove the highpower equipment.
D.If the problem recurs,
please contact URIT.
A.Please contact URIT.
Failed A/D adjustment. A.The lamp is broken.
B.Drain off the liquid in
B.Air bubble or insufficient
the cell and repipette
water in the cell.
liquid to adjust. If
C.Dirty cell.
unfruitful, reset up
7
parameter for the pump.
C.Rinse the cell with
detergent or absolute
alcohol several times.
D.If the problem recurs,
contact URIT.
Inaccurate test results A.Air bubble is the cell.
or poor repeatability. B.The silica get pipe has
deteriorated or cracked
resulting in inaccurate
pipetteed volume.
C. Ageing with the light
8
source lamp.
D.Improper parameter
set for item test.
E.Absence of earth wire
with the power supply.
A.reset the parameter for
the pump.
B.Replace silica get pipe
for the pump.
C.Readjust the initial A/D.
D.Reset item parameter
according to the
reagent instructions.
E.Ground the instrument
with the onboard
ground pole.
F. If the problem recurs,
contact URIT.
37
URIT-800 Operating Manual
9 Transportation and Storage
9.1 Transportation
The transportation must strictly follow the terms specified in order contact. Mixed
transportation with poison, injurant and corrosive is forbidden.
9.2 Storage
The wrapped instrument can be stored in the breezy room with the temperature
-20
55 , relative humidity below 85%. Mixed storage with poison, injurant and
corrosive is forbidden.
38
URIT-800 Operating Manual
Appendix A Replaceable Parts List
No
1
Item
Fuse
Remark
T800MA/250V
(Power input is 220V)
T1A/125V
(Power input is 110V)
2
Switching power supply
3
Power switch
4
Power supply filter
5
Step motor
With plug
6
DC motor
With plug
7
Power cord
8
Online control cable
9
Mainboard
10
11
Amplifier board
Pump pipe
12
Pump
13
Cell
14
Key-press
15
Fan
16
Filter
17
Halogen lamp
18
19
Temperature sensor
Peltier
With plug
300~800nm
6V 10W
With plug
With plug
39
URIT-800 Operating Manual
Appendix B Print Styles
Traditional
Economical
Common
40
URIT-800 Operating Manual
WWW .uritest.com
Tel: +86-773-2832799/2883225
Fax:+86-773-2804668