1
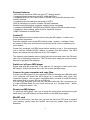
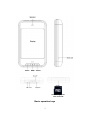
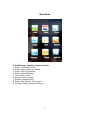
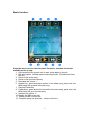
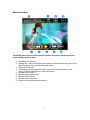
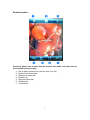
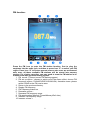
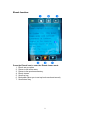
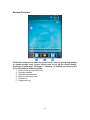
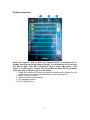
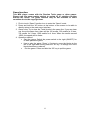
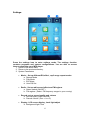
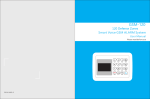
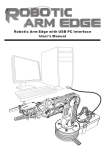
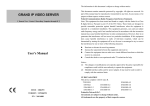
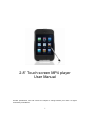
2.8” Touch screen MP4 player
User Manual
Product specification, GUI and colours are subject to change without prior notice. All rights
reserved by manufacturer.
1
Product features:
·320x240 high resolution 260K true color TFT display screen.
·It supports music format such as MP3, WMA and WAV.
·It supports MPEG-4 (AVI) video format in QVGA size (320x240) through video
convert software.
·It supports picture browsing in the format of JPEG.
·Built-in microphone to record, multiple FM radio channels.
·Multiple music EQ settings, supports multiple foreign languages.
·It supports WIN98S/ME, WIN2000 and WINXP systems (Win98 requires driver).
·It supports e-book reading, game function, flash disk function.
·USB2.0 interface to transfer data.
Caution!!!
Please calibrate the touch screen before using the MP4 player. It makes your
touch screen responsive.
Press the settings icon to enter MP4 setting mode ->system ->calibrate. Press
the center of the cursor and follow the movement of the cursor to calibrate your
touch screen.
Please fully recharge your MP4 player before starting to use it. We recommend
you to use the included AC/DC adaptor to charge your MP4 player. The MP4
player can charge through USB host or AC /DC adaptor.
The external audio speaker can only play back the music and video, the FM radio
can only be listened by earphone. The FM radio uses earphone as the external
antenna to get good FM reception.
Switch on /off your MP4 player
Switch and hold the power key to the right for 2-3 second to switch on/off your
MP4 player .Switch the power key to the left to lock the MP4 player.
Connect to your computer and copy files:
Connect your MP4 player to your computer USB port through the USB data cable.
Your computer will detect the MP4 player as a removable disk. Open “My
computer” explorer. You can see 2 removable disks, one disk is for MP4 memory,
and another disk is for mini SD (up to 2GB) slot.
You can copy and paste your files into the removable disk. We recommend you
to make individual folder for your music and movie, e.g. “My pop music”, “James
Blunt”, “Hollywood movie”, etc.
Reset your MP4 player
To reset your MP4 player, use a pin to press the reset button located at the right
hand side of your MP4 player and then switch on the MP4 player again.
MiniSD card
Power off device first, and then you can add an extra mini SD card to expand
your memory, gently insert the miniSD card with the golden finger pins face
downside.
2
Golden finger pins
face downside
Basic operation keys
3
Main Menu
This MP4 player contains 9 main functions.
1. Music – Listen MP3 music
2. Video- Watch QVGA avi movies
3. Photo- View JPG pictures
4. Radio- Listen FM radios
5. Text- Read .txt files
6 Record- Voice recording
7. Explorer- Navigate files
8. Game- Play Russian Tetris game
9. Settings- System parameter setting
4
Music function:
Press the music icon to enter the music list mode, and then choose the
available music to play.
1. A-B repeat function (press once to start, press again to cancel)
2. EQ setup option (include repeat mode, play mode , EQ select and User
EQ set)
3. Return to the main menu
4. Return to the previous directory
5. Decrease the volume “–“
6. Rewind key , press and hold to rewind in the same song, press once, the
MP4 player will go back to the last song
7. Play and Pause key
8. Forward key, press and hold to forward in the same song, press once, the
MP4 player will go to the next song
9. Increase the volume “+”
10. Display the MP3 music title
11. Display the MP3 music lyric
12. Progress status bar (play time , volume, left time )
5
Movie function:
Press the movie icon to enter the file browser list mode, and then choose
the available movie to play.
1. Decrease the volume “–“
2. Rewind key , press and hold to fast rewind in the same movie, press once,
the MP4 player will go back to the last movie
3. Play and Pause key
4. Forward key, press and hold to fast forward in the same movie, press
once, the MP4 player will go to the next movie
5. Increase the volume “+”
6. Movie progress status bar
7. Battery level /volume
8. Return to the main menu
9. Return to the previous level directory
6
Photo function:
Press the photo icon to enter the file browser list mode, and then choose
the available picture to play.
1.
2.
3.
4.
5.
6.
7.
Set up photo viewing time (choose from 1s to 5s)
Return to the main menu
Hide photo viewer bar
Rewind key
Play and pause key
Rotation key
Forward key
7
FM function:
Press the FM icon to enter the FM station function, first to plug the
earphone into the audio jack, and then to press icon “2” to select your FM
region. Press icon “8” to choose manual scan or auto scan, we recommend
auto scan, all those available FM stations will be stored into memory
section. For a better reception, you may need to scan the FM station in an
outdoor area with good and strong signals.
1. FM record –( Record current FM station program)
2. FM set up option ( choose to switch on/off the stereo effect, choose FM
frequency regions CHINA/EUROP/JAPAN/USA) Australian users ,please
select CHINA as the FM receive area
3. Return to the previous directory
4. Display FM frequency
5. FM Frequency status bar
6. Decrease volume –
7. Decrease FM frequency range
8. FM search option (Manual / Preset/Memory/Del/ Auto )
9. Increase FM frequency range
10. Increase volume +
8
Ebook function:
Press the Ebook icon to enter the Ebook viewer mode.
1. Ebook set up option
2. Return to the main menu
3. Return to the previous directory
4. Ebook viewer
5. Scroll up key
6. Bookmark (allow you to set up book mark and record)
7. Scroll down key
9
Record Function:
Press the record icon to enter the record mode. You can set up high quality
or normal quality voice record. Please note, to set up the record quality,
please go to main menu "Settings" -> "Record”, it enables you to set up the
voice recording in different quality.
1. Return to the previous directory
2. Recording details
3. Recording progress bar
4. Return to the main menu
5. Record key
6. Stop/pause key
10
Explorer function:
Press the explorer icon to enter the explorer mode, it navigate you to
browse your files in the mp4 player directly. You are able to access or find
the files to play. Tips: We recommend user to make “My music”, “My
movie” or “My photos” folders and sub folders to make the file systems
clear and easy to identify by you in the future.
1. Delete file( select the file name and press the delete key to delete file, the
delete key can not delete the folder directly ,only the signal file )
2. Return to the main menu
3. Return to the previous directory
4. File navigation viewer
5. Scroll up/down key
11
Game function:
This MP4 player comes with the Russian Tetris game or other games.
Please note the game maybe subject to update by IC solution provider
without the notice. The game function may be not available in some
countries due to the copyright laws.
1. First to touch “Game” function icon to enter the “Game” mode
2. Press and hold the “M” button at the bottom of the screen to be able to
directly return to the main menu interface
3. Game rules: Try to clear the Tetris blocks in the same line. If you can clear
one line at the same time, there will be 100 credits, 300 credits for 2 lines,
700 credits for 3 lines, 1500 credits for 4 lines. When the credits exceed
10000, the speed will be faster
4. Operation method
• Start the game: Switch the power switch to the right (ON/OFF) for
to start /pause the game
• How to play the game: Press “+/-“button to move the blocks to the
left or the right and shortly press the “M” key to change the Tetris
block directions or patterns
•
Exit the game: Press and hold the “M” key to quit the game
12
Settings:
Press the settings icon to enter settings mode. The settings function
contains programs and system configurations. You are able to access
them to customize your MP4 player.
1. Return to the main menu
2. Return to the previous directory
3. System Parameters
•
Music : Set up different EQ effect , mp3 songs repeat modes
a. Repeat Mode
b. Play Mode
c. EQ Select
d. User EQ Set
•
Radio : Set up radio sound effect and FM regions
a. Stereo switch (ON/OFF)
b. FM regions ( Select FM frequency ranges in your country)
•
Record: set up record quality and volume
a. Record quality (High/ Normal)
b. Record volume ( from +1 to +5)
•
Display: LCD screen display , back light adjust
a. Background light Time
13
b. Lum (Adjust backlit from +1 to +5)
c. Background Mode (Screen display Normal/Power save)
•
Auto Play: Set up auto play time for Photo View and Text File
a. Text ( 10s to 30s)
b. JPEG ( 1s to 5s)
•
Music : System: set up OS language , calibrate screen
a. Language (Multiple language)
b. About ( display the MP4 player information)
c. Calibrate( calibrate the screen)
d. Please note, for a better touch screen operation, you can adjust
the unresponsive screen by using this function. Following the
cursor’s movement, press the center of the cursor to adjust.
•
Power off: Select MP4 player powers off time as you like
a. Power off time ( MP4 player power off from 0 - 120 minutes)
•
Default set: Press this icon, the system will be restored to the
factory default mode and all data could lose.
•
Upgrade: The mp4 player supports Firmware update. Please note,
firmware update required special software and experience skills
to operate and it may damage the device and cause data lose.
Currently we do not have the new version firmware update
released yet. Please check back your local distributor’s website
for the release of the new firmware.
14
Convert your Movie into QVGA AVI file
Install the AVI convert software
Please find the software in your attached driver disk, select “2.8 mp4 video
convert software” to install on your computer. In the Windows Operation System,
it usually automatically pops up the installation interface. Click on “Video Convert
Tool V3.X” to start installing all software for this MP4 player.
Please note, you may need to switch off the anti-virus software to install the third
party software on your computer, otherwise your anti-virus will alarm or prevent
the installation and detect the software as the dangerous spamware.
Convert the video files into playable format
AVI is the most popular video format for the current portable media player as well
as one of the most popular video formats on the internet. Please note , the
normal AVI file is over 320x 240 resolution , and usually is for playing on the
computer system , thus we require to use this software to scale down the
resolution to 320x240 to fit in our MP4 player, The normal AVI files are not
playable directly on this MP4 player .
This software supports the formats of AVI, MPG, MPEG, RMVB, VMV and DAT,
etc, it will help you to convert into the 320x 240 AVI format.
System requirement
The basic system requirement by the video conversion software is at least INTEL
PENTIUM3 or above models, including INTEL CELERON series CPU and
windows media player 9 or above version has been installed as well.
How to use the software
1. After installation, Click to launch the program of “AV Converter.exe”, shown
as follows:
2. click "add " to add files , show the dialogue window as follows:
15
3. Select your ready to convert video/audio files and choose the proper directory
to store those converted files later on, and then set up the convert parameters.
After that, then click the [Save] to save your settings for files.
4. Finally, go to click [Convert Now] button, the software start to convert original
file into QVAGA AVI file.
16
MP4 Player FQA
1. MP4 player can not power on
• The battery maybe flat out.
• The USB data cable maybe fault and can not charge the battery
properly.
• The AC/DC adaptor does not work.
2. MP4 player is no sound
• Check the earphone plug.
• Volume setting is not in Zero position.
3. MP4 touch screen is not responsive
• Please calibrate the touch screen, go to main menu, settings>system->calibrate.
• Press reset button to reset the MP4 player.
4. MP4 player can not receive the FM signal
• Earphone must plug into the MP4 player as the antenna
• Scan the FM station in the outdoor area.
5. How to charge through the computer USB port
• Click safely remove USB massive device to quit the removable USB
device mode , then the MP4 player switches to USB charging mode,
and a charging battery icon displays on the MP4 player.
17