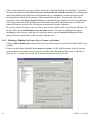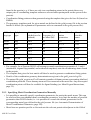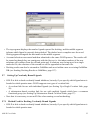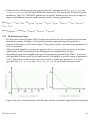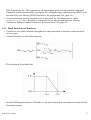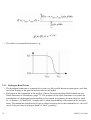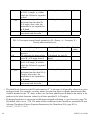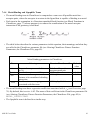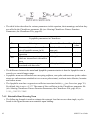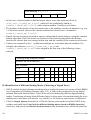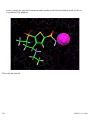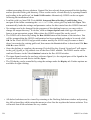
1
About This User Guide This user guide is a practical guide to setting up and running dockings using GOLD. It includes instructions on using the graphical user interface as well as providing help on relevant scientific issues. Two additional software modules are provided with the GOLD suite of programs: • The Hermes visualiser, for preparation of input files, visualisation of docking results and calculation of descriptors. The visualiser is also used for interactive docking setup, e.g. for defining the binding site and the setting of constraints. • GoldMine, for the analysis and post-processing of docking results. User guides for both Hermes and GoldMine (including tutorials) are provided on the CCDC website http://www.ccdc.cam.ac.uk/SupportandResources/Support/Documentation/pages/ Documentation.aspx. An extensive set of tutorials are also available for GOLD. Tutorial 1 describes how to use the GOLD wizard which will guide you through the process preparing and running a docking. Subsequent tutorial examples will be more concise, but will introduce other, more advanced aspects of the program, such as configuring protein flexibility and using constraints. Tutorials can found at the end of this user manual (see Appendix A: Tutorials, page 166). The GOLD user guide is divided into the following sections: 1. 2. 3. 4. 5. 6. 7. 8. 9. 10. 11. 12. 13. 14. 15. 16. 17. Introduction (see page 4) Getting Started (see page 6) Setting Up the Protein(s) (see page 10) Protein Flexibility (see page 34) Setting Up Ligands (see page 50) Atom and Bond Types (see page 60) Fitness Functions (see page 68) Ligand Flexibility (see page 95) Ligand Search Options (see page 104) Setting Constraints (see page 108) Balancing Docking Accuracy and Speed (see page 127) Rescoring (see page 135) Docked Ligand Output Options (see page 139) Running GOLD (see page 143) Viewing and Analysing Results (see page 147) Saving and Reusing Docking Settings (see page 160) Context-Dependent Help (see page 161) GOLD User Guide 1 18. 19. 20. 21. 22. 23. 24. 25. 2 References (see page 163) Acknowledgements (see page 165) Appendix A: Tutorials (see page 166) Appendix B: List of Atom and Bond Types (see page 236) Appendix C: Additional Tags in Output Files (see page 238) Appendix D: Genetic Algorithm Parameter Definitions (see page 246) Appendix E: Utility Programs (see page 248) Appendix F: The Torsion Angle Distribution File (see page 254) GOLD User Guide Conditions Of Use The GOLD suite of programs (the "Program") comprising all or some of the following: Hermes (including as Relibase+ client and as SuperStar interface), GOLD, GoldMine, associated documentation and software, are copyright works of CCDC Software Limited and its licensors and all rights are protected. Use of the Program is permitted solely in accordance with a valid Software Licence Agreement or a valid Licence and Support Agreement with CCDC Software Limited or a valid Licence of Access to the CSD System with CCDC and the Program is proprietary. All persons accessing the Program should make themselves aware of the conditions contained in the Software Licence Agreement or Licence and Support Agreement or Licence of Access Agreement. In particular: • The Program is to be treated as confidential and may NOT be disclosed or re-distributed in any form, in whole or in part, to any third party. • No representations, warranties, or liabilities are expressed or implied in the supply of the Program by CCDC Software Ltd., its servants or agents, except where such exclusion or limitation is prohibited, void or unenforceable under governing law. GOLD © 2013 CCDC Software Ltd. Hermes © 2013 CCDC Software Ltd. GoldMine © 2013 CCDC Software Ltd. Implementation of ChemScore, Heme, Kinase and Astex Statistical Potential scoring functions and the Diverse Solutions code within GOLD © 2001-2013 Astex Therapeutics Ltd. All rights reserved Licences may be obtained from: CCDC Software Ltd. 12 Union Road Cambridge CB2 1EZ United Kingdom Web: www.ccdc.cam.ac.uk Telephone:+44-1223-336408 Email: [email protected] GOLD User Guide 3 1. Introduction • GOLD (Genetic Optimisation for Ligand Docking) is a genetic algorithm for docking flexible ligands into protein binding sites. • GOLD is supplied as part of the GOLD Suite, which includes two additional software component, Hermes and GoldMine. • The Hermes visualiser can be used to assist the preparation of input files for docking with GOLD, visualisation of docking results and calculation of descriptors. The Hermes visualiser is also used for interactive docking setup, e.g. for defining the binding site and the setting of constraints. • GoldMine is a tool for the analysis and post-processing of docking results (see Overview of GoldMine, page 157). • Further details are provided in the Hermes and GoldMine documentation. • GOLD provides all the functionality required for docking ligands into protein binding sites from prepared input files ((see Setting Up the Protein(s), page 10) and (see Setting Up Ligands, page 50)). Although Hermes can be used to assist the preparation of input files e.g. the addition of hydrogen atoms, including those necessary for defining the correct ionisation and tautomeric states of protein residues, GOLD will likely be used in conjunction with a modelling program to create and edit starting models. Commonly used molecular modelling environments include: • SYBYL (http://www.tripos.com/) • Insight II or Cerius2 (http://www.accelrys.com/) • Discovery Studio (http://accelrys.com/) • MOE (http://www.chemcomp.com/) • Predicting how a small molecule will bind to a protein is difficult, and no program can guarantee success. The next best thing is to measure as accurately as possible the reliability of the program, i.e. the chance that it will make a successful prediction in a given instance. For that reason, GOLD has been tested on a large number of complexes extracted from the Protein Data Bank. The overall conclusion of these tests was that the top-ranked GOLD solution was correct in 7082% of cases. • GOLD offers a choice of scoring functions, GoldScore (see GoldScore, page 74), ChemScore (see ChemScore, page 75), ASP (see Astex Statistical Potential (ASP), page 86), CHEMPLP (see Piecewise Linear Potential (PLP), page 68) and User Defined Score which allows users to modify an existing function or implement their own scoring function (see User Defined Scoring Function, page 91). • Different values of the genetic algorithm parameters may be used to control the balance between the speed of GOLD and the reliability of its predictions (see Balancing Docking Accuracy and Speed, page 127). • GOLD will only produce reliable results if it is used properly and correct atom typing for both protein and ligand is particularly important (see Atom and Bond Types, page 60). 4 GOLD User Guide • GOLD may be used in serial or parallel modes (see Running in Parallel, page 145). GOLD User Guide 5 2. Getting Started 2.1 Overview of the GOLD Interface • Select GOLD from the top-level menu in the Hermes visualiser, then Setup and Run a Docking from the resulting menu. • You will be asked whether you wish to create a new GOLD configuration file or to load an existing one. The configuration file is a text file which specifies the GOLD calculation that is to be run, including details of the ligand, the protein binding site, the fitness-function to be used, and the genetic algorithm parameters etc. Selecting an existing configuration file (e.g. from one of the tutorials) will result in the defined configuration options being read into the GOLD Setup window. The corresponding structure input files will also be opened within Hermes. Selecting New will open an empty GOLD Setup window, in which you will be required to specify all the configuration options required to define the docking job (see Saving and Re-using Program Settings in Configuration Files, page 160). • A list of Global Options is given on the left of the GOLD Setup window. Note that there are a number of setup options that are specific to the protein file, thus some options will not be visible until a protein file is read either manually or via a gold.conf. Click on a configuration option in 6 GOLD User Guide the list in order to specify the corresponding settings on the right of the GOLD Setup window. • The Hermes visualiser is an integral part of the GOLD interface. It is used alongside the GOLD Setup window to prepare input files and for interactive docking setup, e.g. for defining the binding site and the setting of constraints. For further information on using the Hermes visualiser, refer to the Hermes user guide. • To simplify the process of setting up a docking a wizard is available which will guide you through the essential configuration steps. The wizard can be opened at any stage from the GOLD Setup window by clicking on Global Options on the left of the window, then clicking on the Wizard button (see Using the GOLD Docking Wizard, page 7). • A number of configuration file templates are also available which contain recommended settings for particular docking protocols (see Using Configuration File Templates, page 160). 2.2 Using the GOLD Docking Wizard • GOLD has many configuration options. To simplify the process of setting up a docking a wizard is available which will guide you through the essential configuration steps. • Select GOLD from the top-level menu in the Hermes visualiser, then Wizard from the resulting menu. Alternatively, the wizard can be opened at any stage from the GOLD Setup window by clicking on Global Options on the left of the window, then clicking on the Wizard button. GOLD User Guide 7 • The appearance of the wizard will vary depending on whether a protein file has been read in or not. General docking settings are available from within the Global Options tab while proteinspecific options only become available after a protein has been loaded into Hermes (either via File, Open or via a gold.conf). These protein-specific options can be found under an additional tab found next to the Global Options tab. The text on this tab is taken from the HEADER record in a PDB file, or the @<TRIPOS>MOLECULE record in a mol2 file. • The number of tabs will vary depending on how many proteins are loaded. 8 GOLD User Guide • The wizard will guide you through the steps required to configure a docking. At each step follow the instruction provided. Once a step has been completed click on the Next button to proceed to the next configuration step, or Back to return to the previous step. To cancel the wizard click on the Cancel Wizard button. • Tutorial 1 describes, in detail, how to use the GOLD wizard (see Tutorial 1: A Step-By-Step Guide to Using GOLD, page 166). GOLD User Guide 9 3. Setting Up the Protein(s) 3.1 Essential Steps • Protein setup is the same whether an individual protein or an ensemble of proteins is being used. • You can either input the whole protein structure to GOLD, or just those residues that are in the active site region. The latter leads to somewhat shorter run times, since both protein initialisation and cavity detection will be quicker. • If you input only the region of interest around the binding site, you must ensure that all the residues you include are complete. You should also include all residues within a 5Å radius from the solvent-accessible surface of the cavity. • Add all hydrogen atoms, including those necessary to define the correct ionisation and tautomeric states of residues such as Asp, Glu and His (see Protonation and Tautomeric States, page 11). • Ensure that all bond types are correct. If they are, and hydrogen atoms have been placed on the correct atoms, GOLD will deduce atom types automatically (see Automatically Setting Atom and Bond Types, page 60). This also applies to PDB input files but only for known residues (i.e there is no HET group library). • GOLD connects atoms within residues on the basis of proximity. Double bonds are assigned as appropriate for the naturally occurring protein residues, • Residues should be in sequence order, and correctly named. • All atoms should be properly labelled (CA, CB etc.). • Any unusual bonds (disulphide bridges, etc.) should have CONECT records. • If a metal ion is present, ensure that all bonds between the ion and coordinating protein or water atoms are deleted (GOLD will re-find them automatically). Metals should be within bonding distance of at least two protein and/or water atoms in the active site so that GOLD can infer likely coordination geometries. (see Metal Ions, page 28) • Save the protein in, e.g., MOL2 format. • GOLD assigns atom types from the information about element types and bond orders in the input structure file, so it is important that these are correct. However, if for any reason, GOLD is unable to deduce an atom type, then the atom in question will be replaced with a dummy atom type Du. If this is the case a warning message will be given in the gold_protein.log file. • The presence of dummy atoms should not significantly affect the docking prediction since dummy atoms are neither considered as donors or acceptors. • Note that the steps above are essential whether docking a ligand into a single protein or carrying out an ensemble docking (see Ensemble Docking, page 43). 3.2 Specifying the Protein File or Files • Click on Proteins from the list of Global Options given on the left of the GOLD Setup window. 10 GOLD User Guide • A list of those proteins currently loaded in the Hermes visualiser are available via the Loaded Proteins pull-down menu. Select the protein you wish to use from this list. • Alternatively, to specify a different protein file, click on the Load Protein button and use the file selection window to choose the protein data file. Once selected, the chosen protein will be loaded and displayed within the Hermes visualiser. • Use the protein tickboxes to determine which proteins are to be docked into, e.g. in the example above all three proteins (1ACM, 1A42 and 1QBT) will be docked into. • Acceptable protein file formats are PDB and MOL2. 3.3 Protonation and Tautomeric States 3.3.1 Adding Hydrogen Atoms to the Protein Using Program Defaults • GOLD uses an all-atom model, so the protein must have all hydrogen atoms added. • To add missing hydrogen atoms to a particular protein, select the tab appropriate to the protein you wish to protonate and then select Protonation and Tautomers from the list of available options given on the left of the window. GOLD User Guide 11 • Click on the Add Hydrogens button to protonate the protein. • The number of hydrogens added to each atom will be sufficient to satisfy the atom's unfilled valencies. • The hydrogen atom positions will be normalised. i.e. the X-H distance will be made equal to the average neutron diffraction value (hydrogen atoms are accurately located by neutron diffraction). E.g. C-H bond lengths will be set to 1.083 Å, N-H to 1.009 Å, and O-H to 0.983 Å. It is possible to customise the values for C-H, N-H and O-H H-normalisation within the Hermes visualiser. It is also possible to specify values to normalise the position of H atoms bonded to other elements. For further information, refer to the Hermes user guide. • The geometry of added hydrogen atoms will be chemically meaningful. However, the precise geometrical positions of Ser, Thr and Tyr hydroxyl hydrogen atoms or Lys NH3 hydrogen atoms do not matter as their orientation will be optimised during the GOLD run (see Rotatable O-H and NH3 Groups, page 27). • GOLD deduces the hydrogen-bonding abilities of protein residues from the presence or absence of hydrogen atoms. For example, you can control the protonation and tautomeric state of Asp, Glu and His residues by adding or removing appropriate hydrogen atoms. If incorrect ionisation or tautomeric states are inferred by the program, it is unlikely that correct protein-ligand binding modes will be predicted. It is therefore important that you check protonation states of such residues before proceeding with the docking. Additional structure editing functionality is available within the Hermes visualiser. 3.3.2 Applying Protonation Rules • It is possible to protonate using SMARTS-based protonation rules contained in a protonation_rules.txt file. • A sample file is provided in <install_dir>\GOLD Suite\Hermes\. • The file contains SMARTS-based rules for protonation of the format <query SMARTS> <rule SMARTS>, e.g. # carboxylate - set the C-O bond type to aromatic *-C(~[OD])~[OD] *-C(:[OD]):[OD] • Load this file using the file selection window obtained by clicking on the ... button adjacent to the Protonation Rules window. • The file can be modified and supplemented to suit user preferences. 3.3.3 Flipping Asn and Gln Residues • Terminal CO-NH2 groups in Asn and Gln residues can be flipped (i.e. rotated 180 deg.). This can be useful when dealing with poorly resolved protein structures in which you suspect the 12 GOLD User Guide oxygen and nitrogen atoms may have been incorrectly determined i.e. transposed. • As residues are protein-specific, click on the appropriate protein tab adjacent to the Global Options tab and select Protonation and Tautomers from the list of options provided. • A list of the Asn and Gln residues within the defined binding site will be displayed. Select the residue you wish to flip from this list (the selected residue will be highlighted in the Hermes visualiser), and click on the Flip button in order to rotate the CO-NH2 group 180 degrees. 3.3.4 Specifying Histidine Tautomers • GOLD will not vary tautomeric states during docking. • To specify the tautomeric state of particular histidine residues within the binding site select the appropriate protein tab then select Protonation and Tautomers from the list of options given on the left of the GOLD Setup window. • A list of the His residues within the defined binding site will be displayed. Select the His residue you wish to edit from this list, the selected residue will be highlighted in the Hermes visualiser. To protonate the ND1 and/or NE2 atoms enable the corresponding check-box(es) and click on the Set Protonation button. • If you are unsure about the tautomeric state of a His residue, you should perform separate GOLD runs using the different possibilities. 3.4 Deleting Ligands and Metal Ions • The protein file may have one or more ligands occupying the binding site that must be removed before you can perform a docking. • The removal of ligands is protein-specific thus first select the appropriate protein tab adjacent to the Global Options tab then click on Delete Ligands from the list of options given. • A list of the ligands present in the protein file will be displayed. Each ligand is assigned a unique identifier based on the protein chain: GOLD User Guide 13 • Clicking on a ligand in this list will highlight it in the Hermes visualiser. • Select which ligands you wish to remove by switching on their corresponding Extract and Reload check-boxes, then click on the Extract button. • Extracted ligands are removed from the protein file and automatically reloaded into Hermes so that they can be used e.g. to define the binding site (see Defining a Binding Site from a Reference Ligand, page 23). • When extracting ligands you will be asked if you want to write the ligand to a file. This can be useful for later comparison with docking results. • If the protein contains metal ions then GOLD can automatically determine their coordination geometry. Virtual coordination points are then added at locations where GOLD is missing a coordination site and these coordination points are used as fitting points that can bind to acceptors (see Metal Ions, page 28). However, if you wish to delete a metal ion from the protein, select the appropriate protein tab then click on Metals from the list of available options. A list of the metal ions present in the protein file will be shown. To remove a metal select it in the list and click on the Delete button. Note that this is an expert GOLD option thus will be greyed out if you are using the wizard. To make use of this feature you will need to exit the wizard. 14 GOLD User Guide 3.5 Water Molecules 3.5.1 Methodology For Handling Waters • Water molecules often play key roles in protein-ligand recognition. Water molecules can either form mediating hydrogen bonds between protein and ligand, or be displaced by the ligand on binding. • GOLD allows waters to switch on and off (i.e. to be bound or displaced) and to rotate around their three principal axes (to optimise hydrogen bonding) during docking. • To predict whether a specific water molecule should be bound or displaced, GOLD estimates the free-energy change, ∆Gb, associated with transferring a water molecule from the bulk solvent to its binding site in a protein-ligand complex. ∆Gb for a given water molecule is defined as: ∆G b ( W ) = ∆G p ( W ) + ∆G i ( W ) • ∆Gp(W) is a constant penalty added for each water molecule that is switched on and represents the loss of rigid-body entropy on binding to the target (hence rewarding water displacement). Note: ∆Gp values were optimised against a training set of 58 protein-ligand complexes for four targets (HIV-1 protease, factor Xa, thymidine kinase and the oligopeptide-binding protein Opp A) where water molecule play key roles in the recognition. Further details can be found in Modelling Water Molecules in Protein-Ligand Docking Using GOLD (see References, page 163). • ∆Gi(W) represents the intrinsic binding affinity of a water molecule and contains contributions resulting from interactions that the water forms with the protein and ligand (changes in the interactions between protein and ligand caused by introduction of the water are also accounted for). • Therefore, for a water molecule to be bound to a protein-ligand complex, its intrinsic binding affinity needs to outweigh the loss of rigid-body entropy on binding. • Where waters are specified in the gold.conf, an additional parameter (S(bar)) is added to the fitness score calculation: • Fitness = S(hb_ext) + 1.3750*S(vdw_ext) + S(hb_int) + 1.0000*S(int) + S(bar) • S(bar) is a barrier/penalty term associated with non-displacement of water. • Note: The use of active waters is not available with the ASP scoring function (see Astex Statistical Potential (ASP), page 86). GOLD User Guide 15 3.5.2 Specifying Waters • GOLD allows you to retain specific water molecules that are important to ligand binding (i.e. you can specify whether a particular water should be present or absent in the protein). Furthermore, for waters which are retained, GOLD can automatically determine whether a water should be bound or displaced by the ligand during docking (i.e. by toggling it on and off during the run). The orientation of the water hydrogen atoms can also be optimised by GOLD during docking. In addition, the location of each water molecule can be allowed to translate within a radius of 2 Å. • Click on Configure Waters from the list of Global Options given on the left of the GOLD Setup window. • Waters must be specified in separate files i.e. one water per mol2 file. To specify the water files, select the Add button at the bottom of the Configure Waters window. Use the file browser to locate the water files, select one or multiple files then hit Open to add them to the Configure Waters dialogue. • If the protein file contains all waters, i.e. active and non-active waters, the active waters must be extracted and the non-active waters deleted in the following way: • Click on the protein name tab, adjacent to the Global Options one (in the example below this is the 1ACM tab), then select the Extract/Delete Waters option. 16 GOLD User Guide . • Select the waters you wish to keep either by selecting them in Hermes’ 3D view or by activating their corresponding tick box. Selected waters can be unselected by deactivating their tickbox or by deselecting them in Hermes’ 3D view. • Hit the Extract Waters for Docking button. This will write the waters to individual files in the working directory. The files will have names of the type 1ACM_HOH15.mol2. • Once you have extracted the important waters, all other waters must be deleted from the protein file. This is done by hitting the Delete Remaining Waters button. • If the waters are extracted in this way they are automatically added to the Configure Waters dialogue under the Global Options tab. • By default, each water molecule in the Configure Waters list will be retained in the binding site during docking and will be allowed to spin in order to optimise the orientation of the water hydrogen atoms. These settings can be customised for specific water molecules within this dialogue: GOLD User Guide 17 • For each water molecule listed the following can be specified: • The state of the water, available options are: On: use the water for docking (i.e. present) Off: do not use the water for docking (i.e. absent) Toggle: have GOLD decide whether the water should be present or absent (i.e. bound or displaced by the ligand) during docking. • The orientation of the water hydrogen atoms, available options are: Spin: have GOLD automatically optimise the orientation of the hydrogen atoms Trans_spin: activate this option and input a translation value into the distance dialogue to make GOLD spin and translate the water molecule to optimise the orientation of the hydrogen atoms as well as the water molecule’s position within a user defined radius. Note that the distance value must be between 0 and 2 Å. Fix: use the orientation specified in the input file. • After docking a summary of which waters were retained or displaced and their contribution to the fitness score can be found in the Analysis of active water placements section of the gold_ligand.log file. 18 GOLD User Guide 3.6 Defining the Binding Site 3.6.1 Overview • It is necessary to define the protein binding site. This can be done in several ways, e.g. by specifying the approximate centre of the binding site and taking all atoms that lie within a specified radius of this point (see Defining a Binding Site from a Point, page 21). • The binding site definition is detailed in the Cavity atoms section of the gold_protein.log file. The cavity atom selection can be saved as a protein atom subset and viewed within Hermes. To do this click on the Add Definition as a Selection button within the Define Binding Site section of the GOLD Setup window. You can then highlight the atoms belonging to the subset by picking the required subset from the Atom Selections pull-down menu, which is situated above the visualiser display area. • Only those atoms specifically included in the binding site definition will be considered during docking. The binding site definition should therefore be large enough to contain any possible binding mode of the ligand, and include all atoms or residues that might be involved in ligand binding. • Since this binding site definition might include atoms that lie outside the cavity (i.e. on the surface of the protein) you can use cavity detection to restrict the binding site definition to concave parts of the binding site surface (see Cavity Detection, page 26). • Each atom in the defined binding site is tested for solvent accessibility, this is a two step process: • First, the solvent accessible surface of each atom in the defined binding site is calculated. Potential donor and acceptor fitting points (used for ligand placement) are then generated for only those protein atoms that are accessible. • Second, the potential fitting points are themselves tested for solvent accessibility, and only those fitting points that are accessible are used. • Therefore, for a protein atom to be recognised as a donor or acceptor it must be included in the binding site definition, be solvent accessible and have at least one associated solvent accessible fitting point. • It is possible to remove the requirement for fitting points to be solvent accessible (see Solvent Accessibility, page 26). In this case fitting points would be generated for all solvent accessible donor and acceptor atoms within the binding site. Remember that these atoms are already deemed to be solvent accessible but it's their potential fitting points that may have been desolvated by neighbouring atoms. • A Fitting points summary is provided in the gold_protein.log file. The polar fitting points used by GOLD are also saved as protein atom subsets within Hermes. Two subsets are saved, donor hydrogens and lone pairs. You can highlight the atoms belonging to any subset by picking the required subset from the Atom Selections pull-down menu, which is situated above the visualiser display area. GOLD User Guide 19 3.6.2 Defining a Binding Site from an Atom • Click on Define Binding Site from the list of Global Options given on the left of the GOLD Setup window. • Switch on the button labelled Atom. Then, within the Hermes visualiser select a single solventaccessible protein atom close to the centre of the active site of the protein. • The approximate radius of the binding site must also be specified. If r is the radius, the binding site will be defined as all atoms that lie within r Å of the specified protein atom. By default, the binding site radius is set to 10.0 Å. This can be changed by entering a value in the box labelled Select all atoms within. • Residues that have at least one of their atoms included in the binding site definition will be highlighted in the Hermes visualiser. When entering a new value in the Select all atoms within box it is necessary to hit the enter key before the visualiser will update to reflect the changes made. • After visual inspection you may wish to manually refine the binding site definition. To do this, switch on the check-box labelled Generate a cavity atoms file from the selection. By enabling this option the binding site definition will automatically be expanded to include all atoms in the 20 GOLD User Guide existing definition plus all the atoms of their associated residues. To manually refine this selection, click on the Refine Selection button to open the Refine Binding Site Selection dialogue. All residues included in the binding site definition are listed. Residues can then be added or removed from the selection by clicking on atoms in the Hermes visualiser. • The cavity atom selection can be saved as a protein atom subset and viewed within Hermes. To do this click on the Add Definition as a Selection button. You can then highlight the atoms belonging to the subset by picking the required subset from the Atom Selections pull-down menu, which is situated above the visualiser display area. • Note that it is not possible to define the binding site from an atom when performing an ensemble docking. 3.6.3 Defining a Binding Site from a Point • Click on Define Binding Site from the list of Global Options given on the left of the GOLD Setup window. • Switch on the button labelled Point. Then, within the Hermes visualiser click on one or more protein atoms in order to define a centroid close to the centre of the active site. Alternatively, the orthogonal x,y,z coordinates of a single solvent-accessible point approximately at the centre of the active site can be typed directly into the three boxes. GOLD User Guide 21 • The approximate radius of the binding site must also be specified. If r is the radius, the binding site will be defined as all atoms that lie within r Å of the specified point. By default, the binding site radius is set to 10.0 Å. This can be changed by entering a value in the box labelled Select all atoms within. • Click on the View Selection button to highlight, in the Hermes visualiser, those residues that have at least one of their atoms included in the binding site definition. When entering a new value in the Select all atoms within box it is necessary to hit the enter key before the visualiser will update to reflect the changes made. • After visual inspection you may wish to manually refine the binding site definition. To do this, switch on the check-box labelled Generate a cavity atoms file from the selection. By enabling this option the binding site definition will automatically be expanded to include all atoms in the existing definition plus all the atoms of their associated residues. To manually refine this selection, click on the Refine Selection button to open the Refine Binding Site Selection dialogue. All residues included in the binding site definition are listed. Residues can then be added or removed from the selection by clicking on atoms in the Hermes visualiser. • The cavity atom selection can be saved as a protein atom subset and viewed within Hermes. To do this click on the Add Definition as a Selection button. You can then highlight the atoms 22 GOLD User Guide belonging to the subset by picking the required subset from the Atom Selections pull-down menu, which is situated above the visualiser display area. 3.6.4 Defining a Binding Site from a Reference Ligand • Click on Define Binding Site from the list of Global Options given on the left of the GOLD Setup window. • Switch on the button labelled One or more ligands. A list of those ligands currently loaded in the Hermes visualiser will be shown. Loaded ligands might typically include ligands in a known binding mode, or the co-crystallised ligand. Select the reference ligand(s) you wish to use from this list. Multiple ligands can be selected by left-clicking whilst holding down the shift key. • By default all protein atoms within 5.0 Å of each selected ligand are used for the binding site definition. This can be changed by entering a new value in the box labelled Select all atoms within. • Residues that have at least one of their atoms included in the binding site definition will be highlighted in the Hermes visualiser. When entering a new value in the Select all atoms within box it is necessary to hit the enter key before the visualiser will update to reflect the changes made. GOLD User Guide 23 • After visual inspection you may wish to manually refine the binding site definition. To do this, switch on the check-box labelled Generate a cavity atoms file from the selection. By enabling this option the binding site definition will automatically be expanded to include all atoms in the existing definition plus all the atoms of their associated residues. To manually refine this selection, click on the Refine Selection button to open the Refine Binding Site Selection dialogue. All residues included in the binding site definition are listed. Residues can then be added or removed from the selection by clicking on atoms in the Hermes visualiser. • The cavity atom selection can be saved as a protein atom subset and viewed within Hermes. To do this click on the Add Definition as a Selection button. You can then highlight the atoms belonging to the subset by picking the required subset from the Atom Selections pull-down menu, which is situated above the visualiser display area. 3.6.5 Defining a Binding Site from a List of Atoms or Residues • Click on Define Binding Site from the list of Global Options given on the left of the GOLD Setup window. • Switch on the button labelled List of atoms or residues. A file which contains a list of protein atom numbers or residues must be specified. Either enter the path and filename of the file, or click on the ... button and use the file selection window to choose the file. 24 GOLD User Guide • When specifying a list of atoms, the atom numbers as they appear in the input protein must be provided. Multiple atom numbers are permitted on each line in the file. It is therefore possible to re-use an existing active site definition by using the list of active atoms printed in the protein.log file. Example file format is shown below: • When specifying a list of residues the residues can be extracted from any text file, including a standard GOLD solution file (GOLD writes the active site residues list to the solution files if output of rotatable hydrogens is turned on). • The following formatting restrictions apply: • The list must begin with the following tag on its own line: > <Gold.Protein.ActiveResidues> • The list must end with a blank line (or the end of the text file). • GOLD will read multiple residue names from one line, but lines must not exceed 250 characters in length. • Residue names must be separated by a space, for example: > <Gold.Protein.ActiveResidues> HIS69 ARG71 GLU72 ARG127 ASN144 ARG145 GLY155 ALA156 GLU163 THR164 HIS196 SER197 TYR198 SER199 LEU201 LEU203 ILE243 ILE244 ILE247 TYR248 GLN249 ALA250 GLY253 SER254 ILE255 THR268 GLU270 PHE279 ZN309 • All solvent-accessible protein acceptor and donor atoms available to the ligand are taken from the list. The file should contain all atoms or residues which are required to explicitly define the GOLD User Guide 25 protein active site. • Click on the View button to highlight, in the Hermes visualiser, those residues that have at least one of their atoms included in the binding site definition. • The cavity atom selection can be saved as a protein atom subset and viewed within Hermes. To do this click on the Add Definition as a Selection button. You can then highlight the atoms belonging to the subset by picking the required subset from the Atom Selections pull-down menu, which is situated above the visualiser display area. 3.6.6 Cavity Detection • The binding site can be defined in several ways, e.g. by specifying the approximate centre of the binding site and taking all atoms that lie within a specified radius of this point (see Defining a Binding Site from a Point, page 21). • This binding site definition might therefore include atoms that lie outside the cavity (i.e. on the surface of the protein). • You can use a cavity detection algorithm (Hendlich, Rippmann and Barnickel, LIGSITE: Automatic and efficient detection of potential small molecule binding sites in proteins, Merck technical report, 1997) to restrict the region of interest to concave parts of the binding site surface. • To enable cavity detection switch on the check-box labelled Detect cavity - restrict atom selection to solvent-accessible surface. This option is available by clicking on Define Binding Site from the list of Global Options given on the left of the GOLD Setup window. • After docking the atoms included in the binding site definition are listed in the Cavity atoms section of the gold_protein.log file. The cavity atom selection is also saved as a protein atom subset within Hermes. You can highlight the atoms belonging to any subset by picking the required subset from the Atom Selections pull-down menu, which is situated above the visualiser display area. • It is possible to generate contour (.acnt) files of the cavity used by GOLD by editing WRITE_CNT_FILES = 0 to WRITE_CNT_FILES = 3 in the gold.params file (see Altering GOLD Parameters: the gold.params File, page 92). The .acnt files produced can be read into Hermes following the docking via Display, Contour Surfaces. Further details on how to read .acnt files into Hermes are provided in the Hermes User Guide. 3.6.7 Solvent Accessibility • Each atom in the defined binding site is tested for solvent accessibility, this is a two step process: • First, the solvent accessible surface of each atom in the defined binding site is calculated. Potential donor and acceptor fitting points (used for ligand placement) are then generated for only those protein atoms that are accessible. • Second, the potential fitting points are themselves tested for solvent accessibility, and only 26 GOLD User Guide • • • • 3.7 those fitting points that are accessible are used. It is possible to remove this requirement for fitting points to be solvent accessible. In this case fitting points would be generated for all solvent accessible donor and acceptor atoms within the binding site. Remember that these atoms are already deemed to be solvent accessible but it's their potential fitting points that may have been desolvated by neighbouring atoms. This option can be used e.g. to avoid problems with solvent accessibility of backbone carbonyls in kinases where one of the carbonyl lone pairs is typically desolvated by a neighbouring atom. To generate fitting points for all solvent accessible donor and acceptor atoms switch on the check-box labelled Force all Hbond donors/acceptors to be treated as solvent accessible. This option is available by clicking on Define Binding Site from the list of Global Options given on the left of the GOLD Setup window. A Fitting points summary is provided in the gold_protein.log file. The polar fitting points used by GOLD are also saved as protein atom subsets within Hermes. Two subsets are saved, donor hydrogens and lone pairs. You can highlight the atoms belonging to any subset by picking the required subset from the Atom Selections pull-down menu, which is situated above the visualiser display area. Rotatable O-H and NH3 Groups • The torsion angles of Ser, Thr and Tyr hydroxyl groups will be optimised by GOLD so their starting positions do not matter. • Specifically, each Ser, Thr and Tyr OH will be allowed to rotate to optimise its hydrogenbonding to the ligand. • Lysine NH3+ groups are similarly optimised, unless they are held in place by strong H-bonds to neighbouring protein residues. • The optimised positions of polar protein hydrogen atoms generated during docking can be written to GOLD solution files. (see Controlling the Information Written to Ligand Solution Files, page 140). • It is possible to run a docking keeping these rotatable bonds static, if required (see Docking into a Rigid Protein, page 27). 3.8 Docking into a Rigid Protein • Even when not using advanced protein flexibility (see Protein Flexibility, page 34), serine, threonine and tyrosine hydroxyl groups are optimised i.e. rotated during docking, as are lysine NH3+ groups. • In some cases it might be necessary to dock into a rigid protein, i.e. to keep all the polar hydrogen atoms fixed during a docking. • To dock into a rigid protein, select Proteins from the list of Global Options given on the left of the GOLD Setup window and activate the Fix all protein rotatable bonds tick box. GOLD User Guide 27 3.9 Metal Ions 3.9.1 Preparing a Protein Input File which Contains a Metal Ion • There are some additional requirements when preparing a protein input file which contains a metal ion. • The metal ion must be coordinated to at least two protein atoms or water molecules so that GOLD can predict the coordination geometry (see Automatic Determination of Metal Coordination Geometries, page 28). • In the protein input file, the metal ion should not have any bonds to coordinating atoms. If these are present in the original PDB file, they must be deleted. • Note: GOLD can only handle the hardcoded metal atom types (see Automatic Determination of Metal Coordination Geometries, page 28); it is not possible to add user defined metal atom types. • If a particular metal ion is not required it can be removed from the protein (see Deleting Ligands and Metal Ions, page 13). 3.9.2 Automatic Determination of Metal Coordination Geometries • GOLD is able to recognise the following metal coordination geometries: Template Geometry Coordination number TETR Tetrahedral n=4 TBP Trigonal bipyramidal n=5 OCT Octahedral n=6 CTP Capped trigonal prism n=7 PBP Pentagonal bipyramidal n=7 SQAP Square prism n=8 ICO Icosahedral n=10 DOD Dodecahedral n=12 • In order to determine the coordination geometry of a particular metal atom GOLD performs a permuted superimposition of coordination geometry templates onto the coordinating atoms 28 GOLD User Guide found in the protein (e.g. if there are only two coordinating atoms in the protein then every unique pair of coordinating template atoms are selected and superimposed on the system in the protein). • Coordination fitting points are then generated using the template that gives the best fit (based on RMSd). • The geometry templates used for given metals are defined in the gold.params file in the section headed # Metals (for explanation of parameters refer to comments in the gold.params file): H-Bonding type Sybyl atom type Atom type (default or elucidated) Donor (D), Acceptor (A), or Metal (M). Allowed Coordination geometries Coordination distance MGD Mg DEF M 4, 6 2.05 ZND Zn DEF M 4, 5, 6 2.09 MND Mn DEF M 4, 6 2.06 FED Fe DEF M 4, 6 1.98 CAD Ca DEF M 6, 7 2.44 COBD Co.oh DEF M 6 2.09 GDD Gd DEF M 6 2.44 • For example, for a Zn atom GOLD will attempt to match coordination geometries 4, 5 and 6 (tetrahedral, trigonal bipyramidal, and octahedral templates) onto the coordinating atoms found in the protein. • The template that gives the best match will then be used to generate coordination fitting points. • Details of the coordination geometry determination are given in the gold_protein.log file. • The output file gold_protein.mol2 will contain a number of dummy atoms representing idealised coordination positions. These dummy atoms will be connected to the metal ion. Any unoccupied coordination points will then be available for ligand binding (see Metal-Ligand Interactions, page 32). 3.9.3 Specifying Metal Coordination Geometries Manually • It is possible to manually specify coordination geometries for particular metal atoms. This can be used to allow non-standard metal coordination geometries, or to limit the number of possible geometries that GOLD checks (i.e. it is possible to overrule the default geometries for the corresponding metal type defined in the gold.params file (see Automatic Determination of Metal Coordination Geometries, page 28)). • Metal ions are protein-specific so first activate the relevant protein tab adjacent to the Global GOLD User Guide 29 Options tab (e.g. Protein (1a42) lyase in the example below). Click on Metals from the list of options given on the left of the GOLD Setup window. • Any metals in the currently loaded protein will be recognised and listed. By default, only the coordination geometries for the corresponding metal type defined in the gold.params file will be considered during docking. For example, for a Zn atom GOLD will attempt to match coordination geometries 4, 5 and 6 (tetrahedral, trigonal bipyramidal, and octahedral templates) onto the coordinating atoms found in the protein (see Automatic Determination of Metal Coordination Geometries, page 28). • If you wish to manually specify coordination geometries for particular metal atoms then select the allowed coordination geometries by enabling the corresponding check box(es). Once the allowed geometries have been selected for a particular metal atom click on the Set button. • If the list of pre-defined coordination geometries does not contain a suitable geometry then you can define a custom metal coordination geometry (see Defining Custom Metal Coordination Geometries, page 31). • To return the allowed coordination geometries of a particular metal to the defaults defined in the gold.params file highlight the entry and hit the Default button. 30 GOLD User Guide 3.9.4 Defining Custom Metal Coordination Geometries • It is possible to specify custom metal coordination geometries which can subsequently be used to derive ligand binding points around particular metal atoms. • GOLD will normalise the size of the custom polyhedron to the appropriate metal-chelator distance before matching it to the metal and the coordinating atoms found in the protein. • Click on the protein tab then select Metals from the list of options given on the left of the GOLD Setup window. Click on the Define custom polyhedra button, The Define custom metal polyhedra window will appear: • Custom metal polyhedron may contain up to nine points. Each point in the custom polyhedron must be specified using a vector (assuming the centre of your polyhedron is at the origin). • For example, to set up a custom square planar geometry you must specify four points using the following vectors: 0, 1, 0 1, 0, 0 -1, 0, 0 0, -1, 0 GOLD User Guide 31 • Assuming the metal is on the origin (0,0,0), GOLD will then attempt to match the specified vectors onto the metal-to-protein-atom vectors found in the protein (vectors are normalised to a metal-to-chelator distance of 2.0 Å). • Once vectors for each point in the polyhedron have been defined click on the Add or replace button to add the custom definition to the list of coordination geometries available for selection (see Specifying Metal Coordination Geometries Manually, page 29). • Repeat the above procedure if you want to specify additional custom polyhedron. It is possible to set up to three custom metal polyhedron. • To edit a custom polyhedra highlight the corresponding entry in the The Define custom metal polyhedra window, make the required changes and then hit the Add or replace button. • To remove a custom polyhedra highlight the corresponding entry in the Define custom metal polyhedra window and hit the Delete button, or to remove all entries hit the Clear button. • Once defined the custom geometries will be available for selection when manually specifying allowed coordination geometries (see Specifying Metal Coordination Geometries Manually, page 29). 3.9.5 Metal-Ligand Interactions • Metal coordination in GOLD is modelled as 'pseudo-hydrogen bonding'. • Metal-ligand interactions will typically involve the metal binding to, for example, carboxylate ions, deprotonated histidines (i.e. negatively charged), and phenolates. Therefore metals can be considered to bind to H-bond acceptors and the metal will compete with H-bond donors for interaction. • Consequently, GOLD uses the following approach for handling metals: • Virtual coordination points are added at locations where GOLD is missing a coordination site. • These coordination points are then used as fitting points that can bind to acceptors. 3.9.6 Heme Containing Proteins • The paper Kirton et al, Proteins: Structure, Function, and Bioinformatics, 58, 836-844, 2005 describes the use of ligand specific iron parameters in the context of docking to heme-containing proteins. This extended metal parameterisation is available for the fine-tuning of metal interactions, so that e.g. metal-ligand interactions can specifically be addressed depending on the metal contact. • The protein does not need to be set up in a special way to make use of these parameters however the standard set-up should be followed (see Preparing a Protein Input File which Contains a Metal Ion, page 28). • Further information on setting up a GOLD run with these settings is available (see Heme Scoring Function, page 93). 32 GOLD User Guide GOLD User Guide 33 4. Protein Flexibility Protein flexibility can be handled in one of three ways in GOLD: • by allowing side chains to rotate within user-defined bounds during docking (see Side Chain Flexibility, page 34). • by docking into subtly different versions of the same protein (see Ensemble Docking, page 43). • by docking using soft potentials (see Allowing For Localised Movements: Docking With Soft Potentials, page 48). 4.1 Side Chain Flexibility 4.1.1 Introduction • You may specify that one or more protein side chains are to be treated as flexible. Each flexible side chain will be allowed to undergo torsional rotation around one or more of its acyclic bonds during docking. • Making a side chain flexible can make docking more difficult because it increases the search space that must be explored. It may also increase the chance of false positives (i.e. ligands that appear to dock well but do not actually bind). Therefore, you should only make a side chain flexible if you have good reason to believe (e.g. from X-ray data) that it is likely to move in response to ligand binding. 4.1.2 Specifying Flexible Side Chains • You may specify that one or more protein side chains are to be treated as flexible during docking. • Flexible side chains are protein-specific, thus click on the protein tab adjacent to the Global Options tab (in the example below the protein tab is named Protein (1fax) coagulation factor), then select Flexible Sidechains from the list of available options. A list of the side chains included within the binding site definition will be displayed. 34 GOLD User Guide • By default all side chains will be treated as rigid, i.e. they will be held fixed at their input conformation during the docking. To make a side chain flexible you can either: • Select the side chain by clicking on it in the list. Once selected, a side chain will be highlighted in the Hermes visualiser. Once a side chain has been selected you will be required the define one or more allowed rotamers. Each rotamer specifies the torsion angles that are permitted to vary, and the allowed values or ranges of values for those torsion angles. Click on the Edit button. The resulting Edit Rotamer Library dialogue should then be used to set the rotational parameters for the selected side chain (see Defining Rotamers, page 36). • Alternatively, select a side chain within Hermes by right-clicking on it and selecting Set flexibility parameters from the drop down list. The resulting Edit Rotamer Library dialogue should then be used to set the rotational parameters for the selected side chain (see Defining Rotamers, page 36). • A maximum of 10 flexible side chain can be defined. • Once rotational parameters have been specified the Status of those side chains made flexible will be updated in the list. To highlight, in the Hermes visualiser, only those side chains that have been made flexible click on the Highlight flexible button. To highlight all side chains in the defined binding site click on Highlight all, and to remove all highlighting click on the Highlight GOLD User Guide 35 none button. 4.1.3 Defining Rotamers • Once a side chain has been specified as flexible you will be required to define one or more allowed rotamers. Each rotamer specifies the torsion angles that are permitted to vary, and the allowed values or ranges of values for those torsion angles. Up to 50 rotamers can be defined for each flexible side chain. • Rotamers are defined using the Edit Rotamer Library dialogue which is opened when selecting a side chain (see Specifying Flexible Side Chains, page 34). For example, consider the side chain TYR99, shown below. 36 GOLD User Guide • Chi1 is the first rotatable torsion in the side chain. In this example it corresponds to rotation around Cα-Cβ, so the atoms will be the backbone N, (= atom 1286), CA (1287), CB (1290) and CG (1291). • Chi2 is the second rotatable torsion and corresponds to rotation around Cβ-Cγ, so the atoms are CA (1287), CB (1290), CG (1291) and CD1 (1293). • Thus, rotamer1 specifies the first set of allowed values for chi1 and chi2. In this example, this is chi1 = 60, chi2 = 90. • Rotamer2 specifies the second set of allowed values. In this example delta1 =10 and specifies the allowed range (delta1 - chi1) to (delta1 + chi1), while delta2 = 10:15 and specifies the range (chi2 - 10) to (chi2 + 15). • In summary, the effect of these two rotamers is therefore to allow Tyr99 to adopt the conformation of precisely chi1 = 60, chi2 = 90, or any conformation in the range chi1 = -55 to 75, chi2 = -100 to -70. • Each rotamer therefore describes one allowed conformation of the side chain as defined by the torsion angles values (chi1, chi2 etc.) and their allowed ranges (delta1, delta2 etc.). Rotamers can be defined in the following ways: • Setting a side chain to be rigid: To fix a particular side chain at it’s input conformation (i.e. to GOLD User Guide 37 • • • • make it non-flexible during docking) click on the Rigid button. Any previously defined rotamers will be lost. Setting a side chain to be freely rotatable: To allow a side chain to rotate freely during docking click on the Free button. This will define a single rotamer where all rotatable torsions are permitted to vary over the range -180 to +180. Any previously defined rotamers will be lost. From a rotamer library: The file <GOLD_DIR>/gold/rotamer_library.txt contains information taken from the paper The Penultimate Rotamer Library, S. C. Lovell, J. M. Word, J. S. Richardson & D. C. Richardson, Proteins, 40, 389-408, 2000. It is a compilation of the most commonly observed side-chain conformations for the naturally occurring amino acids. To define rotamers corresponding to these commonly observed side-chain conformations click on the Library button. Note that the library settings are simply a starting point; users are encouraged to generate their own rotamers for optimal results. From the protein input file: Click on the Crystal button to define a rotamer in which all rotatable torsions in the side chain will be allowed to vary over the range (delta - chi) to (delta + chi); where chi values are taken from the protein input file. From dials: Rotamers can be specified directly. To set a chi value click on the dial and while holding down the mouse button move the red indicator line to the required position. The corresponding torsion will rotate within the Hermes visualiser to show the current value. Alternatively, type the required chi value into the entry box directly under the dial. Once the chi and delta values have been set click on the From Dials button to add this rotamer definition. 4.1.4 Deleting and Editing Rotamer Definitions • To remove, or copy a particular rotamer definition right click on the rotamer name in the Edit Rotamer Library dialogue and select either Delete rotamer or Copy rotamer from the resulting drop down menu. • To edit a particular rotamer definition right click on the rotamer name in the Edit Rotamer Library dialogue and select Edit this rotamer from the resulting drop down menu. This will open the Edit rotamer dialogue: 38 GOLD User Guide • The rotamer Name, Chi and corresponding Delta values can be changed by typing into the appropriate entry boxes. Chi values should be a single number in the range -180 to +180. Delta values should be a single number in the range 0 to -180, or a pair of numbers of the form x:y to specify an asymmetic range. • An Energy may be assigned to a given rotamer. This will penalise (i.e. reduce) the fitness by the value specified if the side chain is placed in defined conformation. In other words, it makes this conformation less favourable. A negative Energy value can be entered, its effect would be to improve (i.e. increase) the fitness if the side chain is placed in the defined conformation. 4.1.5 Allowing a Localised Backbone Movement • Quite often, a side-chain rotation is accompanied by a small change in the local backbone conformation. For example, the figure below shows a detail from an overlay of two PDB structures (1qon, 1dx4) of the same enzyme: GOLD User Guide 39 • Not only has the Tyr side chain rotated around Cα-Cβ and Cβ-Cγ, but there has also been a small backbone movement, primarily affecting the position of the Cα atom. • Although minor (the two Cα positions are only 0.6Å apart), this movement is extremely important because it alters the vector direction Cα-Cβ, and this can have a big leverage effect on the positions of atoms further down the side chain. In this case, it is impossible to overlay the Tyr370 side chain of 1dx4 closely onto that of 1qon simply by rotating around the Cα-Cβ and Cβ-Cγ bonds. This is about as close as one can get: 40 GOLD User Guide • The backbone movement can be mimicked by allowing the Cα atom and the attached side chain to rotate around the N-C vector, where N and C are the backbone atoms on either side of the Cα atom. This is defined as a rotation of the improper torsion defined by the atom sequence CA-NC-CA • To define an improper torsion enable the Improper check-box in the Edit Rotamer Library dialogue. An additional Improper torsion angle dial will become available for defining rotamers (see Defining Rotamers, page 36). • In the example shown below, an additional improper torsion has been specified. The specification for the improper torsion angle will allow a rotation of (+ or -)30 degrees around the N-C vector, the zero angle corresponding to the Cα position given in the protein input file. GOLD User Guide 41 • It is not easy to decide on suitable rotation limits for improper torsions - a trial and error approach is normally required - but they often need to be quite large. For example, an improper rotation of about +40 degrees has to be applied to Tyr370 of 1dx4 for it to be possible to overlay the side chain closely onto the 1qon Tyr370 position. 4.1.6 Protein-Protein Clashes • By default, when a flexible side chain is moved during docking, GOLD checks whether any of its atoms clash with atoms in neighbouring residues. This gives rise to an extra Protein Energy term which contributes to the total fitness value. • The term is computed by summing the van der Waals interactions of all pairs of protein atoms which satisfy the following conditions: (a) at least one of the protein atoms is in a flexible side chain; (b) the van der Waals term for that pair of atoms is repulsive. The van der Waals interactions will be estimated using the same potential as is used for the protein-ligand vdw term (by default, this is a 4-8 potential). • The protein-protein clash term can be switched off by including the command penalise_protein_clashes = 0 anywhere in a rotamer_lib block within the gold.conf file. For further instructions refer to the GOLD configuration file documentation. Note that this will 42 GOLD User Guide switch off calculation of the protein-protein clash term for all flexible side chains, not just the one corresponding to the rotamer_lib block in which you have placed the penalise_protein_clashes = 0 command. • It is recommended that the protein-protein clash term be switched off in the following cases. • When fixed conformers are used (i.e delta =0 throughout): Fixed conformations will usually arise from having identified all such conformers in different crystal structures, and so will be comparable in energetics. You may therefore wish to treat each on equal merit. They may exhibit different protein-protein clash terms, however, and if this option is switched on, one may be significantly favoured over the other, in a way you do not intend. • When using improper torsions: These distort the protein structure in artifactual ways and will often introduce an artifactual protein-protein clash. 4.2 Large Backbone Movements • It is not possible for GOLD to make large backbone movements. This sort of problem can be dealt with by performing an ensemble docking (see Ensemble Docking, page 43). • Small backbone movements in the vicinity of a flexible side chain may be allowed by including the improper torsion angle CA-N-C-CA in a rotamer_lib command block (see Allowing a Localised Backbone Movement, page 39). Another option you can try is to apply a Localised Soft Potential to one or more residues in the loop (see Allowing For Localised Movements: Docking With Soft Potentials, page 48). 4.3Ensemble Docking 4.3.1 Introduction • Sequential docking of individual ligands into a protein is computationally time-consuming. • Ensemble docking aims to address the issue of protein flexibility by adding multiple protein structures into a single GA run. The ultimate aim is to obtain higher enrichments in virtual screening experiments. • Multiple protein conformations can be searched concurrently when docking an ensemble thus saving valuable time compared to a sequential docking approach. • Starting from a superimposed set of protein structures, GOLD evolves a separate population of individuals (representing ligand conformations) for each protein structure part of the ensemble. • The best ligand conformation found in any of the ensemble structures is returned i.e. GOLD selects the best protein for a particular ligand based on the maximum fitness value of a ligand. For example, if a ligand gets the scores 10 in protein 1, 20 in protein 2 and 15 in protein 3, protein 2 will be selected. • There should only be one binding site definition across the entire ensemble (hence the need to superimpose proteins) and this must be protein independent. GOLD User Guide 43 4.3.2 Setting up Proteins for Ensemble Docking • Proteins being specified in an ensemble should be set up in the usual way (see Setting Up the Protein(s), page 10). • In addition, proteins that are to be used in an ensemble docking must be superimposed. • Proteins can be superimposed by using the Superimpose button in the Proteins window of the GOLD interface, or via Calculate and then Superimpose Proteins in Hermes. Brief details follow, complete details are provided in the Hermes documentation. • A wizard is provided to facilitate protein superimposition. Proteins can be overlaid by matching residues based on label, matching residues based on sequence number or by matching residues based on sequence alignment. • Optionally a component of fasta (called ggsearch2), can be used for sequence alignment of proteins to be superimposed. The package can be downloaded from http:// fasta.bioch.virginia.edu/fasta_www2/fasta_down.shtml. • In both cases above the wizard guides you through the superimposition process. 4.3.3 Setting up an Ensemble Docking • All proteins currently loaded into Hermes are listed in the Proteins window and can be selected or deselected for use in the ensemble using their associated tick box. • Only proteins are listed in this dialogue. To view all other loaded files, activate the List all loaded files (not just proteins) tick box. • Each loaded protein has its own tab (adjacent to the Global Options tab) labelled with the name taken from the protein file e.g. pdb1qpc_full_entry below. 44 GOLD User Guide • Proteins must be set up in the usual way and superimposed before they are using in an ensemble docking (see Setting up Proteins for Ensemble Docking, page 44). • From within the Protein window it is possible to apply a Protein score offset. This user-defined value will be subtracted from the overall fitness score if a ligand is docked into this protein structure. Both negative and positive values can be used; negative values favour the selection of a protein conformation, positive ones disfavour thus using the protein score offset it is possible to bias which protein is selected. There are no limits for these values. If using this feature, these scores are reported as DE (Protein) in the GOLD log files. • When docking an ensemble the binding site definition must describe the binding sites of all loaded and superimposed proteins. The binding site must therefore be defined using a method that isn’t protein specific i.e. a point (see Defining a Binding Site from a Point, page 21) or a reference ligand (see Defining a Binding Site from a Reference Ligand, page 23). It is not possible to define the active site using an atom or a list of atoms or residues. • Ligands are specified for ensemble docking in the same way as when docking into an individual protein (see Specifying the Ligand File(s), page 52). A maximum of 20 proteins can be specified in an ensemble. GOLD User Guide 45 • The following setup options can be applied across the entire ensemble: • Specification of active waters (see Specifying Waters, page 16). Waters should not be considered to be associated with a specific protein, rather representative waters should be specified that will be used in all proteins. • Similarity constraint (see Setting Up a Similarity Constraint, page 120). • Scaffold constraint (see Setting Up Scaffold Match Constraints, page 122). • Region constraint (see Setting Up Region (Hydrophobic) Constraints, page 118). • Settings specific to each protein are controlled from within the individual protein tabs i.e.: • Protein setup (addition of H atoms, extraction/deletion of water molecules, extraction of ligands). • Specification of flexible side chains (see Side Chain Flexibility, page 34). Note that the active site definition must be set before flexible side chains can be setup. • Special treatment of metal atoms (see Metal Ions, page 28). • Distance constraint (see Setting Up a Distance Constraint, page 111). • Substructure constraint (see Setting Up Substructure-Based Distance Constraints, page 113). • HBond constraint (see Setting Up Hydrogen Bond Constraints, page 115). • Protein HBond constraint (see Setting up Protein H Bond Constraints, page 116). • Interaction motif (see Setting up an Interaction Motif Constraint, page 124) • Note: protein-specific constraints are only evaluated if the respective protein structures are selected for scoring in the ensemble docking process. It is also possible to only specify a constraint for a single protein structure in the ensemble. There are caveats associated with definition of constraints when docking into an ensemble (see Caveats of Docking into Ensembles, page 47). • It is not possible to apply soft potentials or covalent constraints to a docking ensemble. 4.3.4 Interpreting Ensemble Docking Output • Standard docking output is detailed elsewhere (see Viewing and Analysing Results, page 147). The following details ensemble-specific output. • Each initialised protein is written to a file of the type: gold_protein_<ensemble_index>.mol2. • Each solution file will contain a > <Gold.Ensemble.ID> tag with the ensemble index, identifying the protein that GOLD has selected as the receptor for this solution. 46 GOLD User Guide • The ligand.rnk file and the bestranking.lst file have an additional ensemble column that details the ensemble index of the protein the ligand was docked into. • The gold_protein.log will contain a Loading protein section for each initialised protein (i.e. each protein in the ensemble) and there will be an Active Molecule Initialisation section for all initialised waters molecules in the ensemble. • Protein scores for each ligand are contained with the ligand.log output file. You can see below that for this particular ligand, protein 1 scores highest. 4.3.5 Caveats of Docking into Ensembles • Although it is possible to specify rotatable side chains when docking an ensemble, these sort of movements can be captured in an additional protein mode that can be added to the ensemble. This might be worth considering before setting any side chains as flexible. • Each protein is assigned an index number by GOLD when the ensemble docking is carried out. It is possible to rescore an ensemble docking however if a separate .conf file is used from the original docking, it is essential that the order the proteins are listed in is maintained in the rescore run. If the protein order is not retained, the rescore will not run. • In ensemble docking it is possible to define constraints on individual protein models or on all protein models. Constraints work by penalising poses that do not fulfil a specific constraint. As such if a constraint is only set up on a subset of all models, the proteins without constraints could end up being favoured over those with the constraint. In addition it is worth noting that docking the same ligand into different protein models can lead to differences in the scores. Thus in order GOLD User Guide 47 for the constraints to have a noticeable effect one might need to increase their weighting from the default values. The combination of constraints and ensemble docking is not a straightforward problem; care should be take in order to obtain results that are meaningful. 4.4 Allowing For Localised Movements: Docking With Soft Potentials • GOLD uses Lennard-Jones functional forms for both the External and Internal Van der Waals contributions to the Fitness Function. By default a 6-12 potential is applied to the Internal Van der Waals contribution and a 4-8 potential is applied to the External Van der Waals contribution. These defaults are defined in the gold.params file (see Altering GOLD Parameters: the gold.params File, page 92). • The 4-8 potential form for the External contribution is selected as being optimum for general use. However there are cases where this potential form may be too severe in the short contact (i.e the clash) component. This would arise for instance, where part of the binding site is made up of a loop which it is known can move aside slightly to accommodate large ligands. In such cases it is possible to apply a softer 'Split Van der Waals Potential' for certain selected residues. Two alternative soft 'Split Potential' forms are parameterised in the gold.params file: EXTERNAL_POTENTIAL(1) = 4-8 2-4- Potential 1 EXTERNAL_POTENTIAL(2) = 4-8 1-2- Potential 2 • The first term of each form describes long range interactions, the second term describes short range interactions. The point of change-over is at the 4-8 potential minimum and the second term is set such that both terms take the same value at this point. The function therefore remains continuous and the minimum point is the same as with the default 4-8 potential. • Soft potentials are protein-specific so to apply an alternative soft potential to specific residues you must first activate the protein tab (adjacent to the Global Options tab, e.g. Protein (1fax) coagulation factor in the example below) then click on Soft Potentials from the list of available options given on the left of the GOLD Setup window. 48 GOLD User Guide • Select the alternative potential you wish to apply by switching on the corresponding Add Selection button, then specify those residues you want to apply the alternative potential to by clicking on them in the Hermes visualiser. Selected residues will be listed. • To remove a selected residue from the list click on it again within the Hermes visualiser. To remove all selected waters click on the Clear button. • More than one residue can be specified, and both alternative potential forms can be used in the same GOLD run as shown in the above example. GOLD User Guide 49 5. Setting Up Ligands 5.1 Essential Steps • Add all hydrogen atoms, including those necessary to define the correct ionisation and tautomeric states (see Ligand Hydrogen Atoms, Ionisation States and Tautomeric States, page 50). • Ensure that all bond types are correct. If they are, and hydrogen atoms have been placed on the correct atoms, GOLD will deduce atom types automatically when atom typing is turned on (see Automatically Setting Atom and Bond Types, page 60). • GOLD assigns atom types from the information about element types and bond orders in the input structure file, so it is important that these are correct. However, if for any reason, GOLD is unable to deduce an atom type, then the atom in question will be replaced with a dummy atom type Du. If this is the case a warning message will be given in the gold_ligand.log file. • The presence of dummy atoms should not significantly affect the docking prediction since dummy atoms are neither considered as donors or acceptors. • There is usually a right and a wrong way to code groups which can be drawn in more than one way (i.e. have more than one canonical form), such as nitro, carboxylate and amidinium (see Atom and Bond Type Conventions for Difficult Groups, page 62). • The starting geometry of the ligand should be reasonably low in energy, since GOLD will not alter bond lengths or angles, or rotate rigid bonds such as amide linkages, double bonds and certain bonds to trigonal nitrogens. However, GOLD will optimise the values of torsion angles around rotatable bonds. • Save the ligand as a MOL2 file (i.e. Tripos format) or a MOL file (i.e. MDL SD format). It is also possible (but not recommended) to use PDB format. If using PDB format CONECT records should also be included (see Ligand File Formats, page 51). 5.2 Ligand Hydrogen Atoms, Ionisation States and Tautomeric States • GOLD uses an all-atom model, so the ligand must have all hydrogen atoms added. • The precise geometrical positions of rotatable (e.g. hydroxyl and amino) hydrogen atoms do not matter, as they will be optimised during the GOLD run. • GOLD deduces hydrogen-bonding abilities from the presence or absence of hydrogen atoms. For example, you can control the protonation state of a carboxylic acid group by adding or removing the ionisable hydrogen atom. • If incorrect ionisation or tautomeric states are inferred by the program, it is unlikely that correct protein-ligand binding modes will be predicted. If you are unsure about, e.g., the preferred ionisation state of the ligand, you should perform separate GOLD runs using the different possibilities. • GOLD ignores atom charges, both formal and partial. It deduces whether an atom is charged by 50 GOLD User Guide counting the bond orders of the bonds that it forms and comparing the result with the atom’s normal valency. 5.3 Ligand Geometry, Conformation and Stereochemistry • The ligand conformation will be varied by GOLD during docking. The starting conformation therefore does not matter. • GOLD will not alter bond lengths or angles. These parameters should therefore be set to reasonably optimum values. A good practice is to build the ligand in an arbitrary conformation and then perform a few cycles of molecular-mechanics minimisation to take the ligand close to its local potential-energy minimum. • Ring conformations can be searched during docking using of library of ring templates (see Ring Conformations, page 95). • The torsion angles around rigid bonds such as amide linkages, double bonds and certain bonds to trigonal nitrogens will normally be fixed at their starting values. However, you can use the Ligand Flexibility options to enable some of these features to vary (see Ligand Flexibility, page 95). • GOLD will not alter stereochemistry. If you are unsure about the stereochemistry of the ligand, you must generate all alternatives and dock each separately. It is meaningful to make comparisons between fitness scores for dockings of different stereoisomers. 5.4 Ligand File Formats • Acceptable ligand file formats are MOL2 (i.e. Tripos format), MOL (i.e. MDL SD format) and PDB (although we do not recommend the use of pdb format). Files in MOL format may also have the extension .mdl or .sdf. • Only MOL2 may be used if you wish to set ligand atom types manually (see Automatically Setting Atom and Bond Types, page 60). • An extension to the PDB file format is required if it is used for storing the ligand structure. Specifically, a bond specified twice in a single CONECT record is assumed to be a double bond, and a bond specified three times in a single CONECT record is assumed to be a triple bond. For example, the following CONECT records both specify a double bond between atoms with serial numbers 25 and 26: CONECT CONECT 25 26 20 25 26 27 30 52 26 25 • This mechanism for specifying bond orders is forced by the lack of a bond-order field in the standard PDB format, and seems to offer lots of scope for users to commit errors. For that reason, we recommend that the PDB format is not used for ligands. GOLD User Guide 51 5.5 Specifying the Ligand File(s) • Any number of ligands can be specified, either by selecting several individual files, or by selecting a single file containing several ligands (i.e. a multi-MOL2 or SD file). GOLD will dock each in turn. • Acceptable ligand file formats are MOL2 (i.e. Tripos format), MOL (i.e. MDL SD format) (see Ligand File Formats, page 51). • Click on Select Ligands from the list of Global Options given on the left of the GOLD Setup window. • To specify a ligand file, click on the Add button and use the file selection window to choose the ligand data file(s). • Specify the number of times each ligand is to be docked by entering a value in the GA runs box (see Number of Dockings, page 127). • When using a single file containing several ligands (i.e. a multi-MOL2 or SD file) it is possible to only dock specific ligands in that file. Specify which ligand you wish to start and finish docking at by entering, in the First Ligand and Last Ligand boxes, the numbers relating to the position of 52 GOLD User Guide • • • • • 5.6 the ligands within the file. Unless specified otherwise GOLD will, by default, start at the first ligand and finish at the last ligand in the file. Repeat the above procedure if you want to select further ligands for docking. To edit a specified ligand file (e.g. to change the number of times the ligand will be docked) highlight the ligand file with the mouse and make the required change. To remove a specified file from those listed highlight the ligand file with the mouse and hit the Delete button. It is also possible to retrieve and dock ligands directly from a GoldMine database (see Receiving Ligands From GoldMine, page 53). It is possible to supply to GOLD with a file containing a reference ligand (e.g. a crystallographically observed ligand pose). The ligand reference file will be used to perform automated RMSd calculations against GOLD solution(s) (see Specifying a Ligand Reference File, page 58). Receiving Ligands From GoldMine • It is possible to take a selection of ligand poses from a GoldMine analysis and submit them to GOLD for docking. The results can then be saved within output files or alternatively they can be returned to GoldMine and saved within a GoldMine DB (see Sending Docking Results to GoldMine, page 157). • To receive ligands from GoldMine first it is necessary to create or load a valid GOLD configuration file. Since it will often be the case that you will be using a tried and tested docking protocol to re-dock selected ligands, reading in an existing file is probably the usual case. • Click on Select Ligands from the list of Global Options given on the left of the GOLD Setup window and delete any ligand file specifications made there. • Click on GoldMine from the list of Global Options given on the left of the GOLD Setup window. Within this pane it is possible to set GOLD up so that it either receives or sends docking poses from GoldMine. • To receive ligands, enable the Get ligands from GoldMine check box. An appropriate machine Hostname and a Port number should be provided. It is also possible to specify the Number of GA runs that will be carried out on each ligand. The default is 10. GOLD User Guide 53 • Click on the Run GOLD button. GOLD will start by initialising the protein. The GOLD server is now activated and ready to receive ligands for docking. • Next, within GoldMine, Open a GoldMine DB and make a selection of docking poses of interest within the Selection Manager window. At the top right of the Selection Manager is an option marked Dock in GOLD. Click on this button. • A dialog window will appear informing you that a GOLD process set up to receive ligands from GoldMine, is required. Hit OK. A GOLD dockings window is now displayed: 54 GOLD User Guide • The top segment displays the number ligands queued for docking, and the middle segment informs which ligand is currently being docked. The docked run is complete once the word Waiting appears alongside the host name in the middle segment. • A second selection can created and then submitted to the same GOLD process. The results will be treated as though they are contiguous with the first set i.e. the index numbers of the new solutions will continue from the old end point and, if solutions were being saved in a single molecule file, the solutions of the second set will be appended to that same file. • Docking results can also be returned to GoldMine and saved within a new or existing GoldMine DB (see Sending Docking Results to GoldMine, page 157). 5.7 Setting Up Covalently Bound Ligands • GOLD is able to dock covalently bound inhibitors, but only if you specify which ligand atom is bonded to which protein atom. GOLD supports two types of covalent link: • A covalent link for use with individual ligands (see Setting Up a Single Covalent Link, page 56). • A substructure-based covalent link for use with multiple ligands which have a common functional group (see Setting Up Substructure-Based Covalent Links, page 57). • Note that it is necessary to use mol2 files when running a covalent docking. 5.7.1 Method Used for Docking Covalently Bound Ligands • GOLD is able to dock covalently bound inhibitors, but only if you specify which ligand atom is bonded to which protein atom. GOLD User Guide 55 • The program assumes that there is just one atom linking the ligand to the protein (e.g. the O in a serine residue). Both protein and ligand files are set up with the link atom included (so, if the serine O is the link atom, it will appear in both the protein and ligand input files). Ideally the link atom, in both the ligand and the protein, will have a free valence available through which the link can be made. If the link atom on the ligand does not have a free valence, having a hydrogen instead, then the docking will proceed and the hydrogen will be ignored in terms of its contribution to the fitness score. It will however still be displayed when docking poses are visualised. • Inside the GOLD least-squares fitting routine, the link atom in the ligand will be forced to fit onto the link atom in the protein. • In order to make sure that the geometry of the bound ligand is correct, the angle-bending potential from the Tripos Force Field has been incorporated into the fitness function. On evaluating the score for the docked ligand, the angle-bending energy for the link atom is included in the calculation of the fitness score. The Tripos force-field is described in Validation of the General Purpose Tripos 5.2 Force Field, M. Clark, R.D. Cramer III, & Nicole Van Opdenbosch, J. Comp. Chem., 10, 982, 1989 • This seems to work well in the systems on which GOLD was validated. However, since the protein is held rigid (apart from hydroxyl hydrogen atoms), it does require that the position of the link atom in the protein is sensible. 5.7.2 Setting Up a Single Covalent Link • Set up the protein and ligand structures so that they both contain the link atom (see Method Used for Docking Covalently Bound Ligands, page 55). • Covalent constraints are specific to the protein thus click on the protein tab (e.g. Protein (1ase) aminotransferase in the example below), select Covalent from the list of available options given on the left of the GOLD Setup window and enable the Define covalent docking check-box. 56 GOLD User Guide • Select Atom as the ligand link mode and define both the Protein link atom and Ligand link atom. This can be done by clicking on an atom in the visualiser. Alternatively, you can enter the atom number, or PDB sequence number (as it appears in the input file) directly into the appropriate entry box. 5.7.3 Setting Up Substructure-Based Covalent Links • It is possible to apply a covalent link to multiple ligands which have a common functional group. During docking the link will be applied to any ligands which contain a specified substructure (matching is performed on the basis of the atom types and 2D connectivity). Note: the substructure must be a sub-graph rather than a complete molecule. • To use a substructure-based covalent link, first create a file containing the substructure in MOL2 format (e.g. substructure.mol2). It is recommended that you set atom types manually (see Manually Setting Atom and Bond Types, page 61) since an incomplete fragment can cause problems with automatic atom-typing. The actual conformation of the group in this file is not important, as only the atom types and 2D connectivity will be used. • Covalent constraints are specific to the protein thus click on the protein tab (e.g. Protein (1ase) aminotransferase in the example below), select Covalent from the list of available options given GOLD User Guide 57 on the left of the GOLD Setup window and enable the Define covalent docking check-box. • Select Substructure as the ligand link mode. • To specify the Substructure file either enter the path and filename of the file, or click on the ... button and use the file selection window to choose the file. • Define both the Protein link atom and Substructure link atom. This can be done by clicking on an atom in the visualiser. Alternatively, you can enter the atom number, or PDB sequence number (as it appears in the input file) directly into the appropriate entry box. • Enable the Use topology matching to check equivalent atoms check-box if the constraint refers to a substructure atom (and therefore a ligand atom) which is topologically equivalent to other atoms (e.g. it is one of the oxygen atoms of an ionised carboxylate group), GOLD will then use whichever of the equivalent atoms gives the best result. 5.8 Specifying a Ligand Reference File • It is possible to supply to GOLD with a file containing a reference ligand (e.g. a crystallographically observed ligand pose). • The ligand reference file will be used to perform automated RMSd calculations against GOLD 58 GOLD User Guide solution(s). For each GOLD solution the resultant RMSd with respect to the reference ligand will be written to the files containing the fitness function rankings, i.e. the ligand rank file (.rnk) and bestranking.1st file. • Click on Select Ligands from the list of Global Options given on the left of the GOLD Setup window. To specify the ligand reference file either enter the path and filename of the file in the Reference ligand box, or click on the ... button and use the file selection window to choose the file. GOLD User Guide 59 6. Atom and Bond Types 6.1 Atom and Bond Type Overview • Each protein and ligand atom must be assigned an atom type which is used, for example, to determine whether the atom is capable of forming hydrogen bonds. • GOLD atom typing is based on SYBYL atom types. Internally, GOLD also uses some additional atom types (see Internal GOLD Atom Types, page 67). • SYBYL bond types are also used. • Correct assignment of atom and bond types is crucial. • GOLD assigns atom types from the information about element types and bond orders in the input structure file, so it is important that these are correct. However, if for any reason, GOLD is unable to deduce an atom type, then the atom in question will be replaced with a dummy atom type Du. If this is the case a warning message will be given in the gold_protein.log file. • The presence of dummy atoms should not significantly affect the docking prediction since dummy atoms are neither considered as donors or acceptors • Dummy atoms may be visualised in Hermes by activating the Show unknown atoms tickbox on the hermes top level menu.. • Atom types may be set manually, provided you are using MOL2 input files (see Manually Setting Atom and Bond Types, page 61). • Alternatively, they can be set automatically (see Automatically Setting Atom and Bond Types, page 60). Unless you are an expert GOLD user or are dealing with a very unusual ligand structure, you are recommended to use this option. However, you still need to input the ligand and protein structures correctly, e.g. with correct bond orders and appropriate protonation states. 6.2 Automatically Setting Atom and Bond Types • Unless you are an expert GOLD user or are dealing with a very unusual ligand structure, you are recommended to use the automatic atom-type assigner. • To automatically set atom and bond types click on Atom Typing from the list of Global Options given on the left of the GOLD Setup window. Atom and bond types can then be assigned automatically for the ligand and/or protein by switching on the appropriate check-box(es). • GOLD assigns atom types from the information about element types and bond orders in the input structure file, so it is important that these are correct (see Atom and Bond Type Conventions for Difficult Groups, page 62). However, if for any reason, GOLD is unable to deduce an atom type, then the atom in question will be replaced with a dummy atom type Du. • It does not matter whether the bonds in an aromatic ring are coded as aromatic (ar) or alternate single and double, as the GOLD atom-type assigner will automatically assign the special SYBYL bond type ar where appropriate. • The atom-type assigner will also detect amide linkages and assign them the SYBYL bond type 60 GOLD User Guide am. • Care should be taken when using the type-assignment software on protein input files. In particular, the software is likely to be unreliable if protein residues have been partially deleted, so that some atoms appear to have free valencies. This situation can be avoided by ensuring that all residues included in the input file are complete. • There is usually a right and a wrong way to code groups which can be drawn in more than one way (i.e. have more than one canonical form), such as nitro, carboxylate and amidinium. A list of correct bond types for some of the common, difficult groups is available (see Atom and Bond Type Conventions for Difficult Groups, page 62). • Because correct atom typing is so important, any messages from the type checker are logged in both the gold_protein.log file and the gold.err file. These errors will also be displayed in a separate window if GOLD is run through the front end. 6.3 Manually Setting Atom and Bond Types • If you do not want to use the automatic atom- and bond-type assignment available in GOLD, you can define the atom and bond types yourself, provided that you use MOL2 format. This option is useful when you want to set unusual atom types or user-defined types. • GOLD atom typing is based on SYBYL atom types (see Appendix B: List of Atom and Bond Types, page 236). • SYBYL bond types are also used (see Appendix B: List of Atom and Bond Types, page 236). • Even if atom types are set manually, the automatic atom-type assignment software is still run to check the ligand structure for inconsistencies. Any errors will be recorded in both the log file and the error file. In most cases, input types will not be reset. • If for any reason GOLD is unable to deduce an atom type, then the atom in question will be replaced with a dummy atom type Du. • Bond types must be correctly set (see Atom and Bond Type Conventions for Difficult Groups, page 62). This is normally just a case of checking single and double bonds. However, the amide bond must be set to the am bond type. Also, the ar bond type is used for delocalised bonds (e.g. in carboxylate, phosphate and guanidinium ions) as well as for aromatic bonds. • Atom types should conform to those expected in SYBYL. In particular, sp2 oxygen is atom type O.2, sp3 oxygen is O.3, tetrahedral nitrogen is N.3 (or N.4 if protonated), planar (non-amide) nitrogen is N.pl3 and the planar amide nitrogen is N.am. The atom type O.co2 should be used for the oxygens of carboxylate and phosphate ions or the singly-charged oxygen of phenolates. • If an atom is mis-typed, it is possible that GOLD will assign it the wrong H-bond donor or acceptor properties. Therefore, correct atom-type assignment is crucial. An N.3 donor (tetrahedral nitrogen), is very different from an N.4 (protonated nitrogen) or an N.pl3 (planar trigonal nitrogen) donor. The assignment of rotatable bonds may also be affected. If a bond has the wrong type, it may be inappropriately allowed to rotate freely. • A list of atom and bond type conventions for some common, difficult groups is available (see GOLD User Guide 61 Atom and Bond Type Conventions for Difficult Groups, page 62). 6.4 Atom and Bond Type Conventions for Difficult Groups • Use of correct atom and bond types in GOLD is important for producing good results. • In order for the GOLD atom-type assigner to work correctly, it is necessary for the input structures to have correct bond orders. This can be difficult when a ligand contains a group that can be drawn in more than one way (i.e. a group which has more than one canonical form). In such cases, there is usually a right and a wrong way for GOLD, and you need to know which is which. • The following table explains how to set the bond orders of some common difficult groups. It also shows the atom types that GOLD will assign if bond types are set correctly (or that you must assign if you are setting atom types manually). Functional Group 2D Diagram Notes Amidinium Carboxylate 62 GOLD User Guide Functional Group 2D Diagram Notes Enolate/ phenolate oxygen Guanidinium GOLD User Guide 63 Functional Group 2D Diagram Notes N-oxide Nitro Nitrogen (anionic) 64 For example, an anionic imidazole ring would be: GOLD User Guide Functional Group 2D Diagram Notes Nitrogen (cationic, aromatic) For example, the pteridine ring system in methotrexate (PDB code 4DFR) would be Oxygen (anionic) A serine protease transition-state analogue example is shown Phosphate (bridging) Phosphate (terminal) GOLD User Guide 65 Functional Group Sulphonamide 2D Diagram Notes GOLD will treat the nitrogen atom as a planar, trigonal nitrogen, i.e. not capable of accepting a hydrogen bond. However, pyramidal sulphonamide nitrogen atoms are now typed as N.3, if the geometry read into GOLD is pyramidal rather than N.pl3, and are treated as Hbond acceptors (i.e. they have a fitting point) allowing them to coordinate metal groups. Sulphonate Sulphone Sulfoxide (sulfinyl) 66 GOLD User Guide 6.5 Internal GOLD Atom Types • GOLD uses four internal atom types which are not recognised by SYBYL. These are N.plc (nitrogen donors in a protonated delocalised system, such as a guanidinium ion), N.acid (acidic nitrogen, e.g. in tetrazole or sulphonamide ions), S.a (sulphur acceptors) and S.m (charged sulphur atoms). You should not really need to know about these, but all assignments of the N.plc, N.acid, S.a and S.m atom types are logged in the gold.log file, so you can check to see if everything is working as you would expect. GOLD User Guide 67 7. Fitness Functions 7.1 Selecting a Fitness Function • GOLD offers a choice of fitness functions: GoldScore (see GoldScore, page 74), ChemScore (see ChemScore, page 75), ASP (see Astex Statistical Potential (ASP), page 86), CHEMPLP (see Piecewise Linear Potential (PLP), page 68) and User Defined Score (see User Defined Scoring Function, page 91). • CHEMPLP has been found to give the highest success rates for both pose prediction and virtual screening experiments against diverse validation test sets and is therefore the default scoring function in GOLD. • With respect to use of the GoldScore, ChemScore, ASP, they are about equally reliable although, on any given problem, one may give a good prediction and the other not. Therefore, when screening large numbers of compounds, rescoring docking poses with alternative scoring functions and considering the best results from each can have a favourable impact on the overall rank ordering of ligands (see Rescoring, page 135). • User Defined Score allows users to implement their own scoring function (or modify an existing scoring function) by specifying a path to a dynamically loadable shared object library (see User Defined Scoring Function, page 91). • To select a scoring function click on Fitness and Search Options from the list of Global Options given on the left of the GOLD Setup window and select the required scoring function from the drop-down menu. 7.2 Piecewise Linear Potential (PLP) 7.2.1 Overview • For a more detailed description of the PLP and CHEMPLP fitness functions as well as the derivation of their parameters, please see: O. Korb, T. Stützle and T. E. Exner, References (see page 163). • PLP and CHEMPLP are empirical fitness functions optimised for pose prediction. CHEMPLP is the default scoring function in GOLD. • In both cases, the Piecewise Linear Potential (fPLP) is used to model the steric complementarity between protein and ligand, while for CHEMPLP additionally the distance- and angledependent hydrogen and metal bonding terms from ChemScore are considered (fchem-hb, fchemcho, fchem-met). • The internal score of the ligand consists of the heavy-atom clash potential (flig-clash, see References (see page 163)) as well as the torsional potential used within ChemScore (flig-tors). • Both fitness functions are capable of covalent docking (fchem-cov), considering flexible sidechains (fchem-prot) and explicit water molecules as well as handling constraints (fcons). 68 GOLD User Guide • Parameters for both fitness functions can be altered by changing the files plp.params and chemplp.params for PLP and CHEMPLP, respectively (see Altering PLP Fitness-Function parameters:, page 70). CHEMPLP parameters are used by default as they show on average an improved performance in pose prediction and virtual screening applications. fitnessPLP = -(wPLP . fPLP + Wlig-clash . flig-clash + wlig-tors . flig-tors +fchem-cov + wprot . fchem-prot + wcons . fcons) fitnessCHEMPLP = fitnessPLP -(fchem-hb + fchem-cho + fchem-met) 7.2.2 PLP Interaction Types • The Piecewise Linear Potential (PLP) models the attraction as well as repulsion of protein and ligand heavy-atoms. In Figure 1a the partially attractive potential using 6 parameters is presented. Parameters A to D and in Figure 1b the purely repulsive potential using parameters A to D are presented. • All protein and ligand heavy-atoms are typed as donor, acceptor, donor/acceptor or nonpolar. Additionally, metal ions in the protein's binding site are assigned the metal type. • Depending on protein and ligand atom type, the appropriate potential from Table 1 is selected. Each potential H-bond, metal, buried and nonpolar is defined by a specific setting of parameters A to F. The same accounts for the repulsive potential, in which case parameters A to D are specified. See plp.params and chemplp.params for the default parameters used. Figure: Piecewise Linear Potential. (left) Partially attractive potential. (right) Repulsive potential GOLD User Guide 69 Protein atom type Ligand atom type donor acceptor don./acc. nonpolar metal donor repulsive H-bond H-bond buried repulsive acceptor H-bond repulsive H-bond buried metal don./acc. H-bond H-bond H-bond buried metal nonpolar buried buried buried nonpolar buried Table: PLP interaction types selected depend on the protein and ligand atom type 7.2.3 Altering PLP Fitness-Function parameters: • The PLP and CHEMPLP parameter files are stored in the $GOLD_HOME/gold/ directory. They contain all the parameters used by the GOLD implementation of PLP. A full description of the meaning of the PLP specific parameters are given below. • The PLP and CHEMPLP files can be customised by copying them, editing the copy, and instructing GOLD to use the edited file. • To use a modified plp.params or chemplp.params file click on Fitness and Search Options from the list of Global Options given on the left of the GOLD Setup window and select PLP from the Scoring Function drop-down menu. Then, either enter the path and filename of the Scoring function parameter file, or click on the ... button and use the file selection window to choose the file. • The format of the PLP and CHEMPLP file is quite strict: incorrect editing may cause GOLD to behave in unexpected ways. • The following commands are recognised in PLP parameter files. For the default values used in PLP and CHEMPLP, see the plp.params and chemplp.params parameter files, respectively. Parameters used for PLP and CHEMPLP (plp.params and chemplp.params) 70 PLP_COEFFICIENT Weight of PLP contributions (WPLP) <float value> PLP_LIGAND_CLASH_COEFFICIENT Weight of ligand clash potential (Wlig-clash) <float value> PLP_LIGAND_TORSION_COEFFICIENT Weight of ligand torsion potential (Wlig-tors) <float value> GOLD User Guide Parameters used for PLP and CHEMPLP (plp.params and chemplp.params) PLP_PROTEIN_ENERGY_COEFFICIENT Weight of ChemScore protein potential (Wprot) <float value> PLP_CONSTRAINT_COEFFICIENT Weight of constraint contributions (Wcons) <float value> PLP_GRID_SPACING Grid spacing used for PLP map. <float value> PLP_HBOND_METAL_FUNCTION Additional hydrogen and metal bonding contributions. Use CHEMSCORE to activate ChemScore hydrogen and metal bonding contributions. If NONE is specified, only the PLP contributions will be considered (see plp.params). <CHEMSCORE | NONE > PLP_WATER_BARRIER Penalty value added for each explicit water molecule activated by the search algorithm (positive value). <float value> HBOND_A <float value> HBOND_B <float value> HBOND_C <float value> HBOND_D <float value> HBOND_E <float value> HBOND_F Hydrogen bonding parameters for potential H-Bond (A to D are distance parameters, E and F are interaction scores). <float value> BURIED_A <float value> BURIED_B <float value> BURIED_C <float value> BURIED_D <float value> BURIED_E <float value> BURIED_F Parameters used for potential buried (A to D are distance parameters, E and F are interaction scores). <float value> METAL_A <float value> GOLD User Guide 71 Parameters used for PLP and CHEMPLP (plp.params and chemplp.params) METAL_B <float value> METAL_C <float value> METAL_D <float value> METAL_E <float value> METAL_F Metal bonding parameters for potential metal (A to D are distance parameters, E and F are interaction scores). <float value> NONPOLAR_A <float value> NONPOLAR_B <float value> NONPOLAR_C <float value> NONPOLAR_D <float value> NONPOLAR_E <float value> NONPOLAR_F <float value> Parameters for potential nonpolar (A to D are distance parameters, E and F are interaction scores). REPULSIVE_A <float value> REPULSIVE_B <float value> REPULSIVE_C <float value> REPULSIVE_D Parameters for potential repulsive (A and B are distance parameters, C and D are interaction scores). <float value> LINK_BEND_COEFFICIENT (see ChemScore, page 75) <float value> Parameters for additional ChemScore contributions used in CHEMPLP (chemplp.params) 72 HBOND_COEFFICIENT (see ChemScore, page 75) <float value> METAL_COEFFICIENT (see ChemScore, page 75) <float value> GOLD User Guide CHARGED_HBOND_FACTOR Scaling factor for charged hydrogen bonds (expected to be greater than or equal to one). <float value> CHARGED_METAL_FACTOR Scaling factor for charged acceptors coordinating to a metal ion (expected to be greater than or equal to one). <float value> DELTA_BETA_IDEAL (see ChemScore, page 75) <float value> DELTA_BETA_MAX (see ChemScore, page 75) <float value> CHO_COEFFICIENT (see ChemScore, page 75) <float value> CHO_TYPE (see ChemScore, page 75) <string> CHO_R_IDEAL (see ChemScore, page 75) <float value> CHO_DELTA_R_IDEAL (see ChemScore, page 75) <float value> CHO_DELTA_R_MAX (see ChemScore, page 75) <float value> CHO_ALPHA_IDEAL (see ChemScore, page 75) <float value> CHO_DELTA_ALPHA_IDEAL (see ChemScore, page 75) <float value> CHO_DELTA_ALPHA_MAX (see ChemScore, page 75) <float value> CHO_BETA_IDEAL (see ChemScore, page 75) <float value> CHO_DELTA_BETA_IDEAL (see ChemScore, page 75) <float value> CHO_DELTA_BETA_MAX (see ChemScore, page 75) <float value> HBOND_SCALING (see ChemScore, page 75) <float value> GOLD User Guide 73 7.3 GoldScore 7.3.1 Overview • The GOLD fitness function is made up of four components: • protein-ligand hydrogen bond energy (external H-bond) • protein-ligand van der Waals (vdw) energy (external vdw) • ligand internal vdw energy (internal vdw) • ligand torsional strain energy (internal torsion) • Optionally, a fifth component, ligand intramolecular hydrogen bond energy (internal H-bond), may be added. • If any constraints have been specified, then an additional constraint scoring contribution S(con) will be made to the final fitness score. Similarly, when docking covalently bound ligands a covalent term S(cov) will be present. • By default, output files will contain a single internal energy term S(int) which is the sum of the internal torsion and internal vdw terms. To write these component terms to output files you will need to edit the gold.params file (see Altering GOLD Parameters: the gold.params File, page 92) to include the following line: VERBOSE_SCORE = 1 • Empirical parameters used in the fitness function (hydrogen bond energies, atom radii and polarisabilities, torsion potentials, hydrogen bond directionalities, etc.) are taken from the GOLD parameter file. These parameters are independent of the scoring function being used. Parameters can be customised by copying the file, editing the copy, and instructing GOLD to use the edited file (see Altering GOLD Parameters: the gold.params File, page 92). • A scoring function specific parameters file is also used, for GoldScore this is called goldscore.params. Parameters within this file can also be modified (see Altering GoldScore Fitness-Function Parameters; the GoldScore Parameters File, page 75). • The fitness score is taken as the negative of the sum of the component energy terms, so that larger fitness scores are better. • The external vdw score is multiplied by a factor of 1.375 when total fitness score is computed. This is an empirical correction to encourage protein-ligand hydrophobic contact. • During a docking run, the fitness score may appear to get worse as the docking proceeds. This is due to the fact that the effects of poor H-bond geometry and close nonbonded contacts are artificially down-weighted at early stages of the docking (annealing). Only the final fitness score (i.e. from the completed docking) has any meaning. • The fitness function has been optimised for the prediction of ligand binding positions rather than 74 GOLD User Guide the prediction of binding affinities, although some correlation with the latter has been found. 7.3.2 Van der Waals and Hydrogen Bonding Annealing Parameters • When GoldScore is being used, the annealing parameters, Van der Waals and Hydrogen Bonding, allow poor hydrogen bonds to occur at the beginning of a genetic algorithm run, in the expectation that they will evolve to better solutions. • At the start of a GOLD run, external van der Waals (vdw) energies are cut off when Eij > van der Waals * kij , where kij is the depth of the vdw well between atoms i and j. At the end of the run, the cut-off value is FINISH_VDW_LINEAR_CUTOFF. This allows a few bad bumps to be tolerated at the beginning of the run. • Similarly, the parameters Hydrogen Bonding and FINAL_VIRTUAL_PT_MATCH_MAX are used to set starting and finishing values of max_distance (the distance between donor hydrogen and fitting point must be less than max_distance for the bond to count towards the fitness score). This allows poor hydrogen bonds to occur at the beginning of a GA run. • The Van der Waals and Hydrogen Bonding, annealing parameters can only be set manually when using user defined GA parameters settings (see Using User -Defined Genetic Algorithm Parameter Settings, page 133). Changes to the genetic algorithm parameters should be made with care. • Click on Fitness and Search Options from the list of Global Options given on the left of the GOLD Setup window and select GoldScore from the Scoring Function drop-down menu. The Annealing parameters VdW and H bonding entry boxes can then be used to specify new values. • Both the vdw and H-bond annealing must be gradual and the population allowed plenty of time to adapt to changes in the fitness function. 7.3.3 Altering GoldScore Fitness-Function Parameters; the GoldScore Parameters File • A GoldScore parameter file, goldscore.params, is provided in the $GOLD_DIR/gold directory. • Parameters can be customised by copying the file, editing the copy, and instructing GOLD to use the edited file. Changes to the scoring function parameters file should be made with care. • To use a modified goldscore.params file click on Fitness and Search Options from the list of Global Options given on the left of the GOLD Setup window and select GoldScore from the Scoring Function drop-down menu. Then, either enter the path and filename of the Scoring function parameter file, or click on the ... button and use the file selection window to choose the file. 7.4 ChemScore GOLD User Guide 75 7.4.1 Overview • The ChemScore scoring function is published in: • M. D. Eldridge, C. W. Murray, T. R. Auton, G. V. Paolini and R. P. Mee, J. Comput.-Aided Mol. Des., 11, 425-445 (1997). • C. A. Baxter, C. W. Murray, D. E. Clark, D. R. Westhead and M. D. Eldridge, Proteins, 33, 367-382 (1998). • ChemScore was derived empirically from a set of 82 protein-ligand complexes for which measured binding affinities were available. • Unlike GoldScore, the ChemScore function was trained by regression against measured affinity data, although there is no clear indication that it is superior to GoldScore in predicting affinities. • ChemScore estimates the total free energy change that occurs on ligand binding as: • Each component of this equation is the product of a term dependent on the magnitude of a particular physical contribution to free energy (e.g. hydrogen bonding) and a scale factor determined by regression, i.e. • Here, the ν terms are the regression coefficients and the P terms represent the various types of physical contributions to binding. • The final ChemScore value is obtained by adding in a clash penalty and internal torsion terms, which militate against close contacts in docking and poor internal conformations. Covalent and constraint scores may also be included. • Empirical parameters used in the fitness function (hydrogen bond energies, atom radii and polarisabilities, torsion potentials, hydrogen bond directionalities, etc.) are taken from the 76 GOLD User Guide GOLD parameter file. These parameters are independent of the scoring function being used. Parameters can be customised by copying the file, editing the copy, and instructing GOLD to use the edited file (see Altering GOLD Parameters: the gold.params File, page 92). • A scoring function specific parameters file is also used, for ChemScore this is called chemscore.params. Parameters within this file can also be modified (see Altering ChemScore Fitness-Function Parameters; the ChemScore File, page 85). 7.4.2 Block Functions in ChemScore • ChemScore uses block functions throughout its implementation to describe contact terms of various types. • A block function is of the following form: • This functional form looks like: • In the GOLD implementation of ChemScore, the block function is sometimes convoluted with a Gaussian function: GOLD User Guide 77 • The effect is to smooth the function, e.g.: 7.4.3 Hydrogen-Bond Terms • The hydrogen-bond term is computed as a sum over all possible donor-acceptor pairs, such that one atom belongs to the protein and the other to the ligand. • Each term in the summation is the product of three Gaussian-smoothed block functions (see Block Functions in ChemScore, page 77). The purpose of the block functions is to reduce the contribution of a hydrogen bond according to how much its geometry deviates from (a) ideal H...A distance, (b) ideal D-H...A angle and (c) ideal directionality with respect to the acceptor atom. The maximum contribution of a given donor-acceptor pair to the summation is 1; this will occur if the pair form a hydrogen bond of “ideal” geometry. 78 GOLD User Guide • The tables below describe the various parameters in this equation, their meanings, and what they are called in the ChemScore parameter file (see Altering ChemScore Fitness-Function Parameters; the ChemScore File, page 85). D-H..A distance parameters (D= Donor, A = Acceptor) Term r ∆r ∆rideal ∆rmax σr Meaning The ideal hydrogen..acceptor (H...A) distance (in Å) The absolute deviation of the actual H..A separation from r The tolerance window around the H..A distance, r, within which the H-bond is regarded as ideal The maximum possible deviation from the ideal distance; above this, the interaction is not regarded as an H-bond The Gaussian smearing sigma associated with this term. Name in ChemScore file R_IDEAL Default value 1.85 Calculated for each Hbond DELTA_R_IDEAL 0.25 DELTA_R_MAX 0.65 HBOND_R_SIGMA 0.1 D-H..A angle parameters (D= Donor, A = Acceptor) Term α ∆α GOLD User Guide Meaning The ideal D-H..A angle (in degrees) The absolute deviation of the actual D-H..A angle from α Name in ChemScore file ALPHA_IDEAL Calculated for each Hbond Default value 180.0 - 79 ∆ α ideal ∆ α max σα The tolerance window around the D-H..A angle, α, within which the H-bond is regarded as ideal The maximum possible deviation from the ideal DH..A angle; above this, the interaction is not regarded as an H-bond The Gaussian smearing sigma associated with this term. DELTA_ALPHA_IDEAL 30.0 DELTA_ALPHA_MAX 80.0 HBOND_ALPHA_SIGMA 10.0 DH..A-X acceptor-centred angle parameters (D= Donor, A = Acceptor, X = Heavy atom attached to A) Term β ∆β ∆ β ideal ∆ β max σβ Meaning The ideal H..A-X angle (in degrees) The absolute deviation of the actual H..A-X angle from β The tolerance window around the H..A-X angle, β, within which the H-bond is regarded as ideal The maximum possible deviation from the ideal H..AX angle; above this, the interaction is not regarded as an H-bond The Gaussian smearing sigma associated with this term. Name in ChemScore file BETA_IDEAL Default value 180.0 Calculated for each Hbond DELTA_BETA_IDEAL 70.0 DELTA_BETA_MAX 80.0 HBOND_BETA_SIGMA 10.0 • The third block function in the H-bond equation, B´*, is the sum of all possible values for a given hydrogen bond. For example, a tertiary amine acceptor has three covalently-bound atoms that could be deemed as the “X” atom: in this case, the term added for an H-bond to the amine is the product of the block-function values for all three possible H..A-X angles. • Hydrogen bonds have a regression coefficient associated with them, v1 (see Overview, page 76). By default, this is set to –3.34. The name of this coefficient in the ChemScore parameter file (see Altering ChemScore Fitness-Function Parameters; the ChemScore File, page 85) is HBOND_COEFFICIENT. 80 GOLD User Guide 7.4.4 Metal-Binding and Lipophilic Terms • The metal-binding term in ChemScore is computed as a sum over all possible metal-ion ... acceptor pairs, where the acceptor is an atom in the ligand that is capable of binding to a metal. • Each term in the summation is a Gaussian-smoothed block function (see Block Functions in ChemScore, page 77) whose purpose is to reduce the contribution of the metal-acceptor interaction if the geometry is not ideal. • The table below describes the various parameters in this equation, their meanings, and what they are called in the ChemScore parameter file (see Altering ChemScore Fitness-Function Parameters; the ChemScore File, page 85). Metal-binding parameters in ChemScore Term raM Rideal Rmax σ metal Meaning The actual acceptor-metal distance (in Å) The ideal acceptor-metal distance The maximum acceptor-metal distance to be considered a binding interaction The Gaussian smearing sigma associated with this term Name in ChemScore file Calculated for each acceptor-metal pair METAL_R1 METAL_R2 METAL_R_SIGMA Default value 2.6 3.0 0.1 • The metal-binding term has a regression coefficient associated with it, v2 (see Overview, page 76). By default, this is set to –6.03. The name of this coefficient in the ChemScore parameter file (see Altering ChemScore Fitness-Function Parameters; the ChemScore File, page 85) is METAL_COEFFICIENT. • The lipophilic term is defined in a similar way: GOLD User Guide 81 • The table below describes the various parameters in this equation, their meanings, and what they are called in the ChemScore parameter file (see Altering ChemScore Fitness-Function Parameters; the ChemScore File, page 85). Lipophilic parameters in ChemScore Term rll Rideal Rmax σ lipo Meaning The actual distance between the pair of lipophilic atoms (in Å) The ideal atom...atom distance separation The maximum separation, beyond which no interaction is deemed to occur The Gaussian smearing sigma associated with this term Name in ChemScore file Default value Calculated for each atomatom pair LIPO_R1 4.1 LIPO_R2 7.1 LIPO_R_SIGMA 0.1 • The difference between the metal and lipophilic parameterisation is that the lipophilic term is scored over a much longer range. • Lipophilic atoms are defined as non-accepting sulphurs, non-polar carbon atoms (polar carbon atoms are carbon atoms attached to two or more polar atoms), and non-ionic chlorine, bromine and iodine atoms. • The lipophilic term has a regression coefficient associated with it, v3 (see Overview, page 76). By default, this is set to –0.117. The name of this coefficient in the ChemScore parameter file (see Altering ChemScore Fitness-Function Parameters; the ChemScore File, page 85) is LIPO_COEFFICIENT. 7.4.5 Rotatable-Bond Freezing Term • The following formula is used to estimate the entropic loss that occurs when single, acyclic bonds in the ligand become non-rotatable upon binding: 82 GOLD User Guide • Nrot is the number of frozen rotatable bonds in the ligand (a bond is considered frozen if one or more atoms on both sides of the rotatable bond is in contact with the protein). The expression is deemed to have a value of zero if there are no rotatable bonds in the ligand. • Pnl(r) and P’nl(r) are the percentages of non-hydrogen atoms on either side of the rotatable bond that are not lipophilic. For example, if there are 10 non-hydrogen atoms on one side of the bond, of which 3 are not lipophilic, and there are 20 non-hydrogen atoms on the other side, of which 2 are not lipophilic, then Pnl(r) and P’nl(r) are 30% and 10%, respectively. • The regression coefficient associated with this term, v4 (see Overview, page 76), has the default value 2.56. The name of this coefficient in the ChemScore parameter file (see Altering ChemScore Fitness-Function Parameters; the ChemScore File, page 85) is ROT_COEFFICIENT. 7.4.6 Clash Penalty and Internal Torsion Terms • Clashes between protein and ligand atoms and ligand internal torsional strain are accommodated by penalty terms. • These terms are included to prevent poor geometries in docking. • The clash penalty terms in ChemScore differ on the nature of the contact, i.e. whether it is a hydrogen-bonding contact, a metal-binding contact or neither of these. • Any hydrogen bond with an H...A distance shorter than rhbond Å contributes a clash term of: • The value of rhbond (default = 1.6Å) can be changed by altering the parameter CLASH_RADIUS_HBOND in the ChemScore file (see Altering ChemScore Fitness-Function Parameters; the ChemScore File, page 85). • Any metal coordination contact shorter than rmetal Å contributes a clash term of: GOLD User Guide 83 • The value of rmetal (default = 1.3*Å) can be changed by altering the parameter CLASH_RADIUS_METAL in the ChemScore file (see Altering ChemScore Fitness-Function Parameters; the ChemScore File, page 85). • All other ligand-protein interatomic contacts contribute clash terms of the following form: • rclash varies with contact type: for contacts to protein sulphur atoms, it is set to 3.35Å; for all other contacts, it is set to 3.10Å. These settings correspond to the parameters CLASH_RADIUS_SULPHUR and CLASH_RADIUS_GENERAL in the ChemScore file (see Altering ChemScore Fitness-Function Parameters; the ChemScore File, page 85). • Internal ligand strain is accommodated by clash terms in combination with torsional strain terms of the form: • Bonds are deemed to be rotatable if they are single and acyclic and involve pairs of atoms with hybridisation states sp3-sp3, sp3-sp2 or sp2-sp2. • The parameters A, n and Φ in the above equation are set in the ChemScore file (see Altering ChemScore Fitness-Function Parameters; the ChemScore File, page 85). The relevant lines are SP3_SP3_BOND, SP3_SP2_BOND, SP2_SP2_BOND and UNKNOWN_BOND. The syntax is of the form: 84 GOLD User Guide SP3_SP3_BOND A n Φ0 For example: SP3_SP3_BOND 0.18750 3.0 3.1515926 • The overall contribution of intramolecular strain to the scoring function is scaled by the coefficient called INTRA_COEFFICIENT in the ChemScore file (see Altering ChemScore Fitness-Function Parameters; the ChemScore File, page 85) 7.4.7 Covalent Term • When covalent bonding is switched on (see Setting Up Covalently Bound Ligands, page 55) the ChemScore function is modified in the following ways: • The clash term (see Clash Penalty and Internal Torsion Terms, page 83) is reduced so that no clash is registered for 1-2 or 1-3 contacts around the link atoms in the protein and ligand. • Torsion terms (see Clash Penalty and Internal Torsion Terms, page 83) are added for the rotatable parts of the linkage. • A valence-angle bending term is added to the overall energy to penalize poor link geometries. • The weight of the covalent link energy in the ChemScore function is controlled by the parameter called LINK_BEND_COEFFICIENT in the ChemScore parameter file (see Altering ChemScore Fitness-Function Parameters; the ChemScore File, page 85). 7.4.8 Constraint Terms • Constraints (see Setting Constraints, page 108) are implemented in ChemScore in the same way as they are in GoldScore. 7.4.9 Altering ChemScore Fitness-Function Parameters; the ChemScore File • The ChemScore parameter file is stored in the GOLD distribution directory. It contains all the parameters used by the GOLD implementation of ChemScore. A full description of the meaning of the various parameters is given elsewhere (see ChemScore, page 75). • The ChemScore file can be customised by copying it, editing the copy, and instructing GOLD to use the edited file. • To use a modified chemscore.params file click on Fitness and Search Options from the list of Global Options given on the left of the GOLD Setup window and select ChemScore from the Scoring Function drop-down menu. Then, either enter the path and filename of the Scoring function parameter file, or click on the ... button and use the file selection window to choose the file. • The format of the ChemScore file is quite strict: incorrect editing may cause GOLD to behave in GOLD User Guide 85 unexpected ways or even to crash. Because of the large number of parameters, no guarantee can be given that the program will behave reliably with anything other than the default parameterisation. 7.5 Astex Statistical Potential (ASP) 7.5.1 Overview • For a more thorough discussion on the Astex Scoring Potential (ASP) fitness function, please see: W. T. M. Mooij and M. L. Verdonk, Proteins: Struct. Func. And Bioinf., 61, 272-287 (2005). • ASP is an atom-atom potential derived from a database of protein-ligand complexes and can be compared to other such scoring potentials, e.g. PMF and Drugscore. ASP has comparable accuracy to the ChemScore and GoldScore fitness functions. • Traditional scoring functions are based on force fields or on regression, where parameters are derived from a set of experimental binding affinities and structures. ASP uses a different approach; information about the frequency of interaction between ligand and protein atoms is gathered by analysing existing ligand-protein structures in the PDB and this information is used to generate statistical potentials. Depending on the database where the atom-atom potentials are taken from, the scoring function created can be targeted to certain proteins (see Targeted Scoring Functions, page 89). A general scoring function (one that can be used for “all” types of proteins) would take its interactions from the ‘entire’ PDB while a more targeted function would be created from specific families of proteins. Atom-atom potentials for a general scoring function are included in the GOLD distribution. • Empirical parameters used in the fitness function (hydrogen bond energies, atom radii and polarisabilities, torsion potentials, hydrogen bond directionalities, etc.) are taken from the GOLD parameter file. These parameters are independent of the scoring function being used. Parameters can be customised by copying the file, editing the copy, and instructing GOLD to use the edited file (see Altering GOLD Parameters: the gold.params File, page 92). • A scoring function specific parameters file is also used, for ChemScore this is called asp.params. Parameters within this file can also be modified (see Altering ASP FitnessFunction Parameters: the asp.params File, page 90). 7.5.2 The Reference State • The ASP scoring function differs from other statistical potentials by the choice of the so called reference state. The reference state is the expected number of contacts if there were no interaction between the atoms (i.e. at long distances), incorporating any corrections. The reference state determines how the raw distribution of observations is transformed into potentials. • Contacts between atoms are usually determined by radial distribution functions (RDFs). Given an atom at some position the RDF will tell us how many other atoms we can expect to find at a 86 GOLD User Guide distance between r to r+dr, where dr is the bin width in the RDF and can be thought of as the ‘thickness’ of a spherical shell. A statistical potential between two atom types i and j is defined as: n obs ( i, j, r ) StatScore ( i, j, r ) = – ln ------------------------------------------StatScore ( i, j, r ) n exp • Where the denominator is the reference state of the potential, for ASP the reference state is given by: ASP = n exp r' = 8.0 n obs ( i, j, r' ) ⋅ f p ( i, r' ) ⋅ f l ( j, r' ) ⋅ 4πr 2 ∆r -------------------------------------------------------f p ( i, r' )f l ( j, r' )4πr' 2 ∆r r' = 6.0 • The average contact density is taken to be the average between 6.0 and 8.0 Å of the corrected RDF. At this long range, atoms are not considered to make any specific interactions and should ensure that the scores of the function are close to zero at this length. The two terms fp and fs denote the protein and ligand volume corrections to the contacts, respectively. These two terms are added to account for the difference in accessibility of different protein and ligand atoms; if no excluded volume corrections are included in the reference state the expected number of contacts is simply the product of the average contact density in the sphere with radius Rmax and the volume of a spherical shell at distance r. The way that these corrections are defined differs from other potential scoring functions and the inclusion of a protein correction term is novel to the ASP fitness function. The ligand correction term can be compared to the corresponding term included in Drugscore. 7.5.3 The Generation of Potentials • To derive the pair potentials between ligand and protein atoms a database of protein ligand complexes from the PDB is used. Bond types of the protein are assigned based on residue and atom names. Additional atom types are defined to separate backbone nitrogen and oxygen atoms from those in aspargine, glutamine, aspartic acid and glutamic acid side chains, and to distinguish serine and threonine hydroxyl oxygen from those in tyrosine. Ligands in the database were divided into three separate categories i) covalent ii) co-factor and iii) normal. Only binding sites with normal ligands with a heavy-atom count between 6 and 60 were included in the database (co-factors are treated as part of the protein). • Atom-atom potentials were calculated for each atom pair with an excess of 150 observations in GOLD User Guide 87 the database using the ASP reference state, for atom types with fewer observation the potential was set to zero for all distances. For short distances there will be no observed contacts and the potential is set to 10. The atom-atom potentials for all atom types can be found in the GOLD installation directory, $GOLD_HOME/gold/asp_tables. • The statistical potentials are augmented with the ChemScore clash term and internal energy term (see Clash Penalty and Internal Torsion Terms, page 83). The internal energy term is needed to prevent the docking of high-energy ligand conformations while the clash term should prevent protein-ligand clashes where the supplied potential is too soft to provide sufficient repulsion between protein and ligand atoms and at the same time preventing overlap between atoms with no potential (i.e. too few observations for the generation of a non-zero potential). The final ASP fitness can be written: ASP Fitness = – C s ∑ ∑ StatScore ( p, l, r pl ) – c int E – c clash E int clash pl ∑ ∑ StatScore ( p, l, r pl ) = S(map) pl • The total StatScore (written as S(map) in the ligand output file) is a summation over all combinations of protein atoms, p, and ligand atoms, l, within 6.0 Å, and rpl is the distance between protein atom p and ligand atom l. Cs is a scaling factor and cint and cclash are the internal energy and clash coefficients, respectively. Cs is per default set 0.2 and both cint and cclash are set to 1.0. To speed up scoring and docking, grids are precalculated for each atom type using a grid spacing of 0.3 Å. The max distance for interaction (6.0 Å), the scaling factor (Cs) and the respective weights for the internal (cint) and clash energy (cclash) together with the grid spacing can be altered in the asp.params file (see Altering ASP Fitness-Function Parameters: the asp.params File, page 90). 7.5.4 Metal and Hydrogen Bond Correction • In ASP you can add a correction when docking to metal-containing receptors. When adding the metal correction to the ASP score a hydrogen bond correction is included by default. The hydrogen bond correction is similar to the one found in ChemScore (see Hydrogen-Bond Terms, page 78). The final score is calculated as: 88 GOLD User Guide ASP Fitness = – C S ( S(map) + S(hbond) + S(metal) ) – c int E int – c clash E clash • The S(metal) is calculated for single metal-ligand atom interactions based on the actual distance between the metal and the ligand acceptor and is corrected for the metal-ligand score in S(map). This means that the S(map) contribution (based on grid points) is subtracted from S(metal) to offset the contribution that is already present in the ASP grid for the acceptor type. The S(metal) score more accurately reflects the metal-ligand interaction. • The S(hbond) correction corresponds to the metal correction as it calculates the score of hydrogen bonds from the actual distance as opposed to S(map) where the pre-calculated grid points are used. The hbond score is the multiplied with the HBOND_CORRECTION_FACTOR, making it possible to weight the contribution of hydrogen bonds to the final score, this parameter can be changed by editing the asp.params file (see Altering ASP Fitness-Function Parameters: the asp.params File, page 90). The S(hbond) correction is similar to the same term found in ChemScore since the deviation from ideal geometry is taken into account when calculating the score of the hydrogen bond (see Hydrogen-Bond Terms, page 78). The S(hbond) contribution is offset by the score already present in S(map). 7.5.5 Covalent Docking and Docking with Constraints • Covalent docking with ASP is handled by adding a covalent term to the calculated score. The implementation is the same as for ChemScore (see Covalent Term, page 85). • Using constraints in conjunction with ASP is carried out using the same principle as with GoldScore and ChemScore (see GoldScore, page 74). 7.5.6 Targeted Scoring Functions • The use of statistical potentials in a scoring function enables the creation of targeted fitness functions to certain proteins. This is done by using target-specific information when calculating the atom-atom potentials. Instead of using the information from a general database, such as the PDB, information can be taken from a smaller set of crystal structures, which could be comprised of only one family of proteins or if there is insufficient information in the specifictarget database one can mix in information from the general PDB database. • You can store your customised potentials in a directory specified in the asp.params file (see Altering ASP Fitness-Function Parameters: the asp.params File, page 90). 7.5.7 Performance of the ASP fitness function • On the CCDC/Astex validation set ASP has similar success rate as Goldscore and Chemscore, GOLD User Guide 89 for a more complete discussion on the accuracy of the ASP please refer to the original publication (see Overview, page 86). 7.5.8 Altering ASP Fitness-Function Parameters: the asp.params File • The ASP parameter file is stored in the $GOLD_HOME/gold/ directory. It contains all the parameters used by the GOLD implementation of ASP. A full description of the meaning of the ASP specific parameters is given below. • The ASP file can be customised by copying it, editing the copy, and instructing GOLD to use the edited file. • To use a modified asp.params file click on Fitness and Search Options from the list of Global Options given on the left of the GOLD Setup window and select GoldScore from the Scoring Function drop-down menu. Then, either enter the path and filename of the Scoring function parameter file, or click on the ... button and use the file selection window to choose the file. • The format of the ASP file is quite strict: incorrect editing may cause GOLD to behave in unexpected ways. • The ASP fitness function shares many of its parameters with ChemScore, see the chemscore.params section (see ChemScore, page 75) for an explanation. However, please note that the default value of these may differ from the value used in ChemScore. The asp.params file: • ASP_COEFFICIENT: Default 0.2. The total contribution to the score by the potential is scaled by a coefficient which has been optimised to 0.2 (see The Generation of Potentials, page 87). • CLASH_COEFFICIENT: Default 1.0. The CLASH_COEFFICIENT controls the weight of the clash term to the overall score (see The Generation of Potentials, page 87). • INTERNAL_COEFFICIENT: Default 1.0. The INTERNAL_COEFFICIENT controls the weight of the internal energy of the ligand to the overall score (see The Generation of Potentials, page 87). • HBOND_FUNCTION: Default none. The HBOND_FUNCTION can be turned on by replacing NONE by ASP. When switched on it will also include the metal correction, (see Metal and Hydrogen Bond Correction, page 88). • HBOND_CORRECTION_FACTOR: Default 1.0 (see Metal and Hydrogen Bond Correction, page 88). • CLASH_FUNCTION: Default: ASP. The CLASH_FUNCTION is used for the calculation of clashes between the ligand and the protein. The clash term is evaluated in the same way as for ChemScore (see Clash Penalty and Internal Torsion Terms, page 83). • ASP_GRID_SPACING: Default 0.3. Parameter to control the density of the pre-calculated grid used for evaluation of the atom-atom potentials (see The Generation of Potentials, page 87). 90 GOLD User Guide • ASP_GRID_INTERPOLATE: Uncomment the ASP_GRID_INTERPOLATE to more accurately calculate the distance between atoms for the calculation of the score. Grid points surrounding atoms are used to interpolate a more exact atom location. This will give a similar effect as increasing the grid density. • ASP_MAX_DISTANCE: Default 6.0. The max distance set for interaction between ligand and protein atoms. • ASP_GRID_LOOKUP: This setting is on by default, the score is evaluated from the generated grid points. • ASP_DIRECTORY: Default: DEFAULT. Sets the location of the ASP potentials, by default the location is $GOLD_DIR/gold/asp_tables. • TARGETED_ASP_DIRECTORY. Uncomment this parameter to specify the location of customised targeted ASP potentials. (see Targeted Scoring Functions, page 89). • SAVE_ASP_MAPS: Default 0. If set to 1 the map generated for each ASP ligand atom type is printed out. 7.6 User Defined Scoring Function • In addition to the choice of scoring functions provided, i.e., GoldScore, ChemScore, ASP, and CHEMPLP users can also implement their own scoring function. • The GOLD scoring function Application Programming Interface (API) allows users to modify the GOLD scoring-function mechanism in order to: • Calculate and write out additional data after each docking • Add extra terms to the scoring function • Implement a completely new scoring function • Full documentation for the GOLD Scoring Function Application Programming Interface (API) is provided with the GOLD distribution: • UNIX: $GOLD_DIR/gold/api_doc/index.html • Windows: <InstallDir>/GOLD/gold/api_doc/index.html where <InstallDir> is usually C:/Program Files/CCDC/GOLD_Suite • See: GOLD Scoring Function Application Programming Interface (API) documentation. • A good knowledge of the C programming language is required together with some experience in using GOLD. • Click on Fitness and Search Options from the list of Global Options given on the left of the GOLD Setup window and select User Defined Score from the drop-down menu. • The Scoring Function Shared Object (UNIX) or Scoring Function DLL (Windows) is used to specify a path to a dynamically loadable shared object library. Either enter the path and filename, or click on the ... button and use the file selection window to choose the file. • GOLD uses shared objects (or dynamically loadable libraries) to allow new or modified scoring GOLD User Guide 91 functions to be plugged in. Two shared object files are relevant: • The main GOLD shared object, which is called libgold.so (UNIX) or gold.dll (Windows) • The scoring-function shared objects which, by default, are called libfitfunc_dll.so (UNIX), goldscore.dll or chemscore.dll(Windows) • On UNIX the file libgold.so is included in the GOLD distribution, together with two versions of libfitfunc_dll.so, one implementing the normal GOLD scoring function and the other implementing the ChemScore function. • On Windows the file gold.dll is included in the GOLD distribution, together with two files called goldscore.dll, for implementing the normal GOLD scoring function, and chemscore.dll, for implementing the ChemScore function. • It effectively provides a mechanism by which data may be intercepted and modified during docking. Users may therefore post-process the results of a docking, or modify the GOLD function, or implement their own scoring function, by building their own versions of libfitfunc_dll.so (UNIX) or, e.g. goldscore.dll (Windows). 7.7 Altering GOLD Parameters: the gold.params File • The parameter file gold.params is stored in the GOLD distribution directory. It contains all of the parameters used by GOLD (e.g. hydrogen bond energies, atom radii and polarisabilities, torsion potentials, hydrogen bond directionalities, etc.) other than those which are specified in the configuration file (i.e. can be set via the GOLD front end). • It also contains parameters that control the general behaviour of GOLD, e.g. whether the final solution from a genetic algorithm run is to be minimised via a Simplex procedure before being saved. • The parameter file can be customised by copying it, editing the copy, and instructing GOLD to use the edited file. • To use a modified gold.params file click on Fitness and Search Options from the list of Global Options given on the left of the GOLD Setup window. Then, either enter the path and filename of the GOLD parameter file, or click on the ... button and use the file selection window to choose the file. • If the parameter file is set to DEFAULT then the standard GOLD distribution parameter file is copied to the current directory. • GOLD gets the location of the parameter file from the configuration file line param_file = <parameter file location>. This is most easily defined using the Parameter File button in the front end. • The format of the parameter file is quite strict: incorrect editing may cause GOLD to behave in unexpected ways or even to crash. Because of the large number of parameters, no guarantee can be given that the program will behave reliably with anything other than the default parameterisation. 92 GOLD User Guide • For more information see the comments in the parameter file, gold.params. 7.8 Targeted Scoring Functions 7.8.1 Kinase Scoring Function • Weak CHO interactions can be accounted for by inclusion of a ChemScore term that calculates a contribution for weak hydrogen bonds. This term can be useful when dealing with particular proteins, e.g. most kinases contain weak N-heterocycle CH...O hydrogen bonds. • This term can be enabled by using the chemscore.kinase.params scoring function parameters file located within the $GOLD_DIR/gold directory. • To employ this files click on Fitness and Search Options from the list of Global Options given on the left of the GOLD Setup window and select ChemScore from the Scoring Function drop-down menu. Then, either enter the path and filename of the Scoring function parameter file, or click on the ... button and use the file selection window to choose the chemscore.kinase.params file. • This will enable the recognition of activated CH groups for hydrogen bonding. Active CH groups are those in aromatic rings next to nitrogens (e.g. the CHs in an imidazole ring). These groups are recognised both in the ligand and protein active site. • For further details please refer to Virtual Screening Using Protein-Ligand Docking: Avoiding Artificial Enrichment (see References, page 163). 7.8.2 Heme Scoring Function • The heme scoring function is available for both GoldScore (see GoldScore, page 74) and ChemScore (see ChemScore, page 75). • By default GOLD makes no distinction between different H-bond acceptors in terms of their strength of interaction with the metal. A recent publication by Kirton et al (S. B. Kirton, C. W. Murray, M. L. Verdonk and R. D. Taylor, Proteins: Structure, Function, and Bioinformatics, 58, 836-844, 2005) demonstrated how metal parameters can be set up in GOLD for both GoldScore and ChemScore, to take account of different H-bond acceptor types. Kirton et al described the use of ligand specific iron parameters in the context of docking to heme containing proteins and demonstrated improved performance. It is now possible in GOLD to optionally use these parameters. • The parameters are derived from contact statistics obtained from the CSD and PDB databases. Parameters were derived for both GoldScore and ChemScore. • These parameters can be used by choosing the appropriate scoring function .params file from those that have been supplied with the GOLD installation. The scoring function .params files that are available are: • goldscore.p450_csd.params GOLD User Guide 93 • goldscore.p450_pdb.params • chemscore.p450_csd.params • chemscore.p450.pdb.params • The files are located within the $GOLD_DIR/gold directory. The graphic below shows the iron parameters for GoldScore, derived from the CSD, as displayed in the goldscore.p450_csd.params file. • To employ one of the files click on Fitness and Search Options from the list of Global Options given on the left of the GOLD Setup window and select GoldScore or ChemScore from the Scoring Function drop-down menu. Then, either enter the path and filename of the Scoring function parameter file, or click on the ... button and use the file selection window to choose the file. • It was found necessary by Kirton et al to assign the planar nitrogens in the heme molecules as lipophilic when using the ChemScore scoring function. In order to bring this about the chemscore.p450 parameter files therefore contain the additional keyword: MAKE_PLANAR_N_LIPO 1 NOTE: Use of this keyword has only been validated for nitrogen atoms within heme containing proteins. Improvements in docking performance when used with non-heme containing proteins are not guaranteed. 94 GOLD User Guide 8. Ligand Flexibility 8.1 Ring Conformations 8.1.1 Flipping Ring Corners • To allow free corners of ligand rings to flip during docking click on Ligand Flexibility from the list of Global Options given on the left of the GOLD Setup window, activate the flip ring corners tick box in the Explore ring conformations section of the window. • This will result in GOLD performing a limited conformational search of cyclic systems by allowing free corners of rings to flip above or below the plane of their neighbouring atoms. • The rules govening flipping of ring corners in GOLD are given in: A. W. R. Payne and R. C. Glen, J. Mol. Graphics, 10, 74-91 (1993). 8.1.2 Using CSD Ring Conformation Templates • A library of ring conformations extracted from the Cambridge Structural Database (CSD) can be utilised by GOLD. This allows GOLD to vary ligand ring conformations during docking. • The use of ring conformation templates may improve the chances of GOLD finding the correct answer by allowing the algorithm to sample ring conformations that are commonly observed in crystal structures. • Rings in the ligand are matched against a template library. If a matching template is found then the conformation of that ligand ring will be varied during docking using a set of supplied alternative conformations for that ring. • Each time an alternative conformation is sampled the ligand conformation is changed to match the new conformation by altering the bond lengths, internal ring angles and torsions. A ring torsional strain energy term is also added to the ligand internal energy. • To use ring conformation templates during docking click on Ligand Flexibility from the list of Global Options given on the left of the GOLD Setup window, activate the Match template conformations tick box in the Explore ring conformations section of the window. • Information on the composition of the CSD ring conformation library and how ring templates are matched at run time is available (see The CSD Ring Conformation Library and Matching Templates at Run Time, page 95). • It is also possible to specify your own ring templates, and the allowed alternative conformations for those rings (see User-Defined Ring Conformations, page 96). 8.1.3 The CSD Ring Conformation Library and Matching Templates at Run Time • GOLD identifies each ring in the ligand and attempts to match it to a ring template in the following file: GOLD User Guide 95 <GOLD_DIR>/ring_conformations/template_library.mol2 Note that the atom types in the template_library.mol2 file must match the ligand atom types exactly, i.e. after any ligand atom typing has been performed (see Automatically Setting Atom and Bond Types, page 60). • Details of matched rings are written to the gold_<ligand_name>_m<n>.log file under the heading Match Ring Templates. • The template_library.mol2 file contains 1274 ring templates. Each template represents a different ring identified within the Cambridge Structural Database (CSD). For each template the number of alternative conformations that will be explored during docking will vary depending on the abundance and suitability of data within the CSD. • The index number of the final ring conformation used in each docking solution is written to the gold_<ligand_name>_m<n>.log file under the heading Chromosome decoded. 8.1.4 User-Defined Ring Conformations • GOLD can vary ligand ring conformations during docking. A library of ring conformations extracted from the Cambridge Structural Database (CSD) is supplied with GOLD for this purpose (see The CSD Ring Conformation Library and Matching Templates at Run Time, page 95). • It is also possible to specify your own ring templates, and the allowed alternative conformations for those rings. This is useful if you wish to add a new ring template (not already present in the CSD derived library), or if you wish to override the CSD conformations for an existing template. • First, you must create a ring template library file in the directory: <GOLD_DIR>/gold/user_ring_conformations/template_library.mol2 This mol2 file should contain all user defined ring types. Rings in the ligand are matched against the rings in this template file. The atom types in the template_library.mol2 file must therefore match the ligand atom types exactly. The molecule identifiers in the template_library.mol2 file must start at 0010001. The identifier must be incremented by 1 for each successive ring in the file. For example, the following template_library.mol2 file contains two templates, a triazole, and a cyclohexane ring: 96 GOLD User Guide • Secondly, a set of allowed alternative ring conformations for each ring in template_library.mol2 must be created and stored in the following files: <GOLD_DIR>/user_ring_conformations/0010001.mol2 <GOLD_DIR>/user_ring_conformations/0010002.mol2 and so on... The ring conformation filenames are based on the corresponding template identifier. In the above example the triazole ring template has the molecule identifier 0010001. The alternative conformations of that ring that will be used during docking must therefore be located in <GOLD_DIR>/user_ring_conformations/0010001.mol2. • Note that any user defined templates, and their corresponding set of allowed conformations will be used in preference to the supplied CSD conformations. • Note: user-defined ring conformation functionality does not extend to fused rings or GOLD User Guide 97 macrocycles. A work around would be to create a separate template that matches the ring of interest in the fused ring however this may give rise to strange results in some instances, thus should be used with care. 8.2 Flipping Amide Bonds • During ligand initialisation, ligand amide groups (including thioamides, ureas, and thioureas) will be set to the trans conformation. Flattening to the trans conformation will also occur if the (O)C-N(H) torsion is greater than twenty degrees out of plane. Note: if the (O)C-N(H) torsion is greater than five but less than 20 degrees out of the trans plane, the bond will not be flattened and a warning message will be written to the gold.err file. • Click on Ligand Flexibility from the list of Global Options given on the left of the GOLD Setup window and switch on the Flip amide bonds check box to allow amides, thioamides, ureas, and thioureas in the ligand to flip between cis and trans conformations during docking. • In order to flip between cis and trans conformations the CO-NRR' torsion is first made planar (at the initialised trans conformation). Note: N,N-disubstituted amides are not made planar; CO-NH2 will be set so that the NH2 group is in plane with the CO (care must be taken that the input RNH2 group itself is planar since GOLD will not change this). • On occasion this flattening of the CO-NRR' torsion may result in clashes in the initialised structure. If this occurs, it is advisable to turn off normalisation of amide bonds using the FLATTEN_BONDS keyword in the gold.params file. In this case it is recommended to fix the bond by switching off Flip amide bonds, or by explicitly specifying that the appropriate rotatable bonds are held at their input conformation (see Fixing Rotatable Bonds at Their Input Conformation, page 102). • If the use of torsion angle distribution has been enabled (see Using Torsion Angle Distributions, page 99) GOLD will attempt to match amide torsions against the torsion angles distributions file. If an amide torsion matches, this will override the Flip amide bonds flag setting. Note: Data in the CSD show that both cis and trans conformations occur in ureas, it is therefore recommended that amide flipping be turned on in order to sample R-N-C(O)-N torsions of 0 degrees when docking ureas. 8.3 Flipping Pyramidal Nitrogens • Click on Ligand Flexibility from the list of Global Options given on the left of the GOLD Setup window and switch on the Flip pyramidal N check box to allow pyramidal (i.e. non-planar sp3) nitrogens to invert during docking (otherwise, they will be held fixed at the input geometry). • Given a non-planar group RR’R”N or tetrahedrally surrounded RR’R”NH, the Flip pyramidal N switch enables flipping of the local stereochemistry around the nitrogen (the energy barrier for this umbrella-like change of geometry around the nitrogen is low). • Flipping only changes the stereochemistry around RR’R”N and RR’R”NH nitrogens. It does not 98 GOLD User Guide affect other chiral centers. 8.4 Intramolecular Hydrogen Bonds • Click on Ligand Flexibility from the list of Global Options given on the left of the GOLD Setup window and switch on the Detect Internal H-bonds check box to allow intramolecular hydrogen bonds in the ligand to be formed during docking. • Use this with care as it can make ligands like methotrexate curl up. 8.5 Flipping Planar Nitrogens • Click on Ligand Flexibility from the list of Global Options given on the left of the GOLD Setup window and switch on the Flip all planar R-NR1R2 check box to allow planar trigonal nitrogens in the ligand (bound to sp2 carbons) to flip between cis and trans conformations during docking (otherwise, they will be held fixed at the input geometry). • It is possible to independently control the behaviour of both ring-NHR and ring-NR1R2 groups during docking. The following options are available for each: • Flip: allows ring-NHR and ring-NR1R2 to flip (i.e. rotate 180 deg.) during docking. • Rotate: use this option to allow free rotation of ring-NHR or ring-NR1R2 groups during docking • Fix: This fixes ring-NHR or ring-NR1R2 bonds at their input conformation 8.6 Protonated Carboxylic Acids • Click on Ligand Flexibility from the list of Global Options given on the left of the GOLD Setup window and switch on the Flip protonated carboxylic acids check box. • Protonated carboxylic acids can then either be allowed to flip (i.e. rotate 180 deg.) or rotate freely during docking. • If the Flip protonated carboxylic acids check box is not switched on then these groups will be held rigid at their input conformation. 8.7 Using Torsion Angle Distributions 8.7.1 Enabling Use of Torsion Angle Distributions • Torsion angle distributions extracted from the Cambridge Structural Database (CSD) can be utilised by GOLD. These distributions can be used to restrict the ligand conformational space sampled by the genetic algorithm. • Using torsion angle distributions in this way will not make GOLD go any faster. However, it may improve the chances of GOLD finding the correct answer by biasing the search towards ligand torsion-angle values that are commonly observed in crystal structures. It may also improve convergence and so make improve accuracy with faster settings (see Controlling GOLD User Guide 99 Accuracy and Speed with Genetic Algorithm Parameter Settings, page 128). • To enable the use of torsion angle distributions click on Ligand Flexibility from the list of Global Options given on the left of the GOLD Setup window and switch on the Use Torsion Angle Distributions check box. • A torsion angle distribution file must be specified. Either enter the path and filename of the file, or click on the ... button and use the file selection window to choose the file. Two torsion angle distribution files are provided with GOLD: • gold.tordist - this is the default file. • mimumba.tordist - this contains all the torsional distributions used in the MIMUMBA program (Klebe and Mietzner, J.Comput.-Aided Mol.Des., 8, 583-606, 1994). • It is possible to customise torsion angle distribution information by editing one of the standard torsion angle distribution files (see Editing Torsion Angle Distribution Files, page 100). 8.7.2 Editing Torsion Angle Distribution Files • Copy the default file torsion angle distributions file that is provided in the $GOLD_DIR/gold/ directory to the current directory. After making your changes instruct GOLD to use the edited file (see Enabling Use of Torsion Angle Distributions, page 99). • The format of entries in the file is quite strict: incorrect editing of the file may cause GOLD to behave in unexpected ways or even to crash. • For further information refer to Appendix F: The Torsion Angle Distribution File (see page 254). 8.7.3 Matching Torsion Angle Distributions at Run Time • GOLD identifies each rotatable bond in the ligand and attempts to match it to a torsion angle distribution in the torsion angle distribution file. This includes bonds that are identified by GOLD as flippable (e.g., if torsions are switched on then ligand carboxylic acids (O)C-OH will also use a torsion distribution). • Details of matched torsions are written to the gold_<ligand_name>_m1.log file, specifically: • An itemised list of which torsions have been matched during ligand initialisation, including the torsion name e.g.: Rotatable bond [40 41 61 C.3 | O.3 | C.2 ( =O.2 ) Rotatable bond [65 64 63 C.2 (O.co2 O.co2 ) | C.3 Rotatable bond [67 65 64 O.co2 | C.2 ( O.co2 ) | 63] matches torsion: ester | C.3 61] matches torsion: acid T1 ( 2H ) | C.3 ( 2H ) | C 63] matches torsion: acid T2 C.3 ( 2H ) | C.3 ( 2H C) • Matched torsion angles are now identified in the rotatable ligand bonds list, written out at the end of the docking run when the chromosome is decoded, e.g.: 100 GOLD User Guide Chromosome decoded: Ligand Torsions [ 61 41 40 3 ] -51.44 [ 40 41 61 63 ] 165.82 matched torsion: ester [ 26 57 48 38 ] 60.63 [ 65 64 63 61 ] -71.33 matched torsion: acid T1 [ 67 65 64 63 ] 161.95 matched torsion: acid T2 • In some cases, a rotatable bond may match more than one torsion angle distribution. If this happens, a score is calculated for each torsion angle distribution and the distribution with the highest score is selected. Note: a weighting scheme is used when matching rotatable bonds in the ligand to a torsion angle distribution such that more specific torsion definitions are taken in preference to more generic ones. • Each portion of the torsion angle distribution contributes to the score as follows: 8.8 Element atom type 1.5 SYBYL atom type 2.0 Fragment 3.0 Hydrogen count 2.0 Bond linkage 0.5 Overriding Automatic Bond Settings • When using ligand flexibility options, e.g. Flip amide bonds (see Flipping Amide Bonds, page 98) or Flip all planar R-NR1R2 (see Flipping Planar Nitrogens, page 99), the bond in question is treated in a specific manner at ligand initialisation to prepare it for the docking run (in both the aforementioned cases, the bond is flattened at ligand initialisation prior to it being flipped during docking). • If a bond is e.g. desired to rotate freely rather than flip during docking, this fine-grained control can be achieved by using the rotatable_bond_override.mol2 file, found in the $GOLD_DIR/gold/ directory. Some fragments are already provided (which can be edited), however user-specific ones may also be added. Instructions on how to do this, as well as further information, can be found in the file itself. • To post process fragments via the rotatable_bond_override file click on Ligand Flexibility from the list of Global Options given on the left of the GOLD Setup window and switch on the Postprocess Rotatable Bonds check box. Then, either enter the path and filename of the file, or click on the ... button and use the file selection window to choose the file. • This option is particularly useful if further control is sought over more than one ligand with a common substructure in a ligand library file. GOLD User Guide 101 • The new bond type(s) are specified in the rotatable_bond_override.mol2 file, in the @<TRIPOS>COMMENT part of the molecule file. The following format should be used: RESET_BOND_TYPE <bond_number> <fix | flip | 1 | am> • fix keeps the bond at its input angle. This option can also be specified for a single ligand docking via the gold.conf (see Fixing Rotatable Bonds at Their Input Conformation, page 102). • flip causes 180 degree turns of the input angle geometry. • 1 re-types the bond to a single bond, thus it is treated as fully rotatable. • am re-types the bond as an amide bond. • A report detailing what has been matched can be found in the gold_ligand.log file: • If using the postprocess instruction and rotatable bond override file, the geometry is overruled whether the associated fitness flag is on or off. • If a torsion distribution can be found and matched, this will be used to bias the geometry of the re-typed bond. • Care should be taken to ensure the correct substructure is defined in the rotatable_bonds_override.mol2 file. If a substructure cannot be matched, the bond override will not be used. 8.9 Fixing Rotatable Bonds at Their Input Conformation • GOLD was designed to dock flexible ligands into protein binding sites. However, sometimes it can be useful to fix the geometry of part or all of the ligand e.g. in order to study the possible binding of a pre-determined ligand geometry. • To fix rotatable bonds at their input conformation click on Ligand Flexibility from the list of Global Options given on the left of the GOLD Setup window and switch on the Fix Ligand 102 GOLD User Guide Rotatable Bonds check box. The following options are then available: • To fix all rotatable bonds in the ligand at their input conformation, select the fix all button. • To fix all non-terminal rotatable bonds (i.e. not -CH3, -OH, etc.), select the fix all but terminal button. • To fix the rotatable bond between two specified atoms select fix specific, then click on the Specify Bonds button. The resulting Select Ligand Bonds To Fix dialogue allows you to select the bond(s) you wish to fix. To select a bond hit Add then either select the bond by clicking on it in the visualiser, or by entering the bond atom indices directly. Multiple rotatable bonds can be specified. Click on Delete to remove a bond from the list. Once you are satisfied with your selections click on Close. • The ability to fix rotatable bonds in the ligand at their input conformations is also available using the rotatable_bond_override.mol2 file (see Overriding Automatic Bond Settings, page 101). This is particularly useful if docking a library of ligands that have a common substructure rather than the method above which is more suitable when docking an individual ligand. • Note: When fixing all rotatable bonds at their input conformation (i.e. performing a rigid ligand docking) GOLD will try to find the best orientation of the ligand in the binding site by mapping donor-acceptor (as well as hydrophobic-hydrophobic) fitting points. However, GOLD will not perform a local optimisation (simplex) on the final solution. This may lead to penalisation of near-optimal conformations. Performing a few cycles of molecular-mechanics minimisation before docking may help to take the ligand close to its local potential-energy minimum. GOLD User Guide 103 9. Ligand Search Options 9.1 Internal Energy Offset • Click on Fitness and Search Options from the list of Global Options given on the left of the GOLD Setup window. The Use the internal ligand energy offset check-box is switched on by default. • Enabling this option results in the internal energy terms (internal torsion, internal vdw, and internal Hbond) being corrected according to the best energy encountered for these terms during the run. • By applying this correction the internal energy will be calculated with respect to that of a close to optimal non-bound structure, thereby taking into account any irreducible internal energy. • For each scoring function the ligand energy correction value is written to the docked solution files in the tag <Gold.<scoring_function>.Internal.Correction>. This is the best (i.e. minimum energy) value encountered. • For all scoring functions the best value encountered is subtracted from the ligand score (or energy) value before being passed to the final energy term. • The .rnk file is corrected at the end of a run with the best energy encountered after all docking attempts on a particular ligand (individual solution files are not). Therefore you may observe small deviations for the best energy found between the solutions and rank file. Increasing the number of dockings or the number of GA operations in each docking will result in the discrepancy being less pronounced. 9.2 Hydrophobic Fitting Points • GOLD automatically calculates a list of hydrophobic fitting points in the binding site. These are used during the generation of trial docking solutions to map hydrophobic ligand atoms into favourable regions of the binding site. • GOLD generates its hydrophobic fitting points by placing a fine grid over the binding site. At each grid position, the van der Waals interaction energy between a bare carbon atom and the protein is evaluated. By default, positions at which the interaction energy is below -2.5 kcal/mol are added to the list of fitting points. The potential and threshold for selecting fitting points can be changed by editing the gold.params file and changing the values of INTERNAL_POTENTIAL_FITPTS and E_FITPT_THRESHOLD. • In this way, a map is constructed that contains positions onto which the placement of a hydrophobic ligand atom should be favourable. • The ligand fitting points are used for the matching of hydrophobic regions. • By default only carbon atoms in the ligand are considered when identifying fitting points. The selection of suitable ligand atoms can be extended to include carbon, halogen and non-polar sulfur atoms by uncommenting the following line in the gold.params file: #LIGAND_FITPTS_SELECTION EXTENDED_HAL_S 104 GOLD User Guide • During docking, GOLD selects a list of lipophilic ligand atoms and matches them onto a subset of the hydrophobic fitting points. • It is possible to use customised hydrophobic fitting points. This might be appropriate if GOLD is not giving good results on a particular protein and you suspect that the fault may lie in the placement of hydrophobic ligand groups. • Customised fitting points must be supplied in a MOL2 format file that contains a list of dummy atoms at the desired fitting-point locations. The supplied fitting points should sample all regions of interest in the cavity, so that the docking algorithm has sufficient alternatives for placement of hydrophobic ligand atoms within the cavity. GOLD uses gridded points that are spaced by 0.25 Å; for a speed-up in calculation, higher values could be used. • To make GOLD use a customised fitting-point file, click on Fitness and Search Options from the list of Global Options given on the left of the GOLD Setup window and enable the Read hydrophobic fitting points check-box. Then, either enter the path and filename of the MOL2 file, or click on the ... button and use the file selection window to choose the file. • Customised fitting points can, for example, be generated by the CCDC program SuperStar, which offers the possibility of writing out a file of GOLD fitting points in the appropriate format (see SuperStar manual sections on SAVE_GOLD_FITTING_POINTS and GOLD_MIN_PROPENSITY). 9.3 Generating Diverse Solutions • There are occasions when GOLD obtains a number of docking solutions for a particular ligand which are very similar, or if the Allow early termination option is activated, GOLD may obtain a user-defined number of ligands within the allowed RMSD very quickly. • Although this may not always be a problem there are occasions where it is apparent that none of the solutions are correct. • If this happens GOLD can be set up so that a number of different, diverse solutions can be generated. 9.3.1 Method Used to Generate Diverse Solutions • Diversity is enforced during the ligand mapping stage. As the ligand is constructed and mapped into the binding site, the GOLD checks the RMSD of the current solution against those that have already been generated. • If the RMSD is below the diversity threshold or the maximum number of solutions per cluster has been reached, the mapping is rejected and the process repeated until an acceptable solution is generated. GOLD keeps track of any failures; once the failure threshold has been reached the diverse solutions code is switched off. • The failure threshold is checked once the diverse solutions code has been called a thousand times. After that if the ratio of the number of failures to the number of times the code is called GOLD User Guide 105 (i.e. the number of attempts) is greater than 0.2 then the diverse solutions code is switched off. • After each GA run the Diverse Solutions Stats are printed in the ligand log file e.g. • As the run progresses the failure rate will (probably) increase for each subsequent solution as it becomes increasingly more difficult to generate diversity. 9.3.2 Setting Up GOLD to Generate Diverse Solutions • To generate diverse solutions for a docking run, click on Fitness and Search Options from the list of Global Options given on the left of the GOLD Setup window, then enable the Generate diverse solutions check box. • To specify the diversity criterion click on the Diverse Solution Options button. The resulting Diverse solutions dialogue enables the following two criteria to e specified: • Cluster size: the default is 1. Use this to specify how many ligand diverse solutions are contained in a cluster within a user-defined RMSD. • R.M.S.D.: the default is 1.5 Å. Use this setting to define the RMSD cut-off (in Å) for determining if diverse solutions are in the same cluster or not. • The ligand.log output file contains information on which ligands are in which cluster at a particular RMSD cutoff. For example, the Cluster size was 3 and the R.M.S.D. setting was 1.5 Å in the docking below. • It is recommended that the Allow early termination tick box is disabled in the GOLD front end when generating diverse solutions (see Early Termination, page 127). 106 GOLD User Guide • It is possible to generate links to the top ranked solution from each distinct cluster at a given RMSD cutoff (see Identification of Different Binding Modes (Clustering of Ligand Poses), page 154). GOLD User Guide 107 10. Setting Constraints 10.1 Using the Constraint Editor • Depending on what sort of contraint(s) are required they may be protein-specific or applied to a protein ensemble. • Protein-specific constraints are the following: • Distance constraint, for use with individual ligands (see Distance Constraints, page 111). • Substructure based distance constraint, for use with multiple ligands that have a common substructure or functional group (see Distance Constraints, page 111). • Hydrogen bond constraint, for specifying a hydrogen bond between a particular ligand atom and a particular atom in the protein (see Hydrogen Bond Constraints, page 114). • Protein hydrogen bond constraint, for specifying that a particular protein atom should be hydrogen-bonded to the ligand, but without specifying to which ligand atom (see Hydrogen Bond Constraints, page 114). • To apply one of the above constraints it is necessary to first click on the appropriate protein tab (e.g. pdb1qpc_full_entry below) adjacent to the Global Options tab. To define a constraint, select a constraint type from those listed on the left of the GOLD Setup window. If individual constraint types are not visible, click on the + icon next to Constraints to expand the list of options. 108 GOLD User Guide • Constraints that are applicable to an individual protein or protein ensemble are the following: • Region (hydrophobic) constraint, for biasing the docking towards solutions in which particular regions of the binding site are occupied by specific ligand atoms or types of ligand atom (see Region (Hydrophobic) Constraints, page 117). • Template similarity constraint, for biasing the conformation of docked ligands towards a given solution, or template (see Similarity Constraints, page 119). • Scaffold constraint, to place a ligand fragment at an exact specified position in the binding site (see Scaffold Match Constraint, page 121). • To define one of the above constraints, ensure the Global Options tab is selected then pick a constraint type from those listed on the left of the GOLD Setup window. If individual constraint types are not visible, click on the + icon next to Constraints to expand the list of options. GOLD User Guide 109 • For all constraints the constraint editor is present at the bottom of each constraint setup page. Once the settings for a constraint have been specified click on the Add button to add the constraint definition to the list of defined constraints. Repeat this procedure if you want to specify additional constraints. • To edit a constraint highlight the corresponding entry in the list, make the required change and then hit the Add button. • To remove a constraint from the list highlight the entry and hit the Delete button, or to remove all defined constraints hit the Clear button. • It is possible to instruct GOLD not to dock ligands when the specified constraint is physically impossible to satisfy (e.g. if no suitable group is present in the ligand to form the required Hbond constraint). This is done by selecting the Never dock a ligand when a constraints is physically impossible check box. • When using constraints GOLD will be biased towards finding solutions in which the specified constraint is satisfied. However, it is important to remember that such a solution is not guaranteed (i.e. it is not possible to force a constraint to be satisfied in the final solution). 110 GOLD User Guide 10.2 Distance Constraints • Distance constraints are applicable to individual protein-ligand complexes (i.e. must be set up individually for each protein-ligand if performing ensemble docking). • Any distance between a ligand and protein atom (or between two ligand, or two protein atoms) can be constrained to lie between minimum and maximum distance bounds. GOLD features two types of distance constraint: • A standard distance constraint for use with individual ligands (see Setting Up a Distance Constraint, page 111). • A substructure-based distance constraint for use with multiple ligands which have a common functional group (see Setting Up Substructure-Based Distance Constraints, page 113). 10.2.1 Setting Up a Distance Constraint • A distance between a specified ligand and protein atom (or between two ligand, or protein atoms) can be constrained to lie between minimum and maximum distance bounds. • During a GOLD run, if a constrained distance is found to lie outside its bounds, a spring energy term is used to reduce the fitness score, i.e. E = kx2 where: x is the difference between the distance and the closest constraint bound; k is a user-defined spring constant. • To set up a distance constraint you must first select the appropriate protein tab, adjacent to the Global Options tab. • Select Distance from the list of Global Options given on the left of the GOLD Setup window. If this option is not visible, click on the + icon next to Constraints to expand the list of options. • Specify the atoms to be used in the distance constraint and whether they belong to the protein or ligand. This can be done by clicking on an atom in the visualiser (the atom structure type, i.e. protein or ligand will be updated automatically upon selection). Alternatively, you can enter the atom number, or PDB sequence number (as it appears in the input file) directly into the appropriate entry box. When specifying atom numbers it is necessary to also set the structure type (protein or ligand) from the drop-down menus. • The maximum and minimum separation of the constrained atoms must be entered (distances are in Å), and the spring constant must also be specified. For example: GOLD User Guide 111 • If the specified ligand atom is topologically equivalent to other atoms in the ligand (e.g. it is one of the oxygen atoms of an ionised carboxylate group), then GOLD will compute the constraint term using whichever of the equivalent atoms gives the best value automatically. • Click on the Add button to add the constraint definition to the constraint editor (see Using the Constraint Editor, page 108). 10.2.2 Method Used for Substructure-Based Distance Constraints • Substructure-based constraints are applicable to individual protein-ligand complexes (i.e. must be set up individually for each protein-ligand if performing ensemble docking). • It is possible to apply a distance constraint to multiple ligands which have a common functional group. • The constraint forces GOLD to limit the distance between a protein atom and one atom of this functional group. Docking solutions will be biased towards the specified distance range. • During docking the constraint will be applied to any ligands which contain the specified substructure (matching is performed on the basis of the element types and 2D connectivity) and the resulting solutions will be biased towards the specified distance range. GOLD always 112 GOLD User Guide accounts for topology in the substructure. • Note: the substructure must be a sub-graph rather than a complete molecule. • As with normal distance constraints (see Setting Up a Distance Constraint, page 111), the score is reduced for unfavourable ligand solutions. The amount of decrease in the score is determined by a weight term that the user must supply. 10.2.3 Setting Up Substructure-Based Distance Constraints • To use a substructure-based distance constraint, first create a file containing the substructure in mol2 format (e.g. substructure.mol2). The actual conformation of the group in this file is not important, as only the element types and 2D connectivity will be used. • To set up a distance constraint you must first select the appropriate protein tab, adjacent to the Global Options tab. • To constrain a distance, click on Distance from the list of Global Options given on the left of the GOLD Setup window. If this option is not visible, click on the + icon next to Constraints to expand the list of options. • To specify the Substructure file either enter the path and filename of the file, or click on the Substructure File button and use the file selection window to choose the file. • Specify the Protein atom number and Substructure atom number be used in the distance constraint. This can be done by clicking on an atom in the visualiser. Alternatively, you can enter the atom number, or PDB sequence number (as it appears in the input file) directly into the appropriate entry box. • Specify the allowed range of separation by entering a Maximum separation and a Minimum separation (distances are in Å). • Enter the spring constant (i.e. the weight of the term). This causes a spring-based distance constraint to be added for the specified substructure atom and protein atom. The weight specifies the spring energy term; usually, a weight in the range of 5 to 10 will work well. GOLD User Guide 113 • It is possible to define a distance constraint from a centroid of a ring in the ligand. To do this specify an atom within the ring of interest and enable the Use ring center nearest to selected atom (ring atoms only) check-box. The closest ring center to the selected atom will be used. Note: when defining a distance constraint involving a ring center ensure that the maximum and minimum separations are adjusted accordingly. • If the constraint refers to a substructure atom (and therefore a ligand atom) which is topologically equivalent to other atoms (e.g. it is one of the oxygen atoms of an ionised carboxylate group), GOLD will automatically compute the constraint term using whichever of the equivalent atoms gives the best value. • Click on the Add button to add the constraint definition to the constraint editor (see Using the Constraint Editor, page 108). 10.3 Hydrogen Bond Constraints • Two types of hydrogen bond constraints may be specified: • A hydrogen bond constraint (see Setting Up Hydrogen Bond Constraints, page 115), which can be used to force a hydrogen bond between a particular protein atom and a particular 114 GOLD User Guide ligand atom. • A protein hydrogen bond constraint (see Setting up Protein H Bond Constraints, page 116), which can be used to specify that a particular protein atom should be hydrogen-bonded to the ligand, but without specifying to which ligand atom. 10.3.1 Setting Up Hydrogen Bond Constraints • Hydrogen bond constraints are applicable to individual protein-ligand complexes (i.e. must be set up individually for each protein-ligand if performing ensemble docking). • A ligand atom may be constrained to form a hydrogen bond to a particular protein atom. One atom should be a donatable hydrogen atom (you must specify the hydrogen atom, not the O or N atom to which it is attached) and the other should be an acceptor. The protein atom should be available for ligand binding (i.e. solvent accessible). Note that this constraint does not work with metals. • The constraint is incorporated into the least-squares fitting routine used by GOLD. Thus, when least-squares fitting is used to dock the ligand (by attempting to form hydrogen bonds encoded within the chromosome) the constraint is added to the least-squares mapping. The constraint has a weight of 5 relative to a normal hydrogen bond taken from the chromosome. • To set up a distance constraint you must first select the appropriate protein tab, adjacent to the Global Options tab. • To define a hydrogen bond constraint, click on Hbond from the list of options given on the left of the GOLD Setup window. If this option is not visible, click on the + icon next to Constraints to expand the list of options. • Specify the atoms to be used in the constraint. This can be done by clicking on an atom in the visualiser. Alternatively, you can enter the atom number, or PDB sequence number (as it appears in the input file) directly into the appropriate entry box. • The hydrogen bond constraint weighting can be altered within the # FITNESS FUNCTION section of the GOLD parameters file by changing the value of the parameter CONSTRAINT_WT. • Click on the Add button to add the constraint definition to the constraint editor (see Using the Constraint Editor, page 108). 10.3.2 Method Used for Protein H Bond Constraints • Protein H bond constraints are applicable to individual protein-ligand complexes (i.e. must be set up individually for each protein-ligand if performing ensemble docking). • GOLD will be biased towards finding solutions in which the specified protein atoms form hydrogen bonds. The fitness score of a given docking will be penalised by a user specified value c for every protein H-bond constraint that is not satisfied (i.e. for every protein atom that you have specified should form a hydrogen bond but does not). • GOLD assesses the geometry of each required hydrogen bond on a scale of 0 to 1, with 1 GOLD User Guide 115 denoting perfect. If this geometry weight for the constrained Hbond falls below the Minimum Hbond geometry weight specified by the user, a penalty will be applied to the score for the unfulfilled hydrogen bond. i.e. it will not be considered to be an H-bond and will therefore contribute a penalty to the fitness score. The magnitude of this penalty is equal to the weight specified for the constraint. • Each trial ligand docking in a genetic algorithm run is generated by a least-squares fit of mapping points (H-bonding or hydrophobic binding points on the protein with complementary points on the ligand). The inclusion of a protein H-bond constraint will ensure that at least one of the specified protein atoms is included as one of the mapping points. i.e. use of the specified points is enforced at the mapping stage of the algorithm. • If a ligand simply does not contain sufficient complementary hydrogen-bonding atom(s) to satisfy the specified protein H-bond constraints (e.g. you require an H-bond to a protein acceptor but the ligand contains no donors), then GOLD can be set up not to dock ligands when the specified constraint is physically impossible to satisfy (see Using the Constraint Editor, page 108). 10.3.3 Setting up Protein H Bond Constraints • A protein hydrogen bond constraint can be used to specify that a particular protein atom should be hydrogen-bonded to the ligand, but without specifying to which ligand atom. • To set up a distance constraint you must first select the appropriate protein tab, adjacent to the Global Options tab. • To define a protein hydrogen bond constraint, click on Protein HBond from the list of options given on the left of the GOLD Setup window. If this option is not visible, click on the + icon next to Constraints to expand the list of options. • Specify the protein atoms to be used in the constraint. This can be done by clicking on an atom in the visualiser. Alternatively, you can enter the atom number, or PDB sequence number (as it appears in the input file) directly into the appropriate entry box. Either a donatable hydrogen atom (you must specify the hydrogen atom, not the O or N atom to which it is attached) or an acceptor can be specified. The protein atom should be available for ligand binding (i.e. solvent accessible). This constraint does not work with metals. • The Constraint weight is the strength of bias applied to the formation of a specified hydrogen bond in the least squares mapping algorithm within GOLD. The Constraint weight is also the value of the penalty applied to the fitness score for each constrained H bond that is not formed. • The Minimum H bond geometry weight is a user defined score that determines how good a hydrogen bonding interaction has to be in order for it to be considered a hydrogen bond by GOLD. The Minimum H bond geometry weight takes a range of values from 0 to 1, by default this value is set at 0.005. • For a given protein H bond constraint more than one protein atom number can be entered in the Protein atom(s) required to form H-bond entry box. This will instruct GOLD to use an either-or 116 GOLD User Guide type of constraint during docking. For example, specifying two protein atoms, acceptor m and acceptor n, will result in the constraint being satisfied if an H bond is formed to either m or n during docking. This is of use when defining constraints involving, for example, carboxylates where it is not important which oxygen atom forms an H bond, provided that one of them does. • Click on the Add button to add the constraint definition to the constraint editor (see Using the Constraint Editor, page 108). It is possible to specify several different protein H bond constraints, with different weights for each constraint. 10.4 Region (Hydrophobic) Constraints • This constraint can be used to bias the docking towards solutions in which particular regions of the binding site are occupied by specific ligand atoms (or types of ligand atom, e.g. hydrophobic atoms). 10.4.1 Method Used for Region (Hydrophobic) Constraints • This constraint can be used to bias the docking towards solutions in which particular regions of the binding site are occupied by specific ligand atoms (or types of ligand atom). • For each region (hydrophobic) constraint specified a sphere is placed at an explicitly-defined position within the binding site. Each sphere is assigned a user-defined radius, so a sphere can be adjusted if required, e.g, to fill an entire pocket in the binding-site. Minimum settable radius as 0.5 Å. • A contribution (determined according to a user-specified weighting) is then added to the score for each specified non-hydrogen ligand atom that lies within the designated sphere. A contribution is added to the score for each atom located within the sphere, (i.e. the total contribution will depend on the number of atoms found in the region of interest and ultimately the ligand-accessible volume of the region). • The ligand atoms used in the constraint can be specified explicitly. Alternatively, it is possible to use all hydrophobic ligand atoms, or to use only those hydrophobic atoms in aromatic rings. Atoms considered to be hydrophobic include: • Carbon atoms bound to at least two H or C atoms. • Atoms typed C.cat. • Atoms typed S.3 and bound to two carbons. • H atoms bound to an sp2, sp3 or aromatic carbon (Note: only heavy atoms found within the sphere will contribute to the score). • Details of the region (hydrophobic) constraint calculation, including the final contribution to the fitness score, are given in the ligand log file (see Ligand Log File, page 151). GOLD User Guide 117 10.4.2 Setting Up Region (Hydrophobic) Constraints • To define a region (hydrophobic) constraint, click on Region from the list of Global Options given on the left of the GOLD Setup window. If this option is not visible, click on the + icon next to Constraints to expand the list of options. • Specify the ligand atoms to be used in the constraint by selected either All hydrophobic atoms, Hydrophobic atoms in aromatic rings, or User-specified list. If User-specified list is selected then individual ligand atoms can be selected by clicking on them in the visualiser (you will need to first hide the sphere using the Centroid visible checkbox in the Edit Sphere dialogue). Alternatively, you can enter the atom numbers (as it appears in the input file) directly into entry box. • Next, specify the position and radius of the sphere. To do this, click on the Define Sphere button, this will launch the Edit Sphere dialogue: 118 GOLD User Guide • Enter a name and the radius of the sphere (distances are in Å). • The sphere must then positioned within the binding site, this can be done in a number of different way: • The sphere can be positioned on the centroid of an existing subset of protein atoms. Select Centroid of protein subset and select the protein subset from the drop-down list. To create a new subset of protein atoms click on the Add Subset button. Instructions on defining protein subsets can be found in the Hermes user guide. • The sphere can be positioned on the centroid of selected atoms. Select Centroid of atoms selected in the 3D viewer, then within Hermes click on one or more protein atoms in order to define a centroid. • Alternatively, select Coordinate and enter the orthogonal x,y,z coordinates of a single point upon which to position the sphere. • Click on Done in the Edit Sphere dialogue once the sphere has been defined. • A score contribution must also be specified. This is the value that will be added to the fitness score for each specified non-hydrogen ligand atom found within the sphere region. The total contribution added will therefore depend on the number of atoms located within the sphere. • Click on the Add button to add the constraint definition to the constraint editor (see Using the Constraint Editor, page 108). It is possible to define multiple region (hydrophobic) constraints. 10.5 Similarity Constraints • This constraint can be used to bias the conformation of docked ligands towards a given solution, or template. 10.5.1 Method Used for Similarity Constraints • This constraint will bias the conformation of docked ligands towards a given solution. This solution, or template, can, for example, be another ligand in a known conformation, a common core (useful when docking ligands of a combinatorial set), or it may just be a large substructure that is expected, or known, to bind in a certain way. • The template must be supplied as a MOL2 file. • Unlike the distance-based constraints, which reduce the score for ligands that adopt unfavourable orientations, this constraint will add an energy term to the score based on the similarity between the ligand being docked and the template provided. The similarity between the two is evaluated as a Gaussian overlap term. • The similarity constraint can be applied in three ways that differ in the way that the overlap between ligand and template is calculated. The similarity can be evaluated: • by using the overlap between all donor atoms in the template and the ligand being docked. • by using the overlap between all acceptor atoms in the template and the ligand being docked. GOLD User Guide 119 • by using the overlap of all atoms of the template (this can be regarded as a ligand-shape constraint). • The energy term to be added is calculated as similarity times weight (the similarity value is between 0 and 1, where 1 indicates identity of template and ligand). • If you wish to place a fragment at an exact specified position in the binding site, as opposed to biasing the docking, use the scaffold match constraint (see Scaffold Match Constraint, page 121). 10.5.2 Setting Up a Similarity Constraint • To define a similarity constraint, click on Similarity from the list of Global Options given on the left of the GOLD Setup window. If this option is not visible, click on the + icon next to Constraints to expand the list of options. • Specify the similarity type to be used by selecting H-bond donor overlap, H-bond-acceptor overlap, or shape overlap (see Method Used for Similarity Constraints, page 119). • The similarity template file should contain the template molecule or fragment in its docked position (i.e. expressed with respect to the same coordinate frame as the protein and with the coordinates required to place it in the correct pose). To specify the template file either enter the path and filename of the file, or click on the Template File button and use the file selection window to choose the file. • The weight term determines the maximum energy term that would be added to the score in the case of perfect overlap between ligand and template. As an initial value for this term, we suggest a value between 5 and 30. 120 GOLD User Guide • Click on the Add button to add the constraint definition to the constraint editor (see Using the Constraint Editor, page 108). It is possible to define multiple constraints, e.g. one for donors and one for acceptors. 10.6 Scaffold Match Constraint • The scaffold match constraint can be used to place a fragment at an exact specified position in the binding site, the geometry of the fragment will not be altered during docking. 10.6.1 Method Used for Scaffold Match Constraint • This constraint will attempt to a place a ligand onto a given scaffold location. The scaffold, can, for example, be a common core, or fragment (useful when docking ligands of a combinatorial set), or it may just be a substructure known to adopt a certain binding position. • It is advised that only those atoms required for scaffold matching are specified when using the scaffold constraint. Having a scaffold that almost exactly matches the docked ligand (and specifying a large number of atoms for matching) causes GOLD problems when it is generating random and unique individuals during docking. GOLD User Guide 121 • The scaffold must be supplied as a mol2 file. The file should contain the scaffold fragment in its docked position (i.e. expressed in the same coordinate frame as the protein and with the coordinates required to place it in the correct pose). The element type is matched, not the atom type thus it is not essential for the SYBYL atom types to be correct in the scaffold mol2 file. It is recommended that the scaffold have hydrogens correctly placed on all appropriate atoms other than the unfulfilled valency at the substitution point, which must not be blocked by hydrogen. • Unlike the template similarity constraint, which will bias the docking by adding an energy term to the score based on the similarity between the ligand being docked and the template provided, this constraint is enforced at the mapping stage in GOLD. Ligand placements are generated using a best least-squares fit with the scaffold heavy atom positions. i.e. this constraint forces all atoms on the matching portion of the ligand to lie very close, or coincident, with the corresponding scaffold. There is no S(con) contribution to the fitness score to bias dockings. • How closely ligand atoms fit onto the scaffold is governed by a user specified weight. Setting a higher weight will force the ligand to be placed onto the scaffold locations more strictly. A default weight of 5.0 is used. Setting a high weight can have a detrimental effect on the fitness score if the placement results in e.g. bad protein-ligand clashes. If desired, values below 1 can be used to achieve a more lenient overlay. • Symmetry effects (such as the flipping of a phenyl ring by 180 degrees) are not taken into account during matching of the ligand onto the scaffold. Therefore, a scaffold that will give a unique match should ideally be provided. • For a given ligand, it is not possible to match multiple scaffolds at the same time. Scaffolds are evaluated in the order supplied by the user and the scaffold that matches the ligand first will be used. This means that it is possible to specify two or more different scaffolds, and GOLD will use the scaffold that matches the ligand first. This can be useful when docking multiple different series of compounds. 10.6.2 Setting Up Scaffold Match Constraints • To define a scaffold constraint, click on Scaffold from the list of Global Options given on the left of the GOLD Setup window. If this option is not visible, click on the + icon next to Constraints to expand the list of options. • The scaffold template file should contain the scaffold molecule or fragment in its docked position (i.e. expressed with respect to the same coordinate frame as the protein and with the coordinates required to place it in the correct pose). To specify the scaffold file either enter the path and filename of the file, or click on the Scaffold File button and use the file selection window to choose the file. • The Constraint Weight determines how closely ligand atoms fit onto the scaffold. Setting a higher weight will force the ligand to be placed onto the scaffold locations more strictly. • By default, all heavy atoms in the supplied scaffold structure file will be used for matching. However, it is possible to specify only a subset of those atoms in the scaffold structure (these 122 GOLD User Guide may include non-heavy atoms). Individual scaffold atoms can be specified by clicking on them in the visualiser. Alternatively, you can enter the atom numbers (as it appears in the scaffold file) directly into entry box. Limiting the number of atoms to be matched can be useful for large, rigid scaffolds. In such a case, specifying only a few atoms distributed throughout the scaffold can be sufficient to obtain a good 3D superimposition. • Click on the Add button to add the constraint definition to the constraint editor (see Using the Constraint Editor, page 108). 10.7 Interaction Motif Constraint • This constraint can be used to bias the docking towards solutions that form particular proteinligand binding motifs. • This constraint could be used e.g. when there is experimental evidence, such as a number of Xray structures from a fragment screen, which show that certain combinations of interactions (motifs) are commonly formed by groups of fragment binders. Such motifs can therefore be considered as favourable and this information can be incorporated into the docking in order to bias the ligand poses that are generated. • For further information see: The use of protein-ligand interaction fingerproints in docking References (see page 163). 10.7.1 Method Used for the Interaction Motif Constraint • Interaction motif constraints are applicable to individual protein-ligand complexes (i.e. must be set up individually for each protein-ligand if performing ensemble docking). • This constraint is used to bias the docking towards solutions that form particular protein-ligand binding motifs. • One or more motifs can be specified, and each motif will consists of a unique combination of interactions formed between the protein and the ligand. • Individual interactions are described according to their protein atom interaction type (hydrogen bond acceptor, hydrogen bond donor, lipophilic interaction, or weak CH…O acceptor). • GOLD assesses whether or not specified interactions are satisfied as follows: • For Hbond acceptor and Hbond donor interaction types - A hydrogen bond is deemed to be present if the distance between the acceptor and the donor heavy atoms are within the range 2.85Å ± 0.45, the acceptor angle is within 145°± 65 and the donor angle is within 115° ± 40. Further, a planarity check is used to ensure that the hydrogen bond is not more than 30° out of the plane when the ligand donor is of atom type N.2 or N.pl3 or the protein donor is of atom type N.pl3 or N.am. GOLD User Guide 123 • For a weak CH…O acceptor interaction type - an interaction is deemed to be present if the distance between the acceptor and the aromatic carbon is within the range 3.35Å ± 0.65, the acceptor angle is within 145°± 65, the donor angle is within 115°± 40 and the CH…O bond is not more than 30° out of the aromatic plane. • For a lipophilic interaction type - an interaction is deemed to be present if the sum of the protein and the ligand atom's van der Waals radii plus 0.4 is less than the distance between the protein and the ligand atoms. • During docking a contribution will be added to the fitness score of ligand poses in which a motif is matched (i.e. poses in which all the interactions defined as part of a motif are satisfied). This contribution is based upon the accumulated hydrogen-bonding and lipophilc interactions defined as part of that motif. Therefore, docking will be biased towards ligand poses which form interactions to the protein atoms of interest matching one of the uniquely defined motifs. • Please note that it is not possible to manipulate interaction motif constraints within the constraint editor (see Using the Constraint Editor, page 108). 10.7.2 Setting up an Interaction Motif Constraint • To define an interaction motif constraint, click on Interaction Motif from the list of Global Options given on the left of the GOLD Setup window. • One or more motifs can be specified, and each motif will consists of a unique combination of 124 GOLD User Guide interactions formed between the protein and the ligand. • To define an interaction: • Click on the Add Interaction button. • Interactions are described according to their protein atom interaction type. Select the type of interaction (hydrogen bond acceptor, hydrogen bond donor, lipophilic interaction, or weak CH…O acceptor) using the drop down menu under the column labelled Type. • Next, specify the protein atom that forms the interaction. This can be done by clicking on an atom in the visualiser. Alternatively, you can enter the residue, chain, name and atom identifiers directly into the appropriate entry boxes. Note that your protein input file must include chain identifiers in order avoid problems when specifying atom for use in this constraint. • A maximum of 10 interactions can be defined. Note that hydrogen bond acceptors that can form either a hydrogen bond or a weak CH…O interaction need to be added twice, one for each type of interaction. • To delete an interaction, click on the corresponding row number to highlight the interaction definition then hit the Delete Interaction button. • One or more binding motifs can now be defined. Each motif should consist of a unique combination of the interactions that you previously specified. To define a motif: • Click the Add Motif button. • Specify each of the interactions that need to be included in the motif. The hydrogen bond interaction types (Acceptor, Donor, CHO) are set as either 1 or 0 depending on whether or not they are observed in a particular motif. The lipophilic interaction type is set as the frequency of that interaction as observed in the set of complexes used to originally identify the motifs. The frequency of a lipophilic interaction is added to all the interaction motifs. • To delete a motif, click on the corresponding motif number column then hit the Delete Motif button. The maximum number of motifs that can be defined is 20. • In the example below 3 motifs have been defined. Motif M1 features Glu81O as an acceptor, Leu83N as a donor, Leu83O as an acceptor but does not include Leu83O as a CHO acceptor. Motif M2 features Glu81O as an acceptor, Leu83N as a donor and Leu83O as a CHO acceptor. Motif M3 features Glu81O as an acceptor and Leu83N as a donor. The lipophilic interactions are included in all the motifs, and are expressed as the frequency of that interaction as observed in the set of complexes originally used to identify the motifs. GOLD User Guide 125 • To highlight, in the Hermes visualiser, those protein atoms involved in a motif highlight the appropriate column and click on the View Atoms button. To switch off highlighting click the Hide Atoms button. • In order to remove all interaction and motif definitions click on Reset. 126 GOLD User Guide 11. Balancing Docking Accuracy and Speed 11.1 Number of Dockings • GOLD will dock each ligand several times starting each time from a different random population of ligand orientations. The results of the different docking runs are ranked by fitness score. • The number of dockings to be performed on each ligand is set when the ligand file is defined (see Specifying the Ligand File(s), page 52). • By default the number of dockings to be performed on each ligand is 10. • The total time spent docking a ligand obviously depends on the number of docking runs, so you can make GOLD go faster by reducing this number. However, it is useful to perform at least a few docking runs on each ligand. This increases the chances of getting the right answer. Also, if the same answer is found in several different docking runs, it is usually a strong indicator that the answer is correct. • The early termination option (see Early Termination, page 127) can be used to prevent GOLD wasting time performing multiple docking runs on easy ligands. 11.2 Early Termination • The early termination option instructs GOLD to terminate docking runs on a given ligand as soon as a specified number of runs have given essentially the same answer. In this situation, it is probable that the answer is correct, and GOLD will just be wasting time if it performs more docking runs on that ligand. • To switch early termination on, click on Fitness and Search Options from the list of Global Options given on the left of the GOLD Setup window, then enable the Allow early termination check box. • To specify the early termination criterion click on the Early Termination Options button. In the example below, GOLD has been instructed to stop docking a ligand if it reaches a state in which the best three solutions found so far are all within 1.5 Å rmsd of each other: GOLD User Guide 127 • The rms deviation takes account of any ligand symmetry. • Early termination does not always save as much time as you might think, because it tends to be invoked for easy (i.e. relatively rigid) ligands, which are quick to dock anyway. 11.3 Controlling Accuracy and Speed with Genetic Algorithm Parameter Settings 11.3.1 Genetic Algorithm Overview • GOLD optimises the fitness score by using a genetic algorithm. • A population of potential solutions (i.e. possible docked orientations of the ligand) is set up at random. Each member of the population is encoded as a chromosome, which contains information about the mapping of ligand H-bond atoms onto (complementary) protein H-bond atoms, mapping of hydrophobic points on the ligand onto protein hydrophobic points, and the conformation around flexible ligand bonds and protein OH groups. • Each chromosome is assigned a fitness score based on its predicted binding affinity and the chromosomes within the population are ranked according to fitness. • The population of chromosomes is iteratively optimised. At each step, a point mutation may 128 GOLD User Guide occur in a chromosome, or two chromosomes may mate to give a child. The selection of parent chromosomes is biased towards fitter members of the population, i.e. chromosomes corresponding to ligand dockings with good fitness scores. • A number of parameters control the precise operation of the genetic algorithm, viz. • Population size (see Population Size, page 246) • Selection pressure (see Selection Pressure, page 246) • Number of operations (see Number of Operations, page 246) • Number of islands (see Number of Islands, page 246) • Niche size (see Niche Size, page 247) • Operator weights: migrate, mutate, crossover (see Operator Weights: Migrate, Mutate, Crossover, page 247) • Van Der Walls and hydrogen bonding annealing parameters (see Van der Waals and Hydrogen Bonding Annealing Parameters, page 75) • Changes to individual genetic algorithm parameters should be made with care (see Using User Defined Genetic Algorithm Parameter Settings, page 133). 11.3.2 Relationship between Genetic Algorithm Parameters and Speed • The time taken by GOLD to dock ligands can be controlled by altering the values of the genetic algorithm (GA) parameters. • GOLD runs for a fixed number of genetic operations (crossover, migration, mutation). The easiest way to make GOLD go faster is to reduce the number of GA operations performed in the course of a run. This is done through the Number of Operations variable (this parameter is called maxops in the configuration file). • A reduction in Number of Operations is likely to change the optimum values of several other GA parameters, particularly popsize, van der Waals and Hydrogen Bonding. • GOLD manipulates a pool of chromosomes of size popsize * Number of Islands. The size of this pool should be such that the optimisation converges within the specified maximum number of operations, Number of Operations. If the pool size is too small for a given value of Number of Operations, the algorithm will converge prematurely. Conversely, if the pool size is too large the algorithm will terminate before it has converged. • The annealing parameters van der Waals and Hydrogen Bonding allow poor hydrogen bonds to occur at the beginning of a genetic algorithm run, in the expectation that they will evolve to better solutions. Both the vdw and H-bond annealing must be gradual and the population allowed plenty of time to adapt to changes in the fitness function. • Because of these factors, it is difficult to set GA parameters by hand and you are recommended to use automatic (ligand dependent) GA parameter settings (see Using Automatic (LigandDependent) Genetic Algorithm Parameter Settings, page 130), or one of the default parameter sets offered (see Using Preset Genetic Algorithm Parameter Settings, page 132). GOLD User Guide 129 11.3.3 Using Automatic (Ligand-Dependent) Genetic Algorithm Parameter Settings • The number of genetic operations performed (crossover, migration, mutation) is the key parameter in determining how long a GOLD run will take (i.e. this parameter controls the coverage of the search space). • GOLD can automatically calculate an optimal number of operations for a given ligand, thereby making the most efficient use of search time, e.g. small ligands containing only one or two rotatable bonds will generally require fewer genetic operations than larger highly flexible ligands. • The criteria used by GOLD to determine the optimal GA parameter settings for a given ligand include: • the number of rotatable bonds in the ligand • ligand flexibility, i.e. number of flexible ring corners, flippable nitrogens, etc. (see Ligand Flexibility, page 95) • the volume of the protein binding site, and • the number of water molecules considered during docking (see Water Molecules, page 15). • The exact number of GA operations contributed, e.g. for each rotatable bond in the ligand, are defined in the gold.params file (see Altering GOLD Parameters: the gold.params File, page 92). • To enable automatic (i.e. ligand dependent) GA settings, click on GA Settings from the list of Global Options given on the left of the GOLD Setup window, then switch on the button labelled Automatic. 130 GOLD User Guide • When using these ligand-dependent GA settings the Search efficiency can be used to further control the speed of docking and the predictive accuracy (i.e. the reliability) of the results. • With the Search efficiency set at 100% GOLD will attempt to apply optimal settings for each ligand. For a ligand with five rotatable bonds this will be around 30,000 GA operations. If the Search efficiency were set to 50%, then GOLD will perform around 15,000 operations thereby speeding up the docking by a factor of two, but the search space would be less well explored. Similarly, by setting a Search efficiency greater than 100%, it is possible to make the search more exhaustive (but slower). • The following search efficiency settings are available by clicking the corresponding button: • Very flexible - this sets the search efficiency at 200% and is recommended for large highly flexible ligands. This setting delivers high predictive accuracy but is relatively slow. • Default - this sets the search efficiency at 100%. GOLD will attempt to apply optimal settings for each ligand, see above. • Virtual screening - this sets the search efficiency at 30%. this setting is suitable for routine work and usually gives comparable predictive accuracy to the slower settings, unless the ligand has a large number of rotatable torsions. GOLD User Guide 131 • Library screening - this sets the search efficiency at 10%. This is the fastest setting and as a consequence is the least reliable. • The Minimum number of operations performed during the run will therefore depend on the Search efficiency that is set. To ensure that every ligand is subjected to at least a user-specified number of operations enable the Min ops check-box and specify the minimum number of operations required for every ligand. Similarly, the maximum number of operations to be carried out can be set manually. 11.3.4 Using Preset Genetic Algorithm Parameter Settings • The number of genetic operations performed (crossover, migration, mutation) is the key parameter in determining how long a GOLD run will take (i.e. this parameter controls the coverage of the search space). • When using pre-defined GA parameter settings every ligand, regardless of it’s size and flexibility, will be subjected to a specified number of genetic operations. • To use a pre-defined GA parameter set, click on GA Settings from the list of Global Options given on the left of the GOLD Setup window, then switch on the button labelled Preset. 132 GOLD User Guide • Select the required number of genetic operations from those listed. • 100,000 operations deliver high predictive accuracy but are relatively slow. These settings are recommended for use with large highly-flexible ligands, or for research applications where speed of docking is not an issue and optimal accuracy is required. • 50,000 operations and 30,000 operations are progressively quicker (predictive reliability will fall off, but quite slowly). These setting are recommended for use with compounds containing up to six flexible bonds and/or ring corners (see Ring Conformations, page 95). • 10,000 operations will give comparable predictive accuracy to the slow (100,000 operations) setting when docking small rigid ligands. These settings are recommended for use with ligands containing one or two rotatable torsions and for virtual screening work. 11.3.5 Using User -Defined Genetic Algorithm Parameter Settings • Individual GA parameters can be specified manually. However, it is recommended that you use the automatic (ligand-dependent) settings (see Using Automatic (Ligand-Dependent) Genetic Algorithm Parameter Settings, page 130), or one of the pre-defined GA parameter sets (see Using Preset Genetic Algorithm Parameter Settings, page 132) as opposed to altering individual parameters, because the optimum values of the parameters are highly correlated. • To manually specify individual GA parameter values, click on GA Settings from the list of Global Options given on the left of the GOLD Setup window, then switch on the button labelled User-defined. GOLD User Guide 133 • The values for individual GA parameters can be specified using the appropriate entry box. • A definition of the individual genetic algorithm parameters are provided in Appendix D: Genetic Algorithm Parameter Definitions (see page 246) 134 GOLD User Guide 12. Rescoring 12.1 Overview • Different scoring functions may perform better for selected cases. You may find, for example, that ChemScore outperforms GoldScore in ranking actives or one protein class, whereas the reverse will apply for other classes. • Therefore, when screening large numbers of compounds, rescoring docking poses with alternative scoring functions and considering the best results from each (consensus scoring) can have a favourable impact on the overall rank ordering of ligands. • In GOLD it is possible to rescore a single ligand or a set of ligands in one or more files. • Typically, a user will rescore GOLD solution files with an alternative scoring function. However, it is also possible to score a ligand pose from an alternative source (for example, from a known crystal structure or a solution from another docking program). When rescoring from a source other than a GOLD solution file it will not be possible to use the optimised positions of polar protein hydrogen atoms (see Rescore settings, page 137). • Rescoring can be performed automatically after a docking run. This will result in the solutions from the docking being automatically scored with another scoring function. Alternatively, rescoring can be performed independently of the docking, e.g. against an existing set of GOLD solution files (or ligand poses from an alternative source) (see Setting Up a Rescoring Run, page 135). • It is not possible to use the rescore feature if GOLD is being run in parallel (see Running in Parallel, page 145). 12.2 Setting Up a Rescoring Run • To automatically rescore the results of a docking run with another scoring function you will need to first set up the docking in the normal way. Then, click on Fitness and Search Options from the list of Global Options given on the left of the GOLD Setup window and enable the Rescore check-box. • Select the required scoring function to be used for the rescore from the drop-down menu. To use a modified scoring function parameters file either enter the path and filename of the Parameters file, or click on the ... button and use the file selection window to choose the file. • Finally, specify the settings to be used for the rescoring run (see Rescore settings, page 137). • In the following example ChemScore will be used for the docking and the resulting solutions will be rescored automatically using the Astex Statistical Potential (ASP) scoring function: GOLD User Guide 135 • To rescore an existing set of GOLD solution files or ligand poses from an alternative source (i.e. without first running a docking) enable the Rescore check-box only and select the required scoring function to be used for the rescore from the drop-down menu. To use a modified scoring function parameters file either enter the path and filename of the Parameters file, or click on the ... button and use the file selection window to choose the file. • Rescoring in this way requires essentially the same information as a normal docking run. You will therefore need to: • Provide a prepared protein input file (see Specifying the Protein File or Files, page 10). • Define the binding site (preferably the same definition that was used for the original docking) (see Defining the Binding Site, page 19). • Specify the ligand(s) you wish to rescore (see Specifying the Ligand File(s), page 52). • Specify the fitness function to be used for the rescoring (see Selecting a Fitness Function, page 68). • Finally, specify the settings to be used for the rescoring run (see Rescore settings, page 137). 136 GOLD User Guide 12.3 Rescore settings • To specify the settings to be used for the rescoring run hit the Rescore Options button. This will open the Rescore Options dialog: • The following rescore options are available: • Perform local optimisation - Enable this check-box to minimise the docked ligand pose before rescoring. Simplexing is important if you are to obtain meaningful scores. Due to the nature of scoring functions, one finds that small changes in location or conformation of the pose can have large effects on the calculated score. Simplexing can also affect rotatable protein hydrogen atoms (see File Containing the Protein Binding-Site Geometry, page 148). • Retrieve rotatable H positions from file (if available) - When rescoring a GOLD solution file it is possible to use the optimised positions of the polar protein hydrogen atoms that were generated during the original docking (see File Containing the Protein Binding-Site Geometry, page 148). If this option is not switched on (or no rotatable H positions are available) then the default hydrogen atoms positions specified in the protein input file will be used. • Use receptor depth scaling - This option is only available when rescoring with ChemScore. When using receptor depth scaling the score attributed to hydrogen bonds is scaled depending on the depth in the pocket. Hydrogen bonds deep in the pocket are rewarded with an increased score, while the scores of those closer to the solvent-exposed surface are decreased (see Receptor Depth Scaling, page 138). • The following output options are available: • Write scored structures to file - Enable this check-box to write out docked ligand solutions after rescoring. Solutions will be written to the file rescore.mol2 (to specify an alternative filename (see Rescore Solution File, page 150), MOL2 or SD output can be specified (see Files Containing the Docked Ligand(s), page 147)). Solution files will contain the new scoring function terms and can be used with GoldMine. If writing of this file is switched off, only the rescore.log file will be written (see Rescore Log File, page 150). • Replace score tags in file - When rescoring a GOLD solution file enable this check-box to overwrite the list of active residues and the rotated protein hydrogen atom positions generated GOLD User Guide 137 during the original docking with those resulting from the rescoring run. If you select not to replace relevant tags then rescore.mol2 will contain both the binding site definition of the original docking and that of the subsequent rescoring run. 12.4 Receptor Depth Scaling • In many proteins, the cognate ligand forms hydrogen bonds deep in the active site. This feature of known binders can be exploited using receptor depth scaling, where the score attributed to hydrogen bonds is scaled depending on the depth in the pocket. • Hydrogen bonds deep in the pocket are rewarded with an increased score, while the scores of those closer to the solvent-exposed surface are decreased. Simultaneously, the scores attributed to lipophilic interactions are reduced. • This procedure has been shown to increase the relative scores of active molecules compared to inactive molecules across a diverse range of 85 proteins. References (see page 163), O’Boyle, Brewerton and Taylor. While the default values for the parameters are suitable for the general case, for a particular protein it may be possible to gain better results by adjusting the scaling parameters (see the GOLD configuration file documentation for further information). • Simplexing is turned on when rescoring with receptor depth scaling. • Receptor depth scaling is only available when rescoring with ChemScore (see Setting Up a Rescoring Run, page 135). 12.5 Rescore output files • Each rescored solution is written to the rescore.log file. This file contains the ligand identifiers, the final rescore fitness value and its component terms. To specify an alternative rescore log filename (see Rescore Log File, page 150). • Rescored structure solution files can be written out that will contain the new scoring function terms and can be used with GoldMine. Solutions will be written to the file rescore.mol2 (see Rescore settings, page 137). 138 GOLD User Guide 13. Docked Ligand Output Options 13.1 Specifying Ligand Solution File Formats and Directories • Click on Output Options from the list of Global Options given on the left of the GOLD Setup window, then select the File Format Options tab. • By default, docked ligands will be written out in the same format as was used for input. To change this specify the required file format by selecting either Same as input, SD file, or Mol2. • Use the Output directory entry box to specify the directory to which output files will be written, or click on the ... button and use the directory selection window to choose the location. When more than one ligand is being docked, switch on the Create output sub-directories check box if you want results for each ligand to be written to a separate sub-directory. • Each ligand will normally be docked several times, so a given input ligand will produce a set of files, each containing the results of a separate docking attempt. Alternatively, you can specify that all saved docking solutions for all ligands are to be concatenated and written to a single file. To do this, enable to Save solutions to one file check-box and either enter the path and filename of the file, or click on the ... button and use the file selection window to choose the file. GOLD User Guide 139 13.2 Controlling the Information Written to Ligand Solution Files • It is possible to write additional information to docked solution files. This information is written to SD file tags; for MOL2 files, these tags are written to comment blocks. • For post-processing docking results with GoldMine it is particularly important that the scoring function terms and the rotated protein positions are saved. • Click on Output Options from the list of Global Options given on the left of the GOLD Setup window, then select the Information in File tab. • The following options are available: • Save fitness score - Enable this check-box if you want the docked solution files to include the docking-score terms, e.g. the total GoldScore fitness value for each docking, and its components such as protein-ligand H-bond energy, internal ligand strain energy, etc. • Weighted terms - Certain docking scoring function terms are the product of a term dependent on the magnitude of a particular physical contribution (e.g. hydrogen bonding) and a scale factor determined e.g. by a regression coefficient. The docking scoring function terms included in the output file can therefore consist of weighted terms, non-weighted terms or 140 GOLD User Guide • • • • • • • both. To include weighted terms enable this check-box. Unweighted terms - Enable this check-box to include non-weighted scoring function terms in the output file. Do not write SD-style tags to Mol2 files - Enable this check-box to prevent SD-style tags being written to comment blocks in MOL2 solution files. Preserve COMMENT fields from input Mol2 ligand files - Enable this check-box to retain the COMMENT fields from input MOL2 ligand files in the docked solution files. Save lone pairs - Some 3rd-party programs have difficulty reading files which contain lone pairs. You can stop GOLD including lone pairs when it writes docked solution files by switching off this check-box. Save protein rotated atom positions - Enable this check-box to save the optimised positions of rotated protein atoms. These include the optimised positions of polar protein hydrogen atoms and also final positions of any protein side-chains that have been defined as being flexible. Protein atom positions that are generated during docking will usually be different for each docked ligand pose and are therefore written to the individual ligand solution files. Rotated atom positions are utilised by both Hermes and GoldMine. Save per atom scores - Enable this check-box to include the scoring contributions of individual ligand and protein atoms to be written to docked solution output files. For each atom it’s contribution to the total fitness score and also the constituent scoring terms will be written. Save per atom scores to charge field - Enable this check-box to write to the mol2 file charge field of docked solution files the scoring contribution of individual ligand atoms. 13.3 Selecting Which Ligand Solutions to Keep • By default GOLD will dock each ligand 10 times starting each time from a different random population of ligand orientations (see Number of Dockings, page 127). This can produce a lot of output and you may therefore wish to reduce the number of docking solutions that are retained. • Click on Output Options from the list of Global Options given on the left of the GOLD Setup window, then select the Select Solutions tab. GOLD User Guide 141 • By selecting the appropriate option, it is possible to either: • Keep all solutions • Keep the best n solutions for each ligand, where n is a user-specified number (e.g. n = 3), or • Keep the top-ranked solution for the best m ligands only, i.e. retain just the best solution for only those m ligands with the best fitness scores, where m is user specified (e.g. m = 100). • In addition, you can filter out all solutions with fitness scores lower than a specified value by switching on the button labelled Reject solutions with fitness lower than x. This filter can be used in combination with the options listed above. For example, you could save 3 solutions for each ligand and not keep any solution with a fitness lower than 50. 142 GOLD User Guide 14. Running GOLD 14.1 Required Input Files • The following files must be available before a GOLD job can be run: • One or more files containing the ligand(s) to be docked, in MOL2, MOL, SD or PDB format (but PDB format is not recommended for ligand files) (see Setting Up Ligands, page 50). • A file (or files) containing the protein(s) (or the part of a protein) into which the ligand is to be docked. This may be in PDB or MOL2 format (see Setting Up the Protein(s), page 10) • GOLD also needs a configuration file, which contains the names of the protein and ligand files, and all the user-defined parameters such as genetic algorithm parameter settings, fitness flags, etc. The configuration file can be created manually, but it is usually easier and preferable to create it with the GOLD graphical front end (the file can be written out when the Run GOLD, Run GOLD in the background & Finish buttons are hit). A number of configuration file templates are also available (see Using Configuration File Templates, page 160). • In addition, GOLD uses a parameter file (see Altering GOLD Parameters: the gold.params File, page 92), a scoring function specific parameters file (see Fitness Functions, page 68), and (optionally) a torsion distribution file (see Using Torsion Angle Distributions, page 99). All these files are supplied in the GOLD distribution and, by default, will be found automatically by the program. If required, any of the files can be copied to a user’s directory and edited, and GOLD can then be directed to use the edited file. 14.2 Running GOLD Interactively • GOLD can be run interactively by hitting the Run GOLD button in the GOLD Setup window. • Before the job is started you will prompted to save a configuration file. The configuration file is a text file which specifies the GOLD calculation that is to be run, including details of the ligand, the protein binding site, the fitness-function parameter file to be used, the torsion distribution file to be used, and the genetic algorithm parameters (see Saving and Re-using Program Settings in Configuration Files, page 160). • To save a configuration file, specify the Directory, or click on the ... button and use the browse for folder window to choose the directory. Then, enable the GOLD conf file check box, and specify a filename <filename.conf>. • By enabling the appropriate check boxes it is also possible to save out the initialised protein structure file (see Files Containing the Initialised Protein and Ligand, page 147) and the cavity atoms file (see Defining the Binding Site, page 19). GOLD User Guide 143 • If GOLD is run interactively, output that is written to the log files are displayed: • A full description of the output files produced by GOLD is available elsewhere (see Description of Output Files, page 147). • The parallel version only gives a summary as it is not possible to track multiple files. • If any error conditions are encountered, they will be displayed under the gold.err tab. Note that only fatal errors are reported for the parallel version. • You can use the Interrupt GA button in the Run GOLD window to interrupt and terminate the 144 GOLD User Guide docking run. • Once the job is complete the docked ligand solutions can be viewed in the Hermes visualiser. To do this, click on the View Solutions button in the Run GOLD window. 14.3 Submitting a GOLD job to the Background • You can submit a GOLD job the background by using the Run GOLD in background button in the GOLD Setup window, having first specified all the required information, such as protein and ligand file names, parameter settings, etc. 14.4 Running GOLD from the Command Line • Unix platforms: • GOLD can be run directly in the background by using a simple command available in: $GOLD_DIR/bin: % gold_auto gold.conf & where gold.conf is the name of a configuration file. • Windows Platforms: • GOLD can be run on Windows by starting a command prompt, navigating to the directory containing the gold.conf file and running the following command: "C:\Program Files\CCDC\GOLD_Suite\GOLD\gold\d_win32\bin\gold_win32.exe" • The above command assumes that GOLD is installed in the default installation directory and that the configuration file is called gold.conf. If another name has been used for the gold.conf, (e.g. new_conf_filename.conf), this will have to be specified: "C:\Program Files\CCDC\GOLD_Suite\GOLD\gold\d_win32\bin\gold_win32.exe" new_conf_filename.conf 14.5 Running in Parallel 14.5.1 Using GOLD with a Grid Engine environment • GOLD can be run in parallel using a Grid Engine environment. • For a Grid computing and Grid Engine overview, including documentation and How To guides, please see: GOLD User Guide 145 http://wiki.gridengine.info/wiki/index.php/Main_Page • For further information and template scripts for running GOLD using a Grid Engine environment, please see: http://www.ccdc.cam.ac.uk/products/life_sciences/gold/faqs/parallel. 14.5.2 Using GOLD with Parallel Virtual Machine (PVM) • GOLD may also be run in parallel via use of PVM (Parallel Virtual Machine). PVM is a 3rd party public-domain library of routines that allows a program to schedule and harvest results across a network of machines and/or processors. • PVM is supplied with GOLD for UNIX-based platforms and allows users to distribute jobs over their network across a virtual cluster of machines in order to harness the processing power of multiple machines concurrently. • As PVM is now relatively old technology, we do not recommend it's use and instead recommend use of PBS scripts as detailed in (see Using GOLD with a Grid Engine environment, page 145). However, details of how to configure your systems for PVM and how to run GOLD jobs with it are detailed at http://www.ccdc.cam.ac.uk/products/life_sciences/gold/faqs/parallel. 146 GOLD User Guide 15. Viewing and Analysing Results 15.1 Description of Output Files 15.1.1 Files Containing the Initialised Protein and Ligand • gold_ligand.mol2 is the initialised ligand datafile with lone pairs added and the sets DONOR_HYDROGENS and LONE_PAIRS defined. If you do not wish to save this file, click on Output Options from the list of Global Options given on the left of the GOLD Setup window, select the File Format Options tab, then disable the Save initialised ligand files check-box. • gold_protein.mol2 is the initialised protein datafile with lone pairs added to binding site atoms and the sets DONOR_HYDROGENS and LONE_PAIRS defined. The binding site is defined in the set CAVITY_ATOMS. These set-definitions in the gold_protein.mol2 file are available for visualisation, as protein subsets, in Hermes. 15.1.2 Files Containing the Docked Ligand(s) • Each ligand will normally be docked several times, so a given input ligand will produce a set of files, each containing the results of a separate docking attempt. • Suppose that the original ligand file is structure.mol2. (this can contain more than one ligand, in which case each will be docked). As the GOLD job progresses, the result of each docking attempt is written out as gold_soln_structure_m#_n.mol2, where n is the solution number 1,2,3 ... and m# is the number of the ligand, i.e. m1 for the first ligand, m2 for the second, etc. • Note that the file gold_soln_structure_m1_1.mol2 is not the best GOLD prediction, it is just the solution found in the first docking attempt. However, as GOLD proceeds, symbolic links are created: ranked_structure_m#_1.mol2 will always point to the current topranked solution, ranked_structure_m#_2.mol2 will point to the second-best solution, and so on. • Alternatively, you can specify that all saved docking solutions for all ligands are to be concatenated and written to a single file (see Specifying Ligand Solution File Formats and Directories, page 139). • Output files for the docked ligand(s) may also contain additional information such as the scoring function terms and the rotated protein hydrogen atom positions specific to that solution. This information can be written to SD file tags; for MOL2 files, these tags are written to comment blocks. It is possible to control the information written to solution files (see Controlling the Information Written to Ligand Solution Files, page 140). A description of the various other tags available can be found in Appendix C: Additional Tags in Output Files (see page 238). • Solution file title strings take the form <file_basename>|<p>|[cov<r>|]dock<q> GOLD User Guide 147 where • <file_basename> is the base name of the ligand input file • <p> is the molecule number in the file • <q> is the number of the docking • <r> is the covalent attachment atom. This part is only printed for covalent dockings. • For example (mol2 file): ligand|mol2|1|dock4 where the ligand filename is ligand.mol2, the structure is number 1 in the molecule input file, and the solution is from the fourth docking (dock4). The format for the output of the equivalent sd input file would be the following: ligand|sd|1|dock4 • To revert to the historic output i.e. to output only the structure name e.g. N-phosphonacetyl-L-aspartate the line SET_UNIQUE_SOLN_TITLES = 1 in the gold.params file should be changed to read SET_UNIQUE_SOLN_TITLES = 0. 15.1.3 File Containing the Protein Binding-Site Geometry • During docking, GOLD will optimise hydrogen-bond geometries by rotating groups such as serine OH and lysine NH3. It is also possible to allow specific protein side-chains to be treated as flexible during docking (see Side Chain Flexibility, page 34). This means that the coordinates of certain protein atoms such as these will change. • Protein atom positions that are generated during docking will usually be different for each docked ligand pose and are therefore written to the individual ligand solution files. This information can be written to SD file tags; for MOL2 files, these tags are written to comment blocks (see Controlling the Information Written to Ligand Solution Files, page 140). • Structure files containing the optimised protein binding site geometry can be written out from the Hermes visualiser. 148 GOLD User Guide 15.1.4 File Containing Ranked Fitness Scores for an Individual Ligand • A file called <ligand_file_name>_m#.rnk is written for each ligand (m# refers to the position of the ligand in the input file - remember that a given ligand input file may contain more than one ligand). This file contains a summary of the fitness scores for all the docking attempts on that ligand. The docking attempts are listed in decreasing order of fitness score, so the best solution is placed first. • The file gives total fitness scores and a breakdown of the fitness into its constituent energy terms. • The example file below corresponds to the fifth ligand in the input file ligand_file.mol2 and is therefore called ligand_file_m5.rnk. The solution Mol No 8 corresponds to the file gold_soln_ligand_file_m5_8.mol2, which is symbolically linked to ranked_ligand_file_m5_2.mol2, since it is the second best of the docking attempts for this molecule: • If you do not wish to save ligand rank files, click on Output Options from the list of Global Options given on the left of the GOLD Setup window, select the File Format Options tab, then disable the Save ligand rank (.rnk) files check-box. 15.1.5 File Containing Ranked Fitness Scores for a Set of Ligands • A file called bestranking.lst is written for batch jobs on multiple ligands. This gives a continuous summary of the best solution that has been obtained for each completed ligand. • To specify an alternative filename, click on Output Options from the list of Global Options given on the left of the GOLD Setup window, then select the File Format Options tab. Enable to Use alternative bestranking.lst filename check box and either enter the new path and filename, or click on the ... button and use the file selection window to choose the file. • The file gives total fitness scores and a breakdown of the fitness into its constituent energy terms. The example file below was generated from a ligand input file containing 5 ligands. The GOLD User Guide 149 listed file names correspond to the names of the files containing the best solution found for each ligand, e.g. gold_soln_ligs_m1_3.mol2 contains the best answer found for the first ligand in the input file. 15.1.6 Rescore Solution File • A file containing the docked ligand solution(s) after rescoring can be written. You can control whether or not this file is written (see Rescore output files, page 138). • If specified, solutions will be written with the default filename rescore.mol2. To specify an alternative filename (for both the rescore solution and log files), add the following line to the gold.conf file: concatenated_output = <filename.mol2> For example, if concatenated_output = Myfile.mol2 the rescore mol2 file will be named Myfile.mol2. • Solution files will contain the new scoring function terms and the positions of rotatable protein hydrogen atoms generated during rescoring (see Rescore settings, page 137). • A full description of the additional tags written to solution output files is available in Appendix C: Additional Tags in Output Files (see page 238). 15.1.7 Rescore Log File • The rescore log file rescore.log summarises the outcome of the rescoring run. To specify an alternative filename (for both the rescore solution and log files), add the following line to the gold.conf file: concatenated_output = <filename.mol2> For example, if concatenated_output = Myfile.mol2 the log file will be named Myfile.rescore.log. • For each rescored ligand a total fitness score and the component scoring terms are listed. • Status gives an indication of whether or not there were any errors during the rescoring run. 150 GOLD User Guide • Simplex indicates whether or not a locally optimised ligand pose was used for the rescoring. “1” indicates that the minimised pose was used, “0” indicates that the minimised pose was not used and “-” indicates that simplexing was not switched on (see Setting Up a Rescoring Run, page 135). Note: When Perform local optimisation (simplexing) is switched on the minimised conformation will only be used for the rescoring if this results in an improvement to the fitness score. • When a minimised ligand pose is used for the rescoring an RMSd measure is given of the final minimised orientation with respect to the input ligand conformation. • The example file below was generated by rescoring the best solution found (m2) for the second ligand in the solution file results.mol2: 15.1.8 Protein Log File • The protein log file gold_protein.log details the parameterisation of the protein and the determination of the binding site. • The file is line buffered, so you can see how the algorithm is progressing even when GOLD is run in the background. 15.1.9 Ligand Log File • The progress of each genetic algorithm run is listed in the ligand log file gold_<ligand_file_name>_m#.log. Here, m# is an index to the number of the ligand in the input file, e.g. m3 indicates that the log file refers to the third ligand in the input ligand file (remember that an input file may contain more than one ligand). • The log files are line buffered, so you can see how the algorithm is progressing even when GOLD is run in the background. • The parallel version of GOLD creates several temporary log files for each ligand, named gold_soln_<ligand_file_name>_m#_<N>.log where <N> is a docking-run number. Once all the docking runs for the ligand have been completed, these files are concatenated together into the single log file gold_soln_<ligand_file_name>_m#.log. • The ligand log file contains information on: • The progress of each docking run (see Information on the Progress of Docking Runs, page 153). • A comparison of the various docking solutions found (see Comparison of Docking Solutions, page 153). • Clustering of ligand poses, for identification of solutions with different binding modes (see GOLD User Guide 151 Identification of Different Binding Modes (Clustering of Ligand Poses), page 154). • If you do not wish to save ligand rank files, click on Output Options from the list of Global Options given on the left of the GOLD Setup window, select the File Format Options tab, then disable the Save ligand log files check-box. 15.1.10File Containing Error Messages • The file gold.err lists any errors found by the program. These are generally fatal and cause the program to stop. It is a good idea to check gold.err if something goes wrong. • Errors and warnings generated by the atom-type checker are also written to gold.err. If you are unsure about your atom typing you should therefore check this file. For example: • In the parallel version, warning messages are logged in individual error files - one for each process. They are not sent back to the central parallel scheduling process. • gold.err is line buffered so errors are logged immediately. 15.1.11Process File • The file gold.pid records the user, host and process number of the GOLD job. It is deleted when GOLD exits. Its purpose is to stop the user running two GOLD jobs in the same directory. • If the machine goes down, or GOLD crashes or is killed with signal 9, you will need to remove gold.pid before you can run another GOLD job in the same directory. 15.1.12Seed Log File • A file called gold.seed_log is written to the output directory for each docking run. • GOLD uses a random number generator for some operations e.g. choosing which genetic operator to use next or when to create the starting population of random individuals. The random number generator is normally initialised with random seeds; it is these seeds that are printed to the gold.seed_log file at the end of each docking run. • The seed file can be used to reproduce identical docking results for repeat runs (as long as all other settings are equal). To make use of the seed file in this way: • Copy the required gold.seed_log from the original output directory to an alternative location, e.g. the new docking directory. • Specify the location of the seed file in the gold.params file, i.e. open the gold.params via the Edit Parameters button in the GOLD interface. Find the lines that read 152 GOLD User Guide # Read seeds from SEED_FILE if not equal to none. Used for debugging. SEED_FILE = none • Change the SEED_FILE = none setting to include the full path to your seed file, e.g. SEED_FILE = /home/username/new_docking_dir/gold.seed_log • Then run the docking using the modified gold.params file. 15.2Information on the Progress of Docking Runs • As each docking run is performed on a ligand, the progress of the genetic algorithm is recorded in the ligand log file (see Ligand Log File, page 151). • The best (most fit) individual at any time is listed. The total fitness and its component terms are also displayed. • For GoldScore, the internal vdw energy includes the ligand torsional energy. The external vdw energy is normally scaled by a factor of 1.375 and summed with the other components to give the total fitness (this is to encourage hydrophobic contact between the protein and ligand). • During a docking run, the fitness score may appear to get worse as the docking proceeds. This is due to the fact that the effects of poor H-bond geometry and close nonbonded contacts are artificially down-weighted at early stages of the docking (annealing). Only the final fitness score (i.e. from the completed docking) has any meaning. • The message Reordering... refers to a re-ranking of the GA populations caused by the annealing process. • At the end of the GA run, the solution is output and summarised. 15.3 Comparison of Docking Solutions • Following the completion of all docking runs on a ligand, the results from the different runs are compared in the ligand log file. • The file will include a matrix of rms deviations between the various docked ligand positions. The rms deviation algorithm takes account of symmetry effects, using a graph isomorphism algorithm. For example: Final Ranking 4 2 5 1 3 RMSD Matrix of RANKED solutions 1: 2: 3: GOLD User Guide 2 3 4 5 4.8 4.7 5.1 10.1 4.0 3.1 10.9 4.1 10.4 153 Final Ranking 4 2 5 1 3 4: 11.0 • In this case, solution number 4 had the largest fitness score (this solution will be in gold_soln_ligand_m#_4.mol2, which will be symbolically linked to ranked_ligand_m#_1.mol2), while solution number 3 had the worst fitness. • The numbers in the matrix of rms deviations refer to the rankings, not the run numbers (e.g. row 1 of the above matrix refers to the solution with the best fitness score, contained in ranked_ligand_m#_1.mol2). • Finally, the rms deviations are used as input to a hierarchical cluster analysis, using the complete linkage algorithm. Each line shows one iteration of the clustering algorithm, the distance between the clusters that were merged at that step, and the contents of the current set of clusters. • Clusters are separated by the ’|’ symbol and rankings are used rather than run numbers. For example, the solutions ranked_ligand_m#_2.mol2 and ranked_ligand_m#_4.mol2 were merged in the first step of the following cluster analysis: Clustering using complete linkage. Structure ids are RANKING Dist Clusters... 3.14 | 4 2 4.06 | 4 2 5.07 | 4 10.95 | 4 | 3 | 5 | 1 3 | 1 | 5 | 2 3 1 | 5 | 2 3 1 5 | | 15.4Identification of Different Binding Modes (Clustering of Ligand Poses) • GOLD clusters docked solutions according to how similar the poses are in terms of their RMSd (see Comparison of Docking Solutions, page 153). A link can be generated to the top ranked solution from each distinct cluster. This can be useful in identifying different ligand binding modes. Considering solutions from different clusters is often more relevant than taking the top n ranked poses since these will often be very similar (i.e. all from the same cluster of solutions). • Click on Output Options from the list of Global Options given on the left of the GOLD Setup window and enable the Create links for different binding modes (based on RMSD clustering) check box, and specify the Distance between clusters (this determines how similar the poses are 154 GOLD User Guide in each cluster of solutions). By default the clustering distance is 0.75 Å: • A clustering report is given at the end of the ligand log file (see Ligand Log File, page 151). The clusters themselves and the individual solutions within each cluster are in ranked order (i.e. the first member of the first cluster is always the top-ranked solution). For example, output from a run of 10 GA dockings may look like: • In the above example, at a clustering distance of 0.75 Å, there are four different clusters of solutions: 0.90 | 1 2 3 5 | 4 7 | 6 9 10 | 8 | files (d= 0.75 Å) Clusters are separated by the ’|’ symbol and rankings are used rather than run numbers (see Files Containing the Docked Ligand(s), page 147). • The first cluster contains four solutions ranked numbers 1, 2, 3 and 5, the bestranking structure in this cluster is ranked_structure_m#_1.mol2 which corresponds to the docked solution gold_soln_ligand_m1_8.mol2. Likewise, the second cluster contains two solutions ranked numbers 4 and 7, the bestranking structure in this cluster is GOLD User Guide 155 ranked_structure_m#_4.mol2 which corresponds to the docked solution gold_soln_ligand_m1_10.mol2, and so on for the fourth and fifth clusters. • Symbolic links will be generated in the output directory which will link to the top-ranked solution in each cluster: Cluster 1: bestranking structure is gold_soln_ligand_m1_8.mol Cluster 2 : bestranking structure is gold_soln_ligand_m1_10.mol2 Cluster 3 : bestranking structure is gold_soln_ligand_m1_4.mol2 Cluster 4 : bestranking structure is gold_soln_ligand_m1_9.mol2 • GOLD can be set up to generate diverse solutions, based on cluster size and RMSD (see Generating Diverse Solutions, page 105). 15.5 Viewing Docked Solutions in Hermes • Once the job is complete, to visualise docked solutions in the Hermes visualiser, click on the View Solutions button in the Run GOLD window. • Within Hermes, the docking poses from GOLD docking jobs can be navigated and visualised alongside the associated protein model using the Docking Solutions pane of the Molecule Explorer situated to the left of the Visualiser window. Numerical data associated with the solutions, such as the fitness score and its components, are tabulated as columns within the Docking Solutions pane. The data can be sorted and/or colour coded according to selected data columns. Poses can be grouped. Poses may also be manually selected and can then be reexported with a tailorable number of fields of associated data. • It is also possible in Hermes to further describe the docking poses by calculating additional descriptors for them. These descriptors can be added to a GoldMine DB and used in further analysis. The descriptors quantify, amongst other things: • the hydrogen-bonding interactions that occur between protein and docked ligand. • H-bond interactions that do not occur, e.g. a protein H-bond donor that is prevented from forming a hydrogen bond by a ligand hydrophobic group. • other close contacts between protein and ligand. • the buried surface area of the ligand, or of certain types of atoms in the ligand (e.g. hydrophobic atoms). • whether particular regions of the binding site are occupied by the ligand. • simple properties such as the number of H-bonding ligand atoms, molecular weight of ligand, number of rotatable bonds. • For further information on Visualising and Refining Selections of Docking Poses, and on Defining and Calculating Descriptors refer to the Hermes user guide. 156 GOLD User Guide 15.6 Analysing Results in GoldMine 15.6.1 Overview of GoldMine • GoldMine is a tool for the analysis and post-processing of docking results. • It is possible to create within GoldMine a database of docking data which may comprise one or more sets of docking data. A ‘GoldMine Database’ (or GoldMine DB) is the term we will use to describe such a database. • GoldMine can be used to combine and analyse several docking runs. For instance docking runs against different protein models may be combined within a GoldMine DB and analysed for selectivity and specificity. Docking runs carried out against one protein model but scored using different scoring functions may also be combined within a GoldMine DB. • Each set of docking results saved within a GoldMine DB will contain one or multiple binding poses for each ligand and the corresponding protein configurations. They will also contain any numerical or text information that is present as tagged fields in the .sdf or .mol2 files used to create the GoldMine DB. Such data may include the individual terms that make up the scoring function used in the docking (see Controlling the Information Written to Ligand Solution Files, page 140). Each individual quantity for which a set of data is saved, is termed a Descriptor. • Additional descriptors calculated using Hermes can also be added to a GoldMine DB and used in further analysis (see Viewing Docked Solutions in Hermes, page 156). • Numerical and text data for descriptors associated with individual poses can be viewed and sorted within a spreadsheet. Histograms and scatter plots can be generated for any numeric descriptors. • GoldMine allows you to filter your results in a sophisticated manner. Ranges for a number of descriptors can be set and the ranges combined in Boolean fashion to create sets of docking poses satisfying appropriate properties. • Statistical analysis and modelling can be carried out and new scoring functions derived. • Test Virtual Screening runs can be analysed using ROC curves. • For further information refer to the GoldMine user guide. 15.6.2 Sending Docking Results to GoldMine • Docking results can be sent to GoldMine and saved within a GoldMine database. • The docked poses are saved within GoldMine in a new, or existing dock set and the protein file used in the docking is the protein model associated with that dock set. • First it is necessary to create or load a valid GOLD configuration file. Since it will often be the case that you will be using a tried and tested docking protocol to redock selected ligands, reading in an existing file is probably the usual case. • Click on GOLDMine from the list of Global Options given on the left of the GOLD Setup GOLD User Guide 157 window. Within this pane it is possible to set GOLD up so that it receives and/or sends docking poses from GoldMine. • Enable the Send ligands to GoldMine check box. An appropriate machine Hostname and a Port number should be provided. Then, select either SQlite or PostgreSQL as the database format. SQlite is the default option. Contact your database administrator for information on connecting to a PostgreSQL database. • When using SQlite, the GoldMine database filename to which the docked results will be saved should be specified. Either enter the path and filename of the database file, or click on the Browse button and use the file selection window to choose the file. It will also be necessary to specify the name of the new dock set to which the poses need to be sent. Alternatively, results can be appended to an existing dock set. Click on the Connect button and then select the required set from the Dock Set drop down list. • Before running GOLD you must instruct GoldMine to receive docking results from the port specified. To do this, select GOLD from the top-level menu within the Hermes visualiser, then click on Receive Ligands from GOLD from the resulting drop down menu. Alternatively, this can be configured within the GoldMine Controller, refer to the GoldMine user guide for further 158 GOLD User Guide information. • Click on Run GOLD. The docking job will proceed and when complete, the data should be saved in the appropriate GoldMine. • It is possible to have a GoldMine open whilst running the docking job. It is also possible to take a selection of ligand poses from a GoldMine analysis and submit them to GOLD for docking (see Receiving Ligands From GoldMine, page 53). GOLD User Guide 159 16. Saving and Reusing Docking Settings 16.1 Saving and Re-using Program Settings in Configuration Files • The configuration file is a text file which specifies the GOLD calculation that is to be run, including details of the ligand, the protein binding site, the fitness-function parameter file to be used, the torsion distribution file to be used, and the genetic algorithm parameters. Although the file can be generated with a standard text editor, the easiest way to create it is to use the GOLD front end. • Any settings that have been defined in the GOLD interface can be saved as a configuration file by selecting the Save button located next to the Conf file entry box at the top of the GOLD Setup window. Alternatively, you will be prompted to save the file if you start a GOLD job from the interface by selecting either Run GOLD, or Run GOLD in the background. • By default, the configuration file will be saved in the directory from which GOLD was opened and will be called gold.conf. Use the Conf file entry box at the top of the GOLD Setup window to change the file name and/or directory (any file name can be used). • Once a configuration file has been created, it can be re-used, either as a quick way of reading program settings into the GOLD front end or to run GOLD from the command line (see Running GOLD, page 143). • To load a previously created configuration file into GOLD interface, enter the file name into the Conf file entry box at the top of the GOLD Setup window. Alternatively, click on the Load button and use the file selection window to choose the file. The parameters read in from the configuration file will overwrite any parameters that have already been set in the GOLD front end. • If you have a valid configuration file (i.e. one that completely specifies a GOLD job), you can run GOLD from the command line by using a simple command available in $GOLD_DIR/bin. For example, if the configuration file is gold.conf, the command is: % gold_auto gold.conf & 16.2 Using Configuration File Templates • The configuration file is a text file which fully specifies the GOLD job that is to be run. • Once a configuration file has been created, it can be saved and re-used, either as a quick way of reading program settings into the GOLD front end or to run GOLD from the command line (see Saving and Re-using Program Settings in Configuration Files, page 160). • Configuration file templates can be used. These contain recommended setting for a number of different docking protocols. • Recent validation experiments carried out on the DUD sets of actives/decoys have suggested preferred virtual screening protocols for several protein target classes. These protocols show good early enrichment statistics but also have the best trade-off between speed and accuracy, as 160 GOLD User Guide far as can be ascertained. New protocols for nuclear hormone receptors, kinases, metalloproteases and folate containing enzymes have been created. The protocol for serine proteases has been changed to allow use of a faster scoring function for docking. • The validation experiments will be reported on the CCDC website and in the open literature. Although these protocols are currently believed to be optimum they should be used with care as the datasets used to derive these protocols are small. Other protocols may work better for individual target proteins. It is recommended that ChemPLP be used for target classes not mentioned here. • To load a template configuration file click on Templates from the list of Global Options given on the left of the GOLD Setup window. Select the template you wish to use from the list of available templates, then click on the Load Template button. • Note that configuration file templates are independent of the protein and ligand input files, so these will need to be specified in the usual way before running the docking. 16.3 Customising Scoring Function Parameters • Empirical parameters used in the fitness function (hydrogen bond energies, atom radii and polarisabilities, torsion potentials, hydrogen bond directionalities, etc.) are taken from the GOLD parameter file. These parameters are independent of the scoring function being used. Parameters can be customised by copying the file, editing the copy, and instructing GOLD to use the edited file (see Altering GOLD Parameters: the gold.params File, page 92). • A scoring function specific parameters file is also used, for GoldScore this is called goldscore.params. Parameters within this file can also be modified (see Altering GoldScore Fitness-Function Parameters; the GoldScore Parameters File, page 75). • The ChemScore fitness-function parameters are stored in the chemscore.params file, which can also be customised (see Altering ChemScore Fitness-Function Parameters; the ChemScore File, page 85). • The Astex Statistical Potential (ASP) fitness-function parameters are stored in the asp.params file, this can also be customised (see Altering ASP Fitness-Function Parameters: the asp.params File, page 90). 16.4 Customising the Torsion Angle Distribution File • It is possible to customise torsion distribution information by copying one of the standard torsion distribution files, editing it, and instructing GOLD to use the edited file (see Editing Torsion Angle Distribution Files, page 100). 17. Context-Dependent Help • Context-dependent help is available in the GOLD Setup window by clicking the Help button located at the bottom-left corner of the window. Clicking this button will result in the GOLD user guide being opened on the page appropriate to the task being performed. i.e. the help will GOLD User Guide 161 reflect the Configuration option currently being set. • Balloon help is also available by clicking on the ? icon located at the bottom-left corner of the GOLD Setup window then clicking on an option within the interface. For example, selecting ? and clicking on the protein selection page brings up the following help window: • Balloon help can also be viewed by right-clicking at certain locations in the interface and selecting What’s this? from the resulting menu. 162 GOLD User Guide 18. References GOLD references: • Molecular Recognition of Receptor Sites Using a Genetic Algorithm with a Description of Desolvation G. Jones, P. Willett and R. C. Glen J. Mol. Biol., 245, 43-53, 1995. • Development and Validation of a Genetic Algorithm for Flexible Docking G. Jones, P. Willett, R. C. Glen, A. R. Leach and R. Taylor, J. Mol. Biol., 267, 727-748, 1997. • Protein-Ligand Docking and Virtual Screening with GOLD J. C. Cole, J. W. M. Nissink, R. Taylor in Virtual Screening in Drug Discovery (Eds. B. Shoichet, J. Alvarez), Taylor & Francis CRC Press, Boca Raton, Florida, USA (2005). • Modeling Water Molecules in Protein-Ligand Docking Using GOLD Marcel L. Verdonk, Gianni Chessari, Jason C. Cole, Michael J. Hartshorn, Christopher W. Murray, J. Willem M. Nissink, Richard D. Taylor, and Robin Taylor, J. Med. Chem., 48, 6504-6515, 2005. • Using Buriedness to Improve Discrimination Between Actives and Inactives in Docking. N. M. O'Boyle, S. C. Brewerton and R. Taylor J. Chem. Inf. Model., 48, 1269-1278, 2008 [DOI: 10.1021/ci8000452] • The use of protein-ligand interaction fingerproints in docking S. C. Brewerton Curr. Opin. Drug Discov. Devel. 11(3):356-64 (2008) • Empirical Scoring Functions for Advanced Protein-Ligand Docking with PLANTS O. Korb, T. Stützle and T. E. Exner Journal of Chemical Information and Modeling, 49(1), 84-96 (2009) (http://pubs.acs.org/doi/ abs/10.1021/ci800298z). • References dealing with GOLD validation: • A New Test Set for Validating Predictions of Protein-Ligand Interactions J. W. M. Nissink, C. Murray, M. Hartshorn, M. L. Verdonk, J. C. Cole and R. Taylor Proteins, 49(4), 457-471, 2002. • Improved Protein-Ligand Docking using GOLD M. L. Verdonk, J. C. Cole, M. J. Hartshorn, C. W. Murray, R. D. Taylor Proteins, 52, 609-623, 2003. • Diverse, High-Quality Test Set for the Validation of Protein-Ligand Docking Performance M. J. Hartshorn, M. L. Verdonk, G. Chessari, S. C. Brewerton, W. T. M. Mooij, P. N. Mortenson, C. W. Murray, GOLD User Guide 163 J. Med. Chem., 50, 726-741, 2007. • Pose prediction and virtual screening performance of GOLD scoring functions in a standardised test J.W.Liebeschuetz, J.C. Cole, O. Korb. J. Comput. Aided Mol. Des, 50, 737-48, 2012 [DOI:10.1007/s10822-012-9551-4]. General GOLD/docking/virtual screening papers that may be of interest: • Life-science Applications of the Cambridge Structural Database R.Taylor Acta Cryst., D58, 879-888, 2002. • Virtual Screening Using Protein-Ligand Docking: Avoiding Artificial Enrichment Marcel L. Verdonk, Valerio Berdini, Michael J. Hartshorn, Wijnand T. M. Mooij, Christopher W. Murray, Richard D. Taylor, and Paul Watson, J. Chem. Inf. Comput. Sci., 44, 793-806, 2004. • Comparing protein-ligand docking programs is difficult Jason C. Cole, Christopher W. Murray, J. Willem M. Nissink, Richard D. Taylor, Robin Taylor Proteins, 60, 325-332, 2005. • Evaluating docking programs: keeping the playing field level J.W. Liebeschuetz, JCAMD,Vol 22 No 3-4, (2008), 229-238 • Testing Assumptions and Hypotheses for Rescoring Success in Protein-Ligand Docking. N. M. O’Boyle, J.W. Liebeschuetz, J. C. Cole J. Chem. Inf. Model., 49, 1871–1878, 2009 [DOI:10.1021/ci900164f] • Docking performance of fragments and drug-like compounds M. Verdonk, I. Giangreco, R. Hall, O. Korb, P. Mortensen, C. Murray, J. Med. Chem,., 54, 5422–5431, 2011 [DOI: 10.1021/jm200558u] 164 GOLD User Guide 19. Acknowledgements • GOLD was written by Gareth Jones (University of Sheffield, UK) in a DTI LINK collaboration with GlaxoWellcome and the Cambridge Crystallographic Data Centre (CCDC). • Funding was provided by the Biotechnology and Biological Sciences Research Council, the Department of Trade and Industry, the Medical Research Council, GlaxoWellcome Ltd and CCDC. • Peter Willett (University of Sheffield), Robert Glen (Wellcome), Andrew Leach (GlaxoWellcome) and Jacques Barbanton (Lipha Pharmaceuticals) are also thanked for significant contributions to the development of GOLD. • Implementation of the ChemScore, Heme, Kinase and Astex Statistical Potential scoring functions and the Diverse Solutions code within GOLD is copyright 2001-2007 Astex Therapeutics Ltd. We also thank Astex Technology Ltd for their contribution to the water modelling code. • One of the torsion libraries supplied with GOLD was developed by Gerhard Klebe and Thomas Mietzner (BASF). GOLD User Guide 165 20. Appendix A: Tutorials • In order to familiarise yourself with GOLD it is recommended that you work through the tutorial examples provided. Tutorial 1 will go through the process of setting up and running an example docking using the Docking Wizard in some detail, subsequent tutorials will be more concise but will introduce other, more advanced, aspects of the program. • Tutorial 1 illustrates how to set-up protein and ligand files simply using the Hermes visualiser. For more comprehensive functionality for setting up protein and ligand files ((see Essential Steps, page 10) and (see Essential Steps, page 50)) we recommend you use a molecular modelling program. Full details of the software requirements needed in order to use GOLD are given elsewhere (see Introduction, page 4). • Please note: due to the non-deterministic nature of GOLD results may vary from those described in the tutorials. 20.1 Tutorial 1: A Step-By-Step Guide to Using GOLD 20.1.1 Introduction • First, copy the files in <install_dir>/GOLD Suite/GOLD/examples/tutorial1 to a directory to which you have write permissions. • GOLD features a Wizard for docking setup and an Advanced interface for users who are more familiar with using GOLD. • The Wizard guides the user through the key steps involved in setting up protein and ligand files, as well as the components that are key to running a successful docking. • GOLD will only produce reliable results if the protein and ligand input files are set up correctly. It is therefore essential that a number of key steps are followed when preparing any input structure for use in GOLD ((see Essential Steps, page 10) and (see Essential Steps, page 50)). • This tutorial aims to provide a step-by-step guide to making the most of the GOLD wizard. To illustrate this, the procedure for setting-up a protein and ligand for use with GOLD, then the subsequent docking will be explained and additional information will be provided on related issues. • In this example GOLD will be used to determine the binding mode of N-phosphonacetyl-Laspartate with the aspartate carbamoyltransferase, PDB entry code 1acm. 20.1.2 Using the GOLD Wizard to Prepare the Protein File • Open Hermes. Open the GOLD setup wizard by clicking on the main menu option GOLD, then by picking Wizard from the resultant pull-down menu. The steps required to setup files for docking are listed down the left hand side. 166 GOLD User Guide 20.1.3 Selecting a Protein • In the Select proteins to use window, read in the protein file, 1ACM.pdb, by hitting the Load Protein button, navigating to the folder to where you copied the tutorial1 files, select the file and then clicking on Open. The protein file will be loaded into Hermes’ 3D view. You will notice that the protein C atoms are coloured grey (i.e. coloured by atom type) while the C atoms of any ligands are coloured green. • Also in the Hermes 3D view you will notice the Molecule Explorer, off to the left hand side of the Hermes interface. Click on the “+” adjacent to 1ACM and underneath All Entries. The protein has been broken down into its constituent parts, specifically Chains, Ligands, Metals and Waters. Each of these has a corresponding “+” adjacent to it. Each successive time the “+” is clicked on, the component it corresponds to is broken down further. In this way it is possible e.g. to identify specific protein residues or atoms in a ligand. Display styles, colours and labels and selection options are available by right-clicking. • You will notice that the protein consists of 4 chains: A, B, C and D. The chain we will be focusing on is chain A. • In the GOLD Wizard click on the Next button to proceed to the Protein setup step. Click on the GOLD User Guide 167 1ACM tab adjacent to the Global Options tab. From under the 1ACM tab we can make some essential modifications to the protein, specifically we can: • Add hydrogens (see Adding Hydrogen Atoms, page 168): all hydrogen atoms must be present in the protein input file (see Protonation and Tautomeric States, page 11). The hydrogen atoms are placed on the protein in order to ensure that ionisation and tautomeric states are defined unambiguously. Advanced options within GOLD allow for switching between different tautomeric states during docking. • Delete Waters (see Deleting Waters, page 168): water molecules often play key roles in protein-ligand recognition. Water molecules can either form mediating hydrogen bonds between protein and ligand, or be displaced by the ligand on binding. Water molecules within the active site can be retained and allowed to toggle (i.e. switch on and off during docking) and rotate to optimise their H-bonding positions. Those outside of the binding site can be removed from the protein altogether. • Delete ligands (see Extracting and Deleting Ligands, page 168): the 1ACM.pdb protein is the raw PDB file which is the original protein-ligand complex. For GOLD to effectively dock a ligand back into the active site, the co-crystallised ligand must first be removed. 20.1.4 Adding Hydrogen Atoms • From within the 1ACM tab, add hydrogens to the protein by selecting the Add Hydrogens button from the first Protonation & Tautomers option. Note that this may take a little time depending on how many other processes are running on your computer. • Once the H atoms have been added a pop-up window will inform you that 7192 H atoms were added. Click OK to close the pop-up window. 20.1.5 Deleting Waters • Still in the 1ACM window, hit the Waters option underneath Protonation & Tautomers. From within this dialogue it is possible to specify water molecules that mediate protein-ligand interactions (i.e. active waters), and to delete those that are not required (see Water Molecules, page 15). There are not many water molecules co-crystallised with the protein and they are not needed for the purposes of this tutorial thus can be deleted. • Hit the Delete RemainingWaters button. When prompted Are you sure you want to delete all the waters?, hit OK. You will be informed that 15 waters have been deleted. 20.1.6 Extracting and Deleting Ligands • Before extracting the ligand, it is important to ensure the protonation states are correct. Hermes makes a best guess at protonation states, however as PDB files don’t contain atom type information it is not unexpected that Hermes occasionally gets it wrong. • Minimise the GOLD Setup window and return to the 3D view. The most convenient way of 168 GOLD User Guide editing the ligand structure is to display only the ligand. We are going to be docking into chain A, so hide all Chains, Ligands and Metals apart from Ligand A: expand the Ligands tree, then deactivate all tickboxes apart from that adjacent to A: • Certain groups can be represented in more than one way (i.e. have more than one canonical form), such as nitro, carboxylate and amidinium. In such cases, there is usually a right and a wrong representation for use in GOLD. The conventions used for some common difficult groups and further help on setting up the ligand is provided (see Setting Up Ligands, page 50). • The phosphate and carboxylate groups are unprotonated and in each case the bond to the O atom has been assigned as aromatic (has a red circle through it). In this case these groups have been correctly handled by Hermes and so no editing is required. Had modifications been required, editing functionality is available under Edit, Edit Structure. GOLD User Guide 169 • Re-display all the Chains, Ligands and Metals tickboxes so that the 3D view displays the entire protein structure. • In the Protein setup window, click on the Delete Ligands option beneath the Waters option. This window enables us to extract and delete a ligand from the protein in order to set it up for docking. As we are going to be docking into chain A we need to first remove the co-crystallised ligand from its active site: activate the tickbox adjacent to A, underneath the Extract and Reload header: • Now hit the Extract button. When prompted save the ligand file e.g. as ligand_1acm.mol2 in the folder to which you copied the tutorial1 files. • Return to Hermes’ 3D view: you will notice the ligand file has been re-loaded separately as A:1ACM underneath the protein entry in the Molecule Explorer. • Return to the GOLD Wizard and click on the Global Options tab. • Hit Next to proceed to the Define the binding site step. 170 GOLD User Guide 20.1.7 Defining the Protein Binding Site • It is necessary to specify the approximate centre and extent of the protein binding site, this can be done in a number of ways from within the Define the binding site window, including: • from a protein atom (see Defining a Binding Site from an Atom, page 20) • from a point (see Defining a Binding Site from a Point, page 21) • from a reference ligand (see Defining a Binding Site from a Reference Ligand, page 23) • from a file containing a list of atoms or residues (see Defining a Binding Site from a List of Atoms or Residues, page 24) • For this example we are going to use a set of coordinates to define the binding site. The coordinates can either be input as x,y,z values, or the centroid of a user-selected group of atoms can be used. We will use the former. • Activate the radio button that reads Point: select atoms to define a centroid or edit XYZ. The centre of the binding site in 1acm can be found at 42.409, 29.242, 16.869, so enter these coordinates into the corresponding x,y,z boxes. Click the View button in order to visualise those atoms included in the binding site definition. GOLD User Guide 171 • The approximate radius of the binding site must also be specified. By default the binding site radius is set to 10.0 Å, ensure that this is the case. This radius should be large enough to contain any possible binding mode of the N-phosphonacetyl-L-aspartate ligand. • A cavity detection algorithm, LIGSITE, is used to restrict the region of interest to concave, solvent-accessible surfaces. Ensure that cavity detection is enabled by activating the Detect Cavity - restrict atom selection to solvent-accessible surface tickbox. • Click Next to proceed to the Configuration templates dialogue. 20.1.8 Specifying a Configuration File Template • At this point you are given the option to load a configuration file template. Configuration templates can be used to load recommended settings for a number of different types of docking protocols (see Using Configuration File Templates, page 160). • In this example we will specify all docking settings manually. Click Next to proceed to the Select ligands step. 20.1.9 Specifying the Ligand File • As with the protein file, all hydrogen atoms must be present in the ligand input file (see Ligand Hydrogen Atoms, Ionisation States and Tautomeric States, page 50). We have already added H atoms to our ligand, extracted it from the protein binding site and saved it. • From within the Select Ligands window it is possible to: • Add single ligands • Select a complete directory of ligand files. • Specify a single file containing several ligands (i.e. a multi-MOL2 or SD file). • Specify the ligand you saved earlier by hitting the Add button at the bottom of the GOLD Wizard. Navigate to folder to which you copied the tutorial1 files, select ligand_1acm.mol2 then click Open. The ligand_1acm.mol2 will be listed under Ligand File. • The number of dockings to be performed on each ligand is specified under GA runs: by default this value is 10. The value can be edited by clicking in this window and re-entering another value, however 10 GA runs are sufficient for this docking. • Click Next to proceed to the Choose a fitness function window. 20.1.10Selecting a Fitness Function • During a docking run the solutions found by GOLD are scored according to a fitness function (see Fitness Functions, page 68). • GOLD offers a choice of fitness functions, Piecewise Linear Potential (PLP) (see Piecewise Linear Potential (PLP), page 68), GoldScore (see GoldScore, page 74), ChemScore (see ChemScore, page 75), Astex Statistical Potential (ASP) (see Astex Statistical Potential (ASP), page 86), and User Defined Score (see User Defined Scoring Function, page 91). 172 GOLD User Guide • Ensure that the default CHEMPLP scoring function is selected. • A number of additional options are available by clicking on the More >> button. • Allow early termination: by default the Allow early termination check box should be switched on. Click on the Early Termination Options button to inspect the settings. This will instruct GOLD to terminate the docking if, at any point, the best three solutions found are all within 1.5 Å rmsd of each other. In this case, it is probable that the answer is correct and further docking runs will not be required. Keep the settings as they are and hit Close. • For the purposes of this tutorial all other settings should be left at their default values. • Hit the Next button to proceed to the GA Search Options window. 20.1.11Selecting Docking Speed • GOLD optimises the fitness score using a genetic algorithm (GA) (see Genetic Algorithm Overview, page 128). A number of parameters control the precise operation of the genetic algorithm. The settings are encapsulated into three speeds: • Slow (most accurate): this equates to 100,000 operations • Medium: 50,000 operations • Fast (least accurate): 10,000 operations • Further options are available by clicking on the More button: • Automatic: enable this to make GOLD automatically calculate an optimal number of operations for a given ligand, thereby making the most efficient use of search time, e.g. small ligands containing only one or two rotatable bonds will generally require fewer genetic operations than larger highly flexible ligands (see Using Automatic (Ligand-Dependent) Genetic Algorithm Parameter Settings, page 130). • Preset: choose from four preset options with varying numbers of operations. The larger the number of operations, the slower thus more accurate the docking (see Using Preset Genetic Algorithm Parameter Settings, page 132). • User defined: this option allows you to tailor your GA settings. Care should be taken when altering these parameter settings (see Using User -Defined Genetic Algorithm Parameter Settings, page 133) and you are recommended to use one of the presets offered. • Enable automatic GA settings by clicking on the Automatic radio button and ensure the Search efficiency is set to 100%. GOLD User Guide 173 • The criteria used by GOLD to determine the optimal GA parameter settings for a given ligand include: the number of rotatable bonds in the ligand, ligand flexibility, i.e. number of flexible ring corners, flippable nitrogens, etc., the volume of the protein binding site, and the number of water molecules considered during docking. Details of the exact settings used will be given in the ligand log file gold_ligand_m1.log (see Ligand Log File, page 151). • Hit Next to proceed to the Finish window. 20.1.12Specifying a Directory for GOLD Output • We are now finished our docking setup and re presented with a Run GOLD button with which we can start the docking. If we were to click on Run GOLD now, the output would be written to the directory the 1ACM.pdb file is stored in. It is generally preferable to write output to a separate directory. This option is available as part of the advanced options, so rather that clicking on the Run GOLD button, click on the Advanced button on the bottom right of the interface.This takes us to the standard GOLD interface. • Select Output Options under Global Options. This page is separated into three tabbed views: File Format Options, Information in File, Selecting Solutions, all of which allow control of which files are output and what information is written to the files. 174 GOLD User Guide • In the File Format Options window, ensure that the Same as input radio button is activated, adjacent to Output file format. This means the docking solutions will be written out in the same format as was used for input (we saved our ligand out in MOL2 format, thus this is the format our ligands will be written out in). • Click on the ... button next to Output directory and specify a directory, to which you have write permission, this is where the GOLD output files will be written. • Ensure that the Save rnk files, Save ligand log files and Save initialised ligand files check boxes are switched on, this will instruct GOLD to retain output files listing fitness-function rankings and ligand log files. The content of these files are discussed later (see Analysis of Output, page 178). • Click on the Information in File tab. • It is possible to write additional information to docked solution files. This information is written to SD file tags; for MOL2 files, these tags are written to comment blocks. This information is particularly important for post-processing docking results with GoldMine. For the purpose of this tutorial the Information in File settings can be left at their default settings. GOLD User Guide 175 • Now click on the Selecting Solutions tab. • GOLD can produce a large amount of output. However, it is possible to cut this down by applying output filter options. These options can be used to: • Specify that all docking solutions are saved • Retain only the n best docking solutions • Save the top-ranked solution for the best m ligands only • Filter out all solutions with fitness scores lower than a specified value • By default the Keep all solutions option from the Selecting Docked Solutions panel in the Output preferences window will be selected. 20.1.13Starting the Docking Run • We are now finished setting up our docking, so click on the Run GOLD button at the bottom of the GOLD interface. • You will be prompted that The GOLD configuration has been updated and needs saving. Click OK to proceed. You will be presented with a Finish GOLD Configuration window containing three Save Files options: • GOLD conf file: if the gold.conf has changed in any way, or if there is currently no gold.conf for the docking (as is the case with this tutorial), you will be provided with the option of saving out a gold.conf file and/or modifying its name. • Protein(s): in this case we have started from a raw PDB file that was not correctly setup for use with GOLD. The modifications we have made (note we have been prompted that At least one protein has been edited) means it can now be used with GOLD, but only if the modifications we have made are saved out as a MOL2 file. 176 GOLD User Guide • Cavity atoms: this option will be greyed out. • Ensure the GOLD conf file and Protein tickboxes are activated and that the filenames are as you want them then hit Save to start the docking. 20.1.14Things to Consider While the Docking is Running • Protein and ligand initialisation: • Both the protein and ligand files are initialised before the docking commences. At this step GOLD deduces atom types from the information about element types and bond orders in the input structure files. It is therefore crucial that both the protein and ligand input files are prepared according to the guidelines provided (see Atom and Bond Type Overview, page 60). • If automatic atom typing is switched on GOLD will re-type any atoms or bonds it considers to be incorrect and will issue a warning concerning this in the gold.err file. However, if for any reason, GOLD is unable to deduce an atom or bond type, then the atom or bond in question will be replaced with a dummy atom type Du or an unknown bond type Un respectively. By default automatic atom typing is carried out on the ligand file but not the protein file, however this can be enabled under the Atom Typing Advanced option. • Protein flexibility: • By default, the torsion angles of Ser, Thr and Tyr hydroxyl groups will be allowed to rotate during docking in order to optimise their hydrogen-bonding to the ligand. Lysine NH3+ groups are similarly optimised. • GOLD can allow side chains to rotate within user-defined bounds during docking (see Side Chain Flexibility, page 34). • GOLD can dock into multiple conformations of the same protein (see Ensemble Docking, page 43). • Note that the final positions of any movable protein atoms that are generated during docking (these will usually be different for each docked ligand pose) can be saved to the docked solution file (see Controlling the Information Written to Ligand Solution Files, page 140). • Ligand flexibility: • Only the torsions around the ligand’s flexible bonds will be optimised during docking. Bond distances and valence angles must be optimised before using GOLD. • Torsion angle distributions, extracted from the Cambridge Structural Database (CSD), can be used to restrict the ligand conformational space sampled by the genetic algorithm. Using torsion angle distributions in this way may improve the chances of GOLD finding the correct answer by biasing the search towards ligand torsion-angle values that are commonly observed in crystal structures. It may also improve convergence and so make GOLD usable with faster settings (see Enabling Use of Torsion Angle Distributions, page 99). • The use of torsion angle distributions is enabled by default. The torsion distribution file gold.tordist is provided in <install_dir>/GOLD Suite/GOLD/gold/ and can be GOLD User Guide 177 manually edited to include specific, user-defined distrbutions. The file to be used is specified in the Ligand Flexibility window, under Global Options in Advanced options. 20.1.15During the Docking • As the job progresses output will be displayed in a Run GOLD window: • This is a tabbed view that allows inspection of several files: gold_ligand_m1.log, gold.log, gold_protein.log, gold.err, list of logs and Messages. • Any error or warning messages produced will be displayed under the gold.err tab. This may contain a number of warning messages relating to the GOLD atom type assigner. These messages can be safely ignored. • Once the job is complete the message Finished Docking Ligand will appear in the Run GOLD window. • Load the docking results into Hermes by clicking on the View Solutions button in the Run GOLD window. Keep the Run GOLD window open. 20.1.16Analysis of Output • In addition to the files that can be inspected in the Run GOLD window, the specified output directory (see Specifying Ligand Solution File Formats and Directories, page 139) will contain a number of files including: • Files containing the initialised protein and ligand (gold_protein.mol2 and gold_ligand.mol2) • Files containing the docked ligand (gold_soln_ligand_m1_n.mol2) • Files containing fitness function rankings (ligand_m1.rnk and bestranking.lst) • Protein and ligand log files (gold_protein.log and gold_ligand_m1.log) • Files containing error messages (gold.err), this file will be empty if no errors are found. • Some of these output files will be dealt with in detail below. Further information on the content of all these output files is available (see Description of Output Files, page 147). 20.1.17The Ligand Log File (gold_ligand_m1.log) • Ten docking runs were set up for this ligand and, for each of these docking runs, the progress of the genetic algorithm is displayed in the gold_ligand_m1.log file displayed in the Run GOLD window. The ligand log file is also saved to the specified output directory (where m1 is the index to the number of the ligand in the input file). • Inspect the gold_ligand_m1.log in the Run GOLD window. If you have closed this window by accident you can read the file from your output directory into a text editor and view it this way. • Following the completion of all docking runs on the ligand, the results from the different runs are compared. The end of the gold_ligand_m1.log file will include a matrix of root mean square deviations (RMSd) between the various docked ligand positions (see Comparison of Docking 178 GOLD User Guide Solutions, page 153). A clustering report is also given which can be used to identify different binding modes (see Identification of Different Binding Modes (Clustering of Ligand Poses), page 154). It is possible that fewer than the specified ten dockings were completed due to the Allow early termination option being selected (see Early Termination, page 127). In the example output shown below, the solution found for docking attempt number 2 has the best fitness score, while the solution found for docking attempt number 1 has the worst fitness: • We have finished with the Run GOLD window now so close the window by clicking on the Close button. 20.1.18Fitness Function Rankings Files (ligand_m1.rnk and bestranking.lst) • The ligand_m1.rnk file is stored in the specified output directory: open and inspect the file in a text editor. This file contains a summary of the fitness scores for all the docking attempts on the N-phosphonacetyl-L-aspartate ligand. • The docking attempts are listed according to fitness score, so the best solution is placed first. • The file gives total fitness scores and a breakdown of the fitness into its constituent energy terms. • A file called bestranking.lst is written when running dockings with multiple ligands. This gives a continuous summary of the best solution that has been obtained for each completed ligand. The file gives total fitness scores and a breakdown of the fitness into its constituent energy terms. 20.1.19Files Containing the Docked Ligand (gold_soln_ligand_m#_n.mol2) • The N-phosphonacetyl-L-aspartate ligand will have been docked a number of times so a set of files will have been written to the output directory, each containing the results of a separate docking attempt. GOLD User Guide 179 • The result of each docking attempt is written out as gold_soln_ligand_m1_n.mol2, where n is the number of the docking solution 1,2,3 ... and m1 is an index to the ligand (in this example, only one ligand was docked). • Note that the file gold_soln_ligand_m1_1.mol2 is not the best GOLD prediction, it is just the solution found in the first docking attempt. However, as GOLD proceeds, symbolic links are created: ranked_ligand_m1_1.mol2 will point to the current top-ranked solution, ranked_ligand_m1_2.mol2 will point to the second-best solution, and so on. • Return to the Hermes 3D view and inspect the top-ranked solution predicted by GOLD. Note that the original protein we edited is still loaded: to make the display less complicated you may wish to disable one of the proteins by deactivating the tickbox adjacent to 1ACM or 1ACM_2 under the Display tab in the Molecule Explorer. If you do this, return to the Docking Solutions tab once you have finished. • The docking solutions are given in their docked order with their corresponding fitness score listed under the column headed PLP.Fitness. If required the solutions can be ordered by clicking on PLP.Fitness to determine which is the highest scoring. • A simple test of the effectiveness of a docking program is to take a protein-ligand complex from the PDB and extract the ligand. The docking program can then be used to predict the binding mode of the ligand and a comparison made with the crystallographically observed position. The crystallographically observed conformation of the docked N-phosphonacetyl-L-aspartate ligand is stored in the ligand we extracted from the protein, that was subsequently re-loaded (A:1ACM in the Molecule Explorer). Compare this with the solution predicted by GOLD. • In the figure below the crystallographically observed reference structure A:1ACM (shown in green) is compared with the top-ranked solution predicted by GOLD (shown coloured by element): 180 GOLD User Guide • Using this methodology GOLD has been validated against a large number of protein-ligand complexes taken from the PDB. Further details and the entire validation test set are available for download. This ends the tutorial. GOLD User Guide 181 20.2Tutorial 2: Handling of Metals in GOLD 20.2.1 Introduction • First, copy the files in <install_dir>/GOLD Suite/GOLD/examples/tutorial2 to a directory to which you have write permissions. • The object of this tutorial is to investigate the binding mode of brinzolamide, an inhibitor of carbonic anhydrase II, PDB entry code 1A42. In this example, the brinzolamide molecule is known to coordinate to a zinc atom within the ligand binding site of the protein. • This tutorial will illustrate the requirements for setting up and running a docking in which the protein binding site features a metal ion. Additional information will also be provided on the handling and parameterisation of metals in GOLD. 20.2.2 Preparation of Input Files • Open Hermes and read in the file protein.mol2 from the folder to which you copied the tutorial2 files. The original PDB file 1A42.pdb has also been provided should you wish to set up the protein for yourself. • The protein, protein.mol2, has already been set up in accordance with the guidelines for the preparation of protein input files (see Setting Up the Protein(s), page 10). • Upon inspection of protein.mol2 you should notice that parts of the protein remote from the binding site have been deleted in order to speed up the calculation (see Using the GOLD Wizard to Prepare the Protein File, page 166). You should also notice that all water molecules have been deleted and that hydrogen atoms have been placed on the protein in order to ensure that the ionisation and tautomeric states are defined unambiguously (see Protonation and Tautomeric States, page 11). • There are some additional requirements when preparing a protein input file which contains a metal ion: • In the protein input file it is essential that the metal ion is coordinated to at least two protein atoms or water molecules so that GOLD can determine the correct coordination geometry. • In the protein input file, the metal ion must not have any bonds to coordinating atoms. If these are present in the original protein file, they must be deleted. • On closer inspection of the protein.mol2 input file you will see that the zinc atom is coordinated to three histidine residues. 182 GOLD User Guide • The inhibitor has also been set up in accordance with the guidelines for the preparation of ligands (see Essential Steps, page 50). • Open and inspect the file ligand.mol2 from the folder to which you copied the tutorial2 files. • Once you have finished looking at the protein and ligand files, close them by selecting File, then Close All Files. 20.2.3 The GOLD Configuration File • All of the parameters and settings required to define a particular GOLD job may be saved as a configuration file (gold.conf) (see Saving and Reusing Docking Settings, page 160). This text file will include details of the ligand, the protein binding site, the fitness-function parameter file to be used, the torsion distribution file to be used, and the genetic algorithm parameters. Therefore there is no need to specify protein.mol2 and ligand.mol2 input files, as these will be read in upon opening gold.conf. • A configuration file has been provided for this tutorial. The gold.conf is loaded by clicking on the main menu option GOLD, then Setup and Run a Docking. From the resultant pop-up window select the Load Existing button: you should then browse to the directory containing the tutorial and select the file gold.conf from the folder to which you copied the tutorial2 files then hit Open. This will automatically load the settings and parameter values for this tutorial into the GOLD front end. GOLD User Guide 183 • From the Global Options on the left-hand side of the GOLD front end, click on Output Options. Specify or browse to a directory (using the ... button adjacent to Output Directory) for which you have write permission. This is where the GOLD output files will be written. 20.2.4 The Handling and Parameterisation of Metals in GOLD • GOLD is able to predict binding to seven metal ions: Mg, Zn, Fe, Mn, Ca, Co and Gd. • No special instructions are needed to dock to metal ions, they will be handled automatically when present in the protein binding site. 20.2.5 Automatic Determination of Metal Coordination Geometries • GOLD will automatically recognise the following metal coordination geometries: Template Geometry Coordination number TETR Tetrahedral n=4 TBP Trigonal bipyramidal n=5 OCT Octahedral n=6 CTP Capped trigonal prism n=7 PBP Pentagonal bipyramidal n=7 SQAP Square prism n=8 ICO Icosahedral n=10 DOD Dodecahedral n=12 • In order to determine the coordination geometry of a particular metal atom GOLD performs a permuted superimposition of coordination geometry templates onto the coordinating atoms found in the protein. Coordination fitting points are then generated using the template that gives the best fit (based on RMSd). • The geometry templates used for a given metal are defined in the gold.params file in the section headed # Metals: 184 GOLD User Guide H-Bonding type Sybyl atom type Atom type (default or elucidated) Donor (D), Acceptor (A), or Metal (M). Allowed Coordination geometries Coordination distance MGD Mg DEF M 4, 6 2.05 ZND Zn DEF M 4, 5, 6 2.09 MND Mn DEF M 4, 6 2.06 FED Fe DEF M 4, 6 1.98 CAD Ca DEF M 6, 7 2.44 COBD Co.oh DEF M 6 2.09 GDD Gd DEF M 6 2.44 • The gold.params file is stored in <install_dir>/GOLD Suite/GOLD/gold/; go to this directory and open the parameters file using a text editor. • The parameters used by GOLD for each metal are listed, for explanation of parameters refer to comments in the gold.params file. Additional metal parameterisation can also be found within the H_BOND TABLE. • For our Zn atom GOLD will therefore attempt to match coordination geometries 4, 5 and 6 (tetrahedral, trigonal bipyramidal, and octahedral templates) onto the coordinating atoms found in the protein. The template that gives the best match will then be used to generate coordination fitting points. • Once you have finished viewing the file, close it. 20.2.6 Manually Specifying Metal Coordination Geometries • It is possible to manually specify coordination geometries for particular metal atoms (see Defining Custom Metal Coordination Geometries, page 31). This can be useful in allowing nonstandard metal coordination geometries, or to limit the number of possible geometries that GOLD checks (i.e. to overrule the default geometries for the corresponding metal type defined in the gold.params file). • In this example, the zinc atom is clearly tetrahedral (the Zn is coordinated to three histidine residues in the protein and the final coordination site is available to bind to the inhibitor) and so it is not necessary to enforce a particular metal geometry. 20.2.7 Running GOLD and Analysis of Output • Click on the Run GOLD button at the bottom of the GOLD front end. You will be prompted that the GOLD configuration has been updated and needs to be saved; click Save to proceed to the Finish GOLD Configuration window. GOLD User Guide 185 • From within this window we can: • specify the directory the gold.conf is to be saved to: we will leave this as the default working directory. • save a protein.mol2 file (and specify its name): this is only necessary if the protein file has been modified. We have not modified the protein.mol2 file so ensure the Protein tickbox is deactivated. • save a GOLD conf file (and specify its name). We have changed some of the configuration options so ensure the GOLD conf file tick box is activated. • Hit Save then OK to overwrite the existing gold.conf file. GOLD will then start running interactively. • The GOLD output window is a tabbed view that allows you to inspect various files that are written while the docking proceeds. Once the job is complete, the message Finished Docking Ligand: ligand.mol2 will appear in the gold_ligand_m1.log tab. 20.2.8 Protein Log File • Inspect the gold_protein.log file by hitting the gold_protein.log tab in the Run GOLD window. If you have already closed the Run GOLD window this file can be found in the output directory specified (see The GOLD Configuration File, page 183) and can be read using a text editor. • The gold_protein.log file contains details of the parameterisation of the protein and the determination of the ligand binding site. Information relating to the metal and the determination of the coordination geometry will also be given: 186 GOLD User Guide • Check to see that the matched geometry is indeed tetrahedral. Further information about the contents of the gold_protein.log file are given elsewhere, (see Protein Log File, page 151). 20.2.9 Files Containing the Protein and Docked Ligands • Load the docking results into Hermes by clicking on the View Solutions button in the Run GOLD window. We no longer need the Run GOLD window so close it by hitting the Close button. • The docking results will be loaded into the Hermes visualiser. The different explorer windows in Hermes are dockable so move any windows that may obscure your view of the docking results. • The protein file now contains dummy atoms connected to the metal which represent idealised metal coordination positions. These can be visualised by activating the Show unknown atoms tick box at the top of the Hermes window. • At locations where GOLD is missing a coordination site (i.e. coordination points not bound to the protein) virtual coordination points are added. These coordination points are then used as fitting points that can bind to acceptors. • The docking solutions are listed in the Docking Solutions tab of the Molecule Explorer, their CHEMPLP fitness score is listed alongside. Identify which is the top-ranked solution predicted by GOLD (i.e. the solution with the highest score) and click on it: this will load the file into the 3D view. • Inspect how well the docked inhibitor fits within the protein binding site. • The zinc (shown in blue) is coordinated to the protein via three histidine residues. In the example shown below, the remaining zinc coordination site is used to bind the inhibitor (shown coloured in green) via interaction with the sulphonamide N atom. GOLD User Guide 187 • Metal coordination in GOLD is modelled as ’pseudo-hydrogen bonding’. Metal-ligand interactions will typically involve the metal binding to, for example, carboxylate ions, deprotonated histidines (i.e. negatively charged), and phenolates. Therefore metals can be considered to bind to H-bond acceptors and the metal will compete with H-bond donors for interaction. This ends the tutorial. 188 GOLD User Guide 20.3Tutorial 3: Use of Hydrogen Bonding Constraints 20.3.1 Introduction • First, copy the files in <install_dir>/GOLD Suite/GOLD/examples/tutorial3 to a directory to which you have write permissions. • The design of new and more potent antiretroviral agents for the human immunodeficiency virus (HIV) continues to be the focus of much attention. The crystal structures of HIV-1 protease in complex with a number of cyclic urea inhibitors have been determined in order to identify the key interactions responsible for the high potency of this class of inhibitor (see: Jadhav et al. J. Med. Chem., 40, 181 (1997)). The C2 symmetric cyclic urea scaffold is well suited to interact with the viral protease, it has been observed that these inhibitors are anchored in the active site of the protease by six key hydrogen bonds. • The object of this tutorial is to investigate the binding mode of a cyclic urea inhibitor with HIV1 protease, PDB entry code 1qbt. The use of hydrogen bonding constraints in order to reproduce these key interactions will also be illustrated. 20.3.2 Input Files • Open Hermes and read in and inspect the file protein.mol2 from the folder to which you copied the tutorial3 files. The original PDB file 1QBT.pdb has also been provided should you wish to set up the protein for yourself. • HIV-1 protease, protein.mol2, has already been set up in accordance with the guidelines for the preparation of protein input files (see Setting Up the Protein(s), page 10). • An important feature of cyclic urea inhibitors is their ability, upon binding, to displace a structural water molecule present within the active site of the protein. In this example, all water molecules have been deleted from protein.mol2. However, in other complexes you may not know whether water molecules should form mediating hydrogen bonds, or be displaced by the ligand on binding. GOLD allows waters to switch on and off (i.e. to be bound or displaced) and to rotate (to optimise hydrogen bonding) during docking (see Water Molecules, page 15). • The cyclic urea inhibitor has already been prepared in accordance with the requirements for setting up the ligand (see Setting Up Ligands, page 50). • Open the file ligand.mol2 from the folder to which you copied the tutorial3 files within Hermes and inspect the structure. Keep the file open once you have finished. • A configuration file has been provided for this tutorial. The gold.conf is loaded by clicking on the main menu option GOLD, then Setup and Run a Docking. From the resultant pop-up window select the Load Existing button: you should then browse to the directory to which you copied the tutorial3 files, select the file gold.conf then hit Open. This will automatically load the settings and parameter values for this tutorial into the GOLD front end in addition to the specified protein file. GOLD User Guide 189 • The GOLD interface contains two tabbed views; the default is Global Options which allows you to specify particulars of the docking in general; the other displays the protein name, in this case Protein (1qbt) aspartyl protease, and allows you to edit the protein and set up parameters specific to the protein such as constraints. Click on the Protein (1qbt) aspartyl protease tab. 20.3.3 Hydrogen Bonding Constraints • GOLD features two types of hydrogen bonding constraints: • A standard hydrogen bond constraint can be used to force a hydrogen bond between a specific protein atom and a specific ligand atom (see Standard Hydrogen Bond Constraints, page 190). • A protein hydrogen bond constraint can be used to specify that a particular protein atom should be hydrogen-bonded to the ligand, but without specifying to which ligand atom (see Protein Hydrogen Bond Constraints, page 190). 20.3.4 Standard Hydrogen Bond Constraints • A standard hydrogen bond constraint allows a particular ligand atom to be constrained to form a hydrogen bond to a particular protein atom. • Click on the + next to Contraints in the Protein (1qbt) aspartyl protease tab: this will expand the tree to list all constraint options available. Select HBond from the list of constraint types. • When specifying a hydrogen bond constraint, the ligand and protein atoms involved in the constraint need to be selected in the 3D view. Clicking on the atoms simultaneously selects them (selected atoms will be surrounded by a cyan sphere) and enters the relevant atom IDs into the constraints dialogue. • One of the atoms must be an H-bond donor and the other should be an acceptor. The protein atom must also be available for ligand binding (i.e. solvent accessible). • Once defined, an H-bond constraint is incorporated into the least-squares fitting routine used by GOLD to dock the ligand. The constraint has a weight of 5 relative to a normal hydrogen bond. Thus, the docking will be biased towards solutions which include the specified hydrogen bond. • The hydrogen bond constraint weighting can be altered within the Fitness Function section of the GOLD parameters file by changing the value of the parameter CONSTRAINT_WT. 20.3.5 Protein Hydrogen Bond Constraints • A protein hydrogen bond constraint can be used to specify that a particular protein atom should be hydrogen-bonded to the ligand, but without specifying to which ligand atom (see Setting up Protein H Bond Constraints, page 116). 20.3.6 General Methodology • Click on the + next to Contraints in the Protein (1qbt) aspartyl protease tab and select Protein HBond from the list of constraint types: 190 GOLD User Guide • When specifying a protein hydrogen bond constraint the protein atom must be selected in the 3D view. • GOLD will then be biased towards finding solutions in which the specified protein atom forms hydrogen bonds. However, as with standard hydrogen bond constraints such a solution is not guaranteed. • During the GOLD run the fitness score of a given docking will be penalised for every protein Hbond constraint that is not satisfied. • The Constraint weight is the strength of bias applied to the formation of a specified hydrogen bond in the least squares mapping algorithm within GOLD. The Constraint weight is also the value of the penalty applied to the fitness score for each constrained H bond that is not formed. • The Minimum H bond geometry weight is a user defined score that determines how good a hydrogen bonding interaction has to be in order for it to be considered a hydrogen bond by GOLD. The Minimum H bond geometry weight takes a range of values from 0 to 1, by default this value is set at 0.005. GOLD User Guide 191 20.3.7 Specifying Multiple Constraints • It is possible to specify several different protein H bond constraints, with different weights for each constraint. Simply select each protein atom required to form an H-bond with the ligand as well as the required weight then click on the Add button to add the constraint definition to the constraints dialogue at the bottom of the window. Repeat the procedure to set up further constraints, each constraint will be displayed on a separate line in the constraints dialogue. • For a given protein H bond constraint more than one protein atom can be selected and added to the Protein atom(s) required to form H-bond input box. This will instruct GOLD to use an ‘either-or’ type of constraint during docking. For example, specifying two protein atoms m and n, separated by a space, will result in the constraint being satisfied if an H bond is formed to either m or n during docking. This is of particular use when defining constraints involving, for example, carboxylates where it is not important which oxygen atom forms an H bond, provided one does. 20.3.8 Defining the Protein H Bond Constraints • The crystal structures of HIV-1 protease in complex with a number of cyclic urea inhibitors have been determined. It has been observed that the central urea moiety is anchored in the active site of the protease by six key hydrogen bonds: • Two hydrogen bonds between the urea oxygen atom and the protein backbone peptide groups of Ile50 and Ile50’ (shown below). • Four hydrogen bonds between the cyclic urea diol and the carboxylates of the catalytic aspartate of the protein residues (ASP25’) (shown below). 192 GOLD User Guide • Protein H bond constraints can be used in order to attempt to reproduce these key interactions during docking. • Specify that either oxygen atom of the carboxylate group of Asp25 in chain A should form a hydrogen bond to the ligand by clicking on one O atom, then the other. Note: if you have problems locating Asp25 in chain A you can expand the protein tree in the Molecule Explorer i.e. by clicking on the “+” adjacent to the words Protein (1abt) aspartyl protease. Expanding the Chains tree then A will give a breakdown of all residues in chain A. You can then right-click on Asp25 to modify the display settings and make it stand out. • Once both carboxylate atoms have been selected they will be highlighted with cyan spheres. • In the constraints window, the default settings for Constraint weight and Minimum H bond geometry weight are given (10.0 and 0.005 respectively). Select Add to accept these values. The specified constraint will appear in the Constraints list. GOLD User Guide 193 • Specify protein H bond constraints for the three remaining key hydrogen bonding interactions as outlined in the table below (note that you may have to hit the Reset button to clear the Protein atom(s) required to form H-bond window). Note: It is necessary to specify the hydrogen atom to define the donor partner in the H-bond constraint Protein H bonding group Atom number(s) Constraint weight Minimum H bond geometry weight Ile50 (chain A) 1914 10.0 0.005 Ile50 (chain B) 2724 10.0 0.005 Asp25 (chain B) 1161 or 1162 10.0 0.005 • Once all of these protein H bond constraints have been set up the Constraints Editor window should contain four individual constraints: 194 GOLD User Guide 20.3.9 Running GOLD • Return to the general docking setup by clicking on the Global Options tab. • Click on Output Options. Either type an output directory name in the Output directory window or browse to a directory using the ... button adjacent to this window. This is where the GOLD output files will be written. • Click on the Run GOLD button at the bottom of the GOLD front end. You will be prompted that the GOLD configuration has been updated and needs to be saved; click OK to proceed to the Finish GOLD Configuration window. • All settings can remain as they are, so hit Save to start the GOLD run. This will start the GOLD job interactively. As the job progresses output will be displayed in the Run GOLD window. • The Run GOLD output window is a tabbed view that allows you to inspect various files that are written while the docking proceeds. Once the job is complete, the message Finished Docking Ligand: ligand.mol2 will appear in the gold_ligand_m1.log tabbed view. • Once the GOLD job is complete, load the results into Hermes using the View Solutions button. GOLD User Guide 195 20.3.10Analysis of Output • Inspect the gold_protein.log file by hitting the gold_protein.log tab in the Run GOLD window. If you have already closed the Run GOLD window this file can be found in the output directory specified (see The GOLD Configuration File, page 183) and can be read using a text editor. This file contains details of the protein initialisation. • Now return to the gold_ligand_reference_m1.log window (again if you have closed the Run GOLD window, this file can be found in your specified output directory). This file gives a total fitness score and a breakdown of the fitness into its constituent energy terms for each docking performed on the ligand. • A constraint scoring term S(con) is listed for each docking. If a solution predicted by GOLD satisfies all of the protein H bond constraints then the contribution from this scoring term will be 0.00. However, for solutions in which not all of the constraints are satisfied, a penalty will be applied to the fitness score for each constrained H bond that is not formed. The value of this penalty is the Constraint weight previously specified (see General Methodology, page 190). • The details of each specified protein H bond constraint satisfied in the solution are listed and an overall constraint score is given. A list of all hydrogen bonds formed between ligand and protein is also provided in the ligand log file. • Go to the end of the gold_ligand_reference_m1.log file, then scroll up slightly until you see text similar to the following: * Final ranked order of GA solutions 3 2 6 1 4 5 This text tells you how the docking attempts rank in terms of fitness score. So the third docking attempt is the top-ranked, while the fifth docking attempt is the lowest-ranked of all the solutions. • Go to Hermes’ 3D view and display the top-ranked solution (note that it may not be docking attempt number 3). If you are still unsure which is the top-ranked solution, the docking results can be ordered based on their fitness score in the Molecule Explorer window, using the PLP.Fitness header in the Docking Solutions view. • Inspect how well the docked inhibitor fits within the protein binding site as predicted by GOLD: 196 GOLD User Guide • Interactions between the cyclic urea inhibitor and HIV-1 protease can be divided into two groups: those that anchor the scaffold in the active site and those that fix the substituents in the target subsites. • Confirm that the hydrogen bonds specified in the constraints are formed as expected to the cyclic urea scaffold by measuring the relevant contact distances. Identify any additional hydrogen bonding interactions between the benzimidazole substituents and the target subsites within the protein. This ends the tutorial. GOLD User Guide 197 20.4Tutorial 4: Use of Substructure Based Distance Constraints 20.4.1 Introduction • First, copy the files in <install_dir>/GOLD Suite/GOLD/examples/tutorial4 to a directory to which you have write permissions. • The object of this tutorial is to assess the binding of a small number of structurally related ligands with the carbonic anhydrase II, PDB entry code 1cil. In the ETS inhibitor a terminal sulphonamide nitrogen atom is observed to coordinate to a zinc atom within the protein binding site. • This tutorial will illustrate how GOLD can be used to screen a number of compounds in order to identify ligands with potential activity. The use of constraints in order to bias solutions towards the observed binding mode of the inhibitor will also be demonstrated, as well as the use of automatic speed settings. 20.4.2 Input Files • Open Hermes and read in the file protein.mol2 from the folder to which you copied the tutorial4 files. The original protein PDB file 1CIL.pdb has also been provided should you wish to set up the protein for yourself. • Carbonic anhydrase II, 1cil, protein.mol2, has already been set up in accordance with the guidelines for the preparation of protein input files (see Protonation and Tautomeric States, page 11). • Upon inspection of the protein you will see that the zinc atom is coordinated to three histidine groups, the one remaining zinc coordination site is available for binding to the ligand. • Read in the file ligand_reference.mol2 from the folder to which you copied the tutorial4 files. Inspect the crystallographically observed position of the ETS inhibitor (shown in green) within the protein binding site: 198 GOLD User Guide • The terminal sulphonamide nitrogen atom of the ligand clearly coordinates to the zinc. We can attempt to reproduce this known binding mode within GOLD with the introduction of a distance constraint during docking. • Ten ligands, each structurally similar to the ETS inhibitor, will be screened using GOLD. These ligands were identified using Relibase+, a program for search and analysis of protein-ligand complexes (http://www.ccdc.cam.ac.uk/products/life_sciences/relibase/). • These ligands, ligand.mol2, are available from the folder to which you copied the tutorial4 files, note that each of the ten ligands in this file features a terminal sulphonamide group. • If you have opened all of the files above, close them by going to File, Close All Files. • A configuration file (gold.conf) has been provided for this tutorial which will automatically load the settings and parameter values for this tutorial into the GOLD front end. • From within Hermes click on GOLD, then Setup and Run a Docking in the top level menu. Load the gold.conf for tutorial 4 by selecting Load Existing from the resultant pop-up window and navigating to the directory where the gold.conf is stored and clicking Open. 20.4.3 Distance Constraints • Any distance between a ligand atom and a protein atom can be constrained, or restrained, to lie between minimum and maximum distance bounds. • GOLD features two types of distance constraint: GOLD User Guide 199 • A standard distance constraint for use with individual ligands (see Standard Distance Constraints, page 200). • A substructure-based distance constraint for use with multiple ligands which have a common functional group (see Substructure-Based Distance Constraints, page 201). 20.4.4 Standard Distance Constraints • Distance-based constraints are specific to each protein, thus click on the Protein (1cil) lyase(oxo-acid) tab to access all protein-specific aspects of the docking setup. • Hit the + adjacent to Constraints in the list of available options to expand the Constraints tree, then select Distance. • When setting up a distance constraint it is necessary to select both atoms involved in the constraint within the 3D view. Alternatively the protein and ligand atom numbers as defined in the MOL2 input files can be typed into the Protein and Ligand windows (note you will have to hit return to update the 3D view). The maximum and minimum separation of the constrained atoms must also be entered (distances are in Å). • During a GOLD run, if a constrained distance is found to lie outside the specified bounds, a 200 GOLD User Guide spring energy term is used to reduce the fitness score. The spring energy term (E) = kx2, where x is the difference between the distance and the closest constraint bound and k is a user-defined spring constant. 20.4.5 Substructure-Based Distance Constraints • It is possible to apply a distance constraint to multiple ligands which have a common substructure or functional group. • In order to use a substructure-based distance constraint it is first necessary to create a file containing the common substructure in MOL2 format. • The substructure-based constraint forces GOLD to limit the distance between a protein atom and one atom of this functional group. • During docking the constraint will be applied to any ligands which contain the specified substructure (matching is performed on the basis of the atom types and 2D connectivity) and the resulting solutions will be biased towards the specified distance range. • Click on Substructure within the Constraints tree to open the substructure constraint set-up window. • We now need to select the atoms involved in the constraint, specifically the zinc atom and the N atom in the substructure.mol2 file. • The zinc atom is coloured grey in the 3D view. Click on the metal atom: the metal atom will be highlighted with a cyan sphere and the atom ID 2041 will be entered into the Protein atom number window. • A substructure file (substructure.mol2) containing a sulphonamide group has been provided for this tutorial and can be found in the folder to which you copied the tutorial4 files. When creating your own substructure files it is recommended that you set atom types manually (see Setting Up Substructure-Based Distance Constraints, page 113) since an incomplete fragment can cause problems with automatic atom-typing. • Click on the Substructure file button, then select the file substructure.mol2 from the folder to which you copied the tutorial4 files and hit Open. This automatically loads the substructure file into the 3D view. If the substructure is not clear, you can suppress the protein atoms via the tickbox adjacent to Protein (1cil) lyase(oxo-acid) in the Molecule Explorer. • Select the N atom in the substructure. This will enter the atom ID 4 into the Substructure atom no dialogue. The N atom will also be surrounded by a cyan sphere. • Specify the allowed range of separation by entering a Minimum separation of 1.50 and a Maximum separation of 2.50 (distances are in Å). • As with standard distance constraints, the fitness score is reduced for solutions which do not satisfy the constraint. The amount by which the score is reduced is determined by a user-defined weight term. Set the value of the Spring const. to 20.0, then click on the Add button to add the constraint to the constraints list. GOLD User Guide 201 • Click on the Global Options tab to return to the general docking setup window. 20.4.6 Running GOLD • The time taken by GOLD to dock ligands can be controlled by altering the values of the genetic algorithm (GA) parameters (see Controlling Accuracy and Speed with Genetic Algorithm Parameter Settings, page 128). GOLD runs for a fixed number of genetic operations (crossover, migration, mutation). Therefore reducing the number of GA operations performed during the course of a run will result in GOLD running faster, however the search will be less exhaustive. • GOLD can decide on the optimal settings to use for a given ligand (see Controlling Accuracy and Speed with Genetic Algorithm Parameter Settings, page 128). • To enable automatic GA settings, click on the GA Settings option in the list of available options, then activate the Automatic radio button. The Search efficiency will by default be set to 100%: we will use the default settings. • We now need to specify an output directory. Click on Output Options and specify a directory to which you have write permission. This is where the GOLD output files will be written. • Now click on the Run GOLD button at the bottom of the interface. 202 GOLD User Guide • You will be prompted that the GOLD configuration has been updated and needs to be saved; click OK to proceed to the Finish GOLD Configuration window. • The configuration file name can remain as it is, so hit Save to start the GOLD run and OK to overwrite the existing gold.conf. This will start the GOLD job interactively. As the job progresses output will be displayed in the Run GOLD window. • Any warning messages produced will be displayed under the gold.err tab. • Once the job is complete, the message Finished Docking Ligand: ligand.mol2 will appear in the gold_ligand_m1.log tabbed view. Once you view this message, load the results into Hermes using the View Solutions button then close the Run GOLD window using the Close button. 20.4.7 Analysis of Output • A file called bestranking.lst is written to the specified output directory for batch jobs on multiple ligands. Open this file and inspect it using a text editor; it gives a continuous summary of the best solution that has been obtained for each docked ligand. • The listed file names correspond to the names of the files containing the best solution found for each ligand. • The file gives total fitness scores and a breakdown of the fitness into its constituent energy terms. • An additional constraint scoring term S(con) is also listed. For docking solutions which satisfy the specified distance constraint the contribution from this scoring term will be 0.00. However, for solutions in which the constrained distances lie outside the specified bounds a negative S(con) score will be applied, thus reducing the overall fitness. • Further details relating to substructure-based constraints are given within individual ligand log files. Your output directory should contain ten ligand log files gold_ligands_m#.log, one for each ligand. • Open and inspect the ligand log file corresponding to the first ligand in the input file, i.e. gold_ligands_m1.log. This file will contain the distance bounds as specified in the constraint and the actual distance observed in the docked solution. • From your bestranking.lst file identify GOLD’s top ranked solution for the ligand with the best total fitness score. • Go to the Hermes 3D view. The overall top-ranking ligand can be viewed by ordering the ligands based on their fitness score. To do this, go to the Molecule Explorer and find the tab labelled PLP.Fitness. Click on this tab either once or twice until you have the highest score (i.e. the highest value) listed at the top of the column. • The position and orientation of the terminal sulphonamide groups in the docked solutions should be similar to that observed in the co-crystallised ETS inhibitor (i.e. coordinated to the zinc within the protein via the sulphonamide nitrogen). • In the example below the terminal sulphonamide group of GOLD’s top-ranked solution can be GOLD User Guide 203 seen to satisfy the specified constraint and reproduces the known binding mode of the cocrystallised ETS inhibitor: This ends the tutorial. 204 GOLD User Guide 20.5Tutorial 5: Docking with Water in the Binding Site 20.5.1 Introduction • First, copy the files in <install_dir>/GOLD Suite/GOLD/examples/tutorial5 to a directory to which you have write permissions. • The object of this tutorial is to investigate docking to a binding site that contains water molecules which a ligand may either displace, or alternatively, make use of through hydrogen bond interactions. • The protein used here is acetylcholine esterase (PDB entry code 1acj), the protein that, more than any other, is essential for the correct transmittal of nerve impulses in the brain and around the body. The ligand is tacrine, an inhibitor of acetylcholine esterase which is a drug used to treat Alzheimer’s disease. The active site of the enzyme has been modelled with three water molecules in it, each of which makes hydrogen bonds with the protein. • This tutorial will illustrate the requirements for setting up and running dockings in which the protein binding site features one or more water molecules. The example chosen mimics the situation where a researcher has a crystal structure of a protein binding site, and is unsure which and how many of the waters in that binding site should be included in the model for use in an inhibitor design effort. 20.5.2 Preparation of Input Files • Open Hermes and read in the file protein.mol2 from the folder to which you copied the tutorial5 files. • The acetylcholine esterase protein.mol2, has already been set up in accordance with the guidelines for the preparation of protein input files (see Setting Up the Protein(s), page 10). • The full protein is not displayed. Parts of the protein remote from the binding site have been deleted in order to speed up the calculation (see Essential Steps, page 10). Hydrogen atoms have been placed on the protein in order to ensure that the ionisation and tautomeric states are defined unambiguously (see Protonation and Tautomeric States, page 11). • Active waters (i.e. those that you would like GOLD to consider during docking) must be provided in separate files, one water molecule per file. Read in each of the water molecule files: HOH150.mol2, HOH151.mol2 and HOH152.mol2. • Read in the file ligand.mol2 from the folder containing the tutorial5 files. You will be able to see how the ligand tacrine chooses to bind. You will find that two of the waters in the active site are within hydrogen bonding distance to the NH2 of the ligand, as well as to hydrogen bond acceptors on the protein. The third water is at a position where it can make a hydrogen bond to the same histidine backbone carbonyl as the protonated ring nitrogen of the ligand. This water cannot be accommodated if tacrine takes up its normal binding mode. None of the hydrogen positions on the waters have been positioned for optimal hydrogen bonding.This doesn’t matter as the water hydrogen positions can be optimised during docking. GOLD User Guide 205 • Close all the files by clicking on File, then Close All Files. 20.5.3 Setting up protein bound waters • A configuration file gold.conf has been provided for this tutorial which will automatically load most of the settings and parameter values for this tutorial into the GOLD front end. • From within Hermes click on GOLD, then Setup and Run a Docking in the top level menu. Load the gold.conf for tutorial 5 by selecting Load Existing from the resultant pop-up window, navigating to the folder to which you copied the turorial5 files, selecting the file gold.conf and clicking Open. • We will need to identify the waters in the binding site that we particularly want to consider, and set up their chosen states. To do this, pick Configure Waters from the list of available options. • The dialogue is empty so we need to specify our water molecules by reading in the water files. To do this click on the Add button, select the three water files then hit Open. • The water molecules will be listed in the Configure Waters dialogue. • By default the waters are allowed to toggle and spin. This sets a water up so that it may either be removed, or kept and made use of in terms of hydrogen bonding, depending on which arrangement scores most highly for a given ligand pose. On sets the water to be always present in the binding site and allows the hydrogen positions to vary during docking in order to maximise the hydrogen bonding score both from interactions with the protein and the ligand. The Off water state option allows a water to be removed from consideration during docking. We will be using both these options shortly. 206 GOLD User Guide 20.5.4 Running GOLD Dockings: All waters toggled • Click on Fitness & Search Options. You can see the gold.conf file for this docking job uses the ChemScore scoring function. • Ensure the Allow early termination flag is set off (i.e. that there is a tick in the tickbox) and that the Generate diverse solutions flag is set on. The Diverse Solutions Options button allows the diverse solutions settings to be configured. Keep the settings at default values. • Now go to GA Settings: the Genetic Algorithm parameters used are preset and are the slowest thus most accurate settings (100,000 operations). • Hit Output Options and either browse to or type the name of an appropriate sub-directory in the Output directory box e.g. waters_toggle. • Hit the Run GOLD button at the bottom of the GOLD front end. You will be prompted that the GOLD configuration has been updated and needs to be saved; click OK to proceed to the Finish GOLD Configuration window. • We have not modified the protein.mol2 file so we do not need to save this file, thus ensure the tick box adjacent to protein.mol2 is deactivated. • Change the configuration file name to e.g. waters_toggle.conf then hit Save to start the GOLD GOLD User Guide 207 run. This will start the GOLD job interactively. As the job progresses output will be displayed in the Run GOLD window. • Because allowing the waters to toggle on or off normally increases the size of the search necessary to find a good docking mode, it is generally recommended to increase the search time allowed per ligand, when toggling waters. The search problem becomes harder the more waters that are included. In this case because of the small size of the binding site and the fact the ligand has no rotatable bonds, the search problem is not large and the same settings can be used throughout. • Once the job is complete, the message Finished Docking Ligand: ligand.mol2 will appear in the gold_ligand_m1.log tabbed view of the Run GOLD window. • Hit Close in the Run GOLD window to close it. 20.5.5 Running GOLD Dockings: All waters turned on • Return to the GOLD front end and click on Configure Waters to bring up the water setup window. • Change the toggle state of each water molecule to on. • Go to Output Options and change the output sub-directory name e.g. to waters_on. • Hit the Run GOLD button and proceed to the Finish GOLD Configuration window. As before edit the name of the GOLD configuration file in the GOLD conf file text box to e.g. waters_on.conf. • Hit Save. • Once the GOLD run has finished, hit Close in the Run GOLD window. 20.5.6 Running GOLD Dockings: All waters turned off • Return to the GOLD front end and click on Configure Waters to bring up the water setup window. • Change the toggle state of each water molecule to off. Once all water atoms are off, hit Close to finish the modifications. • Go to Output Options and change the output sub-directory name e.g. to waters_off. • Hit the Run GOLD button and proceed to the Finish GOLD Configuration window. As before edit the name of the GOLD configuration file in the GOLD conf file text box to e.g. waters_off.conf. • Hit Save. There is no need to change any other settings. • Once GOLD has finished hit Close in the Run GOLD window then as we have finished with GOLD, hit Cancel in the GOLD setup window. • Tidy up the 3D view by going to File then selecting Close All Files. 208 GOLD User Guide 20.5.7 Analysis of results: All waters turned on • Load the results of the waters on docking by hitting File, then Load GOLD results and navigating to where waters_on.conf is stored. • Now read the reference ligand by clicking on File, Open, then navigate to the tutorial 5 directory which contains the ligand_reference.mol2 file. Select the file then click Open. • Scroll through the docking solutions one by one to check their poses against that of the reference ligand. You should find that several docking solutions are found, none of which closely resemble the correct binding mode. Note: you may wish to modify the representation style of the reference ligand so that it is more clear. Hit the Display tab in the Molecule Explorer then right click on the reference ligand. From the resultant menu it is possible to modify the representation style and colours of the reference ligand. You may also wish to simplify the display by hiding the protein H atoms (using the Hide H button at the top of the Hermes interface) or by suppressing the protein altogether (by deactivating the Protein 1acj hydrolase(carboxylic esterase) tickbox). 20.5.8 Analysis of results: All waters turned off • From Load GOLD results in Hermes, read in the gold.conf file corresponding to your second set of results (waters_off.conf). The second set of results are read in after the first set, allowing you to directly compare docking results from different runs. • If it is not clear which solutions correspond to which docking run, expand the Docking Solutions header at the top of the ligand solutions list. GOLD User Guide 209 The solutions are numbered sequentially, thus enabling you to establish which docking run they correspond to. • The reference ligand is still displayed. Check each solution in turn against the pose of the reference ligand. Now it is likely that only one docking mode is represented. This docking mode is close to that of the reference ligand. It is not a perfect superposition though, as the ligand attempts to contact the protein, along its edge, more closely than it does in reality. The values of the docking scores for this run are higher than those of the previous run. 20.5.9 Analysis of results: All waters toggled • From Load GOLD run results in Hermes, read in the gold.conf file corresponding to the waters_toggle GOLD run. • The reference ligand is still displayed so compare its pose to the solutions you’ve just loaded. The top ranking pose is now much closer to that of the reference ligand. Also the scores for this run are higher than the two previous runs. Notice that the two waters able to interact with the NH2 of the ligand have also been able to optimise their interactions with H-bond acceptor functionality in the protein. This means that both are making three good H-bonds. The third water has been excluded in all the reported docking poses. 210 GOLD User Guide 20.5.10Changing the Scoring function • You may wish to stop the tutorial here. However, optionally, you can run through the tutorial again, this time having either having the CHEMPLP, GoldScore or ASP option set in Fitness & Search Options in the GOLD GUI. • You will find that similar results are obtained. When all waters are turned off, two binding modes are generally found that score similarly well. One of these binding modes actually superimposes the reference ligand very well, and allowing waters to toggle does not significantly improved the superimposition in this case. However, allowing the waters to toggle does result in only this one binding mode being returned. The second, spurious binding mode is successfully eliminated. This ends the tutorial. GOLD User Guide 211 20.6Tutorial 6: Docking with a Flexible Side Chain 20.6.1 Introduction • First, copy the files in <install_dir>/GOLD Suite/GOLD/examples/tutorial6 to a directory to which you have write permissions. • The object of this tutorial is to demonstrate how to dock a ligand into a binding site which is known to contain a flexible side chain. The example will involve docking the ligand from PDB entry 1lpg into the protein binding site taken from 1fax. These structures are of blood coagulation factor Xa, complexed with two different ligands. • The figure below shows a superposition of several experimental determinations of the factor Xa binding site, complexed with a variety of different ligands (not shown), Only a small part of the binding site is displayed. • While it is clear that parts of the binding site are rigid, their positions hardly moving from one structure to the next, other parts are more inclined to move. In particular, the residue at the top right-hand corner of the plot, Gln192, adopts a variety of positions according to which ligand is bound. The Gln192 position highlighted in purple is taken from 1lpg, that shown in orange is taken from 1fax. • The next figure was produced by superimposing 1lpg and 1fax. It shows the 1fax binding site and the 1lpg ligand. Gln192 is highlighted in orange. It is immediately clear that the 1lpg ligand cannot be docked accurately into the 1fax binding site if Gln192 is not allowed to move, since 212 GOLD User Guide there is a severe steric clash between these two. • To see this more clearly, you can open Hermes and read in the file 1fax_1lpg_super.mol2 from the folder containing the tutorial6 files via File, Open; this is the superposition from which the above figure was generated. 20.6.2 Preparation of Input Files • The file 1fax_protein.mol2 contains the binding site from 1fax. It has been set up for docking in the normal way. Parts of the protein remote from the binding site have been deleted in order to speed up the calculation and hydrogen atoms have been placed on the protein in order to ensure that ionisation and tautomeric states are defined unambiguously (see Essential Steps, page 10). • The ligand from 1lpg has also been set up for docking (see Essential Steps, page 50). It is stored in 1lpg_ligand.mol2. Again, attention has been given to protonation states (e.g. the benzamidine group has been built in its protonated form) and the bond types have been set in accordance with GOLD conventions. • These two files may be viewed in Hermes if desired. 20.6.3 Example conf Files and Output Files • Two GOLD configuration files have been prepared. • non_flexible.conf: this file was set up in the normal way using the GOLD front end. It corresponds to a standard docking of the 1lgp ligand into the 1fax binding site, using slow GOLD User Guide 213 search settings (100,000 GA operations) and allowing no side-chain flexibility. The considerations outlined in the preceding part of this tutorial suggest that this docking protocol is unlikely to give good results. The corresponding output can be found in the non_flexible subdirectory. • flexible.conf: this file defines a docking in which the Gln192 side chain is allowed to move. It was set up using the Flexible Sidechains option in the GOLD front end. The corresponding output can be found in the flexible subdirectory. • The processes used to setup and run these dockings are covered in the sections that follow. If you wish, you can run the two GOLD jobs using the configuration files provided. Alternatively, you can view the results that we have generated. Since GOLD is non-deterministic, any results that you get might differ from ours, but the general trends are likely to be the same. 20.6.4 Running the Non-flexible Docking and Analysing the Results • Open Hermes and specify the non_flexible.conf via GOLD, Setup and run a Docking, Load Existing. • Click on the Protein (1fax coagulation factor) tab then click on the Flexible Sidechains option. The defined active site in the protein has been broken down into its constituent residues which are provided in a scrolling list. Scan through the list: you will notice that the Status of all the residues is listed as Rigid. • Return to the Global Options tab (where we can define general docking settings) and click on Output Options. Change the output directory name e.g. to non_flexible2 then click on Run GOLD. When prompted that The GOLD configuration has been updated and needs saving, click OK then change the GOLD conf file name e.g. to non_flexible2.conf. Start the docking by clicking on Save. • Once the docking has completed, load the solutions into Hermes using the View Solutions button, then Close to close the Run GOLD window. • Load the 1fax_1lpg_super.mol2 superposition file into Hermes via File, Open. • Hit the Display tab in the Molecule Explorer section of the interface. This tabbed window lists all component parts of the visualiser display e.g. Protein (1fax) coagulation factor corresponds to the docked protein and ligands. • Deselect all radio buttons in the list apart from Protein (1fax) coagulation factor and LIM::IMA_301_pdb1lpg_1 (the experimental position of the 1lpg ligand). You may wish to hide the H atoms using the Hide H button at the top of the Hermes interface if the display is not clear. • Return to the Docking Solutions tab and select the ligand with the highest fitness score. Scores are tabulated under the GoldScore.Fitness header in the Molecule Explorer section of the Hermes interface. Solutions can be ordered on fitness score by clicking on the GoldScore.Fitness header. You can scroll through the other docking solutions simply by clicking on them. • As expected, none of the solutions produced in our non-flexible run is correct; all have the 214 GOLD User Guide benzyloxy side chain seriously misplaced. The top-ranked docking has a GoldScore of 63.8592 and is shown below with the true ligand position (C atoms coloured grey) for reference: 20.6.5 Running the Flexible Docking and Analysing the Results • Clear the display by going to File, Close All Files. • At this point you can choose to load the existing flexible.conf to view the results of the flexible docking. Alternatively, continue with the tutorial to see how to set up a flexible docking. • Click on the Load button at the top of the GOLD interface and read in the non_flexible.conf file again. The settings is this file are for the non-flexible docking; click on the Protein (1fax) coagulation factor) tab and click on the Flexible Sidechains option where we will be able to specify sidechains that will be allowed to rotate during docking. • Scroll down the list of residues until you get to GLN192. Click on GLN192 then hit the Edit button (alternatively simply double-click on GLN192). • This launches a dialogue where we can add, edit or delete rotamers. GOLD User Guide 215 • The dialogue is blank as we have yet to define any rotamers for GLN192. • Click on the Library button: 216 GOLD User Guide • The dialogue has been updated to reflect rotamers taken from a rotamer library, in this case information taken from the paper The Penultimate Rotamer Library, S. C. Lovell, J. M. Word, J. S. Richardson and D. C. Richardson, Proteins, 40, 389-408, 2000. It is a compilation of the most commonly observed side-chain conformations for the naturally occurring amino acids. The file can be viewed in txt format in <install_dir>/GOLD Suite/GOLD/gold. Note that the library settings are simply a starting point; users are encouraged to generate their own rotamers for optimal results. • The (nine) allowed rotamers are listed at the bottom of the Edit Rotamer Library GLN192 window. Collectively these lines define the torsional flexibility that the Gln192 side-chain will be allowed to have during docking. • There are a number of parameters listed alongside each rotamer: • Chi1 is the first rotatable torsion in the side chain. In the case of GLN192 this corresponds to rotation around Cα-Cβ, so the atoms will be the backbone N, (= atom 2817), CA (2818), CB (2821) and CG (2822). • Chi2 is the second rotatable torsion and corresponds to rotation around Cβ-Cγ, so the atoms are CA (2818), CB (2821), CG (2822) and CD (2823). • Chi3 is the third rotatable torsion, corresponding to rotation around Cγ-Cδ so the atoms are CB (2821), CG (2822), CD (2823) and terminal N (2825). • Thus, Rotamer1 specifies the first set of allowed values for chi1, chi2 and chi3, i.e. Chi1 = 62, GOLD User Guide 217 • • • • • • • • 218 Chi2 = 180, Chi3 = 20. • Associated with each numbered chi value is a delta value. For Rotamer1 these are Delta1 = 13, Delta2 = 14 and Delta3 = 16. These delta values specify the allowed range e.g. (delta1 chi1) to (delta1 + chi1). • Each rotamer therefore describes one allowed conformation of the side chain as defined by the torsion angles values (chi1, chi2, chi3 etc.) and their allowed ranges (delta1, delta2, delta3etc.). The dials at the top of the window reflect the rotamer information for the currently loaded rotamer. In the first instance, the dials reflect the settings for Rotamer1. Allowed rotation values for other rotamers can be viewed in the dials by clicking on each Rotamer line in turn. The settings on the dials describe the following: • green: the observed torsion in the protein • red: the defined rotamer (Chi value) that will be used during docking • blue wedge: the tolerance allowed (Delta) for the defined rotamer There are a number of other options for setting rotamers, other than the library settings: • Rigid: this fixes a particular side chain at its input conformation (i.e. makes it non-flexible during docking). • Free: this allows a side chain to rotate freely during docking i.e. the defined rotatable torsion will be permitted to vary over the range -180 to +180. • Crystal: this setting will define a rotamer in which all rotatable torsions in the side chain will be allowed to vary over the range (delta - chi) to (delta + chi); where chi values are taken from the protein input file. • From dials: this allows rotamers to be specified directly. To set a chi value click on the dial and while holding down the mouse button move the red indicator line to the required position. The corresponding torsion will rotate within the Hermes visualiser to show the current value. Alternatively, type the required chi value into the entry box directly under the dial. We will use the Library settings for this docking so if you have modified any of the rotamer settings from those initially loaded, hit Rigid to reset the rotamer settings then hit Library again. Hit Accept to close the rotamer definition window. GLN192 is now listed as being constrained to nine rotamers in the Flexible Sidechains window. We only require GLN192 to be flexible for the purposes of this example, however using this method we can specify up to 10 rotatable side chains if we wished. Click on the Global Options tab and within the Output Options window, change the output directory to e.g. flexible2 then hit the Run GOLD button. Change the name of the gold.conf to e.g. flexible2.conf then hit Save. Once the docking has finished, load the results into Hermes using the View Solutions button. The following describes the output in the flexible directory provided with the tutorial. If you have set-up and run your own flexible docking using the instructions above, your output may GOLD User Guide vary slightly however the general trends should be the same. • Compare the top-ranked solution with the experimental position of the 1lpg ligand. The topranked solution from the flexible run is much better. It is not perfect - in particular, the benzamidine moiety is somewhat displaced - but the benzyloxy side chain is now roughly in the right position, the Gln192 side chain having moved out the way (reference ligand C atoms coloured grey, docking result C atoms coloured green): • Also, the best solution from the flexible run has a much higher GoldScore value (76.8235) than was obtained from the rigid run. • The movements of the flexible side chain Gln192 can be seen more effectively if the representation style of the Gln192 residue is changed. Click on Selection then Define Complex Selection. Activate the By residue radio button, then hit the Specify Individual button at which point you can select GLN192 from the list of residues. Click Add, Close, Save then Close to complete the selection. The newly defined subset can be selected by picking it from the Atom selections: pull-down menu in Hermes. The display style can be changed after the residue is selected by right-clicking and selecting Styles from the pulldown menu. 20.6.6 Choosing Side-Chain Rotamers • Two decisions must be made when using the flexible side-chain facility: (a) which side chains are made flexible; (b) how flexible is each side chain made? It is important to recognise that the GOLD User Guide 219 • • • • more flexibility is introduced, the larger the search space becomes. Particularly with highthroughput runs, when relatively little time can be allowed per ligand, this may seriously decrease the chance of finding the global minimum. A sensible strategy is therefore to make a side chain flexible only if you have some a priori reason to suppose that it will move, as we have (from X-ray structures) in the tutorial example. On the other hand, we probably allowed Gln192 more movement than necessary in the above experiments. As long as it can adopt the native 1fax position and one other position in which it is folded away from the binding site, that might well have been enough. One problem is that, in some conformations, Gln192 tends to clash with Arg143. At first sight, this means we have to be careful to pick a Gln192 rotamer that is folded away from the binding region but also does not clash with the arginine residue. A way round this is to add the command penalise_protein_clashes = 0 to the rotamer_lib command block (place it anywhere between rotamer_lib and end_rotamer_lib). This will switch off calculation of clashes between flexible side-chain atoms and neighbouring protein atoms, allowing Gln192 to approach nearby residues closely. While physically unrealistic, this is a pragmatic tactic that might well work (and is not as egregious as it sounds, since, in reality, Arg143 can probably move away from Gln192 if it needs to). Obviously you can experiment with these options if you wish. This ends the tutorial. 220 GOLD User Guide 20.7Tutorial 7: Docking using Localised Soft Potentials 20.7.1 Introduction • First, copy the files in <install_dir>/GOLD Suite/GOLD/examples/tutorial7 to a directory to which you have write permissions. • The object of this tutorial is to demonstrate how to employ the Localised Soft Potential option that is available when using GoldScore. This option allows you to soften the VdW clash component of the GoldScore for one or more residues in the protein. We will examine the docking of a ligand to two different crystal structures of Estrogen Receptor Alpha. The structures differ in that a small loop movement constrains the binding site of one of the structures (pdb code 1x7r) slightly more than for the other structure (pdb code 1l2i). • The figure below shows the superposition of both protein structures. 1x7r corresponds to the protein colour coded light blue and the ligand colour coded green, 1l2i corresponds to the protein colour coded orange with the ligand colour coded yellow. • Most of the binding site is well superimposed however above the ligands you can see that there is movement of a protein loop that brings Leu346 closer in to the ligand in 1x7r than in 1l2i. This superposition suggests that a clash would exist if the ligand from 1l2i were docked into 1x7r. GOLD User Guide 221 This might prevent the correct binding mode being rated highly if using a scoring function such as GoldScore, with a clash term that increases sharply with proximity to the protein. Other residues such as Met343 also do not superimpose well as a consequence of this loop movement. However these residue shifts appear to have less of an impact on the size of the active site than does that of Leu346. • You can view this superposition yourself by opening Hermes or another protein visualiser and reading in the file 1x7r_1l2i_sup.mol2. 20.7.2 Docking With No Soft Potential Applied • The files 1l2i_prot.mol2 and 1x7r_prot.mol2 are the protein models derived from the pdb entries 1l2i and 1x7r respectively. 1l2i_lig.mol2 is the ligand structure obtained from, and in the same frame of reference as 1l2i. • The GOLD configuration file gold_1l2i_1l2i.conf is set up to dock the 1l2i ligand back into the 1l2i protein structure. Load the file into GOLD via GOLD, Setup and Run a Docking, Load Existing, then navigate to the folder containing the tutorial7 files, select gold_1l2i_1l2i.conf and click Open. Run this GOLD job and analyse the results in Hermes to check that the crystallographic binding mode is indeed retrieved. Note that once the GOLD run has finished, the docking results can be read directly into Hermes from the GOLD Run window via the View Solutions button. Read in the file 1l2i_lig.mol2 to make the comparison. • The GOLD configuration file gold_1x7r_1l2i.conf is set up to dock the 1l2i ligand into the 1x7r protein structure. Load the gold_1x7r_1l2i.conf as described above, run this GOLD job then analyse the results in Hermes. Read in the file 1x7r_1l2i_sup.mol2 to compare the docked poses with the binding mode found in 1l2i. You may find that there are some solutions which have approximately the right binding mode which return scores of between 23 and 25. However there should also exist higher ranking poses with scores of between 28 and 32. These poses have the ligand rotated through 180 degrees along the long axis as shown in the superposition below (crystallographic binding mode colour coded orange, GOLD docking pose colour coded green). 222 GOLD User Guide 20.7.3 Cross-Docking into 1x7r with a Soft Potential applied to Leu 346 • Load the file gold_1x7r_1l2i_SP.conf into Hermes. The definition of soft potentials is specific to the protein thus click on the MOL_ID:1; tab (adjacent to the Global Options tab). Click on Soft Potentials. • You will notice that LEU346 is already in the Residues - alternative potential 1 box. This means that a soft vdW potential with 2-4 functional form has been applied to one residue only, Leu346. This replaces the default 4-8 functional form that applies to the rest of the protein. Note: Potentials are applied simply by choosing the appropriate potential (i.e. either 1 or 2) and activating the Add selections radio button adjacent. Residues are then added to the appropriate box by selecting them in the 3D view. • Because LEU346 is in the Residues - alternative potential 1 box, this means a 2-4 soft potential is applied to the residue. If LEU346 had been entered into the Residues - alternative potential 2, this would mean a softer 1-2 functional form would be applied. Further information is available (see Allowing For Localised Movements: Docking With Soft Potentials, page 48). • Run the docking job gold_1x7r_1l21_SP.conf and analyse the results using Hermes. • This time you should find that the highest scoring solutions correspond very closely with the 1l2i binding mode (see below). These solutions will have scores of 43-45. The reversed binding mode still appears in some solutions but these invariably have lower scores. GOLD User Guide 223 This ends the tutorial. 224 GOLD User Guide 20.8Tutorial 8: Generating Diverse Solutions 20.8.1 Introduction • First, copy the files in <install_dir>/GOLD Suite/GOLD/examples/tutorial8 to a directory to which you have write permissions. • The object of this tutorial is to investigate PDB code 3MTH, pig hormone complexed with methylparaben insulin. The binding site is large and primarily hydrophobic in nature with a small number of acceptor regions. The ligand is small, thus there is potential for obtaining an incorrect docking pose or poses. Consequently, GOLD does not perform well when attempting to replicate the binding mode of the ligand. • 3MTH is an entry in the CCDC/Astex validation test set: http://www.ccdc.cam.ac.uk/products/ life_sciences/gold/validation/astex/. • A water molecule which mediates protein-ligand binding in the native crystal structure has been reinstated in the protein molecule file (all water molecules were removed from the protein files for validation). The presence of this water molecule does not improve the standard GOLD docking results significantly (i.e. without using the diverse solutions feature). • This tutorial will illustrate how to use GOLD to generate diverse solutions, and show how this feature can be used to improve the outcome of docking methylparaben insulin back into its native protein. 20.8.2 Preparation of Input Files • The original PDB file (3MTH.pdb) has been provided should you wish to set up the protein and ligand files yourself. • Protein and ligand files are also provided and have been set up in accordance with guidelines for the preparation of input files (see Setting Up the Protein(s), page 10) and (see Setting Up Ligands, page 50) respectively. • These files can be opened in Hermes and inspected. You will be able to see the extent of the protein active site compared to the size of the ligand. 20.8.3 GOLD Configuration Files • Two GOLD configuration files are provided in <install_dir>/GOLD Suite/GOLD/ examples/tutorial8. The settings in these files and how to run the files is covered in the sections that follow: • gold.conf (see Running gold.conf and Viewing the Results, page 225). • diverse.conf (see Running a Diverse Solutions Docking and Viewing the Results, page 227). 20.8.4 Running gold.conf and Viewing the Results • The gold.conf configuration file contains settings for carrying out a standard docking, i.e. GOLD User Guide 225 • • • • • • without generating diverse solutions. Output files have already been generated for this docking and are provided in the gold directory. These results can be viewed directly by opening Hermes and reading in the gold.conf via Load GOLD results. Alternatively GOLD can be run again following the instructions below. Load the gold.conf into GOLD via GOLD, Setup and Run a Docking, Load Existing, then navigate to the folder containing the tutorial8 files, select gold.conf and click Open. This automatically loads the settings and parameter values for this tutorial into the GOLD front end. No settings need to be changed for the purposes of this docking however you may wish to change the output directory. To do this, click on Output Options and either type the path to or browse to an appropriate output folder where the GOLD output files can be saved. The GOLD run is started by hitting the Run GOLD button at the bottom of the interface. You will be prompted that the GOLD configuration has been updated and needs to be saved: click OK. In the Finish GOLD Configuration window modify the GOLD conf file name so that it doesn’t overwrite the existing gold.conf, then ensure the Protein tickbox is deactivated. Hit Run GOLD to start GOLD. Once the docking is complete, the message Finished Docking Ligand: ligand.mol2 will appear in the gold_ligand_m1.log tabbed view of the Run GOLD window. The GOLD results can be read into Hermes via the View Solutions button in the Run GOLD window. The input ligand can also be used as a reference ligand (i.e. the original pose of the ligand in the crystal structure) so read this in via File, Open. The 3D display can be controlled by using the settings under the Display tab. Further options are available on right-clicking. • All docked solutions can be viewed by returning to the Docking Solutions window and pressing the Alt keyboard key whilst using the mouse to select first the top then the bottom solution. You will notice that all the solutions are very similar. 226 GOLD User Guide • None of the solutions replicate the original binding mode. The ligand OH group is H-bonding to the same CYS6 carbonyl group, however the size of the protein active site means it is possible for the ligand to occupy an alternative area of the cavity than in the original crystal structure. Also, the water molecule known to mediate the protein-ligand interaction is not being used by the pose above. • The RMSD of the top ranked pose when compared to that of the co-crystallised ligand is 7.30 Å. • Clear up the 3D view by selecting File then Close All Files. 20.8.5 Running a Diverse Solutions Docking and Viewing the Results • The docking set-up is provided in diverse.conf and the corresponding output is in the diverse directory in the folder to which you copied the tutorial8 files. The docking results can be read into Hermes via File, Load GOLD results. Alternatively the diverse solutions docking can be set up by modifying the conf file from the previous exercise; instructions on how to do this follow. • The GOLD interface will still be open. Click on the Load button to read the gold.conf from above. • Click on Fitness & Search Options then activate the Generate Diverse Solutions tickbox. The settings for generating diverse solutions can be modified; click on the Diverse Solutions Options buttons to view these settings. • Change the Cluster size to 2 and the R.M.S.D. to 2.0 Angstroms. This means that each diverse solutions cluster will contain 2 ligands and that the clusters will differ by an RMSD of 2 Å (see Setting Up GOLD to Generate Diverse Solutions, page 106). Hit Close to close the window. • Now click on Output Options and change the directory from what it was previously to e.g. diverse_solutions. At the bottom of the window, activate the Create links for different binding modes (based on RMSD clustering) tick box, then enter 2.0 into the box next to d=. GOLD User Guide 227 Because we have defined the same value for RMSD as with our diverse solutions settings, the cluster shortcuts will point to the top-ranked solution in each of our diverse clusters (see Identification of Different Binding Modes (Clustering of Ligand Poses), page 154). • Now hit the Run GOLD button to start the docking. When prompted, change the GOLD conf file name e.g. to diverse_solutions.conf (this will ensure a new conf file is saved rather than overwriting the original file), then hit Save to start the docking. • Once the docking has completed, load the results into Hermes by hitting the View Solutions button. • Before closing the Run GOLD window, inspect the gold_ligand_m1.log file. Diverse solution information is given for each docked ligand under the heading Diverse Solutions Stats. • • • • These stats are explained elsewhere (see Method Used to Generate Diverse Solutions, page 105). Cluster information can be found at the end of the file. At the 2.44 Angstrom cut-off there are 4 clusters. Close the Run GOLD window by hitting the Close button. As before, load the reference file ligand.mol2 via File, Open so that the docked poses can be compared to the crystallographic pose. 228 GOLD User Guide • You should see something similar to the above (H atoms removed for clarity; native ligand coloured by atom type). Two of the solutions are close to the native binding pose. • The RMSDs for the top ranked pose in each cluster compared to the native ligand pose in the example above are: • cluster 1: 7.35 Å (GoldScore fitness 29.48, ranked 1st) • cluster 2: 5.20 Å (GoldScore fitness 26.19, ranked 3rd) • cluster 3: 0.82 Å (GoldScore fitness 25.23, ranked 7th) • cluster 4: 7.82 Å (GoldScore fitness 24.48, ranked 9th) • You will observe something similar in the docking you have carried out. 20.8.6 Conclusions • The binding site of 3MTH is large. In addition, there are a relatively small number of donor and/ or acceptor points in the active site where a ligand might bind. Furthermore, the co-crystallised ligand, methylparaben insulin also contains few functional groups. All of these factors mean the docking of the native ligand back into 3MTH is a complex problem for GOLD. • Enabling the diverse solutions feature produces a number of different docked poses, one of which is found to be close to the native ligand pose. This ends the tutorial. GOLD User Guide 229 20.9Tutorial 9: Running a Covalent Docking 20.9.1 Introduction • First, copy the files in <install_dir>/GOLD Suite/GOLD/examples/tutorial9 to a directory to which you have write permissions. • The object of this tutorial is to perform a covalent docking using 1ASE, taken from the CCDC/ Astex validation test set: http://www.ccdc.cam.ac.uk/. The ligand is an essential co-factor in enzymatic transamination and is bound covalently through an azomethine linkage between the ligand and an active-site lysine (LYS258). • This tutorial will illustrate how to carry out a covalent docking by docking the PLP N-oxide ligand back into its native binding site. 20.9.2 Preparation of Input files • The original PDB file (1ASE.pdb) has been provided should you wish to set up the protein and ligand files yourself. • Protein and ligand files are also provided and have been set up in accordance with guidelines for the preparation of input files (see Setting Up the Protein(s), page 10) and (see Setting Up Ligands, page 50) respectively. 20.9.3 Running a Covalent Docking • GOLD makes a few assumptions when docking covalently (see Method Used for Docking Covalently Bound Ligands, page 55): • It is assumed that there is just one atom linking the ligand to the protein. • The link atom must be present in both the protein and ligand files. • Ideally in both files the link atom will have a free valence available through which the link can be made. • It is possible to dock covalently to a single ligand (see Setting Up a Single Covalent Link, page 56) or a ligand substructure (see Setting Up Substructure-Based Covalent Links, page 57). In this case we are docking only to a single ligand. Note that mol2 files must be used when running covalent dockings. • Load both the protein and ligand files into Hermes. You will see that the ligand is indeed covalently bonded to LYS258. Both moieties have been highlighted in capped stick in the image below (note that the H atoms on the protein have been hidden for clarity). 230 GOLD User Guide • If you view the protein and ligand files separately (toggling either off using the Molecule Explorer) you will notice the N atom is present in both files. The presence of this atom in both files is extremely important as will be illustrated when we set up the docking later on. • Close the protein and ligand files by clicking on File and then Close All Files in the Hermes main menu. 20.9.4 Setting up a covalent docking • Open Hermes. Load the gold.conf provided into GOLD via GOLD, Setup and Run a Docking, Load Existing, then navigate to the folder containing the tutorial9 files, select gold.conf and click Open. • Open the ligand.mol2 file via File, Open. • The settings for a covalent docking are specific to the protein so click on the Protein (1ase aminotransferase) tab to access the protein settings, then click on Covalent. • Activate the Define covalent docking tickbox. As we are docking a single ligand and not a substructure, ensure the Ligand link mode: Atom radio button is selected. Now we must either enter the atom IDs manually into the Protein link atom and Ligand link atom boxes or else select GOLD User Guide 231 the atoms in the 3D view. • Both the ligand and protein files are open in the 3D view, so return to Hermes and select first the ligand link N atom (atom ID 25) and the protein link atom (atom ID 1905). Note that you can toggle the ligand/protein on and off via the Molecule Explorer to help make the selection of both covalent constraint atoms easier. • Once you have finished defining the covalent atoms, click on the Global Options tab to return to the general docking setup. • Click on Output Options and specify a directory to which you have write permission. This will be where the output files are written. • Click on the Run GOLD button and click OK in the dialogue informing you that the GOLD configuration has been updated and needs saving. Change the gold.conf filename to e.g. covalent.conf then hit Save. 20.9.5 Analysis of output • Once the docking has completed, click on the gold_ligand_m1.log text in the Run GOLD window. This will load the ligand.log file into the Run GOLD window, enabling us to view the 232 GOLD User Guide progress of each genetic algorithm run. • Scroll through this file. You will notice that as the ligand was being initialised, the covalent constraint was analysed: • You will notice a couple of Angle terms: these correspond to the geometry around the link N atom. During docking GOLD refers to angle and torsion data in its parameter file to ensure the pose(s) adopted by the ligand are chemically sensible. This is also done for the covalent link to ensure the geometry around the link is sensible. The entry 178 text corresponds to the line number of the angle entry in the BOND_ANGLE_TABLE in the gold.params file. • If you scroll down further you will notice that during the algorithm run, the fitness score is broken down into its constituent parts, specifically S(hb_ext), S(vdw_ext), S(hb_int), S(int). In addition to these default scoring terms there is an additional term, S(cov), that is added only when docking covalently. Within the BOND_ANGLE_TABLE in the gold.params there are also energy terms and the S(cov) contribution to the score is calculated from this. GOLD User Guide 233 • Click on the View Solutions button in the Run GOLD window to load the docking results into the 3D view. Then hit Close to close the window. • Scroll through the docking results. You will notice the ligand is indeed bonded to the protein. • The docked poses can be compared to the pose of the native ligand structure by superimposing the docking solutions with the ligand.mol2 file. Select the Display tab at the top of the Molecule Explorer and ensure only the Ligand_reference (1ase) aminotransferase tickbox is active, then return to the Docking Solutions tab and select all the docking solutions. 234 GOLD User Guide This ends the tutorial. GOLD User Guide 235 21. Appendix B: List of Atom and Bond Types GOLD uses SYBYL atom and bond types as follows: Atom types: Hydrogen H Carbon sp3 C.3 Carbon sp2 C.2 Carbon sp C.1 Carbon aromatic C.ar Carbocation (guanadinium) C.cat Nitrogen sp3 N.3 Nitrogen sp2 N.2 Nitrogen sp N.1 Nitrogen aromatic, e.g. in pyridine N.ar Nitrogen amide N.am Nitrogen trigonal planar, e.g. in nitro, pyrrole N.pl3 Nitrogen sp3 positively charged, e.g. in lysine N.4 236 Oxygen sp3 O.3 Oxygen sp2 O.2 Oxygen in carboxylates and phosphates O.co2 Sulphur sp3 S.3 Sulphur sp2 S.2 Sulphoxide sulphur S.o Sulphone sulphur S.o2 Phosphorus sp3 P.3 GOLD User Guide Halogens, metals normal element symbols, e.g. F, Cl, Ca, Zn Bond types: GOLD User Guide single 1 double 2 triple 3 aromatic ar amide am delocalised, e.g. in carboxylate, guanidinium ar 237 22. Appendix C: Additional Tags in Output Files • Solution output files for the docked ligand(s) can contain additional information such as the scoring function terms and the rotated protein hydrogen atom positions that were generated during the docking. • This information can be written to SD file tags; for MOL2 files, these tags are written to comment blocks. This additional information is particularly important when post-processing docking results with GoldMine. It is possible to control the information written to solution files (see Controlling the Information Written to Ligand Solution Files, page 140). • The table below lists the tag names that you are likely to see in GOLD solution files Name Explanation See Gold.Protein.ActiveResidue s List of protein residues used to define the binding site. (see Defining a Binding Site from a List of Atoms or Residues, page 24) Gold.Protein.RotatedAtoms Optimised positions of polar protein hydrogen atoms that are generated during docking. (see File Containing the Protein BindingSite Geometry, page 148) Gold.Protein.RotatedWater Atoms Optimised positions of water hydrogen atoms generated during docking (see Water Molecules, page 15) Gold.Protein.RotatedTorsio ns Optimised torsions for rotatable bonds in the ligand. Also for protein side chain torsions which have been specified as being allowed to rotate during docking (see Side Chain Flexibility, page 34) Gold.Id.Protein Enabling the association of a solution with its protein Gold.Id.Ligand Ligand identifier Gold.Rescore.Rmsd Rmsd of rescored solutions (see Rescoring, page 135) Scoring terms 238 GOLD User Guide Name Explanation See Gold.Fitness.Score Total fitness value of docked ligand Gold.Covalent.Energy Covalent bonding contribution to the fitness score Gold.Constraint.Score Constraint contribution to the fitness score Ligand.Score.Contributions For individual ligand atom it’s scoring contribution to the total fitness score and also the constituent scoring terms. (see Controlling the Information Written to Ligand Solution Files, page 140) Protein.Score.Contributions For individual protein atom its scoring contribution to the total fitness score and also the constituent scoring terms. (see Controlling the Information Written to Ligand Solution Files, page 140) Gold.Ensemble.ID When docking into protein ensembles, this is a numerical identifier given to each initialised protein. The Gold.Ensemble.ID corresponds to the number in the output protein file, i.e. gold_protein_1.mol2, gold_protein_2.mol2. (see Interpreting Ensemble Docking Output, page 46) Total GoldScore fitness value of docked ligand (see GoldScore, page 74) GoldScore Gold.Goldscore.Fitness Gold.Goldscore.External.Hb Protein-ligand H-bond ond contribution to GoldScore value (see GoldScore, page 74) Gold.Goldscore.External.Vd Protein-ligand vdw w contribution to GoldScore value (see GoldScore, page 74) GOLD User Guide 239 Name Explanation See Gold.Goldscore.Internal.Hb ond Internal ligand intramolecular H-bond contribution to GoldScore value (see GoldScore, page 74) Gold.Goldscore.Internal.Vd w Internal ligand vdw contribution to GoldScore value (see GoldScore, page 74) Gold.Goldscore.Internal.Tor sion Internal ligand torsion-strain contribution to GoldScore value (see GoldScore, page 74) Gold.Goldscore.Covalent.E nergy Covalent bonding contribution to Goldscore value (see GoldScore, page 74) Gold.Goldscore.Constraint. Score Constraint contribution to GoldScore value (see GoldScore, page 74) Gold.Goldscore.Internal.Cor Internal ligand energy offset rection (see Internal Energy Offset, page 104) Gold.Goldscore.Protein.Ene rgy Protein energy term to penalise clashes when using flexible sidechains (see Protein-Protein Clashes, page 42) Gold.Goldscore.SBar Penalty term for nondisplacement of active site waters (see Water Molecules, page 15) Gold.Goldscore.Reference. RMSD RMSd of solution against reference ligand (see Specifying a Ligand Reference File, page 58) Gold.Chemscore.ZeroCoef The Chemscore zero coefficient (see Overview, page 76) Gold.Chemscore.Rot Rotatable-bond freezing term contribution to Chemscore value (see Rotatable-Bond Freezing Term, page 82) Gold.Chemscore.Fitness Total Chemscore fitness value of docked ligand (see Overview, page 76) Chemscore 240 GOLD User Guide Name Explanation See Gold.Chemscore.Hbond Protein-ligand H-bond contribution to Chemscore value (see Hydrogen-Bond Terms, page 78) Gold.Chemscore.Lipo Protein-ligand lipophilic contribution to the Chemscore value (see Metal-Binding and Lipophilic Terms, page 81) Gold.Chemscore.Metal Metal-binding contribution to Chemscore value (see Metal-Binding and Lipophilic Terms, page 81) Gold.Chemscore.internal_H bond Internal ligand intramolecular H-bond contribution to Chemscore value (see Hydrogen-Bond Terms, page 78) Gold.Chemscore.DEClash Protein-ligand clash penalty to the Chemscore value (see Clash Penalty and Internal Torsion Terms, page 83) Gold.Chemscore.DEInternal Internal ligand torsional strain (see Clash Penalty penalty to the Chemscore value and Internal Torsion Terms, page 83) Gold.Chemscore.DG Free energy change (that occurs on ligand binding) contribution to Chemscore value (see Overview, page 76) Gold.Chemscore.Covalent Covalent bonding contribution to Chemscore value (see Covalent Term, page 85) Gold.Chemscore.Constraint Constraint contribution to Chemscore value (see Constraint Terms, page 85) Gold.Chemscore.CHOScore Contribution for weak CH...O H-bonds (see Kinase Scoring Function, page 93) Gold.Chemscore.Internal.C orrection Internal ligand energy offset (see Internal Energy Offset, page 104) Gold.Chemscore.Protein.En ergy Protein energy term to penalise clashes when using flexible sidechains (see Protein-Protein Clashes, page 42) GOLD User Guide 241 Name Explanation See Gold.Chemscore.SBar Penalty term for nondisplacement of active site waters (see Water Molecules, page 15) Gold.Chemscore.Reference. RMSD RMSd of solution against reference ligand (see Specifying a Ligand Reference File, page 58) Astex Statistical Potential (ASP) 242 Gold.ASP.Fitness Total ASP fitness value of docked ligand (see Astex Statistical Potential (ASP), page 86) Gold.ASP.ASP Calculated statistical potential plus the ChemScore clash term and internal energy term (see Astex Statistical Potential (ASP), page 86) Gold.ASP.Map. The total calculated statistical potential is a summation over all combinations of protein and ligand atoms (see Astex Statistical Potential (ASP), page 86) Gold.ASP.Hbond Protein-ligand H-bond contribution to ASP value (see Astex Statistical Potential (ASP), page 86) Gold.ASP.Metal. Metal-binding contribution to ASP value (see Astex Statistical Potential (ASP), page 86) Gold.ASP.DEClash Protein-ligand clash penalty to the ASP value (see Astex Statistical Potential (ASP), page 86) Gold.ASP.DEInternal Internal ligand intramolecular H-bond contribution to ASP value (see Astex Statistical Potential (ASP), page 86) Gold.ASP.Rot Rotatable-bond freezing term contribution to ASP value (see Astex Statistical Potential (ASP), page 86) GOLD User Guide Name Explanation See Gold.ASP.Covalent Covalent bonding contribution to ASP value (see Covalent Docking and Docking with Constraints, page 89) Gold.ASP.Constraint Constraint contribution to ASP value (see Covalent Docking and Docking with Constraints, page 89) Gold.ASP.Protein.Energy Protein energy term to penalise clashes when using flexible sidechains (see Protein-Protein Clashes, page 42) Gold.ASP.SBar Penalty term for nondisplacement of active site waters (see Water Molecules, page 15) Gold.ASP.Internal.Correctio Internal ligand energy offset n (see Internal Energy Offset, page 104) Gold.ASP.Reference.RMSD RMSd of solution against reference ligand (see Specifying a Ligand Reference File, page 58) Piecewise Linear Potential (PLP) Gold.PLP.Fitness Total PLP fitness value of docked ligand (see Piecewise Linear Potential (PLP), page 68) Gold.PLP.PLP Calculated potentials plus the ChemScore clash term and internal energy term (see Piecewise Linear Potential (PLP), page 68) Gold.PLP.part.hbond Protein-ligand H-bond contribution to PLP value (see Piecewise Linear Potential (PLP), page 68) Gold.PLP.part.metal Metal-binding contribution to PLP value (see Piecewise Linear Potential (PLP), page 68) GOLD User Guide 243 244 Name Explanation See Gold.PLP.part.buried. Scoring contribution from buried interaction types (see Piecewise Linear Potential (PLP), page 68) Gold.PLP.part.nonpolar Scoring contribution from nonpolar interaction types (see Piecewise Linear Potential (PLP), page 68) Gold.PLP.part.repulsive Scoring contribution from repulsive interaction types (see Piecewise Linear Potential (PLP), page 68) Gold.PLP.ligand.clash Protein-ligand clash penalty to the PLP value (see Piecewise Linear Potential (PLP), page 68) Gold.PLP.ligand.torsion Internal ligand torsional strain penalty to the PLP value (see Piecewise Linear Potential (PLP), page 68) Gold.PLP.Chemscore.hbond Chemscore Protein-ligand Hbond contribution (see Piecewise Linear Potential (PLP), page 68) Gold.PLP.Chemscore.CHOs Contribution for weak CH...O core H-bonds (see Piecewise Linear Potential (PLP), page 68) Gold.PLP.Chemscore.metal Chemscore Metal-binding contribution (see Piecewise Linear Potential (PLP), page 68) Gold.PLP.Goldscore.Hbond Goldscore Protein-ligand Hbond contribution (see Piecewise Linear Potential (PLP), page 68) Gold.PLP.DEclash Protein-ligand clash penalty to the PLP value (see Piecewise Linear Potential (PLP), page 68) Gold.PLP.Chemscore.protei n.energy Protein energy term to penalise clashes when using flexible sidechains (see Protein-Protein Clashes, page 42) GOLD User Guide Name Explanation See Gold.PLP.SBar Penalty term for nondisplacement of active site waters (see Water Molecules, page 15) Gold.PLP.Chemscore.intern al.correction Internal ligand energy offset (see Internal Energy Offset, page 104) Gold.PLP.Chemscore.covale Covalent bonding contribution nt to PLP value (see Piecewise Linear Potential (PLP), page 68) Gold.PLP.constraint (see Piecewise Linear Potential (PLP), page 68) Constraint contribution to PLP value • Certain docking-score terms are the product of a term dependent on the magnitude of a particular physical contribution (e.g. hydrogen bonding) and a scale factor determined e.g. by a regression coefficient. • The docking-score term descriptors included in the output file can therefore consist of weighted terms, non-weighted terms or both (see Controlling the Information Written to Ligand Solution Files, page 140). • Weighted terms will be indicated as such in the tag name, e.g. Gold.Chemscore.Hbond.Weighted. GOLD User Guide 245 23. Appendix D: Genetic Algorithm Parameter Definitions 23.1 Population Size • The genetic algorithm maintains a set of possible solutions to the problem. Each possible solution is known as a chromosome and the set of solutions is termed a population. • The variable Population Size (or popsize) is the number of chromosomes in the population. If n_islands is greater than one (i.e. the genetic algorithm is split over two or more islands), popsize is the population on each island. • Changes to genetic algorithm parameters should be made with care (see Controlling Accuracy and Speed with Genetic Algorithm Parameter Settings, page 128). 23.2 Selection Pressure • Each of the genetic operations (crossover, migration, mutation) (see Operator Weights: Migrate, Mutate, Crossover, page 247) takes information from parent chromosomes and assembles this information in child chromosomes. The child chromosomes then replace the worst members of the population. • The selection of parent chromosomes is biased towards those of high fitness, i.e. a fit chromosome is more likely to be a parent than an unfit one. • The selection pressure is defined as the ratio between the probability that the most fit member of the population is selected as a parent to the probability that an average member is selected as a parent. Too high a selection pressure will result in the population converging too early. • For the GOLD docking algorithm, a selection pressure of 1.1 seems appropriate, although 1.125 may be better for library screening where the aim is faster convergence. • Changes to genetic algorithm parameters should be made with care (see Controlling Accuracy and Speed with Genetic Algorithm Parameter Settings, page 128). 23.3 Number of Operations • The genetic algorithm starts off with a random population (each value in every chromosome is set to a random number). Genetic operations (crossover, migration, mutation) (see Operator Weights: Migrate, Mutate, Crossover, page 247) are then applied iteratively to the population. The parameter Number of Operations (or maxops) is the number of operators that are applied over the course of a GA run. • It is the key parameter in determining how long a GOLD run will take. • Changes to genetic algorithm parameters should be made with care (see Controlling Accuracy and Speed with Genetic Algorithm Parameter Settings, page 128). 23.4 Number of Islands • Rather than maintaining a single population, the genetic algorithm can maintain a number of 246 GOLD User Guide populations that are arranged as a ring of islands. Specifically, the algorithm maintains n_islands populations, each of size popsize. • Individuals can migrate between adjacent islands using the migration operator. • The effect of n_islands on the efficiency of the genetic algorithm is uncertain. • Changes to genetic algorithm parameters should be made with care (see Controlling Accuracy and Speed with Genetic Algorithm Parameter Settings, page 128). 23.5 Niche Size • Niching is a common technique used in genetic algorithms to preserve diversity within the population. • In GOLD, two individuals share the same niche if the rmsd between the coordinates of their donor and acceptor atoms is less than 1.0 Å. • When adding a new individual to the population, a count is made of the number of individuals in the population that inhabit the same niche as the new chromosome. If there are more than NicheSize individuals in the niche, then the new individual replaces the worst member of the niche rather than the worst member of the total population. • Changes to genetic algorithm parameters should be made with care (see Controlling Accuracy and Speed with Genetic Algorithm Parameter Settings, page 128). 23.6 Operator Weights: Migrate, Mutate, Crossover • The operator weights are the parameters Mutate, Migrate and Crossover (or pt_cross). • They govern the relative frequencies of the three types of operations that can occur during a genetic optimisation: point mutation of the chromosome, migration of a population member from one island to another, and crossover (sexual mating) of two chromosomes. • Each time the genetic algorithm selects an operator, it does so at random. Any bias in this choice is determined by the operator weights. For example, if Mutate is 40 and Crossover is 10 then, on average, four mutations will be applied for every crossover. • The migrate weight should be zero if there is only one island, otherwise migration should occur about 5% of the time. • Changes to genetic algorithm parameters should be made with care (see Controlling Accuracy and Speed with Genetic Algorithm Parameter Settings, page 128). GOLD User Guide 247 24. Appendix E: Utility Programs 24.1 smart_rms • smart_rms calculates the rms difference between two conformations of the same structure, while taking account of symmetry effects (such as the flipping of a phenyl ring by 180 degrees). Using a graph isomorphism algorithm, an rms score is calculated for each way of mapping the molecule onto itself. • smart_rms can be invoked from the command line. The following platform-dependent commands should be used. • Linux platforms: <install_dir>/GOLD_Suite/bin/smart_rms [-hv] conformation_1 conformation_2 • Windows platforms (at the Windows command prompt): <install_dir>\GOLD\gold\d_win32\bin\smartrms_win32.exe conformation_2 [-hv] conformation_1 where <install_dir> is the GOLD installation directory. If specifying the full path, the command will need to be in inverted commas, e.g. : “C:\Program Files\CCDC\GOLD_Suite\GOLD\gold\d_win32\bin\smartrms_win32.exe” [hv] conformation_1 conformation_2 • The flags are: h use heavy atoms only (the calculation easily becomes intractable if Hs are included). v verbose output. conformation_1 and conformation_2 are MOL2 files containing the two conformations. 24.2 rms_analysis • rms_analysis calculates an rms difference matrix for a set of structures (as MOL2 files) and performs hierarchical cluster analysis. A graph isomorphism algorithm is used to determine optimal rms values. • rms_analysis can be invoked from the command line. • The structure of the command is dependent on the platform being used: • Linux: 248 GOLD User Guide <install_dir>/GOLD_Suite/bin/rms_analysis -method [simple|complete|group_average] <file1>.mol2 <file2>.mol2 <file3>.mol2 <file4>.mol2... Note: this command will only work if users have their GOLD_DIR environment variable correctly set. To e.g. carry out a simple cluster analysis for the files file1.mol2 and file2.mol2, the following command would be used: <install_dir>/GOLD_Suite/bin/rms_analysis -method simple file1.mol2 file2.mol2 • Windows (via the command prompt): <install_dir>\GOLD\gold\d_win32\bin\rms_analysis_win32.exe -method [simple|complete|group_average] <file1>.mol2 <file2>.mol2 <file3>.mol2 <file4>.mol2... where <install_dir> is the GOLD installation directory. If specifying the full path, the command will need to be in inverted commas, e.g. : “C:\Program Files\CCDC\GOLD_Suite\GOLD\gold\d_win32\bin\rms_analysis_win32.exe method [simple|complete|group_average] <file1>.mol2 <file2>.mol2 <file3>.mol2 <file4>.mol2... • Choose simple for single linkage cluster analysis, complete for complete linkage, group_average for group average. • For example, the table of rms deviations below for nine dockings of a molecule produces the following clustering with the complete linkage method: 1 2 3 4 5 6 7 8 GOLD User Guide 2 3 4 5 6 7 8 9 0.8 1.1 1.0 1.0 1.4 2.3 5.0 4.6 0.9 1.1 1.1 1.2 2.3 5.2 4.6 0.4 0.8 0.9 2.3 5.0 4.5 0.6 1.1 2.3 4.9 4.5 1.3 2.0 4.9 4.5 1.8 5.1 4.4 5.3 4.5 2.4 249 Step Distance between clusters being merged Clusters 1 0.40 1 | 2 | 3, 4 | 9 | 5 | 6 | 7 | 8 | 2 0.84 1 | 2 | 3, 4, 5 | 9 | 8 | 6 | 3 0.84 1, 2 | 7 | 3, 4, 5 | 9 | 8 | 6 | 4 1.13 1, 2, 3, 4, 5 | 7 | 6 | 9 | 8 | 5 1.42 1, 2, 3, 4, 5, 6 | 7 | 8 | 9 | 6 2.35 1, 2, 3, 4, 5, 6, 7 | 9 | 8 | 7 2.38 1, 2, 3, 4, 5, 6, 7 | 8, 9| 8 5.28 1, 2, 3, 4, 5, 6, 7, 8, 9 | 24.3 identify_ligand.py • identify_ligand.py can be used to extract a specific ligand description from PDB SDFile or MOL2 format input files. • It requires a filename and a ligand number (n) as arguments and then locates the nth ligand in the file. If any descriptive information, such as the ligand name, is available for that ligand, it is then displayed. • identify_ligand.py can be invoked from the command line. The structure of the command is: identify_ligand.py <ligand data file> <ligand number> Note: identify_ligand.py is a Python script and as such requires a working installation of Python (http://www.python.org). 24.4 check_mol2.exe • check_mol2 uses the same algorithms as the main GOLD program to check the quality of the input ligand structure. • check_mol2 can either be used to simply generate output on the ligand of interest or to create a corrected version of the ligand that can be used by GOLD. • check_mol2 only works on mol2 files with individual ligands. In other words it will not work on a multi-mol2 file. • check_mol2 can be invoked from the command line. The following platform-dependent commands should be used: 250 GOLD User Guide • Linux platforms: <install_dir>/GOLD_Suite/bin/check_mol2 -i ligand.mol2 [-o corrected_ligand.mol2] • Windows platforms (at the Windows command prompt): <install_dir>\GOLD\gold\d_win32\bin\check_mol2.exe -i ligand.mol2 [-o corrected_ligand.mol2] where <install_dir> is the GOLD installation directory. If specifying the full path, the command will need to be in inverted commas, e.g. : "C:\Program Files\CCDC\GOLD_Suite\GOLD\gold\d_win32\bin\check_mol2.exe" -i ligand.mol2 [-o corrected_ligand.mol2] • The flags are: • i original input ligand • o corrected output ligand 24.5 apply_rotated_atoms.py • In GOLD rotated atoms, water atoms and residues are solution specific, hence the coordinates of the rotated atoms are written to each solution file, not the initialised gold_protein.mol2 file. • Rotated atoms may be visualised using Hermes however other visualisers will not display them. • A script apply_rotated_atoms.py, is provided to extract the rotated atom positions from the ligand solution file and apply them to the protein file. • The form of the command is the following: python %s <path to gold_protein.mol2> <path to solution file> <new protein file name> • Note: apply_rotated_atoms.py is a Python script and as such requires a working installation of Python (http://www.python.org). 24.6 gold_utils • The gold_utils file contains four scripts that allow modifications to be made to input and/or output files, thus facilitating docking setup and post-processing. GOLD User Guide 251 24.6.1 gold_utils -protonate • This utility is used for protonating molecule file(s), • Usage: gold_utils -protonate -i <filename> -o <filename> -rules <filename> • Details of the arguments above are: • -protonate: this is a required argument that instructs the script to protonate the supplied molecule file. • -i: this is a required argument that specifies the input molecule file. • -o: this is an optional argument that specifies the output molecule file. • -rules: this is an optional argument that forces the script to use the specified protonation rules file (see Applying Protonation Rules, page 12). 24.6.2 gold_utils -print_rotamer • This utility is used for printing the rotamer block for the specified amino acid residue. • Usage: gold_utils -help -print_rotamer -i <filename> -o <filename> residue <residue id> -ignore_library -reference_ligand <filename> • Details of the arguments above are: • -print_rotamer: required argument that instructs the script to print he rotamer block for the specified amino acid residue (for inclusion in a GOLD .conf file) • -i: required argument that specifies the input molecule file. • -o: optional argument that specifies the output molecule file. • -residue: required argument that specifies the amino acid residue to use, including the chain ID e.g. ASP102A. • -ignore_library: optional argument that instructs the script to ignore the rotamer library and set all torsions to fully rotate. • -reference_ligand: optional argument that instructs the script to use the specified reference ligand file to identify which chain to use (in case the unique residue cannot be identified from the chain ID). 24.6.3 gold_utils -convert • This utility enables file conversion e.g. .pdb to .mol2. • Usage: 252 GOLD User Guide gold_utils -help -convert -i <filename> -o <filename> • Details of the arguments above are: • -convert: required argument that converts the file based on the formats given by the -i and -o name extensions. • -i: required argument that specifies the input molecule file. • -o: required argument that specifies the output molecule file. 24.6.4 gold_utils -write_complexes -conf • This file enables a set of protein-ligand complex files to be written out for a set of docking solutions. • Usage: gold_utils -help -write_complexes -conf <conf_filename> -o <output_directory> -format <output_format> • Details of the arguments above are: • -write_complexes: required argument that writes all protein-ligand complexes for a set of docking solutions. • -i: required argument that specifies the input molecule file. • -o: optional argument that specifies the output molecule file. • -format: an optional Argument that specifies the output format. GOLD User Guide 253 25. Appendix F: The Torsion Angle Distribution File 25.1Format of Torsion Angle Distribution File Header • The first section of the torsion angle distribution file sets parameters and tells GOLD what to do with the distributions. • N_BINS is the number of bins used in the torsion histogram. • REMOVE_HIGH_ENERGY and DELTA_E are parameters that can be used to control the filtering out of high-energy torsion angles. • If torsion angle distributions are used, GOLD will no longer sample over 360 degrees but will constrain the torsion to values contained in the histogram. However, if a histogram contains a large number of entries, there may be some high-energy torsions within the histogram. GOLD therefore provides a method for filtering out such high-energy torsions: set REMOVE_HIGH_ENERGY = 1 and DELTA_E = E to remove those bars in the histogram that correspond to torsions that are E kcal/mol higher in energy than the most populated state. The ground state of the torsion is assumed to correspond to the maximum peak in the torsional histogram. The energy difference between this ground state and any other peak in the torsion angle histogram is then assumed to be approximately given by the partition function. • The following table indicates the relationship between the value of DELTA_E and the ratio high/ low, where high is the height of the biggest bar in the histogram and low is the height below which bars will be removed from the histogram: DELTA_ E ratio 3.0 161 2.5 69 2.0 30 • For example, if REMOVE_HIGH_ENERGY=1 and DELTA_E = 2.5, those bars which are 1/69th or less of the height of the largest bar will be removed from the histogram and torsion angles corresponding to these bars will never be sampled by the genetic algorithm. • The relationship between DELTA_E and ratio, based on the partition function, is: ratio = exp (DELTA_E/0.5898) 25.2Format of Torsion Angle Distributions • Each torsion angle distribution entry comprises three lines: the first line is the name of the torsion angle; the second line is the definition of the torsion angle; the third line is the histogram. 254 GOLD User Guide • The histogram should be a list of space-separated integers. The ith integer should be the number of observations in the torsion-angle range of the ith bin. There should be N_BINS integers in all. The first bin starts at -180 degrees and the last bin ends at +180. • Torsion angle distributions are defined using Backus-Naur Form (BNF) grammar, as follows (all the symbols in the table are part of the grammar except for ||, which is used to indicate alternative fields): TORSION NODE | NODE | NODE | NODE | || NODE | NODE | NODE | NODE | DIRECTIVE || NODE | NODE | NODE | NODE | DIRECTIVE | DIRECTIVE DIRECTIVE expand <min> <max> || period <min> <max> NODE ATOM || ATOM (NEIGHBOURS) NEIGHBOURS NEIGHBOUR_NODE || NEIGHBOUR_NODE NEIGHBOURS NEIGHBOUR_NODE NODE || HYDROGENS HYDROGENS 0H || 1H || 2H || 3H ATOM ATOM_DEF || ATOM_DEF [FRAGMENT] FRAGMENT ribose || adenine || uracil || benzene ATOM_DEF TYPE_DEF || LINKAGE<no space>TYPE_DEF TYPE_DEF SYB_TYPE || EL_TYPE LINKAGE ~ || = || - SYB_TYPE C.3 || C.2 || C.1 || C.ar || C.cat || N.3 || N.2 || N.1 || N.ar || N.am || N.pl3 || N.4 || O.3 || O.2 || O.co2 || S.3 || S.2 || S.o || S.o2 || P.3 || H || F || Cl || Br || I EL_TYPE C || N || O || S || P • This grammar allows torsions to be specified as four fragment nodes. Each node defines an atom type and, optionally, a set of neighbours to which the atom is connected. Each of the neighbours is a node or an exact count of the number of hydrogen atoms to which the atom is bonded. Atom types are defined using SYBYL atom types or elemental atom types. The atom can also be required to be part of a pre-defined fragment. • Bonding environments can also be specified, using the symbols ~,=,-, which indicate, respectively, that an atom forms an aromatic, double or single bond to its parent node. Note: ~,=, and - should therefore not be used on the first atoms specified, these bond types are specified for substituents only. • A node is a parent of all its neighbours and a top level node in the torsion definition is a parent of GOLD User Guide 255 • • • • subsequent nodes in the torsion. There are currently four fragments available, one of which (the uracil fragment) matches both thymine and uracil. More fragments can easily be added. The Ullman algorithm is used to determine if an atom belongs to a fragment. Fragments are defined through SYBYL atom types and connectivity (exact bond types are not used). Only heavy atoms are considered. Currently, fragments are precompiled, but they could be read in at run-time if required. Directives are allowed to take account of special circumstances. There are two directives: expand and period. The expand directive has the form expand <min> <max> where <max> - <min> = 180.0 or <min> = 0. This directive is used for torsions where the CSD query has symmetry and torsions are only measured over <min> to <max> degrees. However, although the CSD query may have two-fold symmetry, often the matched structure does not. The expand directive fills out the rest of the histogram with the correct values. The period directive takes account of those torsional distributions for which the matched structure has symmetry. This directive has the form period <pmin> <pmax>. The distribution will only be expanded between angles <pmin> and <pmax>. 25.3Example Torsion Angle Distributions Here are some examples of torsion angle distributions extracted from the Cambridge Structural Database and in the correct format: DIAGRAM acid T1 C.2 (O.co2 O.co2) | C.3 (2H) | C.3 (2H) | C 41 8 0 0 0 0 0 0 0 1 8 7 2 0 0 0 0 1 1 0 0 0 1 0 4 1 0 1 0 0 0 0 0 2 2 41 DIAGRAM acid T2 O.co2 | C.2 (O.co2) | C.3 (2H) | C.3 (2H C) 8 5 1 3 2 1 3 2 3 2 3 3 4 0 3 2 7 11 15 9 1 4 1 0 2 1 4 4 1 3 3 6 0 3 5 7 DIAGRAM amide nh T2 C.2 (=O.2 N.am (1H)) | C.3 (1H C.3) | N.am (1H) | C.2 (=O.2) 1 1 14 16 29 25 23 38 35 50 82 156 53 6 1 0 0 0 0 0 0 1 1 14 17 15 4 4 2 256 GOLD User Guide 1 2 5 2 2 0 0 DIAGRAM uracil O.3 [ribose] | C.3 [ribose] | N.am [uracil] (C.2 (1H))| C.2 [uracil] (=O.2) 24 73 85 44 59 60 40 14 8 3 2 0 0 0 0 0 0 0 0 0 0 0 0 0 7 5 3 0 0 1 4 3 3 5 10 6 DIAGRAM benzyl sub C | C.3 (2H) | C.ar (~C.ar (0H)) | ~C.ar (0H) | expand 0.0 180.0 0 0 0 0 0 0 0 0 0 0 0 0 0 0 0 0 0 0 0 0 0 0 0 1 9 27 76 64 15 7 4 2 0 0 0 0 25.4Extracting Torsion Angle Distributions from the Cambridge Structural Database • The command process_tab (only available on SG machines) will extract the torsion angle histogram from the .tab file produced by a search of the Cambridge Structural Database, and reformat it so that it can be added into the GOLD torsional distribution file. GOLD User Guide 257