1
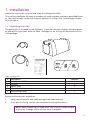
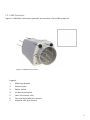
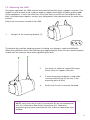
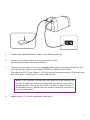
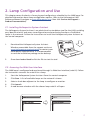
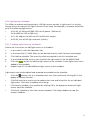
1
2
Installation2
1.1. Unpacking the LX60
2
1.2. LX60 Overview
3
1.3. Mounting the LX60
4
1.4. Network Setup
6
Lamp Configuration and Use
7
2.1. Installing Heliospectra System Assistant
7
2.2. Accessing the Web User Interface
7
2.3. Using the Web User Interface
8
2.3.1 Starting the light and changing intensities
8
2.3.2 Configuring a Schedule
9
Disclaimer
The contents of this document are subject to revision without notice due to continued progress in methodology, design and manufacturing. Heliospectra AB shall have no liability for
any error or damage of any kind resulting from the use of this document.
At Heliospectra AB we aim to continuously improve our product documentation. If you have
comments or ideas regarding this document, please contact us at
[email protected].
Copyright & Trademarks
No part of this publication may be reproduced, stored in a retrieval system or transmitted
in any form or by any means, electronic, mechanical, photocopying, recording or otherwise,
without prior permission of Heliospectra AB.
Windows and Windows XP/Vista/Windows 7/Windows 8 are registered trademarks of Microsoft Corporation. NETGEAR is a registered trademark of NETGEAR Inc. All other trademarks
and copyrights are the property of their respective owners.
©2013 by Heliospectra AB. All rights reserved.
Revision History
Revision/Date
1/2014-06-18
Author
Anthony Gilley
Changes
First Version
1
1. Installation
Follow the Instructions to install and setup the Heliospectra LX60.
QUICK SETU
To install and configure the lamp the reader will need a modern and up to date Web Browser. The LX60 has been tested with Internet Explorer 10, Firefox 20.0.1 and Google Chrome
26.0.1410.64 m.
1.1. Unpacking the LX60
The packing list is included in each shipment. It specifies the part numbers and descriptions
of each part in your order. Refer to Table 1 Package List for a listing of the contents of the
LX60 package.
1.
4.
3.
5.
2.
or
or
T
Table 1 Package List
#
1
2
3
4
5
Description
Heliospectra LX60 lamp unit
Hangers
Power cord
Ethernet cable
Quick Setup Guide
Amount
1
2
1
1
1
Plug
in the power cable to a power
Verify that all parts in each LX60 package have been received.
socket
and
the Ethernet
If outlet
any part is missing,
contact
your customer
service representative.
cable
to a router or computer.
NOTE! When unpacking the LX60 make sure to have a sturdy surface
Before continuing with installation:
1.
2.
to work on. Damage to the unit can occur if dropped.
2
1.2. LX60 Overview
Figure 1 LX60 Main Connectors provides an overview of the LX60 lamp unit.
1
7
6
3
2
Variant without
air duct attachment
5
4
Figure 1 LX60 Main Connectors
Legend:
1.
Mounting bracket
2.
Ethernet port
3.
Power socket
4.
Air duct attachment
5.
Heat sink and air inlet
6.
Fans and air intake (not shown)
7.
Indicator LED (not shown)
3
1.3. Mounting the LX60
For proper operation the LX60 must be mounted horizontally from a support structure. The
support structure needs to be sturdy enough to support the weight of lamps and any additional equipment. It must also allow for air to flow freely into the unit (an additional fan
duct is available upon request; contact your Heliospectra sales representative for more information).
Follow the instructions to mount the LX60:
1.
Hangers to the mounting bracket (1).
or
or
The bracket has multiple hanging options including wire hangers, hooks and M6 bolts.
When using M6 bolts verify that the bolt goes approximately 6 mm into the mounting holes
and do not use excessive force when tightening the bolts.
2.
Use chains or cables to suspend the lamp
levelly from the support structure.
3.
If other mounting hardware is used make sure that the bolts go all the way in the
mounting holes (6 mm).
4.
Verify that the unit is securely fastened.
NOTE! Verify that the air inlet (5) and outlet (6) are not covered and
that air is allowed to flow freely around the unit. Otherwise,
overheating may occur and cause the unit to dim to counteract heat
buildup.
4
*if not otherwise specified, the v-hangers will be included
Then mount the lamp using the hangers.
r
5.
Connect the supplied Ethernet cable to the Ethernet port (2).
6.
Connect the Ethernet cable to a free port in the switch.
(see Example Setup for more information)
7.
To power up the lamp, connect the supplied power cord to the power socket (3), and then connect the cord to a grounded 120V/230V, 50/60Hz power outlet.
Go to
www.heliospectra.com/getstarted
The indicator LED (7) (see Figure 1) will flash orange for approximately 15 seconds and to
download
then flash green. The lamp unit
is now
ready for use. and install the
System Assistant software.
NOTE! If the indicator LED does not flash green after 60 seconds, verify that all cables are securely attached and that the unit and switch
Here
you
can
also
find more
detailed
are powered on. Also
verify
that
DHCP
is enabled
in your
network.manuals,
If
the problem persists, power cycle
the lamp
by removing
and etc
reinsertFAQs,
support
contact
.
ing the power cable.
8.
Repeat steps 1–7 to mount additional lamp units.
5
LX601
NOTE! For proper performance of the LX60 the ambient air temperature shall be no higher than 40 °C (104 F).
The duct attachment allows for separating the cooling air from the
plant growth environment. No more than two lamps may be connected in series. The cooling air to the first lamp shall have a temperature of no more than 21 °C (70 F).
1.4. Network Setup
By default, the LX60 lamp uses the Dynamic Host Configuration Protocol (DHCP) to automatically receive an IP address from a router in the network. This is a commonly available feature
in computer networks. The IP address is used when configuring and monitoring the lamp, see
chapter 2 Lamp Configuration and Use.
6
UICK SETUP GUIDE
Make sure that you have recieved the
following contents:
2. Lamp Configuration and Use
This chapter covers the basics of accessing and
configuring
schedule for the LX60 lamp. For
Heliospectra
lightasystem
detailed information about lamp configuration options,
refer
Ethernet cable to the Heliospectra LX60
Reference Manual (navigate to www.heliospectra.com;
Power then
cable click Service and Support >
Quick
Setup
Guide
Product Documentation).
or
or
Chosen hanging attachments*
*if not otherwise specified, the v-hangers will be included
2.1. Installing Heliospectra System
Assistant
Then mount
the lamp using the hangers.
The Heliospectra System Assistant is an administrative standalone tool for the LX60, enabling
easy identification of and access to configuration and monitoring functions of individual
lamps in the network. Follow the instructions to install the Heliospectra System Assistant to
the control computer:
er cable to a power
1.
Download the Heliospectra System Assistant
and the
Ethernet
Windows executable from the support section at o a router.
www.heliospectra.com/getstarted or contact your Heliospectra representative. It is recommended
to save the installation package to the desktop.
2.
Once downloaded double click the file to start the tool.
2.2. Accessing the Web User Interface
Go toUser Interface (web UI). Follow
The LX60 lamp is configured and monitored through its Web
the instructions to access the web UI forwww.heliospectra.com/getstarted
a lamp:
1.
to download and install the
System Assistant software.
Start the Heliospectra System Assistant from the control computer.
2.Click Scan. A list of available lamps on the network is shown.
3.
you
also find more
detailed manuals,
Select a check box adjacent to theHere
lamp
tocan
configure
or monitor.
w turn 4.Click
on.
Launch.
5.
FAQs, support contact etc.
A web browser window with the chosen lamp web UI will open.
at your computer and
he same network.
tem Assistant is
rt the program
an. When the
en found, click
nch button.
nterface will now open in a web
e Operation tab and tick the Real
LX601
Congratulations!
You can now create your own light
7
2.3. Using the Web User Interface
The Web UI of the LX60 is made up tabs providing information, operation and configuration
options, each described in the following sections. All pages in the web UI also contain the
following general information:
•
The current Status of the lamp is shown on the top left-hand corner of the page.
•
The current System Time and Name of the lamp (if configured) is shown on the top right-hand corner of the page.
•
General information for the lamp, such as model, CPU firmware version, driver
firmware version, MAC and IP address is shown on the bottom of the page.
Click the Show Description link next to a web UI element to find out more information
about its use.
2.3.1 Starting the light and changing intensities
Follow the instructions below to starting and manipulating the individual wavelength’s
intensities.
1.
In the web UI, click the Operation tab.
2.
In the Intensities (1-1000) field, set the desired intensity levels for each wavelength.
3.
Tick the Real time update box underneath the intensities (1-1000) field.
4.
You can easily turn the light to maximum intensity by clicking the All 1000. Turn the light off by clicking All 0.
400
All 0
All 1000
Add to schedule
Set now
Real time update
490
231
Lock ratio
8
2.3.2 Configuring a Schedule
The LX60 can execute and repeat up to 150 light events per day. A light event is a setting
change of one or more of the light channels in the lamp. For example, a schedule could comprise the following light events:
•
At 07.00, set 450 and 5700K LEDs to full power (1000 units).
Set the 660 nm LED to 500 units.
•
At 11.00, add set the 450 nm LED to 600 units output.
•
At 23.00, turn off all light channels (0 units).
2.3.1.1. Adding Light Events to a Schedule
Follow the instructions to add light events to a schedule:
1.
In the web UI, click the Operation tab.
2.
In the Intensities (1-1000) field, set the desired intensity levels for each wavelength.
3.
Click Add to schedule. The intensity values are copied to the first schedule row.
4.
In the Schedule field, enter a start time for the light event in the HH:MM:SS field.
5.
Click the
button to add the light event to the schedule. A new light event row is added to the schedule.
6.
Repeat steps 2-5 to add additional light events to the schedule.
Light events can also be edited and removed once added to the schedule:
•
Click the
button next to a schedule event row, then confirm by clicking OK in the popup to remove the row.
•
Click Edit next to an event row to update start time and intensities for an individual light event. Click Save to update the settings.
•
Click Delete schedule, then confirm by clicking OK in the popup to remove all light events from the schedule.
•
Click Start schedule to start the current schedule. Click Stop schedule to stop the
current schedule.
9