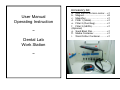
1
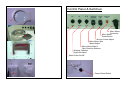
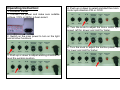
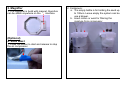
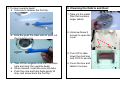
Accessory list:
a. M45 45k RPM micro motor… x1
b. Magnet………………………. x2
c. Magnifier…………………….. x1
d. Filter 1 (Metal)……………….. x1
e. Filter 2 (Dust bag)…………… x1
f. Filter 3 (HEPA)………………. x1
(Optional)
g. Sand Blast Pan……………… x1
h. Media Container…………….. x1
i. Wool/Cotton Container……... x1
User Manual
Operating Instruction
~
Dental Lab
Work Station
~
a
b
g
Control Panel & Switches:
c
Micro Motor
Connector
Micro Motor
Reset Button
Suction Power Adjust
Micro Motor Spin
Speed Adjust
d
e
f
h
Micro Motor Start &
Spin Direction Selector
Working Chamber
High/Low Adjust
Main Power On/Off
i
Power Reset Button
Operating Instruction:
1. Control Panel
4. Push up or down to select and start the micro
motor spin direction CW or CCW.
1. Connect the power and make sure suitable
voltage (110V or 230V) is been select.
5. Turn the knob to adjust the micro motor spin
speed, left for slower and right for faster.
2. Switch on the main power to turn on the light
and all other functions.
6. Turn the knob to adjust the suction power, left
for lower and right for higher
3. Push up or down to adjust working chamber to
level the working position.
2. Micro Motor
1. To connect the micro motor to controller, plug
into the connector at the right hand side of the
control panel.
3. To change the tool:
a. Hold the handle section.
b. Turn this section CW to release and CCW
to secure the tool.
c. When done, make sure both front and back
end cover and secured.
b
a
*Make sure the dent on the plug is oriented to
plug into connector.
2. To change the spin direction, make sure the
switch is set in the middle and wait till the motor
stops, than to select next direction.
c
c
4. If micro motor stopped while grinding, set the
spin direction switch to the middle, than press
the red reset button next to the connector.
3. Magnifier
1. The magnifier is build with magnet, therefore
can be attach anywhere on the
machine.
2. Containers:
a. The empty battle is for holding the sand up
to 100um. Leave empty the system can be
use a blower.
b. Insert cotton or wool for filtering the
moisture from compressor.
a
(Optional)
4. Sand Blast
1. Press the button to start and release to stop
the air compressor.
b
3. To clear oversize bead:
a. Unscrew to release the front tip.
5. Cleaning the Debris and Dust
1. Take out the metal
filter that contains
larger debris.
b. Hold the push the clear tube to push out
the tungsten core.
2. Unscrew these 2
screws to open the
cover.
3. Turn CW to take
down the dust bag
and CCW to secure.
c. Take off the tungsten core from the clear
tube and clear the oversize bead.
d. When cleared, insert the core into tube.
e. Push the core and tube back gently till
stop, and screw back the front tip.
4. Cover the box and
fasten 2 screws.
*Please contact your local dealer if you
encounter and issue that are unable to clear.